

Disney Princess Scooter KT1003TG Owner's Manual
Princess Scooter
© Disney
©2010 Pacic Cycle Inc.
4902 Hammersley Rd.
Madison, WI 53711
United States of America
Phone: (877) 741-6154
www.kidtraxtoys.com
Styles and Colors may vary
Made in China
The owner’s manual contains assembly, use and maintenance
instructions. The Disney Princess Scooter must be assembled by an
adult who has read and understands the instructions in this manual.
Keep the packaging away from children and dispose all packaging
before use.
Model Number: KT1003TG
Owner’s Manual
Keep instructions for future reference.

For purchasing the Disney Princess Scooter. With the Disney
Princess Scooter your child will have fun and enjoyment for years
to come. Features on the vehicle include lights and melodies,
forward / reverse and a rechargeable battery.
Please call us at Kid Trax Toys Consumer Relations at
877-741-6154 with comments or questions.
ii
Thank You

Safety 1
User Requirements . . . . . . . . . . . . . . . . . . . . . . . . . . . . 2
Parts . . . . . . . . . . . . . . . . . . . . . . . . . . . . . . . . . . . . . . . 3
Assembly . . . . . . . . . . . . . . . . . . . . . . . . . . . . . . . . . . . . 4
Attach the Front Wheel . . . . . . . . . . . . . . . . . . . . . . . . . . . . . . 4
Attach the Mufer . . . . . . . . . . . . . . . . . . . . . . . . . . . . 5
Insert the Axle . . . . . . . . . . . . . . . . . . . . . . . . . . . . . . 5
Attach the Gear Box . . . . . . . . . . . . . . . . . . . . . . . . . . . . . 6
Attach the Drive Wheel . . . . . . . . . . . . . . . . . . . . . . . . . . . 6
Attach the Left Rear Wheel . . . . . . . . . . . . . . . . . . . . . . . 7
Attach the Rearview Mirrors . . . . . . . . . . . . . . . . . . . . . . 8
Attach the Handlebar . . . . . . . . . . . . . . . . . . . . . . . . . 8
Connecting the Wires . . . . . . . . . . . . . . . . . . . . . . . . . 9
Gear Box Connection . . . . . . . . . . . . . . . . . . . . . . . . . . . . . 9
Attaching the Seat . . . . . . . . . . . . . . . . . . . . . . . . . . .10
Charging the Battery. . . . . . . . . . . . . . . . . . . . . . . . . .12
Battery Replacement and Disposal . . . . . . . . . . . . . . . 14
Insert Batteries for Sound . . . . . . . . . . . . . . . . . . . . . . 15
Use . . . . . . . . . . . . . . . . . . . . . . . . . . . . . . . . . . . . . . .16
Maintenance . . . . . . . . . . . . . . . . . . . . . . . . . . . . . . . . . .17
Troubleshooting Guide . . . . . . . . . . . . . . . . . . . . . . . . .18
Services, Repairs and Parts . . . . . . . . . . . . . . . . . . . . 20
Contents

WARNING!
The following safety hazards may result in serious injury or death to the
user of the Quad:
• This product contains small parts that are for adult assembly only.
Keep small children away when assembling. Remove and dispose
of all protective material and poly bags before assembly. Be sure to
remove all packaging materials and parts from underneath the car
body.
• Riding the vehicle without a helmet. Riders must always wear a tted
helmet that complies with U.S. Consumer Product Safety
Commission (CPSC) Standard CFR 1183.
• Battery posts, terminals and related accessories contain lead and
lead compounds (acids) chemicals known to the state of California to
cause cancer, reproductive harm, and are toxic and corrosive. Never
open the battery.
• Body parts such as hands, legs, hair and clothing can get caught in
moving parts. Never place a body part near a moving part or wear
loose clothing while using the vehicle. Always wear shoes when
using the vehicle.
• Using the vehicle near streets, motor vehicles, drop-offs such as:
steps, water (swimming pools) or other bodies of water, sloped
surfaces, hills, wet areas, ammable vapors, in alleys, at night or in
the dark could result in an unexpected accident. Always use the
vehicle in a safe, secure environment with continuous adult
supervision.
• Using the vehicle in unsafe conditions such as snow, rain, loose dirt,
mud, sand or ne gravel may result in unexpected action such as tip
over and skidding.
• Using the vehicle in an unsafe manner. Examples include but are not
limited to:
a. Pulling the vehicle with another vehicle or similar device
b. Allowing more than one rider
c. Pushing the user from the back
d. Traveling at an unsafe speed
Always use common sense and safe practices when using the vehicle.
This product contains or emits chemicals known to the state of
California to cause cancer or birth defects or other reproductive harm.
1
Safety

User Requirements
The suitable age range for a child using the Quad is 3 + years. The
maximum weight of the child is 44 lbs (20kg).
Before using the Quad the child must understand the vehicle controls
and safety issues. They must also demonstrate the capability to handle
the vehicle and operate its controls. It is the responsibility of the adult
to educate the child, determine if they are t to operate the vehicle, and
supervise the vehicle’s use.
Here are basic safe riding rules you should read aloud to your child and
anyone who may ride the Quad:
• An adult must always supervise a child that is riding the Quad.
• Children under 3 + years should not be allowed to use
the vehicle.
• Always sit in the seat when using the vehicle.
• Keep your hands, hair and clothes away from moving parts.
Always wear shoes when riding the vehicle.
• Only one rider is allowed at a time.
• Don’t drive the vehicle into loose dirt, mud, sand or ne gravel.
Driving the vehicle into loose dirt, mud, sand, or ne gravel may
damage the chain mechanism inside the vehicle.
• Only drive on level ground. Don’t go near water, drop-offs or up
and down steep slopes.
• Do not drive the vehicle indoors or around obstructions.
• Do not drive the vehicle on streets or near cars.
2

Parts
front wheel (1)
seat (1)
charger (1)
spanner (1)
6V 4AH battery (1)
rear wheels (2)
handlebar (1)
hubcaps (2)
axle (1)
Scooter body (1)
wheel
covers (2)
locknuts (2)
small
washers (2)
gear box spacer (1)
rearview mirrors (2)
mufer (1)
fasteners (2)
3
Assembly
1
2
4
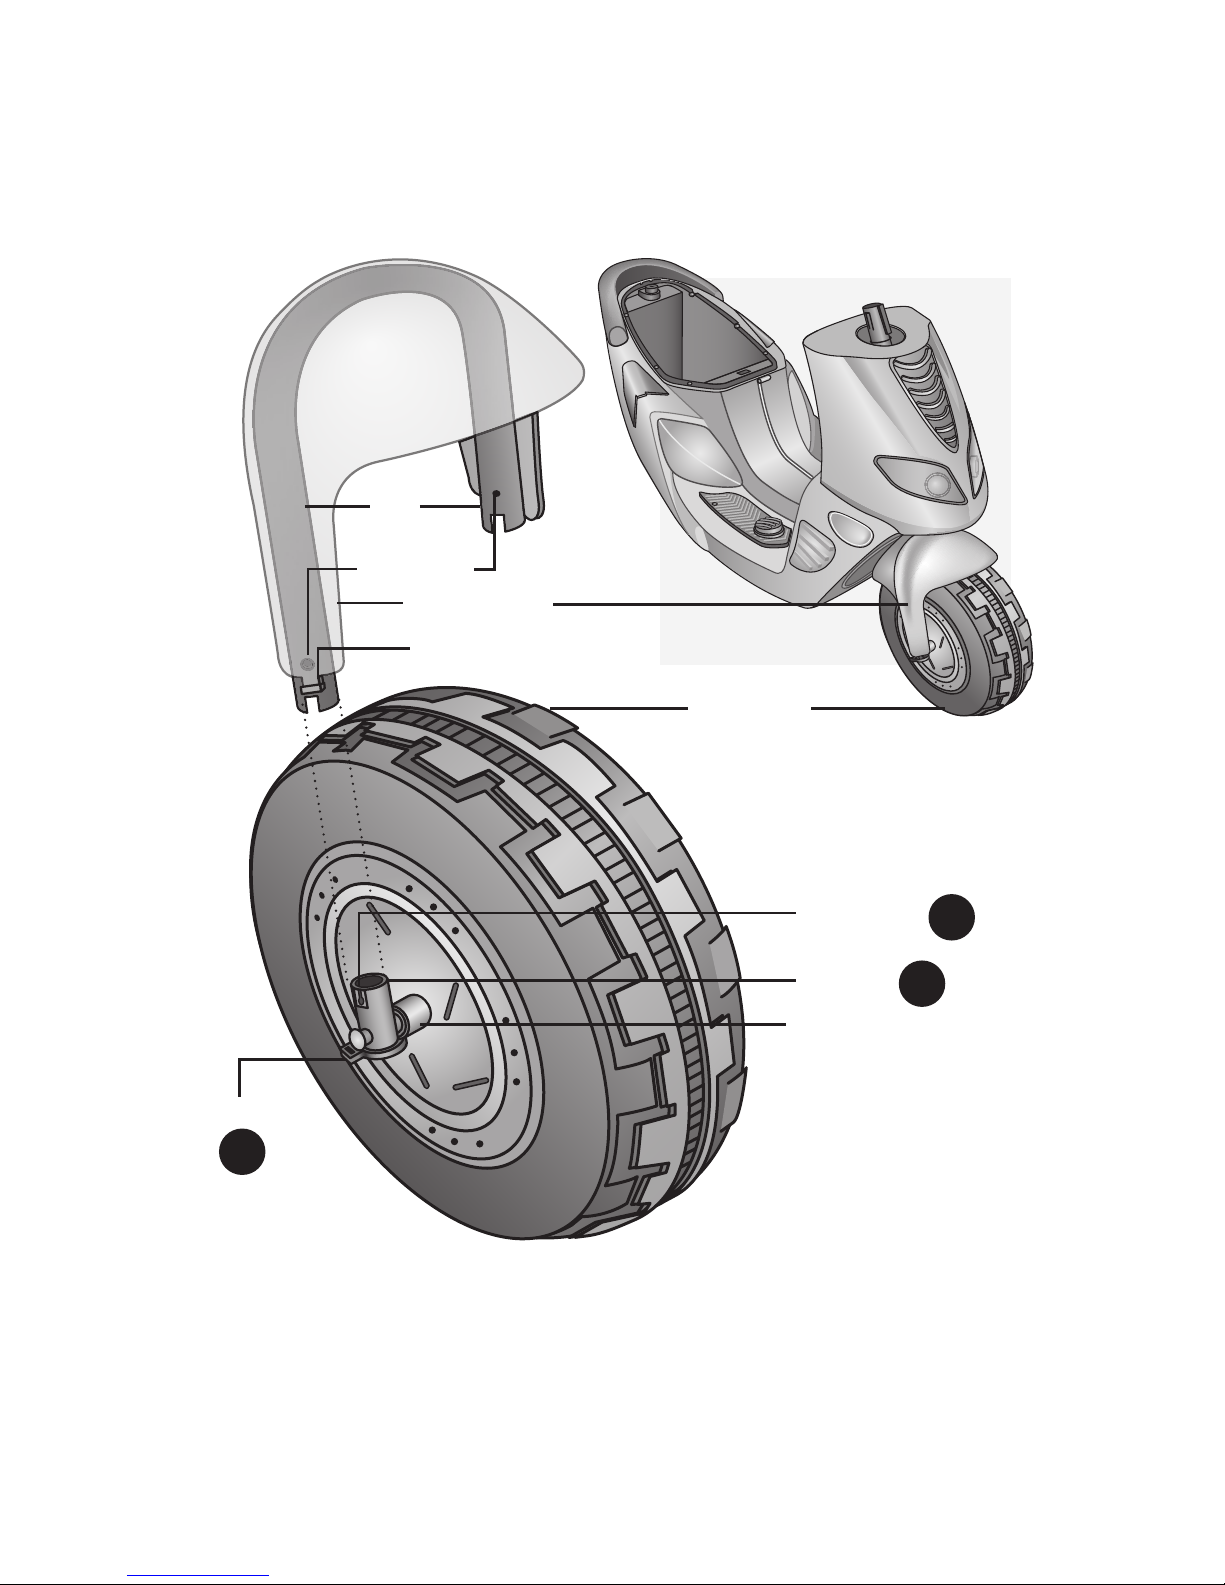
Attach the Front Wheel
1. Place the bushings attached to the front axle into the fork.
2. Push the bushings up into the fork until the locking tabs engage into
the fork holes on both sides of the wheel.
3. Be sure the front wheel is locked into the fork.
4. Push the splash guard tabs into the bushing slots on both sides of
the wheel.
4
front axle
bushing
fork
fork holes
locking tab
bushing slot
splash guard tab
splash guard
front wheel
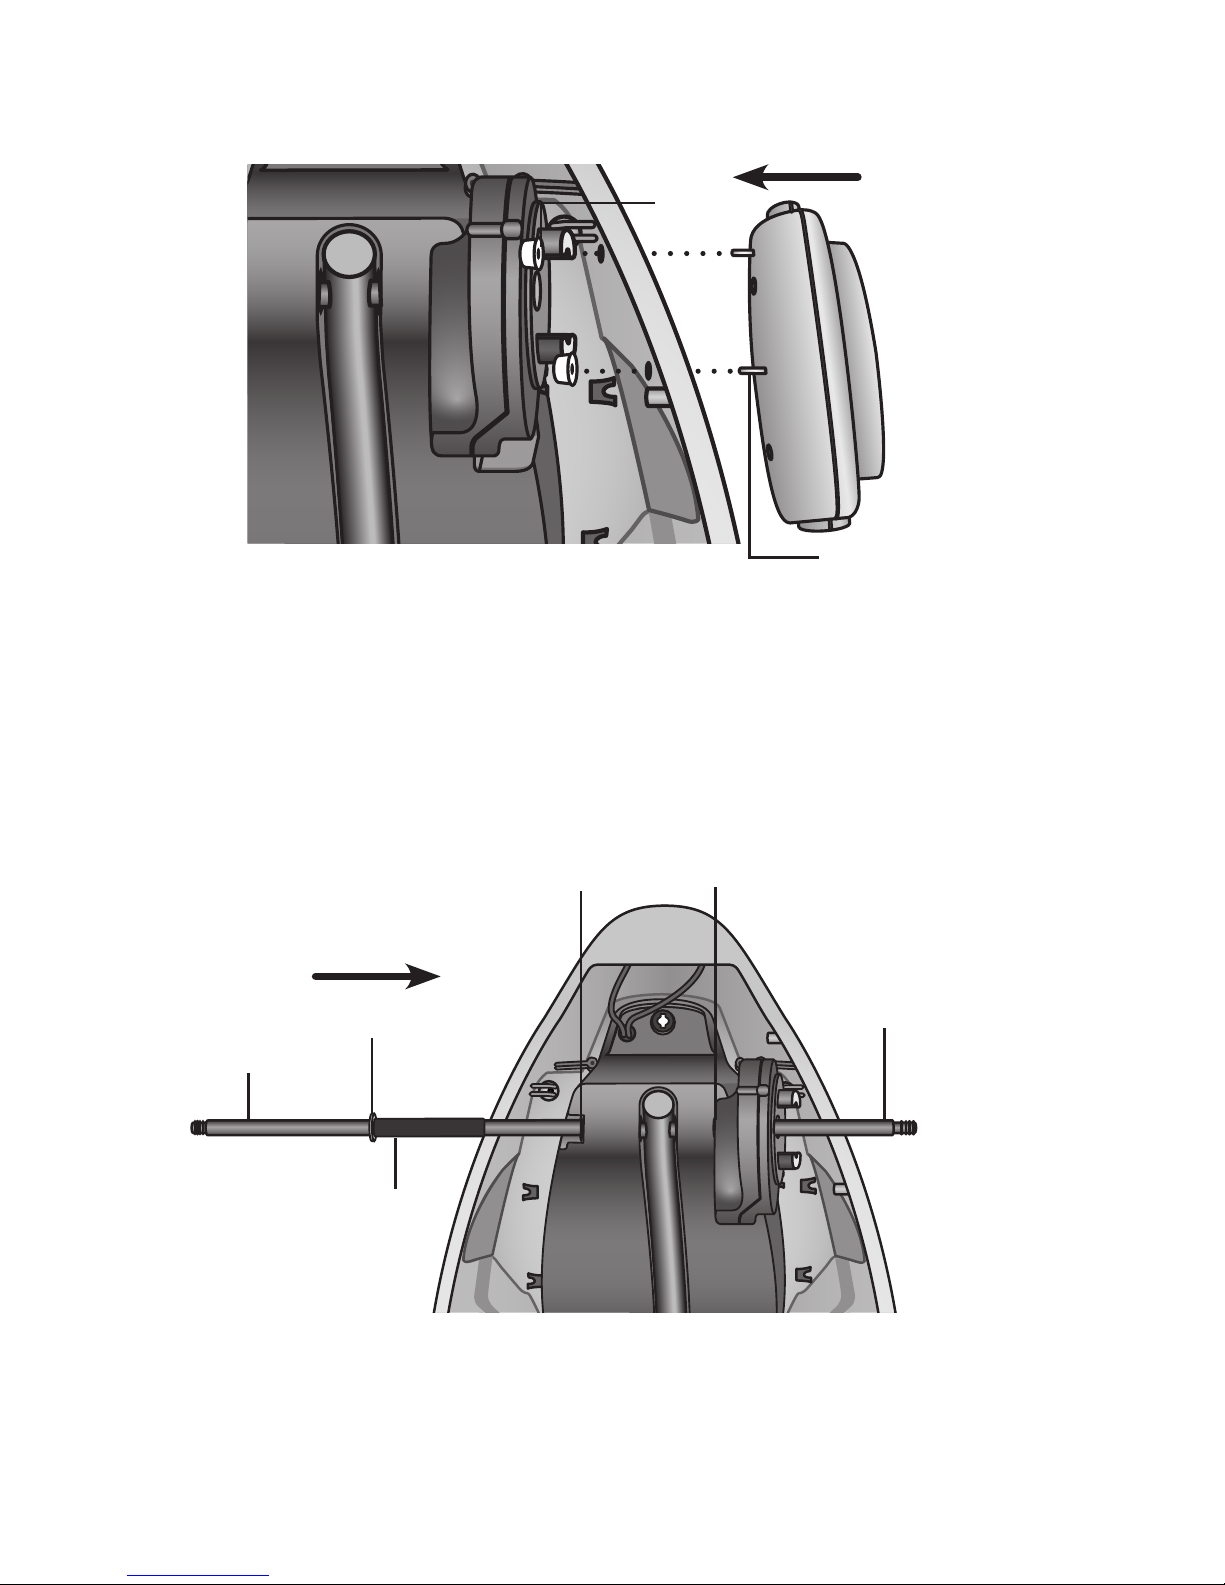
Insert the Axle
1. Remove the locknut, small washer, and gear box spacer from the
left side of the axle.
2. Position the axle so the gear box end is on the right side.
3. Slide the axle through the Scooter body axle holes.
Note: The left side
of the axle is the
end that has the
wielded spacer.
Attach the Mufer
1. Turn the Scooter body over.
2. Align the two mufer screws with the two holes in the Scooter body.
3. Slide the mufer into place, and attach with the two red fasteners.
5
axle
gear box end
large washer
Scooter body axle holes
mufer screws
red
fasteners
 Loading...