

Page 1
USER GUIDE
Page 2
Copyright
Copyright Notice
Copyright © 2016 EchoStar Technologies L.L.C., Englewood, Colorado 80112. All rights reserved. The information
in this document may change without notice. We may issue revisions to tell you about such changes.
Please send questions or comments about this document to [email protected].
Part Number: 210371
DISH is a registered trademark of DISH Network L.L.C. For information about DISH, please visit mydish.com.
We acknowledge all product names, trade names, or corporate names that we mention in this document to be the
proprietary property of the registered owners.
Manufactured under license from Dolby Laboratories. Dolby and the double-D symbol are registered trademarks of
Dolby Laboratories.
HDMI, the HDMI logo, and High-Denition Multimedia Interface are trademarks or registered
trademarks of HDMI Licensing L.L.C.
This equipment may incorporate copyright protection technology that is protected by U.S. patents, patent
applications, and/or other intellectual property rights. Use of such copyright protection technology is intended for
home and other limited pay-per-view uses only unless otherwise authorized. Reverse-engineering or disassembly is
prohibited.
Equipment Covered in This User Guide
This user guide covers the Wally receiver and may also cover other devices that are not listed here.
®
Wally User Guide
2
Page 3
Wally User Guide
Table of Contents
Click a topic to jump to it:
1 Introduction ........................................................4
2 Connections and Setup .....................................9
3 Wally Receiver and Remote Control ..............12
4 Watching TV ......................................................19
5 Watching Pay-Per-View Programs ..................28
6 Recording and Watching DVR Programs .......33
7 Apps ...................................................................43
8 Parental Controls .............................................46
9 Customizing Your Wally ..................................52
10 Troubleshooting ...............................................56
Wally User Guide
3
Page 4
1
1
Introduction
Chapter
Click a topic to jump to it:
• Welcome
• Conventions in This User Guide
• Watching TV Now
• Moving On-Screen Logo
• On-Screen Help
• About Satellite TV Reception
• About Your DISH Account
• Tips
• Questions
Wally User Guide
4
Page 5

Introduction
Welcome
Thank you for choosing DISH. You’re about to experience the excitement and convenience of our Direct Broadcast
Satellite (DBS) service, which delivers the very best picture and sound quality. DISH consistently provides the latest
products and satellite-delivered services—with high performance, ease of operation, and a variety of entertainment
options.
Conventions in This User Guide
• Names of most buttons on the remote control appear in uppercase letters.
Example: Press GUIDE on the remote.
• “Double-press” means to press a button twice.
Example: Double-press on the remote to display the Menu screen.
• On-screen menu options that you can select are in bold.
Example: Select Closed Captioning to display the Closed Captioning screen.
• “Select” means to use the remote’s arrow buttons to highlight an option on-screen and then press SELECT on
the remote.
Example: Select Save to save your changes.
Watching TV Now
Once your Wally is connected, you can start watching TV in the following ways:
• Program Guide: Press GUIDE on the remote and select a program to watch.
• Arrow Buttons: Press the CH▲ or CH▼ buttons on the remote while watching live TV.
• Number Buttons: Enter a valid channel number.
• Mini Guide: While watching live TV, press the RIGHT arrow on the remote and select a program.
• Trending Live: While watching live TV, press the LEFT arrow on the remote and select a program or the
See More icon.
1
To learn more about these options, see the Watching TV chapter.
Wally User Guide
5
Page 6

Introduction
Moving On-Screen Logo
Whenever your Wally is turned off but your TV remains on, helpful tips display on your TV screen, as shown below.
1
This screen assures you that your Wally is still connected to your TV. Additionally, it provides an opportunity for you
to learn about your Wally and its features.
To resume watching TV, press any button on the remote.
Wally User Guide
6
Page 7

Introduction
On-Screen Help
Quick Tips
When you press and hold INFO/HELP on the remote while viewing commonly used screens, quick tips display, such
as the screen shown below.
1
Help App
You can access helpful information about your Wally by double-pressing on the remote and selecting Help.
From there, you can see frequently asked questions and learn about your Wally’s features.
Wally User Guide
7
Page 8
Introduction
About Satellite TV Reception
Satellite television uses satellites in a stationary orbit over the Earth to deliver television and audio programming.
This type of orbit enables the satellites to stay aligned over one place on the surface of the Earth. Once the satellite
dish is aimed at the satellite, the dish does not have to move to follow it.
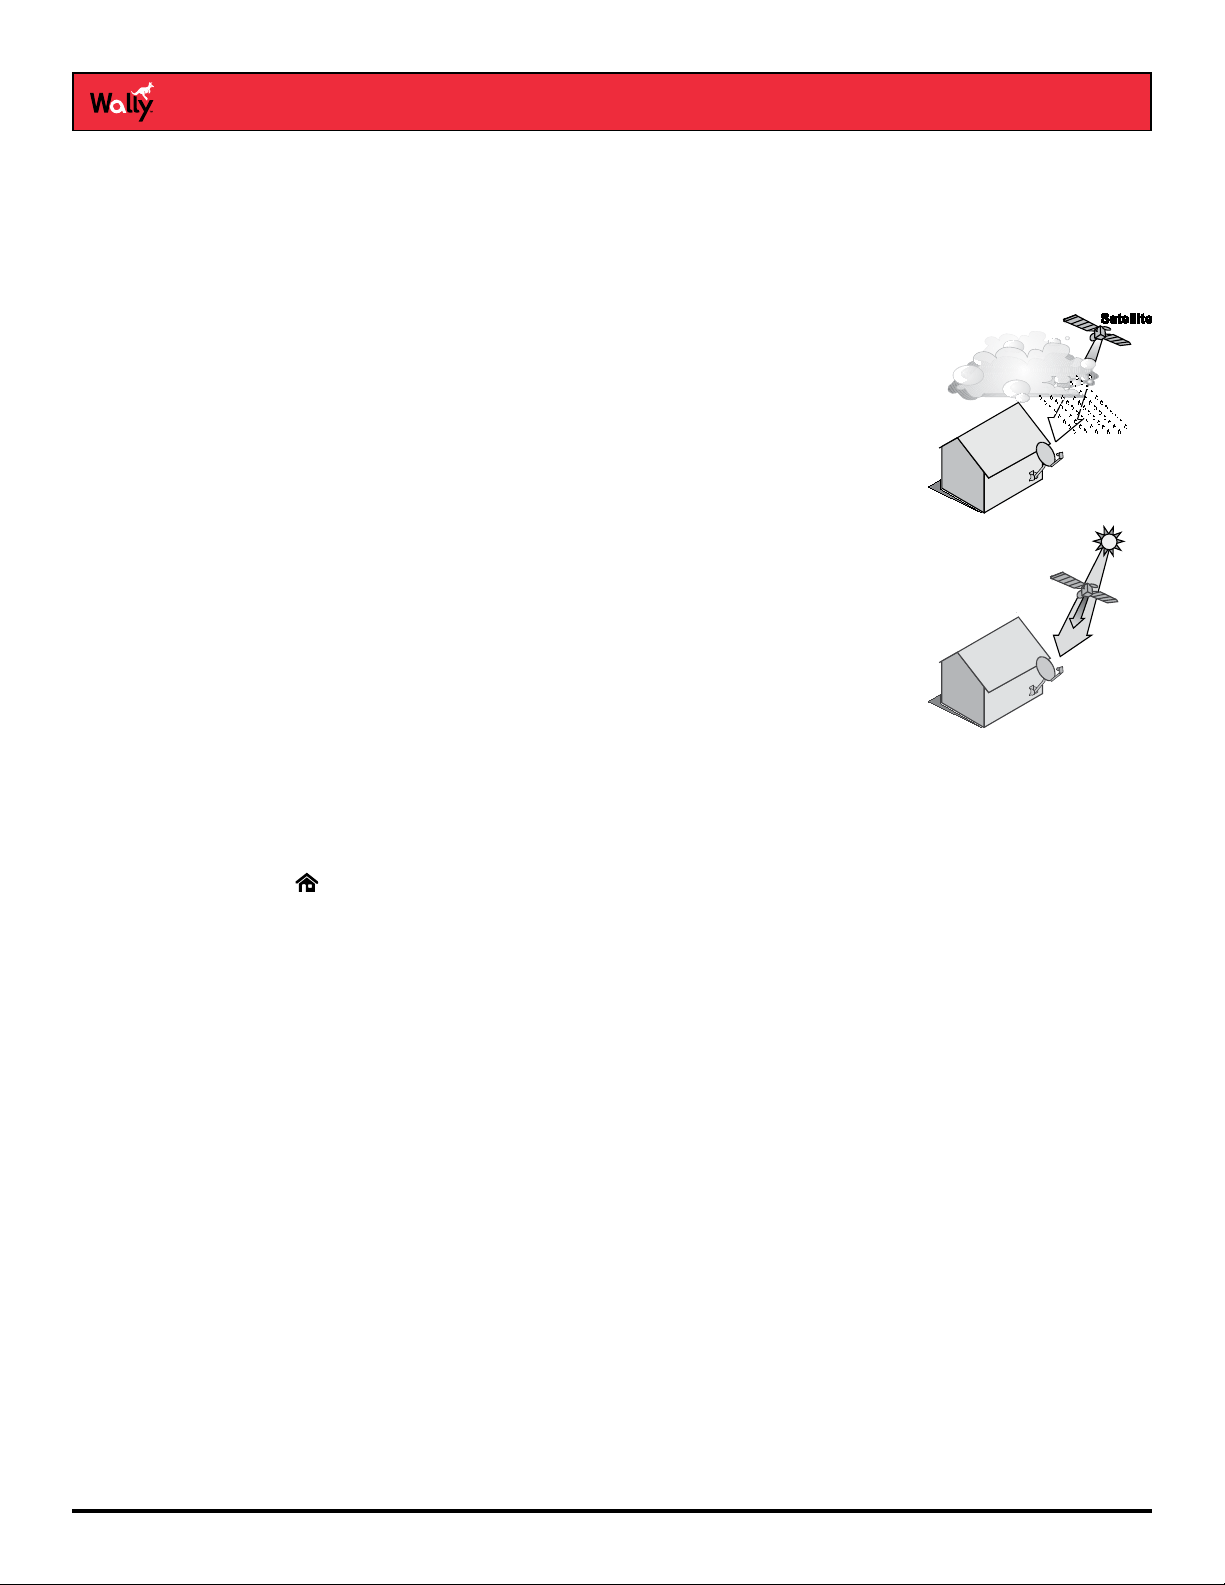
Rain and Snow Fade
Heavy rain, snow, or dense cloud cover can reduce your satellite signal and possibly
interrupt your service. Your service will return after the weather condition has passed.
During installation, aiming the satellite dish to get the strongest signal will help prevent
rain and snow from interrupting the signal.
Semiannual Solar Interference
Twice a year, the sun moves to a position behind DISH satellites as they orbit the
Earth. This event occurs during a few days at the beginning of spring and fall, and
lasts only a few minutes.
During these brief periods, you won’t be able to watch programs on DISH. When
the sun has moved from behind the satellites, the programs will reappear. This is an
unavoidable natural event for all television involving the use of satellites and has an
adverse effect on many program providers.
1
About Your DISH Account
If you want to know about charges to your DISH account or if you’d like to make changes to your programming
packages, be sure to have your account information handy and choose one of the following options:
• Visit mydish.com/myaccount and log in to your account.
• Double-press on the remote and select My Account, then Manage My Account.
• Call DISH at 1-800-333-DISH (3474).
Note: Additional authorization may be required before high-denition programming and/or over-the-air digital
broadcasts can be viewed; additional fees may apply.
Tips
• Use DISH Anywhere to manage your Wally when you’re away from home.
• Keep your Wally connected to broadband Internet to maintain easy access to apps and pay-per-view.
• Turn off your Wally when you’re not using it so that it can receive the latest software updates, which usually
occur overnight.
Questions
• I’m looking at program information in a guide that I bought at the grocery store, but nothing matches
what’s on my Wally. Is something wrong?
No; DISH programming may vary from what you’ll nd in a local publication. For best results, use the program
guide on your Wally or order DISH’s Hopper magazine at dishhoppermag.com.
Wally User Guide
8
Page 9
2
2
Chapter
Connections and Setup
Click a topic to jump to it:
• Connecting to Your TV
• Connecting to Broadband Internet
• Connecting to an Over-the-Air (OTA) Antenna
• Connecting to a DISH Tailgater
®
Wally User Guide
9
Page 10

Connections and Setup
Connecting to Your TV
If your HDTV or HD monitor has an HDMI connection available, this is the recommended connection to use with
your Wally to provide high-denition audio and video using a single cable.
If you can’t connect via HDMI, you can use standard red/white/yellow RCA cables to get picture quality in standard
denition.
1 Connect in one of the following ways:
• Using an HDMI cable from the HDMI port on the back of your Wally to an HDMI port on your HDTV or
HD monitor. For optimal picture quality, connect your Wally using a short, high-quality HDMI cable.
• Using RCA cables from the back of your Wally to RCA inputs on your TV or monitor
2 Power on your Wally and connected TV or monitor.
3 Conrm that you’re getting a TV signal from your Wally. Make sure that you’re using the correct input on your TV.
Note: In most cases, connecting the HDMI cable will provide plug-and-play control of the TV or monitor’s display
resolution and other settings. However, your TV may require selecting a different format to display video from
your Wally during its setup.
4 Turn up the volume on your TV and conrm that you have sound.
5 Consult your TV or monitor documentation for the best HD resolution that’s supported. For HDTVs and monitors,
this is usually 1080p/1080i or 720p.
6 Double-press on the remote to display the Menu screen.
7 Select Settings, then TV.
8 On the TV Settings screen that displays, select Video Resolution and choose the best HD resolution for your
TV or monitor. For HDTVs and HD monitors, this will usually be 1080p or 1080i.
9 Select the Aspect Ratio eld and choose the aspect ratio that’s best suited for your TV or monitor:
• 16:9 is the typical setting for a widescreen HD display.
• 4:3 with Horizontal Compression is the setting to use on a standard 4x3 TV or monitor that uses vertical
compression. When viewing a 16x9 program on such a TV or monitor, it automatically displays the picture in
letterbox format (with black bars across the top and bottom of the screen) to preserve the correct horizontal
and vertical proportions of the widescreen HD image.
• 4:3 without Horizontal Compression is the setting to use on a standard 4x3 TV or monitor that doesn’t use
vertical compression. When viewing a 16x9 program on such a TV or monitor, black bars at the top and bottom
won’t be displayed, and a widescreen HD image will appear tall and skinny.
2
Connecting to Broadband Internet
If you have broadband Internet access at home, connecting your Wally to your home network allows you to take
advantage of pay-per-view programming, DISH apps, and DISH Anywhere.
You can connect your Wally to broadband Internet in one of the following ways:
• Wired Connection (recommended): Connect an Ethernet cable from the ETHERNET port on the back of
your Wally to your home network router or switch.
• Wireless Connection: Insert the Wi-Fi USB Adapter into one of the USB ports on the back of your Wally. Visit
mydish.com/orderfromstore to order this product.
To check your connection to broadband Internet, double-press on the remote and select Settings, then Internet.
The Internet Settings screen displays the current status of your Internet connection. You have the option to view
network details or reset the network.
Wally User Guide
10
Page 11

Connections and Setup
Connecting to an Over-the-Air (OTA) Antenna
If you want to receive digital OTA channels in addition to your satellite programming, you can use the OTA USB
Adapter and an OTA antenna (both sold separately). You can add the OTA channels to your Wally’s default channels
lists and assign them network afliations, giving you access to the channels via the Guide or Mini Guide, just like
any other channel.
Notes:
• The audio/video quality on local OTA channels depends on the distance and terrain between the broadcast
station and your home, and on the placement and quality of the over-the-air TV antenna you use. If you have
questions about over-the-air channels, contact your local broadcasters—not DISH.
• The type of OTA antenna that you need depends on the channels used by and the locations of the local
broadcasters for your area. Visit antennaweb.org or contact a professional installer or consumer electronics
retailer to help you select a suitable antenna.
Follow this procedure to watch digital OTA channels on your Wally:
1 Order the OTA USB Adapter from mydish.com/orderfromstore.
2 Install an OTA antenna in your home, making sure to follow the installation instructions correctly.
3 Connect the USB plug of your OTA USB Adapter to one of the USB ports on the back of your Wally.
4 Connect the coaxial port of your OTA USB Adapter to your over-the-air antenna. When prompted to restart your
Wally, select Yes.
5 When you can view live TV again, double-press on the remote to display the Menu screen.
6 Select Settings, then OT A Antenna.
7 On the Over-The-Air Channels screen that displays, select Scan to begin searching for channels that your OTA
antenna can pick up in your area. A popup shows the status of the scan.
8 When your channel scan is complete, choose the local channels that you want to add to your program guide,
then select Save. The selected channels will be added to the program guide for your Wally and will be available
for live TV viewing as well as DVR recording (if you have an external hard drive connected).
2
Connecting to a DISH Tailgater
The Wally supports the mobile antenna, DISH Tailgater, providing you with your satellite programming while away
from home.
While setting up your Tailgater, please keep the following guidelines in mind:
®
• Don’t stand or walk in front of the side of the Tailgater that faces the southern sky. Ensure that the handle of
your Tailgater antenna is pointing north.
• If instructed during setup, contact DISH at 1-800-333-DISH (3474) to authorize your Tailgater.
• If your Wally hasn’t been used for a long period of time, it may need to be re-authorized. Contact DISH at
1-800-333-DISH (3474) and follow the prompts to re-authorize your Wally. If channel 101 appears, change the
channel to ensure that everything is working normally.
Follow these general steps to set up your Tailgeter. For detailed information on setting up a Tailgater, please read
the documentation that came with your Tailgater.
1 Use the instructions that came with your Tailgater to connect and set up the Tailgater, Wally, and TV.
2 Follow the on-screen prompts. If you’re using your Wally for the rst time, you may have to complete the on-
screen installation wizard. If you’re unable to complete the wizard, relocate your Tailgater to a location where
there are no obstructions of the southern sky.
Wally User Guide
11
Page 12
3
3
Chapter
Wally Receiver and Remote Control
Click a topic to jump to it:
• Wally Receiver
• Remote Control Buttons
• Using the Remote Control
• Controlling an Auxiliary Device
• Selecting Menu Options
• Exiting a Screen or Canceling a Procedure
• Tips
• Questions
Wally User Guide
12
Page 13
Wally Receiver
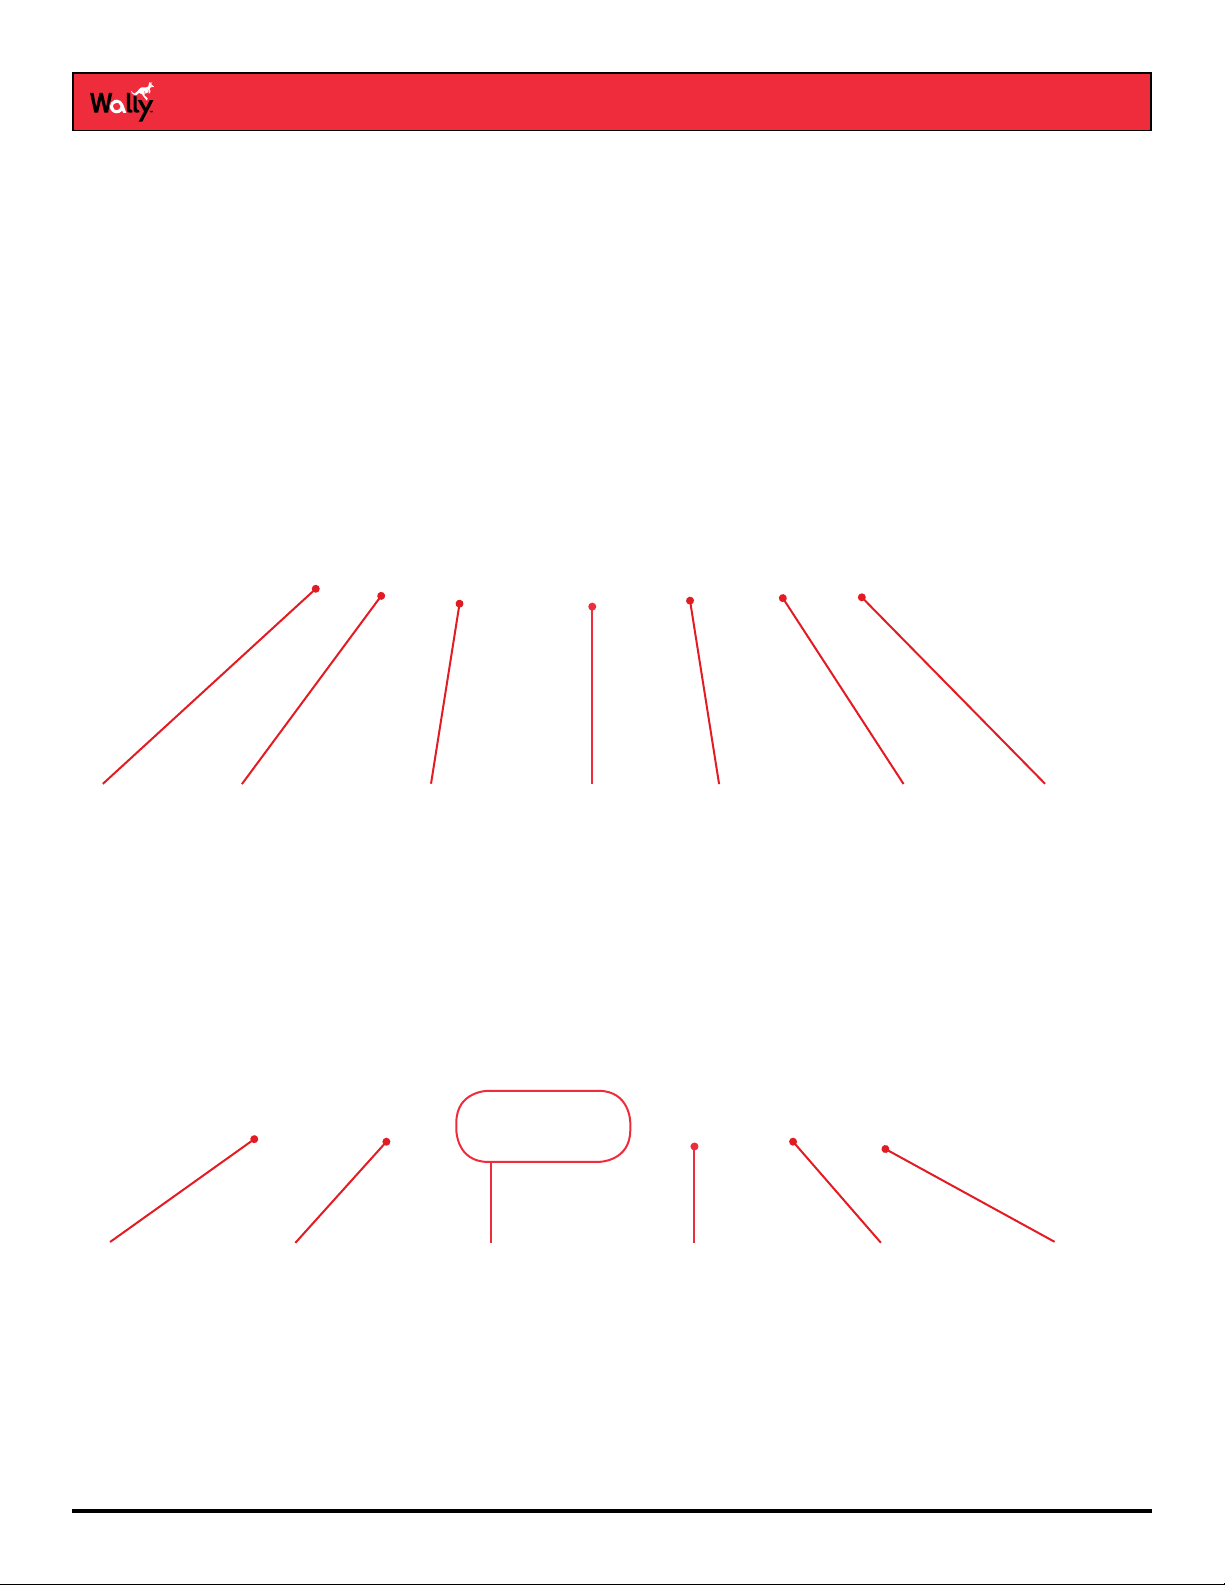
Front Panel
Wally Receiver and Remote Control
3
LED Indicator
Indicates power
status
Power
Hold to reset your
Wally
Back Panel
Power Port
Plugs in to AC
power using the
power cable
Satellite Port
Connects to the
satellite dish
System Info
Displays system
information
Audio/Video
Output
Provides a standard-
denition connection
to the TV audio and
video input
Locate Remote
Press to locate your
remote control
HDMI® Output
Provides a high-
denition audio and
video connection
to an HDTV or HD
monitor
Up
Navigates
through menus or
channels
Select
Selects an item
or channel
USB Ports
Connects to
multimedia
devices, such as
an external hard
drive or accessory
Down
Navigates
through menus
or channels
Ethernet Port
Connects to a
broadband home
network
Wally User Guide
13
Page 14
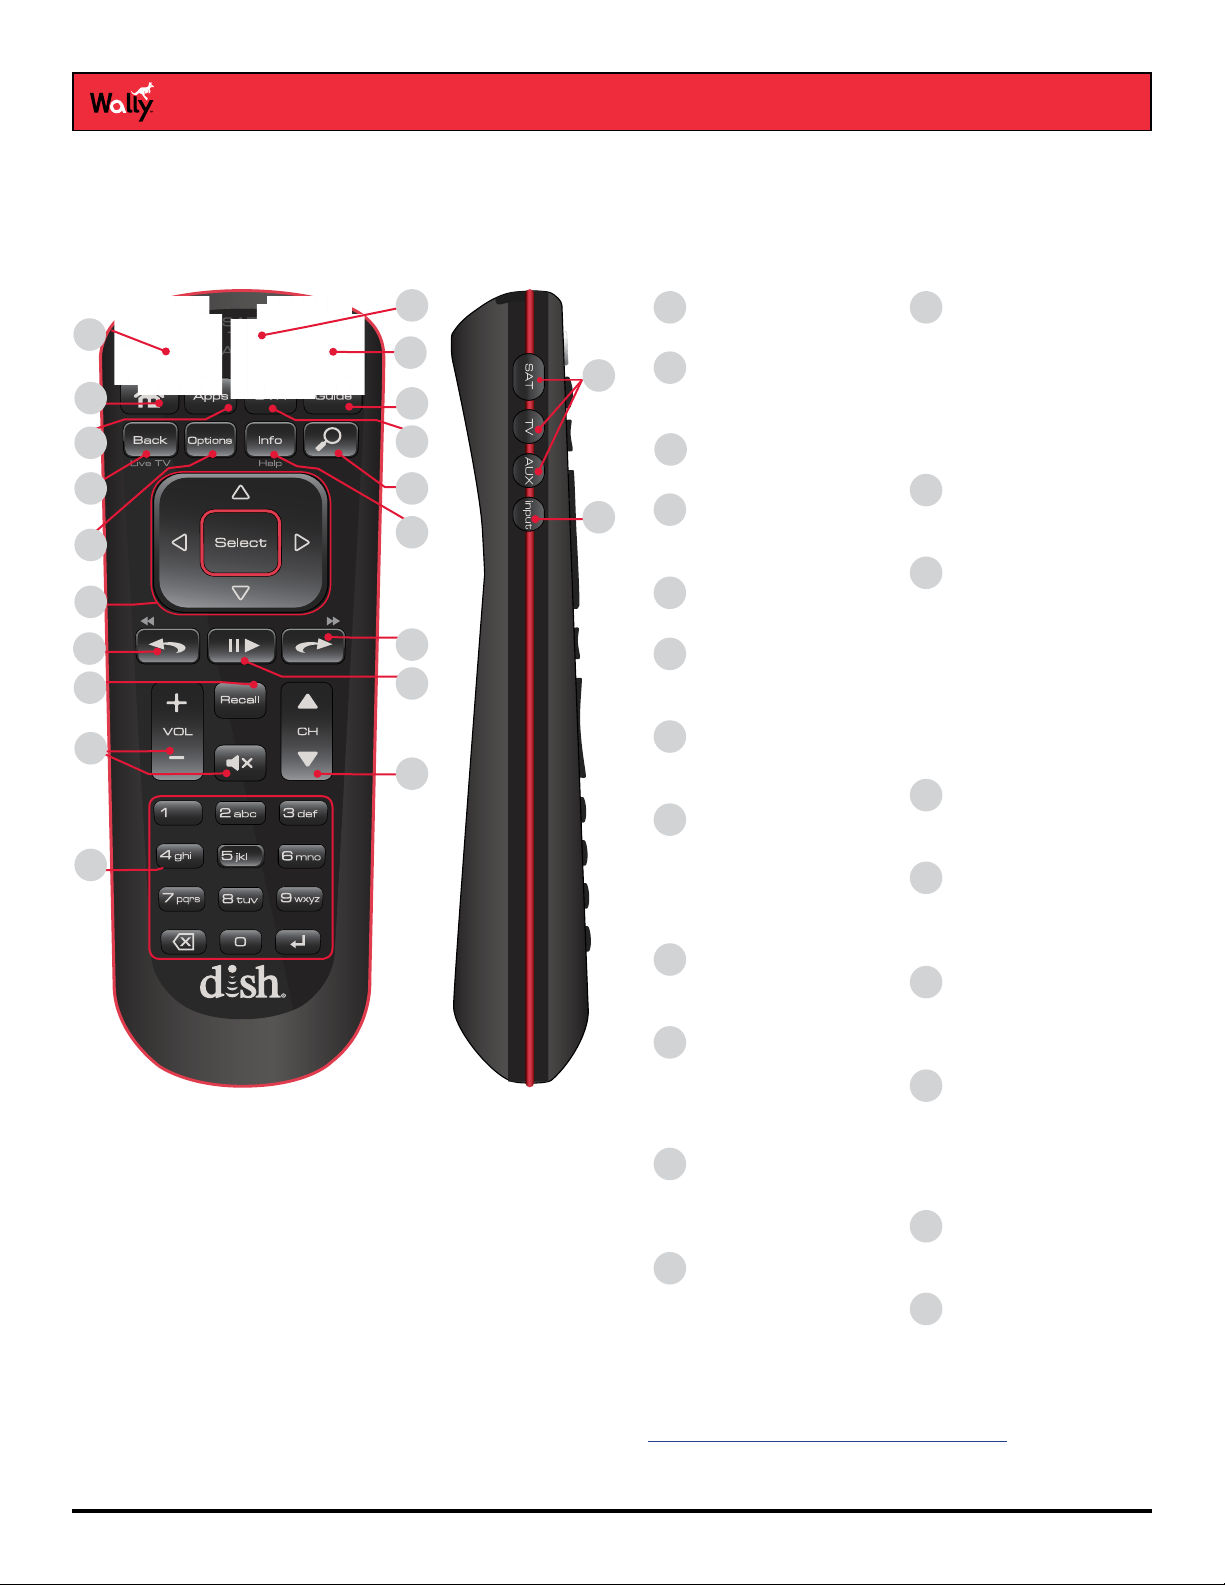
Wally Receiver and Remote Control
Remote Control Buttons
To display your satellite programming and to use the features described below, press the SAT Mode button, located
on the left side of the remote.
3
1
4
5
8
9
12
13
16
17
19
2
3
7
6
11
10
15
14
18
20
21
Receiver Power
1
Turns the Wally on and of f
SAT / TV / AUX
2
Mode indicator lights up
when in that mode
TV Power
3
Turns the TV on and off
Home
4
Displays the Home
screen
Apps
5
Displays the Apps bar
DVR*
6
Displays recorded
programs
Guide
7
Displays the program
guide
Back/Live TV
8
• Returns to the previous
menu
• Press and hold to
return to viewing live
TV
Options
9
Displays the Options
menu
Info/Help
10
• Displays info on a
program
• Press and hold for help
on most screens
Search
11
Displays the Search
screen to help nd
programs
Arrow Buttons &
12
Select
Helps you navigate the
Wally user interface
Skip Back/Rewind*
13
• Press to jump back 10
seconds in a program
• Press and hold to
rewind through the
program
• Navigates tabbed
screens
Pause/Play*
14
Pauses or plays a live or
recorded program
Skip Forward/
15
Fast-Forward*
• Press to jump forward
30 seconds in a
program
• Press and hold to
fast-forward through
a program
• Navigates tabbed
screens
Recall
16
Returns to previously
viewed channel(s)
VOL▲, VOL▼,
17
and Mute
Controls TV and
AUX volume
CH▲ and CH▼
18
• Changes the channel
• Pages up and down on
some screens
Number Buttons
19
• For entering a
channel number
• Navigates through
menus and the
program guide
SAT / TV / AUX Mode
20
Changes which device the
remote controls
Input
21
Changes the input for
your TV when in TV mode
*Works only with a connected external hard drive. See the Recording and Watching DVR Programs chapter for
more information.
Wally User Guide
14
Page 15
Wally Receiver and Remote Control
Using the Remote Control
The remote control included with your Wally gives you access to all of the receiver’s features. Your remote controls
the Wally receiver via radio frequency (RF) signals, and as many as two other devices in the same room via infrared
(IR) signals. These devices can be a TV, a DVD/Blu-ray™ player or VCR, and an audio device (receiver, amplier,
or accessory).
Note: IR signals travel only short distances (40 feet or less), and cannot go through walls or other solid objects.
If you’re using the Wally remote to control an auxiliary device via IR, you must point the remote directly at the
device, with no objects blocking the line of sight.
Remote Control Modes
Basic Modes
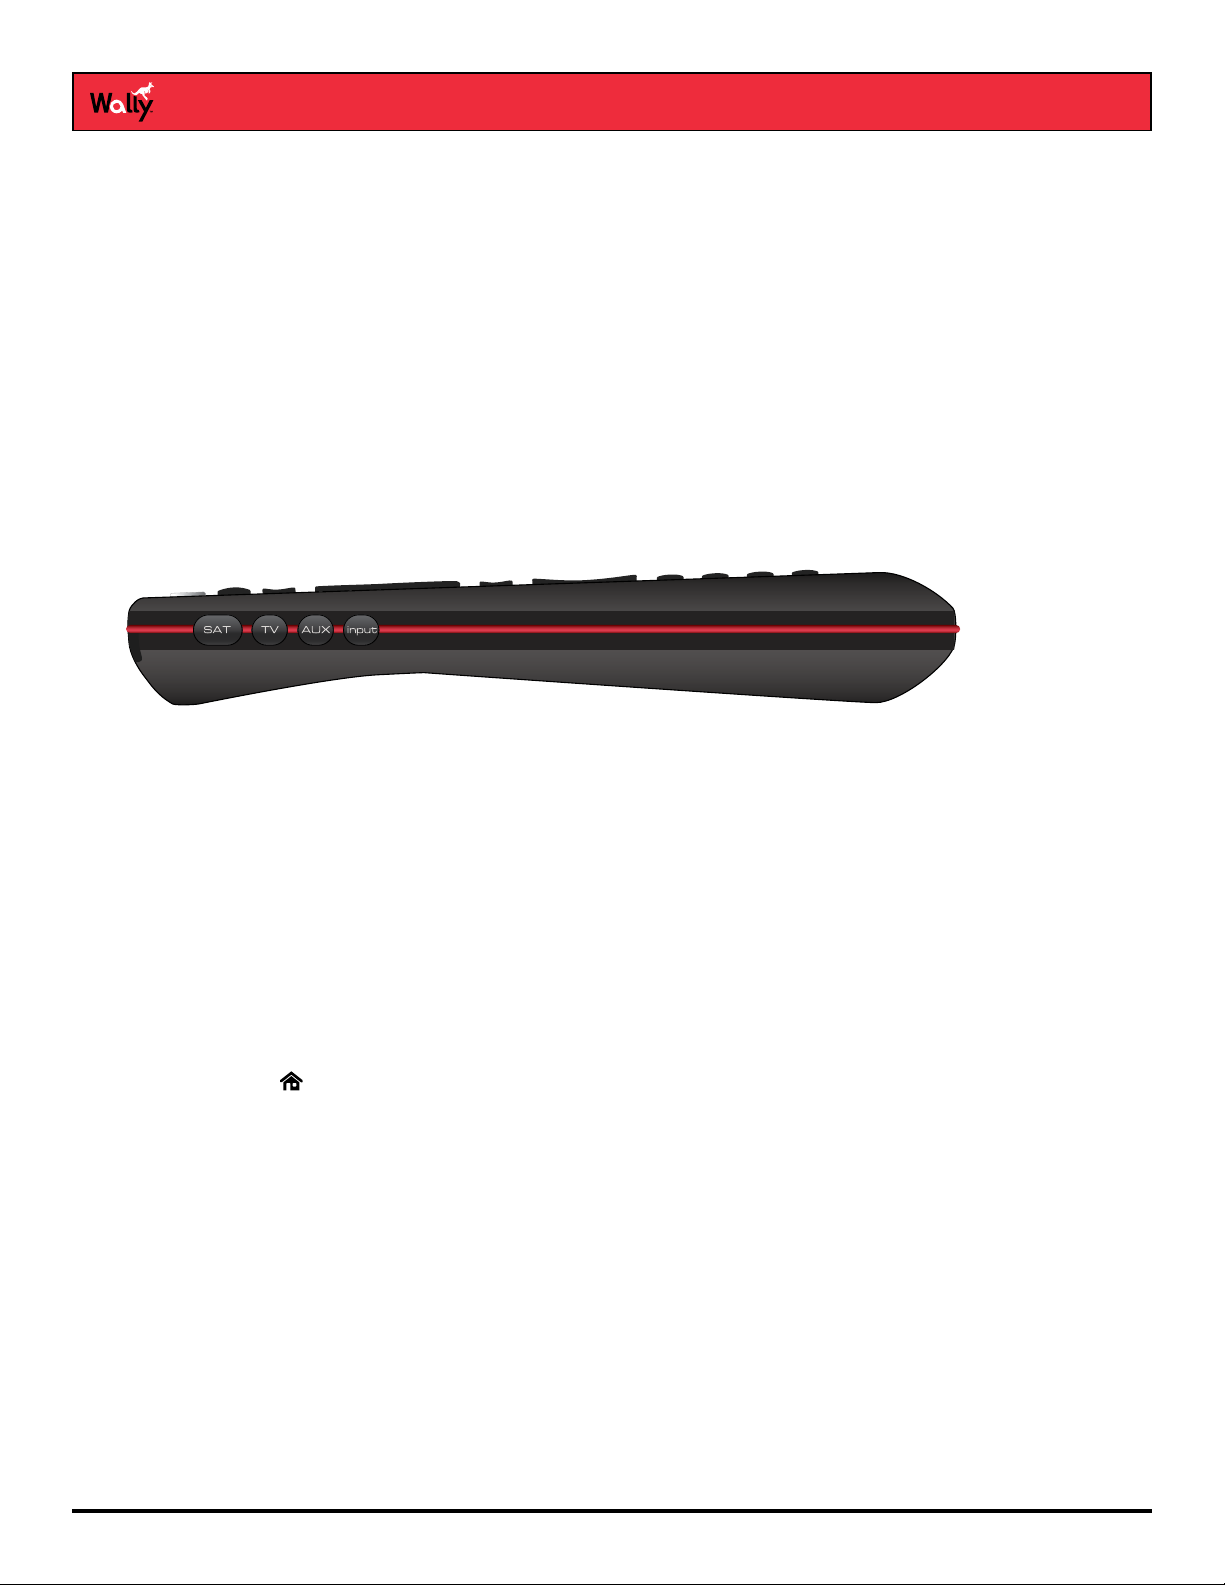
The mode buttons for your remote control are located on its left side. These buttons allow you to switch between
different devices to control.
3
• SAT – Press this button to control your Wally receiver.
• TV – Press this button to control your TV.
• AUX – Press this button to control a DVD/Blu-ray player, VCR, or an audio device.
• INPUT – Press this button to change inputs on your TV.
Limited Mode
While watching DISH programming, you can put your remote in Limited Mode to avoid accidentally changing inputs
on your TV and seeing a black, blue, or snowy screen. When the remote is in Limited Mode, you will be able to
control only the POWER, MUTE, and VOLUME functions for your TV.
Note: Limited Mode is not used with audio devices.
Turning On Limited Mode
1 Double-press on the remote to display the Menu screen.
2 Select Settings, then Remote Control.
3 On the Remote Control Settings screen that displays, scroll down to the Advanced section and select
Limited Mode to enable it. Your change is automatically saved.
Wally User Guide
15
Page 16
Wally Receiver and Remote Control
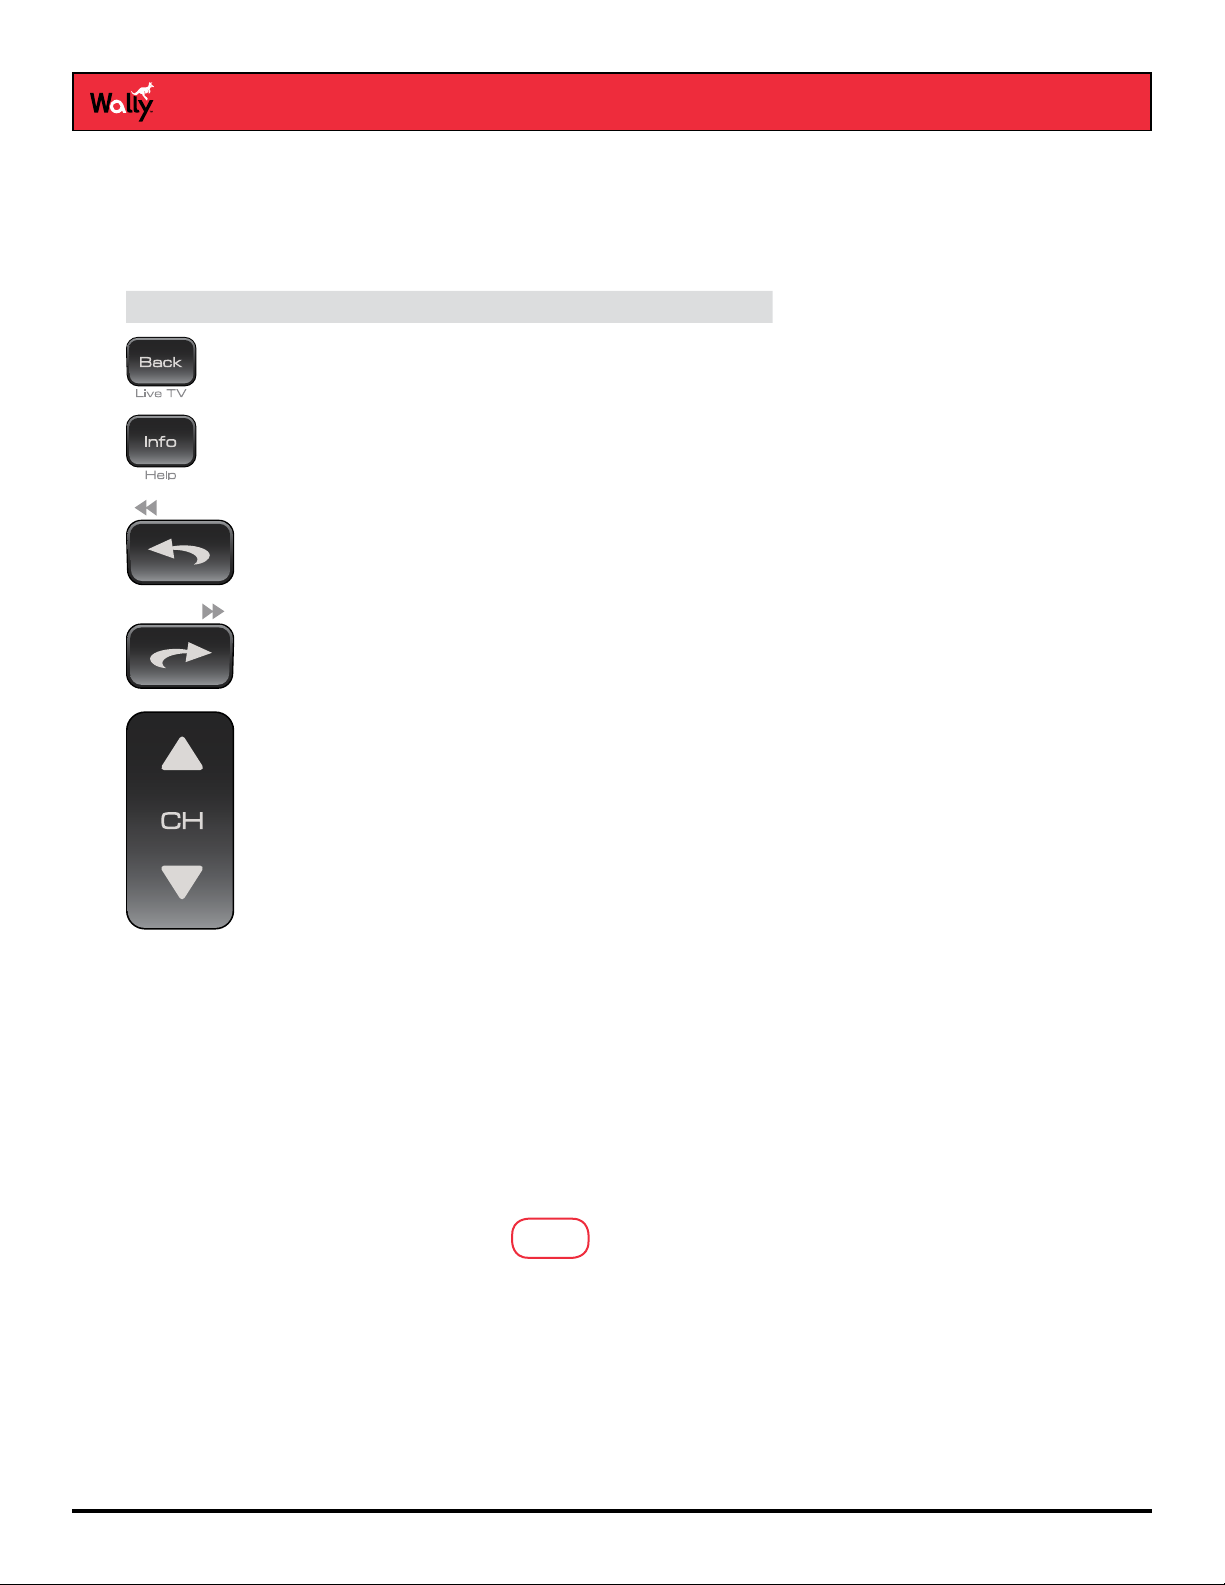
Alternate Button Functions
Most of the following button functions on the remote appear in gray text above or below the main button names. To
execute the functions in gray, simply hold down the corresponding button for a few seconds until the action happens
on-screen.
Button Alternate Function
View live TV
Display tips and help info
Rewind playback (only with a connected external
hard drive)
Fast-forward playback (only with a connected external
hard drive)
3
Page up or page down on a scrollable screen
Remote Locator
If you can’t nd your remote control, simply press the LOCATE REMOTE button on the front of your Wally. In a few
seconds the remote will begin to beep to help you locate it.
Note: If your remote control is out of range from your Wally or the remote’s batteries are dead, you won’t hear these
tones.
When you nd the remote control, press any button on it to stop the beeping. Then you can use the remote control
normally.
Wally User Guide
16
Page 17
Wally Receiver and Remote Control
Batteries
Low-Battery Warning
When you see a low-battery warning on your screen, the batteries in your remote control are low and will need to be
replaced. You can also check the health of your batteries on the System Info screen by double-pressing on the
remote and selecting Settings, then Diagnostics. Alternately, you can press the SYSTEM INFO button on the front
of your Wally.
Replacing the Batteries
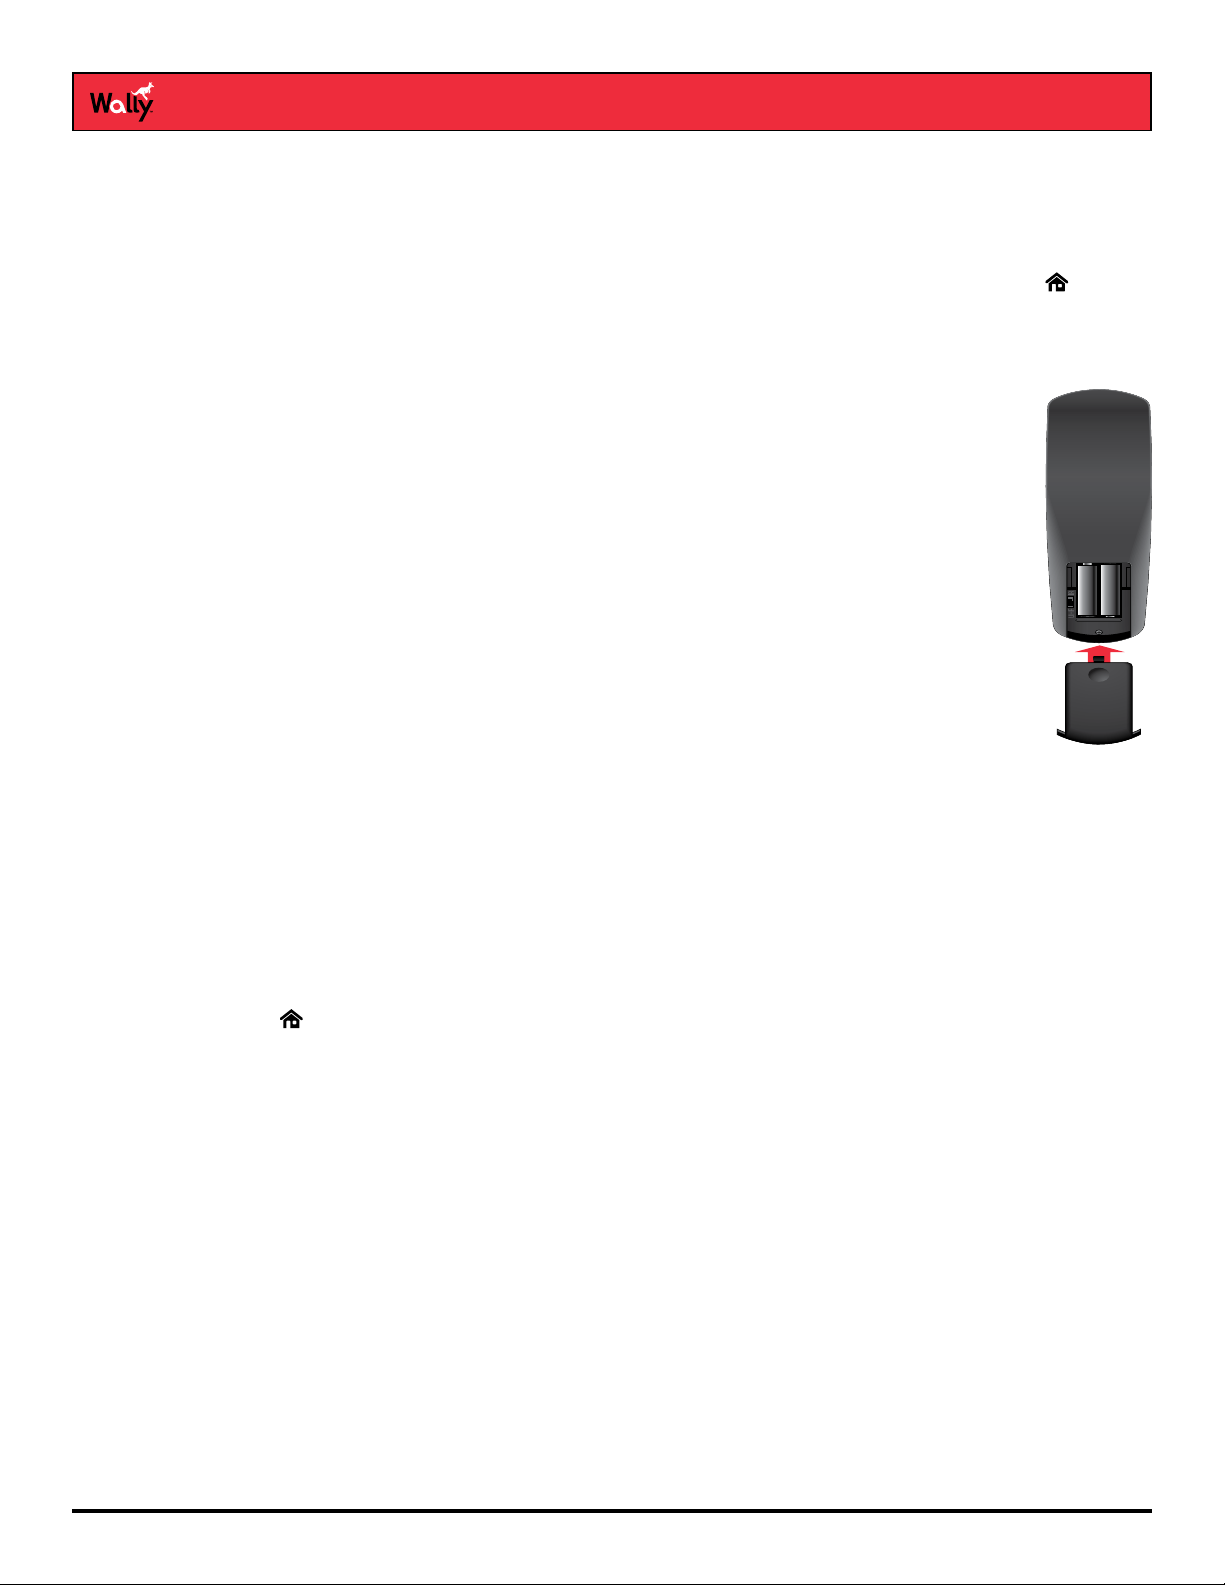
The remote control comes with two AA batteries. When you replace old batteries, you should replace
both batteries at the same time and use batteries of the same type (for example, all alkaline or all
carbon zinc batteries). Alkaline batteries last longer.
Follow this procedure to replace the batteries:
1 On the back of the remote, push the tab toward the top of the remote to release the battery door
latch, then lift the battery door from the remote.
2 Remove the old batteries.
3 Put in two new AA batteries. Make sure that you match the plus (“+”) ends with the plus markings
on the battery case.
4 Reattach the battery door.
3
Controlling an Auxiliary Device
The remote contains manufacturer codes for controlling up to two other devices, including your TV, DVD/Blu-ray
player or VCR, and audio receiver, tuner, or amplier. However, the remote can control more devices through IR
learning.
Note: Every attempt has been made to include all manufacturer device codes. If your device brand isn’t listed or if
the codes listed don’t work, then the DISH remote may not control your specic device. Not all of the buttons may
work with some codes.
Follow this procedure to program your remote to control an auxiliary device:
1 Turn on the auxiliary device that you want to control.
2 Double-press on the remote to display the Menu screen.
3 Select Settings, then Remote Control.
4 On the Remote Control Settings screen that displays, select Auxiliary Device.
5 Select the type of device that you want to control and select Next.
6 Select how you want to program the remote using one of the following options:
• Auxiliary Device Pairing Wizard (recommended) – Select the brand of your auxiliary device, select Next,
and follow the on-screen instructions.
• Teach Commands – Follow the on-screen instructions. Note that the learning sequence will end when:
– No button on either remote is pressed for at least 30 seconds.
– The Wally remote runs out of memory for learned commands, whereupon it saves the commands it has
learned for equipment in this mode, exits learning, and returns to normal remote control operation. At this
point, the remote cannot learn any more commands.
– All the mode buttons on the Wally remote blink quickly eight times, indicating that the batteries are too
low for learning. Learning ends with no learned commands saved, and the remote returns to its normal
operation.
• Enter Pairing Code – Follow the on-screen instructions.
Wally User Guide
17
Page 18

Selecting Menu Options
You can select a menu option in either of the following ways:
• If the option has a number next to it, press the same number on the remote. When you use the number
buttons, you don’t need to highlight the option rst.
Wally Receiver and Remote Control
3
• Use the arrow buttons on the remote to highlight the menu option, then press SELECT.
Exiting a Screen or Canceling a Procedure
You can exit a screen or cancel a procedure in any of the following ways:
• If you want to return to the previous screen, press BACK on the remote.
• If you want to return to watching a program, press and hold BACK for a few seconds.
• Wait a few minutes until the menu closes automatically, discarding any changes you’ve made.
Tips
• If you don’t do anything on a screen for a few minutes, the screen automatically closes. This inactivity will
discard any changes you made and return you to the program you were watching.
• You can put your remote control in Limited Mode to keep from accidentally changing the channel or input on
your TV.
Questions
• My remote doesn’t control my Wally or other devices. What should I do?
– Make sure that the remote control is in the right mode and you’re pointing the remote directly at your Wally
or device (e.g., TV, DVD player, audio receiver).
– Make sure that the batteries are good.
Wally User Guide
18
Page 19
4
4
Watching TV
Click a topic to jump to it:
• Using the Guide
• Searching for Programs
• Finding Themed Programs
• Using the Mini Guide
• Seeing What’s Trending
Chapter
• Changing Channels
• Channel Lists and Favorites Lists
• TV Viewing Options
• Tips
• Questions
Wally User Guide
19
Page 20

Watching TV
Using the Guide
Press GUIDE on the remote to display the Guide (program guide). The Guide can display information for programs
on now and those coming on within the next nine days. The guide doesn’t show programs that ended earlier in the
day.
Note: The guide will display program information for the next nine days if an external hard drive is connected and
your Wally can receive satellite programming from the either the 119°W or 72.7° orbital location. Otherwise, the
guide displays up to two days of program information.
4
• Press CH▲ or CH▼ to move a page of program data at a time, allowing you to view guide information about
programs on other channels.
• Press SKIP FORWARD and SKIP BACK to move forward and backward two-and-a-half hours at a time,
allowing you to view guide information about future programs for a given channel.
• Press INFO on the remote to see a screen of more detailed program information.
• Press OPTIONS to see which channel list is active:
– All Channels displays all the channels.
– All Subscribed displays only the channels included in your DISH package.
– All Unsubscribed displays only the channels not included in your DISH package.
– If you set up a favorites list, the Guide displays only the channels that you included on that list.
See Channel Lists for more information.
Wally User Guide
20
Page 21

Watching TV
• When certain types of programming are available within a range of channels in the Guide, the range is
collapsed into one row of the guide to make it easier to scroll through programming. The range is denoted with
a + sign. You can select that row to display all of the channels within the range.
4
Searching for Programs
The Wally’s predictive search feature makes it easy to nd programs to watch on TV or pay-per-view.
Follow this procedure to search for a program:
1 Press SEARCH on the remote to display the Search screen. The Search screen is also accessible by double-
pressing on the remote and selecting Settings, then Search.)
2 Using the on-screen keyboard, start typing a title, actor’s name, or keyword. Results of your search will start to
display. Typing more characters narrows the results.
3 To select a search result, press the number button on the remote that corresponds to the search result. You can
also use the arrow buttons to select a search result directly.
Wally User Guide
21
Page 22

Finding Themed Programs
You can browse programs by their general theme—shows, sports, and movies.
Watching TV
4
Follow this procedure to nd a themed program:
1 Press on the remote to display the Home screen.
2 Press SKIP FORWARD or SKIP BACK to switch to a different tab at the top of the screen—Shows, Sports, or
Movies. By default, results are returned only for available program listings.
3 Browse for and select a program to watch.
Wally User Guide
22
Page 23

Watching TV
Using the Mini Guide
You can use the Mini Guide to see what other programs are on or coming up while not missing any of the program
you’re watching.
4
• While watching live TV, press the RIGHT arrow on the remote, then press UP or DOWN and select a program.
• You can also enter a valid channel number using the remote’s number buttons to display that channel as a
selectable option.
Wally User Guide
23
Page 24

Seeing What’s Trending
You can use the Trending Live feature to see popular programs that everyone’s watching.
Watching TV
4
While watching live TV, press the LEFT arrow on the remote, then select a program or See More.
Changing Channels
Note: If an external hard drive is connected to your Wally and you’re not watching a program live, changing the
channel displays a popup notifying you that you’ll be in live mode if you agree to the channel change.
Arrow Buttons
• While watching live TV, press the CH▲ or CH▼ button on the remote.
• You can also change channels the same way using the UP and DOWN arrow buttons on the front of
your Wally.
Number Buttons
• Enter a valid channel number using the number buttons on the remote.
Wally User Guide
24
Page 25

Watching TV
Channel Lists and Favorites Lists
Channel Lists
By default, a channel list controls what you see in the Guide and Mini Guide until a favorites list is applied. You
can view and change the channel list by pressing GUIDE on the remote, then OPTIONS. Below are the available
channel lists:
• All Channels – Displays all channels, including channels that are not in your DISH package.
• All Subscribed – Displays only the channels that are in your DISH package.
• All Unsubscribed – Displays only the channels that are not in your DISH package. To subscribe to one of
these channels, call 1-800-333-DISH (3474).
Favorites Lists
4
Favorites lists are custom lists of your favorite channels that can display in the Guide and Mini Guide so that you
can see only the channels you’re interested in. You can edit up to four favorites lists, adding and removing channels
as you wish.
• When using a favorites list, the Guide and Mini Guide display only the channels in that favorites list. Also,
when you use the UP or DOWN ARROW to change channels, the Wally skips channels that aren’t on the list.
Unlisted channels that are included in your current DISH package are still accessible by entering the channel
number directly using the number buttons on the remote.
• You can name each of your favorites lists. By default, the four lists are named List 1, List 2, List 3, and List 4.
These lists are empty until you edit them.
Wally User Guide
25
Page 26

Watching TV
Editing a Favorites List
1 Double-press on the remote to display the Menu screen.
2 Select Settings, then Favorite Channels.
3 On the Favorite Channel Settings screen that displays, select the list that you want to edit. On the popup that
displays, select Edit Channels.
4 Edit your favorites list as follows:
• Add Channels – In the NOT IN LIST column, navigate up and down and select the channels that you want to
add to your favorites list. You may also enter a channel number to jump to it faster.
• Remove Channels – In the IN LIST column, navigate up and down and select the channels that you want to
remove from your favorites list. If you want to remove all channels from the list, select Remove All.
5 When nished, press and hold BACK on the remote to return to your program.
Renaming a Favorites List
1 Double-press on the remote to display the Menu screen.
2 Select Settings, then Favorite Channels.
3 On the Favorite Channel Settings screen that displays, select the list that you want to edit. On the popup that
displays, select Edit Name.
4 Using the on-screen keyboard, enter the new name of your favorites list (up to eight characters long).
5 When nished, select Save.
4
Favoriting Live TV Channels
1 When watching live TV, press OPTIONS on the remote.
2 On the TV Viewing Options popup that displays, select the Favorite tile.
3 On the popup that displays, select the list(s) that you want to add this channel to.
4 When nished, select Save.
Applying a Favorites List
1 Press GUIDE on the remote to display the Guide.
2 Press GUIDE again to display the Guide Options • Favorite Channels popup.
3 Select the favorites list that you want to apply.
Note: If you want to edit a favorites list, select Favorite Settings.
Wally User Guide
26
Page 27

Watching TV
TV Viewing Options
While watching a program, you can access TV viewing options quickly by pressing OPTIONS on the remote to
display the TV Viewing Options popup, shown below.
4
Tips
• When you’re watching a program or have one selected on the Guide, you can get more information about the
program by pressing INFO on the remote.
• Press and hold BACK on the remote to exit almost any menu screen and return to watching your program.
Questions
• How can I customize my program guide?
– Set up a favorites list. See Favorites Lists for more information.
– While viewing the guide, press OPTIONS on the remote and select a different channel list. See
Channel Lists for more information.
– Change the order in which the channels display by following the Editing a Favorites List procedure.
• Why does my program guide show only two days of programming?
– You don’t have an external hard drive connected to your Wally. See DVR Functionality with Your Wally.
– Your Wally may not be obtaining a signal from the necessary orbital locations. See the Favoriting Live TV
Channels chapter to see if you’re receiving a proper signal.
• Why are channels missing from my program guide?
– Parental controls may be set to lock or hide the channels. See the Parental Controls chapter for more
information.
– Your program guide may be displaying channels that aren’t in your DISH package. Press GUIDE on the
remote to display the program guide. Then press OPTIONS and select All Subscribed or All Channels.
– Your program guide may be displaying channels in a favorites list. Press GUIDE on the remote to display
the Guide and display the default favorites list. Press GUIDE again to highlight the next available list. You
can also choose to edit your own favorites list. See Favorites Lists for more information.
Wally User Guide
27
Page 28
5
5
Watching Pay-Per-View Programs
Chapter
Click a topic to jump to it:
• DISH Pay-Per-View
• Ordering Considerations
• Ordering Pay-Per-View
• Recording Pay-Per-View
• Tips
• Questions
Wally User Guide
28
Page 29

Watching Pay-Per-View Programs
DISH Pay-Per-View
DISH Pay-Per-View allows you to instantly watch movies and other exciting events on your Wally for a rental fee.
Even if you don’t have a connected external hard drive, you can use your remote control’s playback buttons to
control your viewing experience, just as you would when pausing or reversing a DVR program.
5
To order pay-per-view using your remote, your Wally must be connected to broadband Internet service. If it’s not,
you can order a pay-per-view program by logging in to your DISH account at mydish.com/myaccount and selecting
Order Pay-Per-View.
Visit mydish.com/ppv for more information on DISH Pay-Per-View.
Ordering Considerations
Keep these important considerations in mind before ordering a pay-per-view program:
• Once you conrm an order for a pay-per-view program, you cannot cancel the order; you’ll be billed for it.
• You cannot record certain pay-per-view programs.
• An All Day DISH Ticket for a program is available for up to 24 hours and runs from the rst showtime
(5 a.m. ET) to the same time the following day (5 a.m. ET). If you record a program from All Day DISH Ticket,
you can watch the rental for up to 24 hours from the rst viewing.
• Replays of some pay-per-view programs or events are separate, and you may be be billed for each viewing.
• You can use parental locks to restrict your family from watching pay-per-view programs. See the
Parental Controls chapter for more information.
• You can review what you’ve rented during the past 30–60 days by viewing the Recent Purchases screen.
Double-press on the remote, select My Account, then Recent Purchases. The program titles that you’ve
ordered will appear on your next DISH bill.
Wally User Guide
29
Page 30

Ordering Pay-Per-View
Watching Pay-Per-View Programs
5
1 Press GUIDE on the remote to display the Guide.
2 Using your remote, navigate to a category of pay-per-view programs:
• Movies begin on channel 502.
• Sports begin on channel 455.
• Adult programs begin on channel 481.
3 Select the program that you want to watch.
4 On the program screen that displays, select Rent.
5 On the popup that displays, press SELECT to begin watching the pay-per-view program. You may stop watching
the program and return to live TV at any time.
Wally User Guide
30
Page 31

Watching Pay-Per-View Programs
Recording Pay-Per-View
If you have an external hard drive connected to your Wally, you can record pay-per-view programs.
To record a pay-per-view program from the point where you’re watching:
• Press SELECT on the remote to display an options bar at the bottom of the screen, then select the
Record This icon.
5
or
• Press INFO on the remote to display the program info screen, then select Record This.
To record a pay-per-view program from the point where you started watching:
• Rewind the program as far as you can go, press SELECT, and select the Record This icon.
or
• Rewind the program as far as you can go, press INFO, and select Record This.
To stop recording a pay-per-view program:
• Press SELECT on the remote, select the Stop Recording icon, then select Yes on the popup that displays.
or
• Press INFO and select Stop Recording. On the popup that displays, select the Stop icon to stop recording.
Wally User Guide
31
Page 32

Tips
• Keep your Wally connected to broadband Internet so you can easily order pay-per-view programming with your
remote control.
• You can connect an external hard drive to the USB port on the back of your Wally to record pay-per-view
programs. See the Recording and Watching DVR Programs chapter for more information.
Questions
• Why doesn’t my program guide show any pay-per-view channels?
– Your program guide may be displaying channels that aren’t in your DISH package. Press GUIDE, then
OPTIONS, and select All Subscribed.
– Parental controls may be set to lock and hide pay-per-view channels. See the Parental Controls chapter for
more information.
• Why are some pay-per-view programs blacked out?
Sporting events and other programs are sometimes blacked out because of local broadcast restrictions. Note
that the provider of such programming determines these restrictions—not DISH.
• Why did my all-day pay-per-view program shut off while I was watching it?
The all-day events run from 5 a.m. ET to 5 a.m. ET the next day. You should ensure that you can nish
watching an event that you’ve ordered by this time.
Watching Pay-Per-View Programs
5
Wally User Guide
32
Page 33
6
6
Recording and Watching DVR Programs
Chapter
Click a topic to jump to it:
• DVR Functionality with Your Wally
• Setting Up an External Hard Drive (EHD)
• Recording a Program
• Event Timers
• DVR Schedule
• Playing a Recording
• Managing Recordings
• Using DISH Anywhere
• Tips
• Questions
Wally User Guide
33
Page 34

Recording and Watching DVR Programs
DVR Functionality with Your Wally
A digital video recorder (DVR) lets you watch TV the way that you want, when you want. DVR functionality makes it
easy to pause, rewind, or skip through a program. You can also move forward and backward in slow motion so that
you don’t miss any of the action.
6
The Wally allows you to record one program at a time, only when a dedicated external hard drive (EHD) is
connected to a USB port on the back of your Wally. The EHD must:
• Have a capacity between 500 GB and 2 TB
• Use a USB 2.0 or 3.0 data connection
• Be dedicated for use only with your Wally. The EHD cannot be used for any other purposes, such as the
backup and storage of computer les.
• Be the only EHD connected to the Wally. Do not connect two EHDs to your Wally at the same time.
• Using an EHD with an external power supply is recommended. Portable or pocket hard drives powered only by
a single USB cable may not work properly with your Wally.
Note: Programs or events recorded in high denition require as much as six times more storage space than
programs recorded in standard denition.
Setting Up an External Hard Drive (EHD)
Note: Programs or events recorded in high denition require as much as six times more storage space than
programs recorded in standard denition.
1 Purchase an external hard drive (EHD) that meets the requirements listed above.
2 Call the DISH Customer Service Center at 1-800-333-DISH (3474) to activate the DVR functionality for your
Wally. You may incur additional monthly charges on your DISH bill.
3 Connect your EHD to one of the Wally’s two USB ports on the back of your Wally, making sure to follow any
instructions that came with the EHD.
4 Follow the on-screen prompts to reformat your EHD, erasing all content that’s currently on it. Reformatting is
necessary so that the Wally can store its recordings in a compatible format on the EHD.
5 Wait until the reformatting process ends.
WARNING: Do not disconnect your EHD, as doing so can cause irreparable damage to it that DISH is not liable
for.
When the process ends, the Wally reboots. You can now record programs and use playback controls on live TV.
Wally User Guide
34
Page 35

Recording and Watching DVR Programs
Recording a Program
The Wally can record one program at a time. This means that if you’re currently recording a program and want to
watch live TV, you have to watch the program that’s currently being recorded—you cannot record on one channel
while watching another. Alternatively, you can watch a DVR or Netix program while a program is being recorded.
See Resolving Recording Conicts for more information.
Note that when you record a program, an event timer is automatically created for that program. See Event Timers
for more information.
Recording Live TV
To record a live program from the point where you’re watching:
• Press SELECT on the remote to display an options bar at the bottom of the screen, then select a recording
option. You can press SELECT again to change recording options.
6
or
• Press INFO on the remote to display the program info screen, then select a recording option. You can press
SELECT again to change recording options.
To record a live program from the point where you started watching:
• Rewind the program as far as you can go, press SELECT, and select a recording option. You can press
SELECT again to change recording options.
• Rewind the program as far as you can go, press INFO, and select a recording option. You can press SELECT
again to change recording options.
Wally User Guide
35
Page 36

Recording and Watching DVR Programs
To stop recording a program:
• Press SELECT on the remote to display an options bar at the bottom of the screen, select the Stop Recording
icon, then select Yes on the popup that displays.
or
• Press INFO and select Stop Recording. On the popup that displays, select the Stop icon to stop recording.
6
Recording a Future Program
When you record a program, you create an event timer.
• Press GUIDE on the remote, select a program that hasn’t aired yet, and choose a desired recording option.
You can press SELECT again to change recording options.
or
• Press , search for a program, and select a search result. On the information screen that displays for that
program, choose a desired recording option. You can press SELECT again to change recording options.
Wally User Guide
36
Page 37

Recording and Watching DVR Programs
Resolving Recording Conflicts
Recording conicts happen when you attempt to record a program that overlaps with another recording, either live
or scheduled. Recording conicts happen in the following ways:
• On the Program Guide – When a conict occurs, the Recording Conict popup displays and allows you to not
record the program or to resolve the conict by canceling the conicting program.
6
• When Changing the Channel – If you’re recording a program and attempt to change the channel, the TV
Activity screen displays to show you what’s being recorded.
From this screen, you can decide to watch the same program being recorded (live or from the beginning), stop
it from recording, or change the channel. If you don’t want to stop the recording, you have the option to watch
a DVR or pay-per-view program.
Note: You can display the TV Activity screen while watching a program by pressing OPTIONS on the remote
and selecting TV Activity.
Wally User Guide
37
Page 38

Recording and Watching DVR Programs
Event Timers
When you record a program, an event timer is automatically created for that program and added to the DVR list of
scheduled recordings. Sometimes you may need to edit an event timer to change the start and end times or the
frequency of recordings.
6
There are two types of event timers:
• DVR – Records a program automatically. This is the default option for every event timer when you set a
program to record.
• Auto Tune – Changes the channel to the program to remind you that it’s starting, but does not record
the program.
Editing an Event Timer
1 Press the DVR button on the remote.
2 On the DVR screen that displays, select the Timers tab.
3 Select a program whose timer you want to edit. On the popup that displays, select Edit Timer.
4 On the Edit Timer screen that displays, select a setting and choose a desired option. Any changes are
automatically saved.
Note: If you need more information about a setting, click the ? icon to the right of it.
Wally User Guide
38
Page 39

Recording and Watching DVR Programs
DVR Schedule
The Schedule tab of the DVR screen is helpful for viewing all programs that are set to record.
6
Press the DVR button on the remote and select the Schedule tab to view it. Selecting a program gives you the
option to skip recording or edit the timer.
Playing a Recording
1 Press the DVR button on the remote.
2 On the DVR screen that displays, highlight a program, series, or custom folder and choose one of the following
options:
• If you want to watch the program or the newest recording in a folder of programs, press PAUSE/PLAY on the
remote.
• If you want to watch a specic episode or see more options, press SELECT to view the information screen
for the program. Then highlight an episode and press PLAY on the remote or select an episode to see more
options.
Wally User Guide
39
Page 40
Recording and Watching DVR Programs
DVR Playback Controls
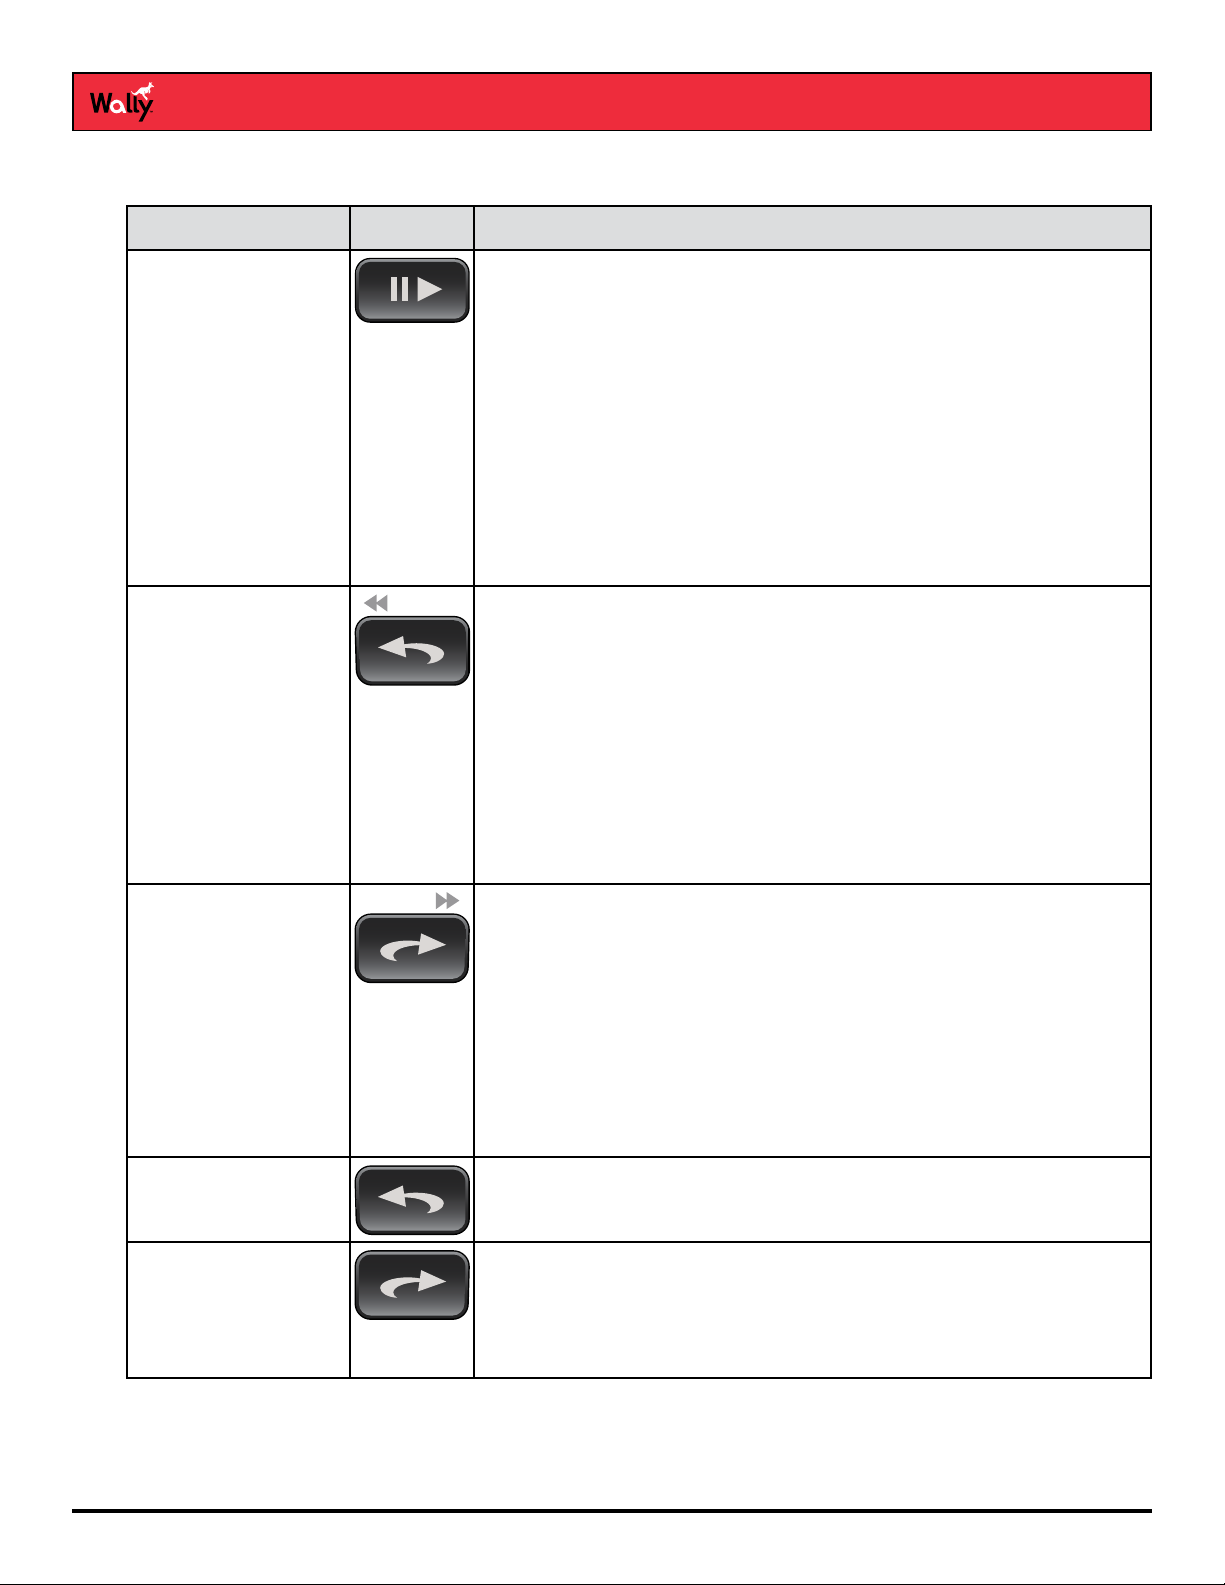
Function(s) Button How To Use
Pause / Play • Press PAUSE/PLAY to pause playback. Press PAUSE/PLAY again to
resume watching your program.
• For a live TV program, the on-screen pause timer shows how long
you’ve paused the program, indicating how far behind you are in the live
program. You can pause a live program for as long as an hour before
playback resumes. If you think you might be away from the TV for
more than an hour, but don’t want to miss any of the program, consider
recording the program.
• WARNING: On some TVs, the presence of xed images for extended
periods of time may cause them to be permanently imprinted on the
screen. Consult your TV user’s guide for information on whether this is
a problem for your TV, what operating/viewing restrictions apply to avoid
this problem, and any associated TV warranty coverage.
Rewind
Fast-Forward
Skip Back
• 15x: Press and hold SKIP BACK/REWIND until the program starts
reversing at four times normal speed.
• 60x: Press and hold SKIP BACK/REWIND until the program starts
reversing. Press SKIP BACK/REWIND one more time to rewind at 60
times normal speed.
• 300x: Press and hold SKIP BACK/REWIND until the program starts
reversing. Press SKIP BACK/REWIND two more times to rewind at 300
times normal speed.
• The on-screen bar shows how far you’ve rewound the program. For a
live program, you can rewind back only to the last channel change or
back one hour—whichever occurs rst.
• 15x: Press and hold SKIP FORWARD/FAST FORWARD until the
program starts fast-forwarding at four times normal speed.
• 60x: Press and hold SKIP FORWARD/FAST FORWARD until the
program starts fast-forwarding. Press SKIP FORWARD/FAST
FORWARD one more time to fast-forward at 60 times normal speed.
• 300x: Press and hold SKIP FORWARD/FAST FORWARD until
the program starts fast-forwarding. Press SKIP FORWARD/FAST
FORWARD two more times to fast-forward at 300 times normal speed.
• The on-screen bar shows how far you’ve fast-forwarded the program. As
expected, you can’t go forward beyond what’s shown on live TV.
• Press SKIP BACK to jump back 10 seconds in a program. Press this
button repeatedly to continue jumping back 10 seconds at a time.
6
Skip Forward • Press SKIP FORWARD to jump forward 30 seconds in the program.
Wally User Guide
Press this button repeatedly to continue jumping ahead 30 seconds at a
time.
40
Page 41
Recording and Watching DVR Programs
Function(s) Button How To Use
6
Slow Motion
then
or
Slow-Motion Rewind
• Press PAUSE/PLAY and then press SKIP BACK to rewind the program
in slow motion.
• Press PAUSE/PLAY to exit.
Slow-Motion Forward
• Press PAUSE/PLAY and then press SKIP FORWARD to advance the
program in slow motion.
• Press PAUSE/PLAY to exit.
Managing Recordings
Grouping and Sorting Recordings
1 Press the DVR button on the remote.
2 On the DVR screen that displays, press OPTIONS.
3 On the DVR Recording Options popup that displays, select RECORDED DATE / Sort.
4 Select one of the following options:
• A-Z – Sort your recordings alphabetically.
• Recorded Date – Sort your recordings according to the most recent date when they were recorded.
Deleting a Recording
1 Press the DVR button on the remote.
2 On the DVR screen that displays, select the recording that you want to delete.
3 On the information screen for that program, select Delete.
Restoring a Deleted Recording
If you accidentally delete a recording, you can restore it to your DVR within 48 hours by following this procedure:
1 Press the DVR button on the remote.
2 On the DVR screen that displays, select the Trash tab.
3 Select the deleted recording that you want to restore. On the popup that displays, select Restore. The recording
will be moved to the Recordings tab of the DVR screen.
Note: You may not be able to restore deleted recordings if your external hard drive is full.
Wally User Guide
41
Page 42

Recording and Watching DVR Programs
Using DISH Anywhere
At no additional cost, DISH Anywhere lets manage your Wally from the convenience of a broadband-connected
computer, tablet, or smartphone.
6
By logging in to dishanywhere.com, you can:
• View your program guide and channel lists, including any OTA channels
• Create, edit, and delete your auto-tune timers
• Use your smartphone or tablet as a virtual remote that controls your Wally
• Create, edit, and delete your DVR timers and programs (only with a connected external hard drive)
All you need is a working broadband Internet connection to your Wally and the DISH Anywhere app on your
computer, tablet, or smartphone. Visit dishanywhere.com to get started.
Tips
• If you’re reversing or fast-forwarding a program at any speed, you can press PAUSE/PLAY to resume normal
playback.
• Press and hold BACK on the remote to catch up with the program live, if applicable.
Questions
• How can I fast-forward through commercials?
If you’re watching a pre-recorded program, or have delayed a live program, press SKIP FORWARD/FAST
FORWARD on the remote. See DVR Playback Controls.
Wally User Guide
42
Page 43
7
7
Apps
Click a topic to jump to it:
• Using Apps on Your Wally
• Tips
Chapter
Wally User Guide
43
Page 44

Apps
Using Apps on Your Wally
The Wally was specically designed to feature a variety of high-bandwidth apps that bring the best of the web to
your TV. Apps appear in the categories of movies, sports, music, weather, social media, games, and more. DISH
continually updates its apps.
Note: Apps relating to specic events like March Madness or the World Cup appear only around the time of those
events.
You can access apps in the following ways:
• Apps Bar – Press APPS on the remote to display the Apps bar. Use the left and right arrow buttons to scroll
the list of apps, then select the app that you want to launch.
7
• Apps Screen – Double-press on the remote to display the Menu screen and select Apps. Then select an
app to launch it. Alternately, you can press APPS on the remote when the Apps bar is on-screen.
Note: You can also access the Netix and The Weather Channel apps by selecting them from the
Menu screen.
Wally User Guide
44
Page 45

Tips
Apps
• Whenever you want to exit an app and return to watching your program, press and hold BACK on the remote
for a few seconds.
• In addition to the on-screen app, you can also access DISH customer support on the DISH website.
Visit mydish.com/myaccount and log in for more information.
7
Wally User Guide
45
Page 46
8
8
Parental Controls
Chapter
Click a topic to jump to it:
• Parental Locks and Ratings Restrictions
• Creating or Changing the Parental Passcode
• Changing Parental Controls
• Ratings Systems
• Tips
• Questions
Wally User Guide
46
Page 47

Parental Controls
Parental Locks and Ratings Restrictions
Parental locks and ratings restrictions are powerful tools that allow parents to restrict what their kids can watch.
8
Below are the available parental controls:
• Ratings Restrictions – For locking programs based on their ratings. See Ratings Systems for more
information.
• Channel Locks – For locking channels, regardless of content
• Hide Adult Programs – For hiding adult channels from the Guide and Mini Guide
• Hide Locked Channels – For hiding locked channels from the Guide and Mini Guide
Parental Control Rules
After you enable a parental control:
• If you try to access a locked channel, restricted program, or the Parental Controls screen, you’ll be prompted to
enter the passcode.
• You get three tries to enter the correct passcode. If you fail to do so, you cannot try again for ve minutes.
• If you enter the correct passcode, you can access the locked channel, restricted program, or the
Parental Controls screen to make changes to any locks and restrictions.
• If you exit a locked or restricted item or the Parental Controls screen, you must enter the passcode again to
access the item or screen.
Wally User Guide
47
Page 48

Parental Controls
Creating or Changing the Parental Passcode
You must set up a passcode before using your Wally’s parental controls.
1 Double-press on the remote to display the Menu screen.
2 Select Settings, then Parental Controls. If you’ve already created a passcode, enter it now.
3 On the Parental Controls screen that displays, select the Parental Controls eld, then select On or a temporary
Off option in the popup that displays.
4 Select the Parental Passcode eld.
5 On the Create Parental Passcode popup that displays, enter a four-digit passcode using the
number buttons on the remote. An on-screen circle character (•) masks each digit that you enter.
6 On the popup that displays, re-enter the passcode. Your passcode is automatically saved.
7 Memorize your new passcode or note it in a place where no one else is likely to nd it. From now on, you’ll
enter this passcode to lock or unlock your Wally. If you ever forget the passcode, you must call DISH Customer
Service at 1-800-333-DISH (3474) to change it.
Changing Parental Controls
1 Double-press on the remote to display the Menu screen.
2 Select Settings, then Parental Controls. If you’ve already created a passcode, enter it now.
3 On the Parental Controls screen that displays, select the Parental Controls eld, then select On or a temporary
Off option in the popup that displays.
4 Scroll down, select a setting, and choose a desired option.
Note: If you need more information about a setting, click the ? icon to the right of it.
5 If you haven’t set a parental passcode, do so now by following the Tips procedure above.
6 Select Save.
8
Wally User Guide
48
Page 49
Parental Controls
Ratings Systems
Movie Ratings
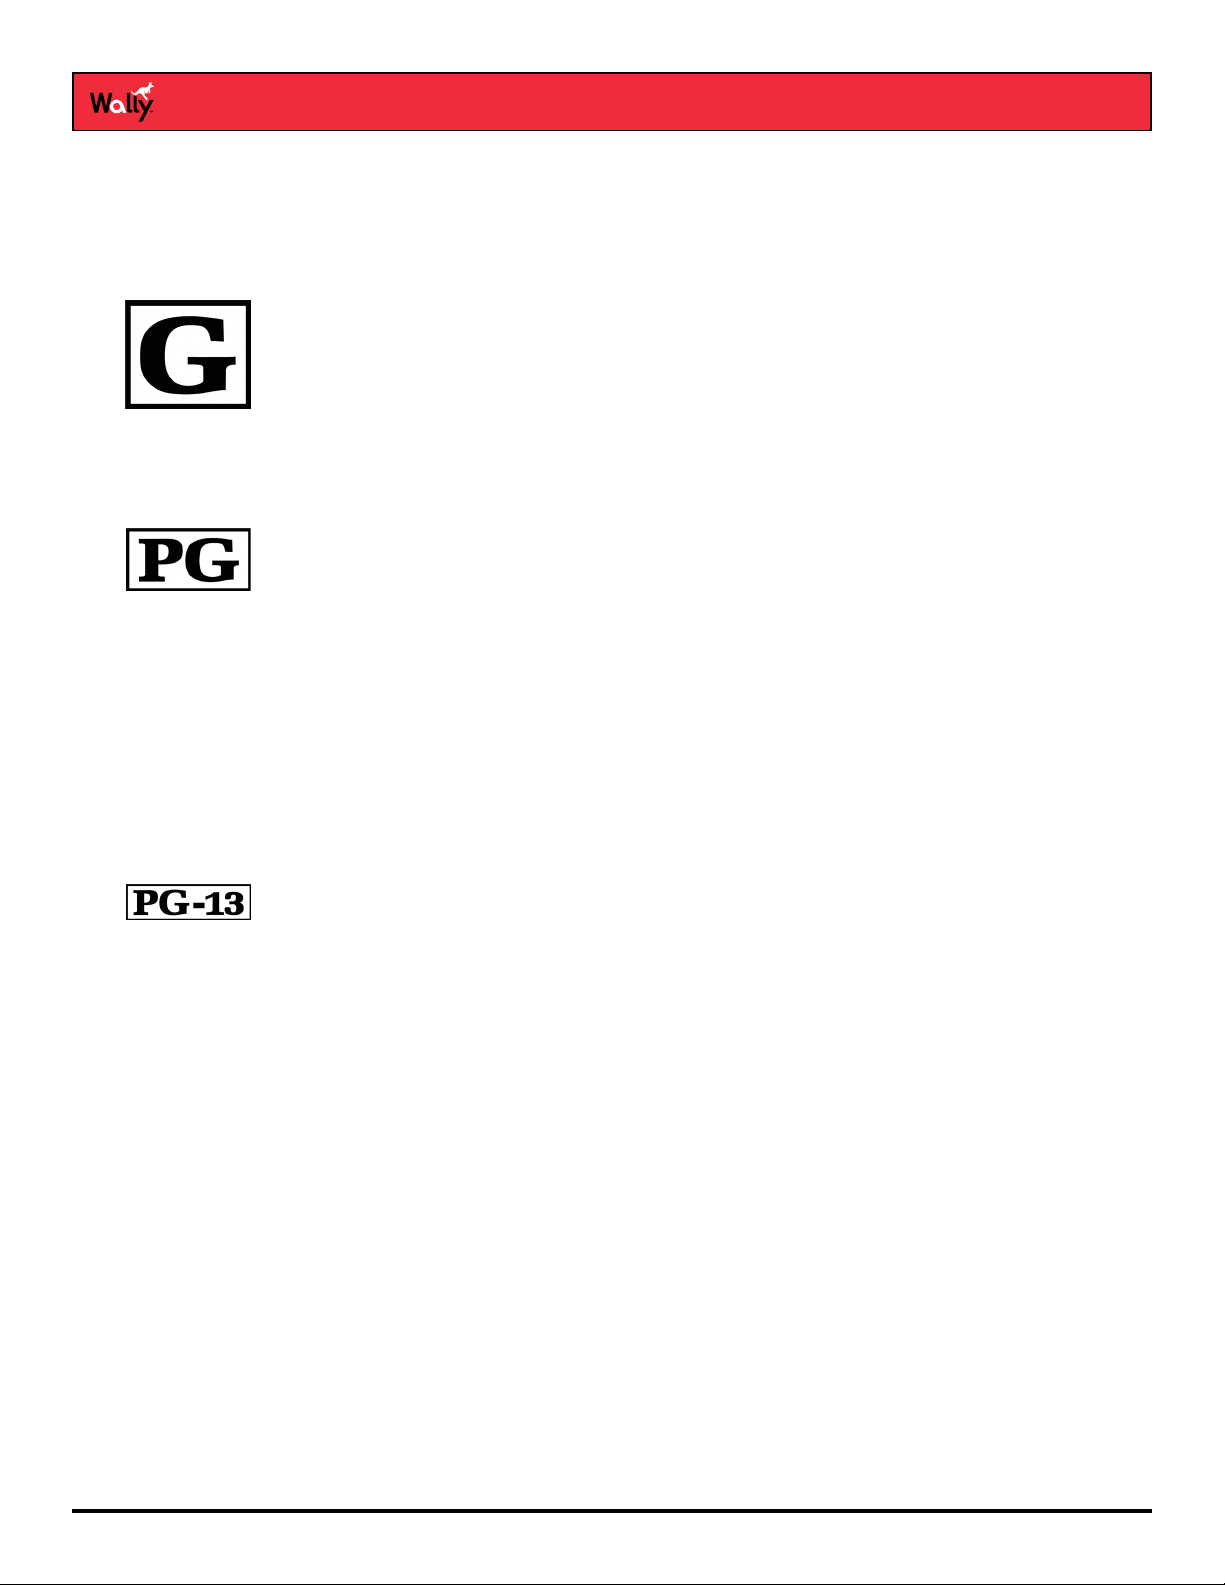
The Motion Picture Association of America (MPAA) assigns ratings to motion pictures as follows:
General
Audiences
A G-rated motion picture contains nothing in theme, language, nudity,
sex, violence, etc. which would, in the view of the MPAA, be offensive to
parents whose younger children view the lm.
The G rating is not a “certicate of approval,” nor does it signify a
children’s lm. Some snippets of language may go beyond polite
conversation, but they are common everyday expressions. No stronger
words are present in G-rated lms, and violence is at a minimum. Nudity
and sex scenes are not present, nor is drug use depicted.
8
Parental
Guidance
Suggested.
Some
Material
May Not Be
Suitable for
Children.
Parents
Strongly
Cautioned.
Some
Material
May Be
Inappropriate
for Children
Under 13.
A PG-rated motion picture clearly needs to be examined or inquired into
by parents before they let their children under 10 attend. The label PG
plainly states that parents may consider some material unsuitable for
their children under 10, but the parent must make the decision. Parents
are warned against sending their children, unseen and without inquiry, to
PG-rated movies.
The theme of a PG-rated lm may itself call for parental guidance.
There may be some profanity, violence, or brief nudity in these lms. But
these elements are not deemed so intense as to require that parents be
strongly cautioned beyond the suggestion of parental guidance. There is
no drug use depicted in a PG-rated lm.
Although a child could nd the PG-rated lm sad and scary, a PG rating
should not unsettle a child age 10 or older.
A PG-13-rated motion picture issues a sterner warning to parents to
determine the attendance of their younger children, as they might
consider some material not suited for them. By the rating, parents are
alerted to be very careful about the attendance of their under-teenage
children.
A PG-13 lm is one which, in the view of the MPAA, leaps beyond
the boundaries of the PG rating in theme, violence, nudity, sensuality,
language, or other content, but does not quite t within the restricted
R category. Any drug use depicted will initially require at least a PG-13
rating. In effect, the PG-13 cautions parents with more stringency than
usual to give special attention to this lm before they allow their 12-year-
olds and younger to attend.
If nudity is sexually oriented, the lm will generally not be found in the
PG-13 category. If violence is too rough or persistent, the lm is assigned
the R (restricted) rating. A lm’s single use of one of the harsher sexually
derived words, though only as an expletive, shall initially require the
MPAA to issue at least a PG-13 rating for that lm. More than one such
expletive must lead the MPAA to issue an R rating for a lm.
Wally User Guide
49
Page 50
Parental Controls
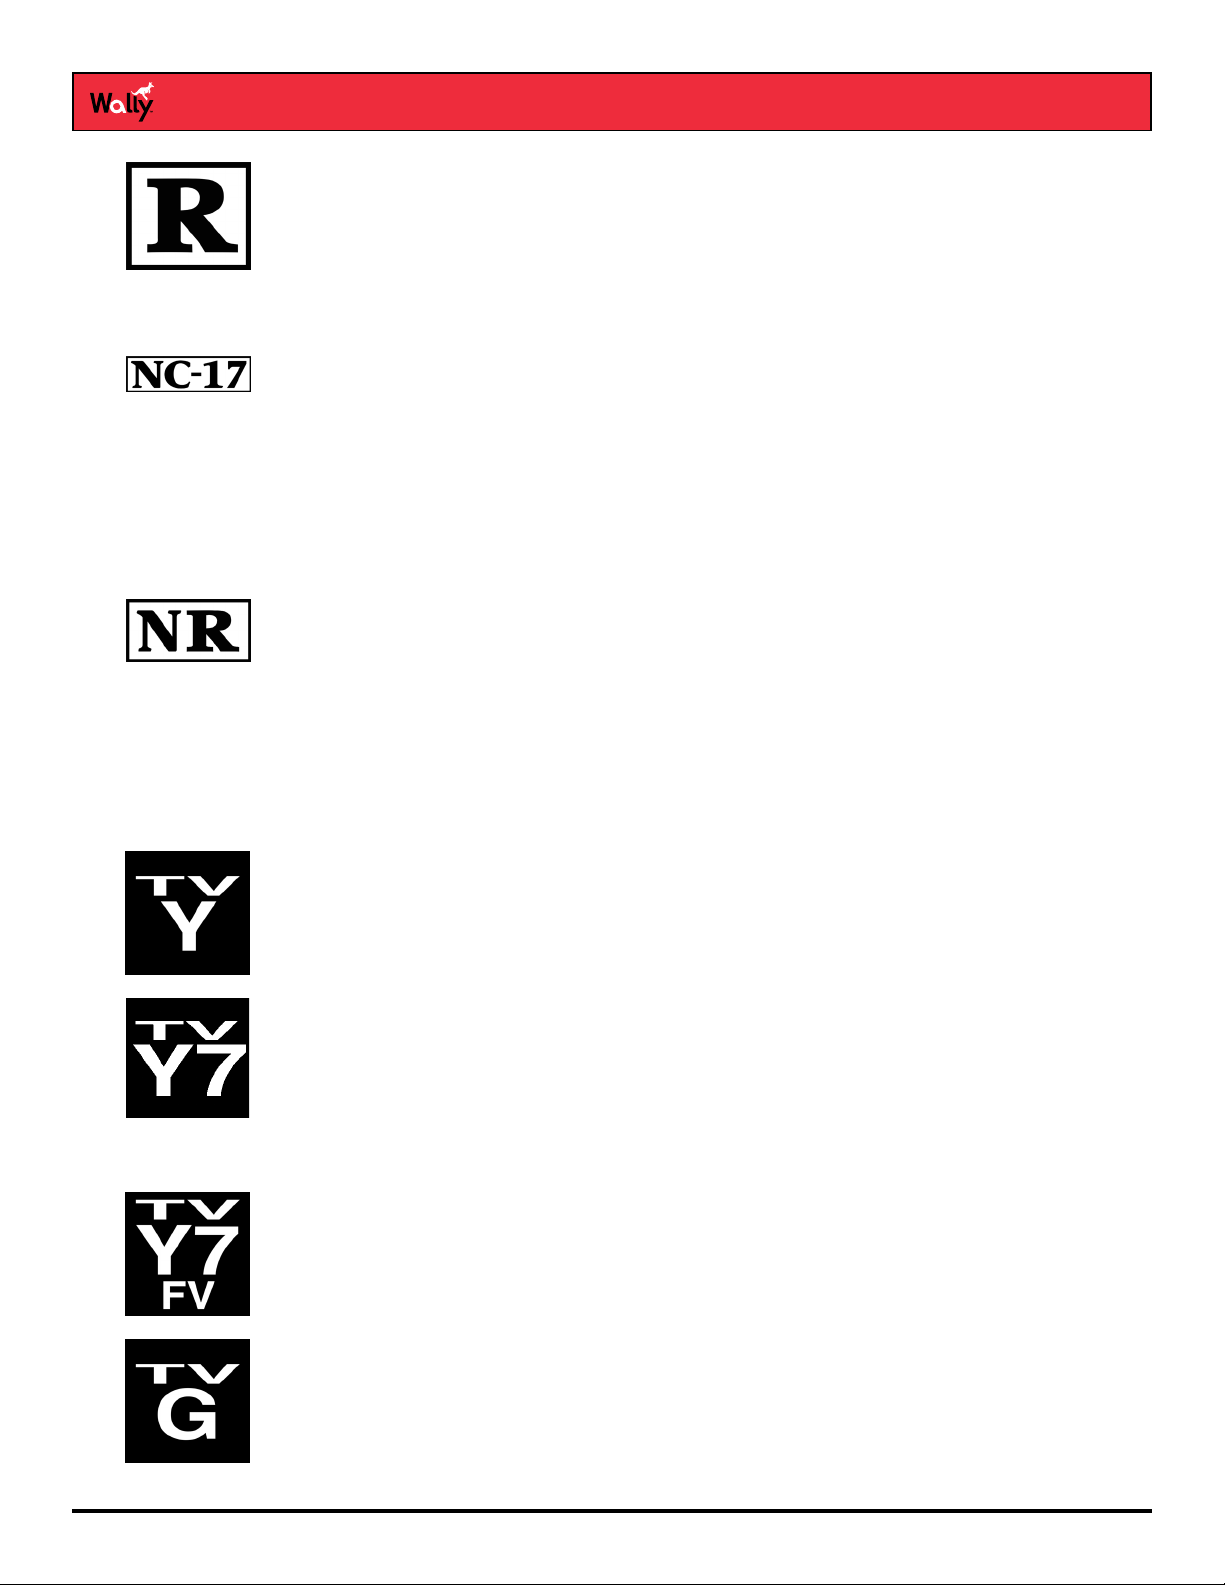
Restricted An R-rated motion picture contains some adult material. Parents are
strongly urged to nd out more about this lm before they allow their
children under 17 to accompany them. An R-rated lm may include hard
language, tough violence, nudity within sensual scenes, drug abuse or
other elements, or some combination therein. Parents are counseled
to take this rating very seriously. Parents must nd out more about an
R-rated movie before they allow their teenagers to view it.
8
No One 17
and Under
Admitted.
NR/AO – Not
Rated
An NC-17-rated motion picture is one that, in the view of the MPAA,
most parents would consider patently too adult for their children 17 and
under. No children will be admitted. NC-17 does not mean “obscene”
or “pornographic” in the common or legal meaning of those words, and
should not be construed as a negative judgment in any sense. The rating
simply signals that the content is appropriate only for an adult audience.
An NC-17 rating can be based on violence, sex, aberrational behavior,
drug abuse, or any other element that most parents would consider too
strong and therefore off-limits for viewing by their children.
Programs created before the MPAA rating system have an NR/AO rating.
Also, if your Wally loses its connection with a satellite, movies will carry
the NR/AO rating until the connection is restored.
TV Ratings
The TV Parental Guidelines Monitoring Board assigns ratings to all television shows except news and sports
programs, as follows. The guidelines contain information about the appropriate audience and appear in the upperleft corner of the TV screen at the beginning of TV shows, and sometimes after commercial breaks.
All Children A TV-Y-rated program is designed to be appropriate for all children.
Whether animated or live-action, the themes and elements in this
program are specically designed for a very young audience, including
children from ages 2–6. A program with this rating is not expected to
frighten younger children.
Wally User Guide
Directed
to Older
Children
Directed
to Older
Children
(Fantasy
Violence)
General
Audience
A TV-Y7-rated program is designed for ages 7 and above. It may be more
appropriate for children who’ve acquired the developmental skills needed
to distinguish between make-believe and reality. Themes and elements in
a program with this rating may include mild fantasy violence or comedic
violence, or may frighten children under the age of 7. Therefore, parents
may want to consider the suitability of this program for their very young
children.
A TV-Y7-FV-rated program has fantasy violence that may be more
intense or more combative than TV-Y-rated programs.
A TV-G-rated program is one that most parents would nd suitable
for all ages. Although this rating does not signify a program designed
specically for children, most parents may let younger children watch
this program unsupervised. It contains little or no violence, no strong
language, and little or no sexual dialogue or situations.
50
Page 51
Parental Controls
8
Parental
Guidance
Suggested
Parents
Strongly
Cautioned
Mature
Audiences
Only
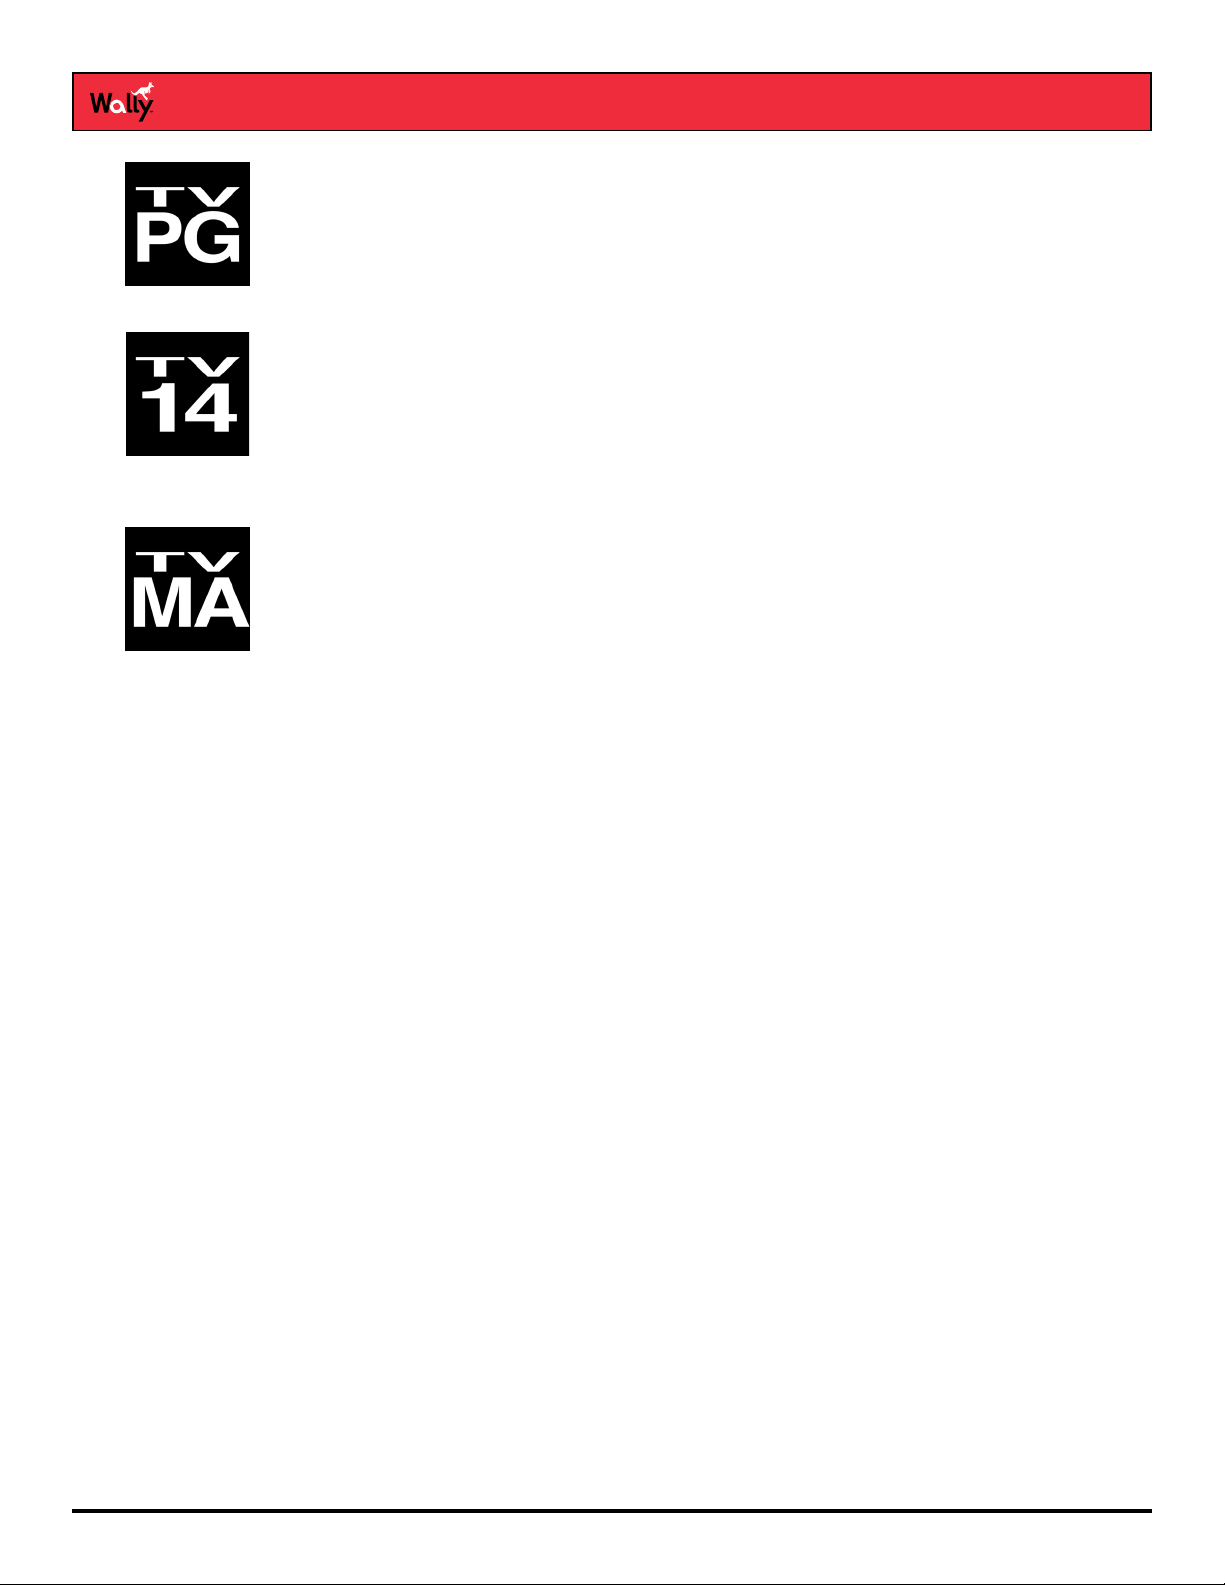
A TV-PG-rated program contains material that parents may nd
unsuitable for younger children. Many parents may want to watch it with
their younger children to make a proper determination. The theme itself
may call for parental guidance, and/or the program may contain one or
more of the following: some suggestive dialogue (D), infrequent coarse
language (L), some sexual situations (S), and moderate violence (V).
A TV-14-rated program contains some material that many parents would
nd unsuitable for children under 14 years of age. Parents are strongly
urged to exercise greater care in monitoring a program with this rating
and are cautioned against letting children under the age of 14 watch
it unattended. This program may contain one or more of the following:
intensely suggestive dialogue (D), strong coarse language (L), intense
sexual situations (S), and intense violence (V).
A TV-MA-rated program is specically designed to be viewed by adults,
and therefore may be unsuitable for children under 17. This program may
contain one or more of the following: crude indecent language (L), explicit
sexual activity (S), and graphic violence (V).
Content Labels of TV Ratings
The TV Ratings may have one or more letters added to the basic rating to let parents know when a show may
contain the following objectionable elements:
• V – violence
• L – coarse or crude language
• N – nudity
• SC – sexual content or situations
• D – suggestive dialogue (usually regarding sexual situations)
Tips
• You can’t reset your Wally to default settings to discard or reset a passcode that you’ve forgotten. Only a DISH
Customer Service representative can reset your Wally to bypass a passcode-protected parental control setting.
• You can lock any channel, including pay-per-view channels. Locked channels can be accessed or recorded
only after you enter the passcode for your Wally.
• When you restrict a channel by rating, you also lock channels with more restrictive ratings. For example, if you
restrict PG-13-rated movies, all other programming with the R, NC-17, and NR/AO ratings are also restricted.
Questions
• I can’t remember my parental passcode. What should I do?
Call DISH Customer Service at 1-800-333-DISH (3474).
Wally User Guide
51
Page 52
9
9
Chapter
Customizing Your Wally
Click a topic to jump to it:
• Changing the Channel Order
• Changing DVR Timer Defaults
• Enabling Closed Captioning
• Changing Audio Settings
• Changing the Alternate Audio Language
• Getting Receiver Updates
• Resetting to Factory Defaults
• Tips
• Questions
Wally User Guide
52
Page 53

Customizing Your Wally
Changing the Channel Order
By default, the Guide displays channels in descending order, with the highest channel number listed at the top of the
screen. Follow this procedure to change the Guide to display channels in ascending order:
1 Double-press on the remote to display the Menu screen.
2 Select Settings, then Guide.
3 On the Guide Settings screen that displays, select Channel Order and choose a desired option. Your change is
automatically saved.
4 Press GUIDE to view the Guide with your channels sorted in the order that you selected.
Changing DVR Timer Defaults
If your DVR recordings are cut off, or if some programs don’t record at all, follow this procedure to change your
default timer settings:
1 Double-press on the remote to display the Menu screen.
2 Select Settings, then Timer Defaults.
3 On the Timer Default Settings screen that displays, select a setting and choose a desired option. Any changes
are automatically saved.
Note: If you need more information about a setting, click the ? icon to the right of it.
9
Enabling Closed Captioning
Your Wally has many options for closed captioning (CC), which allows you to customize the feature to suit your
viewing needs. Also, you can display captions when you play back programs recorded on a connected external hard
drive, even if you didn’t have them enabled at the time when the program was recorded. Note that not all programs
contain closed captioning.
Follow this procedure to customize the closed captioning on your Wally:
1 Double-press on the remote to display the Menu screen.
2 Select Settings, then Closed Captioning.
3 On the Closed Captioning screen that displays, select Closed Captioning to change the option from Off to On.
Your change is automatically saved.
4 You can now customize your closed captioning by choosing from different options that are now enabled on this
screen.
Note: If you need more information about a setting, click the ? icon to the right of it.
Wally User Guide
53
Page 54

Customizing Your Wally
Changing Audio Settings
You can change the following audio settings for your Wally:
• Dolby Digital Passthrough – If your Wally outputs its audio to an audio device that supports Dolby
playback, you should enable this setting to ensure that Dolby Digital audio (which supports surround sound)
can be decoded by your audio receiver. Note that not all programs include Dolby Digital audio. This setting is
disabled by default.
• Volume Leveling – Volume leveling helps prevent annoying volume uctuations, such as loud commercials.
This setting is enabled by default.
1 Double-press on the remote to display the Menu screen.
2 Select Settings, then Audio Outputs.
3 On the Audio Output screen that displays, select the setting that you want to change.
Note: If you need more information about a setting, click the ? icon to the right of it.
Changing the Alternate Audio Language
Some programs, such as movies, include an alternate audio track that you can listen to as you watch.
The availability of alternate audio is indicated at the beginning of the program. Some programs also include
descriptive video, which is a feature for the visually impaired that describes what’s happening on-screen during
a program. An alternate audio language applies only to the audio portion of programs that support it and doesn’t
change the language used in the menus displayed on your Wally.
®
Digital
9
Follow this procedure to change the alternate audio language:
1 Double-press on the remote to display the Menu screen.
2 Select Settings, then Secondary Audio.
3 On the Secondary Audio Settings screen that displays, select the language that you want for secondary audio.
Your change is automatically saved.
Getting Receiver Updates
Your Wally will power itself off (that is, enter standby mode automatically) after a set period of inactivity. Follow this
procedure to change the length of inactivity or disable this feature (not recommended).
Note: Changing this setting does not interfere with any scheduled event timers.
1 Double-press on the remote to display the Menu screen.
2 Select Settings, then Standby.
3 On the Inactivity Standby Settings screen that displays, select Inactivity Standby Timeout and choose a
desired option. Your change is automatically saved.
Wally User Guide
54
Page 55

Customizing Your Wally
Resetting to Factory Defaults
You can reset your Wally’s settings to factory defaults to undo any settings you’ve changed, except for parental
controls and remote control addresses.
Note: You can’t reset your Wally to default settings to discard or reset a parental passcode that you’ve forgotten—
only a DISH Customer Service representative can do so.
1 Double-press on the remote to display the Menu screen.
2 Select Settings, then Diagnostics.
3 On the Diagnostics screen that displays, select Tools from the list on the left.
4 On the right, select RESET RECEIVER TO FACTORY DEFAULTS.
5 A warning message displays to conrm that you want to reset your Wally’s settings. Select Yes to begin the
process. Your Wally will reboot before you can resume normal operation.
Tips
• To take full advantage of Dolby Digital surround sound, you need a digital optical audio cable and audio
equipment that supports this feature.
9
Questions
• Why is my audio in another language?
An alternate language may have been selected. See the Changing the Alternate Audio Language procedure to
change your preferred language.
• How can I change the channel order in the Guide and Mini Guide?
You can switch from ascending order (lowest-numbered to highest) to descending order (highest-numbered to
lowest) or back again. See the Changing the Channel Order procedure to change the channel order.
Wally User Guide
55
Page 56
10
10
Chapter
Troubleshooting
Click a topic to jump to it:
• Quick Fixes for the Most Common Issues
• Troubleshooting Tools
• Troubleshooting Tables
Wally User Guide
56
Page 57

Troubleshooting
Quick Fixes for the Most Common Issues
• Resetting your Wally can resolve minor issues. See Resetting Your Wally below.
• Make sure that your TV is tuned to the correct input or channel.
• Carefully clear anything that might be blocking the satellite dish’s view of the sky, such as snow or tree
branches. To ensure a strong signal, make sure that you don’t move the dish at all.
• Make sure that your remote control has fresh batteries. If you see a low-battery warning on your TV screen, it’s
time to change the batteries.
• Make sure that your Wally is connected to broadband Internet. See the Connecting to Broadband Internet
procedure for more information.
Troubleshooting Tools
Your Wally includes troubleshooting tools that you can use to resolve many common problems. Your Wally and
remote control have troubleshooting tools that a DISH Customer Service representative may ask you to use if you
run into issues while using your equipment. Even though these tools are quite helpful, it’s recommended that you
use them only when directed to on the phone by a DISH Customer Service representative.
Resetting Your Wally
On the front of your Wally, press and hold the POWER button (HOLD FOR RESET) until the receiver resets. The
Wally will take a few minutes to reset, then display the “Acquiring Satellite Signal” message, download the program
guide, and return to DISH programming.
10
Checking Your System Status
Follow this procedure to check the status of your Wally, the satellite signal, and your Internet connection:
1 Double-press on the remote to display the Menu screen.
2 Select Settings, then Diagnostics.
3 On the Diagnostics screen that displays, select Status from the list on the left.
4 On the right, select Check Status.
5 On the popup that displays, select Yes.
6 Use the results of the status check to diagnose any issues your Wally may have.
7 If you want to send the status to DISH, select Send Status, then:
a On the Send Status screen that displays, select Test Connections.
b Select Test Signal.
c Select Send Data.
d Write down the conrmation code that displays in the lower-right corner.
Wally User Guide
57
Page 58

Troubleshooting
Running Check Switch
The Diagnostics screen allows you to test your installation using a Check Switch test, the results of which are often
helpful when you call the DISH Customer Service Center.
WARNING: Do not run a Check Switch test unless directed to do so by a DISH Customer Service representative,
authorized technician, or one of the troubleshooting steps in this chapter. Running the Check Switch test while your
satellite dish is having signal issues can result in incorrect satellite receiver settings and cause you to lose channels.
1 Double-press on the remote to display the Menu screen.
2 Select Settings, then Diagnostics.
3 On the Diagnostics screen that displays, select Dish from the list on the left.
4 On the right, select Test Installation. A popup displays your Check Switch Status.
5 When nished, you can use the information on the screen to diagnose your satellite signal. The bar at the bottom
of the screen indicates the signal strength as follows:
• Green – A good signal
• Yellow – A marginal signal
• Red – A weak, unacceptable signal that may be from the wrong satellite transponder or orbital location
Other Help Resources
• Access information about your Wally by double-pressing on the remote and selecting Help.
• For support information, visit mydish.com/support.
• For more user documentation, visit mydish.com/manuals.
• To chat live with a DISH Customer Service representative, visit mydish.com/chat.
• To call the DISH Customer Service Center, dial 1-800-333-DISH (3474).
10
Wally User Guide
58
Page 59
Troubleshooting
Troubleshooting Tables
Before calling DISH Customer Service, use the troubleshooting tables in this section if you have problems with your
Wally. Many problems arise from basic misunderstandings of how your equipment works, especially when you’re
just becoming familiar with it. To solve a particular problem, follow these steps:
1 Review the section in this user guide that relates to the problem.
2 If you can’t nd a solution, nd the section in the following tables that relates to the problem. All subsections are
listed alphabetically.
• Scan the What’s Happening or Message Number(s) column until you nd the problem.
• Read the information in the Possible Reason(s) column.
• Try each of the suggested solutions in the What To Do column.
3 For more information, call the DISH Customer Service Center at 1-800-333-DISH (3474) or visit
mydish.com/support.
Note: Before calling DISH, write down any error messages that appear on your TV screen, and have your DISH
account number ready.
Message Numbers
Message Number(s) Possible Reason(s) What To Do
10
001 There may be a problem with the
multi-dish switch.
002 Heavy rain, snow, or thick cloud
cover may be interfering with the
transmission of the satellite signal,
or there may be other interference.
Check the coaxial cables and their connections
to and from the multi-dish switch. Make sure
that all required cables are in place, and check
that all the cable connections are tight and
dry—especially outdoor cables. Call the DISH
Customer Service Center at 1-800-333-DISH
(3474) for help and, when directed,
Running Check Switch.
• Note the local weather conditions. Carefully
remove any snow or other debris that may
have collected on the satellite dish, making
sure not to move the dish at all.
• Make sure that the satellite dish has a clear
line of sight to the satellite. Check whether
tree branches or leaves have grown into the
line
of sight.
• Make sure that the satellite dish is aimed at
the satellite. Check the strength of the signal
using the Diagnostics screen as described in
the Running Check Switch procedure.
• Contact a DISH technician to re-aim the dish
and obtain the strongest-possible signal.
Wally User Guide
59
Page 60
Message Number(s) Possible Reason(s) What To Do
Troubleshooting
10
• 003
• 004
• 005
• 022
• 006
• 018
• 078
• 079
• 080
• 011
• 012
The wrong type or quality of coaxial
cable may be used in the system,
or the cable length may be too long.
There may also be a problem with
the multi-dish switch.
• Your Wally may not have received
authorization for programming yet.
• The satellite dish may have moved
so that it’s no longer picking up the
satellite signal.
• The cable connections may have
loosened or have moisture inside.
There may be an interruption of
the satellite signal.
Your Wally may not be connected
to an active broadband Internet
service.
Viewers in specic areas are
prohibited from watching certain
programs. For example, viewers
who live close to a particular football
stadium may be prohibited from
watching live football games that are
played in that stadium.
• Make sure that the system uses RG-6 coaxial
cable; if it doesn’t, contact a DISH technician
for assistance.
• Check the dish-to-receiver cable length. If
your system is DISH Pro or newer, it can be
as long as 200 feet. If it’s an older legacy
system, it should not be more than 100 feet.
• Check the coaxial cables and their
connections to and from the multi-dish switch.
Make sure that all required cables are in
place, and check that all cable connections
are tight and dry—especially outdoor cables.
If this doesn’t work, contact DISH Customer
Service at 1-800-333-DISH (3474) for help
and, when directed, to perform
Running Check Switch.
• If you have just authorized your Wally (added
it to your account), wait a few minutes to see
if the message disappears. If you haven’t
authorized your Wally, call DISH Customer
Service Center at 1-800-333-DISH (3474).
• Make sure that all required cables are in
place, and check that all cable connections
are tight and dry—especially outdoor cables.
• Make sure that the satellite dish has a clear
line of sight to the satellite. Check whether
branches or leaves have grown into the line of
sight.
• Check that the Signal Strength bar on the
Diagnostics screen is green and displays
“Locked,” as described in the Running Check
Switch procedure. If not, contact a DISH
technician to re-aim the satellite dish and
obtain the strongest-possible signal.
• You must connect your Wally to a home
network with broadband Internet access.
See the Connecting to Broadband Internet
procedure for more information.
• Call the DISH Customer Service Center at
1-800-333-DISH (3474) for help checking your
credit limit and/or to get authorization to make
a purchase.
Your local broadcasters determine which
programs are blacked out for specic areas—
not DISH.
Wally User Guide
60
Page 61
Message Number(s) Possible Reason(s) What To Do
Troubleshooting
10
• 013
• 014
015 • You may have just plugged in your
028 Your Wally may need to update its
059 You may have tried to close an
060 The satellite dish may be aimed at
061 Your Wally is currently downloading
You may have tried to tune to a
program on a channel that you don’t
subscribe to.
Wally and it’s in the process of
acquiring the satellite signal.
• Your Wally may have temporarily
lost the signal.
software before you can order
pay-per-view programs.
installation menu without having run
the Check Switch test.
one satellite, but a different satellite
is selected on the Diagnostics
screen.
software.
• Before you can tune to a program, the
associated channel must be part of your DISH
package. Call DISH Customer Service Center
at 1-800-333-DISH (3474) to add the channel
to your subscription, or if you believe this
message was displayed in error.
• If you already subscribe to the channel and
you see these messages, rst try resetting
your Wally by pressing and holding the
POWER button on the front panel.
• Wait a few minutes to see if the message goes
away. Make sure that all required cables are
in place, and check that all cable connections
are tight and dry—especially outdoor cables.
• Make sure that the satellite dish has a clear
line of sight to the satellite. Check whether
branches or leaves have grown into the line of
sight.
• Check that the Signal Strength bar on the
Diagnostics screen is green and displays
“Locked,” as described in the Running Check
Switch procedure. If not, contact your DISH
installer to re-aim the satellite dish.
Turn your Wally off to allow it to download new
software via the satellite signal. The download
may take several minutes; do not disturb or
unplug your Wally during this time. When the
download is done, you will be able to order
pay-per-view programs.
If your setup includes a multi-dish switch, you
must contact DISH Customer Service at
1-800-333-DISH (3474) for help and guidance
during the Running Check Switch procedure.
• Make sure that you have selected the option
for the right satellite on the Diagnostics
screen, as described in the
Running Check Switch procedure.
• Make sure that the cable(s) for the satellite
you’ve selected is connected to the LNBF that
receives signals from that satellite. In the Dish
section of the Diagnostics screen, choose a
different satellite until the issue is resolved.
It’s very important for your Wally to get the latest
software to function properly. The download may
take several minutes. Do not disturb or unplug
your Wally during this time.
Wally User Guide
61
Page 62
Message Number(s) Possible Reason(s) What To Do
Troubleshooting
10
074 You get three chances to enter
the correct passcode. If you fail to
do so, the process times out and
won’t allow you to try again for ve
minutes.
Wait ve minutes and then try entering the
correct passcode again.
Note: The timeout feature is designed to prevent
someone from trying passcode after passcode
until they happen to guess the right one and
gain unauthorized access to your Wally.
Changing Channels
What’s Happening Possible Reasons What To Do
The channel number
you enter turns to a
different channel.
When changing
channels using the
Guide, Mini Guide, or a
channel or favorites list,
some of your channels
aren’t listed.
• You may have entered an
incorrect channel number, or the
channel number you entered
may be invalid. If so, the channel
displayed is the closest possible to
the channel you entered.
• If a channel list or favorites list
is applied, your Wally will skip
channels that aren’t on the
active list.
• If you entered the number for a
channel that’s not included in your
DISH package, your Wally will
change to the channel and display
a message indicating that it’s not
part of your subscription.
• If a channel list or favorites list
is applied, your Wally will skip
channels that aren’t on the
active list.
• If you’ve set up your Wally to hide
adult and/or locked channels,
these channels aren’t displayed
in the Guide, Mini Guide, or a
channel or favorites list.
• Carefully re-enter the channel number.
• Reset your Wally by pressing and holding the
• Press GUIDE on the remote and apply a
• If you want to add a channel to your DISH
• Press GUIDE on the remote, then press
• Change the Hide Adult Programs or
POWER button on the front panel.
different favorites list.
package, visit mydish.com/myaccount or
contact the DISH Customer Service Center at
1-800-333-DISH (3474).
OPTIONS and select All Channels.
Locked Channels setting to include these
channels in the Guide and other channel lists.
Favorites Lists
What’s Happening Possible Reason What To Do
A favorites list doesn’t
show channels that you
know you’ve added to it.
Wally User Guide
If you’ve set your Wally to hide or
lock adult channels, they won’t
display in the Guide or other channel
lists.
If you don’t want these channels excluded from
the Guide, Mini Guide, or favorites lists, change
the parental controls on your Wally. See the
Parental Controls chapter for more information.
62
Page 63
Guide and Mini Guide
What’s Happening Possible Reason(s) What To Do
Troubleshooting
10
You try to display future
programs in the Guide
or Mini Guide, but you
can’t.
You try to display
programs that have
ended in the Guide or
Mini Guide, but you
can’t.
When you’re using the
Guide or Mini Guide,
some channels are
missing.
The Guide and Mini Guide can
display the scheduled programming
for up to nine days if an external
hard drive is connected and
your Wally can receive satellite
programming from the either the
119°W or 72.7° orbital location.
The Guide and Mini Guide can
display only programs that have not
yet ended. These features cannot
display a time earlier in the day.
• You may have applied a channel
list other than All Channels.
• You may have set up your
program guide so that when your
Wally is locked, the program guide
hides adult channels.
Try displaying the Guide again later. By that
time, it may show programs for the time and
date that you want.
Contact the program providers (i.e., the channel
or network afliate that broadcast the program)
for details on past programs.
• While using the Guide, you can change the
• Unlock your Wally for the Guide to display
Hearing a Program
What’s Happening Possible Reason(s) What To Do
applied channel list by pressing OPTIONS on
the remote.
adult channels. See the Parental Controls
chapter for more information.
The Wally’s power light
is on and there’s a good
picture on your TV,
but you don’t hear any
sound.
You hear a foreign
language while
watching a program.
• You may have muted the sound
or set the volume so low that you
can’t hear it.
• Audio cables may not be properly
connected.
• Your audio device can’t decode
Dolby® Digital or PCM audio.
You may have set up your Wally to
select an alternate audio language.
The program may be in a foreign
language.
• Check the volume level on your TV or audio
• Check the audio connectors and cables from
• Check your TV speakers or the sound system.
• Use the analog RCA connections instead (red
Select a desired alternate audio language by
double-pressing
Settings, then Secondary Audio.
Menus
What’s Happening Possible Reason What To Do
You were on a menu,
and it suddenly closed.
You may not have touched the
remote control or front panel buttons
for a few minutes.
Your Wally has a timeout function that closes
any menu after a few minutes of inactivity. This
inaction will discard any changes you’ve made,
but otherwise does no harm. Start over.
device. Unmute or turn up the volume, as
required.
your Wally to your TV or the sound system.
and white cables).
on the remote and selecting
Wally User Guide
63
Page 64
Parental Locks
What’s Happening Possible Reason What To Do
Troubleshooting
10
You set a parental lock,
but the lock doesn’t take
effect.
You forgot the
passcode, so you’re
unable to unlock your
Wally.
You may not have locked your Wally
with a passcode.
You may not have written down the
passcode.
You must lock your Wally to apply any lock that
you have set. See the Tips procedure for more
information.
Call the Customer Service Center at 1-800-333DISH (3474).You must be able to verify your
account information with the customer service
representative.
Purchasing a Pay-Per-View Program
What’s Happening Possible Reason What To Do
Someone orders a
pay-per-view program
without your permission.
You are unable to
cancel a pay-per-view
program.
You may have been away from your
Wally while someone else used it.
You ordered a pay-per-view
program, then decided not to watch
it.
Lock the purchase of pay-per-view programs.
Remember that you are responsible for all
pay-per-view purchases, whether or not you
authorize such purchases. If you lock pay-perview purchases, anyone who wants to order a
pay-per-view program must enter the passcode.
You cannot cancel an order for a pay-per-view
program, whether it was just ordered or ordered
earlier. You will be billed regardless.
Recording and Event Timers
What’s Happening Possible Reason(s) What To Do
You try to create or edit
the event timer for a
program, but a message
says that the program is
locked.
You try to set up
a recording, but a
message says that the
program is a pay-perview event.
You try to set up a
recording, but you get
an error message with
the option to delete an
event timer that was set
up earlier.
You have not entered the passcode
for the locked program.
You have not yet ordered the
pay-per-view event.
You already have set up the
maximum number of event timers.
To create or edit an event timer for the program,
rst enter the passcode.
To record the pay-per-view event, rst order it.
To create a new event timer, delete one of the
timers that you set up earlier.
Wally User Guide
64
Page 65
What’s Happening Possible Reason(s) What To Do
Troubleshooting
10
You set up a recording
for a program that is
repeated (such as a
regularly scheduled
program), but the event
timer doesn’t operate
for a showing of the
program.
You set up an event
timer, but the timer
doesn’t operate at all.
You stop the operation
of an event timer for one
showing of a program
that’s repeated (such as
a regularly scheduled
program), but the timer
operates for the next
showing.
You set an event
timer that misses the
beginning or the end of
a program.
• You may have set up an event
timer with an incorrect frequency.
• You may have set up a duplicate
event timer.
• The event timer may not be
current.
• You may have multiple event
timers set up for the same time,
and the timer you set is at a lower
priority than others.
• You may have selected
Record New and the event timer
you set was for an episode that’s
not new.
Stopping the event timer applies
only to the current showing of the
program.
The program may have started a
little earlier than scheduled, or it may
have run over its scheduled ending
time.
Remember that selecting the Record This
option operates just once. The Record All option
will record all episodes of that program, and the
Record New option will record only new
episodes that haven’t previously aired.
• Check the event timer priorities and timer
frequency on the Timers tab of the DVR
screen.
To stop all operations of a repeated event timer,
you must delete the timer.
Note: Your Wally deletes a Once timer when the
program is done recording.
• Change the start and end times for your
program. You can adjust the times for
individual programs on the Timers tab of the
DVR screen. To change the default start and
end times for all recordings, see the
Changing DVR Timer Defaults procedure.
• Use a manual event timer to start any event
timer at the times you set yourself, except for a
pay-per-view event.
Wally User Guide
65
Page 66
Remote Control
What’s Happening Possible Reason(s) What To Do
Troubleshooting
10
You can’t nd the
remote.
When you press a
button on the remote,
your Wally doesn’t do
what you expect it to.
Your remote doesn’t
work well from far away.
When you press the
remote’s POWER
button to turn your Wally
on, the Wally’s power
light doesn’t light up.
(various reasons) • Press the LOCATE REMOTE button on the
front of your Wally. If the remote is within
range of your Wally and the batteries aren’t
dead, the remote will emit a series of tones to
help you nd it.
• If the remote control is permanently lost or too
damaged to use, you can order a replacement
by visiting mydish.com, logging in to your
account, and selecting the appropriate option.
• The remote may be missing
batteries, the batteries may be
incorrectly placed in the remote,
or the batteries may be weak or
dead.
• The remote may be in the wrong
mode.
You may be experiencing UHF
interference from objects near your
Wally.
• The remote may be in the wrong
mode.
• Other lights in the room are too
bright.
• The remote isn’t operating
properly, or the batteries are weak
or dead.
• The Wally’s power cord isn’t
plugged in, or there may be a
problem with the power at that
location.
• If the batteries are missing or dead, insert
fresh AA batteries. If the remote has fresh
batteries, make sure that they’re inserted in
the correct orientation.
• On the left side of the remote, press the mode
button for the device that you want to control.
Place your Wally higher than the other
equipment in your entertainment center.
• On the left side of the remote, press the mode
button for the device that you want to control.
• Try other remote control buttons to see if your
Wally responds.
• Replace the remote batteries with fresh ones.
• Check that the Wally’s power cord isn’t
damaged, and that the plug is inserted
correctly into the outlet.
Wally User Guide
66
Page 67
Watching a Program
What’s Happening Possible Reason(s) What To Do
Troubleshooting
10
The TV Activity screen
displays when you turn
on your TV .
The Wally’s power light
is on, but your TV’s
image is black, blue,
or snowy.
Your TV’s image has
pixels (small squares),
is freezing, or has
intermittent black
screens.
The Wally’s power
light is on, and there
is a picture on your TV
screen, but the picture:
• has sparkles or is
grainy;
• has a herringbone
pattern;
• lacks color or vertical
hold;
• wobbles;
• looks washed out or
fuzzy.
All tuners are currently in use. From this screen, you can choose to join the live
TV program, play back a DVR recording, watch
Netix, or view a pay-per-view program or event.
• Your TV may be connected to the
wrong input.
• Your TV may not be working
properly.
• If your TV and the Wally are
working properly, there may be
interference with the satellite
signal.
Your Wally may be experiencing
signal loss due to something
blocking your dish’s view of the
sky, the dish being misaligned, or
weather.
• Make sure that your TV is properly
connected to your Wally.
• Your TV may not be working
properly. There may be
interference from other nearby
electrical devices, such as radio
towers, cellular telephones,
computers, microwave ovens,
radios, stereos, or TVs.
• Verify that your TV is set to the correct input or
channel for your setup.
• Make sure that your TV is plugged in to a
working electrical outlet.
• Make sure that your TV is turned on.
• Make sure that your TV is connected properly
to the Wally.
• Make sure that your TV’s text mode and
closed captioning features are turned off.
• Make sure that your TV’s brightness and
contrast are adjusted correctly.
• Make sure that the satellite dish has a clear
line of sight to the satellite.
• Check whether branches or leaves have
grown into the line of sight.
• Make sure that the satellite dish is aimed at
the satellite. Check the strength of the signal
using the Diagnostics screen, as described in
the Running Check Switch procedure.
• Contact a DISH technician to re-aim the dish
and obtain the strongest-possible signal.
• Note the local weather conditions. Heavy rain,
snow, or cloud cover may be interfering with
transmission of the satellite signal. Carefully
remove any snow or other debris that may
have collected on the satellite dish, making
sure not to move the dish at all.
• Check other nearby electrical devices as
possible sources of interference.
• Check that all required coaxial cables are in
place.
• Check for moisture or water leaking into all
connections. Dry them out if needed, then seal
them with coaxial cable sealant.
• Check the length of cable between your dish
and the Wally. If it’s greater than 200 feet,
contact a DISH technician for assistance.
• Make sure that the system is properly
grounded. Contact a DISH technician for
assistance.
Wally User Guide
67
Page 68
What’s Happening Possible Reason(s) What To Do
Troubleshooting
10
A black box lls almost
all of your TV screen.
Your TV screen is all
blue.
You may have turned on the closed
captioning feature on your TV.
You may have connected your Wally
to an input on your TV that doesn’t
match the signal output from the
Wally.
Using your TV remote control and/or menus
displayed by your TV (not the Wally remote
control or menus), turn off the closed captioning
feature.
Check your TV’s owner’s manual for the correct
TV input to use for the signal output from your
Wally (1080p/1080i or 720p for HD).
Wally User Guide
68
Page 69

For all your customer needs,
go to mydish.com/chat or call
the Customer Service Center
at 1-800-333-DISH (3474).
210371
 Loading...