

Page 1

Contents
Safety.........................................................................................v
Introduction...............................................................................1
Welcome to DISH Network ......... ..................................................1
Overview .......................................................................................1
If You Need More Assistance ........................................................2
Quick Start Guide ..........................................................................2
About Satellite Television ..............................................................3
Satellite Signal Quality ..................................................................3
Parts of the System..................................................................5
The Receiver Front Panel ........... ..................................................5
The Receiver Back Panel ..............................................................6
The Remote Control .......................................... ............................7
The Menus ......... ................................................................. ........11
The Browse Banner .....................................................................15
Using the System...................................................................17
Changing Channels ................................................................. ....17
Using the Menus .........................................................................17
Using the Program Guide ............................................................20
Using the Program Banner ..........................................................22
Using the Browse Banner ...........................................................22
Ordering Pay Per View Programs ...............................................24
Using Themes .............................................................................25
Using Search ...............................................................................25
Using Favorites Lists ...................................................................27
Using Timers ............................................................................... 29
Using Locks .................................................................................36
Using Caller ID ............................................................................ 44
Restarting the Receiver ...............................................................46
Resetting the Receiver to Factory Settings .................................46
Changing Program Languages ....... ............................................46
Testing the Phone Connection ....................................................47
Setting Up the Receiver for Channel 3 or 4 ................................48
Installation Instructio ns...................................... ......... ......... .49
How to Use these Instructions ....................................................49
Connecting Your TV and VCR ....................................................49
Installing a DISH 500 Antenna ............................................ .... ....50
DishPro Wiring Diagrams ........ ............................................ ........60
Running Coaxial Cable ...............................................................67
Connecting the Receiver to a Phone Line ...................................68
Page iii
Page 2

Contents
Reference................................................................................71
Troubleshooting Tables .............................................................. 71
Device Codes .......................................................... .... ........... .... 81
Appendix A............... ......... .......... ......... ......... .........................83
Appendix B............... ......... .......... ......... ......... .........................85
Limited Warranty ........................................................................ 85
Residential Customer Agreement ............................................... 88
Staying Legal ......................................... ..................................... 94
FCC Compliance ........................................................................ 94
Index........................................................................................97
Page iv
Page 3
Important Safety Instructions
1. Read these instructions.
2. Keep these ins tru ction s .
3. Heed all warnings.
4. Follow all inst ructions.
5. Do not use this apparatus ne ar water.
6. Clean only with a dry cloth.
7. Do not block any ventila tion openings. Install in accor dance with the
manufacturer’s instructions.
8. Do not install near any heat sources such as radiators, heat registers,
stoves, or other apparatus (including amplifiers) that produce heat.
9. Do not defeat the safety purpose of the polarized or grounding-type
plug. A polarized plug has two blades with one wider than the other. A
grounding-type plug has two blades and a third grounding prong. The
wide blade or the third prong are provided for your safety. If the
provided plug does not fit into your outlet, consult an electrici an for
replacem ent of the o b solet e ou tlet.
10. Protect the power cord from being walked on or pinched, parti cularly at
plugs, convenience receptacles, and the point where they exit from the
apparatus.
11. Use only attachments/ac cessories specified by the manufactur er .
12. Unplug this apparatus during lightning storms or when unused for long
periods of time.
13. Refer all servicing to qualified service personnel. Servicing is required
when the apparatus has been damaged in any way, such as the power
supply cord or plug is damaged, liquid has been spilled or objects have
fallen into the apparatus, the apparatus has been exposed to rain or
moisture, does not operate normally, or has been dropped.
Apparatus shall not be exposed to dripping or splashing and
no objects filled with liqui ds, such as vases, shall be placed
on the apparatus.
Page v
Page 4
Safety
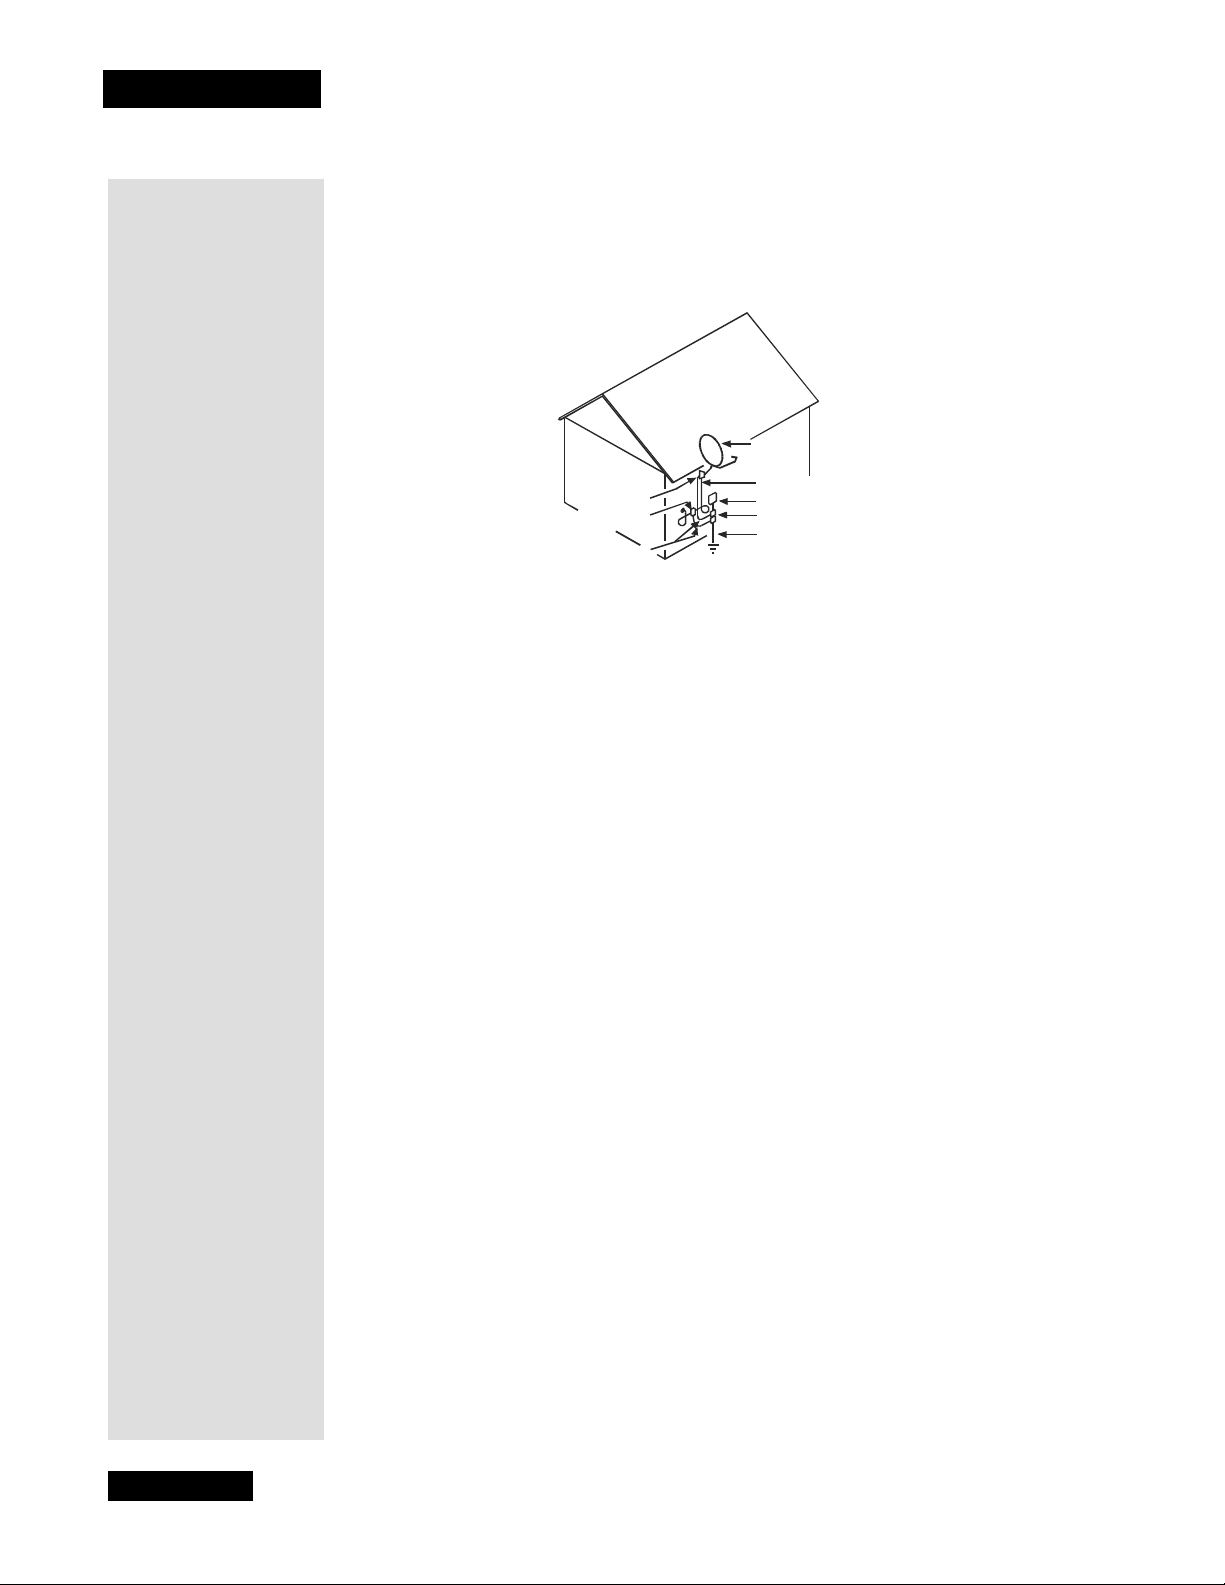
Note to Satellite TV System Installer: This reminder is provided to call the
satellite TV system instal ler’s attention to Article 820-40 of the National
Electrical Code (NEC) that provid es guidelines for proper grounding and, in
particular, specifies that the cable ground shall be connected to the grounding
system of the b uild in g as cl ose to the poin t of cable en try as prac tical.
Satel l ite Dish
Coaxial Ca b l e
Ground Clamp
Ante nn a Discharge
Unit
Grounding Conductor s
(NEC Sect io n 810-21)
Safety Tips
• Unplug the receiver from the AC power outlet before cleaning.
• The use of accessories or attachments not recommende d by the re ce iver
manufacturer will void the Limited Warranty .
•Do not pl ac e th e r eceiver in an en c lo su r e s u ch as a ca bi n et wi t hou t pr op e r
ventilation.
• Do not install the receiver in any area wher e the temp erature can be less than
40°F or more than 113°F.
•Do not stack the receiver on top of or below other electronic devices.
•Do not place candles or other meltable objects on top of the receive r.
• Operate the receiver using only the type of power source indicated on the
marking label. Unplug the receiver power cord by gripping the power plug, not
the cord .
•Do not overload wall outlets or extension cords, as this can result in a risk of
fire or electrical shock.
• Never insert objects of any kind into the receiver through openings, as the
objects may tou ch dangerous vol tage p oints or short o ut pa rts. This coul d cause
fire or electrical shock.
• Make sure that the outdoor parts of the antenna system are grounded in
accord an ce with local, state, federal, an d National Electrical Code (NEC )
requirements.
•Do not locate the antenna near ove rhead lig ht or power circuits , or where it can
fall into s uch power lines or circuits . When instal ling the an tenna, take extreme
care to avoid touching s uch power li nes or circui ts, as contact with them can be
fatal.
•Do not attempt to service the receiver you rself, as opening or removing covers
may expose you to dangerous voltage, and will void the Limited Warranty.
Refer all servici ng to authorized servi ce pers onnel.
• Use an outlet that con tains surge suppression or ground fault pr otection. For
added protection during a lightning storm, or when the receiver is left
unattended and unuse d for long periods of time, unplug the power cord from
the wall outlet, disconnect the lines between the rece iver and the antenn a, and
disconnect the telephone line. This will provide som e protection agains t
damage caused by light ning or power line surges.
from Satellite Dish
Electric Service Equipment
Ground Clamps
Power Serv ic e Gr o un di ng
Electrod e System
(NEC Art. 250, Par t H)
Page vi
Page 5
Chapter 1
Introduction
WELCOME TO DISH NETWORKTM
Thank you for choosing DISH Network. You are about to experience
the excitement and convenie nce of Digital Broadcast Sat ellite (DBS)
service, which delive rs the very best in pictur e and so und quality. DISH
Network consistently provides state-of-the-art, products and satellitedelivered services — with high performance, ease of operation, and a
wide variety of entertainm ent options.
OVERVIEW
Before you use your satellite receiver, you need to install the
system or have it installed by a professional technician. For a
professional ins tallation, please call the Customer Service Center
at 1-800-333-DISH (3474). If you install the system yourself, use the
instructions in Chapter 4.
A vital par t of the installation is to set up the receiver to
get the la test software from the satellite signal. If you are
installing a new system and follow the instructions in
Chapter 4, your receiver will automatically get thi s
software.
For information on the system, read Chapter 2, Parts of the System
beginning on page 5.
For information on any specifi c feature or function, read Chapter 3,
Using The System beginning on page 17.
For information on assembling a nd installing a satellite system, read
Chapter 4, Installation Instructions beginning on page 49.
If you have a pro blem operat ing t he system or r eceive an error message,
use the Troubleshooting Tables beginn ing on page 71.
CONVENTIONS USED IN THIS GUIDE
T o make it easy for you to use this guide, we use the following
conventions:
• The names of remote control buttons and modes are all upperca se.
Example : Pres s th e POWER button.
• Menus and options that appear on the TV screen are in bold type.
Example : Open the Program Guide.
• Connections on the back of the rec eiver are in small capital letters.
Example: SAT IN
• Select means to move the highlight to an onscreen option or choic e
in a list and press the SELECT button on the remote control.
Example : Sele ct the
Locks option.
Page 1
Page 6
Chapter 1
Introduction
Tip: Channe ls tha t
appear in red
cannot be viewed
because they are
not part of your
subscription. You
can add channels
to your subscription simply by calling DISH Network
at 1-800-333-DISH.
IF Y OU NEED MORE ASSISTANCE
If you need help after you read this guide, call Customer Service at 1-800-333DISH (3474). You can also call the Customer Service number for informat ion
on professional installation.
QUICK START GUIDE
After your system has been installed, order and watch your programming usi ng
the following steps:
STEP 1: ORDERING YOUR PROGRAMMING
1. If the receiver is off, press the blank POWER button on the
remote or press the POWER button on the receiver.
2. Press GUIDE
Y ou will see that some channels appear in white. These channels
can be viewed immediate ly. However, many channels will be in
red. You cannot vie w these channels until you order
programming.
on the remote control.
TO ORDER PROGRAMMING
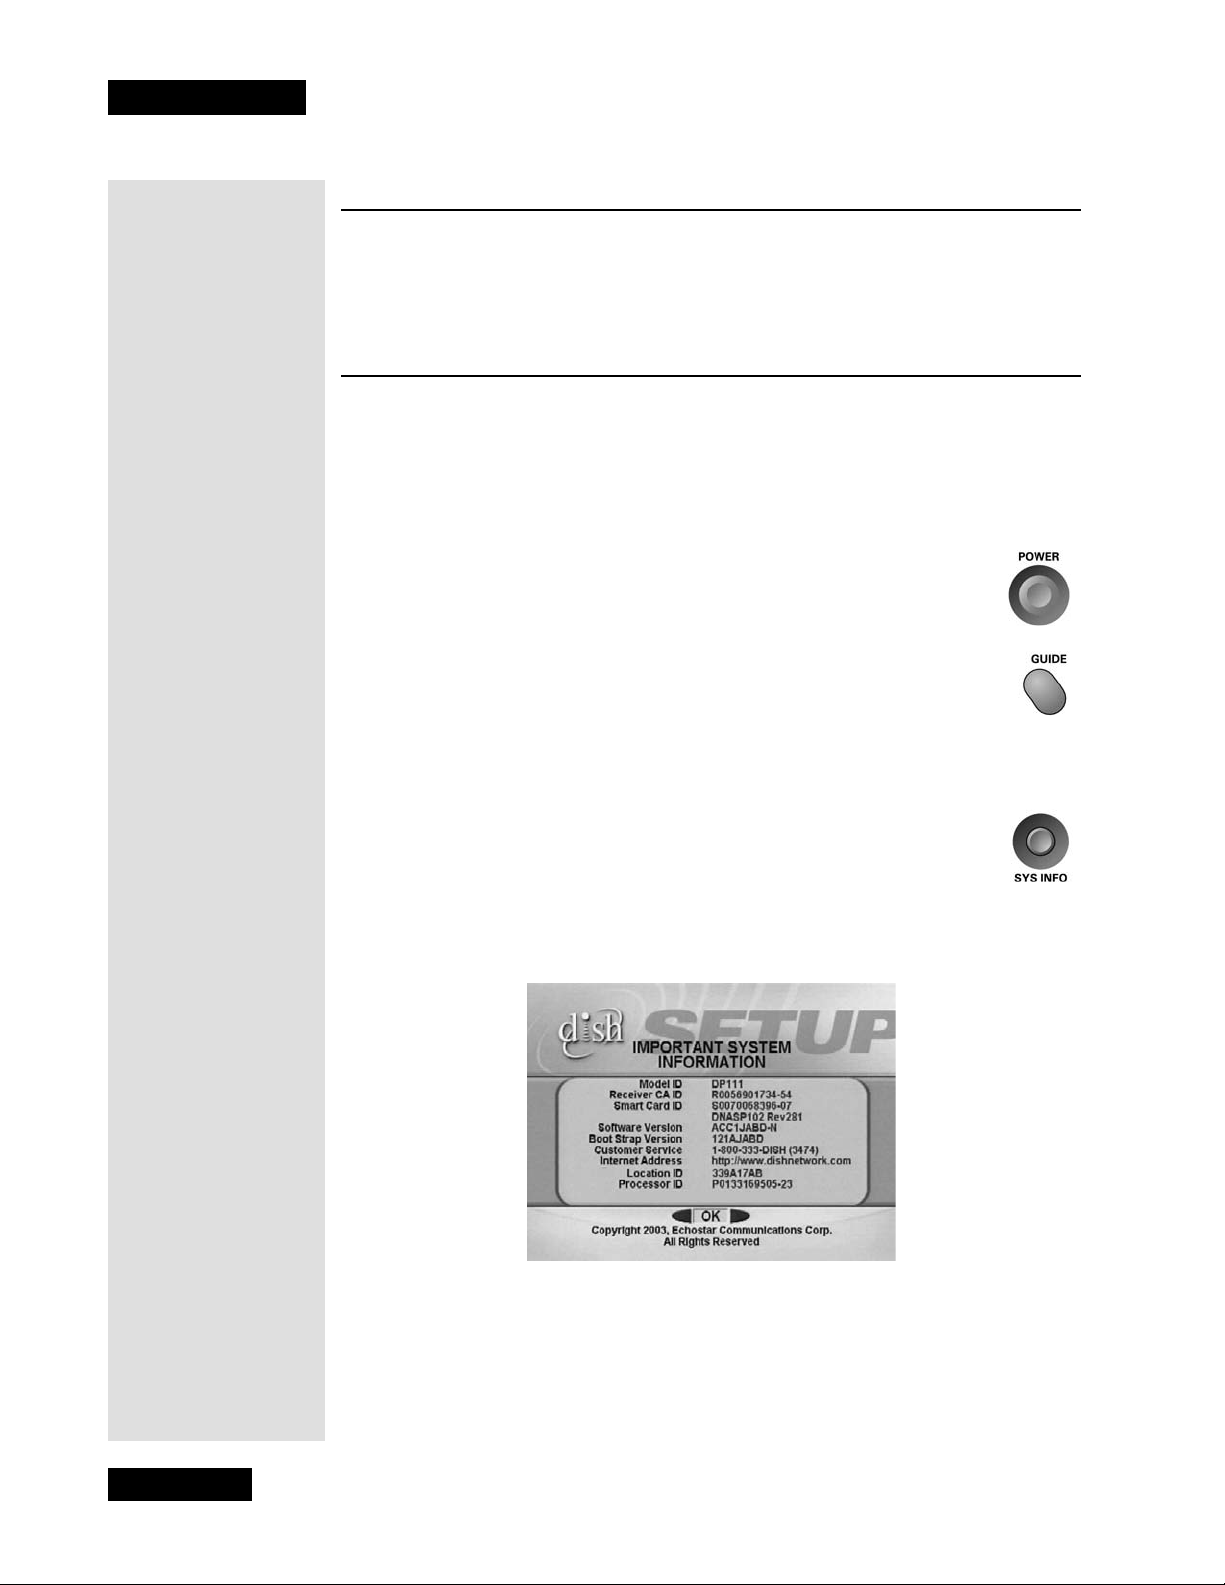
1. Display the Important System Information screen on your TV
by pressing SYS INFO on the remote.
Note: You can also display the Important System Information screen by
turning off the recei ver an d pressing either the UP or DOWN ARROW
button on the receiver front panel.
2. Call the Customer Ser vice Center at 1-800-333-DI SH (3474). A customer
service representative will help you with your system and will discuss the
various programm ing packages available.
3. Choose a package and the repr esentative will aut horize your programming.
4. Wait a few minutes and the channels you purchased will turn from red to
white, and can now be viewed.
Page 2
Page 7
STEP 2: FINDING PROGRAMS TO WATCH
Fir s t, make sure th e re ceiv er is turne d on. Press the POWER
button on the remote or press the POWER button on the
receiver. There are two ways to find information on programs.
•Press the GUIDE button. When the Program Guide
opens, use the UP or DOWN ARROW to view information on other channels. After you have highlighted a
program in the Program Guide, press SELECT to watch
it.
Note: The Program Guid e provides a complete listing of all programs
available on all channels, including those that are not in your subscription (these channels have red backgrounds).
• W hile viewing a program, press the BROWSE
(RIGHT ARROW) button. Then press either the UP
or DOWN ARROW. The information on other channels will appear in the Browse Banner at the bottom
of the screen. Pres s SELECT to watch the program.
Step 2: Finding Programs To Watch
Tip: The system
automatically
displays
programs based
on the current day
and time. You can
advance the Guide
to view information on future
programs , but not
programs that
have already
ended.
ABOUT SATELLITE TELEVISION
Satellite televis ion uses a satellite in a stati onary orbit over the Earth to
deliver television and audio programming. This type of orbit enables the
satellite to stay aligne d over one plac e on the surface of the Earth.
Once the satellite dish is aimed at the sat ellite, the dish does not have to
mov e to f o llow it .
SATELLITE SIGNAL QUALITY
RAIN AND SNOW FADE
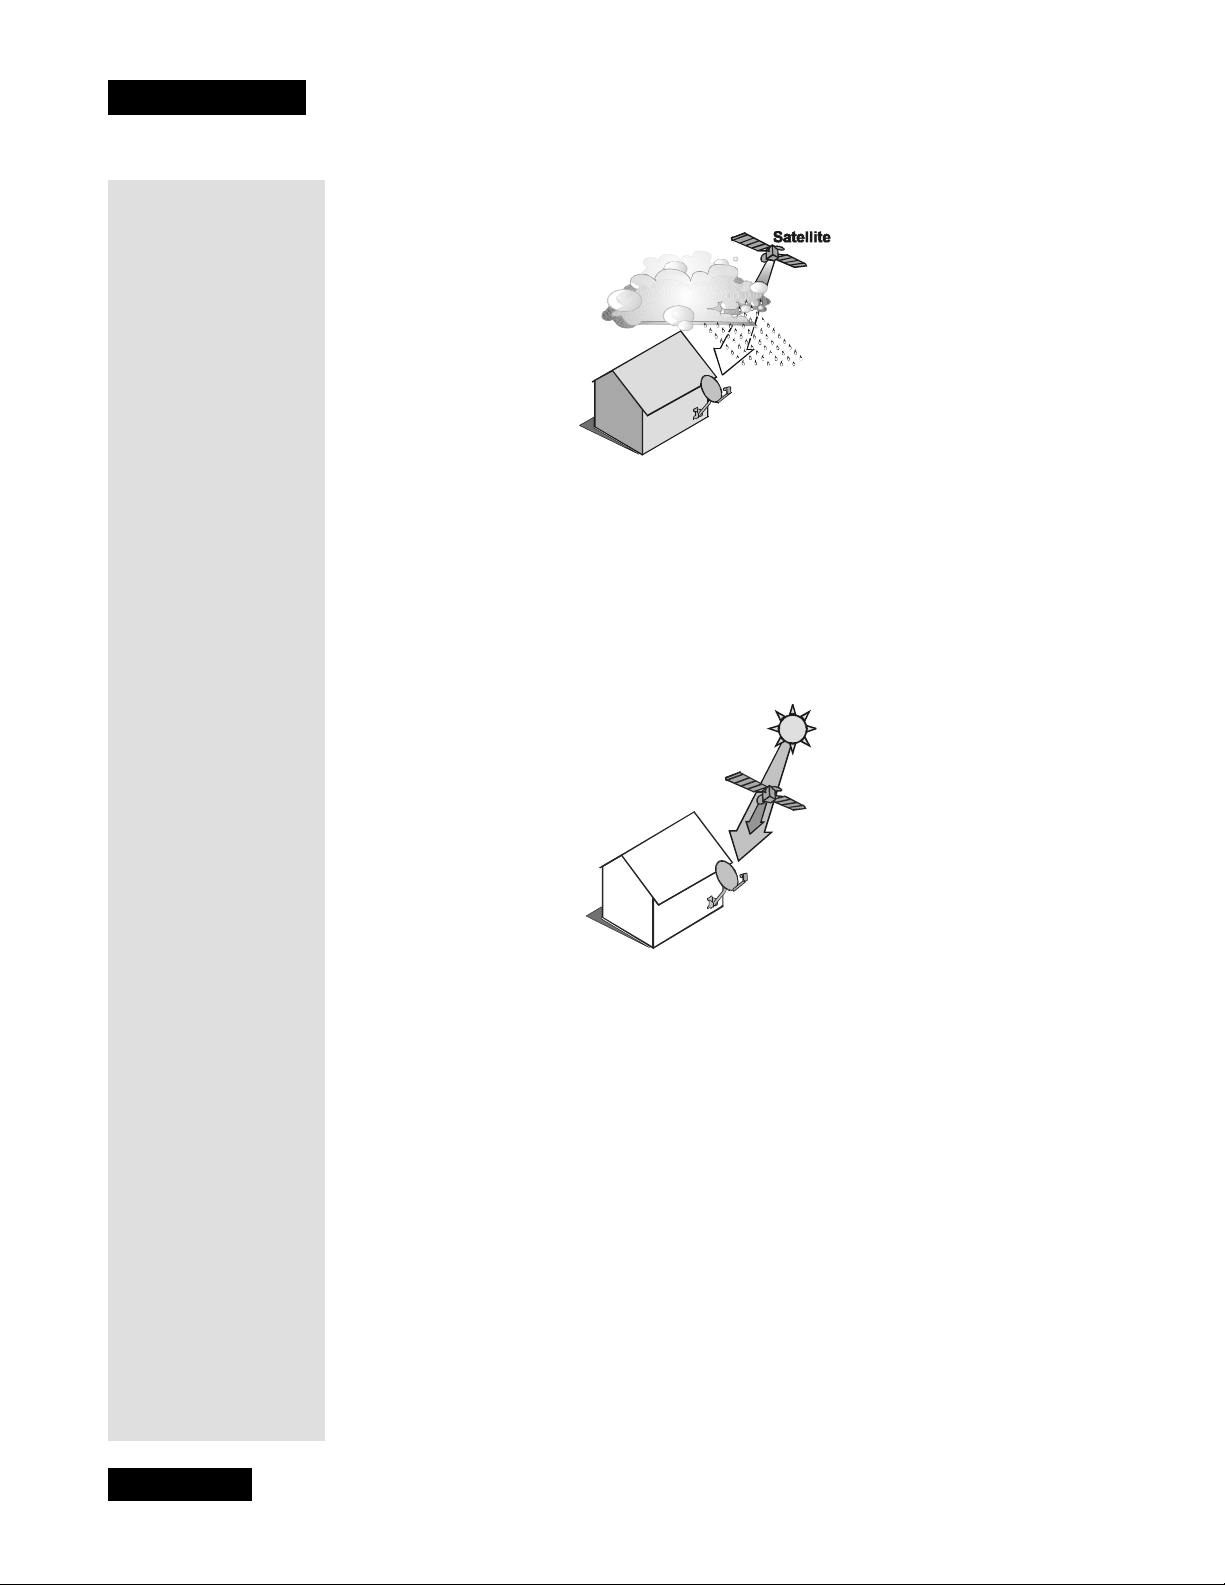
Heavy rain, snow, or cloud cover can block the satellite signal, which can
interrupt your programming servic e. By aiming the satellite dish to get the
strongest signal during installation, you can help prevent rain and snow
from interrupting the signa l. Your service will return after the weather
condition has passed.
Tip: If you lose
your picture, it’s
most likely due to
heavy rain, snow or
snow build-up on
your dish.
Page 3
Page 8
Chapter 1
Introduction
SOLAR INTERFERENCE
Twice a year, the sun moves to a position behind the DISH Network satellite as
it orbits the Earth. The exact time of the year that this occurs varies, depending
on the location, but it is near the beginning of spring and again near the
beginning of autumn. The period of solar interference lasts for a few minutes at
about the same time everyday for a few days during the spring and autumn, so
do not be alarmed when it happens.
Page 4
This is an unavoidable natural event f or all television involving the use of
satellites and has an adverse effect on many program providers. During this
period, you will not be able to see programs on DISH Network. Once the sun
has moved from behind the satellite, the programs will reappear.
Page 9
Chapter 2
Parts of the System
THE RECEIVER FRONT PANEL
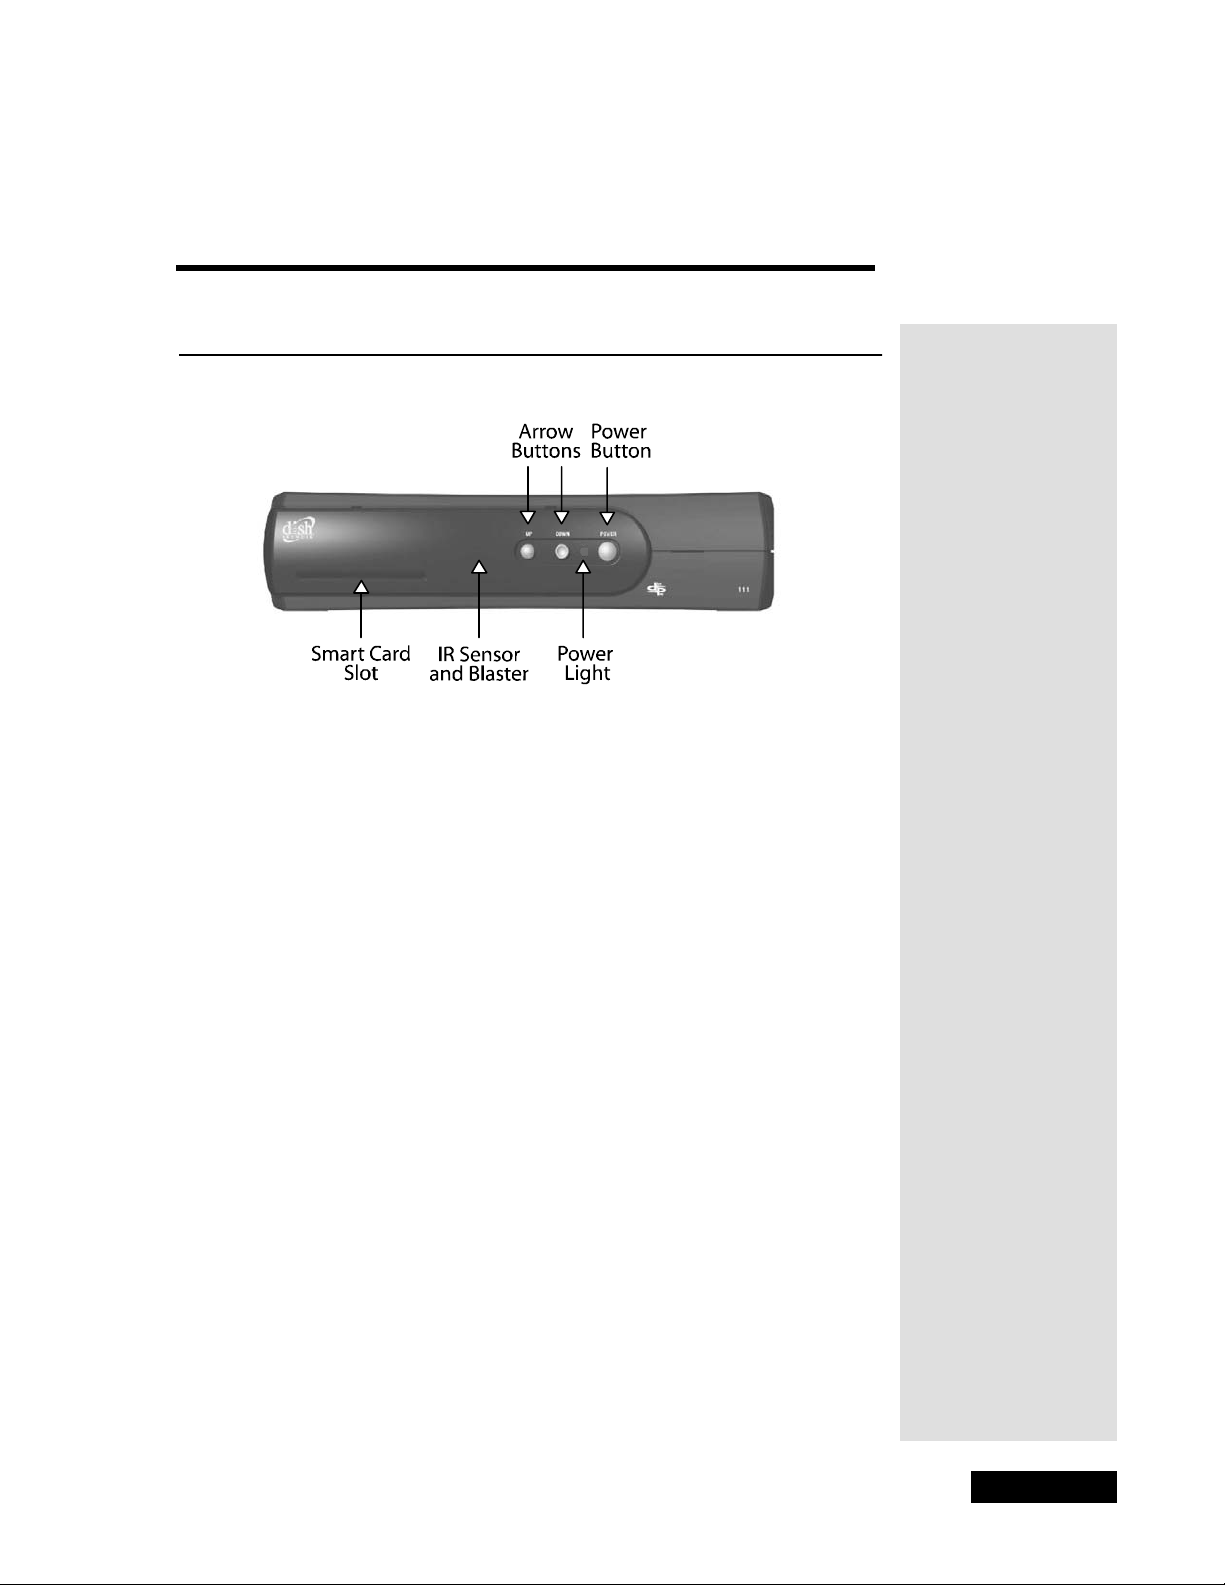
SMART CARD SLOT
This slot is for a future Smart Card. No Smart Card is incl uded with this
receiver.
UP AND DOWN ARROW BUTTONS
The UP and DOWN buttons change the channel on the receiver.
Note: You can display the Important S ystem Informati o n screen by
turning off the receiver and pressing either the UP or DOWN ARROW
button on the receiver front panel.
IR SENSOR AND IR BLASTER
The IR Sensor receives IR signals from the remote control. For information
on the IR Blaster, see page 35, Setting Up the Rec eiver to Control the VCR.
POWER BUTTON AND LIGHT
The POWER button turns the receiver on and off. The light indicates that
the receiver is on .
Note: If your receiver stops res ponding to the remote control and front
panel commands, pr ess and hol d th e front pane l POWER button for about 4
seconds. When you release the butt on, the receiver will reset .
Page 5
Page 10
Chapter 2
Parts of the System
THE RECEIVER BACK PANEL
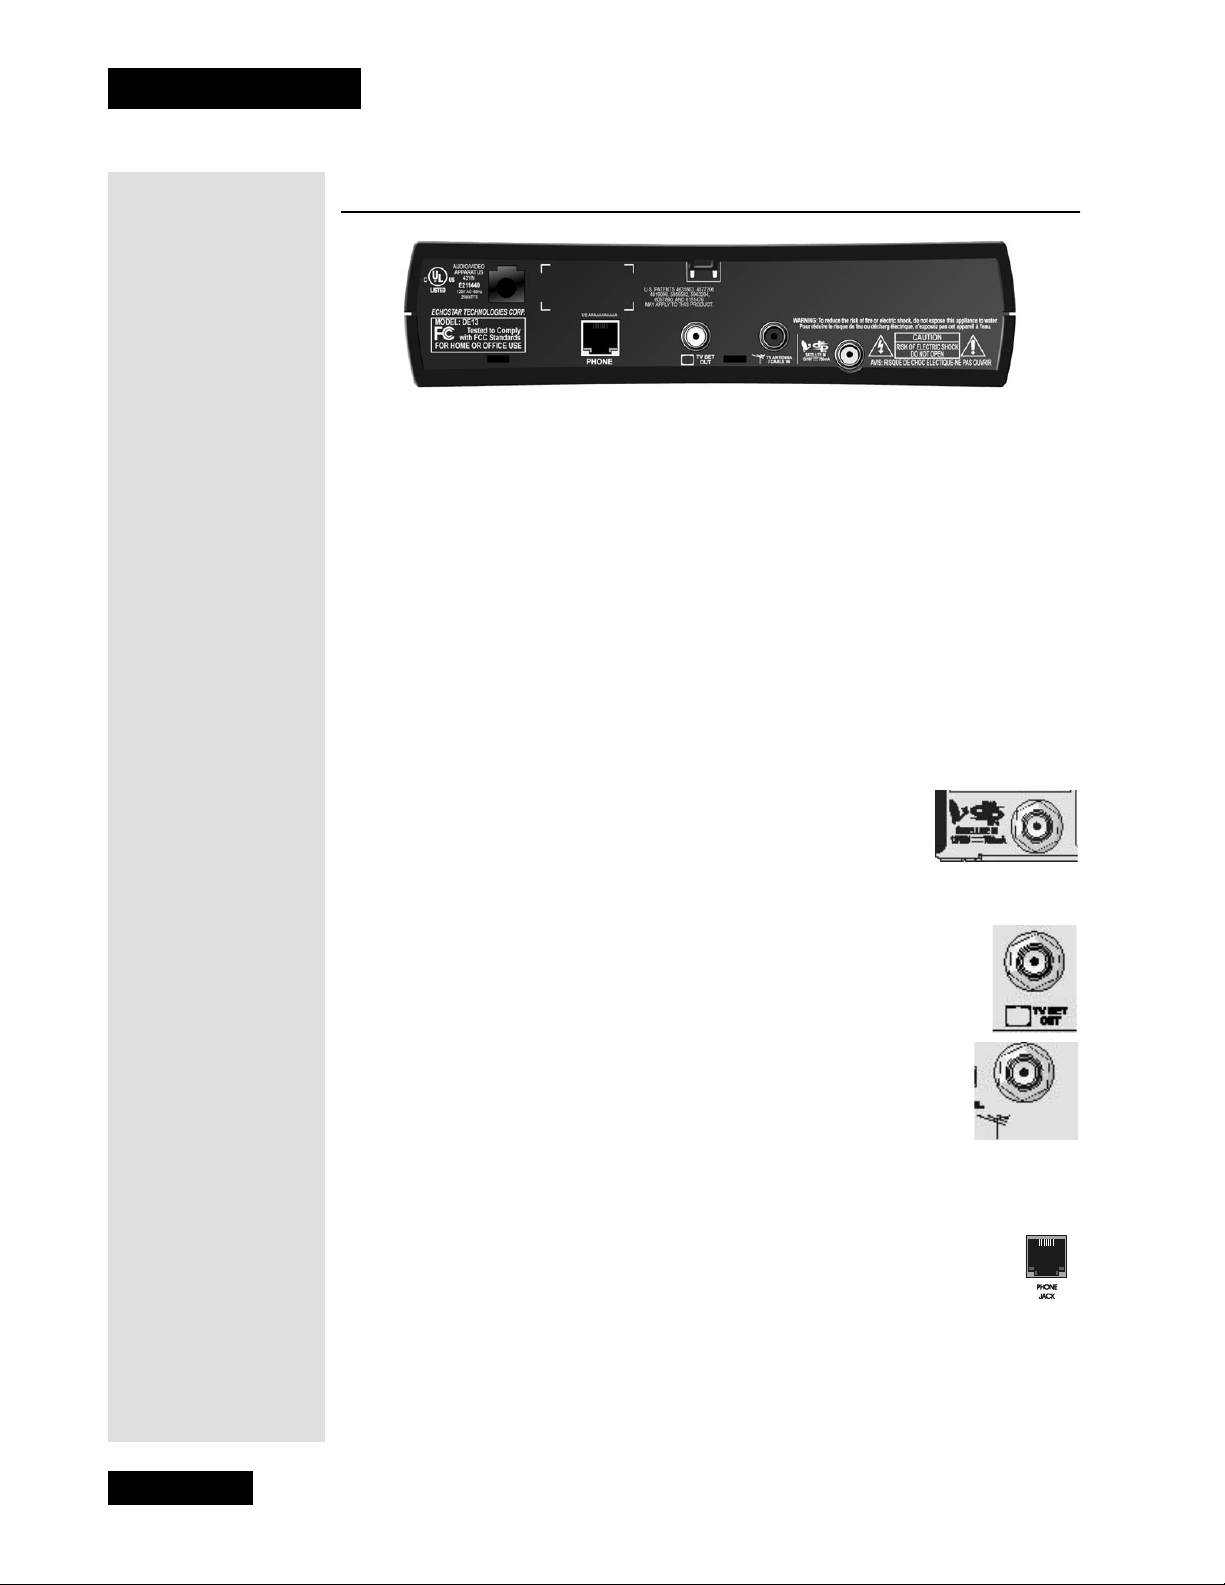
The back panel of the r eceiver provide s the connections that you use to conne ct
the receiver to other electronic devices. It also provides the receiver power cord
and telephone jack. Depending on the setup that you use , you may only use
some of these connecti ons. For information on wiring and wiring diagrams, see
the installation instructions in Chapter 4.
COAXIAL CONNECTIONS
Tighten the
coaxial cable
connections only
by hand.
Tip: Using ca b le
labels makes it
easy to tell which
cables connect to
the right receiver
ports.
Tip: If you have the
receiver connected
to a DSL (Dig ita l
Subscriber Line)
phone line a n d it
cannot dial out,
you may have to
install a DSL filter
between the
rece iver and t he
telephone jack on
the wall.
The three coaxial connections on the back of your rece iver are color coded.
When you install your receiver or if you ever have to move it, the color coding
will make it easier for you to connect the cables to the bac k of your receiver.
Inside the front cover of this guide are stickers that are color coded the same
way as the coaxial connections. See Chapter 4 for instructions on connecting
your receiver to other electronic device s using coaxial cables.
SATELLITE IN
Connect the coaxial cable between the satellite dish and the
receiver using this input. The S
ATELLITE IN connection is
color coded blue.
TV SET OUT
Connect the coax ial cab le be twe en the rec ei ver an d TV usin g this
input. The TV SET OUT connection is color coded white.
TV ANTENNA/CABLE IN
If you connect a cable TV box or a broadcast TV antenna to the
receive r, use the back panel TV ANTENNA/CABLE IN connection
for the local signal. The TV ANTENNA/CABLE IN connection is
color coded black. See TV/Video Button on page 8 for information
on how to use this input.
TELEPHONE JACK
Connect a telephone cable with a standar d RJ-11 telephone
connector to the receiver here , and then connect the cable to an
active telephone line.
Note: The receiver must be connected at all times to an active telephone line. If
you install two or more re ceivers, each r ec eiver must be connected at all times to
an active telephone line.
TV ANTENNA
/CABLE IN
Page 6
Page 11
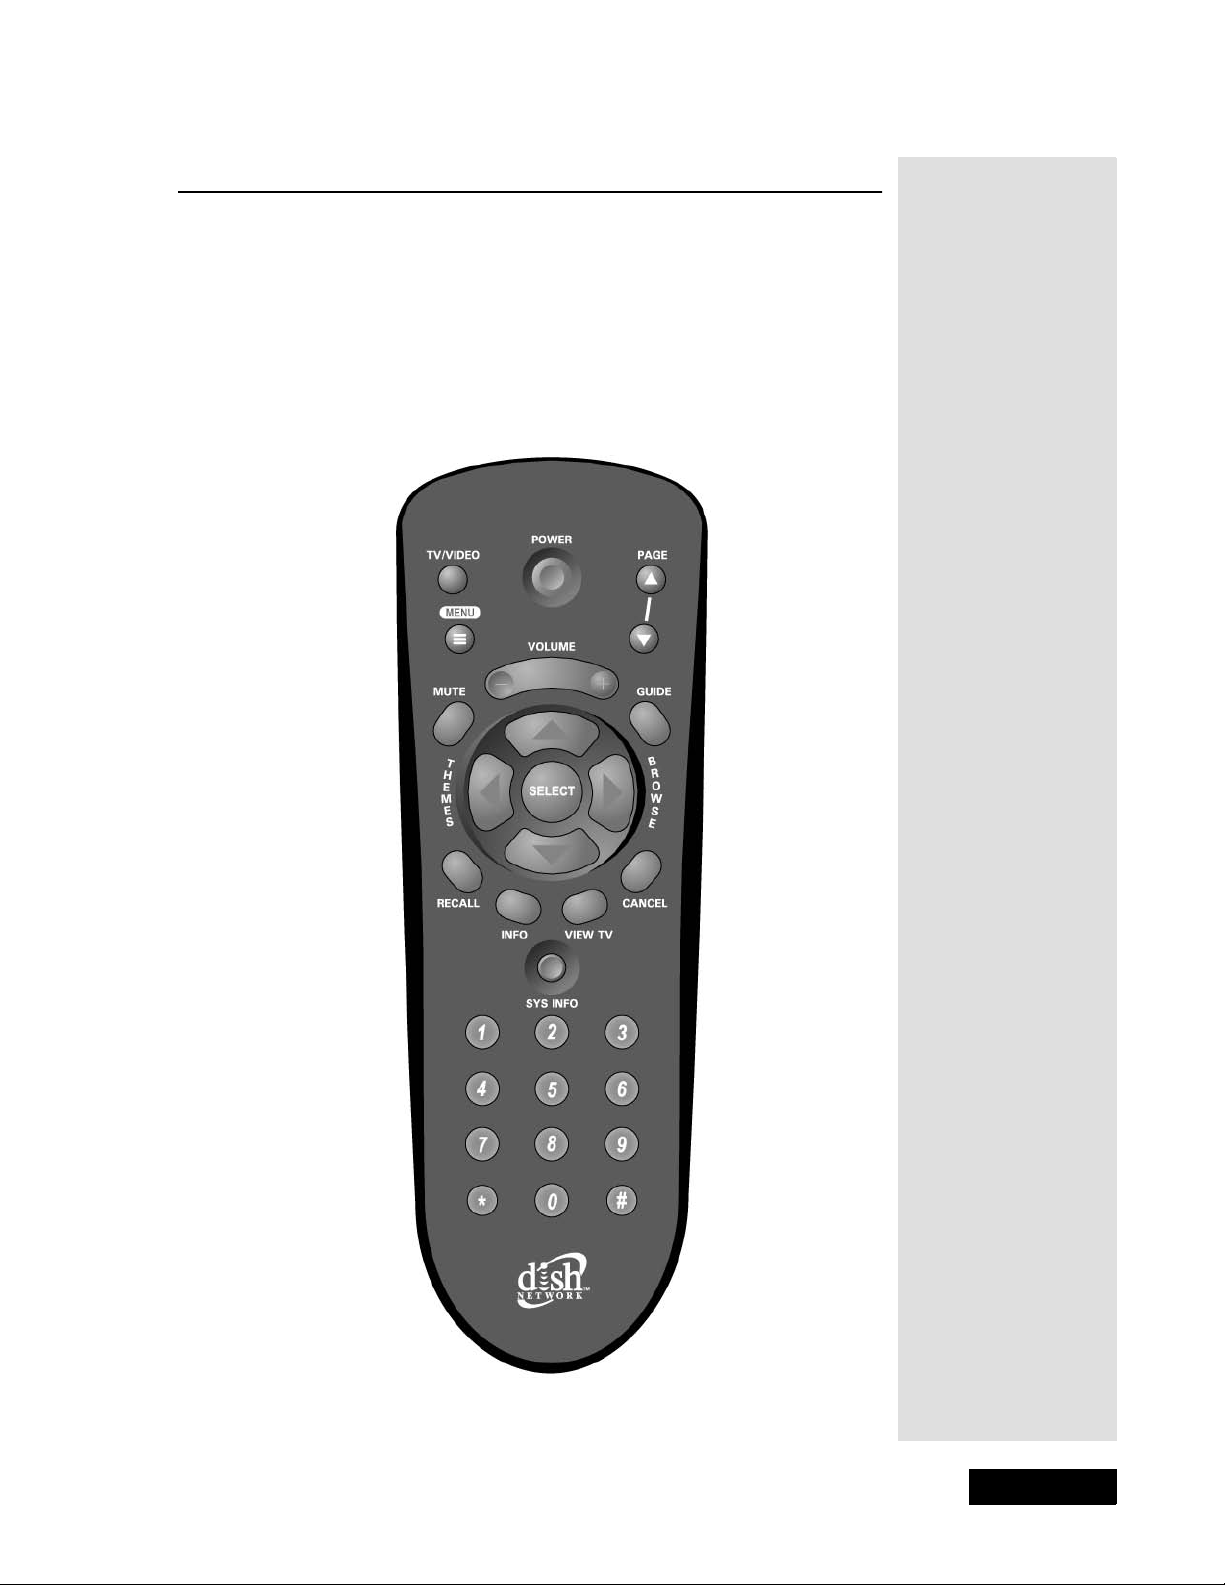
THE REMOTE CONTROL
This section describes the remote control and how to use the buttons to
operate the satellite receiver.
If you lose or damage the remote control, you will not be fully able to
control the receiver. If this happens, call the Customer Service Center at
1-800-333-DISH (3474) to order a replacement.
Note: This remote co ntrol shown here is for example only. The remote that
came with the receiver may look slightly different.
The Remote Control
Page 7
Page 12
Chapter 2
Parts of the System
R
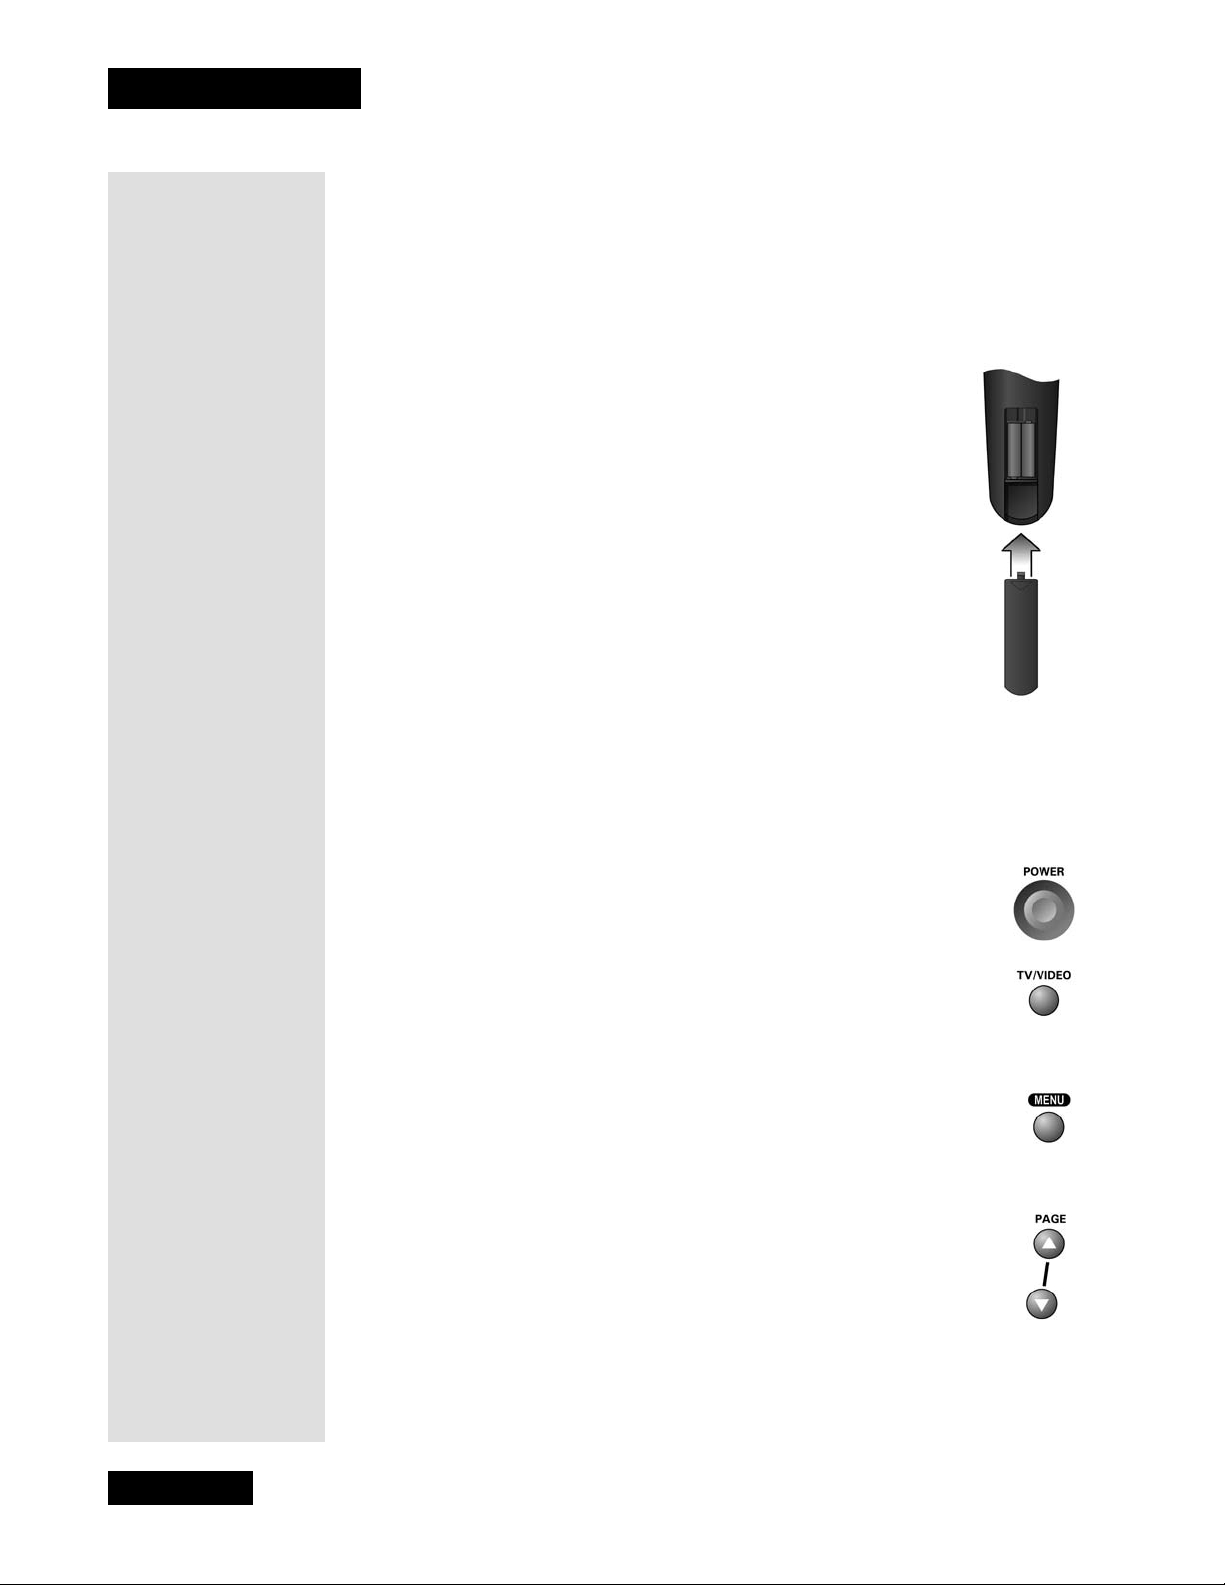
EMOTE CONTROL BATTERIES
The remote control comes with AAA batteries. When you replace old batteri es,
you should replace all of the bat teries. Use batteries of the same kind, for
example alkaline or carbon zi nc, and don’t mix batt eries of different kinds.
Alkaline batteries last longer.
1. Press down on the top of the battery cover and slide the
cover off.
2. Take out all of the old batteries.
3. Put the new batteries in. Make sure you match the plus
(“+”) ends with the plus markings inside the battery case.
4. Fit the battery cover’s bottom tab back into the slot at the
bottom of the battery case, and slide the cover back into
place.
USING THE REMOTE CONTROL
The following section describe s how to use the remote control with your
satellite receiver.
POWER BUTTONS
Press the POWER button to turn the receiver ON or OFF.
TV/VIDEO BUTTON
Use this button to switch the receiver between the satellite
programming and anothe r v ideo si gnal c onnec ted in to t he rece iver’ s
TV A
NTENNA/CABLE IN input, such as cable or broadcast TV
antenna input.
MENU BUTTON
Press this button to open the Main Menu.
PAGE UP AND PAGE DOWN (ARROW) BUTTONS
Press the PAGE UP button or the PAGE DOWN button to scan,
page by page, through the
list, a Favorite List, a n Event Timers list, or a list of channels.
Program Guid e, a Theme Categories
Page 8
Page 13
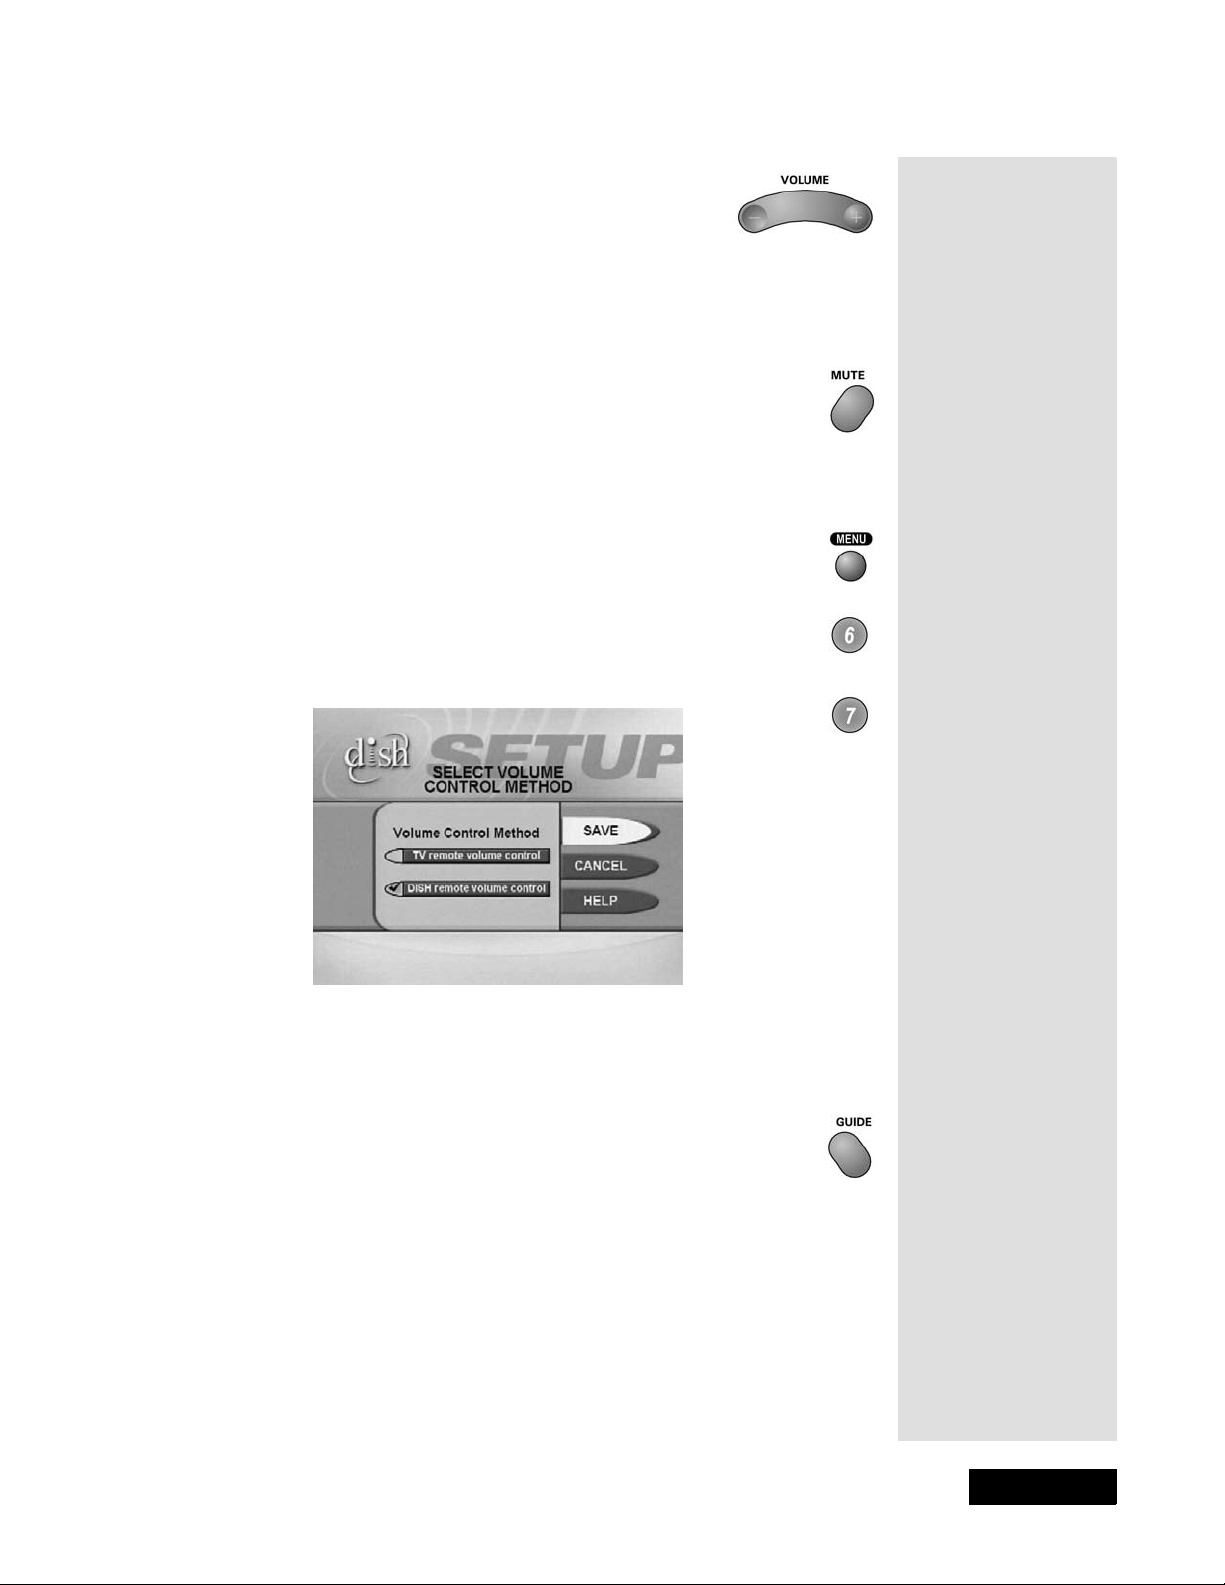
VOLUME BUTTON
Press the minus (-) side of this button to lower the
receiver sou nd. Press t he plus (+) side of this button to
raise the receiver sound. When you press the
VOLUME button, a bar displays on the TV to show
you the receiver volume.
MUTE BUTTON
Press this button to turn off the receiver sound. Press it again to
restore the receive r sound.
To u s e the VOLUME and MUTE buttons with the receiver:
1. Press MENU.
The Remote Control
2. Select
3. Select
4. Select
5. Select
System Setup.
Volume Control.
DISH remote volume control.
Save.
GUIDE BUTTON
Press the GUIDE button to open the Program Guide. When
the Program Guide is open, press this button to switch among
Favorite Lists.
Page 9
Page 14
Chapter 2
Parts of the System
Tip: The arr ow
buttons can be
used to quickly
navi ga te through
menus and the
prog ram guide.
When you find a
prog ram or menu
option you would
like to access, just
press
SELECT.
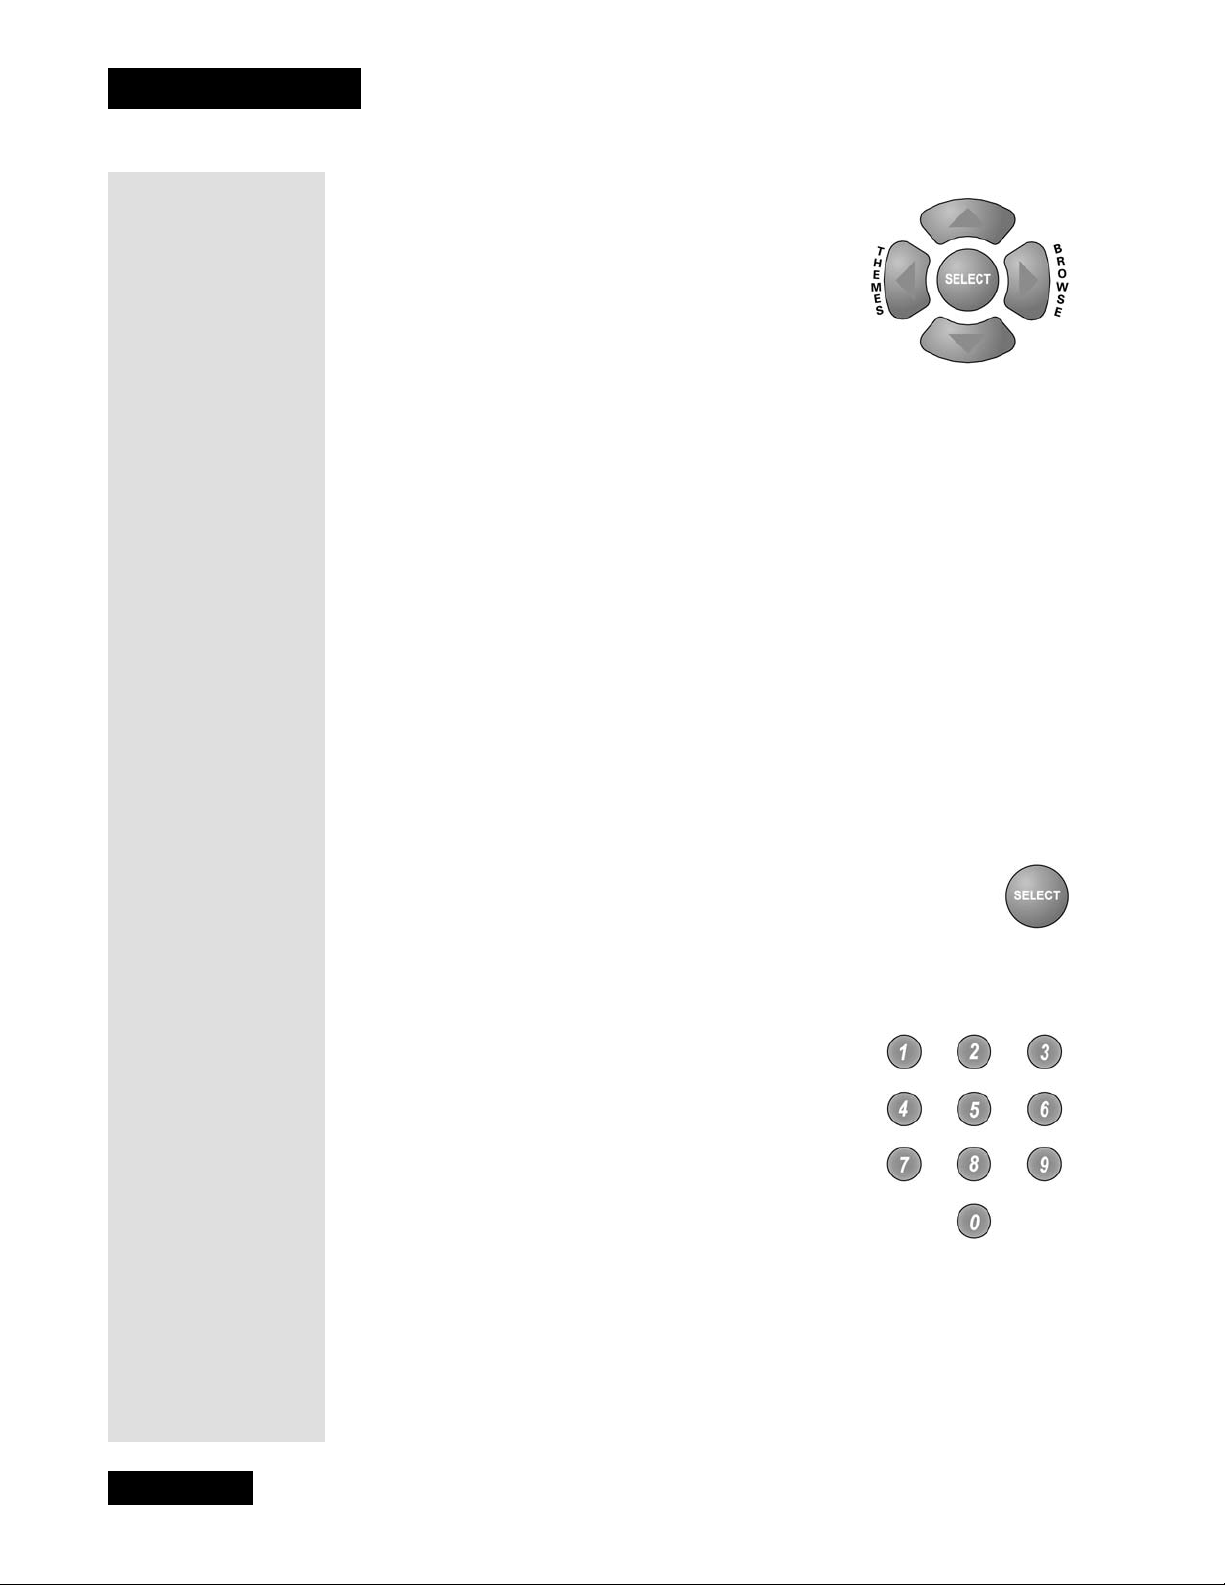
U
P/DOWN/LEFT/RIGHT (ARROW) BUTTONS
• When using a menu, press the se butt ons to move
the highlight to an option.
• When watching a program, press the RIGHT
ARROW button to open the
Browse Banner or
the UP or DOWN ARROW button to change
channels.
• When the Browse Banner is open, press the UP or DOWN ARROW
button to see the Browse Banner for the next channels.
Note: The Browse Banner, like the Pr ogra m Guide , shows infor mati on on
current and f uture programs. It c annot show information on programs that
have ended.
Tip: To open some
of the menu s, use
the matching
buttons on th e
remote control. For
example, press the
LEFT ARROW
button to quickly
open the Themes
Menu.
Tip: You can
quickly change
channels by using
the
NUMBER
buttons on the
remote. Just enter
the numbers for
the channel you
would l ike to view
next.
• When a menu offers a list of choices, press the UP or DOWN ARROW
button to see more choices.
• When the Program Guide is open, press these buttons to move the
highlight among the programs.
• When the Browse Banner is open, press the RIGHT or LEFT ARROW
button to obta in information on the next program tha t will be on that
channel.
• When watching a program, press the L EFT ARROW button to open the
Theme Categories menu.
SELECT BUTTON
Press the SELECT button to select a highlighted option or program
in a menu.
NUMBER BUTTONS
When watching a program or with the Program
Guide
open, use these buttons to enter a channel
number to change to that channel.
• When the Program Guide is open, you can skip
ahead and then back a number of hours. Just enter
the number you want to skip ahead (or bac k), and
then press the RIGHT (or LEFT) ARROW
button.
• Use these buttons to enter menu optio n numbers instead of highlighting the
option and then pressing the SELECT button.
Page 10
• Use thes e butt o ns to ent er n umb er s in a me nu:
• Highlight t he place where you want to enter the first number, and press
the appropriate number buttons on the remote.
Page 15
•Use the LEFT or RIGHT ARROW button to move the highlight t o
the next place where you want to enter a number. When you are
done entering numbers, press SELECT.
RECALL BUTTON
Press the RECALL button to return to the last channel you were
watching. Press it again to s witc h between the la st two c hannels
that you watched.
INFO BUTTON
Press this button for more infor mation whe n t he Pro gram G uide
or the Browse Banner is open, or when watching a program.
• When a menu is open that includes a Help option, press this button to
see help information for that menu.
• Highlight a pr ogram in a Theme Categories list and then press this
button for more information on tha t program.
VIEW TV BUTTON
Press this button to return to watching a program.
The Menus
Tip: When you’re
in the Prog ram
Guide, a Theme
Category or a
Favorites List use
the Information
button to get a
description of the
progr a m , the
names of the
actors, and other
important details .
• If you are watching a program, press this button to briefly
display the
Program B anner.
• While using any menu, press this button to cancel a procedure and
return to watching a program.
CANCEL BUTTON
Press this button to cancel a proc edure and to return to the
previous menu or to watching a program.
SYS INFO BUTTON
Press this button to open the Important System
Information
screen.
THE MENUS
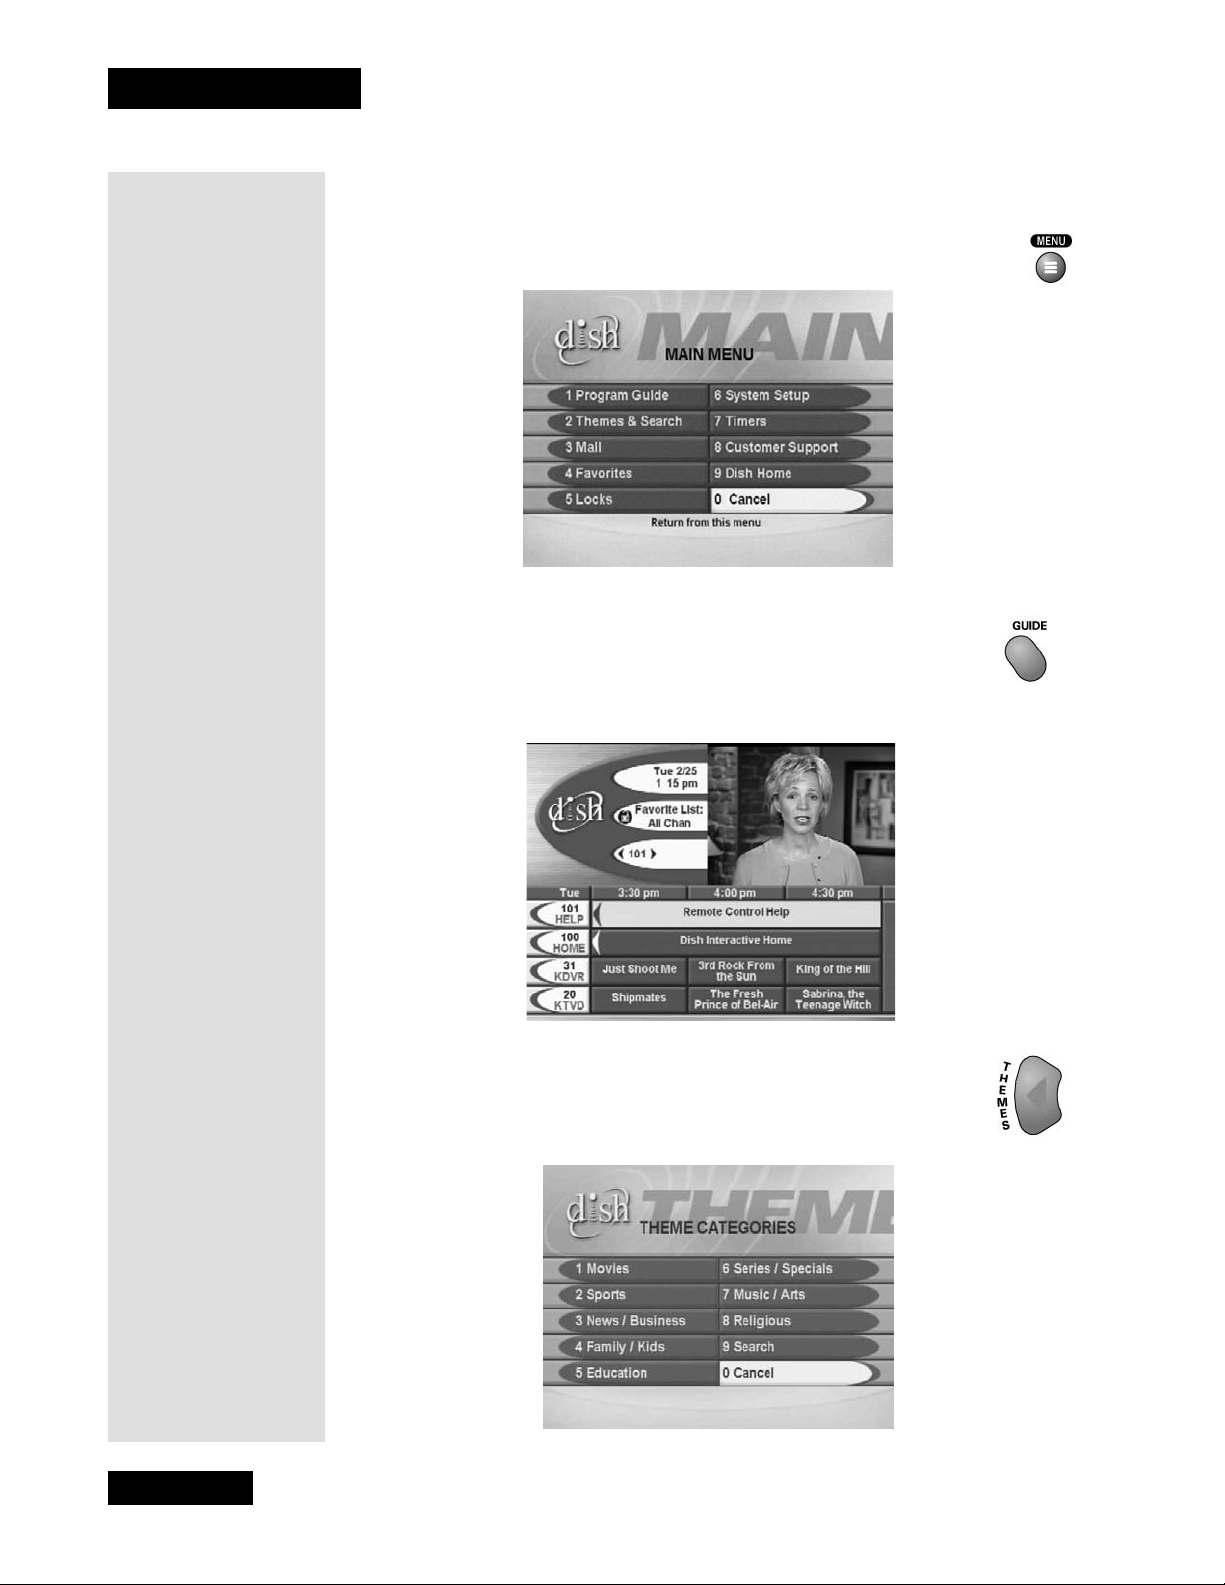
The next few pag es de sc rib e the me n u s that the receiv er dis play s o n the
television scree n. See the chapter titled Using the Syste m for more details on
using the me nus to operate the system.
Page 11
Page 16
Chapter 2
Parts of the System
M
AIN MENU
The Main Menu is the key to the menus. Each option on this menu
displays another menu.
PROGRAM GUIDE
The Progra m Guide list s the a vailable channels and pro grams. It
also has a one-quarter screen video window option that shows the
last program you were viewing.
Tip: Love sports
or movies?
Choose one of
these themes and
the system
immediately
displays a list of all
programs on at the
current time that fit
the selected
category. See
page25 for details.
Page 12
THEME CATEGORIES MENU
The Theme Categories menu allows you to choose programs
based on their contents. This menu also includes a search feature.
Page 17
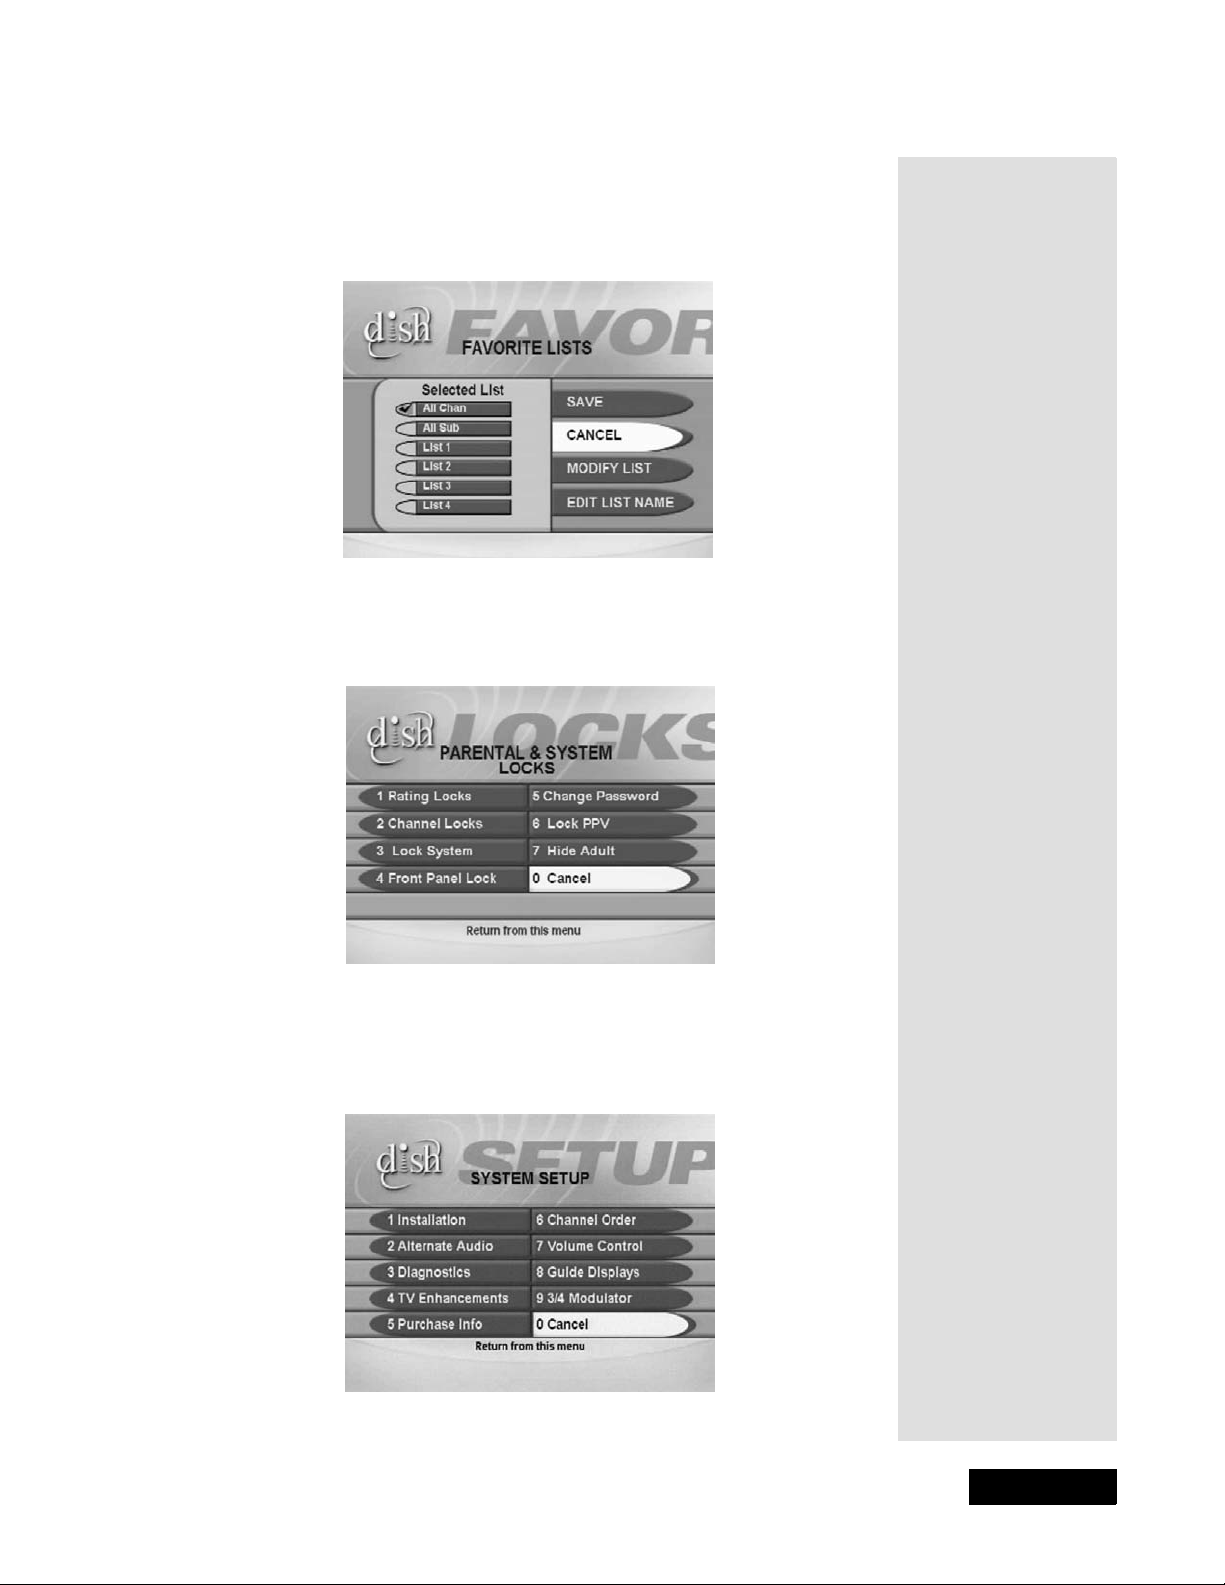
FAVORITES LISTS MENU
The Favorites Lists menu allows you to create, change, and activate lists
of favorite channels .
PARENTAL AND SYSTEM L OCKS MENU
The Parental and System Locks menu allows you to set and use locks.
The Menus
Tip: This menu is
where you set up
lists of your
favorite channels. For details
on set ting up
these lists, see
page 27.
Tip: Want to keep
your kids fr om
watching certain
channels or
programs? Here’s
where you can set
locks to keep them
out. For complete
details, see page 36.
SYSTEM SETUP MENU
The System Setup menu provides se veral features tha t help you set up
and maintain the system.
Page 13
Page 18
Chapter 2
Parts of the System
Tip: This menu lets
you set timers to
remind you when
that important
program is on . You
can also set
timers to videotape
events. See page 29
for complete d e tails.
T
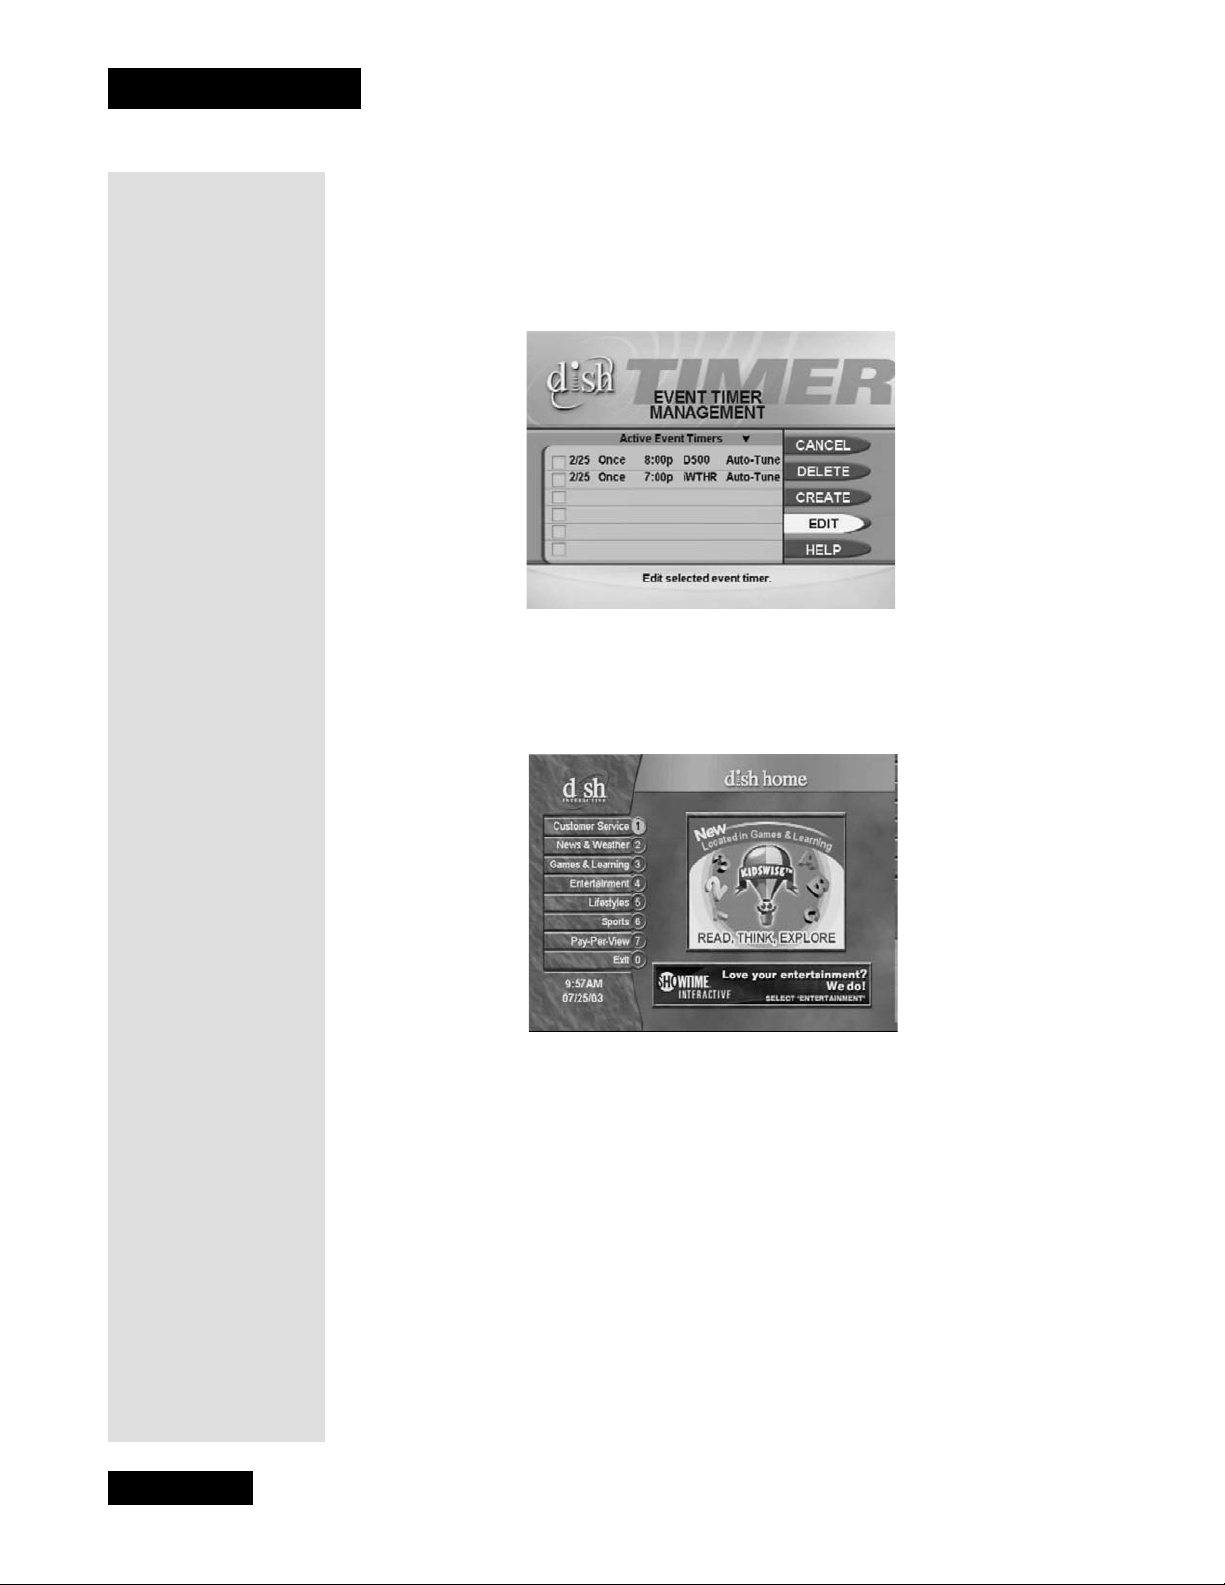
IMERS MENU
The Timers Menu allows you to set up the re ceiver to tune in a future “event, ”
that is, a program. If you have a VC R connected to the rece iver, you can set up
a timer to start recording a program on the VCR.
DISH HOME
With Dish Home, you can order channels, check the news and weather, and
even play games.
Page 14
Page 19
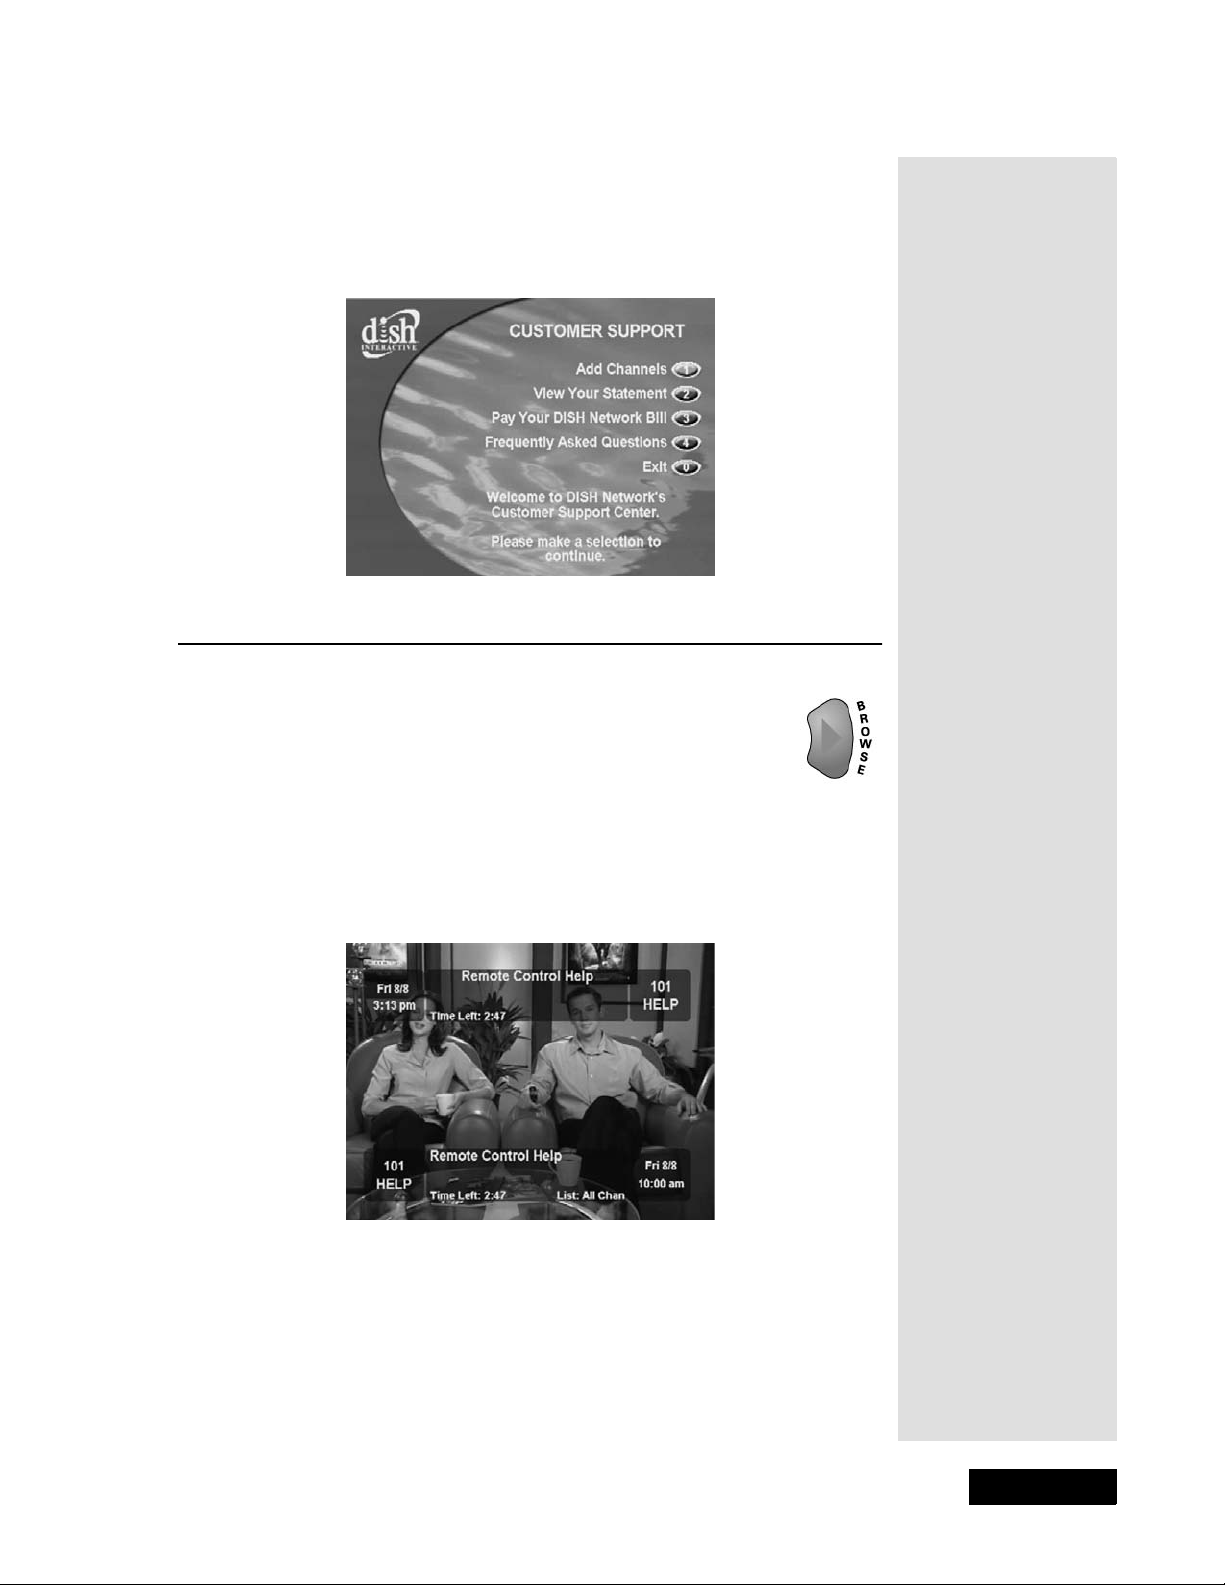
CUSTOMER SUPPORT
The Customer Support menu provides convenient access to your DISH
Network account to review your sta tement, pay your bill, upgrade
programming, and more.
THE BROWSE BANNER
The Browse Banner
You can use the Browse Banner (press the RIGHT ARROW
on the remote control) to change channe ls, or to see what other
programs are availabl e without changing the program that you
are watching. The r eceive r dis plays inf ormati on on the program
you are watching at the top of the screen and
information at the botto m of the scree n.
Note: Your Browse Banner may look a bit different than the one
shown here.
Browse Banner
Page 15
Page 20

Chapter 2
Parts of the System
Notes
Page 16
Page 21
Chapter 3
Using the System
CHANGING CHANNELS
There are three basic ways to change channe ls while watching a program:
• Press the remot e con tr ol
button to get to the desired channel.
• Use the remote control number pad buttons to ente r the
desired channel number.
• Press the GUIDE button and select a program from the
Program Guide . See page 20 for more info rm at i on.
UP or DOWN ARROW
USING THE MENUS
Menus displayed on the TV screen make using the receiver and selecting
programs quick and easy. Use the menus to control the receiver and to use
its features, such as setting locks, choosing a program, or creating a
Favorites List.
OPENING THE MENUS
You can open the menus in either of two ways:
•Press MENU to open the
menus from the
• Use the matching button on the remote control. For example, to open
the
Program Guid e, press GUIDE.
Main Menu.
Main Menu, then select any of the other
CLOSING THE MENUS
T o close a menu and return to wat ching a program, press the remote control
VIEW T V button, or the remote control CANCEL button.
Note: The menu closes if you do not do anything in a menu for several
minutes. Any unsaved changes you made will be lost.
MENU OPTIONS
A menu option looks like this.
Page 17
Page 22
Chapter 3
Using the Sys tem
HIGHLIGHTING A MENU OPTION
Tip: To quickly go
to any menu
option with a
number next to it,
just press the
numbers on the
remote that match
that number.
T o highlight a menu option, use the remote cont rol ARROW buttons to
move the on-screen highlight to the menu option. When you do this, the
option appears lighter than the other options. The highlight is like the one
that you may have seen on a computer screen.
Compare the highlighted menu option with the
non-highlighted menu optio n in the previous
example.
SELECTING A MENU OPTION
When you select a menu option, that option takes effect right away . You can
select a menu option in either of two ways:
• If the option has a number next to it, press the number on the remote
control number pa d that matches this number. If you do this, you do not
need to highlight the option first.
• Move the highlight to the menu option using the remot e control Arrow
buttons. Then press the remote control Select button.
LISTS OF CHOICES IN THE MENUS
When you make a choice in a list, the receiver does not apply the change
until you select the Save or OK option. If you do not want to sa ve any
changes, select the Cancel option to discard all the change s made in the
menu.
There are tw o type s of list s:
•A single choice list allows you to select only one choic e at a time. If
you select another choice, your previous choice is desel ected.
•A multiple choice list allows you to select more than one choice at one
time. If you select another choice, your previous choice(s) stays
selected.
HIGHLIGHTING A CHOICE IN A MENU LIST
Use the remote control ARROW buttons to move the highlight to the
desired item in the list. The black a rrows on the list show where you can
move the highlight.
SELECTING A CHOICE IN A MENU LIST
To s e le ct a choice in a lis t, hig hl igh t the ch o ice an d then pr es s the remo te
control SELECT button. Make sure you select the Save or OK option to
save your choice. Select the Cancel option to discard your choice.
Page 18
Page 23

When you highlight a choice in a single choice list, it looks like this. In this
example, the Spanish option is highlighted.
When you highlight a choice in a multiple choic e lis t, it looks like this. In
this example, the
LIFE - 108 option is highlighted.
Using the Menus
When you select a choice in a list, it looks like this:
or
CANCELING A PROCEDURE
T o cancel a procedure, you must press the remote control CANCEL or
VIEW TV button before you do the last step of the procedure. If this does
not work, you must finish the procedure.
Tip: You can
cancel out of any
menu option or the
program guide at
any time, and
immediately return
to viewing a
program by
pressing the VIEW
TV button.
lPage 19
Page 24
Chapter 3
Using the Sys tem
USING THE PROGRAM GUIDE
Tip: The channel
you select may
display one of
several program
information
symbols. If the
program is on a
channel that is not
part of your
subscription, the
chan nel will b e in
red.
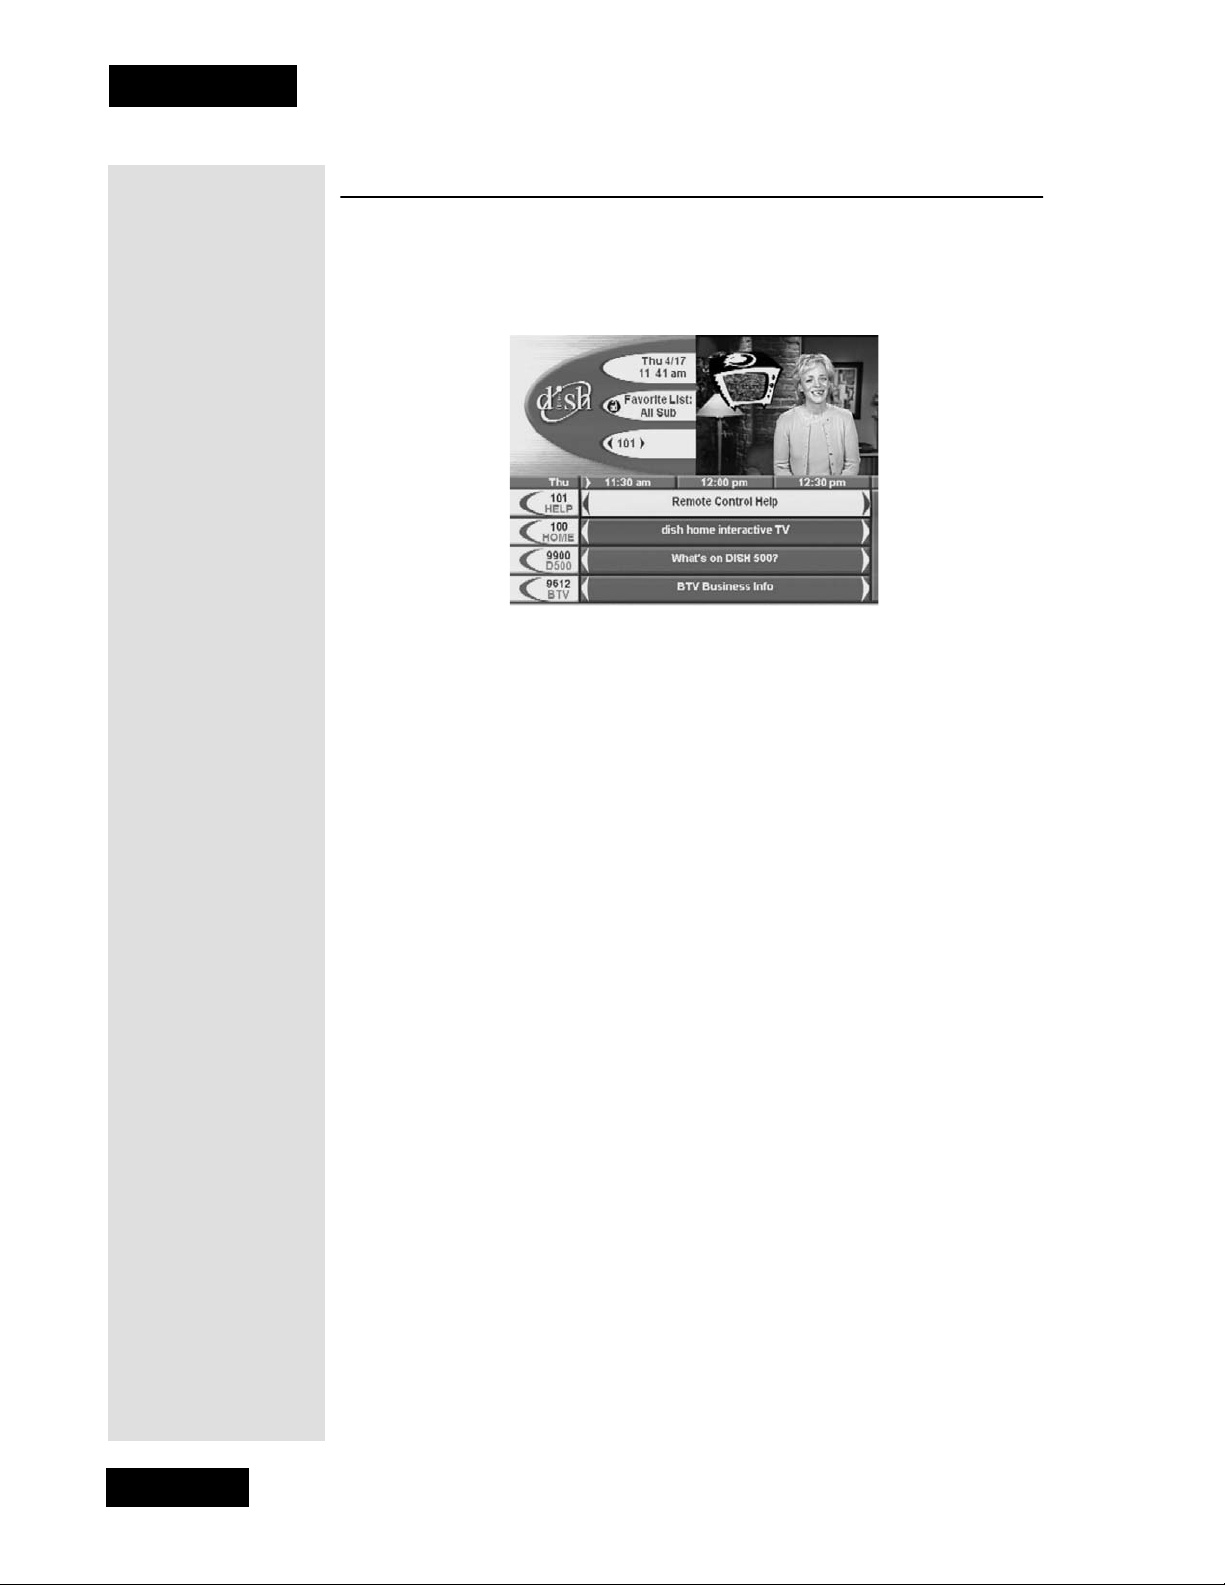
The on-scre en Program Guide provides a complete listing of the available
channels and programs. You can use the Program Guide to change
channels, to see what programs are schedul ed, and to buy pay per view
programs. The Prog ra m Guide shows which Favorites List is active.
•The
Program Guide displa ys only the c hannels in the active Favorites
List
(see page 27).
All Chan - Displays all of the channels in the Program Guide.
•
•
All Sub - Displays the channels in your subscription.
Favorites Lists - Y ou c an add four Favorites Lists that show only
•
the channels you want to see. For more information on creating
Favorites Lists , se e page 27.
• This receiver allows you to see the program you are watching in a
corner of the
select the
Program Guide. To do this, open the Main Menu. Then,
System Setup option. Finally, select the Guide Displays
option, select the Par t ial Guide With Video option. If you prefer a
bigger guide (with no vide o displayed), select the Full Guide Without
Video
option, and select the Save option. When you first display the
inset, there may be a brief delay before a picture appears.
•A red background behind a channel sh ows tha t you ha ve not s ubscri bed
to that channel. You cannot tune in to this channel.
•The
Program Guide shows programs that are on now and that are
scheduled up to two days in advance. The guide does not show
programs that have ended. You can set up the Program Guide to list
cha nn els in ascending order, with the highest channel number at the
top, or in descending order, with the highest channel number at the
bottom. To do this, open the
Setup
option. Finally, select the Channel Order option, select the
Ascending or Descending option, and select the Save option.
• You can set up the
Program Guide to hide adult channels . See Hiding
Main Menu. Then, select the System
Adult Channels on page 42.
Page 20
Page 25
OPENING THE PROGRAM GUIDE
There are two ways to open the Program Guide:
•Press the GUIDE button.
•Press the MENU button and then select the Program
Guide option.
SELECTING A PROGRAM IN THE PROGRAM GUIDE
1. Use the NUMBER PAD buttons to enter the desired channel number.
The Program Guide displays a block of channels including the one
that you just entered.
2. Use the ARROW buttons to
move the highlight to the desired pr ogram.
Note: You may press the PAGE UP or
PAGE DOWN ARROW button to scan,
page by page, through the listing of
channels.
Using the Program Guide
3. You may press the INFO button for more
information about the highlighted program.
Press the CANCEL button to return to the
Program Guide.
4. Press the SELECT button to change to the
new channel.
You may skip the
Program Guid e forward or backward many hours at
one time. To do this, enter the number of hours that you want to skip
using the NUMBER PAD buttons. The n press the LEFT or RIGHT
ARROW button to move back or forward, respectively.
CLOSING THE PROGRAM GUIDE
To close the Program Guide and not change the chann el, press the remote
control CANCEL or VIEW TV button. The receiver displays the program
you were watching before you opened the
Program Guid e.
Tip: The Progra m
Guide can display
programs
scheduled for
some time beyond
the present, but
cannot display
programs that
have ended.
lPage 21
Page 26
Chapter 3
Using the Sys tem
USING THE PROGRAM BANNER
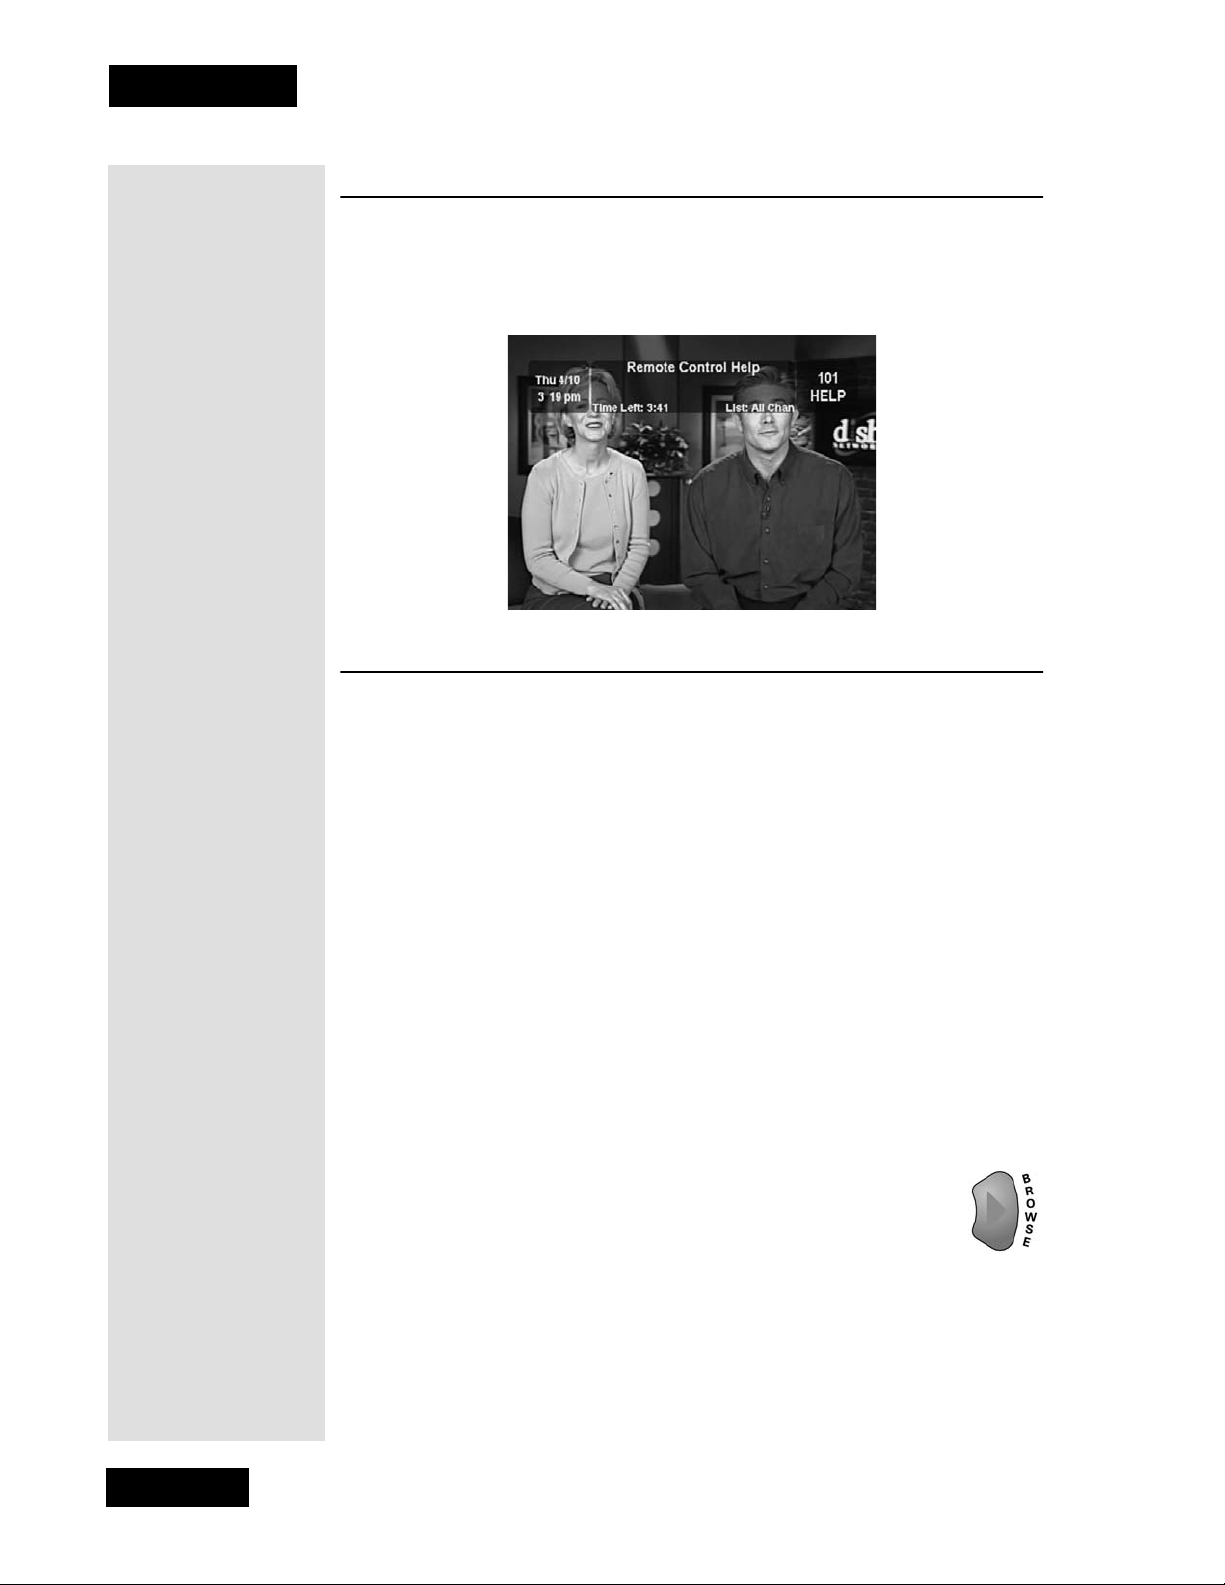
The Program Ba nn er provides information about the program you are
watching. The receiver displays the Pr ogram Banner for a few seconds at
the top of the TV screen every time you change the channel or press the
remote control VIEW button.
USING THE BROWSE BANNER
Tip: You can use
the Browse
Banner to see what
other programs are
available without
leav ing the
program you are
watching.
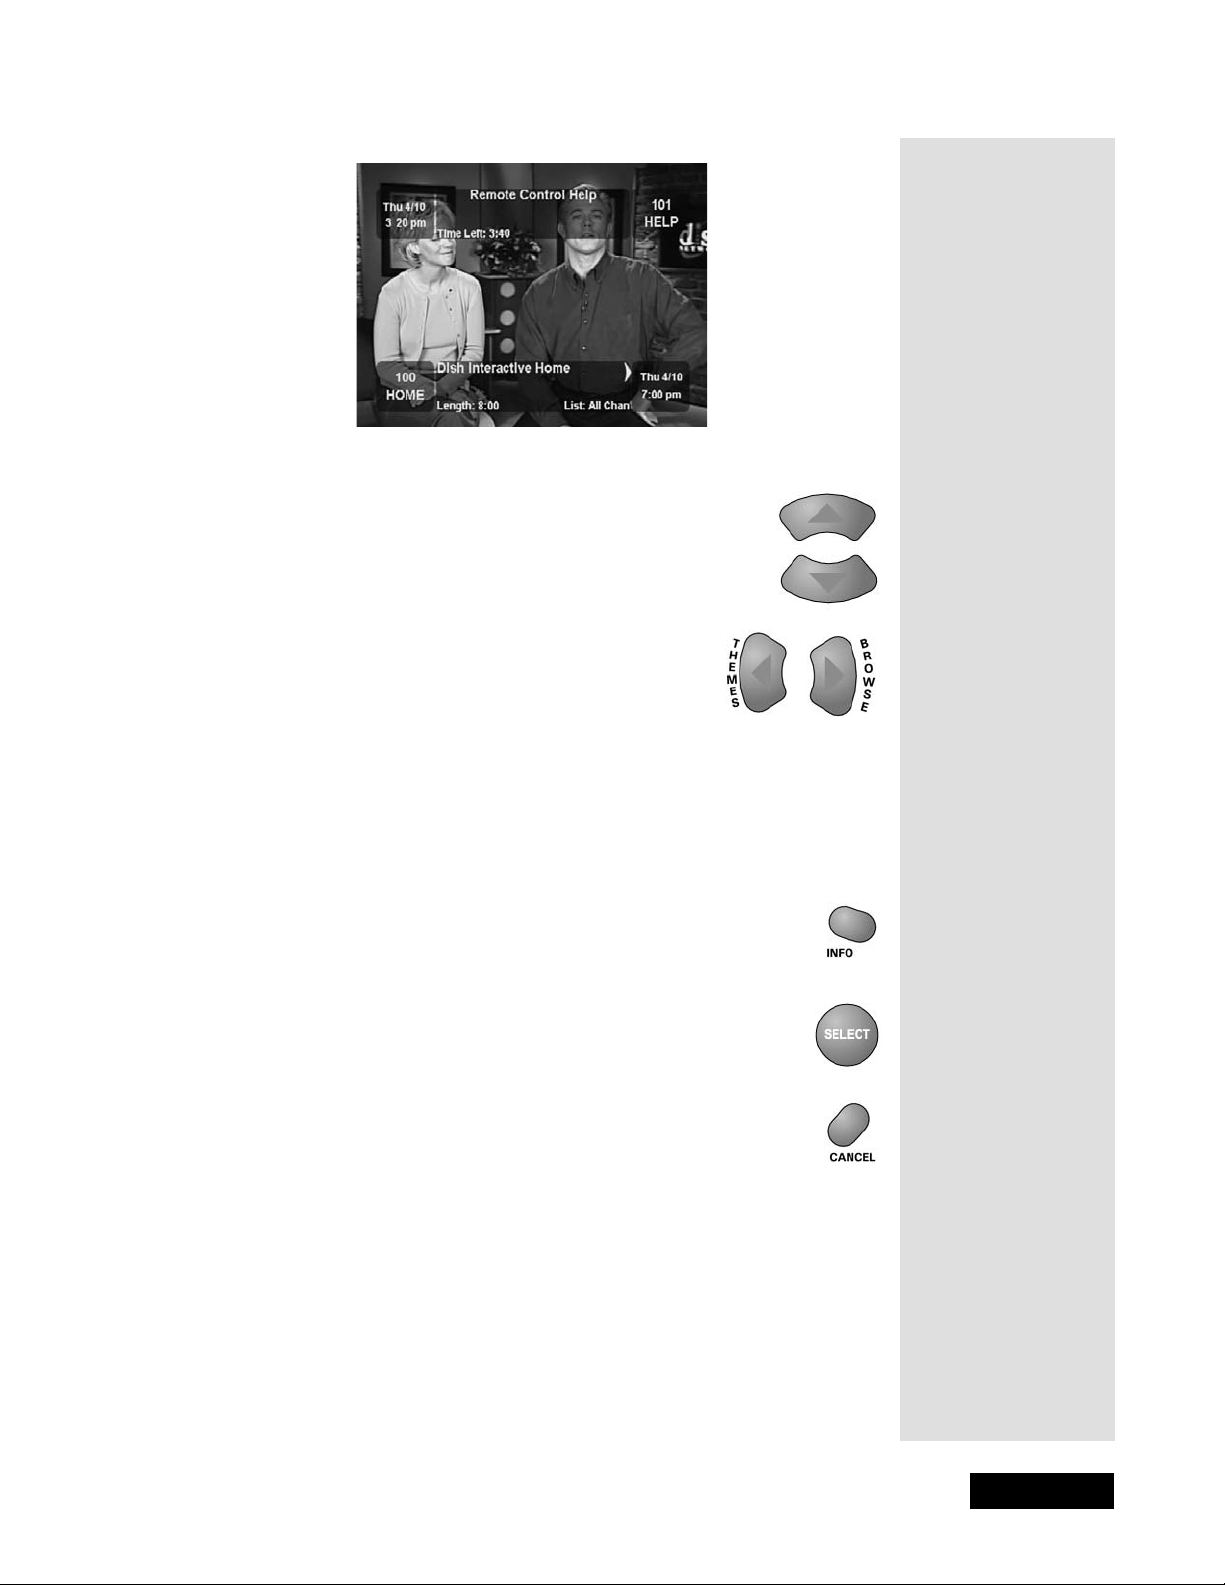
You can use the Browse Bann er to change channels, or to see what other
programs are available without c hanging the program that you are
watching. The rec eiver displays information on the program you are
watching at the top and
Browse Banner information at the bottom of the
TV screen. Press the UP or DOWN ARROW to see what programs are
playing on the channels above or below the one you are viewing.
Information on these programs appears at the bottom of the TV screen.
Note: The Browse Banner only displays the channels in the active
Favorites List that is indicated in the Browse Banner. For example, if the
All Chan Favorites List is active, th e Browse Banner displays all the
channels. If the All Sub list is active, the Browse Banner displays only the
channels in your subscription.
If you have set up the
Program Guid e to hide adult channels and the
receiver is locked, the Browse Banner does not display such channels.
To use the
Browse Banner:
1. Press the remote control RIGHT ARROW button to open
Browse Banner for the program that you are
the
watching.
Page 22
Page 27
2. Change the channel:
• Enter the channel number for the program that you
want, using the NUMBER PAD buttons
• Press the UP or DOWN ARROW button to display
the channel that you want.
3. Press the RIGHT ARROW button to display the
next program. Press the LEFT ARROW button to
return to the curr ent program.
Using the Browse Bann er
Note: The Browse Banner displays programs that are on now . If you
press the RIGHT ARROW, it will display information on the program
that is on next on the same channel. It does not display information for
any other progra ms in the future and cannot display programs that have
ended.
4. You may press the INFO button for more information a bout
the program highlighte d.
5. Press the SELECT button to change to the highlighted
program.
6. To cl o se the
Browse Banner, press the remote control
CANCEL button. The receiver stays tuned to the program
you are watching.
Tip: If the
prog ram is on
some time in the
future, the
receiver will open
the Create An
Event Timer
menu.
lPage 23
Page 28
Chapter 3
Using the Sys tem
ORDERING PAY PER VIEW PROGRAMS
Tip: If a n y lock is i n
effect that covers
the pay per view
program, you must
enter the password
using the
PAD
soon as you enter
the fourth di gi t of
the password, the
receiver highlights
OK.
NUMBER
buttons . As
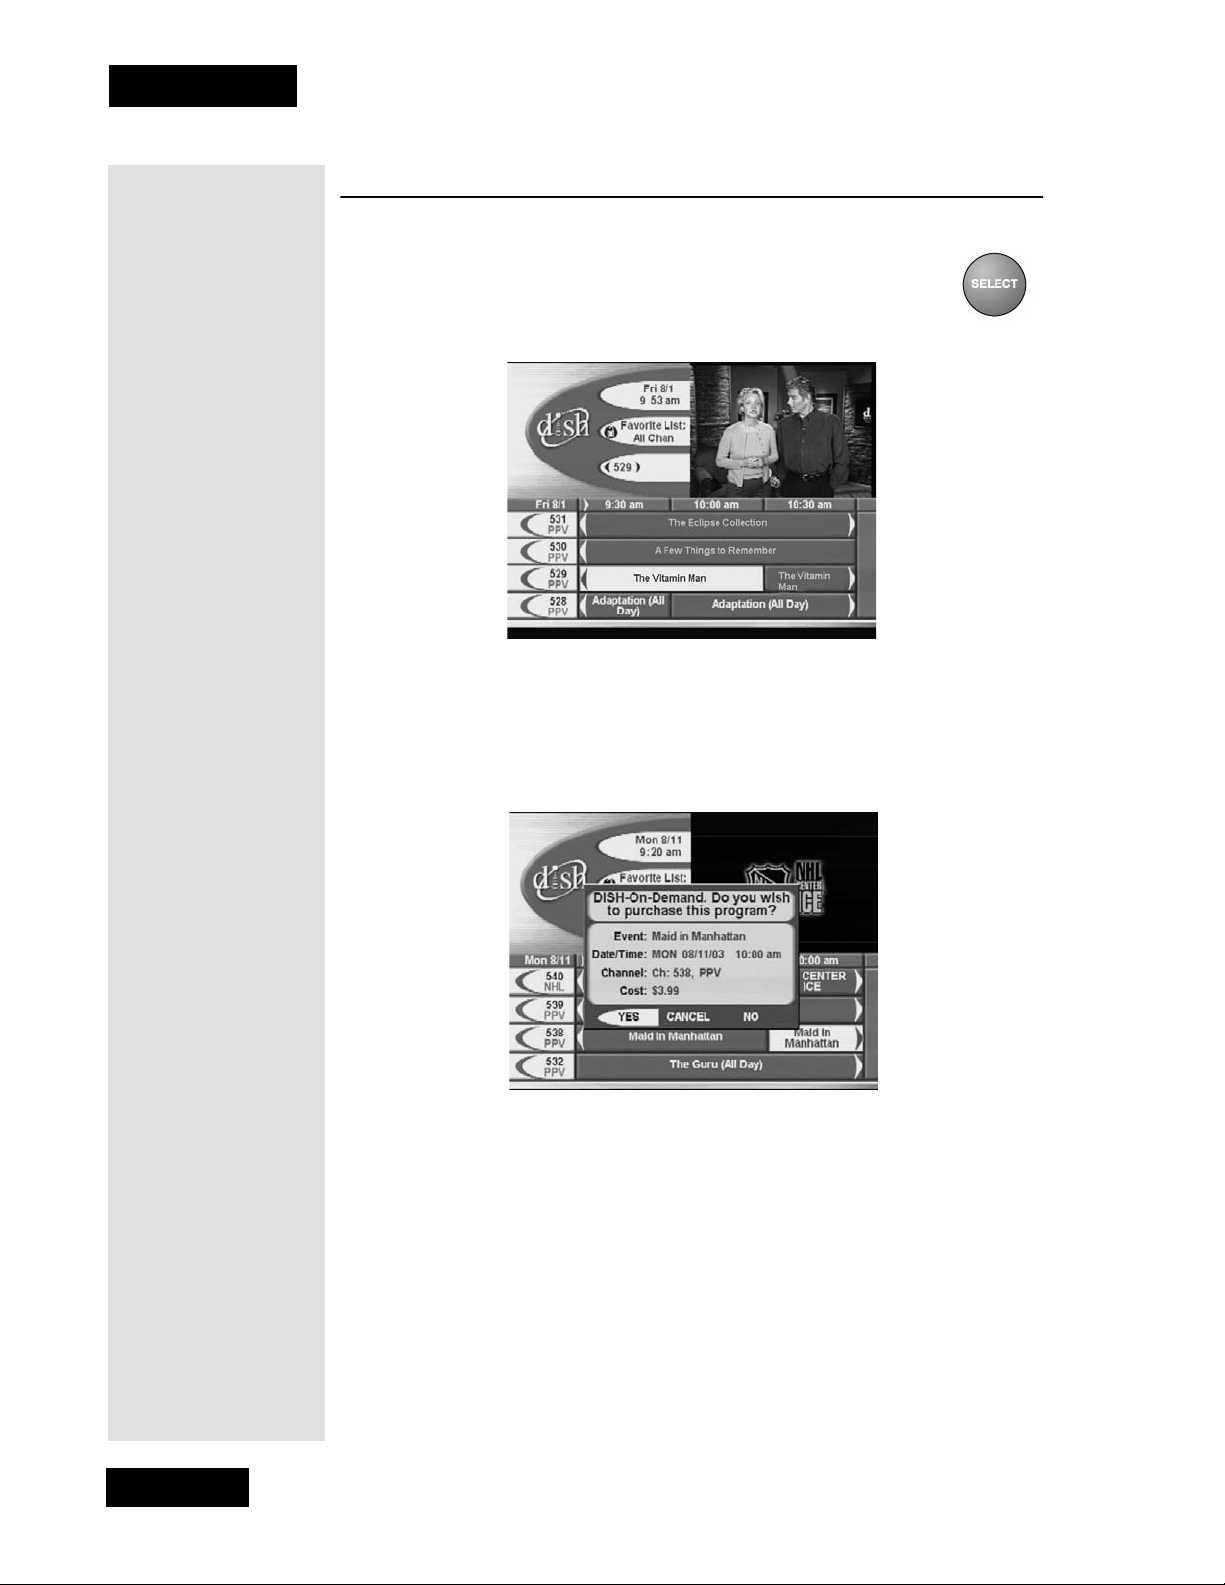
1. Highlight the desir ed p ay pe r vie w progra m in th e Progra m
Guide
. The pay per view programs are listed with the
channel number as PPV in the Program Guide.
2. Press the SELECT button.
3. To buy the pay per view program, select the
Yes o ptio n . Th e rece iver
displays a confirmation menu. Go on to step 4.
If you do not want to buy the pay per view program, pr ess the UP or
DOWN ARROW button or select the
No or Cancel option.
Page 24
At the confirmation menu:
4. Select the
Yes option to confirm the purcha se. The pay per vi ew fee will
be added to your bill.
Select the No or Cancel option to cancel the purchase.
Note: Once you confirm an order for a pay per view program, you
cannot cancel the order and you will be bille d for it.
Page 29
USING THEMES
THEMES
Using Themes
You can list and choose programs by the theme of their contents (for
example, just movies or just sports). You can then quickly list programs
based on tha t theme, and choose the program you want.
1. To open the
button or press MENU and then select
Themes menu, press the LEFT ARROW
Themes.
2. Move through the Themes menu by using the UP or
DOWN ARROWS. You can also move a page at a time
using PAGE UP or PAGE DOWN.
3. Highlight the desired program in the program list.
4. Press the SELECT button to watch the program.
Note: If the program you highli ghted is o n some time in the
future, the receiver will open the Create An Event Timer
menu. See page 29 for information on using timers.
Tip: Want to see
what movies or
sports events are
available for
viewing? Just press
the
LEFT ARROW
button (
button) and use the
up/down/left/right
arrows to move to
the theme that
interests you. Press
THEMES
SELECT and you’ll
see what’s playing.
USING SEARCH
The Search feature of your satellite receiver makes it easy for you to find
the programs you want to watch.
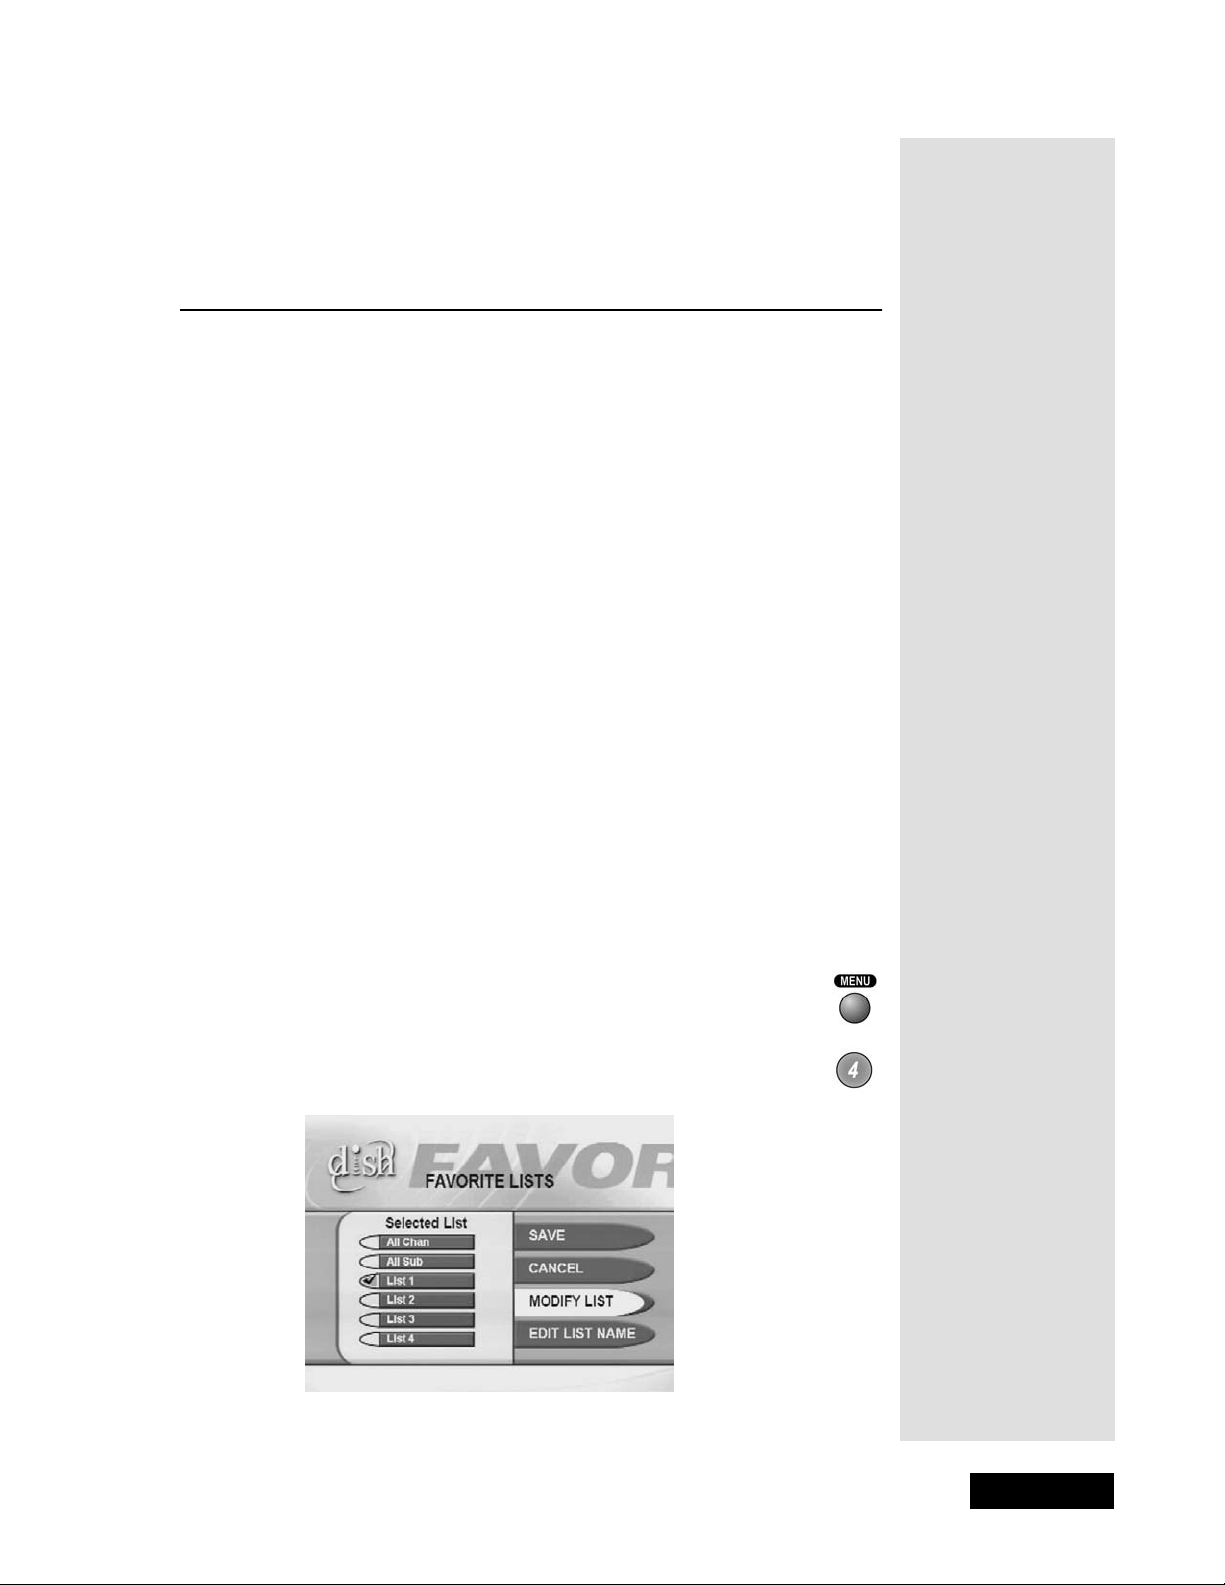
1. Press MENU-2-9 on the remote control.
2. The
Search menu will open.
lPage 25
Page 30

Chapter 3
Using the Sys tem
3. Move the highlight to the Name box.
4. There are two ways to enter the name of the progr am you want to find:
•Use the UP, DOWN, LEFT, and RIGHT ARROWS to scroll
around on the virtual key board and then select the let ters you want.
• Some remote controls have telephone-style letters above the
buttons on the NUMBER PAD . Use the remote control NUMBER
PAD buttons to enter the letters in the
Name box. To enter an H,
for example, press 4 twice because H is the second letter listed
above the 4 on the NUMBER PAD. For example, if you are
searching for Rudy Fremmel Presents, enter the first few letters in
the title as follows:
Press three times for an
Press twice for a
U.
R.
Press onc e for a D.
Press three times for a
Note: Enter up to 14 characters (letter s and spaces) for your search.
Y.
5. When you have entered the name, scrol l down to choose between two
options:
Search Event Titles Only - Select this option when you are sure the
word(s) you entered are part of the event title.
Search All Event Info - Select this option if you want to search event
titles and info rm at ion fo r the word (s ) yo u ent ere d .
6. Select the
Search option. When the search completes, you will see a
screen listing the name of the program (s) an d the start and stop times.
Page 26
Page 31
7. Highlight the program you want to watch and press SELECT.
Using Favorites Lists
8. If the program o ccurs in the futu re, the
opens. Select
Create to record the program. See Using Timers on
Create An Event Timer menu
page 29 for more info rm at ion.
USING FAVORITES LISTS
Favorites Lists allow you to display only your favorite chann els in
the Program Guid e . You can create and change the lists yourself, addi ng
and removing channels as you wish. You can have an unlimited number of
favorite channels but they must be grouped into no more than four lists.
• When you make a
only the channels in that lis t. Also, the receiver skips ch annels that are
not on the list when you use the r emote control UP or DOWN
ARROW button to change channels.
•The
All Chan Favorites List contains all the channels. You cannot
make any changes to the
•The
All Sub Favorites List contains all the channels in your
subscription. You cannot make any changes to the
by changing your subscription.
• Each
Favorites List has a unique color in the Program Guid e. You can
give each list a name. When you first get the recei ver, the four lists are
named
List 1, List 2, List 3, and List 4. The lists are empty until you
add channels to them.
Favorites List active, the Program Guide displays
All Chan list.
All Sub list, except
Tip: Favorite li sts
let you create lists
of your favorite
channels. Press
the
GUIDE button
until the name of
your list appears.
This way you can
quickly see what
programs are
playing on just
those channels
and not every
channel in your
subscription.
CREATING OR CHANGING A FAVORITES LIST
You can create, add channels to, and remove channels from, a Favorites
List
.
1. Press the MENU button.
2. Select the
Favorites option.
lPage 27
Page 32
Chapter 3
Using the Sys tem
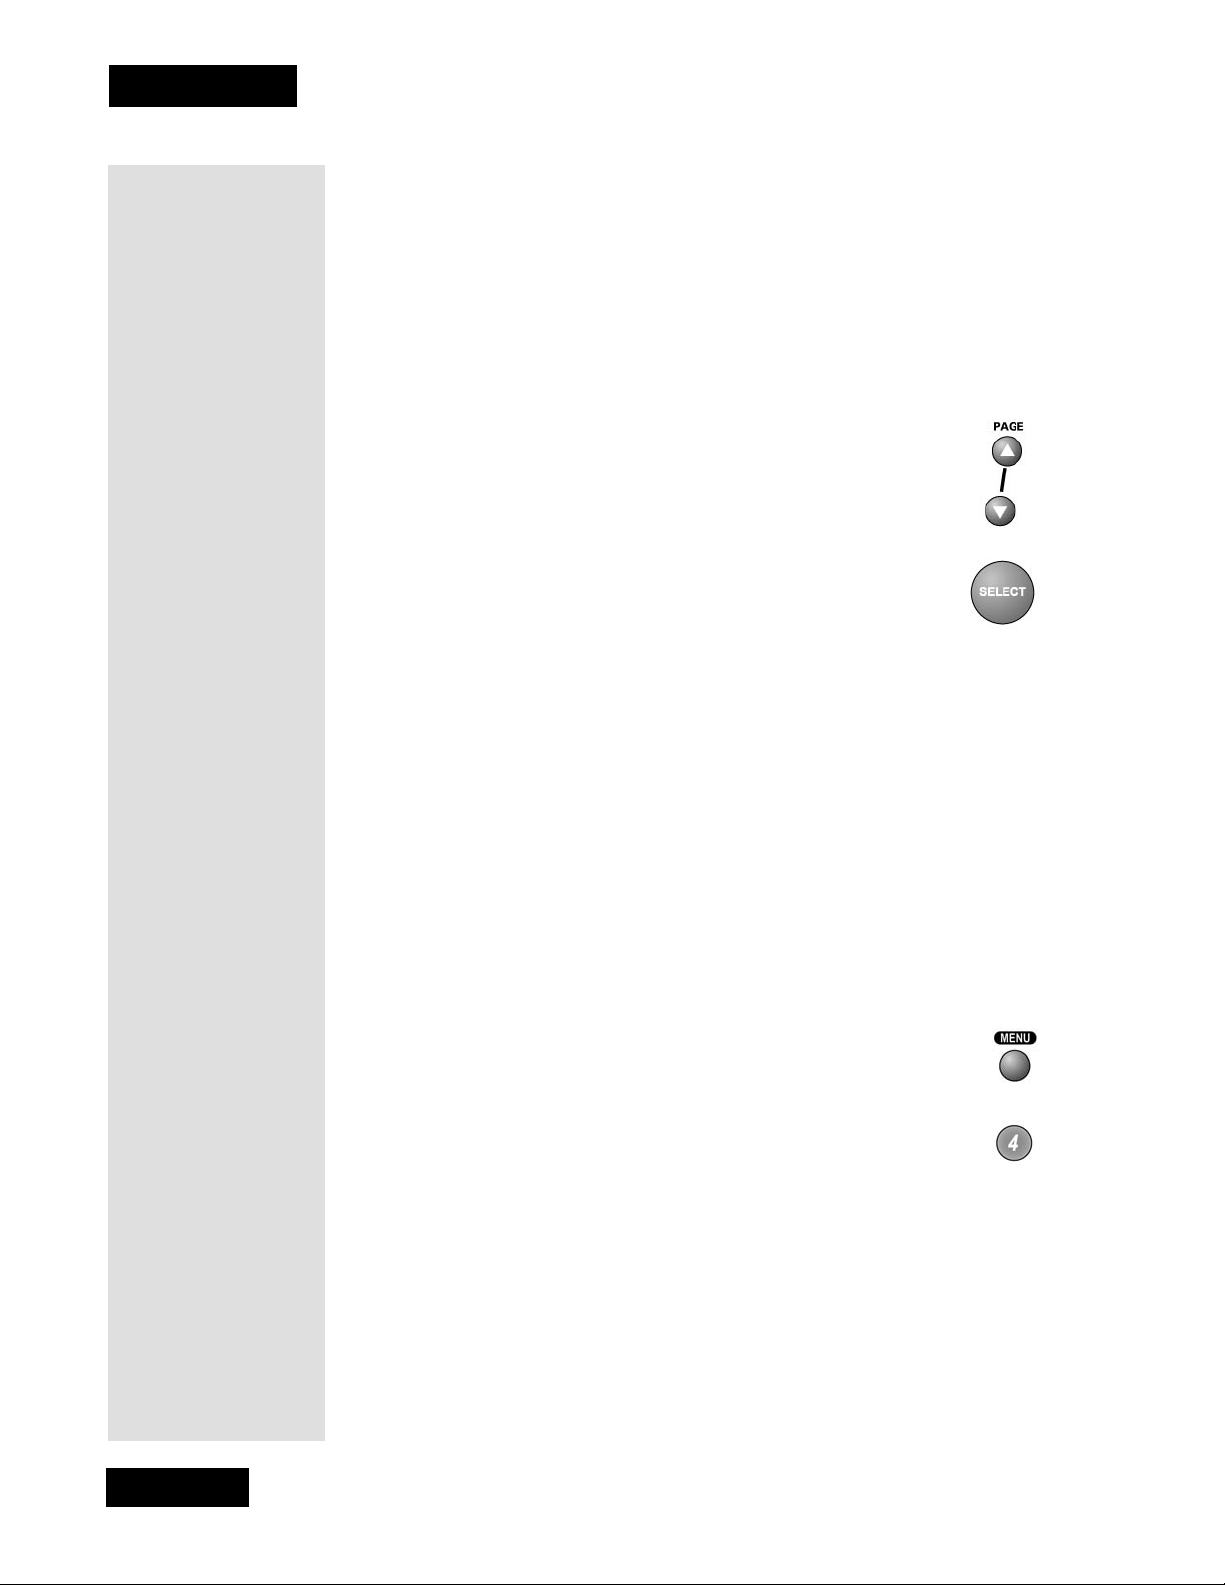
3. Select the Favorites List that you want to create or change.
Tip: You can activate
a Favorites List only
if you have added
channels to the list.
If you have not
created any
Favorites Lists,
pressing the
button switches the
receiver between the
All Chan and All Sub.
GUIDE
4. Select the
Note: At any time you can se lect the Clear List option to remove all
Modify Li st option.
channels from the current list. This does not apply to the All Chan and
All Sub.
5. In the
Channels list, highlight a channel you want to add to the
Favorites List.
Note: You can use the number pad buttons to enter the
channel number, or select the PAGE UP or PAGE
DOWN option to move quickly through the list.
6. Press the SELECT button to add the highlighted channel
to the
Favorites List. A check mark appears next to the
channel.
7. Repeat steps 5 and 6 until you have added all the channels that you
want.
8. To delete a channel from the
Favorites Lists, select the channel in the
list. The chec k ma rk ne xt to the cha nne l di sap pe ars.
9. Select the
Save option to save all changes to the Favorites List.
MAKING A FAVORITES L IST ACTIVE
If the Program Guide is open, press the GUIDE button to select the next
Favorites List. Press the GUIDE button a gain to scan through all the
available lists.
CHANGING THE NAME OF A FAVORITES LIST
Page 28
1. Press the MENU button.
2. Select the
3. Select the
Favorites option.
Favorites List that you want to change.
Page 33
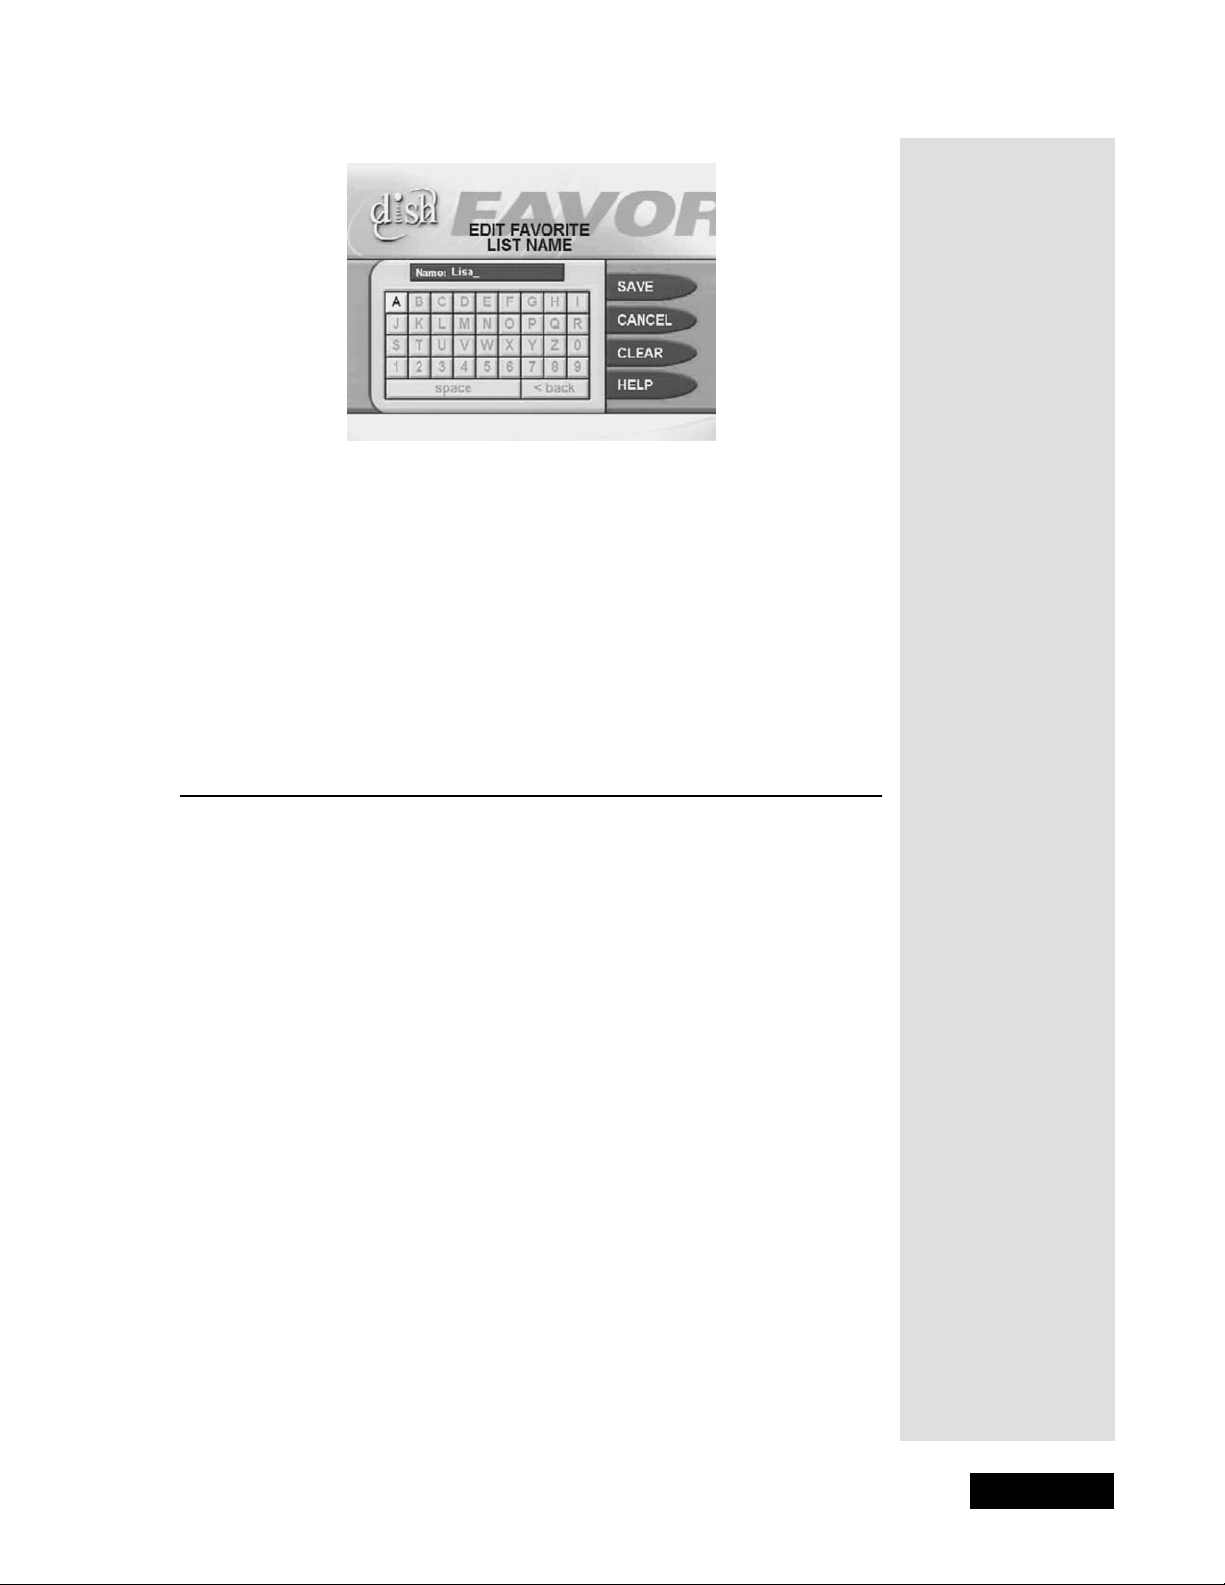
4. Select the Ed it List Name option to open the virtual keyboa rd.
Note: You cannot change the name of the All Chan or All Su b list.
5. Select a lett er in the keypad area on the screen. Repeat to spell out the
desired name. You can enter up to eight characters, including spaces. If
needed, select the
<back option to correct a letter.
Note: A list must have at least one character. Two lists cannot have the
space option to insert a space in the name or the
same name.
Using Timers
Tip: If you try to
make an empty
Favorites Lists
active, the receiver
displays an Error
message. You must
add at least one
channel to this
Favorites List
before you can
make it activ e.
Note: At any time, you can select Clear to clear the name.
6. Select
Save.
USING TIMERS
Event timers allow you to set up the receive r to automatically change to a
channel and send a signal to a VCR to record a future “event,” that is, a
program. You can se t an automatic event timer for a progr am list ed with
start and stop times in the Program Guide. A manual event timer allows
you to set custom start and stop times for a timer.
EVENT TIMER TYPES
Reminder Reminds you that a program is about to start.
Auto-Tune Reminds you that a program is about to st art; tunes the receiver
to the program when it begins.
VCR Reminds you that a program is about to start; tunes the receiver to the
program when it begins; starts a VCR to record the program. See Setting Up
the Receive r to Cont rol the VCR on page 35.
Note: Most TV programs and films are copyrighted. In some cases,
copyright law may apply to private, in-home recording.
Tip: You can use an
Auto-Tune event
timer to remind you
that a pro gram is
about to start and
then automatically
tune the receiver to
the right channel.
lPage 29
Page 34
Chapter 3
Using the Sys tem
EVENT TIMER FREQUENCIES
Once Applies to a one-time program. If the program time changes, this
timer operates at the new time. The receiver deletes this timer when the
timer operates.
Mon.-Fri. - Applies to a program that is scheduled for Monday through
Friday on the same channel at the same time each day.
Daily - Applies to a progr am that is scheduled for Monday through Sunday
on the same c hannel at the same time each day.
Weekly - Applies to a program that is scheduled for once a week on the
same channel at the same time on the same day.
Note: You can record only the program to which the receiver is tuned. If
you open any menu (including the Program Guide) while recording a
program on videotape, the menu also will be recorded. If a program time
changes by more than 24 hours, the timer will not operat e.
BEFORE AN EVENT TIMER OPERATES
Five minutes before an event timer operate s, the receiver displays a small
blinking “clock” symbol on the TV screen. This symbol disa ppears when
the program begins. While the symbol is displayed, you may do either one
of the following.
• Press the remote control CA NCE L button to clear the
symbol from the TV sc reen. This doe s not aff ect the ti mer;
it will operate.
• Press the remote control INFO button to see more
information on the event timer. If you do this, you will
have the following choices:
• Select the
OK or Cancel option to continue with the
event timer.
Or
Select the
Note: This stops only this instance of a Mon.-Fri., Daily or Weekly timer.
Stop Timer or No option to stop the event timer.
Or
The timer will operate the next time it is sc hedule d. To stop all operations of
such a timer, you must delete the timer. For a Reminder Event Timer, instead
of having the option to stop the timer, you have the option to tune to the
program.
Page 30
Page 35
Using Timers
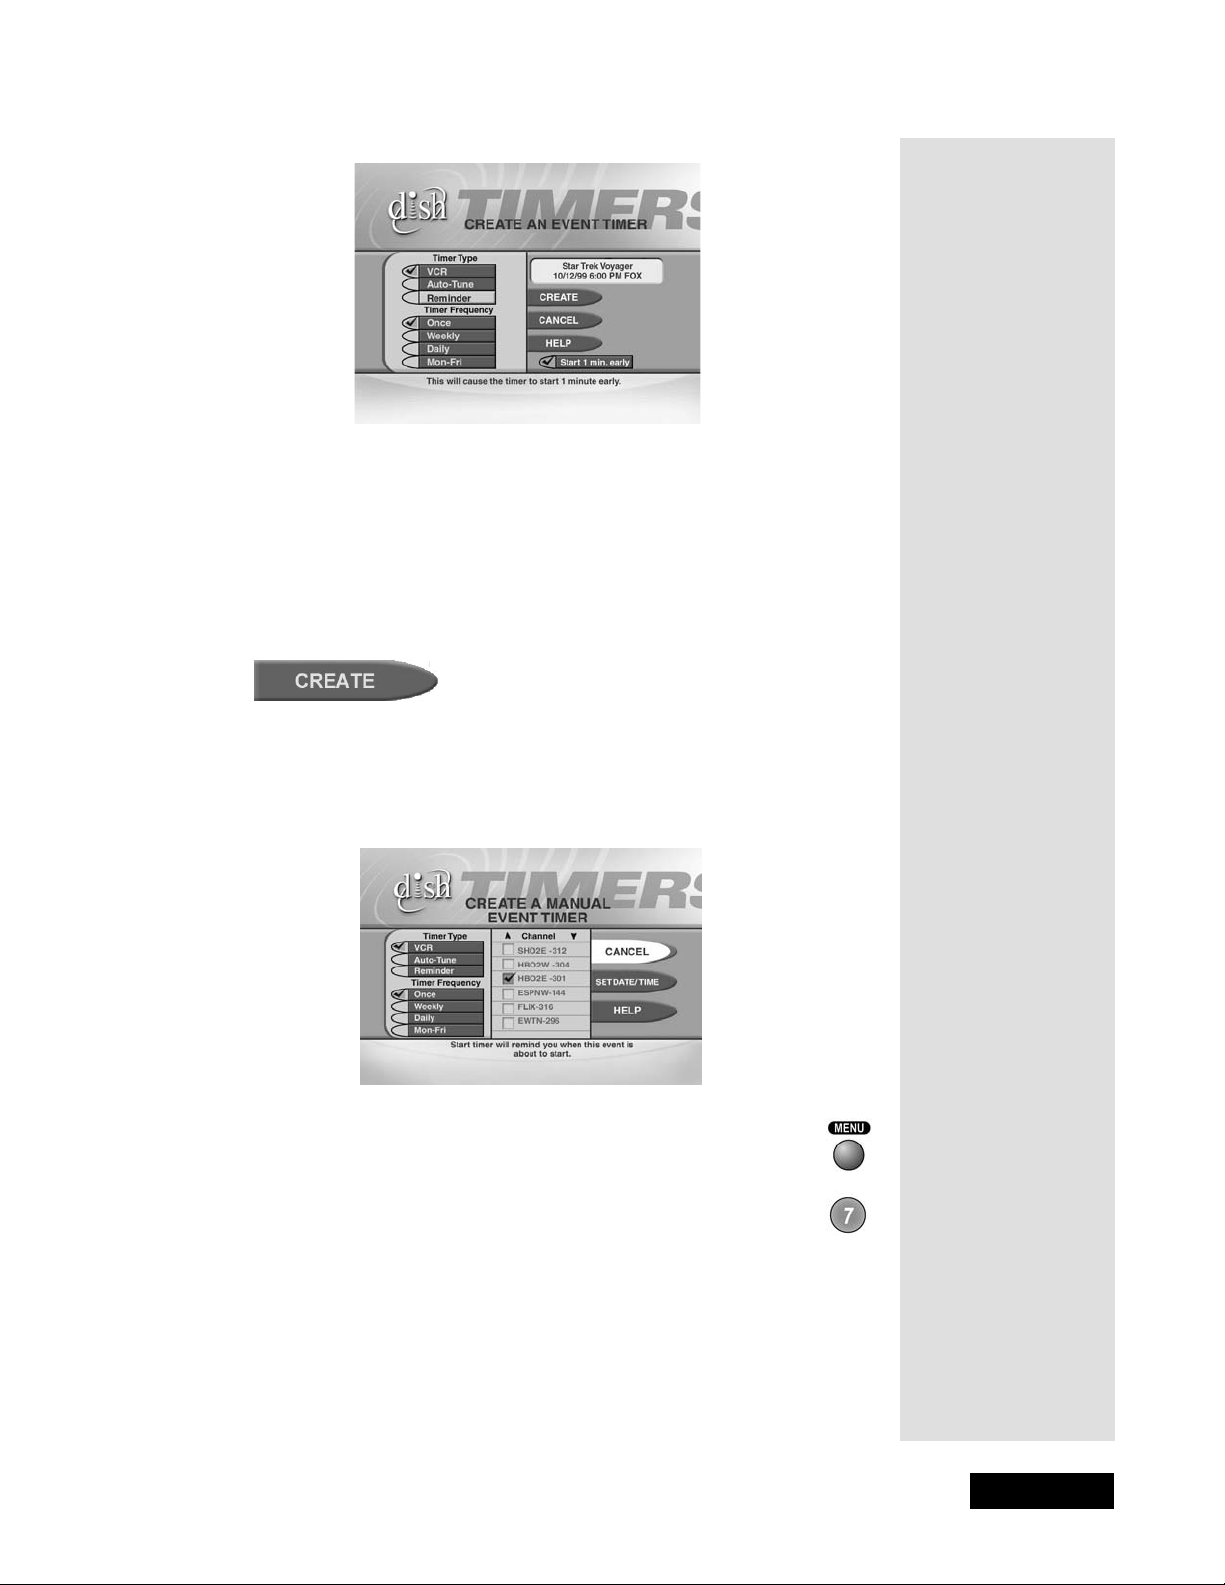
SETTING UP AN AUTOMATIC EVENT TIMER
1. Select a future program using the Browse Banner, Themes and
Search
2. Select a
3. Select a
the box.
4.
Select the Create option to save the event timer.
or the Program Guid e.
Timer Type option.
Timer Frequency option. Notice that a check mark displays in
Tip: You may start
any timer one
minute early. But if
you set back-toback event timers
and the second one
starts early, the first
one will end early.
An event timer
cannot start early
for a pay per view
program. If you try
to set a timer for
overlapping events,
you will get an error
message.
5. The rece iver displays a timer symbol in the Program Guide, and a lso
when you press the INFO button to get information about the program.
SETTING UP A MANUAL EVENT TIMER
1. Press the MENU button.
2. Select the Timers option.
3. Select the
Manual Event Timer
4. Select a
Create option. The receiver displays the Create a
menu.
Timer Type option.
Tip: Use the
Program Gu ide or
your prin te d
television guide
to see when the
program(s) starts
and stops —
before you go to
the Set Date/TIme
for Manual Timer
menu.
5. Select a
Tim er Frequency option.
lPage 31
Page 36
Chapter 3
Using the Sys tem
6. Se lect a channel:
• Highlight a channel using the UP or DOWN
ARROW button. Then, press the SELECT button.
• Enter a channel number using the number buttons.
7. Select the Set Date/Time opti on. The receiver displays the
Time for Manual Timer
menu.
Set Date/
8. Use the NUMBER PAD buttons to enter the Start Time (this includes
selecting
PM).
9. Use the NUMBER PAD buttons to enter the
10. Select the
11. To create another event timer select the
Note: You cannot set a manual event timer for a pay per view event.
AM or PM) and the End Time (this includes selecting AM or
Date.
Create Timer option.
Create option again.
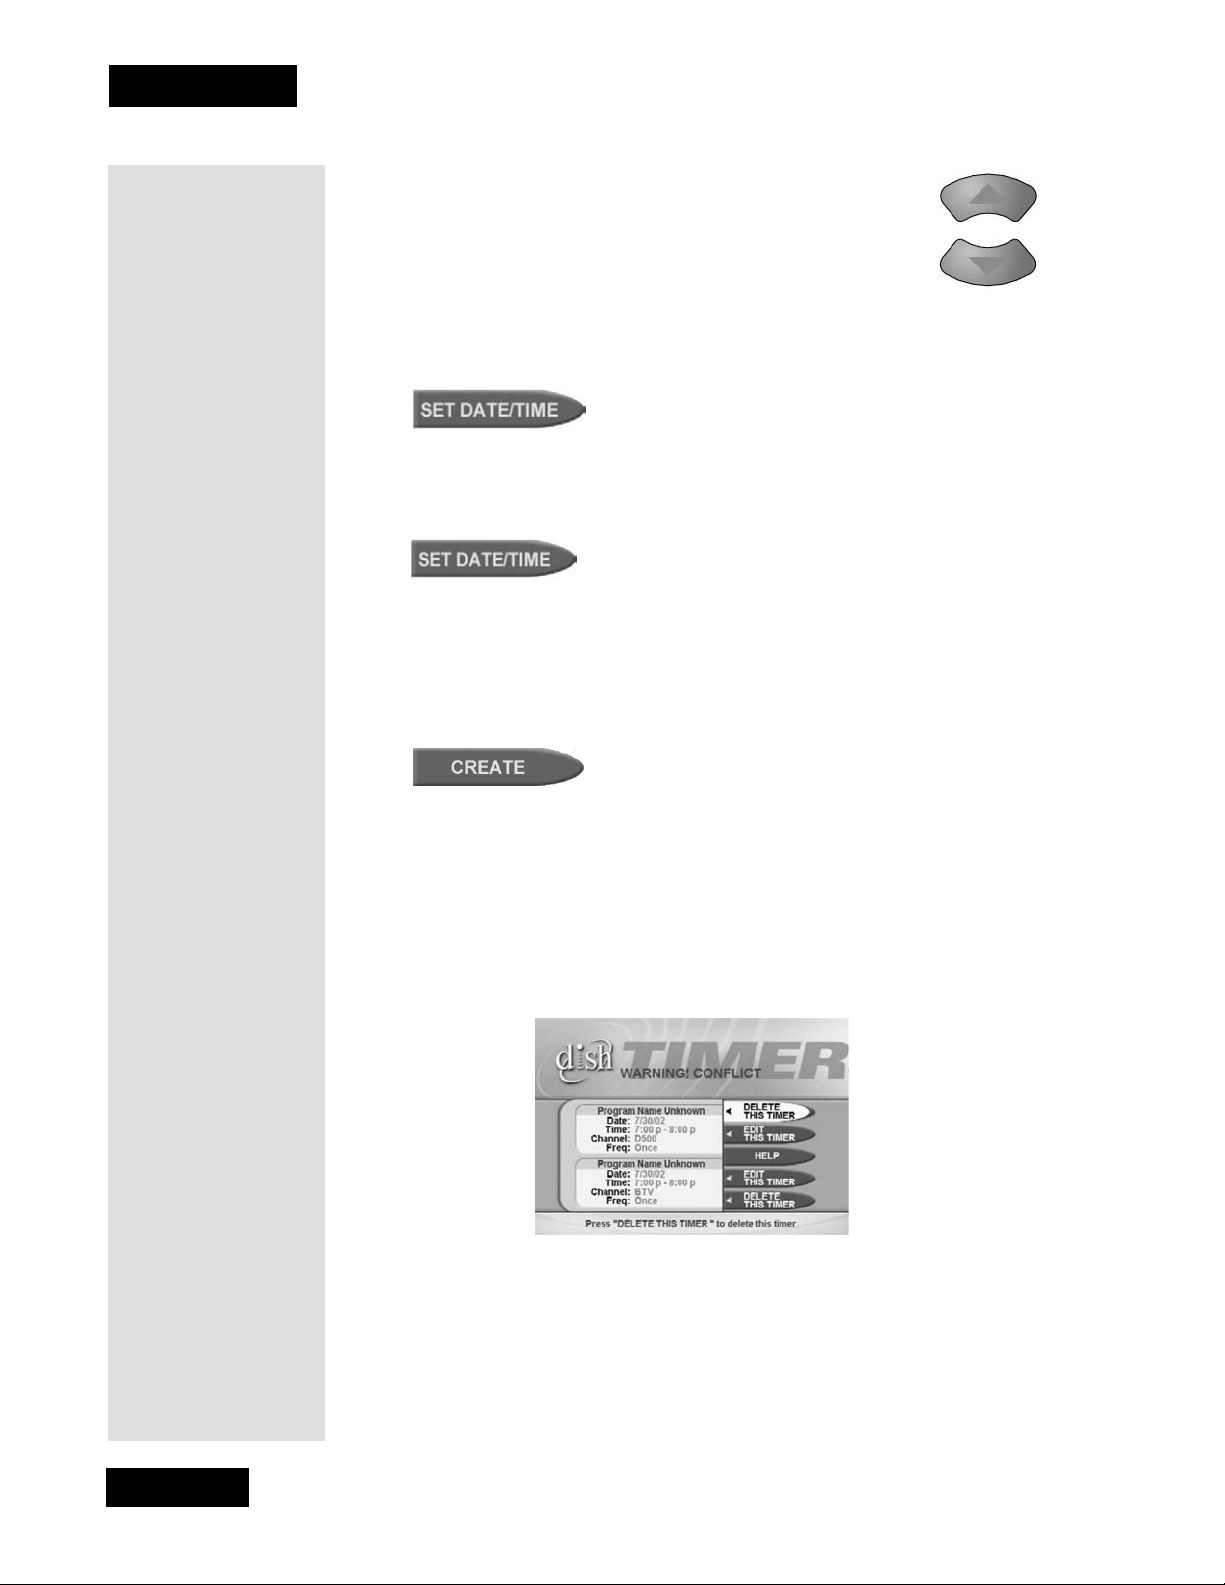
OVERLAPPING EVENT TIMERS
If you try to create event timers for overlapping programs, the receiver
displays a menu with the dates and times of both programs. The receiver
also displays this menu if a program time has change d, causing one timer to
overlap another. Y ou must delete or edit one of the timers.
Tip: The receiver
deletes Once
event timers
when they
operate. You must
delet e a ll othe r
types of event
timers yourself.
Page 32
MAXIMUM NUMBER OF EVENT TIMERS
You can create a limited number of event tim ers. If you try to create more,
the receiver displays a menu giving you the option to del ete an existing
timer. If you do not delete an existing tim er, you will not be able to create
any new ones.
Page 37
EDITING AN EVENT TIMER
• You can edi t alm o st any featu re o f an event tim er.
• You can edit bo t h automatic and manual event timers.
• Editing an automatic event timer converts the timer to a manual event
timer that operates at the times you set, not the actual program times.
1. Press the Menu button.
Using Timers
2. Select the
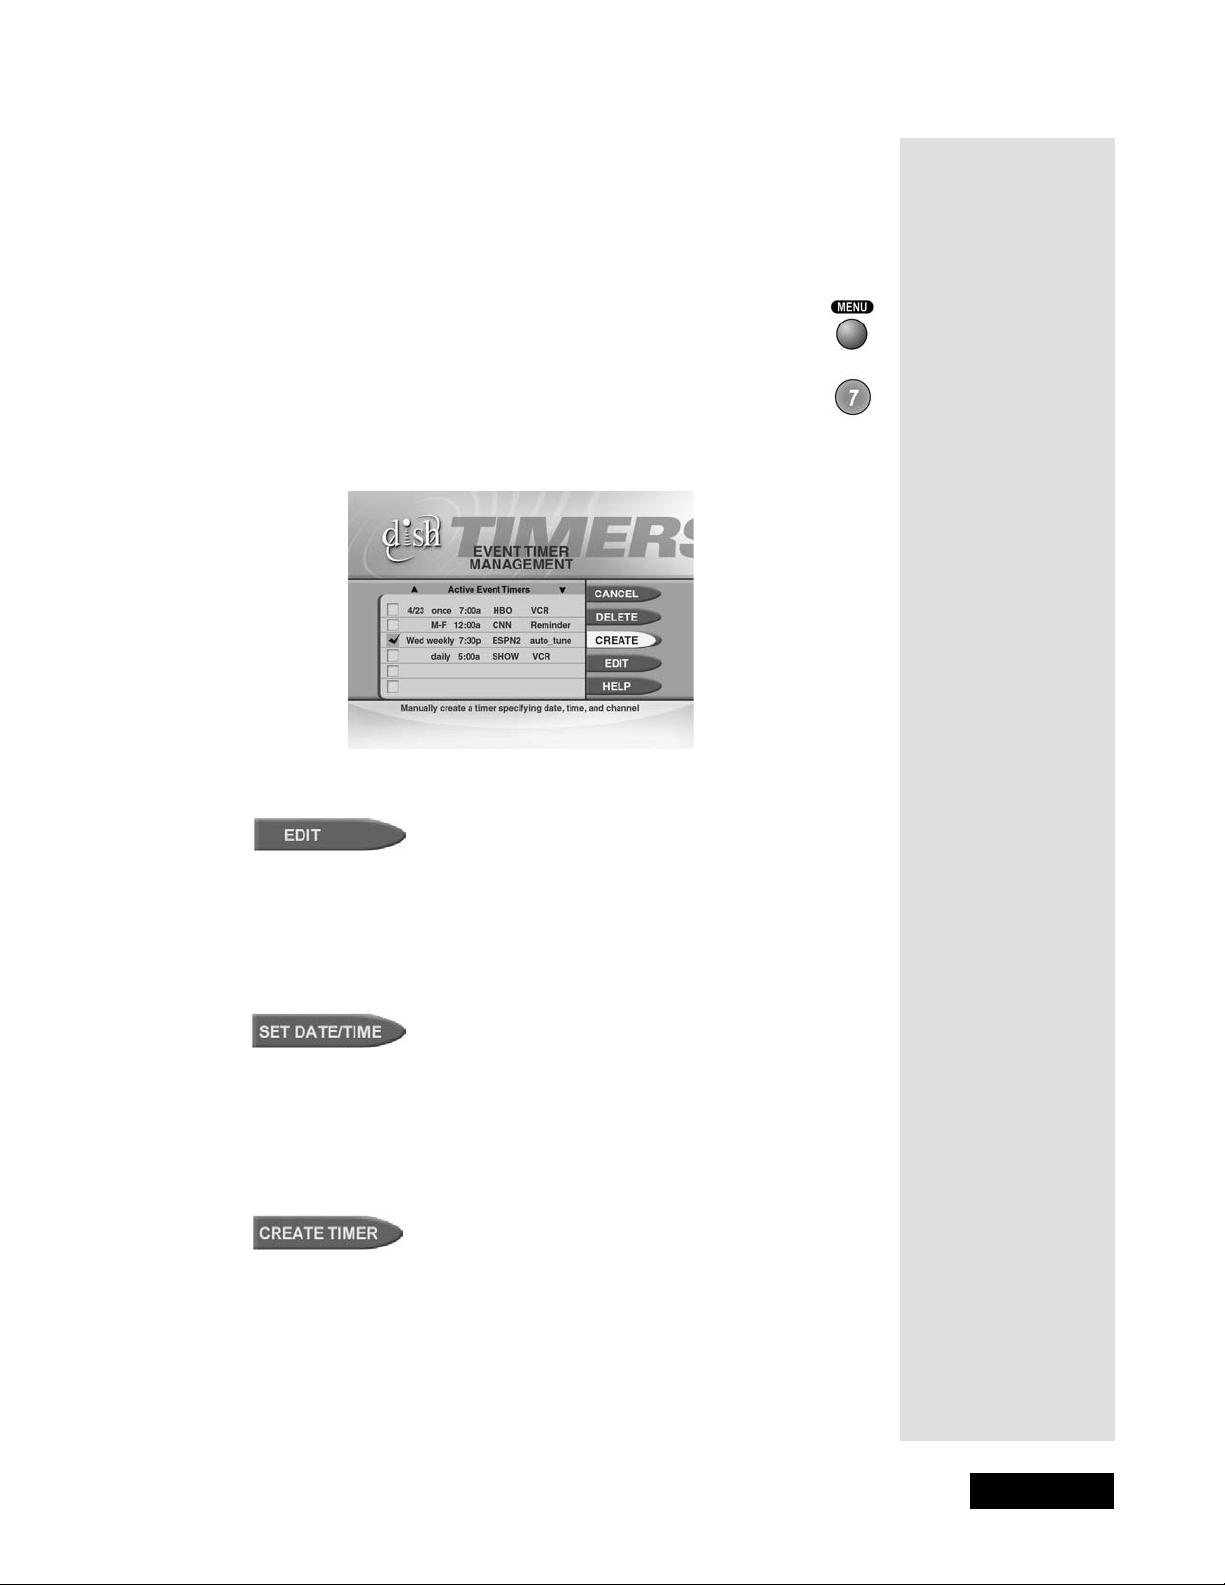
3. The receiver displays the
Timers option.
Event Timer Management menu.
4. Select the event tim er that you want to edit. A check mark appears in
the box next to the eve nt timer. Select the Edit option.
5. You may change the
Timer Type, Timer Frequency , or Channel. T o do
this, select each option that you want.
6. If you want to change the Start Time, the End Time, or the Date, select
the Set Date/Tim e option to display the Set Date/Time
for Manual Timer
menu. Otherwise, skip to step 9, below.
7. Use the NUMBER PAD buttons to enter the
Start Time (this includes
selecting AM or PM) and the End Time (this includes selecting AM or
PM).
8. Use the NUMBER PAD buttons to enter the
Date.
9. Select the Create Timer option.
10. To edit another event timer,
Either: Highlight that timer and select the Edit option again.
Or: If you do not want to edit another event timer, press the CANCEL
button.
lPage 33
Page 38
Chapter 3
Using the Sys tem
DELETING AN EVENT TIMER
1. Press the MENU button.
2. Select the
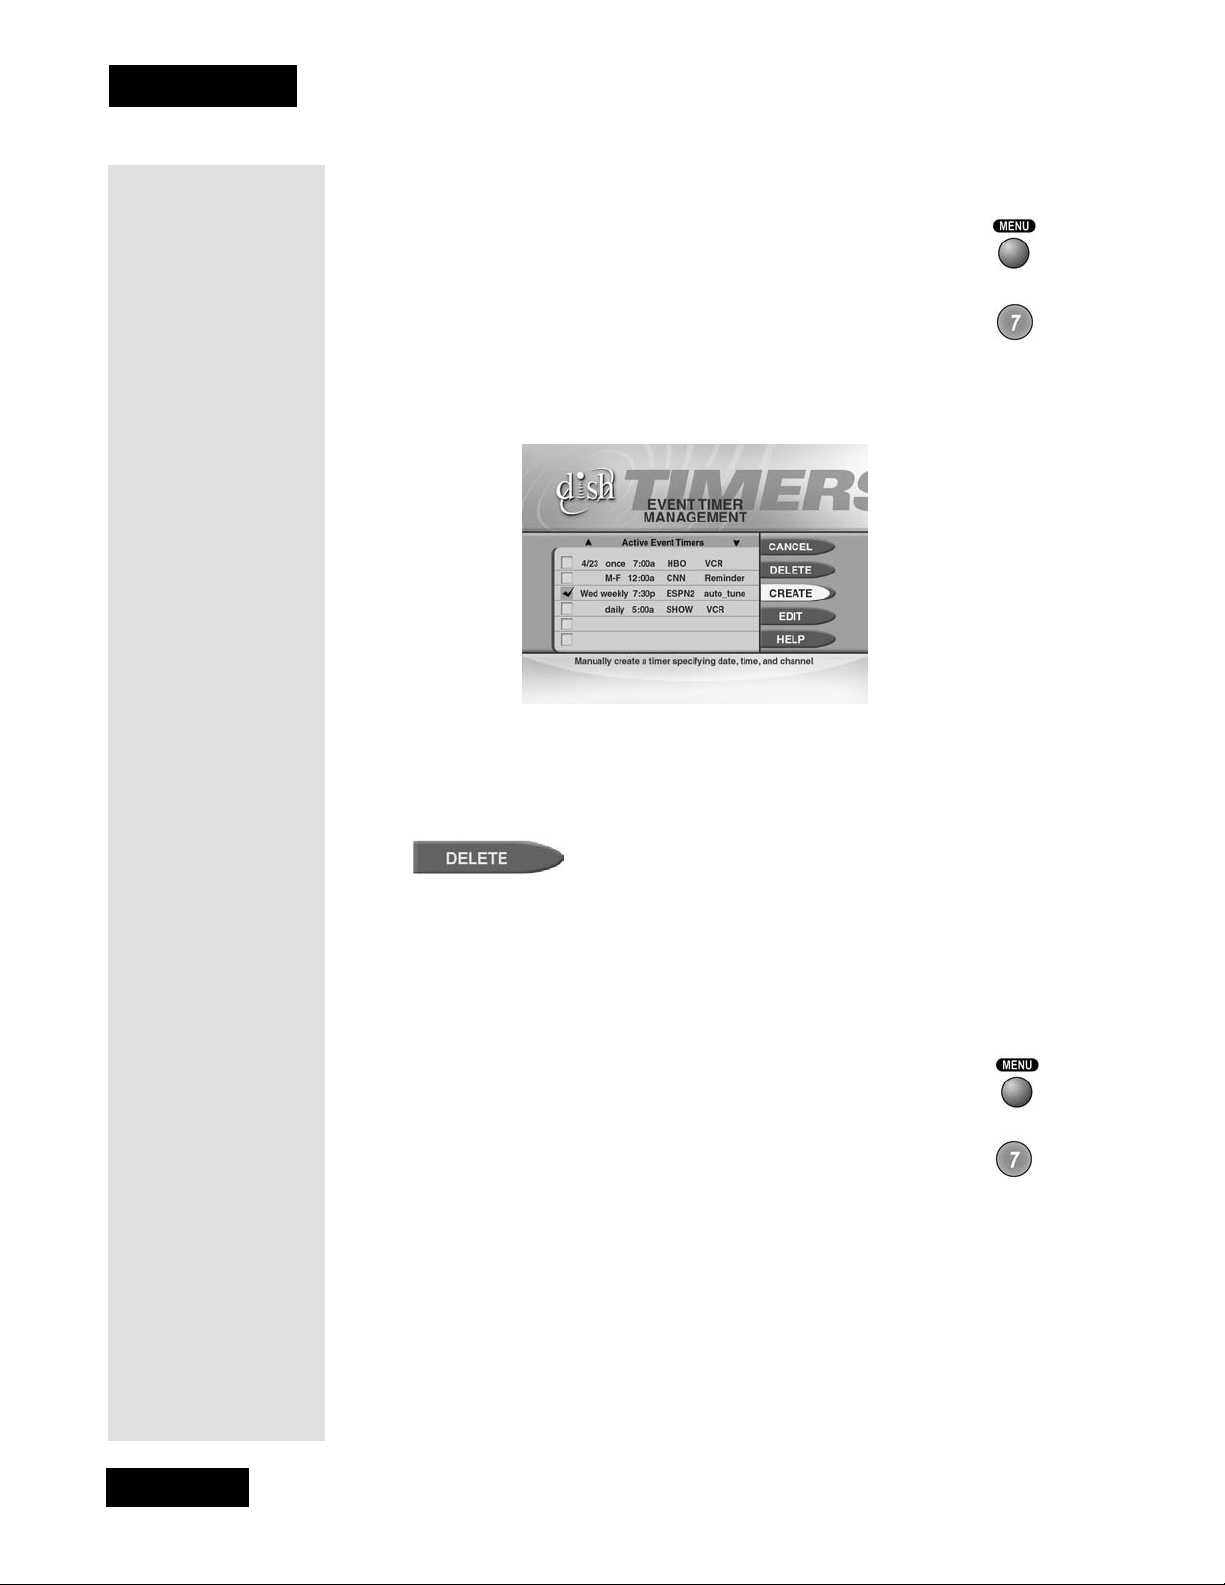
3. The receiver displays the
Timers option.
Event Timer Management menu.
4. Select an event timer that you want to delete. A check mark appears in
the box next to the event timer.
5. Move to
Delete and press SELECT on the remote.
Page 34
Do this again for any other timer(s) that you want to delete.
REVIEWING EVENT TIMERS
Y ou c an revie w event timers by using the Event Timer Management menu.
1. Press the MENU button.
2. Select the
3. The receiver displays the
Timers option.
Event Timer Management menu.
Page 39
Setting Up the Receiver to Control the VCR
To use VCR Event Timers, you must connect the rec ei ver’s back panel
CH 3-4 output to the tuner input s on the VCR. To use VCR Event Timers,
you must set up the receiver to control the VCR.
The receive r uses an IR sig nal to co ntrol the VCR. This signal is much
stronger than the signal the remote use s, so it can bounce off walls or other
objects on its way to the VCR. This works in most home setups. However,
shelves or sm oked gl ass door s be tween the re ceiver a nd the VCR ma y bl ock
the signal. Also, if the signa l must cross a very large room, or bounce off
curtains, it may not be strong enough to control the VCR. Make sure that
nothing blocks the signal, and that the signal can bounce off relatively
nearby, light-colored, smooth surfaces.
Using Timers
1. Press the MENU
2. Select the
3. Select the
4. Select the
button.
System Setup option.
Installation option.
VCR Setup option.
5. Find the brand name of the VCR in the table on page 81.
6. Set the code for the VCR using one of the foll owing:
• Enter the first 3-digit code number from the table using the
NUMBER PAD buttons.
• Highlight each digit of the first VCR code, and
then press the UP or DOWN ARROW button
until you reach the correct number and then pr ess
SELECT.
7. Make sure the VCR is turned ON and the switch is set
to 3 or 4 (whiche ver you use). Insert a rewound tape on
which you want to record. The receiver star ts the VCR
recording, but does not turn ON the VCR, so you must
do this yourself.
8. To test the new code, highlight the
Test option. The receiver displays a
message warning you to make sure the VCR is turned ON.
9. Press the SELECT button to start the test. Your VCR
records for a few seconds, stops, and then rewinds. The
receiver displays a message saying that your VCR test is
complete. Follow the instructions on the message.
lPage 35
Page 40
Chapter 3
Using the Sys tem
10. If your VCR did not complete the test, enter another code from the
table, and then repeat steps 5 through 8.
11. Once you have found the correct VCR code select the
save the VCR code you entered and return to the Installation and
Setup
menu.
Note: If the receiver can’t control the VCR, use an Auto-Tune Event
Timer to tune the receiver to the channel you want to record. Use the
timers built into the VCR to start and stop the VCR at the right times.
Save option to
LOCKS, BLACKED-OUT PROGRAMS, AND EVENT TIMERS
You must enter the receiver password before you can create an automatic
event timer for a locked program, and you must order a pay per view
program before you can create a timer for it. You can create a manual event
timer for a locked program without ent ering the password. However, if you
do this, or if the program is blacked out in your area, when the event timer
operates the receiver may displa y only an error or passwo rd en t ry men u . If
you have set a VCR Event Timer, the VCR will record only that menu.
POWER OFF AND EVENT TIMERS
If the receiver is OFF at the time an Auto-Tune or VCR Event Timer is
scheduled to operate, the receiver will turn ON. Once the event has ended,
the receiver will turn OFF, unless you pressed a ny remote control or
receiver front panel buttons during the time that the timer was active .
If the receiver is OFF at the time a Reminder Event Timer is scheduled to
operate, the timer will turn the receiver ON and tune it to the channel you
last watched. The receiver will then display the reminder menu. You will
have a few se conds to respond. If you do not respond to the reminder menu,
the receiver will turn OFF.
USING LOCKS
First you set the locks; then you lock the receiver. Y ou must
lock the receiver in order to put any locks into effect. If you
unlock the receiver, leave the locks unchanged, and then
lock the receiver again, the same locks will be in effect as
before.
HOW TO SET LOCKS: A TWO STEP PROCESS
1. Create the lock s that you w an t.
2. Lock the recei ver.
Once the receiver is locked, anyone who wants to access locked items
must enter the password.
Page 36
Page 41
WHEN YOU HAVE LOCKED THE RECEIVER
If you tr y to access a locked item or open the Parental and System Locks
menu, the receiver displays a message prompting you to enter the password.
The receiver al lows you three tries to enter the correct password. If you fail
to enter the correct password, the receiver does not allow more tries for
several minutes.
If you enter the correct password, you can access the locked item or open
the
Parental and System Locks menu.
Using Locks
If you exit a locked item or close the
Parental and System Locks menu,
you must enter the password again to access the item or open the menu
again.
If you forget your password, you will need to speak with
a Customer Service Representat ive and may need to
provide some infor mation rela ted to your a ccount includin g
a Personal Identification Number (PIN), if used. See
page 44 for information on PINs.
CREATING A PASSWORD
You must lock the receiver for any receiver Parental Locks y ou set to ta k e
effect. To lock the receiver, you must first create a password. If you forget
your password, you will need to call the Customer Service Center at 1-800333-DISH (3474).
To create a password:
1. Press the MENU button to display the
2. Select the
System Locks
Locks option to display the Parental and
menu.
Main menu.
Note: If the rec eiver displays a messa ge prompting you to
enter a password, the receiver has already been locked.
3. Select the
Lock System option. The receiver displays a
message prompting you to enter a password.
Note: If this option appears as Unlock System instead,
the receiver is already locked.
4. Enter and verif y a password, using the number pad buttons. The
receiver displays sta rs (*) as you enter the digits of the pass word.
5. Memorize your password. From now on, you must enter this password
to lock or unlock the re ceiver.
6. Highlight and select the
OK option. Re- enter the password. All the
locks you have set are now in effect.
lPage 37
Page 42
Chapter 3
Using the Sys tem
CREATING OR CHANGING RATING (CONTENT) CODE LOCKS
Please be aware of the following: The locks use the codes
that the original progr am providers assigned to the
programs. The actual content of the programs may diffe r
from their assigned rati ngs. No rati ng system can guarant ee
that all objectionable material is screened out. Like all other
locks, these locks are only in effect when the receiver is
locked. You can lock any program, including pay per view
programs. The locks built into some televisions do not
apply to satellite programs. Television program ratings
differ fr om movie ratings.
Do the following to set program locks based on rating codes. Then, when
the receiver is locked, only someone who knows the password can watch
these prog ram s .
1. Press the MENU button.
2. Select the
Locks option.
If the receiver is locked, enter the password using the
number pad buttons. The receiver displays stars (*) as you
enter the digits of the password. As soon as you enter the
fourth digit of the password, the receiver highlights the
OK option.
Press the SELECT button.
3. Select the
Ratings Locks option.
Highlight the r ating that corresponds to the lowest
acceptabl e aud i ence ag e. Press the SELECT button to lock
the highlighted rating.
Note: All ratings that are more restrictive than the selected rating are
also selected. For exam pl e , if you lock PG-13 ra ted programs, then all
programs with the R, NC-17, and NR/AO ratings are also lock ed.
4. Select the expanded rating code(s), if you want to also lock these
ratings.
5. To unlock a rating code, highlight the code and press SELECT.
6. Select the
Save option to save the changes.
7. If the receiver is not locked, you must lock it to put the locks you just
created into effect.
Page 38
Page 43
CREATING OR CHANGING CHANNEL LOCKS
Note: You c an lock any channel, including pa y per view channels.
1. Press the MENU button.
Using Locks
2. Select the
Locks option.
3. If the receiver is locked, enter the password using the
number pad buttons. The receiver displays stars (*) as you
enter the digits of the passwor d. As soon as you enter the
fourth digit of the passwor d, the receiver highlights the
OK
option. Press the SELECT button.
Select the
Channel Locks option.
4. Highlight the channel that you want to lock. If
necessary, press the UP or DOWN ARROW button
to see the desired ch ann el. You can also enter each
channel number using the number pad buttons.
5. Press the SELECT button to lock or unlock the
highlighted channe l. I f the checkbox next to the channel has a
checkmar k, the ch ann e l is loc ked .
6. Select the
Save option to save the changes.
7. If the receiver is not already locked, you m ust lock it to put the locks
you just created into effect.
LOCKING THE RECEIVER
1. Press the MENU button.
2. Select the
3. Select the
Locks option.
Lock System option.
The receiver displays a message prompting you to enter a
password.
Note: If this option appears as Unlock System instead, the receiver is
already lock ed.
4. Enter and check a password, using the number pad buttons. The
receiver displays sta rs (*) as you enter the digits of the pass word.
Memorize your passwor d. From now on, you must enter this password
to lock or unlock the re ceiver.
5. Select the
OK option. Ente r the password again.
lPage 39
Page 44
Chapter 3
Using the Sys tem
UNLOCKING THE RECEIVER
If you unlock the receiver, leave the locks unchanged and then lock the
receiver again, the same locks will be in effect as before.
1. Press the MENU button to display the
2. Select the
Locks option.
Main Menu.
3. Wi th the receiver locked, you must enter the password using
the NUMBER P AD buttons. The receiver displays stars (*) as you enter
the digits of the password. As soon as you enter the fourth digit of the
password, the receiver highlights the
OK option.
4. Press the SELECT button.
5. Select the
Note
Unlock System option.
: If this option appears as L ock System instead, the
receiver is already unlocke d.
LOCKING THE RECEIVER FRONT PANEL CONTROL BUTTONS
This keeps anyone from changing the channel, but it does not lock the
remote control buttons. Remember that you must lock the receiver for thi s
lock to take e ffect.
To lock the receiver front panel buttons, do the following:
1. Press the MENU
2. Select the
button.
Locks option.
If the receiver is locked, enter the password using the
number pad buttons. The receiver displays stars (*) as you
enter the digits of the password. As soon as you enter the
fourth digit of the password, the receiver highlights the
OK option.
Press the SELECT button.
3. Select the
4. Select the
Front Panel Lock option.
Yes option.
5. If the receiver is not locked, you must lock it to put the lock you just
created into effect.
Page 40
Page 45

UNLOCKING THE RECEIVER FRONT PANEL CONTROL BUTTONS
T o unlock the receiver front panel but tons, you must use the remote control.
Using Locks
1. Press the MENU
2. Select the
button.
Locks option.
If the receiver is locked, enter the password using the
NUMBER PAD buttons. The receiver displays stars (*) as you
enter the digi ts of t he pas sword. As soon as y ou enter the f ourth
digit of the password, the receiver highlights the
OK option.
Press the SELECT button.
3. Select the
4. Select the
Front P a nel Lock option.
Yes option.
LOCKING PAY PER VIEW PROGRAMS
This locks all pay per view channels. Remember that you must lock the
receiver for this lock to take effect.
You also can lock one or more pay per view channels by using channel
locks or rating locks.
1. Press the MENU
2. Select the
button.
Locks option.
If the receiver is locked, enter the password using the number
pad buttons. The receiver displays stars (*) as you enter the
digits of the password. As soon as you enter the fourth digit
of the password, the receiver highlights the
OK option. Press the
SELECT button.
3. Select the
Lock PP V option.
4. If the receiver is not locked, you must lock it to put the
lock you just created into ef fect.
To unlock pay per view programs:
5. Press the MENU
button.
Tip: If this option
appears as Unlock
PPV instead, pay
per view programs
are already locked.
lPage 41
Page 46
Chapter 3
Using the Sys tem
6. Select the Locks option.
If the receiver is locked, enter the password using the
NUMBER PAD buttons. The receiver displays stars (*) as you
enter the digit s of the password. As soon as you ente r the fourth
digit of the password, the receiver highlights the
OK option.
Press the SELECT button.
Tip: If the receiver
displays a
message
prompting you to
enter a password,
it already has been
locked.
7. Select the
Note: When you select this option, you unlock all pay per
Unlock PPV option.
view chann els .
HIDING ADULT CHANNELS
This keeps the Program Guide, Themes lists, and the Browse Banner
from displaying adult channels. It keeps anyone from choosing such
channels by using the UP or DOWN ARROW buttons or the remote
control NUMBER PAD buttons. Remember that you mu st lock the r eceiver
for this lock to take effec t.
To hide adult channels:
1. Press the MENU
2. Select the
If the receiver is locked, enter the password using the number
pad buttons. The receiver displays stars (*) as you enter the
digits of the password. As soon as you enter the fourth digit of
the password, the receiver highlights the OK option. Press the SELECT
button.
3. Select the
button.
Locks option.
Hide Adult option.
Tip: If this option
appears Unhide
Adult instead, the
adult channels are
already hidden.
Page 42
4. If the receiver is not locked, you must lock it to put the lock you just
created into effect.
To show adult channels:
1. Press the MENU
button.
2. Select the Locks option.
If the receiver is locked, enter the password using the number pad
buttons. The receiver displ ays stars (*) as you enter the digit s of the
password. As soon as you enter the fourth digit of the password, the
receiver highlight s the
3. Select the
Show Adul t option.
OK option. Press the SELEC T button.
Page 47
OPENING A LOCKED ITEM, OR OPENING THE LOCKS MENU
1. Se lect an it em tha t is lock e d .
Using Locks
2. The receive r displays an
Attention message telling you tha t the item or
menu is locked.
3. Enter th e password u sing t he number pad buttons. The receive r disp lays
stars (*) as you enter the digits. As soon as you enter the fourth digit of
the password, the receiver highlights the
OK option.
4. Press the SELECT button.
CHANGING THE RECEIVER PASSWORD
1. Press the MENU button.
2. Select the
If the receiver is locked, enter the password using the
number pad buttons. The receiver displays stars (*) as you
enter the digits of the passwor d. As soon as you enter the
fourth digit of the passwor d, the receiver highlights the OK
option.
3. Press the SELECT button.
4. Select the
Locks option.
Change Password option.
5. Enter the current password using the number pad buttons.
As soon as you enter the fourth digit of the password, the receiver
highlights the
OK option.
6. Press the SELECT button.
7. Enter the new password using the number pad buttons.
As soon as you enter the fourth digit of the password, the receiver
highlights the
8. Select the
OK option.
OK option to change the password.
9. Enter the new password again, using the NUMBER PAD buttons. The
receiver displays sta rs (*) as you enter the digits of the pass word. As
soon as you enter the fourth digit of the pas sword, the receiver
highlights the
OK option. Press the SELECT button.
Memorize the new password. From now on, you must enter this
password to lock or unlock the recei ver.
lPage 43
Page 48
Chapter 3
Using the Sys tem
PERSONAL IDENTIFICATION NUMBER
You can set up a Personal Identification Number (PIN) for call-in requests
only. Anyone calling the Customer Service Center must provide this PIN to
make any changes to your account. You may call the Customer Service
Center at any time to set up a PIN.
If you forget your PIN, you will need to call the Customer Service Center.
The representative may ask for more infor mation to make sure that you are
authorized to make changes to your account.
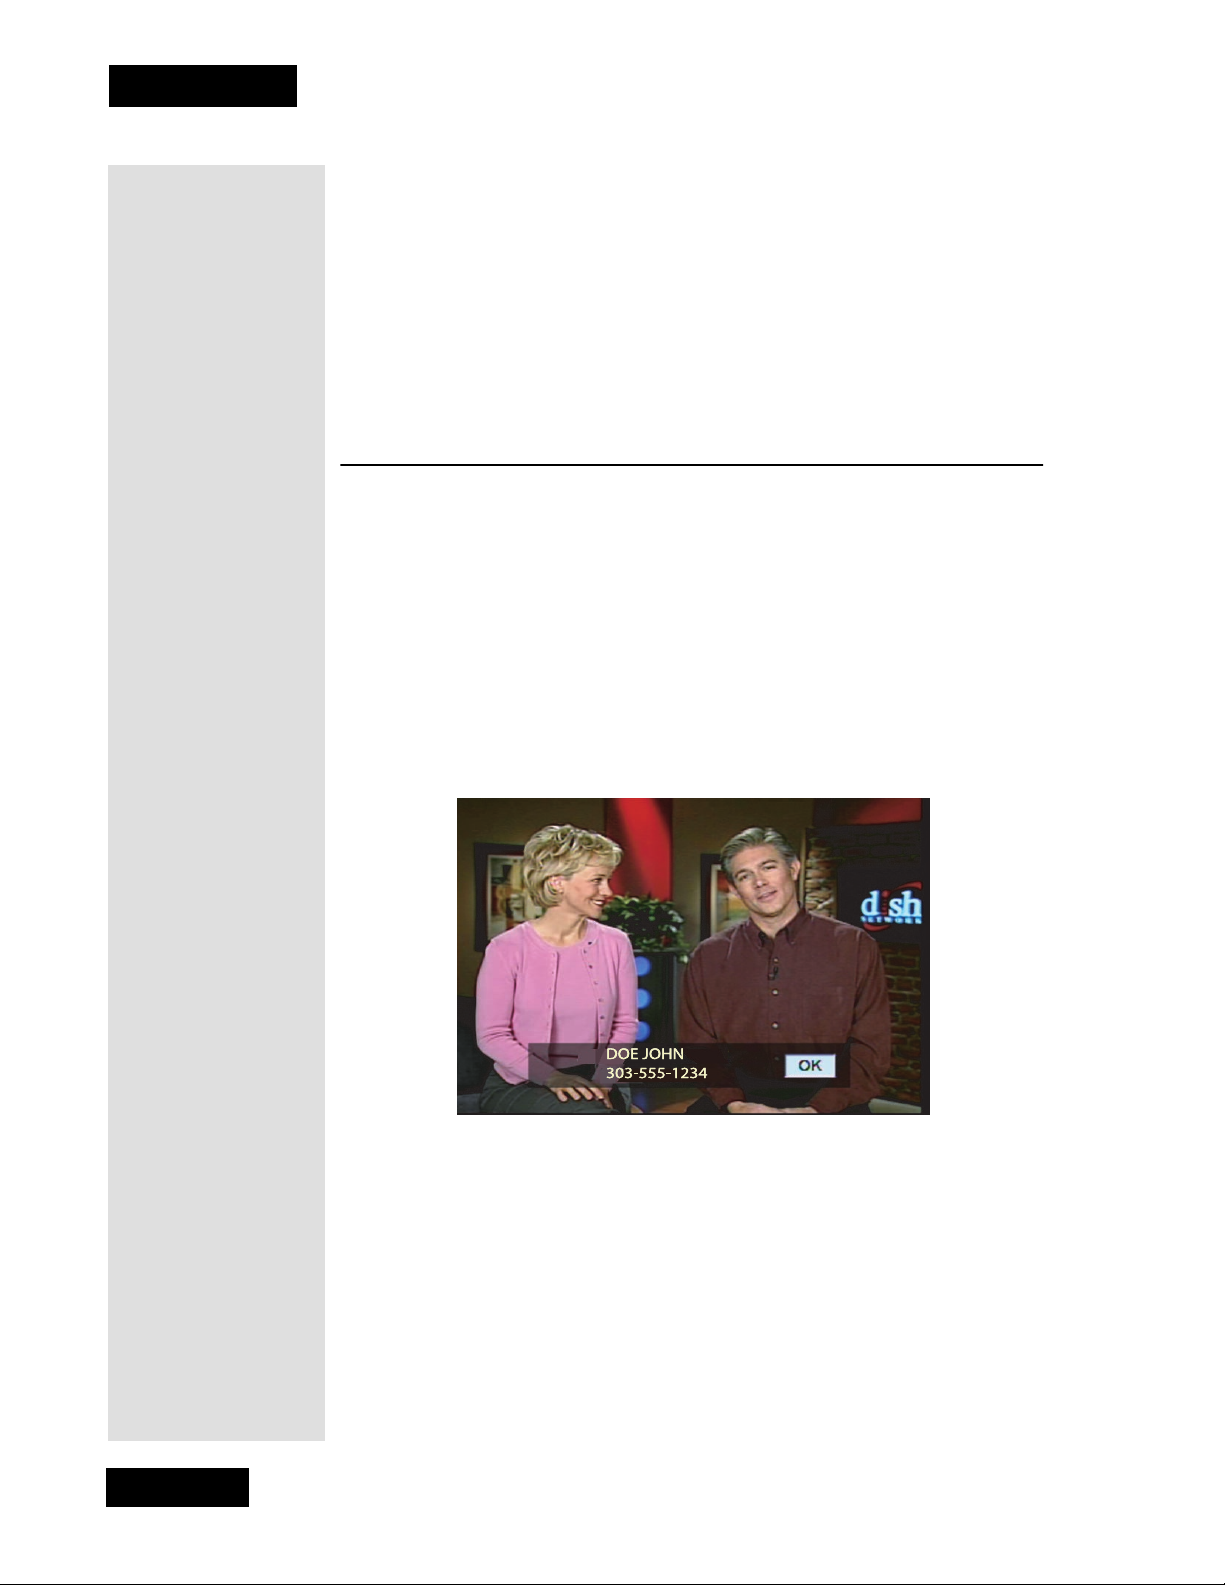
USING CALLER ID
Call e r ID displays on your TV the names of people as they call you if you
subscribe to Caller ID from your local phone company. To use this feature,
make sure you have a phone line connected to the receiver and that the
Call e r ID feature is enabled. After you turn on Call er ID, it stays on until
you decide to turn it off.
Note: For best performance, make sure your syst em is proper ly grounded.
CALLER ID SCREENS
When you receive a call, you will see a Caller ID popup screen.
You can select
disappear after 20 seconds.
OK to eliminate the message. If you do nothing, it will
Page 44
Page 49
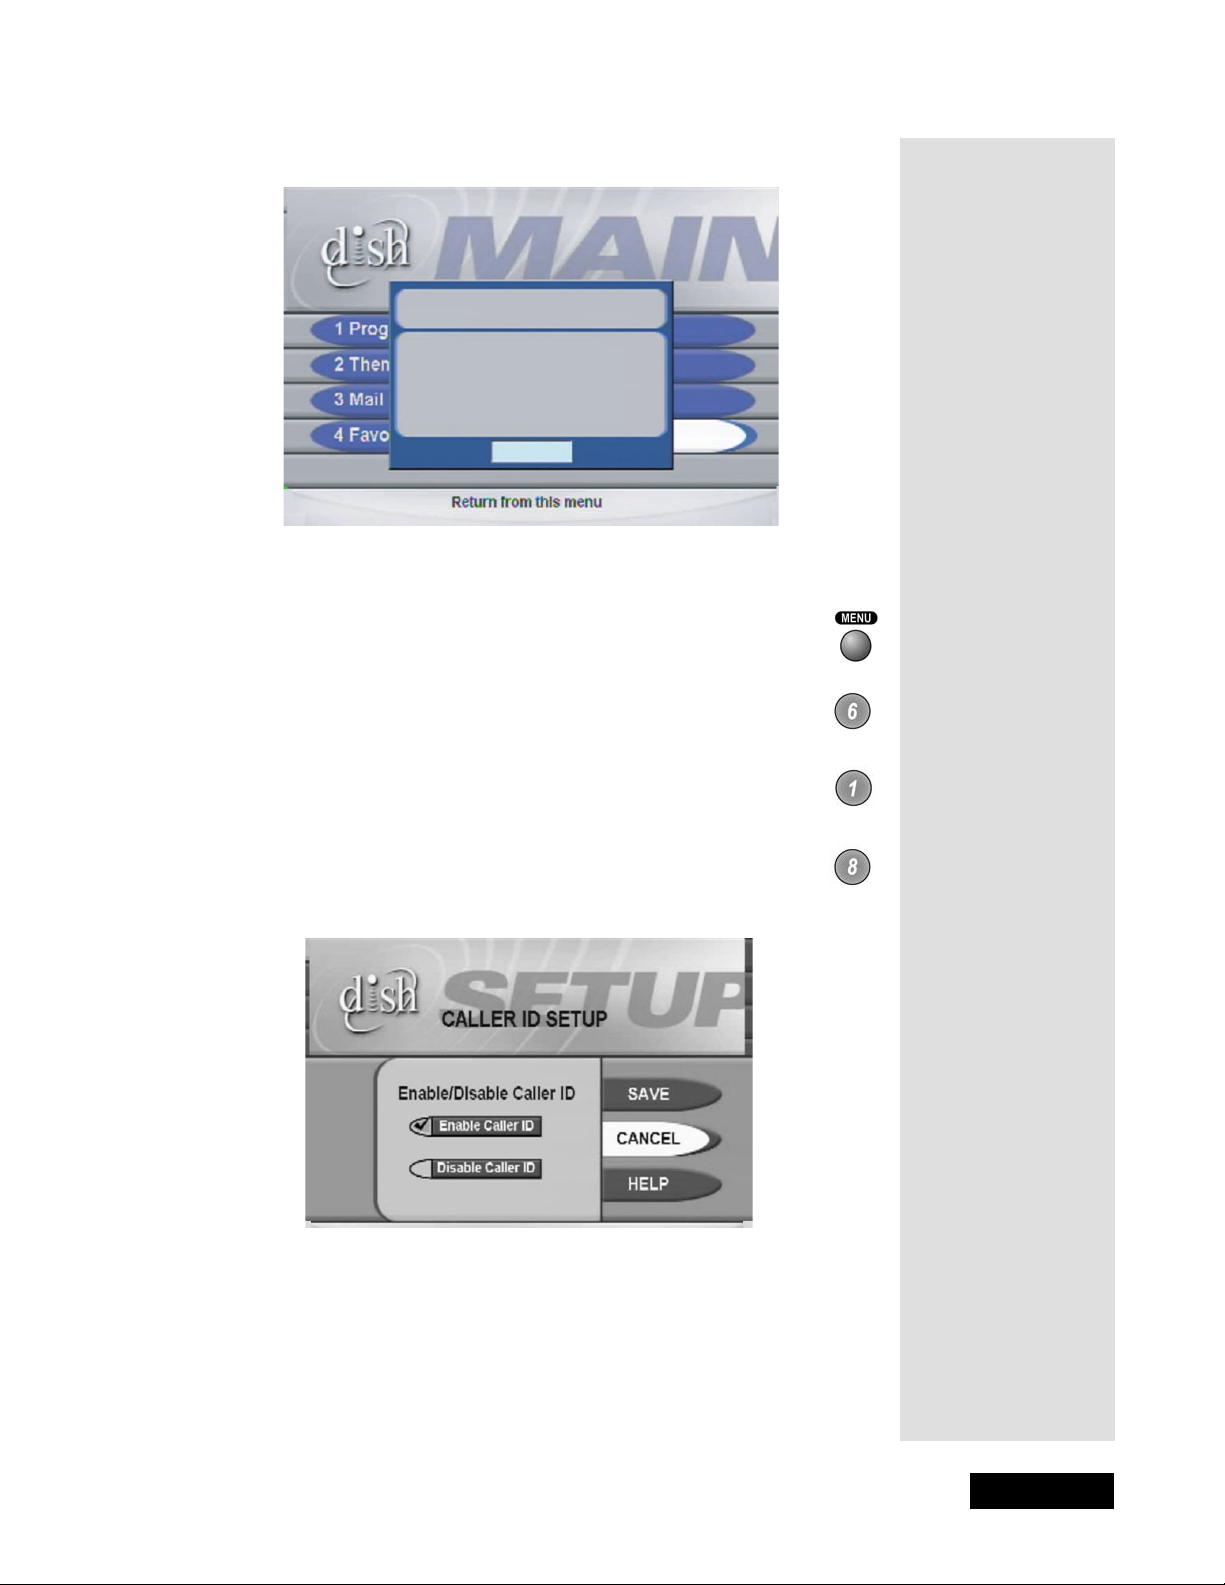
If you are in a menu when a call comes in, you will see a different Caller ID
popup screen.
Attention
Incoming call:
Name: DOE JOHN
Phone: 303-555-1234
OK
TO TURN THE CALLER ID ON AND OFF
1. Press MENU.
Using Caller ID
2. Select the
3. Select the
4. Select the
display.
5. Highlight
System Setup option.
Installation option.
Caller ID option. The following screen will
Enable Caller ID or Disable Caller ID and press SELECT.
6. Select
Save.
lPage 45
Page 50
Chapter 3
Using the Sys tem
RESTARTING THE RECEIVER
If your receiver stops responding to remote control or front panel
commands, press and hold the front panel POWER button for 4 seconds.
When you release the POWER button, the receiver will restart.
RESETTING THE RECEIVER TO FACTORY SETTINGS
Use these instructions if you want to reset the receiver to be the same a s
when it was shipped.
Note: Resetting the receiver disc ards all Favorite Lis ts except the All Chan
All Sub lists.
and
Note: If you have set any locks on the rece iver, and the rec eiv er is lock e d ,
these locks will be kept. If the receiver is unlocked, any such locks will be
lost. You cannot reset the receiver to default settings to discard a password
you have for gotten. Only the Customer Service Cent er can r eset the rece iver
to bypass a receiver lock.
1. Press the
MENU button.
Tip: You can
choose an alternate lang uage (if
available) but this
applies only to the
audi o part of a
program and does
not change the
language used in
the menus
displayed by the
receiver.
2. Select the
3. Select the
4. Select the
System Setup option.
Installation option.
Factory Defaults option.The receiv er displa ys a Warning
message, prompting you to confirm that you want to reset the receiver.
5. Select the
Yes option to confir m the reset. The r eceiver resets, and then
displays the Installation and Setup menu.
CHANGING PROGRAM LANGUAGES
You may be able to change the language of some programs. An alternate
language may not be available for all progra ms. Some programs, such as
movies, show at the start whether an alternate language is availa ble. An
alternate language applie s only to the audio part of a program and does not
change the language used in the menus displayed by the receiver.
1. Press the MENU button.
Page 46
Page 51
2. Select the Syst em Setup option.
Testing the Phone Connection
3. Select the
Alternate Audio option.
4. Select the lan guage you want in the
Note: Alternate provides vis u all y-im p aired customers wit h a visu al
description of the program.
5. Select
6. Press VIEW TV to exit the
Save to save your language choice. The receiver displays the
System Setup menu.
System Setup menu.
TESTING THE PHONE CONNECTION
STARTING A TEST
1. Press the MENU button.
2. Select the Syst em Setup option.
3. Select the
Diagnostics option.
Languages list.
Tip: Before you do
the telephone test,
make sure that an
active telephone
line is connected
to the Telephone
Jack on the
receiver back
panel.
TELEPHONE CONNECTION TEST
This test ch ecks that the receiver telephone connection is correct. Sel ect the
Connection option to begin the test. The receiver displays a message
asking you to wait until the test is done.
• If the telephone connection is correct, the receiver displays a
Connection OK
• S el ec t t h e
Custo mer Service Center. Press th e SELECT button to start the call.
When the call is done, select the
• If the telephone line is not connected properly, the receiver displays a
failure message. Check the tel ephone connection and then repea t the
test.
Note: If you have the receiver connected to a DSL (Digital Subscriber
Line) phone line, it may cause this test to fail. If so, you will need to
install a DSL filter between the rece iver and the phone jack on the wall.
message.
Dial Out option so the receiver can make a toll-free call to the
Cancel option to exit the test menu.
Phone
Tip: You can get a
DSL filter from
your Internet
Service Provider
or a local
electronics parts
store.
lPage 47
Page 52
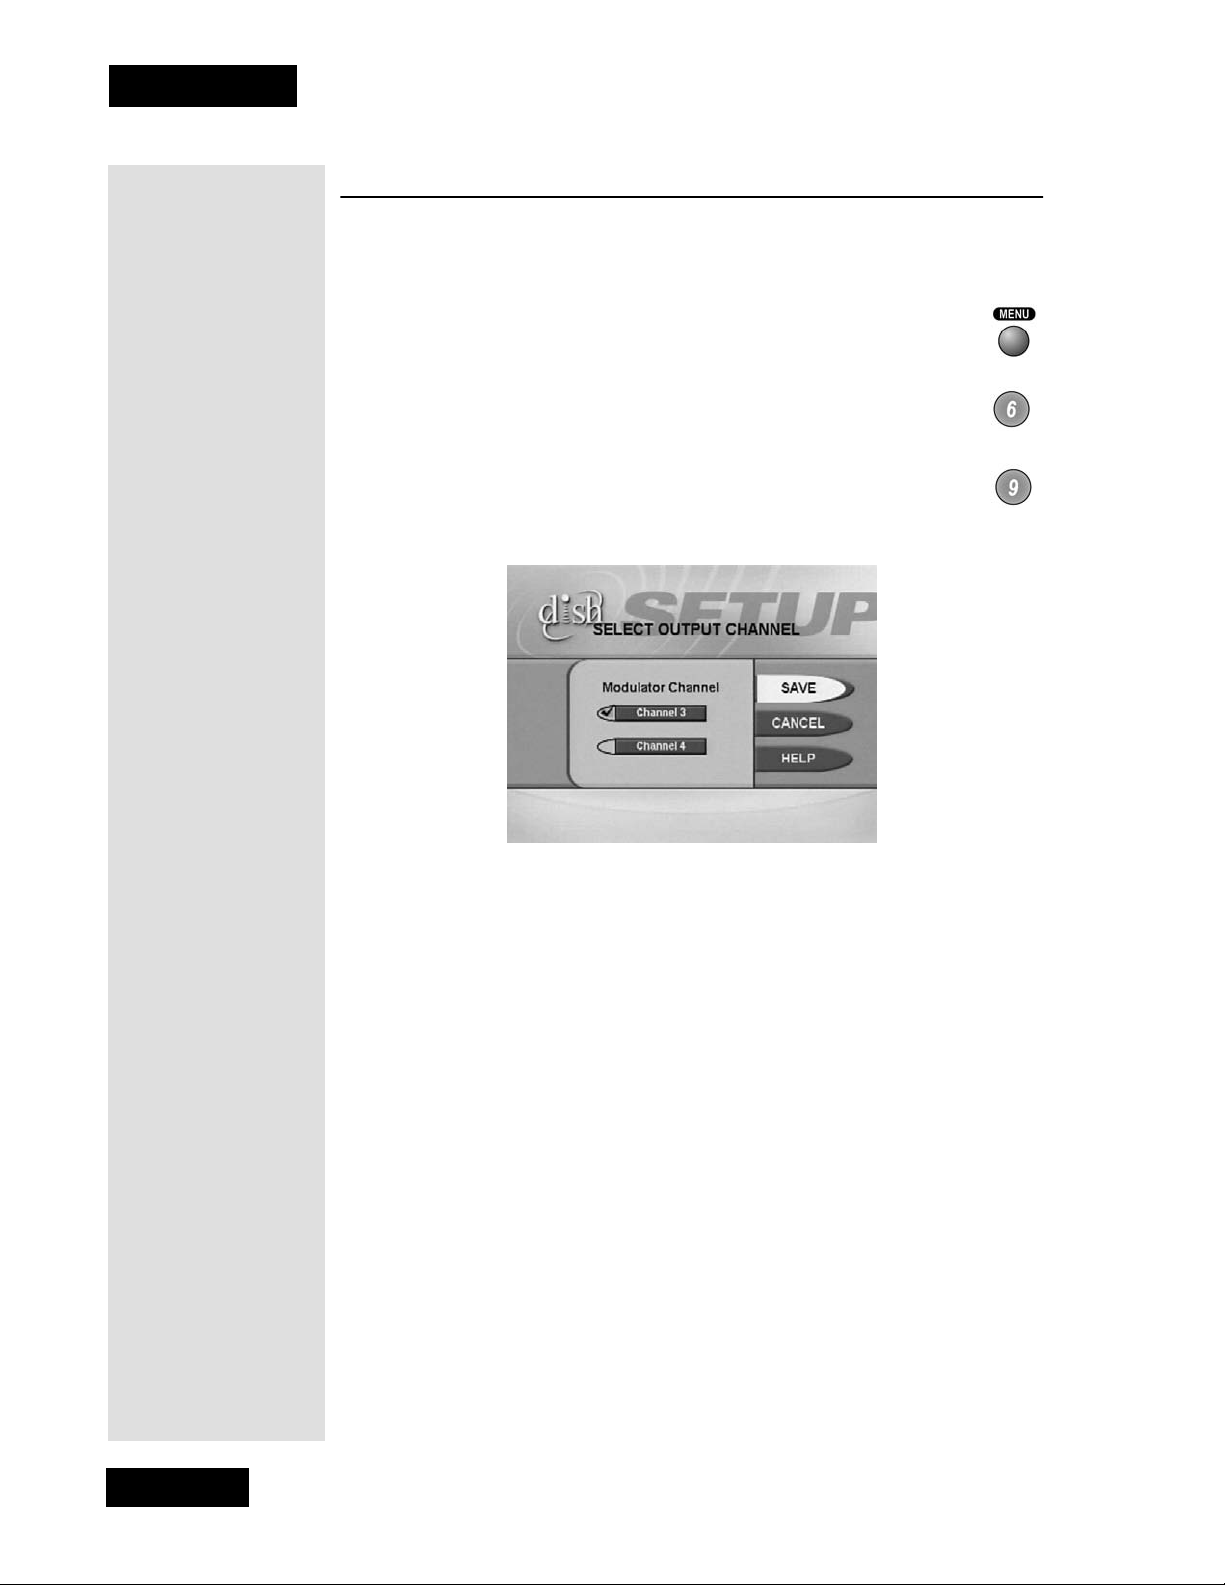
Chapter 3
Using the Sys tem
SETTING UP THE RECEIVER FOR CHANNEL 3 OR 4
Your receiver comes preset to tune to channel 3 on the TV. If you need to
change the channel your TV uses, do the following:
1. Press the MENU button.
2. Select
3. Select
4. Select either
5. Select
6. Tune your TV to the same channel (3 or 4) that you selected on the
System Setup.
3/4 Modulator. The Select Output Channel
screen displays.
Channel 3 or Channel 4.
Save.
Select Output Channel screen.
Page 48
Page 53
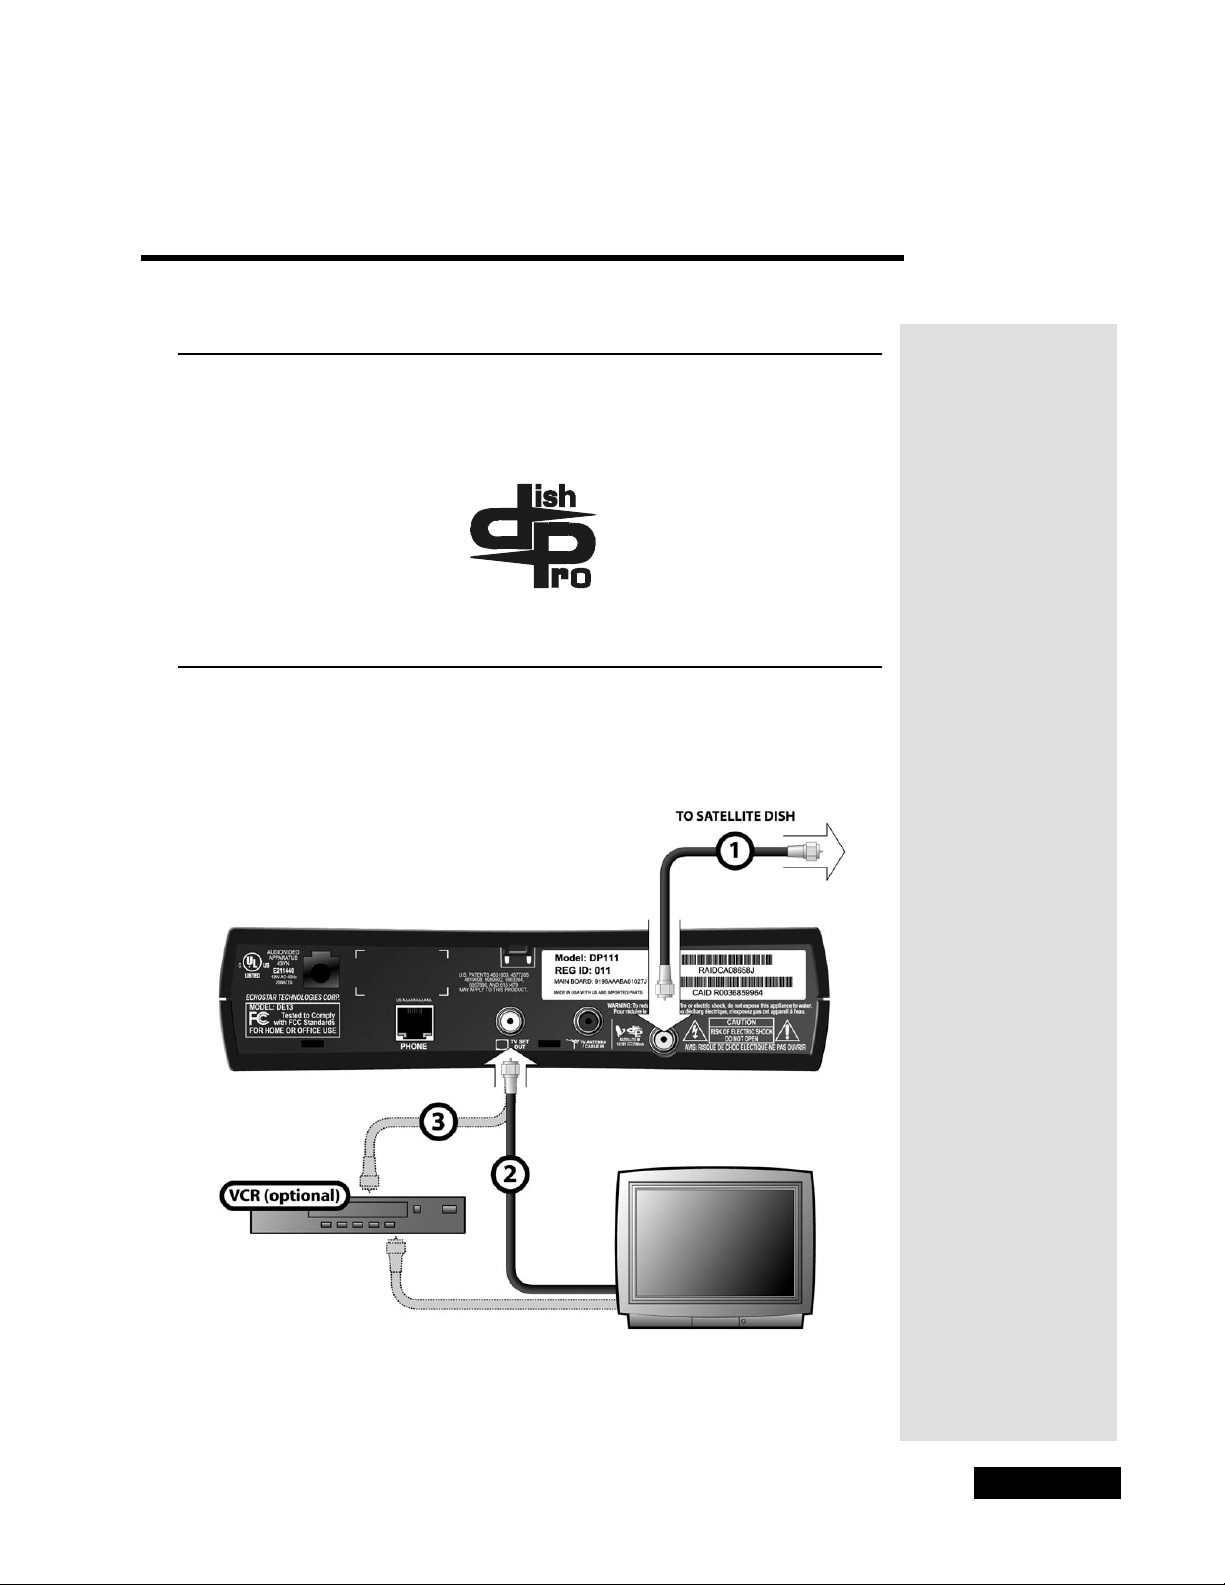
Chapter 4
Installation Instructions
How to Use these Instructions
These instruc tions guide you through the installation of a satellite system which
includes your DISH Pro receive r (included with this manual), and a DISH Pro
antenna system that can be ident ified by the DISH Pro logo shown below.
Connec ting Your TV and VCR
Use the following diagram and inst ructions to connect the sat ellite receiver
to a dish antenna, TV, and VCR (optional).
Page 49
Page 54
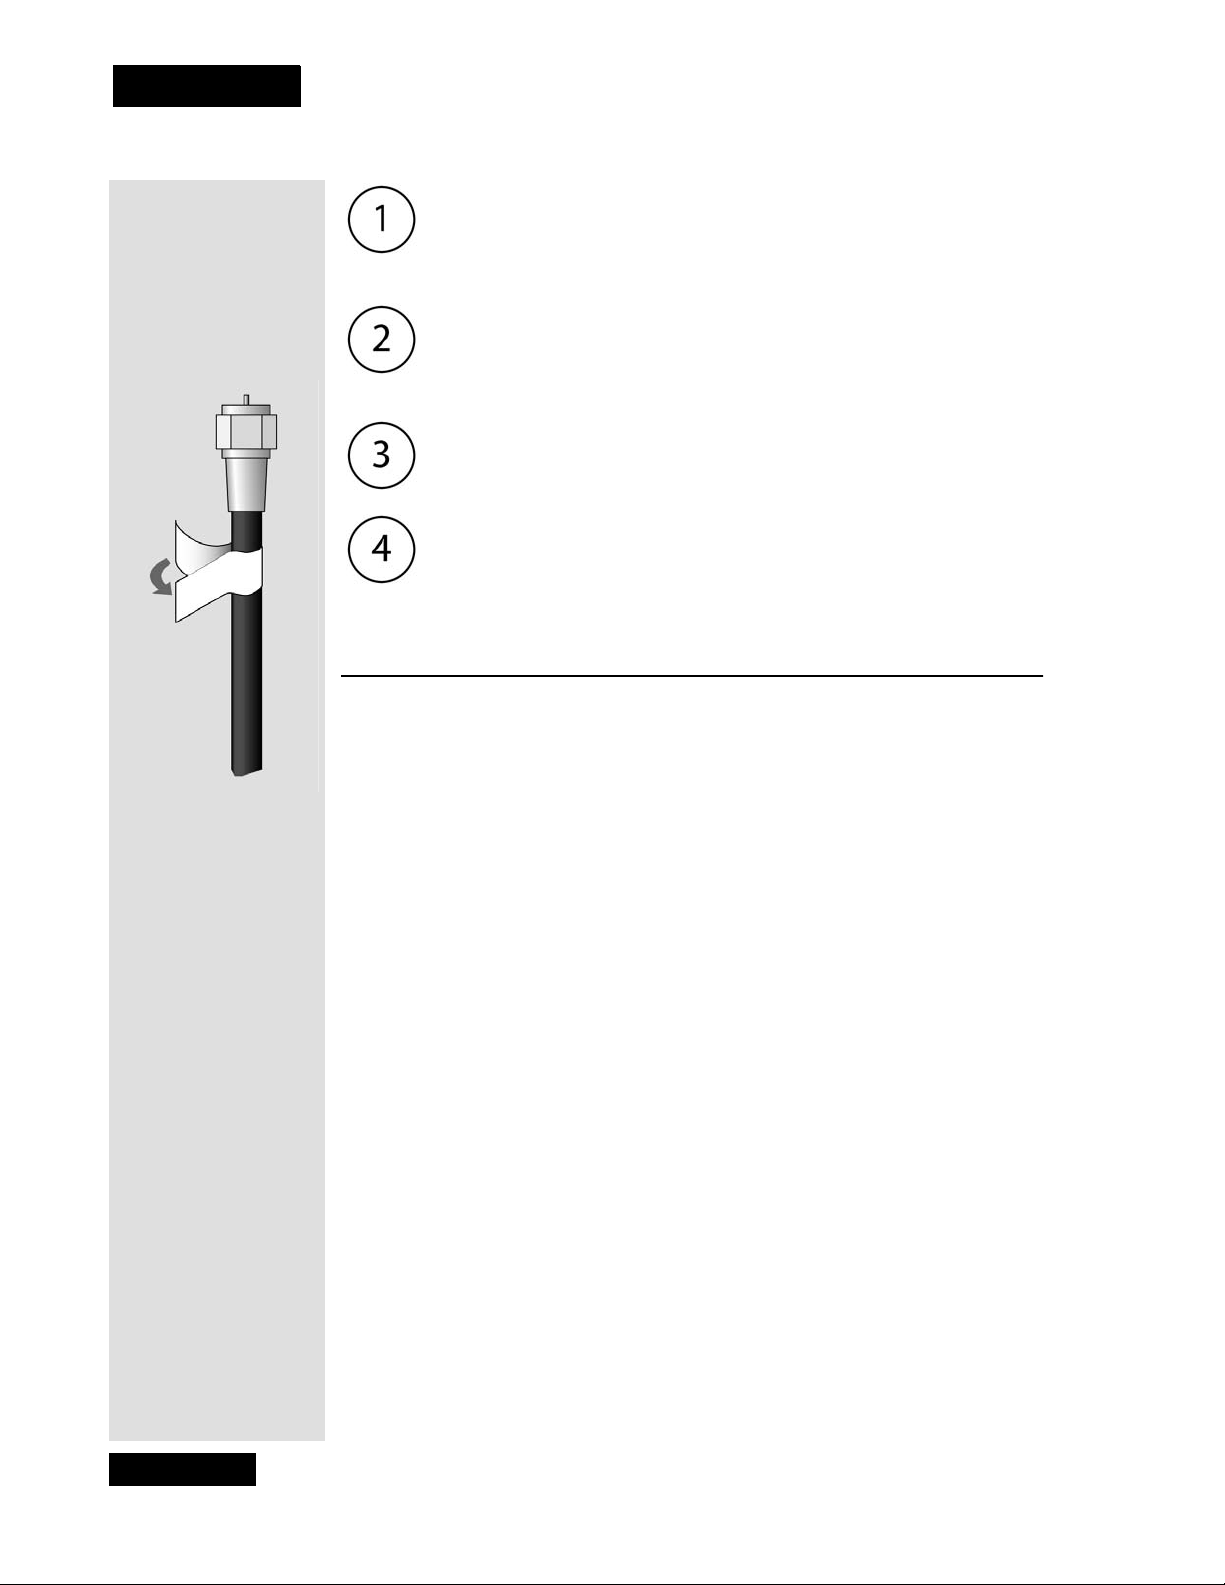
Chapter 4
Installation Instructions
Tip: Using cab le
labels makes it
easy to tell which
cables connect to
the receiver ports.
Installing a DISH 500 Antenna
Sat In - Connect a coaxial ca ble between t he DishPro LNB F and SAT
I
N on the back of the receiver. Peel off the blue stic ker and affix it to
the cable close to whe re i t conn ect s to the S
AT IN connection on the
back of the receiver.
TV Set Out to a TV - Connect a coaxial cable between the TV SET
OUT on the receiver an the TV’s input. Peel off the wh ite stick e r and
affix it to the cable close to whe re it con n ects to the TV SET OUT
connection on the back of the receiver.
TV Set Out to a VCR (Optional ) - Connect a coaxial cable between
the TV SET OUT on the receiver and the VCR’s input. Connect
another cable between the VCR’s output and the TV’s input.
Set the receiver to tune to channel 3 or 4 - Make sure the TV and
VCR (if installed) are on the channel you set in the 3/4 M odulator
screen. The receiver comes preset to channel 3. Se e Setting Up the
Receiver For Channel 3 or 4 on page 48.
Note: If you have a Dish antenna sy stem alre ady inst alle d, and the dish has be en
pointed for the strongest possible signal strength, you can skip this chapter and
go directly to Appendix A to install the satellite receiver in an exist ing system.
The first step in installing your dish antenna is to assemble the satellite dish,
mount it, and point it in the general direction of a satellite. To do this, follow
these instructions:
Finding the Satellites
You need to find the satellites in the sky. To do this, you need to know the
azimuth angle (the south, southeast, or southwest direction to the satellites) and
the elevation angle (the angle up to the satellites) from your location, and the
skew angl e.
1. Make sure tha t the remote control batteries are fresh, and are installed
properly.
2. Turn ON the tele vision and receiver.
Page 50
Page 55
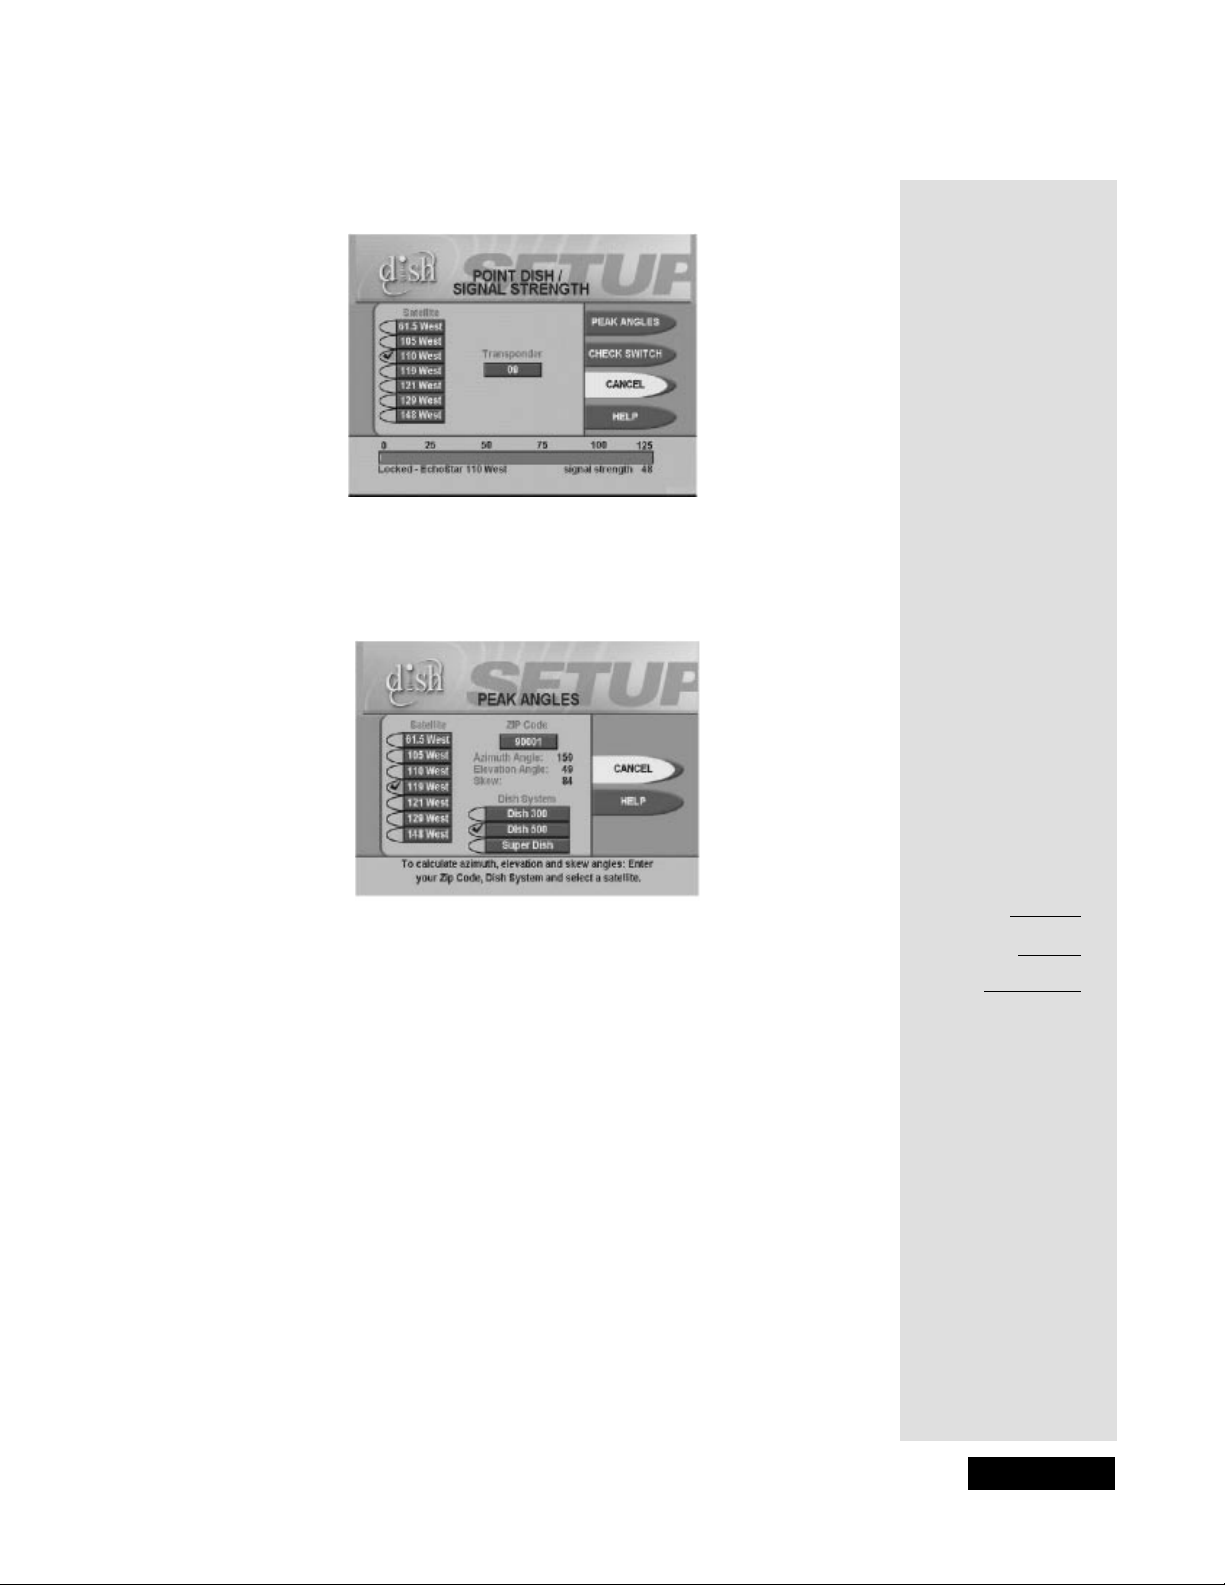
Installing a DISH 500 Antenna
3. Display the Point Dish and Signal Strength menu by pressing MENU and
and then 6-1-1 (unless the recei ver already displays this menu).
4. Select
5. Enter your ZIP code in the
6. Select the
Peak Angles.
ZIP Code field.
Dish 500 option.
7. The menu displays the azim uth, elevation, and skew angles. Write down
these numbers in the blanks provi ded in the margin.
8. Select
Cancel to exit out of this menu and return to the Point
Dish/Signal
menu.
9. Go to Mounting the Dish on page 52.
Azimuth:
Elevation:
Skew:
Page 51
Page 56
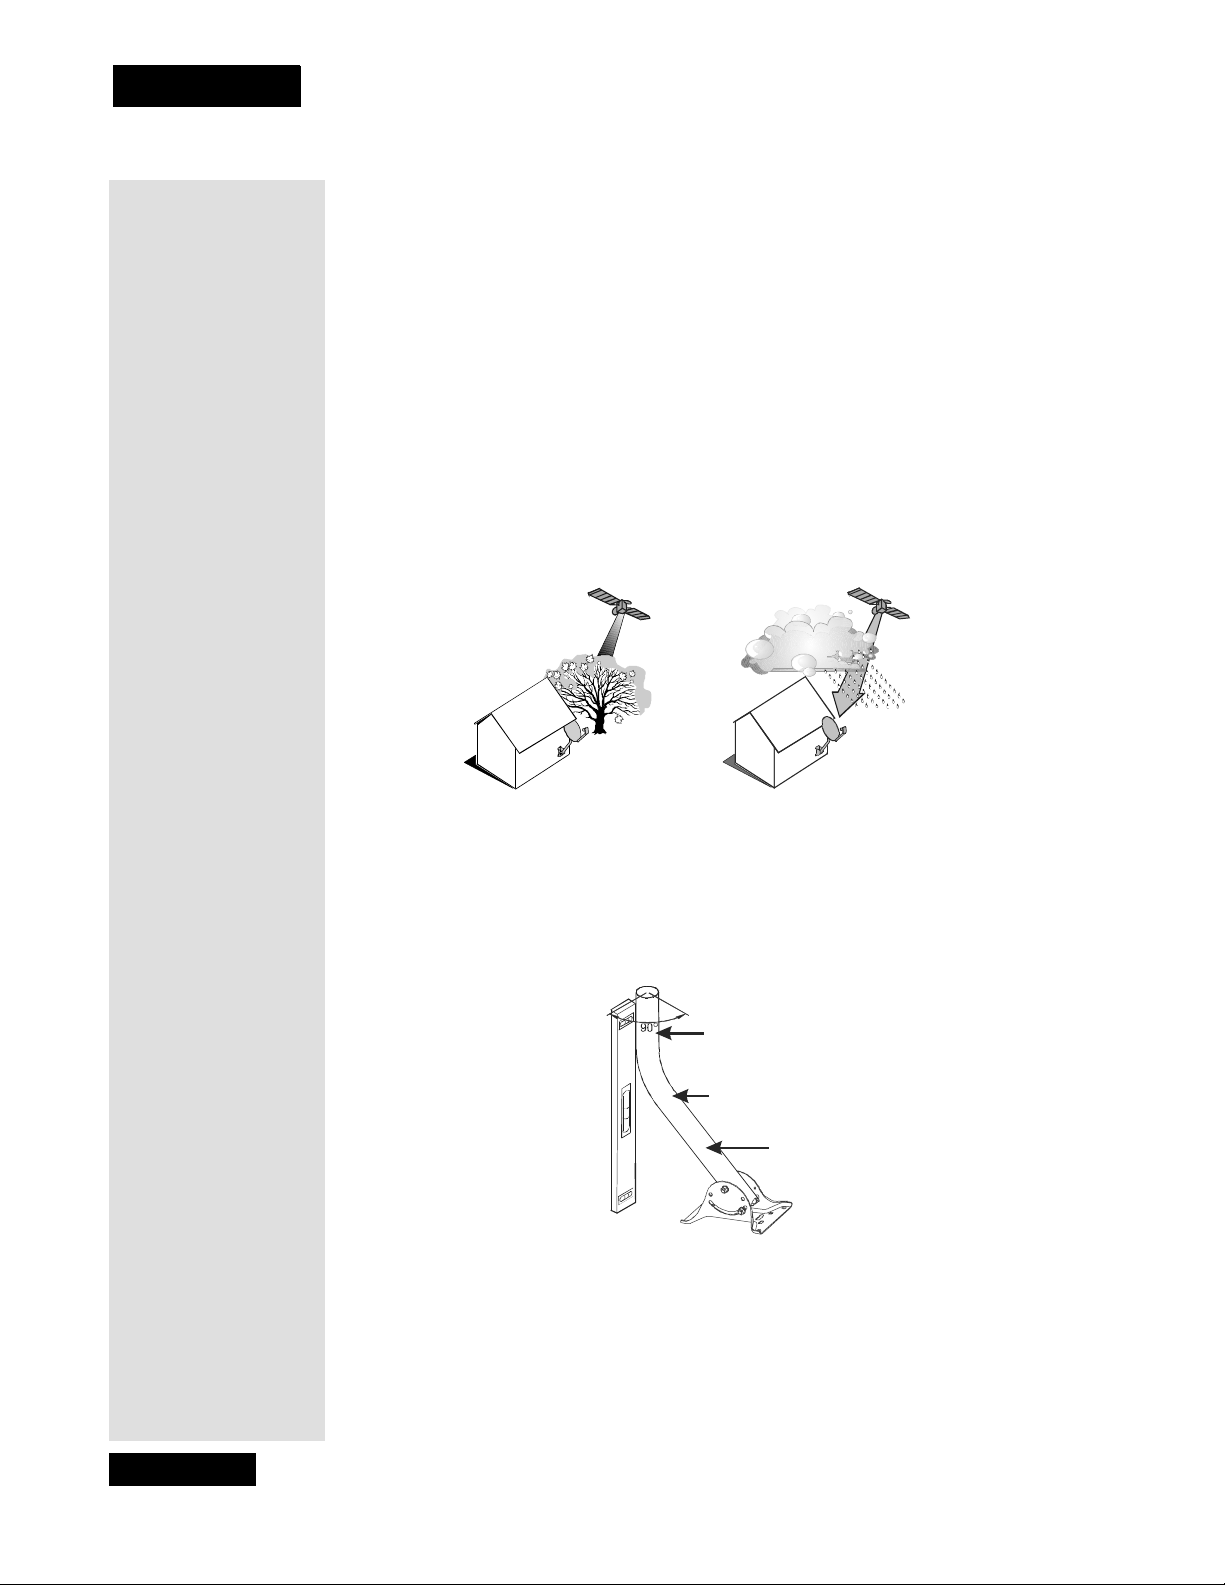
Chapter 4
Installation Instructions
Mounting the Dish
1. Using these azimuth and ele vation angles, find a location for the satellit e
2. Mount the mas t to a soli d surface so tha t t he dish anten na cannot move or be
dish which can be pointed towards the satellites located at these angles.
With a compass, find the required azimuth angle. Then, use the elevation
angle to find out how high the satellites are in the sky fro m your location.
Make sure nothing blocks the line of sight bet ween the dish and the
satellites.
bumped out of adjustment. Keep in mind that physical and environmental
conditions can block your satellite dish’s ability to receive a clear satellite
signal. The conditions to be aware of are: Eaves an d overhangs on your
building or house, wind, plant growth, and deterioration of the mounting
surface. Never mount to a tree.
NO YES
3. Align the top part of the mast so that it is absolutel y vertical, as shown
below . If the top part of the mast is of f vertic al by only a few degre es, it wil l
be difficult or maybe even impossible for you to find the sa tellites. Take at
least two readings with a bubble level, on the upper mast, that are 90
degrees apart from one another.
Top Part
of Mast
Bubble Level
Mast
Page 52
Page 57
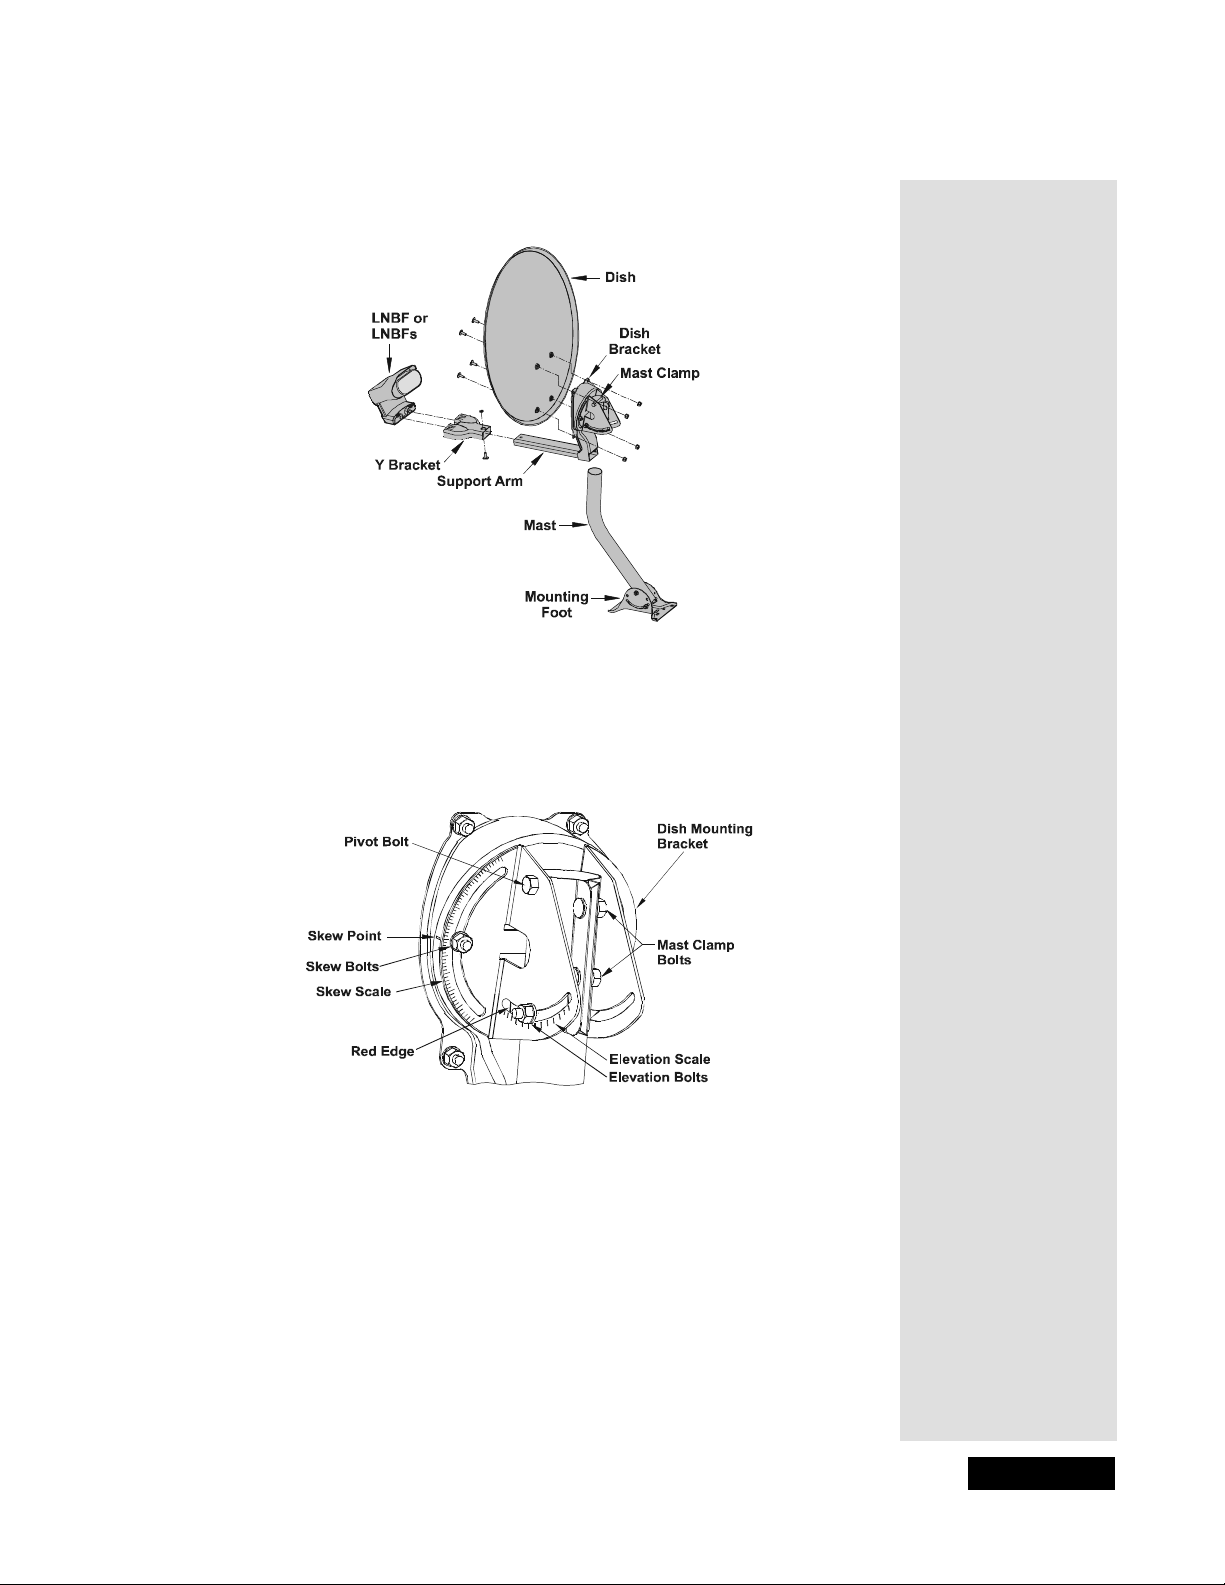
Installing a DISH 500 Antenna
4. Assemble the sate llite dish as shown below, except do not attach the Ybracket or LNBF at this time.
5. Loosen both skew bolts and set the skew by rotating the dish mounting
bracket to align the red mark with the required angle on the skew scale
which you wrote down on 51. Tighten the skew bolts securely to keep the
dish from ro tating. Once the skew is set, do not try to fine-tune this angle
when aiming the dish.
6. Set the elevation by tilting the dish mounting bracket to align the red edge
with the required angle from page 51 on the elevation scale. Tighten the
elevation bolts, but do not tighten the pivot bolt at this time .
7. Slide the dish ass embly down onto the mast. Make sure the pivot bolt rests
on the top of the mast. T ur n the dish a ssembly so tha t it points in the genera l
direction of the satellites, using the azimuth angle from 51.
Page 53
Page 58
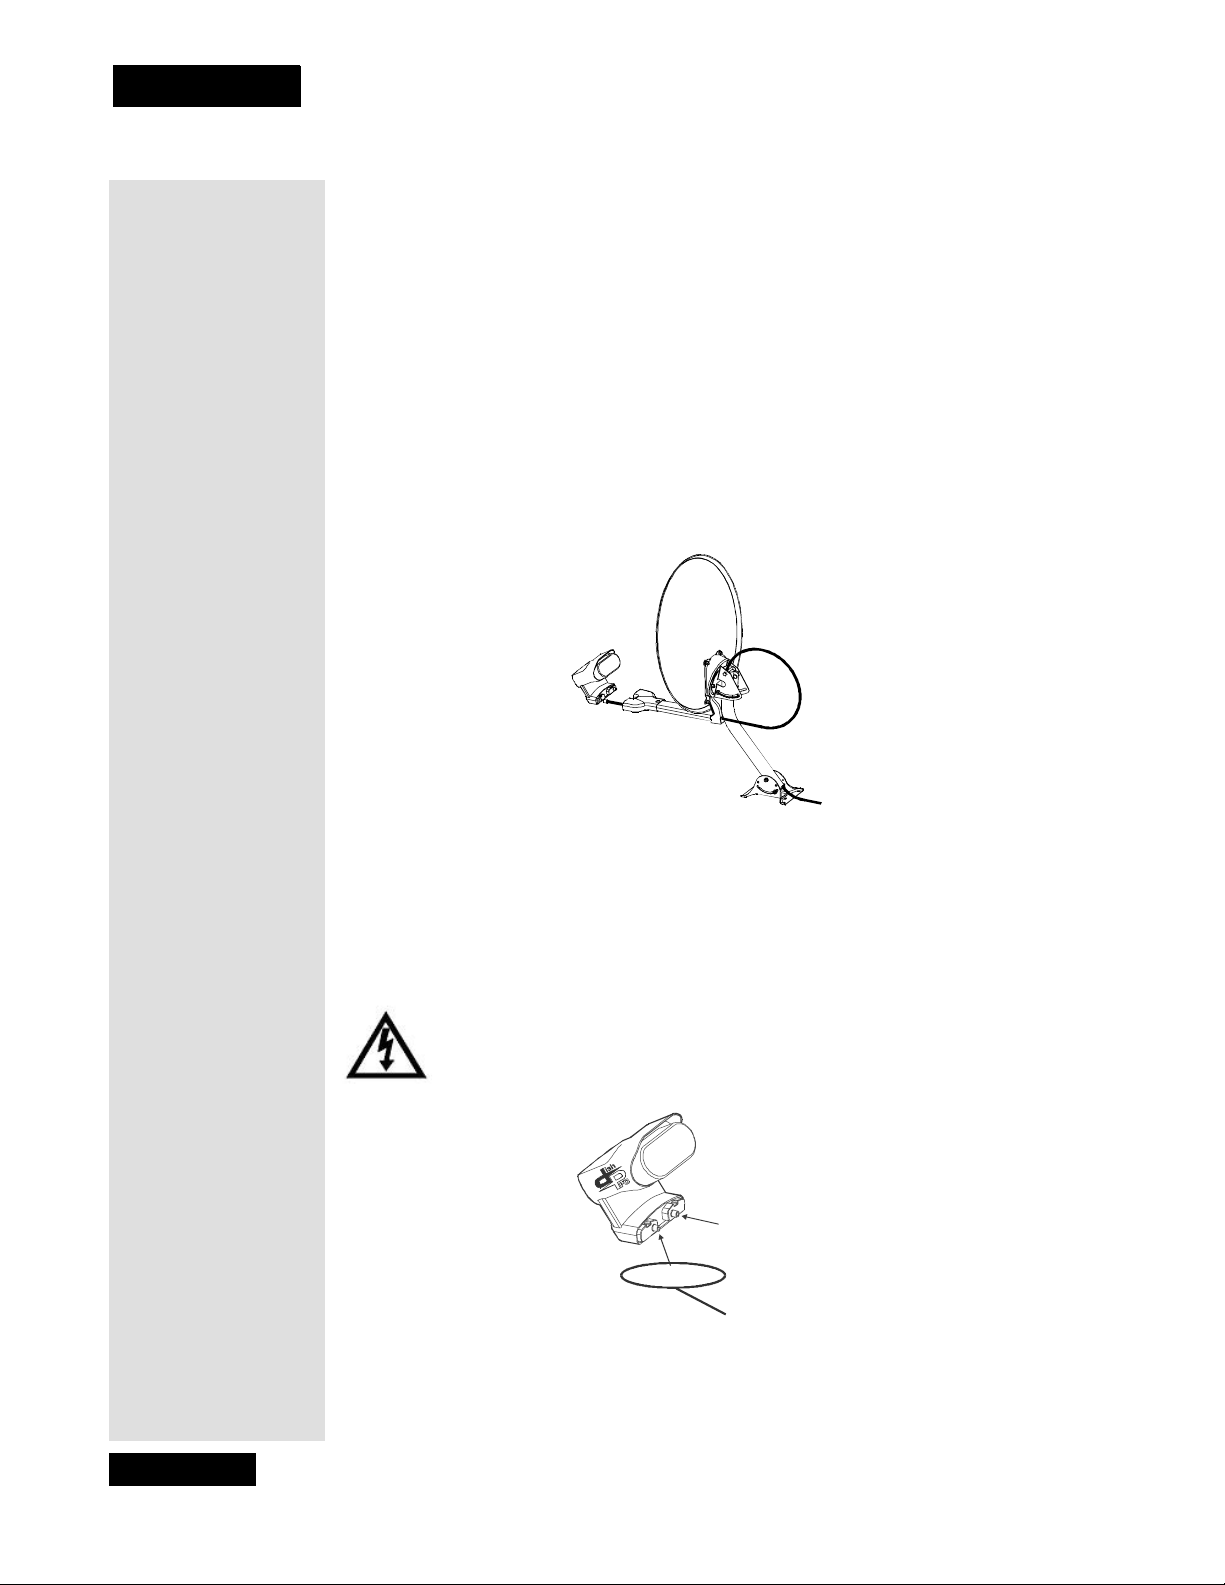
Chapter 4
Installation Instructions
8. Thread the RG-6 coaxial cable through the mast support arm and
the Y-bracket. This cable should be long enough to run from your recei ver
to your LNBF.
Note: See Running Coaxial Cables on page 67 for cable installation
guidance.
Note: You can have as m uch as 200 feet of cable between the DishPro
LNBF and the DishPro receiver. However, you must use only RG-6 coaxial
cables rated for 950 to 2150 MHz. Some cables may say "Swept test ed for
2150 MHz." If you have any doubt about this, ask your DISH retailer, or
look on the container the cable came in. Do not use cable company TV
cables or cables from other satel lite TV systems not rated for 950-2150
MHz. These other cables may cause signal loss. Do not use existing cables
such as RG-59. Also, be sure that any outdoor connect ions are made using
waterproof F-connectors.
9. Attach the Y-bracket, usi ng the Y-bracke t screw.
10. Co nne ct the RG-6 cable from the DISHPro SAT IN connection on the back
of the receiver directly to port 1 of the DISHPro Twin LNBF, as shown
below. Be sure there are no multi-d ish switches between the LNBF and the
receiver.
Tight en all of the coaxial cable connect ion only by hand. If you use
a wrench, you may over-tighten the connections and damage your
equipment. Such damage is not covered by the Limited Warranty .
Port 2
Port 1
Connect to Port 1. It’s on
the left when the LNBF is
pointed towards you
11. Attach the LNBF to the Y-bracket using the two LNBF screws.
Page 54
Page 59
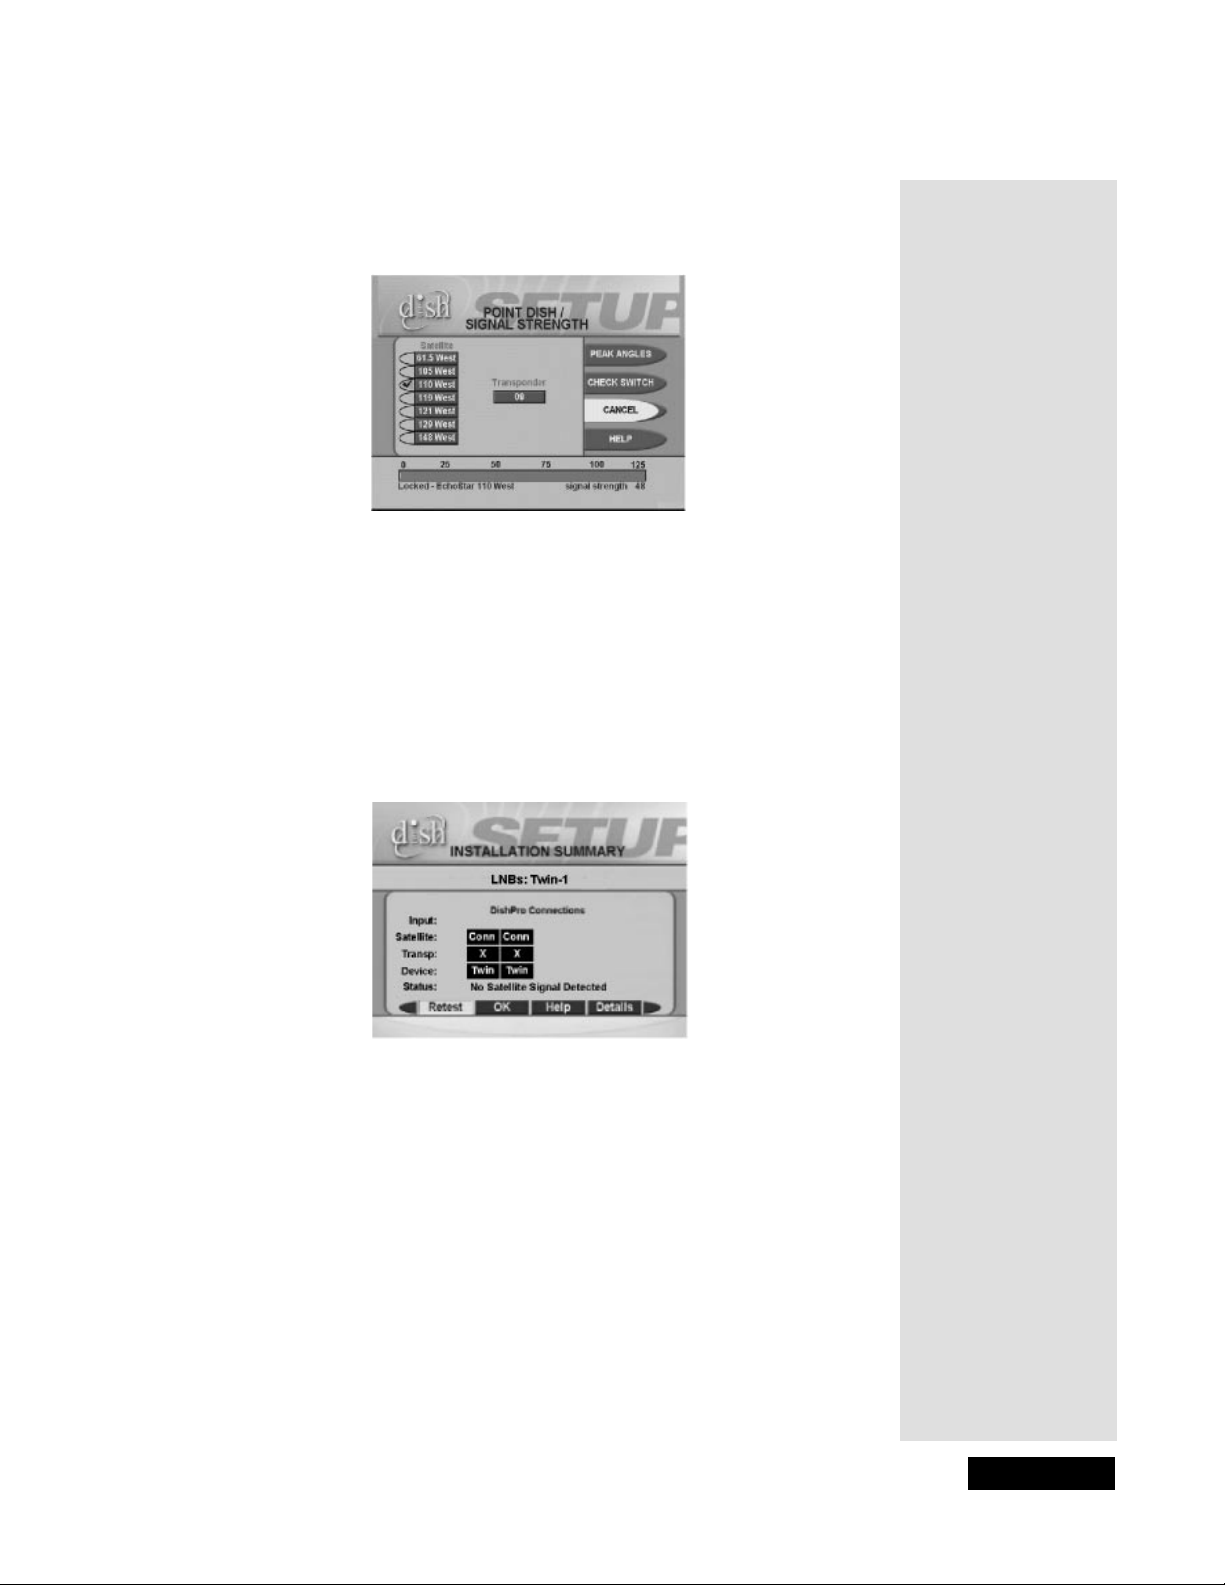
Installing a DISH 500 Antenna
12. You should see the Point Dish / Signal menu. If not, open the Main Menu,
select
System Setup, th e n Installation, the n Point Dish/Signal (press
MENU and then press 6-1-1 on the remote).
13. Select
14. Select
Check Switch. The Check S wit ch screen will open.
Test. The receiver shows you a message that it is checking the
switches.
15. When the chec k switch procedure finishes, you will see an installation
summary screen similar to the one below. In the
“Conn.” In the
Device line, you will see “Twin” twice. This indicates that
Satellite line, you will see
your receiver has conf irmed the connection with your DishPro Twin LNBF
is working. The Transponder line may show two “Xs.” This is OK and does
not indicate a problem with the receiver.
16. Select
Cancel or OK to return to the Point Dish/Signal screen. Make sure
the check mark is next to
119 West. If not, move the highlight to 119 West
and press SELECT. Notice the signal strength bar. This is used to help you
aim the dish by showing the strength of the sign al you are receiving. Look
at the signal strength bar while you aim the dish.
Don’t stand in front of the dish while you aim it, bec ause your body will
block the satellite signal. After you adjust the aim, let go of the dish so that
you can get a good signal reading after the dish settle s back in place by
itself. Do not change the skew setting.
Tip: Have one
person aim the
dish while another
watches the signal
strength or listens
to the signa l tone.
Page 55
Page 60
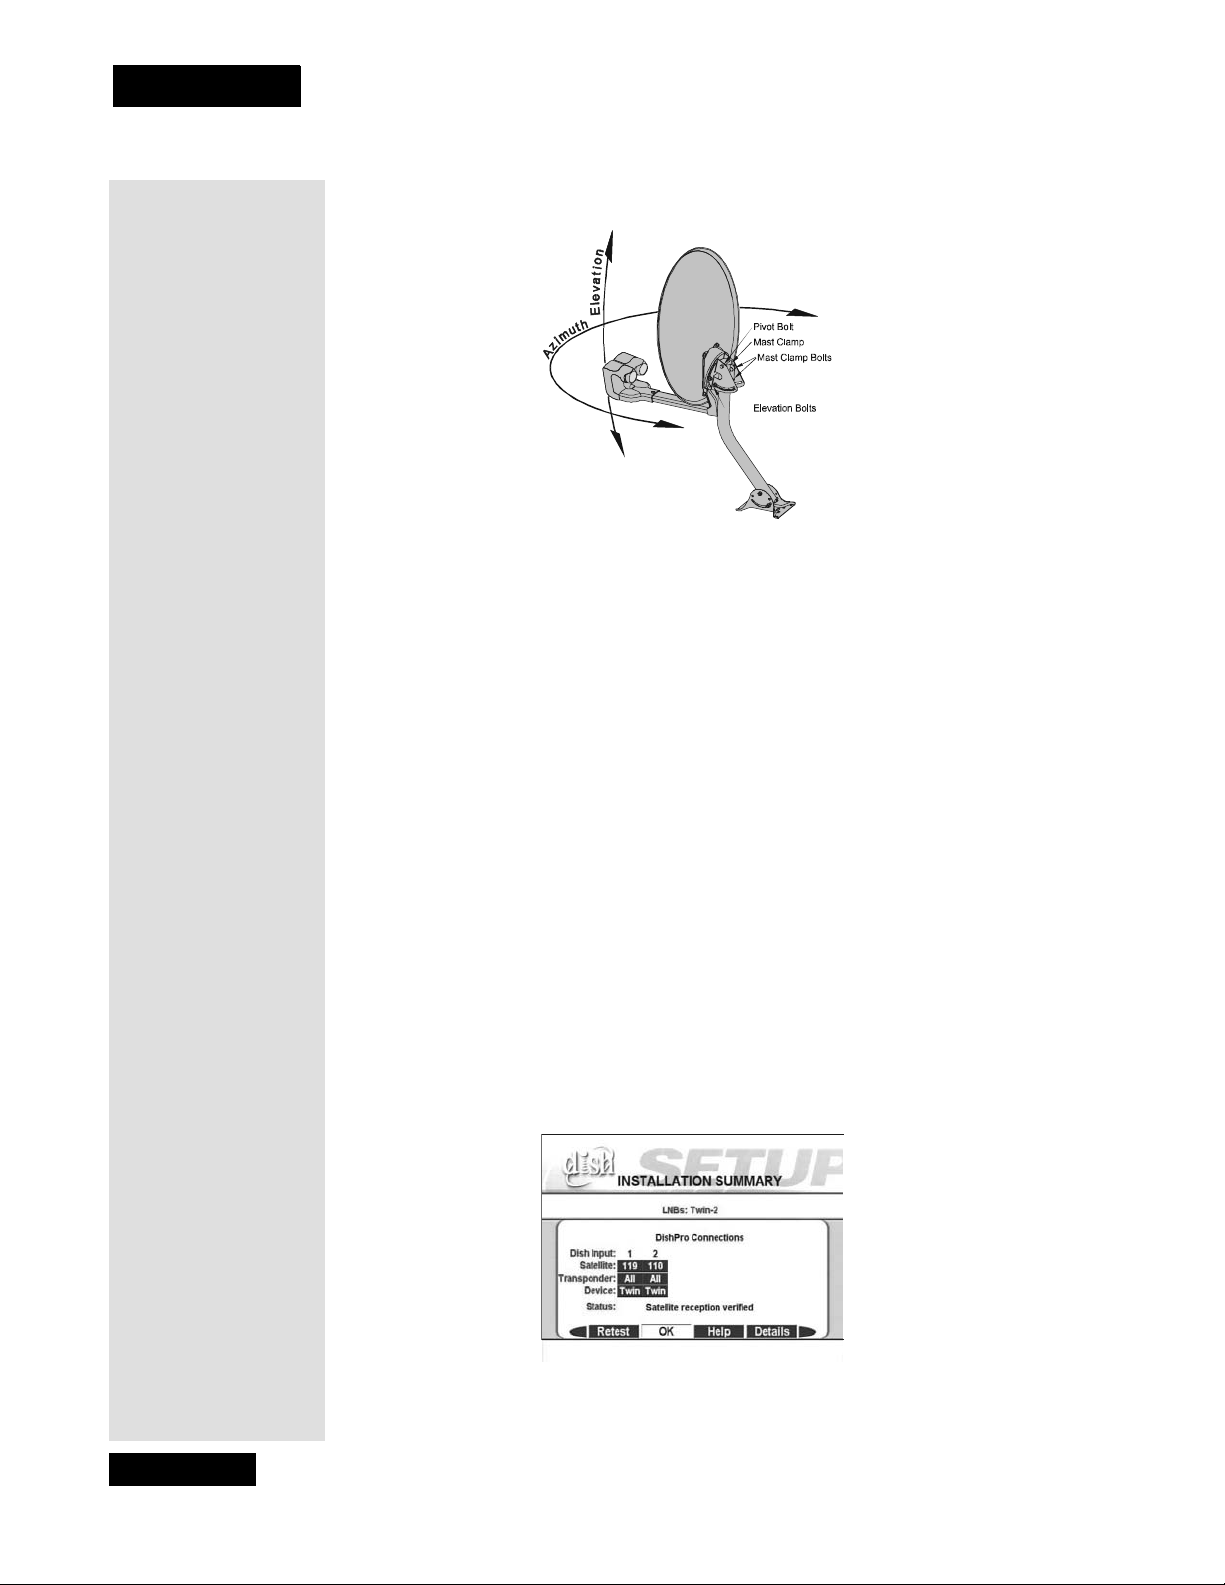
Chapter 4
Installation Instructions
17. Turn the dish back and forth very slowly, until the signal strength bar turns
green. This shows you’ve found the signal.
Note: If you ca nnot find the signal, turn the dish back to the first a zimuth
angle. Then, loosen both el evation bolts j ust enough so you c an tilt the dish.
Tilt the dish e levation up by two degrees, and then tighten both bolts. Now,
turn the dish back and forth again. If you still can’t find the signal, tilt the
dish up again very slightly and turn the d ish b ack and forth until you f ind the
signal.
18. Once the signal strength bar is green, turn the dish back and forth just a
little, to where the signal strength bar shows the strongest signa l. When you
find the strongest signal, tighten both mast clamp bolts. Then loosen both
elevation bolts, just enough so you can tilt the dish. Tilt the dish up and
down just a little, to where the signal strength bar shows the strongest
signal. Do not adjust the skew. When you find the strongest signal, tighten
all bolts in the dish assembly so the dish cannot be moved.
19. Y ou a re now r eady to verif y re ception f rom both sa tellit es. Se lect the
Switch
option. When the Check Switch menu opens, select Check or Test.
Check
The receiv er show s you a mes s age that it is checking the swi tch es . Wh en
the procedure is finished, you will see an Installation Summary screen.
This screen may look differ ent than the one shown below. However, you
must see that you have signals from both the 110 West and 119 West
Satellites, you see “All” twice in the Transponder line, and the message
“Satellite reception verified. Press CANCEL or OK to exit thi s m e n u . ”
Page 56
20. If you do not see “110” under
Dish Inpu t 2:
Page 61

Installing a DISH 500 Antenna
• Make sure the skew angle you wrote down on page 51 is exac tly the
same as the skew angle you set in st ep 5 on pag e 53. If it is not , re set the
skew angle as described on page 53. Af ter you reset the skew angle , go
back page 55 and start over from ste p 16.
• If “119” is shown under
Dish Input 2, move the dish approximately 9°
to the east and restart the procedure at step 12.
21. Look at the Point Dish/Signal menu. If you have good signal strength
with the check mark in 119 West, move the check mark to 11 0 We st. If
you have good signal strength on 110 West, go to step 22.
If you do not have good signal stre ngth with the check mark in 110 West,
go back to Step 17, and fine-tune the dish but with the check mark in 110
West ins tead o f 119 West. While the 110 West and 119 West signals will
not be equal, you should be able to fine-tune the dish until you have the
strongest possib le signal from both satellites.
22. Sele ct Can cel to exi t the Point Dish/Signal menu. An Attention screen
will open asking the mounting and positioning of your dish is complete with
a “Locked” indication in the Point Dish/Signals sc reen. If the answer is yes,
select Yes.
If the answer is No, you will need to repoint your dish following the
prece ding steps until the mounting and positioning is complete and you do
have the “Locked” indication.
23. After you sel ect Yes, the receiver will begin taking a sof tware upg rade. You
will see a Warning that “Vital program inform at i on wi ll now b e
downloaded into your receive r.” You will also see a status bar showing the
progress of this upgrade.
24. Once the software upgrade is complete , you will see a message that your
receiver’s memory is being upgraded.
Do not disturb the receiver while the receiver ’s memory is being upgraded.
Note: If you are installing other DishPro receivers, be sure to r un Check
Switch
on all of them, and allow them to take the necessary software
upgrade.
25. When the memory has been upgra ded, your installation is complete.
Page 57
Page 62
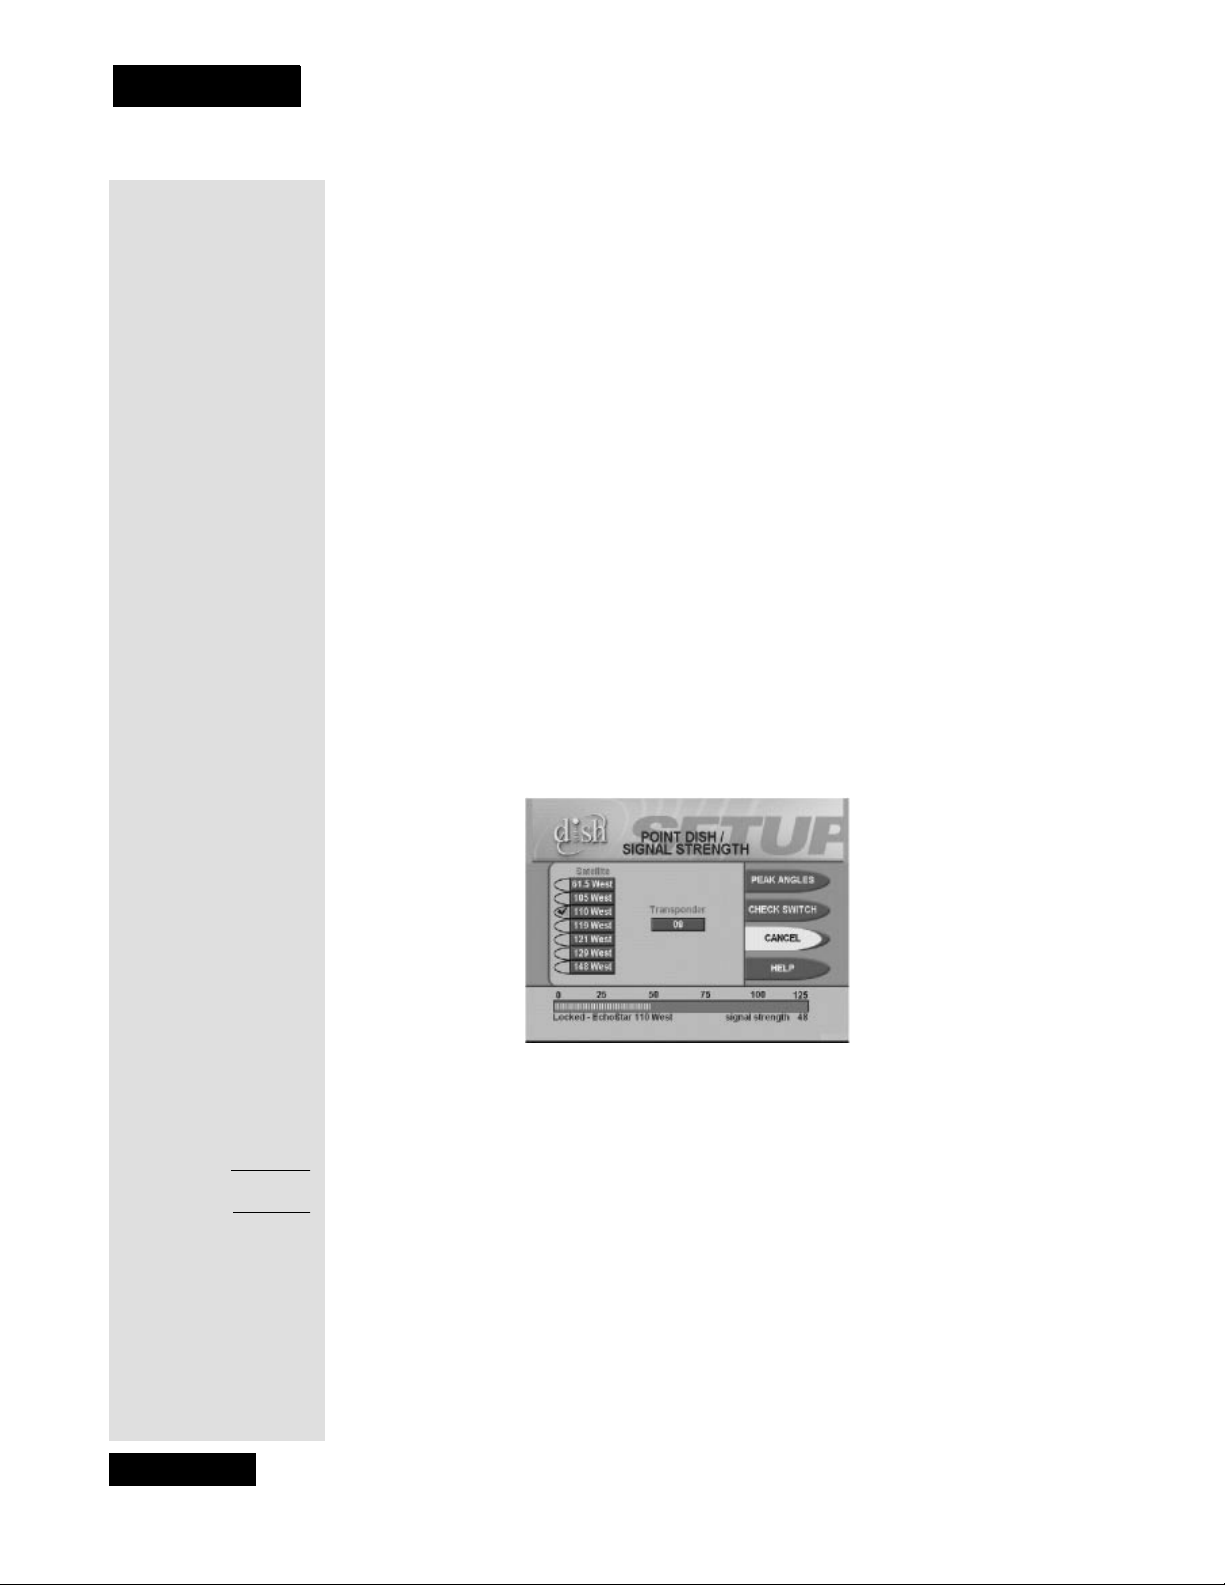
Chapter 4
Installation Instructions
Installing a Multiple Dish DishPro System
Note: You cannot use DishPro LNBFs and switches (those marked with the
DishPro logo) with Legacy (non-DishPro) switche s and LNBFs (those without
the DishPro logo). You must install your DISH antenna system with either all
DishPro LNBFs and switc hes or a ll Lega cy LNBFs and swi tc hes. If you mix t he
two, the syste m will not work.
Note: You can have as m uch as 200 feet of cable between the DishPro LN BF
and the DishPro receiver. However, you must use only RG-6 coaxial cables
rated for 950 to 21 50 MHz. Some cables m ay sa y "Swept te sted f or 2150 MHz."
If you have any doubt about this, ask your DISH retailer, or look on the
container the cable came in. Do not use cable company TV cables or cables
from other satelli te TV sys tems not rat ed fo r 950-2150 M Hz. These other c ables
may cause signal loss. Do not use existing cables such as RG-59. Also, be sure
that any outdoor connections are made using waterproof F-connectors.
Once you have installed the DISH 500 with its DishPro Twin LNBF using the
preceding instructi ons, you can install a DISH 300 with a DishPro LNBF as
follows:
Azimuth:
Elevation:
1. Turn on the television and the receiver if they are not already on. You
should see the
Point Dish/Signal screen. If not, open the Main Menu and
press 6-1-1 on the remote.
2. Make sure the check mark is next to the satellite your dish will be pointed
toward.
3. Select
Peak Angles and then se lect the Dish 300 option.
4. Use the number buttons on the remote to ente r your ZIP code to get the
necessary azimuth and elevation. Write these numbers down in the spaces
provided in the margin.
5. Mount the dis h antenna following the mounting instructions that came with
it.
6. Connect an RG- 6 cable fr om the DishPro S
directly to the DishPro LNBF on the Dish 300.
AT IN connection on the r eceiver
Make sure there are no
multi-dish switches betwe en the LNBF and the DishPro receiver.
Page 58
7. Select
Cancel to go back to the Point Dish/Signal screen.
Page 63
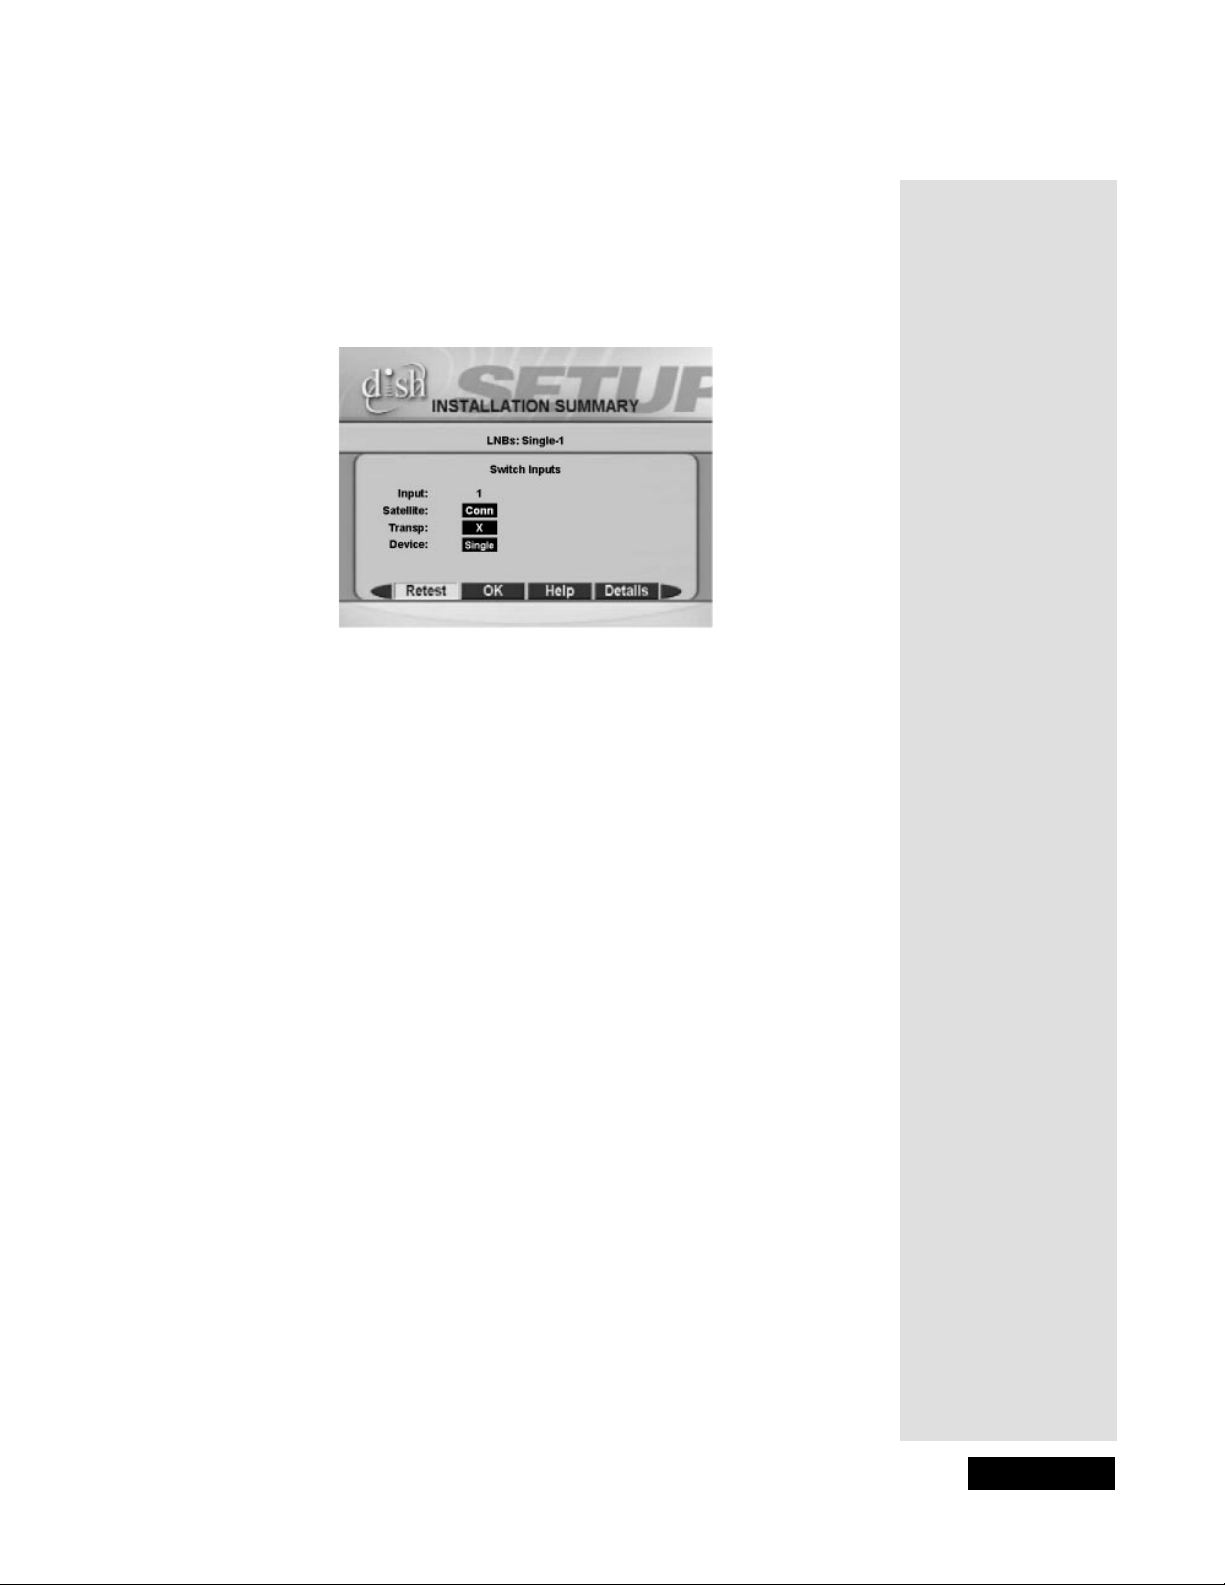
Installing a DISH 500 Antenna
8. Select Check Switch. When the Check Switch screen opens, select Test.
9. When
10. Press CANCEL to exit back to the Point Dish/Signal menu.
Check Switch is complete, you will see an Installation Summary
screen similar to the one shown next. It will show a connection (“Conn”
next to satellite) an d
Single devic e under 1 ( Dish Input). It may also show
an X on the Tra nsponder line. This is OK and does not mean there is a
problem with the system.
11. Point the dish for the strongest possible signal, following the instruc tions
that came with it and the DishPro wiring diagrams that start on page 60.
12. Connect any switches in your system, using the instruc tions which came
with th e switch(es ) .
13. Select
Check Switch from the Point Dish/Signal menu. When the Check
Switch
Installation Summary screen again. This time you should see confir mati on
menu opens, Test. When the procedure completes, you will see the
for all satellites your dishes are pointed at, and “Satellite reception
verified.” You should also see that the switch(es) in your system has been
correctly id entifi ed.
Refer to the DishPro wiring d iagrams for examples of ins tallation summary
screens.
14. Press CANCEL to exit this menu, and then Cancel to exit the Point
Dish/Signal screen. If you have any other rec eivers in your system, make
sure you run Check Switch on each of them, and allow each to take the
software upgrade, as needed.
Page 59
Page 64
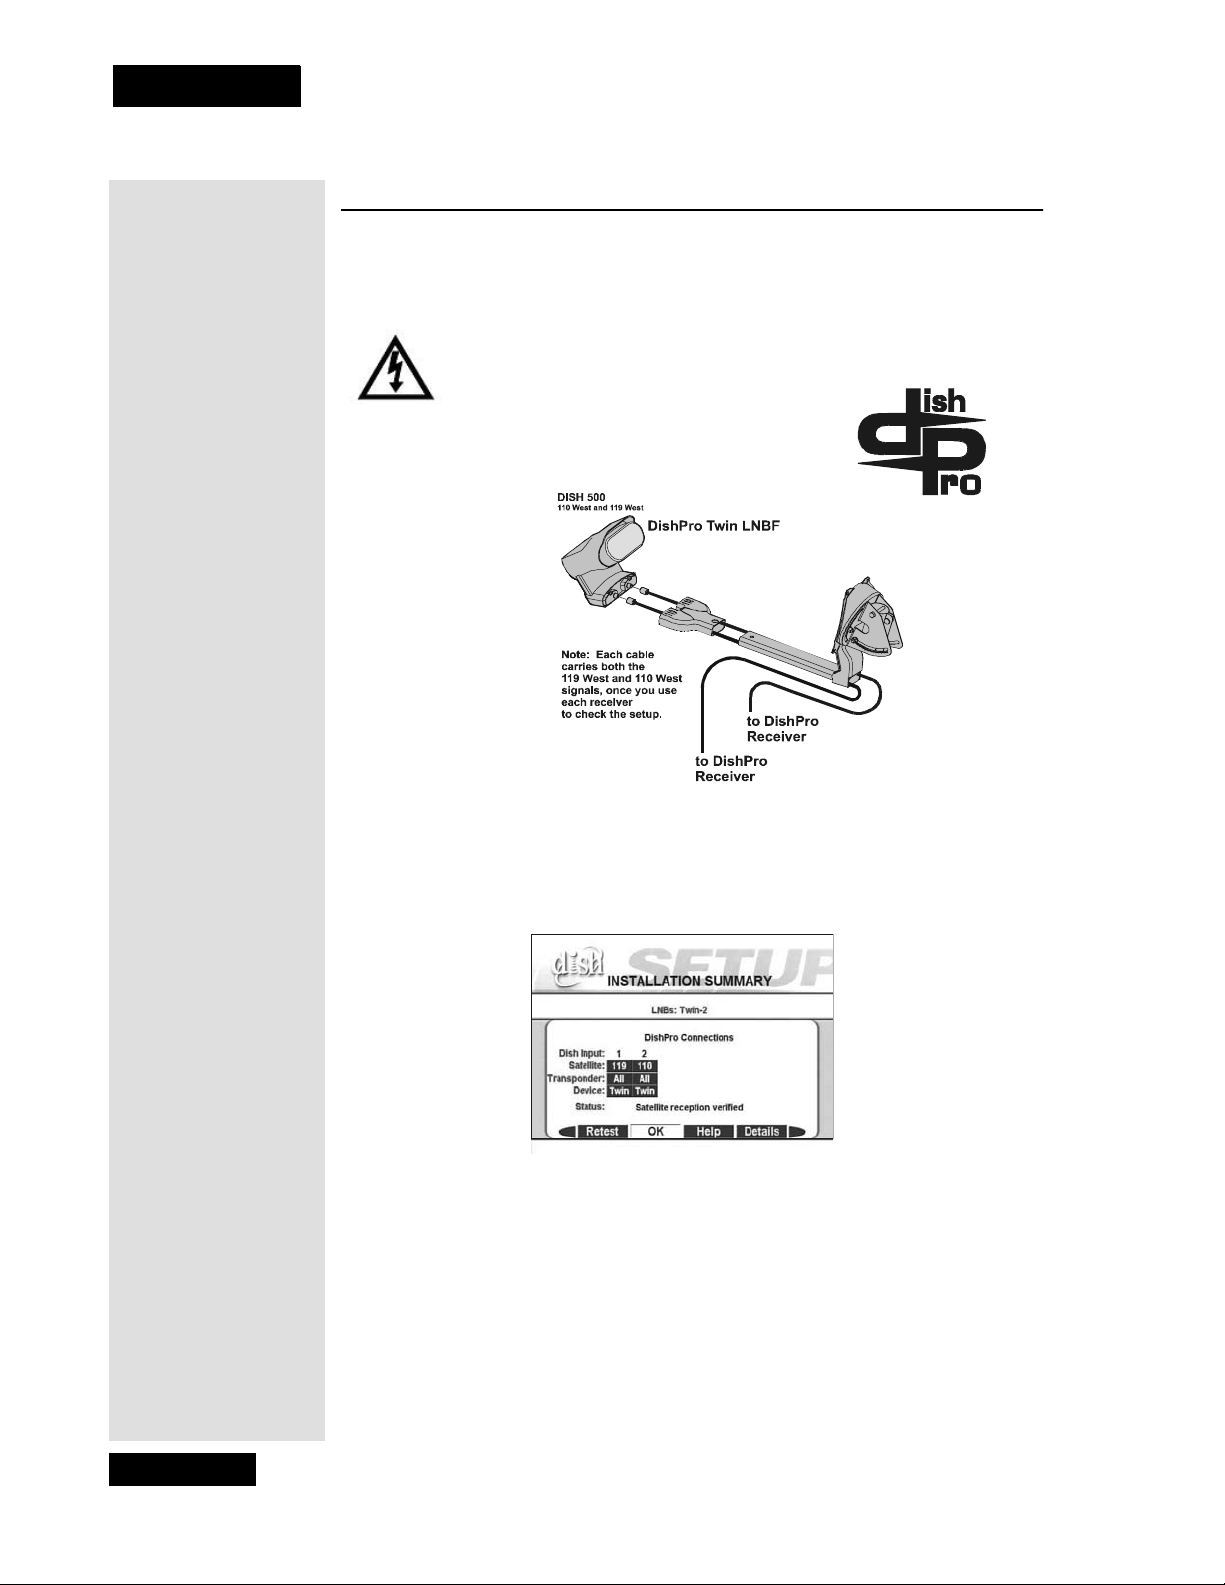
Chapter 4
Installation Instructions
DishPro Wiring Diagrams
DISH 500, One DishPro Twin LNBF, Two DishPro Receivers
This diagram leaves out grounding to be clea r. Make sure you
ground the system per the Nati onal Electric al Code (NEC) and all
local electrical codes.
When you set up your system following this diagram and run Ch ec k Switch
the Installation Summary screen should look similar to the one shown
below.
Page 60
Page 65
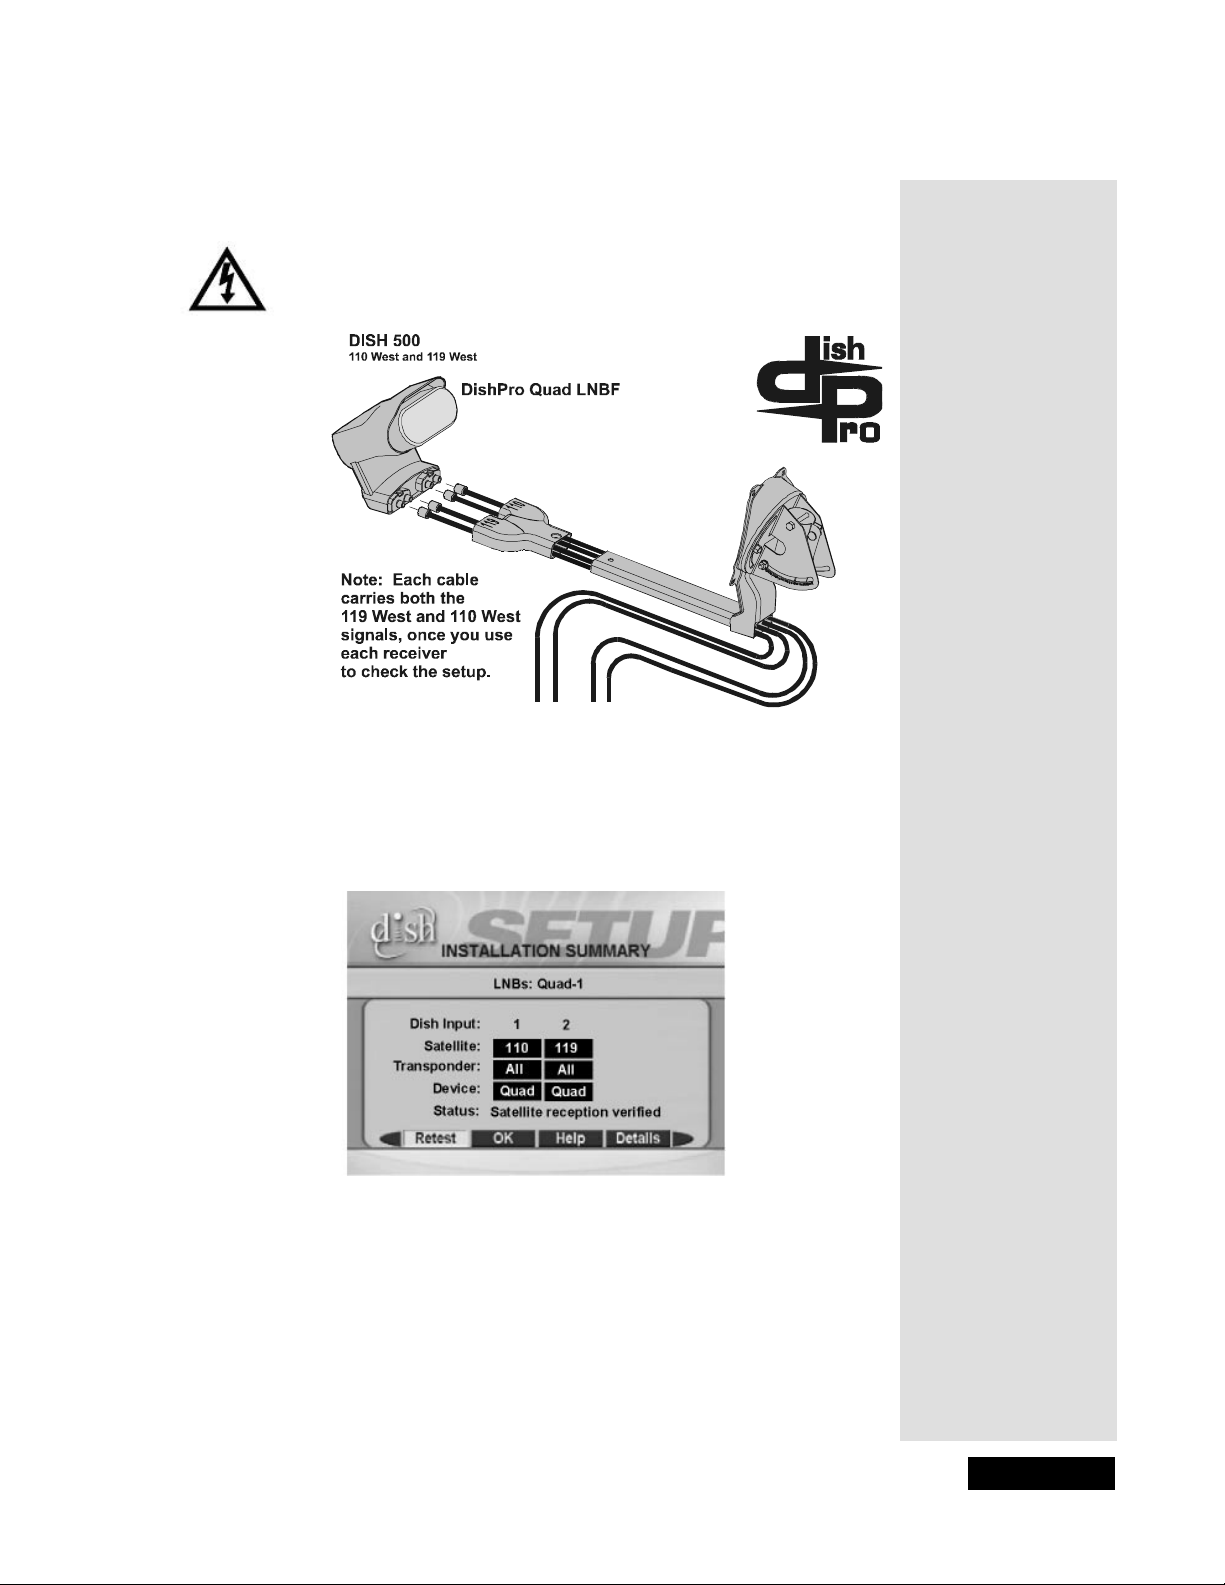
DishPro Wiring Diagrams
DISH 500, One DishPro Quad LNBF, Four DishPro Receivers
This diagram leaves out groundi ng to be clear. Make sure you
ground the system per the National Electrical Co de (NEC) and all
local electrical codes.
To four DishPro receivers
When you set up your system following this diagra m and run Check Sw i tch
the Inst al lation Summary screen should look similar to the one shown
below.
Page 61
Page 66
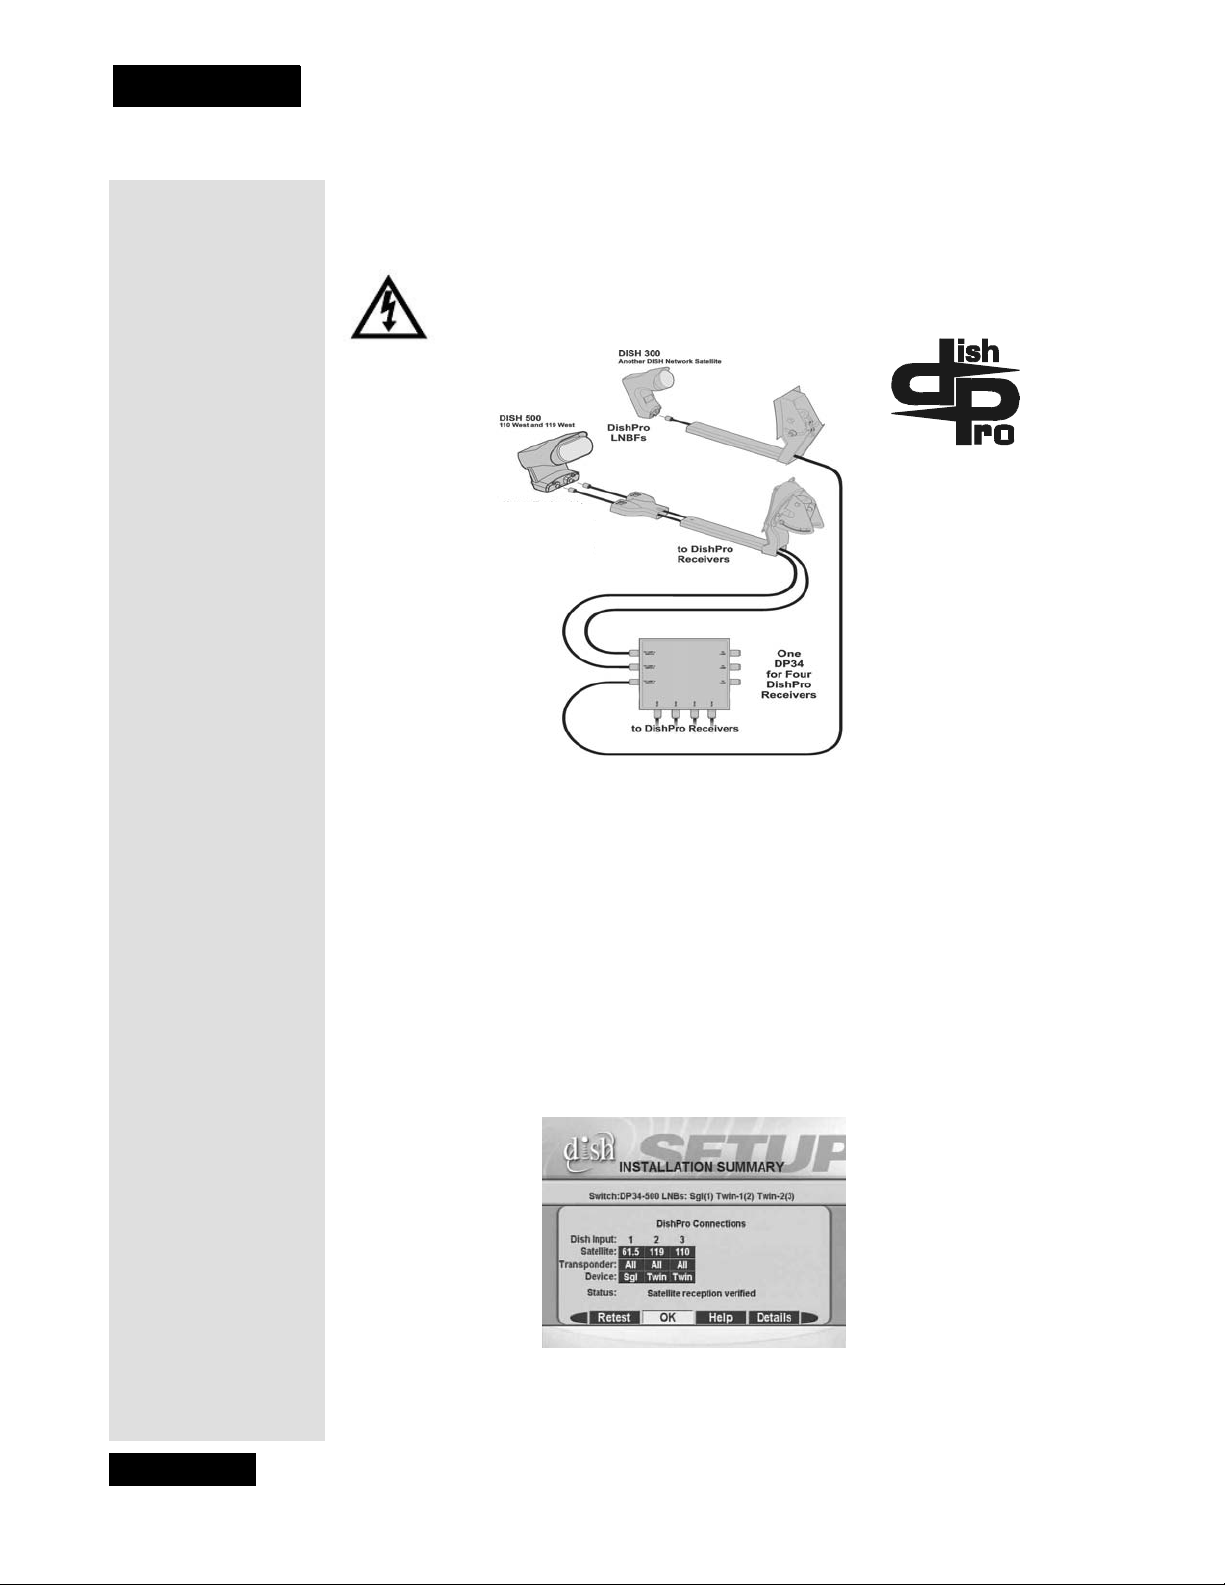
Chapter 4
Installation Instructions
DISH 500 with a DishPro Twin LNBF, One DISH 300 with a
DishPro LNBF, DP34 Switch, Four DishPro Receivers
This diagram leaves out grounding to be clear. Make sure you
ground the system per the National Electrical Code (NEC) and all
local elec tric al codes.
Two DP34s for
Eight DishPro Receivers
Three DP34s for
Twelve DishPro Receivers
When you set up your system following this diagram and run Ch ec k Switch
the Installation Summary screen should look similar to the one shown
below.
Page 62
Page 67
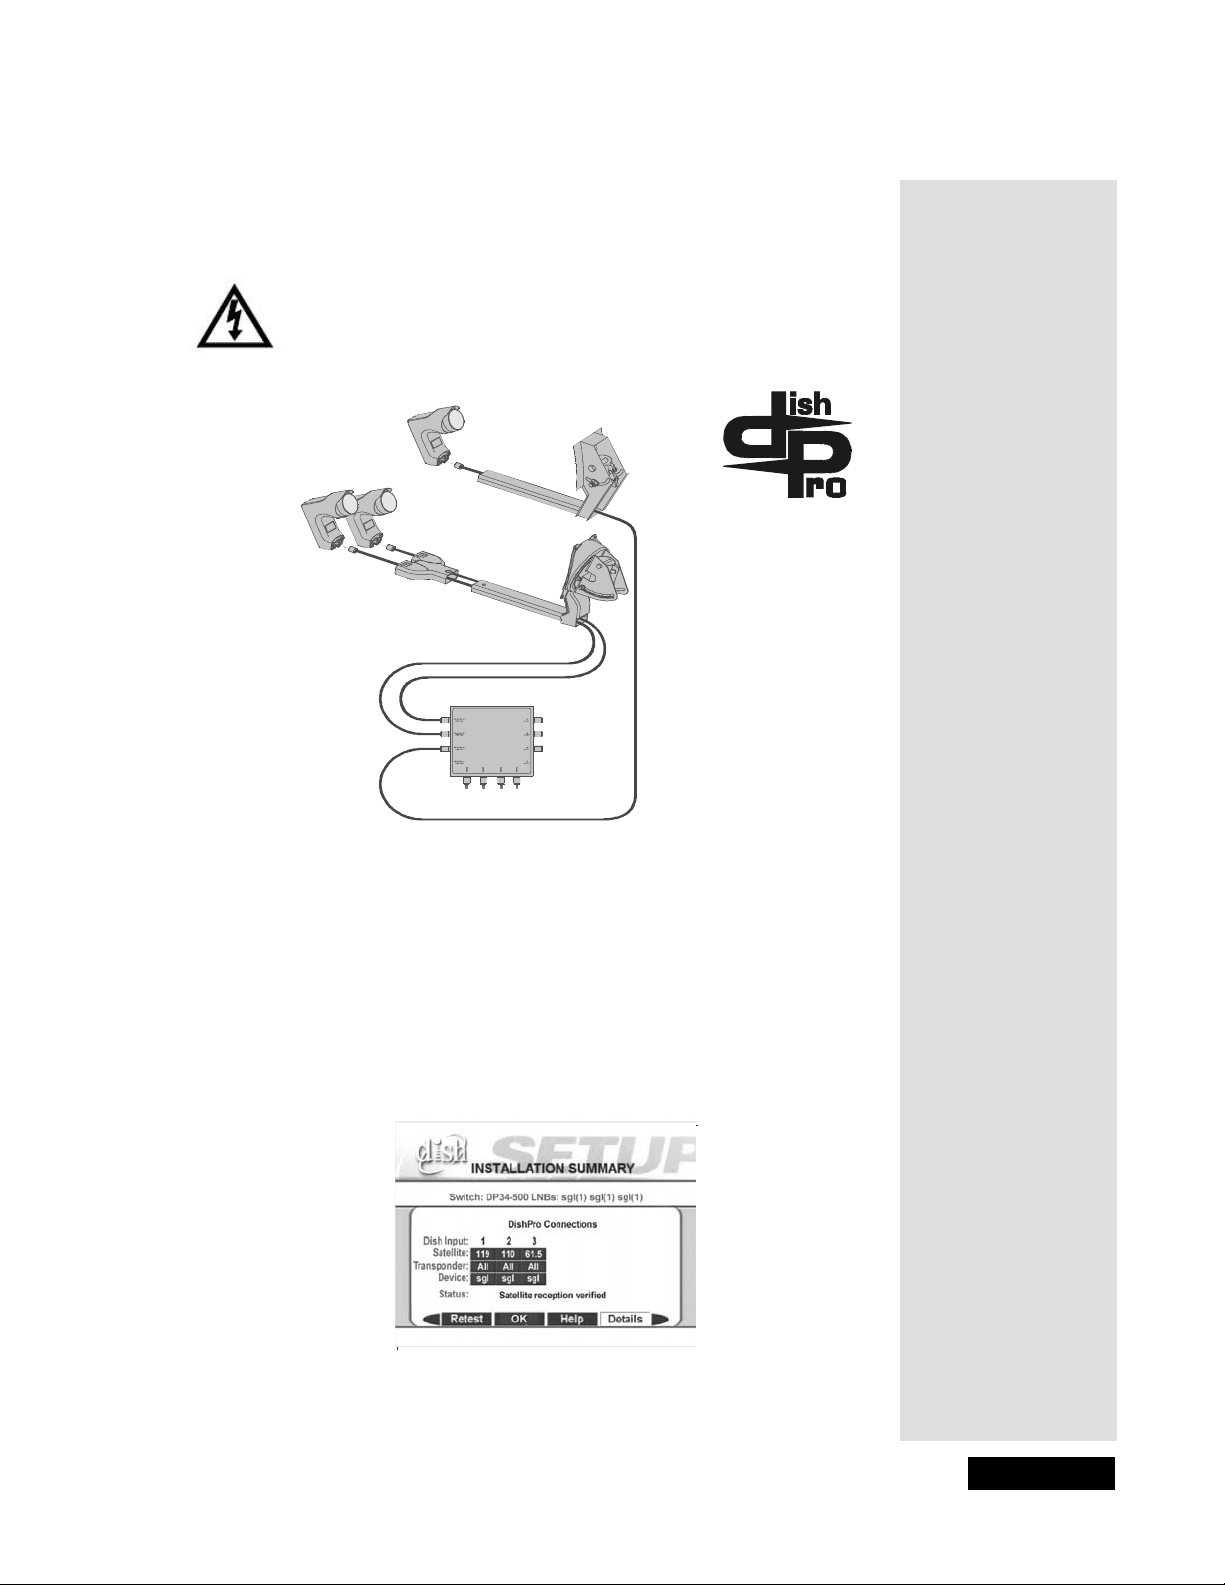
Two Dishes, Three Single-Output DishPro LNBFs, Three
Cables, DP34 Switch, Four DishPro Receivers
This diagram leaves out grounding to be clear. Make sure you
ground the system per t he National Ele ctric al Code (NEC) and all
local electrical codes.
DISH 300
Another DISH Network Sat e llite
DishPro Wiring Diagrams
DISH 500
110 West and 1 19 West
DishPro
LNBFs
One DP34
for four
DishPro
receivers
To DishPro Receiver Tuner Inputs
When you set up your system following this diagra m and run Check Sw i tch
the Inst al lation Summary screen should look similar to the one shown
below.
Page 63
Page 68
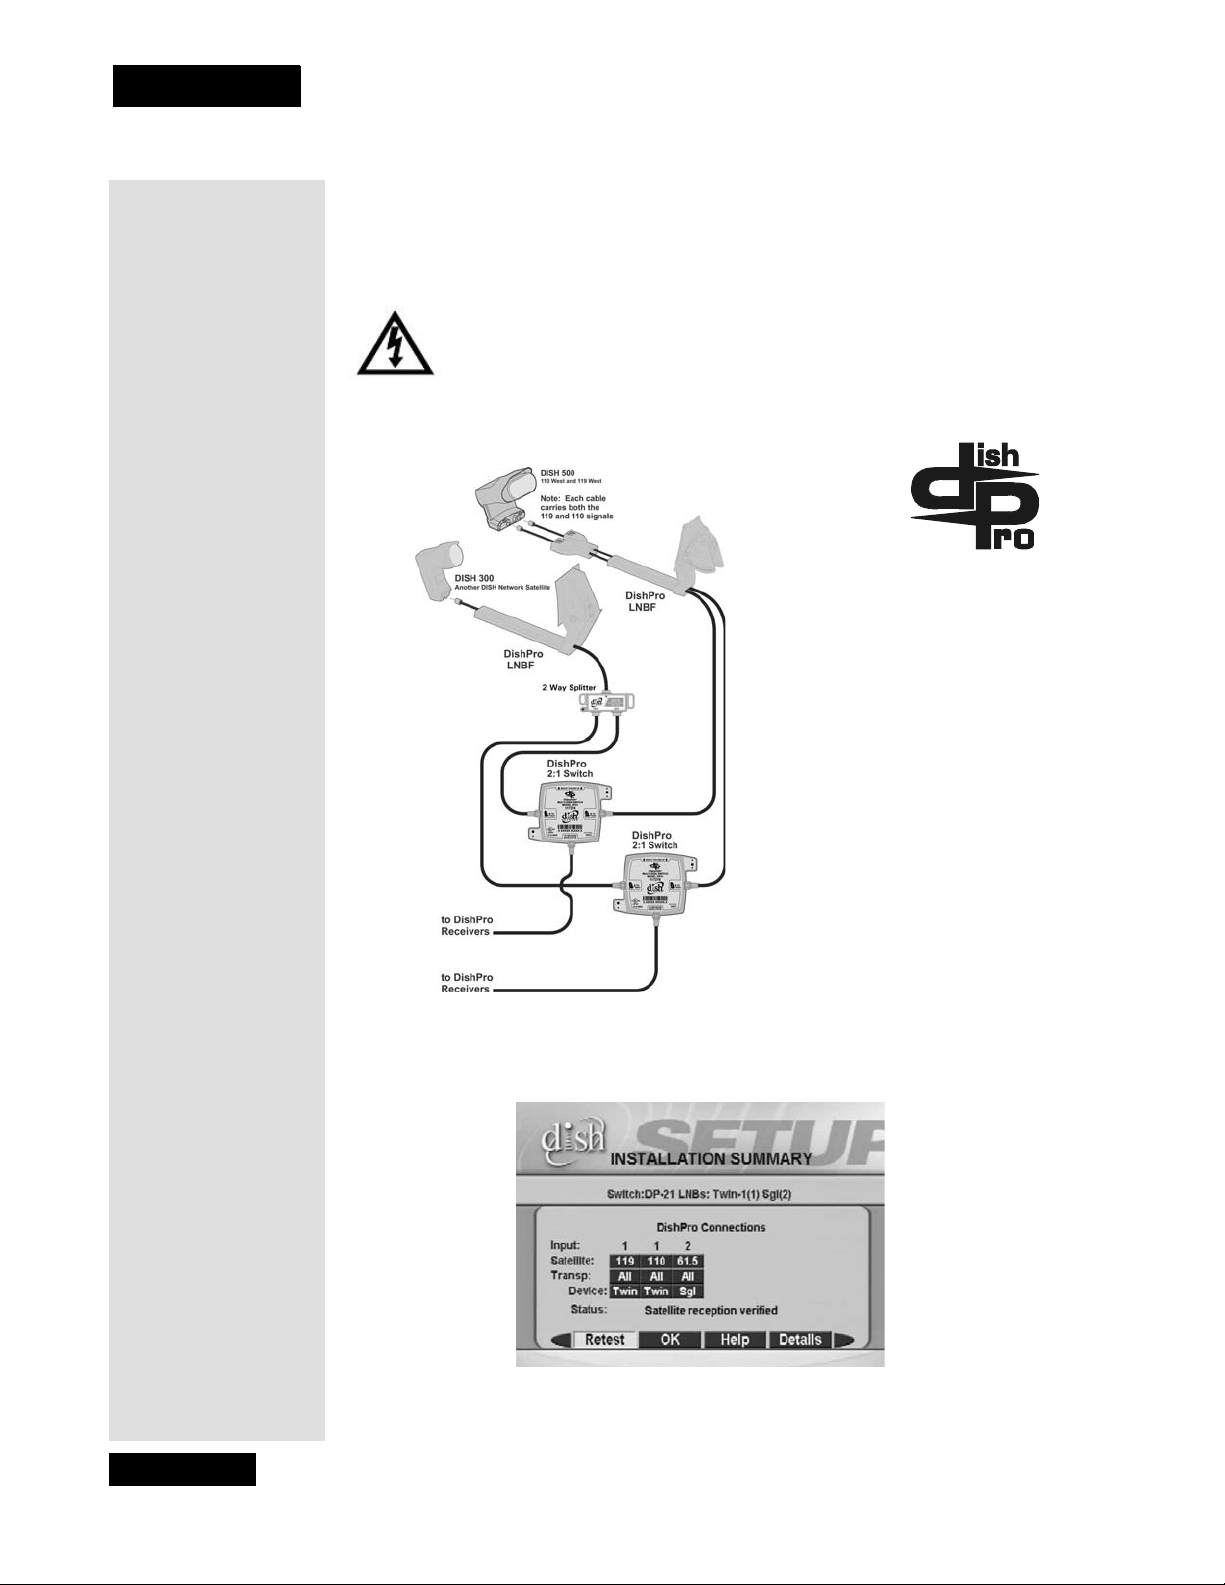
Chapter 4
Installation Instructions
Two Dishes, One DishPro Twin LNBF, One DishPro Single
LNBF, One DishPro Compliant Splitter, Two DishPro 21
Switches, Two Receivers
This diagram leaves out grounding to be clear. Make sure you
ground the syst em per the National El ectrical Code (NEC) and all
local elec tric al codes.
*
* When using a DishPro compliant
splitt er to sp lit the signal from a
DishPro single LNBF, the receiver
whose DP 21 switch is connected to
the passing side of the splitter must
be plugged into a live power outlet
at all times. If not, the DishPr o
single LNBF will not have any
power and will not be able to
provide satellite signal to the ot her
receiver.
When you set up your system following this diagram and run Ch ec k Switch
the Installation Summary screen should look similar to the one shown
below.
Page 64
Page 69
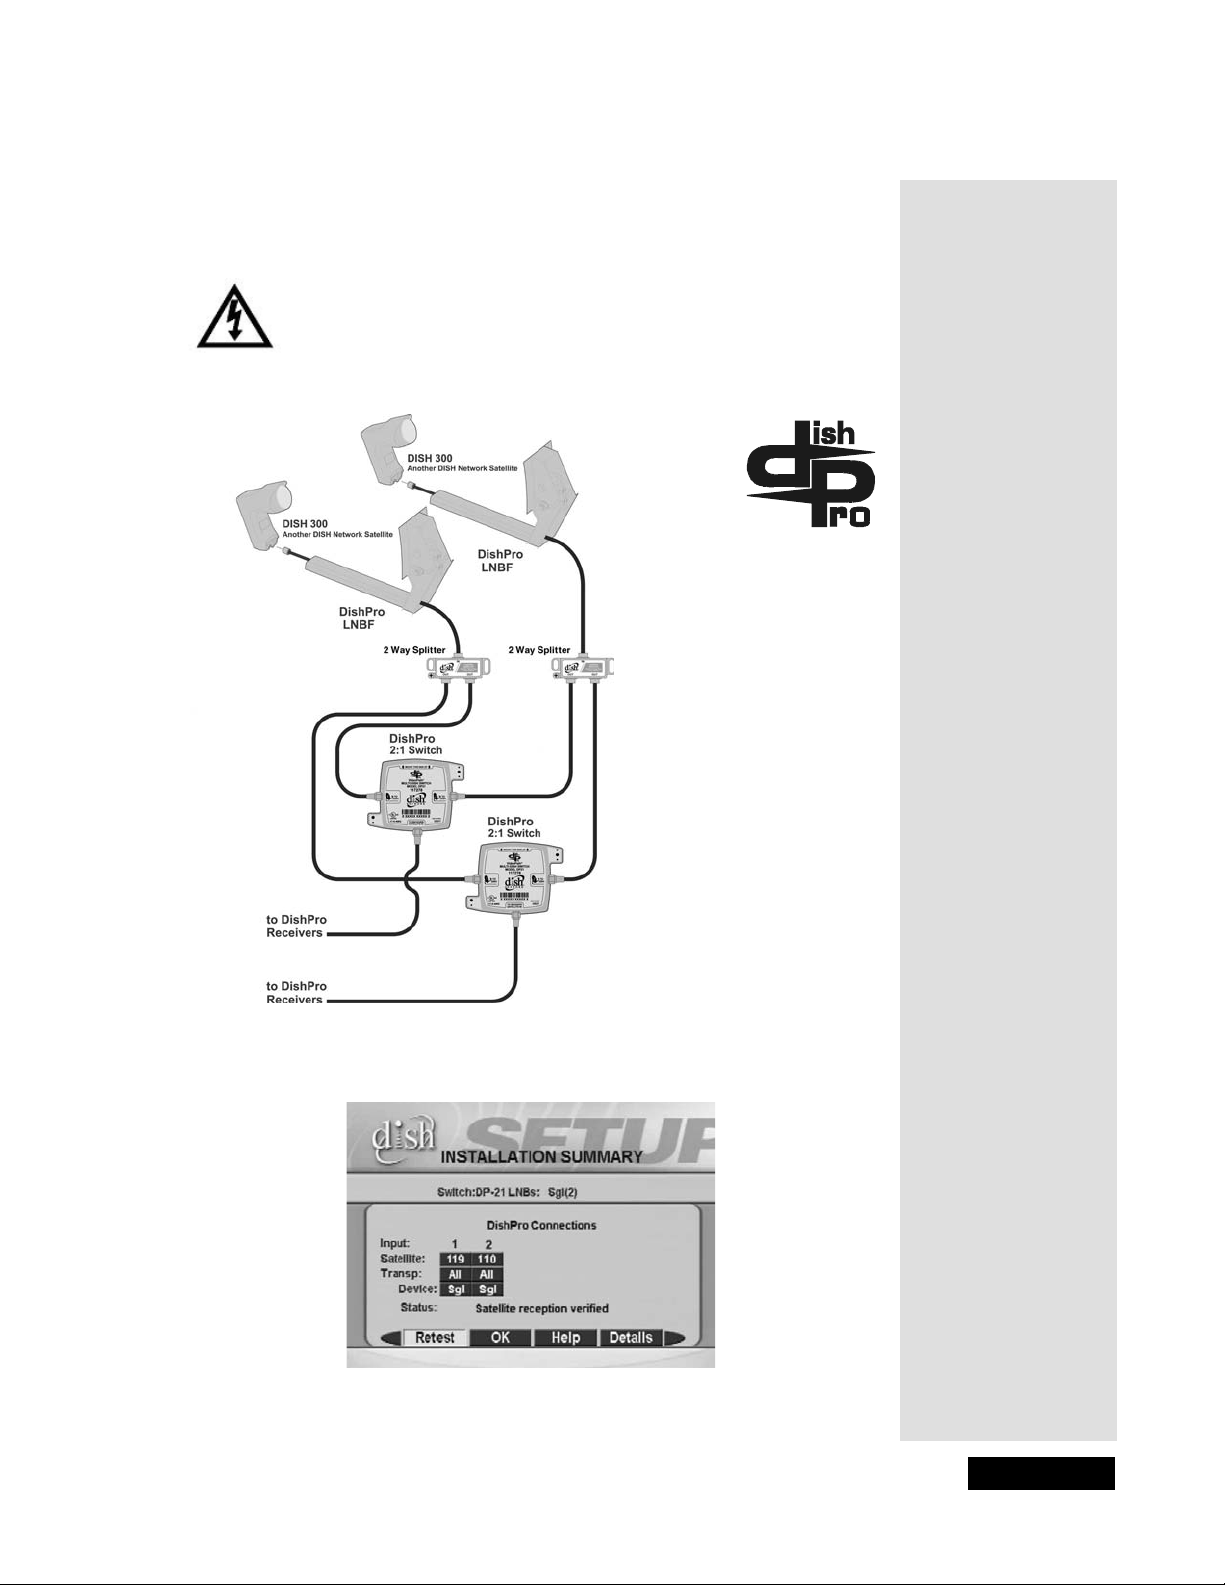
DishPro Wiring Diagrams
Two Dishes, Two DishPro Single LNBFs, Two DishPro
Compliant Splitters, Two DishPro 21 Switches, Two Receivers
This diagram leaves out grounding to be clear. Make sure you
ground the system per t he National Ele ctric al Code (NEC) and all
local electrical codes.
**
* When using a DishPro compliant
splitt er to split the signal from a
DishPro single LNBF, the rec eiver
whose DP21 switch is connected to
the passing side of the splitter must
be plugged into a live power outlet
at all times. If not, the DishPro
single LNBF will not have an y
power and wil l not be able to
provide satellite signal to the other
receiver.
When you set up your system following this diagra m and run Check Sw i tch
the Inst al lation Summary screen should look similar to the one shown
below.
Page 65
Page 70
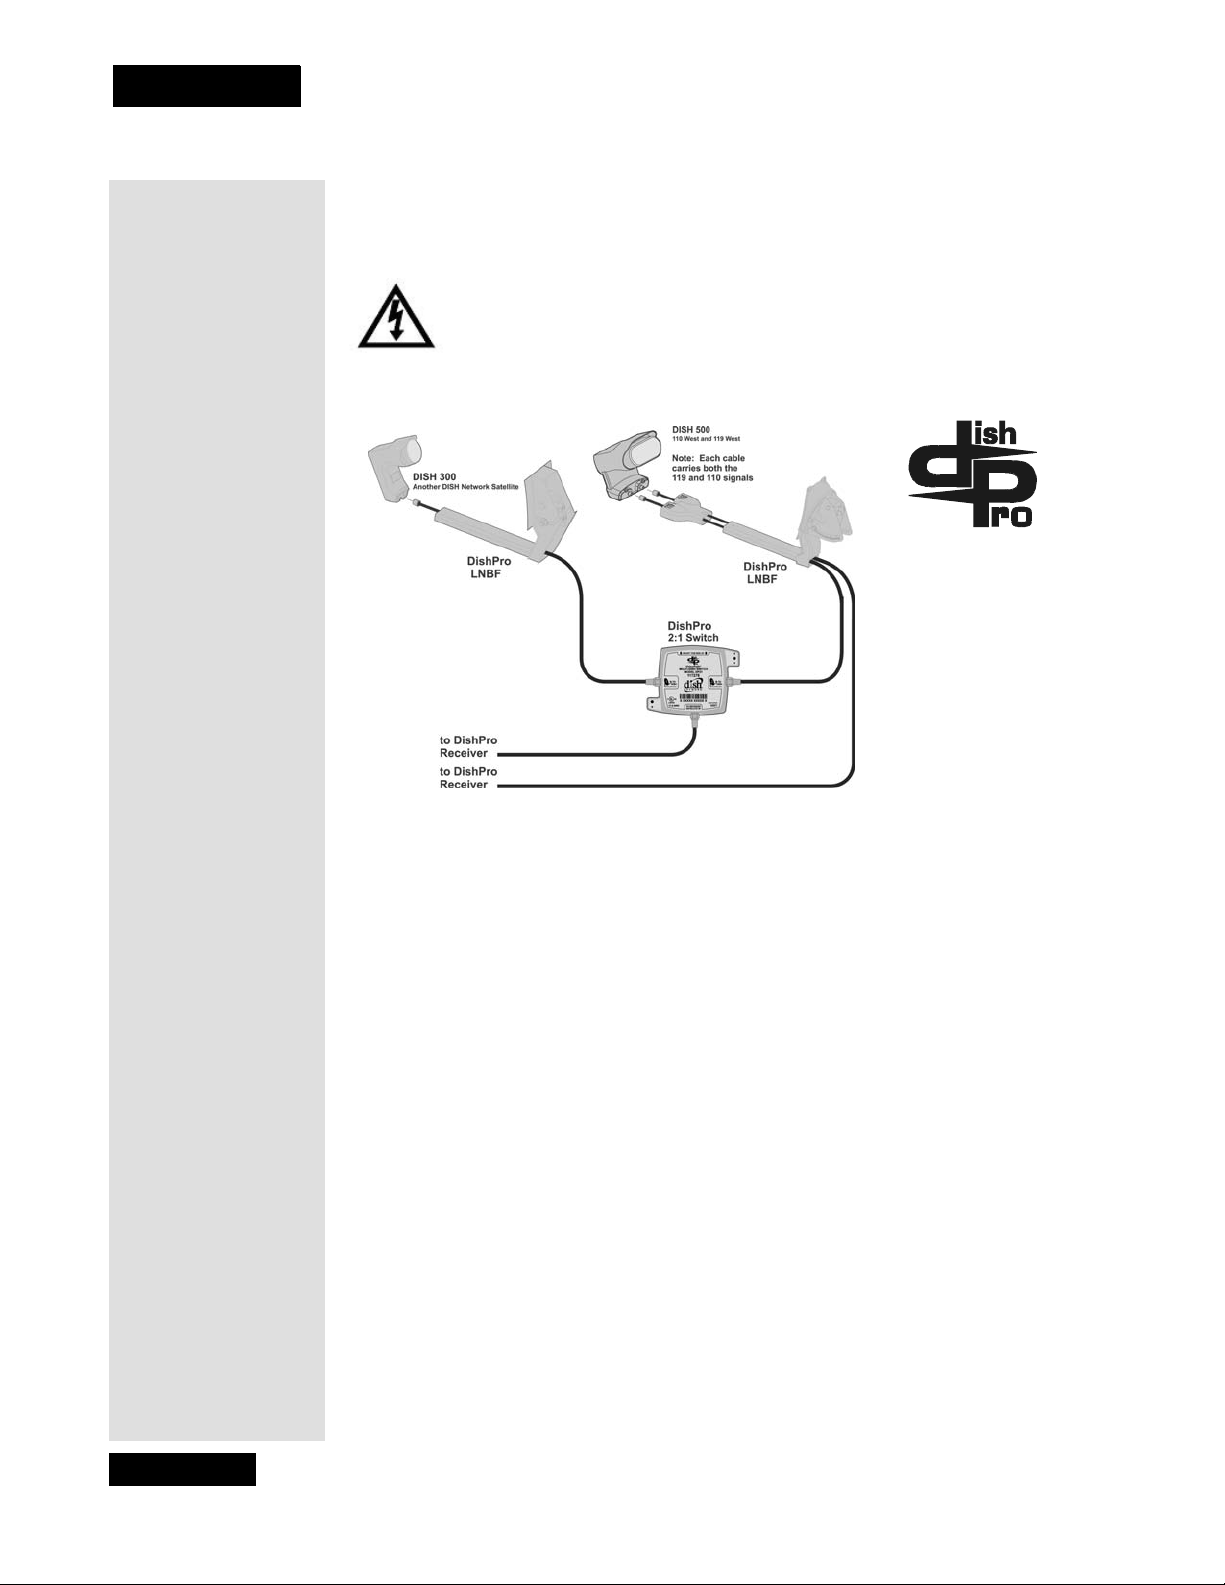
Chapter 4
Installation Instructions
One DISH 50 0 with a DishPro Twin LNBF, One DIS H 300 with a
DishPro Single LNBF, and One DP21 Switch
This diagram leaves out ground ing to be clear. Make sure you
ground the syst em per the National El ectri cal Cod e ( NEC) and all
local electrical codes.
Page 66
Note: This setup supports only one receiver from three satellite locations and
the other receiver from only two satellite locations.
Page 71
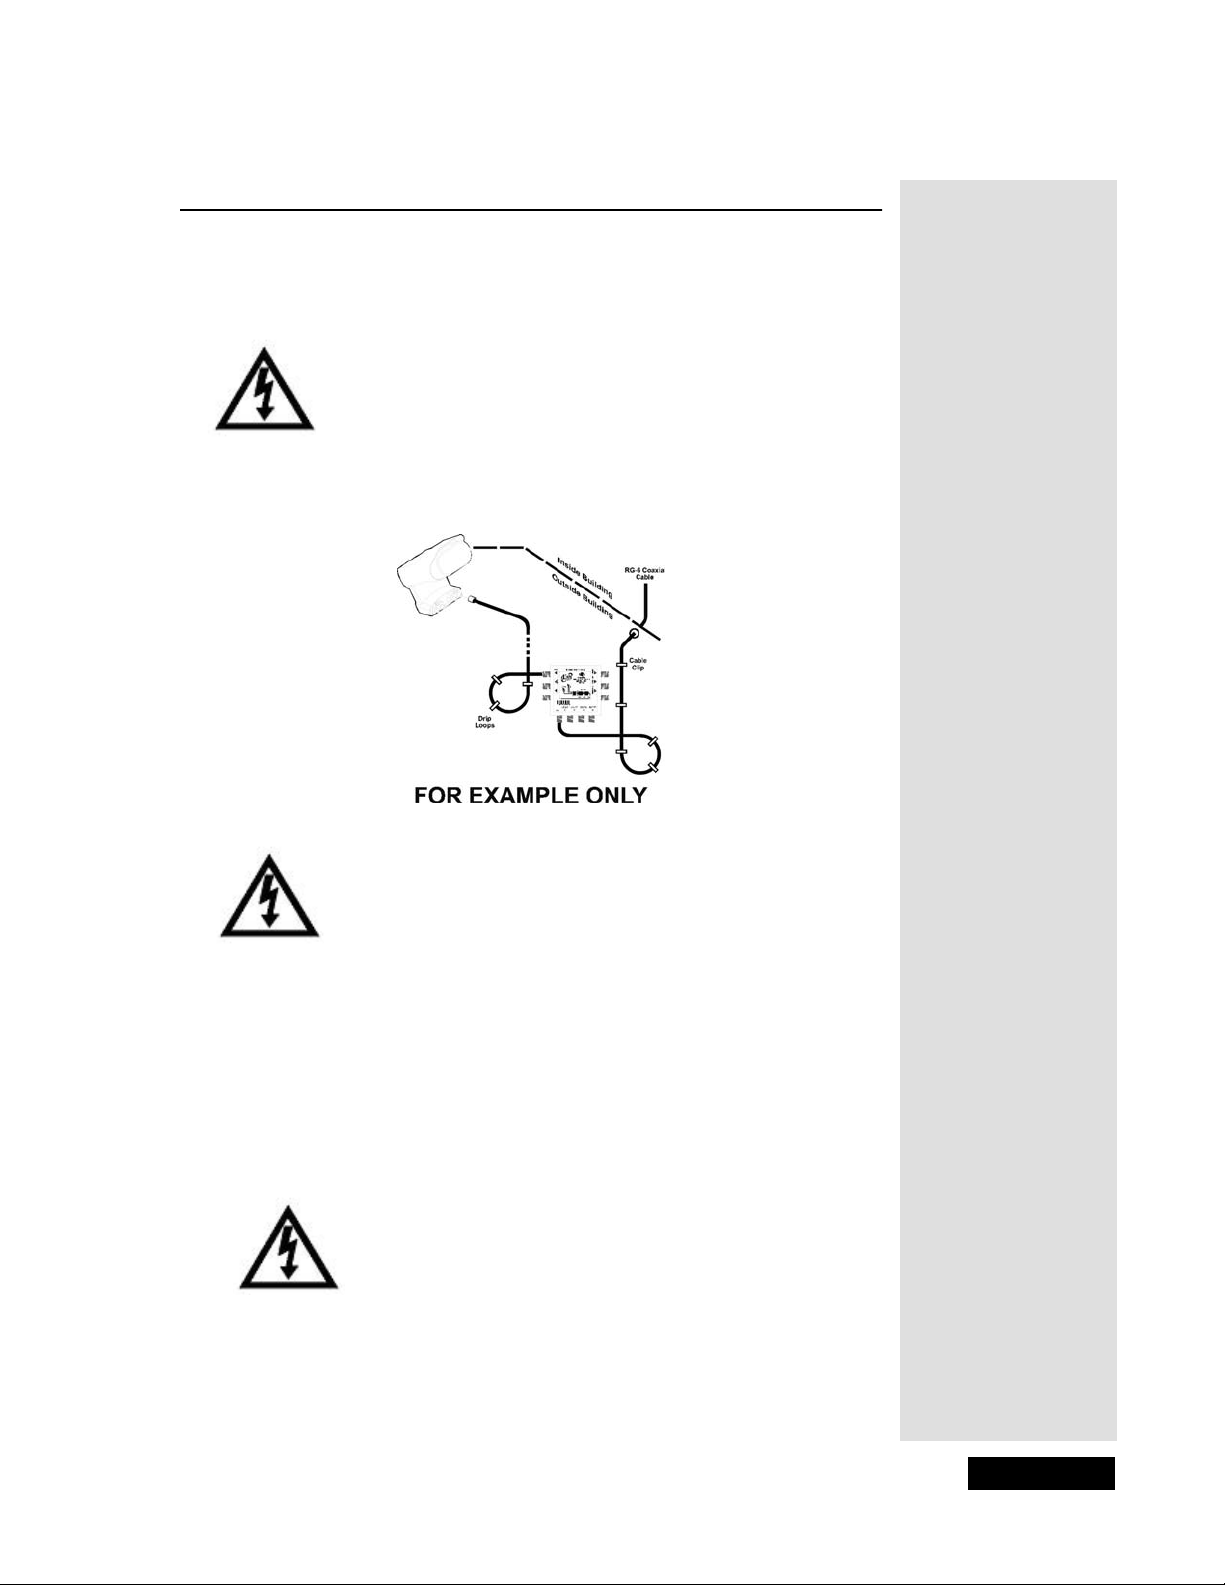
Running Coaxial Cable
Running Coaxial Cable
1. Using the shortest path possible, run the coaxial cable(s) from the ground
block or switch to the satellite receiver(s). Do not kink or pinch any ca ble.
Cables should be bent only in gentle curves.
Do not use a longer cable between the satellite dish and the
receiver than is specified in the DishPro or Legacy system
installati on instructions. If your system requires more cable
than the limit specifi ed in these installati on instructions, you
should consider having the system professionally installed.
2. Put a drip loop in each cable at a point before it enters the building. A drip
loop allows moisture to drip from the cable before it runs into
the building.
Before drilling any holes in the wall or roof of your buildi ng,
make sure that there are no wires or pipes in the area of the
holes. If you are not comfortable doing this, contact a
professional in your are a. Make sure tha t you follow all safe ty
instructions and building codes.
3. Locate each rece iver inside the building, against or near an outside wall.
Then drill a ho le thr ough the outer wall to pass a cable i nside t he build ing. If
a receiver is located in an inte ri or room, run a cable through the outside
wall, and into an attic, basement, or crawl space in order to reach the
receiver.
4. Seal all holes tha t you drill in the building with silic one or other weatherproof sealant after installation. Once each cable is inside the building, you
may attach it to a wal l recep t acle o r dire ct ly to a rece ive r.
Tighten the back panel coaxial cable connections only by
hand. Using a wrench may over-tighten the connections,
causing damage. Such d amage is not covered b y the Limit ed
Warranty in the User Guide that came with the system.
Page 67
Page 72
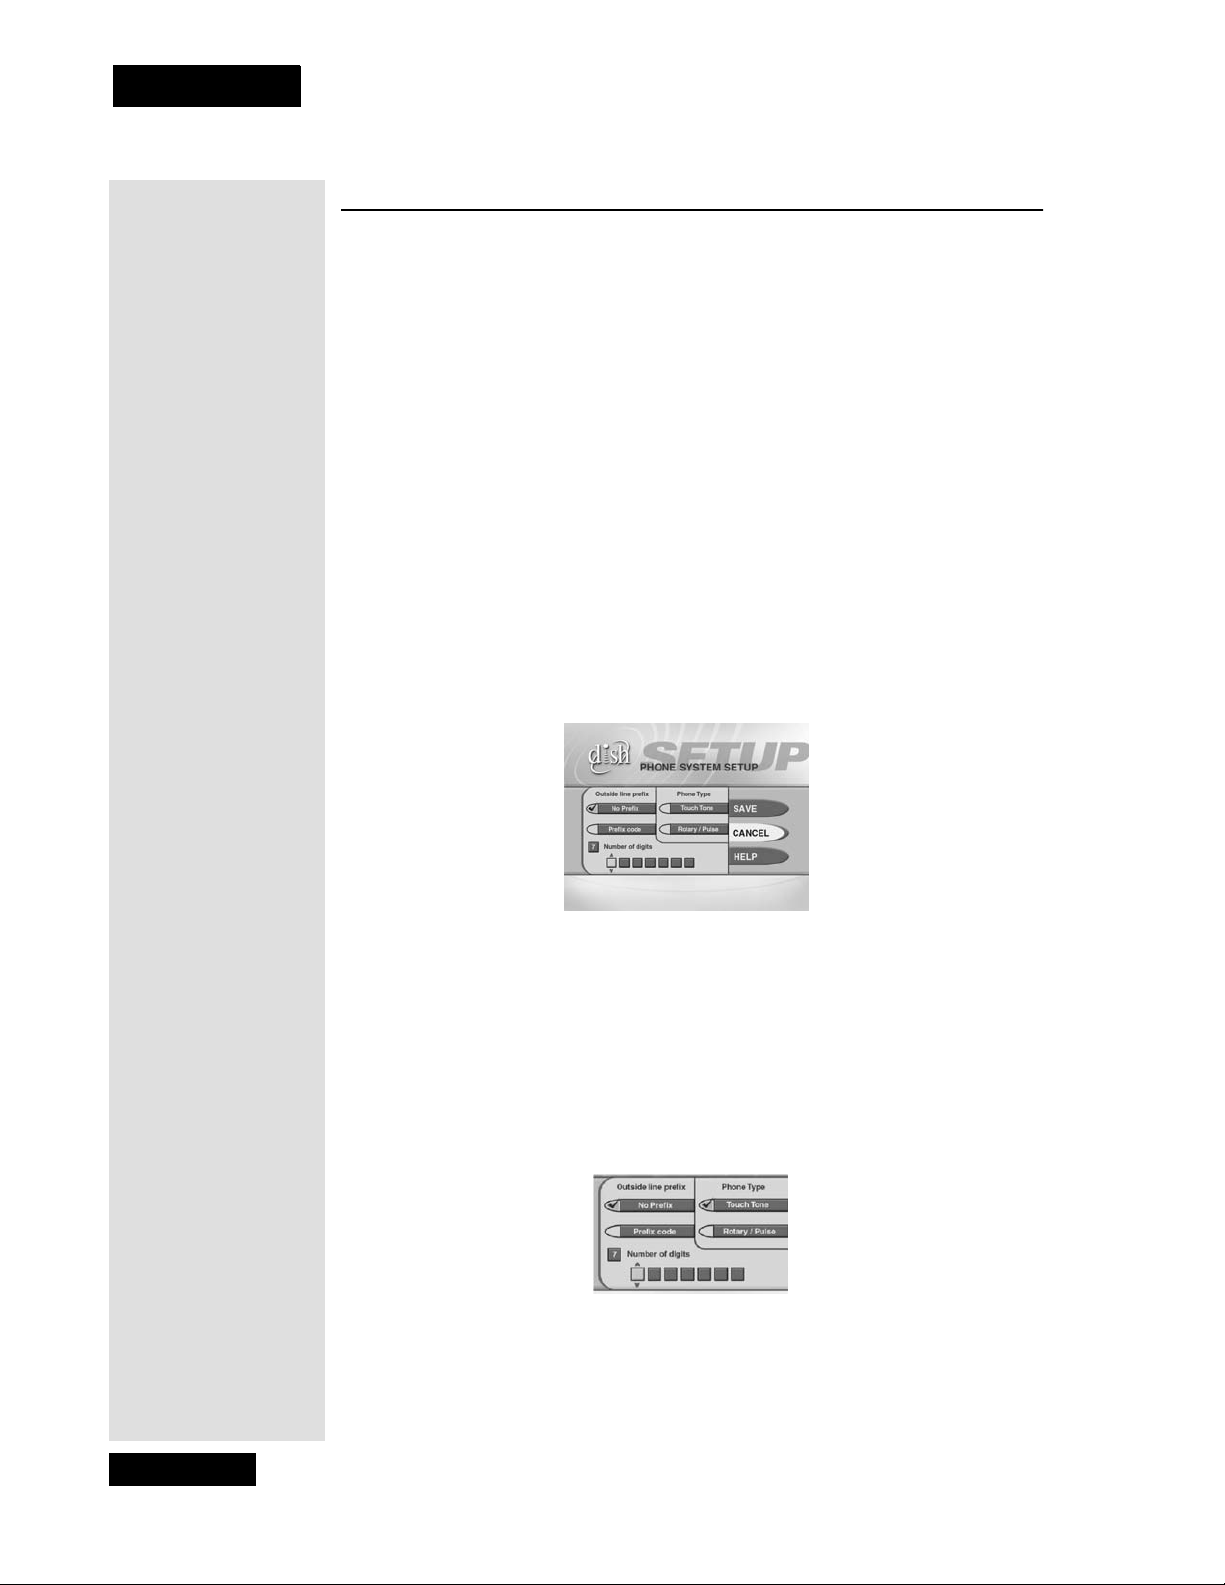
Chapter 4
Installation Instructions
Connecting the Receiver to a Phone Line
1. Display the
You must keep the receiver connected to an active telephone line.
Otherwise, you may not be a ble to or der pa y per vi ew programs or use all of
the Dish Inte ractive features. Run a telephone cable with a standard RJ-11
connector from the receiver’s back panel PH ONE JACK to a n a c t ive
telephone connection.
Note: You may be able to use a wireless telephone extender. However, this
may not support all the features of some rec eivers, such as Caller ID.
Note: If you have a Digital Subscriber Line (DSL), you may have to install
a DSL filter between the receiver’s back panel PHONE JACK an d the
telephone wall jack to successfully connec t with the DISH Network. You
can obtain a filter from your DSL provider.
You must also set up the receiver for your telephone system (touchtone or
rotary/pulse), and set a telephone number prefix, if you need a prefix to
make an outside call.
Installation and Setup menu (press MENU th en 6-1-4).
2. Select the
Setup
3. Select the
Note: Usually, you need a telephone number prefix only for business
Telephone System option to display the Telephone System
menu.
Touch T one or the Rotary/Pulse option in the Phone Type list.
installations. For most residential installations, a ll you need to do is set the
telephone system type . The default setting of
correct dial ing. If this is the case, select the
No Prefix needed will allo w
Save option to save the above
setting, and stop here. If you do need to set a prefix, then instead of
selecting the
4. Move the highlight to the
Save option, go on to step 4.
Outside Line P re fix list. Press the SELECT
button to select the highlighted option.
Page 68
Page 73

Connecting the Receiver to a Phone Line
5. Select one of the fol lowing:
• If you do not need to dial a prefix, select the
• If you need to dial a prefix (for example, dial 9 to get an outside line) ,
select the
Prefix Code option. The re ceiver displays the same number
of boxes (highlighting the first box) where you must enter the digits.
Use the Number Pad to enter the prefix code. As you enter each
number, the highlight moves to the next box.
6. Move the highlight to the Save option. Press the SELECT button to save
the settings.
No Prefix option.
Page 69
Page 74

Chapter 4
Installation Instructions
Notes
Page 70
Page 75

Chapter 5
Reference
TR OUBLESHOOTING TABLES
Use these tables if you have proble ms using the system before calling the
Customer Service Cente r. Many problems arise from misunderstandings of how
the system works , especi ally when you a re just becomi ng famili ar wit h it. The se
tables cover many problems , usua lly with a simple solution for each one . To
solve a particular pr oblem, do the following:
1. Review the section in this Guide that relates to the problem.
2. If you cannot find a solution, then find the section in the following tables
that r e l a t e s to the pro b l e m.
•Read the What’s Happening column until you f ind the problem.
• Read the information in the Possible Reason column.
• Try each of the suggeste d solutions in the What to Do column.
3. For more in formati on, c all the C usto mer Servic e Cente r at 1- 800-333- DISH
(3474).
Note: Before c alling the Service Center, have ready the date of purchase and
either your customer account number, the receiver conditional access num ber,
or the receiver model number. Display the Important System Information menu
to find these numbers (See Ordering your Programming on page 2). Also, write
down any error messages that the rec ei ver displays on the television screen.
Page 71
Page 76
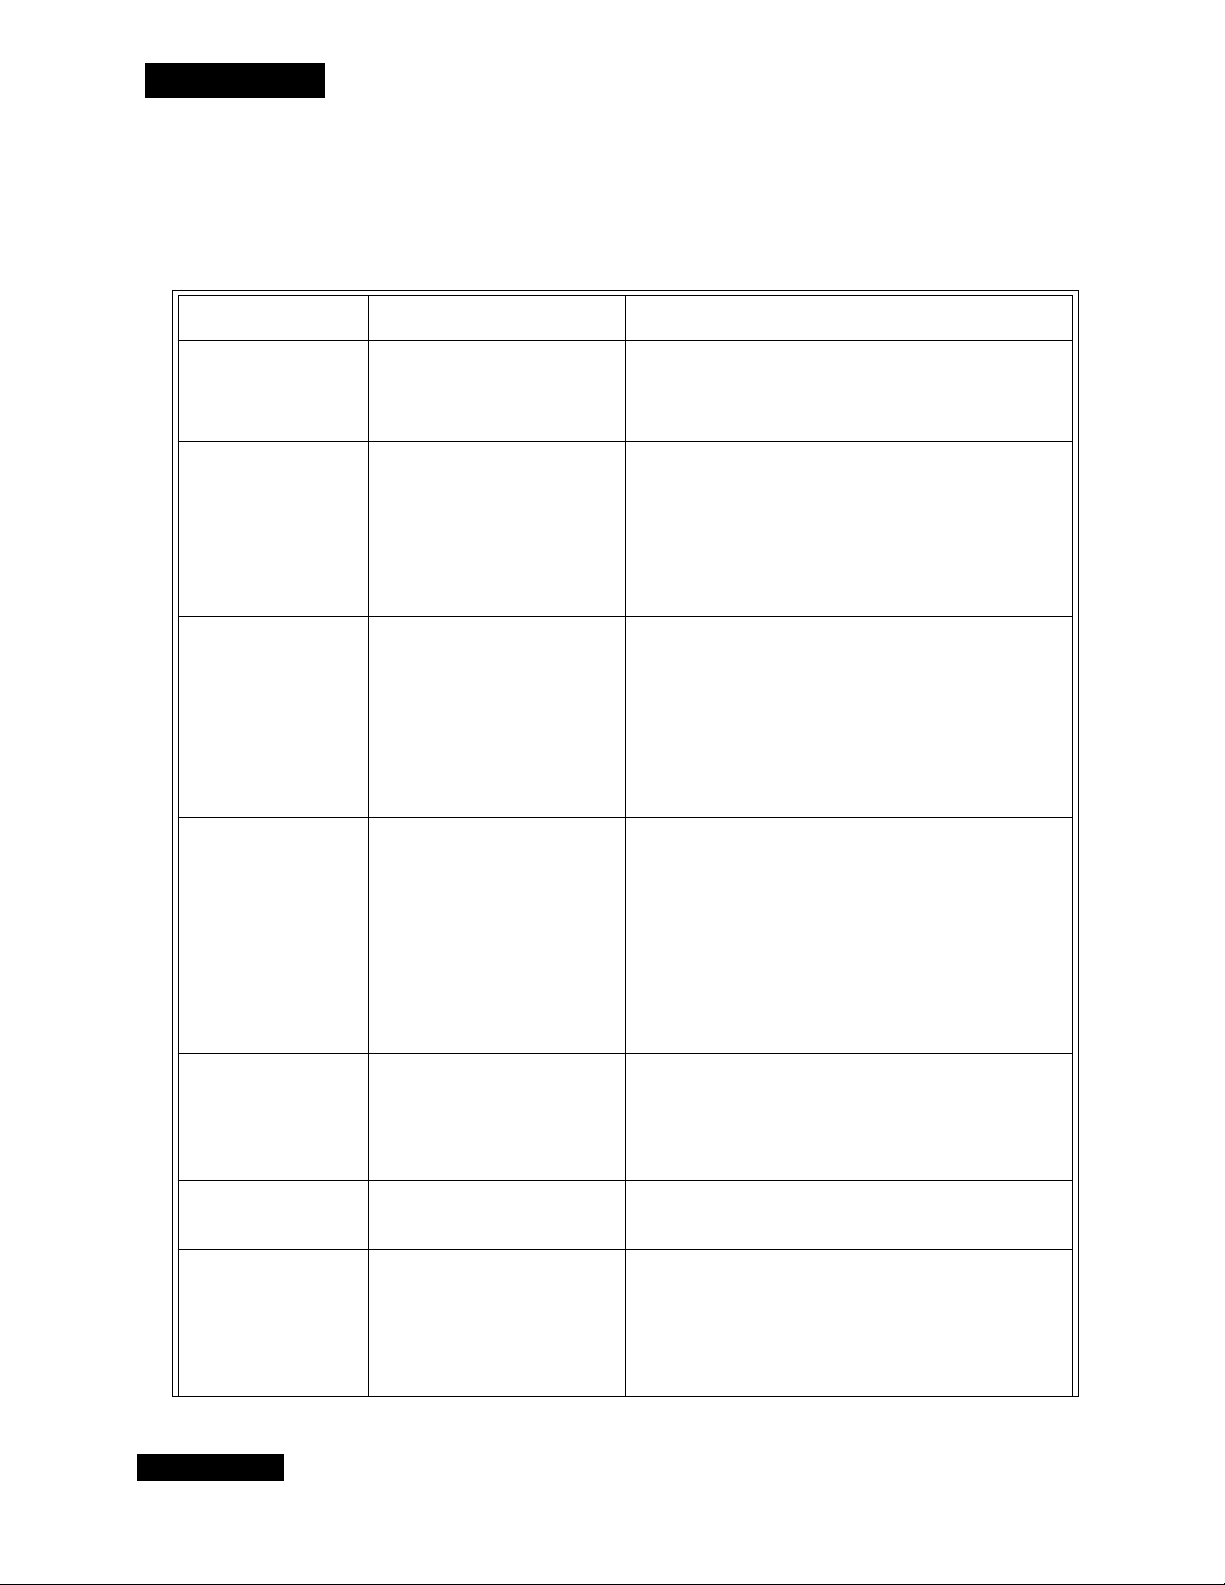
Chapter 5
Reference
ON-SCREEN MESSAGES
This table describes some on-screen messages in the order of their message numbers. Find the message
number in the upper right corne r of the message displayed on your TV scre en, and then find the matching
number in this table.
Message Number Possible Reason What to Do
001
002
003, 004
005
• There may be a proble m wi th th e
multi-di sh sw itch .
• Heavy rain, snow , o r cl oud cove r
may be interfe rin g with
transmission of the satellite
signal, or there may be other
interference.
• The wrong type of coaxial cable
may be used in the s ystem, or the
cable run le ngth may be to o long .
Or, there may be a problem with
the multi-dish switch.
• The receiver may not yet have
been authorized. The satellite
dish may have moved so that it is
no longer picking up the satellite
signal. The cable connections
may have loosened or have
moisture inside. There may be an
interruption of the satellite
signal.
• Check the coaxial cables and their connections to and from the
multi-dish switch. Make sure that all required cables are in
place, and che ck tha t all cable c onn ecti ons are ti ght an d d ry (f or
outdoor c ables). If t his does not work , call the Cus tomer Ser vice
Center for help.
• Note the local weather conditions. Remove any snow or other
debris which may have collected on the satellite dish.
Make sure that the satellite dish has a clear line of sight to the
satellite. Check whether branches or leaves have grown into the
line of sight.
• Make sure that the satellite dish is aimed at the satellite. Check
the strength of the sig nal using the Point Dish/Signal menu.
Consult your installer to re-aim the dish, if necessary, to obtain
the strongest possible signal.
• Make sure the system uses RG6 coaxial cable; if not, call your
dealer or installer.
• Check the dish-t o-receiv er cable r un length; if it is over 1 00 feet,
call your deal er or installer .
• Check the coaxial cables and their connections to and from the
multi-dish switch. Make sure that all required cables are in
place, and che ck tha t all cable c onn ecti ons are ti ght an d d ry (f or
outdoor ca bles).
• If this does not work, do the Check Switch test.
• If you have authorized the re ceiver, wai t a few minut es to see i f
the message is remo ved. Make sure that all required cables ar e
in place, and check that all cable connections are tight and dry
(for outdoor cables).
• Make sure that the satellite dish has a clear line of sight to the
satellite. Check whether branches or leaves have grown into the
line of sight.
• Check that the Signal Strength bar in the Poin t Dish/
Signal menu is green and displays the wo r d Locked. If not,
contact your installer to re-aim the satellite dish. If you have not
authorized the r eceiver, call the Customer Servic e Cen ter for
help.
Page 72
006
008
011, 012
• The receiver may not be
connected to an active telephone
line.
• T he cred it limit m a y hav e been
suspended.
• Maybe the receiver is connected
to a DSL (Digital Subscriber
Line) phone line.
• Viewers in specific areas are
prohibited fr om w atchi ng cer tain
programs.
For example, view er s w ho live
close to a parti c ular football
stad iu m ma y be prohibited from
watching football games that are
played in that stadium.
•You must connect th e recei ver to an ac tive t elephone connect ion
at all times. If you install two or more receivers, you must
connect each receiver to an active telephone connection at all
times.
• Review your pay per view purchas es to check the cred it limit.
• Install a DSL filter between the receiver and the telephone wall
jack. You can obt ain the filter from your DSL provi der .
• Remember that the pr ogram providers specify which programs
are “blacked out ” for which view er s , not DISH Network™.
Page 77
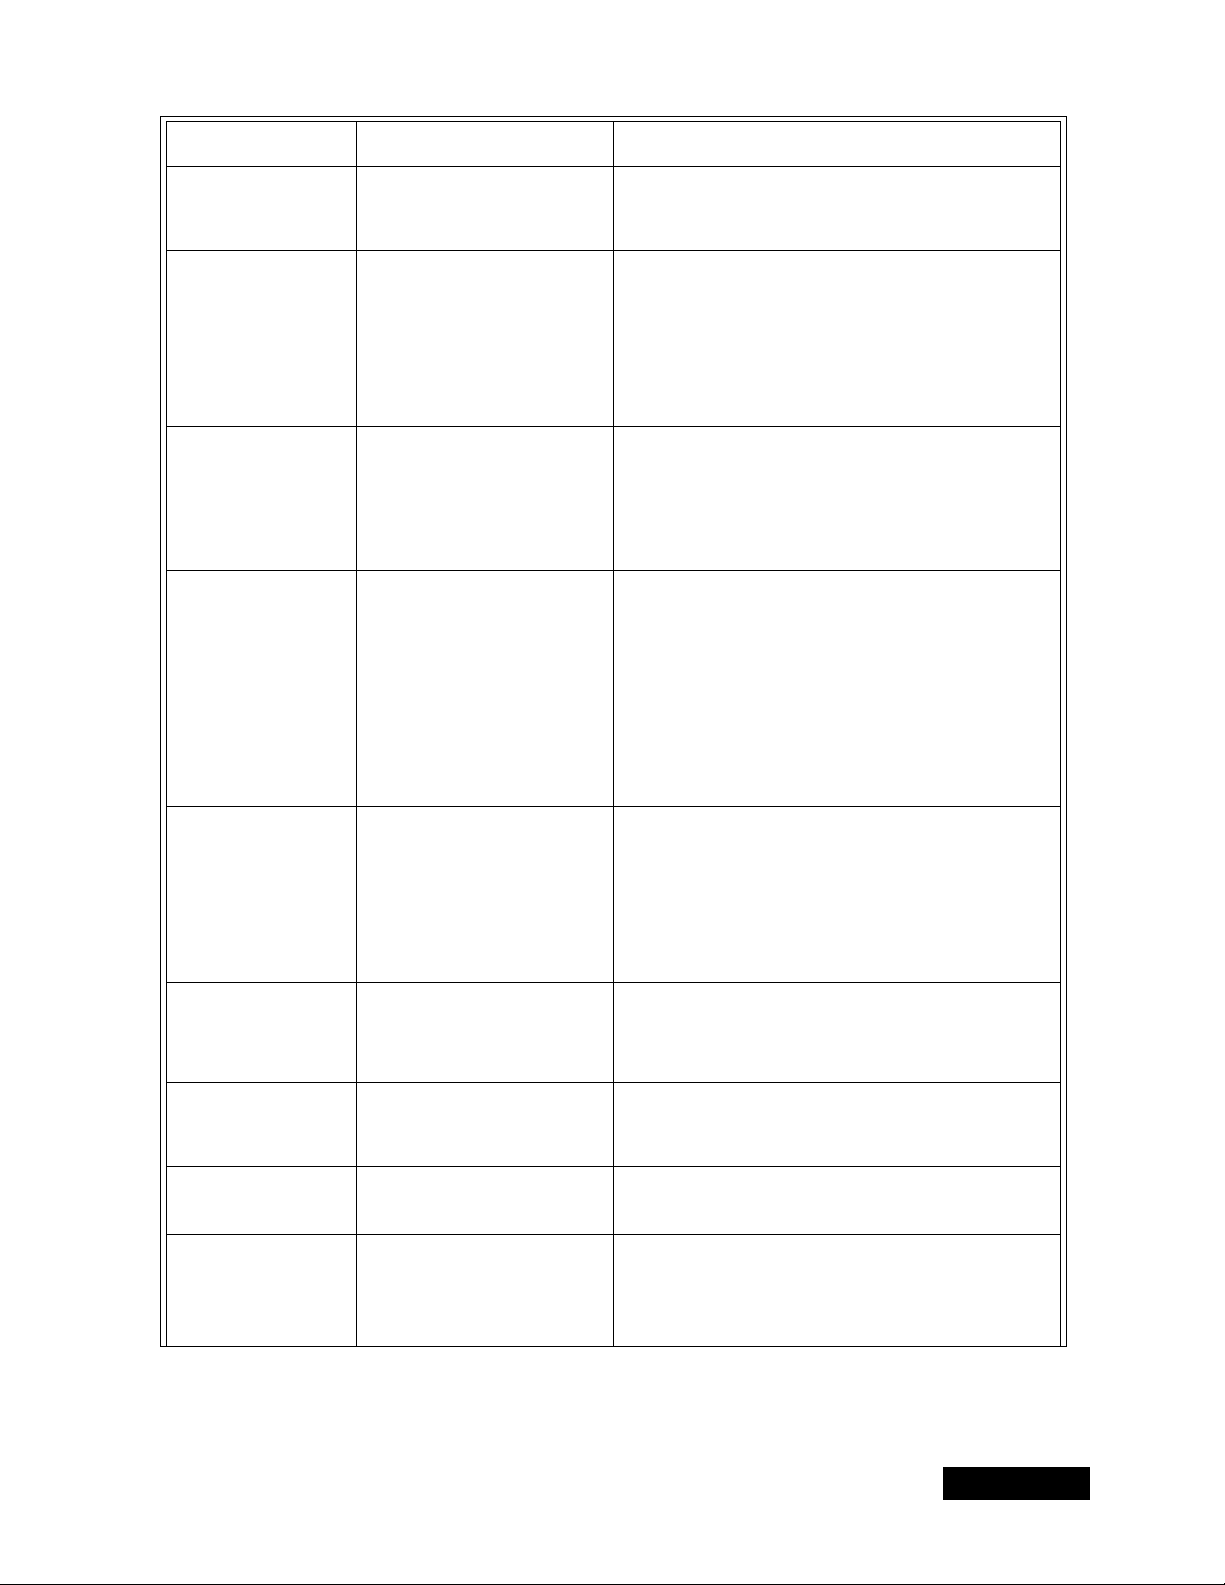
Troubleshooting Tables
Message Number Possible Reason What to Do
013, 014
015
018
022
• You may have tried to tune to a
program o n a channel which you
have not bought.
• You may have just plugged in the
receiver, and it is acquir ing the
satellite signal. Or, the receiver
may have temporarily l os t the
signal.
• The receiver may not be
connected to an active telephone
line.
• T he cred it limit m a y hav e been
exceeded.
• The receiver may not yet have
been authorized. The satellite
dish may have moved so that it is
no longer picking up the satellite
signal. The cable connections
may have loosened or have
moisture inside. There may be an
interruption of the satellite
signal.
•You must buy a channel before yo u can tune to a program on
that channel. Call the Cus tomer Service Center to buy the
channel, or if you believe this message was displayed by
mistake.
• Wait a few minutes to see if the message is removed. Make sure
that all requi red cables are in place, and check that all cable
connections are tight and dry (for outdo or cables).
Make sure that the satellite dish has a clear line of sight to the
satellite. Check whether branches or leaves have grown into the
line of sight.
• Check that the Signal Strength bar in the Poin t Dish/
Signal menu is green and displays the wo r d Locked. If not,
contact your installer to re-aim the satellite dish.
•You must connect the receiver to an active telephone connection
at all times. If you install two or more receivers, you must
connect each receiver to an active telephone connection at all
times.
• Review your pay per view purchas es to check the cred it limit.
Call the Customer Service Center for help checking the credit
limit, and/or to get authorization to make a purchase.
• If you have authorized the re ceiver , wai t a few minut es t o see if
the message is remo ved. Make sure that all required cables ar e
in place, and check that all cable connections are tight and dry
(for outdoor cables).
• Make sure that the satellite dish has a clear line of sight to the
satellite. Check whether branches or leaves have grown into the
line of sight.
• Check that the Signal Strength bar in the Poin t Dish/
Signal menu is green and displays the wo r d Locked. If not,
contact your installer to re-aim the satellite dish. If you have not
authorized the r eceiver, call the Customer Servic e Cen ter for
help.
026
028
032
059
060
• The receiver may have
temporarily lost the satellite
signal.
• The receiver may need to get new
software before you can use it to
order pay per view programs.
• You may have tried to set a VCR
Event Timer without having set
up the receiver to control th e
VCR.
• You may have tried to close an
installation menu without having
done the Check Sw it c h test.
• You may have aimed the satellite
dish at one satellite, but selected
the option for another satellite on
the Point Dish/Signal me nu.
• Wait a few minutes to see if the message is removed. Make sure
that all requi red cables are in place, and check that all cable
connections are tight and dry (for outdo or cables).
Make sure that the satellite dish has a clear line of sight to the
satellite. Check whether branches or leaves have grown into the
line of sight.
• Check that the Signal Strength bar in the Poin t Dish/
Signal menu is green and displays the wo r d Locked. If not,
contact your installer to re-aim the satellite dish.
• Turn the receiver off. Doi ng this allow s the receiver to
“downloa d” new softwa re via th e satellit e signal. The downl oad
may take several minutes; do not disturb or unplug the receiver
during this time . Wh en the do wn loa d is don e , you will be able
to use it to order pay per view programs.
•You must set up the receiver to control the VCR before you can
set a VCR Eve nt Timer. See the Using the System for
instructions.
• If your setup includes a multi-dish switch, you must do
the Check Switch test.
• Make sure that you have selected the option for the right satellite
on the Point Dish/Signal menu.
• Make sure that the c able(s) f or the sat ellite yo u have se lected are
connected to the LNBF that r eceives signals from that satell ite.
Re-aim the satellite dish at the right satellite.
Page 73
Page 78
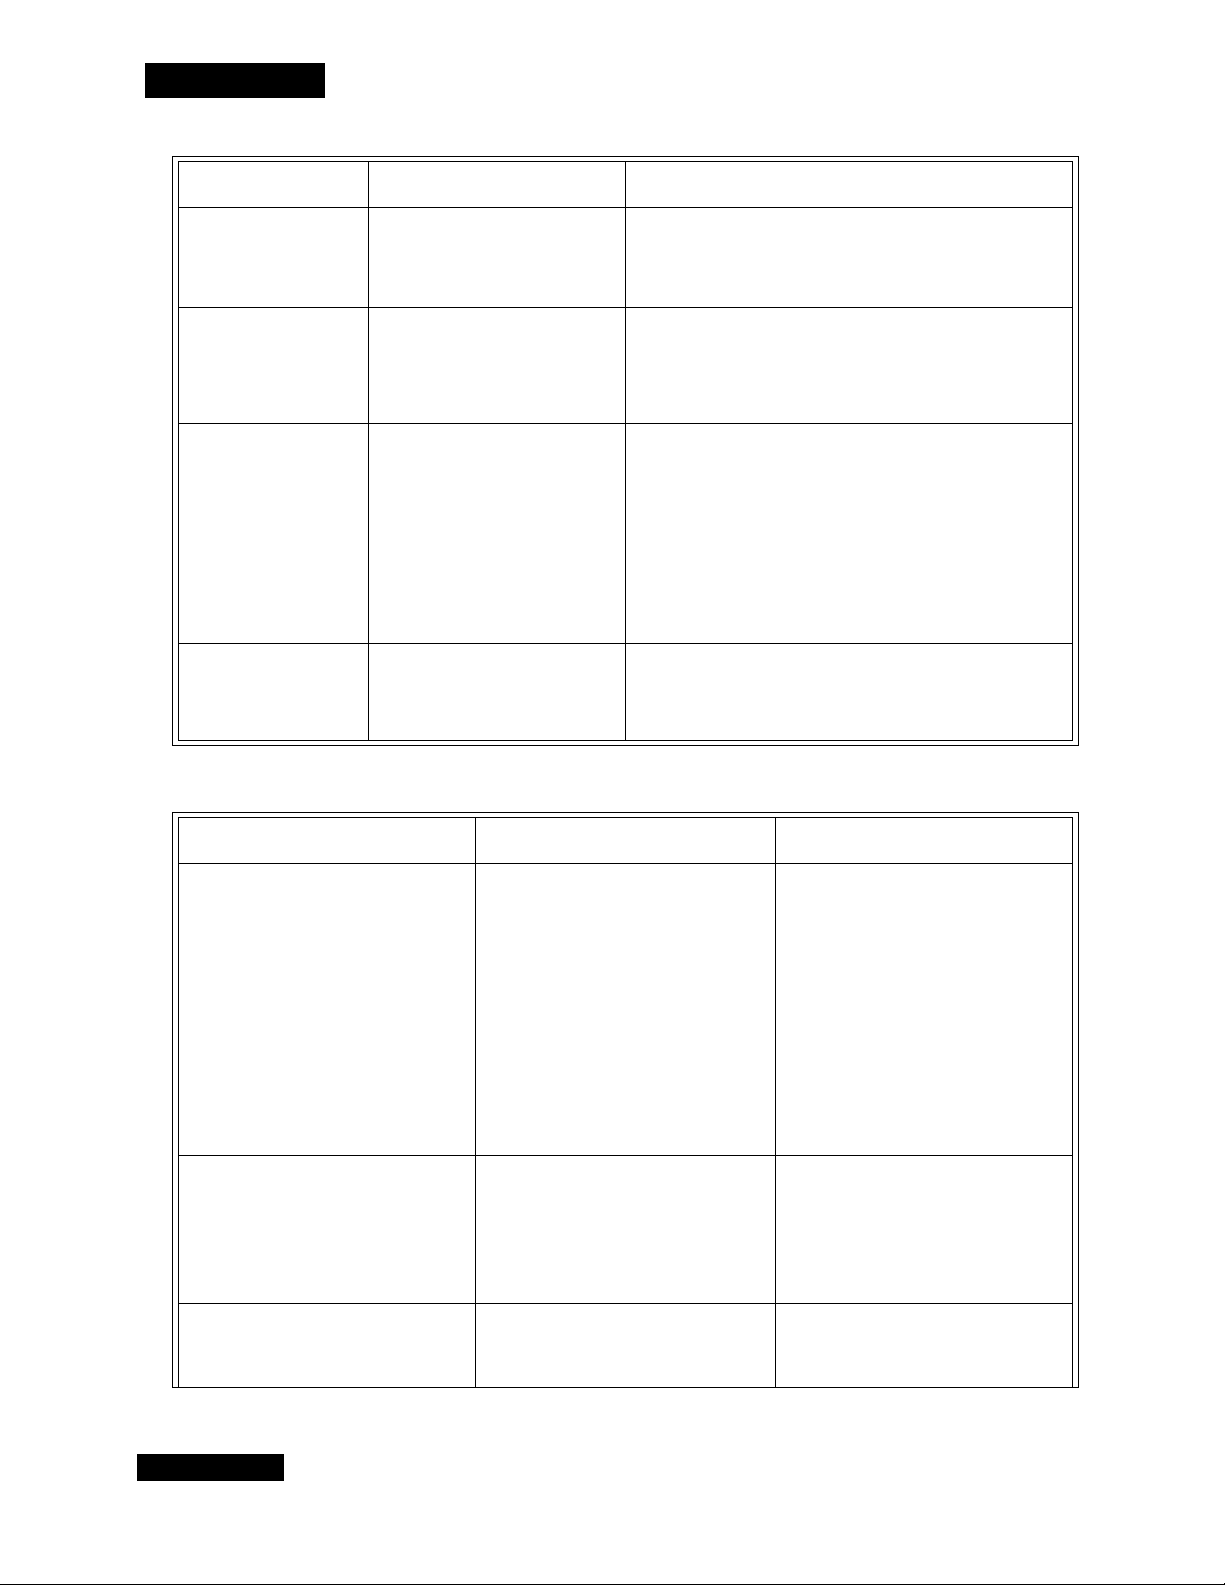
Chapter 5
Reference
Message Number Possible Reason What to Do
061
074
078, 079, 080
093
DISHPRO TWIN LNBF
• You may have set up the receive r
to accept a transmis s ion (a
“download” ) of the lates t
operating software via the
satellite signal.
• The receiver gives you thr ee
chances to enter the correct
password. If you fa il to do so, the
receiver “times out” and will not
allow you t o try ag ai n for se ver al
minutes.
• You may not have connected the
receiver to an ac ti ve telep hone
line. Or, the tele pho ne lin e may
be defective.
• Maybe the receiver is connected
to a DSL (Digital Subscriber
Line) phone line.
• You may have set up the receive r
to reset itself back to the “factory
defaults,” that is, the settings it
had when it was shipped from the
factory.
• It is very important for the receiver to get the latest operating
software, so le t t he r eceiver do so. The “download” may take
sever a l m i nu t e s . D o not dis turb or unp lug the re ce iver dur ing
this time.
• Wait a few minutes and then try again to enter the password.
Note: The “time out” featu re is designed to prevent s omeone
from trying password after password until he or she happens to
guess the right one and so gains unauthorized access to the
receiver.
• Connect the receiver to an active telephone line.
Make s u re that the telephone line to which you connect the
receiver is wor king properly.
Note: To be able to order pay per view programs, you must
keep the receiver connected to an active tel ephone line at all
times. If you r setup i ncludes mo re than one r eceiver , this app lies
to each receiver. Th e receiver uses the telephone line to make
toll-free calls, usually in the middle of the night, to send
information to the Customer Service Center.
• Install a DSL filter be tween the receiver and the telephone
wall jack.
• If you want to reset the receiver to its factory default se tt ings,
select the Yes option. If not, sele ct the No option.
What’s Happening What’s Wrong What You Can Do
When you run Check Switch, you do not
see "Twin" identified as a Device or LNB.
All entries show "X"s.
When you run Check Switch, yo u s ee
"Twin" identified as the Device/LNB and
Satellite s hows "Conn" but you do not see
"Satellite Recep tio n Verifi ed" .
When you run Check Switch, yo u s ee
"Satellite Reception Verified" but you see
"Feed" instead of "Twin" identified as the
Device/LNB.
• The DishPro Twin LNBF may no t be
properly connected.
• Cables may be too long, over 200 feet.
• Cables may not be rated for 2150 MHz.
• You may have DishPro Adapter
installed on a Dish Pr o r eceiver.
• May have a non-DishPro switch or LNB
or incompatible accesso ry device* in
the system.
• The DishPro Twin LNBF is connected
but no satellite signal is present.
• The DishPro Twin is connected but
somethin g in the syste m may be
blocking the swit ch commands.
• Check all cable connections in your
system and run Check Switch again.
• Make sure cable length between
receiver and DishPro Twin does not
exceed 200 feet. R e r un check switch.
• Make sure cable is rated fo r 2150 MHz.
Rerun check switch.
• Remove the DishPro Adapter; this
device is only f or non-DishPro
receivers. Rerun check switch.
• Remove any non-DishPro switches/
LNBs or incompat ible access ory
devices* from the system. All LNBs
and switches must be DishPro. Rerun
check switch.
• Check the point dish/signal screen to
confirm you have satellite signal. If not,
check your dish antenna to ensure the
DishPro Twin is inst alled properly, the
dish is pointed/peaked on the satellite
signal and t here is nothing blocking the
signal path to th e dish. Rerun check
switch.
• Check the cable path between the
DishPro Twin and the receiver and
remove any incompatible accessory
devices*. Rerun check switch.
Page 74
Page 79
Troubleshooting Tables
What’s Happening What’s Wrong What You Can Do
When you run Check Switch, you do not
see "Twin" identified as a Device or LNB,
but odd trans ponders are detected only on
one satellit e.
When you run Check Switch, yo u s ee
"Twin" identi f ied as the Device/LNB but
you only have signal confirmed from one
satellite.
When you run Check Switch, yo u s ee
"Twin" identi f ied as a Device or LNB , but
only odd transponders are detected.
Getting receiver messages that signal is lost
or being acqui red
• You may have DishPro Adapter
installed on a Dish Pr o r eceiver.
• May have a non-DishPro switch or LNB
in the system
• The DishPro Twin LNBF is connected
but the dish may not be pointed to
receive sign al from both 110 and 119
satellites.
• Cables may not be rated for 2150 MHz. • Make sure cable i s rated for 2150 MHz
• Check the weather conditions to see if
heavy rain or snow could be te mporaril y
block the signal.
• Check for any obstructions in way of the
dish like new growth on trees
• Remove the DishPro Adapter; this
device is only f or non-DishPro
receivers. Rerun check switch.
• Remove any non-DishPro switches/
LNBs from t he system. All LNBs and
switches must be D ishP ro. Rerun ch eck
switch.
• If the check switch summary screen
shows "119 W" on D ish Input 2, you
need to point you dish 9 degrees to the
east and repeak your dish. Rerun check
switch.
• If the check switch summary screen
shows "110 W" on D ish Input 1, you
need to point you dish 9 degrees to the
west and repea k yo ur di sh . Reru n ch eck
switch.
• Make sure the skew setting is correct for
a Dish 500 ins tallat ion at yo ur zi p code.
Rerun check switch.
and all accessor y devices are
compatible. Re r un check switch.
• Wait for weather to c lear u p and restore
signal.
• Clear obstructions from th e s ignal path.
* Compatible accessory devices must pass 2150 MHz signals, 22 KHz si gnals both directions ( per DiSEqC 2 .0
specifications), and pass DC power.
USING THE REMOTE CONTROL
What Is
Happening
You cannot find the
remote control.
When you press a button
on the remote control, the
receiver does not do what
you expect .
When you press th e
remote control Power
button to turn the receiver
ON, the receiver front
panel Power light does
not light up.
Possible Reason What to Do
• N/A • Use the receiver front panel Control Buttons to control the
• The remote control may be
missing ba tter ies , th e batt e rie s
may be incorrect ly placed in the
remote, or th e batteries may be
weak or dead.
• The remote control addres s may
be incorrect.
• Other lights are too bright.
• Remote control not operating
properly or t he batt eries are w eak
or dead.
• The receiver power cord not
plugged int o a power out let, or
ther e ma y be a pr o blem with the
power.
receiver until you find the remote. If the remote control is
permanently lost or too damag ed to us e, cal l the Ser vice Cent er
to order a replacement.
• If the batteries are missing or dead, insert fresh AAA-size
batteries.
• If the remote has f resh batteries, check whether they are placed
according to t he label diagram. If not, remove t hem and place
correctly.
• If you are using a DISH Netwr ok 4-service database remote
control unlike the remote control which came with your
receiver, op en the Important System Information screen
and press the RECORD button on your remote control.
• Try other remote contr ol buttons to see if the receiver is
respondi ng.
• Re p lace the re mote batte ri es w ith fresh ones.
• Check that the rece iver pow er c ord i s not d amage d, and tha t the
plug is inserted correctly into the outlet.
Page 75
Page 80
Chapter 5
Reference
HEARING A PROGRAM
What Is
Happening
The receiver front panel
Power ligh t is on and
there is a good pict ure on
the TV se t, but you do no t
hear any sound.
You hear a foreign
language with a program.
WATCHING A PROGRAM
What Is
Happening
The receiver front panel
Power light is on, but the
TV image:
is black (no picture),
is frozen,
has breakups,
has “snow,” or
shows small squares of
various col ors.
Possible Reason What to Do
• You may have muted the sound,
or set the volume so low that you
cannot hear it.
• You may have set the receiver to
an alternate audio language.
• Check the volume leve l o n the TV or aud io devi ce. T urn o ff the
mute or turn up the volume, as required.
•Use the Alternate Audio Language menu to select the
language that you prefer .
Possible Reason What to Do
• The TV set may not be working
properly.
• If the TV and the receiver are
working properly, there may be
interference with the satellite
signal. Th e TV may be wired to
the wrong input.
• Make sure that the TV set is plugged into an electrical outlet.
Make sure the outlet has electrical power. Make sure that the TV
is turned on.
• Make sure that the TV is tuned to channel 3 or 4 (whichever
works bes t in your area) an d that the receiver modulator setting
is set to the same channel as the TV.
Make sure that th e TV br ightness and contrast are adjusted
correctly.
• Make sure that the TV is connected pr operly to the receiver.
Make sure that the TV’s te xt mode and closed captioned
features are turned off.
• Check that the system has been installed correctly. Make sure
that all requi r ed coaxial cables are in place, and check that all
cable connectors are tight and dry (for ou tdoor cables).
Make sure that the satellite dish has a clear line of sight to the
satellite. Check whether branches or leaves have grown into the
line of sight.
• Make sure that the satellite dish is aimed at the satellite. Check
the strength of the sig nal using the Point Dish and Signal
Strength menu. Consult your installer to re-aim the dish, if
necessary, to obtain the maximum possible signal strength.
Note the local weather conditions. Heavy rain, snow, or cloud
cover may be interfering with transmission of the satellite
signa l . Rem ove any sn ow or other debris whic h may have
collected on the satellite dish.
The receiver front panel
Power light is on, and
there is a picture o n the
TV screen, but th e pict ure:
has sparkles or is grainy,
has a herringbone patte rn,
lacks color or vertical
hold, or wobbles, or
looks “washed out” or
fuzzy.
A “black box” fills al mos t
all of the TV screen.
Page 76
• The TV set may not be working
properly.
• There may be a strong local
broadcast on t he s ame channe l,
or a channel adjacent to the one
to which the TV is tuned.
There may be interference from
other nearby electrical devices
(such as cellular telephones,
computers, microwave ovens,
radios, stereos, or TVs).
• You may have turned on the
Closed Captioned feature on the
TV, and put tha t featu re into T ext
mode.
• Make sure that the TV brightn e s s and contrast are adjusted
correctly, and that the TV is working properly.
• Make sure that the TV is connected pr operly to the receiver.
Check other nearby elect r ical devices as possible sources of
interferen ce. Check t ha t all re quired coax ial cables are i n p lace.
Check for moi s ture or water leaking into all connections. Dry
them out if needed, then seal them with coaxial cable sealant.
Check the dish-to-r eceiver cable run l ength; i f it is o ver 200 feet,
call your deal er or installer .
• Using the TV remote contr ol and/or menu s displa yed by the TV
(not the receiver remote control or the menus displayed by the
receiver), t ur n of f the closed captioned feature.
Page 81
USING THE MENUS
Troubleshooting Tables
What Is
Happening
You were using a menu,
and it suddenly closed.
Possible Reason What to Do
• The receiver has a time-out
feature th at close s any me nu after
several minutes of no activity.
This will discard any changes
you have made, but otherwise
does no harm to the r eceiver.
• Start over again.
USING THE PROGRAM GUIDE OR THE BROWSE BANNER
What Is
Happening
In the Program Guide,
some channels have a red
background.
You try to display future
programs i n the Program
Guide or Browse
Banner, but find you
cannot.
You try to display
programs th at have ended
in the Program Guide or
Browse Banner, but
find you cannot.
Possible Reason What to Do
• Red means that you have not
bought the program. You must
buy a channel before you can
tune the receiver to it.
•The Progra m Guide and
Browse Banner can display
programs sc heduled for an
extended, but not unlimited time
beyond the present.
•The Progra m Guide and
Browse Banner can display
only programs that have not yet
ended. These features cannot
display a time earlier than the
present.
• If you want to buy a channel, call the Customer Service Center
at 1-800-333-DISH (3474).
• Try displaying the Program Guide again later. By that time,
it may show programs for the time and date you want.
• Turn the receiver off for about ten minutes.
• Contact the program providers for details on pas t programs.
When you are using the
Program G uid e or
Browse Banner, some
channels are miss ing.
USING LOCKS
What Is
Happening
You set a lock (for
example, a lock on
programs by ra tings), but
the lock does not take
effect.
You forgot the password,
so that you are unable to
unlock the receiver.
• You may have applied a Favori te
List other than the list named All
Chan.
You may have set up the
Program Guide so that when
the receiver is lo cked, the Guide
hides adult channels.
If your setup includes a multidish switc h, you may need to do
the Check Switch procedure .
• You can change the applied Favorite List while using the
Program Guide, by pressing the remot e control Guide
button. Yo u can choose another custom Favo r it e List, th e All
Chan list, which includes all of the channels, or the All Sub
list, which includes a ll subscri bed channel s. Unlock the receive r
for the Program Guide to display adult ch annels.
Do the Check Sw itch procedure (see the ins tallation
instructions
for details).
Possible Reason What to Do
• Y ou may no t ha ve locke d the
receiver.
• NA • If you forget your password, you will need to speak with
•You must lock the rece iver to apply any lock that you have set.
a Customer Service Representative. If you have a Personal
Identification Number (PIN), you will need to give it to
the Customer S ervice Representative. See page 44 for
information on PINs.
Page 77
Page 82
Chapter 5
Reference
CHANGING CHANNELS
What Is
Happening
You enter a desired
channel number . The
channel changes, but the
new channel is not exactly
the channel you e ntered.
You are scanning up or
down through the
channels, and the receiver
is skipping channels that
you know you have
bought.
USING FAVORITE LIST S
What Is
Happening
You press the remote
Guide button while the
Program G uid e is
displaye d. You find that
you can appl y only the All
Chan list or the All Sub
list.
Possible Reason What to Do
You may have made a mistake
entering th e chan nel nu mb er, or the
channel num ber yo u enter ed ma y be
invalid.
If so, the channel displayed is the
closest possible to the channel you
entered.
If you entered the number for a
channel that you have not bought,
the receiver will change to the
channel and a ll ow you to buy the
channel or display a message.
If a Favorite List other than All
Chan is applied, the receiver will
skip channe ls that are not on the
applied list.
If you have set up the Program
Guide to hide adul t channels and
the receiver is lo cked, the receiver
will skip such channels.
Carefully retry entering the channel number you want.
Press the remote con tro l Recall button to return to the previous
channel number . Select All Chan as t h e ac t ive Fav o rite Li st .
Unlock the receiver so that it does not skip adult channels.
If you want to bu y a channel, call the Customer Service Center.
Possible Reason What to Do
If you have not added channels to
any custom Favorite List, you will
be able to apply only the All Chan
list or the All Sub list.
You must add channels t o a custom Favorite List before you can
apply it.
You try to chang e the
All Chan list or the All
Sub list. The receiver
displays an ERROR
message.
You try to app ly an em pt y
Favorite List. The receiver
displays an ERROR
message.
A Favorite List does not
show channe ls that you
know you have ad ded t o it.
Page 78
The receiver will not allow you to
change the All Chan list o r the All
Sub list.
The receiver will not allow you to
apply an empty list.
If you have set up the Program
Guide to hide adul t channels and
the receiver is locked, the Favorite
List will not show such channels.
Choose anothe r li s t to change.
Note: You can change the All Sub list by changing what channels
you buy.
Choose anoth e r li s t to apply, or add at least one channel to the
empty list.
Unlock the receiver for the list to show adult cha nnels.
Page 83
BUYING A PAY PER VIEW PROGRAM
Troubleshooting Tables
What Is
Happening
Someone or ders a pay per
view progra m without
your permission.
You find that you are not
able to order a pay per
view progra m .
You find that you are not
able to cancel a pa y per
view progra m .
Your setup incl udes more
than one receiver . You
order a pay per vi ew
program, bu t i t does not
appear via all of the
receivers.
Possible Reason What to Do
You may have been away from the
receiver, and someone els e us ed it.
The receiver may not be connected
to an active telephone line.
The credit limit m a y have bee n
exceeded.
You ordered a pay per view
program, and then decided not to
watch it.
You ordered a pay per view
program, and want it to be avail a ble
via all the receivers in your setup.
Lock the purchase of pay per view programs. Reme mb er that you
are responsible for all pay per view purchases, whether or not you
authorize such purchases. If you lock pay per view purchases, then
anyone who wants to order a pay per view program must enter the
password.
You must connect the receive r to an act ive t elepho ne conne ct ion at
all times. If you install two or more receivers, you must connect
each receiver to an active telephone connection at all times.
Review your pay per view purchases to check the credit limit.
You cannot cancel an orde r for a pay pe r view prog r am, wheth er it
was jus t or d ered or ord e r e d e ar l i e r .
If you want to watch a pay per view progr am on TVs connected to
up to six receivers, you must order the program for each receiver
but you only pay for the program once.
USING THE TELEPHONE FOR VOICE/DATA/FAX
What Is Happening Possible Reason What to Do
While you are making a
telephone call, you hear
“clicks.”
The rece iver c anno t co nne ct
to DISH Network.
You pick up the te lephone to
make a call, but you do not
hear a dial tone.
Your computer or facsimile
(FAX) machine tries to send
a FAX or modem
transmission, but fails.
Your computer or FAX
machine was recei ving a
FAX or modem
transmission, but an error
occurred.
The receiver ma y ha ve tri ed to ca ll t he
Customer Ser vice Center to send pay
per view purchase information. When
the receiver fou nd tha t th e telep ho ne
was b u sy, it automatically
disconnected.
Maybe the receiver is connected to a
DSL (Digital Subscriber Line) phone
line.
The receiver was calling the Customer
Service Cent er to send pay per view
informat ion. When the receiver fo und
that the telephone was busy, it
automatically disconnected.
The receiver was calling the Customer
Service Cent er to send pay per view
informat ion. When the receiver fo und
that the telephone was busy, it
automatically disconnected. The FAX
or modem found that there was no dial
tone, and can celled the transmission.
The receiver ma y ha ve tri ed to ca ll t he
Customer Ser vice Center to send pay
per view purchase information during
the FAX or mode call. When th e
receiver fou nd that th e tele ph one was
busy, it automatically disconnected.
This genera ted “ click s” t hat cau sed an
error in the FAX or modem
transmission.
You do not have to do anythin g. You can always use your telephone
line, because the rec eiver auto mati cally han gs u p if it find s th e line i s
busy.
Install a DSL filter between the receiver and the tele phone wall jack.
Hang up, and then pi ck up the telephone again to get a dial tone.
Resend the FAX or modem transmission.
Have the sender resend the FAX or modem transmission.
Page 79
Page 84
Chapter 5
Reference
USING EVENT TIMERS
What Is Happening Possible Reason What to Do
You try to set up an event
timer and the receiver
displays a message noting
that the program is locked.
You try to set up an event
timer and the receiver
displays a message noting
that the p rogr am is a pa y p er
view event.
You try to set up an event
timer, but the rec eive r
displays an Error message
giving you the option to
delete an event timer that
was set up earlier.
You set up an event t imer,
but the receiv er does not
tune to the channel of the
program, or does not rec ord
the program.
You set up an event t imer
for a program that is
repeated (su ch as a r egularl y
schedule d prog r am), but t he
timer does not op erate for a
showing of the program.
You set up an event t imer,
but the timer does not
operate at all.
You set up a Once event
timer, but t h e ti mer op erates
at a time different from what
you expect.
You stop the operation of an
event tim er for on e sho wi ng
of a program that is rep eated
(such as a regularly
schedule d prog r am), but t he
timer operates for the next
showing.
You are testing a VCR code
to see if the receive r controls
a VCR.
The VCR does not do the
test.
You must enter the passwo rd before
you can creat e an event timer for a
locked program.
You must order a pay per view event
before you can create an event timer
for it.
You already hav e set up the maxi mum
number of event timers.
You may have s et up a Reminder
Event Timer but wh at yo u shou ld ha ve
set up is an Auto-Tune Event Timer, or
a VCR Event Timer.
You may have s et up a timer wi th an
incorrect frequency.
The program time may have changed
so that the event timer over lapped
another event timer.
The program time may have changed
by more than twenty-four hours.
The program time changed. A Once event ti mer a lwa ys oper ates at the actua l time of th e pro gram.
Stoppin g the event timer applies only
to the current showing of the program.
The VCR may not be tur ned ON, there
may not be a tape inserted, the tape
may not be rew ound, or the writeprotect tab on the tape may have been
removed.
The code you ar e testing may not be
valid for the VCR.
To be able to set up an e ve nt timer for the program, first enter the
password.
To be able to set up an event time r for th e even t, fir st ord e r it.
To be able to set up a new event timer, delete one of the event timers
you set up earlier.
Remember that a Reminder Eve n t Timer just reminds you that the
program is about to start. An Auto-Tune Event Timer reminds you and
tunes the recei ver t o the ch annel of t he progr am. A VC R Eve n t T im er
reminds you, tun e s th e receiver, and starts the VCR.
Remember that a Once ev ent timer oper ates just one time. A Mon.-
Fri. event timer operates Monday through Friday on the same
channel at the sam e time. A Daily event timer doe s the same, Monda y
through Sunday. A Weekly event timer operates once a week on the
same channel at the sa me time.
If the rece iver is ON and finds an event timer overla p, it will display
the Event Timer Scheduling Conflict menu. You must edit or
delete one of the overlapping event timers.
No event timer wi ll operat e if the progr am time ch anges by mo re than
twenty-four hours.
To stop all oper a tions of a repeated event timer, you must delete the
event timer.
Note: The receiver deletes a Once event timer when it operates.
Make sure the VCR is turned ON, with a blank tape inserted on which
you want to record, that the tape is rewound, and that the writeprotect tab on t he tape is intact.
Try another VCR co de from the VCR Codes tabl e. The remot e
control user guide provides this t able.
Page 80
Page 85
Devi ce Codes
DEVICE CODES
These tables contain the manuf acturer codes for programming the remote to control your VCR when
you use timers o n your receiver. Every attempt has been made to include all codes. If your VCR brand
is not listed or if the codes to not work, the receiver may not be able to use VCR timers.
VCR CODES
Brand Code
Aiwa 588, 622, 623,
Akai 513, 514, 515,
Alba 546
Amstrad 588
ASA 565
Audio
Dynamics
Broksonic 559
Bush 589
Candle 580, 59 2, 593
Canon 542, 553, 554
Capehart 543, 546
624
516, 517, 518,
519, 520, 568,
594, 60 0
Brand Code
Emerson 505, 506, 507,
508, 5 09, 510,
511, 512, 559,
568, 5 88, 590,
609, 61 8
Finlandia 549
Finlux 549, 565, 588
Fisher 548, 549, 584,
588, 60 8, 610
General
Electric (GE)
Goldstar 530, 555, 592,
Goodmans 585, 589
Go Video 557 558, 620
Granada 549, 581
Grundig 565
550, 5 51, 552,
554, 5 72, 591,
612, 61 3
605
Brand Code
Kenwood 562, 581, 592,
594, 60 0, 601
Lloyd 588
Logik 589
Luxor 518
Magnavox 527, 553, 554,
556, 565, 611
Marantz 530, 554, 565,
585, 59 2, 594,
600, 60 1, 603
MEI 554
Memorex 533, 549, 554,
566, 58 1, 585,
588, 60 8
MGA 567, 568, 609
Mitsubishi 562, 567, 568,
569, 57 0, 571,
609
Citizen 591, 592, 593
Craig 591, 608
Croslex 553
Curtis Mathes 554, 592, 605
Daewoo 534, 545, 546,
547, 59 3
Daytron 546
DBX 594, 600
Dumont 549
Dynatech 588
Electrohome 609
Harmon
Kardon
Hinari 589
Hitachi 536, 537, 538,
Instant Replay 553
ITT 518
JC Penney 530, 554, 580,
Jenson 560
JVC 561, 562, 563,
530, 56 9
539, 5 40, 541,
553, 5 88, 595,
596, 59 7
591, 5 94, 600,
601
564, 5 92, 594,
600, 60 1
MTC 544, 580, 588
Multitech 588, 58 9, 591
NAD 573
NEC 530, 531, 532,
562, 59 2, 594,
599, 60 0, 601,
602, 60 3, 604
Olympic 553
Optonica 585
Orion 506, 507
Panasonic 521, 522, 523,
524, 52 6, 553,
633 554, 598,
614, 62 8
Pentax 537, 592
Page 81
Page 86
Chapter 5
Reference
Brand Code
Perdio 588
Philco 553, 554, 611
Philips 553, 554, 565,
585
Pioneer 553, 562, 57 3,
574, 575, 57 6,
600
Portland 546, 593
Proscan 553, 605
Pulsar 533
Quartz 581
Quasar 553, 554, 577,
578
Radio Shack 607, 608, 60 9,
610
RCA 525, 526, 52 7,
528, 529, 53 7,
553, 591, 60 5,
606, 615, 63 0,
631
Realistic 549, 554, 580,
581, 584, 58 5,
588
Ricoh 502
Saisho 506, 507
Salora 567, 581
Samsung 517, 534, 579,
580, 591
Sansui 532, 544, 56 2,
600, 621
Sanyo 549, 58 1, 58 2,
583, 608
SBR 565
Brand Code
Sharp 58 5, 60 7, 60 9,
625
Shintom 589
Sony 500, 501, 502,
503, 504
Sylvania 553, 55 4, 556,
567, 58 8, 611
Symphonic 588, 594
Tashiko 588
Tatung 586, 594, 601
Teac 588, 594, 601
Technics 553, 554
Teknika 554, 587, 588
TMK 506
Toshiba 53 4, 53 5, 56 7,
590
Totevision 580, 591
Unitech 580
Vector
Reaserch
Victor 561, 562, 600
Video
Concepts
Videosonic 591
Wards 5 2 7, 55 4, 58 0,
Yamaha 53 0, 592, 594,
Zenith 500, 501, 533
530, 600
568, 600
585, 58 8, 58 9,
590, 59 1, 60 7,
608, 609
600, 601
Schneider 589
Scott 508, 559, 590
Sears 548, 54 9, 581,
584, 608, 61 0,
Sentra 546
Page 82
Page 87

Index
A
Audio
Automatic Event Timer 29
B
Back Panel, Receiver 6
Banner, Browse 22
Banner, Program 22
Blacked-Out Program 36
Browse Bann er 15
Changing Channel s Usi ng the Browse Banner 40
Displa ying Information on Othe r Programs 22
Using the Browse Banner 22
Buttons
Locking the Receiver Front Panel Control Buttons 40
Receiver Front Panel Control Buttons 5
C
Caller ID 44
Changing Channels 17
Changing Channel s Usi ng the Browse Banner 40
Changing Program Languages 46
Channel Locks 39
Channels, Changing 17
Closing the Menus 17
Closing the Program Guide 21
Coaxial Cable Connections 6
Control Buttons, Receiver Front Panel 5
Control, Rem ote 7
Creting a VCR Event Tim er 36
Customer Service 71
D
Displaying Program Information 22
Using the Browse Banner 22
Using the Program Banner 22
E
Event Timers
Automatic Event Timer 29
Before an Event Tim er Operates 30
Editing an Event Timer 33
Event Time r Frequencies 30
Event Timer Types 29
Locks, Bl acked-Out Programs, and Event Timers 36
Manual Event Timer 29
Maximum Number of Event Timers 32
Power Off and Event Timers 36
Reviewing Event Timers 34
Events (P rograms) 29
F
Favorite Lists
Page 97
Page 88

Index
Changing the Nam e of a Favorite List 28
Creating or Modifying a Favorite List 27
Making a Favori te List Active 28
Using Favorite Lists 27
Favorit es L ists
How Resett ing the Receiver Affects Favorites Li sts 46
FCC 94
Federal Communications Commission (FCC) Compliance
Radio Interference 95
Telephone Com munication 94
Front Panel, Receiver 5
G
Guide, Program 12, 20
H
Highlighting a Choice in a Menu List 18
Highlighting a Menu Option 18
I
Information
Problems and Solutions Tables 71
L
Legal Notices 94
Limited Warr anty 85
Lists of Choices in the Menus
Multiple Choice Lists 18
Single Choice Lists 18
Locks
Accessin g a L ocked Item or Opening the Loc ks Menu 37, 43
Changing the Receiver Password 40, 43
Creating or Changing Channel Locks 39
Creating or Changing Rating (Content) Code Locks 38
Enteri n g th e P as sw o rd 37
Hiding Adult Channels 42
How Resett ing the Receiver Affects Locks 46
How to Set Locks - A Two Step Process 36
Locking Pay Per V iew Programs 41
Locking the Receiver 39
Locking the Receiver Front Panel Control Buttons 40
Opening the L oc ks Menu 37 , 43
Personal Identificat io n N u m be r (P I N ) 44
Locks Menu (Parental and System Locks Me nu) 13
M
Main Menu 12
Manual Event Timer 29
Menu Options 17
Highlighting a Menu Option 18
Selecting a Menu Option 18
Menus 11
Browse Bann e r 15 , 22
Closing the Menus 17
Displaying Program Information 22
Highlighting a Choice in a Menu List 18
Lists of Choices in the Menus 18
Locks Menu (Parental and System Locks Me nu) 13
Main Menu 12
Menu Options 17
Opening the M e nu s 17
Parental and System Locks Menu (Locks Menu) 13
Page 98
Page 89

Program Guide 12, 20
Select ing a Choice in a Menu List 18
Selecting a Menu Option 18
System Setup Menu 13
Theme Categories (Themes) Menu 12
Time-Out Feature 17
Using th e Menus 1 7
O
On-Screen Messages 72
Opening t he Menus 17
Opening t he Program Guide 21
Options, M enu 17
P
Parental and System Locks Menu (Locks Menu) 13
Opening t he Menu When You Have Locked the Recei ver 37
Pay Per View Pr ograms
Locking Pay Per View Programs 41
Persona l Identification Number (PIN) 44
Powe r Light 5
Problems and Solutions Tables 71
Using the Remote Control 75
Program Banner
Using the Program Banner 22
Program Guide 12
Closing the Program Guide 21
Opening t he Program Guide 21
Selecting a Program in the Program Guide 21
Using the Program Guide 20
Programs
Events 29
Index
R
Radio Interference 95
Rain and Snow Fade 3
Rating (Content) Code Locks 38
Receiver
Back Panel 6
Changing the P asswor d 43
Front Panel 5
Locking the Receiver 39
Menus 11
Radio Interference 95
Resetting the Receiver 46
Telephone Com m unication 94
Receiver Back Panel 6
Receiver Front Panel 5
Control Buttons 5
Locking the Front Panel Control Buttons 40
Powe r Light 5
Remote Control 7
Using the Remote Control 75
REN 94
Resetting the Receiver 46
Restarting the Reciever 46
S
Satellite Signal Q u ality 3
Rain and Snow Fade 3
Solar Interference 4
Select ing a Choice in a Menu List 18
Selecting a Menu Option 18
Selecting a Program in the Program Guide 21
Service, Customer 71
Page 99
Page 90

Index
Setting and Using Security Locks
Locks, Blacked-Out Programs, and Event Timers 36
Setting Up th e R eceiver and VCR to Use a VCR Event Time 36
Signal Quality, Satellite 3
Solar Interference 4
Staying Legal 94
System Setup Menu 13
T
Telephone Connection
Testing the Tel ephone Connection 47
Testing the System
Starting a Tes t 47
Telephone Connection 47
Theme Categories (Themes)
Using Themes 25
Theme Categories (Themes) Menu 12
Themes (Theme Categories)
Using Themes 25
Timers, Event
Locks, Blacked-Out Programs, and Event Timers 36
Power Off and Eve nt Timers 36
Troubleshooting
Problems and Solutions Tables 71
Troubleshooting Tables
Buying a Pay Per View Program 79
Changing Channels 78
On-Screen Messages 72
Using Event Timers 80
Using Favorite Lists 78
Using Locks 77
Using the Menus 77
Using the Program Guide or the Brow se B anner 77
Using the Telephone for Voice/Data/FAX 79
U
Using Caller I D 44
Using Favorite Lists 27
Using the Menus 17
Closing the Menus 17
Displaying Program Information 22
Highlighting a Choice in a Menu List 18
Highlighting a Menu Option 18
Lists of Choices in the Menus 18
Menu Options 17
Opening the M e nu s 17
Selecting a Choice in a Menu List 18
Selecting a Menu Option 18
Using the Pro gram Guid e 20
Using the Remote Control 75
W
Warranty 85
Page 100
Page 91
Append ix A
Installing a DISH Pro Receiver in an Existing
System
These instructions guide you through the installation of your new
DISH Pro satellite receiver in an existing system where your satellite
dish(es) has already been installed a nd pointed for the str ongest possible
signal. If your DISH Pro dish antenna(s) is not already installed, you
will need to follow the Installation In structions found in Chapter 4.
There are two dish antenna systems that are covered by these installation
instructions.
• DISH Pro antenna systems which have the DISH Pro logo shown
below.
• Legacy antenna s ystems which do not have the DISH Pro logo.
Installation Instructions
1. Connect an RG-6 coaxial cable (see notes below) from the SAT IN port
on the receiver's back pane l to an available port on your switch or
LNBF in your existing system. See Chapter 4 wiring diagrams for
appropriate r eceiv er conne ction s i n your system. See Runni ng C oaxial
Cabling. Peel off the blue sticker and aff ix it to the cable close to
where it connect to the
Note: If you are installing a DISH Pro recei ver into a system with
DISH Pro LNBFs (and/or switc hes), you can have as muc h as 200 f eet
of cable between the LNBF and the receiver. However, you must use
only RG-6 coaxial cables rated for 950 to 2150 MHz. Some cables
may say "Swept tested for 2150 MHz." If you have any doubt about
this, ask your Dish retailer, or look on the container the cable came in.
Do not use cable company TV c ables or cables fr om other sa tell ite TV
systems not rated for 950-2150 MHz. These other cables may cause
signal loss. Do not use existing cables such as RG-59. Also, be sure
that any outdoor connections are made usi ng waterproof Fconnectors.
Note: If you are installing the DISH Pro receiver into a system with
Legacy LNBFs and/or switches (that do not have a DISH Pro logo),
you can have as much as 100 feet of cab le betwe en the LNBF and the
receiver . However, you must use only RG-6 c able - do not use existin g
cables such as RG-59. Also, be sure that any outdoor conne ctions are
made using waterproof F-connector s.
SAT IN connection on the back of the receiver.
Tip: Using cab le
labels makes it
easy to tell which
cables connect to
the receiver ports.
Page 83
Page 92
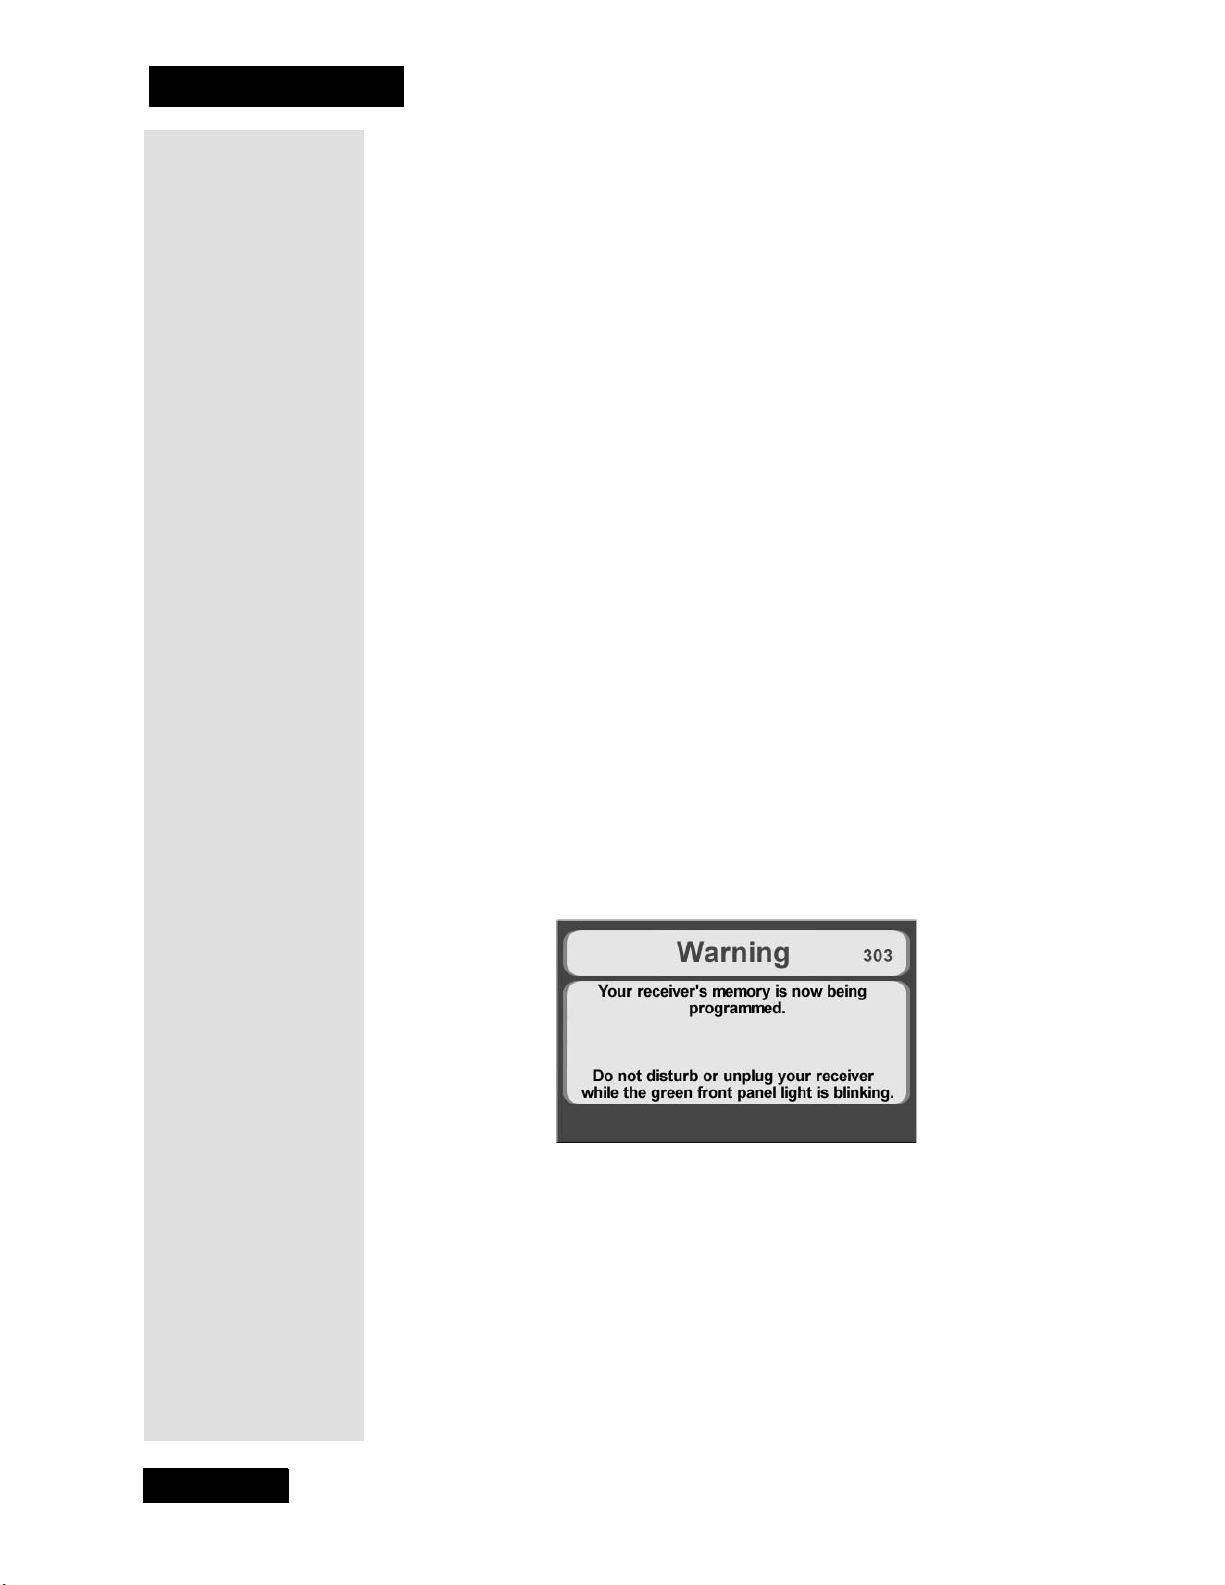
Appendix A
Warning: Tighten all the coaxial cable con nections only by hand.
Using a wrench may over-tighten the connections, causing damage.
Such damage is not covered by the Limited Warranty.
2. Connect a coaxial cable from the
TV SET OUT connect ion on your
receiver to your television's RF tuner input. Pee l off the white sticker
and affix it to the cable close to where it connect to the TV SET OUT
connection on the back of the receiver.
3. Plug in the receive r's power cord. Make sur e both t he rec eive r and TV
are turned on.
4. You should see the
Point Dish/ Signal Strength menu in the new
receiver. If you do not, open the Main Menu, by pressing MENU fol-
lowed by 6-1-1 on the remote.
5. Select Check Switch. Select Test to run Check Switch.
6. When Check Switch is complete, you will see an Install ation Sum-
mary
screen. If the screen shows the correct switch and the message
"Satellite rece ption verified" for all satellit es in your system, go to
step 7. If the Installation Summary screen does not detect all of the
satellites your system should be receiving, check and retighten (by
hand) the cable connections be tween your receiver, LNBFs and
switches in your system. Then press Test to rerun C heck Swit ch
again.
7. Select
OK to return to the Point Dish/S ignal Str e ngth screen. Then
select Cancel to exit th e Point Dis h/Signal Strength screen.
8. An Attenti on screen will o pen asking if the m ounting and posit ioning
of your dish is complete with a "Locked" indication in the Point
Dish/Signal Strength
screen. Since your system is already installed
and your dish is poi nted for t he stro ngest possi ble signa l str ength, yo u
can select
Yes.
9. The receiver will be gin taking a software upgrade . You will see the
message shown below.
Page 84
A progress bar a t the bot tom of t he screen will s how how the softwa re
upgrade is progressi ng. Once the software upgrade is complete, you
will see a second message that the rec eiver's memory is now being
programmed.
This message may disappear, your screen may go blank for a few
minutes, and th e gr ee n li ght may conti nue to blink . This is nor mal and
does not indicate a problem w ith the receive r.
10. When the software upgrade is complete, press VIEW TV and you
should now be able to watch TV programming. To activate your programming on this newly install ed receiver, call 1-800-333-DISH
(3474). See C hapter 1, Introduction.
Page 93
Append ix A
Installing a DISH Pro Receiver in an Existing
System
These instructions guide you through the installation of your new
DISH Pro satellite receiver in an existing system where your satellite
dish(es) has already been installed a nd pointed for the str ongest possible
signal. If your DISH Pro dish antenna(s) is not already installed, you
will need to follow the Installation In structions found in Chapter 4.
There are two dish antenna systems that are covered by these installation
instructions.
• DISH Pro antenna systems which have the DISH Pro logo shown
below.
• Legacy antenna s ystems which do not have the DISH Pro logo.
Installation Instructions
1. Connect an RG-6 coaxial cable (see notes below) from the SAT IN port
on the receiver's back pane l to an available port on your switch or
LNBF in your existing system. See Chapter 4 wiring diagrams for
appropriate r eceiv er conne ction s i n your system. See Runni ng C oaxial
Cabling. Peel off the blue sticker and aff ix it to the cable close to
where it connect to the
Note: If you are installing a DISH Pro recei ver into a system with
DISH Pro LNBFs (and/or switc hes), you can have as muc h as 200 f eet
of cable between the LNBF and the receiver. However, you must use
only RG-6 coaxial cables rated for 950 to 2150 MHz. Some cables
may say "Swept tested for 2150 MHz." If you have any doubt about
this, ask your Dish retailer, or look on the container the cable came in.
Do not use cable company TV c ables or cables fr om other sa tell ite TV
systems not rated for 950-2150 MHz. These other cables may cause
signal loss. Do not use existing cables such as RG-59. Also, be sure
that any outdoor connections are made usi ng waterproof Fconnectors.
Note: If you are installing the DISH Pro receiver into a system with
Legacy LNBFs and/or switches (that do not have a DISH Pro logo),
you can have as much as 100 feet of cab le betwe en the LNBF and the
receiver . However, you must use only RG-6 c able - do not use existin g
cables such as RG-59. Also, be sure that any outdoor conne ctions are
made using waterproof F-connector s.
SAT IN connection on the back of the receiver.
Tip: Using cab le
labels makes it
easy to tell which
cables connect to
the receiver ports.
Page 83
Page 94
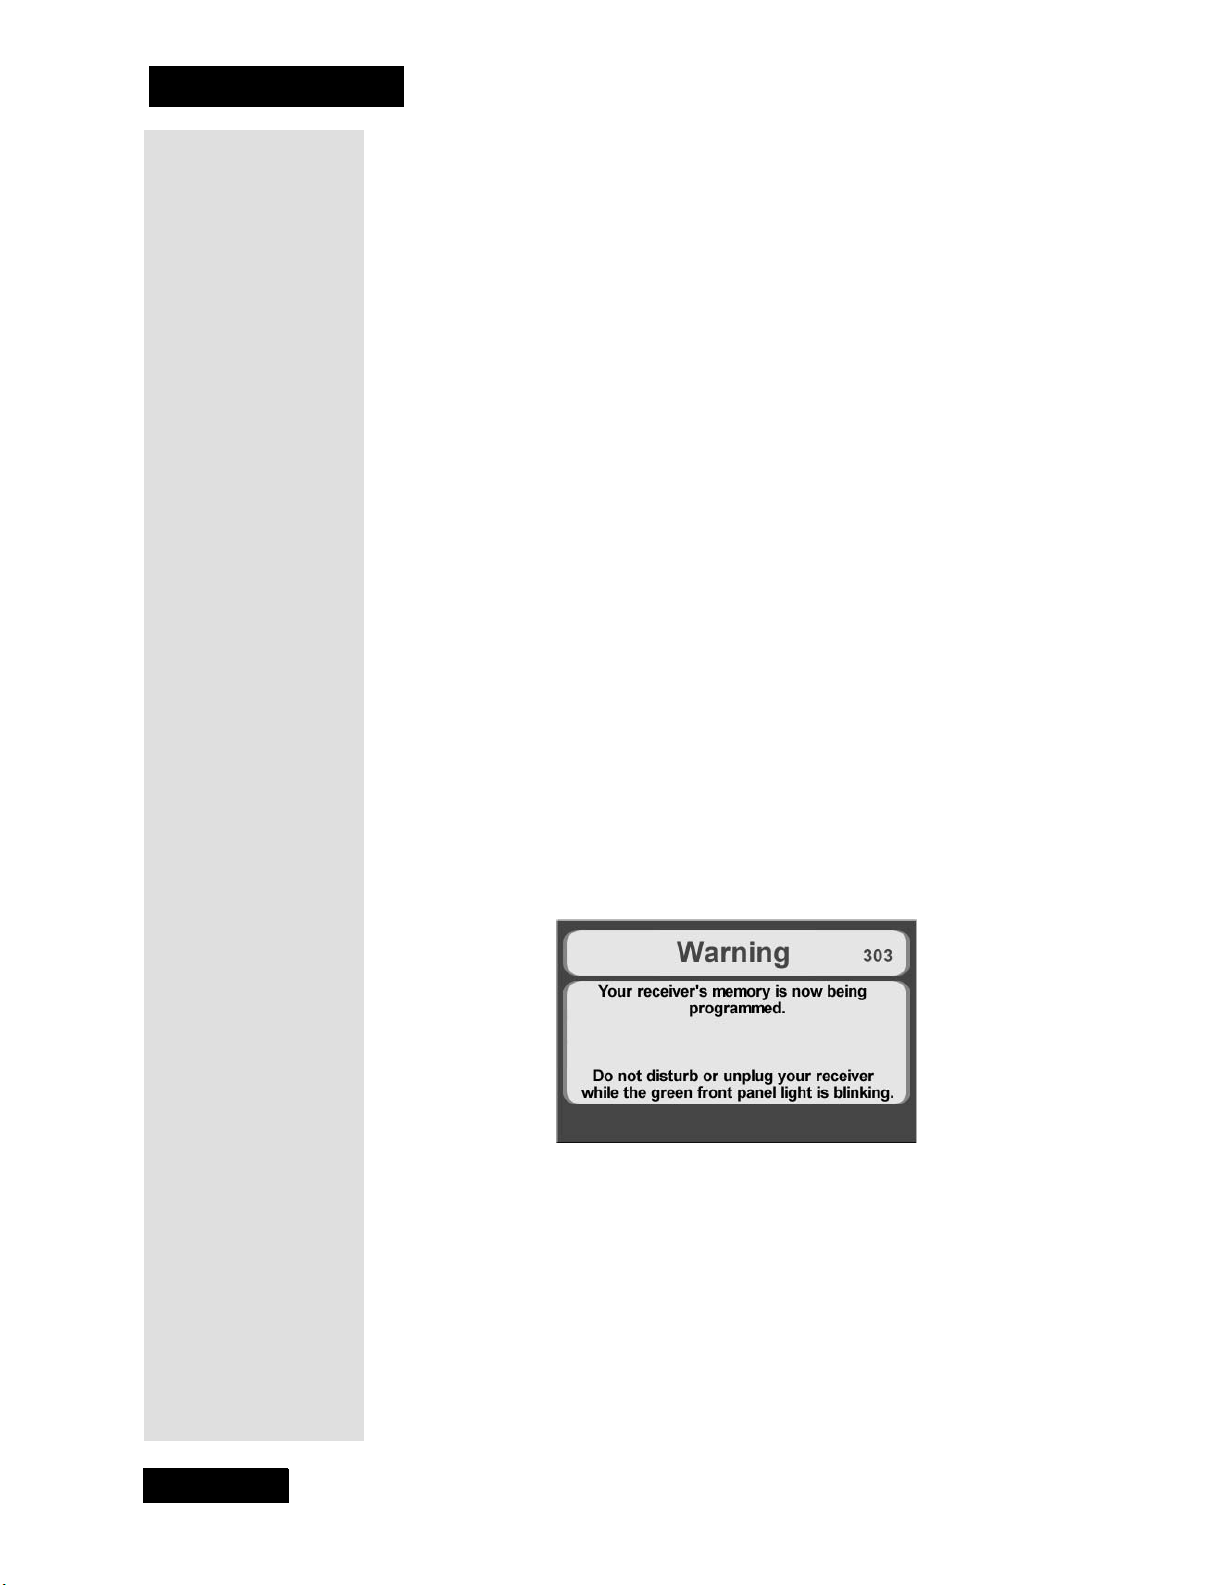
Appendix A
Warning: Tighten all the coaxial cable con nections only by hand.
Using a wrench may over-tighten the connections, causing damage.
Such damage is not covered by the Limited Warranty.
2. Connect a coaxial cable from the
TV SET OUT connect ion on your
receiver to your television's RF tuner input. Pee l off the white sticker
and affix it to the cable close to where it connect to the TV SET OUT
connection on the back of the receiver.
3. Plug in the receive r's power cord. Make sur e both t he rec eive r and TV
are turned on.
4. You should see the
Point Dish/ Signal Strength menu in the new
receiver. If you do not, open the Main Menu, by pressing MENU fol-
lowed by 6-1-1 on the remote.
5. Select Check Switch. Select Test to run Check Switch.
6. When Check Switch is complete, you will see an Install ation Sum-
mary
screen. If the screen shows the correct switch and the message
"Satellite rece ption verified" for all satellit es in your system, go to
step 7. If the Installation Summary screen does not detect all of the
satellites your system should be receiving, check and retighten (by
hand) the cable connections be tween your receiver, LNBFs and
switches in your system. Then press Test to rerun C heck Swit ch
again.
7. Select
OK to return to the Point Dish/S ignal Str e ngth screen. Then
select Cancel to exit th e Point Dis h/Signal Strength screen.
8. An Attenti on screen will o pen asking if the m ounting and posit ioning
of your dish is complete with a "Locked" indication in the Point
Dish/Signal Strength
screen. Since your system is already installed
and your dish is poi nted for t he stro ngest possi ble signa l str ength, yo u
can select
Yes.
9. The receiver will be gin taking a software upgrade . You will see the
message shown below.
Page 84
A progress bar a t the bot tom of t he screen will s how how the softwa re
upgrade is progressi ng. Once the software upgrade is complete, you
will see a second message that the rec eiver's memory is now being
programmed.
This message may disappear, your screen may go blank for a few
minutes, and th e gr ee n li ght may conti nue to blink . This is nor mal and
does not indicate a problem w ith the receive r.
10. When the software upgrade is complete, press VIEW TV and you
should now be able to watch TV programming. To activate your programming on this newly install ed receiver, call 1-800-333-DISH
(3474). See C hapter 1, Introduction.
Page 95

Appendix B
Limited Warranty
This Limited Warranty is a legal document. Keep it in a safe place. Remember
to retain your Bill of Sale for warranty service! Any items returned without a copy
of the Proof of Purchase will be considered out of warranty.
What the Warranty Covers
This warranty extends only to the original user of the equipment and is limited to
the purchase price of each part. EchoStar Technologies Corporation and its
affiliated companies (“EchoStar”) warrant this system against defects in
materials or workmanship as follows:
• LABOR: For a period o f one (1) year from the origin al date of purc hase, if Ech oStar
determines that the equipment is defective subject to the limitations of this warranty, it
will be replaced at no charge for labor. EchoStar warrants any such work done against
defects in materials or workmanship for the remaining portion of the original warranty
period.
• Parts: For a period of one (1) year from the original date of purchase, EchoStar will
supply, at no charge, new or re-manufactured parts in exchange for parts determined to
be defective subject to the limitations of this warranty. EchoStar warrants any such
replacement parts against defects in materials or workmanship for the remaining part of
the original warranty period.
which may include the satellite dish assembly, receiver, LNBF, remote control, or dish
mounting hardware. It does not include other parts purchased separately.
Note: “Parts” means items included in this package,
What the Warranty Does Not Cover
• This warranty does not cover installation of the system. If applicable, such installation
will be warranted under a separate installation agreement.
• This warranty does not cover consumer instruction, physical setup or adjustment of any
consumer electronic devices, re mote control batteries, signal reception problems, loss
of use of the system, or unused programming charges due to system malfunction.
• This warranty does not cover cosmetic damage, damage due to lightning, electrical or
telephone line surges, fire, flood, or other acts of Nature, accident, misuse, abuse,
repair or alteration by other than authorized factory service, use of accessories not
recommended by the receiver manufacturer, negligence, com mercial or institutional
use, or improper or neglected maintenance.
• This warranty does not cover equipment sold AS IS or WITH ALL FAULTS, shipping
and handling, removal or reinstallation, shipping damage if the equipment was not
packed and shipped in the manner prescribed, nor equipment purchased, serviced, or
operated outside the continental United States of America.
Page 85
Page 96

Appendix B
Legal Limitations
REPLACEMENT AS PROVIDED UNDER THIS WARRANTY IS YOUR EXCLUSIVE
REMEDY . ECHOSTAR SHALL NOT BE HELD LIABLE FOR ANY INCIDENTAL OR
CONSEQUENTIAL DAMAGES FOR BREACH OF ANY EXPRESSED OR IMPLIED
WARRANTY ON THIS SYSTEM, NOR FOR ANY INCIDENTAL OR
CONSEQUENTIAL DAMAGES RESULTING FROM THE USE OF, OR INABILITY
TO USE, THIS SYSTEM. UNDER NO CIRCUMSTANCES SHALL ECHOSTAR’S
LIABILITY, IF ANY, EXCEED THE PURCHASE PRICE PAID FOR THIS SYSTEM.
EXCEPT TO THE EXTENT PROHIBITED BY APPLICABLE LAW, ANY IMPLIED
WARRANTY OF MERCHANTABILITY OR FITNESS FOR A PARTICULAR
PURPOSE ON THIS SYSTEM IS LIMITED IN DURATION TO THE PERIOD OF
THIS WARRANTY. ECHOSTAR RESERVES THE RIGHT TO REFUSE TO HONOR
THIS WARRANTY IF ECHOSTAR DETERMINES ANY OF THE ABOVE
EXCEPTIONS TO HAVE CAUSED THIS SYSTEM NOT TO HAVE PERFORMED
PROPERLY. THIS WARRANTY SHALL BE VOID IF ANY FACTORY-APPLIED
IDENTIFICATION MARK, INCLUDING BUT NOT LIMITED TO SERIAL OR
CONDITIONAL ACCESS NUMBERS, HAS BEEN ALTERED OR REMOVED. THIS
WARRANTY SHALL ALSO BE VOID IF THE RECEIVER HAS BEEN OPENE D BY
AN UNAUTHORIZED PERSON.
If You Need Assistance
1. Call the Customer Service Center at 1-800-333-3474. Have the date of
purchase and either your customer account number, the receiver conditional
access number, or the recei ver model number ready. Display the
System Information
menu to find these numbers.
2. A Customer Service Representative will assist you.
3. If the Repre sen ta ti ve deter m ines yo u sh ou ld r et urn an y eq uipm ent , yo u will be
directed to call a Return Authorization representative. Before shipping any
equipment, you must talk to a Return Authorization representative and must
obtain a Return Authorization (RA) number.
4. You will be given the appropriate address for which to return your equipment.
Whether under warranty or not, you will be responsible for the cost of shipping
back the defective equi pment. For faster service, see the Advan ce Exchange
Program below.
5. Returned equipment must be packaged properly, using either the original
shipping materials or the packaging in which the replacement equipment is
shipped. Include a copy of the Bill of Sale. Any items returned without a copy
of the Proof of Purchase will be considered out of warranty. Follow the
instructions given to you by the Custome r Service Representative.
6. Write the RA number in large, clearly visible characters o n the outside o f the
shipping box that you use to return the equipment. To avoid confusion and
misunderstandings, shipments without an RA number clearly visible on the
outside of the box will be returned to you at your expense.
Important
Page 86
Page 97

Advance Exchange Program
The Advance Exchange Program allows yo u to have replacement equipment
shipped immediately to you (depending upon where you live, it could take
three to five business days). Along with replacement equipment, you will
receive a prepaid shipping label and instructions on how to return the
defective equipment.
The shipping charge, for receiving repl acement equipment and returning th e
defective equipment, is a one-time fee bas ed on EchoS tar’s competitive bulk
shipping rates (addition al char ges may apply ou tside of th e continental US).
This fee will be charged to your billing account or your valid credit card.
If you do not ship the defective equipm ent to EchoStar within ten days after
receiving the replacement, your billing account or credit card will be
charged the market price of the replacement. If you return the defective
equipment after ten days, you will receive a full refund less an
administrative fee.
If your equipment is out of warranty and can be repaired your billing
account or credit card will be charged the standard repair fee for the
replacement. If damage to the defective equipment is found, which EchoStar
in its sole discretion determines has voided the warranty, or makes the
equipment unrepairable, billing account or credit card will be charged the
market price of the replacement.
Post Receipt Exchange Program
You may choose to ship the equipment to us at your cost. To provide faster
service, upon receipt of your equipment you will be shipped a replacement.
Your original equipment will not be available for return.
The equipment you return will be checked to verify whether it is covered
under this warranty. If the defective equipment is covered under this
warranty, it will be replaced and shipped back to you at no additional cost
(additional charges may apply outside of the continental US).
If your equipment is out of warranty and can be repaired your billing
account or credit card will be charged the standard repair fee for the
replacement. If damage to the defective equipment is found, which EchoStar
in its sole discretion determines has voided the warranty, or makes the
equipment unrepairable, your billing account or credit card will be charged
the market price of the replacement.
Limited Warranty
Accessory Warranty
An accessory is any DISH Network branded equipment, displaying the
DISH Network logo, excluding the receiver, cables and hookups, and nonmechanical components. A one-year warranty becomes effective upon the
activatio n of the DISH syst em or date of purchase, if bought separately. A
proof of purchase is required t o verify the purchase date. If an accessory has
an expired warranty, no exchange will be issued. You may purchase
replacement accessories from DISH Network or your local retailer.
Page 87
Page 98

Appendix B
Residential Customer Agreement
Effective as of September 1, 2001 until replaced.
THIS DOCUMENT DESCRIBES TH E TERMS AND CONDITION S UNDER
WHICH DISH NETWORK WILL PROVIDE ITS SERVICE TO YOU. IF YOU
DO NOT ACCEPT THESE TERMS AND CONDITIONS, PLEASE NOTIFY US
IMMEDIATELY AND WE WILL CANCEL YO UR SERVICE. IF YOU ARE A
NEW DISH NETWORK CUSTOMER, YOUR ACTIVATION OF A DISH
NETWORK ACCOUNT AND RECEIPT OF DISH NETWORK SERVICES
SHALL CONSTITUTE YOUR ACCEPTANCE OF THIS AGREEMENT AND ITS
TERMS AND CONDITIONS WILL BE LEGALLY BINDING UPON YOU.
IF YOU ARE AN EXISTING DISH NETWORK CUSTOMER, YOUR
CONTINUED RECEIPT OF DISH NETWORK SERVICES FOLLOWING
RECEIPT OR PUBLICATION BY DISH NETWORK ON ITS WEB SITE OF
THIS AGREEMENT SHALL CONSTITUTE YOUR ACCEPTANCE OF ITS
TERMS AND CONDITIONS, AND, ACCORDINGLY, THEY WILL BE
LEGALLY BINDING ON YOU.
Thank you for choosing DISH Network for your television service provider.
DISH Network is happy to answer any questions you may have and to provide you
with technical and other customer suppo rt through the following toll-free number
and email address:
1-800-333-DISH
or you may write to:
DISH Network
Customer Service Center
P.O. Box 33577
Northglenn, CO 80233
and, for general kn owledge, try our website at www.dishnetwork.com.
"DISH Network" is a trademark of EchoStar Satellite Corporation.
Page 88
1. THE DISH NETWORK SERVICE
A. Services Defined. DISH Network offers a wide variety of video and audio
programmin g an d other services and we are constant ly s tr iving to add new services to our
lineup. For purposes of this Agreement the te rm "Services" shall mean the programming
available on DISH Network (whether subscription based or pay per view based) and any
other services that we may provide to consumers either now or in the future. For
purposes of this Agreement the terms "You" or "Your" refer to you, the DISH Network
subscriber.
B. Programming Changes
change your programming selection at any time by notifying us. A fee may apply to such
changes (Change of Service Fee). In add ition, yo u may be charged a fee (Servic e Access
Fee) if you fail to subscribe to one of DISH Network’s basic programming packages
which include America’s Top 50, America’s Top 100/CD, America’s Top 150, DISH
Latino or DISH Latino Dos.
C. Programming Availability. Certain Services transmitted by us, including but not
limited to some subscription S ervices, sporting even ts and br oadcast network S ervices,
may be blacked out i n your area of re cepti o n. If yo u cir cu mve nt or at te mpt t o circ umven t
any of these blackouts, you may be subject to legal action. You must be at least 18 years
of age, or the applicable age of majority where you resi de, in order to receive adultoriented progra m ming services.
. Except as otherwise set forth in this Agreement, you may
Page 99

Residential Cust om er Agreement
D. Ordering Pay Per View. You may order DISH Network pay-per-view Services by
using your on-screen Program Guide and remote control unit to select the movies and
other events we offer. To order DISH Network pay-per-view Services, your DISH
Network DBS digital re ceiv e r m ust be c o nn e cted to a telephone outlet. You may also order
DISH Network special events and pay-per-view Services over the telephone by calling the
Customer Service Center or by using our automated system through the following toll-free
number:
1-877-DISH-PPV (3 47 -4778) for ordering movies
A small fee will apply for use of the automated sys tem (Pay-Per-View Automated
Fee) or the Customer Service Center (Pay-Per-View Fee).
E. Private Vi ewing
viewing, use and enjoyment. You agree that the Services provided will not be viewed
outside of your private residence. You are permitted to exhibit the Services solely in your
private residence and not in any other areas. The Serv ices may not be rebroadcast,
transmitted, recorded or performed, nor may admission be charged for listening to or
viewing any Services provided by us. I f we later d etermine that you utilized your DISH
Network Equipment (inclu ding any addi tiona l DISH Netwo rk receiv ers) or sol d, leased or
otherwise gave possession of the same to a third party who you knew or reasonably should
have known intended to use it to permit the viewing of the Services in a commercial
establishment or any other area open to the public, we may terminate the Services and in
addition to all other applicable fees, you agree to pay us the difference between the price
actually paid for the Services and the full com mercial rate for such S ervic es, regard less of
whether we have or had the commercial rights to such Services. The payment of that
amount and/or the termination of Services shall not prejudice our abil ity to exercise any
other rights and remedies we may h ave under this Agreement, at law, in equity, or
otherwise.
F. Additional Receivers
receivers on your account. Each additional receiver would be authorized to receive the
same Services as your initial receiver. DISH Network will charge you a reduced monthly
fee (Additional Receiver Authorization Fee) for each additional receiver added to your
account. This option is only available if your initial DISH Network receiver and all
additional receiver(s) are located at the same residence and a re continuously connected to
the same telephone line. If you desire to receive Services at two different locations, you
must open a separate account for each location. You agree that you will not directly or
indirectly use a single account for the purpose of authorizing Services for multiple DISH
Network receivers that are not all located in the same residence and connected to the same
phone line. If we later determine that you did, we may terminate your Services and, in
addition to all other applicable fees, you agree to pay us the difference between the
amounts actually received by us an d the full retail price for the Services authorized for
each DISH Network DBS receiver on the account, whether owned by you or not. The
payment of that amount and/ or the te rminat ion of S ervices shal l not pre judice ou r abili ty to
exercise any other rights and remedies we may have under this Agreement, at law, in
equity, or otherwise.
G. Changes in Services offered
Services that we offer, and our prices or fees related to such Services at any time. If the
change affects you, we will provide you noti ce of the change and its effective date. The
notice may be provided on your billing statement or by other communication permitted
under Section 9B. In the ev ent of a change in th e contents of any programming,
programming pack ages or other S ervices, you un derstand and agree that we have no
obligation to replace or supplement the programming, programming packages or other
Services previously offered that have been deleted, rearranged or otherw ise changed. You
further understand and agree you will not be entitled to any refund because of a change in
the contents of any progr amming, programmin g packages, or other Servi ces previously
offered.
H. Multi-Month Subscriptions
the Services only at the time of renewal. You may not downgrade the Services during the
term of the multi-month subscription .
. DISH Network provides Services to you for your private home
. DISH Network will allow you to place up to five additional
. DISH Network reserves the right to change the
.For multi-month subscriptions, you may downgrade
Page 89
Page 100

Appendix B
I. Fees for Receivers that Independently Support Multiple Televisions. Additional
fees may apply for a receiver which supports independent viewing of programming on
multiple televisions.
2. BILLING POLICIES AND PAYMENTS FOR SERVICES
A. You agree to pay all amounts billed for Services and to pay all taxes, fees and
other charges, if any, which are now or may in the future be assessed on the Services you
receive from us. Unless you prepay for a multi-month subscription to Services, we will
bill you each month, in adva nce, for Ser vices ordere d by you or anyone who uses yo ur
DISH Network Equipment, whether with or with ou t y ou r perm ission , u nti l yo u ca nce l th e
Services. The bills you receive will show the total amount due, the payment due date,
payments, credits, purchases and other charges to your account.
B. You agree to pay us in full monthly by the payment due date for the Services and
for any other charges due us, including any fees set forth in this Section 2. Payment of
your bill after the due da te will result in you paying us a Late Payme nt Fee. Other fee s and
charges may also be assessed. If partial payme nts are made, the y will be applied firs t to
the oldest outstanding bill. If you send checks or money orders marked "payment in full,"
we can accept them without losing any of our rights to collect any other amounts owed by
you, notwithstan ding your characteri zation of the paymen t. DISH Netw ork does n ot
extend credit to our customers, and the Late Payment Fee is not interest, a credit service
charge or a finance charge. You understand and agree that in the case of late payment or
nonpayment for any Services ordered by you or for any of the charges stated below, we
may report such late payment or nonpayment to credit reporting agencies. If you do not
pay your bill by the due date, we have the right to disconnect your Services at any time
thereafter, in our sole discretion. DISH Network may require you to pay all past due
charges, a Reconnect Fee, a dep osit equ al t o a m ini mum o f o ne mon th’s adva nce charges
and all outstanding balances accrued through the date of deactivation, before we
reconnect your Services. Deposits will not be held segregated from other funds and shall
not earn or accrue inter e st .
C. If you at any time fail, neglect, or refuse to make timely payments hereunder, or if
a petition in bankruptcy shall be filed on your be half or against you, or if you take
advantage of any insolvency law or become insolvent or make an assignment for the
benefit of creditors, or if a receiver, liquidator, or trustee is appointed for your property or
affairs, we shall be wholly relieved from our obligations hereunder.
D. If you paid for an annual or other multi-month subscription to any Services and
your account is past due for any amounts owed to us, at our option we may suspend any or
all Service until payment is received, and/or convert your annual or other multi-month
subscription to a monthly subscription. If we convert your multi-month subscription to a
monthly subscriptio n, we will first apply th e amount you paid for you r multi-month
subscription to any past due amounts an d then any remaining amounts to fut ure
obligations. If we elect to offset the amount paid for the remaining portion of a multimonth subscription agai nst amou nts past due, you agree to pay, in addition to al l other
applicable fees, the Offset Fee set forth below for each month and partial month that the
multi-month subscription was previously received.
E. If we use a collection agency or attorney to collect m oney you owe us or to assert
any other right whic h we may hav e agai nst you, you agre e to pay th e reasona ble cost s of
collection or other action. These costs might include, but are not limited to, the costs of a
collection agency, reasonable attorne y’s fees and court costs. If there are billing errors or
other requests for credit, you can contact ou r Customer S ervice Center by teleph on e or in
writing. You must contact us within sixty (60) days of the time you receive the billing
statement for which you are seeking corrections. Failure to timely notify us of a dispute
shall constitute acceptance of the bill. Undisputed portions of the billing statement must
be paid before the next billing statement is issued to avoid an administra tive fee for late
payment. All payments for Services must be made directly by you to us. DISH Network
shall have no obligation to provide Services for which payment is made by you to a third
party.
Page 90
 Loading...