

Page 1
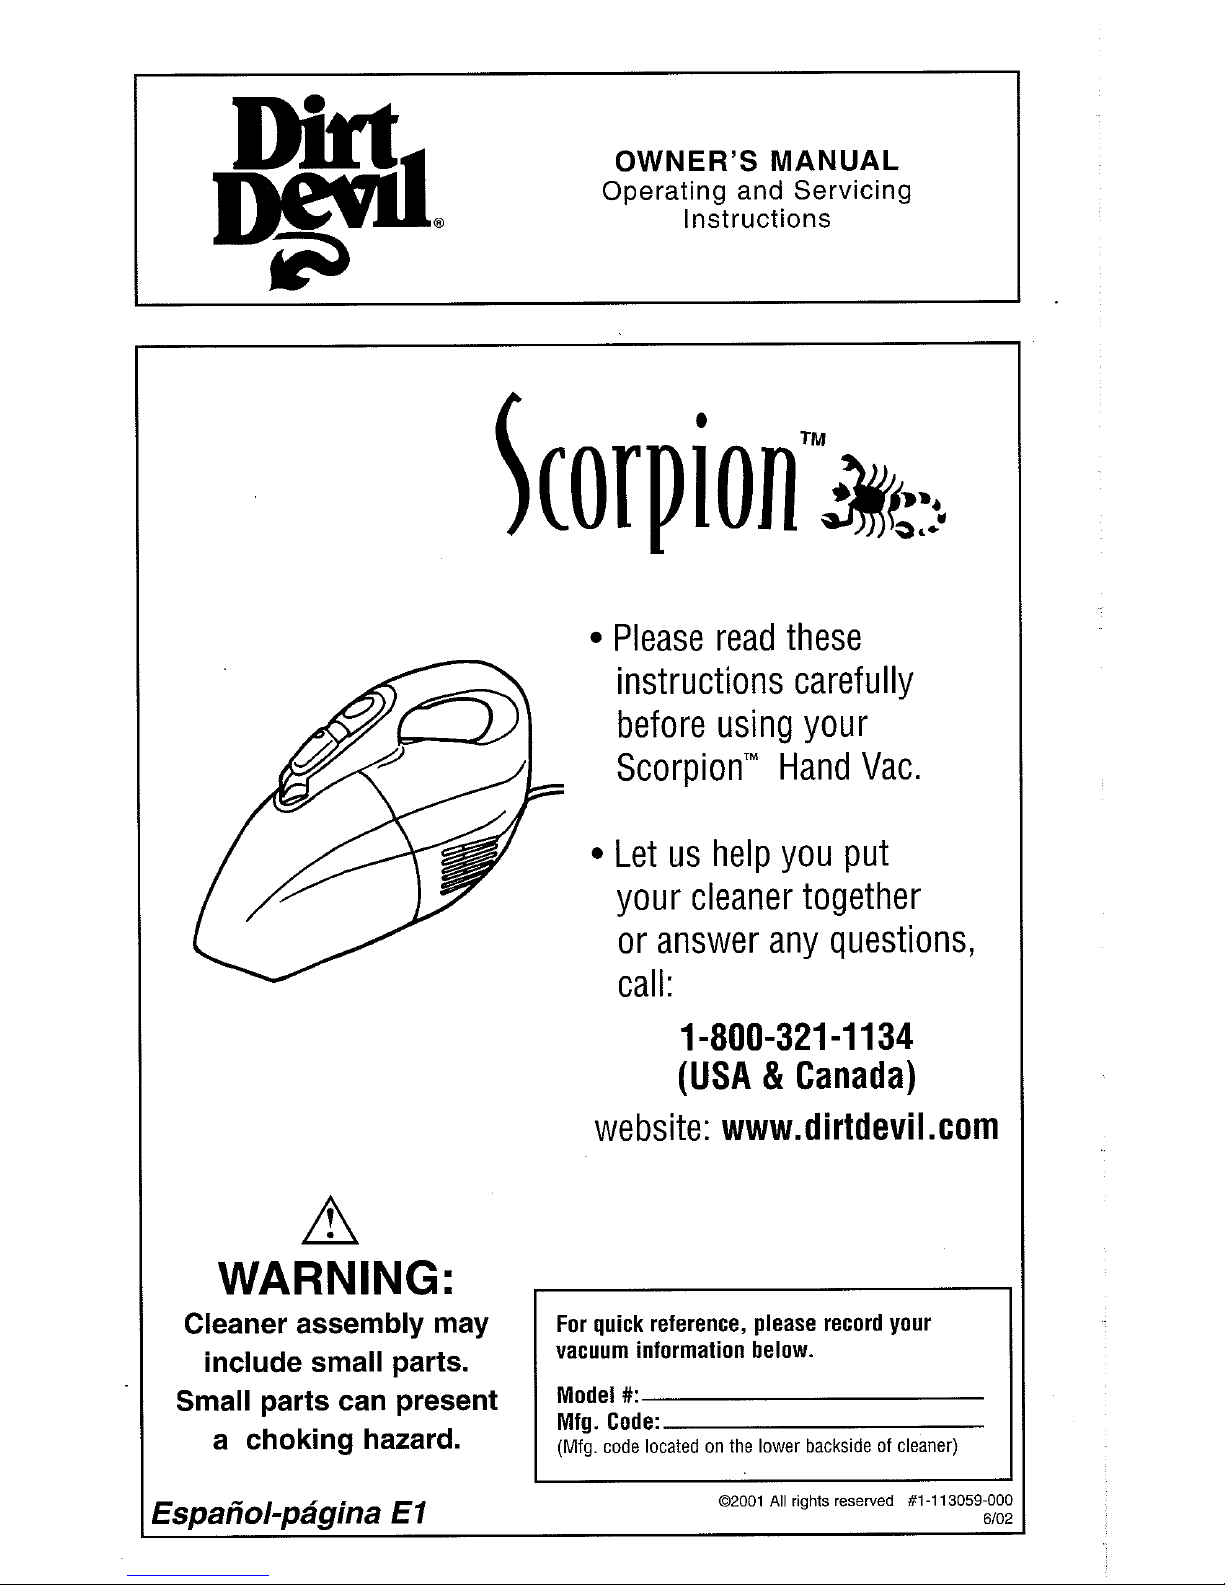
OWNER'S MANUAL
Operating and Servicing
Instructions
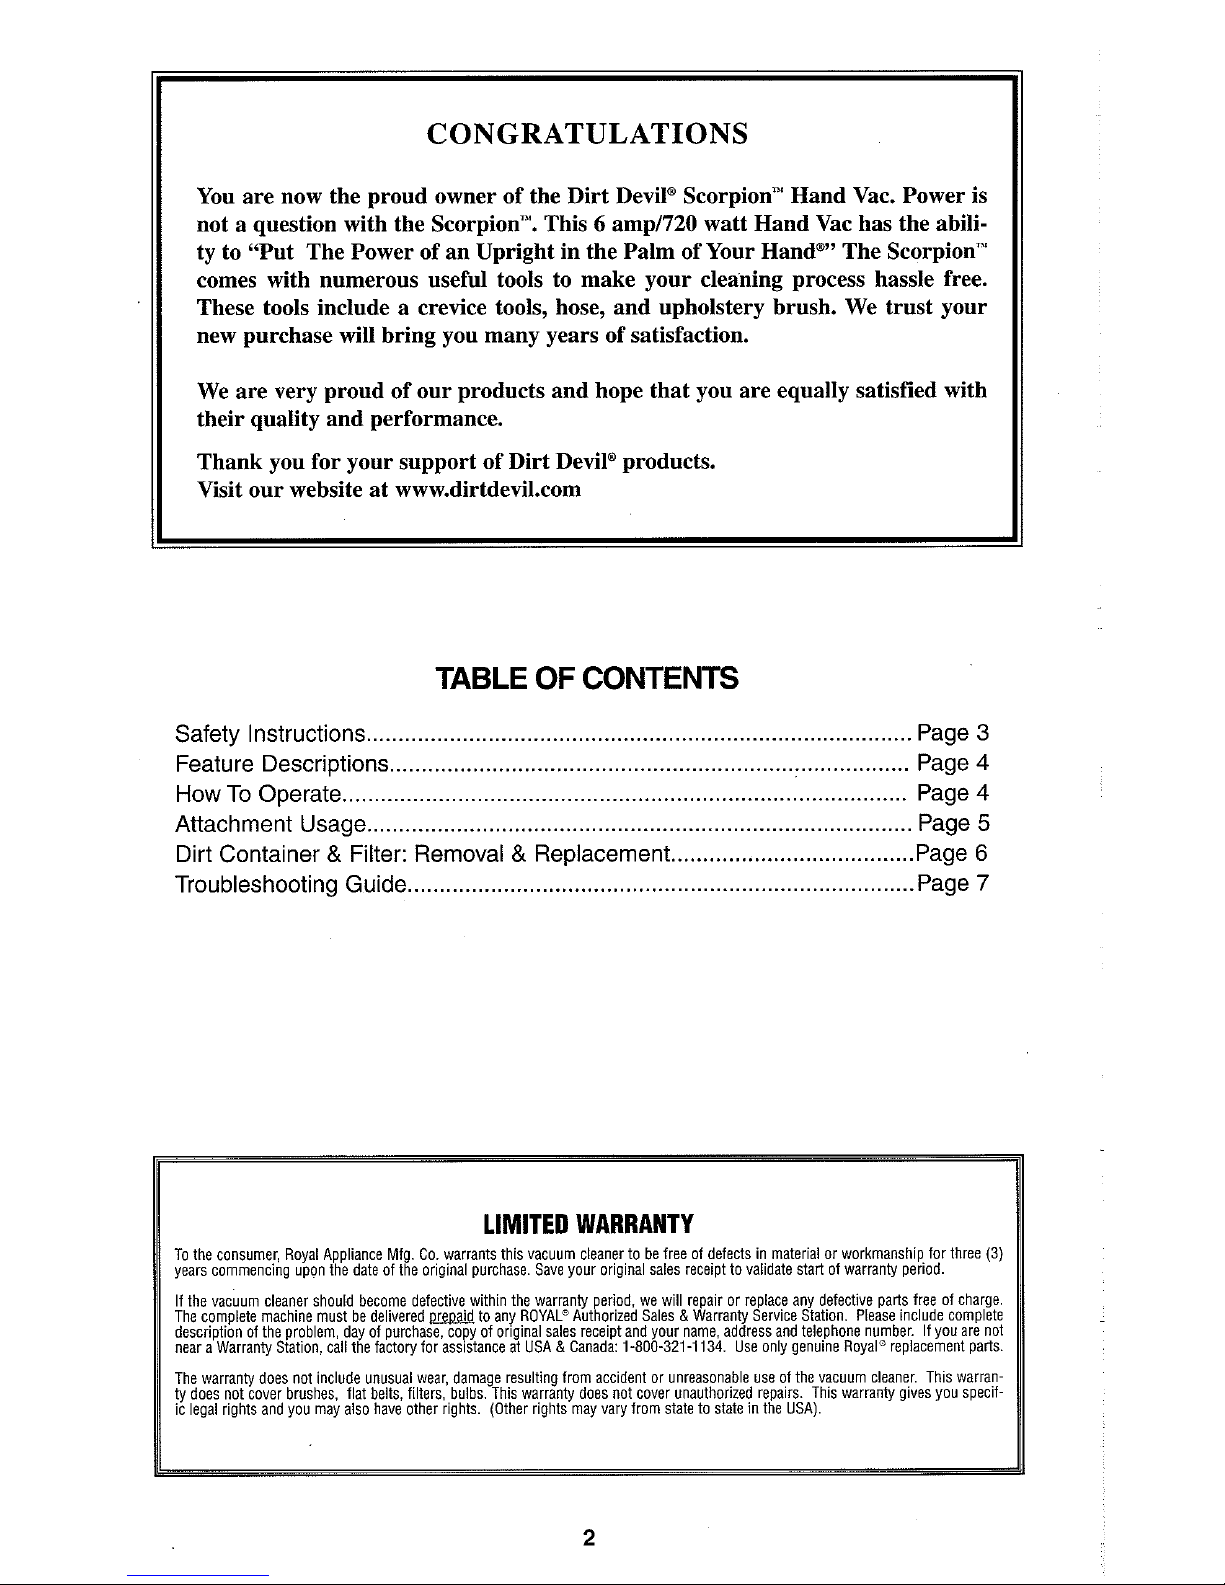
WARNING:
Cleaner assembly may
include small parts.
Small parts can present
a
choking hazard.
Please read these
instructions carefully
before using your
ScorpionTM Hand Vac.
Let us help you put
your cleaner together
or answer any questions,
call:
1-800-321 -1 134
(USA & Canada)
website:
www.dirtdevil
.corn
For quick reference, please record your
vacuum information below.
Model
#:
Mfg. Code:
(Mfg.
code located on the lower backside of cleaner)
02001
All
riahts resewed
#I-1 13059-000
Page 2
CONGRATULATIONS
You are now the proud owner of the Dirt Devilm Scorpion"' Hand Vac. Power is
not a question with the Scorpion"'. This
6
amp1720 watt Hand Vac has the ability to "Put The Power of an Upright in the Palm of Your Handm" The Scorpion"'
comes with numerous useful tools to make your cleaning process hassle free.
These tools include a crevice tools, hose, and upholstery brush. We trust your
new purchase will bring you many years of satisfaction.
I
I
We are very proud of our products and hope that you are equally satisfied with
their quality and performance.
I
Thank you for your support of Dirt Devilm products.
Visit our website at www.dirtdevil.com
TABLE
OF CONTENTS
Safety Instructions
.....................................................................................
Page
3
Feature Descriptions
.................................................................................
Page
4
How To Operate
........................................................................................
Page
4
Attachment Usage
.....................................................................................
Page
5
Dirt Container & Filter: Removal & Replacement
......................................
Page
6
Troubleshooting Guide
...............................................................................
Page
7
LIMITED WARRANTY
To the consumer Royal Appliance Mfg. Go. warrants this vacuum cleaner to be free of defects in material or workmanship for three
(3)
years commenci& upon the date of the or~ginal purchase. Save your original sales receipt to validate start of warranty period.
The warranty does not include unusual wear damage resulting from acc~dent or unreasonable use of the vacuum cleaner Thls warranty does not cover brushes, flat belts, filters.'bulbs. This warranty does not cover unauthorized repairs. This warranty gives you specific legal rights and you may also have other rights. (Other rights may vary from state to state in the
USA).
Page 3
CONSUMER INFORMATION
IMPORTANT SAFETY INSTRUCTIONS
When you use an appliance, basic precautions should always be followed, including the following:
READ ALL INSTRUCTIONS BEFORE USING THlS APPLIANCE
ALWAYS FOLLOW THESE SAFETY INSTRUCTIONS
DO NOT LEAVE CLEANER UNATTENDED
WARNING - FULLY ASSEMBLE CLEANER BEFORE OPERATING
WARNING -THE CORDS, WIRES AND/OR CABLES SUPPLIED WITH THlS PRODUCT CONTAINS CHEMICALS,
INCLUDING LEAD OR LEAD COMPOUNDS, KNOWN TO THE STATE OF CALIFORNIA TO CAUSE CANCER AND
BIRTH DEFECTS OR OTHER REPRODUCTIVE HARM. WASH HANDS AFTER USING.
WARNING: TO REDUCE THE RISK OF FIRE,
ELECTRIC SHOCK OR INJURY:
Do not leave appliance when plugged in. Unplug from outlet when not in use and before sewicing.
Do not use outdoors or on wet surfaces.
Do not allow to be used as a toy. Close attention is necessary when used by or near children.
Use only as described in this manual. Use only manufacturer's recommended attachments.
Do not use with damaged cord or plug. If appliance is not working as it should, has been
dropped, damaged, left outdoors, or dropped into water, return it to a service center for
inspection. Call 1-800-321 -1 134 for the nearest service center.
Do not pull or carry by cord, use cord as a handle, close a door on cord, or pull cord
around sharp edges or corners. Do not run appliance over cord. Keep cord away from
heated surfaces.
Do not unplug by pulling on cord. To unplug, grasp the plug, not the cord.
Do not handle plug or appliance with wet hands.
Do not put any object into openings. Do not use with any opening blocked; keep free of
dust, lint, hair and anything that may reduce air flow.
Keep hair, loose clothing, fingers, and all parts of body away from openings and moving parts.
Turn off all controls before unplugging.
Use extra care when cleaning on stairs.
Do not use to pick up flammable or combustible liquids, such as gasoline, or use in areas
where they may be present.
Look on your vacuum cleaner and follow all label and marking instructions.
Do not use an extension cord with this cleaner.
Keep end of hose, wands and other openings away from your face and body. Keep your
hands, feet, hair and clothing away from moving parts; especially the revolving brush.
Do not use the vacuum cleaner without dirt container and/or filters in place.
Store the vacuum cleaner indoors. Put the vacuum cleaner away after use to prevent
tripping accidents.
Do not pick up anything that is burning or smoking, such as cigarettes, matches, or hot ashes.
Unlpug before connecting *Turbo Tool".
Approved by the Vacuum Cleaner Manufacturer's Association Executive Committee, April 29, 1987.
SAVE THESE INSTRUCTIONS
-
WARNING:
To reduce the risk of electric shock, this appliance has a polarized plug (one blade is
wider than the other). This plug will fit in
a
polarized outlet only one way. If the plug does not fit fully in
the outlet, reverse the plug. If it still does not fit, contact a qualified electrician to install the proper outlet. Do not change the plug in any way.
I
I
NOTE: RETURN WARRANTY CARD TO REGISTER YOUR CLEANER
*NOT
AVAILABLE ON ALL MODELS
3
Page 4
1
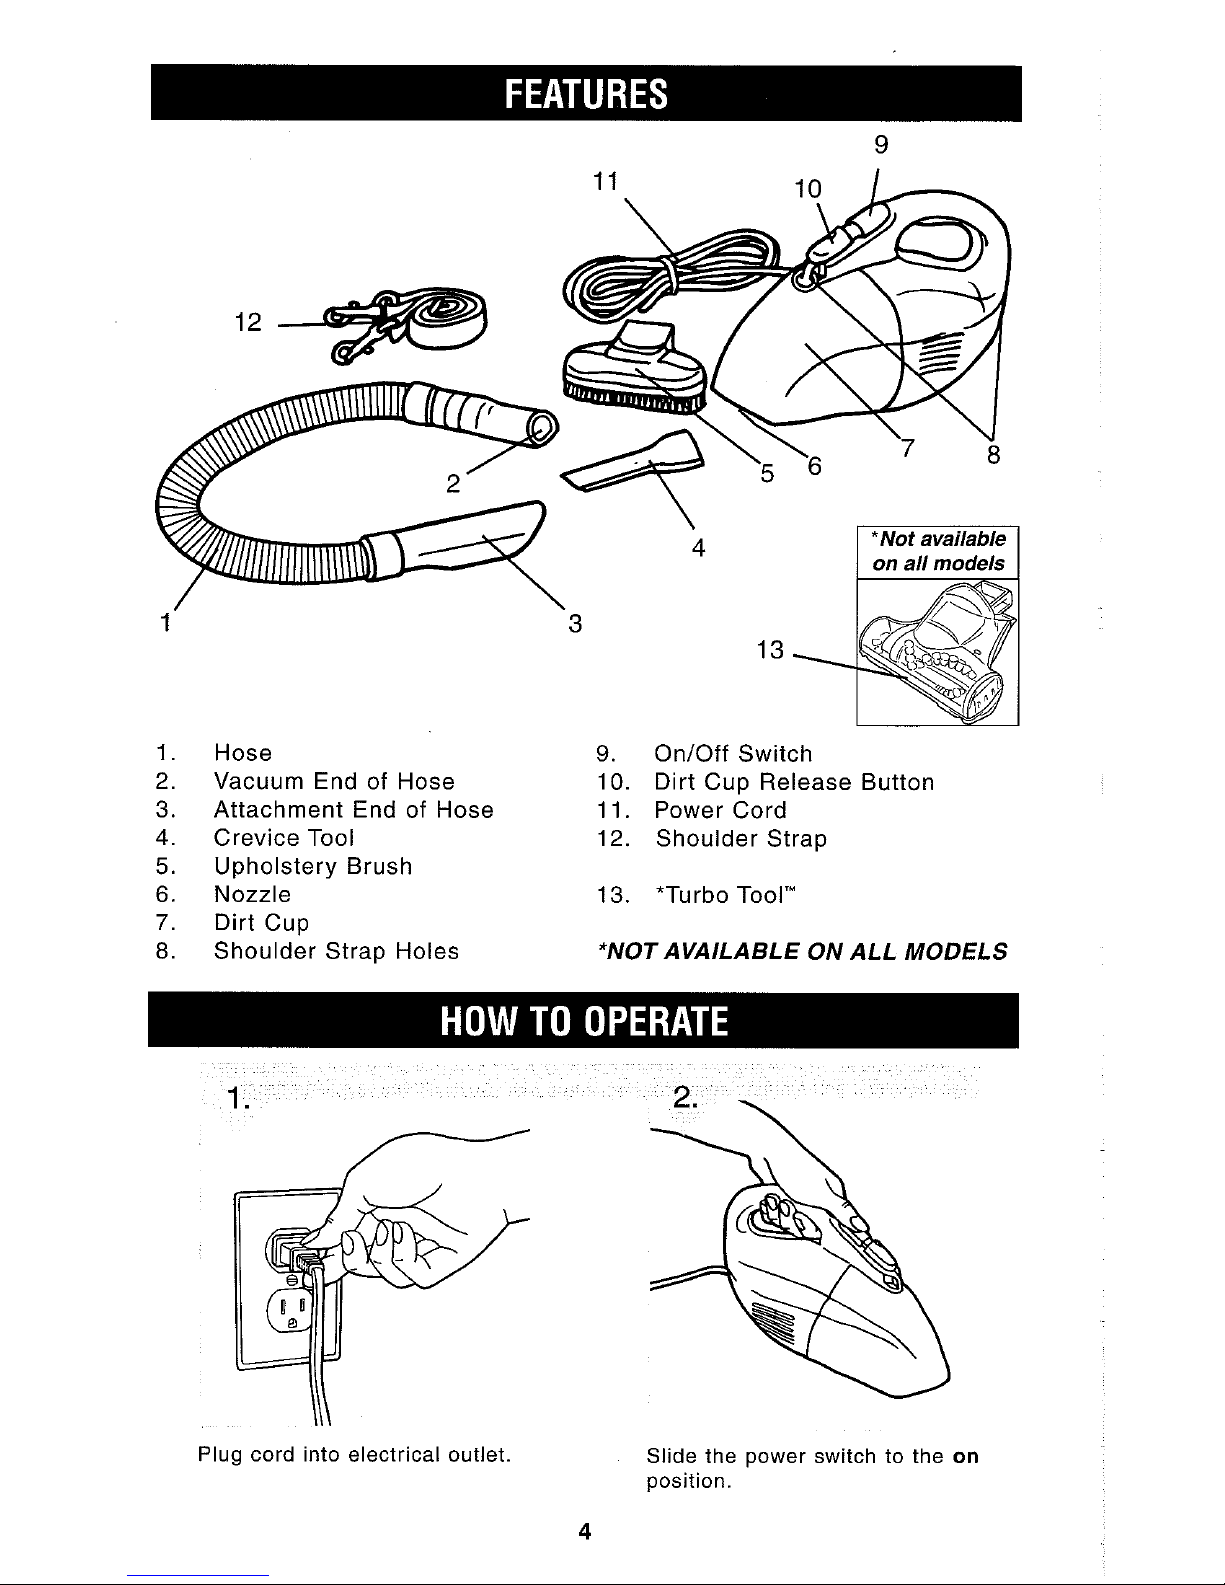
1.
Hose
9.
OnIOff Switch
2.
Vacuum End of Hose
10.
Dirt Cup Release Button
3.
Attachment End of Hose
11.
Power Cord
4.
Crevice Tool
12.
Shoulder Strap
5.
Upholstery Brush
6.
Nozzle
13.
*Turbo Tool'"
7.
Dirt Cup
8. Shoulder Strap Holes
*NOT
AVAILABLE
ON
ALL
MODELS
Plug cord into electrical outlet.
Slide the power switch to the
on
position.
Page 5
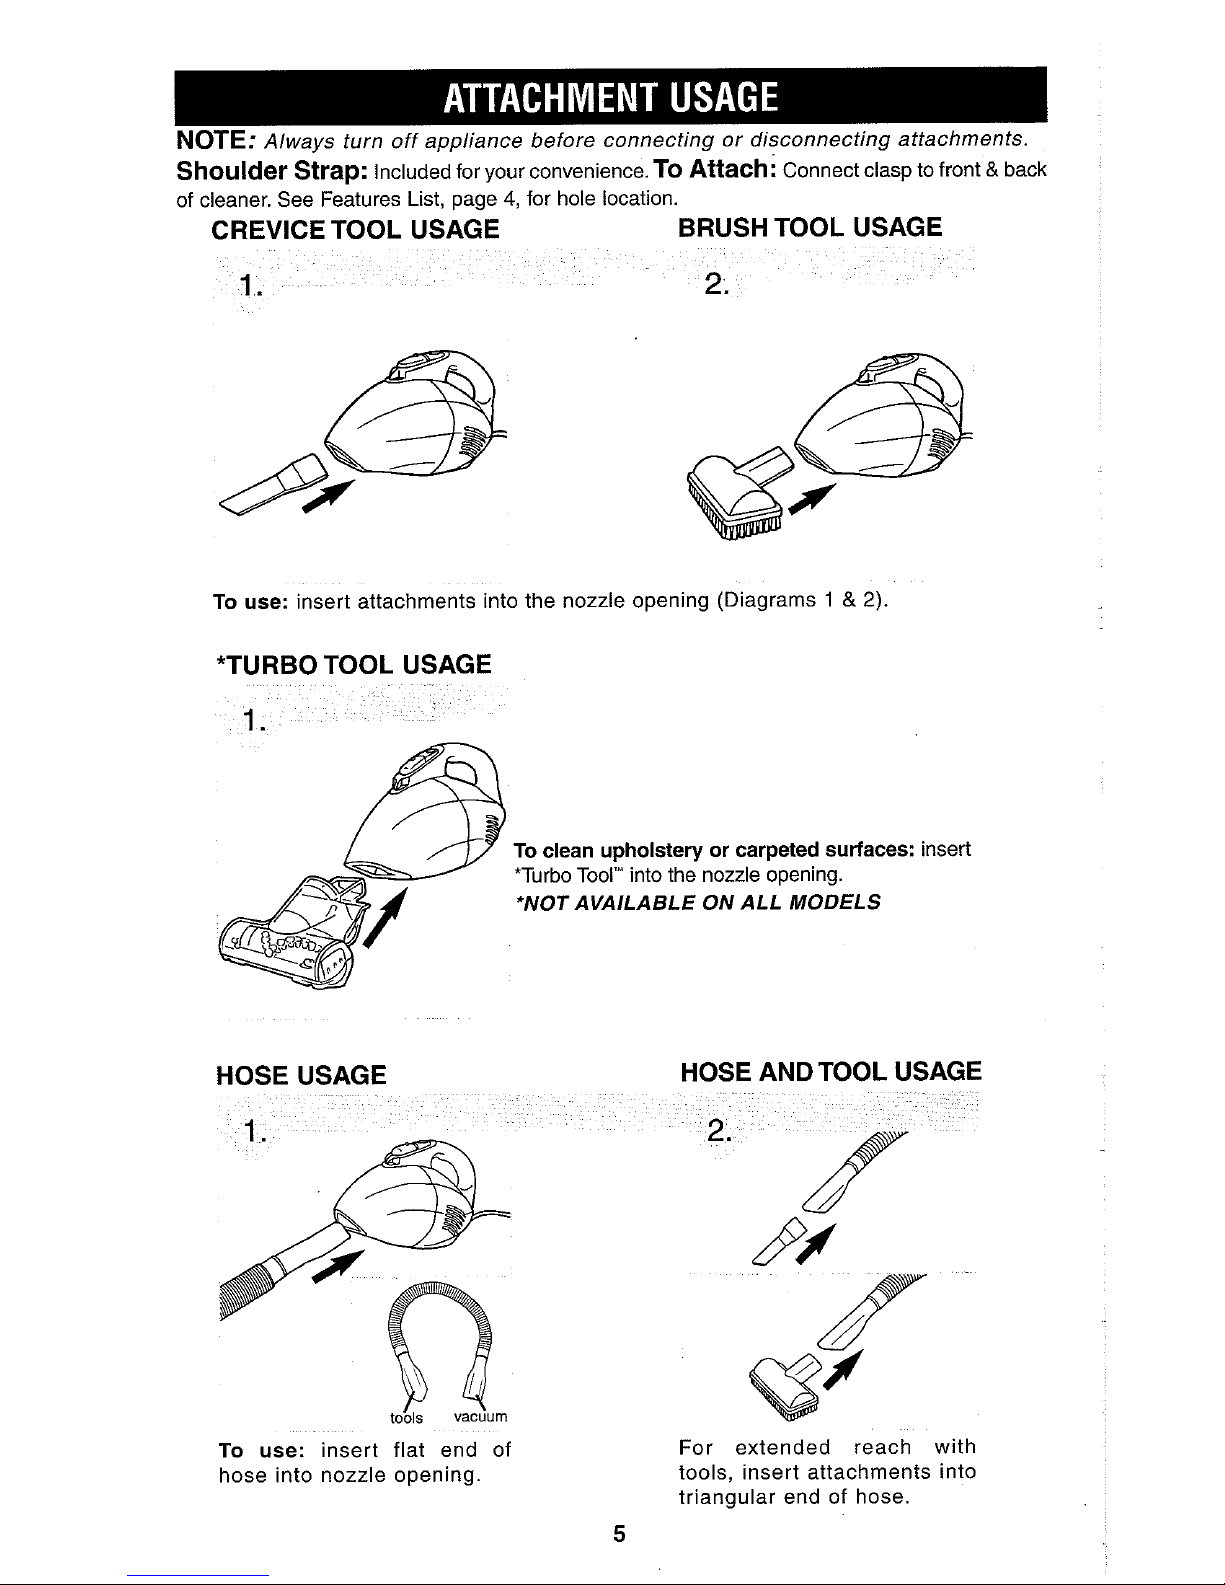
NOTE:
Always turn off appliance before connecting or disconnecting attachments.
Shoulder Strap: Included for your convenience. TO Attach: Connect clasp to front
&
back
of cleaner. See Features List, page
4,
for hole location.
CREVICE TOOL USAGE
BRUSH TOOL USAGE
1.
2.
To use:
insert attachments into the nozzle opening (Diagrams
1 & 2).
*TURBO TOOL USAGE
To clean upholstery or carpeted surfaces:
*Turbo Tool'" into the nozzle opening.
*NOTAVAILABLE ON ALL MODELS
insert
HOSE USAGE
HOSE AND TOOL USAGE
To use:
insert flat end of
hose into nozzle opening.
For extended reach with
tools, insert attachments into
triangular end of hose.
Page 6
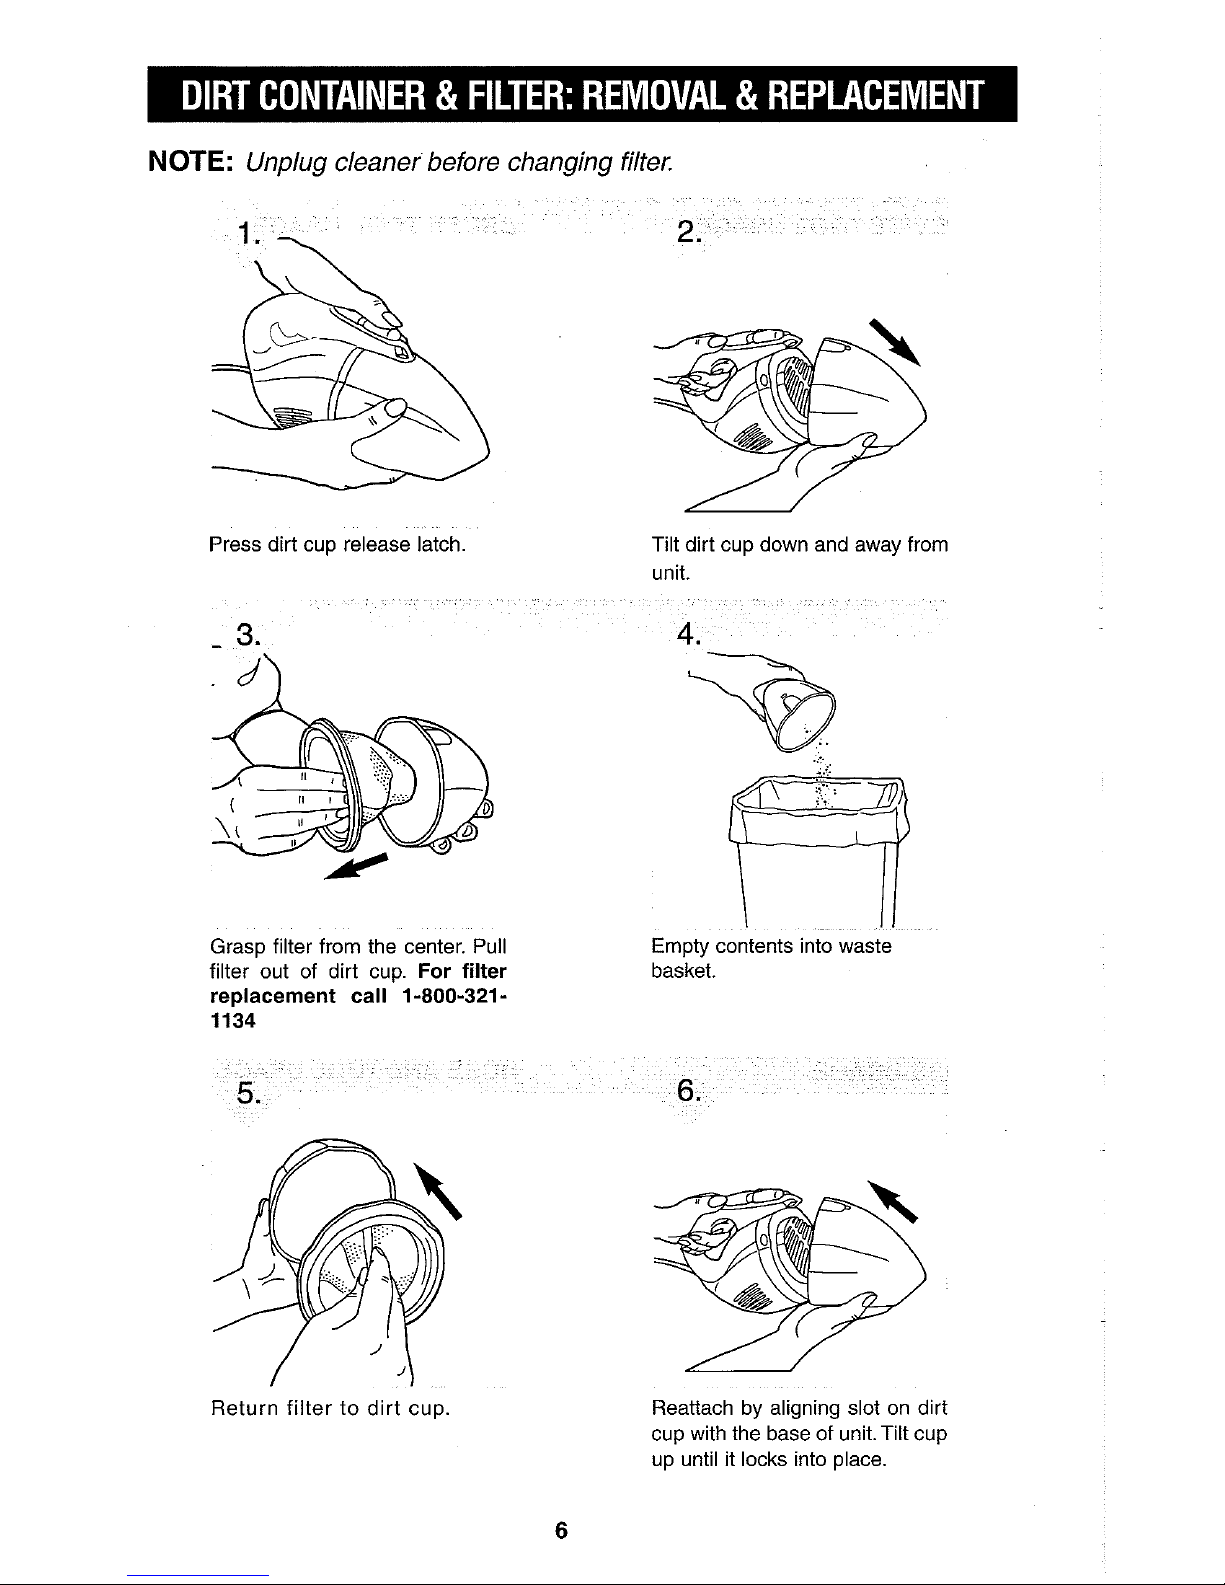
NOTE:
Unplug cleaner before changing filter.
Press dirt cup release latch Tilt dirt cup down and away from
Grasp f~lter from the center. Pull
basket.
Empty contents mto waste
f~lter out of dirt cup
For filter
replacement call 1-800-321
-
1134
Return filter to dirt cup. Reattach by aligning slot on dirt
cup with the base of unit. Tilt cup
up until it locks into place.
Page 7

WARNING: TO REDUCE RISK OF PERSONAL INJURY
-
UNPLUG CLEANER BEFORE SERVICING
/
Problem
Cleaner won't run
r
Cleaner won't
pick-up or low
suction
Dust escaping
from cleaner
Cleaner tools
won't pick up
*Turbo Tool'"
clogged
Possible Causes
1.
Power cord not firmly plugged
into outlet.
2.
Needs service.
1.
Dirt cup not installed correctly.
2.
Dirt cup full.
3.
Clogged filter.
1.
Dirt cup full.
2.
Dirt cup not installed correctly.
3.
Filter not installed correctly.
I.
Hose clogged.
2.
Dirt cup full.
3.
Filter clogged.
1.
*Turbo Tool'" clogged.
Possible Solutions
1.
Plug unit in firmly.
2.
Take to service center or call
1-800-321 -1 134.
1.
Review dirt container removal
and replacement
-
Pg.
6.
2.
Empty dirt container - Pg.
6.
3.
Remove filter and clean - Pg.
6.
I.
Empty dirt cup - Pg.
6.
2.
Review dirt cup removal and
replacement
-
Pg
6.
3.
Review filter installation - Pg.
6.
1.
Remove hose and tools; remove
obstruction
-
Pg.
5.
2.
Empty dirt container - Pg.
6.
3.
Clean filter - Pg.
6.
I.
Turn unit off and unplug. Remove
*Turbo Tool'" and inspect for blockage.
Clear blockage.
"NOT AVAILABLE ON ALL MODELS
ANY OTHER SERVICING SHOULD BE DONE BY AN AUTHORIZED SERVlCE REPRESENTATIVE
CUSTOMER SERVICE (1-800-321-1134)
In the event that further assistance is required, see yourYellow Pages for an authorized Royale Dealer.
Costs of any transportation to and from any place of repair are to be paid by the owner. The service parts
used in this unit are easily replaced and readily available from an authorized Royal" Dealer or retailer.
Always identify your cleaner by the model number when requesting information or ordering replacement
parts. (The model number appears on the bottom of the cleaner.)
Page 8

Page 9

Dirt
MANUAL DEL PROPlETARlO
lnstrucciones
de
Funcionamiento y Servicio
@
ADVERTENCIA:
El ensamble de la aspi-
radora puede incluir
partes pequefias. Las
partes pequefias pueden
presentar riesgo de
ahogamiento.
Por favor lea estas instruc-
ciones con cuidado antes
de usar su aspiradora vertical ScorpionTM Hand
Vac.
Permitanos ayudarle a
ensamblar su aspiradora
o
a contestar sus pregutas,
llame al:
1-800-321
-1
134
(USA & Canada)
website:
www.dirtdevil.com
Para tener una referencia rapida, anote por
favor la informacion de su aspiradora aqui.
No. de Modelo:
Codigo del Fabricante:
(El
c6digo del fabricante aparece en la parte posterior e
inferior de la aspiradora.)
02001
Todos 10s Derechos Reservados
#1-113059-00C
6/02
Page 10

FELICITACIONES
Usted es ahora el orgulloso propietario de una aspiradora manual Scorpion"'
de Dirt Devilo. La potencia no es problema con la Scorpion"'. Esta aspiradora
manual de
6
amps1720 vatios, tiene la capacidad para "Poner la potencia de
una aspiradora vertical en la palma de su manoo" La Scorpion"' viene con
numerosas herramientas utiles para hacer su proceso de limpieza sin problemas. Estas herramientas incluyen una herramienta para hendiduras,
manguera y cepillo para tapiceria. Confiamos en que
su nueva adquisici6n le
ofrecer6 muchos aiios de satisfaccibn.
Estamos muy orgullosos de nuestros productos y esperamos que usted estC
igualmente satisfecho con su calidad y rendimiento.
Le agradecemos su apoyo a nuestros productos Dirt Devilo.
Visite.nuestro sitio Web en www.dirtdevil.com
lnstrucciones de Seguridad
..................................................................
Pain
E3
Descripciones de las Caracteristicas
...................................................
Pagina
E4
Como Funciona
....................................................................................
Pagina
E4
Uso de 10s Accesorios
..........................................................................
Pain
E5
Recipiente de Polvo y Filtro: Retiro y Reemplazo
................................
Pagina
E6
Guia de Solucion de Problemas
..........................................................
Pain
E7
Al consLrn dor Royal Appl~ance Mlg Co garantlza esta asp radora contra oelecros de rnater a y ae mano ae oora par Ires
(3)
anas cornen-
zando en a iecha de cornpra or~g~nal Guarde
SJ
rec~bo de cornpra or g nal para nacer val~do el nlclo ael perlodo de garantla
En caso que la aspiradora muestre algun defect0 dentro del period0 de garantia, repararemos o reemplazaremos de rnanera gratuita
cualquier park defectuosa. La rnaquina completa debe ser enviada con porte pagado a cualquier Estacion Autorizada ROYALB de Ventas
y
Sewicio de Garantia. Por favor incluya una descripcion cornpleta del problerna, fecha de compra, copia del recibo de compra orlglnal
y
su,nombre, domicilio y numero de telefono. Si no se encuentra cerca de una Estacion de Garantia, llarne a la fabrica para pedir asis-
tencla en 10s EE.UU.
y
Canada: 1-800-321-1134. Use solarnente partes de repuesto genulnas Royal'?
La garantia no lncl~ye el desgaste anormal aano coma res-ltado de un acc~dente o ael us0 no adec~aoo oe la aspiradora. Esta garania no c~bre 10s cepl as, oanaas, l~lrros
y
focos. Esta garanria no c~bre reparac ones no a~rorcadas. Esta garant'a le con1 ere aerecnos
legales espec'l~cos
y
poar'a naber oms derechos tamb en. (Los otros derechos var:an de esrado a estado en 10s EE UU.]
Page 11

INFORMACION
PARA EL CONSUMIDOR
ESTA ASPIRADORA
ESTA
DISENADA
PARA US0
DOMESTICO
SOLAMENTE.
INSTRUCCIONES DE SEGURIDAD IMPORTANTES
Cuando use un electrodornestico se deben seguir siernpre las precauciones basicas, incluyendo [as siguientes:
LEA TODAS LAS INSTRUCCIONES ANTES DE USAR ESTE APARATO
SIEMPRE SlGA ESTAS INSTRUCCIONES DE SEGURIDAD
NO DEJE
LA
ASPIRADORA FUNGIONANDO SOLA
ADVERTENCIA
-
ENSAMBLE TOTALMENTE LA ASPIRADORA ANTES DE USARLA
ADVERTENCIA: LOS CORDONES ELECTRICOS, ALAMBRES YIO CABLES SUMINISTRADOS CON ESTE PRODUCT0 CONTIENEN QUIMICOS, INCLUYENDO PLOMO 0 COMPUESTOS DE PLOMO QUE SEGUN EL ESTADO
DE CALIFORNIA CAUSAN
CANCER
Y DEFECTOS DE NAClMlENTO U OTRO DANO REPRODUCTIVO.
LAVESE
LAS MANOS
DESPUES
DE USARLOS.
ADVERTENCIA: PARA RFDUCIR EL RIESGO DE
INCENDIO, CHOQUE ELECTRIC0
0
LESIONES:
No deje solo el aparato cuando este conectado. Desconectelo de la toma de corriente cuando no lo use
y
antes de darle servicio.
No lo utilice en exteriores o en superficies mojadas.
No permita que se use como juguete. Ponga mucha atencion cuando lo use un niRo o cerca de niiios.
Uselo solamente como se indica en este manual. Use solamente 10s accesorios recomendados
por el fabricante.
No lo utilice con el cordon electrico o la clavija daiiados. Si el aparato no trabaja como debiera, se ha
caido, daiiado, dejado en exteriores o caido en agua,
regreseio a un centro de servicio para su inspeccion. Llame al 1-800-321-1134 para encontrar el centro de servicio mas cercano a su domicilio.
No tire ni lo transporte tomandole del cordon electrico, no utilice el cordon
electric0 como asa,
no cierre la puerta
sobre el cordon electrico, o tire del cordon electrico alrededor de rebordes o
esquinas agudos. No pase el aparato
sobre el cordon electrico. Mantenga el cordon electrico
lejos de superficies calientes.
No lo desconecte tirando del cordon electrico. Para desconectarlo, tome la clavija, no el cordon electrico.
No tome la clavija o el aparato con las manos mojadas.
No coloque objetos en las aperturas. No lo use con una apertura bloqueada; mantengalo libre de
polvo, pelusa, pelo
y
cualquier cosa que pueda reducir el flujo de aire.
Mantenga lejos de las aperturas
y
partes moviles el pelo, ropa suelta, dedos y todas las partes del cuerpo.
Apague todos 10s controles antes de desconectar.
Tenga mas cuidado cuando aspire escaleras.
No lo use para aspirar liquidos inflamables o combustibles, tales como gasolina, ni lo use en
Areas donde pudieran estar presentes.
Siga las instrucciones de la etiqueta
y
las marcas que se encuentran en su aspiradora.
No use una extension electrica al usar esta aspiradora.
Mantenga lejos de su cara
y
cuerpo la manguera, lanzas y otras aperturas. Mantenga sus manos,
pies, pelo
y
ropa lejos de las partes moviles; especialmente del cepillo giratorio.
No use la aspiradora sin tener en su sitio el recipiente de polvo
y
10s filtros.
Guarde la aspiradora en interiores. Guarde la aspiradora despues de su uso para evitar accidentes
de tropiezos.
No aspire obietos que esten quemandose o emitiendo humo, tales como
cigarrillos, cerillos o
cenizas calientes.
'
Desconecte la as~iradora antes de conectar el *Turbo Tool".
Aprobada por el cohite Ejecutivo de la Asociacion de Fabricantes de Aspiradoras el
29
de Abril de
1987
GUARDE ESTAS INSTRUCCIONES
ADVERTENCIA:
Para reducir el riesgo de choque elkctrico, este aparato tiene una clavija polarizada
(una h0ja es mas ancha que la otra.) Esta clavija encajara en una torna de corriente polarizada de una rnanera solarnente.
Si
la clavija no encaja totalmente en la torna de corriente, invierta la clavija. Si atin no encaja, pongase en contact0 con un electricista calificado para instalar la toma de corriente apropiada. No rnodifique la clavija de ninguna rnanera.
NOTA: REGRESE LA TARJETA DE
GARANT~A
PARA REGISTRAR SU ASPIRADORA
*NO DISPONIBLE EN LOS TODOS LOS MODELOS
Page 12

Manguera
Extremo de aspiracion de la
manguera
Extremo de la manguera para el
accesorio
Herramienta para Hendiduras
Cepillo para tapiceria
Boquilla
Recipiente de Polvo
Orificios de la correa para el hombro
en todos 10s
modelos
L
9.
lnterruptor Encendido
/
Apagado
10.
Boton de liberacion del recipiente
de Polvo
11.
Cordon Electrico
12.
Correa para el hombro
13.
*Turbo Tool'"
*NO DlSPONlBLE EN TODOS LOS MODELOS
Conecte el cordon electric0 en Deslice el interruptor a la posila torna de corriente. cion de encendido.
Page 13

NOTA:
Siempre apague este aparato antes de conectar o desconectar 10s accesorios.
Correa para el Hombro: Para Colocarla:
Enganche la hebilla en la parte delantera y trasera de la aspi-
radora. Vea la ubicacion del orificio en la Lista de Caracteristicas que se encuentra en la pagina E4.
US0 DE
LA
HERRAMIENTA
US0 DE
LA
HERRAMIEN-
PARA HENDIDURAS TA DE CEPILLO
1.
2.
Como usar: lnserte 10s accesorlos en la apertura de la boqu~lla (Diagramas 1 y
2).
US0 DEL TURBO TOOC"
1.
Para la limpieza de tapiceria o de superficies
alfombradas: lnserte el *Turbo Tool'" en la apertura
de la boquilla.
*NO DlSPONlBLE EN TODOS LOS MODELOS
US0 DE LA MANGUERA
Como usar: inserte el
extremo plano de la
manguera en la apertura de
la boquilla.
US0 DE LA MANGUERA
Y
LAS HERRAMIENTAS
Para un mayor alcance con
las herramientas, inserte 10s
accesorios en el extremo triangular de la manguera.
E5
Page 14

NOTA:
Desconecte la aspiradora antes de cambiar el filtro.
Oprima la palanca de
liberation
del recipiente de polvo.
Tome el filtro por el centro.
Para
reemplazar el filtro, Hame al
1-800-312-1134.
Coloque de nuevo el filtro en el
recipiente de polvo.
Tire del
recrpiente de polvo
hacia abajo
y
afuera de la
unidad.
4.
i-
Vacie el contenido en un
basurero.
Fijelo de nuevo al alinear la ranura
en el recipiente de polvo con la base
de la unidad. Incline el recipiente de
polvo hasta que se asegure en su
sitio.
Page 15

ADVERTENCIA: PARA REDUCIR EL RIESGO DE LESIONES PERSONALES
DESCONECTE ANTES DE DAR SERVICIO.
.a aspiradora no
unciona
.a aspiradora no
~spira o la suc:ion es
muy
debil
il polvo sale de la
~spiradora
-0s accesorios de
a
aspiradora no
uncionan
Turbo Tool'"
apado
Possibles Causas
1.
El cordon electric0 no esta bien
conectado en ia toma de corriente.
2.
Necesita servicio.
1.
El recipiente de polvo no esta
instalado correctamente.
2.
El recipiente de polvo esta Ileno.
3.
Filtro tapado.
1.
El recipiente de polvo esta Ileno.
2.
El recipiente de polvo no esta
instalado correctarnente.
3.
El filtro no esta instalada de manera
correcta en la boquilia electrica.
1.
Manguera tapada.
2.
El recipiente de polvo esta Ileno.
3.
Filtro tapado.
1.
'Turbo Tool" tapado
Soluciones Posibles
1.
Conecte la unidad con firmeza.
2.
Llevela al centro de servicio o
llame al:
1-800-321-1134.
1.
Revise la forma de retiro y reemplazo
del recipiente de polvo
-
Pag. E6.
2.
Vacie el recipiente de polvo - Pag. E6.
3.
Retire y limpie el filtro - Pag. E6.
1.
Vacie el recipiente de polvo - Pag. E6.
2.
Revise la forma de retiro y reemplazo
del recipiente de polvo
-
Pag E6.
3.
Revise la instalacion dei filtro - Pag E6.
1.
Retire la manguera y 10s accesorios;
retire la obstruccion
-
Pag.
E5.
2.
Vacie el recipiente de polvo - Pag.
E6.
3.
Limpie el filtro - Pag E6.
1.
Apague la unidad y desconectela. Retirc
el Turbo Tool"
y
busque el atasco.
Limpie el atasco.
'NO DISPONIBLE EN TODOS
LOS MODELOS
CUALQUIER
OTRO SERVICIO
DEBERA
SER
EFECTUADO
POR
UN
REPRESENTANTE
DE SERVlClO AUTORIZADO
SERVlClO
AL
CLIENTE (1-800-321-1 134)
En caso de necesitar mas ayuda, vea en las Paginas Amarillas para encontrar a un Distribuidor Autorizado
Royalm. Los costos de transporte hacia y desde el sitio de reparacion seran pagados por el propietario. Las
partes de repuesto utilizadas en esta unidad son de reemplazo facil y estan disponibles con un Distribuidor
Autorizado Royal"
o
en otras tiendas. Siempre identifique su aspiradora por medio del numero de modelo
cuando pida informacion u ordene partes de repuesto. (El numero de modelo aparece en la parte posterior
de la aspiradora.)
Page 16

Page 17

Page 18

AVERTISSEMENT: AFlN DE
REDUIRE
LES RISQUES DE BLESSURE CORPORELLE,
DEBRANCHEZ
L'APPAREIL AVANT DE FAIRE SON ENTRIWEN
Probleme
Caspirateur ne
fonctionne pas
L'appareil
n'aspire pas ou
faiblesuccion
De la poussiere
s'echappede
I'aspira teur
Les accessoires
de I'appareil
n'aspirent pas
*Turbo Tool'"
obstrue
Causes possibles
1.
La fiche n'est pas bien inseree
dans la prise
2.
II est temps de proceder a I'entre
tien.
1.
Le godet a poussiere n'est pas
installe correctement.
2.
Le godet a poussiere est plein.
3.
Le filtre est obstrue.
1.
Le godet a poussiere est plein.
2.
Le godet a poussiere n'est pas
install e correctement.
3.
Le filtre n'est pas installe
correctement.
1.
Hose clogged.
2.
Le godet a poussiere est plein.
3.
Le filtre est obstrue.
1.
'Turbo Tool'" obstrue.
Solutions possibles
1.
Bien enficher le cordon d'alime
tation.
2.
Apportez I'appareil au centre de
service ou tele phonez au
1-800-321-1 134.
1.
Revoyez I'enlevement et la reinstallation
du godet apoussiere
-
Pg.
6.
2.
Videz le godet a poussiere - Pg.
6.
3.
Retirez le filtre et nettoyez-le - Pg.
6.
1.
Videz le godet a poussiere - Pg.
6.
2.
Revoyez I'enlevement et la remise en
place du godet apoussiere- Pg
6.
3.
Revoyez I'installation du filtre - Pg.
6.
1.
Retirez le tuyau et les accessoires et
degagez I'obstruction
-
Pg.
5.
2.
Videz le godet a poussiere - Pg.
6.
3.
Nettoyez le filtre - Pg.
6.
1.
Arretez I'appareil puis le debrancher
Retirez le *Turbo Tool" et reperez
I'obstruction. Degagez I'obstruction.
TOUT
AUTRE ENTRmEN
DOiT
m~
EFFECTUE
PAR
UN
REPRESENTANT
AU SERVICE AUTORISE.
SERVICE
A
LA
CLIENTELE
(1 -800-321 -1 134)
Pour obtenir de I'aide supplementaire, consultez les Pages jaunes afin de connaitre les depositaires Royal'
autorises. Les coOts de transport aller-retour de I'endroit ou sont effectuees les reparations doivent Qre
defrayes par le proprietaire de I'appareil. Les pieces de service utilisees dans cet appareil peuvent facilement Qre remplacees et sont disponibles aupres des depositaires ou revendeurs Royal' autorises.
ldentifiez toujours I'aspirateur par son nurnero de rnodele quand vous demandez de I'information ou commandez des pieces de rechange. (Le numero de rnodele figure au bas de I'aspirateur).
Page 19

.allaqnod
aun suep nualuo3 a1 zap!/\
'awn,[
ap lal!laJ a1 mod seq a1 sAan
a~a!ssnod
r?
lap06 a1 zano3ag
.a~a!ssnod 8 lap06
a1 suep a~ll!~ a1 za3eldatl
Page 20

REMARQUE:
Arritez rappareil avant de connecter ou de deconnecter les accessoires.
Bandouliere:
incluse pour votre cornmodite.
Pour
la fixer:
raccorder la boucle au devant et
a
I'arriere de I'aspirateur. Voir la liste des caracteristiques en page 4 pour I'ernplacement des trous.
UTlLlSATlON DU
UTlLlSATlON DE
LA
SUCEUR PLAT
BROSSE
essoires dans I'ouverture du suceur (schemas
1 & 2).
TOOL'"
Nettoyage des meubles ou des moquettes
:
mserez le *Turbo Tool'" dans le suceur.
*NON DlSPONIBLE SUR TOUS LES MODELES
UTlLlSATlON DU TUYAU
Utilisation:
lnserez I'extremite plate
du tuyau dans I'ouverture du suceur.
UTlLlSATlON DU TUYAU
ET DES ACCESSOIRES
Pour augmenter la portee des acces-
soires, inserez les accessoires dans
I'extremite triangulaire du tuyau.
Page 21

'lus~no:, ap as!~d
aun susp uop103 a1 zay~ue.~g
sappour sal snoj
ms
alq!uods!p uo~,
salneda,p a!o~~noa ap snoJ1
.8
sappow sal
snoj ms alq!
P
Page 22

INFORMATIONS
DESTINEES
AUX CONSOMMATEURS
CET ASPIRATEUR A
ETE
CONCU POUR USAGE DOMESTIQUE SEULEMENT.
-
IMPORTANTES
INSTRUCTIONS DE
SECURITE
Lorsque vous ut~l~sez un appareil menaqer, vous devriez touiours suivre certaines orecautions de securte, dont les suivantes:
LISEZ
TOUTES LES
INSTRUCTIONS
AVANT
DIITIL~SER
CET
APPAREI~
RESPECTEZ TOUJOURS A LA LETRE CES INSTRUCTIONS DE
SECURITE
NE LAISSEZ PAS CASPIRATEUR SANS SURVEILLANCE
MlSE EN GARDE
-
ASSEMBLEZ L'ASPIRATEUR EN ENTIER AVANT DE LE METTRE EN MARCHE
AVERTISSEMENT
:
LES CORDONS. LES FILS ELECTRIQUES ETIOU LES CABLES FOURNIS AVEC CE PRODUIT
CONTIENNENT DES PRODUITS CHIMIQUES CONTENANT DU PLOMB OU DES
COMPOSES
DU PLOMB CONSIDERES PAR CETAT DE CALlFORNlE COMME PRODUITS CANCEROGENES ET CAUSANT DES MALFORMATIONS
CONGENITALES
OU AUTRES ANOMALIES DE
LA
REPRODUCTION. SE LAVER LES MAINS
APRES
UTILISATION.
AVERTISSEMENT: POUR
REDUIRE
LES RISQUES
D'INCENDIE, DE CHOC
ELECTRIQUE
ET DE
LESION:
Ne laissez pas I'appareil sans surveillance quand il est branche. Debranchez-le quand il n'est pas utilise
ainsi qu'avant d'en faire I'entretien.
N'utilisez pas I'appareil
a
I'exterieur ou sur des surfaces mouill6es.
Ne laissez pas les enfants jouer avec I'appareil. Exercez une surveillance etroite quand I'appareil est utilise
par les enfants ou
2
proxirnite de ceux-ci.
Utilisez I'appareil seulernent comrne indique dans ce manuel. Utilisez seulernent les accessoires recornmandes par le fabricant.
N'utilisez pas I'appareil si la fiche
ou le cordon est endomrnage. Si I'aspirateur ne fonctionne pas cornrne
prevu, s'il a
ete echappe, endornrnage, laisse
a
I'exterieur, ou s'il est tornbe dans I'eau, expediez-le a un
centre de service pour verification. Telephonez au 1-800-321-1134 pour connaitre le centre de service le
plus pres de chez vous.
Ne tirez pas I'appareil par son cordon, ne vous servez pas du cordon comme poignee, ne ferrnez pas de
portes sur le cordon et ne tirez pas le cordon sur des coins ou bords tranchants. Evitez de passer sur le
cordon d'alimentation avec I'appareil. Gardez le cordon
a
I'kcart des surfaces chauffees.
Ne debranchez pas I'appareil en tirant sur le cordon. Pour le debrancher, saisissez la fiche et non
le cordon.
Ne manipulez pas la fiche ou I'aspirateur avec les mains mouillees.
N'inserez pas d'objets dans les ouvertures. N'utilisez pas I'appareil si les ouvertures sont obstrukes; gardez
les ouvertures libres de poussiere, de peluches, de cheveux et de tout ce qui pourrait reduire
le debit d'air.
Gardez les cheveux, les vBtements amples, les doigts et toute partie du corps
a
I'ecart des ouvertures et
des pieces en rnouvement.
Ferrnez toutes les cornrnandes avant de debrancher I'appareil.
Soyez tres prudents quand vous nettoyez les marches d'escalier.
N'aspirez pas les liquides
inflammables ou combustibles comrne I'essence; n'utilisez pas I'appareil en
presence de ces
materiaux.
Examinez votre aspirateur et suivez toutes les instructions sur les etiquettes.
N'utilisez pas de rallonge electrique avec cet aspirateur.
Gardez le bout du tuyau, les rallonges et autres ouvertures
a
distance du visage et du corps. Gardez vos mains,
vos pieds, vos cheveux et vos vitements
a
distance des pieces mobiles, tout specialement de la brosse rotative.
N'utilisez pas sans le godet
a
poussiere ni les filtres.
Rangez I'aspirateur
a
I'interieur. Rangez I'appareil apres son utilisation pour eviter de trebucher dessus.
Evitez d'aspirer ce qui brirle ou fume, comme les cigarettes, les allurnettes et les cendres chaudes.
Mettez toujours I'interrupteur de I'appareil en position d'arrBt avant de connecter ou de deconnecter les suceurs
motorises.
Debranchez avant de connecter le *Turbo Tool.
VEUILLEZ CONSERVER CES INSTRUCTIONS
AVERTISSEMENr
Afin de reduire les risques de choc Blectrique,.cet appareil est muni d'une fiche
polarisee (une tige est plus large que I'autre). Cette fiche ne peut Btre inseree dans une prise de courant polarisee
que dans un sens. Si la fiche ne s'insere pas completement dans la prise, inversez-la. Si elle ne s'insere toujours
pas, demandez
a
un Blectricien qualifie d'installer la prise appropriee. Ne modifiez d'aucune fa~on la fiche.
REMARQUE: RETOURNEZ LA FICHE DE GARANTIE POUR ENREGISTRER
VOTRE ASPIRATEUR.
*NON DlSPONlBLE SUR TOUS LES MOD'ELES
3
Page 23

(.s!un-sley xne allne,l
e
lela un,p Ja!Jen luannad sl!o~p
saline
sal) .sl!olp saJ1ne.p !ssne al)a-lnad la !ol el led snuuo3al syolp sap aJajuo3 snon a!)ue~efi aua3
.saasyolne uou suo!le~edal sal sed amo3 au a!iuelefi aUa3 .salnodme sal la saJll!j sal
'
sa!o~~no:, sal 'sassolq sal sal snld uou sed aln
-no3 au a113 'lnapl!d~e.l ap jjsnqe afiesn un no quap!me sal led sasne3 safiewwop sal 'allanl!qequ! aJnsn.1 sed alnno:, au a!iuele6 aUa3
.a!luelefi ap apo!~ad
el ap ~nanfiy ua aa~lua,p alep el la!j!lsn! lnod au!fi!~o,p leqJe,p nla~ allon zaNasuo3 .au!fi!lo,p wp.p alep es ap Jaidmo3
q
saauue (E)
s!oll luepuad uo!je+qej ap no ne!lalew ap saqn ap ldwaxa Isa male~!dse la3 anb 1na~ewwosuo3 ne $!lue1e6 '03 '6jm asue!~ddy (eAoH
a6ed
..............................................................................
a6euuedap ap ap!n3
..............................
$uaura3qdura~ la asodaa : a.1$1!4 la a~a!ssnod lap03
a6ed
.......................................................................
sa~!ossa33e sap uo!$es!yln
a6ed
...........................................................................
l!a~edde,~ ap uo!les!ygn
afjed
.."
""
........
..............................................
sanb~s!~ape~ecI sap uo!$dyc~aa
a6ed"
..
""
......................................................................
ayn3as ap suo!pnJlsul
-asueunopad ma[ ap $a p!pnb ma1 ap $!ejs!les saq auraur
-snoa zalas snoa anb suo;r?dsa snou $a s$mpo.rd sou ap sxag
qq
saururos snoN
Page 24

Notice d'utilisation et d'entretien
du
MANUEL DU PROPRIETAIRE
Veuillez lire attentivement
ces instru tions avant d'u
tiliser votre aspirateur
a
main ScorpionTM Hand Vac.
Nous pouvons vous aider
a
asse bler votre aspirateur
et
a
repondre a vos ques
tions. Communiquez avec
nous.
AVERTISSEMENT:
L'assemblage de I'aspirateur
peut contenir des pieces de
petites dimensions. Les
pieces de petites dimensions
peuvent constituer un risque
d'etouffement.
1-800-321 -1 134
(Canada et hats-~nis)
site Web
:
www.dirtdeviI
.corn
Consignez les renseignements sur votre aspirateur
ci-dessous pour pouvoir les consulter rapidement.
NVe modele:
Code de fabrication:
(Le code de fabrication se trouve sur la partie inferieure arriere
de I'aspirateur.)
E~paiiol-pagina E
1
02001
All
rights rese~ed
#1-113059-00(
610:
 Loading...