

Page 1
Handy Duo
Royal Appliance International GmbH
Itterpark 5-7
40724 Hilden
Germany
℡ +49 - 2103 - 20 07 10
+49 - 2103 - 20 07 77
info@dirtdevil.de
Roya-11931-1 • A5 • 15.03.2010
www.dirtdevil.de
Akku-Handsauger
DE
Bedienungsanleitung
Hand-held vacuum cleaner
GB
Operating Manual
Aspirateur à main à piles
FR
Mode d‘emploi
Accu-handzuiger
NL
Bedieningshandleiding
Aspiradora de mano de batería
ES
Manual de instrucciones
Аккумуляторный ручной пылесос
RUS
Инструкция по эксплуатации
Şarjlı el süpürgesi
TR
Kullanim Klavuzu
Akumulátorový ruční vysavač
CZ
Návod k obsluze
Akumulátórový ručny výsávač
SK
Návod na obsluhu
Roni sesalec na baterije
SI
Navodila za uporabo
Baterijski rucni usisavac
HR
Uputa za upotrebu
Akku kézi porszívó
HU
Kezelési útmutató
Page 2

Bedienungsanleitung ................................................................................ 4 - 10
Operating Manual ....................................................................................... 11 - 17
Mode d‘emploi............................................................................................. 18 - 24
Bedieningshandleiding .............................................................................. 25 - 31
Manual de instrucciones ........................................................................... 32 - 38
Инструкция по эксплуатации ................................................................. 39 - 45
Kullanim Klavuzu........................................................................................ 46 - 52
Návod k obsluze ......................................................................................... 53 - 59
DE
GBFRNLESTRCZSKSIHRHU
RUS
Návod na obsluhu ...................................................................................... 60 - 66
Navodila za uporabo................................................................................... 67 - 73
Uputa za upotrebu ..................................................................................... 74 - 80
Kezelési útmutató ...................................................................................... 81 - 87
2
Page 3
1
D
5
4
2
1
2
6
3
3
7
4
5
8
2
6
9
10
3
1
1
4
7
4
3
1
8
9
2
5
4
2
5
2
6
3
1
2
1
7
ab
8
2
3
1
2
1
3
Page 4
1 Sicherheitshinweise
Vielen Dank!
Es freut uns, dass Sie sich für den AkkuHandsauger Handy Duo entschieden haben!
Wir wünschen Ihnen viel Freude mit dem Gerät und danken Ihnen für den Kauf!
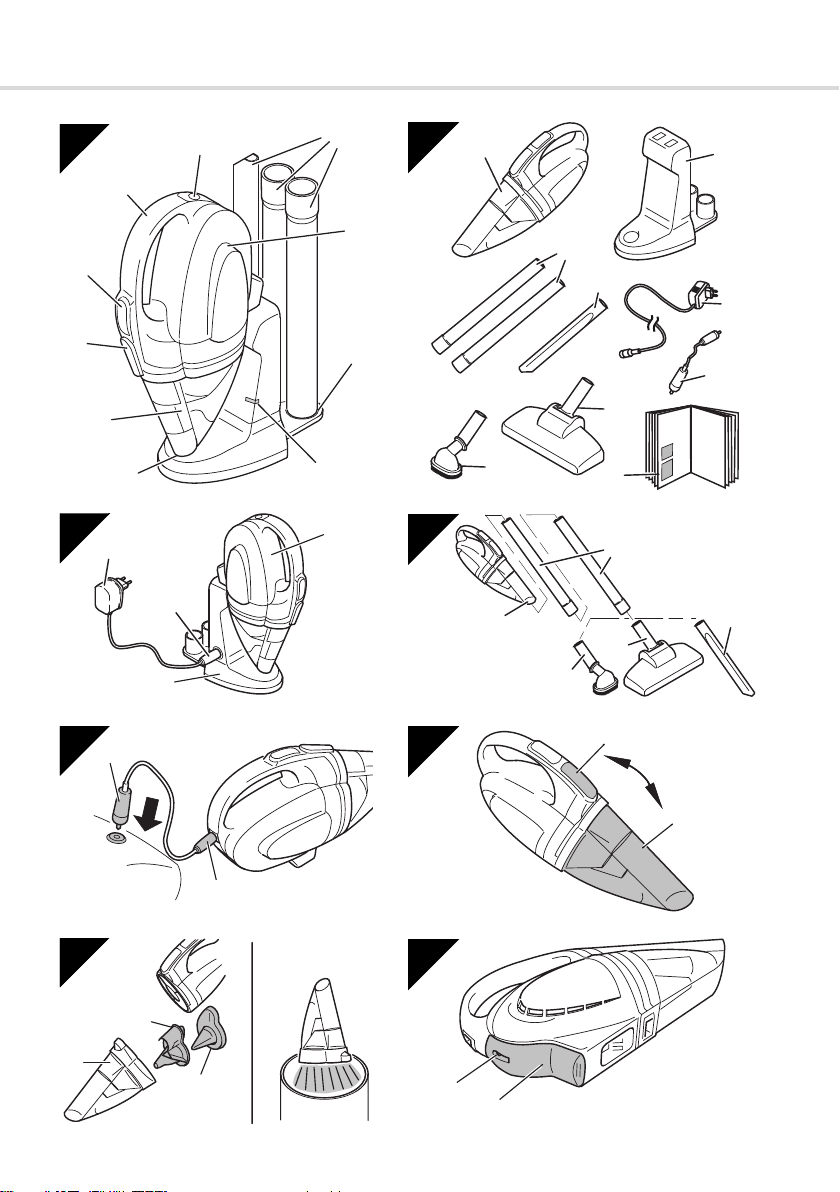
Überblick (Abb. 1):
1 Ladeleuchte
2 Zubehörhalter
3 Luftaustrittsöffnungen
4 Zubehör
5 Buchse für 12-V-Auto-Anschluss
6 Handgriff
7 Ein-/Aus-Schalter
8 Entriegelungstaste
9 Staubbehälter
10 Saugdüse
Lieferumfang (Abb. 2):
1 Akku-Handsauger
2 Ladestation
3 Steckrohre (2 Stück)
4 Fugendüse
5 Netzteil
6 12-V-Auto-Anschlusskabel
7 Möbelbürste
8 Bodendüse
9 Bedienungsanleitung
Technische Daten
Geräteart : Akku-Handsauger
Modell : Handy Duo
Netzteil : 230-240 V~, 50 Hz
Batterie : Ni-MH
Auto-Anschluss : 12 V
max. Betriebs-
dauer
Leistung : 80 W nom.
Staubbehälter : 0,3 Liter
Gewicht ohne
Ladestation
M3120 (0-9); M3121 (0-9)
15 V DC, 200 mA
10,8 V DC, 1500 mAh
Ladezeit 14-16 h
: ca. 10 min
88 W max.
auswaschbar
: ca. 1,2 kg
1 Sicherheitshinweise
1.1 zur Bedienungsanleitung
Lesen Sie diese Bedienungsanleitung vollständig durch, bevor Sie mit dem Gerät arbeiten. Bewahren Sie die Anleitung gut auf. Falls
Sie das Gerät an Dritte weitergeben, geben
Sie auch die Bedienungsanleitung mit.
Die Nichtbeachtung dieser Anleitung kann zu
schweren Verletzungen oder Schäden am
Gerät führen. Für Schäden, die aufgrund der
Nichtbeachtung dieser Bedienungsanleitung
entstehen, übernehmen wir keine Haftung.
Wichtige Hinweise für Ihre Sicherheit sind besonders gekennzeichnet. Beachten Sie diese
Hinweise unbedingt, um Unfälle und Schäden
am Gerät zu vermeiden:
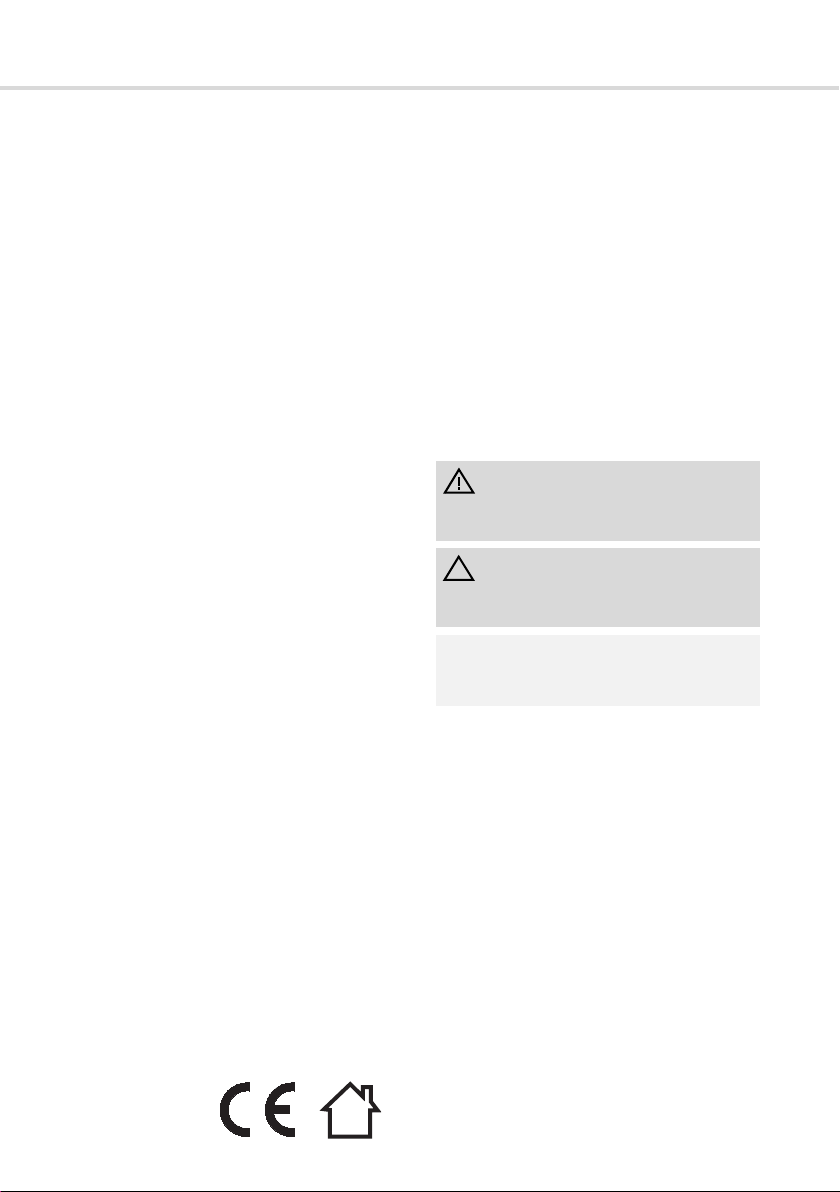
WARNUNG:
Warnt vor Gefahren für Ihre Gesundheit und
zeigt mögliche Verletzungsrisiken auf.
ACHTUNG:
Weist auf mögliche Gefährdungen für das
Gerät oder andere Gegenstände hin.
HINWEIS:
Hebt Tipps und Informationen für Sie hervor.
1.2 zu den Akkus
Das Gerät enthält wiederaufladbare NickelMetallhydrid-Akkus.
Die Akkus nicht ins Feuer werfen oder ho-
hen Temperaturen aussetzen. Es besteht Explosionsgefahr.
Bei falscher Anwendung kann Flüssigkeit
aus dem Akku austreten. Diese kann zu
Hautreizungen führen. Vermeiden Sie den
Kontakt mit der Flüssigkeit. Bei Kontakt die
Flüssigkeit mit viel Wasser abspülen. Wenn
die Flüssigkeit in die Augen gelangt, sofort 10
min. mit Wasser ausspülen und unverzüglich
einen Arzt aufsuchen.
Sollte es erforderlich sein, die Akkus auszu-
tauschen, wenden Sie sich an einen Fachhändler oder den Royal Appliance Kundendienst.
Für Schäden durch unsachgemäß ausgetauschte Akkus übernehmen wir keine Haftung.
4
Page 5

1 Sicherheitshinweise
1.3 zur Stromversorgung
Das Gerät wird mit elektrischem Strom
aufgeladen und betrieben, dabei besteht
grundsätzlich die Gefahr eines elektrischen
Schlags. Achten Sie daher besonders auf Folgendes:
- Fassen Sie das Netzteil niemals mit nassen Händen an.
- Wenn Sie das Netzteil aus der Steckdose
herausziehen wollen, ziehen Sie immer
direkt am Stecker. Ziehen Sie niemals am
Kabel, es könnte reißen.
- Achten Sie darauf, dass das Stromkabel
nicht geknickt, eingeklemmt, überfahren
wird oder mit Hitzequellen in Berührung
kommt.
- Tauchen Sie das Gerät niemals in Wasser oder andere Flüssigkeiten und halten
Sie es von Regen und Nässe fern.
- Laden Sie das Gerät nur, wenn die auf
dem Netzteil angegebene elektrische
Spannung mit der Spannung Ihrer Steckdose übereinstimmt. Eine falsche Spannung kann das Netzteil zerstören.
1.4 zu Kindern
Dieses Gerät ist nicht dafür bestimmt,
durch Personen (einschließlich Kinder) mit
eingeschränkten physischen, sensorischen
oder geistigen Fähigkeiten oder mangels Erfahrung und/oder mangels Wissen benutzt zu
werden, es sei denn, sie werden durch eine
für ihre Sicherheit zuständige Person beaufsichtigt oder erhielten von ihr Anweisungen,
wie das Gerät zu benutzen ist. Bewahren Sie
das Gerät für diesen Personenkreis unzugänglich auf.
Kinder sollten beaufsichtigt werden, um
sicherzustellen, dass sie nicht mit dem Gerät
spielen.
Verpackungsmaterialien dürfen nicht zum
Spielen verwendet werden. Es besteht Erstickungsgefahr.
1.5 zur bestimmungsgemäßen
Verwendung
Das Gerät darf nur im Haushalt eingesetzt
werden. Es ist für eine gewerbliche Nutzung
nicht geeignet.
Der Akku-Handsauger ist ausschließlich
für das Aufsaugen kleiner Mengen Staub zu
verwenden. Jede weitere Verwendung gilt als
nicht bestimmungsgemäß und ist untersagt.
Insbesondere die im Folgenden aufgeführten Tätigkeiten dürfen auf keinen Fall mit
dem Akku-Handsauger ausgeführt werden:
Das Saugen von:
- glühender Asche, brennenden Zigaretten oder Streichhölzern. Es kann zum
Brand kommen.
- spitzen Gegenständen, wie Glassplittern, Nägeln etc. Dadurch kann das Gerät beschädigt werden.
- Wasser und anderen Flüssigkeiten, insbesondere feuchten Teppich-Reinigungsmitteln. Feuchtigkeit im Inneren
kann zum Kurzschluss führen.
- Toner (für Laserdrucker, Kopierer etc.).
Es besteht Brand- und Explosionsgefahr.
- Bauschutt, Gips, Zement, feinstem
Bohrstaub, Schminke usw. Dadurch
kann das Gerät beschädigt werden.
- Haaren, Fingern und anderen Körperteilen. Sie könnten eingezogen werden
und Verletzungen hervorrufen.
Die Verwendung in der Nähe von explo-
siven oder leicht entzündlichen Stoffen. Es
besteht Brand oder Explosionsgefahr.
Die Verwendung im Freien. Es besteht die
Gefahr, dass Regen und Schmutz das Gerät
zerstören.
Das Hineinstecken von Gegenständen in
die Öffnungen des Gerätes. Es könnte überhitzen.
1.6 falls das Gerät defekt ist
Betreiben Sie niemals ein defektes Gerät
oder ein Gerät mit einem defekten Kabel.
Wenn die Anschlussleitung dieses Gerätes
beschädigt wird, muss sie durch den Hersteller oder seinen Kundendienst oder eine ähnlich qualifizierte Person ersetzt werden, um
Gefährdungen zu vermeiden.
Geben Sie ein defektes Gerät zur Repara-
tur an einen Fachhändler oder den Royal
pliance Kundendienst (ZKapitel 6,
„Garantie“).
Ap-
DE
5
Page 6

2 Auspacken / Anschließen
2 Auspacken / Anschließen
2.1 Auspacken
Packen Sie das Gerät und alle Zubehörteile
aus und überprüfen Sie den Inhalt auf Vollständigkeit.
ACHTUNG:
Transportieren/versenden Sie das Gerät
grundsätzlich immer in der Originalverpackung, damit es keinen Schaden nimmt.
Heben Sie dazu die Verpackung auf.
Entsorgen Sie nicht mehr benötigtes Verpackungsmaterial entsprechend den in Ihrem
Land geltenden Vorschriften.
HINWEIS:
Sollten Sie einen Transportschaden bemerken, wenden Sie sich umgehend an Ihren
Händler.
2.2 Montieren
1. Setzen Sie den Akku-Handsauger
(Abb. 3/1) in die Ladestation (Abb. 3/2).
2. Verstauen Sie das Zubehör (Abb. 1/4) zur
Aufbewahrung wie dargestellt in den Zubehörhaltern (Abb. 1/2).
2.3 Akku laden
ACHTUNG:
Verwenden Sie zum Laden der Akkus nur
das mitgelieferte Ladegerät. Bei Missachtung können Schäden am Gerät auftreten
oder die Akkus schwer beschädigt werden.
Bevor Sie mit dem Gerät arbeiten können,
muss der Akku geladen werden. Dazu:
1. Schließen Sie das Netzteil zunächst an
der Ladestation an (Abb. 3/3).
2. Stecken Sie dann das Netzteil (Abb. 3/4)
in die Steckdose .
Die Ladeleuchte (Abb. 1/1) leuchtet.
3. Lassen Sie den Akku nun 14-16 Stunden
laden.
ACHTUNG:
Vermeiden Sie längere Ladezeiten. Diese
verkürzen die Lebensdauer des Akkus. Bei
Missachtung können Schäden am Gerät
auftreten oder die Akkus schwer beschädigt
werden.
4. Ziehen Sie nach dem Laden das Netzteil
zunächst aus der Steckdose und dann
aus der Ladestation.
HINWEIS:
Laden Sie den Akku erst wieder auf, wenn
dieser vollständig leer ist. So erhöhen Sie
seine Lebensdauer.
2.4 Weitere Düsen (Zubehör) verwenden
Mit den im Lieferumfang enthaltenen Düsen
und den beiden Steckrohren (Abb. 4/2) lässt
sich der Akku-Handsauger vielseitig verwenden.
WARNUNG:
Schalten Sie den Akku-Handsauger aus,
bevor Sie das Zubehör montieren oder
abnehmen.
Das Zubehör können Sie einfach in die
Saugdüse (Abb. 4/1) einstecken und beliebig
kombinieren (Abb. 4).
Verwenden Sie das Zubehör wie folgt:
- Möbelbürste (Abb. 4/3)
Benutzen Sie diese, um Staub von Gegenständen zu saugen, die empfindliche Oberflächen haben (z. B. Schränke, Tische).
- Bodendüse (Abb. 4/4)
Eignet sich zum Saugen von Teppich
und Hartböden. In Verbindung mit den
zwei Steckrohren können Sie den Handy Duo wie einen Stielsauger verwenden.
- Fugendüse (Abb. 4/5)
Benutzen Sie diese, um Staub aus
schwer zugänglichen Stellen zu saugen.
6
Page 7

3 Bedienung
3 Bedienung
3.1 Saugen
.
WARNUNG:
Prüfen Sie den Akku-Handsauger vor jeder
Benutzung. Ein beschädigtes Gerät darf
nicht verwendet werden. Es besteht Verletzungsgefahr.
1. Nehmen Sie den Akku-Handsauger aus
der Ladestation.
2. Schalten Sie den Akku-Handsauger am
Ein-/Aus-Schalter (Abb. 1/7) ein.
ACHTUNG:
Achten Sie darauf, dass die Luftaustrittsöffnungen (Abb. 1/3) frei sind. Die Saugwirkung lässt sonst stark nach.
3. Bei Bedarf können Sie zum Saugen auch
das Zubehör verwenden ZKapitel 2.4,
„Weitere Düsen (Zubehör) verwenden“.
3.2 Abstellen
1. Setzen Sie den Akku-Handsauger nach
dem Saugen wieder in die Ladestation.
2. Verstauen Sie nicht mehr benötigtes Zu-
behör in den Zubehörhaltern.
ACHTUNG:
Stellen Sie das Gerät nie direkt neben Wärmequellen ab (z.B. Heizung, Ofen). Vermeiden Sie direkte Sonneneinstrahlung. Die
Hitze kann das Gerät beschädigen.
Wenn Sie das Gerät längere Zeit lagern
möchten, leeren Sie den Staubbehälter und
reinigen Sie ihn. Bewahren Sie das Gerät in
einem kühlen, trockenen Raum auf.
3.3 Betrieb im Auto
Mit dem 12-V-Auto-Anschluss können Sie
den Akku-Handsauger am 12-V-Anschluss
Ihres Autos (z. B. am Zigarettenanzünder) betreiben (nicht laden). Dabei entlädt sich der
Akku nicht, so dass Sie beliebig lange saugen
können.
WARNUNG:
Benutzen Sie den Akku-Handsauger niemals während der Fahrt. Parken Sie das
Auto vor der Benutzung und stellen Sie den
Motor ab.
1. Schließen Sie das 12-V-Auto-Anschluss-
kabel zunächst an den Akku-Handsauger
an (Abb. 5/1). Beachten Sie, dass sich der
Stecker nur in einer Richtung einstecken
lässt.
2. Stecken Sie dann das 12-V-Auto-An-
schlusskabel in eine passende 12-VBuchse (z. B. Zigarettenanzünder) des
Autos (Abb. 5/2).
3. Sie können den Akku-Handsauger nun
verwenden.
4. Ziehen Sie nach der Benutzung das 12-V-
Auto-Anschlusskabel zunächst aus der
12-V-Buchse des Autos und dann aus
dem Akku-Handsauger.
3.4 Staubbehälter ausleeren
Leeren Sie den Staubbehälter regelmä-
ßig.
ACHTUNG:
Bevor Sie den Staubbehälter leeren, schalten Sie das Gerät aus.
1. Halten Sie den Staubbehälter (Abb. 6/2)
mit einer Hand fest. Drücken Sie nun die
Entriegelungstaste (Abb. 6/1), um den
Staubbehälter zu entnehmen.
2. Zum Entleeren halten Sie den Staubbe-
hälter tief über einen Mülleimer.
3. Entnehmen Sie die Filtereinsätze (Abb. 7/
1 und 2) und schütten Sie den Staub in
den Mülleimer (Abb. 7/b).
4. Klopfen Sie Staubrückstände vorsichtig
aus.
5. Stecken Sie die Filtereinsätze (Abb. 7/1
und 2) wieder in den Staubbehälter
(Abb. 7/3).
6. Setzen Sie den Staubbehälter (Abb. 6/2)
mit der unteren Öse an den AkkuHandsauger an und führen Sie beide oben
zusammen. Sie rasten hörbar ein.
DE
7
Page 8

4Wartung
4Wartung
4.1 Filter reinigen
Der Akku-Handsauger besitzt die folgenden
Filtereinsätze:
- Vorfilter (Abb. 7/1): Verhindert, dass
größere Partikel den Dauerfilter verschmutzen.
- Dauerfilter (Abb. 7/2): Filtert feinste Partikel aus der eingesaugten Luft.
Die Filtereinsätze können nach einiger
Zeit verstopfen und so die Saugleistung reduzieren. Deshalb ist es wichtig, dass die Filtereinsätze regelmäßig gereinigt werden.
Falls Sie feststellen, dass ein Filtereinsatz
beschädigt ist, ersetzen Sie diesen umgehend.
HINWEIS:
Wir empfehlen, die Filtereinsätze regelmäßig auszutauschen.
1. Schalten Sie das Gerät aus und beachten
Sie die Hinweise unter ZKapitel 3.2,
„Abstellen“.
2. Leeren Sie den Staubbehälter und ent-
nehmen Sie die Filtereinsätze, ZKapitel
3.4, „Staubbehälter ausleeren“, Punkt 1-2.
3. Klopfen Sie die Filtereinsätze zur Grobrei-
nigung über einem Mülleimer aus.
4. Bürsten Sie Gewebe und Kunststoffteile
mit einer kleinen Bürste ab.
HINWEIS:
Falls die Filtereinsätze stark verschmutzt
sind, spülen Sie sie mit lauwarmem Wasser
aus. Lassen Sie die Filtereinsätze anschließend trocknen (ca. 15 Stunden bei Raumtemperatur). Setzen Sie sie erst ein, wenn
sie vollkommen trocken sind.
5. Setzen Sie die Filtereinsätze wieder ein.
4.2 Gehäuse reinigen
WARNUNG:
Bevor Sie das Gerät reinigen, schalten Sie
es aus.
Reinigen Sie das Gehäuse ausschließlich
mit einem leicht angefeuchteten Tuch. Verwenden Sie keine Reinigungsmittel, Scheuermittel oder Alkohol, da diese das Gehäuse beschädigen können.
8
4.3 Problembehebung
Bevor Sie das Gerät an den Royal Appliance
Kundendienst einschicken, überprüfen Sie
anhand der folgenden Tabelle, ob Sie das
Problem selbst beseitigen können.
WARNUNG:
Bevor Sie sich auf Problemsuche begeben,
schalten Sie das Gerät aus. Verwenden Sie
niemals ein defektes Gerät.
Problem mögliche Ursache
Lösung
Ladelampe (Abb. 1/
1) leuchtet
nicht
Netzteil ist nicht eingesteckt.
Netzteil einstecken.
Steckdose führt keinen Strom.
Testen Sie das Netzteil an einer
anderen Steckdose, bei der Sie
sicher sind, dass diese Strom
führt.
Gerät läuft
nicht
Gerät
nimmt keinen
Schmutz
auf
Akku leer. Akku laden,
ZKapitel 2.3, „Akku laden“.
Staubbehälter ist voll oder verstopft. Staubbehälter leeren/reinigen, ZKapitel 3.4,
„Staubbehälter ausleeren“ oder
ZKapitel 4.1, „Filter reinigen“.
4.4 Ersatzteile
Zubehörteile sowie Ersatzteile können nachbestellt werden.
Artikelnr. Beschreibung
3120001 Filterset bestehend aus
0030011 1 Bodendüse
0030012 2-teiliges Rohrset
Diese erhalten Sie:
im Dirt Devil Onlineshop unter
www.dirtdevil.de
oder bei den Firmen
Service-Versand Ina Riedmüller
Frankenstraße 34
89233 Neu-Ulm
Deutschland
Tel.: 07307 - 51 75
Fax: 07307 - 41 56
Riedmueller.service@t-online.de
1 Vorfilter + 1 Motorfilter
Service-Versand Feuerbach KG
Corneliusstraße 75
40215 Düsseldorf
Deutschland
Tel.: 0211 - 38 10 07
Fax: 0211 - 37 04 97
Staubsaugercenter@t-online.de
Page 9

5 Entsorgung
5 Entsorgung
ACHTUNG:
Gefahr von Umweltschäden! Das Gerät
enthält Akkus, die nicht in den Hausmüll
gelangen dürfen. Geben Sie das Gerät und
den ausgebauten Akku separat zur Entsorgung an die entsprechenden Sammelstellen, an Ihren Händler oder direkt an Royal
Appliance.
Elektrische Abfälle dürfen nicht
zusammen mit Haushaltsabfällen entsorgt werden. Wenden
Sie sich für Ratschläge bezüglich des Recyclings an Ihre
Kommunalbehörde oder Ihren
Händler.
Wenn das Gebrauchsende des Geräts, insbesondere des Akkus, erreicht ist oder wenn
etwa Funktionsstörungen auftreten, machen
Sie das ausgediente Gerät unbrauchbar, indem Sie den Akku ausbauen.
5.1 Ausbauen des Akkus
WARNUNG:
Verletzungsgefahr durch unsachgemäßen
Umgang mit Akkus!
Schließen Sie den Akku niemals kurz,
d. h. berühren Sie niemals beide Pole zur
gleichen Zeit, insbesondere nicht mit elektrisch leitenden Gegenständen.
Nehmen Sie den Akku niemals ausein-
ander.
Setzen Sie den Akku niemals hohen
Temperaturen aus.
Bei unsachgemäßem Umgang kann
Flüssigkeit aus dem Akku austreten. Diese
kann zu Hautreizungen führen. Vermeiden
Sie den Kontakt mit der Flüssigkeit.
Sollte es erforderlich sein, den Akku
auszutauschen, wenden Sie sich an einen
Fachhändler oder den Royal ApplianceKundendienst.
Ersetzen Sie den Akku niemals selbst.
Ersetzen Sie den Akku erst recht nicht durch
andere Akkus oder Batterien.
WARNUNG:
Gefahr eines elektrischen Schlages!
Bevor Sie den Akku ausbauen, stellen Sie
sicher, dass:
das Gerät Netzteil nicht eingesteckt ist,
der Akku leer gelaufen ist und
das Gerät ausgeschaltet ist.
1. Betreiben Sie das Gerät so lange, bis der
Akku völlig leergelaufen ist und der Motor
des Geräts stoppt.
2. Lösen Sie die Schraube an der Rückseite
des Geräts (Abb. 8/2) mit einem
Schraubendreher.
3. Nehmen Sie die Abdeckung ab (Abb. 8/1).
4. Entnehmen Sie den ausgedienten Akku
aus dem Akkufach.
5. Setzen Sie die Abdeckung wieder auf und
schrauben Sie die Schraube an der Rückseite des Geräts wieder fest.
6. Geben Sie das Gerät und den ausge-
bauten Akku nun separat zur Entsorgung
an die entsprechenden Sammelstellen, an
Ihren Händler oder direkt an Royal Appliance.
DE
9
Page 10

6 Garantie
0180 501 50 50*
In Deutschland stehen wir Ihnen
für Fragen, Anregungen oder bei
Problemen gerne zur Verfügung.
Mo.-Fr. 8-20 Uhr
*0,14€/Min. aus dem deutschen Festnetz
(deutscher Mobilfunkhöchstpreis 0,42€ /Min.)
SERVICE- HOTLINE
6 Garantie
Wir übernehmen für das von uns vertriebene Gerät eine Garantie von 24 Monaten
ab Kaufdatum.
Innerhalb dieser Garantiezeit beseitigen wir
nach unserer Wahl durch Reparatur oder
Austausch des Gerätes oder des Zubehörs
(Schäden an Zubehörteilen führen nicht automatisch zum Umtausch des kompletten Gerätes) unentgeltlich alle Mängel, die auf Material- oder Herstellungsfehlern beruhen.
Von der Garantie sind Schäden ausgenommen, die auf unsachgemäßen Gebrauch (Betrieb mit falscher Stromart/-spannung, Anschluss an ungeeignete Stromquellen, Bruch
etc.) zurückzuführen sind, normaler Verschleiß und Mängel, die den Wert oder die
Gebrauchstauglichkeit des Gerätes nur unerheblich beeinflussen. Bei Eingriffen durch
eine nicht von uns autorisierte Stelle oder bei
Verwendung anderer als original Royal
ance Ersatzteile erlischt die Garantie.
Verschleißteile fallen nicht unter die Garantie
und sind deshalb kostenpflichtig!
Die Garantie tritt nur in Kraft, wenn das Kaufdatum durch Stempel und Unterschrift des
Händlers auf der Garantiekarte bestätigt ist
oder eine Rechnungskopie dem eingeschickten Gerät beiliegt. Garantieleistungen bewirken weder eine Verlängerung der Garantiezeit, noch beginnt dadurch ein Anspruch auf
eine neue Garantie!
Versenden Sie das Gerät mit entleertem
Staubbehälter und einer kurzen Fehlerbeschreibung in Blockschrift. Versehen Sie das
Anschreiben mit dem Vermerk „Zur Garantie“.
Senden Sie es zusammen mit der Garantiekarte oder einer Rechnungskopie an folgende
Adresse:
Appli-
Royal Appliance International GmbH
Abt. Kundenservice
Itterpark 5-7
40724 Hilden
Deutschland
Tel.: +49 (0) 2103 - 20 07 10
Fax: +49 (0) 2103 - 20 07 77
www.dirtdevil.de
10
Page 11

1 Safety instructions
Many thanks!
We are pleased that you decided on the
Handy Duo battery powered hand-held
vacuum cleaner! We hope you enjoy using
your appliance and we would like to thank you
for your purchase!
Overview (Fig. 1):
1 Charging light
2 Accessories container
3 Air outlet openings
4 Accessories
5 Socket for the 12 V car connection
6 Handle
7 On/off button
8 Release button
9 Dust container
10 Suction nozzle
Scope of delivery (Fig. 2):
1 Battery powered hand-held vacuum cleaner
2 Charging station
3 Insert tubes (2 items)
4 Crevice nozzle
5 Power unit
6 12 V car connection cable
7 Furniture brush
8 Floor nozzle
9 Operating Manual
1 Safety instructions
1.1 Regarding the operating
manual
Read this operating manual through
completely before working with the appliance.
Keep the operating manual safe. If you pass
the appliance on to a third party, give them the
operating manual as well.
Non-compliance with these instructions
can lead to serious injuries or damage to
the appliance. We assume no liability for
damage that occurs as a result of noncompliance with this operating manual.
Important notes for your safety are especially
marked. You must observe these instructions
to avoid accidents and damage to the
appliance:
WARNING:
Warns against hazards for your health and
indicates possible risks of injury.
ATTENTION:
Indicates possible hazards for the appliance
or other objects.
NOTE:
Highlights tips and information for you.
GB
Technical data
Type of appliance :Battery powered hand-
held vacuum cleaner
Model : Handy Duo
M3120 (0-9); M3121 (0-9)
Power unit : 230-240 V~, 50 Hz
15 V DC, 200 mA
Battery : Ni-MH
10.8 V DC, 1500 mAh
Charging time 14-16 hrs.
Car connection : 12 V
Max. operating
time
Output : 80 W nom., 88 W max.
Dust container : 0.3 litre, washable
weight without
charging station
: approx. 10 min
: approx. 1.2 kg
1.2 Regarding the batteries
The appliance contains rechargeable nickel
metal hydride (NiMh) batteries.
Do not throw the batteries into fire or
subject to high temperatures. There is a risk of
explosion.
If used wrongly, fluid can leak from the
battery. This can cause skin irritations. Avoid
any contact with the fluid. If you experience
contact with the fluid, rinse with lots of water.
If the fluid comes into contact with your eyes,
rinse immediately for 10 min. with water and
find a doctor straightaway.
If it is necessary to replace the batteries,
contact a specialist dealer or Royal
Customer Services. We assume no liability for
any damage resulting from improperly
replaced batteries.
Appliance
11
Page 12

1 Safety instructions
1.3 Regarding the power supply
The appliance is charged and operated
with electrical power which means there is in
principle a risk of electric shock. Pay particular
attention to the following:
- Never touch the power unit with wet
hands.
- If you want to pull the power unit out of the
socket, always pull directly on the plug.
Never pull on the cable as it could break.
- Make sure that the power cable is not
bent, caught or run over, and that it does
not come into contact with heat sources.
- Never immerse the appliance in water or
other fluids and keep it away from rain
and moisture.
- Only charge the appliance if the electrical
voltage stated on the power unit matches
the voltage of your socket. Wrong voltage
can destroy the power unit.
1.4 Regarding children
This appliance is not intended to be used
by persons (including children) with impaired
physical, sensorial or mental abilities and/or
insufficient experience or knowledge, unless
they are supervised by a person responsible
for their safety or have been instructed in the
proper use of the appliance by this person.
Keep the appliance out of reach of people of
these groups.
Children should be supervised in order to
make sure that they don’t play with the
appliance.
Packing material must not be used to play
with. There is a danger of suffocation.
1.5 Regarding intended use
The appliance may only be operated in
households. It is not suitable for industrial or
commercial use.
The battery powered hand-held vacuum
cleaner must be used exclusively for
vacuuming up small quantities of dust. Any
other use is considered non-intended use and
is prohibited.
In particular, the activities listed in the
following may under no circumstances be
carried out with the battery powered handheld vacuum cleaner:
Do not vacuum:
- hot ash, burning cigarettes or matches.
These can cause fire.
- pointed objects such as, glass
fragments, nails, etc. Otherwise, the
appliance might be damaged.
- water and other fluids, especially damp
carpet cleaning agents. Internal
dampness can lead to a short-circuit.
- toner (for laser printers, copy machines,
etc.). There is a risk of fire and
explosion.
- Rubble, plaster, cement, finest drillingdust, makeup, etc. Otherwise, the
appliance might be damaged.
- hair, fingers and other body parts. They
could be pulled right in and cause
injuries.
Do not use near explosive or easily
flammable substances. There is a risk of fire
or explosion.
Do not use in the open-air. There is a risk
of the appliance being destroyed by rain and
dirt.
Do not push objects into the openings of
the appliance. It could overheat.
1.6 If the appliance is defective
Never operate a defective appliance or an
appliance with a defective cable. If the power
cord of this appliance is damaged it must be
replaced by the manufacturers, their
authorised service representative or a
similarly qualified person to avoid danger.
Bring or send defective appliances to a
specialist dealer or to Royal
Customer Services for repair (ZChapter 6,
"Warranty").
Appliance
12
Page 13

2 Unpacking / Connecting
2 Unpacking / Connecting
2.1 Unpacking
Unpack the appliance and all accessory parts
and check that the contents are complete.
ATTENTION:
Always transport/send the appliance in its
original packaging so that it does not
become damaged. Keep the packing
material for this purpose.
Dispose of any packing material that is no
longer required in accordance with the
provisions applicable in your country.
NOTE:
If you should notice damage due to
transport, then contact your dealer
immediately.
2.2 Assembly
1. Insert the battery powered hand-held
vacuum cleaner (Fig. 3/1) into the
charging station (Fig. 3/2).
2. Stow the accessories (Fig. 1/4) for
storage in the accessories containers
(Fig. 1/2) as shown.
2.3 Charge the battery
ATTENTION:
Only use the charger supplied with the
appliance for charging the battery. If this
condition is disregarded, the appliance may
incur damage or the batteries may be
severely damaged.
The battery must be charged before being
able to work with the appliance. To do this:
1. First connect the power unit to the
charging station (Fig. 3/3).
2. Then plug the power unit into the socket
(Fig. 3/4). The charging light (Fig. 1/1) is
illuminated red.
3. Now leave the battery to charge for 14-16
hours.
ATTENTION:
Avoid longer charging times. These shorten
the operating life of the battery. If this
condition is disregarded, the appliance may
incur damage or the batteries may be
severely damaged.
4. After charging, pull the power unit out of
the socket first and then out of the
charging station.
NOTE:
Only recharge the battery again if it is
completely dead. This will increase its
operating life.
2.4 Using other nozzles
(accessories)
The battery powered hand-held vacuum
cleaner can be used for many different
purposes when combined with the nozzles
included in the scope of delivery and both
insert tubes (Fig. 4/2).
WARNING:
Switch the battery powered hand-held
vacuum cleaner off before assembling or
removing the accessories.
You can simply push the accessory into
the suction nozzle (Fig. 4/1) and combine as
required (Fig. 4).
Use the accessories as follows:
- Furniture brush (Fig. 4/3)
Use this to vacuum dust off objects that
have sensitive surfaces (e.g.
cupboards, doors).
- Floor nozzle (Fig. 4/4)
This is suitable for vacuuming carpets
and hard floors. Combined with the two
insert tubes, you can use the Handy
Duo like a cylinder vacuum cleaner.
- Crevice nozzle (Fig. 4/5)
Use this to vacuum dust from hard to
reach places.
GB
13
Page 14

3 Operating
3 Operating
3.1 Vacuuming
WARNING:
Check the battery powered hand-held
vacuum cleaner before each use. A
damaged appliance must never be used.
There is a risk of injury.
1. Remove the batter powered hand-held
vacuum cleaner from the charging station.
2. Switch on the battery powered hand-held
vacuum cleaner using the on/off switch
(Fig. 1/7).
ATTENTION:
Make sure that the air outlet openings
(Fig. 1/3) are free. Otherwise the suction
power will be extremely impaired.
3. If necessary, you can also use the
accessories for vacuuming ZChapter 2.4,
"Using other nozzles (accessories)".
3.2 Putting away
1. Replace the battery powered hand-held
vacuum cleaner in the changing station
after vacuuming.
2. Stow any acessories no longer needed in
the accessory containers.
ATTENTION:
Never position the appliance directly against
heat sources (e.g. heating, oven). Avoid
direct sunlight. Heat can damage the
appliance.
If you want to store the appliance for a
longer period of time, empty the dust
container and clean it. Store the appliance in
a cool, dry room.
14
3.3 Operation in a car
With the 12 V car connection (e.g. cigarette
lighter), you can run (not charge) the battery
powered hand-held vacuum cleaner on the
12 V socket in your car. This means the
battery will not discharge and you can vacuum
for as long as you want.
WARNING:
Never use the battery powered hand-held
vacuum cleaner while driving. Park the car
and turn off the engine before use.
1. Then connect the 12 V car connection
cable to the battery powered hand-held
vacuum cleaner (Fig. 5/1). Make sure that
the plug can only be plugged in one
direction.
2. Then connect the 12 V car connection
cable to a suitable plug socket in the car
(e.g. cigarette lighter) (Fig. 5/2).
3. You can now use the battery powered
hand-held vacuum cleaner.
4. After vacuuming, disconnect the 12 V car
connection cable first from the car socket,
then from the battery-powered hand-held
vacuum cleaner.
3.4 Emptying the dust container
Empty the dust container regularly.
ATTENTION:
Switch off the appliance before emptying
the dust container.
1. Hold the dust container (Fig. 6/2) firmly with
one hand. Now press the release button
(Fig. 6/1) to remove the dust container.
2. When emptying the dust container, hold it
low over a dustbin.
3. Remove the filter inserts (Fig. 7/1 and 2)
and tip the dust into the dustbin (Fig. 7/b).
4. Carefully knock the remaining dust loose.
5. Push the filter inserts (Fig. 7/1 and 2) back
into the dust container (Fig. 7/3).
6. Place the dust container (Fig. 6/2) with the
lower lug against the battery powered
hand-held vacuum cleaner and click them
together above. They will click audibly into
place.
Page 15

4 Maintenance
4 Maintenance
4.1 Cleaning the filters
The battery powered hand-held vacuum
cleaner has the following filter inserts:
- Pre-filter (Fig. 7/1)
Prevents larger particles from blocking
the permanent filter.
- Permanent filter (Fig. 7/2)
Filters out fine particles from the
sucked-in air.
The filter inserts can become blocked after
some time and can thereby reduce the suction
power. It is therefore important that the filter
inserts are cleaned regularly.
If you determine that a filter insert is
damaged then replace it immediately.
NOTE:
We recommend that you replace the filter
inserts regularly.
1. Switch the appliance off and observe the
instructions under ZChapter 3.2, "Putting
away".
2. Empty the dust container and remove the
filter inserts, ZChapter 3.4, "Emptying the
dust container", Point 1-2.
3. Knock the filter inserts over a dustbin for a
rough clean.
4. Brush off the fabric and plastic parts with a
small brush.
NOTE:
If the filter inserts are extremely dirty, rinse
them with lukewarm water.
Then leave the filter inserts to dry (approx.
15 hours at room temperature). Only use
them again when they are completely dry.
5. Place the filter inserts inside again.
4.2 Cleaning the housing
4.3 Correcting malfunctions
Before sending the appliance to Royal
Appliance Customer Services, use the
following table to check whether you can
correct the malfunctions yourself.
WARNING:
Switch off the appliance before troubleshooting. Never use a defective appliance.
Malfunction Possible cause
Solution
Charging light
(Fig. 1/1) is
not illuminated
Appliance
does not work
Appliance
does not suck
up any dirt
Power unit has not been
inserted.
Insert power unit.
Socket does not carry any
current.
Test the power unit at
another socket which you
are sure carries current.
Battery dead.
Charge the battery,
ZChapter 2.3, "Charge the
battery".
Dust container is full or
blocked.
Empty/clean dust container,
ZChapter 3.4, "Emptying the
dust container" or ZChapter
4.1, "Cleaning the filters".
4.4 Spare parts
Item no. Description
3120001 Filter set consisting of
0030011 1 floor nozzle
0030012 2-part tube set
Accessory parts and spare parts can be
reordered Zpage 88, „International Service“.
1 pre-filter + 1 motor filter
GB
WARNING:
Switch off the appliance before cleaning it.
Only clean the housing with a slightly
damp cloth. Do not use any cleaning agent,
scouring agent or alcohol as these can
damage the housing.
15
Page 16

5 Disposal
5 Disposal
ATTENTION:
Danger of pollution! The appliance contains
rechargeable batteries that must not
disposed of in your domestic waste. Give
the appliance and the removed batteries
separately to the respective disposal points,
to your dealer or directly to Royal
Appliance.
Electrical waste must not be
disposed of with domestic
waste. Consult your local
authorities or your dealer for
advice on recycling.
When the appliance, especially
the battery, has reached the
end of its service life or when dysfunctions
recur, disable the appliance by removing the
battery.
5.1 Removing the batteries
WARNING:
Danger of injury by improper handling of
batteries!
Never short-circuit the battery, i.e. never
touch both poles simultaneously, especially
with metal objects.
Never dismantle the battery.
Never expose the battery to high
temperatures.
Improper handling can lead to liquid
leaking from the battery. This can cause
skin irritations. Avoid any contact with the
fluid.
If the battrery needs replacing, contact a
specialist dealer or Royal Appliance
Customer Services.
Never exchange the battery yourself,
and by no means replace it with batteries of
a different type.
WARNING:
Danger of electric shock!
Before removing the battery, make sure
that:
the AC adapter is not connected,
the battery is empty and
the appliance switched off.
1. Run the appliance until the battery is
completely empty and the motor stops.
2. Loosen the screw on the back side of the
appliance (Fig. 8/2) with a screwdriver.
3. Remove the cover (Fig. 8/1).
4. Remove the exhausted battery from the
battery compartment.
5. Put the cover back on and refit the
fastening-screw on the back of the
appliance.
6. Give the appliance and the removed
battery to the respective separate
disposal points, to your dealer or directly
to Royal Appliance.
16
Page 17

6 Warranty
6Warranty
We offer a warranty of 24 months from the
date of purchase for the appliances we
sell.
Within this warranty period, we will remove all
defects free of charge that are due to material
or manufacturng faults, either by repair work
or replacing the appliance or accessories, at
our discretion (damage to accessory parts
does not automatically lead to the entire
appliance being replaced). The warranty does
not cover damage due to improper use
(operating with the wrong power type/voltage,
connecting to unsuitable power sources,
breakage, etc.) normal wear and defects that
only insignificantly affect the value or the
ability of the appliance to be used.
The warranty is made null and void if any work
is carried out by a site not authorized by us or
if spare parts other than Royal
spare parts are used. Wear parts are not
included in the warranty and are therefore at
the customer's expense!
The warranty only comes into force if the
purchase date is confirmed by a stamp and
signature of the dealer on the warranty card or
if a copy of the invoice is included with the
appliance when it is sent in. Any warranty
work does not extend the warranty time nor
does it constitute a claim for a new warranty!
Send the appliance with an emptied dust
container and a short description of the fault in
block capitals. Write the comment "Regarding
warranty" on the address label. Send it
together with the warranty card or a copy of
the invoice to the following address:
Appliance
GB
Zpage 88, „International Service“
17
Page 18

International Service
International Service
DE
D
Royal Appliance International GmbH
Abt. Kundenservice
Itterpark 5-7
40724 HILDEN
DEUTSCHLAND
Tel.: +49 - 2103 - 20 07 10
Fax: +49 - 2103 - 20 07 77
www.dirtdevil.de
CZ ES FR
Le Cygne electronic service spol. s r.o.
Jablonecká 722/8
190 00 Praha 9
ČESKÁ REPUBLIKA
Tel: +420 - 28 68 83 940
Fax: +420 - 28 68 85 064
servis@lce.cz
AT
Zmugg Elektronik Service
und Vertriebges. M.b.H.
Fabriksgasse 27
8020 Graz
ÖSTERREICH
Tel: +43 - 316 - 77 21 20
Fax: +43 - 316 - 77 21 20 10
Royal Appliance Espana, SL
Royal, Dirt Devil, Stellar
C/CRONOS, Nº 20 , PORTAL 2 ,3º 13
28037 MADRID
ESPAÑA
Tel: +34 - 902 - 43 06 63
CH
Finissimo AG
Landquartstr. 32
9320 Arbon
SCHWEIZ
Tel. +41 - 71 - 227 99 93
Fax. +41 - 71 - 227 99 94
www.finissimo.ch
info@finissimo.ch
OPM France Nant’Est entreprise
33 rue du bois Briand
44316 Nantes cdx 3
FRANCE
Tel. +33 - 2 - 40 49 64 25
Fax +33 - 2 - 40 93 96 22
www.opm-france.com
HR
TD ''MEDJIMURKA'' D.D.
Trg Republike 6
40000 Čakovec
HRVATSKA
Tel.: +385 - 40 - 31 27 60
Fax: +385 - 40 - 32 86 61
HU
Aspico Kft.
Puskás Tivadar út.4.
9027 Győr
MAGYARORSZÁG
Tel.: +36 - 96 - 51 12 91
szerviz@aspico.hu
PYC RUS
ООО РТЦ "Совинсервис",
127081 г. Москва,
Ясный проезд, д. 10
РОССИЙСКАЯ ФЕДЕРАЦИЯ
Тел. +7 - 495 - 47 39 003
SK
Aspico Slovakia s r.o.
Kracanska 40/104
92901 Dunajská Streda
SLOVAKIA
Tel: +421 - 31 - 55 11 815
OOO RTC „Sovinservice“
127081 Moscow
Jasny proezd, 10
ROSSIJSKAJA FEDERAZIJA
Tel.: +7 - 495 - 47 39 003
TR
GERCEKLER ITH. IHR.
PAZ. DAGITIM LTD. STI
Egitim Mah. Kasap Ismail Cikmazi No:6/3
Hasanpasa / Kadiköy
ISTANBUL, TURKEY
Tel: +90 - 216 - 550 89 41
Fax:+90 - 216 - 550 89 43
http://www.gerceklergroup.com
NL
Z.E.S. Goes B.V.
T.a.v. afd. Service
Pearyweg 1
4462 GT Goes
NEDERLAND
Tel: +31 - 113 - 24 07 00
Fax: +31 - 113 - 24 07 50
dirtdevil@zesgoes.nl
BE
SI
Strojinc Ciril s.p.
Koseskega ul. 1a
1000 Ljubljana
SLOVENIJA
Tel: +386 -1- 42 28 489
88
Page 19

NUR GÜLTIG MIT RECHNUNGSKOPIE! • VALID ONLY INCLUDING A COPY OF THE PURCHASE SLIP!
VALABLE UNIQUEMENT AVEC UNE COPIE DE LA FACTURE! • ALLEEN GELDIG MET KOPIE VAN DE REKENING!
¡VÁLIDO SÓLO CON COPIA DE FACTURA! • ДЕЙСТВИТЕЛЬНО ТОЛЬКО С КОПИЕЙ СЧЕТА!
SADECE FATURA SURETİ İLE GEÇERLİ DİR! • PLATNOST POUZE S KOPIÍ FAKTURY!
PLATÍ IBA S KÓPIOU POKLADNIČNÉHO DOKLADU! • VELJA SAMO S KOPIJO RAČUNA!
VRIJEDI SAMO UZ PRILOŽENU KOPIJU RAČUNA! • CSAK A SZÁMLA MÁSOLATÁVAL EGYÜTT ÉRVÉNYES!
Garantiekarte
Warranty Card
Card de garantie
Garantiekaart
Handy Duo
Name • Name • Nom • Naam • Nombres y apellidos • Фамилия, имя
İsim • Jméno • Priezvisko • Ime • Ime i prezime • Név
Straße und Hausnummer • Street and house number • Rue et numéro de maison • Straat en huisnummer • Calle y número • Улица и номер дома
Sokak ve ev no • Ulice a číslo domu • Ulica a číslo domu • Ulica in hišna številka • Ulica i kućni broj • Utca és házszám
PLZ und Ort • Zip code and town • Numéro postal et lieu • Postcode en plaats • C.P. y ciudad • Индекс и населенный пункт
Posta kodu ve yer • PSČ a obec • PSČ a miesto • Poštna številka in kraj • Poštanski broj i mjesto • Irányítószám és település
E-Mail • email • Courriel • E-mail • Correo electrónico • Эл. почта
E-Posta • E-mail • Email • E-naslov • E-mail • E-mail
Certificado de garantía
Гарантийная карточка
Garanti Kartı
Záruční list
Záručný list
Garancijski list
Jamstveni list
Garanclalevěl
Telefon mit Vorwahl • Phone number (with area code) • Téléphone avec indicatif • Telefoon met kengetal • Teléfono con prefijo • Телефон с кодом • Şehirlerarası
kodla telefon • Telefon s předvolbou • Telefón s predvoľbou • Telefon s številko omrežne skupine • Broj telefona s pozivnim brojem • Telefonszám, körzetszámmal
Fehlerbeschreibung • Description of the malfunction • Description du problème
Omschrijving van de fout • Descripción del fallo • Описание неполадки • Hata tanımı
Popis závady • Popis chyby • Opis okvare • Opis neispravnosti • Hibaleírás:
_____________________________________________________________________
_____________________________________________________________________
_____________________________________________________________________
Bitte diesen Abschnitt ausschneiden und dem Gerät beilegen. • Please detach this part and send it in with the appliance.
Veuillez détacher cette partie et la joindre à l'appareil. • Dit deel a.u.b. uitknippen en bij het apparaat leggen.
Por favor, recorte este resguardo y añádelo al aparato. • Пожалуйста, вырежьте этот раздел и приложите его к прибору.
Lütfen bu bölümü kesin ve cihazın yanı na ekleyin. •Tuto část prosím odstřihně te a přiložte k přístroji.
Odstrihnite túto časť a priložte ju k prístroju. • Ta del izrežite in priložite napravi. • Izrežite ovaj odjeljak i priložite ga uređaju.
Vágja ki ezt a részt és csomagolja a készülék mellé.
 Loading...