

Page 1
Centrixx TS
Royal Appliance International GmbH
Itterpark 5-7
40724 Hilden
Germany
℡ +49 (0) 2103 - 20 07 10
+49 (0) 2103 - 20 07 77
info@dirtdevil.de
Roya-10392 • A5 • 20.03.2009
www.dirtdevil.de
Staubsauger
DE
Bedienungsanleitung
Vacuum cleaner
GB
Operating Manual
Aspirateur
FR
Mode d‘emploi
Stofzuiger
NL
Bedieningshandleiding
Aspiradora
ES
Manual de instrucciones
пылесос
RUS
Elektrikli süpürge
TR
Vysávac
CZ
Инструкция по эксплуатации
Kullanma Talimatı
Návod k obsluze
Vysávac
SK
Návod na obsluhu
Sesalnik
Sl
Navodila za uporabo
Usisavac
HR
Uputa za upotrebu
Porszívó
HU
Kezelési útmutató
Page 2
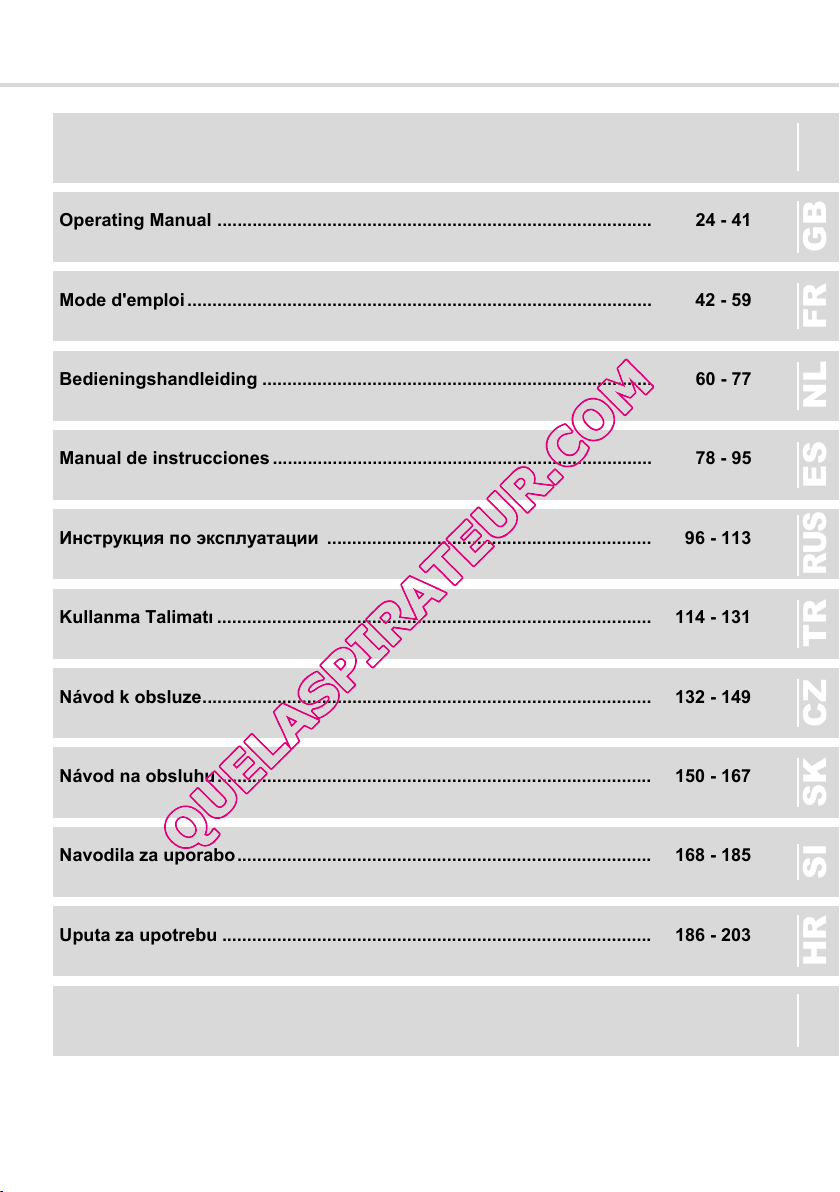
Bedienungsanleitung ................................................................................ 4 - 23
Operating Manual ....................................................................................... 24 - 41
Mode d'emploi............................................................................................. 42 - 59
Bedieningshandleiding .............................................................................. 60 - 77
Manual de instrucciones ............................................................................ 78 - 95
Инструкция по эксплуатации ................................................................. 96 - 113
Kullanma Talimatı ....................................................................................... 114 - 131
Návod k obsluze.......................................................................................... 132 - 149
DE
GBFRNLESTRCZSKSIHRHU
RUS
Návod na obsluhu....................................................................................... 150 - 167
Navodila za uporabo................................................................................... 168 - 185
Uputa za upotrebu ...................................................................................... 186 - 203
Kezelési útmutató ....................................................................................... 204 - 221
2
Page 3
D
18
19
20
21
17
16
15
5
4
14
2
1
3
6
7
9
8
10
22
Abb. 1
3
13
12
11
Page 4
Übersicht über Ihren Centrixx TS
Übersicht über Ihren Centrixx TS
Vielen Dank!
Wir danken Ihnen für den Kauf des Centrixx TS und das entgegengebrachte Vertrauen.
D
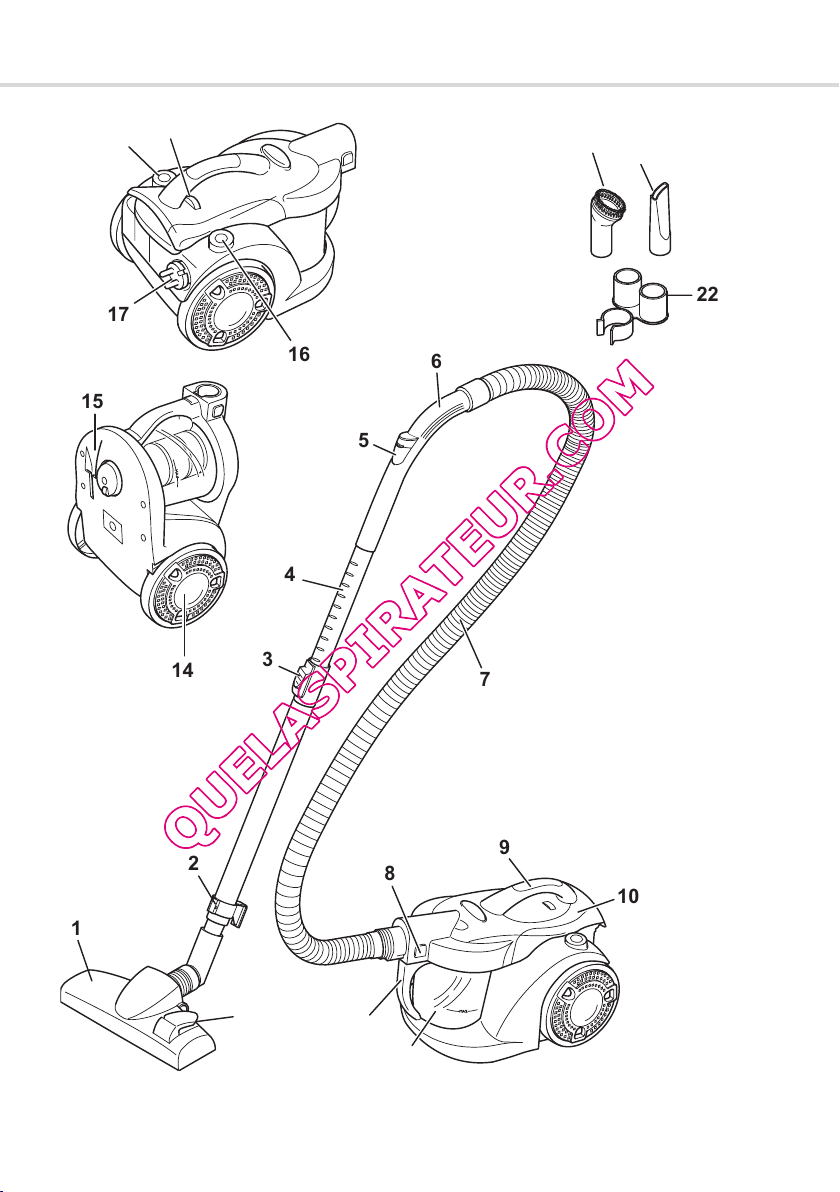
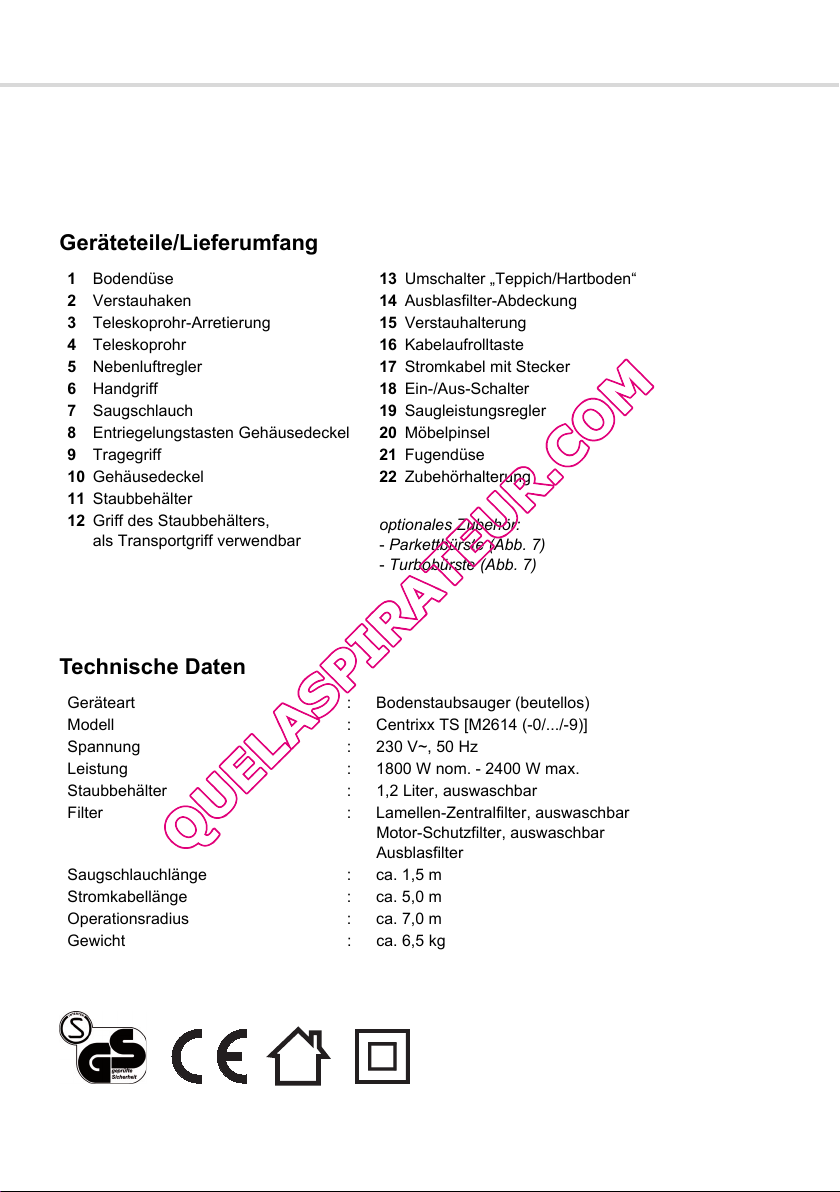
Geräteteile/Lieferumfang
1 Bodendüse
2 Verstauhaken
3 Teleskoprohr-Arretierung
4 Teleskoprohr
5 Nebenluftregler
6 Handgriff
7 Saugschlauch
8 Entriegelungstasten Gehäusedeckel
9 Tragegriff
10 Gehäusedeckel
11 Staubbehälter
12 Griff des Staubbehälters,
als Transportgriff verwendbar
13 Umschalter „Teppich/Hartboden“
14 Ausblasfilter-Abdeckung
15 Verstauhalterung
16 Kabelaufrolltaste
17 Stromkabel mit Stecker
18 Ein-/Aus-Schalter
19 Saugleistungsregler
20 Möbelpinsel
21 Fugendüse
22 Zubehörhalterung
optionales Zubehör:
- Parkettbürste (Abb. 7)
- Turbobürste (Abb. 7)
Technische Daten
Geräteart : Bodenstaubsauger (beutellos)
Modell : Centrixx TS [M2614 (-0/.../-9)]
Spannung : 230 V~, 50 Hz
Leistung : 1800 W nom. - 2400 W max.
Staubbehälter : 1,2 Liter, auswaschbar
Filter : Lamellen-Zentralfilter, auswaschbar
Motor-Schutzfilter, auswaschbar
Ausblasfilter
Saugschlauchlänge : ca. 1,5 m
Stromkabellänge : ca. 5,0 m
Operationsradius : ca. 7,0 m
Gewicht : ca. 6,5 kg
Technische und gestalterische Änderungen im Zuge ständiger Produktverbesserung vorbehalten.
© Royal Appliance International GmbH
4
Page 5
Inhaltsverzeichnis
1 Sicherheitshinweise ................................................................. 6
1.1 zur Bedienungsanleitung............................................................................................. 6
1.2 zu den verwendeten Hinweisen................................................................................... 6
1.3 zur Stromversorgung................................................................................................... 7
1.4 zu Kindern ................................................................................................................... 7
1.5 zur bestimmungsgemäßen Verwendung..................................................................... 7
1.6 bei defektem Gerät...................................................................................................... 8
2 Auspacken und Montieren....................................................... 9
2.1 Auspacken................................................................................................................... 9
2.2 Montieren..................................................................................................................... 9
2.3 Weitere Düsen (Zubehör) verwenden ......................................................................... 10
3 Bedienung ................................................................................. 12
3.1 Staubsaugen ............................................................................................................... 12
3.2 Ausschalten und Stromkabel aufrollen ........................................................................ 14
3.3 Transportieren und Aufbewahren................................................................................ 14
3.4 Staubbehälter leeren ................................................................................................... 15
4 Pflege und Reinigung ............................................................... 16
4.1 Übersicht über die Filter .............................................................................................. 16
4.2 Lamellen-Zentralfilter und Motorschutzfilter reinigen/wechseln................................... 17
4.3 Hygiene-Ausblasfilter wechseln................................................................................... 19
4.4 Gerät reinigen.............................................................................................................. 19
DE
5 Problembehebung .................................................................... 20
5.1 Bevor Sie das Gerät einsenden................................................................................... 20
5.2 Ersatzteile.................................................................................................................... 21
5.3 Entsorgung .................................................................................................................. 21
6 Garantie ..................................................................................... 22
Inhaltsverzeichnis
5
Page 6
Sicherheitshinweise
1 Sicherheitshinweise
1.1 zur Bedienungsanleitung
1.2 zu den verwendeten
Hinweisen
Lesen Sie diese Bedienungsanleitung vollständig durch,
bevor Sie mit dem Gerät arbeiten.
Bewahren Sie die Anleitung gut auf. Falls Sie das Gerät an
Dritte weitergeben, geben Sie die Bedienungsanleitung mit.
Die Nichtbeachtung dieser Anleitung kann zu
schweren Verletzungen oder Schäden am Gerät füh-
ren.
Für Schäden, die durch Nichtbeachtung dieser Bedie-
nungsanleitung entstehen, übernehmen wir keine Haftung.
Wichtige Hinweise für Ihre Sicherheit sind besonders ge-
kennzeichnet. Beachten Sie diese Hinweise unbedingt, um
Unfälle und Schäden am Gerät zu vermeiden:
WARNUNG:
Warnt vor Gefahren für Ihre Gesundheit und zeigt mög-
liche Verletzungsrisiken auf.
ACHTUNG:
Weist auf mögliche Gefährdungen für das Gerät oder
andere Gegenstände hin.
HINWEIS:
Hebt Tipps und Informationen für Sie hervor.
6
Page 7
Sicherheitshinweise
1.3 zur Stromversorgung Das Gerät wird mit elektrischem Strom betrieben, dabei
besteht grundsätzlich die Gefahr eines elektrischen
Schlags. Achten Sie daher besonders auf Folgendes:
- Fassen Sie den Stecker nie mit nassen Händen an.
- Wenn Sie den Stecker aus der Steckdose herauszie-
hen wollen, ziehen Sie immer direkt am Stecker. Zie-
hen Sie niemals am Stromkabel, es könnte beschä-
digt werden.
- Achten Sie darauf, dass das Stromkabel nicht ge-
knickt, eingeklemmt oder überfahren wird oder mit
Hitzequellen in Berührung kommt.
- Verwenden Sie nur Verlängerungskabel, die für die
Leistungsaufnahme des Gerätes ausgelegt sind.
- Tauchen Sie das Gerät niemals in Wasser oder ande-
re Flüssigkeiten und halten Sie es von Regen und
Nässe fern.
- Betreiben Sie das Gerät nur, wenn die auf dem Ty-
penschild angegebene elektrische Spannung mit der
Spannung Ihrer Steckdose übereinstimmt. Falsche
Spannung kann das Gerät zerstören.
1.4 zu Kindern Personen (einschließlich Kinder), die aufgrund ihrer
physischen, sensorischen oder geistigen Fähigkeiten oder
ihrer Unerfahrenheit oder Unkenntnis nicht in der Lage
sind, das Gerät sicher zu benutzen, sollten dieses Gerät
nicht ohne Aufsicht oder Anweisung durch eine verantwort-
liche Person benutzen. Bewahren Sie es unzugänglich auf.
Lassen Sie das Gerät nicht unbeaufsichtigt und ver-
wenden Sie es mit größter Vorsicht, wenn Kinder oder Per-
sonen, die die Gefahren nicht einschätzen können, in der
Nähe sind.
Verpackungsmaterialien dürfen nicht zum Spielen ver-
wendet werden. Es besteht Erstickungsgefahr.
DE
1.5 zur bestimmungsge-
mäßen Verwendung
Das Gerät darf nur im Haushalt eingesetzt werden.
Es ist für eine gewerbliche Nutzung nicht geeignet.
Verwenden Sie den Bodenstaubsauger ausschließlich
für das Reinigen von trocken, normal verschmutzten Böden.
Je nach Bürstaufsatz können Sie das Gerät auch zum
Reinigen von Möbeln einsetzen, bei verminderter Saugleistung sogar zum Saugen von Gardinen.
7
Page 8
Sicherheitshinweise
Jede weitere Verwendung gilt als nicht bestimmungsgemäß und ist untersagt. Verboten ist insbesondere:
Das Saugen von:
- Haaren, Fingern und anderen Körperteilen. Sie
könnten eingezogen und verletzt werden.
- Kleidungsstücken (z. B. Schuhbänder, Schals usw.).
Sie könnten eingezogen werden und Verletzungen
hervorrufen.
- Wasser und anderen Flüssigkeiten, insbesondere
feuchten Teppich-Reinigungsmitteln. Feuchtigkeit im
Inneren kann zum Kurzschluss führen.
- Toner (für Laserdrucker, Kopierer usw.). Es besteht
Brand- und Explosionsgefahr.
- glühender Asche, brennenden Zigaretten oder
Streichhölzern. Es kann zum Brand kommen.
- spitzen Gegenständen, wie Glassplittern, Nägeln
usw. Diese Gegenstände zerstören die Filter.
- Bauschutt, Gips, Zement, Schminke usw. Die Filter
können sich zusetzen.
Die Verwendung in der Nähe von explosiven oder leicht
entzündlichen Stoffen. Es besteht Brand- und Explosions-
gefahr.
Die Verwendung im Freien. Es besteht die Gefahr, dass
Regen und Schmutz das Gerät zerstören.
Das Hineinstecken von Gegenständen in die Öffnungen
des Gerätes. Es könnte überhitzen.
Das selbstständige Öffnen, Umbauen oder Reparieren
des Geräts.
1.6 bei defektem Gerät Betreiben Sie niemals ein defektes Gerät oder ein Ge-
rät mit einem defekten Stromkabel. Wenn die Anschlusslei-
tung dieses Gerätes beschädigt wird, muss sie durch den
Hersteller oder seinen Kundendienst oder eine ähnlich qua-
lifizierte Person ersetzt werden, um Gefährdungen zu ver-
meiden.
Geben Sie ein defektes Gerät zur Reparatur an einen
Fachhändler oder den Royal Appliance-Kundendienst.
Adresse ZSeite 22, „Garantie“.
8
Page 9
2 Auspacken und Montieren
Auspacken und Montieren
2.1 Auspacken 1. Packen Sie das Gerät und alle Zubehörteile aus.
2. Überprüfen Sie den Inhalt auf Vollständigkeit und Un-
versehrtheit. Informationen zum Lieferumfang
ZSeite 4, „Übersicht über Ihren Centrixx TS“.
ACHTUNG:
Transportieren/versenden Sie das Gerät grundsätzlich
immer in der Originalverpackung, damit es keinen Scha-
den nimmt. Heben Sie dazu die Verpackung auf.
Entsorgen Sie nicht mehr benötigtes Verpackungsmate-
rial gemäß den in Ihrem Land geltenden Vorschriften.
HINWEIS:
Sollten Sie einen Transportschaden bemerken, wenden
Sie sich umgehend an Ihren Händler.
2.2 Montieren
WARNUNG:
Verletzungsgefahr! Montieren Sie das Gerät nur, wenn
der Stecker aus der Steckdose ausgezogen ist. Das
Gerät könnte versehentlich eingeschaltet werden.
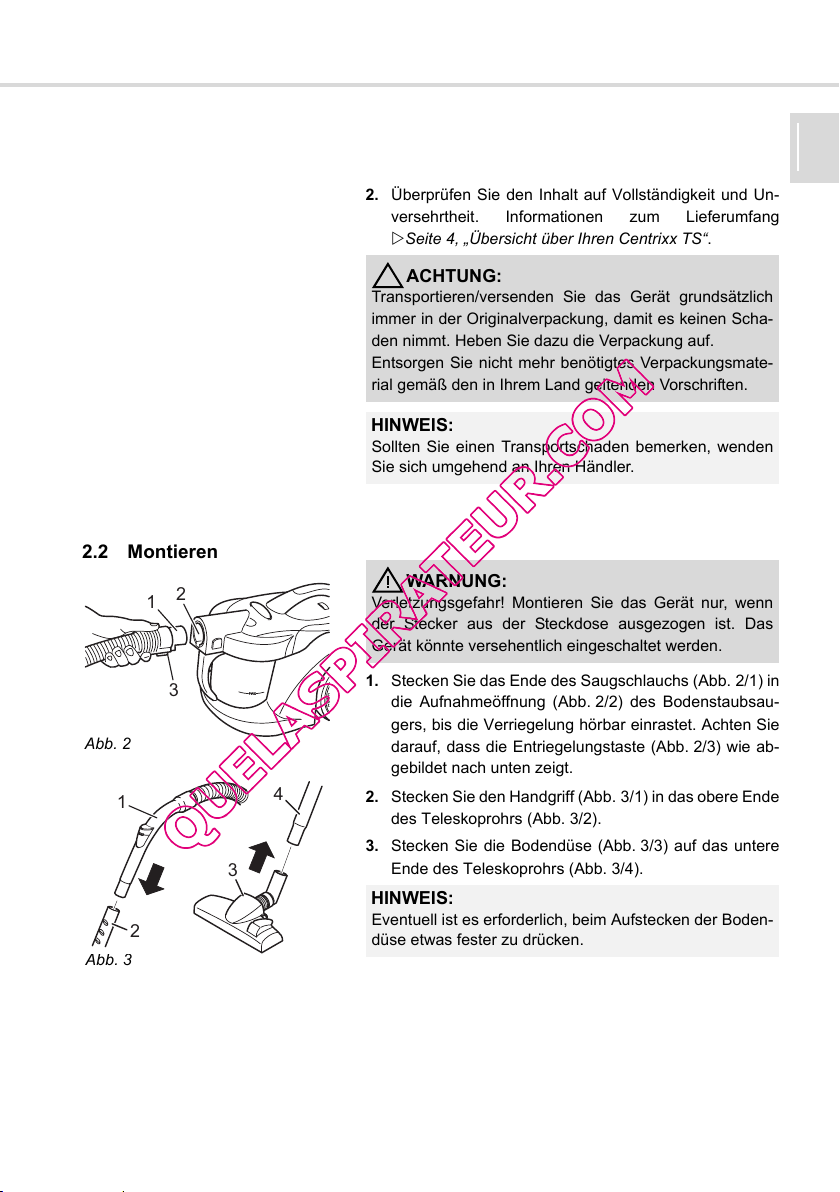
1. Stecken Sie das Ende des Saugschlauchs (Abb. 2/1) in
die Aufnahmeöffnung (Abb. 2/2) des Bodenstaubsau-
gers, bis die Verriegelung hörbar einrastet. Achten Sie
darauf, dass die Entriegelungstaste (Abb. 2/3) wie ab-
gebildet nach unten zeigt.
2. Stecken Sie den Handgriff (Abb. 3/1) in das obere Ende
des Teleskoprohrs (Abb. 3/2).
3. Stecken Sie die Bodendüse (Abb. 3/3) auf das untere
Ende des Teleskoprohrs (Abb. 3/4).
Abb. 2
2
1
3
1
4
3
HINWEIS:
2
Abb. 3
Eventuell ist es erforderlich, beim Aufstecken der Boden-
düse etwas fester zu drücken.
DE
9
Page 10
Auspacken und Montieren
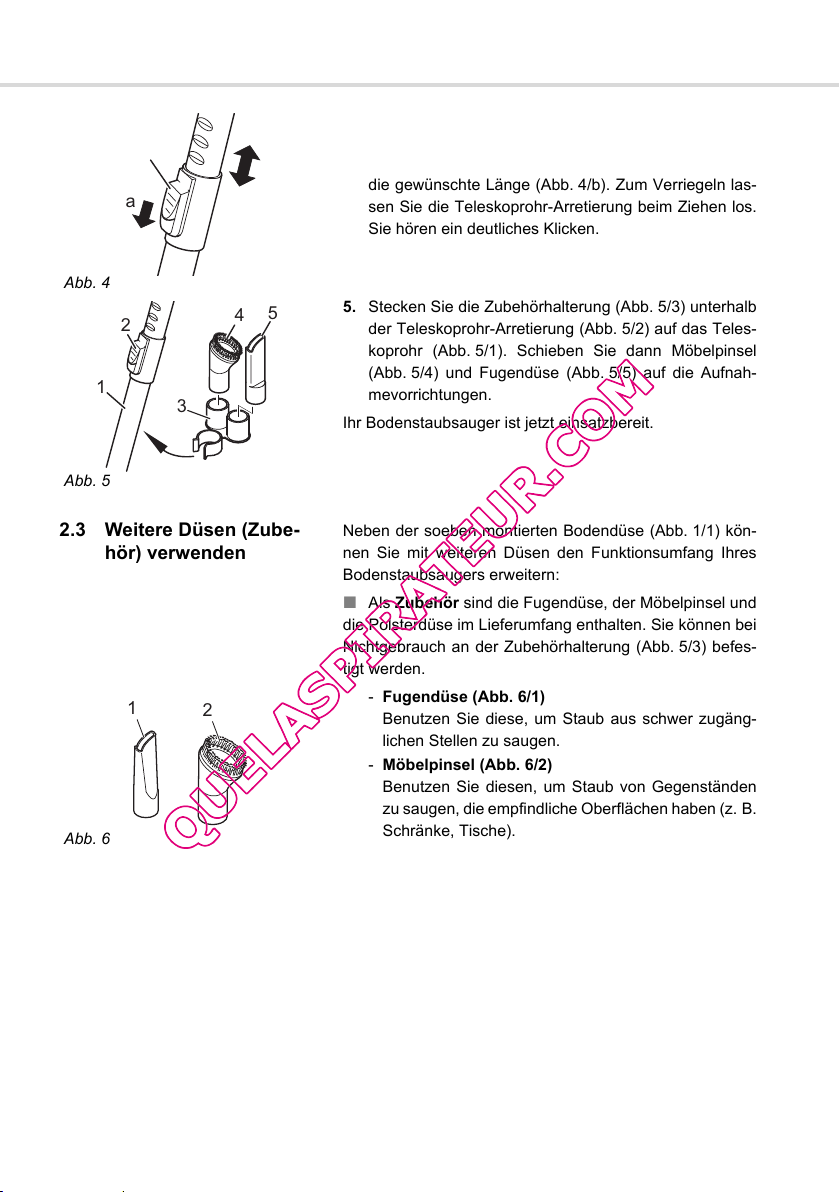
4. Stellen Sie die Länge des Teleskoprohrs ein. Drücken
Sie dazu die Teleskoprohr-Arretierung (Abb. 4/1) nach
unten (Abb. 4/a). Ziehen Sie dann das Teleskoprohr auf
die gewünschte Länge (Abb. 4/b). Zum Verriegeln las-
sen Sie die Teleskoprohr-Arretierung beim Ziehen los.
Sie hören ein deutliches Klicken.
5. Stecken Sie die Zubehörhalterung (Abb. 5/3) unterhalb
der Teleskoprohr-Arretierung (Abb. 5/2) auf das Teles-
koprohr (Abb. 5/1). Schieben Sie dann Möbelpinsel
(Abb. 5/4) und Fugendüse (Abb. 5/5) auf die Aufnah-
mevorrichtungen.
Ihr Bodenstaubsauger ist jetzt einsatzbereit.
Abb. 4
Abb. 5
1
b
a
5
2
4
1
3
2.3 Weitere Düsen (Zube-
hör) verwenden
1
Abb. 6
2
Neben der soeben montierten Bodendüse (Abb. 1/1) kön-
nen Sie mit weiteren Düsen den Funktionsumfang Ihres
Bodenstaubsaugers erweitern:
Als Zubehör sind die Fugendüse, der Möbelpinsel und
die Polsterdüse im Lieferumfang enthalten. Sie können bei
Nichtgebrauch an der Zubehörhalterung (Abb. 5/3) befes-
tigt werden.
- Fugendüse (Abb. 6/1)
Benutzen Sie diese, um Staub aus schwer zugäng-
lichen Stellen zu saugen.
- Möbelpinsel (Abb. 6/2)
Benutzen Sie diesen, um Staub von Gegenständen
zu saugen, die empfindliche Oberflächen haben (z. B.
Schränke, Tische).
10
Page 11
Auspacken und Montieren
Optional erhältlich sind weiterhin:
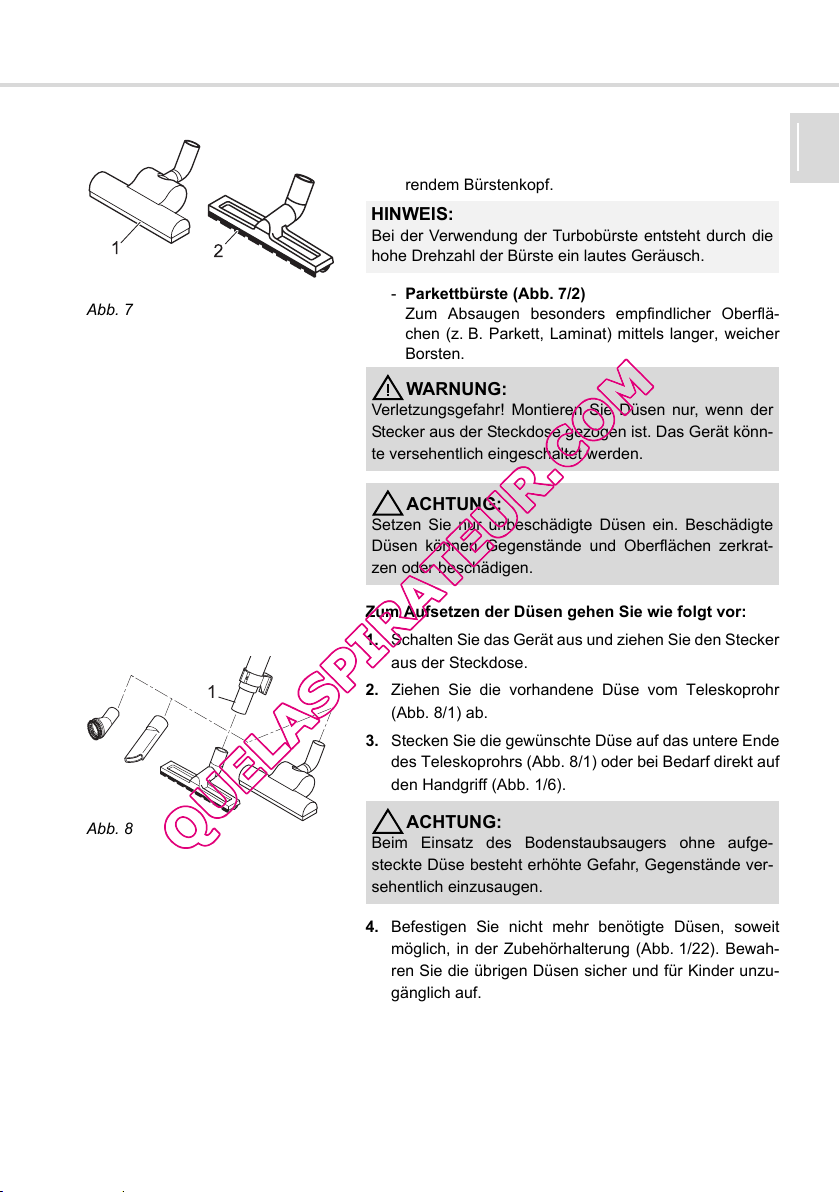
- Turbobürste (Abb. 7/1)
Zur Tiefenreinigung von Teppichen mittels rotierendem Bürstenkopf.
HINWEIS:
Bei der Verwendung der Turbobürste entsteht durch die
hohe Drehzahl der Bürste ein lautes Geräusch.
DE
Abb. 7
Abb. 8
- Parkettbürste (Abb. 7/2)
Zum Absaugen besonders empfindlicher Oberflä-
chen (z. B. Parkett, Laminat) mittels langer, weicher
Borsten.
WARNUNG:
Verletzungsgefahr! Montieren Sie Düsen nur, wenn der
Stecker aus der Steckdose gezogen ist. Das Gerät könn-
te versehentlich eingeschaltet werden.
ACHTUNG:
Setzen Sie nur unbeschädigte Düsen ein. Beschädigte
Düsen können Gegenstände und Oberflächen zerkrat-
zen oder beschädigen.
Zum Aufsetzen der Düsen gehen Sie wie folgt vor:
1. Schalten Sie das Gerät aus und ziehen Sie den Stecker
aus der Steckdose.
1
2. Ziehen Sie die vorhandene Düse vom Teleskoprohr
(Abb. 8/1) ab.
3. Stecken Sie die gewünschte Düse auf das untere Ende
des Teleskoprohrs (Abb. 8/1) oder bei Bedarf direkt auf
den Handgriff (Abb. 1/6).
ACHTUNG:
Beim Einsatz des Bodenstaubsaugers ohne aufge-
steckte Düse besteht erhöhte Gefahr, Gegenstände ver-
sehentlich einzusaugen.
4. Befestigen Sie nicht mehr benötigte Düsen, soweit
möglich, in der Zubehörhalterung (Abb. 1/22). Bewah-
ren Sie die übrigen Düsen sicher und für Kinder unzu-
gänglich auf.
11
Page 12
Bedienung
3 Bedienung
3.1 Staubsaugen .
WARNUNG:
Verletzungsgefahr! Prüfen Sie den Bodenstaubsauger
und das Stromkabel vor jeder Benutzung. Ein beschä-
digtes Gerät darf nicht verwendet werden.
WARNUNG:
Verletzungsgefahr! Achten Sie insbesondere beim Sau-
gen von Treppen/Stufen darauf, dass Sie sich stets ober-
halb des Geräts befinden.
ACHTUNG:
Verwenden Sie den Bodenstaubsauger nur, wenn alle
Filter intakt, trocken und korrekt eingesetzt sind. Stellen
Sie sicher, dass keine Öffnungen verstopft sind. Ande-
renfalls kann der Staubsauger beschädigt werden.
ACHTUNG:
Informieren Sie sich vor dem Saugen über die Ansprü-
che Ihres Bodenbelags. Beachten Sie die Empfehlungen
der Bodenbelaghersteller.
12
HINWEIS:
Ihr Bodenstaubsauger besitzt einen Überhitzungsschutz.
Er schaltet bei Überhitzung automatisch ab. Ist dies der
Fall, schalten Sie den Bodenstaubsauger aus und ziehen
Sie den Stecker. Beseitigen Sie die Überhitzungsursa-
che. Warten Sie ca. 45 min bis zum Wiedereinschalten.
Page 13
1
Abb. 9
Abb. 10
Abb. 11
1
Bedienung
1. Stecken Sie die gewünschte Düse auf, ZKapitel 2.2,
4
3
2
A
B
1
„Montieren“ bzw. ZKapitel 2.3, „Weitere Düsen
(Zubehör) verwenden“.
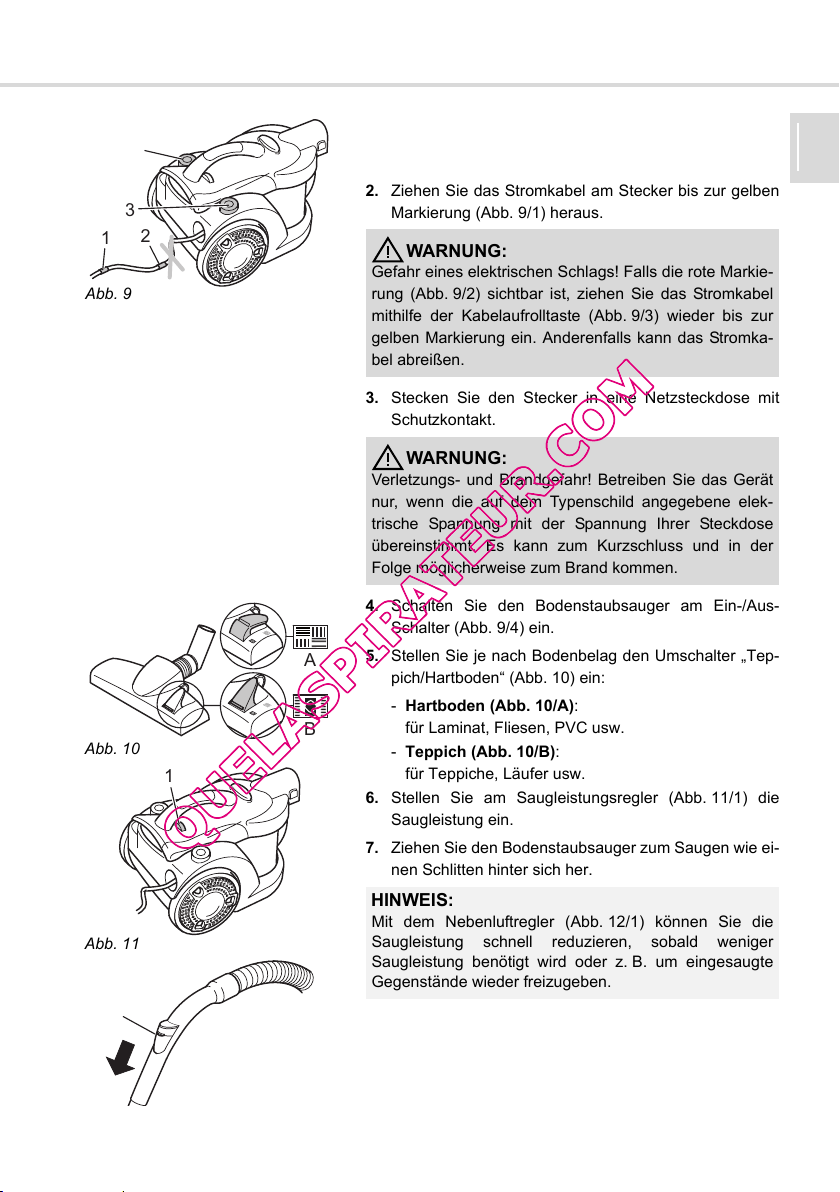
2. Ziehen Sie das Stromkabel am Stecker bis zur gelben
Markierung (Abb. 9/1) heraus.
WARNUNG:
Gefahr eines elektrischen Schlags! Falls die rote Markie-
rung (Abb. 9/2) sichtbar ist, ziehen Sie das Stromkabel
mithilfe der Kabelaufrolltaste (Abb. 9/3) wieder bis zur
gelben Markierung ein. Anderenfalls kann das Stromka-
bel abreißen.
3. Stecken Sie den Stecker in eine Netzsteckdose mit
Schutzkontakt.
WARNUNG:
Verletzungs- und Brandgefahr! Betreiben Sie das Gerät
nur, wenn die auf dem Typenschild angegebene elek-
trische Spannung mit der Spannung Ihrer Steckdose
übereinstimmt. Es kann zum Kurzschluss und in der
Folge möglicherweise zum Brand kommen.
4. Schalten Sie den Bodenstaubsauger am Ein-/Aus-
Schalter (Abb. 9/4) ein.
5. Stellen Sie je nach Bodenbelag den Umschalter „Tep-
pich/Hartboden“ (Abb. 10) ein:
- Hartboden (Abb. 10/A):
für Laminat, Fliesen, PVC usw.
- Teppich (Abb. 10/B):
für Teppiche, Läufer usw.
6. Stellen Sie am Saugleistungsregler (Abb. 11/1) die
Saugleistung ein.
7. Ziehen Sie den Bodenstaubsauger zum Saugen wie ei-
nen Schlitten hinter sich her.
HINWEIS:
Mit dem Nebenluftregler (Abb. 12/1) können Sie die
Saugleistung schnell reduzieren, sobald weniger
Saugleistung benötigt wird oder z. B. um eingesaugte
Gegenstände wieder freizugeben.
DE
Abb. 12
13
Page 14
Bedienung
3.2 Ausschalten und
Stromkabel aufrollen
1
Abb. 13
3.3 Transportieren und
Aufbewahren
1
2
Abb. 14
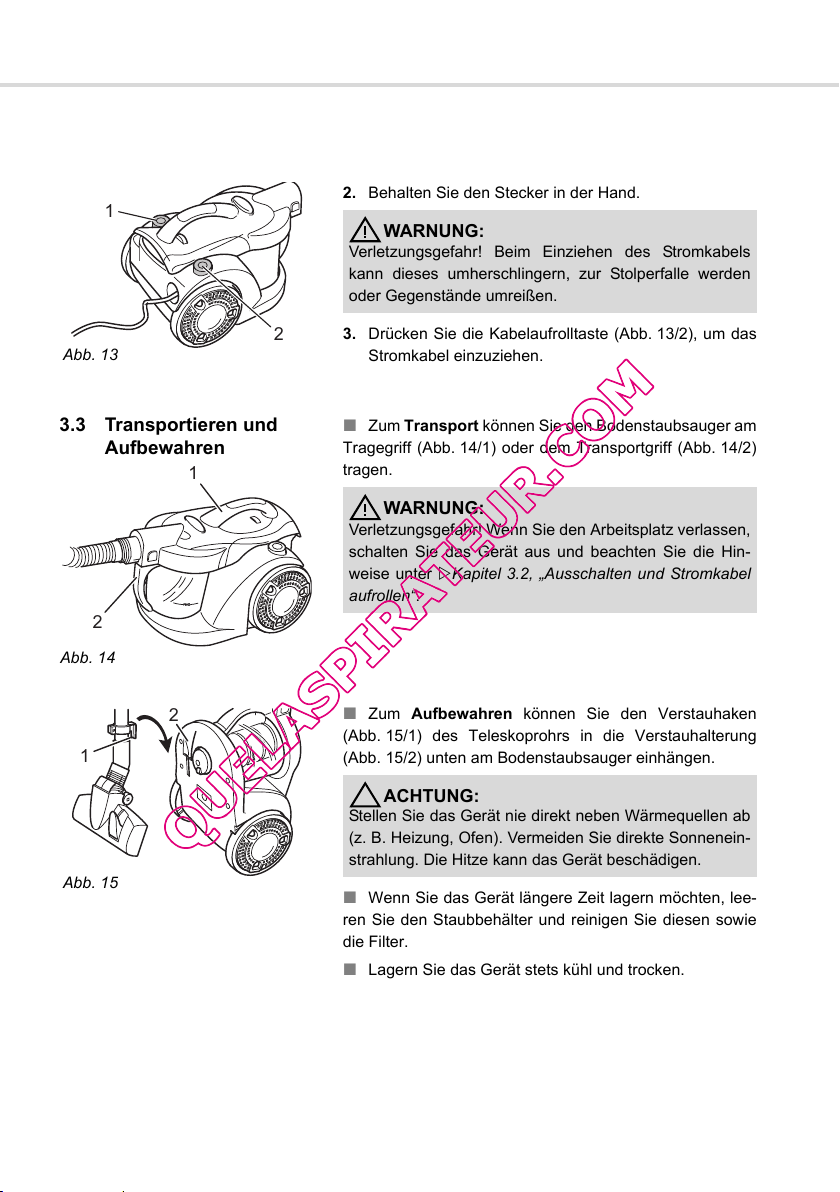
1. Schalten Sie den Bodenstaubsauger am Ein-/Aus-
Schalter (Abb. 13/1) aus und ziehen Sie den Stecker
aus der Steckdose.
2. Behalten Sie den Stecker in der Hand.
WARNUNG:
Verletzungsgefahr! Beim Einziehen des Stromkabels
kann dieses umherschlingern, zur Stolperfalle werden
oder Gegenstände umreißen.
2
3. Drücken Sie die Kabelaufrolltaste (Abb. 13/2), um das
Stromkabel einzuziehen.
Zum Transport können Sie den Bodenstaubsauger am
Tragegriff (Abb. 14/1) oder dem Transportgriff (Abb. 14/2)
tragen.
WARNUNG:
Verletzungsgefahr! Wenn Sie den Arbeitsplatz verlassen,
schalten Sie das Gerät aus und beachten Sie die Hin-
weise unter ZKapitel 3.2, „Ausschalten und Stromkabel
aufrollen“.
1
Abb. 15
14
2
Zum Aufbewahren können Sie den Verstauhaken
(Abb. 15/1) des Teleskoprohrs in die Verstauhalterung
(Abb. 15/2) unten am Bodenstaubsauger einhängen.
ACHTUNG:
Stellen Sie das Gerät nie direkt neben Wärmequellen ab
(z. B. Heizung, Ofen). Vermeiden Sie direkte Sonnenein-
strahlung. Die Hitze kann das Gerät beschädigen.
Wenn Sie das Gerät längere Zeit lagern möchten, lee-
ren Sie den Staubbehälter und reinigen Sie diesen sowie
die Filter.
Lagern Sie das Gerät stets kühl und trocken.
Page 15
Bedienung
3.4 Staubbehälter leeren Leeren Sie den Staubbehälter spätestens, wenn die
„Max“-Markierung (Abb. 16/1) erreicht ist oder die Saugwirkung nachlässt.
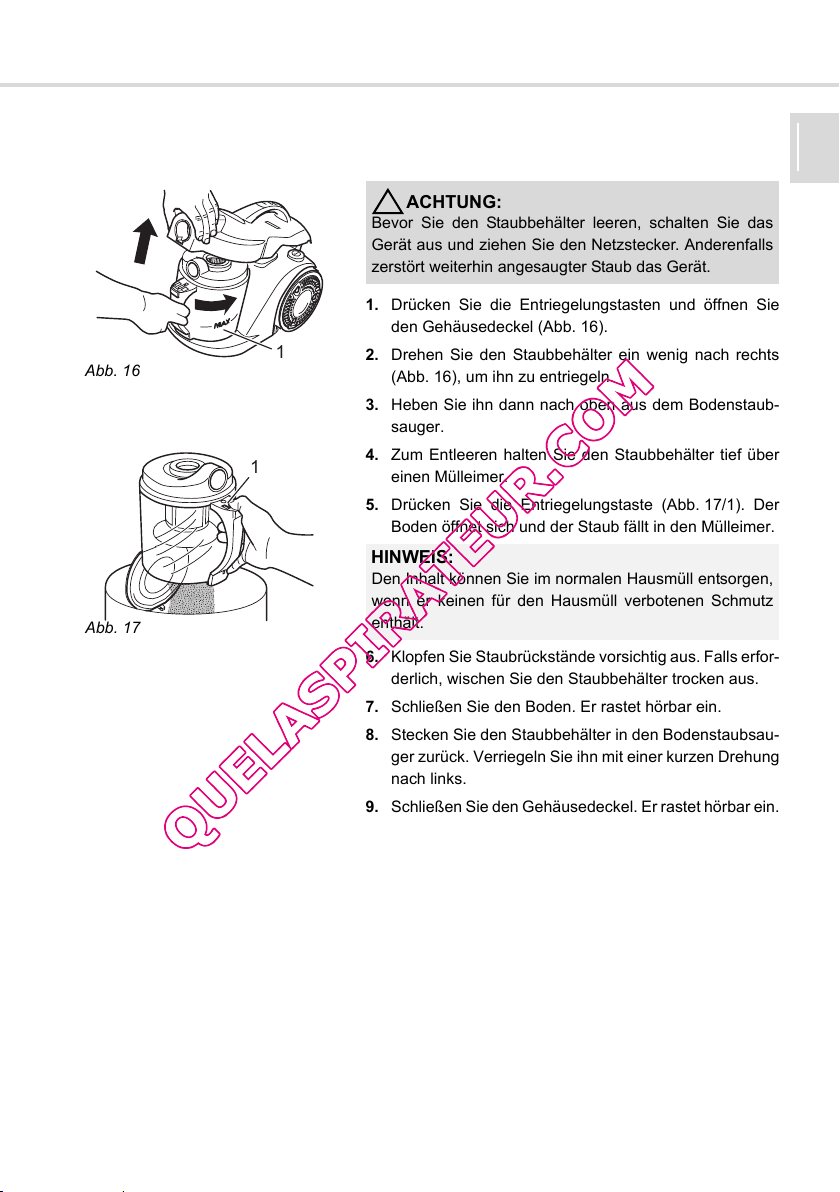
ACHTUNG:
Bevor Sie den Staubbehälter leeren, schalten Sie das
Gerät aus und ziehen Sie den Netzstecker. Anderenfalls
zerstört weiterhin angesaugter Staub das Gerät.
1. Drücken Sie die Entriegelungstasten und öffnen Sie
den Gehäusedeckel (Abb. 16).
Abb. 16
1
1
Abb. 17
2. Drehen Sie den Staubbehälter ein wenig nach rechts
(Abb. 16), um ihn zu entriegeln.
3. Heben Sie ihn dann nach oben aus dem Bodenstaub-
sauger.
4. Zum Entleeren halten Sie den Staubbehälter tief über
einen Mülleimer.
5. Drücken Sie die Entriegelungstaste (Abb. 17/1). Der
Boden öffnet sich und der Staub fällt in den Mülleimer.
HINWEIS:
Den Inhalt können Sie im normalen Hausmüll entsorgen,
wenn er keinen für den Hausmüll verbotenen Schmutz
enthält.
6. Klopfen Sie Staubrückstände vorsichtig aus. Falls erfor-
derlich, wischen Sie den Staubbehälter trocken aus.
7. Schließen Sie den Boden. Er rastet hörbar ein.
8. Stecken Sie den Staubbehälter in den Bodenstaubsau-
ger zurück. Verriegeln Sie ihn mit einer kurzen Drehung
nach links.
9. Schließen Sie den Gehäusedeckel. Er rastet hörbar ein.
DE
15
Page 16
Pflege und Reinigung
4 Pflege und Reinigung
4.1 Übersicht über die Filter
2
1
3
Abb. 18
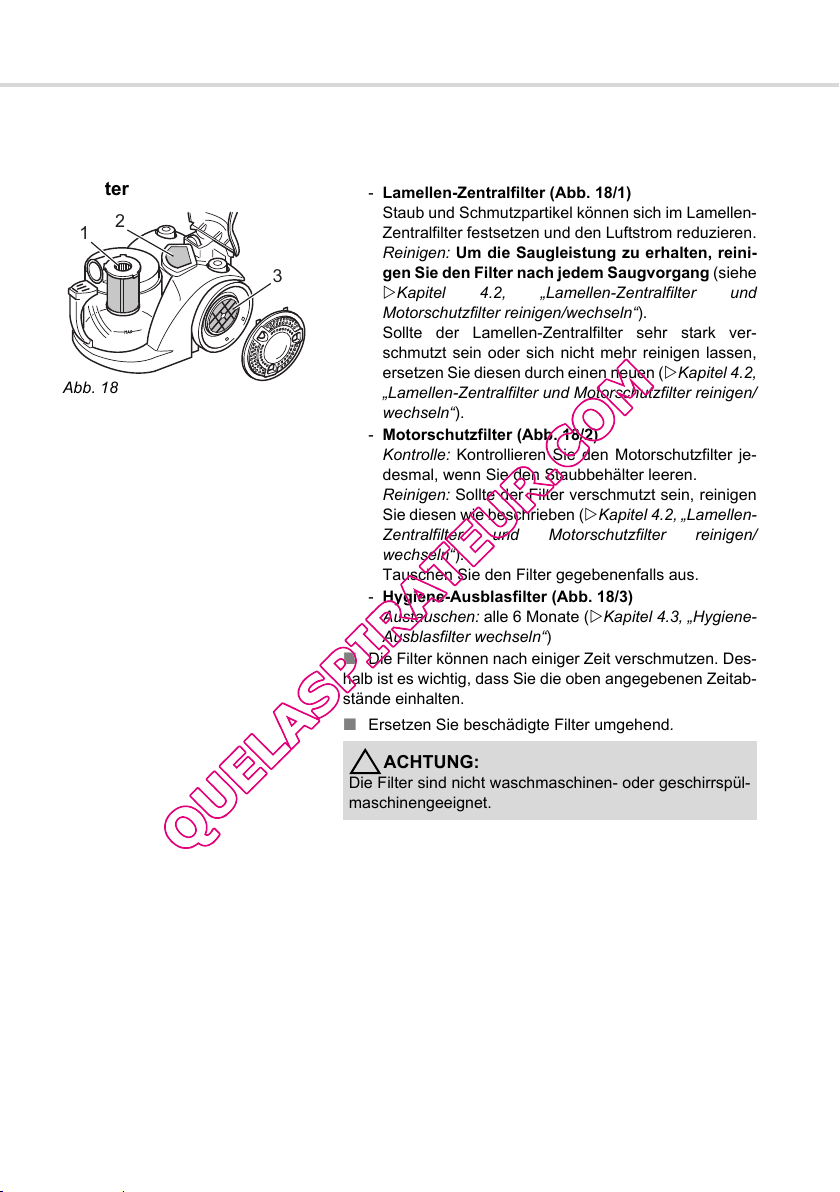
Ihr Bodenstaubsauger besitzt die folgenden 3 Filter:
- Lamellen-Zentralfilter (Abb. 18/1)
Staub und Schmutzpartikel können sich im Lamellen-
Zentralfilter festsetzen und den Luftstrom reduzieren.
Reinigen: Um die Saugleistung zu erhalten, reini-
gen Sie den Filter nach jedem Saugvorgang (siehe
ZKapitel 4.2, „Lamellen-Zentralfilter und
Motorschutzfilter reinigen/wechseln“).
Sollte der Lamellen-Zentralfilter sehr stark ver-
schmutzt sein oder sich nicht mehr reinigen lassen,
ersetzen Sie diesen durch einen neuen (ZKapitel 4.2,
„Lamellen-Zentralfilter und Motorschutzfilter reinigen/
wechseln“).
- Motorschutzfilter (Abb. 18/2)
Kontrolle: Kontrollieren Sie den Motorschutzfilter je-
desmal, wenn Sie den Staubbehälter leeren.
Reinigen: Sollte der Filter verschmutzt sein, reinigen
Sie diesen wie beschrieben (ZKapitel 4.2, „Lamellen-
Zentralfilter und Motorschutzfilter reinigen/
wechseln“).
Tauschen Sie den Filter gegebenenfalls aus.
- Hygiene-Ausblasfilter (Abb. 18/3)
Austauschen: alle 6 Monate (ZKapitel 4.3, „Hygiene-
Ausblasfilter wechseln“)
Die Filter können nach einiger Zeit verschmutzen. Des-
halb ist es wichtig, dass Sie die oben angegebenen Zeitab-
stände einhalten.
Ersetzen Sie beschädigte Filter umgehend.
16
ACHTUNG:
Die Filter sind nicht waschmaschinen- oder geschirrspül-
maschinengeeignet.
Page 17
Pflege und Reinigung
4.2 Lamellen-Zentralfilter
und Motorschutzfilter
reinigen/wechseln
Abb. 19
Abb. 20
1. Schalten Sie das Gerät aus und beachten Sie die Hin-
weise unter ZKapitel 3.2, „Ausschalten und Stromkabel
aufrollen“.
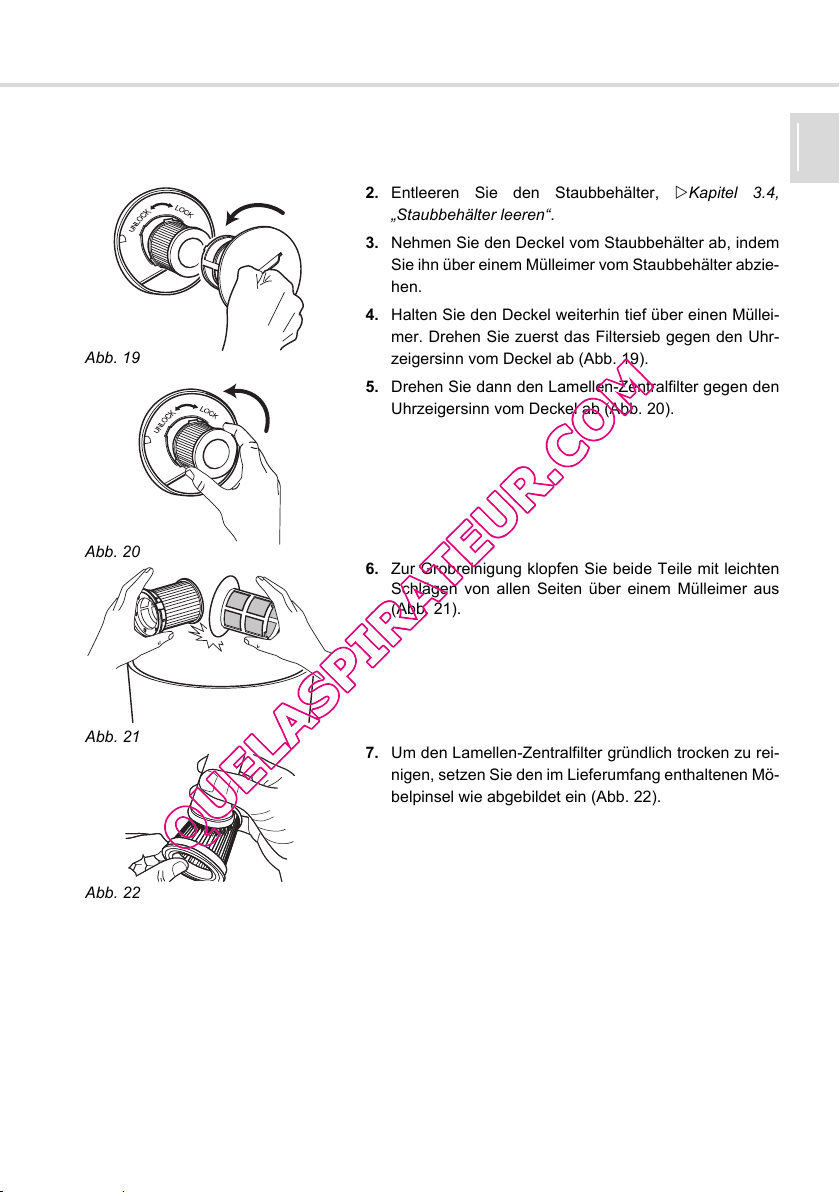
2. Entleeren Sie den Staubbehälter, ZKapitel 3.4,
„Staubbehälter leeren“.
3. Nehmen Sie den Deckel vom Staubbehälter ab, indem
Sie ihn über einem Mülleimer vom Staubbehälter abzie-
hen.
4. Halten Sie den Deckel weiterhin tief über einen Müllei-
mer. Drehen Sie zuerst das Filtersieb gegen den Uhr-
zeigersinn vom Deckel ab (Abb. 19).
5. Drehen Sie dann den Lamellen-Zentralfilter gegen den
Uhrzeigersinn vom Deckel ab (Abb. 20).
6. Zur Grobreinigung klopfen Sie beide Teile mit leichten
Schlägen von allen Seiten über einem Mülleimer aus
(Abb. 21).
DE
Abb. 21
Abb. 22
7. Um den Lamellen-Zentralfilter gründlich trocken zu rei-
nigen, setzen Sie den im Lieferumfang enthaltenen Mö-
belpinsel wie abgebildet ein (Abb. 22).
17
Page 18
Pflege und Reinigung
Abb. 23
1
Abb. 24
Abb. 25
1
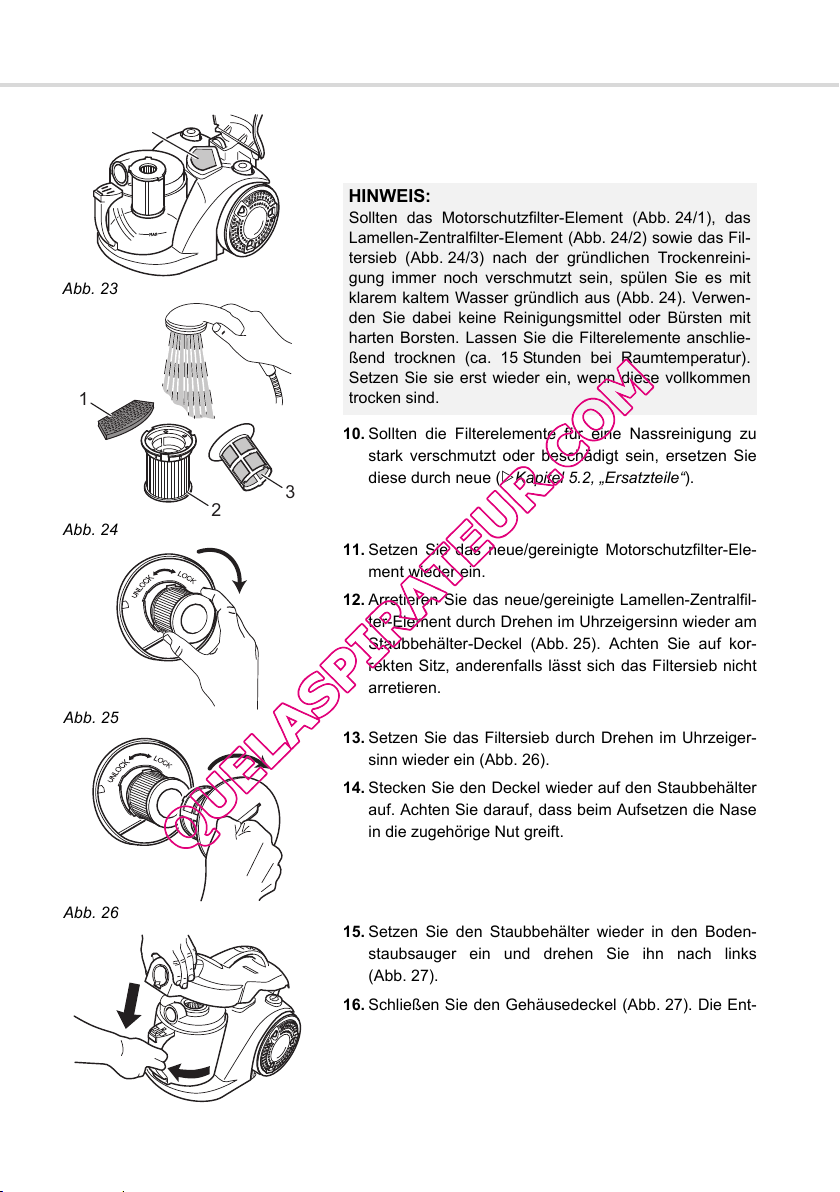
8. Entnehmen Sie bei dieser Gelgeneheit sogleich den
Motorschutzfilter (Abb. 23/1).
9. Klopfen Sie auch ihn über einem Mülleimer aus.
HINWEIS:
Sollten das Motorschutzfilter-Element (Abb. 24/1), das
Lamellen-Zentralfilter-Element (Abb. 24/2) sowie das Fil-
tersieb (Abb. 24/3) nach der gründlichen Trockenreini-
gung immer noch verschmutzt sein, spülen Sie es mit
klarem kaltem Wasser gründlich aus (Abb. 24). Verwen-
den Sie dabei keine Reinigungsmittel oder Bürsten mit
harten Borsten. Lassen Sie die Filterelemente anschlie-
ßend trocknen (ca. 15 Stunden bei Raumtemperatur).
Setzen Sie sie erst wieder ein, wenn diese vollkommen
trocken sind.
10. Sollten die Filterelemente für eine Nassreinigung zu
stark verschmutzt oder beschädigt sein, ersetzen Sie
3
diese durch neue (ZKapitel 5.2, „Ersatzteile“).
2
11. Setzen Sie das neue/gereinigte Motorschutzfilter-Ele-
ment wieder ein.
12. Arretieren Sie das neue/gereinigte Lamellen-Zentralfil-
ter-Element durch Drehen im Uhrzeigersinn wieder am
Staubbehälter-Deckel (Abb. 25). Achten Sie auf kor-
rekten Sitz, anderenfalls lässt sich das Filtersieb nicht
arretieren.
13. Setzen Sie das Filtersieb durch Drehen im Uhrzeiger-
sinn wieder ein (Abb. 26).
14. Stecken Sie den Deckel wieder auf den Staubbehälter
auf. Achten Sie darauf, dass beim Aufsetzen die Nase
in die zugehörige Nut greift.
Abb. 26
Abb. 27
18
15. Setzen Sie den Staubbehälter wieder in den Boden-
staubsauger ein und drehen Sie ihn nach links
(Abb. 27).
16. Schließen Sie den Gehäusedeckel (Abb. 27). Die Ent-
riegelungstasten müssen hörbar einrasten. Prüfen Sie
den Gehäusedeckel auf festen Sitz.
Page 19
Pflege und Reinigung
4.3 Hygiene-Ausblasfilter
wechseln
2
1
3
Abb. 28
4.4 Gerät reinigen
1. Schalten Sie das Gerät aus und beachten Sie die Hin-
weise unter ZKapitel 3.2, „Ausschalten und Stromkabel
aufrollen“.
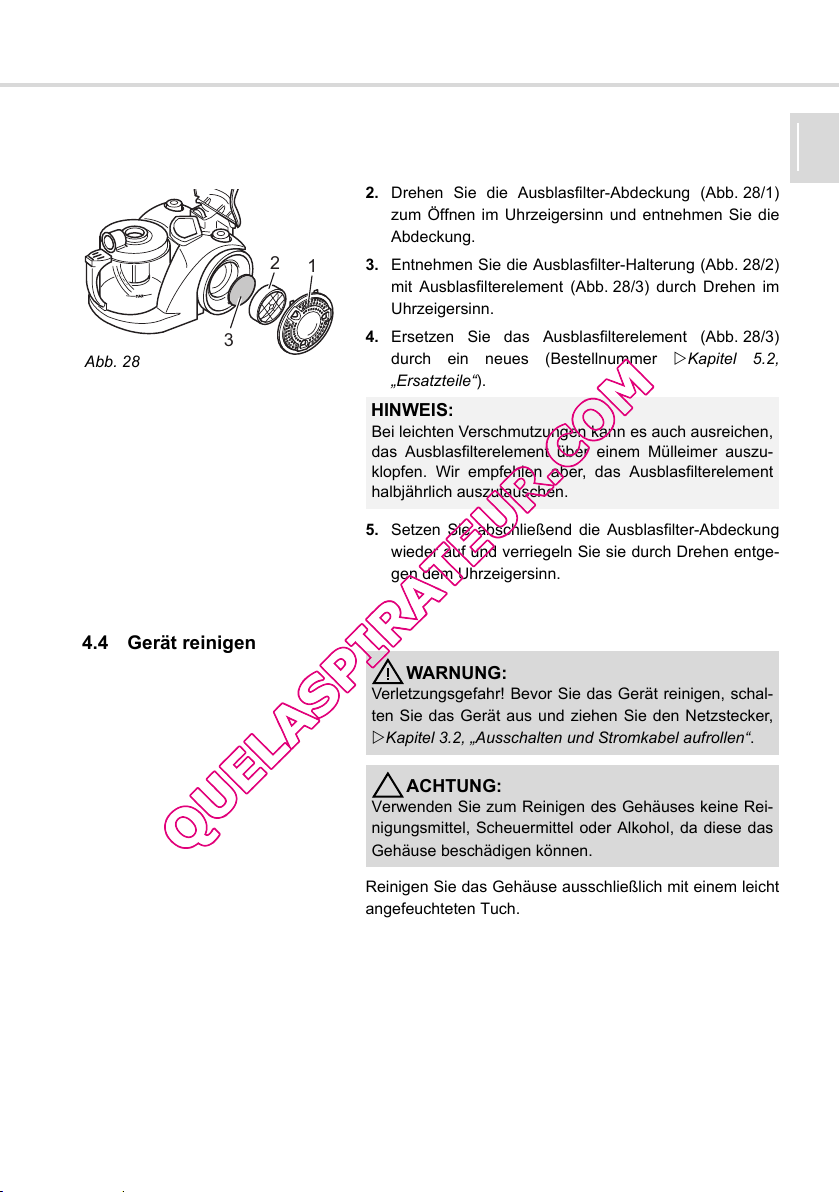
2. Drehen Sie die Ausblasfilter-Abdeckung (Abb. 28/1)
zum Öffnen im Uhrzeigersinn und entnehmen Sie die
Abdeckung.
3. Entnehmen Sie die Ausblasfilter-Halterung (Abb. 28/2)
mit Ausblasfilterelement (Abb. 28/3) durch Drehen im
Uhrzeigersinn.
4. Ersetzen Sie das Ausblasfilterelement (Abb. 28/3)
durch ein neues (Bestellnummer ZKapitel 5.2,
„Ersatzteile“).
HINWEIS:
Bei leichten Verschmutzungen kann es auch ausreichen,
das Ausblasfilterelement über einem Mülleimer auszu-
klopfen. Wir empfehlen aber, das Ausblasfilterelement
halbjährlich auszutauschen.
5. Setzen Sie abschließend die Ausblasfilter-Abdeckung
wieder auf und verriegeln Sie sie durch Drehen entge-
gen dem Uhrzeigersinn.
WARNUNG:
Verletzungsgefahr! Bevor Sie das Gerät reinigen, schal-
ten Sie das Gerät aus und ziehen Sie den Netzstecker,
ZKapitel 3.2, „Ausschalten und Stromkabel aufrollen“.
DE
ACHTUNG:
Verwenden Sie zum Reinigen des Gehäuses keine Rei-
nigungsmittel, Scheuermittel oder Alkohol, da diese das
Gehäuse beschädigen können.
Reinigen Sie das Gehäuse ausschließlich mit einem leicht
angefeuchteten Tuch.
19
Page 20

Problembehebung
5 Problembehebung
5.1 Bevor Sie das Gerät einsenden
Bevor Sie das Gerät an den Royal Appliance-Kundendienst einschicken, überprüfen Sie anhand der
folgenden Tabelle, ob Sie das Problem selbst beseitigen können.
WARNUNG:
Verletzungsgefahr! Verwenden Sie niemals ein defektes Gerät! Bevor Sie auf Problemsuche
gehen, schalten Sie das Gerät aus und ziehen Sie den Netzstecker ZKapitel 3.2, „Ausschalten
und Stromkabel aufrollen“.
Problem mögliche Ursache Lösung
Gerät lässt sich
nicht einschalten
Gerät hört plötz-
lich auf zu saugen
Saugergebnis ist
trotz einwandfrei-
er Funktion nicht
zufriedenstellend
Gerät läuft unge-
wöhnlich laut
Stecker ist nicht eingesteckt. Stecken Sie den Stecker in eine Steckdose
mit Schutzkontakt und schalten Sie das Ge-
rät ein, ZKapitel 3.1, „Staubsaugen“.
Steckdose führt keinen Strom. Testen Sie den Bodenstaubsauger an einer
anderen Steckdose, bei der Sie sicher sind,
dass diese Strom führt.
Stromkabel ist beschädigt. Lassen Sie das Stromabel durch den Royal
Appliance-Kundendienst ersetzen, Adresse,
ZSeite 22, „Garantie“.
Überhitzungsschutz hat ange-
sprochen (möglicherweise auf-
grund verstopfter Saugwege, ver-
schmutzter Filter o. Ä.).
Staubbehälter ist voll. Leeren/Reinigen Sie den Staubbehälter
Filter ist verschmutzt. Reinigen Sie den betroffenen Filter,
Düse, Teleskoprohr oder Saug-
schlauch sind verstopft.
Aufgesteckte Düse ist dem Unter-
grund nicht angemessen.
Umschalter „Teppich/Hartboden“
(Abb. 1/13) ist dem Untergrund
nicht angemessen.
Eingesaugte Partikel versperren
den Luftweg.
Staubbehälter ist voll. Leeren/Reinigen Sie den Staubbehälter
Schalten Sie das Gerät aus und ziehen Sie
den Stecker aus der Steckdose.
Beseitigen Sie die Ursache der Überhitzung
(z. B. verstopfte Saugwege o. Ä.). Warten
Sie ca. 45 Minuten. Das abgekühlte Gerät
können Sie wieder einschalten.
ZKapitel 3.4, „Staubbehälter leeren“.
ZKapitel 4, „Pflege und Reinigung“.
Entfernen Sie die Verstopfung. Benutzen
Sie dazu, falls erforderlich, einen langen
Holzstab (z. B. Besenstiel).
Wechseln Sie die Düse ZKapitel 2.3,
„Weitere Düsen (Zubehör) verwenden“.
Passen Sie die Stellung des Umschalters
„Teppich/Hartboden“ (Abb. 1/13) an den Bo-
denbelag an, ZKapitel 3.1, „Staubsaugen“,
Schritt 4.
Entfernen Sie die Partikel. Benutzen Sie da-
zu, falls erforderlich, einen langen Holzstab
(z. B. Besenstiel).
ZKapitel 3.4, „Staubbehälter leeren“.
20
Page 21

Problembehebung
5.2 Ersatzteile
Zubehörteile sowie Ersatzteile können nachbestellt werden.
Artikel-Nr. Beschreibung
2610001 Filterset 5-teilig, bestehend aus
1 Lamellen-Zentralfilter, 1 Motorschutzfilter,
1 Hygiene-Ausblasfilter sowie 2 Filterhülsen
Diese erhalten Sie bei den Firmen:
Zubehör-Ersatzteile-Service-Versand
Ina Riedmüller
Frankenstraße 34
89233 Neu-Ulm
Deutschland
Tel.: +49 (0) 7307 - 51 75
Fax: +49 (0) 7307 - 41 56
Riedmueller.service@t-online.de
5.3 Entsorgung
Die verwendeten Filter sind aus umweltverträglichen Materialien hergestellt und können im Haus-
müll entsorgt werden.
Wenn das Gebrauchsende erreicht ist, machen Sie das ausgediente Gerät unbrauch-
bar, indem Sie den Netzstecker aus der Steckdose ziehen und das Stromkabel durch-
trennen. Entsorgen Sie das Gerät gemäß den in Ihrem Land geltenden Umweltvor-
schriften. Elektrische Abfälle müssen gesondert entsorgt werden. Wenden Sie sich
für Ratschläge bezüglich des Recyclings an Ihre Kommunalbehörde oder Ihren Händ-
ler.
Service Center Feuerbach KG
Corneliusstr. 75
40215 Düsseldorf
Deutschland
Tel.: +49 (0) 211 - 38 10 07
Fax: +49 (0) 211 - 37 04 97
dirtdevil-service@t-online.de
www.dirtdevil-service.de
DE
21
Page 22

Garantie
6 Garantie
Wir übernehmen für dieses Gerät eine Garantie von 24 Monaten ab Kaufdatum.
Innerhalb der Garantiezeit beseitigen wir nach unserer Wahl durch Reparatur oder Austausch des
Gerätes oder des Zubehörs (Schäden an Zubehörteilen führen nicht automatisch zum Umtausch
des kompletten Gerätes) unentgeltlich alle Mängel, die auf Material- oder Herstellungsfehlern beru-
hen. Von der Garantie sind Schäden ausgenommen, die auf unsachgemäßen Gebrauch (Betrieb mit
falscher Stromart/-spannung, Anschluss an ungeeignete Stromquellen, Bruch usw.) zurückzuführen
sind, normaler Verschleiß und Mängel, die den Wert oder die Gebrauchstauglichkeit des Gerätes
nur unerheblich beeinflussen. Bei Eingriffen durch eine nicht von uns autorisierte Stelle oder bei Ver-
wendung anderer als original Royal Appliance-Ersatzteile erlischt die Garantie. Verschleißteile fallen
nicht unter die Garantie und sind deshalb kostenpflichtig!
Die Garantie tritt nur in Kraft, wenn das Kaufdatum durch Stempel und Unterschrift des Händlers auf
der Garantiekarte bestätigt ist oder eine Rechnungskopie dem eingeschickten Gerät beiliegt. Garan-
tieleistungen bewirken weder eine Verlängerung der Garantiezeit, noch beginnt dadurch ein An-
spruch auf eine neue Garantie! Versenden Sie das Gerät mit entleertem Staubbehälter und einer
kurzen Fehlerbeschreibung in Blockschrift. Versehen Sie das Anschreiben mit dem Vermerk „Zur
Garantie“. Senden Sie es zusammen mit der Garantiekarte oder einer Rechnungskopie an folgende
Adresse:
SERVICE-HOTLINE
Royal Appliance International GmbH
Abt. Kundenservice
Itterpark 5-7
40724 Hilden
Germany
Tel.: +49 (0) 2103 / 20 07 10
Fax: +49 (0) 2103 / 20 07 77
www.dirtdevil.de
22
In Deutschland stehen wir Ihnen für Fragen,
Anregungen oder bei Problemen unter fol-
gender Nummer gern zur Verfügung:
0180 501 50 50*
Mo-Fr, 8-20 Uhr
*14 Ct pro Minute aus dem
deutschen Festnetz
(Mobilfunktarif abweichend)
Page 23

DE
23
Page 24

Overview of your Centrixx TS
Overview of your Centrixx TS
Thank you!
Thanks for purchasing the Centrixx TS and for your confidence in us.
D
Appliance parts/scope of delivery
1 Floor nozzle
2 Storage hook
3 Telescopic tube catch
4 Telescopic tube
5 Bypass vent
6 Handle
7 Suction hose
8 Housing cover release buttons
9 Carrying-handle
10 Housing cover
11 Dust container
12 Dust container handle,
can be used as carrying-handle
13 "Carpet/hard floor" switch
14 Exhaust filter cover
15 Storage bracket
16 Cable retraction button
17 Power cord with plug
18 On/Off switch
19 Suction power control
20 Furniture brush
21 Crevice nozzle
22 Accessory holder
optional accessories:
- Parquet brush (Fig. 7)
- Turbo brush (Fig. 7)
Technical data
Type of appliance : Cylinder vacuum cleaner (bagless)
Model : Centrixx TS [M2614 (-0/.../-9)]
Voltage : 230 V~, 50 Hz
Power : 1800 W nom. - 2400 W max.
Dust container : 1.2 litre, washable
Filters : Central laminar filter, washable
Suction hose length : approx. 1.5 m
Power cord length : approx. 5.0 m
Operation radius : approx. 7.0 m
Weight : approx. 6.5 kg
We reserve the right to make technical and design-related alterations in the course of ongoing
product improvements.
© Royal Appliance International GmbH
24
Motor protection filter, washable
Exhaust filter
Page 25

List of contents
1 Safety notices............................................................................ 26
1.1 Re: Operating Manual ................................................................................................. 26
1.2 Re: The Notices Given ................................................................................................ 26
1.3 Re: Power supply ........................................................................................................ 27
1.4 Re: Children................................................................................................................. 27
1.5 Re: Appropriate Use.................................................................................................... 28
1.6 If the appliance is defective ......................................................................................... 28
2 Unpacking and assembling ..................................................... 29
2.1 Unpacking.................................................................................................................... 29
2.2 Assembly..................................................................................................................... 29
2.3 Using further nozzles (accessories) ............................................................................ 30
3 Operation ................................................................................... 32
3.1 Vacuum cleaning......................................................................................................... 32
3.2 Switching off and retracting the power cord. ............................................................... 34
3.3 Transport and storage ................................................................................................. 34
3.4 Emptying the dust container ........................................................................................ 35
4 Cleaning and care..................................................................... 36
4.1 Overview of the filters .................................................................................................. 36
4.2 Cleaning or changing the central laminar filter and motor protection filter. ................. 37
4.3 Changing the hygienic exhaust filter............................................................................ 39
4.4 Cleaning the appliance................................................................................................ 39
GB
5 Troubleshooting........................................................................ 40
5.1 Before you send in the appliance ................................................................................ 40
5.2 Spare parts.................................................................................................................. 41
5.3 Disposal....................................................................................................................... 41
6 Warranty .................................................................................... 41
List of contents
25
Page 26

Safety notices
1 Safety notices
1.1 Re: Operating Manual Read this operating manual completely before working with
the appliance.
Keep the operating manual for reference. Include the
operating manual if you pass the appliance on to someone
1.2 Re: The Notices Given Notices for your safety are especially marked. Always
else.
Non-compliance with these instructions can lead to
serious injuries or damage to the appliance.
We take no responsibility for damages due to violations of
these operating instructions.
observe these notices to avoid accidents and damage to
the appliance.
WARNING:
Warning concerning health hazards describing possible
risks of injury.
ATTENTION:
Warning concerning possible dangers to the appliance or
other objects.
26
NOTE:
Highlights tips and information for you.
Page 27

Safety notices
1.3 Re: Power supply The appliance runs on electricity -- that means there is
a general risk of electric shock. So please especially
observe the following:
- Never touch the plug with wet hands.
- Always pull directly at the plug if you want to
disconnect the appliance from the mains. Never pull
on the cable as this could damage it.
- Take care that the power cord is not bent, pinched,
rolled over or gets in contact with heat sources.
- Only use extension cords of sufficient capacity for the
power requirement of the appliance.
- Never immerse the appliance in water or other liquids.
Keep it away from rain and moisture.
- Only operate the appliance if your mains voltage is
the same as that indicated on the appliance's
nameplate. Wrong voltage can destroy the appliance.
1.4 Re: Children People (including children) who are unable to safely
operate the appliance on account of their physical, sensory
or mental abilities or their lack of experience or knowledge
should only use this appliance under surveillance or
instruction by a responsible person. Store it out of reach.
Never leave the appliance unattended and use it with
special precaution if children or persons who cannot judge
dangers are nearby.
Packing material must not be used to play with. There
is danger of suffocation.
GB
27
Page 28

Safety notices
1.5 Re: Appropriate Use This appliance may only be used in households.
It is not suitable for commercial or industrial use.
Use the cylinder vacuum cleaner only for cleaning dry,
normally soiled floors.
With the proper brush attachment the appliance may
also be used to clean furniture, at reduced power even for
vacuuming curtains.
Any other use is considered inappropriate and is prohibited.
It is especially forbidden:
To vacuum-clean:
- hair, fingers and other parts of the body. They could
be sucked in and injured.
- pieces of clothing (e.g. shoelaces, scarves, etc.).
They could be sucked in and cause injuries.
- water and other fluids, especially damp carpet
cleaning agents. Moisture inside the appliance can
cause a short-circuit.
- toner (for laser printers, copying machines, etc.).
There is danger of fire or explosion.
- hot ash, burning cigarettes or matches. This could
cause a fire.
- pointed objects such as glass fragments, nails, etc.
These objects destroy the filters.
- rubble, plaster or cement powder, makeup, etc. The
filters may clog.
To use the appliance near explosive or easily
flammable substances. There is danger of fire or explosion.
Outdoor use. There is danger of rain and dirt destroying
the appliance.
Sticking objects into the appliance's openings. It could
overheat.
To open, modify or repair the appliance on your own.
1.6 If the appliance is
defective
28
Never use a defective appliance or operate an
appliance with a defective power cord. If the power cord of
this appliance is damaged it must be replaced by the
manufacturers, their authorised service representative or a
similarly qualified person to avoid danger.
Refer a defective appliance to an authorised dealer or
the Royal Appliance service for repair. Address: .
Page 29

Unpacking and assembling
2 Unpacking and assembling
2.1 Unpacking 1. Unpack the appliance and all its accessories.
2. Check the contents for completeness and possible
damages. Information regarding the scope of delivery
ZPage 24, "Overview of your Centrixx TS".
ATTENTION:
Always transport/send the appliance in its original
packaging to avoid transport damages. Keep the
packaging for such an event.
Dispose of no longer needed packaging material
according to the applicable regulations of your country.
NOTE:
Immediately contact your dealer if you have found
damage resulting from transport.
2.2 Assembly
2
1
WARNING:
Danger of injury! Only assemble the appliance when it is
not connected to the mains. Otherwise, the appliance
could be switched on by accident.
GB
Fig. 2
Fig. 3
3
1
4
3
1. Push the end of the suction hose (Fig. 2/1) into the
socket opening (Fig. 2/2) of the cylinder vacuum
cleaner until the lock audibly clicks into place. Make
sure that the release button (Fig. 2/3) points down as
illustrated.
2. Insert the handle (Fig. 3/1) into the upper end of the
telescopic tube (Fig. 3/2).
3. Attach the floor nozzle (Fig. 3/3) to the bottom end of
the telescopic tube (Fig. 3/4).
NOTE:
2
When attaching the floor nozzle, you might have to push
a bit harder.
29
Page 30

Unpacking and assembling
4. Adjust the length of the telescopic tube. To do this,
press the telescopic tube lock (Fig. 4/1) down (Fig. 4/a).
Then extend the telescopic tube to the desired length
(Fig. 4/b). Let go of the release catch while pulling until
it locks in place. You will hear a distinct click.
5. Push the accessory holder (Fig. 5/3) onto the telescopic
tube (Fig. 5/1) below the telescopic tube lock (Fig. 5/2).
Then push the furniture brush (Fig. 5/4) and the crevice
nozzle (Fig. 5/5) onto the holder.
Your cylinder vacuum cleaner is now ready for use.
Fig. 4
Fig. 5
1
b
a
5
2
4
1
3
2.3 Using further nozzles
(accessories)
1
Fig. 6
2
Besides the floor nozzle (Fig. 1/1) you just attached, you
may extend the functions of your cylinder vacuum cleaner
with other nozzles.
The crevice nozzle, the furniture brush and the
upholstery nozzle are included as accessories in the
scope of delivery. They can be placed on the accessory
holder (Fig. 5/3) when not in use.
- Crevice nozzle (Fig. 6/1)
Use this to vacuum dust from hard to reach places.
- Furniture brush (Fig. 6/2)
Use this to remove dust from objects with delicate
surfaces (e.g. cupboards and tables).
30
Page 31

Unpacking and assembling
Optionally available are:
- Turbo brush (Fig. 7/1)
For thoroughly deep cleaning of carpets with the
revolving brush head.
NOTE:
The brush rotating at high speed causes a loud noise
during operation.
GB
Fig. 7
Fig. 8
- Parquet brush (Fig. 7/2)
For vacuuming especially delicate surfaces (e. g.
parquet, laminate) with long, soft bristles.
WARNING:
Danger of injury! Only attach nozzles when the vacuum
cleaner is not connected to the mains. The appliance
could be switched on by accident.
ATTENTION:
Use only intact nozzles. Damaged nozzles may scratch
or damage surfaces and objects.
Proceed as follows to attach the nozzles:
1. Switch off the vacuum cleaner and pull the plug from the
1
mains socket.
2. Remove the nozzle from the telescopic tube (Fig. 8/1).
3. Attach the desired nozzle to the bottom end of the
telescopic tube (Fig. 8/1) or if necessary directly to the
handle (Fig. 1/6).
ATTENTION:
Using the cylinder vacuum cleaner without a nozzle
attached increases the danger of accidentally sucking in
objects.
4. If possible, store nozzles not in use on the accessory
holder (Fig. 1/22). Keep the other nozzles safe and
inaccessible to children.
31
Page 32

Operation
3 Operation
3.1 Vacuum cleaning .
WARNING:
Danger of injury! Check the cylinder vacuum cleaner and
the power cord before each use. A damaged appliance
must never be used.
WARNING:
Danger of injury! Especially when vacuum-cleaning stairs
make sure that you are always higher up than the
appliance.
ATTENTION:
Only use the cylinder vacuum cleaner with all filters
intact, in dry condition and correctly fitted. Make sure that
the openings of the vacuum cleaner are not clogged.
Otherwise the vacuum cleaner might be damaged.
ATTENTION:
Check the requirements of your floorings before using
the vacuum cleaner. Follow the recommendations of the
flooring manufacturers.
32
NOTE:
Your cylinder vacuum cleaner is equipped with a safety
switch to prevent overheating. It turns off automatically if
the appliance overheats. In this case switch off the
cylinder vacuum cleaner and disconnect it from the
mains. Remove the cause of overheating. Wait approx.
45 min before switching the vacuum cleaner on again.
Page 33

1
Fig. 9
Fig. 10
Fig. 11
Operation
1. Attach the desired nozzle ZChapter 2.2, "Assembly" or
4
3
2
A
B
1
ZChapter 2.3, "Using further nozzles (accessories)".
2. Pull out the cord by the plug up to the yellow mark
(Fig. 9/1).
WARNING:
Danger of electric shock! If the red marking (Fig. 9/2)
shows, retract the cord by pressing the cord retracting
button (Fig. 9/3) to pull in the cord up to the yellow mark
again. Otherwise the power cord might break.
3. Insert the mains plug into a socket with ground/safety
contact.
WARNING:
Danger of injury or fire! Only operate the appliance if your
mains voltage is the same as that indicated on the
appliance's nameplate. Wrong voltage can cause short-
circuiting and possibly a subsequent fire.
4. Switch on the cylinder vacuum cleaner with the on/off
switch (Fig. 9/4).
5. Set the nozzle switch to "carpet" or "hard floor"
according to the floor (Fig. 10) to be cleaned:
- Hard floor (Fig. 10/A):
Laminate, tiles, PVC, etc.
- Carpet (Fig. 10/B):
for carpets, runners, etc.
6. Set the suction power with the suction controller
(Fig. 11/1).
7. When working with the cylinder vacuum cleaner, pull if
after you like a sleigh.
NOTE:
With the bypass vent (Fig. 12/1) you can quickly reduce
the suction power if less power is needed, or to release
objects accidentally sucked in.
GB
1
Fig. 12
33
Page 34

Operation
3.2 Switching off and
retracting the power
cord.
1
2
Fig. 13
1. Switch off the cylinder vacuum cleaner with the on/off
switch (Fig. 13/1) and pull the plug from the mains
socket.
2. Keep the plug in your hand.
WARNING:
Danger of injury! During retraction the power cord can
whip around, become an obstacle or overthrow objects.
3. Push the cord retracting button (Fig. 13/2) to retract the
power cord.
3.3 Transport and storage To transport the cylinder vacuum cleaner you can
carry it by the carrying-handle (Fig. 141/) or the
1
transportation handle (Fig. 14/2)
WARNING:
Danger of injury! If you leave your work area, switch off
the appliance and observe the instructions under
ZChapter 3.2, "Switching off and retracting the power
cord.".
2
Fig. 14
2
1
For storage, you can hook the storage hook (Fig. 15/1)
of the telescopic tube into the storage bracket (Fig. 15/2) at
the bottom of the cylinder vacuum cleaner.
Fig. 15
34
ATTENTION:
Never store the appliance next to heat sources (e.g.
stoves or radiators). Avoid exposing it to direct sunlight.
Heat can damage the appliance.
If you want to store the appliance for a prolonged
period, empty the dust container and clean it as well as the
filter.
Always store the appliance in a cool, dry place.
Page 35

Operation
3.4 Emptying the dust
container
1
Fig. 16
1
Fig. 17
Empty the dust container at the latest when the "Max"
mark (Fig. 16/1) has been reached or when the vacuum
cleaner is losing suction power.
ATTENTION:
Before you clean the dust container, switch off the
appliance and remove the mains plug. Otherwise,
sucked-in dust might destroy the appliance.
1. Press the release buttons and open the housing cover
(Fig. 16).
2. Turn the dust container a little to the right (Fig. 16) to
unlock it.
3. Then lift the dust container up out of the cylinder
vacuum cleaner.
4. Hold the dust container low over a dustbin to empty it.
5. Push the release button (Fig. 17/1). The bottom opens
and the dust falls into the dustbin.
NOTE:
You can dispose of the dust with your regular domestic
trash if it contains no prohibited waste materials.
6. Carefully tap loose the remaining dust. If necessary,
wipe the dust container with a dry cloth.
7. Close the dust compartment bottom. It snaps into place.
8. Push the dust container back into the cylinder vacuum
cleaner. Lock it with a short turn to the left.
9. Close the housing cover. It snaps shut.
GB
35
Page 36

Cleaning and care
4 Cleaning and care
4.1 Overview of the filters Your cylinder vacuum cleaner is equipped with the
following filters:
- Central laminar filter (Fig. 18/1)
Dust and dirt particles can become attached to the
central laminar filter and reduce the airflow.
Cleaning: To maintain suction performance, clean
the filter after each vacuuming session (see
ZChapter 4.2, "Cleaning or changing the central
laminar filter and motor protection filter.").
If the central laminar filter is very dirty or it is no longer
possible to clean it, replace it with a new filter
(ZChapter 4.2, "Cleaning or changing the central
laminar filter and motor protection filter.").
- Motor protection filter (Fig. 18/2)
Checking: Check the motor protection filter every time
you empty the dust container.
Cleaning: If the filter is dirty, clean or exchange it as
described (ZChapter 4.2, "Cleaning or changing the
central laminar filter and motor protection filter.").
If necessary, replace the filter.
- Hygienic exhaust filter (Fig. 18/3)
Changing: every 6 months (ZChapter 4.3, "Changing
the hygienic exhaust filter")
The filters can become dirty with time. That's why it is
important to adhere to the above changing intervals.
Replace a damaged filter as soon as possible.
1
Fig. 18
2
3
36
ATTENTION:
All filters may not be machine-washed or cleaned in a
dishwashing-machine.
Page 37

Cleaning and care
4.2 Cleaning or changing
the central laminar
filter and motor
protection filter.
Fig. 19
Fig. 20
1. Switch the appliance off and observe the instructions
under ZChapter 3.2, "Switching off and retracting the
power cord.".
2. Empty the dust container, ZChapter 3.4, "Emptying the
dust container".
3. Remove the cover from the dust container by pulling it
off the dust container over a dustbin.
4. Keep holding the cover low over a dustbin. First remove
the filter screen by turning it counter-clockwise off the
cover (Fig. 19).
5. Then twist the central laminar filter off the cover by
turning it counter-clockwise (Fig. 20).
6. For a rough cleaning beat the dirt from both parts by
lightly tapping them from all sides over a dustbin
(Fig. 21).
GB
Fig. 21
Fig. 22
7. To thoroughly clean the central laminar filter without
water, use the supplied furniture brush as shown
(Fig. 22).
37
Page 38

Cleaning and care
Fig. 23
1
Fig. 24
1
8. On this occasion, also take out the motor protection
filter (Fig. 23/1).
9. Tap the dirt out of this filter over a dustbin. as well.
NOTE:
If the motor protection filter element (Fig. 24/1), the
central laminar filter element (Fig. 24/2) and the filter
screen (Fig. 24/3) are still dirty after thorough dry
cleaning, thoroughly rinse them with cold water (Fig. 24).
Do not use detergents or brushes with hard bristles for
this task. Then leave the filter elements to dry (approx.
15 hours at room temperature). Only put them back into
the appliance when they are completely dry.
10. If these filter elements are damaged or too dirty for wet
cleaning, replace them by new ones(ZChapter 5.2,
"Spare parts").
3
2
11. Put the new or cleaned motor protection filter element
back in place.
12. Lock the central laminar filter onto the dust container
cover again by turning it clockwise (Fig. 25). Make sure
it is fitted correctly as otherwise the filter screen will not
lock into place.
Fig. 25
Fig. 26
Fig. 27
38
13. Insert the filter screen again by turning it clockwise
(Fig. 26).
14. Push the cover onto the dust container again. When
attaching it, make sure the nose engages the
corresponding groove.
15. Place the dust container back into the cylinder vacuum
cleaner and turn it to the left (Fig. 27).
16. Close the housing cover (Fig. 27). The release buttons
must click shut audibly. Check that the housing cover is
fitted securely.
Page 39

Cleaning and care
4.3 Changing the hygienic
exhaust filter
2
1
3
Fig. 28
4.4 Cleaning the appliance
1. Switch the appliance off and observe the instructions
under ZChapter 3.2, "Switching off and retracting the
power cord.".
2. Turn the exhaust filter cover (Fig. 28/1) clockwise to
open and remove the cover.
3. Remover the exhaust filter holder (Fig. 28/2) with the
exhaust filter element (Fig. 28/3) by turning it clockwise.
4. Replace the exhaust filter element (Fig. 28/3) by a new
one (item number ZChapter 5.2, "Spare parts").
NOTE:
If it is only slightly dirty, it can also be enough to tap the
dirt out of the exhaust filter element over a dustbin.
However, we recommend changing the exhaust filter
element every six months.
5. Then replace the exhaust filter cover and lock it by
turning it counter-clockwise.
WARNING:
Danger of injury! Before you clean the appliance, switch
off the appliance and pull the mains plug, ZChapter 3.2,
"Switching off and retracting the power cord.".
ATTENTION:
Do not use cleaning or scouring agents or alcohol, as
these might damage the appliance housing.
GB
Clean the outside of the housing using a slightly damp cloth
only.
39
Page 40

Troubleshooting
5 Troubleshooting
5.1 Before you send in the appliance
Before sending the appliance to Royal Appliance Customer Services, use the following table to
check whether you can solve the problem yourself.
WARNING:
Danger of injury! Never use a defective appliance! Always switch off the appliance and disconnect
it from the mains before starting troubleshooting ZChapter 3.2, "Switching off and retracting the
power cord.".
Problem Possible cause Solution
The appliance will
not start
The vacuum
cleaner stops
suddenly.
The results are
unsatisfactory in
spite of the
appliance working
correctly.
The appliance's
noise is unusually
loud.
Plug is not plugged in or the
appliance is not switched on.
The socket does not carry
current.
Power cord is damaged. Have the cord replaced by Royal
The overheating protection has
tripped (possibly due to blocked
suction channels, filters, or
similar).
The dust container is full. Empty / clean the dust container ZChapter
The filter is dirty. Clean the respective filter, ZChapter 4,
Nozzle, telescopic tube or suction
hose are blocked.
The nozzle you are using does
not suit the flooring.
The "carpet / hard floor" switch
(Fig. 1/13) is in the wrong position
for the particular type of floor.
Sucked-in objects are obstructing
the air stream.
The dust container is full. Empty / clean the dust container ZChapter
Insert the plug into a mains socket and
switch on the appliance, ZChapter 3.1,
"Vacuum cleaning".
Test the cylinder vacuum cleaner at another
socket which you are sure carries current.
Customer Services, address, ZPage 41,
"Warranty".
Switch the appliance off and pull the plug out
of the socket.
Eliminate the cause of overheating (e.g.
blocked suction channels, filters, etc.). Wait
for about 45 minutes. After it has cooled off,
you may switch on the vacuum cleaner
again.
3.4, "Emptying the dust container".
"Cleaning and care".
Remove the obstacle. If necessary, use a
long wooden rod for this (e.g. a broomstick).
Change the nozzle ZChapter 2.3, "Using
further nozzles (accessories)"
Set the "carpet/hard floor" switch (Fig. 1/13)
to the correct position for the type of floor,
ZChapter 3.1, "Vacuum cleaning", step 4.
Remove the objects. If necessary, use a
long wooden rod for this (e.g. a broomstick).
3.4, "Emptying the dust container".
Appliance
40
Page 41

Warranty
5.2 Spare parts
You can order accessories and spare parts from:
Item number Description
2610001 5-piece filter set, consisting of
1 central laminar filter, 1 motor protection filter,
1 hygienic exhaust filter and 2 filter elements
You can get these:
ZPage 224, "Royal Appliance Int. GmbH International Service"
5.3 Disposal
The filters used are made of environment-friendly materials and can de disposed of with your
domestic trash.
When the the appliance has reached the end of its usefulness, disable it by pulling the
mains plug from the socket and cutting off the power cord. Dispose of the appliance
according to the environmental provisions applicable in your country. Electric waste
must be disposed of separately. Consult your local authorities or your dealer for
advice on recycling.
GB
6Warranty
We grant a warranty period of 24 months from the date of purchase for this appliance.
Within the warranty period, we will remove free of charge all defects due to material or manufacturing
faults, either by repair work or by replacing the appliance or accessories, at our discretion (damage
to accessories does not automatically lead to the entire appliance being replaced). The warranty
does not cover damage due to improper use (operating on the wrong power type/voltage, connecting
to unsuitable power sources, breakage, etc.), normal wear and defects that only insignificantly affect
the value or the serviceability of the appliance. Interventions by unauthorised parties and the use of
spare parts not supplied by Royal Appliance make the warranty null and void. Consumable parts are
not included in the warranty and must be paid for!
The warranty is only valid if the date of purchase has been acknowledged by the dealer's stamp and
signature on the warranty card or if a copy of the invoice or sales slip is included with the sent-in
appliance. Warranty work does not extend the warranty period nor does it constitute a claim for a
new warranty! Send us the appliance with its dust container empty and a short description of the
defect in printed letters. Head your accompanying letter with the notice "warranty claim". Send it to
the following address, including the warranty card or a copy of the purchase slip:
ZPage 224, "Royal Appliance Int. GmbH International Service"
41
Page 42

Aperçu de votre Centrixx TS
Aperçu de votre Centri xx TS
Merci beaucoup !
Nous vous remercions pour votre confiance ainsi que de l'achat de ce Centrixx TS.
D
Parties de l'appareil / matériel fourni à la livraison
1 Suceur universel
2 Encoche de rangement
3 Arrêt du manche télescopique
4 Tube télescopique
5 Variateur mécanique de puissance
6 Poignée
7 Tuyau flexible d'aspiration
8 Bouton de déverrouillage du couvercle
du boîtier
9 Poignée de transport
10 Couvercle du boîtier
11 Bac à poussière
12 Poignée du bac à poussière utilisable
en tant que poignée de transport
13 Commutateur « Tapis / sols durs »
14 Couvercle du filtre de sortie d'air
15 Support de rangement
16 Bouton de l'enrouleur
17 Cordon d'alimentation avec fiche
18 Interrupteur marche-arrêt
19 Variateur de puissance d'aspiration
20 Brosse à meuble
21 Suceur long
22 Compartiment pour accessoires
Accessoires en option :
- Brosse pour parquets (ill. 7)
- Turbobrosse (ill. 7)
Caractéristiques techniques
Type d'appareil : Aspirateur (sans sac)
Modèle : Centrixx TS [M2614 (-0/.../-9)]
Tension : 230 V~, 50 Hz
Puissance : 1800 W nom. - 2400 W max.
Bac à poussière : 1,2 litre, lavable
Filtre : Filtre central à lamelles, lavable
Longueur du tuyau d'aspiration : env. 1,5 m
Longueur du cordon : env. 5,0 m
Rayon de travail : env. 7,0 m
Poids : env. 6,5 kg
Toutes modifications techniques ou de conception liées à la constante amélioration de ce produit
sont réservées.
© Royal Appliance International GmbH
42
Filtre de protection du moteur, lavable
Filtre de sortie d'air
Page 43

Sommaire
Sommaire
1 Consignes de sécurité.............................................................. 44
1.1 relatives à ce mode d'emploi ....................................................................................... 44
1.2 à propos des indications mentionnées ........................................................................ 44
1.3 par rapport à l’alimentation électrique ......................................................................... 44
1.4 Remarques relatives aux enfants................................................................................ 45
1.5 Utilisation conforme aux instructions ........................................................................... 45
1.6 En cas de défectuosités de l'appareil .......................................................................... 46
2 Déballage et montage............................................................... 47
2.1 Déballage .................................................................................................................... 47
2.2 Montage....................................................................................................................... 47
2.3 Utilisation des autres suceurs (accessoires) ............................................................... 48
3 Emploi ........................................................................................ 50
3.1 Utilisation de l'aspirateur.............................................................................................. 50
3.2 Arrêt et rangement du cordon d'alimentation............................................................... 52
3.3 Transport et rangement............................................................................................... 52
3.4 Videz le bac à poussière ............................................................................................. 53
4 Maintenance et entretien.......................................................... 54
4.1 Vue d'ensemble des filtres........................................................................................... 54
4.2 Nettoyage/changement du filtre central à lamelles et du filtre de protection du moteur 55
4.3 Remplacement du filtre hygiénique de sortie d’air....................................................... 57
4.4 Nettoyage de l'appareil................................................................................................ 57
5 Élimination des anomalies....................................................... 58
5.1 Avant d'envoyer l'appareil............................................................................................ 58
5.2 Pièces de rechange..................................................................................................... 59
5.3 Élimination................................................................................................................... 59
6 Garantie ..................................................................................... 59
FR
43
Page 44

Consignes de sécurité
1 Consignes de sécurité
1.1 relatives à ce mode
d'emploi
1.2 à propos des
indications
mentionnées
Veuillez lire attentivement et intégralement ce mode
d'emploi avant de vous servir de l'appareil.
Conservez précieusement ce mode d'emploi. Remettez
toujours le mode d'emploi à toute personne se servant de
l'appareil.
Le non respect de ce mode d'emploi peut entraîner des
blessures graves ou des dommages irréparables à
l'appareil.
Nous déclinons toute responsabilité pour des dommages
résultant du non respect de ce mode d'emploi.
Les consignes importantes pour votre sécurité font l'objet
d'une mention particulière. Respectez impérativement ces
consignes afin d'éviter tout accident ou dommage de
l'appareil :
AVERTISSEMENT:
Nous attirons votre attention sur les dangers pouvant
mettre en péril votre santé et vous informons sur les
éventuels risques de blessures.
ATTENTION:
Nous vous rendons attentifs aux risques éventuels pour
l'appareil ou pour tout autre objet.
REMARQUE:
Nous vous fournissons des conseils et des informations.
1.3 par rapport à
l’alimentation
électrique
44
L'appareil est alimenté par du courant électrique, ce qui
implique par principe un risque d'électrocution. Respectez
par conséquent les points ci-dessous :
- Ne touchez jamais la prise avec des mains mouillées.
- Pour débrancher l'appareil, tirez toujours sur la fiche.
Ne tirez jamais sur le câble, car il pourrait être
endommagé.
- Assurez-vous que le cordon d'alimentation n'est pas
plié, coincé, écrasé ou encore en contact avec une
source de chaleur.
- Utilisez toujours une rallonge dont la consommation
électrique correspond à celle de l'appareil.
- Ne plongez jamais l'appareil dans de l'eau ou tout autre
liquide, conservez-le à l'abri de la pluie et de l'eau.
Page 45

Consignes de sécurité
- N'exploitez l'appareil que si la tension indiquée sur la
plaque signalétique correspond bien à celle de votre
prise. Une tension différente pourrait rendre l'appareil
définitivement inutilisable.
1.4 Remarques relatives
aux enfants
1.5 Utilisation conforme
aux instructions
Les personnes (y compris les enfants) qui ne sont pas
en mesure de se servir de manière sûre de l'appareil, en
raison de leurs capacités physiques ou sensorielles, de
leurs capacités mentales, de leur inexpérience ou d'un
manque de connaissances, ne doivent pas utiliser cet
appareil sans surveillance ou sans bénéficier des
indications d'une personne responsable. Conservez-le
hors de leur portée.
Ne laissez jamais l'appareil sans surveillance et soyez
particulièrement vigilant lorsque vous l'utilisez à proximité
d'enfants ou de personnes n’étant pas en mesure d’évaluer
les dangers.
Ne jouez pas avec le matériel d'emballage : il existe un
risque d'asphyxie.
Cet appareil convient exclusivement à un usage
domestique. Toute utilisation à titre professionnel est
strictement interdite.
Cet aspirateur-traîneau doit uniquement servir à
nettoyer des sols d'un degré de saleté normal.
En fonction des jeux de brosses choisis, l'appareil peut
aussi être utilisé pour nettoyer les meubles; il est
également possible de nettoyer les rideaux avec une
puissance réduite d'aspiration.
Toute autre utilisation est considérée comme non conforme
et est interdite. Cette interdiction concerne en
particulier :
L'aspiration de :
- cheveux, doigts et autres parties du corps. Ils peuvent
être aspirés et entraîner des blessures graves.
- pièces de vêtements (par ex. lacets, écharpes, etc.).
Elles peuvent être aspirées et entraîner des
blessures.
- l'eau ou d'un autre liquide, en particulier les produits
de nettoyage humides pour tapis. Toute humidité à
l'intérieur de l'appareil peut entraîner un court-circuit.
FR
45
Page 46

Consignes de sécurité
Cette interdiction concerne en particulier :
L'aspiration de :
En cas d'utilisation à proximité de matières explosives
ou facilement inflammables, il y a un risque d'incendie et
d'explosion.
En cas d'utilisation à l'extérieur, la pluie et la saleté
peuvent occasionner des dommages irréparables à
l'appareil.
En cas d'introduction d'objets dans les ouvertures de
l'appareil, ce dernier pourrait surchauffer.
Toute ouverture, modification ou reconstruction de
l'appareil.
- toners (par ex. pour des imprimantes laser, des
copieurs, etc.). Il y a un risque d'incendie et d'explosion.
- les cendres incandescentes, les cigarettes ou les
allumettes non éteintes. Il y a un risque d'incendie.
- les objets pointus comme des bris de verre, des clous
etc. Ces objets détruisent les filtres.
- les décombres de chantier, le plâtre, le ciment, le
maquillage, etc. Les filtres peuvent se boucher.
1.6 En cas de
défectuosités de
l'appareil
46
N'utilisez jamais un appareil défectueux ou ayant un
cordon d'alimentation abîmé. Si le cordon de raccordement
au secteur de cet appareil est endommagé, faites-le
remplacer par le fabricant, son service après-vente ou toute
personne ayant des compétences similaires, ceci afin
d'éviter tout danger.
Amenez l'appareil à réparer dans un magasin
spécialisé ou au service après-vente Royal Appliance,
Adresse ZPage 59, „Garantie“.
Page 47

Déballage et montage
2 Déballage et montage
2.1 Déballage 1. Déballez l'appareil et tous les accessoires.
2. Vérifiez si le contenu est bien complet et ne présente
aucuns dommages. Informations relatives au contenu
de la livraison ZPage 42, „Aperçu de votre Centrixx
TS“.
ATTENTION:
Transportez et expédiez l'appareil uniquement dans son
emballage d'origine afin d'éviter tout dommage.
Conservez à cet effet soigneusement l'emballage.
Jetez les emballages dont vous n'avez plus besoin
conformément aux réglementations nationales et locales
en vigueur.
REMARQUE:
Si vous constatez des défauts ou des dommages dus au
transport, contactez immédiatement votre revendeur.
2.2 Montage
AVERTISSEMENT:
Risque de blessures ! Assurez-vous que l'appareil ne
soit pas branché lorsque vous le montez. Sinon, ce
dernier pourrait se mettre en marche accidentellement.
1. Emboîtez le flexible d'aspiration (ill. 2/1) dans
l'ouverture de réception (ill. 2/2) de l'aspirateur jusqu'à
ce qu'il se verrouille par un clic. Assurez-vous que la
touche de déverrouillage (ill. 2/3) pointe vers le bas
comme sur l'illustration.
2. Emboîtez la poignée (ill. 3/1) dans l'extrémité
supérieure du tube télescopique (ill. 3/2).
3. Emboîtez le suceur universel (ill. 3/3) dans l'extrémité
inférieure du tube télescopique (ill. 3/4).
REMARQUE:
Il peut être nécessaire d'appuyer un peu plus fort lors de
la mise en place du suceur universel.
Ill. 2
Ill. 3
2
1
3
1
4
3
2
FR
47
Page 48

Déballage et montage
1
b
a
Ill. 4
5
2
1
Ill. 5
4
3
4. Réglez la longueur du tube télescopique. Appuyez pour
cela vers le bas l'arrêt du tube télescopique (ill. 4/1)
(ill. 4/a). Tirez ensuite le tube télescopique jusqu'à
atteindre la longueur souhaitée (ill. 4/b). Pour procéder
au verrouillage, relâchez l'arrêt du tube télescopique
pendant que vous le tirez. Vous entendez alors
clairement un "clic".
5. Fixez le compartiment pour accessoires (ill. 5/3) sous
l'arrêt du tube télescopique (ill. 5/2) placé sur celui-ci
(ill. 5/1). Ensuite, poussez la brosse à meubles (ill. 5/4)
et le suceur long (ill. 5/5) sur les dispositifs de
positionnement.
Votre aspirateur-traîneau est maintenant prêt à l'emploi.
2.3 Utilisation des autres
suceurs (accessoires)
1
Ill. 6
2
En plus du suceur universel déjà monté (ill. 1/1) d'autres
suceurs vous permettent d'accroître la polyvalence de
votre aspirateur :
Le suceur long, ainsi que la brosse à meubles et le
suceur pour meubles rembourrés sont fournis comme
accessoires. Lorsque vous ne les utilisez pas, vous
pouvez les ranger dans le compartiment pour accessoires
(ill. 5/3).
- Suceur long (ill. 6/1)
Utilisez-le pour aspirer la poussière aux endroits
difficilement accessibles.
- Suceur pour meubles rembourrés (ill. 6/2)
Utilisez celui-ci pour aspirer des objets dont les
surfaces sont fragiles (comme par ex. les armoires et
les tables).
48
Page 49

Déballage et montage
En option, vous pouvez également vous procurer :
- une turbo brosse (ill. 7)
Pour un nettoyage en profondeur des tapis avec une
brosse à tête rotative.
REMARQUE:
Vous remarquerez, lorsque vous utiliserez la
turbobrosse, que celle-ci est bruyante (vitesse rapide de
rotation).
Ill. 7
Ill. 8
- une brosse pour parquets (ill. 7/2)
Elle est équipée de longs poils et convient
parfaitement aux surfaces qu'il faut ménager (comme
par ex. les parquets ou les sols stratifiés).
FR
AVERTISSEMENT:
Risque de blessures ! Monter les suceurs uniquement
lorsque l'appareil est débranché. Ce dernier pourrait
sinon se mettre en marche accidentellement.
ATTENTION:
N'emboîtez que des suceurs ou des brosses en parfait
état. Des suceurs ou des brosses abîmés peuvent rayer
ou endommager des objets et des surfaces.
Pour monter les brosses et les buses, procédez
comme suit :
1. Éteignez l'appareil et retirez la fiche de la prise.
1
2. Retirez la brosse ou le suceur du manche télescopique
(ill. 8/1).
3. Emboîtez le suceur ou la brosse choisis à l'extrémité
inférieure du tube télescopique (ill. 8/1) ou, si
nécessaire, directement sur la poignée (ill. 1/6).
ATTENTION:
Si vous utilisez l'aspirateur sans suceur ou brosse, vous
risquez d'aspirer accidentellement des objets.
4. Remettez les suceurs ou brosses non utilisés si
possible dans le compartiment pour accessoires (ill. 1/
22). Conservez soigneusement les autres accessoires
et maintenez-les hors de portée des enfants.
49
Page 50

Emploi
3Emploi
3.1 Utilisation de
l'aspirateur
.
AVERTISSEMENT:
Risque de blessures ! Avant tout emploi, vérifiez
l'aspirateur et le cordon d'alimentation. N'utilisez jamais
un appareil qui est endommagé.
AVERTISSEMENT:
Risque de blessures ! Lors d'une aspiration dans des
escaliers ou des sols dénivelés, prenez garde à ce que
vous vous trouviez toujours au-dessus de l'appareil.
ATTENTION:
N'utilisez l'aspirateur que lorsque tous les filtres sont en
parfait état, secs et bien insérés. Assurez-vous
qu'aucune ouverture n'est bouchée. Vous risquez sinon
d'endommager l'aspirateur.
ATTENTION:
Informez-vous sur les exigences d'entretien de votre
revêtement de sol avant de procéder à l'aspiration.
Respectez les recommandations du fabricant des
revêtements de sols.
REMARQUE:
Votre aspirateur est équipé d'une protection anti-
surchauffe. Il s'arrête automatiquement lorsqu'il est
surchauffé. Dans ce cas, éteignez l'aspirateur et
débranchez-le. Éliminez la cause de la surchauffe.
Attendez environ 45 minutes avant de remettre l'appareil
en marche.
50
Page 51

1
Ill. 9
Ill. 10
Ill. 11
Emploi
1. Emboîtez le suceur ou la brosse voulu, ZChapitre 2.2,
4
3
2
A
B
1
1
„Montage“ et ZChapitre 2.3, „Utilisation des autres
suceurs (accessoires)“
2. tirez le cordon d'alimentation au niveau de la prise
jusqu'à voir la marque jaune (ill. 9/1).
AVERTISSEMENT:
Risques d'électrocution ! Si la marque rouge (ill. 9/2) est
visible, rentrez à nouveau le cordon à l'aide du bouton de
l'enrouleur (ill. 9/3) jusqu'à la marque jaune. Dans le cas
contraire, le cordon peut se rompre.
3. Introduisez la fiche dans une prise de courant munie
d'un contact de protection.
AVERTISSEMENT:
Risque de blessures et d'incendie ! N'utilisez l'appareil
que si la tension indiquée sur la plaque signalétique
correspond bien à celle de votre prise. Il pourrait sinon
en résulter un court-circuit entraînant un éventuel risque
d'incendie.
4. Appuyez sur le bouton marche-arrêt (ill. 9/4) afin de
mettre l'aspirateur en marche.
5. Réglez le commutateur sur « moquettes / sols lisses »
(ill. 10) selon le revêtement de sol :
- Sols durs (ill. 10/A):
sols stratifiés, carrelage, linoléums, etc.
- Moquettes et tapis (ill. 10/B):
pour tapis, tapis d'escalier, etc.
6. Réglez la puissance d'aspiration à l'aide du variateur de
puissance (ill. 11/1).
7. Pour passer l'aspirateur, tirez-le derrière vous comme
un traîneau.
REMARQUE:
En vous servant du variateur mécanique de puissance
(ill. 12/1), vous pouvez réduire rapidement la puissance
d'aspiration lorsqu'une puissance d'aspiration inférieure
est requise, par exemple pour dégager les objets que
vous avez aspirés.
FR
Ill. 12
51
Page 52

Emploi
3.2 Arrêt et rangement du
cordon d'alimentation
1
2
Ill. 13
3.3 Transport et
rangement
1
2
Ill. 14
2
1
1. Éteignez l'aspirateur au moyen du bouton marche-arrêt
(ill. 13/1), puis débranchez-le.
2. Gardez la fiche en main.
AVERTISSEMENT:
Risque de blessures ! En s'enroulant, le cordon
d'alimentation peut faire trébucher des personnes ou
arracher des objets.
3. Appuyez sur le bouton de l'enrouleur (ill. 13/2) pour
enrouler le cordon d'alimentation.
Pour transporter l'aspirateur, vous pouvez le saisir soit
au niveau de la poignée servant à le soulever (ill. 14/1), soit
par la poignée servant à le transporter (ill. 14/2).
AVERTISSEMENT:
Risque de blessures ! Si vous quittez le lieu de travail,
éteignez l'appareil et respectez les consignes énoncées
sous ZChapitre 3.2, „Arrêt et rangement du cordon
d'alimentation“.
Pour le rangement de l'appareil, vous pouvez
accrocher l'encoche de rangement (ill. 15/1) du manche
télescopique au support de rangement (ill. 15/2) sous
l'aspirateur.
Ill. 15
52
ATTENTION:
Ne rangez ou ne posez jamais l'appareil à proximité
directe d'une source de chaleur (par ex. un chauffage ou
un four). Évitez de l'exposer directement aux rayons du
soleil. La chaleur peut endommager l'appareil.
Si vous rangez l'appareil pour une période prolongée,
videz le bac à poussière et nettoyez-le, ainsi que les filtres.
Rangez l'appareil dans un environnement frais et sec.
Page 53

Emploi
3.4 Videz le bac à
poussière
Ill. 16
Ill. 17
Videz le bac à poussière au plus tard lorsque
l'indicateur "Max" (ill. 16/1) est atteint ou lorsque l'efficacité
de l'aspirateur diminue.
ATTENTION:
Avant de vide la bac à poussière, éteignez l'appareil et
débranchez-le. Autrement, la poussière aspirée
endommagera l'appareil.
1. Appuyez sur la touche de déverrouillage puis ouvrez le
couvercle du boîtier (ill. 16).
1
1
2. Tournez légèrement le bac à poussière (ill. 16) vers la
droite afin de le déverrouiller.
3. Retirez le ensuite de l'aspirateur vers le haut.
4. Maintenez le bac à poussière à l'intérieur d'une
poubelle afin de le vider.
5. Appuyez sur la touche de déverrouillage (ill. 17/1). Le
fond s'ouvre et la poussière tombe dans la poubelle.
FR
REMARQUE:
Le contenu du bac à poussière peut être mis à la
poubelle s'il ne contient pas de saleté dont la présence
est interdite dans les ordures ménagères.
6. Tapez légèrement pour faire tomber les restes de
saleté. Si nécessaire, essuyez à sec le bac à poussière.
7. Refermez le fond. Vous entendrez un "clic" lorsqu'il
s'emboîte.
8. Remettez le bac à poussière dans l'aspirateur.
Verrouillez-le en le tournant légèrement vers la gauche.
9. Refermez le couvercle du boîtier. Vous entendrez un
"clic" lorsqu'il s'emboîte.
53
Page 54

Maintenance et entretien
4 Maintenance et entretien
4.1 Vue d'ensemble des
filtres
2
1
3
Ill. 18
Votre aspirateur est équipé des 3 filtres suivants :
- Filtre central à lamelles (ill. 18/1)
La poussière et les particules de saleté peuvent
rester accrochées aux lamelles du filtre central et
réduire le flux d'air.
Nettoyage : Nettoyez le filtre après chaque
aspiration afin de conserver la puissance
d'aspiration (voir ZChapitre 4.2, „Nettoyage/
changement du filtre central à lamelles et du filtre de
protection du moteur“).
Si le filtre central à lamelles devait être très sale ou
qu'il n'est plus possible de le nettoyer, remplacez-le
par un nouveau filtre (ZChapitre 4.2, „Nettoyage/
changement du filtre central à lamelles et du filtre de
protection du moteur“).
- Filtre de protection du moteur (ill. 18/2)
Contrôle: Contrôlez le filtre de protection du moteur
chaque fois que vous videz le bac à poussière.
Nettoyage : si le filtre est sale, nettoyez celui-ci selon
la description (ZChapitre 4.2, „Nettoyage/
changement du filtre central à lamelles et du filtre de
protection du moteur“).
Remplacez le filtre le cas échéant.
- Filtre hygiénique de sortie d'air (ill. 18/3)
Remplacement : tous les 6 mois (ZChapitre 4.3,
„Remplacement du filtre hygiénique de sortie d’air“)
Passé une certaine période, les filtres peuvent se
boucher. C'est pour cela qu'il est important de respecter les
intervalles indiqués ci-dessus.
Remplacez immédiatement les filtres endommagés.
54
ATTENTION:
Aucun des filtres ne peut être lavé à la machine ou dans
le lave-vaisselle.
Page 55

Maintenance et entretien
4.2 Nettoyage/changement
du filtre central à
lamelles et du filtre de
protection du moteur
Ill. 19
Ill. 20
1. Éteignez l'appareil et respectez les consignes
énoncées sous ZChapitre 3.2, „Arrêt et rangement du
cordon d'alimentation“.
2. Videz le bac à poussière, ZChapitre 3.4, „Videz le bac
à poussière“.
3. Retirez le couvercle du bac à poussière en l'ôtant du
bac au-dessus d'une poubelle.
4. Maintenez le couvercle très bas au dessus d'une
poubelle. Séparez d'abord le tamis du filtre et le
couvercle en tournant le premier dans le sens inverse
de celui des aiguilles d'une montre (ill. 19).
5. Séparez ensuite le tamis du filtre à lamelles et le
couvercle en tournant le premier dans le sens inverse
de celui des aiguilles d'une montre (ill. 20).
6. Pour un nettoyage sommaire, tapotez légèrement les
deux pièces sur toutes les faces au-dessus d'une
poubelle (ill. 21).
FR
Ill. 21
Ill. 22
7. Pour nettoyer à sec et à fond le filtre central à lamelles,
placez la brosse pour meubles fournie à la livraison
comme indiqué sur l'illustration (ill. 22)
55
Page 56

Maintenance et entretien
Ill. 23
1
Ill. 24
Ill. 25
1
8. Retirez par la même occasion le filtre de protection du
moteur (ill. 23/1).
9. Tapotez légèrement le filtre au dessus d'une poubelle.
REMARQUE:
Si, après un nettoyage à sec approfondi, l'élément du
filtre de protection du moteur (ill. 24/1), l'élément du filtre
central à lamelles (ill. 24/2) ainsi que le tamis du filtre
(ill. 24/3) devaient être encore sales, il faut les laver à
fond avec de l'eau froide et claire (ill. 24). N'utilisez pour
cela ni brosse à poils durs, ni produit de nettoyage.
Faites ensuite directement sécher les éléments de filtre
(env. 15 heures à température ambiante). Remettez-les
en place uniquement une fois qu'ils sont bien secs.
10. Si les éléments de filtre étaient trop sales ou abîmés
pour mériter un lavage, remplacez-les par des
nouveaux (ZChapitre 5.2, „Pièces de rechange“).
3
2
11. Insérez le nouvel élément / l'élément nettoyé du filtre de
protection du moteur.
12. Placez ensuite à nouveau l'élément du filtre central à
lamelles en le vissant dans le sens des aiguilles d'une
montre au couvercle du bac à poussière. (ill. 25).
Veillez à ce qu'il soit bien en place, sinon le tamis du
filtre n'est pas bloqué.
13. Revissez le tamis du filtre en le tournant dans le sens
des aiguilles d'une montre (ill. 26).
14. Remettez le couvercle sur le bac à poussière. Veillez,
en le plaçant, à ce que le bec s'enfonce dans la rainure
correspondante.
Ill. 26
Ill. 27
56
15. Remettez le bac à poussière dans l'aspirateur et
tournez-le vers la gauche (ill. 27).
16. Refermez le couvercle du boîtier (ill. 27). Vous
entendrez un clic signalant le verrouillage des boutons
de déverrouillage. Vérifiez à ce que le couvercle du
boîtier soit bien en place.
Page 57

Maintenance et entretien
4.3 Remplacement du filtre
hygiénique de sortie
d’air
2
1
3
Ill. 28
4.4 Nettoyage de l'appareil
1. Éteignez l'appareil et respectez les consignes
énoncées sous ZChapitre 3.2, „Arrêt et rangement du
cordon d'alimentation“.
2. Pour ouvrir le couvercle du filtre de sortie d'air (ill. 28/1),
tournez-le dans le sens des aiguilles d'une montre, puis
retirez-le.
3. Retirez le support du filtre de sortie d'air (ill. 28/2) avec
son élément (ill. 28/3) en le tournant dans le sens des
aiguilles d'une montre.
4. Remplacez l'élément du filtre de sortie d'air par un
nouveau (ill. 28/3) (numéro de référence ZChapitre
5.2, „Pièces de rechange“).
REMARQUE:
Si le filtre de sortie d'air n'est pas très sale, il suffit de le
tapoter au-dessus d'une poubelle. Nous vous
recommandons cependant de remplacer l'élément du
filtre de sortie d'air tous les 6 mois.
5. Replacez le couvercle du filtre de sortie d'air et
verrouillez-le en le tournant dans le sens inverse des
aiguilles d'une montre.
AVERTISSEMENT:
Risque de blessures ! Avant de nettoyer l'appareil,
éteignez-le et débranchez-le, ZChapitre 3.2, „Arrêt et
rangement du cordon d'alimentation“.
FR
ATTENTION:
Ne nettoyez en aucun cas le boîtier avec des produits de
nettoyage, des détergents ou de l'alcool, car cela
pourrait l'endommager.
Nettoyez le boîtier de l'aspirateur uniquement avec un
chiffon légèrement humide.
57
Page 58

Élimination des anomalies
5 Élimination des anomalies
5.1 Avant d'envoyer l'appareil
Avant d'expédier l'appareil au service après-vente de Royal Appliance, veuillez vérifier, en vous
aidant du tableau ci-dessous, si vous ne pouvez pas remédier vous-même à l'anomalie.
AVERTISSEMENT:
Risque de blessures ! N'utilisez jamais un appareil défectueux ! Avant de rechercher la cause de
l'anomalie, arrêtez l'appareil et débranchez-le ZChapitre 3.2, „Arrêt et rangement du cordon
d'alimentation“.
Problème Cause possible Solutions proposées
Impossibilité de
mettre en
marche
l'appareil
L'appareil
cesse soudain
d'aspirer
Le résultat de
l'aspiration n'est
pas satisfaisant
malgré un
fonctionnement
correct
L'appareil est
très bruyant.
58
L'appareil n'est pas branché
ou il n'est pas allumé.
Il n'y pas de courant à la prise. Essayez de brancher l'aspirateur à une autre prise
Le cordon d'alimentation est
endommagé.
La protection contre les
surchauffes s'est déclenchée
(certainement à cause d'une
obturation des canaux
d'aspiration, une obturation
du filtre ou pour une raison
semblable).
Le bac à poussière est trop
plein ou bouché.
Le filtre est sale. Nettoyez le filtre concerné, ZChapitre 4,
Le suceur, le manche
télescopique ou le flexible
sont bouchés.
Le suceur mis en place ne
convient pas au revêtement
de sol.
Le commutateur „tapis et
moquettes / sols durs“ (ill. 1/
13) ne convient pas au
revêtement de sol.
Un élément aspiré entrave la
circulation de l'air.
Le bac à poussière est trop
plein ou bouché.
Branchez la fiche dans une prise munie d'un
contact de protection, puis mettez l'appareil en
marche, ZChapitre 3.1, „Utilisation de
l'aspirateur“.
dont vous êtes sûr qu'elle fonctionne.
Faites remplacer le cordon par le service après-
vente de Royal
„Garantie“.
Éteignez l'appareil et débranchez-le.
Éliminez la cause de surchauffe (par exemple une
obturation des canaux d'aspiration, une obturation
du filtre ou une raison semblable). Attendez env.
45 minutes. Une fois l'aspirateur refroidi, vous
pouvez le remettre en marche.
Videz/nettoyez le bac à poussière ZChapitre 3.4,
„Videz le bac à poussière“.
„Maintenance et entretien“.
Débouchez-les. En cas de besoin, utilisez un long
morceau de bois (par ex. un manche à balai).
Changez le suceur ZChapitre 2.3, „Utilisation des
autres suceurs (accessoires)“.
Adaptez la position du commutateur « tapis et
moquettes / sols durs » (ill. 1/13) au revêtement
de sol, ZChapitre 3.1, „Utilisation de l'aspirateur“,
étape 4.
Retirez cet élément. En cas de besoin, utilisez un
long morceau de bois (par ex. un manche à balai).
Videz/nettoyez le bac à poussière ZChapitre 3.4,
„Videz le bac à poussière“.
Appliance, adresse, ZPage 59,
Page 59

5.2 Pièces de rechange
Vous pouvez commander ultérieurement les pièces détachées et les accessoires.
No. d'art. Description
2610001 Jeu de filtres de 5 pièces, comprenant
1 filtre central à lamelles, 1 filtre de protection du moteur
1 filtre hygiénique de sortie d'air et 2 gaines pour filtres
Garantie
Vous pouvez acheter celles-ci auprès de :
ZPage 224, „Royal Appliance Int. GmbH International Service“
5.3 Élimination
Les filtres sont conçus avec des matériaux écologiques et peuvent être mis à la poubelle.
À la fin du cycle de vie de votre produit, rendez l'appareil inutilisable en le
débranchant et en coupant le cordon d'alimentation. Éliminez l'appareil en tenant
compte des réglementations en vigueur dans votre pays. Les déchets électriques
doivent être éliminés séparément. Pour toute question relative au recyclage des
déchets, demandez conseil à vos autorités communales ou à votre revendeur.
6 Garantie
Nous assurons une garantie de 24 mois sur votre appareil à compter de la date d'achat.
Pendant la garantie, nous nous réservons le droit de réparer ou de remplacer l'appareil ou l'accessoire
gratuitement (des accessoires endommagés n'impliquent pas forcément le remplacement de
l'appareil) afin de remédier à tout défaut lié au matériel ou à la fabrication. Tout dommage résultant
d'une utilisation non conforme (emploi d'une tension ou d'un courant erroné, branchement à une prise
non adaptée ou lorsque l'appareil est cassé etc.) est exclu de la garantie, de même que l'usure et les
défauts liés à l'usage normal de l'appareil qui n'influencent pas le bon fonctionnement de l'appareil.
En cas d'intervention d'une personne ou d'un service non habilités, ou lors de l'utilisation de pièces
détachées ne provenant pas de Royal Appliance, les droits de garantie deviennent caducs. Les
pièces sujettes à usure sont exclues de la garantie et leur remplacement est payant ! La garantie
s'applique uniquement lorsque la date d'achat, le tampon du revendeur et sa signature figurent sur le
bon de garantie ou si une copie de la facture sont joints à l'appareil. Les prestations de garantie
n'impliquent en aucune façon le prolongement de la durée de garantie ou un droit à une nouvelle
garantie ! Expédiez l'appareil en ayant pris soin de vider le bac à poussière et en indiquant brièvement
et en majuscule les causes de l'anomalie. Envoyez le tout par courrier recommandé avec la mention
"Zur Garantie" ("Appareil sous garantie“). N'oubliez pas d'y joindre le bon de garantie ainsi qu'une
copie du ticket de caisse ou de la facture et envoyez le tout à l'adresse suivante :
FR
ZPage 224, „Royal Appliance Int. GmbH International Service“
59
Page 60

Royal Appliance Int. GmbH International Service
Royal Appliance Int. GmbH Internat ional Service
DE
Royal Appliance International
GmbH
Abt. Kundenservice
Itterpark 5-7
40724 HILDEN
DEUTSCHLAND
Tel.: +49 (0) 2103 - 20 07 10
Fax: +49 (0) 2103 - 20 07 77
FR
Pièce de rechange service
OPM NANTÉS Enterprises
33 Rue du Bois Briand
BP 61635
44316 NANTES Cedex 3
FRANCE
Tel. +33 - 2 - 40 49 64 25
Fax +33 - 2 - 40 93 96 22
www.opm-france.com
TR
GERCEKLER ITH. IHR.
PAZ. DAGITIM LTD. STI
Egitim Mah. Kasap Ismail Cikmazi
No:6/3
Hasanpasa / Kadiköy
ISTANBUL, TURKEY
Tel: +90 (216) 5508941
Fax:+90 (216) 5508943
http://www.gerceklergroup.com
NL
Z.E.S. Goes B.V.
T.a.v. afd. Service
Pearyweg 1
4462 GT GOES
NEDERLAND
Tel: +31 - 113 - 24 07 00
Fax: +31 - 113 - 24 07 50
dirtdevil@zesgoes.nl
ES
Royal Appliance Espana, SL
Royal, Dirt Devil, Stellar
C/ Jazmin, 66 - 3°
28033 MADRID
ESPAÑA
Tel: +34 - 902 - 43 06 63
PL
SERV-SERWIS Sp. z o.o.
ul. Poniatowskiego 4/1
45-049 OPOLE
POLSKA
Tel: +48 - 77 - 45 36 139
Fax: +48 - 77 - 45 36 138
adabrowski@serv-serwis.pl
HR
TD ''ME
DJIMURKA'' D.D.
Trg Republike 6
40000
ČAKOVEC
HRVATSKA
Tel.: +385 - 40 - 31 27 60
Fax: +385 - 40 - 32 86 61
AT
Zmugg Elektronik Service
und Vertriebges. M.b.H.
Fabriksgasse 27
8020 GRAZ
ÖSTERREICH
Tel: +43 - 316 - 77 21 20
Fax: +43 - 316 - 77 21 20 10
CZ
Le Cygne electronic service
spol. s r.o.
Jablonecká 722/8
190 00 PRAHA 9
ČESKÁ REPUBLIKA
Tel: +420 - 28 68 83 940
Fax: +420 - 28 68 85 064
servis@lce.cz
RUS PYC
OOO RTC „Sovinservice“
127081 MOSCOW
Jasny proezd, 10
ROSSIJSKAJA FEDERAZIJA
Tel.: +7 - 495 - 47 39 003
SI
Strojinc Ciril s.p.
Koseskega ul. 1a
1000 LJUBLJANA
SLOVENIJA
Tel: +386 -1- 42 28 489
ООО РТЦ "Совинсервис",
127081 г. МОСКВА,
Ясный проезд, д. 10
РОССИЙСКАЯ ФЕДЕРАЦИЯ
Тел. +7 - 495 - 47 39 003
SK
Aspico Slovakia s r.o.
Kracanska 40/104
92901 DUNAJSÁ STREDA
SLOVAKIA
Tel: +42 - 031 - 55 11 815
HU
Magyarország: Aspico Kft.
Puskás Tivadar út.4.
9027 GYŐR
MAGYARORSZÁG
Tel.: +36 - 96 - 51 12 91
szerviz@aspico.hu
224
Page 61

Garantiekarte
Warranty Card
Card de garantie
Garantiekaart
Certificado de garantía
Гарантийная карточка
Garanti Kartı
Záruční list
Záručný list
Garancijski list
Jamstveni list
Garancialevél
Centrixx TS
Stempel und Unterschrift des Händlers / Stamp and sign of dealer / Cachet et signatur du vendeur / Stempel en handtekening van de handelaar / Sello y firma
del distribuidor / Печать и подпись продавца / Satıcının mührü ve imzası / Razítko a podpis prodejce / Pečiatka a podpis predajcu /
Žig in podpis trgovca / Pečat i potpis trgovca / A kereskedés bélyegzője és aláírása
Fehlerbeschreibung / Description of fault / Description de l’erreur / Beschrijving van de fouten / Descripción del error
Описание неисправности/ Hata tarifi / Popis poruchy / Popis poruchy /
Kaufdatum / Date of purchase / Date d´achat / Koopdatum / Fecha de compra / Дата покупки / Satın alma tarihi /
Datum zakoupení / Dátum zakúpenia / Datum nakupa / Datum kupnje / Vásárlás napja
Opis napake / Opis greške / Hiba leírása
 Loading...