

Page 1
Centrino X3.1
DE
GB
ES
Bedienungsanleitung..........3-9
beutelloser Bodenstaubsauger
Operating Manual............10-17
bagless cylinder vacuum cleaner
Manual de instrucciones 18-25
Aspiradora rodante sin bolsa
Roya-31315-3 • A4 (ohne AS) • 29.03.2012
Page 2
18
23
24
25
27
22
20
21
26
31
6
1
10
5
3
4
2
12
13
14
15
16
17
29
28
7
11
9
8
33
19
34
32
30
1
2
Page 3
1 Überblick über Ihren Centrino X3.1
Beheben Sie
Störungen
ganz leicht selbst.
www.dirt-devil.de/service
*0,14 €/Min. aus dem
deutschen Festnetz
(deutscher Mobilfunkhöchstpreis 0,42 €/Min.)
SERVICE-HOTLINE
0180 501 50 50
*
Mo.– Fr., 8 – 20 Uhr
1 Überblick über Ihren Centrino X3.1
Vielen Dank!
Wir danken Ihnen für den Kauf des Centrino X3.1 und das entgegengebrachte Vertrauen.
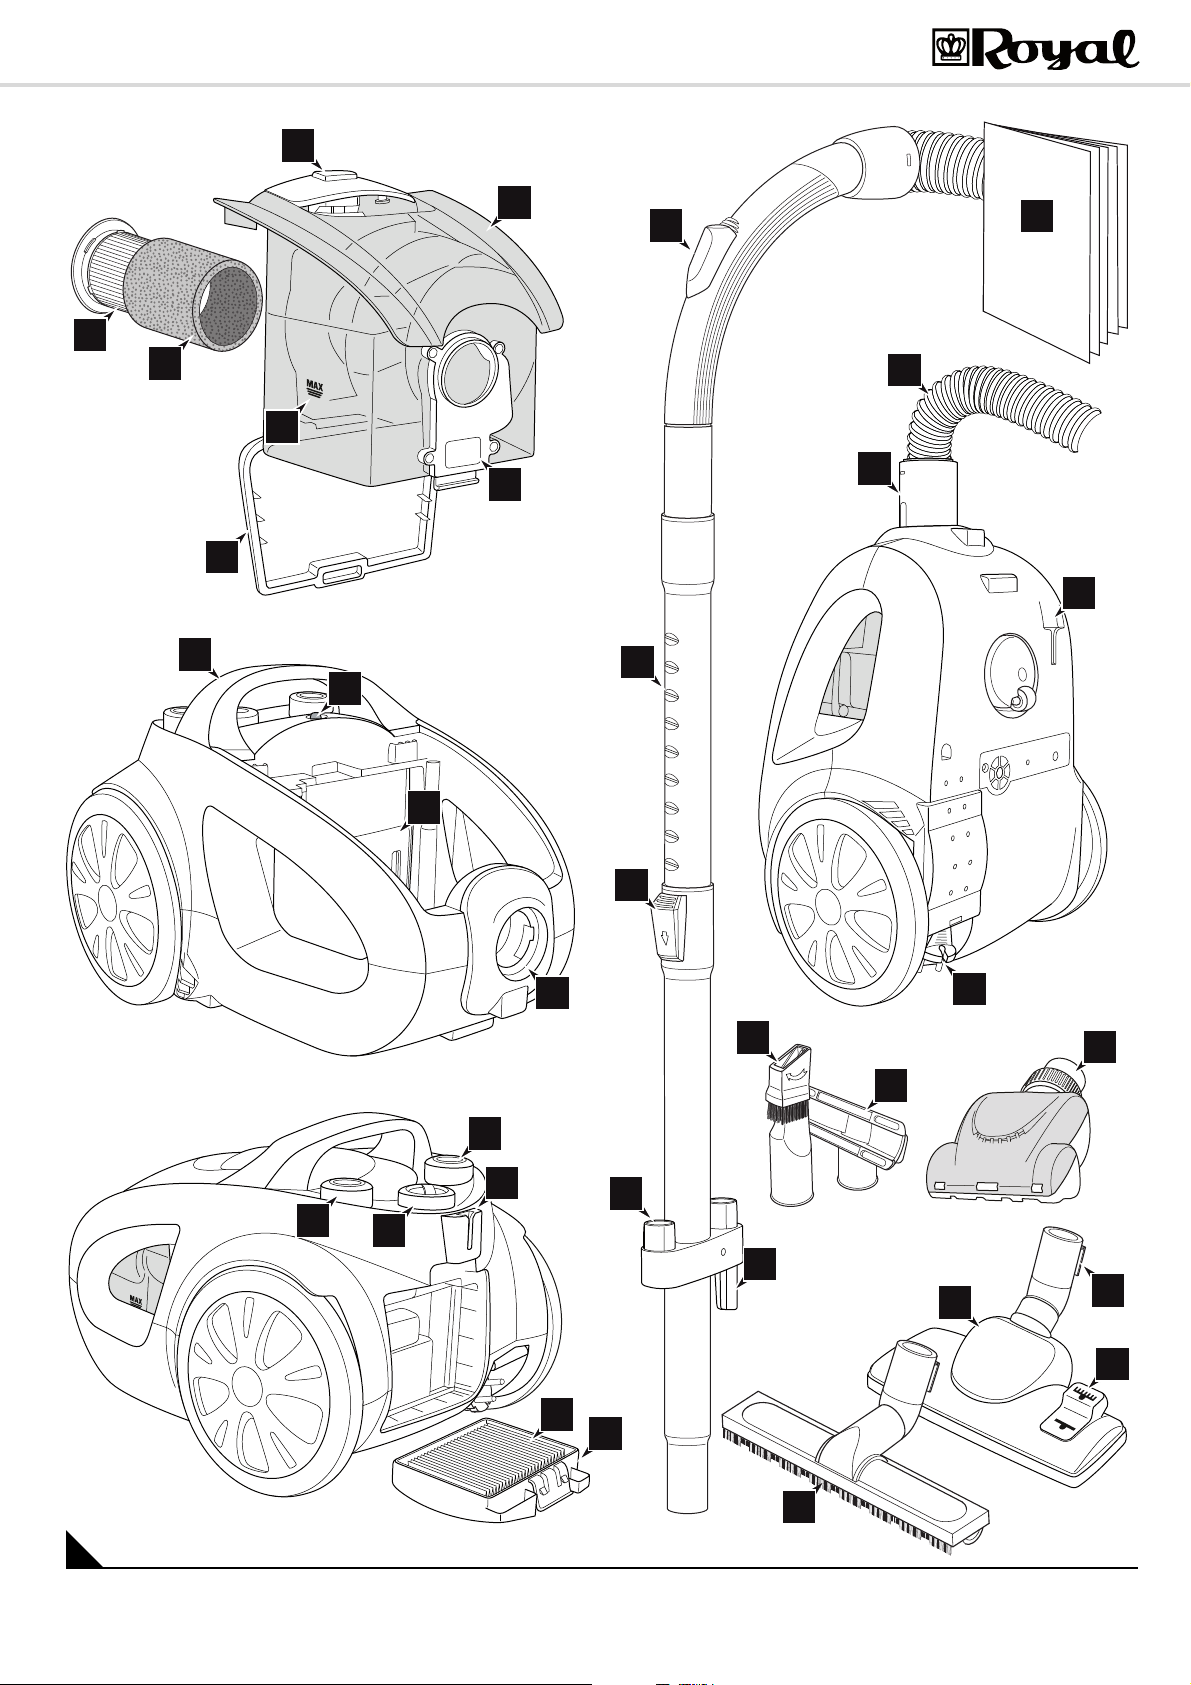
Übersicht über den Lieferumfang (Abb. 1)
1 Ein-/Aus-Schalter
2 Saugleistungsregler
3 Kabelaufrolltaste
4 Parkhalterung
5 Ausblasfilter mit Entnahmelasche
6 Ausblasfilter-Abdeckung
7 Saugschlauchaufnahme
8 Motorschutzfilter
9 Reinigungs-/Entleerungsanzeige
10 Tragegriff
11 Entleerungstaste
12 Staubbehälterboden
13 MAX-Markierung am Staubbehälter
14 Filtervlies
15 Lamellenzentralfilter
16 Entriegelungstaste für den Staubbehälter
17 Staubbehälter
18 Nebenluftregler
19 Saugschlauch
20 Saugschlauchadapter
21 Verstauhalterung
22 Stromkabel mit Stecker
23 Teleskoprohr
24 Teleskoprohr-Arretierung
25 Zubehörhalterung
26 Verstauhaken
27 2-in-1-Kombipinsel, einsetzbar als
- Möbelpinsel oder
- Fugendüse
28 Polsterdüse
29 Bodendüse (Abbildung beispielhaft)
30 Parkhaken
31 Umschalter „Teppich/Hartboden“ (Abbildung beispielhaft)
32 Mini-Turbobürste „Fellino“
33 Parkettbürste
34 Bedienungsanleitung
Inhaltsverzeichnis
1 Überblick über Ihren Centrino X3.1 ...................................... 3
Garantiebedingungen ............................................................... 3
Im Garantiefall .......................................................................... 3
2 Sicherheitshinweise ............................................................... 4
2.1 zur Bedienungsanleitung .......................................................... 4
2.2 zu bestimmten Personengruppen ............................................ 4
2.3 zur Stromversorgung ................................................................ 4
2.4 zur bestimmungsgemäßen Verwendung ................................. 4
2.5 bei defektem Gerät ................................................................... 4
2.6 zur Entsorgung ......................................................................... 4
3 Vor dem Gebrauch ................................................................. 5
3.1 Auspacken ............................................................................... 5
3.2 Düse auswählen ....................................................................... 5
3.3 Montieren ................................................................................. 5
4 Gebrauch ................................................................................ 6
4.1 Sicherheit beim Gebrauch ........................................................ 6
4.2 Staubsaugen ............................................................................ 6
4.3 Ausschalten .............................................................................. 6
4.4 Transportieren und Aufbewahren ............................................. 6
5 Wartung ................................................................................... 7
5.1 Staubbehälter leeren und reinigen ........................................... 7
5.2 Lamellenzentralfilter und Motorschutzfilter reinigen ................. 7
5.3 Ausblasfilter reinigen ................................................................ 8
5.4 Ersatzteile und Zubehör ........................................................... 8
5.5 Falls das Gerät nicht arbeitet, wie es soll ................................. 8
Technische Daten
Geräteart : beutelloser Bodenstaubsauger
Modell : Centrino X3.1
Modellnummer : M2012-3
Spannung : 220 – 240V ~, 50/60 Hz
Leistung : 1800 W nom. – 2300 W max.
max. nutzbares Staubbehältervolumen : ca. 1,5 Liter
Stromkabellänge : ca. 5,0 m
Gewicht : ca. 5,3 kg
Technische und gestalterische Änderungen im Zuge stetiger Produktverbesserungen vorbehalten. © Royal Appliance International GmbH
DE
Garantiebedingungen
Wir übernehmen für das von uns vertriebene Gerät die gesetzlich vorgeschriebene Gewährleistung von 24 Monaten ab Kaufdatum.
Innerhalb dieser Gewährleistungsfrist beseitigen wir nach unserer Wahl
durch Reparatur oder Austausch des Gerätes oder des Zubehörs (Schäden an Zubehörteilen führen nicht automatisch zum Umtausch des kompletten Gerätes) unentgeltlich alle Mängel, die auf Material- oder
Herstellungsfehlern beruhen.
Von der Gewährleistung sind Schäden ausgenommen, die auf unsachgemäßen Gebrauch (Betrieb mit falscher Stromart/-spannung, Anschluss
an ungeeignete Stromquellen, Bruch etc.) zurückzuführen sind, normaler
Verschleiß und Mängel, die den Wert oder die Gebrauchstauglichkeit des
Gerätes nur unerheblich beeinflussen.
Bei Eingriffen durch eine nicht von uns autorisierte Stelle oder bei Verwendung anderer als original Royal
Verschleißteile fallen nicht unter die Garantie und sind deshalb kostenpflichtig!
Die Gewährleistung tritt nur in Kraft, wenn das Kaufdatum durch Stempel
und Unterschrift des Händlers auf der Garantiekarte bestätigt ist oder eine
Rechnungskopie dem eingeschickten Gerät beiliegt. Garantieleistungen
bewirken weder eine Verlängerung der Garantiezeit, noch beginnt dadurch
ein Anspruch auf eine neue Garantie!
Appliance-Ersatzteile erlischt die Garantie.
Im Garantiefall
Versenden Sie das Gerät mit entleertem Staubbehälter und einer kurzen
Fehlerbeschreibung in Blockschrift.
Versehen Sie das Anschreiben mit dem Vermerk „Zur Garantie“. Senden
Sie es zusammen mit der Garantiekarte oder einer Rechnungskopie an
diese Adresse:
Royal Appliance International GmbH
Abt. Kundenservice
Jagenbergstraße 19
41468 Neuss
Deutschland
Tel.: +49 (0) 180 - 501 50 50*
Fax: +49 (0) 2131 - 60 90 60 95
www.dirtdevil.de
servicecenter@dirtdevil.de
*0,14 €/Minute aus dem deutschen
Festnetz (deutscher Mobilfunkhöchstpreis 0,42 €/Minute)
3
Page 4
2 Sicherheitshinweise
WARNUNG:
ACHTUNG:
HINWEIS:
2 Sicherheitshinweise
2.1 zur Bedienungsanleitung
Lesen Sie diese Bedienungsanleitung vollständig durch, bevor Sie mit
dem Gerät arbeiten. Bewahren Sie die Anleitung gut auf. Falls Sie das Gerät an Dritte weitergeben, geben Sie die Bedienungsanleitung mit.
Die Nichtbeachtung dieser Anleitung kann zu schweren Verletzungen
oder Schäden am Gerät führen.
Für Schäden, die durch Nichtbeachtung dieser Bedienungsanleitung entstehen, übernehmen wir keine Haftung.
Beachten Sie Hinweise, die wie folgt gekennzeichnet sind, unbedingt,
um Unfälle und Schäden am Gerät zu vermeiden.
2.2 zu bestimmten Personengruppen
Dieses Gerät ist nicht dafür bestimmt, durch Personen (einschließlich
Kinder) mit eingeschränkten physischen, sensorischen oder geistigen Fähigkeiten oder mangels Erfahrung und/oder mangels Wissen benutzt zu werden, es sei denn, sie werden durch eine für ihre Sicherheit zuständige Person
beaufsichtigt oder erhielten von ihr Anweisungen, wie das Gerät zu benutzen
ist. Bewahren Sie das Gerät für diesen Personenkreis unzugänglich auf.
2.3 zur Stromversorgung
Das Gerät wird mit elektrischem Strom betrieben, dabei besteht grundsätzlich die Gefahr eines elektrischen Schlags. Achten Sie daher besonders
auf Folgendes:
Fassen Sie den Stecker nie mit nassen Händen an.
Wenn Sie den Stecker aus der Steckdose herausziehen wollen, ziehen
Sie immer direkt am Stecker. Ziehen Sie niemals am Stromkabel, es könnte beschädigt werden.
Transportieren Sie das Gerät niemals am Stromkabel. Es könnte be-
schädigt werden.
Achten Sie darauf, dass das Stromkabel nicht geknickt, eingeklemmt,
überfahren wird oder mit Hitzequellen in Berührung kommt. Es darf außerdem nicht zur Stolperfalle werden.
Warnt vor Gefahren für Ihre Gesundheit und zeigt mögliche Verletzungsrisiken auf.
Weist auf mögliche Gefährdungen für das Gerät oder andere Gegenstände hin.
Hebt Tipps und Informationen für Sie hervor.
Kinder sollten beaufsichtigt werden, um sicherzustellen, dass sie nicht
mit dem Gerät spielen. Kinder dürfen sich unter anderem weder auf das
Gerät stellen oder setzen.
Verpackungsmaterialien dürfen nicht zum Spielen verwendet werden.
Es besteht Erstickungsgefahr.
Tauchen Sie das Gerät niemals in Wasser oder andere Flüssigkeiten
und halten Sie es von Regen und Nässe fern.
Stellen Sie vor dem Anschließen an die Stromversorgung sicher, dass
die auf dem Typenschild angegebene elektrische Spannung mit der Spannung Ihrer Steckdose übereinstimmt. Benutzen Sie nur Steckdosen mit
Schutzkontakt.
Benutzen Sie nach Möglichkeit keine Verlängerungskabel. Falls dies
unumgänglich ist, benutzen Sie nur GS-geprüfte, spritzwassergeschützte,
einfache Verlängerungskabel (keine Mehrfachsteckdosen), die für die
Leistungsaufnahme des Geräts ausgelegt sind.
Kontrollieren Sie das Stromkabel vor dem Benutzen auf eventuelle Be-
schädigungen.
2.4 zur bestimmungsgemäßen Verwendung
Der Bodenstaubsauger darf nur im Haushalt eingesetzt werden. Er ist für
eine gewerbliche Nutzung nicht geeignet.
Verwenden Sie den Bodenstaubsauger ausschließlich für das Reinigen
von trockenen, normal verschmutzten Böden. Wenn Sie die Möbelbürste
montiert haben, können Sie das Gerät ebenso zum Saugen von Möbeln
einsetzen. Bei komplett geöffnetem Nebenluftregler (Abb. 1/18) und mit
entsprechender Vorsicht kann das Gerät sogar zum Saugen von Gardinen
dienen.
Jede weitere Verwendung gilt als nicht bestimmungsgemäß und ist untersagt. Verboten ist insbesondere:
Die Verwendung in der Nähe von explosiven oder leicht entzündlichen
Stoffen. Es besteht Brand- oder Explosionsgefahr.
Die Verwendung im Freien. Es besteht die Gefahr, dass Regen und
Schmutz das Gerät zerstören.
Das Hineinstecken von Gegenständen in die Öffnungen des Gerätes.
Es könnte überhitzen.
Das selbstständige Umbauen oder Reparieren des Gerätes.
2.5 bei defektem Gerät
Wenn die Anschlussleitung dieses Gerätes beschädigt ist, muss sie durch
den Hersteller oder seinen Kundendienst oder eine ähnlich qualifizierte
Person ersetzt werden, um Gefährdungen zu vermeiden.
Verboten ist zudem:
Das Saugen von:
- Menschen, Tieren, Pflanzen, insbesondere Haaren, Fingern und anderen Körperteilen sowie am Körper befindlichen Kleidungsstücken.
Sie könnten eingezogen werden und Verletzungen hervorrufen.
- Wasser und anderen Flüssigkeiten, insbesondere feuchten TeppichReinigungsmitteln. Feuchtigkeit im Inneren kann zum Kurzschluss
führen.
- Tonerstaub (für Laserdrucker, Kopierer usw.). Es besteht Brand- und
Explosionsgefahr.
- glühender Asche, brennenden Zigaretten oder Streichhölzern. Es
kann zum Brand kommen.
- spitzen Gegenständen, wie Glassplittern, Nägeln etc. Dadurch kann
das Gerät beschädigt werden.
- Bauschutt, Gips, Zement, feinstem Bohrstaub, Schminke, Puder
usw. Dadurch kann das Gerät beschädigt werden.
Betreiben Sie niemals ein defektes Gerät oder ein Gerät mit einem defekten
Stromkabel. Geben Sie ein defektes Gerät zur Reparatur an einen Fachhändler oder den Royal
„International Service“.
Appliance-Kundendienst. Adresse Seite 26,
2.6 zur Entsorgung
4
Entsorgen Sie das Gerät entsprechend den in Ihrem Land geltenden Umweltschutzvorschriften. Elektrische Abfälle dürfen nicht zusammen mit Haushaltsabfällen entsorgt werden. Nutzen Sie stattdessen die örtlichen Sammelstellen zur Rückgabe von Altgeräten.
Die verwendeten Filter sind aus umweltverträglichen Materialien hergestellt. Sie können diese im Hausmüll entsorgen.
Page 5
3 Vor dem Gebrauch
ACHTUNG:
HINWEIS:
2
3
1
2
BA
2
1
3
B
A
1 1
4
B
C
A
5
WARNUNG:
ACHTUNG:
3 Vor dem Gebrauch
3.1 Auspacken
Versenden Sie das Gerät grundsätzlich in der Originalverpackung, damit
es keinen Schaden nimmt. Heben Sie dazu die Originalverpackung auf.
Entsorgen Sie dagegen nicht mehr benötigtes Verpackungsmaterial ordnungsgemäß.
3.2 Düse auswählen
1. Packen Sie das Gerät und sein Zubehör aus.
2. Überprüfen Sie den Inhalt auf Unversehrtheit.
Sollten Sie einen Transportschaden bemerken, wenden Sie sich umgehend an Ihren Händler.
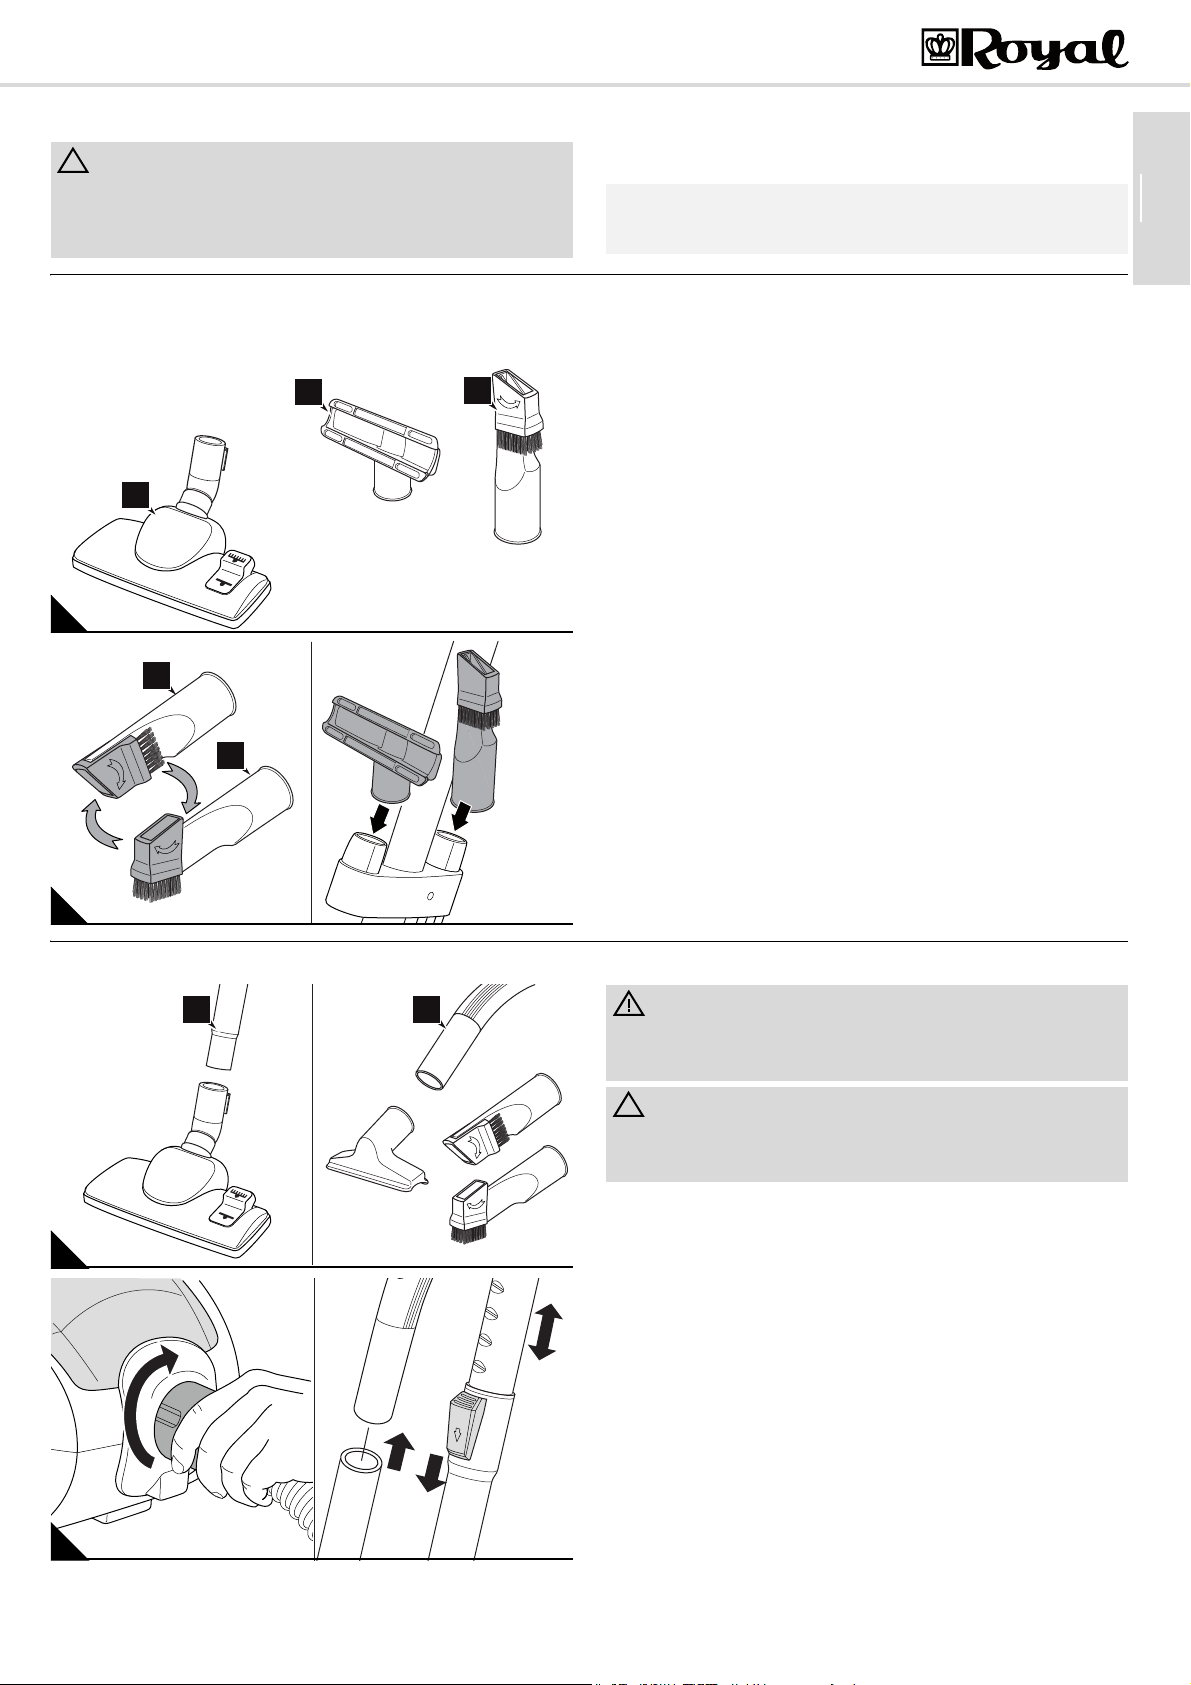
1. Wählen Sie je nach zu saugendem Untergrund eine Düse aus:
Bodendüse (Abb. 2/1):
Diese ist universal einsetzbar und eignet sich durch ihren Umschalter gleichermaßen für Teppiche und Hartböden.
Parkettbürste (Abb. 2/2):
Diese ist mit langen Borsten ausgestattet und dient zum Absaugen besonders empfindlicher Oberflächen (z. B. Parkett, Laminat).
Mini-Turbobürste „Fellino“ (Abb. 2/3):
Diese besitzt einen rotierenden Bürstenkopf und eignet sich daher bestens
zur Tiefenreinigung von Polstern und Teppichen.
Polsterdüse (Abb. 2/4):
Benutzen Sie diese, um Staub von Polstermöbeln zu saugen.
DE
3.3 Montieren
2-in1-Kombipinsel (Abb. 2/5), einsetzbar als:
- Fugendüse (Abb. 3/A1):
Benutzen Sie diese, um Staub aus schwer zugänglichen Stellen zu
saugen.
- Möbelpinsel (Abb. 3/A2):
Benutzen Sie diesen, um Staub von Gegenständen zu saugen, die
empfindliche Oberflächen haben.
2. Stecken Sie nicht benötigte Zubehördüsen, sofern möglich, auf die
Steckplätze der Zubehörhalterung (Abb. 3/B).
3. Bewahren Sie die übrigen Düsen sicher und für Kinder unzugänglich
auf.
Verletzungsgefahr! Montieren Sie Düsen nur, wenn der Stecker aus der
Steckdose gezogen ist. Der Bodenstaubsauger könnte versehentlich
eingeschaltet werden.
Stellen Sie vor dem Saugen sicher, dass die aufgesetzte Düse für den
zu saugenden Untergrund geeignet ist. Beachten Sie die Empfehlungen
des Belagherstellers.
1. Stecken Sie die gewählte Düse auf das untere Ende des Teleskoprohrs
(Abb. 4/A1) bzw. des Handgriffs (Abb. 4/B1).
2. Stecken Sie den Saugschlauchadapter wie abgebildet in die Saug-
schlauchaufnahme am Gerät (Abb. 5/A). Drehen Sie den Saugschlauchadapter im Uhrzeigersinn, bis sie spüren, dass seine Verriegelung greift und er sich nicht weiter drehen lässt.
Bei Verwendung des Teleskoprohrs:
3. Stecken Sie den Handgriff in das obere Ende des Teleskoprohrs
(Abb. 5/B).
4. Stellen Sie die Länge des Teleskoprohrs ein (Abb. 5/C). Drücken Sie
dazu die Teleskoprohr-Arretierung nach unten. Ziehen Sie dann das
Teleskoprohr auf die gewünschte Länge. Zum Verriegeln lassen Sie
die Teleskoprohr-Arretierung beim Ziehen los. Sie hören ein deutliches
Klicken.
5
Page 6
4Gebrauch
WARNUNG:
WARNUNG:
ACHTUNG:
HINWEIS:
1
2
5
3
4
6
6
B
A
1
7
WARNUNG:
HINWEIS:
WARNUNG:
WARNUNG:
A
1
8
ACHTUNG:
4 Gebrauch
4.1 Sicherheit beim Gebrauch
Verletzungsgefahr! Prüfen Sie Gerät und Stromkabel vor jeder Benutzung. Ein beschädigtes Gerät darf nicht verwendet werden.
Verletzungsgefahr! Achten Sie insbesondere beim Saugen von Treppen
darauf, dass Sie sich stets oberhalb des Gerätes befinden.
Verwenden Sie den Bodenstaubsauger nur, wenn alle Filter intakt, trocken und korrekt eingesetzt sind. Stellen Sie sicher, dass keinerlei
Gegenstände das Teleskoprohr, den Saugschlauch oder andere Öffnungen verstopfen.
4.2 Staubsaugen
Der Bodenstaubsauger besitzt einen Überhitzungsschutz. Er schaltet
sich bei Überhitzung (z. B. durch verstopfte Saugwege) automatisch ab.
Ist dies der Fall:
Schalten Sie den Bodenstaubsauger aus.
Ziehen Sie den Stecker.
Beseitigen Sie die Ursache der Überhitzung.
Warten Sie ca. 45 Minuten.
Den abgekühlten Bodenstaubsauger können Sie wieder einschalten.
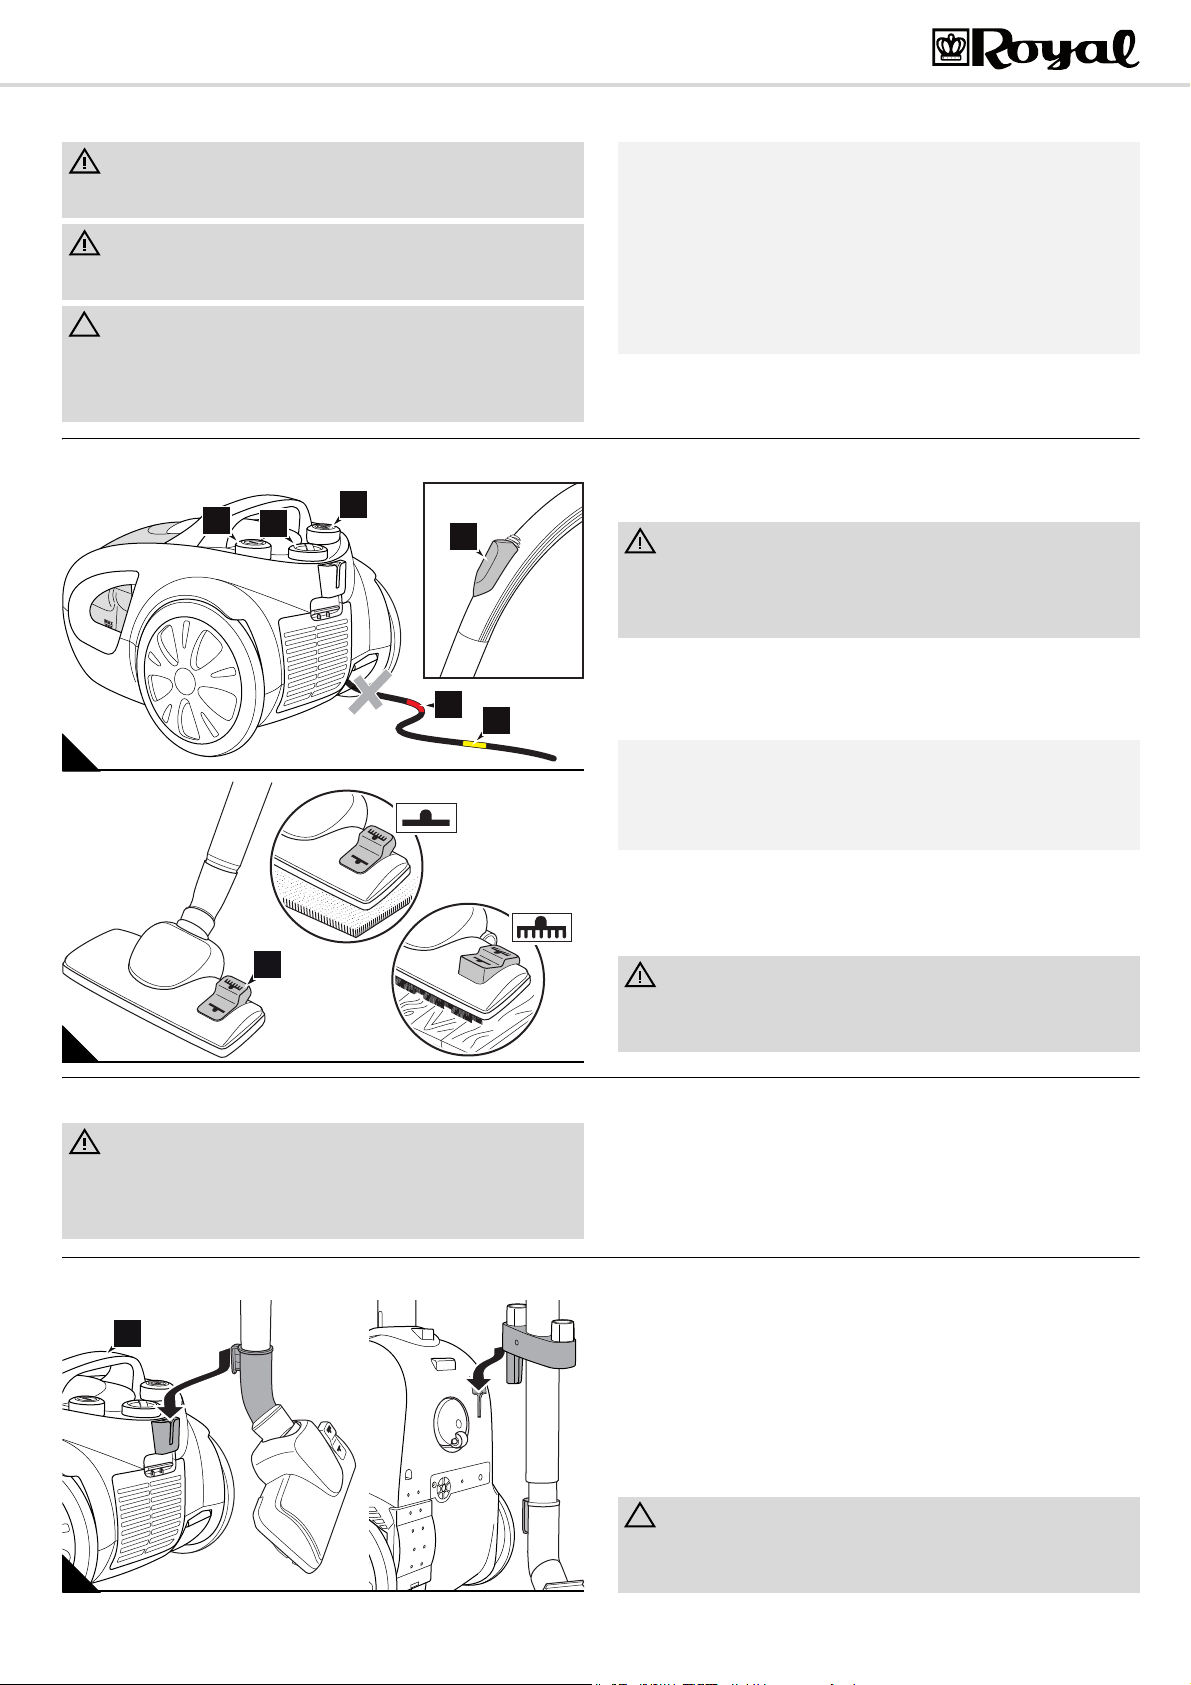
1. Ziehen Sie das Stromkabel am Stecker bis zur gelben Markierung
(Abb. 6/1) heraus.
Gefahr eines elektrischen Schlags! Falls die rote Markierung (Abb. 6/2)
sichtbar ist, ziehen Sie das Stromkabel mithilfe der Kabelaufrolltaste
(Abb. 6/3) wieder bis zur gelben Markierung (Abb. 6/1) ein. Anderenfalls
kann das Stromkabel beschädigt werden.
2. Stecken Sie den Stecker in eine Steckdose mit Schutzkontakt.
3. Schalten Sie den Bodenstaubsauger am Ein-/Aus-Schalter (Abb. 6/4)
ein.
4. Stellen Sie die Saugleistung am Saugleistungsregler ein (Abb. 6/5).
4.3 Ausschalten
Verletzungsgefahr! Beim unkontrollierten Einziehen des Stromkabels
kann dieses umherschlingern, zur Stolperfalle werden oder Gegenstände umreißen. Behalten Sie daher den Stecker in der Hand und führen Sie ihn beim Einziehen des Stromkabels mit.
4.4 Transportieren und Aufbewahren
B
Der Nebenluftregler (Abb. 6/6) muss im Normalfall vollständig geschlossen sein. Mithilfe des Nebenluftreglers können Sie bei Bedarf die Saugleistung schnell reduzieren, z. B. um eingesaugte Gardinen wieder freizugeben.
5. Wenn Sie die Bodendüse einsetzen, stellen Sie den Umschalter „Tep-
pich/Hartboden“ je nach Bodenbelag ein (Abb. 7/1):
Abb. 7/A: für lang- und kurzflorige Teppiche, Läufer
Abb. 7/B: für Hartböden wie Parkett, Fliesen, PVC usw.
Verletzungsgefahr! Wenn Sie den Arbeitsplatz verlassen, schalten Sie
das Gerät aus und beachten Sie die Hinweise unter Kapitel 4.3,
„Ausschalten“. So vermeiden Sie Unfälle.
1. Schalten Sie den Bodenstaubsauger am Ein-/Aus-Schalter (Abb. 6/4)
aus und ziehen Sie den Stecker aus der Steckdose.
2. Behalten Sie den Stecker in der Hand.
3. Um das Stromkabel einzuziehen, drücken Sie die Kabelaufrolltaste
(Abb. 6/3).
Tragen Sie den Bodenstaubsauger zum Transport ausschließlich am
Tragegriff (Abb. 8/A1).
Zum Aufbewahren können Sie das Teleskoprohr entweder
- mithilfe des Parkhakens der Bodendüse parken (Abb. 8/A) oder
- mithilfe des Verstauhakens verstauen (Abb. 8/B).
Wenn Sie das Gerät längere Zeit lagern möchten, leeren Sie zuvor den
Staubbehälter, Kapitel 5.1, „Staubbehälter leeren und reinigen“.
Bewahren Sie das Gerät in einem kühlen, trockenen Raum für Kinder
unzugänglich auf.
6
Stellen Sie das Gerät nie direkt neben Wärmequellen ab (z. B. Heizung,
Ofen). Vermeiden Sie direkte Sonneneinstrahlung. Die Hitze kann das
Gerät beschädigen.
Page 7
5 Wartung
ACHTUNG:
HINWEIS:
A
1
B
1
2
2
9
HINWEIS:
ACHTUNG:
AB
10
OPEN
11
12
ACHTUNG:
5 Wartung
5.1 Staubbehälter leeren und reinigen
Bevor Sie den Staubbehälter leeren, schalten Sie das Gerät aus. So
vermeiden Sie, dass Staub das Gerät beschädigt.
Den Inhalt des Staubbehälters können Sie im Hausmüll entsorgen,
sofern er keine für den Hausmüll verbotenen Bestandteile enthält.
5.2 Lamellenzentralfilter und Motorschutzfilter reinigen
Die Filterelemente sind waschbar, jedoch weder spülmaschinen- noch
waschmaschinentauglich. Verwenden Sie außerdem zur Reinigung
keine Reinigungsmittel oder Bürsten mit harten Borsten.
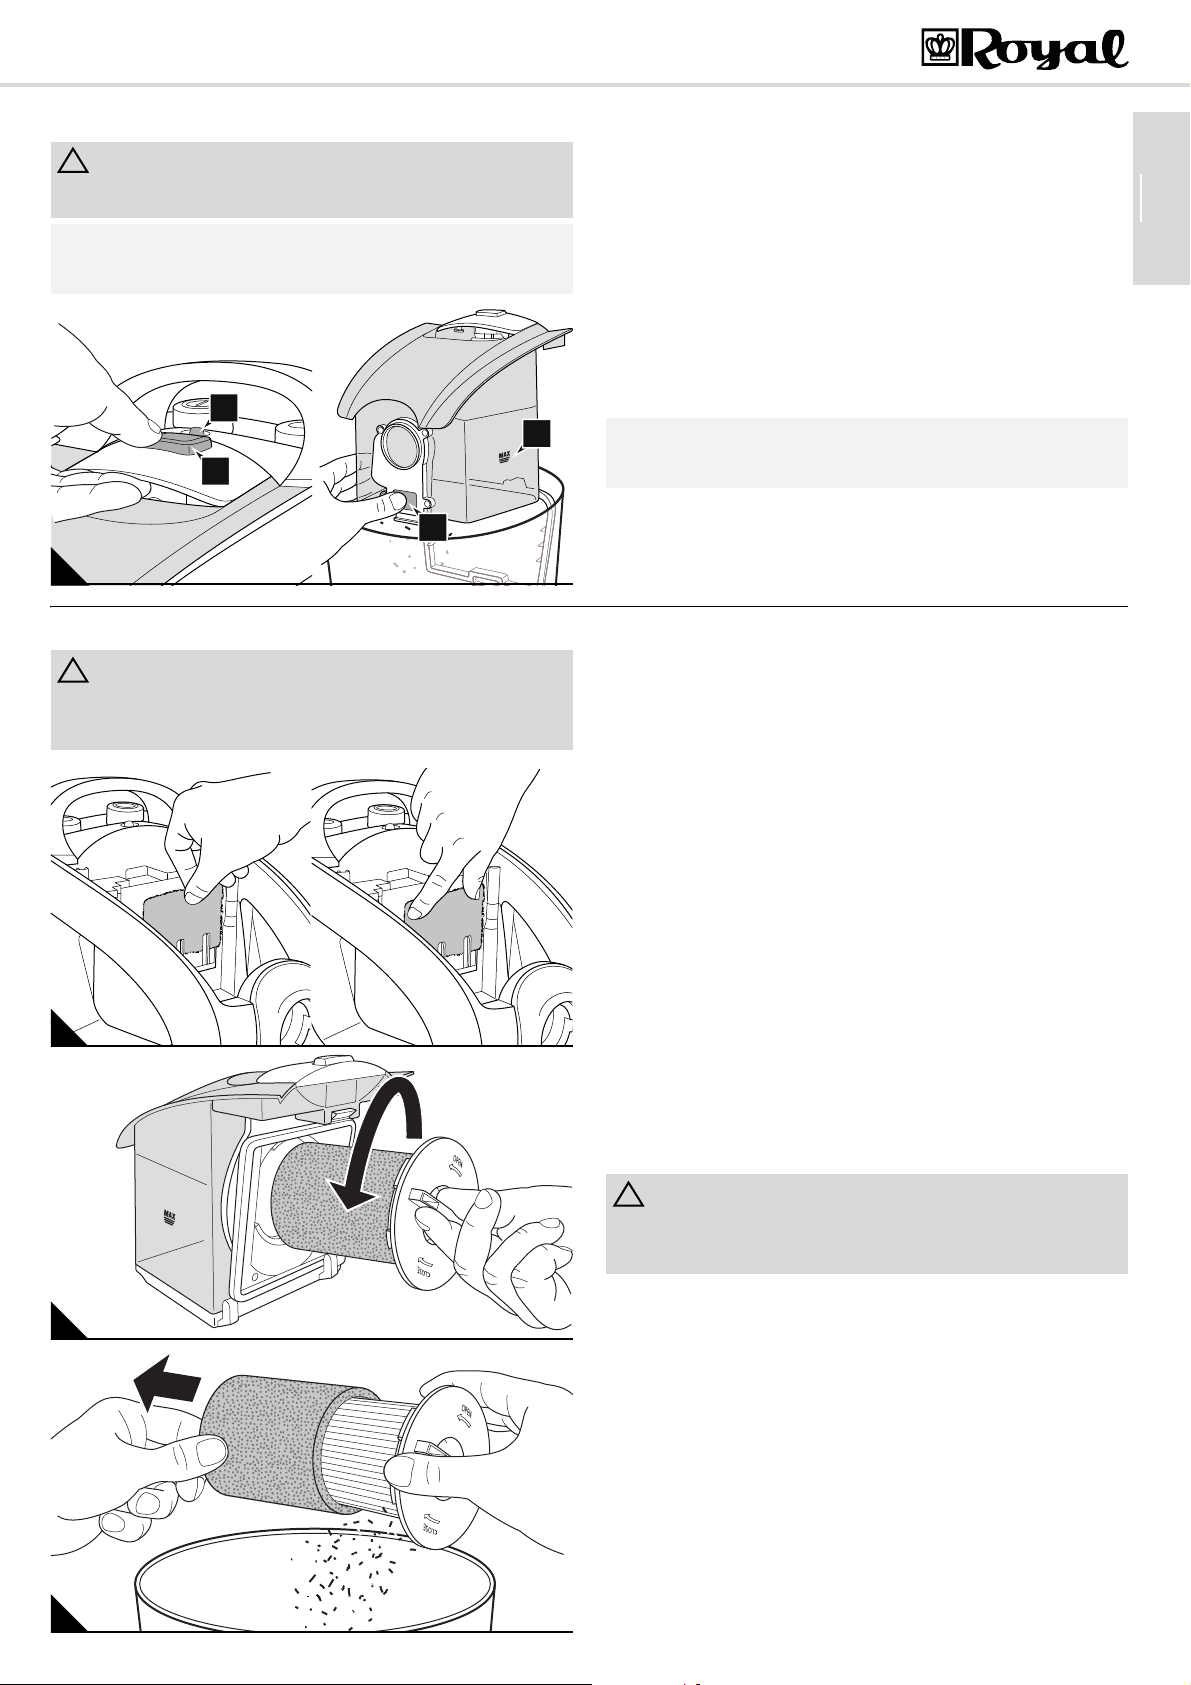
Leeren Sie den Staubbehälter am besten nach jedem Saugvorgang.
Leeren Sie den Staubbehälter jedoch spätestens:
- wenn die Reinigungs-/Entleerungsanzeige (Abb. 9/A1) leuchtet,
- wenn die „MAX“-Markierung (Abb. 9/B1) erreicht ist,
- vor längerer Lagerung oder Versand.
1. Schalten Sie das Gerät aus, Kapitel 4.3, „Ausschalten“.
2. Drücken Sie die Entriegelungstaste für den Staubbehälter (Abb. 9/A2).
3. Nehmen Sie den Staubbehälter aus seiner Konsole.
4. Entleeren Sie den Staubbehälter, indem Sie ihn tief über einen Müllei-
mer halten und erst dann die Entleerungstaste drücken (Abb. 9/B2).
5. Reinigen Sie bei dieser Gelegenheit sogleich den Lamellenzentralfilter,
Kapitel 5.2, „Lamellenzentralfilter und Motorschutzfilter reinigen“.
Bei eingesetztem Lamellenzentralfilter lässt sich der Staubbehälter nicht
reinigen.
6. Entfernen Sie Staubrückstände, die sich eventuell noch im Staubbehäl-
ter befinden, mithilfe eines trockenen Tuchs oder einer weichen Bürste,
z. B. der mitgelieferten Möbelbürste.
7. Klappen Sie die Bodenplatte des Staubbehälters wieder an.
Reinigen Sie die Filter am besten jedes Mal, wenn Sie den Staubbehäl-
ter reinigen, Kapitel 5.1, „Staubbehälter leeren und reinigen“.
Reinigen Sie die Filter jedoch spätestens dann, wenn die Reinigungs-/
Entleerungsanzeige (Abb. 9/A1) leuchtet.
DE
1. Schalten Sie das Gerät aus, Kapitel 4.3, „Ausschalten“.
2. Entnehmen und leeren Sie den Staubbehälter, Kapitel 5.1,
„Staubbehälter leeren und reinigen“.
3. Ziehen Sie den Motorschutzfilter nach oben aus seiner Halterung
(Abb. 10/A).
4. Entriegeln Sie den Lamellenzentralfilter durch Drehen in Richtung
„open“ (Abb. 11) und nehmen Sie ihn samt übergestülptem Filtervlies
aus dem Staubbehälter.
5. Halten Sie den Lamellenzentralfilter samt übergestülptem Filtervlies
tief über einen Mülleimer.
6. Trennen Sie das Filtervlies vom Filter, indem Sie den Filter gut festhal-
ten und das Filtervlies vorsichtig abziehen (Abb. 12).
7. Beseitigen Sie gröbere Verschmutzungen an beiden Filterelementen
von Hand.
8. Bürsten Sie den Lamellenzentralfilter mithilfe des mitgelieferten 2-in-1-
Kombipinsels aus.
9. Sollten die Filterelemente nach der Trockenreinigung immer noch ver-
schmutzt sein, spülen Sie diese von Hand gründlich aus, bis jegliche
Verschmutzungen beseitigt sind.
Lassen Sie die Filterelemente nach einer Nassreinigung ca. 24 Stunden
bei Raumtemperatur trocknen. Setzen Sie sie erst wieder ein, wenn sie
vollkommen trocken sind.
10. Sollte eines der Filterelemente beschädigt oder zu stark verschmutzt
sein, ersetzen Sie es durch ein neues (Bestellinformationen Kapitel
5.4, „Ersatzteile und Zubehör“).
11. Setzen den neuen/gereinigten und vollkommen trockenen Motor-
schutzfilter wieder in seine Konsole (Abb. 10/B).
12. Stülpen Sie das Filtervlies wieder über den Lamellenzentralfilter, so
dass es die Lamellen vollständig umschließt.
13. Führen Sie den Lamellenzentralfilter wieder in den Staubbehälter und
verriegeln Sie den Filter, indem Sie ihn in Richtung „close“ drehen. Der
Filter rastet hör- und spürbar ein.
14. Setzen Sie den Staubbehälter zurück in seine Konsole. Er rastet hör-
und spürbar ein.
15. Prüfen Sie den Staubbehälter auf festen Sitz.
7
Page 8
5 Wartung
ACHTUNG:
BA
13
14
ACHTUNG:
ACHTUNG:
WARNUNG:
5.3 Ausblasfilter reinigen
Der Ausblasfilter ist waschbar, jedoch weder spülmaschinen- noch
waschmaschinentauglich. Verwenden Sie außerdem zur Reinigung
keine Reinigungsmittel oder Bürsten mit harten Borsten.
Reinigen Sie die Filter am besten jedes Mal, wenn Sie den Staubbehäl-
ter reinigen, Kapitel 5.1, „Staubbehälter leeren und reinigen“.
Reinigen Sie die Filter jedoch spätestens dann, wenn die Reinigungs-/
Entleerungsanzeige (Abb. 9/A1) leuchtet.
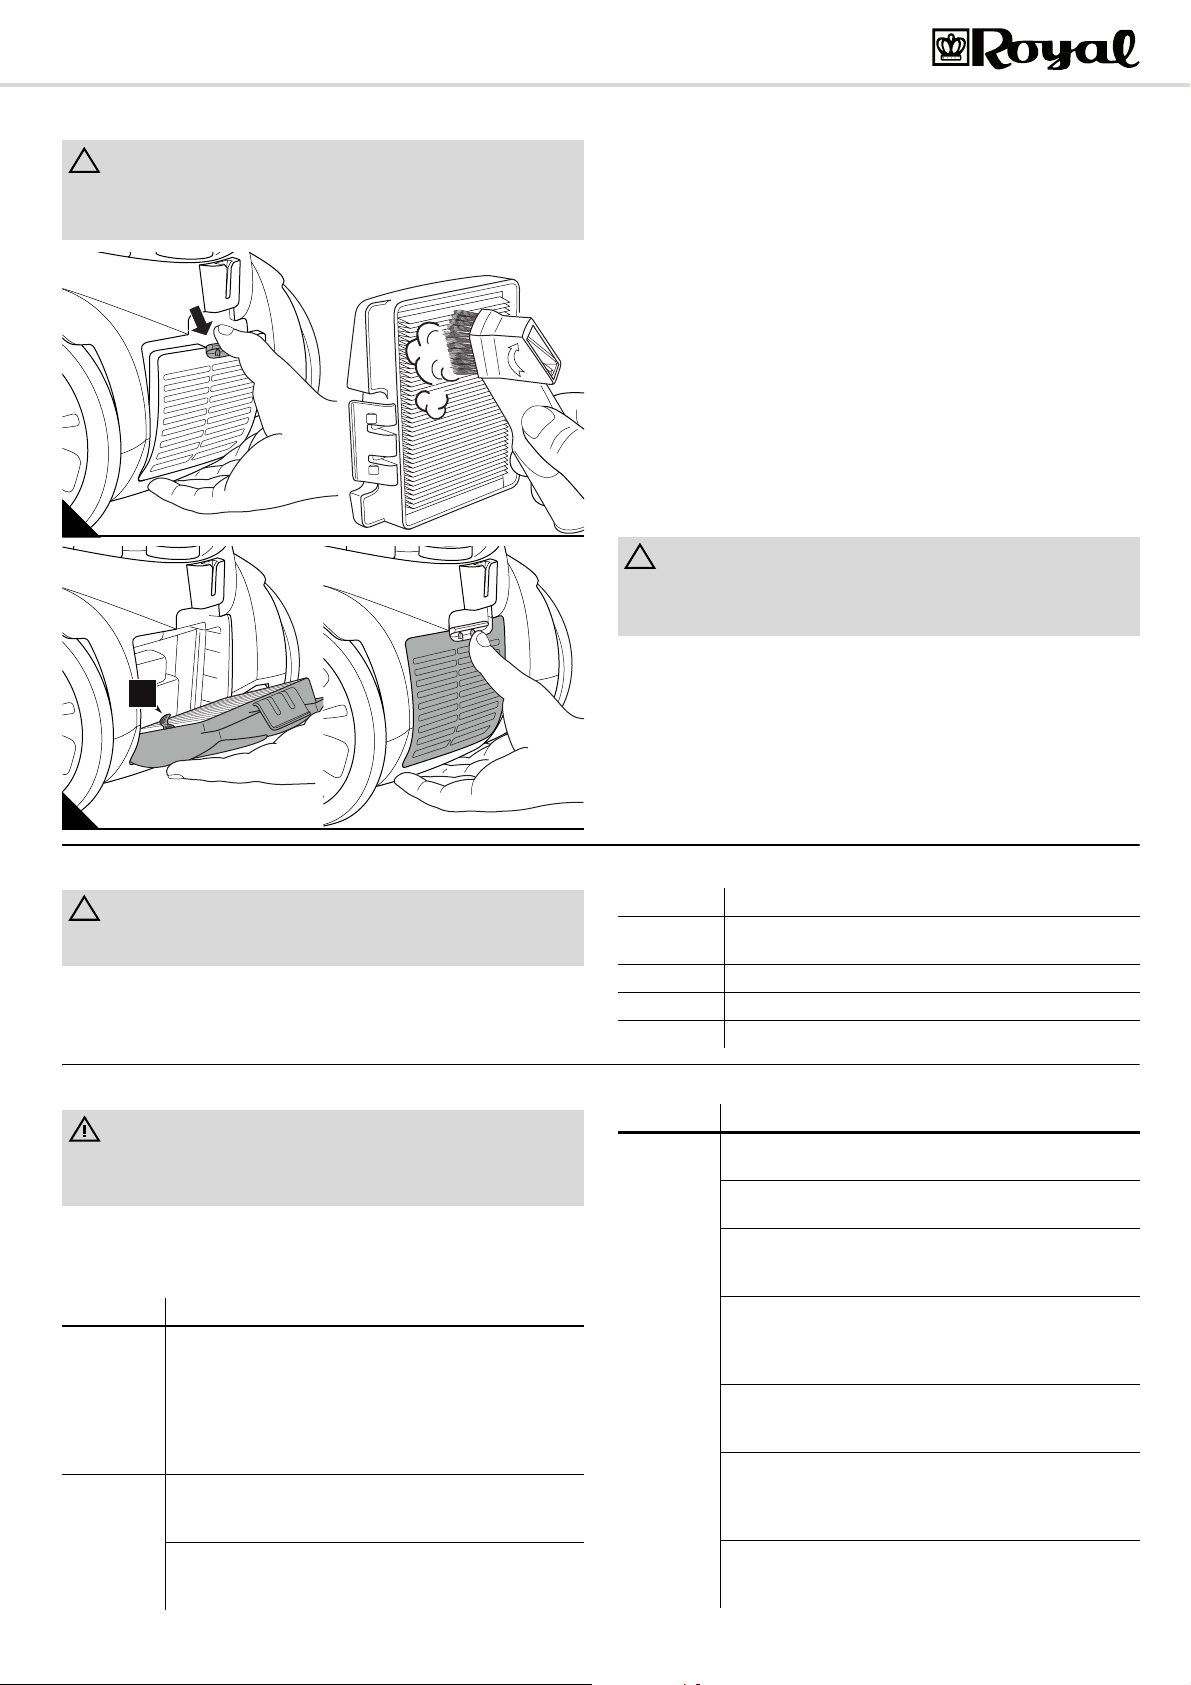
1. Schalten Sie das Gerät aus, Kapitel 4.3, „Ausschalten“.
2. Drücken Sie die Entriegelung der Ausblasfilter-Abdeckung nach unten
(Abb. 13/A) und klappen Sie die Ausblasfilter-Abdeckung ab.
3. Entnehmen Sie die Ausblasfilter-Abdeckung samt Ausblasfilter.
4. Halten Sie die Ausblasfilter-Abdeckung samt Ausblasfilter tief über ei-
nen Mülleimer.
5. Bürsten Sie Verschmutzungen mithilfe einer weichen Bürste, beispiels-
weise dem mitgelieferten 2-in-1-Kombipinsel, aus (Abb. 13/B).
6. Sollte dies nicht genügen, nehmen Sie den Ausblasfilter an der Entnah-
melasche aus der Ausblasfilter-Abdeckung und klopfen Sie beide Elemente gut aus.
7. Sollte der Ausblasfilter nach der Trockenreinigung immer noch ver-
schmutzt sein, spülen Sie ihn von Hand gründlich aus, bis jegliche Verschmutzungen beseitigt sind.
BA
1
5.4 Ersatzteile und Zubehör
Verwenden Sie nur Originalersatzteile aus dem Lieferumfang oder solche, die Sie durch Nachbestellung erworben haben.
Bestellkontakt: Seite 26, „International Service“
Weitere Informationen: www.dirtdevil.de
Nebenstehende Zubehör- und Ersatzteile können Sie nachbestellen.
5.5 Falls das Gerät nicht arbeitet, wie es soll
Verletzungsgefahr! Verwenden Sie niemals ein defektes Gerät! Bevor
Sie auf Problemsuche gehen, schalten Sie das Gerät aus und ziehen
Sie den Stecker aus der Steckdose, Kapitel 4.3, „Ausschalten“.
Bevor Sie Ihren zuständigen Royal-Vertragshändler, Royal-Servicepartner
oder Ihren Fachmarkt kontaktieren oder das Gerät gar einsenden (Seite
26, „International Service“), überprüfen Sie anhand der folgenden Tabelle,
ob Sie das Problem selbst beseitigen können.
Problem mögliche Ursache / Lösung
Gerät hört
plötzlich auf
zu saugen.
Reinigungs-/
Entleerungsanzeige
(Abb. 1/9)
leuchtet.
Überhitzungsschutz hat angesprochen (möglicherweise
aufgrund verstopfter Saugwege o. Ä.).
Schalten Sie das Gerät aus und ziehen Sie den Stecker
aus der Steckdose. Beseitigen Sie die Ursache der Überhitzung (z. B. Teleskoprohr und Saugschlauch demontieren und Verstopfung entfernen). Warten Sie ca. 45 Minuten. Das abgekühlte Gerät können Sie wieder einschalten.
Lamellenzentralfilter ist verschmutzt.
Reinigen Sie den Lamellenzentralfilter, Kapitel 5.2,
„Lamellenzentralfilter und Motorschutzfilter reinigen“.
Staubbehälter ist voll.
Leeren/Reinigen Sie den Staubbehälter, Kapitel 5.1,
„Staubbehälter leeren und reinigen“
Lassen Sie den Filter nach einer Nassreinigung ca. 24 Stunden bei
Raumtemperatur trocknen. Setzen Sie ihn erst wieder ein, wenn er vollkommen trocken ist.
8. Falls der Ausblasfilter beschädigt, verformt oder zu stark verschmutzt
sein sollte, ersetzen Sie ihn (Bestellinformationen Kapitel 5.4,
„Ersatzteile und Zubehör“).
9. Setzen Sie den neuen/gereinigten und vollkommen trockenen Ausblas-
filter zurück in die Ausblasfilter-Abdeckung. Achten Sie darauf, dass die
Entnahmelasche (Abb. 14/A1) nach dem Einsetzen noch sichtbar ist.
10. Setzen Sie die die frisch bestückte Ausblasfilter-Abdeckung zuerst un-
ten ein (Abb. 14/A) und klappen Sie sie dann oben an. Sie rastet hörund spürbar ein (Abb. 14/B).
Artikel-Nr. Beschreibung
2725001 3-teiliges Filterset, bestehend aus
1 Lamellenzentralfilter, 1 Motorschutzfilter, 1 Ausblasfilter
2725077 2 Filtervliese
M203 1 Parkettbürste
M209 1 Turbobürste
Problem mögliche Ursache / Lösung
Saugergebnis ist trotz
einwandfreier Funktion
nicht zufriedenstellend.
Nebenluftregler (Abb. 1/18) ist geöffnet.
Schließen Sie den Nebenluftregler.
Aufgesteckte Düse ist nicht angemessen.
Wechseln Sie die Düse, Kapitel 3.2, „Düse auswählen“.
Eingestellte Saugleistung ist nicht angemessen.
Passen Sie die Stellung des Saugleistungsreglers an den
Belag an, Kapitel 4.2, „Staubsaugen“, Schritt 4.
Stellung des Umschalters „Teppich/Hartboden“ (Abb. 1/
31) ist nicht angemessen. Passen Sie die Stellung des
Umschalters „Teppich/Hartboden“ an den Belag an,
Kapitel 4.2, „Staubsaugen“, Schritt 5.
Staubbehälter ist überfüllt.
Leeren/Reinigen Sie den Staubbehälter, Kapitel 5.1,
„Staubbehälter leeren und reinigen“.
Filter sind verschmutzt.
Reinigen Sie den entsprechenden Filter, Kapitel 5.2,
„Lamellenzentralfilter und Motorschutzfilter reinigen“ bzw.
Kapitel 5.3, „Ausblasfilter reinigen“.
Düse, Teleskoprohr oder Saugschlauch sind verstopft.
Entfernen Sie die Verstopfung. Benutzen Sie dazu falls erforderlich einen langen Holzstab (z. B. einen Besenstiel).
8
Page 9

_________________________________________________________________________________________________________________________
_________________________________________________________________________________________________________________________
_________________________________________________________________________________________________________________________
_________________________________________________________________________________________________________________________
_________________________________________________________________________________________________________________________
_________________________________________________________________________________________________________________________
_________________________________________________________________________________________________________________________
_________________________________________________________________________________________________________________________
_________________________________________________________________________________________________________________________
_________________________________________________________________________________________________________________________
_________________________________________________________________________________________________________________________
_________________________________________________________________________________________________________________________
_________________________________________________________________________________________________________________________
_________________________________________________________________________________________________________________________
_________________________________________________________________________________________________________________________
9
Page 10

18
23
24
25
27
22
20
21
26
31
6
1
10
5
3
4
2
12
13
14
15
16
17
29
28
7
11
9
8
33
19
34
32
30
15
10
Page 11

1 An overview of your Centrino X3.1
1 An overview of your Centrino X3.1
Thank you!
Thanks for purchasing the Centrino X3.1 and for your confidence in us.
Overview of the scope of delivery (Fig. 1)
1 On/off switch
2 Suction power control
3 Cable retraction button
4 Parking bracket
5 Exhaust filter with removal tab
6 Exhaust filter cover
7 Suction hose receptacle
8 Motor protection filter
9 Cleaning/emptying indicator
10 Carrying handle
11 Emptying button
12 Dust container bottom
13 MAX marking on the dust container
14 Filter fleece
15 Central lamellae filter
16 Release button for the dust container
17 Dust container
18 Bypass vent
19 Suction hose
20 Suction hose adapter
21 Storage bracket
22 Power cord with plug
23 Telescopic tube
24 Telescopic tube stop catch
25 Accessory bracket
26 Storage hook
27 Two-in-one combi brush, can be used as
- furniture brush or
- crevice nozzle
28 Upholstery nozzle
29 Floor nozzle (illustration serves as an example)
30 Parking hook
31 "Carpet/hard floor" selector (illustration serves as an example)
32 Mini-turbo brush ‘Fellino’
33 Parquet brush
34 Operating manual
Table of Contents
1 An overview of your Centrino X3.1 ..................................... 11
Warranty conditions ............................................................... 11
In case of a warranty claim .................................................... 11
2 Safety instructions ............................................................... 12
2.1 About the operating manual ................................................... 12
2.2 About certain groups of persons ............................................ 12
2.3 About the power supply .......................................................... 12
2.4 About appropriate use ............................................................ 12
2.5 If the appliance is defective .................................................... 12
2.6 About disposal ........................................................................ 12
3 Before use ............................................................................. 13
3.1 Unpacking .............................................................................. 13
3.2 Selecting the proper nozzle .................................................... 13
3.3 Assembly ................................................................................ 13
4 Use ......................................................................................... 14
4.1 Operational safety .................................................................. 14
4.2 Vacuum cleaning .................................................................... 14
4.3 Switching off ........................................................................... 14
4.4 Transport and storage ............................................................ 14
5 Maintenance ......................................................................... 15
5.1 Emptying and cleaning the dust container ............................. 15
5.2 Cleaning central lamellae filter and motor protection filter ..... 15
5.3 Cleaning the exhaust filter ...................................................... 16
5.4 Spare parts and accessories .................................................. 16
5.5 If the appliance does not work as it should ............................ 16
Technical data
Type of appliance : bagless cylinder vacuum cleaner
Model : Centrino X3.1
Model number : M2012-3
Voltage : 220 – 240V ~, 50/60 Hz
Power : 1800 W nom. – 2300 W max.
max. available dust container
capacity
Power cord length : approx. 5.0 m
Weight : approx. 5.3 kg
Technical and design specifications may be changed in the course of continuous product improvement. © Royal Appliance International GmbH
: approx. 1.5 litres
GB
Warranty conditions
We grant the legally prescribed warranty of 24 months from the date
of purchase for the appliance distributed by us.
Within this period we will, at our discretion, either repair all appliance defects due to manufacturing or materials or replace the appliance or accessory (damages to accessories do not automatically cause a replacement of
the complete appliance) at no cost.
Damages due to inappropriate use (operation on wrong voltage or type of
current, connecting to unsuitable power supplies, breakage, etc.) are exempt from warranty, as are normal wear and minor defects that only negligibly influence the appliance's serviceability.
Interventions by unauthorised parties and the use of spare parts not supplied by Royal
parts are not included in the warranty and therefore must be purchased by
the customer!
The warranty is only valid if the date of purchase has been acknowledged
by the dealer's stamp and signature on the warranty card or if a copy of the
invoice or sales slip is included with the sent-in appliance. Warranty work
does not extend the warranty period nor does it constitute a claim for a new
warranty!
Appliance make the warranty null and void. Consumable
In case of a warranty claim
Send us the appliance with its dust container empty and a short description
of the defect in printed letters.
Head your accompanying letter with the comment "warranty claim". Send
it to the following address, including the warranty card or a copy of the invoice or purchase slip:
Page 26, “International Service”
11
Page 12

2 Safety instructions
WARNING:
ATTENTION:
NOTE:
2 Safety instructions
2.1 About the operating manual
Read this operating manual completely before working with the appli-
ance. Keep the operating manual in a safe place. Include the operating
manual if you pass the appliance on to someone else.
Non-compliance with the operating instructions can lead to severe injuries as well as damage to the appliance.
We take no responsibility for damage due to violation of these operating instructions.
Always observe the notices marked as follows to avoid accidents and
damage to the appliance.
2.2 About certain groups of persons
This appliance is not intended to be used by persons (including chil-
dren) with impaired physical, sensory or mental abilities or insufficient experience or knowledge, unless they are supervised by a person
responsible for their safety or have been instructed in the proper use of the
appliance by this person. Keep the appliance out of reach of people of
these groups.
2.3 About the power supply
The appliance is operated with electrical power which means there is in
principle a risk of electric shock. So please observe the following in particular:
Never touch the plug with wet hands.
Always pull directly at the plug if you want to disconnect the appliance
from the mains. Never pull on the cable as this could damage it.
Never carry the appliance by its power cord. It could get damaged.
Take care that the power cord is not bent, pinched, or rolled over and
ensure it does not come into contact with heat sources. Also take care that
it does not become a stumbling-hazard.
Warning concerning health hazards describing possible risks of injury.
Warning concerning possible dangers to the appliance or other objects.
Highlights tips and information for you.
Children should be supervised in order to make sure that they do not
play with the appliance. Children must not be allowed to stand or sit on the
appliance.
Packing material must not be used to play with. There is danger of suf-
focation.
Never immerse the appliance in water or other liquids; keep it away
from rain and moisture.
Before connecting to the power supply, make sure that the voltage stat-
ed on the type plate matches the voltage of your plug socket. Only use
sockets with a ground/safety contact.
If possible, avoid using extension cords. If you must use an extension
cord, use only safety-certified, water-protected single extension cords (nomulti-socket distributors) designed for the power consumption of the appliance.
Always check the power cord for possible damage before using the ap-
pliance.
2.4 About appropriate use
The cylinder vacuum cleaner is intended for home use only. It is not suitable for commercial use.
Use the cylinder vacuum cleaner only for cleaning dry, normally soiled
floors. With the furniture brush attached, you may also use the appliance
for vacuuming furniture surfaces. You may even use the appliance to vacuum-clean drapes if the bypass vent (Fig. 1/18) is completely open and you
take appropriate care.
Any other use is considered inappropriate and is prohibited. It is especial-
ly forbidden:
To use the appliance near explosive or easily flammable substances.
There is danger of fire or explosion.
To use the appliance outdoors. There is danger of rain or dirt destroying
the appliance.
To stick objects into the appliance's openings. It could overheat.
To modify or repair the appliance on your own.
2.5 If the appliance is defective
If the power cord of this appliance is damaged, it must be replaced by the
manufacturers, their authorised service representative or a similarly qualified person to avoid danger.
2.6 About disposal
Dispose of the appliance in compliance with the environmental
protection laws of your country. Electrical waste may not be disposed of together with domestic waste. Use local old-appliance
collection points instead.
It is also forbidden:
To vacuum-clean:
- Persons, animals, plants, especially hair, fingers and other parts of
the body as well as pieces of clothing worn on the body. They could
be sucked in and cause injuries.
- Water and other fluids, especially damp carpet cleaning agents.
Moisture inside the appliance can cause a short-circuit.
- Toner dust (for laser printers, copying machines, etc.). There is danger of fire or explosion.
- Hot ash, burning cigarettes or matches. This could cause a fire.
- Pointed objects, such as glass shards, nails, etc. They can damage
the appliance.
- Rubble, plaster, cement, fine drilling-dust, make-up, etc. These might
damage the appliance.
Never use a defective appliance or operate an appliance with a defective
power cord. Refer a defective appliance to an authorised dealer or the Roy-
al
Appliance service for repair. Address Page 26, “International Service”.
The filters used are made from environment-friendly materials. You may
dispose of them in your household waste.
12
Page 13

3 Before use
ATTENTION:
NOTE:
2
BA
2
1
3
B
A
1 1
4
B
C
A
5
WARNING:
ATTENTION:
3 Before use
3.1 Unpacking
Always transport/send the appliance in its original packaging to avoid
transport damage. Keep the packaging for such an event. However, dispose of no-longer-needed packaging material properly.
3.2 Selecting the proper nozzle
2
1
3
1. Unpack the appliance and all its accessories.
2. Check that the contents are intact.
Immediately contact your dealer if you have found damage resulting
from transport.
1. Select the nozzle according to the surface to be cleaned:
Floor nozzle (Fig. 2/1):
It can be used everywhere and, thanks to its switch, can be used equally
well on carpets and hard floors.
Parquet brush (Fig. 2/2):
Its long bristles make it especially suitable for cleaning delicate surfaces
(e.g. parquet and laminate floors).
Mini turbo brush ‘Fellino’ (Fig. 2/3):
This has a rotating brush head and is therefore ideally suited for deepcleaning upholstery and carpets.
Upholstery nozzle (Fig. 2/4):
Use this to vacuum up dust off upholstered furniture.
3.3 Assembly
2-in1 combi brush (Fig. 2/5), can be used as:
- a crevice nozzle (Fig. 3/A1):
Use these accessories to vacuum dust from hard to reach places.
- Furniture brush (Fig. 3/A2):
Use this to vacuum dust off objects that have sensitive surfaces.
2. If possible, push nozzles not in use onto the stubs of the accessory
bracket (Fig. 3/B).
3. Keep the other nozzles safe and inaccessible to children.
Danger of injury! Only attach the nozzles if the appliance is not connected to the power supply. The cylinder vacuum cleaner could be
switched on by accident.
Before vacuuming, make sure that the fitted nozzle suits the surface to
be cleaned. Also observe the flooring manufacturer's recommendations.
1. Attach the selected nozzle to the bottom end of the telescopic tube
(Fig. 4/A1) or handle (Fig. 4/B1).
GB
2. Insert the suction hose adapter into the suction hose receptacle on the
appliance (Fig. 5/A) as shown. Turn the suction hose adapter clockwise
until you feel it engage and it can no longer be turned.
If using the telescopic tube:
3. Insert the handle into the upper end of the telescopic tube (Fig. 5/B).
4. Adjust the length of the telescopic tube (Fig. 5/C). Press down the re-
lease latch on the tube to do this. Then extend the telescopic tube to
the desired length. Let go of the release catch while pulling until it locks
in place. You will hear a distinct click.
13
Page 14

4Use
WARNING:
WARNING:
ATTENTION:
NOTE:
6
B
A
1
7
WARNING:
NOTE:
WARNING:
WARNING:
A
1
B
8
ATTENTION:
4 Use
4.1 Operational safety
Danger of injury! Check appliance and power cord before each use. A
damaged appliance must never be used.
Danger of injury! Especially when vacuum-cleaning stairs make sure
that you always stand on a higher level than the appliance.
Only use the cylinder vacuum cleaner when all filters are intact, dry and
correctly fitted. Make sure that no objects obstruct the telescopic tube,
the suction hose or other openings.
4.2 Vacuum cleaning
4
5
3
6
2
1
Your cylinder vacuum cleaner is equipped with a safety switch to prevent
overheating. It will switch off automatically if overheated (e.g. due to
clogged suction channels).
If this happens:
Switch off the vacuum cleaner.
Pull the plug from the power socket.
Eliminate the cause of the overheating.
Wait for about 45 minutes.
After it has cooled off, you may switch on the vacuum cleaner again.
1. Pull out the cord by the plug up to the yellow mark (Fig. 6/1).
Danger of electric shock! If the red marking (Fig. 6/2) shows, press the
cord retraction button (Fig. 6/3) to pull in the cord up to the yellow mark
again (Fig. 6/1). Otherwise, the power cord may be damaged.
2. Insert the mains plug into a socket with ground/safety contact.
3. Switch on the cylinder vacuum cleaner with the on/off switch (Fig. 6/4).
4. Adjust the suction power with the suction power control (Fig. 6/5).
In normal situations the bypass vent (Fig. 6/6) must be completely
closed. With the bypass vent you can quickly reduce the suction power,
e.g. to release curtains that have accidentally been sucked in.
4.3 Switching off
Danger of injury! During uncontrolled retraction the power cord can whip
around, become a tripping hazard or knock over objects. Therefore,
keep the plug in your hand and guide the cord when retracting it.
4.4 Transport and storage
5. If using the floor nozzle, set the "carpet/hard floor" selector according
to the type of floor to be cleaned (Fig. 7/1):
Fig. 7/A: for deep- and short-pile carpets, runners
Fig. 7/B: for smooth floors, e.g. parquet, tiles, PVC, etc.
Danger of injury! When leaving your working-area, switch off the appliance and comply with the notices in Chapter 4.3, “Switching off”. This
will help avoid accidents.
1. Switch off the cylinder vacuum cleaner with the on/off switch (Fig. 6/4)
and pull the plug from the mains socket.
2. Keep the plug in your hand.
3. To retract the power cord, push the cord retracting button (Fig. 6/3).
Only carry the vacuum cleaner by its carrying-handle (Fig. 8/A1).
For storage you may either park the telescopic tube
- using the parking-hook of the floor nozzle (Fig. 8/A) or
- the storage-hook (Fig. 8/B).
If you want to store the appliance for a longer period of time, empty the
dust container, Chapter 5.1, “Emptying and cleaning the dust container”.
Store the appliance in a cool, dry place, out of the reach of children.
Never store the appliance next to heat sources (e.g. stoves or radiators).
Avoid exposing it to direct sunlight. Heat can damage the appliance.
14
Page 15

5 Maintenance
ATTENTION:
NOTE:
A
1
B
1
2
2
9
NOTE:
ATTENTION:
AB
10
OPEN
11
12
ATTENTION:
5 Maintenance
5.1 Emptying and cleaning the dust container
Switch off the appliance before emptying the dust container. This will
prevent dust from damaging the appliance.
You can dispose of the contents of the dust container with your regular
domestic waste as long as it does not contain any substances not permitted in domestic waste.
5.2 Cleaning central lamellae filter and motor protection filter
The filter elements are washable, but may not be cleaned in dishwashers or washing-machines. Also, do not use detergents or brushes with
hard bristles to clean the filters.
It is best to empty the dust container after each vacuuming session.
But empty the dust container at the latest:
- if the cleaning/emptying indicator (Fig. 9/A1) lights up;
- if the "MAX" marking (Fig. 9/B1) has been reached; or
- before prolonged storage or dispatch.
1. Switch off the appliance, Chapter 4.3, “Switching off”.
2. Push the release button for the dust container (Fig. 9/A2).
3. Remove the dust container from its receptacle.
4. Empty the dust container by holding it low over a dustbin and only then
press the release button (Fig. 9/B2).
5. Also clean the central lamellae filter on this occasion, Chapter 5.2,
“Cleaning central lamellae filter and motor protection filter”.
The dust container cannot be cleaned with the central lamellae filter fitted.
6. Remove any residual dust from the dust container using a dry cloth or
a soft brush, e.g. the supplied furniture brush.
7. Close the dust compartment bottom plate.
GB
Clean the filters each time you clean the dust container, Chapter 5.1,
“Emptying and cleaning the dust container”.
Clean the filters at the latest when the cleaning/emptying indicator
(Fig. 9/A1) lights up.
1. Switch off the appliance, Chapter 4.3, “Switching off”.
2. Remove and empty the dust container, Chapter 5.1, “Emptying and
cleaning the dust container”.
3. Remove the motor protection filter by pulling it upwards out of its holder
(Fig. 10/A).
4. Release the central lamellae filter by turning in the ‘open’ direction
(Fig. 11) and remove it along with the filter fleece from the dust
container.
5. Hold the central lamellae filter with the filter fleece low over a dustbin.
6. Separate the filter fleece from the filter by holding the filter firmly and
pulling the filter fleece carefully off (Fig. 12).
7. Remove larger agglomerations of dirt from both filter elements by hand.
8. Brush out the central lamellae filter using the 2-in-1 combi brush sup-
plied.
9. If the filter elements are still dirty after this dry-brushing procedure, thor-
oughly rinse them by hand until all dirt is gone.
Let the filter elements dry for approx. 24 hours at room temperature after
wet cleaning. Only put them back into the appliance when they are completely dry.
10. If a filter element is damaged or too dirty, replace it with a new one (or-
dering information Chapter 5.4, “Spare parts and accessories”).
11. Put the new / cleaned and completely dry motor protection filter back
into its receptacle (Fig. 10/B).
12. Pull the filter fleece back over the central lamellae filter so that the
lamellae are completely enclosed.
13. Insert the central lamellae filter back into the dust container and lock the
filter by turning it in the ‘close’ direction. You will feel and hear the filter
snap into place.
14. Put the dust container back into its receptacle. You will feel and hear it
snap into place.
15. Check that the dust container is fitted securely.
15
Page 16

5 Maintenance
ATTENTION:
BA
13
BA
14
ATTENTION:
ATTENTION:
WARNING:
5.3 Cleaning the exhaust filter
The exhaust filter is washable, but it may not be cleaned in dishwashers
or washing-machines. Also, do not use detergents or brushes with hard
bristles to clean the filters.
1
Clean the filters each time you clean the dust container, Chapter 5.1,
“Emptying and cleaning the dust container”.
Clean the filters at the latest when the cleaning/emptying indicator
(Fig. 9/A1) lights up.
1. Switch off the appliance, Chapter 4.3, “Switching off”.
2. Push the release catch of the exhaust filter cover down (Fig. 13/A) and
open out the exhaust filter cover.
3. Remove the exhaust filter cover with the exhaust filter.
4. Hold the exhaust filter cover complete with the exhaust filter low over a
dustbin.
5. Brush out dirt using a soft brush, such as the 2-in-1 combi brush sup-
plied (Fig. 13/B).
6. If this is not enough, remove the exhaust filter from the exhaust filter
cover using the removal tab and knock out remaining dirt from both elements.
7. If the exhaust filter is still dirty after this procedure, thoroughly rinse it
by hand in running water until all dirt is gone.
Let the filter dry for approx. 24 hours at room temperature after wet
cleaning. Only put it back in place when it is completely dry.
8. If the exhaust filter is damaged, deformed or too soiled, replace it (or-
dering information Chapter 5.4, “Spare parts and accessories”).
9. Put the clean/new and completely dry exhaust filter back into the ex-
haust filter cover. Make sure that, after putting it back in, the removal
tab (Fig. 14/A1) is still visible.
10. Fit the exhaust filter cover with the new or cleaned exhaust filter on the
bottom side first (Fig. 14/A) and then pivot it in upwards. You will feel
and hear it snap into place (Fig. 14/B).
5.4 Spare parts and accessories
Only use original spare parts from the scope of delivery or those that you
have purchased by reordering.
Ordering address: Page 26, “International Service”
Further information: www.dirtdevil.de
The adjacent accessory parts and spare parts can be reordered.
5.5 If the appliance does not work as it should
Danger of injury! Never use a defective appliance! Always switch off the
appliance and disconnect it from the mains before starting troubleshooting Chapter 4.3, “Switching off”.
Before contacting your authorised Royal dealer, Royal service partner or
appliance market or before sending in the appliance (Page 26, “Interna-
tional Service”), first follow the procedure in the following table to check if
you can solve the problem yourself.
Problem Possible cause / solution
The vacuum
cleaner
stops suddenly.
Cleaning/
emptying indicator
(Fig. 1/9)
lights up.
The overheating protection has tripped (possibly due to
blocked suction channels, filters, or similar).
Switch the appliance off and pull the plug out of the socket.
Remove the cause of overheating (e.g. by disassembling
telescopic tube and suction hose and removing the obstacle and/or cleaning filters). Wait for about 45 minutes. After
the appliance has cooled off, you may switch it on again.
The central lamellae filter is dirty.
Clean the central lamellae filter, Chapter 5.2, “Cleaning
central lamellae filter and motor protection filter”.
The dust container is full.
Empty / clean the dust container. Chapter 5.1, “Empty-
ing and cleaning the dust container”
Item number Description
2725001 Filter set 3 pcs, consisting of 1 central lamellae filter,
2725077 2 filter fleeces
M203 1 parquet brush
M209 1 turbo brush
Problem Possible cause / solution
The cleaning
results are
unsatisfactory in spite of
the appliance working correctly.
1 motor protection filter, 1 exhaust filter
The bypass vent (Fig. 1/18) is open.
Close the bypass vent .
The attached nozzle is unsuitable.
Change the nozzle, Chapter 3.2, “Selecting the proper
nozzle”.
The suction power you set is unsuitable.
Adjust the suction power control to suit the flooring,
Chapter 4.2, “Vacuum cleaning”, step 4.
The position of the "carpet/hard floor" selector (Fig. 1/31)
is unsuitable. Set the "carpet/hard floor" selector to the
correct position for the type of floor, Chapter 4.2, “Vacu-
um cleaning”, step 5.
The dust container is full.
Empty/clean the dust container, Chapter 5.1, “Emptying
and cleaning the dust container”.
The filters are dirty. Clean the respective filter, Chapter
5.2, “Cleaning central lamellae filter and motor protection
filter” or Chapter 5.3, “Cleaning the exhaust filter”.
Nozzle, telescopic tube or suction hose is blocked.
Remove the obstacle. If necessary, use a long wooden
stick (e.g. a broomstick) to do this.
16
Page 17

_________________________________________________________________________________________________________________________
_________________________________________________________________________________________________________________________
_________________________________________________________________________________________________________________________
_________________________________________________________________________________________________________________________
_________________________________________________________________________________________________________________________
_________________________________________________________________________________________________________________________
_________________________________________________________________________________________________________________________
_________________________________________________________________________________________________________________________
_________________________________________________________________________________________________________________________
_________________________________________________________________________________________________________________________
_________________________________________________________________________________________________________________________
_________________________________________________________________________________________________________________________
_________________________________________________________________________________________________________________________
_________________________________________________________________________________________________________________________
_________________________________________________________________________________________________________________________
17
Page 18

18
23
24
25
27
22
20
21
26
31
6
1
10
5
3
4
2
12
13
14
15
16
17
29
28
7
11
9
8
33
19
34
32
30
15
18
Page 19

1 Vista de conjunto de su Centrino X3.1
1 Vista de conjunto de su Centrino X3.1
¡Muchas gracias!
Le agradecemos la compra del Centrino X3.1 y la confianza depositada en
nosotros.
Vista de conjunto del alcance del suministro (Fig. 1)
1 Interruptor de conexión / desconexión
2 Regulador de potencia de aspiración
3 Tecla para enrollar el cable
4 Fijación de estacionamiento
5 Filtro de evacuación con lengüeta de extracción
6 Cubierta del filtro de evacuación
7 Alojamiento de la manguera de aspiración
8 Filtro de protección del motor
9 Indicador de limpieza/vaciado
10 Asa de transporte
11 Pulsador de vaciado
12 Base del depósito de polvo
13 Marca MAX en el depósito de polvo
14 Tela de filtración
15 Filtro central de láminas
16 Pulsador de desbloqueo para el depósito de polvo
17 Depósito de polvo
18 Regulador de aire adicional
19 Manguera de aspiración
20 Adaptador de la manguera de aspiración
21 Fijación para guardar
22 Cable eléctrico con clavija
23 Tubo telescópico
24 Inmovilizador del tubo telescópico
25 Sujeción de accesorios
26 Gancho para guardar
27 Cepillo combinado 2 en 1, utilizable como
- cepillo de muebles o
- tobera para ranuras
28 Tobera para tapicerías y cojines
29 Tobera de suelo (ilustración como ejemplo)
30 Gancho de estacionamiento
31 Conmutador "Alfombra/Suelo duro" (ilustración como ejemplo)
32 Minicepillo turbo "Fellino"
33 Cepillo para parqués
34 Manual de instrucciones
Índice
1 Vista de conjunto de su Centrino X3.1..................................... 19
Condiciones de la garantía ..........................................................19
En el caso de garantía ................................................................. 19
2 Advertencias de seguridad .......................................................20
2.1 sobre el manual de instrucciones................................................. 20
2.2 sobre determinados grupos de personas..................................... 20
2.3 sobre la alimentación de corriente ...............................................20
2.4 sobre el uso conforme.................................................................. 20
2.5 En caso de aparato defectuoso ................................................... 20
2.6 sobre la eliminación ..................................................................... 20
3 Antes del uso.............................................................................. 21
3.1 Desembalaje ................................................................................ 21
3.2 Seleccionar tobera .......................................................................21
3.3 Montaje ........................................................................................ 21
4 Uso .............................................................................................. 22
4.1 Seguridad durante el uso ............................................................. 22
4.2 Aspirar el polvo ............................................................................ 22
4.3 Desconexión ................................................................................ 22
4.4 Transportar y guardar .................................................................. 22
5 Mantenimiento............................................................................ 23
5.1 Vaciar y limpiar el depósito de polvo............................................ 23
5.2 Limpiar el filtro central de láminas y el filtro de protección del motor 23
5.3 Limpiar filtro de evacuación ......................................................... 24
5.4 Piezas de recambio y accesorios................................................. 24
5.5 Si el aparato no funciona como debe........................................... 24
Datos técnicos
Tipo de aparato : Aspiradora rodante sin bolsa
Modelo : Centrino X3.1
Número de modelo : M2012-3
Tensión : 220 – 240V ~, 50/60 Hz
Potencia : 1800 W nom. – 2300 W máx.
Volumen útil máx. del depósito : aprox. 1,5 litros
Longitud del cable eléctrico : aprox. 5,0 m
Peso : aprox. 5,3 kg
Nos reservamos el derecho a realizar cambios técnicos y de diseño en el
marco de la mejora permanente de nuestros productos. © Royal Appliance
International GmbH
ES
Condiciones de la garantía
Para el aparato distribuido por nosotros nos hacemos cargo de la garantía legalmente prescrita de 24 meses a partir de la fecha de compra.
Durante este plazo de garantía eliminaremos gratuitamente todos los fallos
que se deban al material o a defectos de fabricación. Esta eliminación se
efectuará a nuestra elección, por la reparación o el cambio del aparato o
del accesorio (los daños a piezas de accesorios no conducen automáticamente a un cambio de todo el aparato).
Quedan excluidos de la prestación de garantía, los daños que sean consecuencia de un uso inadecuado (operación del aparato con un tipo de corriente/tensión equivocados, conexión a fuentes inadecuadas de alimentación, rotura, etc.), el desgaste normal y las deficiencias que influyan de
modo irrelevante sobre el valor o la utilidad del aparato.
En caso de que intervengan establecimientos no autorizados por nosotros
o se utilicen piezas de recambio que no sean las originales de Royal
Appliance se extinguirá la garantía. ¡Las piezas de desgaste no están incluidas en la garantía y por lo tanto no son gratuitas!
La prestación de garantía sólo entrará en vigencia si la tarjeta de garantía
está provista de la fecha de compra, validada por el sello y la firma del vendedor o si se adjunta una copia de la factura de compra del aparato enviado. ¡Los servicios de garantía no generan una prolongación del período de
garantía, ni comienza por ello el derecho a una nueva garantía!
En el caso de garantía
Envíe el aparato con el depósito de polvo vacío y una breve descripción
del fallo en letra de imprenta.
Indique en la carta de acompañamiento la observación "Para garantía".
Envíelo junto con la tarjeta de garantía o con una copia de la factura de
compra a esta dirección:
Página 26, "International Service"
19
Page 20

2 Advertencias de seguridad
AVISO:
ATENCIÓN:
ADVERTENCIA:
2 Advertencias de seguridad
2.1 sobre el manual de instrucciones
Lea este manual de instrucciones por completo antes de utilizar el apa-
rato. Guarde bien las instrucciones. En caso de que ceda este aparato a
un tercero, entréguele también el manual de instrucciones.
La inobservancia de este manual puede ser origen de graves lesiones
o de daños en el aparato.
No asumimos ningún tipo de responsabilidad por los daños causados debido a la inobservancia de este manual de instrucciones.
Para evitar accidentes y daños en el aparato, es imprescindible tener
en cuenta las advertencias marcadas igual que las de al lado.
2.2 sobre determinados grupos de personas
Este aparato no está destinado para ser usado por personas (incluidos
niños) con capacidad física, sensorial o mental restringida o con falta de
experiencia y/o de conocimientos, a no ser que sean supervisadas por una
persona responsable de su seguridad o hayan recibido de ella instrucciones de cómo usar el aparato. Guarde el aparato de modo inaccesible para
este círculo de personas.
2.3 sobre la alimentación de corriente
El aparato funciona con corriente eléctrica, por tanto existe en general el
peligro de una descarga eléctrica. Por esta razón, tenga especialmente en
cuenta lo siguiente:
Jamás toque la clavija con las manos mojadas.
Quite siempre la clavija de la caja de enchufe tirando directamente de
aquélla. No tire nunca directamente del cable eléctrico porque podría dañarlo.
Jamás transporte el aparato del cable eléctrico. Podría ser dañado.
Procure que el cable eléctrico no se doble ni quede enganchado y evite
que se pase por encima de él o esté en contacto con fuentes de calor. Además no se debe convertir en una fuente de tropiezos.
Advierte sobre peligros para su salud y muestra posibles riesgos de
lesión.
Indica la posibilidad de que el aparato u otros objetos corran peligro.
Destaca consejos e informaciones.
Los niños deben ser supervisados para asegurarse de que no jueguen
con el aparato. Entre otros no deben ponerse de pie sobre el aparato ni
sentarse encima.
El material de embalaje no debe ser utilizado para jugar. Existe peligro
de asfixia.
Jamás sumerja el aparato en agua u otros líquidos y manténgalo ale-
jado de la lluvia y de la humedad.
Antes de la conexión a la alimentación de corriente cerciórese que la
tensión eléctrica indicada en la placa de características se corresponde
con la tensión de su caja de enchufe. Emplee solo cajas de enchufe con
toma de tierra.
De ser posible no use cables de prolongación. Si no hubiese alternati-
va, utilice sólo cables de prolongación simples (sin cajas de enchufes múltiples), protegidos contra chorros de agua, con certificación GS, que estén
diseñados para la toma de potencia del aparato.
Antes de usar el cable de corriente, controle que no esté dañado.
2.4 sobre el uso conforme
La aspiradora rodante está destinada sólo al uso doméstico. No es adecuada para un uso comercial.
Emplee la aspiradora rodante exclusivamente para limpiar suelos secos
con un grado normal de suciedad. Si ha montado el cepillo para muebles,
también podrá usar el aparato para aspirar muebles. Con el regulador de
aire adicional (Fig. 1/18) abierto por completo y con el debido cuidado el
aparato hasta puede servir para aspirar cortinas.
Cualquier otra utilización se considera no conforme y está prohibida. Que-
da especialmente prohibido lo siguiente:
El uso en las cercanías de materiales explosivos o fácilmente inflama-
bles. Existe riesgo de incendio o explosión.
El empleo al aire libre. Existe el peligro de que la lluvia y la suciedad
dañen el aparato.
La introducción de objetos en las aberturas del aparato. Se podría so-
brecalentar.
Las modificaciones o reparaciones del aparato por cuenta propia.
2.5 En caso de aparato defectuoso
Para evitar riesgos, si el cable de conexión de este aparato está dañado,
deberá ser reemplazado por el fabricante o por su servicio de asistencia al
cliente o por una persona igualmente calificada.
2.6 sobre la eliminación
Elimine el aparato de acuerdo con las normas de protección del
medio ambiente vigentes en su país. Los residuos eléctricos no
deben ser desechados con los residuos domésticos. Deséchelos
en los centros de recogida locales para aparatos eléctricos usados.
Además está prohibido:
Aspirar:
- Personas, animales, plantas, especialmente cabellos, dedos u otras
partes del cuerpo, así como prendas de ropa llevadas sobre el cuerpo. Puede ser aspirada y causar lesiones.
- Agua y otros líquidos, en especial productos para la limpieza en húmedo de alfombras. La humedad en el interior del aparato puede provocar un cortocircuito.
- Polvo de tóner (para impresoras láser, copiadoras, etc.). Existe el
riesgo de incendio y explosión.
- Rescoldos, cigarrillos y cerillas encendidas. Pueden provocar un incendio.
- Objetos puntiagudos como vidrios rotos, clavos, etc. El aparato podría ser dañado.
- Escombros, yeso, cemento, polvo finísimo de taladrar, maquillaje,
polvos de talco etc. Por ellos, el aparato podría ser dañado.
Jamás utilice un aparato defectuoso o un aparato con un cable de corriente
averiado. Entregue un aparato defectuoso para su reparación a un distribuidor especializado o al Servicio de Atención al Cliente de Royal
ce. Dirección Página 26, "International Service".
Los filtros empleados están fabricados de materiales compatibles con el
medio ambiente. Pueden ser eliminados con la basura doméstica.
Applian-
20
Page 21

3 Antes del uso
ATENCIÓN:
ADVERTENCIA:
2
BA
2
1
3
B
A
1 1
4
B
C
A
5
AVISO:
ATENCIÓN:
3 Antes del uso
3.1 Desembalaje
Envíe el aparato siempre en su embalaje original para que no resulte
dañado. Para ello guarde el embalaje original. Por el contrario, elimine
correctamente el material de embalaje que ya no sea necesario.
3.2 Seleccionar tobera
2
1
3
1. Desembale el aparato y sus accesorios.
2. Compruebe que el contenido no esté dañado.
En caso de descubrir algún daño debido al transporte, diríjase inmediatamente a su distribuidor.
1. Seleccione la tobera según el suelo a aspirar:
Tobera de suelo (Fig. 2/1):
Puede utilizarla universalmente y, gracias al conmutador, limpiar tanto alfombras como suelos duros.
Cepillo para parqués (Fig. 2/2):
Este cepillo está provisto de cerdas largas y sirve para aspirar superficies
muy delicadas (p.ej., parqués o laminados).
Minicepillo turbo "Fellino" (Fig. 2/3):
Este cepillo dispone de un cabezal giratorio de cepillado y por tanto resulta
idóneo para la limpieza en profundidad de tapicerías y alfombras.
Tobera para cojines (Fig. 2/4):
Utilícela para aspirar el polvo de los muebles tapizados.
Cepillo combinado 2 en 1 (Fig. 2/5), utilizable como:
- Tobera para ranuras (Fig. 3/A1):
Utilícela para aspirar el polvo en lugares de difícil acceso.
- Cepillo de muebles (Fig. 3/A2):
Utilícelo para aspirar el polvo de objetos que tengan superficies delicadas.
2. Dentro de lo posible, inserte las toberas de accesorios que no necesita
sobre los puntos de inserción de la sujeción de accesorios (Fig. 3/B).
3. Guarde las demás toberas de forma segura y alejadas de los niños.
3.3 Montaje
¡Peligro de lesiones! Monte las toberas sólo cuando la clavija esté desenchufada. La aspiradora rodante podría conectarse por error.
Antes de aspirar, asegúrese que la tobera colocada sea apta para la
superficie a aspirar. Observe las recomendaciones de los fabricantes de
revestimientos de suelo.
1. Introduzca la tobera que necesite en el extremo inferior del tubo tele-
scópico (Fig. 4/A1) o del asidero (Fig. 4/B1).
2. Inserte el adaptador de la manguera de aspiración en el alojamiento de
la manguera de aspiración ubicada en el aparato (Fig. 5/A). Gire el
adaptador de la manguera de aspiración en sentido horario hasta que
perciba que el bloqueo encaja y no se deja girar más.
En caso de utilización del tubo telescópico:
3. Introduzca el asidero en el extremo superior del tubo telescópico
(Fig. 5/B).
4. Ajuste la longitud del tubo telescópico (Fig. 5/C). Para ello presione el
inmovilizador del tubo telescópico hacia abajo. A continuación tire el tubo telescópico hasta la longitud deseada. Para bloquear, suelte el inmovilizador del tubo telescópico al tirar de éste. Escuchará claramente
como encaja.
ES
21
Page 22

4Uso
AVISO:
AVISO:
ATENCIÓN:
ADVERTENCIA:
1
2
5
3
4
6
6
B
A
1
7
AVISO:
ADVERTENCIA:
AVISO:
AVISO:
A
1
B
8
ATENCIÓN:
4Uso
4.1 Seguridad durante el uso
¡Peligro de lesiones! Antes de cada uso controle el aparato y el cable
eléctrico. Un aparato dañado no debe ser utilizado.
¡Peligro de lesiones! Especialmente al aspirar escaleras preste atención
a que usted siempre se encuentre por encima del aparato.
Emplee la aspiradora rodante únicamente si todos los filtros están intactos, secos y colocados correctamente. Asegúrese de que el tubo telescópico, la manguera de aspiración u otras aberturas no estén obstruidos por ningún objeto.
4.2 Aspirar el polvo
La aspiradora rodante dispone de una protección contra el sobrecalentamiento. Se desconecta automáticamente en caso de sobrecalentamiento (p. ej. por conductos obstruidos).
Si esto fuera el caso:
Desconecte la aspiradora rodante.
Desenchufe la clavija.
Elimine la causa del sobrecalentamiento.
Aguarde aproximadamente 45 minutos.
Una vez que la aspiradora rodante se haya enfriado podrá conectarla
nuevamente.
1. Tire el cable del enchufe y extráigalo hasta la marca amarilla (Fig. 6/1).
¡Peligro de una descarga eléctrica! En caso de que se vea la marca roja
(Fig. 6/2) vuelva a introducir el cable con la ayuda de la tecla para enrollar el cable (Fig. 6/3) hasta la marca amarilla (Fig. 6/1). En caso contrario podría resultar dañado el cable.
2. Enchufe la clavija en una caja de enchufe con contacto de protección.
3. Conecte la aspiradora rodante en el interruptor de conexión / desco-
nexión (Fig. 6/4).
4. Ajuste la potencia de aspiración en el regulador de potencia de aspira-
ción (Fig. 6/5).
4.3 Desconexión
¡Peligro de lesiones! Si el cable eléctrico se enrolla incontroladamente,
puede dar bandazos, hacer que se tropiece o producir la caída de objetos. Por ello sostenga la clavija en la mano y condúzcala durante el
enrollamiento del cable de corriente.
4.4 Transportar y guardar
22
El regulador de aire adicional (Fig. 6/6) debe estar completamente
cerrado en caso normal. Gracias al regulador de aire adicional se puede
reducir rápidamente la potencia de aspiración, p.ej. para soltar cortinas
aspiradas.
5. Si utiliza la tobera de suelo, ajuste el conmutador "Alfombra/Suelo du-
ro“ según el revestimiento del suelo (Fig. 7/1):
Fig. 7/A: para alfombras de pelo largo y corto, alfombrillas
Fig. 7/B: para suelos duros como parqué, baldosas, PVC, etc.
¡Peligro de lesiones! Si abandona el lugar de trabajo, desconecte el
aparato y tenga en cuenta las indicaciones en Capítulo 4.3, "Desco-
nexión". Así evitará accidentes.
1. Desconecte la aspiradora rodante mediante el interruptor de conexión
/ desconexión (Fig. 6/4) y desenchufe la clavija de la caja de enchufe.
2. Sostenga la clavija en la mano.
3. Para recoger el cable eléctrico presione la tecla para enrollar el cable
(Fig. 6/3).
Lleve la aspiradora rodante para el transporte exclusivamente del asa
de transporte (Fig. 8/A1).
Para guardar puede o bien estacionar el tubo telescópico
- mediante el gancho de estacionamiento de la tobera de suelo (Fig. 8/A)
o
- guardarla mediante el gancho para guardar (Fig. 8/B).
Si desea almacenar el aparato durante un período prolongado, vacíe
el depósito de polvo antes, Capítulo 5.1, "Vaciar y limpiar el depósito de
polvo".
Guarde el aparato en un lugar fresco, seco y no accesible para los niños.
Jamás deje el aparato en la proximidad inmediata de fuentes de calor
(p. ej. de la calefacción o del horno). Evite la incidencia directa de rayos
solares. El calor puede dañar el aparato.
Page 23

5 Mantenimiento
ATENCIÓN:
ADVERTENCIA:
A
1
B
1
2
2
9
ADVERTENCIA:
ATENCIÓN:
AB
10
OPEN
11
12
ATENCIÓN:
5 Mantenimiento
5.1 Vaciar y limpiar el depósito de polvo
Antes de vaciar el depósito de polvo, desconecte el aparato. Así evitará
que el polvo dañe el aparato.
El contenido del depósito de polvo puede ser eliminado junto con la
basura doméstica, siempre y cuando no contenga ningún componente
prohibido para los residuos domésticos.
Lo mejor es vaciar el depósito de polvo después de cada proceso de
aspiración.
Pero a más tardar debería vaciarse:
- cuando el indicador de limpieza/vaciado (Fig. 9/A1) se prenda,
- cuando se haya alcanzado la marca "MAX" (Fig. 9/B1),
- antes de un almacenamiento prologado o de un envío.
1. Desconecte el aparato, Capítulo 4.3, "Desconexión".
2. Oprima el pulsador de desbloqueo del depósito de polvo (Fig. 9/A2).
3. Extraiga el depósito de polvo de su consola.
4. Vacíe el depósito de polvo, colocándolo profundamente sobre un cubo
de basura y pulsando sólo entonces el pulsador de vaciado (Fig. 9/B2).
5. En esta oportunidad limpie asimismo el filtro central de láminas,
Capítulo 5.2, "Limpiar el filtro central de láminas y el filtro de protección del motor".
Con el filtro central de láminas colocado no puede limpiarse el depósito
de polvo.
6. Con la ayuda de un trapo seco o de un cepillo blando, p.ej. el cepillo
para muebles suministrado, elimine los restos de polvo que eventualmente aún se encuentren en el depósito.
7. Vuelva a fijar la placa de fondo del depósito de polvo.
5.2 Limpiar el filtro central de láminas y el filtro de protección del motor
Cuando esté limpiando el depósito de polvo, aproveche la situación pa-
Los elementos filtrantes son lavables pero no son aptos para lavavajillas
ni para lavadoras. Además, no use para la limpieza ningún producto de
limpieza o cepillos con cerdas duras.
ra limpiar también el filtro, Capítulo 5.1, "Vaciar y limpiar el depósito de
polvo".
Limpie el filtro a más tardar, cuando se prenda el indicador de limpieza/
vaciado (Fig. 9/A1).
1. Desconecte el aparato, Capítulo 4.3, "Desconexión".
2. Extraiga el depósito de polvo y vacíelo, Capítulo 5.1, "Vaciar y limpiar
el depósito de polvo".
3. Extraiga hacia arriba el filtro de protección del motor de su soporte
(Fig. 10/A).
4. Desbloquee el filtro central de láminas girándolo en dirección "open"
(Fig. 11) y extráigalo del depósito de polvo junto con la tela de filtración
puesta por encima.
5. Sostenga el filtro central de láminas junto con la tela de filtración puesta
por encima sobre un cubo de basura.
6. Retire la tela de filtración del filtro teniendo el filtro bien agarrado y qui-
tando cuidadosamente la tela de filtración (Fig. 12).
7. Elimine manualmente las suciedades más gruesas en ambos elemen-
tos filtrantes.
8. Limpie el filtro central de láminas con ayuda del cepillo combinado 2 en
1 que está incluido en el suministro.
9. Si después de la limpieza en seco los elementos filtrantes estuviesen
todavía sucios, enjuáguelos manualmente a fondo hasta que se elimine toda suciedad.
ES
Deje que los elementos filtrantes se sequen durante aprox. 24 horas a
temperatura ambiente después de su limpieza. Vuelva a colocarlos de
nuevo sólo cuando estén totalmente secos.
10. Si uno de los elementos filtrantes estuviese dañado o extremadamente
sucio, reemplácelo por uno nuevo (Informaciones para pedidos
Capítulo 5.4, "Piezas de recambio y accesorios").
11. Coloque nuevamente el filtro de protección del motor nuevo / limpio y
completamente seco en su consola (Fig. 10/B).
12. Coloque de nuevo la tela de filtración sobre el filtro central de láminas
de forma que encierra completamente las láminas.
13. Vuelva a colocar el filtro central de láminas en el depósito de polvo y
bloquee el filtro girándolo en dirección "close". El filtro encaja audible y
perceptiblemente.
14. Vuelva a colocar el depósito de polvo en su consola. Encaja audible y
perceptiblemente.
15. Compruebe el ajuste fijo del depósito de polvo.
23
Page 24

5 Mantenimiento
ATENCIÓN:
BA
13
BA
14
ATENCIÓN:
ATENCIÓN:
AVISO:
5.3 Limpiar filtro de evacuación
El filtro de evacuación es lavable pero no es apto para lavavajillas ni
para lavadoras. Además, no use para la limpieza ningún producto de
limpieza o cepillos con cerdas duras.
1
Cuando esté limpiando el depósito de polvo, aproveche la situación pa-
ra limpiar también el filtro, Capítulo 5.1, "Vaciar y limpiar el depósito de
polvo".
Limpie el filtro a más tardar, cuando se prenda el indicador de limpieza/
vaciado (Fig. 9/A1).
1. Desconecte el aparato, Capítulo 4.3, "Desconexión".
2. Oprima el desbloqueo de la cubierta del filtro de evacuación hacia aba-
jo (Fig. 13/A) y rebátala.
3. Retire la cubierta del filtro de evacuación y el filtro mismo.
4. Sostenga la cubierta del filtro de evacuación junto con el filtro de eva-
cuación sobre un cubo de basura aproximándolos lo más posible.
5. Limpie las suciedades con un cepillo blando, por ejemplo con el cepillo
combinado 2 en 1 suministrado (Fig. 13/B).
6. Si esto no fuese suficiente, retire el filtro de evacuación de la cubierta
del filtro de evacuación cogiéndolo de la lengüeta de extracción y sacuda bien ambos elementos.
7. Si después de la limpieza en seco el filtro de evacuación estuviese to-
davía sucio, enjuáguelo a fondo hasta que se elimine toda suciedad.
Deje que el filtro se seque durante aprox. 24 horas a temperatura
ambiente después de la limpieza en húmedo. Introdúzcalo de nuevo
una vez que esté totalmente seco.
8. En caso de que el filtro de evacuación esté dañado, deformado o de-
masiado sucio, reemplácelo (informaciones de pedido Capítulo 5.4,
"Piezas de recambio y accesorios").
9. Vuelva a colocar el filtro de evacuación limpio o nuevo y totalmente se-
co en su cubierta. Asegúrese de que la lengüeta de extracción (Fig. 14/
A1) sea visible después de la colocación.
10. Coloque la cubierta del filtro de evacuación con el filtro nuevo o limpio
primero abajo (Fig. 14/A) y rebátala después hacia arriba. Encaja audible y perceptiblemente (Fig. 14/B).
5.4 Piezas de recambio y accesorios
Emplee únicamente piezas de recambio originales incluidas en el suministro o que haya pedido al fabricante con posterioridad.
Contacto para pedidos: Página 26, "International Service"
Más información: www.dirtdevil.de
Los accesorios y las piezas de recambio listados al lado pueden ser ad-
quiridos con posterioridad.
5.5 Si el aparato no funciona como debe
¡Peligro de lesiones! ¡Jamás utilice un aparato defectuoso! Antes de
ponerse a localizar el problema, desconecte el aparato y desenchufe la
clavija de la caja de enchufe, Capítulo 4.3, "Desconexión".
Antes de contactar a su concesionario oficial Royal‚ al socio de servicio
Royal, a su mercado especializado o, incluso, enviar el aparato (Página
26, "International Service"), verifique con la siguiente tabla si usted puede
solucionar el problema por sí mismo.
Problema Posible causa / solución
El aparato
deja súbitamente de
aspirar.
El indicador
de limpieza/
vaciado
(Fig. 1/9)
está iluminado.
Ha disparado la protección contra sobrecalentamiento (posiblemente debido a tuberías o similares obstruidos).
Desconecte el aparato y desenchufe la clavija de la caja
correspondiente. Elimine la causa del sobrecalentamiento
(p. ej. desmontar el tubo telescópico y la manguera de aspiración y eliminar la obturación). Aguarde aproximadamente 45 minutos. Una vez que el aparato se haya enfriado podrá conectarlo nuevamente.
El filtro central de láminas está sucio. Limpie el filtro central
de láminas, Capítulo 5.2, "Limpiar el filtro central de lá-
minas y el filtro de protección del motor".
El depósito de polvo está lleno. Vacíe / limpie el depósito
de polvo. Capítulo 5.1, "Vaciar y limpiar el depósito de
polvo"
24
Nº de artículo Descripción
2725001 Juego de filtro de 3 piezas, compuesto de 1 filtro central
de láminas, 1 filtro de protección del motor, 1 filtro de
evacuación
2725077 2 telas de filtración
M203 1 cepillo para parqués
M209 1 cepillo turbo
Problema Posible causa / solución
El resultado
de la aspiración no es
satisfactorio a pesar
de un funcionamiento correcto.
El regulador de aire adicional (Fig. 1/18) está abierto.
Cierre el regulador de aire adicional.
La tobera colocada no está apta para el objeto a aspirar.
Cambie la tobera, Capítulo 3.2, "Seleccionar tobera".
La potencia de aspiración ajustada no es apta. Adapte la
posición del regulador de la potencia de aspiración al revestimiento de suelo, Capítulo 4.2, "Aspirar el polvo",
paso 4.
La posición del conmutador "Alfombra/Suelo duro" (Fig. 1/
31) no está apta para el objeto a aspirar. Adapte la posición del conmutador "Alfombra/Suelo duro" al revestimiento del suelo, Capítulo 4.2, "Aspirar el polvo", paso 5.
El depósito de polvo está excesivamente lleno.
Vacíe / limpie el depósito de polvo, Capítulo 5.1, "Vaciar
y limpiar el depósito de polvo".
Los filtros están sucios.
Limpie el filtro correspondiente, Capítulo 5.2, "Limpiar el
filtro central de láminas y el filtro de protección del motor"
o bien Capítulo 5.3, "Limpiar filtro de evacuación".
La tobera, el tubo telescópico o la manguera de aspiración
están obstruidos.
Elimine la obstrucción. Si fuese necesario, utilice para ello
una vara larga de madera (p. ej. un palo de escoba).
Page 25

_________________________________________________________________________________________________________________________
_________________________________________________________________________________________________________________________
_________________________________________________________________________________________________________________________
_________________________________________________________________________________________________________________________
_________________________________________________________________________________________________________________________
_________________________________________________________________________________________________________________________
_________________________________________________________________________________________________________________________
_________________________________________________________________________________________________________________________
_________________________________________________________________________________________________________________________
_________________________________________________________________________________________________________________________
_________________________________________________________________________________________________________________________
_________________________________________________________________________________________________________________________
_________________________________________________________________________________________________________________________
_________________________________________________________________________________________________________________________
_________________________________________________________________________________________________________________________
25
Page 26

International Service
DEDEDE
BE
CH
DKESES
ESFIFI
HR
HU
PL
SI
International Service
Kundenservice:
Royal Appliance International GmbH
Abt. Kundenservice
Jagenbergstraße 19
41468 Neuss
DEUTSCHLAND
Tel.: +49 (0) 180 - 501 50 50*
Fax: +49 (0) 2131 - 60 90 60 95
Hotline Ersatzteile: 01805 15 85 08*
E-Mail: Ersatzteilshop@dirtdevil.de
www.dirtdevil.de
servicecenter@dirtdevil.de
*0,14 €/Minute aus dem deutschen Festnetz
(deutscher Mobilfunkhöchstpreis 0,42 €/Minute)
Z.E.S. Goes B.V.
T.a.v. afd. Service
Pearyweg 1
4462 GT Goes
NEDERLAND
Tel: +31 - 113 - 24 07 00
Fax: +31 - 113 - 24 07 50
dirtdevil@zesgoes.nl
Zubehör und Ersatzteile:
Service-Versand
Ina Riedmüller
Frankenstraße 34
89233 Neu-Ulm
DEUTSCHLAND
Tel.: +49 (0) 1805 - 15 85 08*
Fax: +49 (0) 7307 - 41 56
Riedmueller.service@t-online.de
*0,14 €/Minute aus dem deutschen Festnetz
(deutscher Mobilfunkhöchstpreis 0,42 €/Minute)
Bluepoint-Service SAGL
Via Cantonale 14
6917 Barbengo
SWITZERLAND
Tel. +41 (0) 91 980 49 73
E-Mail: info@bluepoint-service.ch
www.bluepoint-service.ch
Zubehör und Ersatzteile:
Service Center Feuerbach KG
Corneliusstr. 75
40215 Düsseldorf
DEUTSCHLAND
Tel.: +49 (0) 1805 - 15 85 08*
Fax: +49 (0) 211 - 37 04 97
dirtdevil-service@t-online.de
www.dirtdevil-service.de
*0,14 €/Minute aus dem deutschen Festnetz
(deutscher Mobilfunkhöchstpreis 0,42 €/Minute)
CZ
K+P service s.r.o.
Vančurova 83
339 01 Klatovy
Česká Republika
Tel: +420 - 602 366 221
E-mail: k.p.servis@seznam.cz
AT
Zmugg Elektronik Service
und Vertriebges. M.b.H.
Fabriksgasse 27
8020 Graz
ÖSTERREICH
Tel. +43 - 316 - 77 21 20
Fax +43 - 316 - 77 21 20 10
Tel. Ersatzteile: +43 - 316 - 77 21 20 14
Fax Ersatzteile: +43 - 316 - 77 21 20 15
zmuggelektronik@utanet.at
DK
WhiteBrown A/S
Ramsherred 27 1 Sal
DK-6200 Aabenraa
info@whitebrown.eu
Distribution:
Support adresse:
WhiteBrown A/S
c/o BSL Baltship Seatainers Logistics
Egeskovvej 6
DK-8700 Horsens
info@whitebrown.eu
Helpdesk nummer:
Tel.: +45 73326150
Reparaciones y recambios:
SAT EIXAMPLE
Calabria, 277/279
08029 - Barcelona
Tel.: 93 430 69 50
sateixample@hotmail.com
TD ''MEDJIMURKA'' D.D.
Trg Republike 6
40000 Čakovec
HRVATSKA
Tel.: +385 - 40 - 31 27 60
Fax: +385 - 40 - 32 86 61
Recambios online:
www.recambiosyaccesoriosonline.es
pedidos@recambiosyaccesoriosonline.es
Distribution:
HOME APPLIANCE BROKERS HAB OY
HELSINKI, FINLAND
info@haboy.fi
www.haboy.fi
SEKON BT.
1117 Bp. Budafoki út 60
MAGYARORSZÁG
Tel: +36-1-205-3180
Fax: +36-1-205-3181
Mobil: +36-70-297-6985
e-mail: service@invitone.hu
Reparaciones y recambios:
ELECTRONICA LATINA, S.L.
Paseo Virgen del Puerto 13,
28005 Madrid
Tel.: 91 366 52 02
Tel.: 91 366 52 03
eleclatina@hotmail.es
Service:
SIMSON HUOLTOPALVELU OY
KARVAAMOKUJA 1
00380 HELSINKI
FINLAND
TEL:+358 (0) 20 755 87 90
FAX:+358 (0) 20 755 87 99
huolto@simson.fi
www.simson.fi
IT
RICAMBI ELETTRODOMESTICI
Corso L. Zanussi, 11
33080 Porcia (PN)
ITALIA
tel: 0434/550833
info@elettrodomesticiricambi.com
ES
M.J. TORIBIO
Calle Tahona, 4,
28223 - Pozuelo de Alarcón - Madrid
Tel.: 91 715 60 52
mjtoribio@telepolis.com
Reparaciones y recambios:
FR
OPM France Nant’Est entreprise
33 rue du bois Briand
44316 Nantes cdx 3
FRANCE
Tel. +33 - 2 - 40 49 64 25
Fax +33 - 2 - 40 93 96 22
www.opm-france.com
NL
Z.E.S. Goes B.V.
T.a.v. afd. Service
Pearyweg 1
4462 GT Goes
NEDERLAND
Tel: +31 - 113 - 24 07 00
Fax: +31 - 113 - 24 07 50
dirtdevil@zesgoes.nl
OBSŁUGA GWARANCYJNA I
SERWISOWA
QUADRA-NET Sp. z o.o.
61-888 Poznań, ul. Składowa 5
infolinia: 66 444 88 00
DYSTRYBUTOR I GWARANT
DSV Sp. z o.o. S.K.A. Gdynia,
Plac Kaszubski 8
26
Strojinc Ciril s.p.
Koseskega ul. 1a
1000 Ljubljana
SLOVENIJA
Tel: +386 -1- 42 28 489
SK
Aspico Slovakia s r.o.
Kracanska 40/104
92901 Dunajská Streda
SLOVAKIA
Tel: +421 - 31 - 55 11 815
Page 27

DE
GB
ES
D
NUR GÜLTIG MIT RECHNUNGSKOPIE!
VALID ONLY INCLUDING A COPY OF THE PURCHASE SLIP!
¡VÁLIDO SÓLO CON COPIA DE FACTURA!
Absender: Bitte Blockschrift in Großbuchstaben
From: Please print in capitals
Remitente: Por favor, escriba en letra de imprenta y en mayúsculas
Name • Name • Nombres y apellidos
Straße und Hausnummer • Street and house number • Calle y número
Garantie • Warranty • Garantía
PLZ und Ort • Zip code and town • C.P. y ciudad
Telefon mit Vorwahl • Phone number (with area code) • Teléfono con prefijo
Centrino X3.1
E-Mail • email • Correo electrónico
Kaufdatum • Date of purchase • Fecha de compra
Datum, Unterschrift des Käufers • Date and owner's signature • Fecha, firma del comprador
_________________________________________________________________________________________________________________
Fehlerbeschreibung • Description of the malfunction • Descripción del fallo:
_________________________________________________________________________________________________________________
Bitte diesen Abschnitt ausschneiden und dem Gerät beilegen. • Please detach this part and send it in with the appliance. • Por favor, recorte este resguardo y añádelo al aparato.
Page 28

DE
GB
ES
Royal Appliance International GmbH
Jagenbergstraße 19
41468 Neuss
Germany
servicecenter@dirtdevil.de
www.dirtdevil.de
+49 (0) 1805 - 10 90 19*
+49 (0) 2131 - 60 90 60 95
* 0,14 €/Minute aus dem deutschen Festnetz, deutscher Mobilfunkhöchstpreis 0,42 €/Minute;
Die Gebühren für Telefonate aus dem Ausland (also außerhalb von Deutschland) richten sich nach den Preisen
der jeweiligen ausländischen Anbieter und der jeweils aktuellen Tarife.
* € 0.14 per minute from German landlines, maximum German mobile phone tariff € 0.42 per minute.
The cost of calls from abroad—outside Germany—depend upon the current prices of the respective foreign
telephone company.
* 0,14 €/minuto desde la red fija alemana, precio máximo alemán para telefonía móvil 0,42 €/minuto;
Las tasas para las llamadas telefónicas desde el extranjero (fuera de Alemania) se orientan a los precios de cada
servidor extranjero y a las correspondientes tarifas actuales.
 Loading...