

Page 1
@
OWNER'S
MANUAL
Operating and Servicing
l
nstructions
Please read these
instructions carefully before
using your Swivel Glidee" Vision?
@
Let us help you put your
cleaner together or answer
any questions, call:
1-800-321
-1
134
(USA
&
Canada)
website: www.dirtdeviI.com
For
quick
reference, please record your vacuum
information below.
Model
Mfg. Code:
(Mfg. code located on
#:
the
lower backside of cleaner)
Espaiiol - pagina E 1
01
998
All
rights
reserved
#I
-1 13344-000
3/03
Page 2
CONGRATULATIONS
You are now the proud owner of the Dirt Devilm Swivel Glidea Visiona, with Power You Can SeeTM!
You'll never buy another bag again with the unique bagless design that includes a see-through
dirt container for retrieving lost items. You'll also enjoy superior cleaning performance with
amps of Maximum Vacuum Power.
We are very proud of our products and hope that you are equally satisfied with their quality and
performance.
Thank you for your support of Dirt Devil@ products.
Visit our website at www.dirtdevil.com
12
Feature Descriptions
How To Assemble
How To Operate
..................................
....................................
......................................
Hose Assembly and Tool Storage
FloorICarpet Cleaning
Above Floor Cleaning
Hands Free Edge Cleaning
Carpet Settings
.................................
How To Transport Cleaner
TABLE
............................
............................
..............................
OF CONTENTS
...................
........................
Dirt Container & HEPA Removal and Replacement
Belt or Brushroll Removal and Replacement
Lightbulb Removal and Replacement
Troubleshooting Guide
.................................
......................
................
...........
.Page
.Page
.Page
.Page
.Page
.Page
.Page
.Page
.Page
.Page
.Page
.Page
.Page
4
4
5
5
5
5
5
6
6
6
7
7
8
LIMITED WARRANTY
To the consumer, Royal Appliance Mfg. Co. warrants this vacuum cleaner to be free of defects in material or workmanship commencing upon the date of the original
purchase. Refer to your vacuum cleaner carton for the length of warranty and save your original sales receipt to validate start of warranty period.
If the vacuum cleaner should become defective within the warranty period, we will repair or replace any defective parts free of charge. The complete machine must be
Dreoaid
delivered
sales receipt and your name, address and telephone number. If you are not near a Warranty Station, call the factory for assistance at USA
1-800-321
The warranty does not include unusual wear, damage resulting from accident or unreasonable use of the vacuum cleaner. This warranty does not cover belts, f~lters,
brushes, bags, bulbs or fan damage. This warranty does not cover unauthorized repalrs Th~s warranty gives you spec~fic legal rights and you may also have other
rights. (Other rights may vary from state to state in the USA).
to any ROYALm Authorized Sales & Warranty Service Station. Please include complete description of the problem, day of purchase, copy of original
-1
134.
Use only genuine Royala replacement parts.
&
Canada:
Page 3
THlS CLEANER IS INTENDED FOR HOUSEHOLD USE ONLY
IMPORTANT SAFETY INSTRUCTIONS
When you use an appliance, basic precautions should be followed, including the following:
READ ALL INSTRUCTIONS BEFORE USING THE APPLIANCE.
ALWAYS FOLLOW THESE SAFETY INSTRUCTIONS.
BRING CLEANER TO UPRIGHT POSITION WHEN USING THE HOSE AND ATTACHMENTS.
DO NOT LEAVE CLEANER UNATTENDED WHEN PLUGGED IN.
REGULARLY
WARNING: DO NOT USE SHARP OBJECTSTO CLEAN OUTTHE HOSE SINCE THEY COULD CAUSE DAMAGE.
OCCASIONALLY REMOVE BRUSH AND CLEAN DEBRIS FROM END CAPS TO KEEP BRUSH ROTATING SMOOTHLY.
WARNING: THE CORDS, WIRES
LEAD OR LEAD COMPOUNDS, KNOWN TO THE STATE OF CALIFORNIA TO CAUSE CANCER AND BIRTH DEFECTS OR
OTHER REPRODUCTIVE HARM. WASH HANDS AFTER USING.
CHECKTHE FILTERS TO CLEAN OR REPLACE.
AND/OR CABLES SUPPLIED WITH THlS PRODUCT CONTAINS CHEMICALS, INCLUDING
READ ALL INSTRUCTIONS BEFORE USING
THE
APPLIANCE.
WARNING: TO REDUCE THE RISK OF FIRE,
ELECTRIC SHOCK OR INJURY:
Do not leave appliance when plugged in. Unplug from outlet when not in use and before servicing.
Do not use outdoors or on wet surfaces. Electrical shock could occur.
Do not allow to be used as a toy. Close attention is necessary when used by or near children.
Use only as described in this manual. Use only manufacturer's recommended attachments.
Do not use with damaged cord or plug. If appliance is not working as it should, has been dropped, damaged, left outdoors,
or dropped into water, return it to a service center for inspection. Call 1-800-321-1 134 for the nearest service center.
Do not pull or carry by cord, use cord as handle, close a door on cord, or pull cord around sharp edges or corners. Do
not run appliance over cord. Keep cord away from heated surfaces.
Do not unplug by pulling on cord. To unplug, grasp the plug, not the cord.
Do not handle plug or appliance with wet hands.
Do not put any objects into openings. Do not use with any opening blocked; keep free of dust, lint, hair, and anything that
may reduce air flow.
Keep hair, loose clothing, fingers, and all parts of body away from openings and moving parts.
Do not pick up anything that is burning or smoking, such as cigarettes, matches, or hot ashes.
Do not use without dirt container and filters in place.
Turn off all controls before unplugging.
Use extra care when cleaning on stairs.
Do not use to pick up flammable or combustible liquids, such as gasoline, or use in areas where they may be present.
Keep the vacuum cleaner on the floor. Only the hand-held vacuum cleaners may be set on furniture.
Cleaner must be in the upright position to lift the rotating brush off the carpet when doing above floor cleaning.
Do not use an extension cord with this vacuum cleaner.
Store the vacuum cleaner indoors. Put the vacuum cleaner away after use to prevent tripping accidents.
Using improper voltage may result in damage to the motor and possible injury to the user. Proper voltage is listed on the
cleaner plate.
Unplug before connecting Turbo Tool (Turbo Tool not included on all models).
SAVE THESE INSTRUCTIONS
WARNING:
To reduce the risk of electric shock, this appliance has a polarized plug (one blade wider than the other). This plug will fit
in a polarized outlet only one way.
a qualified electrician to install the proper outlet. Do not change the plug in any way.
If
the plug does not fit fully in the outlet, reverse the plug. If it still does not fit, contact
Page 4
Fia.
1
FEATURES
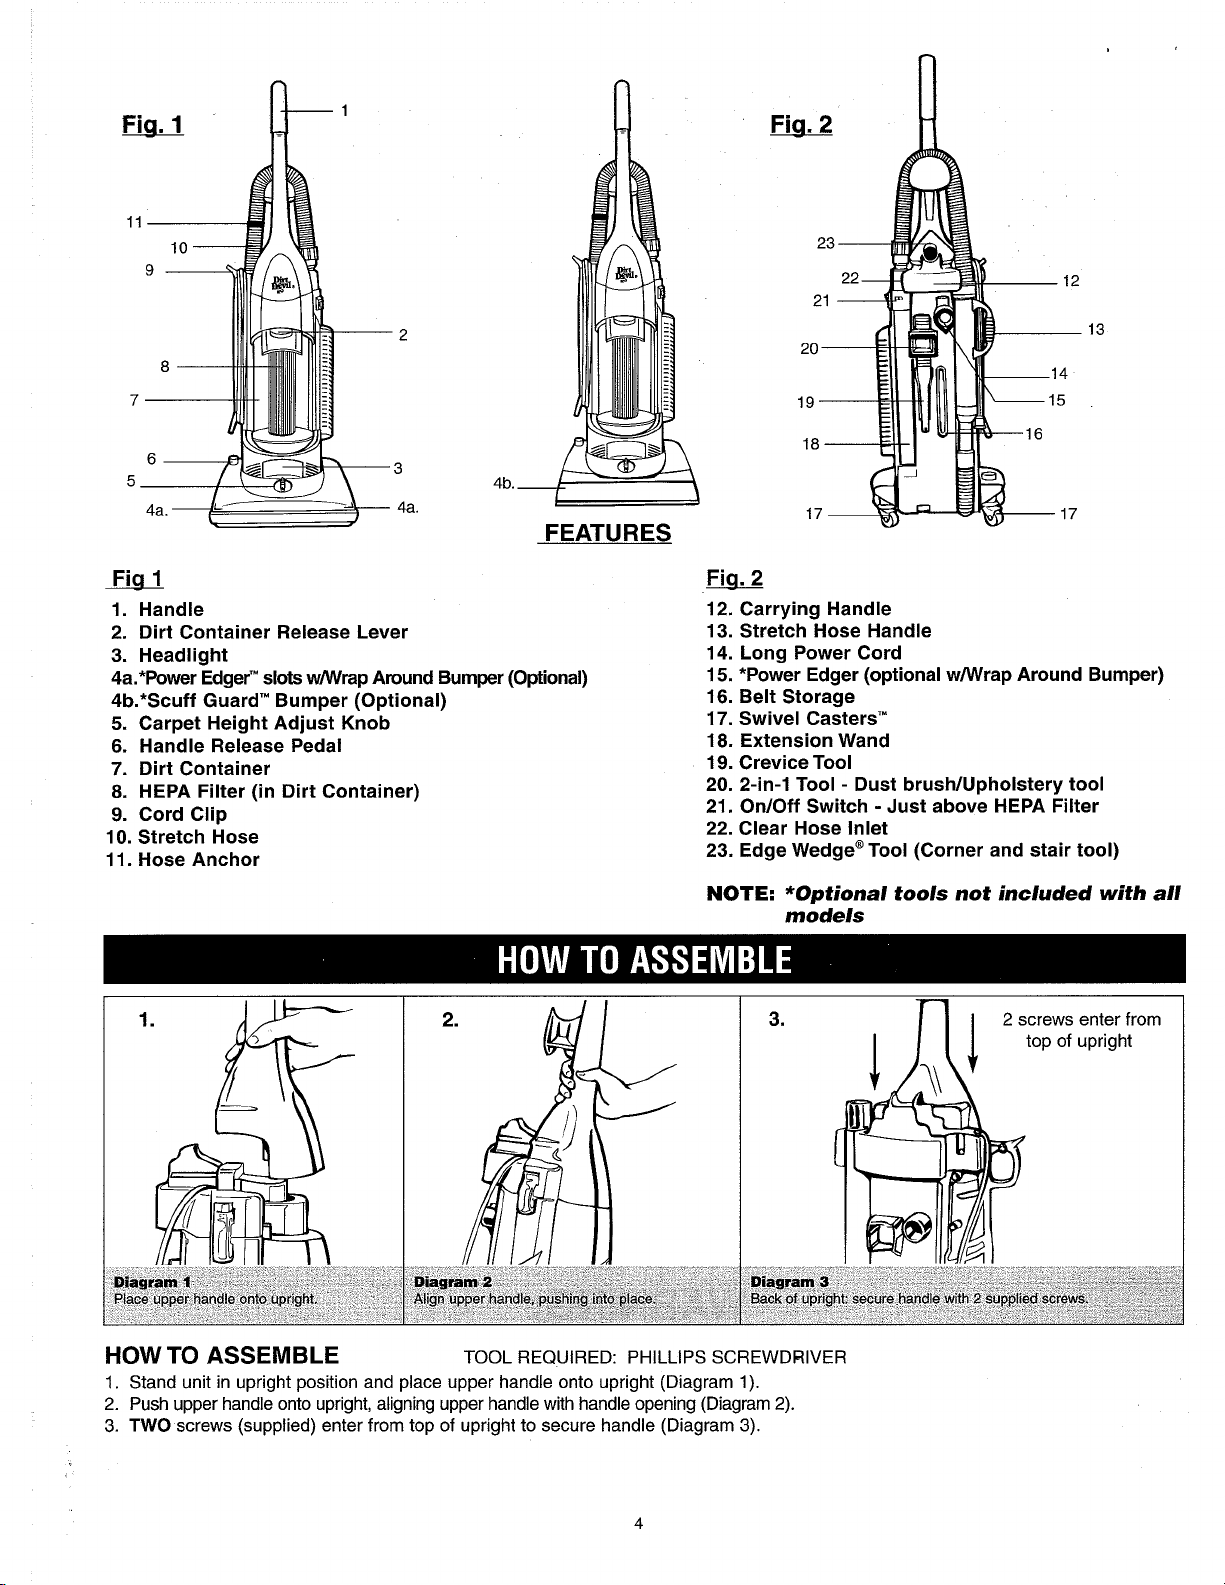
Fiu
1
1. Handle
2. Dirt Container Release Lever
3. Headlight
4a.*Power EdgerTM slots wMlrap Around Bumper (Optional)
4b.*Scuff Guard'" Bumper (Optional)
5.
Carpet Height Adjust Knob
6.
Handle Release Pedal
7.
Dirt Container
8. HEPA Filter (in Dirt Container)
9. Cord Clip
10. Stretch Hose
11. Hose Anchor
Fia.
2
Fiu.
2
12. Carrying Handle
13. Stretch Hose Handle
14. Long Power Cord
15. *Power Edger (optional
16. Belt Storage
17. Swivel Casters'"
18. Extension Wand
19. Crevice Tool
-
20. 2-in-1 Tool
21. OnIOff Switch
22. Clear Hose Inlet
23. Edge WedgeaTool (Corner and stair tool)
Dust brush1Upholstery tool
!
wMlrap Around Bumper)
-
Just above HEPA Filter
NQTE:
TOOL
HOW
1.
2. Push upper handle onto upright, aligning upper handle with handle opening (Diagram 2).
3.
TO
ASSEMBLE
Stand unit in upright position and place upper handle onto upright (Diagram
TWO
screws (supplied) enter from top of upright to secure handle (Diagram 3).
REQUIRED: PHILLIPS SCREWDRIVER
1).
*Optional tools not included with all
models
Page 5
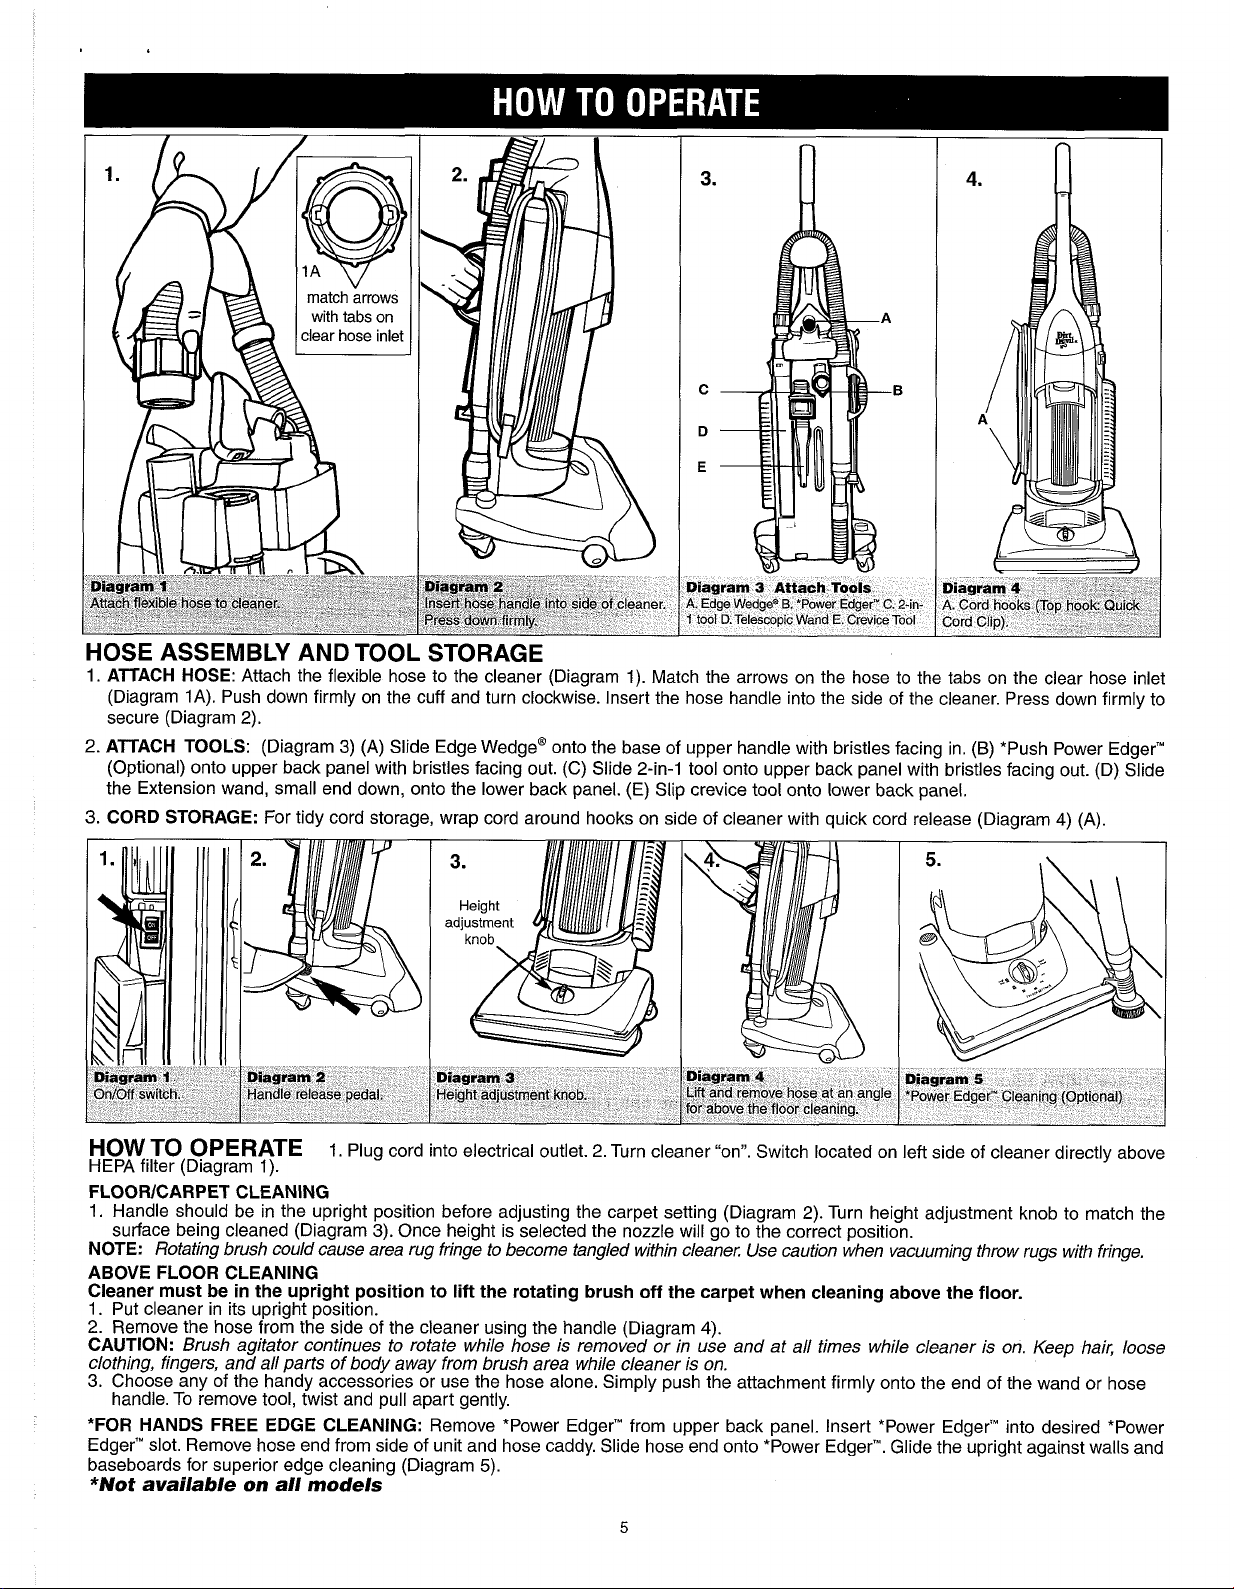
Diagram 3 Attach
4.
Edge
WedgeQ
1
tool
D.
Telescopic
B.
'Power
Wand
Tools
Edger'"
E.
Crevice
C.
2-in-
Tool
HOSE ASSEMBLY AND TOOL STORAGE
1.
ATTACH HOSE:
(Diagram IA). Push down firmly on the cuff and turn clockwise. Insert the hose handle into the side of the cleaner. Press down firmly to
secure (Diagram 2).
2.
ATTACH TOOLS:
(Optional) onto upper back panel with bristles facing out.
the Extension wand, small end down, onto the lower back panel.
3.
CORD STORAGE:
Attach the flexible hose to the cleaner (Diagram 1). Match the arrows on the hose to the tabs on the clear hose inlet
(Diagram 3) (A) Slide Edge wedge@ onto the base of upper handle with bristles facing in.
(C)
Slide 2-in-1 tool onto upper back panel with bristles facing out. (D) Slide
(E)
Slip crevice tool onto lower back panel.
(B)
*Push Power Edger'"
For tidy cord storage, wrap cord around hooks on side of cleaner with quick cord release (Diagram 4) (A).
HOW TO OPERATE
HEPA filter (Diagram
1).
I.
Plug cord into electrical outlet. 2. Turn cleaner "on". Switch located on left side of cleaner directly above
FLOORICARPET CLEANING
1. Handle should be in the upright position before adjusting the carpet setting (Diagram 2). Turn height adjustment knob to match the
surface being cleaned (Diagram 3). Once height is selected the nozzle will go to the correct position.
NOTE:
Rotating brush could cause area rug fringe to become tangled within cleaner. Use caution when vacuuming throw rugs with fringe.
ABOVE FLOOR CLEANING
Cleaner must be in the upright position to lift the rotating brush off the carpet when cleaning above the floor.
1. Put cleaner in its upright position.
2.
Remove the hose from the side of the cleaner using the handle (Diagram 4).
CAUTION:
Brush agitator continues to rotate while hose is removed or in use and at all times while cleaner is on. Keep hair, loose
clothing, fingers, and all parts of body away from brush area while cleaner is on.
3. Choose any of the handy accessories or use the hose alone. Simply push the attachment firmly onto the end of the wand or hose
handle. To remove tool, twist and pull apart gently.
*FOR HANDS FREE EDGE CLEANING:
Remove *Power Edger'" from upper back panel. Insert *Power Edger'" into desired *Power
Edger'" slot. Remove hose end from side of unit and hose caddy. Slide hose end onto *Power Edger'". Glide the upright against walls and
baseboards for superior edge cleaning (Diagram
5).
*Not available on all models
Page 6
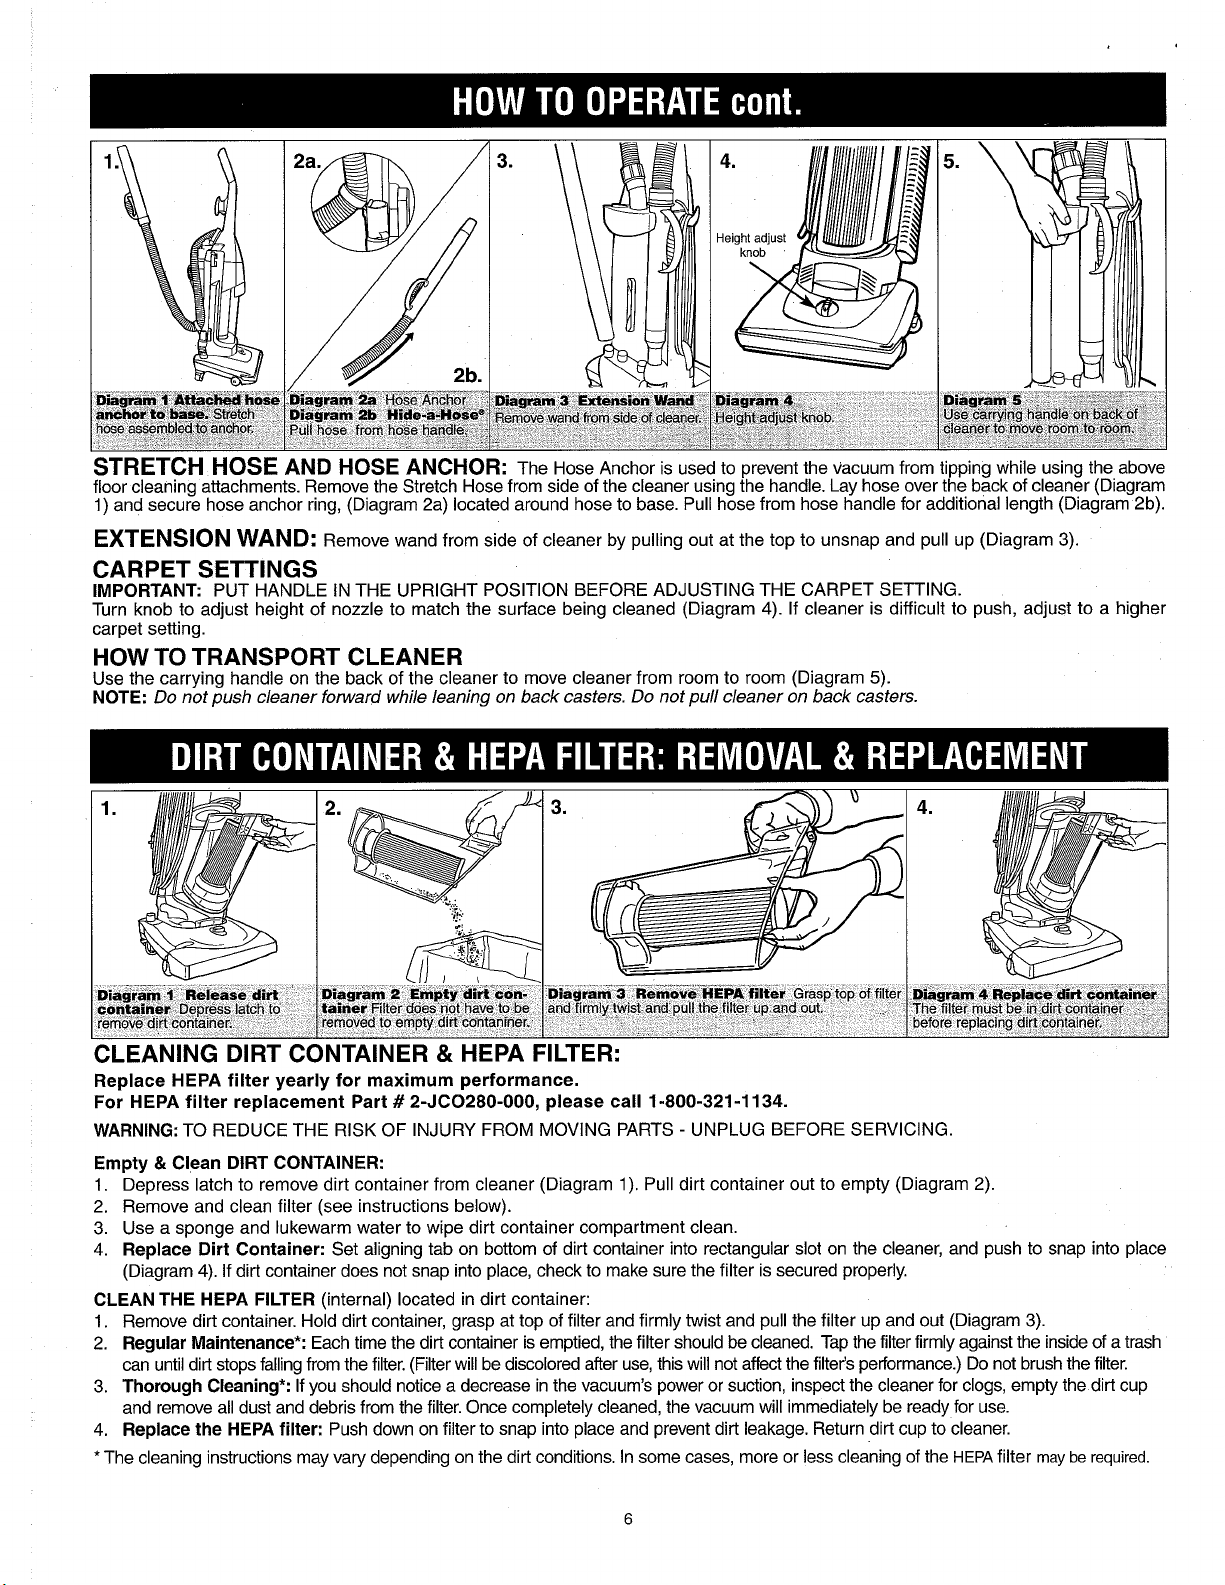
STRETCH HOSE
floor cleaning attachments. Remove the Stretch Hose from side of the cleaner using the handle. Lay hose over the back of cleaner (Diagram
1) and secure hose anchor ring, (Diagram 2a) located around hose to base. Pull hose from hose handle for additional length (Diagram
AND HOSE ANCHOR:
The Hose Anchor is used to prevent the vacuum from tipping while using the above
2b).
EXTENSION WAND:
Remove wand from side of cleaner by pulling out at the top to unsnap and pull up (Diagram 3).
CARPET SETTINGS
IMPORTANT:
Turn knob to adjust height of nozzle to match the surface being cleaned (Diagram 4). If cleaner is difficult to push, adjust to a higher
carpet setting.
PUT HANDLE IN THE UPRIGHT POSITION BEFORE ADJUSTING THE CARPET SETTING.
HOW TO TRANSPORT CLEANER
Use the carrying handle on the back of the cleaner to move cleaner from room to room (Diagram
NOTE:
Do not push cleaner forward while leaning on back casters. Do not pull cleaner on back casters.
Diagram I Release dirt
container
,emove dirt container.
I:
Depress latch to
CLEANING DlRT C(
Replace HEPA filter yearly for maximum performance.
For HEPA filter replacement Part
WARNING:
Empty & Clean DIRT CONTAINER:
1.
2. Remove and clean filter (see instructions below).
3. Use a sponge and lukewarm water to wipe dirt container compartment clean.
4.
CLEAN THE HEPA FILTER
1.
2.
can until dirt stops falling from the filter. (Filter will be discolored after use, this will not affect the filter's performance.) Do not brush the filter.
3.
Thorough Cleaning*:
and remove all dust and debris from the filter. Once completely cleaned, the vacuum will immediately be ready for use.
4.
*The cleaning instructions may vary depending on the dirt conditions. In some cases, more or less cleaning of the
TO REDUCE THE RISK OF INJURY FROM MOVING PARTS - UNPLUG BEFORE SERVICING.
Depress latch to remove dirt container from cleaner (Diagram 1). Pull dirt container out to empty (Diagram 2).
Replace ~irt Container:
(Diagram 4). If dirt container does not snap into place, check to make sure the filter is secured properly.
Remove dirt container. Hold dirt container, grasp at top of filter and firmly twist and pull the filter up and out (Diagram 3).
Regular Maintenance*:
Replace the HEPA filter:
Set aligning tab on bottom of dirt container into rectangular slot on the cleaner, and push to snap into place
(internal) located in dirt container:
Each time the dirt container is emptied, the filter should be cleaned. Tap the filter firmly against the inside of a trash
If you should notice a decrease in the vacuum's power or suction, inspect the cleaner for clogs, empty the dirt cup
Push down on filter to snap into place and prevent dirt leakage. Return dirt cup to cleaner.
#
2-JC0280-000, please call 1-800-321 -1 134.
Diagram
snd firmly twist and pull the filter up and out.
ILTER:
3
Remove
HEPA
filter
Grasp top of filter
5).
Diagram 4 Replace dirt container
The filter must be in dirt container
before replacing dirt container.
HEPA
filter
may
be required.
Page 7
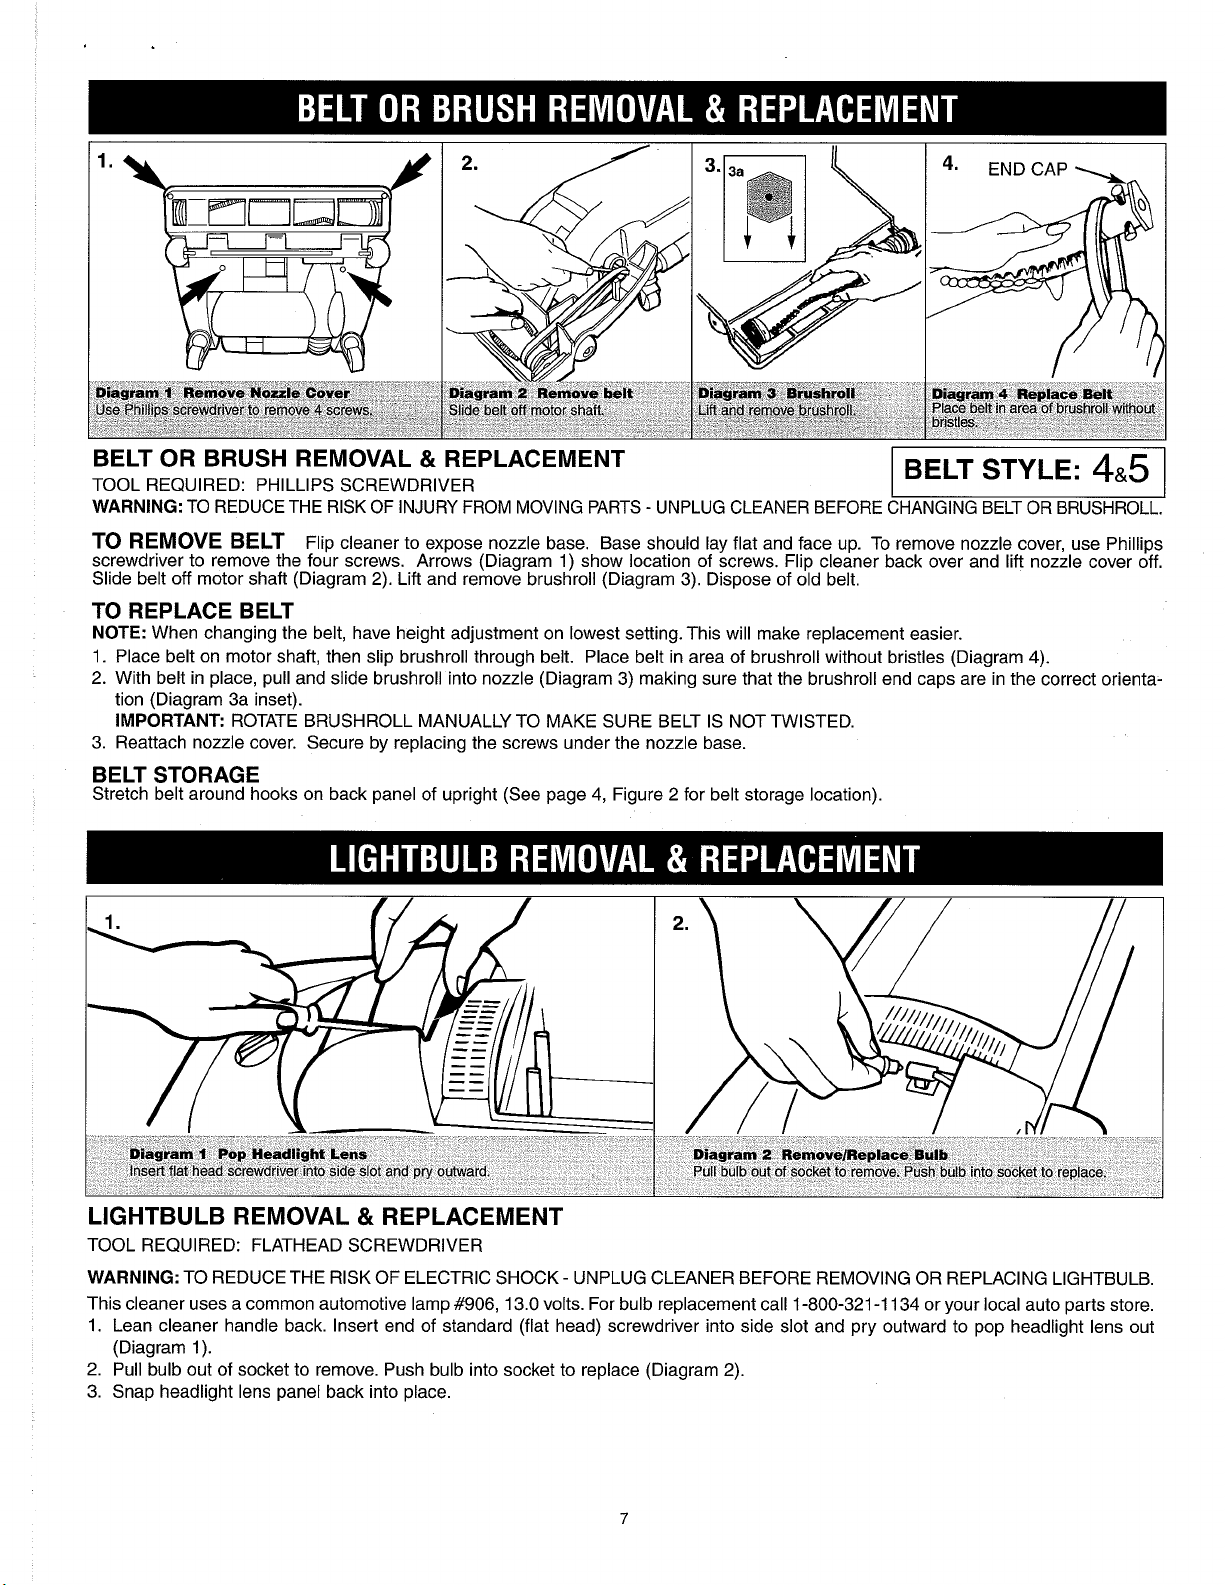
Diagram 1 Remove Nozzle
Use Phill~ps screwdrwer to remove 4 screws.
COW&
Diagram 2 Remove belt
Shde belt off motor shaft.
Diagram 3 Brushroll
Lift and remove brushroll.
Diagram 4 Replace Belt
Place belt in area of brushroll wfihout
bristles.
BELT OR BRUSH REMOVAL & REPLACEMENT
TOOL REQUIRED: PHILLIPS SCREWDRIVER
WARNING:
TO REMOVE BELT
screwdriver to remove the four screws. Arrows (Diagram 1) show location of screws. Flip cleaner back over and lift nozzle cover off.
Slide belt off motor shaft (Diagram 2). Lift and remove brushroll (Diagram 3). Dispose of old belt.
TO REDUCE THE RlSK OF INJURY FROM MOVING PARTS - UNPLUG CLEANER BEFORE CHANGING BELT OR BRUSHROLL.
Flip cleaner to expose nozzle base. Base should lay flat and face up. To remove nozzle cover, use Phillips
BELT STYLE:
485
TO REPLACE BELT
NOTE:
When changing the belt, have height adjustment on lowest setting. This will make replacement easier.
1. Place belt on motor shaft, then slip brushroll through belt. Place belt in area of brushroll without bristles (Diagram
2.
With belt in place, pull and slide brushroll into nozzle (Diagram 3) making sure that the brushroll end caps are in the correct orienta-
tion (Diagram 3a inset).
IMPORTANT:
3. Reattach nozzle cover. Secure by replacing the screws under the nozzle base.
ROTATE BRUSHROLL MANUALLY TO MAKE SURE BELT IS NOT TWISTED.
4).
BELT STORAGE
Stretch belt around hooks on back panel of upright (See page 4, Figure 2 for belt storage location)
LIGHTBULB REMOVAL & REPLACEMENT
TOOL REQUIRED: FLATHEAD SCREWDRIVER
WARNING:
This cleaner uses a common automotive lamp #906, 13.0 volts. For bulb replacement call 1-800-321 -1 134 or your local auto parts store.
1. Lean cleaner handle back. Insert end of standard (flat head) screwdriver into side slot and pry outward to pop headlight lens out
(Diagram 1).
2.
Pull bulb out of socket to remove. Push bulb into socket to replace (Diagram 2).
3. Snap headlight lens panel back into place.
TO REDUCE THE RISK OF ELECTRIC SHOCK - UNPLUG CLEANER BEFORE REMOVING OR REPLACING LIGHTBULB.
Page 8
I
I
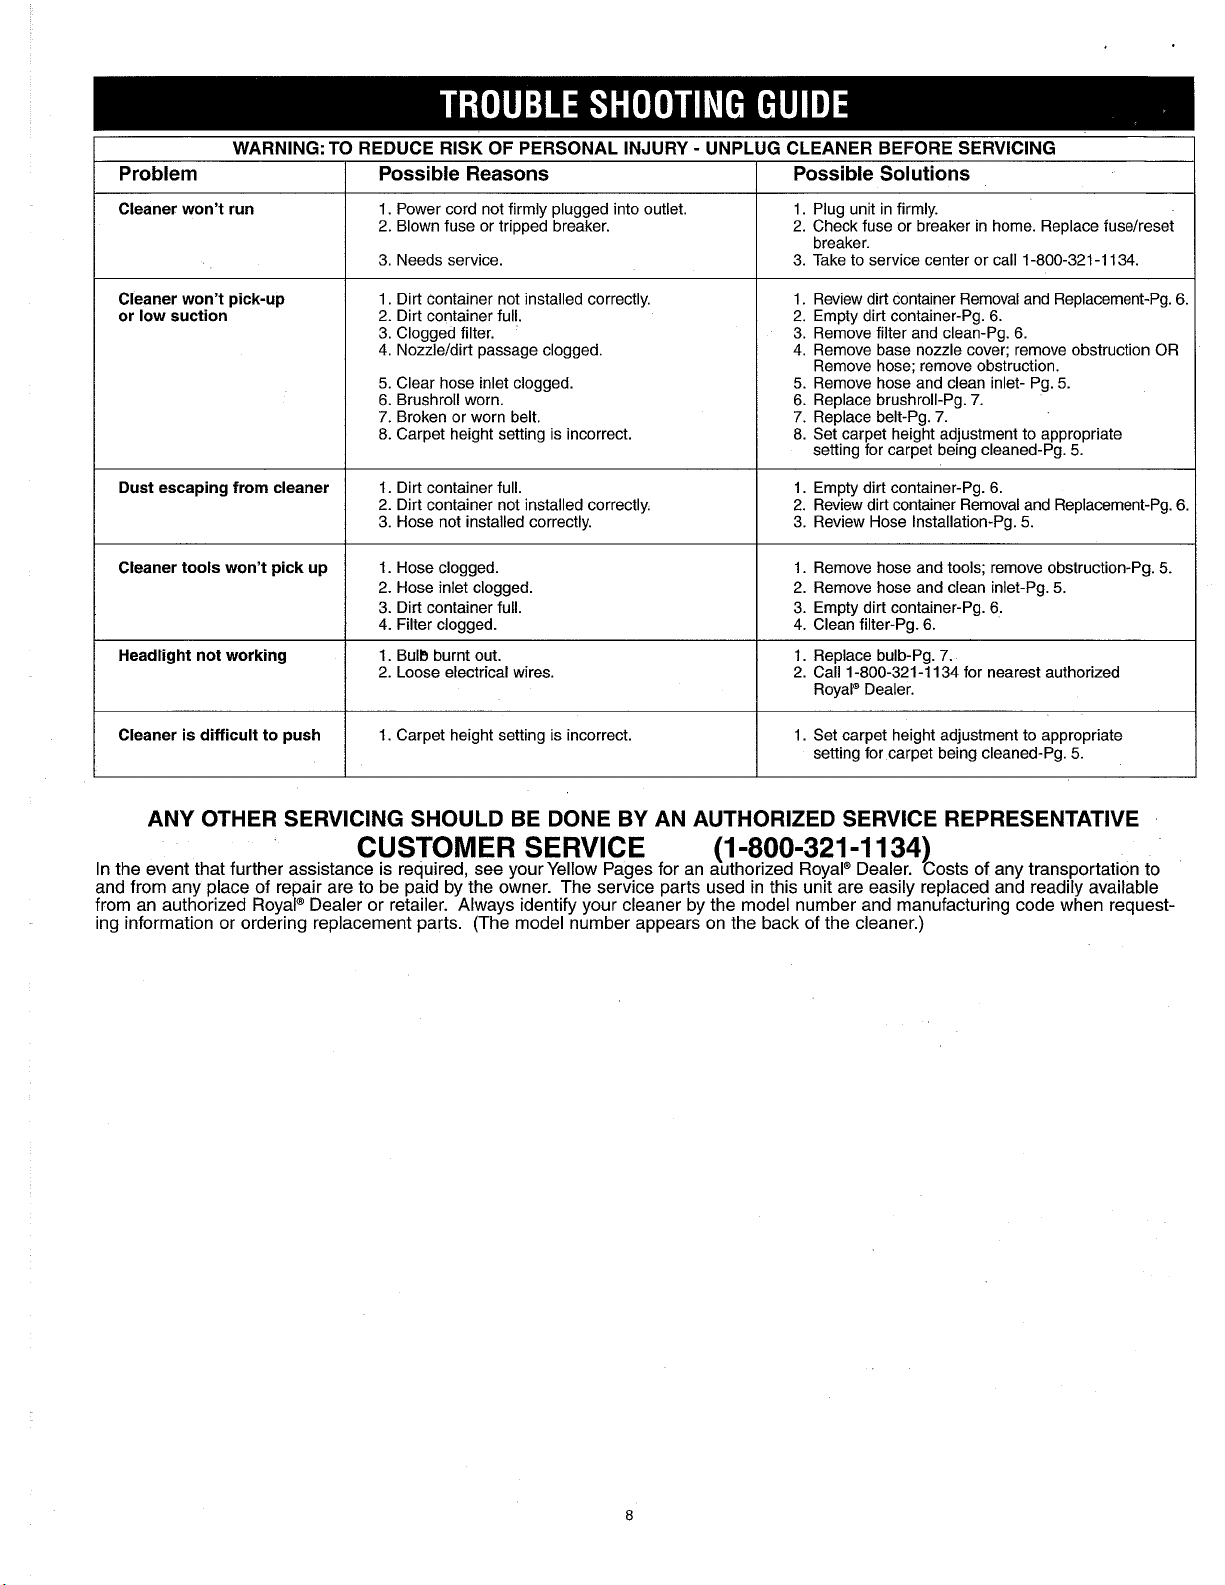
Problem
I
Cleaner won't run
WARNING: TO REDUCE RISK OF PERSONAL INJURY - UNPLUG CLEANER BEFORE SERVICING
Possible Reasons
I
1. Power cord not firmly plugged into outlet.
2.
Blown fuse or tripped breaker.
3. Needs service.
Possible Solutions
1. Plug unit in firmly.
2.
Check fuse or breaker in home. Replace fuseheset
breaker.
3. Take to service center or call 1-800-321 -1 134.
Cleaner won't pick-up
or low suction
Dust escaping from cleaner
Cleaner tools won't pick up
Headlight not working
1. Dirt container not installed correctly.
2.
Dirt container full.
3. Clogged filter.
Nozzleldirt passage clogged.
4.
5.
Clear hose inlet clogged.
6.
Brushroll worn.
7.
Broken or worn belt.
8. Carpet height setting is incorrect.
1. Dirt container full.
2.
Dirt container not installed correctly.
3. Hose not installed correctly.
1. Hose clogged.
2.
Hose inlet clogged.
3. Dirt container full.
4. Filter clogged.
1. Bulb burnt out.
2.
Loose electrical wires.
1. Review dirt container Removal and Replacement-Pg.
2.
Empty dirt container-Pg.
3. Remove filter and clean-Pg.
4. Remove base nozzle cover; remove obstruction
Remove hose; remove obstruction.
5.
Remove hose and clean inlet- Pg.
6.
Replace brushroll-Pg.
7.
Replace belt-Pg.
8. Set carpet height adjustment to appropriate
setting for carpet being cleaned-Pg.
1. Empty dirt container-Pg.
Review dirt container Removal and Replacement-Pg.
2.
3. Review Hose Installation-Pg.
1. Remove hose and tools; remove obstruction-Pg.
2.
Remove hose and clean inlet-Pg.
3. Empty dirt container-Pg.
4. Clean filter-Pg.
1. Replace bulb-Pg.
2.
Call 1-800-321-1 134 for nearest authorized
Royalm Dealer.
6.
6.
6.
OR
5.
7.
7.
5.
6.
5.
5.
6.
7.
5.
i
Cleaner is difficult to push
1. Carpet height setting is incorrect.
ANY OTHER SERVICING SHOULD BE DONE BY AN AUTHORIZED SERVICE REPRESENTATIVE
In the event that further assistance is required, see yourYellow Pages for an authorized Royal" Dealer. Costs of any transportation to
CUSTOMER SERVICE
and from any place of repair are to be paid by the owner. The service parts used in this unit are easily replaced and readily available
from an authorized Royal" Dealer or retailer. Always identify your cleaner by the model number and manufacturing code when request-
ing information or ordering replacement parts. (The model number appears on the back of the cleaner.)
(1 -800-321 -1 134)
1. Set carpet height adjustment to appropriate
setting for carpet being cleaned-Pg.
5.
6
6
Page 9

MANUAL DEL USUARIO
lnstrucciones para el funcionamiento
y
el servicio
Por favor lea bien estas
instrucciones antes de usar su
aspiradora Swivel Glidem Vision?
Dejenos ayudarle a ensamblar
su aspiradora o a contestarle
cualquier duda, llame al:
1-800-321 -1 134 (EE.UU.
y
Canada)
Sitio Web: www.dirtdeviI.com
Para tener 10s datos a la mano, por favor Ilene la
informacion sobre su aspiradora a continuacion.
Modelo
Codigo del Fabricante:
(El codigo del fabricante se localiza en la parte inferior,
atras de la aspiradora)
#:
O
1998
Derechos reservados
#
1-1 13344-000
J
3/03
Page 10

FELICITACIONES
I
I
Ahora usted es el feliz propietario de la aspiradora Dirt Devilm Swivel Glidem Vision@,
con el poder para ver iPower You Can See'"! Usted nunca mhs comprarh otra bolsa
gracias a1 diseiio sin bolsa que incluye un recepthculo para polvo transparente que
le permite ver 10s objetos perdidos. Tambih disfrutarh de un desempeiio de
limpieza superior con
12
amps de Mhxima Potencia de Aspiracihn.
Estamos muy orgullosos de nuestros productos y esperamos que quede
absolutamente satisfecho de la calidad y del desempeiio.
I
I
Le agradecemos su preferencia por 10s productos Dirt Devilo.
Visite nuestro sitio de la web en www.dirtdevil.com
I
Piezas
Como Ensamblar
Como Operar
Como transportar la aspiradora
Recipiente de polvo
Remocion
Remocion y reemplazo del foco
Guia para la deteccion y solucion de problemas
..........................................
................................
....................................
Montaje de manguera
Limpieza del piso/alfombra
Limpieza por encima del piso
Limpieza de bordes a manos libres
Graduacion de alfombra
y
reemplazo de la banda o del cepillo rotatorio
y
almacenamiento de accesorios . .Pagina E5
.......................
.....................
.................
........................
......................
y
filtro HEPA: retiro y reemplazo
.....................
......
..
..........
PaginaE4
.Pagina E4
.Pagina E5
.Pagina E5
.Pagina E5
.Pagina E5
.Pagina E6
.Pagina E6
.Pagina E6
.Pagina
.Pagina
.Pagina
E7
E8
E8
A1 Consurnidor, Royal Appliance Mfg. Co. le garantiza que esta aspiradora no tiene defectos ni de material ni de mano de obra, la garantia cornienza en la fecha de
cornpra original. Vea la caja para inforrnacion de la duracion de la garantia y guarde el recibo de cornpra original para hacer valido el inicio del periodo de garantia.
En caso que la aspiradora rnuestre algun defect0 dentro del periodo de garantia, repararernos o reernplazaremos de rnanera gratuita cualquier parte defectuosa. La
rnaquina cornpleta debe ser enviada con porte pagado a cualquier Estacion Autorizada ROYALm de
cornpleta del problerna, fecha de cornpra, copia del recibo de compra original
de Garantia, llame a la fabrica para pedir asistencia en 10s EE.UU. y Canada: 1-800-321-1134. Use solarnente partes de repuesto genuinas Royal".
La garantia no incluye el desgaste anorrnal,
planas, filtros
das
tarnbien. (Los otros derechos varian de estado a estado en 10s EE.UU.)
y
focos. Esta garantia no cubre reparaciones no autorizadas. Esta garantia le confiere derechos legales especificos y podria haber otros derechos
dafio corno resultado de un accidente o del uso no adecuado de la aspiradora. Esta garantia no cubre 10s cepillos, ban-
y
su nornbre, dornicilio y nurnero de telefono. Si no se encuentra cerca de una Estacion
Ventas y Servicio de Garantia. Por favor incluya una descripcion
Page 11

ESTA ASPIRADORA ES SOLO PARA US0 DOMESTIC0
INSTRUCCIONES
Cuando se use un aparato electrico, deben tomarse ciertas precauciones basicas de sequridad, incluvendo las siauientes:
LEA TODAS LAS INSTRUCCIONES ANTES DE USAR EL APARATO.
SIEMPRE SlGA ESTAS INSTRUCCIONES DE SEGURIDAD.
PONGA LA ASPIRADORA EN POSICION VERTICAL CUANDO USE LA MANGUERA Y LOS ACCESORIOS.
NO DEJE LA ASPIRADORA DESATENDIDA CUANDO ESTE CONECTADA.
REVISE REGULARMENTE LOS
ADVERTENCIA: NO USE OBJETOS AFILADOS PARA SACAR OBJETOS DE
DANARLA.
OCASIONALMENTE QUITE EL CEPILLO Y LlMPlE LAS TAPAS DE LOS EXTREMOS PARA PERMlTlR QUE EL
CEPILLO GlRE UNIFORMEMENTE.
ADVERTENCIA:
PRODUCT0 CONTIENEN QU~MICOS, INCLUYENDO PLOMO
DE CALIFORNIA CAUSAN CANCER
MANOSDESPUESDEUSARLOS.
LOS
CORDONES ELECTRICOS,
FILTROS PARA SACUDIRLOS
DE
Y
DEFECTOS DE NAClMlENTO U OTRO
SEGURIDAD
0
REEMPLAZARLOS.
ALAMBRES
YIO
CABLES
0
COMPUESTOS DE PLOMO QUE SEG~~N EL ESTADO
IMPORTANTES
-
LA
MANGUERAYA QUE PODRIAN
SUMINISTRADOS CON ESTE
DANO
REPRODUCTIVO. LAVESE LAS
-
-
-
-
LEA TODAS LAS INSTRUCCIONES ANTES DE USAR EL APARATO.
ADVERTENCIA: PARA EVITAR PELIGRO DE INCENDIO,
DESCARGAS ELECTRICAS
No deje la aspiradora conectada. Desconectela del tomacorriente cuando no la use y antes de darle servicio.
No la use a la intemperie ni en superficies humedas, ya que podria ocasionar una descarga electrica.
No permita que jueguen con ella. Se necesita supervision cuando la usa un nifio o cuando se usa donde hay nifios.
Usela solo de la manera descrita en este manual. Utilice solo 10s accesorios recomendados por el fabricante.
No use la aspiradora si la clavija o el cordon estan dafiados. Si la aspiradora no funciona como debiera o se ha
caido, dafiado o se dejo a la intemperie, o se
l-800-32l-Il34
al
No la jale ni la cargue del cordon, ni use el cordon como mango, ni cierre la puerta sobre el cordon, ni pase el cordon
alrededor de bordes o esquinas filosas. No ruede la aspiradora
superficies calientes.
No desconecte la aspiradora jalando el cordon. Para desconectarla, hagalo tomando del enchufe, no del cordon.
No toque el enchufe ni la aspiradora con las
No coloque objetos en las aberturas. No la utilice con las aberturas obstruidas; mantengalas libres de polvo, pelusa,
cabellos o cualquier cosa que reduzca el paso de aire.
Mantenga el
No aspire nada que este quemandose o que este desprendiendo hum0 como podrian ser cigarrillos, cerillos o
cenizas calientes.
No la use sin la bolsa para polvo
Apague todos 10s controles antes de desconectarla.
Tenga mucho cuidado cuando aspire escaleras.
No la utilice para aspirar liquidos inflamables o combustibles como por ejemplo gasolina ni la use en areas donde
estos puedan encontrarse presentes.
Mantenga la aspiradora en el piso. Solamente las aspiradoras de mano se pueden usar en 10s muebles.
La aspiradora debe estar en posicion vertical para levantar el cepillo rotatorio de la alfombra cuando se aspire arriba del piso.
No use extension de cordon con esta aspiradora.
Guarde la aspiradora en interiores. Coloque la aspiradora en su lugar para evitar tropezones.
El utilizar un voltaje incorrect0 puede dafiar el motor
la placa de la aspiradora.
Desenchufe antes de conectar la Turboboquilla (Turboboquilla no incluida en todos 10s modelos).
para localizar el centro de servicio mas cercano.
cabello, la ropa suelta, 10s dedos y todas las partes del cuerpo lejos de las aberturas y las partes moviles.
ni/o sin 10s filtros en su lugar.
cay6 al agua, llevela a un centro de servicio para que la revisen. Llame
sobre el cordon. Mantenga el cordon alejado de
manos mojadas.
y
causar lesiones al usuario. El voltaie a~roeiado esta inscrito en
0
LESIONES:
...
GUARDE
ESTAS
INSTRUCCIONES
ADVERTENCIA:
Para reducir el riesgo de descargas electricas, esta aspiradora tiene un enchufe polarizado (una paletilla mas ancha que la otra). Este
enchufe entrara en un tomacorriente polarizado, solo de una manera. Si el enchufe no entra completamente en el tomacorriente, invier-
talo. Si aun asi no entra, consulte a un electricista calificado para instalar el tomacorriente apropiado. No cambie el enchufe de ningu-
na
manera.
Page 12

Fiu
1
1.
Asa
2.
Palanca de
3.
Lampara frontal
4a.*Ran uras Power Edger'" con Tope Envolvente
(Opcional)
4b.*Tope Scuff Guard'" (Opcional)
5.
Boton de graduacion de espesor de alfombra
6.
Pedal liberador del mango
7.
Recipiente para polvo
8.
Perma FilteP con Sistema de Filtracion
Cleanstream"
9.
Sujetador de Cordon
10.
Manguera extensible
11.
Anclaje de Manguera
liberation
del recipiente para polvo
en Recipiente para Polvo
Fiu.
2
12.
Mango transportador
13.
Asa de manguera extensible
14. Cordon electric0 largo
15.
*Power Edger'" (con Tope Envolvente Opcional)
16.
Alojamiento para banda
17.
Swivel Casters'"
18.
Lanza de extension
19.
Accesorio para areas dificiles
20.
Accesorio 2 en
21.
lnterruptor de
arriba del filtro HEPA
22.
Entrada transparente para manguera
23.
Accesorio Edge Wedgea (accesorio para
esauinas
NOTA
*~'LOS
1
-
cepillo para polvolpara tapiz
Encendido(0n)lApagado'"Off)
v
escalerasl
accesorios opciona~es no
vienen incluidos en todos 10s modelosyy
2
Tornillos entran en
la parte superior de
la unidad vertical.
-
COMO ENSAMBLAR
1.
Coloque la unidad en posicion vertical y coloque el mango en la parte superior de la unidad vertical (Diagrama
2.
Oprima el mango sobre la parte superior, alinee el mango superior con la apertura del mango (Diagrama
3.
DOS
tornillos (que se proveen) entran en la parte superior de la unidad vertical para fijar el mango (Diagrama
HERRAMIENTA REQUERIDA: DESTORNILLADOR DE CRUZ
E4
1).
2).
3).
Page 13

MONTAJE DE MANGUERAY ALMACENAMIENTO DE ACCESORIOS
1.
FlJE LA MANGUERA: Fije la manguera flexible a la aspiradora (Diagrama
lengiietas en la entrada transparente para la manguera (Diagrama 1A). Presione firmemente en el muiion y gire en el sentido de las
el
manecillas del reloj. lnserte
2.
FlJE LOS ACCESORIOS: (Diagrama
(B)
*Presione el Power Edger'" (Opcional) en el panel trasero inferior con las cerdas hacia afuera.
muiion en el costado de la aspiradora. Presione firmemente para asegurarla en su lugar (Diagrama 2).
3)
(A) Deslice el Edge wedge@ en la base del mango superior con las cerdas hacia adentro.
el Dane1 trasero suoerior con las cerdas hacia afuera. (D) Deslice la lanza de extension. con el extremo DeaueAo hacia abaio. en la
cubierta inferior trasera. (E) Deslice el accesorio para areas dificiles en el panel trasero'inferior.
3.
ALMACENAMIENTO DEL CORDON: Para guardar ordenadamente, enrolle el cordon alrededor del gancho a un costado de la aspi-
radora con el liberador rapido de cordon (Diagrama
4)
(A).
1).
Haga coincidir las flechas de la manguera con las
(C).
Deslice el accesorio 2 en 1 en
0,
,
.
Diagrama
Interruptor encend~do
(on)/apagado(off).
COMO OPERAR
I
Diagrama
pedal llberador del
2
1.
Enchufe el cordon a un tomacorriente.
mango.
Diagrama
Boton de graduacion de espesor
de alfombra.
3
izquierda de la aspiradora, justo arriba del filtro HEPA (Diagrama
Diagrama
Levante quite la manguera en
un +ngu& ara la i~mpieza
enema defp~so.
2.
Encienda la aspiradora por medio del interruptor ubicado en la pate
1).
4
Diagrama
Limpieza con *Power Edger"
(Opcional)
5
LlMPlEZA DEL PISOIALFOMBRA
1.
El mango debe estar en posicion vertical antes de ajustar el espesor de alfombra (Diagrama
coincida con la superficie que se va a limpiar (Diagrama
NOTA:
El cepillo en rotacion podria hacer que 10s flecos de la alfombra se enredaran dentro de la aspiradora. Sea precavido cuando aspire
3).
Una vez que la altura haya sido ajustada, la boquilla ira a la posicion correcta.
2).
Gire el boton para ajustar la altura para que
alfombras con flecos.
LlMPlEZA POR ENCIMA DEL PISO
La aspiradora debe estar en posicion vertical para levantar el cepillo giratorio de la alfombra cuando se limpie por encima del piso.
1.
Coloque la aspiradora en posicion vertical.
2.
Quite la manguera del costado de la aspiradora por medio del mango (Diagrama
PRECAUCION:
dida. Mantenga el cabello, la ropa suelta, 10s dedos
El agitador de cepillo continuara girando cuando se retire o use la manguera y siempre que la aspiradora este encen-
y
todas /as partes del cuerpo lejos del area del cepillo cuando la aspiradora este
4).
encendida.
3.
Seleccione cualquiera de 10s accesorios manuales o utilice solo la manguera. Simplemente inserte el accesorio con firmeza en el extremo
de la extension o del muiion. Para quitar el accesorio, gire y jale con suavidad.
*PARA LlMPlEZA DE BORDES A MANOS LIBRES: Quite el *Power Edger,. del panel trasero superior. lnserte el *Power Edger'" en la ranura
deseada para el *Power Edger". Quite el extremo de la manguera del costado de la unidad y del estuche de la manguera. Deslice la manguera en
el *Power Edger'". Deslice su aspiradora vertical contra las paredes y las bases de 10s bordes para una limpieza
*No viene
en
todos 10s modelos
E5
de
bordes superior (Diagrama
5).
Page 14

MANGUERA EXTENSIBLE Y ANCLAJE DE LA MANGUERA:
aspiradora se voltee cuando se usan 10s accesorios de limpieza por encima del suelo. Retire la manguera extensible del lado de la aspiradora
usando el asa. Coloque la manguera sobre la parte posterior de la aspiradora (Diagrama
(Diagrama 2a) ubicado alrededor de la manguera. Jale la manguera del mango de la misma para tener una extension adicional (Diagrama 2b).
LANZA DE EXTENSION:
hacia arriba (Diagrama 3).
GRADUACION DE ALFOMBRA
IMPORTANTE:
GlRE EL BOTON PARA GRADUAR
Si es dificil empujar la aspiradora, cambie a una graduacion de alfombra mas aka.
PONGA EL MANGO EN LA
Quite la extension del costado de la aspiradora jalando de la parte superior para desengancharla y jalarla
LA
POSICION
ALTURA DE LA BOQUILLA DE ACkRDO COk LA SUPERFlClE QUE SE VA A ASPIRAR (DIAGRAMA
DE
OPERACION
VERTICAL ANTES DE AJUSTAR LA
EI
Anclaje de Manguera se usa para evitar que la
1)
y
asegure el anillo del anclaje de manguera,
GRADUACION
DE ALFOMBRA.
4).
COMO TRANSPORTAR LA ASPIRADORA
Por medio del mango transportador en la arte posterior de la aspiradora lleve la misma de un cuarto a otro (Diagrama
NOTA:
No empuje la aspiradora hacia a&lante mientras este recargada sobre las ruedas traseras. No jale la aspiradora cuando Bsta estB
solamente sobre /as ruedas traseras.
5).
LlMPlEZA DEL REClPlENTE DE POLVO Y FILTRO HEPA:
Para mayor rendimiento reemplace el filtro HEPA cada aiio.
Para reemplazar el filtro HEPA, No. de Parte
ADVERTENCIA:
ANTES DE DARLE SERVICIO.
Vacie
y
1.
Oprima el pestillo para sacar el receptaculo para polvo de la aspiradora. Jale el receptaculo para polvo para vaciarlo (Diagrama
2.
Retire y limpie el filtro (vea las instrucciones a continuacion).
3. Limpie el compartimiento del receptaculo para polvo con una esponja y agua tibia.
4.
Vuelva a colocar el Receptaculo para Polvo: Alinee la saliente en la parte inferior del receptaculo para polvo en la ranura rectangular de la aspi-
radora, y haga presion para abrocharla en su lugar (Diagrama 3). Si el recipiente para polvo no hace un ruido al entrar en su lugar, verifique para
asegurarse que el filtro esta colocado apropiadamente.
PARA REDUCIR EL RIESGO DE UNA LESION CAUSADA POR PARTES EN MOVlMlENTO - DESCONECTE LA ASPIRADORA
Limpie el RECEPTACULO PARA POLVO:
2-JC0280-000,
por favor Name al
1-800-321-1134.
1).
LlMPlE EL FILTRO HEPA (INTERNO) UBICADO EN EL REClPlENTE DE POLVO:
1.
Quite el recipiente para polvo. Sostenga el recipiente de polvo, tome la parte superior del filtro, gire y tire del filtro con firmeza hacia arriba y
afuera (Diagrama 3).
2.
Mantenimiento Regular*: Cada vez que se vacia el Recipiente para Polvo, debe limpiarse el filtro. Golpee suavemente el filtro, per0 con firmeza,
contra el interior del basurero hasta que deje de caer polvo del filtro. (El filtro estara decolorado despues del uso, esto no afectara su funcion.) No
cepille el filtro.
3. Limpieza a fondo*: Si nota una disminucion en el poder de succion de la aspiradora, inspeccionela buscando atascos, vacie el recipiente para
polvo y retire TODO el polvo y desechos del filtro. Una vez completamente limpia, la aspiradora estara lista para su uso de inmediato.
4.
Reemplace el filtro HEPA: Haga presion sobre el filtro para abrocharlo en su lugar y evitar que haya fuga de polvo. Vuelva a colocar la copa para
polvo en la aspiradora.
*Las instrucciones de limpieza pueden variar dependiendo de las condiciones de suciedad. En algunos casos, se necesitara una limpieza mayor o
menor del filtro HEPA.
Page 15

Diagrama 1 Quite la Cubierta de
Use el destorndlador de cruz para quitar 10s 4 torn~llos.
la
Boquilla
Diagrama 2 Quite la banda
Deslice la banda hacia aiuera del eje
del motor.
Diagrama 3 Cepillo Rotatorio
Levante y qulte el cep~llo rotatorio.
Diagrama 4 Reemplace la banda
Coloque la banda en la zona del
cepillo rotator10 que no trene cerdas
REMOCIONY REEMPLAZO DE LA BANDA O DEL CEPILLO ROTATORIO
HERRAMIENTA REQUERIDA: DESTORNILLADOR DE CRUZ
ADVERTENCIA:
ASPIRADORA ANTES DE CAMBIAR LA BANDA
PARA QUITAR LA BANDA
superficie de cara arriba. Para retirar la cubierta de la boquilla, use un destornillador de cruz para quitar 10s cuatro tornillos. Las
flechas (Diagrama 1) muestran la ubicacion de 10s tornillos. Incline la aspiradora hacia atras y levante la cubierta de la boquilla. Quite
la banda del
PARA REDUCIR EL RIESGO DE LESION DEBIDO A LAS PARTES EN MOVlMlENTO - DESCONECTE LA
Acueste la aspiradora para dejar expuesta la base de la boquilla. La base debe quedar sobre la
eje del motor (Diagrama 2). Levante y quite el cepillo rotatorio (Diagrama 3). Deseche la banda usada.
0
EL CEPILLO ROTATORIO.
EST~LO
DE
BANDA:~~~
PARA REEMPLAZAR LA BANDA
NOTA:
1. Coloque la banda en el eje del motor y despues deslice el cepillo rotatorio a traves de la banda. Coloque la banda en la zona del
2. Con la banda en su lugar, jale
3. Coloque de nuevo la cubierta de la boquilla. Fijela colocando de nuevo 10s tornillos debajo de la base de la boquilla.
Cuando cambie la banda, coloque el ajuste de altcnra en el punto mas bajo. Esto facilitara el cambio.
cepillo rotatorio donde no haya cerdas (Diagrama 4).
del cepillo rotatorio esten en la orientacion correcta (Diagrama 3a).
IMPORTANTE:
GIRE
MANUALMENTE
y
deslice el cepillo rotatorio en la boquilla (Diagrama 3) asegurandose que las tapas de 10s extremos
EL
CEPILLO ROTATORIO
PARA
ASEGURARSE
QUE
LA
BANDA
NO
ESTE TORCIDA.
ALMACENAMIENTO DE BANDA
Estire la banda alrededor de 10s ganchos en el panel posterior de la aspiradora. (Vea la pagina E4, diagrama 2 para ubicar el lugar
del almacenamiento de la banda)
REMOCION Y REEMPLAZO DEL FOCO
HERRAMIENTA REQUERIDA: DESTORNILLADOR PLAN0
ADVERTENCIA:
QUITAR
Esta as iradora usa un foco com~h para automovil # 906, 13.0 voltios. Para repuestos del foco llame al 1-800-321 -1 134 o llame a su
provmdbr local de repuestos para automov~l.
1. Incline el mango de la aspiradora hacia atras. lnserte el extremo del destornillador (destornillador plano) dentro de la ranura lateral
2. Jale el foco hacia afuera del receptaculo para quitarlo. lnserte el foco nuevo en el receptaculo (Diagrama 2).
3. Coloque a presion el panel del lente del foco en su lugar.
0
y haga palanca para sacar el lente del foco (Diagrama 1).
PARA REDUCIR EL RIESGO DE DESCARGAS ELECTRICAS - DESCONECTE LA ASPIRADORA ANTES DE
CAMBIAR EL FOCO.
Page 16

ADVERTENCIA: PARA REDUCIR EL RIESGO DE LESIONES PERSONALES - DESCONECTE LA ASPIRADORA ANTES DE DARLE SERVlClO
Problema
La aspiradora no funciona
La aspiradora no recoge o
presenta bajo poder de succion
La rueda indicadora de
desernpeiio esta girando
Sale polvo de la aspiradora
Los accesorios de la
aspiradora no
No funciona la larnpara frontal
Es
dificil hacer rodar la aspirador:
recogen
Causas Posibles
1. El cordon no esta conectado firmemente al tornacorriente
2. El fusible esta fundido o se desconecto el cortacircuitos.
3. Necesita servicio
1. El recipiente para polvo no esta instalado correctamente.
2. El recipiente para polvo esta Ileno.
3. El filtro esta
4. Boquillalpasaje de polvo bloqueado.
5. La entrada transparente para la rnanguera esta tapada.
6. El cepillo rotatorio esta gastado.
7. La banda esta rota o gastada.
8. La graduacion de altura de alfornbra es incorrecta.
1. El recipiente para polvo esta Ileno.
2. El recipiente para polvo no esta instalado correctarnente
3. La rnanguera no esta instalada correctarnente.
1. La manguera esta tapada.
2. La entrada para la rnanguera esta tapada.
3. El recipiente para polvo esta Ileno.
4. El filtro esta
1. El foco esta fundido.
2. Los cables electricos estan flojos.
1. La graduacion de altura de alfornbra es incorrecto.
tapado.
tapado.
Soluciones Posibles
1. Conecte la unidad firrnemente.
2. Revise el fusible o el interruptor en casa. Reernplace el
fusible/vuelva a conectar el cortacircuitos.
3. Llevela al centro de servicio o llarne al 1-800-321
1. Revise la rernocion y el reernplazo del recipiente para
polvo-Pag. E6.
2. Vacie el recipiente para polvo-Pag. E6.
3. Quite el filtro y limpielo-Pag. E6.
4. Quite la cubierta de la base; despeje la obstruccion
Quite la rnanguera; despeje la obstrucci6n.
5. Quite la rnanguera y lirnpie la entrada-Pag. E5.
6. Reernplace el cepillo rotatorio-Pag. E7.
7. Reernplace la banda-Pag. E7.
8. Grad~je la altura de alfornbra de acuerdo al tipo de
alfornbra que va a aspirar-Pag. E5.
1. Vacie el recipiente para polvo-Pag. E6.
2. Revise la rernocion y el reernplazo del recipiente para
polvo-Pag. E6.
3. Revise la instalacion de la rnanguera-Pag. E5.
1. Quite la rnanguera y
obstruccion-Pag. E5.
2. Quite la rnanguera
3. Vacie el recipiente para polvo-Pag. E6.
4.
Limpie el filtro-Pag E6.
1. Reernplace el foco-Pag. E8.
2. Llarne al 1-800-321-1 134 para consultar al Distribuidor
Royal" autorizado mas cercano.
1. Gradue la altura de alfornbra de acuerdo al tipo de
alfornbra que va a aspirar-Pag. E5.
10s accesorios; despeje la
y
despeje la entrada-Pag. E5.
-1
134.
0
CUALQUIER OTRO SERVlClO DEBE SER REALIZADO POR UN REPRESENTANTE AUTORIZADO DE SERVlClO
SERVlClO AL CLIENTE
En caso de necesitar
reparaci6n seran pagados pbr el propietario.
o en otras tiendas. Siernpre identifique su aspiradora por medio del nlirnero de rnodelo y el codigo de fabricaci6n cuando pida inforrnacion u ordene partes de repuesto. (El
nlirnero de rnodelo aparece en la parte posterior de la aspiradora.)
mh
ayuda, vea en las Paginas Arnarillas para encontrar a un Distribuidor Autorizado Royal'. Los costos de transporte hacia y desde el sitio de
L&
partes de repuesto utilizadas en esta unidad son de reemplazo facil y estan disponibles con un Distribuidor Autorizado Royal'
(1 -800-321
-1
134)
Page 17

Probleme
Caspirateur ne marche pas
AVERTISSEMENT
'OUR REDUIRE LE RISQUE DE SE BLESSER, DEBR,
Raisons aossibles
1.
La fiche n'est pas bien inseree dans la prise
2.
Fusible saute ou rupteur declenche.
3.
A
besoin de service
JCHER L'ASPIRATEUR AVANT LE SERVICE
Solutions possibles
1.
Bien inserer la fiche dans la prise.
2.
Verifiez fusible et disjoncteur. Rernplacer le
fusiblelrecaler le rupteur.
3.
Transporter au centre de service ou appeler le
1-800-321 -1 134.
Caspirateur ne ramasse pas
ou I'aspiration est faible
La roue indicatrice de
performance est en train de
tourner
De la poussiere s'echappe
de I'aspirateur
Les outils de I'aspirateur ne
ramassent pas
Le phare ne
L'aspirateur est difficile
a
pousser
marche pas
TOUT AUTRE SERVICE DOlT ETRE
Si I'on a besoin d'assistance supplementaire, volr les Pages Jaunes pour reperer un distributeur agree Royalm. Les coits de transport vers I'endroit des reparations et le retour
a
la charge du proprietaire. Les pieces de service utilisees dans cette unite se rernplacent facilernent et sont disponibles chez un distributeur Royal" agree ou chez un
sont
detaillant. Identifiez toujours I'aspirateur par le nurnero du rnodele et le code de fabrication lorsque vous dernandez des informations ou que vous cornrnandez des pieces de
1.
Le vide-poussiere n'est pas bien installe
2.
Le vide-poussiere est plein.
3.
Le filtre est encrasse.
4.
Le suceurlpassage des saletes est encrasse.
5.
Le raccord transparent du tuyau est encrasse.
6.
Le rouleau de brosse est use.
7.
La courroie est cassee ou usee.
8.
Le reglage de hauteur pour le tapis n'est pas exact.
1.
Le woe-poussiere est ple~n.
2.
Le vide-poussiere n'est pas bien installe
3.
Le tuyau n'est pas installe correcternent.
1.
Le tuyau est bouche.
2.
Le raccord du tuyau est encrasse.
3.
Le vide-poussiere est plein.
4.
Le filtre est encrasse.
1.
Campoule est grillee.
2.
Les cdbles electriques sont desserres.
1.
Le reglage de hauteur du tapis est inexact.
EFFECTUE
SERVICE A LA
CLIENTELE
PAR UN
(1
Revoir "Retrait et remise en place du
1.
vide-poussiere"-Page
2.
Vider le vide-poussiere-Page
3.
Retirer et nettoyer le filtre-Page
4.
Enlever le couvercle du suceur et enlever I'obstruction
Enlever le tuyau et enlever I'obstruction.
5.
Enlever le tuyau et nettoyer le raccord-Page
6.
Rernplacer le rouleau de brosse-Page
7.
Rernplacer la courroie-Page
8.
Regler I'ajusternent de hauteur du tapis au reglage
approprie pour le tapis
1.
Vider le vide-poussiere-Page
2.
Revoir " Retrait et remise en place du
vide-poussieren-Page
3.
Revoir I'installation du tuyau-Page
1.
Enlever le tuyau et les outils; enlever I'obstruction-Page
2.
Enlever le tuyau et nettoyer le raccord-Page
3.
Vider le vide-poussiere-Page
4.
Nettoyer le filtre-Page
1.
Rernplacer I'arnpoule-Page
2.
Appeler le
distributeur agree Royal" le plus proche.
1.
Mettre I'ajusternent de hauteur du tapis au
reglage approprie pour le tapis
1-800-321
REPRESENTANT
-800-321
-1
134)
6.
a
nettoyer-Page
6.
6.
8.
-1
134
pour le
AGREE
6.
6.
5.
7.
7.
5.
6.
5.
6.
a
nettoyer -Page
5.
DU SERVICE
OU
5
5.
rechange. (Ce numero du rnodele est indique au dos de I'aspirateur).
Page 18

RETRAIT ET REMPLACEMENT DE CAMPOULE
OUTlL
NECESSAIRE
AVERTISSEMENT
L 'AMPOULE.
Cet aspirateur utilise une ampoule automobile reguliere de 13,O volts
ampoule de rechange.
1. Incliner le manche de I'aspirateur vers I'arriere. lnserer I'extremite d'un tournevis
I'exterieur pour extraire la lentille du phare (Schema 1).
2. Tirer I'ampoule hors de la douille pour I'enlever. Pousser la nouvelle ampoule dans la douille pour concretiser le remplacement (Schema 2).
3. Remettre la lentille du phare en place.
Schema 1 Enlever le couvercle du suceur
Ut~l
ser un tournevls cruclforme pour enlever les quatre v~s
RETRAIT ET REMPLACEMENT DE LA COURROIE OU DE LA BROSSE
OUTlL NECESSAIRE : TOURNEVIS CRUCIFORME
AVERTISSEMENT:
PIECES
EN MOUVEMENT,
:
TOURNEVIS
:
POUR
POUR
A
TETE
REDUIRE
REDUIRE
DEBRANCHER
LES RISQUES D'ELECTROCUTION,
LES
PLATE
DEBRANCHER
N"
906.
Appeler le 1-800-321-1 134 ou votre magasin de pieces auto pour obtenir une
a
t6te plate regulier dans la fente laterale et exercer une pression vers
\\w/
Schema 2 Enlever la courroie
Gltsser la murmle hors de I'arbre du moteur
RISQUES
CASPIRATEUR AVANT DE CHANGER LA COURROIE OU LE ROULEAU DE BROSSE.
DE BLESSURES DUES
1
A
DES
CASPIRATEUR AVANT D'ENLEVER OU DE REMPLACER
Schdma 3 Rouleau
Soulever
et
enlever le rouleau de brosse
MODELE
de
brosse
DE
Schha 4 Remettre
en
phce
partle du rouleau de brosse sans polls
Placer
COURROIE
la
courrole autour de
la
counoie
la
:4et5
POUR ENLEVER LA COURROIE
haut. Pour enlever le couvercle du suceur, utiliser un tournevis cruciforme pour enlever les quatre vis. Les fleches (Schema 1) indiquent I'emplacement
des vis. Remettre
enlever le rouleau de brosse (Schema
le suceur
a
I'endroit et soulever le couvercle du suceur. Glisser la courroie hors de I'arbre du moteur (Schema 2). Soulever et
Retourner I'aspirateur de maniere a exposer le dessous du suceur. La base doit &re a plat et pointer vers le
3).
Jeter I'ancienne courroie.
POUR REMETTRE LA COURROIE EN PLACE
REMARQUE
1. Mettre la courroie sur I'arbre du moteur et alisser le rouleau de brosse
sans poils (Schema 4).
2. Une fois la courroie installee, tendre le rouleau de brosse et le alisser dans le suceur (Schema 3) en veillant
du rouleau de brosse (schema 3a en medaillon).
IMPORTANT:
3. Remettre le couvercle du suceur en place. Fixer en inserant les vis sous le suceur.
:
Lors du remplacement de la courroie, reglez la hauteur au plus bas. Vous pourrez ainsi remplacer la courroie plus facilement.
"
TOURNER LE ROULEAU DE BROSSE A LA MAIN POUR S'ASSURER QUE LA COURROIE N'EST PAS TORDUE.
-
a
travers la courroie. Placer la courroie autour de la ~artie du rouleau de brosse
a
I'orientation des couronnes d'extremite
RANGEMENT DE LA COURROIE
Etirer la courroie autour des crochets situes sur le panneau arriere de I'aspirateur (voir I'emplacement du dispositif de rangement de la courroie a la
page 4, Schema
2).
Page 19

Sch6ma
1
Pii
du t~yau attach=
Tuyau extensible
d'ancrage.
d'ancrage
i
fixe
a
la
la piece
TUYAU FLEXIBLE ET ANCRAGE DU TUYAU:
base
Sch&na
2a
clu
cache-tuyau
Sorbr
Pike Bancage
tuyau
Schh
2b
Systhe
~irba-~ose~
le tuyau du manche du tuyau. place
Sch6ma
Enlever le baton du
Ra"onge
c6tk
dd ksplrateur. Bouton de regbe de la hauteur.
SchtSma
4
La piece d'ancrage du tuyau est destinee a eviter que I'aspirateur ne bascule lors
Schema
Ubliser la poignC
I'asp~rateur pour d6placer I'asptrateur d'une
I'autre
5
de
transpon a I'arnere
de
de I'utilisation des accessoires de nettoyage des endroits en hauteur. Enlevez le tuYau flexible du c& de I'asPirateur au moYen de la ~oignee. Mettre
le tuyau
a
I'arriere de I'aspirateur (Schema
1)
et fixer I'anneau de la piece d'ancrage du tuyau (Schema 2a) se trouvant autour du tuyau a la base. Tirer
le tuyau du manche du tuyau pour plus de longueur (Schema 2b).
RALLONGE:
REGLAGES
IMPORTANT:
Tourner le bouton pour ajuster la hauteur du suceur en fonction de la surface
Enlever le bhton du c6te de I'aspirateur en le tirant par le haut pour le degager et tirer vers le haut (Schema 3).
POUR LES
METTRE LE MANCHE EN POSITION VERTICALE AVANT D'AJUSTER LE
TAPIS
a
nettoyer (Schema 4). Si I'aspirateur est difficile a pousser, utiliser une
REGLAGE
DU TAPIS.
hauteur de tapis plus elevee.
TRANSPORT DE CASPIRATEUR
Utiliser la poignee de transport a I'arriere de I'aspirateur pour deplacer I'aspirateur d'une piece a I'autre (Schema
REMARQUE
:
Ne pas pousser I'aspirateur vers I'avant sur les roulettes arriere. Ne pas tirer I'aspirateur sur les roulettes arriere.
5).
-
NETTOYAGE DU GODET
Remplacez le filtre HEPA annuellement pour une performance maximale.
Pour obtenir un filtre HEPA de rechange, piece no JC0280-000, veuillez composer le
AVERTISSEMENT
:
POUR
REDUIRE
A
POUSSIERE
ET DU FILTRE HEPA
LES RISQUES DE BLESSURES DUES A DES
:
1-800-321-1134.
PIECES
:
EN MOUVEMENT,
DEBRANCHER
L'ASPIRATEUR
AVANT L'ENTRETIEN.
Vidage et nettoyage du VIDE-POUSSIERE
1.
Appuyer sur le loquet pour degager le vide-poussiere de I'aspirateur (Schema
:
1).
Sortir le vide-poussiere pour le vider (Schema 2).
2. Enlevez le filtre et nettoyez-le (lire les instructions ci-apres).
3.
Utiliser une eponge et de I'eau tiede pour essuyer le compartiment du vide-poussiere.
4.
Pour remettre le vide-poussiere en place:
Mettre la patte d'alignement se trouvant sous le vide-poussiere dans la fente rectangulaire formee dans
I'aspirateur et enfoncer le vide-poussiere pour le verrouiller en place (Schema 3). Si le vide-poussiere ne s'emboite pas correctement, verifier que le fil-
8
-
tre soit bien en place (voir Page
NElTOYEZ LE FILTRE HEPA (INTERNE)
1.
Retirer
le
vide-poussiere. En maintenant le godet a poussiere, saisissez la partie superieure du filtre et tirez-le vers le haut pour le degager (Schema 3).
Entretien regulier*:
2.
il faut nettoyer le filtre chaque fois que le vide-poussiere est vide. Cognez le filtre fermement contre I'interieur d'une poubelle jusqu'a ce
Schema
4).
SITUE
DANS LE GODET
A
POUSSIERE
:
que la poussiere cesse de s'en echapper. (Apres utilisation, le filtre sera decolore mais restera efficace). Ne pas brosser le filtre.
Nettoyage en profondeur*:
3.
Si vous constatez une diminution de la puissance d'aspiration, verifiez qu'il n'y a pas d'obstruction. Videz le godet a pous-
sieres et enlevez TOUTES les poussieres et les saletes du filtre. Une fois nettoye, I'aspirateur sera pret a 6tre utilise.
4.
Remplacez le filtre HEPA
*
Les instructions de nettoyage peuvent varier selon les conditions de salete. Dans certains cas,
:
Appuyer sur le filtre pour le verrouiller en place et empecher toute fuite de poussiere. Remettre le vide-poussiere dans I'aspirateur.
il
sera necessaire de nettoyer plus ou moins le filtre
HEPA.
Page 20

1.
AlTACHER LE TUYAU : Attacher le tuyau flexible a I'aspirateur (Schema 1). Aligner les fleches se trouvant sur le tuyau aux pattes situees sur le
raccord transparent du tuyau (Schema 1A). Bien enfoncer la manchette et la tourner dans le sens des aiguilles d'une montre. Inserer le manche du
tuyau dans le cBte de I'aspirateur. Appuyer fermement pour fixer (Schema 2).
INSTALLER LES OUTILS : (Schema 3) : (A) Glisser I'outil Edge wedgea sur la base de la partie superieure du manche avec ses poils tournes vers
2.
I'interieur. (6) Glisser le Power Edger'" (en option) sur le panneau arriere superieur avec ses poils tournes vers I'exterieur.
le panneau arriere superieur avec ses poils tournes vers I'exterieur.
arriere. (E) lnserer I'outil pour fentes dans le panneau arriere inferieur.
3.
RANGEMENT DU
de cordon (Schema 4) (A).
CABLE
:
Pour un bon rangement du cordon, I'enrouler autour des crochets sur le cBte de I'aspirateur avec le rel2chement rapide
(D)
Glissez la rallonge, petit c6te vers le bas, dans la partie inferieure du panneau
(C)
Glisser 110uti12-en-1 sur
UTILISATION
"onloff" situe sur le cBte gauche de I'aspirateur, juste au dessus du filtre HEPA (Schema 1).
NETTOYAGE DES PLANCHERS ET TAPE
1. Le manche doit &re en position verticale lors du reglage de la hauteur (Schema 2). Tourner le bouton de reglage de la hauteur pour ajuster la hauteur
du suceur en fonction de la surface
REMARQUE : Les franges de tapis peuvent sJemm61er dans le rouleau de brosse de I'aspirateur lorsque celui-ci tourne. Etre prudent lors du passage
de I'aspirateur sur des tapis pourvus de franges.
NETTOYAGE AU-DESSUS DU PLANCHER
L'aspirateur doit etre en position verticale pour soulever la brosse en rotation du tapis lorsque I'on nettoie au-dessus du plancher.
1. Mettre I'aspirateur en position verticale.
2.
Enlever le tuyau du cBte de I'aspirateur au moyen du manche (Schema 4).
AlTENTION: L'agitateur
DE
L'ASPIRATEUR
a
nettoyer (Schema 3).
a
brosse continue a tOUrner tandis que le tuyau est enleve ou en train d'gtre utilise, et a tout moment lorsque
I.
Brancher le c2ble dans une prise Blectrique.
Une
fois la hauteur choisie, le suceur se mettra dans la position souhaitee.
2.
Allumer I'aspirateur en appuyant sur IJinterrupteur
le nettoyeur de tapis est en marche. Ne pas mettre les cheveux, les vgtements Isches, les doigts ou toute autre partie du corps dans
la zone de la brosse lorsque
3. Choisir I'un des accessoires pratiques ou utiliser seulement
manche du tuyau. Pour enlever I'outil, tourner et degager avec soin.
*NElTOYAGE DES BORDS SANS LES MAINS : Retirer le Power EdgerTM du panneau arriere superieur. lnserer le Power Edger'" dans la fente
edger
souhaitee. Retirer I'extremite du tuyau du cBte du dispositif et du support d'outils. Glisser I'extremite du tuyau sur le Power Edger". Glisser
I'aspirateur le long des murs et des plinthes pour obtenir un nettoyage superieur des bords (Schema 5).
*Non
disponible sur tous les modeles
le nettoyeur est en marche.
le
tuyau. Simplement pousser I'accessoire fermement sur I'extremite du b5ton ou du
F5
power
Page 21

Schema
1
kl
Schema
2
H
Schema
1. Poignee
2. Levier de deblocage du vide-poussiere
3. Phare
4a.*Glissoirs Power Edger'" avec Pare-Chocs qui
4b.*Pare-Chocs Scuff GuardMC (Optionnel)
5.
6. Pedale de deblocage du manche
7. Vide-poussiere
8. Filtre
9. Bride du cordon
10. Tuyau flexible
11. Piece d'anchage de tuyau
Schema
12. Poignee de transport
1
s'encadre (Optionnel)
Bouton de reglage de la hauteur
a
HEPA (dans le godet
poussiere)
2
13. Poignee du tuyau flexible
14. Long cdble electrique
15. Outil Power Edger (optionnel avec le Pare-Chocs
i
s'encadre)
qu
16. Compartiment
17. Swivel CastersMC
18. Rallonge
19. Outil pour fentes
20. Outil 2-en-1
et outil
21. lnterrupteur MarcheIArr6t ("On/Off")
juste au dessus du filtre HEPA
22. Raccord de tuyau transparent
23. Outil Edge Wedgem (outil pour coins et escaliers)
REMARQUE:
sont pas inclus avec tous les modeles
a
a
courroies
-
brosse d'epoussetage
mobilier
-
*Les accessoires optionnek ne
ASSEMBLAGE
1. Mettre I'unite en position verticale et mettre la partie superieure du manche sur I'aspirateur (Schema 1).
2. Enfoncer la partie superieure du manche dans I'aspirateur tout en I'alignant avec I'ouverture du manche (Schema 2).
3.
Les
DEUX
vis (fournies) doivent &re inserees a partir du haut de I'aspirateur pour fixer le manche (Schema
OUTIL
NECESSAIRE
:
TOURNEVIS
CRUCIFORME
3).
Page 22

CET ASPIRATEUR N'EST
DESTINE
QU'A L'USAGE DOMESTIQUE.
INSTRUCTIONS IMPORTANTES POUR VOTRE
Lors
de
I'utilisation
&re
respectees, notamment
LIRE TOUTES LES INSTRUCTIONS AVANT D'UTILISER L'APPAREIL.
TOUJOURS RESPECTER CES INSTRUCTIONS
PLACER L'ASPIRATEUR EN POSITION VERTICALE LORS DE CUTlLlSATlON DU TUYAU ET DES ACCESSOIRES.
NE JAMAIS LAISSER L'ASPIRATEUR SANS SURVEILLANCE LORSQU'IL EST
VERIFIER
AVERTISSEMENT : NE JAMAIS UTlLlSER D'OBJETS A ARETE
POURRAIT L'ENDOMMAGER.
REGULIEREMENT LES FILTRES ET LES NETTOYER OU LES REMPLACER.
d'un
appareil
les
electro-menager, certaines precautions
suivantes
:
DE
SECURITE.
BRANCHE.
VlVE POUR NETTOYER LE TUYAU CAR CECl
de base
SECURIT~
doivent toujours
ENLEVERLABROSSEETNETTOYERLESDEBRISDESCHAPEAUXD~EXTREMITEDETEMPSAAUTRES
AFIN QUE LA BROSSE PIVOTE UNIFORMEMENT.
AVERTISSEMENT : LES CORDONS, LES FILS ELECTRIQUES ETIOU LES
CONTIENNENT DES PRODUITS CHlMlQUES CONTENANT DU PLOMB OU DES COMPOSES DU PLOMB CONSID
ERES
PAR L'ETAT DE CALIFORNIE COMME PRODUITS
CONGENITALES
OU AUTRES ANOMALIES DE LA REPRODUCTION. SE LAVER LES MAINS
CANCEROGENES
CABLES
ET CAUSANT DES MALFORMATIONS
FOURNIS AVEC CE PRODUIT
APRES
UTILISATION.
LIRETOUTES LES INSTRUCTIONS AVANT D'UTILISER CE DISPOSITIF.
AVERTISSEMENT : AFIN DE
D'INCENDIE, DE CHOC
Ne pas quitter I'appareil lorsqu'il est branche. Debrancher de la prise lorsqu'il n'est pas utilise et avant entretien.
Ne pas utiliser dehors ou sur des surfaces humides. Un choc electrique pourrait se produire.
Ne pas permettre qu'il soit utilise comme jouet. Etre particulierement attentif lors de I'utilisation par des enfants ou
Ne I'utiliser que tel que decrit dans ce manuel. N'utiliser que les accessoires recommandes par le fabricant.
Ne pas utiliser si le cordon d'alimentation ou la fiche est endommage(e). Si cet aspirateur ne fonctionne pas comme il le devrait,
si on
I'a fait tomber, s'il a ete endommage ou bien encore si on I'a laisse tomber dans I'eau, le rapporter
pour le faire inspecter. Appeler le numero sans frais 1-800-321 -1 134 pour obtenir I'adresse du centre de service le plus proche.
Ne pas tirer sur le cible Blectrique ou porter I'aspirateur par le cible. Ne pas utiliser le cible comme poignee, ne pas fermer de porte
sur
le cible, et ne pas entourer le cible autour de bords tranchants ou de coins. Ne pas passer I'appareil au dessus du cible. Tenir le
a
cible
Garder les cheveux, les
des endroits
distance des surfaces chauffees.
Ne pas dkbrancher en tirant sur le cible. Pour debrancher, tenir la fiche, non le cible.
Ne pas manipuler la prise ou le dispositif avec des mains mouillees.
Ne pas introduire
poussiere, de peluche, de cheveux, et de tout ce qui pourrait affecter le passage de I'air.
Ne pas ramasser quoi que ce soit qui brOle ou qui fume, tel que les cigarettes, les allumettes, ou les cendres chaudes.
Ne pas utiliser I'aspirateur sans avoir le vide-poussiere et les filtres en place.
Mettre tous les commandes sur arrBt avant de debrancher.
Etre particulierement attentif lors du nettoyage d'escaliers.
Ne pas utiliser I'aspirateur pour ramasser des liquides inflammables ou combustibles, tels que I'essence, ou utiliser le dispositif dans
Maintenir I'aspirateur
Caspirateur doit Btre en position verticale pour soulever la brosse pivotante du tapis lorsque I'on nettoie au-dessus du plancher.
Ne pas utiliser de rallonge electrique avec cet aspirateur.
Ranger I'aspirateur
Cemploi d'une tension incorrecte peut endommager le moteur et potentiellement blesser I'utilisateur. La tension adequate est
indiquke sur la plaque de I'aspirateur.
Debranchez avant de connecter I'accessoire Turbo (I'accessoire Tubo n'est pas inclus dans tous nos modeles).
d'objets dans les ouvertures. Ne pas utiliser avec une ouverture bloquee
vBtements, les doigts et toutes les parties du corps loin des ouvertures et des pieces en mouvement.
012 ceux-ci pourraient Btre presents.
a
mBme le sol. Seuls les aspirateurs tenus en main peuvent Btre utilises sur du mobilier.
a
I'interieur. Ranger I'aspirateur apres usage pour eviter les accidents.
ELECTRIQUE
REDUIRE
OU DE BLESSURE
;
maintenir celles-ci exemptes de
LES RISQUES
a
leur proximite.
a
un centre de service
:
CONSERVER CES INSTRUCTIONS
AVERTISSEMENT
Afin de reduire le risque de choc electrique, cet appareil est muni d'une fiche polarisee (avec une lame plus large que I'autre). Cette
fiche ne peut se placer que d'une seule fa~on dans une prise polarisee.
la fiche. Si elle ne rentre toujours pas, prendre contact avec un electricien professionnel afin de faire installer une prise appropriee. Ne
pas modifier la fiche de quelque maniere que ce
soit.
Si
la fiche ne rentre pas completement dans la prise, tourner
:
Page 23

Vous etes dCsormais le fier proprietaire d'un Dirt Devila Swivel GlideB Visionm avec le
dispositif Power You Can See"! Vous n'achcterez plus jamais un autre sac poussiere avec
cette conception sans sac unique qui inclut un vide-poussihre transparent permettant de
rCcupCrer les objets perdus. Vow apprkcierez Cgalement une puissance de nettoyage
supCrieure avec
12
amperes de puissance d'aspiration maximum.
Nous sommes extrcmement fiers de nos produits et espCrons que, tout comme nous, vous
etes satisfaits de leur qualit6 et de leur performance.
Merci pour votre support des produits Dirt Devila.
Visitez
notre site web au www.dirtdevil.com.
TABLE DES
Pieces Page4
Assemblage
Utilisation de I'aspirateur
Transport de I'aspirateur
Godet a poussere et filtre HEPA: enlevement et reinstallation
Retrait et remplacement de la courroie ou du rouleau de brosse . .Page
Retrait et remplacement de I'ampoule
Guidededepannage
..............................................
.........................................
............................... .Page
Assemblage du tuyau et rangement des outils
Nettoyage des planchers et tapis
Nettoyage au-dessus du plancher
Nettoyage des bords sans les mains
Reglages pour les tapis
.............................
...............................
...................................
MATIERES
............
......................
......................
...................
....
.....................
Page4
.Page
.Page
.Page
.Page
.Page
.Page
.Page
.Page
Page8
5
5
5
5
5
6
6
6
7
7
Royal Appliance Mfg. Co. garantit au consornrnateur que cet aspirateur est exempt de tout vice de rnateriau ou de fabrication a cornpter de la date d'achat origi-
nale. Consultez le carton d'ernballage de I'aspirateur pour determiner la duree de la garantie et conservez I'original de votre reCu d'achat pour justifier la date
d'entree en vigueur de la garantie.
Si I'aspirateur
cornplet doit %re livre, port ~avk
d'achat, une copie du rey d'achat original, ainsi que vos norns, adresse et nurnero de telephone. Si vous n'avez pas de concessionnaire pres de chez vous, tele-
phonez
La garantie ne couvre pas I'usure inhabituelle, ni les deteriorations dues
roies, les brosses, les sacs, les ampoules ou le ventilateur. Cette garantie ne couvre pas les reparations non autorisees. Cett9 garantie vous confere des droits
juridiques precis, rnais vous pouvez egalernent disposer d'autres droits (ces derniers variant d'un Etat
fait defaut durant la periode couverte par la garantie, nous reparerons ou rernplacerons toutes pieces defectueuses gratuiternent. L'aspirateur au
a
I'usine pour obtenir une assistance aux Etats-Unis et Canada: 1-800-321-1134. N'utilisez que des pieces de rechange Royal@authentiques.
a
n'irnporte quel point de vente et de service ROYALm agree. Veuillez inclure une description detaillee du problerne, la date
a
un accident ou a un usage abusif de I'aspirateur. Elle ne couvre pas non plus les cour-
a
I'autre au sein des Etats-Unis).
Page 24

MANUEL DU
Notice
d'utilisation
d'entretien
PROPRIETAIRE
et
SWIVEL
CUDE
Veuillez lire ces instructions avec soin
avant d'utiliser votre Swivel GlideB
Vision?
Permettez-nous de vous aider
a
assembler votre aspirateur ou de
repondre
a
vos questions en appelant le
:
Espafiol - pagina El
I-
1-800-321
-1
134 (hats-~nis et Canada)
site Web: www.dirtdeviI.com
Consignez les renseignements concernant votre aspirateur
ci-dessous pour pouvoir les retrouver rapidement.
Nge modele
Code de
(Le code de fabrication se trouve sur le c6tk infkrieur arriere de I'aspirateur.)
01
998
:
fab.
:
Tous droits reserves
No
1-1 13344-000
3/03
 Loading...