

Page 1
THIS VACUUM CLEANER IS INTENDED FOR HOUSEHOLD USE ONLY.
WARNING:
Cleaner assembly may
include small parts. Small
parts can present a choking
hazard.
OWNER’S MANUAL
Operating and Servicing
Instructions
• Please read these
instructions carefully before
using your Upright.
• Let us help you put your
vacuum together or answer
any questions, call:
1-800-321-1134
(USA & Canada)
www.dirtdevil.com
Warranty Registration
• Online at: www.dirtdevil.com
• Phone: 1-800-321-1134
• Mail: Royal Appliance Mfg
7005 Cochran Rd.
Glenwillow, Ohio 44139
For quick reference, please record your
vacuum information below.
Model #:
Mfg. Code:
(Mfg. code located on the lower backside of cleaner)
©2004 All rights reserved # 1-113821-000
11/04
IMPORTANT SAFETY INSTRUCTIONS
When you use an appliance, basic precautions should always be followed,
including the following:
• READ ALL INSTRUCTIONS BEFORE USING THIS APPLIANCE.
• ALWAYS FOLLOW THESE SAFETY INSTRUCTIONS.
• BRING CLEANER TO UPRIGHT POSITION WHEN USING THE HOSE AND
ATTACHMENTS.
• DO NOT LEAVE CLEANER UNATTENDED WHEN PLUGGED IN.
• REGULARLY CHECK THE FILTERS TO CLEAN OR REPLACE.
• WARNING: DO NOT USE SHARP OBJECTS TO CLEAN OUT THE HOSE
SINCE THEY COULD CAUSE DAMAGE.
• OCCASIONALLY REMOVE BRUSH AND CLEAN DEBRIS FROM END CAPS
TO KEEP BRUSH ROTATING SMOOTHLY.
• WARNING: THE CORDS, WIRES, AND/OR CABLES SUPPLIED WITH THIS
PRODUCT CONTAINS CHEMICALS, INCLUDING LEAD OR LEAD COMPOUNDS,
KNOWN TO THE STATE OF CALIFORNIA TO CAUSE CANCER AND BIRTH
DEFECTS OR OTHER REPRODUCTIVE HARM. WASH HANDS AFTER USING.
WARNING: TO REDUCE THE RISK OF FIRE,
ELECTRIC SHOCK OR INJURY:
• Do not leave appliance when plugged in. Unplug from outlet when not in use
and before servicing.
• Do not use outdoors or on wet surfaces. Electrical shock could occur.
• Do not allow to be used as a toy. Close attention is necessary when used by or
near children.
• Use only as described in this manual. Use only manufacturer’s recommended
attachments.
• Do not use with damaged cord or plug. If appliance is not working as it should,
has been dropped, damaged, left outdoors, or dropped into water, return it to a
service center for inspection. Call 1-800-321-1134 for the nearest service center.
• Do not pull or carry by cord, use cord as handle, close a door on cord, or pull
cord around sharp edges or corners. Do not run appliance over cord. Keep cord
away from heated surfaces.
• Do not unplug by pulling on cord. To unplug, grasp the plug, not the cord.
• Do not handle plug or appliance with wet hands.
• Do not put any objects into openings. Do not use with any opening blocked;
keep free of dust, lint, hair, and anything that may reduce air flow.
• Keep hair, loose clothing, fingers, and all parts of body away from openings and
moving parts.
• Do not pick up anything that is burning or smoking, such as cigarettes, matches,
or hot ashes.
Do not use without dirt container and filters in place.
•
• Turn off all controls before unplugging.
2
Page 2

• Use extra care when cleaning on stairs.
• Do not use to pick up flammable or combustible liquids, such as gasoline, or
use in areas where they may be present.
• Keep the vacuum cleaner on the floor. Only the hand-held vacuum cleaners may
be set on furniture.
• Cleaner must be in the upright position to lift the rotating brush off the carpet
when doing above floor cleaning.
• Do not use an extension cord with this vacuum cleaner.
• Store the vacuum cleaner indoors. Put the vacuum cleaner away after use to
prevent tripping accidents.
• Using improper voltage may result in damage to the motor and possible injury to
the user. Proper voltage is listed on the cleaner plate.
• Unplug before connecting *Power Brush Tool.
*NOT AVAILABLE ON ALL MODELS
SAVE THESE INSTRUCTIONS
WARNING:
To reduce the risk of electric shock, this appliance has a polarized plug (one blade is wider
than the other). This plug will fit in a polarized outlet only one way. If the plug does not fit
fully in the outlet, reverse the plug. If it still does not fit, contact a qualified electrician to
install the proper outlet. Do not change the plug in any way.
CONGRATULATIONS
You are now the proud owner of a Dirt Devil®. We trust your new purchase will
bring you many years of satisfaction.
Our company designed and developed this product with you in mind.
We are very proud of our products and hope that you are equally satisfied
with their quality and performance.
Thank you for your support of Dirt Devil®products.
Visit our website at www.dirtdevil.com
TABLE OF CONTENTS
Safety Instructions . . . . . . . . . . . . . . . . . . . . . . . . . . . . . . . . . Page 2, 3
Features. . . . . . . . . . . . . . . . . . . . . . . . . . . . . . . . . . . . . . . . . Page 5
How to Assemble . . . . . . . . . . . . . . . . . . . . . . . . . . . . . . . . . . Page 6, 7
Body to Nozzle . . . . . . . . . . . . . . . . . . . . . . . . . . . . . . . . Page 6
Handle . . . . . . . . . . . . . . . . . . . . . . . . . . . . . . . . . . . . . . Page 6
Power Brush Tool Caddy . . . . . . . . . . . . . . . . . . . . . . . . . Page 6
Tool Storage . . . . . . . . . . . . . . . . . . . . . . . . . . . . . . . . . . Page 6
Dirt Container
How To Operate . . . . . . . . . . . . . . . . . . . . . . . . . . . . . . . . . . . Page 7, 8
Floor/Carpet Cleaning . . . . . . . . . . . . . . . . . . . . . . . . . . . Page 7
Above Floor Cleaning
Dirt Container & Filter: Removal & Replacement . . . . . . . . . . Page 9
Belt or Brush: Removal & Replacement . . . . . . . . . . . . . . . . . Page 10
Lightbulb: Removal & Replacement . . . . . . . . . . . . . . . . . . . . Page 11
General Maintenance . . . . . . . . . . . . . . . . . . . . . . . . . . . . . . . Page 11
Troubleshooting Guide . . . . . . . . . . . . . . . . . . . . . . . . . . . . . . Page 12
. . . . . . . . . . . . . . . . . . . . . . . . . . . . . . . . . Page 7
. . . . . . . . . . . . . . . . . . . . . . . . . . . . Page 8
Your cleaner contains a thermal protective device to shut off the motor to avoid overheating. If this happens, turn switch off and unplug the cleaner. Inspect the exhaust,
inlet, and filters for any blockage. Empty the dirt container and clean filters. After
approximately 30 minutes the motor will have cooled and the vacuum will be ready to
Note: the cleaner must remain unplugged during the 30 minute cooling period.
use.
3
WARRANTY
To the consumer, Royal Appliance Mfg. Co. warrants this vacuum cleaner to be free of defects in material or
workmanship for 1 year from the date of the original purchase. Save your original sales receipt to validate
start of warranty period.
If the vacuum cleaner should become defective within the warranty period, we will repair or replace any defective
parts free of charge. The complete machine must be delivered prepaid
Warranty Service Station. Please include complete description of the problem, day of purchase, copy of original
sales receipt and your name, address and telephone number. If you are not near a Warranty Station, call the
factory for assistance in the USA & CANADA: 1-800-321-1134. Use only genuine Royal®replacement parts.
The warranty does not include unusual wear, damage resulting from accident or unreasonable use of the vacuum
cleaner. This warranty does not cover brushes, bags, flat belts, filters, bulbs or fan damage. This warranty does
not cover unauthorized repairs. This warranty gives you specific legal rights and you may also have other rights.
(Other rights may vary from state to state in the USA).
IMPORTANT: USE ONLY GENUINE ROYAL®REPLACEMENT PARTS.
NOTE: RETURN WARRANTY CARD TO REGISTER YOUR CLEANER
4
to any ROYAL
®
Authorized Sales &
Page 3
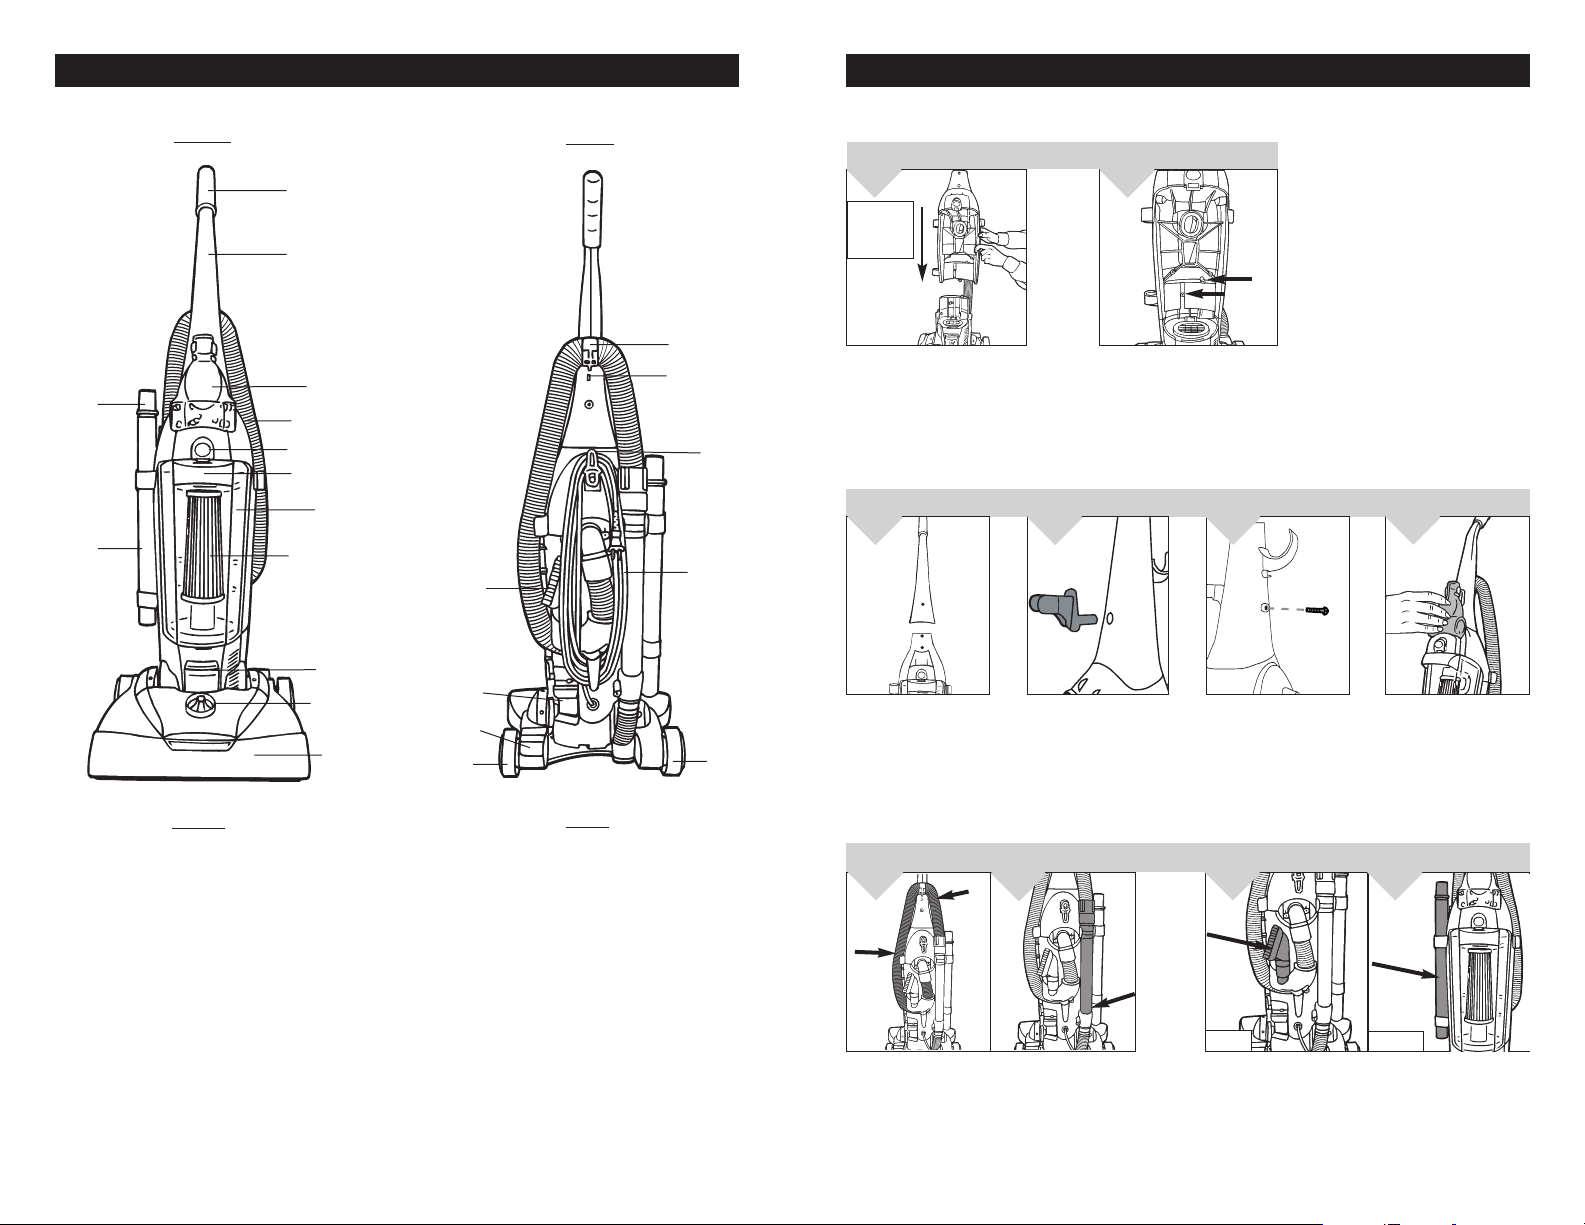
FRONT
1
2
FEATURES
BACK
HOW TO ASSEMBLE
TOOL REQUIRED: PHILLIPS OR FLAT HEAD SCREWDRIVER
BODY TO NOZZLE
1.
FRONT
VIEW OF
CLEANER
2.
13
12
FRONT
1. Handle Grip
2. Handle
3. Power Brush Tool
4. Hose
5. Dirt Container Release Button
6. Carry Handle
7. Dirt Container
8. Dirt Container Filter
9. Headlight
10. Height Adjust Knob
Bumper
11.
12. Extension Wand
Crevice Tool (inside extension wand)
13.
14
3
4
5
6
7
8
21
9
10
11
20
19
18
15
16
17
18
BACK
14. Hose Clip
15. Cord Guide
16. Cord Wrap With Quick Cord
Release
17. Long Power Cord
18. Wheels
Handle Release Pedal
19.
On/Off Pedal
20.
21. Dust Brush
Slide the back panel onto
base.
To secure, insert two (2)
screws into the front of the
back panel.
HANDLE (BACK) AND POWER BRUSH
TOOL CADDY (FRONT) ASSEMBLY
1.
Place upper handle
onto top of cleaner.
2.
Push handle plug onto
the front of cleaner.
3.
Insert the one (1)
screws into the back of
the handle and tighten,
making sure the handle
plug is secure.
SECURE BACK HOSE TOOL STORAGE
1.
Wrap hose around back of hose caddy (Diagram
1). Push hose wand down into the right side of
cleaner (Diagram 1a).
1a.
2.
BACK
Attach tools: (a) Slide the dust brush onto post on the
lower tool caddy with bristles facing out (Diagram 2).
(b) Slide the extension wand/crevice tool into round
slot on the front right side of tool caddy (Diagram 2a).
INSTALL POWER
BRUSH TOOL
4.
Clip Power Brush Tool
onto the front of the
Power Brush Tool
caddy.
2a.
FRONT
5
6
Page 4
HOW TO ASSEMBLE: CONTINUED
HOW TO OPERATE: CONTINUED
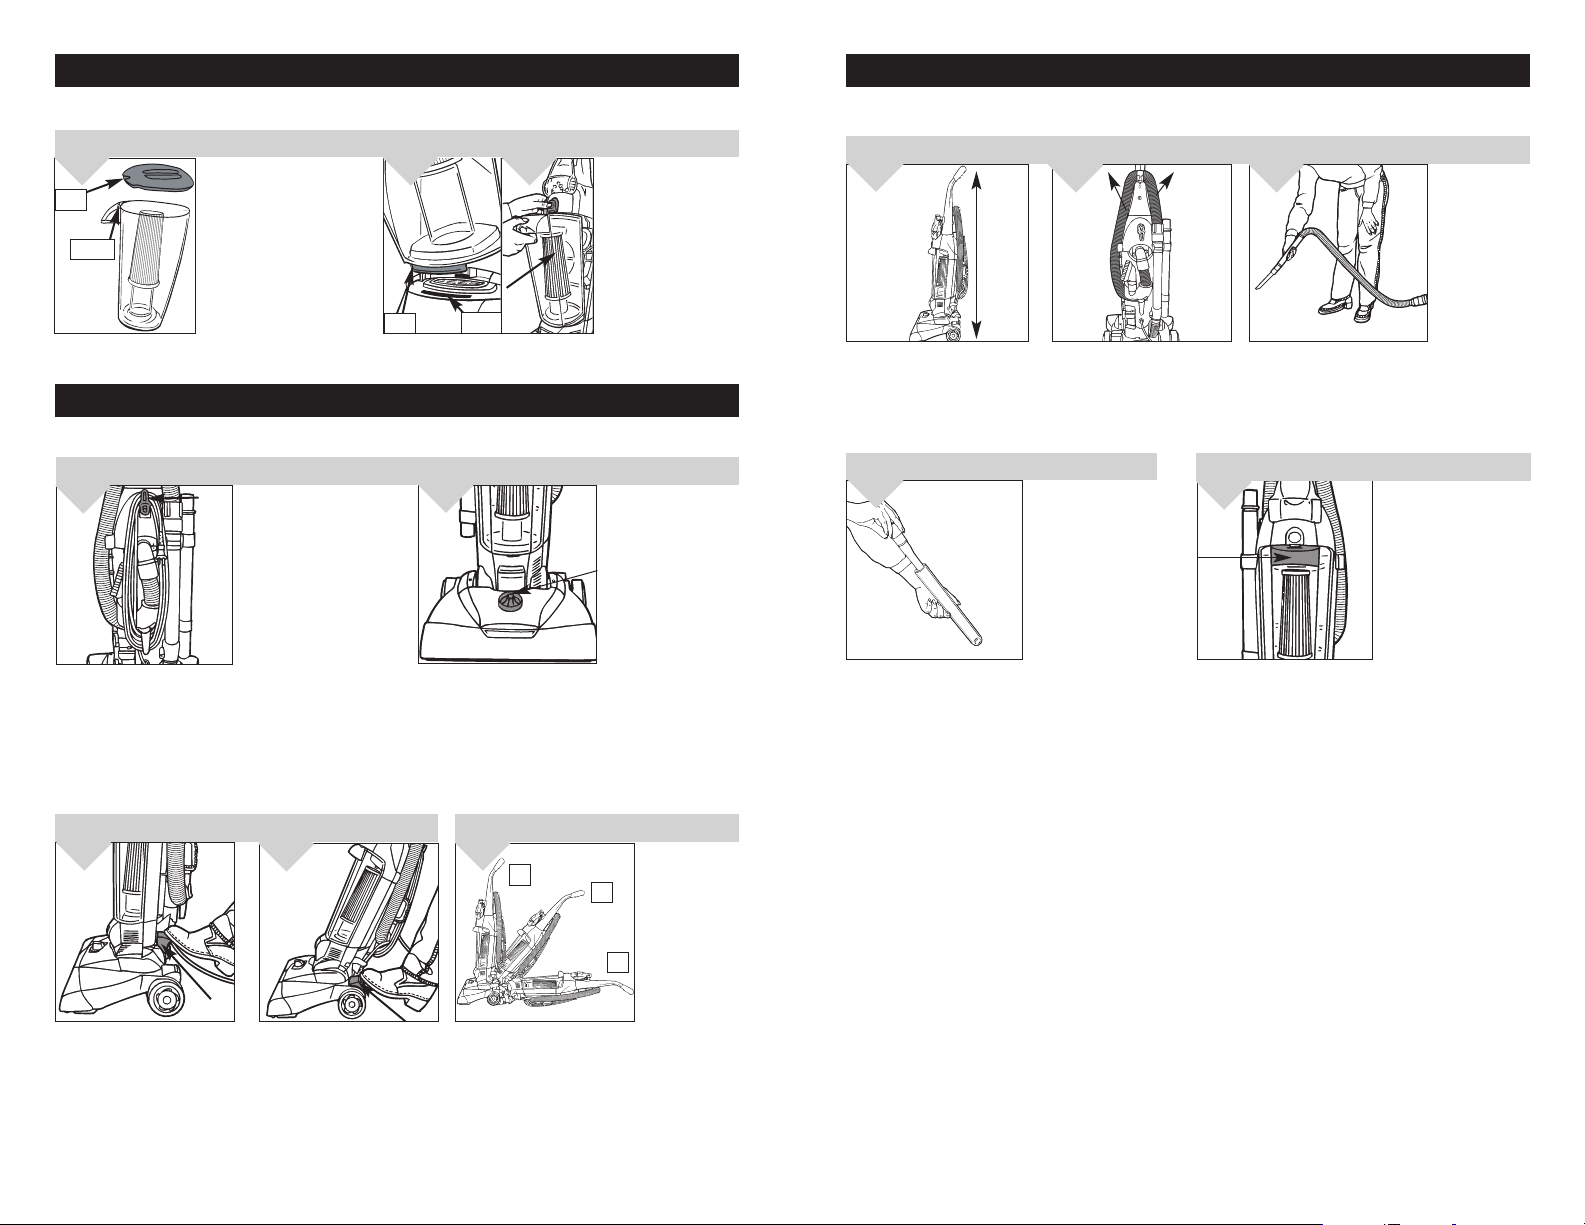
INSTALL DIRT CONTAINER INSTALL DIRT CONTAINER LID
3. 4a.
TAB
SLOT
Align tab on lid with
slot on dirt container.
Push the lid down
until it snaps into
place.
TAB
4.
Set aligning tab on
bottom of dirt container
into rectangular slot
on cleaner (Diagram
4), and push to snap
into place (Diagram
4a).
SLOT
HOW TO OPERATE
CORD RELEASE
1.
CAUTION: Brush agitator continues to rotate while hose is removed or in use and at all times while cleaner
is on. Keep hair, loose clothing, fingers, and all parts of body away from brush area while cleaner is on.
Cleaner must be in the upright position to lift the rotation brush off the carpet when cleaning above the
floor.
Turn Quick Cord
Release for easy cord
removal. Store cord
in cord guide (see
Features - pg. 5) to
keep out of the way
while vacuuming.
HEIGHT ADJUST LEVER
2.
Turn the height
adjustment knob to
match the surface
being cleaned.
IMPORTANT: For
easiest adjustment,
place cleaner in full
upright position.
ABOVE FLOOR CLEANING
1.
Cleaner must be in its upright
position to raise brushroll.
EXTENSION WAND
4.
2.
Remove the hose from the tool
caddy.
If additional length is
needed, use the
extension wand and
crevice tool. Pull
crevice tool out of
extension wand. Use
extension wand and
crevice tool together
or separately.
3.
or hose handle. To remove tool, twist and pull
apart gently.
CARRY HANDLE
1.
Use the carry handle on
the dirt container to
move the cleaner from
room to room. NOTE:
Verify dirt cup is secured
in place BEFORE lifting
cleaner.
Choose any of
the handy
accessories or
use the hose
alone. Simply
push the
attachment
firmly onto the
end of the wand
ON/OFF PEDAL
3.
Plug cord into electrical outlet.
Turn cleaner on by depressing
foot pedal located on the back
left side of the cleaner.
HANDLE RELEASE
PEDAL
4.
To release handle, push the
handle release pedal located
on the lower left side of the
cleaner.
7
FLOOR/CARPET
CLEANING
1.
a
pedal again to clean under furniture.
Rotating brush could cause area rug fringe to
become tangled within cleaner. Use caution
when vacuuming throw rugs with fringe.
b
c
Move the handle
and adjust it to
the desired
position for (a)
storing the
upright, (b)
operating the
cleaner, and (c)
de-press the
handle release
NOTE:
8
Page 5
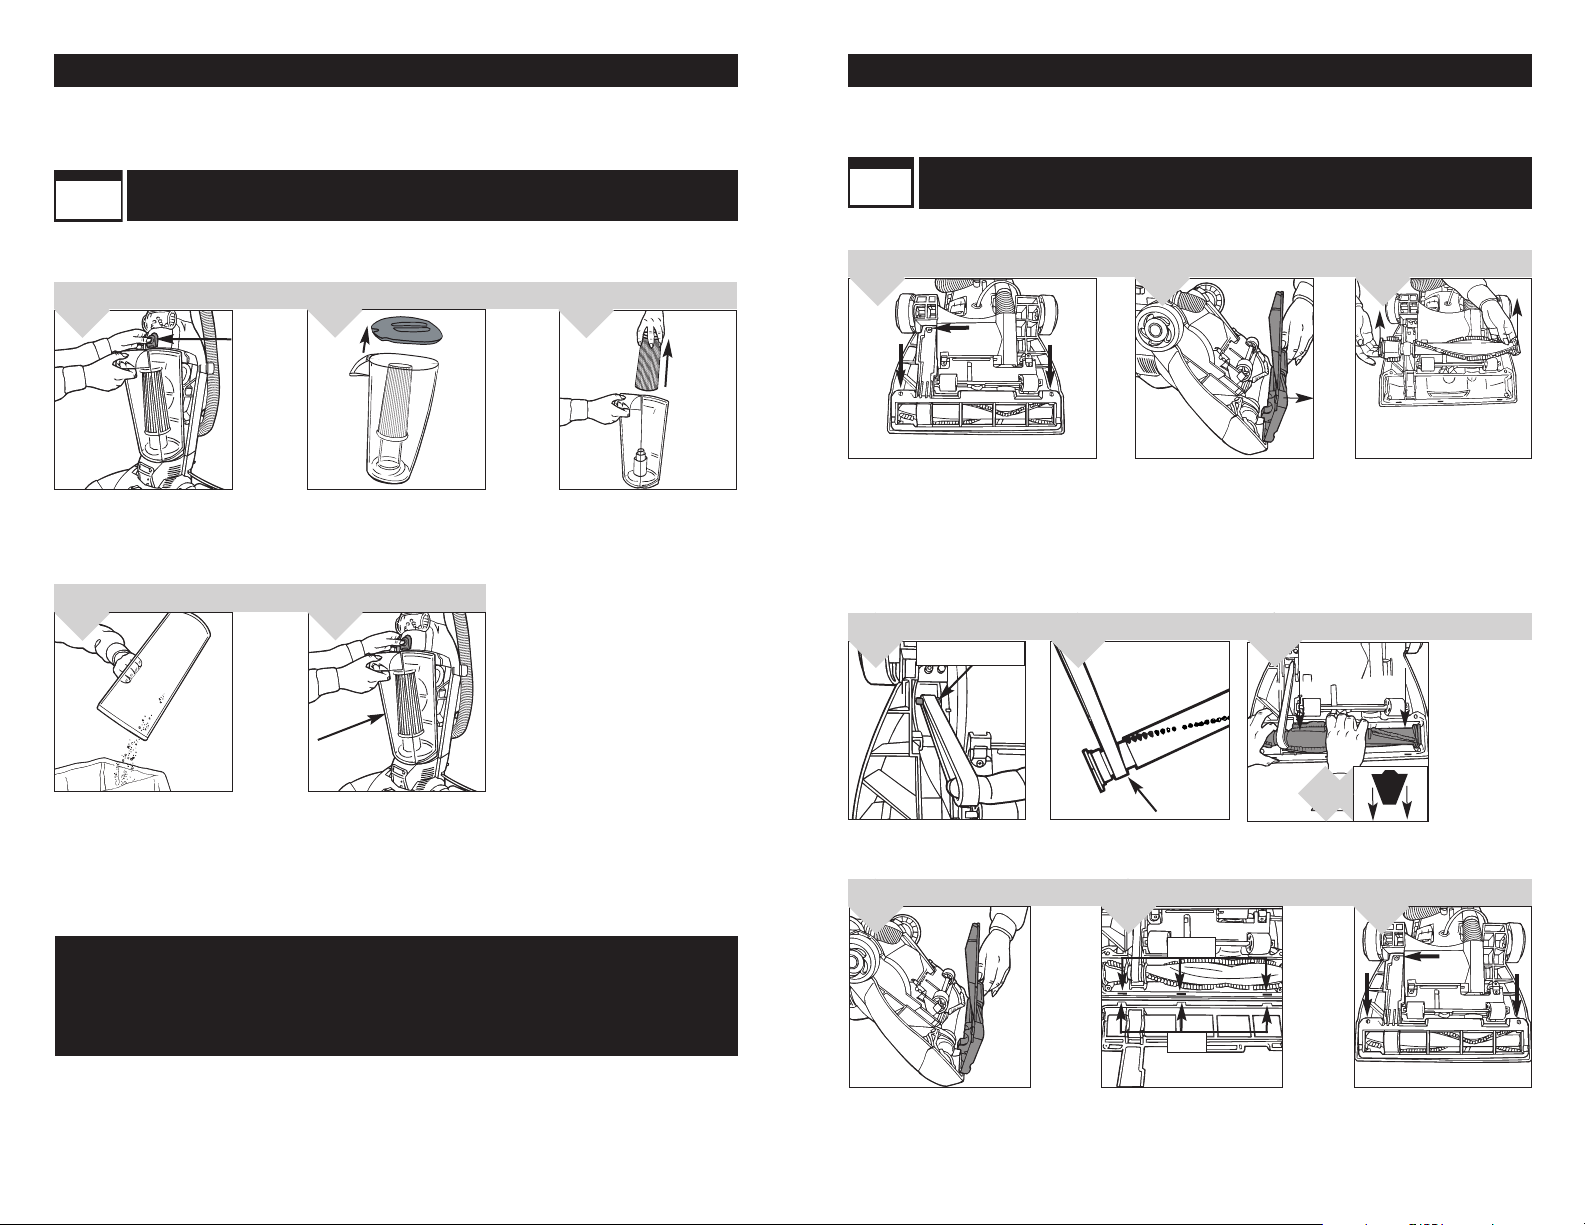
DIRT CONTAINER & FILTER: REMOVAL & REPLACEMENT
F1
FILTER TYPE
5
BELT STYLE
WARNING: TO REDUCE THE RISK OF INJURY FROM MOVING PARTS - UNPLUG BEFORE SERVICING.
NOTE: Unplug cleaner before changing filter.
NOTE: For best performance, replace filter yearly.
For F1 filter replacement (Part # 3-JCO280-000), please call 1-800-321-1134 or
visit our website at www.dirtdevil.com to locate a dealer nearest you.
EMPTY AND CLEAN DIRT CONTAINER
1.
2.
3.
BELT OR BRUSHROLL: REMOVAL & REPLACEMENT
TOOL REQUIRED: PHILLIPS OR FLATHEAD SCREWDRIVER
WARNING:TO REDUCE THE RISK OF INJURY FROM MOVING PARTS - UNPLUG CLEANER BEFORE CHANGING BELT
TO REMOVE BELT
OR BRUSHROLL.
For Belt Style 5 replacement, please call 1-800-321-1134 or visit our website at
www.dirtdevil.com to locate a dealer nearest you.
1.
2.
3.
Press latch above dirt container
and remove dirt container from
cleaner.
4.
Clean filter and empty dirt
container completely. See
“Regular Maintenance” note
below for instructions on
cleaning the filter.
*REGULAR MAINTENANCE: Each time the dirt container is emptied, the filter should be cleaned. Tap the filter
firmly against the inside of a trash can until the dirt stops falling from the filter. (Filter will be discolored after use,
this will not affect the filter’s performance.) Do not brush the filter. The cleaning instructions may vary depending
on the dirt conditions. In some cases, more or less cleaning of the filter may be required. It is recommended that
the F1 filter Part # 3-JCO280-000 be replaced once per year. Please use reminder label located on filter
cap to record replacement date.
Remove dirt container lid.
5.
Return filter to dirt container.
Push filter into place to prevent
dirt leakage. Return dirt
container to cleaner (see
Page 7, Install Dirt
Container).
Hold the dirt container and
grasp the top of filter. Twist
and pull the filter up and out.
Lay cleaner flat and flip cleaner to expose
nozzle base. Base should lay flat and
face up. To remove nozzle guard, use
Phillips screwdriver to remove the three
(3) screws. Arrows show location of
screws.
TO REPLACE BELT OR BRUSHROLL
4.
MOTOR SHAFT
Slide belt onto motorshaft.
5.
Place new belt in area of
brushroll without bristles.
7.
Pull and lift nozzle guard off.
Rotate brushroll manually to make sure belt is
properly aligned.
8.
SLOTS
TABS
6.
Lift and remove brushroll.
Dispose of old belt.
6a.
9.
With new belt in
place, pull and
slide brushroll
into nozzle
making sure
that the
brushroll end
caps are in the
correct orientation
(6a inset).
Reattach nozzle guard.
9
Secure by aligning the three
(3) tabs in the base slots.
10
Replace all three (3) screws
to secure nozzle guard.
Page 6
LIGHTBULB: REMOVAL & REPLACEMENT
TOOL REQUIRED: FLATHEAD AND PHILLIPS SCREWDRIVER
WARNING: TO REDUCE THE RISK OF ELECTRIC SHOCK - UNPLUG CLEANER BEFORE REMOVING OR
This cleaner uses a common automotive lamp #906, 13.0 volts. For bulb replacement call 1-800-321-1134
or your local auto parts store.
REPLACING LIGHTBULB.
1.
2.
3.
4.
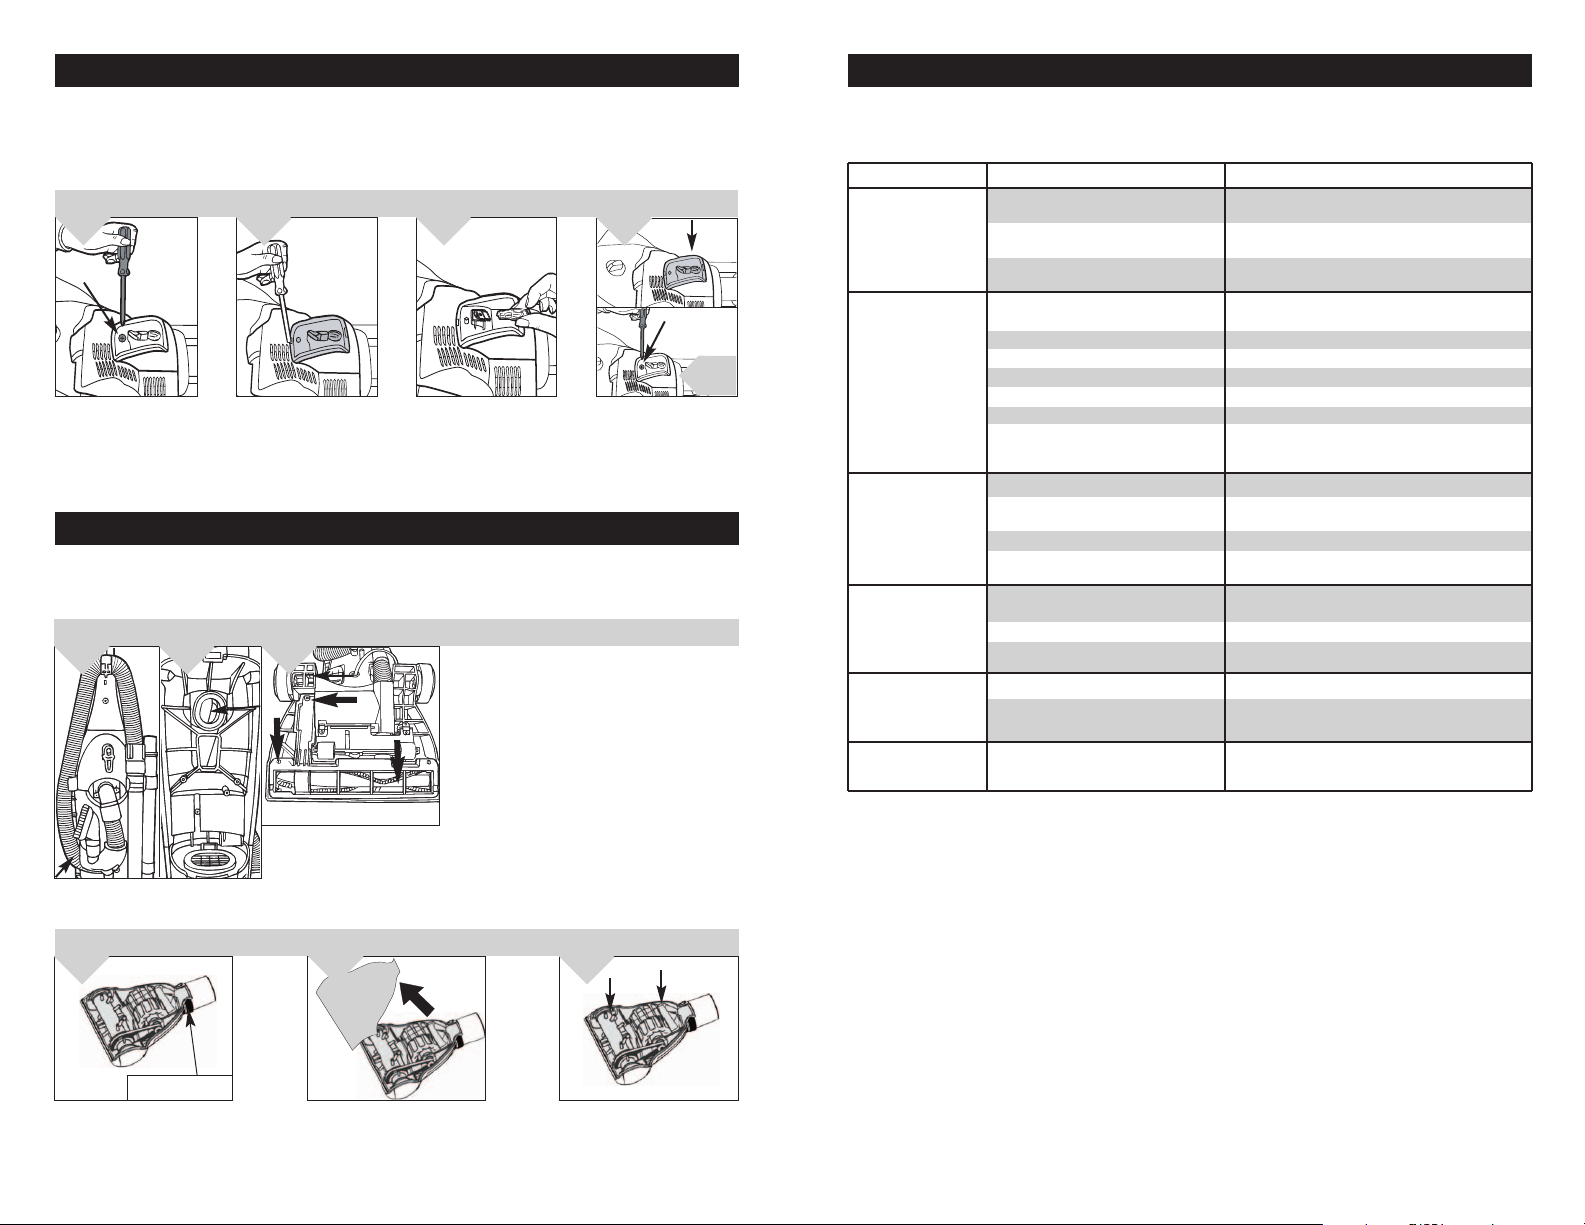
TROUBLESHOOTING GUIDE
WARNING: TO REDUCE RISK OF PERSONAL INJURY - UNPLUG CLEANER BEFORE SERVICING
PROBLEM POSSIBLE REASON POSSIBLE SOLUTION
Cleaner won’t run
1. Power cord not firmly plugged into
outlet.
2. Blown fuse or tripped breaker.
3. Needs service.
1. Plug unit in firmly.
2. Check fuse or breaker in home. Replace
fuse/reset breaker.
3. Take to service center or call 1-800-321-1134.
Lean cleaner handle
back. Remove the one
(1) screw.
Using the end of a
Flathead screwdriver,
gently pop open the
lens. Remove lens.
Pull bulb of of socket.
Do NOT twist. Gently
push bulb into socket to
replace.
Snap lens back into
place (Diagram 4).
Secure the headlight
lens by replacing the
one screw (Diagram 4a).
GENERAL MAINTENANCE
WARNING: TO REDUCE THE RISK OF INJURY FROM MOVING PARTS - UNPLUG BEFORE SERVICING.
DEBRIS
REMOVAL/HOSE
1.
2.
DEBRIS REMOVAL/POWER BRUSH TOOL
4.
DEBRIS REMOVAL/
NOZZLE GUARD
3.
5.
1. Check to see if dirt container is full; empty
if needed.
2. Plug cleaner in and check to see if there is
any suction at end of hose. If there is suction
at end of hose, move on to Diagram 4. If there
is no suction at the end of hose, follow these
steps: 1. Unwrap hose from caddy. Remove
obstruction. Check hose curve (near dust
brush) and remove obstruction (Diagram 1). 2.
Remove dirt container (Pg. 9) and check dirt
container inlet located on cleaner (Diagram 2).
3. Remove nozzle guard (see Diagram 3) by
removing the three (3) screws. Remove
obstructions.
6.
4a.
Cleaner won’t
pick-up or low
suction
Dust escaping
from cleaner
Cleaner tools won’t
pick-up
Headlight not
working
Cleaner is difficult
to push
1. Dirt container not installed correctly.
2. Dirt container full.
3. Brushroll worn.
4. Broken or worn belt.
5. Clogged filter.
6. Nozzle/dirt passage hose clogged.
7. Carpet height setting is incorrect.
1. Dirt container full.
2. Dirt container not installed correctly.
3. Hose not installed correctly.
4. Filter not installed completely.
1. Hose clogged.
2. Dirt container full.
3. Filter clogged.
1. Bulb burnt out.
2. Loose electrical wires.
1. Carpet height setting is incorrect.
1. Review dirt container removal & replacement Pg. 9.
2. Empty dirt container - Pg. 9.
Replace brushroll - Pg. 10.
3.
4. Replace belt - Pg. 10.
5. Remove filter and clean - Pg. 9.
6. Remove lower hose; remove obstruction - Pg. 11.
7. Set carpet height adjust lever to appropriate
setting for carpet being cleaned - Pg. 7.
1. Empty dirt container - Pg. 9.
2. Review dirt container removal & replacement Pg. 9.
3. Review hose installation - Pg. 6.
4. Review filter removal & replacement - Pg. 9.
1. Remove hose and tools; remove obstruction Pg. 11.
2. Empty dirt container - Pg. 9.
3. Clean filter - Pg. 9.
1. Replace bulb - Pg. 11.
2. Call 1-800-321-1134 for nearest authorized
®
Royal
Dealer.
1. Set carpet height adjust lever to appropriate
setting for carpet being cleaned - Pg. 7.
ANY OTHER SERVICING SHOULD BE DONE BY AN AUTHORIZED SERVICE REPRESENTATIVE
CUSTOMER SERVICE (1-800-321-1134)
In the event that further assistance is required, see your Yellow Pages for an authorized Royal®Dealer. Costs of any
transportation to and from any place of repair are to be paid by the owner. The service parts used in this unit are
easily replaced and readily available from an authorized Royal®Dealer or retailer. Always identify your cleaner by
the model number and manufacturing code when requesting information or ordering replacement parts. (The model
number appears on the bottom of the cleaner.)
LOCKING RING
Rotate locking ring 180˚ and
turn Power Brush Tool over.
Pivot lower housing and
remove clog.
11
To reassemble, be sure tabs
are engaged. Pivot the lower
housing closed.
12
Page 7

CET APPAREIL A ÉTÉ CONÇU EXCLUSIVEMENT POUR UN USAGE DOMESTIQUE.
MANUEL DU PROPRIÉTAIRE
Notice d’utilisation et d’entretien
• Veuillez lire attentivement
ces instructions avant
d’utiliser votre aspirateur.
• Nous pouvons vous aider à
assembler votre aspirateur et
à répondre à vos questions.
Pour cela composez le :
1-800-321-1134
(É.U. et Canada)
www.dirtdevil.com
INSTRUCTIONS DE SÉCURITÉ IMPORTANTES
Lorsque vous utilisez un appareil ménager, vous devez toujours suivre
certaines précautions de sécurité, dont les suivantes :
• LISEZ TOUTES LES INSTRUCTIONS AVANT D’UTILISER CET APPAREIL.
• RESPECTEZ TOUJOURS À LA LETTRE CES CONSIGNES DE SÉCURITÉ.
• METTRE L’ASPIRATEUR EN POSITION VERTICALE QUAND VOUS
UTILISEZ LE TUYAU ET LES ACCESSOIRES.
• NE LAISSEZ PAS L’APPAREIL SANS SURVEILLANCE QUAND IL EST
BRANCHÉ.
• VÉRIFIEZ RÉGULIÈREMENT LES FILTRES À NETTOYER OU À REMPLACER.
• AVERTISSEMENT : N’UTILISEZ PAS D’OBJETS TRANCHANTS POUR
NETTOYER LE TUYAU : ILS POURRAIENT L’ENDOMMAGER.
• ENLEVEZ LE ROULEAU DE TEMPS EN TEMPS ET NETTOYEZ LES
SALETÉS QUI ENCOMBRENT SES EXTRÉMITÉS AFIN QU’IL CONTINUE À
TOURNER SANS PROBLÈME.
• AVERTISSEMENT : LES CORDONS, FILS ÉLECTRIQUES ET/OU CÂBLE
FOURNIS AVEC CE PRODUIT CONTIENNENT DES PRODUITS CHIMIQUES
Y COMPRIS DU PLOMB OU DES COMPOSÉS DU PLOMB CONNU PAR
L’ÉTAT DE CALIFORNIE POUR SON EFFET CANCÉRIGÈNE, POUVANT
ENTRAÎNER DES MALFORMATIONS CONGÉNITALES OU ENDOMMAGER
LES ORGANES DE REPRODUCTION. LAVEZ-VOUS LES MAINS APRÈS
TOUTE UTILISATION.
AVERTISSEMENT:
L’assemblage de l’appareil
comprend des petites pièces.
Ces dernières présentent un
danger d’étouffement.
Enregistrement en Garantie
• Sur Internet : www.dirtdevil.com
• Téléphone : 1-800-321-1134
• Adresse postale :
Royal Appliance Mfg
7005 Cochran Rd.
Glenwillow, Ohio 44139
Consignez les renseignements ci-dessous pour
pouvoir les consulter rapidement.
Nº de modèle :
Code de fabrication :
(Le code de fabrication se trouve sur la partie inférieure
arrière de l’aspirateur)
2004 Tous droits réservés # 1-113821-000
11/04
AVERTISSEMENT : POUR EMPÊCHER LES
CHOCS ÉLECTRIQUES OU LES BLESSURES :
• Ne laissez jamais l’appareil sans surveillance quand il est branché. Débranchezle quand il n’est pas utilisé ainsi qu’avant de procéder à son entretien.
• N’utilisez pas l’appareil à l’extérieur ou sur des surfaces mouillées. Vous pourriez vous électrocuter.
• Ne laissez pas les enfants jouer avec l’appareil. Exercez une surveillance étroite
quand l’appareil est utilisé par des enfants ou à proximité de ceux-ci.
• Utilisez l’appareil en respectant à la lettre les consignes de ce manuel. Utilisez
seulement les accessoires recommandés par le fabricant.
• N’utilisez pas l’appareil si la fiche ou le cordon est endommagé. Si l’aspirateur
ne fonctionne pas comme prévu, s’il est tombé, s’il a été endomma
l’extérieur ou s’il est tombé dans l’eau, expédiez-le à un centre de réparation
pour qu’il soit vérifié. A
de répara
• Ne tirez pas l’appareil par son cordon, ne vous servez pas du cordon comme
poignée, ne fermez pas de portes sur le cordon et ne tirez pas le cordon sur
des coins ou des bords tranchants. Évitez de passer l’a
d’alimentation. Tenez le cordon hors de portée des surfaces chauffées.
tion le plus proche.
ppelez le 1-800-321-1134 pour sa
2
voir quel est le centre
ppareil sur le cordon
gé, laissé à
Page 8

• Ne tirez pas l’appareil par son cordon, ne vous servez pas du cordon comme
poignée, ne fermez pas de portes sur le cordon et ne tirez pas le cordon sur
des coins ou des bords tranchants. Évitez de passer l’appareil sur le cordon
d’alimentation. Tenez le cordon hors de portée des surfaces chauffées.
• Ne débranchez pas l’appareil en tirant sur le cordon. Pour le débrancher, tirez
sur la fiche et non sur le cordon.
• Ne manipulez pas la fiche ou l’aspirateur avec des mains mouillées.
• N’insérez pas d’objets dans les ouvertures. Évitez d’utiliser l’appareil si les
ouvertures sont obstruées; gardez les ouvertures exemptes de poussière, de
peluches, de cheveux et de tout ce qui pourrait réduire le débit d’air.
• Gardez les cheveux, les vêtements amples, les doigts et toute partie du corps à
l’écart des ouvertures et des pièces en mouvement.
• Évitez d’aspirer tout objet qui brûle ou fume, comme les cigarettes, les
allumettes et les cendres incandescentes.
• Ne l’utilisez pas sans le godet à-poussière ni les filtres.
• Éteignez toutes les commandes avant de débrancher l’appareil.
• Faites bien attention quand vous nettoyez les marches d’escalier.
• N’aspirez pas les liquides inflammables ou combustibles comme l’essence;
n’utilisez pas l’appareil en présence de ces matériaux.
• Gardez l’aspirateur au sol. Seuls les aspirateurs à main peuvent être posés sur
les meubles.
• L’aspira
teur doit être en position verticale pour pouvoir lever la brosse rotative et
nettoyer le plancher.
• N’utilisez jamais de rallonge électrique avec cet aspirateur.
• Rangez l’aspira
teur à l’intérieur
. Rangez l’aspirateur a
près son utilisation pour
ne pas trébucher dessus.
• L’utilisation d’une tension inadéquate peut endommager le moteur et blesser
l’utilisateur. La tension adéquate est indiquée sur la plaque de l’appareil.
• Débranchez l’appareil avant de connecter la *Brosse Power.
*NON DISPONIBLE SUR TOUS LES MODÉLES
VEUILLEZ CONSERVER CES INSTRUCTIONS
FÉLICITATIONS !
Vous êtes désormais l’heureux propriétaire d’un Dirt Devil®. Nous sommes
persuadés que cet appareil vous satisfera pendant plusieurs années.
Nous avons conçu ce produit pour vous faciliter la vie.
Nous sommes très fiers de nos produits et nous espérons que vous serez
aussi satisfait que nous de leur qualité et de leur performance.
Merci d’utiliser les produits
Visitez notre site Web à www.dirtdevil.com.
Dirt Devil®.
TABLE DES MATIÈRES
Consignes de sécurité . . . . . . . . . . . . . . . . . . . . . . . . . . . . . . Page 2, 3
Caractéristiques. . . . . . . . . . . . . . . . . . . . . . . . . . . . . . . . . . . Page 5
Assemblage de l’appareil. . . . . . . . . . . . . . . . . . . . . . . . . . . . Page 6, 7
Assembla
Assemblage de la poignée . . . . . . . . . . . . . . . . . . . . . . . Page 6
Ensemble Brosse Power et panier à accessoires. . . . . . . Page 6
Assemblage du dispositif de rangement des
accessoires . . . . . . . . . . . . . . . . . . . . . . . . . . . . . . . . . . Page 6
Installation du godet à poussière. . . . . . . . . . . . . . . . . . . Page 7
tion de l’appareil. . . . . . . . . . . . . . . . . . . . . . . . . . . . . . Page 7, 8
Utilisa
Netto
Nettoyage au-dessus du sol . . . . . . . . . . . . . . . . . . . . . . Page 8
Godet à poussière et filtre : Enlèvement et remplacement . . . Page 9
Courroie ou brosse Dépose et remplacement . . . . . . . . . . . . Page 10
Ampoule : Dépose et remplacement . . . . . . . . . . . . . . . . . . . Page 11
Entretien Général . . . . . . . . . . . . . . . . . . . . . . . . . . . . . . . . . . Page 11
Guide de dépannage . . . . . . . . . . . . . . . . . . . . . . . . . . . . . . . Page 12
ge du suceur sur le corps de l’appareil . . . . . . Page 6
yage du sol/tapis . . . . . . . . . . . . . . . . . . . . . . . . . . Page 7
AVERTISSEMENT :
Afin de réduire les risques de choc électrique, cet appareil est muni d’une fiche polarisée
une tige est plus large que l’autre). Cette fiche ne peut être insérée dans une prise de
courant polarisée que dans un sens. Si la fiche ne s’insère pas complètement dans la prise,
inversez-la. Si elle ne s’insère toujours pas, demandez à un électricien qualifié d’installer
la prise appropriée. Ne modifiez jamais la fiche.
Votre aspirateur est muni d'un protecteur thermique afin de couper le moteur en
cas de surchauffe. Si cela se produit, arrêtez l'aspirateur et débranchez-le.
Examinez le système d'évacuation, d'aspiration, le tuyau, le godet à poussière et le
deuxième filtre pour détecter toute obstruction. Videz le godet à poussière et
nettoyez les filtres. Au bout de 30 minutes, le moteur aura refroidi et l'aspirateur sera
de nouveau prêt à être utilisé. REMARQUE : L’aspirateur doit demeurer à l’arrêt pen-
dant la période de refroidissement de 30 minutes.
3
GARANTIE
Royal Appliance Mfg. Co. garantit au consommateur que cet aspirateur est exempt de vices de matériau ou de
fabrication pendant 1 année à compter de sa date d’achat d’origine. Conservez votre reçu d’achat d’origine
pour justifier la date d’entrée en vigueur de la période de garantie.
Si l’aspirateur fait défaut pendant la période couverte par la garantie, nous réparerons ou remplacerons gratuitement
toute pièce défectueuse. L’appareil entier doit être retourné port payé à n’importe quel point de vente ou de service
en vertu des garanties autorisé ROYAL®. Veuillez inclure une description détaillée du problème, la date d’achat, une
copie du reçu d’achat d’origine ainsi que vos nom, adresse et numéro de téléphone. Si aucun centre de service ne se
trouve dans votre région, communiquez avec l’usine au numéro 1-800-321-1134, au CANADA et aux ÉTATS-UNIS.
N’utilisez que les pièces de rechange Royal®authentiques.
Cette garantie ne couvre pas l’usure inhabituelle, les dommages causés par les accidents ou un usage abusif
de l’aspirateur. Elle ne couvre pas non plus les brosses, les courroies plates, les sacs, les ampoules ou les
dommages au ventilateur. Cette garantie ne couvre pas les réparations non autorisées. Cette garantie vous
confère des droits reconnus par la loi et peut-être aussi d’autres droits. (Les autres droits peuvent varier d’un
État à l’autre aux États-Unis.)
IMPORTANT : N’UTILISEZ QUE LES PIÈCES DE RECHANGE ROYAL®AUTHENTIQUES.
REMARQUE : RENVOYEZ LA FICHE DE GARANTIE POUR ENREGISTRER
VOTRE ASPIRATEUR
4
Page 9

AVANT
CARACTÉRISTIQUES
ARRIÈRE
ASSEMBLAGE
OUTIL NÉCESSAIRE : TOURNEVIS À POINTE CRUCIFORME OU À TÊTE PLATE
ASSEMBLAGE DU SUCEUR SUR LE CORPS DE L’APPAREIL
1.
1
VUE
AVANT
2
14
13
12
3
4
5
6
7
8
21
9
10
11
20
19
18
15
16
17
18
DE
L’ASPI-
RATEUR
POIGNÉE (ARRIÈRE) ET ENSEMBLE
BROSSE POWER ET PANIER À
ACCESSOIRES (AVANT)
1.
Mettez la poignée
supérieure en haut de
l’aspirateur.
Glissez le panneau
arrière sur la base.
2.
Insérez la fiche de la
poignée dans la partie
avant de l’aspirateur.
2.
3.
Insérez la vis (1) à
l’arrière de la poignée
et serrez, en vous
assurant de fixer la
fiche de la poignée
solidement.
Pour fixer l'ensemble,
insérez deux (2) vis
sur la partie avant du
panneau arrière.
INSTALLATION
DE LA BROSSE
POWER
4.
Accrochez la Brosse
Power à l’avant du
panier à accessoires.
AVANT
1. Manche de la poignée
2. Poignée
3. Brosse Power
4. Tuyau
5. Loquet du godet à poussière
6. Poignée de transport
7. Godet à poussière transparent
8. Filtre du godet à poussière
Phare avant
9.
Levier de réglage de la hauteur
10.
Pare-choc
11.
12. Rallonge
13. Suceur plat (dans la rallonge).
ARRIÈRE
14. Attaches pour tuyau
15. Guide du cordon
16. Dispositif d’enroulement du
cordon à déclenchement rapide
17. Cordon d’alimentation long
18. Roues
19. Pédale de dégagement de la
poignée
20. Pédale marche/arrêt
21. Brosse à épousseter
5
POUR FIXER LE TUYAU
1.
Enroulez le tuyau à l’arrière du support de tuyau
(Schéma 1). Insérez la rallonge de tuyau sur le
côté droit de l’aspirateur (Schéma 1a).
1a.
RANGEMENT DES ACCESSOIRES
2.
ARRIÈRE
Comment fixer les accessoires : (a) Glissez la brosse
à épousseter dans le taquet situé sur le support à
accessoires inférieur avec les poils de la brosse
tournés vers l’extérieur (Schéma 2). (b) Glissez la rallonge/
suceur dans l’encoche ronde du côté droit du support
à accessoires (Schéma 2a).
6
2a.
AVANT
Page 10

ASSEMBLAGE : SUITE
FONCTIONNEMENT DE L’ASPIRATEUR : SUITE
INSTALLATION DU COUVERCLE DU
INSTALLATION DU GODET À POUSSIÈRE
GODET À POUSSIÈRE
3.
FENTE
LANGUETTE
Alignez la languette
du couvercle sur
l’encoche du godet à
poussière. Appuyez
sur le couvercle pour
l’enclencher.
4.
LANGUETTE
FENTE
4a.
Placez la languette au fond
du godet à poussière dans
la fente rectangulaire
située sur l’aspirateur
(Schéma 4), et appuyez
pour enclencher (Schéma
4a).
FONCTIONNEMENT DE L’ASPIRATEUR
DÉCLENCHEUR DU CORDON
1.
ATTENTION : L’agitateur de la brosse continues à pivoter lorsque le tuyau est enlevé ou en marche tout le
temps lorsque l’aspirateur fonctionne. Gardez les cheveux, les vêtements amples, et toute partie du corps
à l’écart de la zone de la brosse lorsque l’aspirateur est en marche.
L’aspirateur doit être en position verticale pour pouvoir lever la brosse rotative et nettoyer au-dessus du sol.
PÉDALE
MARCHE/ARRÊT
Tournez le déclencheur
instantané du cordon pour
faciliter l'enlèvement du
cordon. Rangez le cordon
dans le guide du cordon
(voir caractéristiques à la
page 5) pour ne pas nuire
pendant l'utilisation.
PÉDALE DE
DÉGAGEMENT DE LA
POIGNÉE
LEVIER DE RÉGLAGEDE LA HAUTEUR
2.
Tournez le bouton de
réglage de la hauteur de
manière à correspondre
à la surface à nettoyer.
IMPORTANT : Pour
faciliter le réglage,
mettez l’aspirateur en
position verticale.
NETTOYAGE DU
SOL/DES TAPIS
NETTOYAGE AU-DESSUS DU SOL
1.
Mettez l’aspirateur en position
vertical pour lever la brosse.
2.
Retirez le tuyau du support à
accessoires.
RALLONGE
4.
Si vous avez besoin d’une
longueur supplémentaire,
utilisez la rallonge et le
suceur. Retirez le suceur
plat de la rallonge. Utilisez
la rallonge et le suceur plat
ensemble ou séparément.
3.
poignée du tuyau et appuyez fermement Pour
retirer un accessoire, tournez-le et retirez-le avec
précaution.
POIGNÉE DE TRANSPORT
1.
Utiliser la poignée de
transport située sur le
godet à poussière pour
transporter l’aspirateur
d’une pièce à l’autre.
REMARQUE : Vérifiez
que le godet à poussière
est fixé solidement
AVANT de soulever
l’aspirateur.
Choisissez les
accessoires
selon vos besoins
ou utilisez
uniquement le
tuyau. Insérez
simplement les
accessoires sur
l'extrémité de la
rallonge ou de la
3.
Branchez le cordon dans une
prise de courant. Mettez
l’aspirateur en marche en
appuyant sur la pédale de
marche située à l’arrière de
l’aspirateur du côté gauche.
4.
Pour dégager la poignée,
appuyez sur la pédale de
dégagement de la poignée
située sur la partie inférieure
de l’aspirateur.
7
1.
a
(c) appuyez sur la pédale de déclenchement
de la poignée pour nettoyer sous les meubles.
REMARQUE : Les franges de tapis peuvent
s’emmêler dans le rouleau de brosse de l’aspirateur lorsque celui-ci tourne. Être prudent
lors du passage de l’aspirateur sur des tapis
pourvus de franges.
Déplacez la
poignée et
réglez-la à la
b
position
souhaitée
lorsque vous
(a) rangez
c
l’aspirateur, (b)
faites-le
fonctionner, et
8
Page 11

5
MODÈLE DE COURROIE
GODET À POUSSIÈRE ET FILTRE : RETRAIT ET RÉINSTALLATION
F1
TYPE DE FILTRE
AVERTISSEMENT : POUR ÉVITER DE VOUS BLESSER AVEC LES PIÈCES EN MOUVEMENT, DÉBRANCHEZ
L’APPAREIL AVANT DE PROCÉDER À SON ENTRETIEN.
REMARQUE : Débranchez l’aspirateur avant de changer le filtre.
REMARQUE : Pour un meilleur rendement, remplacez le filtre chaque année.
Pour obtenir un filtre de rechange (n° de pièce 3-JC0280-000) veuillez appeler le 1-800-321-1134
ou visitez le site www.dirtdevil.com pour connaître le centre de service le plus proche.
DÉPOSE ET REMPLACEMENT DE LA COURROIE OU DU ROULEAU-BROSSE
OUTIL NÉCESSAIRE : TOURNEVIS À POINTE CRUCIFORME
AVERTISSEMENT : POUR ÉVITER DE VOUS BLESSER AVEC LES PIÈCES EN MOUVEMENT, DÉBRANCHEZ
POUR ENLEVER LA COURROIE
L’APPAREIL AVANT DE REMPLACER LA COURROIE OU LE ROULEAU-BROSSE.
Pour remplacer la courroie modèle 5, veuillez appeler le 1-800-321-1134 ou visiter
notre site à www.
dirtdevil.com pour connaître le revendeur le plus proche.
POUR VIDER ET NETTOYER LE GODET À POUSSIÈRE
1.
Appuyez sur le loquet situé audessus du godet à poussière et
enlever le godet à poussière de
l’aspirateur.
4.
Nettoyez le filtre et videz
complètement le godet à
poussière. Reportez-vous à la
note sur l' « Entretien régulier
» ci-dessous en ce qui concerne
les instructions sur le nettoyage
du filtre.
2.
Enlevez le godet à poussière.
5.
Remettez le filtre dans le godet
à-poussière. Enfoncez le filtre
pour prévenir toute fuite de
poussière. Remettez le godet à
poussière dans l’aspirateur
(voir page 7, Installation du
godet à poussière).
3.
Tenez le godet à poussière et
saisissez le filtre par le haut.
Tournez le filtre vers le haut
et sortez-le.
1.
Posez l’aspirateur à plat retournez-le
pour exposer la base du suceur. La base
doit être à plat et tournée vers le haut.
Pour enlever le dispositif de protection
du suceur, utilisez un tournevis à pointe
cruciforme pour dévisser les trois (3)
vis. Les flèches indiquent l’emplacement
des vis.
2.
Tirez et soulevez le dispositif
de protection du suceur.
POUR REMPLACER LA COURROIE OU LE ROULEAU-BROSSE
4.
Glissez la courroie sur l’arbre
de moteur.
ARBRE DU
MOTEUR
7.
5.
Placez la nouvelle courroie
dans la partie du rouleaubrosse n’ayant pas de crins.
8.
6.
rouleau-brosse à la main pour vous assurer que la
courroie est alignée correctement.
3.
Les flèches indiquent
l’emplacement des vis.
Soulevez et enlevez le
rouleau-brosse. Jetez la
courroie usagée.
Une fois la nouvelle
courroie installée,
tirez et glissez le
rouleau-brosse
dans le suceur en
veillant à ce que les
extrémités du
rouleau-brosse
soient orientées
6a.
correctement
(illustration 6a).
Faites pivoter le
9.
*ENTRETIEN REGULIER : À chaque fois que vous videz le godet à poussière, nettoyez le filtre. Cognez le filtre
fermement contre l’intérieur d’une poubelle jusqu’à ce que la poussière cesse de s’en échapper. (Le filtre se
décolorera après son utilisation, ceci n’altérera pas son rendement.) Ne brossez pas le filtre. Les instructions de
nettoyage peuvent varier selon les conditions de saleté. Dans certains cas, il sera nécessaire de nettoyer plus
ou moins le filtre. Nous recommandons de changer la pièce de F1 filtre réf. 3-JCO280-000 une fois par an.
Veuillez utiliser l’étiquette de rappel située sur le bouchon du filtre pour noter la date de remplacement.
9
Remettez en place le disposi
tif de protection du suceur.
FENTES
LANGUETTES
-
Fixez-le en alignant les trois
(3) languettes sur les
encoches de la base.
10
Remettez les trois (3) vis pour
fixer le dispositif de protection
du suceur.
Page 12

AMPOULE : DÉPOSE ET REMPLACEMENT
OUTIL NÉCESSAIRE : TOURNEVIS À TÊTE PLATE
AVERTISSEMENT : POUR REDUIRE LE RISQUE DE CHOC ELECTRIQUE : DEBRANCHEZ L’ASPIRATEUR
Cet aspirateur utilise une ampoule automobile courante : nº 906, 13,0 volts. Pour acheter une ampoule
composez le 1-800-321-1134 ou contactez votre magasin de pièces automobiles.
1.
AVANT D’ENLEVER ET DE REMPLACER L’AMPOULE.
2.
3.
4.
GUIDE DE DÉPANNAGE
AVERTISSEMENT : POUR RÉDUIRE LE RISQUE DE SE BLESSER, DÉBRANCHER L’ASPIRATEUR AVANT LE SERVICE
PROBLEME CAUSE POSIBLE SOLUTION POSIBLE
L’appareil ne
fonctionne pas
1. La fiche du cordon d’alimentation
n’est pas bien insérée dans la
prise de courant.
2. Un fusible est grillé ou le disjoncteur
est déclenché.
3. L’appareil doit être entretenu.
1. Branchez fermement le cordon d’alimentation.
2. Vérifiez le fusible ou le disjoncteur. Remplacez
le fusible ou réenclenchez le disjoncteur.
3. Apportez l’appareil au centre de réparation
ou téléphonez au 1-800-321-1134.
Basculez la poignée de
l’aspirateur. Enlevez la
vis (1) .
Au moyen d’un
tournevis à tête plate,
ouvrez doucement le
verre de la lampe.
Enlevez le verre.
Tirez sur l’ampoule pour
la sortir de la douille. Ne
la tournez pas. Insérez
soigneusement l’ampoule
dans la douille.
Remettez le verre de la
lampe en place (Schéma
4). Fixez le verre de la
lampe en remettant l’une
des vis (Schéma 4a).
ENTRETIEN GÉNÉRAL
AVERTISSEMENT : POUR RÉDUIRE LE RISQUE DE LÉSION À CAUSE DE PIÈCES EN MOUVEMENT,
POUR ENLEVER LES
SALETÉS /TUYAU
1.
POUR ENLEVER LES SALETÉS/BROSSE POWER
4.
DÉBRANCHEZ L’PPAREIL AVANT DE FAIRE SON ENTRETIEN.
POUR ENLEVER LA SALETÉ/DISPOSITIF DE
PROTECTION DU SUCEUR
2.
3.
1. Vérifiez si le godet à poussière est plein, videz le
si nécessaire.
2. Branchez l’aspirateur et vérifiez s’il se produit une
aspiration à l’extrémité du tuyau. Si l’aspiration se
produit à l’extrémité du tuyau, passez à Schéma
4. Si le tuyau n’aspire pas, suivez les instructions
ci-après : 1. Déroulez soigneusement le tuyau du
support. Dégagez l’obstruction. Vérifiez la partie
courbe du tuyau (près de la brosse à épousseter)
et dégagez l’obstruction (Schéma 1). 2. Enlevez le
godet à poussière (page 9) et vérifiez l’orifice
d’admission du godet à poussière situé sur
l’aspirateur (Schéma 2).
3. Enlevez le dispositif de protection du suceur
(Schéma 3) en enlevant les trois (3) vis. Dégagez
l’obstruction.
5.
4a.
L’appareil n’aspire
pas ou n’a qu’une
faible succion
De la poussière
s’échappe de
l’aspirateur
Les accessoires
n’aspirent pas la
poussière
La lumière avant
ne fonctionne pas
L’aspirateur est
difficile à pousser
1. Le godet à poussière n’est pas
installé correctement.
2. Godet à poussière plein.
3. Le rouleau-brosse est usé.
4. La courroie est cassée ou usée.
5. Le filtre est obstrué.
6. Le suceur ou le tuyau d’aspiration
est obstrué.
7. Mauvais réglage de la hauteur de
l’appareil.
1. Godet à poussière plein.
2. Le godet à poussière n’est pas
installé correctement.
3. Le tuyau n’est pas installé
correctement.
4. Le filtre n’est pas installé
complètement.
1. Le tuyau est obstrué.
Godet à poussière plein.
2.
3. Filtre obstrué.
1. L’ampoule est grillée.
2. Les fils électriques sont desserrés.
1. Mauvais réglage de la hauteur de
l’appareil.
1. Revoir l’enlèvement et la réinstallation du
godet à poussière - Pg 9.
2. Vider le godet à poussière - Pg. 9.
Changez le rouleau brosse - Pg. 10.
3.
4. Changez la courroie - Pg. 10.
5. Retirez le filtre et nettoyez-le - Pg. 9.
6. Enlevez le tuyau inférieur, dégagez l’obstruction Pg. 11.
7. Régler la hauteur de l’appareil pour l’épaisseur
du tapis à nettoyer - Pg. 7.
1. Vider le godet à poussière - Pg. 9.
2. Revoir l’enlèvement et la réinstallation du
godet à poussière - Pg. 9.
Consultez à nouveau la section sur
3.
l’installation du tuyau - Pg. 6.
4. Consultez à nouveau la section sur l’installation
du filtre - Pg. 9.
1. Enlever le tuyau et les accessoires, dégager
les obstructions - Pg. 11.
2. Vider le godet à poussière - Pg. 9.
3. Nettoyer le filtre - Pg. 9.
1. Changer l’ampoule - Pg. 11.
2. Appeler le 1-800-321-1134 pour connaître
le dépositaire Royal
1. Régler la hauteur de l’appareil pour
l’épaisseur du tapis à nettoyer - Pg. 7.
®
le plus proche.
TOUT AUTRE ENTRETIEN DOIT ÊTRE ÉFFECTUÉ PAR UN REPRÉSENTANT AUTORISÉ
SERVICE À LA CLIENTÈLE : (1-800-321-1134)
Pour obtenir de l’aide supplémentaire, consultez les Pages jaunes afin de connaître les dépositaires Royal®autorisés.
Les coûts de transport aller-retour à partir de l’endroit où sont effectuées les réparations doivent être défrayés par
le propriétaire de l’appareil. Les pièces réparables utilisées dans cet appareil peuvent facilement être remplacées
et sont disponibles auprès des dépositaires ou revendeurs Royal
numéro du modèle et le code de fabrication lorsque vous demandez des informations ou que vous commandez des
pièces de rechange. (Le numéro de modèle figure au bas de l’appareil).
®
autorisés. Identifiez toujours l’aspirateur par le
ANNEAU DE VERROUILLAGE
Faites pivoter l’anneau de
verrouillage à 180° et
retournez la Brosse Power.
Faites pivoter le boîtier
inférieur et dégager l’obstruction.
11
Pour assembler de nouveau, veillez à engager
les attaches et faites pivoter le boîtier inférieur
pour le fermer.
12
Page 13

ESTA ASPIRADORA ESTÁ DISEÑADA PARA USO DOMÉSTICO SOLAMENTE.
MANUAL DEL PROPIETARIO
Instrucciones de
Funcionamiento y Servicio
• Por favor lea estas
instrucciones con cuidado
antes de usar su aspiradora.
• Permítanos ayudarle a
ensamblar su aspiradora o
a contestar sus preguntas,
llame al:
1-800-321-1134
(EE.UU. y Canadá)
www.dirtdevil.com
CUANDO USE UN ELECTRODOMÉSTICO SE
DEBEN SEGUIR SIEMPRE LAS PRECAUCIONES
BÁSICAS, INCLUYENDO LAS SIGUIENTES:
Cuando use un electrodoméstico se deben seguir siempre las precauciones
básicas, incluyendo las siguientes:
• LEA TODAS LAS INSTRUCCIONES ANTES DE USAR ESTE APARATO.
• SIEMPRE SIGA ESTAS INSTRUCCIONES DE SEGURIDAD.
• PONGA LA ASPIRADORA EN POSICIÓN VERTICAL CUANDO USE LA
MANGUERA Y LOS ACCESORIOS.
• NO DEJE LA ASPIRADORA SIN VIGILANCIA CUANDO ESTÉ CONECTADA.
• REVISE CON FRECUENCIA LOS FILTROS PARA LIMPIARLOS O REEMPLAZARLOS.
• ADVERTENCIA: NO UTILICE OBJETOS CON FILO PARA LIMPIAR LA
MANGUERA, DEBIDO A QUE PUEDEN CAUSAR DAÑO.
• DE VEZ EN CUANDO RETIRE EL CEPILLO Y LIMPIE LOS RESIDUOS DE
LAS TAPAS FINALES PARA PERMITIR LA ROTACIÓN UNIFORME DEL
CEPILLO.
• ADVERTENCIA: LOS CORDONES, ALAMBRES Y/O CABLES SUMINISTRADOS
CON ESTE PRODUCTO CONTIENEN PRODUCTOS QUÍMICOS QUE INCLUYEN
PLOMO O COMPUESTOS DE PLOMO ACERCA DE LOS CUALES SE HA
SABIDO EN EL ESTADO DE CALIFORNIA, PRODUCEN CÁNCER, DEFECTOS
DE NACIMIENTO U OTROS DAÑOS REPRODUCTIVOS. LÁVESE LAS
MANOS DESPUÉS DE SU USO.
ADVERTENCIA:
El ensamble de la aspiradora
puede inc
Las partes pequeñas pueden
presentar riesgo de ahogamiento.
luir partes pequeñas.
©2004 Todos los derechos reservados # 1-113821-000
Registro de Garantía
• En línea en: www.dirtdevil.com
• Teléfono: 1-800-321-1134
• Dirección: Royal Appliance Mfg.
7005 Cochran Rd.
Glenwillow, Ohio 44139
Para tener una referencia rápida, anote por
favor la información de su aspiradora aquí.
No. de Modelo:
Código del Fabricante:
(El código del fabricante aparece en la parte posterior e
inferior de la aspiradora).
11/04
ADVERTENCIA: PARA REDUCIR EL RIESGO DE
INCENDIO, CHOQUE ELÉCTRICO O LESIONES:
• No deje solo el aparato cuando esté conectado. Desconéctelo de la toma de
corriente cuando no lo use y antes de darle servicio.
• No lo utilice en exteriores o en superficies mojadas. Puede ocurrir un choque
eléctrico.
• No permita que la aspiradora se use como juguete. Ponga mucha atención
cuando la use un niño o cerca de niños.
• Úsela solamente como se indica en este manual. Use solamente los accesorios
recomendados por el fabricante.
• No la utilice con el cordón eléctrico o la clavija dañados. Si el aparato no trabaja
como debiera, se ha caído, dañado, dejado en exteriores o caído en agua,
regréselo a un centro de servicio para su inspección. Llame al 1-800-321-1134
para encontrar el centro de servicio más cercano a su domicilio.
No tire ni lo transporte tomándole del cordón eléctrico, no utilice el cordón eléctrico
•
como asa, no cierre la puerta sobre el cordón eléctrico, ni tire del mismo alrededor
de esquinas o rebordes agudos. No pase el aparato sobre el cordón eléctrico.
Mantenga el cordón eléctrico lejos de superficies calientes.
No lo desconecte tirando del cordón eléctrico. P
•
no el cordón eléctrico.
E2
ara desconectarlo, tome la c
lavija,
Page 14

• No tome la clavija o el aparato con las manos mojadas.
• No coloque objetos en las aberturas. No lo use con una abertura bloqueada;
manténgalo libre de polvo, pelusa, pelo y cualquier cosa que pueda reducir el
flujo de aire.
• Mantenga lejos de las aperturas y partes móviles, el pelo, ropa suelta,
dedos y todas las partes del cuerpo.
• No aspire objetos que estén quemándose o emitiendo humo, tales como
cigarrillos, cerillos o cenizas calientes.
• No lo use sin tener en su sitio el recipiente de polvo y los filtros.
• Apague todos los controles antes de desconectar.
• Tenga más cuidado cuando aspire escaleras.
• No lo use para aspirar líquidos inflamables o combustibles, tales como
gasolina, ni lo use en áreas donde pudieran estar presentes.
• Mantenga la aspiradora en el suelo. Solamente las aspiradoras de mano
pueden ser colocadas sobre muebles.
• La aspiradora debe estar en posición vertical para levantar de la alfombra al
cepillo giratorio cuando haga limpieza por encima del nivel del piso.
• No use una extensión eléctrica al usar esta aspiradora.
• Guarde la aspiradora en interiores. Guárdela después de su uso para evitar
accidentes de tropiezos.
• Usar el voltaje inapropiado puede resultar en daño al motor y posibles
lesiones al usuario. El voltaje apropiado está listado en la placa de la
aspiradora.
• Desconecte la aspiradora antes de conectar el *Power Brush Tool.
*NO DISPONIBLE EN LOS TODOS LOS MODELOS
GUARDE ESTAS INSTRUCCIONES
ADVERTENCIA:
Para reducir el riesgo de choque eléctrico, este aparato tiene una clavija polarizada (una
hoja más ancha que la otra.) Esta clavija encajará en una toma de corriente polarizada de
una manera solamente. Si la clavija no encaja totalmente en la toma de corriente, invierta la clavija. Si aún no encaja, póngase en contacto con un electricista calificado para instalar la toma de corriente apropiada. No modifique la clavija de ninguna manera.
Su aspiradora contiene un dispositivo de protección termal para apagar el motor y
así evitar el recalentamiento. Si esto sucede apague el interruptor y desconecte la
aspiradora. Inspeccione la descarga, la entrada y los filtros por si hubiera atascos.
acíe el recipiente de polvo y limpie los filtros. Después de a
V
minutos el motor se habrá enfriado y la aspiradora estará lista para usar.
aspiradora deberá permanecer desconectada durante el período de enfriamiento de
30 minutos.
E3
proximadamente 30
NOTA: La
FELICITACIONES
Usted es ahora el orgulloso propietario de una Dirt Devil®. Confiamos en que
su nueva adquisición le ofrecerá muchos años de satisfacción.
Nuestra compañía diseñó y desarrolló este producto teniéndolo a usted en
mente.
Estamos muy orgullosos de nuestros productos y esperamos que usted esté
igualmente satisfecho con su calidad y rendimiento.
Gracias por su apoyo a los productos Dirt Devil®.
Visite nuestro sitio Web en www.dirtdevil.com
ÍNDICE
Instrucciones de Seguridad
Características . . . . . . . . . . . . . . . . . . . . . . . . . . . . . . . . . . . . Página 5
Cómo Ensambla. . . . . . . . . . . . . . . . . . . . . . . . . . . . . . . . . . . Página 6, 7
Ensamblaje del Cuerpo a la Boquilla . . . . . . . . . . . . . . . . Página 6
Ensamblaje del Asa . . . . . . . . . . . . . . . . . . . . . . . . . . . . . Página 6
Ensamblaje del Contenedor del Power Brush Tool . . . . . . . Página 6
Ensamblaje del Compartimiento de Accesorios . . . . . . . . . Página 6
Instalación del Recipiente de Polvo . . . . . . . . . . . . . . . . Página 7
Cómo Funciona
. . . . . . . . . . . . . . . . . . . . . . . . . . . . . . . . . . . Página 7, 8
Limpieza de alfombras / piso
Limpieza por encima del nivel del piso . . . . . . . . . . . . . . Página 8
Recipiente de Polvo y Filtro: Retiro y Reemplazo. . . . . . . . . . . Página 9
Banda o Cepillo: Retiro y Reemplazo . . . . . . . . . . . . . . . . . . . Página 10
Foco: Retiro y Reemplazo. . . . . . . . . . . . . . . . . . . . . . . . . . . . Página 11
Mantenimiento General . . . . . . . . . . . . . . . . . . . . . . . . . . . . . Página 11
Guía de Solución de Problemas . . . . . . . . . . . . . . . . . . . . . . . Página 12
Al consumidor, Royal Appliance Mfg. Co. le garantiza que esta aspiradora no tiene defectos ni de material ni de mano de obra por
1 año a partir de la fecha de compra original. Guarde su recibo original de compra para hacer válido el período de garantía.
En caso que la aspiradora muestre algún defecto dentro del período de garantía, repararemos o reemplazaremos de manera
gratuita cualquier parte defectuosa. La máquina completa debe ser enviada con porte pagado a cualquier Estación Autorizada
®
de Ventas y Servicio de Garantía. Por favor incluya una descripción completa del problema, fecha de compra, copia
ROYAL
del recibo de compra original y su nombre, domicilio y número de teléfono. Si no se encuentra cerca de una Estación de
Garantía, llame a la fábrica para pedir asistencia en los EE.UU. y CANADÁ: 1-800-321-1134. Use solamente partes de
repuesto genuinas Royal
La garantía no incluye el desgaste anormal, daño como resultado de un accidente o del uso no adecuado de la aspiradora.
Esta garantía no cubre los cepillos,bandas planas, bolsas, filtros o daño al ventilador. Esta garantía no cubre reparaciones
no autorizadas. Esta garantía le confiere derechos legales específicos y podría haber otros derechos también. (Los otros
derechos varían de Estado a Estado en los EE.UU.)
IMPORTANTE: USE SOLAMENTE PARTES DE REPUESTO GENUINAS ROYAL®.
NOTA: REGRESE LA TARJETA DE GARANTÍA PARA REGISTRAR SU ASPIRADORA
®
.
. . . . . . . . . . . . . . . . . . . . . . . . . . Página 2, 3
. . . . . . . . . . . . . . . . . . . . . Página 7
GARANTÍA LIMITADA
E4
Page 15

CARACTERÍSTICAS
CÓMO ENSAMBLAR
HERRAMIENTA NECESARIA: DESTORNILLADOR PHILLIPS O PLANO
PARTE POSTERIOR PARTE FRONTAL
CUERPO A LA BOQUILLA
1
2
14
13
12
3
4
5
6
7
8
21
9
10
11
20
19
18
15
16
17
18
1.
VISTA DE LA
PARTE
FRONTAL
DE LA
ASPIRADORA
Deslice la cubierta posterior en
la base.
ENSAMBLAJE DEL CONTENEDOR DEL POWER
BRUSH TOOL (FRENTE) Y DEL ASA (PARTE
POSTERIOR)
1.
Coloque el asa superior
en la parte de arriba de
la aspiradora.
2.
Empuje la clavija del asa
en la parte delantera de
la aspiradora.
2.
Para asegurar inserte dos (2)
tornillos en la sección frontal
de la cubierta posterior.
3.
Inserte el (1) tornillo en la
parte trasera del asa y
apriételo, asegurándose
que la clavija del asa
esté asegurada.
INSTALACIÓN DEL
POWER BRUSH
TOOL
4.
Fije el Power Brush Tool
en la parte delantera de
su contenedor.
PARTE FRONTAL
1. Empuñadura del Asa
2. Asa
3. Power Brush Tool
4. Manguera
5. Seguro de Liberación del Recipiente
de Polvo
6. Asa de Transporte
7. Recipiente de Polvo Transparente
8. Filtro del Recipiente de Polvo
9. Luz Frontal
10. Palanca de Adjuste de Altura
11. Tope
12. Lanza de Extensión
13. Accesorio para Hendiduras (en la
lanza de extensión)
PARTE POSTERIOR
14. Abrazadera de la Manguera
15. Guía del Cordón Eléctrico
16. Gancho con Liberación Rápida del
Cordón Eléctrico
17. Cordón Eléctrico Largo
18. Ruedas
19. Pedal de Liberación del Asa
20. Pedal de Encendido / Apagado
21. Cepillo para Polvo
E5
FIJACIÓN DE LA MANGUERA
POSTERIOR
1.
Enrolle la manguera alrededor de la parte posterior
del contenedor (Diagrama 1). Empuje la lanza de
la manguera hacia abajo en el lado derecho de
la aspiradora (Diagrama 1a).
1a.
ALMACENAMIENTO DE ACCESORIOS
2.
POSTERIOR
Para fijar los accesorios: (a) Deslice el cepillo para polvo
en el contenedor de accesorios superior con las cerdas
hacia afuera (Diagrama 2). (b) Deslice el accesorio para
hendiduras/ la lanza de extensión en la ranura redonda del
lado derecho frontal del contenedor de accesorios
(Diagrama 2a).
E6
2a.
ANTERIOR
Page 16

CÓMO ENSAMBLAR: CONTINUACIÓN
CÓMO FUNCIONA: CONTINUACIÓN
INSTALE LA TAPA DEL
INSTALACIÓN DEL RECIPIENTE DE POLVO
RECIPIENTE DE POLVO
3. 4a.
LENGÜETA
RANURA
Alinee la lengüeta de
la tapa con la ranura
en el recipiente de
polvo. Empuje la
tapa hacia abajo
hasta que quede
encajada en su sitio.
4.
L
ENGÜETA
Fíjelo alineando la lengüeta
en la parte inferior del
recipiente de polvo en la
ranura rectangular de la
aspiradora (Diagrama 4) y
empújelo para que entre
en su sitio (Diagrama 4a).
RANURA
CÓMO FUNCIONA
AJUSTE DE ALTURA PALANCALIBERACIÓN DEL CORDÓN ELÉCTRICO
1.
PRECAUCIÓN: El agitador del cepillo continúa girando cuando usted usa o retira la manguera o si la aspir-
dora está funcionando. Mantenga lejos del área del cepillo el pelo, la ropa suelta, los dedos y otras partes
del cuerpo cuando la aspiradora esté funcionando.
La aspiradora debe estar en posición vertical para levantar de la alfombra el cepillo giratorio cuando limpie
por encima del nivel del piso.
Gire el gancho de
liberación rápida del
cordón eléctrico
para retirarlo más
fácilmente. Guárdelo
en la guía del cordón
eléctrico.
2.
Gire la perilla de ajuste de
altura para que corresponda
con la superficie que se va a
limpiar. IMPORTANTE: Para
un ajuste más fácil, coloque
la aspiradora en posición
completamente vertical
position.
LIMPIEZA POR ENCIMA DEL NIVEL DEL PISO
1.
La aspiradora debe estar en su
posición vertical para levantar
el cepillo giratorio.
2.
Retire la manguera del
contenedor de accesorios.
LANZA DE EXTENSIÓN
4.
herramienta para hendiduras juntas o por separado.
Si se necesita mayor
longitud, use la
lanza de extensión
y el accesorio para
hendiduras. Saque
la herramienta para
hendiduras de la
lanza de extensión.
Use la lanza de
extensión y la
3.
lanza o del asa de la manguera. Para quitar
el accesorio, gire y tire suavemente.
ASA DE TRANSPORTE
1.
Para llevar la aspiradora
de una habitación a otra,
use el asa para transporte
ubicada en el recipiente
de polvo. NOTA:
Compruebe que el
recipiente de polvo esté
asegurado en su lugar
ANTES de levantar la
aspiradora.
Elija cualquiera
de los útiles
accesorios o
use la
manguera sola.
Simplemente
empuje el
accesorio con
firmeza en el
extremo de la
PEDAL DE
ENCENDIDO / APAGADO
3.
Conecte el cordón eléctrico
en la toma de corriente.
Encienda la aspiradora
pisando el pedal localizado
en la parte posterior izquierda
de la aspiradora.
PEDAL DE
LIBERACIÓN DEL ASA
4.
Para liberar el asa, pise el
pedal de liberación del asa
localizado en la parte inferior
izquierda de la aspiradora.
E7
PISO / ALFOMBRAS
LIMPIEZA
1.
a
para limpiar debajo de los muebles. NOTA: El
cepillo en rotación podría hacer que los flecos de
la alfombra se enredaran dentro de la aspiradora.
Sea precavido cuando aspire alfombras con flecos.
Mueva el asa y
ajústela en la
posición deseada
b
para (a) guardar la
aspiradora, (b)
operar la
aspiradora y (c)
c
pisar el pedal de
liberación del
asa nuevamente
E8
Page 17

5
E
STILO DE BANDA
RECIPIENTE DE POLVO Y FILTRO: RETIRO Y REEMPLAZO
F1
TIPO DE FILTRO
ADVERTENCIA: PARA REDUCIR EL RIESGO DE LESIONES CAUSADAS POR LAS PARTES MÓVILES,
DESCONECTE ANTES DE DAR SERVICIO.
NOTA: Desconecte la aspiradora antes de cambiar el filtro.
NOTA: Para un mejor desempeño, reemplace el filtro cada año.
Para el filtro de reemplazo F1 (No. de Parte 3-JC0280-000), por favor llame al 1-800-321-1134 o
visite nuestro sitio Web www.dirtdevil.com para localizar al distribuidor más cercano a usted.
BANDA O CEPILLO: RETIRO Y REEMPLAZO
HERRAMIENTA NECESARIA: DESTORNILLADOR PHILLIPS
ADVERTENCIA: PARA REDUCIR EL RIESGO DE LESIONES CAUSADAS POR LAS PARTES MÓVILES,
DESCONECTE LA ASPIRADORA ANTES DE CAMBIAR LA BANDA O EL CEPILLO GIRATORIO.
Para el reemplazo de la banda Estilo 5 por favor llame al 1-800-321-1134 o visite nuestro
sitio web www.dirtdevil.com para localizar al distribuidor más cercano a usted.
PARA RETIRAR LA BANDA
VACÍE Y LIMPIE EL RECIPIENTE DE POLVO
1.
Oprima el seguro que está
sobre el recipiente de polvo
para quitarlo de la aspiradora.
4.
Limpie el filtro y el recipiente
de polvo completamente. Vea
la nota a continuación
“Mantenimiento Regular”
para las instrucciones de
limpieza del filtro.
2.
Retire la tapa del recipiente
de polvo.
5.
Coloque de nuevo el filtro en el
recipiente de polvo. Empuje el
filtro en su sitio para evitar
fugas de polvo. Coloque de
nuevo el recipiente de polvo en
la aspiradora (vea la Página
E7, Instalación del Recipiente
de Polvo.)
3.
Sostenga el recipiente de polvo
y sujete el tope del filtro. Gire y
tire del filtro hacia arriba y
afuera.
1.
Acueste la aspiradora y voltéela para ver la
base de la boquilla. La base debe quedar
plana y mirando hacia arriba. Utilice un
destornillador Phillips para retirar los tres
(3) tornillos y así quitar la protección de la
boquilla. Las flechas indican la posición de
los tornillos.
2.
Tire y levante la protección de
la boquilla.
REEMPLAZO DE LA BANDA O DEL CEPILLO GIRATORIO
4.
EJE DEL MOTOR
Deslice la banda en el eje del
motor.
7.
5.
Coloque la banda nueva en el
área sin cerdas del cepillo
giratorio.
8.
RANURAS
la orientación correcta (inserción 6a). Gire el
cepillo giratorio de forma manual para asegurarse
que la banda esté alineada apropiadamente.
6.
3.
Levante y retire el cepillo
giratorio. Deseche la banda
usada.
6a.
9.
Una vez que la
banda nueva
está puesta en
su lugar, tire del
cepillo giratorio y
deslícelo dentro
de la boquilla
asegurándose
que las tapas
finales estén en
MANTENIMIENTO REGULAR: Cada vez que se vacía el recipiente de polvo, se debe limpiar el filtro. Golpee
suavemente el filtro, pero con firmeza, contra el interior del basurero hasta que deje de caer polvo del filtro. (El
filtro perderá color con el uso, pero esto no afectará su rendimiento.) No cepille el filtro. Las instrucciones de
limpieza pueden variar dependiendo de las condiciones de suciedad. En algunos casos, se necesitará una
limpieza mayor o menor del filtro. Se recomienda que el F1 filtro No. de Parte 3-JCO280-000 se reemplace
una vez al año. Por favor use la etiqueta ubicada en la tapa del filtro para registrar la fecha de reemplazo.
E9
Vuelva a colocar la protección
de la boquilla.
LENGÜETA
Fíjela alineando las tres (3)
lengüetas en las ranuras de
la base.
E10
Coloque nuevamente los tres
(3) tornillos para asegurar la
protección de la boquilla.
Page 18

REMOCION Y REEMPLAZO DEL FOCO
HERRAMIENTA NECESARIA: DESTORNILLADOR PLANO
ADVERTENCIA: PARA REDUCIR EL RIESGO DE CHOQUE ELÉCTRICO, DESCONECTE LA ASPIRADORA
sta aspiradora utiliza un foco automotor común No.906, 13.0 voltios. Para focos de reemplazo, llame al
E
1-800-321-1134 o a su tienda de partes automotrices.
1.
NTES DE RETIRAR O REEMPLAZAR EL FOCO.
A
2.
3.
4.
GUÍA DE SOLUCIÓN DE PROBLEMAS
ADVERTENCIA: PARA REDUCIR EL RIESGO DE LESIONES PERSONALES - DESCONECTE LA ASPIRADORA ANTES
DE DARLE SERVICO.
PROBLEMA POSIBLE CAUSA SOLUCIÓN POSIBLE
La aspiradora no
funciona
1. El cordón eléctrico no está bien
conectado en la toma de corriente.
2. Fusible quemado o interruptor
desconectado.
3. Necesita servicio.
1. Conecte la unidad con firmeza.
2
. Revise el fusible o el interruptor en casa.
Reemplace el fusible / reajuste el interruptor.
3. Llévela al centro de servicio o llame al
1-800-321-1134.
Incline hacia atrás el
asa de la aspiradora.
Retire el (1) tornillo.
Con un destornillador
plano abra suavemente
la lente. Retírela.
Para retirar el foco, sáquelo
del receptáculo. NO lo
gire. Para reemplazarlo,
empújelo suavemente en
el receptáculo.
MANTENIMIENTO GENERAL
ADVERTENCIA:
RETIRO DE LOS
DESECHOS / MANGUERA
1.
RETIRO DE LOS DESECHOS / POWER BRUSH TOOL
PARA REDUCIR EL RIESGO DE LESIONES PERSONALES - DESCONECTE LA ASPIRADORA
ANTES DE DARLE SERVICO.
RETIRO DE LOS DESECHOS /
PROTECCIÓN DE LA BOQUILLA
2.
3.
4a.
Encaje la lente de nuevo
en su sitio (Diagrama 4).
Fije la lente de la luz
frontal volviendo a colocar
el tornillo (Diagrama 4a).
1. Vea si el recipiente está lleno; vacíelo si es necesario.
2. Conecte la aspiradora y verifique que haya succión
en el extremo de la manguera. Si hay succión en el
extremo de la manguera, vaya al Diagrama 4. Si no
hay succión en el extremo de la manguera, siga los
siguientes pasos: 1. Saque la manguera del
contenedor. Retire la obstrucción. Revise la vuelta
de la manguera (cerca del cepillo para polvo) y
retire la obstrucción (Diagrama 1). 2. Retire el
recipiente de polvo (Pág. E9) y revise la entrada
del recipiente de polvo que está en la aspiradora
(Diagrama 2).
3. Retire la protección de la boquilla (vea el
Diagrama 3) al quitar los tres (3) tornillos. Retire la
obstrucción.
La aspiradora no
aspira o la succión
es muy débil
Polvo escapando
de la aspiradora
Los accesorios de
la aspiradora no
recogen
La luz frontal no
funciona
Es difícil empujar
la aspiradora
1. El recipiente de polvo no está
instalado correctamente.
2. El recipiente de polvo está lleno.
3. Cepillo giratorio desgastado.
4. Banda rota o desgastada.
5. Filtro tapado.
Está tapada la boquilla /manguera
6.
de paso de polvo.
7. Ajuste incorrecto de la altura de
alfombra.
1. El recipiente de polvo está lleno.
2. El recipiente de polvo no está
instalado correctamente.
3. La manguera no está instalada
correctamente.
4. El filtro no está instalado
completamente.
1. Manguera tapada.
2. El recipiente de polvo está lleno.
3. Filtro tapado.
1. Foco fundido.
2. Cables eléctricos sueltos.
1. Ajuste incorrecto de la altura de
alfombra.
1. Revise la forma de retiro y reemplazo del
recipiente de polvo - Pág. E9.
2. Vacíe el recipiente de polvo - Pág. E9.
3. Reemplace el cepillo giratorio - Pág. E10.
Reemplace la banda - Pág. E10.
4.
5. Retire y limpie el filtro - Pág. E9.
6. Retire la manguera inferior; retire la
obstrucción - Pág. E11.
7. Mueva la palanca de ajuste de altura de
alfombra a un nivel apropiado para la
alfombra que se esté limpiando - Pág. E7.
1. Vacíe el recipiente de polvo - Pág. E9.
2. Revise la forma de retiro y reemplazo del
recipiente de polvo - Pág. E9.
3. Revise la instalación de la manguera Pág. E6.
4. Revise la forma de retiro y reemplazo del
filtro - Pág. E9.
1. Retire la manguera y los accesorios; retire
la obstrucción - Pág. E11.
2. Vacíe el recipiente de polvo - Pág. E9.
3. Limpie el filtro - Pág. E9.
1. Reemplace el foco - Pág. E11.
2. Llame al 1-800-321-1134 para encontrar al
Distribuidor Royal
1. Mueva la palanca de ajuste de altura de
alfombra a un nivel apropiado para la
alfombra que se esté limpiando - Pág. E7.
®
más cercano a su domicilio.
4.
ANILLO DE SEGURO
Gire el anillo del seguro 180
y de vuelta el Power Brush
Tool.
5.
°
Gire el alojamiento inferior y
retire el atasco.
E11
6.
Para reensamblar, asegúrese que las
lengüetas estén metidas y gire para cerrar el
alojamiento inferior.
CUALQUIER OTRO SERVICIO DEBERÁ SER EFECTUADO POR UN
REPRESENTANTE DE SERVICIO AUTORIZADO
SERVICIOS AL CLIENTE (1-800-321-1134)
En caso de necesitar más ayuda, vea en las Páginas Amarillas para encontrar a un Distribuidor Autorizado Royal®.
Los costos de transporte hacia y desde el sitio de reparación serán pagados por el propietario. Las partes de
repuesto utilizadas en esta unidad son de reemplazo fácil y están disponibles a través de un Distribuidor Autorizado
Royal®o en otras tiendas. Siempre identifique su aspiradora por medio del número de modelo y el código de
fabricación cuando pida información u ordene partes de repuesto. (El número de modelo aparece en el fondo
de la aspiradora.)
E12
 Loading...