

Page 1
I
OWNER'S
O~eratina and Servicina Instructions
MANUAL
PLEASE READ THESE INSTRUCTIONS CAREFULLY BEFORE
USING YOUR POWER
PAK
Page 2
a
This information has been compiled by the Vacuum Cleaner
Manufacturer's Association working with government and private sources,
concerned with product safety. These basic guidelines are for your protection and convenience.
THIS CLEANER IS INTENDED FOR HOUSEHOLD USE ONLY.
IMPORTANT SAFETY INSTRUCTIONS
When you use an appliance, basic precautions should always
be followed, including the following:
READ ALL INSTRUCTIONS BEFORE YOU USE THE APPLIANCE
ALWAYS FOLLOW THESE SAFETY INSTRUCTIONS
WARNING: TO REDUCE THE RISK OF
FIRE, ELECTRIC SHOCK OR INJURY:
H
Look on your vacuum cleaner and follow
all label and marking instructions.
H
Electric shock could occur if used
outdoors or on wet surfaces.
Do not let children lay with the vacuum
cleaner., Watch
cleaner
Do not use the vacuum cleaner to pick up
flammable or combustible liquids or fumes,
such as
may be present.
Keep the vacuum cleaner on the floor.
Only the hand-held vacuum cleaners may be
set on furniture.
I
Do not use the vacuum cleaner without
dustbag or filters in place.
Do not use the power cord to pull or carry
the vacuum cleaner. Do not use the power
cord as a handle. Do not shut an door on
the cord or pull the cord around
of corners. Keep the cord away from heated
surfaces. Do not run the vacuum cleaner
over the cord.
H
Do not use vacuum cleaner with a
damaged cord or plug. Do not use vacuum
cleaner if working improperly, dropped,
damaged, left outdoors or dropped In water.
First? send to service center for check and
repalr.
Store the vacuum cleaner indoors. Put
the vacuum cleaner away after use to
prevent tripping accidents.
H
Do not ull on the cord to unplug the
vacuum ckaner. Grasp the plug instead.
H
Be most careful when vacuum cleaning
on stairs.
closet when, the vacuum
IS
used by or near ch~ldren.
gasohne, or use In areas where they
siarp edges
2
H
Only use attachments and hoses
recommended by the manufacturer. Use the
vacuum cleaner only as stated in this
manual.
Turn all controls to 'OFF', before
unplugg~ng the vacuum cleaner.
H
Do not use an extension cord with this
vacuum cleaner.
Do not touch the plug or the vacuum
cleaner with wet hands.
Do not put any object into the vacuum
cleaner vent or other openings, Do not turn
the vacuum cleaner on if something is
blockin an openin Keep vents free of
things tflat slow airyiow, such as dust, lint
and hair.
I
Do not pick up anything that is hot,
smoking or burning. Do not pick up
cigarettes, hot ashes or matches.
Unplug the vacuum cleaner if you leave
the room. Unplug it when it is not in use and
before you
Always turn off the vacuum cleaner
before connecting, or removing either the
hose or the
H
punctured. Do not pick up sharp objects
with the vacuum nozzle or hose. The hose
contams electr~cal wires.
H
o enings away from your face and body.
)<Peep our hands, feet, hair and clothing
away {om moving parts.
service it.
motor~zed nozzle.
Do not use hose if it is damaged, cut or
Keep end of hose, wands and other
Page 3
Approved
by
the Vacuum Cleaners Manufacturers Association Executive Committee. April 29.
SAVE THESE INSTRUCTIONS
1987
.
This cleaner contains a thermal protector
current flow at abnormally high motor temperatures
activated
secondary filter for any blockage
Once the motor cools the current's flow will be reactivated
.
unplug the cleaner and inspect the exhaust. inlet. hose. paper bag and
.
which will automatically shut off the
.
If the thermal protector is
.
WARNING:
Electrical shock could occur if used outdoors or on wet surface
I
TABLE OF CONTENTS
Features
How To Assemble
How To Operate
Using The Attachments
Cord Wrap And Quick Release
Mount Tool Caddy
Remove Tool Caddy
Shoulder Strap Installation
Using As A Blower
Paper Bag Removal and Installation
Belt or Brush Roll Removal And Replacement
Mounting Wall Bracket 15
Customer Service
......................................................................................
.......................................................................
..........................................................................
...............................................................
...................................................
.......................................................................
...................................................................
..........................................................
......................................................................
........................................
...........................
................................................................
.......................................................................
.
I
4
5-6
7
7
8
9
9
10
11
12-
14
16
Page 4
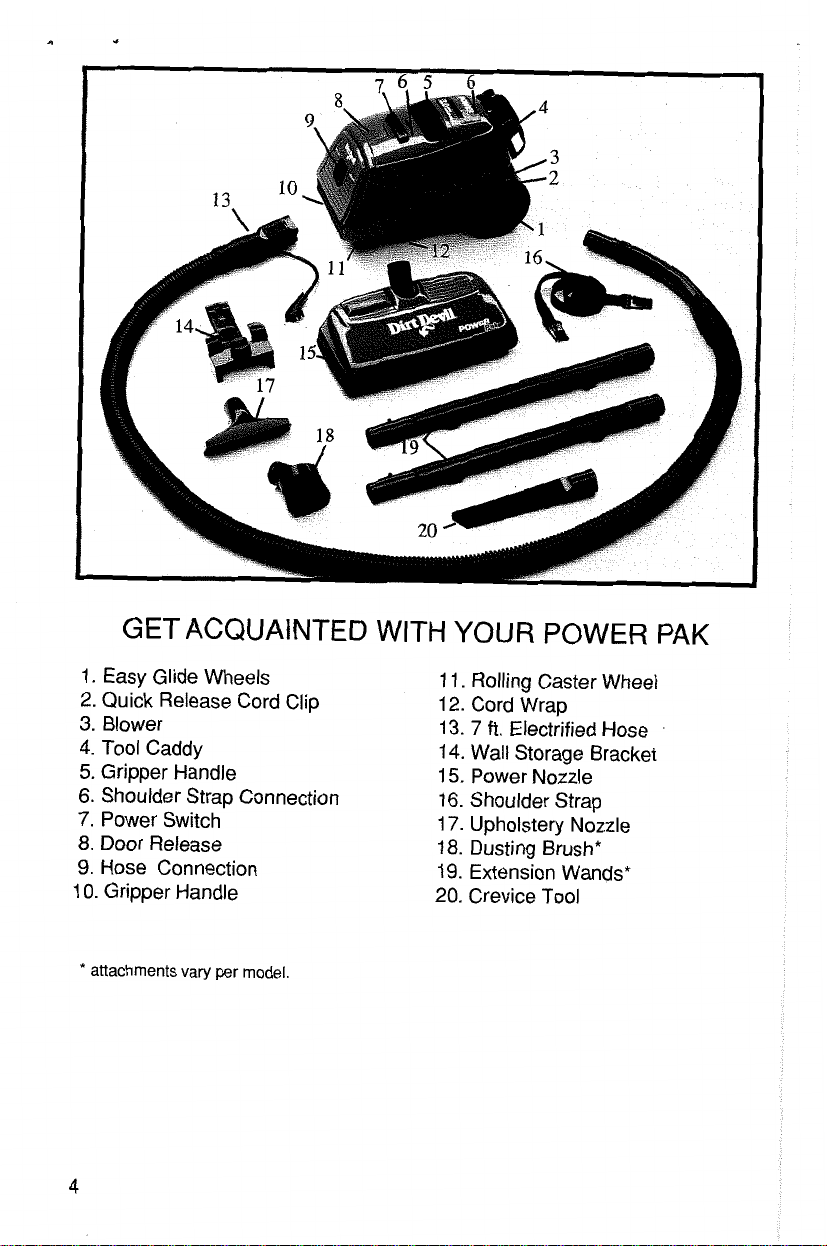
GET ACQUAINTED WITH YOUR POWER PAK
1. Easy Glide Wheels
2. Quick Release Cord Clip
3.
Blower
4.
Tool Caddy
5.
Gripper Handle
6. Shoulder Strap Connection
7.
Power Switch
8.
Door Release
9.
Hose Connection
10. Gripper Handle
*
attachments
vary
per
model.
1 1. Rolling Caster Wheel
12. Cord Wrap
13.
7
ft.
Electrified Hose
14. Wall Storage Bracket
15. Power Nozzle
16. Shoulder Strap
17.
Upholstery Nozzle
18. Dusting Brush*
19.
Extension Wands*
20.
Crevice Tool
Page 5
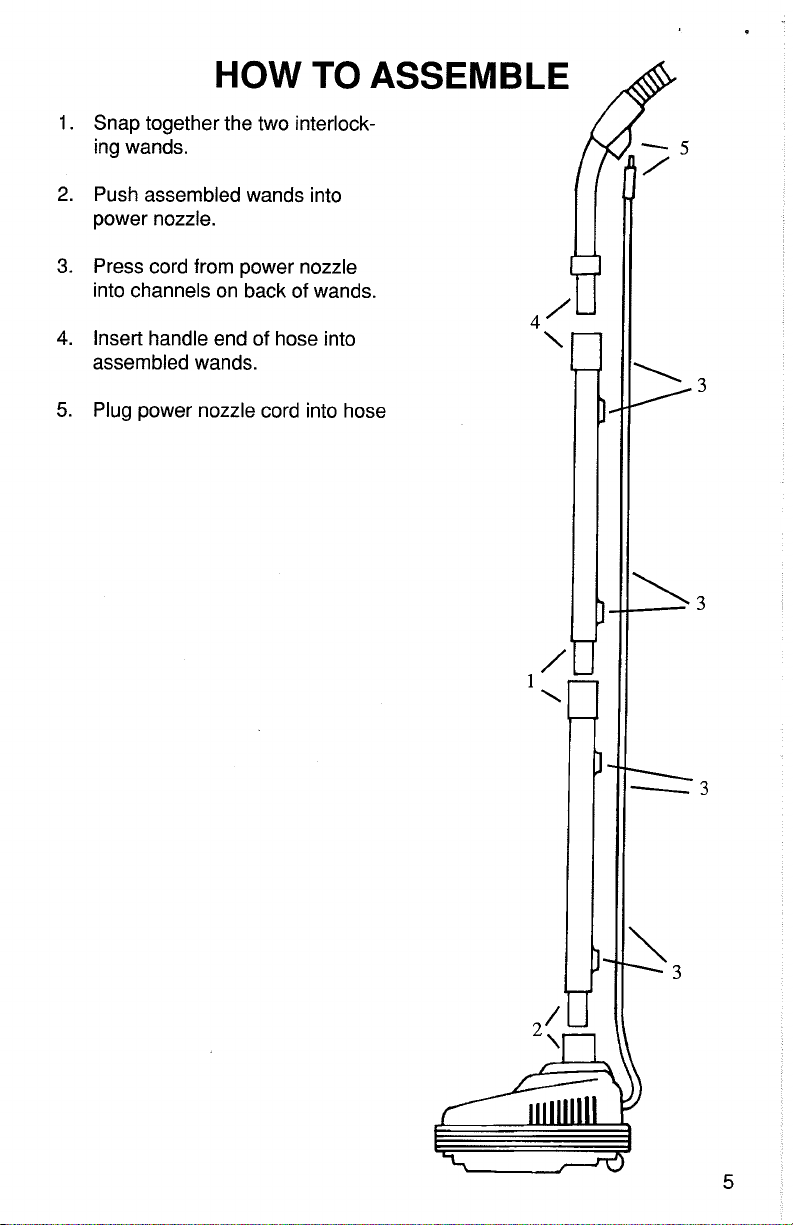
HOW
Snap together the two interlocking wands.
Push assembled wands into
power nozzle.
Press cord from power nozzle
into channels on back of wands.
Insert handle end of hose into
assembled wands.
Plug power nozzle cord into hose
TO
ASSEMBLE
4
/
i
Page 6
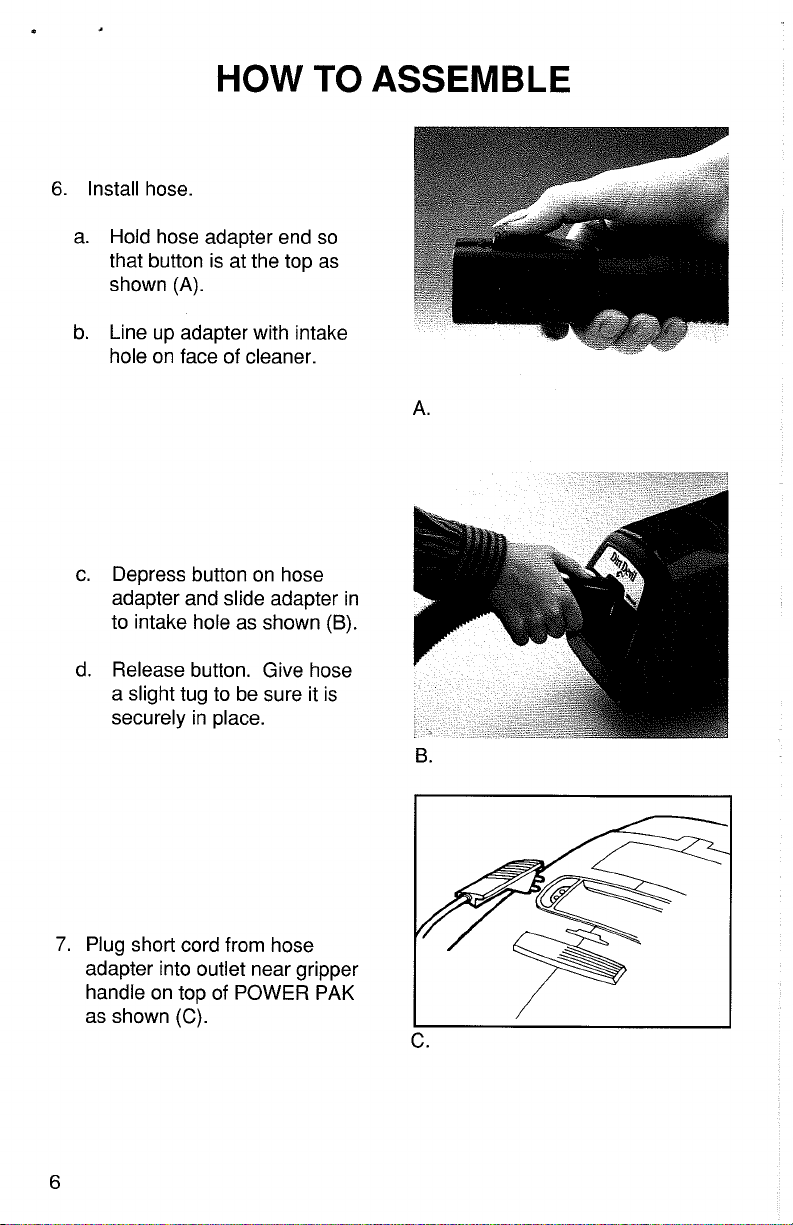
HOW
6.
Install hose.
a. Hold hose adapter end so
that button is at the top as
shown (A).
b. Line up adapter with intake
hole on face of cleaner.
c. Depress button on hose
adapter and slide adapter in
to intake hole as shown
TO
ASSEMBLE
(B).
d. Release button. Give hose
a slight tug to be sure it is
securely in place.
7.
Plug short cord from hose
adapter into outlet near gripper
handle on top of POWER PAK
as shown
(C).
Page 7

HOW TO OPERATE
8.
Pull handle back into the
operating position.
9.
Push power switch on POWER
PAK nozzle as shown (A).
10.
Select carpet or bare floor
cleaning.
a. For Carpet Cleaning
power switch on the power A.
nozzle. Be sure brush roll is
rotating for effective cleaning
and grooming.
b. For Bare Floor Cleaning
Push power switch on the
power nozzle. Be sure brush
roll stops rotating
-
Push
-
USING THE ATTACHMENTS
Chose any of the handy
accessories to meet your
various cleaning needs. Then
simply push it firmly onto the
hose or wand end (A).
The hose can be used alone or
with many combinations of
wands and tools.
To remove a tool or wand, pull
the two apart gently. You may
rotate the attachment back and
forth a little to make the re-
moval easier.
Page 8

CORD WRAP AND QUICK RELEASE
1.
The cord can be easily
wrapped around the two cord
hooks provided underneath the
POWER PAK.
2.
Turn the POWER PAK on end
as shown (A).
3.
Wrap the cord around one cord
hook and then the other.
4.
To release the cord without
unwinding it, push in the black
quick cord release tab
(B).
Page 9

TO MOUNT TOOL
Hold the empty tool caddy with
the flat side facing the back of
the POWER PAK.
Note the groove on the caddy
and the clip on the POWER
PAK as shown (A).
Slide the caddy down over the
clip until it locks. The caddy is
now secure.
Place the dusting brush and
upholstery tool (except the
crevice tool) in the round
pockets on top of the caddy
(B).
Push on securely.
Slide the crevice tool into the
slots available under these two
tools. It will enter from both the
right and left sides.
CADDY
TO REMOVE THE TOOL
Reach underneath the tool
caddy.
Pull the entire caddy up and off
of the cleaner.
CADDY
Page 10

INSTALLATION AND REMOVAL OF
CONVENIENT SHOULDER STRAP
(Optional)
Squeeze together the clip on
one end of the strap.
Insert the clip into one of the
grooves (one front, one back)
on the POWER PAK as shown
(A).
NOTE:
3.
Clips may break if not
properly installed.
Do the same steps for the
remaining clip and groove.
Your POWER PAK can now be
carried on your shoulder while
you clean above the floor as
shown
(B).
Page 11

TO
USE AS A
BLOWER
exhaust on rear of cleaner
4.
You can now blow dust from
behind refrigerators or other
(B).
A
Page 12

PAPER BAG REMOVAL AND
INSTALLATION
UNPLUG CLEANER BEFORE
CHANGING PAPER BAG.
CLEANER MUST HAVE
PAPER BAG IN PLACE AT
Check to be sure your POWER
PAK has one paper bag in place
before you begin vacuuming.
1.
Remove hose if it is in place
from the face of the cleaner.
2.
Depress door release button to
open door and expose paper
bag (A).
If your POWER PAK has no paper
insert in place, follow these easy
bag installation steps.
NOTE:
ALL TIMES.
3.
Place a fresh paper bag into
the bag chamber with the
cardboard collar facing you (B).
4.
Be sure the paper bag is
placed back into the chamber
so the cardboard collar is flush
with the front edge of the
POWER PAK.
5.
Snap the bottom two corners of
the cardboard collar behind the
two clips along the bottom edge
of the chamber. The new bag
is now secure.
6.
Close the door and be sure it
snaps shut tightly.
Page 13

PAPER BAG REMOVAL AND
INSTALLATION
(Continued)
If your paper bag is full and you'd
like to replace it with a fresh bag,
#2
follow instructions #1 and
then begin at #7 (you can tell your
bag needs replaced when you
experience low performance with
the POWER PAK).
7. After removing the hose and
opening the POWER PAK
door, simply grasp the cardboard collar and pull the full
paper bag toward you as
shown(C).
8.
Carry the full bag to a waste
receptacle and dispose of it.
You may now follow steps #3-#6 in
section A to place a fresh bag in
your POWER PAK.
and
You may also want to purchase
paper bags now so you have them
when you need them. Call your
local Royal dealer or retailer for
information.
Page 14

BELT OR BRUSH ROLL
REMOVAL AND REPLACEMENT
NOTE:
Unplug cleaner before changing
belt or brush roll.
1.
To remove nozzle guard: turn
power nozzle over and insert
finger into openings near an
arrow as shown (A). Squeeze
clip and pull nozzle guard
toward you.
TO REMOVE BELT
1.
Be sure belt is off motor shaft.
2.
Lift and remove brush roll (B).
3.
Dispose of old belt.
TO REPLACE BELT
1.
Loop belt around motor shaft
(c).
2.
Slip brush roll through belt.
Place belt on raised area of
brush roll without bristles.
3.
Pull brush towards you and
insert into side holder
then
#2
(D).
4.
Replace nozzle guard. Match
the front tabs to the slots on the
nozzle base. Swing down to
snap hooks. Press firmly on
entire nozzle guard to fit into
(E).
place
IMPORTANT: Be sure belt is not
twisted and brush roll rotates
smoothly.
#I
and
Page 15

TO MOUNT
Choose a convenient location
such as a broom closet in
which to store your
PAK.
Using the screws provided,
mount the bracket on
shown
Hang the attachment on the
bracket as shown
store the wands and remaining
tool on the hose end while
hanging. If your closet does
not allow for this, simply stand
the remaining accessories in a
corner.
(A).
POWER
a
(B).
VVALL
wall as
You can
BRACKET
(Optional)
Page 16

CUSTOMER SERVICE
In the event that further assistance is required, see your Yellow Pages for an
authorized Royal Dealer. Costs of any transportation to and from any place
of repair are to be paid by the owner.
The service parts used in this unit are easily replaced and readily available
from an authorized Royal Dealer or retailer.
Always identify your cleaner by the model and serial number when requesting information or ordering replacement parts. (The model number appears
on the bottom of the cleaner.)
If further assistance is needed, contact Royal Appliance Mfg. Co., Cleveland,
1-800-321 -1 134.
Ohio
Page 17

Now that you have a
POWER
PAK,
meet the rest of the family.
We know you're going to be impressed with the way your new POWER PAK
performs. Why not get the same quality with other Royal and Dirt Devil
vacuums?
Check your yellow pages for an authorized Royal dealer or see your favorite
retailer.
Page 18

'AC
Page 19

FOR SERVICE
or to locate the dealer nearest you:
Check
the
YELLOW
to locate the dealer nearest you.
Or call toll-free 1 -(800)-321-1134
01991
Royal Appliance
All
rights reserved.
1-210397-001
Rev.B
Mfg.
9/91
Co.
PAGES
ROYAL APPLIANCE
650
Alpha
Drive
~levelhd, Ohio 441 43-21 72
MFG.
CO.
 Loading...