

Page 1

OPERATING INSTRUCTIONS
MODE
INSTRUCCIONES DE US0
~INSTRUCOES PARA US0
\
FOR YOUR SAFETY CAREFULLY READ THE OPERATING INSTRUCTIONS.
POUR VOTRE S~CURIT& LlSd SOIGNEUSEMENT LES INSTRUCTIONS D'EMPLOI.
PARA
su
SEGU~DAD
PARA A SUA SEGUMNCA DEVE LER ATENTAMENTE ESTAS INSTRUC6ES.
L~A ATEN~AMENTE
D'EMPLOI
LAS
INSTRUCCIONES
DE EMPLEO
8
Saeco.
Page 2
_I
la
I
IMPORTANT
SAFEGUARDS
When using electrical appliances, basic safety
precautions should always
the risk of fire, electric shock, and
persons, including the following:
1
READ ALL
IN THlS BOOK AND ANY OTHER LITERATURE
INCLUDED IN THlS CARTON REFERRING TO
MIS
USING THlS APPLIANCE.
2
Do not leave appliance unattended while in
use. Unplug from outlet when not in use and
before servicing.
3
Use.indoors only.
4
Do not expose to rain. Store indoors only.
Do not store in temperature below freezing..
5
Do not allow to be used as a toy. Close
attention. is necessary when used by or near
children.
6
Use this system following the directions as
described inthis manual. Use only
manufac-turer's rec0mmended attachments.
7
Do not use with damaged cord or plug.
If
been dropped, damaged, left outdoors, or
dropped into water, contact an Authorized
Service Center.
8
Do not pull or carry by cord, use cord as
handle, close door on cord, or pull cord
around sharp edges or comers. Do not run
appliance over cord. Keep cord away from
heated surfaces.
9
Do not unplug by pulling on cord. To unplug,
hold the plug and pull out of the socket.
10
Do not handle plug or appliance with wet
hands.
11
Do not put any object into the openings.
Do not use with any openings blocked or
plugged up; keep free of dust, lint, hair,
and anything that may reduce air flow.
INSTRUCTIONS
PRODUCT PRIOR TO OPERATING OR
appliance is not working as
be
followed to reduce
l
AND INFORMATION
it
-
or injury to
should, has
IMPORTANT SAFEGUARDS
12
Keep hair, loose clothing, fingers, and all parts
of body away from openings and moving
parts.
13
Turn off all controls before unplugging the
machine.
14
Use extra care when cleaning on stain.
15
,
Do not use with flammable or combustible
liquids, such as gasoline, or use in areas
where they may be present.
16
Do not pick up anything that is burning or
smoking, such as cigarettes, matches, or hot
ashes.
17
Do not use without dust bag and/or filters
in place.
18
For a rechargeable appliance, use only the
charger supplied by the manufacturer to
recharge.
19
Connect to a properly grounded outlet only.
See Grounding Instructions (section
20
CAUTION. Risk of scalding. Do not remove
steam boiler filling cap
and shows pressure on the pressure gauge.
Release all pressure from the boiler and let
machine cool down completely before
unscrewing the boiler cap.
21
Do not immerse in water.
(13)
while unit is on
1
b)
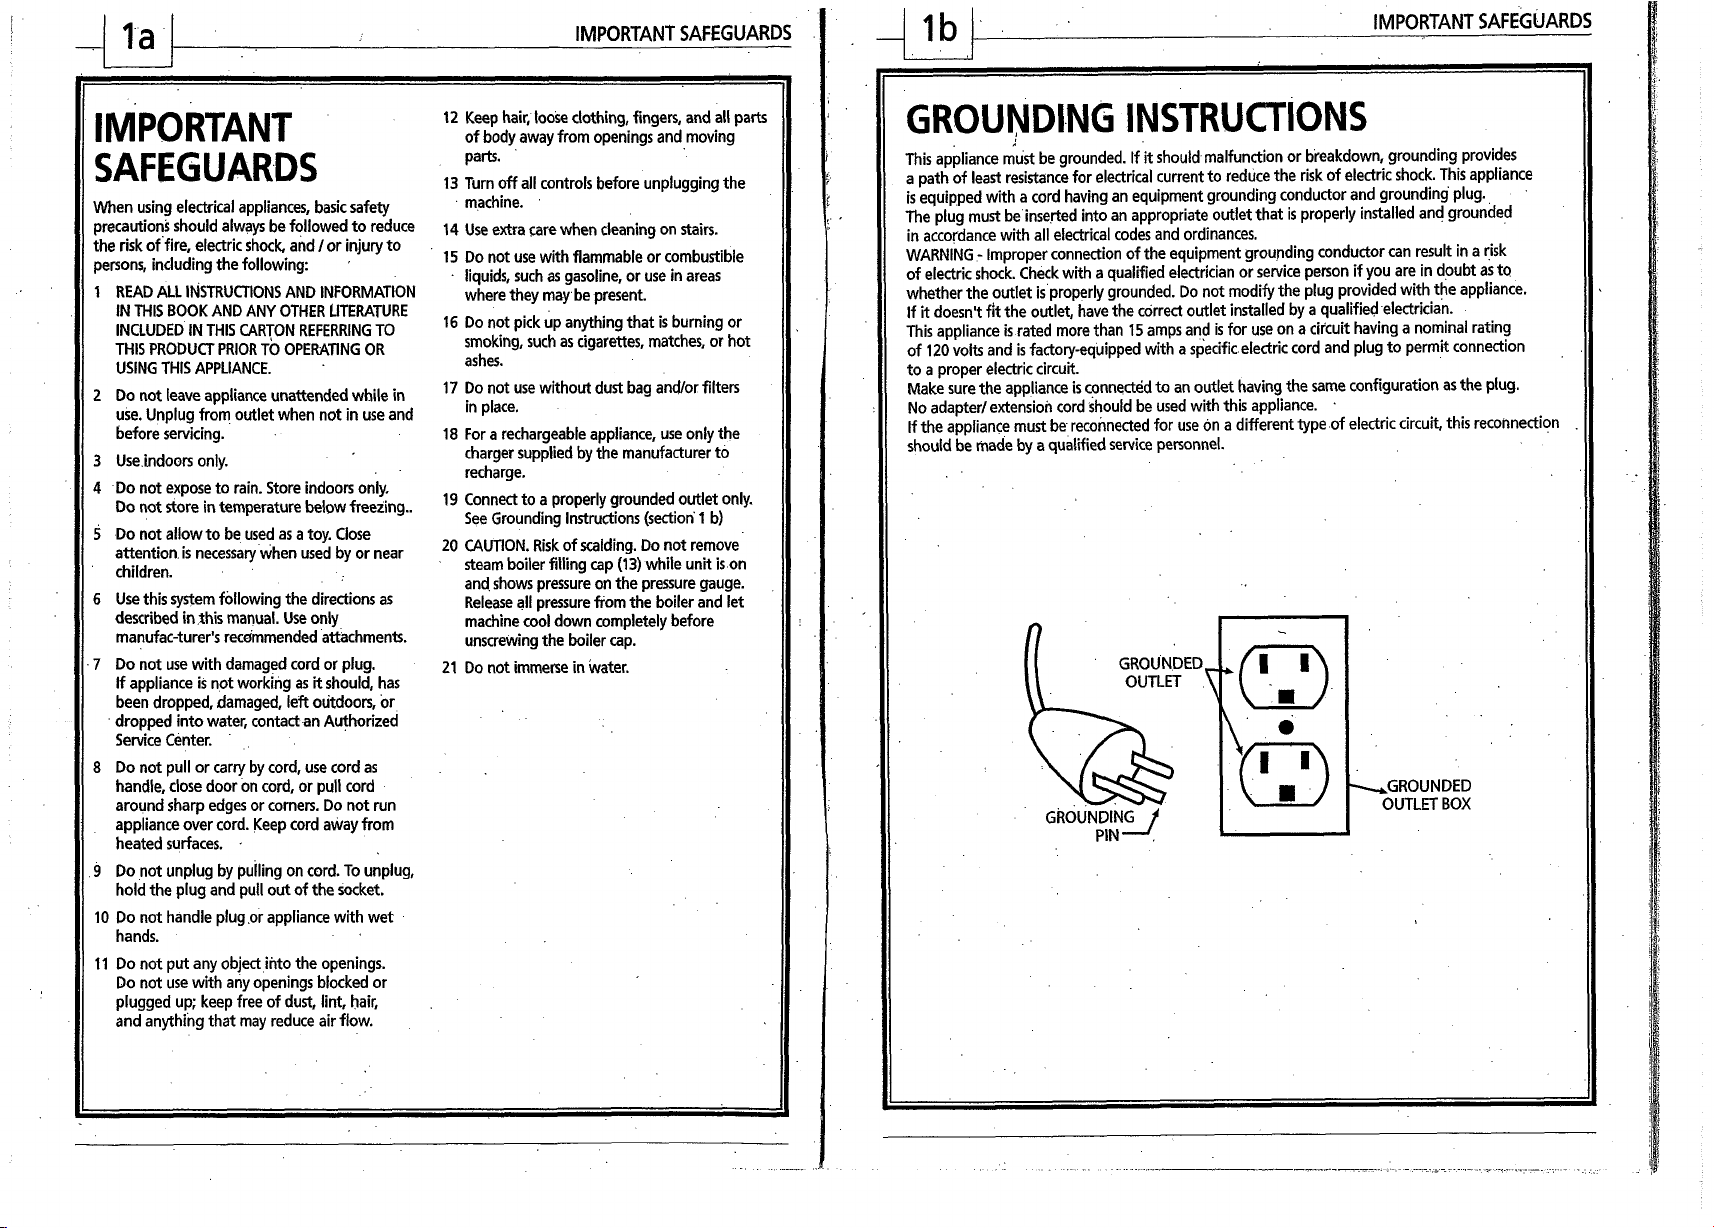
GROUNDING INSTRUCTIONS
This appliance must be grounded. If
a path of least resistance for electrical current to reduce the risk of electric shock. This appliance
is equipped with a cord having an equipment grounding conductor and grounding plug.
The plug must be inserted into an appropriate outlet that
in accordance with all electrical codes and ordinances.
WARNING
of electric shock. Check with a qualified electrician or service person if you are in doubt as to
whether the outlet is properly grounded. Do not modify the plug provided with the appliance.
If
This appliance is rated more than
of
to a proper electric circuit.
Make sure the appliance is connected to an outlet having the same configuration as the plug.
No
If
should be made by a qualified service personnel.
-
Improper connection of the equipment grounding conductor can result in a risk
it
doesn't fit the outlet, have the correct outlet installed by a qualified electrician.
120
volts and is factory-equipped with a specific electric cord and plug to permit connection
adapter1 extension cord should be used with this appliance.
the appliance must be reconnected for use on a different type of electric circuit, this reconnection
it
should malfunction or breakdown, grounding provides
is
properly installed and grounded
15
amps and
GROUNDED
OUTLET
is
for use on a circuit having a nominal rating
,GROUNDED
OUTLET BOX
Page 3
I
Congratulationsl
Dear Customer, Today you made a winning choice. Your machine is the result of SAECO's exclusive experience
SAECO is a world-wide leader in the manufacture of electrical appliances and equipment. Therefore, the Fat;
Morgana is of the highest
instnrction booklet thoroughly. Careful observation of the safety precautions ensures best results. We wish you ful
satistiction of this wonderful SAECO product1
Cher cliente, ch&e diente,
Compliments! Vuos venez de faire un choix gagnant. Votre appareil est le fruit de I'experience SAECO, leader
mondial dans la production d'appareils blectrombnagers, et repksente donc
le marchb.
En observant les conditions de s6curit6, wos obtienderez de meilleurs r6sultants. Nous vous souhaitons d'obtenir
beaucoup
dbrangement devait se produire,
de votre appareil SAECO.
Nuos
wos prions 'de wos habituer B votre nowel appareil en liiant attentivement
de
satisfaction
quasi today's market can offer. To become acquainted
en
uiiliiant votre nuovel appareil. Encore une chose: si - conk toute attente - un quelconque
le
service apes-vente se tient B votre disposition, m6me longtemps apks I'achat
with
your machine, read this
ce
qu'il y a de mieux actuellement sur
ce
manuel d'hsbuctions.
Felicitaciones
mr haber hecha tan ventajosa deccibn.
nundial en la fabricaclon de aparab elecgodom&cos.
pe
lea usted este manual
ie seguridad le ayudar5 a obtener 10s mejores resultados. Le deseamos muchas satisfacciones en el uso de su
lueva mhquina.
'arakns,
'rezado Cliente, hoje V&
la produqilo de, aparelhos detmdomtsticos, e e por isso o melhor que o mercado pode oferecer.Pedimos que aprenda a
isar sua maquha lendo atentamente
sra obter o mdhor resultado. Desejamos muitas satisfapks corn a utilii@o de Sua nova maquina.
de
intrucdones, a fin de que pueda familiarizarse con el aparado. El respeto de la advertendas
fez
La
maquina que acaba de adquirir es fruto de
uma escolha vencedora. ASua maquina e fnrto da experihaa da SAECO, lider mundial
este
manual de instrupks.0 wmprimento das adve~ncias de seguranp ajudarh
Es
decir, lo mejor que d mercado pude ofrecede. Es importante
\
la
experienaa de SAECO, lider
Page 4
Page 5

IN I RWDUCTIWN
--I
O
I
.
INTRODUCTION
1
1.1 Reading instructions
.I2
How
to
2
3
4
4.1 Removing packing
42
4.3
4.4
4.5
4.6 Plugging intothe mains
5
5.1
52 Connectingaccessories
5.3 Usingtheappiiana? 14
1
use these operating instructims
TECHNICAL FEATURES
SAFETY RULES
INSTALLATION
Ca~ivno$s
~reparing~thernultipurposedeanerf~~~wuming
prwwing(hemu&+ucpos~deanerfor~~~~~
-the~~for&~
INSTRUCTIONS 'FOR USE 13 8 DESCALING 18
Preparingfbruse
INTRODUCTION
The multi-purpose.cleaner
..................................................
..............................................................
................................
.....................................
...................................................
..................................................
materials
.....
r
..:
...............................................................
......................................
.................
...........................................
6
6
7
7
9
12
12
12
-
.............
12
......
13
.....
13 7.1 Filter deaning 17
..........
:
13 7.2 Cleaningthewitertank
...............................
..................................................................
...............................
.............................................................
is
ideal for cleaning with steam all fabrics that may be cleaned in this way. The
A:
............
13
14
.
5.3.1 Filiing,up
5.32 Emplyingthe watertank
6 DESCRIPTION OF THE ACCESSORIES 16
6.1 Largemuitkpurpose bnrsh attachment 16
6.2 Spray node
6.3 Small
6.4 Blow attachment
6.5 Pmfessional articulated b~sh attachment
(m
7
USER AND MAINTENANCE INSTRUCTIONS
4e
water boiler
.........................................
....................................
................................
with
brush
.L
brushattachmentandwindowd6aner
......
;
...........................................................
......................................
.......................................
...........................................
......................
.................................
.::.
.......................
........................
.............................
:
...
..
...........
........
.I7
17
17
17
......................................................
9
JURIDICAL. INFORMATION 18
10
DISPOSAL OF THE APPLIANCE
..............................
....:
..................
19
15
15
16
16
controls located on the handle and on the top part of the appliance are marked with easy-to-understand
it
symbols. The elegant
mulii-purpose device has been de~igned for heavy domestic use but
is not suitable
for continuous professional use.
A
Warning. No liability
will
be accepted for damage or injury occurring as a result of:
Improper use or use for purposes other than those provided;
Repairs that are not performed by authorized service centers;
Tampering with the power supply cord;
Tampering of any kind with machine components;
The use of non-original spare parts and accessories;
Opening the casing .of the unit;
Damage caused by mineralllimescale build-up or freezing..
The warranty is voided in the above cases.
1.1
Reading
instructions
TECHNICAL FEATURES
.
The illustrations corresponding to the text are located on the inside cover flap.
Keep this page open while reading the operating instructions.
1.2 How
to
use
these
operating
instructions
Keep these operating instructions in a safe place. They must accompany the multi-purpose
cleaner if someone else is to use it.
Contact Saeco Authorized Service Center for further information or in the case of problems that are not
completely dealt with in this handbook.
2
TECHNICAL FEATURES
.
.
Rated voltage 120V- 60Hz
Rated capacity max 1500W
Casing material Thermoplastic
Dimensions
(I
x h x p)
Weight (without accessories)
Cable length 16.4'15
--
19.7"x11.8"x13"1500 mmx300 mmx330 mm
19.40 LBS 1 8.8 kg
m
control panel on top
Boiler
Power supply
Water tank capacity
Boiler capacity
Operating time on full tank
Max. pressure in boiler
,
Max. motor vacuum 21 kPa
Stainless steel 1811 0 thickness: 12110
see rating plate fitted on the device
12.2
1.5
1
1
77.4 oz
52.8 oz 1
2 hours roughly
(4
400 kPa
bar)
Flow rate 46 llsec
Safety devices
Boiler empty thermostat, safety thermostat (thermal
protection device) pressure switch, boiler cap with
built-in safety valve.
The warning triangle. points out all the important i,nstructions for user safety. Strictly observe
these instructions to avoid hazardous situations!
101
Reference to illustrations, parts of the device or controls and so on are pointed out by numbers or
letters. In this case the user must consult the illustration.
This symbol points out information of major importance for the best use of the appliance.
The manufacturer reserves the right to modify the design and construction of the appliance in
accordance with technological progress.
Page 6

-PI
I.
SAP
t I Y S I
ANDARDS
"
SAFETY STANDARDS
3
SAFETYRULES
I'
..
Safeguarding others
Make sure that children cannot play with the
Keep powered parts well away from water at
all time: short-circuit hazard! The heated
steam and hot water could cause scalding!
appliance; therefore never leave the multi-purpose
cleaner within their reach.
Children do. not realize the danger related to
household 'appliances!
Intended use
The multi-purpose cleaner is intended for
domestic use under supervision only. It is
prohibited to make technical modifications and to
use the cleaner for purposes other than those for
which it has been designed due to the risks
involved. The multi-purpose cleaner must be used
exclusively by adults who are in perfect physical1
mental health.
O
Power supply
'
Danger of burns
Never direct jets of steam towards yourself
andlor other people, animals and material
sensitive to hot temperatures andlor humidity.
Never unscrew the boiler cap (13) when the
appliance is in use. Before unscrewing the cap
make sure that there is no pressure in the steam
pressure boiler. (see section 5.3.1)
Do not direct the steam jet over electrical
electronic equipment such as the inside of ovens.
A
andlor
Connect the multi-purpose cleaner exclusively to
a suitable power socket.
Always make sure that the power socket
properly earthed and fitted with a safety fuse. The
voltage must correspond to that indicated on the
appliance rating plate.
01
Power cord
Never use the multi-purpose cleaner if the power
cqrd is damaged.
be
FauHy plugsand cords must
and exclusively by authorized service centers.
Never pass the power Cord around comers or near
sharp edges or above hot objects and protect it
against oil.
movelpull the multi-purpose cleaner by
Never
tugging on the cord.
Do not unplug the device by pulling on the cord
and never touch this with wet or damp hands.
Do not allow the power cord to fall off tables or
shelves.
replaced immediately
is
You .could be scalded #:boiling water.andlor
steam should spill out of the boiler!
positioning the appliance
Position the multi-purposecleaner in a safe place
it
where nobody can tip
Never use the multi-purpose cleaner outdoors;
never leave it in rooms at a temperature below or
equal to 0°C 132
Freezing damage could occur.
Do not place the multi-purpose cleaner on hot
surfaces or near open flames to avoid damaging it.
131
Cleaning
Before cleaning the appliance, turn the main
ONIOFF switch off (14) and remove the plug
from the power socket.
Then wait for the appliance to cool down.
a
damp cloth. Do not use solvents or
Use
detergents that could damage the surface.
over or be injured by
F
when there is water inside it.
it.
(20)
Page 7

-4
'"I
Never soak the multi-purpose cleaner in water!
Do not dry the multi-purpose cleaner in a traditional
oven andlor microwave oven.
Do not open up the appliance. This will void the
warranty.
O
Use
Proceed as follows to use the multi-purpose
cleaner correctly and efficiently:
Move the cleaner along even surfaces while
using it;
The room must be sufficiently lit and there must
be an easily accessible power socket;
*
Never touch the cleaner with wet hands or feet
when it is plugged in;
Never put the multi-purpose cleaner under a
running tap to fill the boiler up with water;
Never leave the appliance running while
unattended;
Do not fill the boiler above the set level and do
not mix the water with other chemical products;
Do not use distilled water and do not put
detergents or chemical substances in the boiler;
The multi-purpose cleaner can only be used
horizontally;
Do not vacuum acids andlor solvents in cleaner
as these will damage the appliance;
*
Do not vacuum powders andlor expldsive liquids;
Do not vacuum burning andlor red-hot objects
such as embers, cinders and other material
ready to take fire;
The device must be unplugged after use and
before cleaning or servicing
Storing the appliance
When you have finished using the multi-purpose
cleaner, shut off all its switches, unplug it from
the power socket and empty any water left over
(6);
in the tank
and neutral detergents. (see section
We recommend emptying the boiler after each use.
NOTE: Allow machine to cool down completely
before unscrewing the boiler cap.
then wash
it;
it
carefully with water
7.2).
SAFETY
Store in a
Protect against dust and dirt.
Repairs I Maintenance
In the case of faults, defects or suspected damage
following a fall, unplug it from the power socket.
Never start the appliance if it shows signs of faults.
Only authorized service centers may perform
repairs and maintenance jobs.
All liabilities for damage to property
to persons will be declined
serviced in compliance with current safety
standards or is serviced by unauthorized personnel.
Always contact an authorized technical
center when the thermal protection switch needs
replacing and in the case of faults or malfunctioning.
Do not
the warranty.
Fire extinguishing
In the'case of fire, use only carbon dioxide type
extinguishers (CO,). Never use water or powder
extinguishers.
A
do not start to clean fabrics directly but
discharge the initial steam onto a separate
cloth to eliminate any processing impurities.
.dry place out of the reach of children.
dismanle the cleaner yourself. This will void
WARNING
When using steam foi the firsttime,
STANDARDS
andlor injury
if
the cleaner is not
senrice
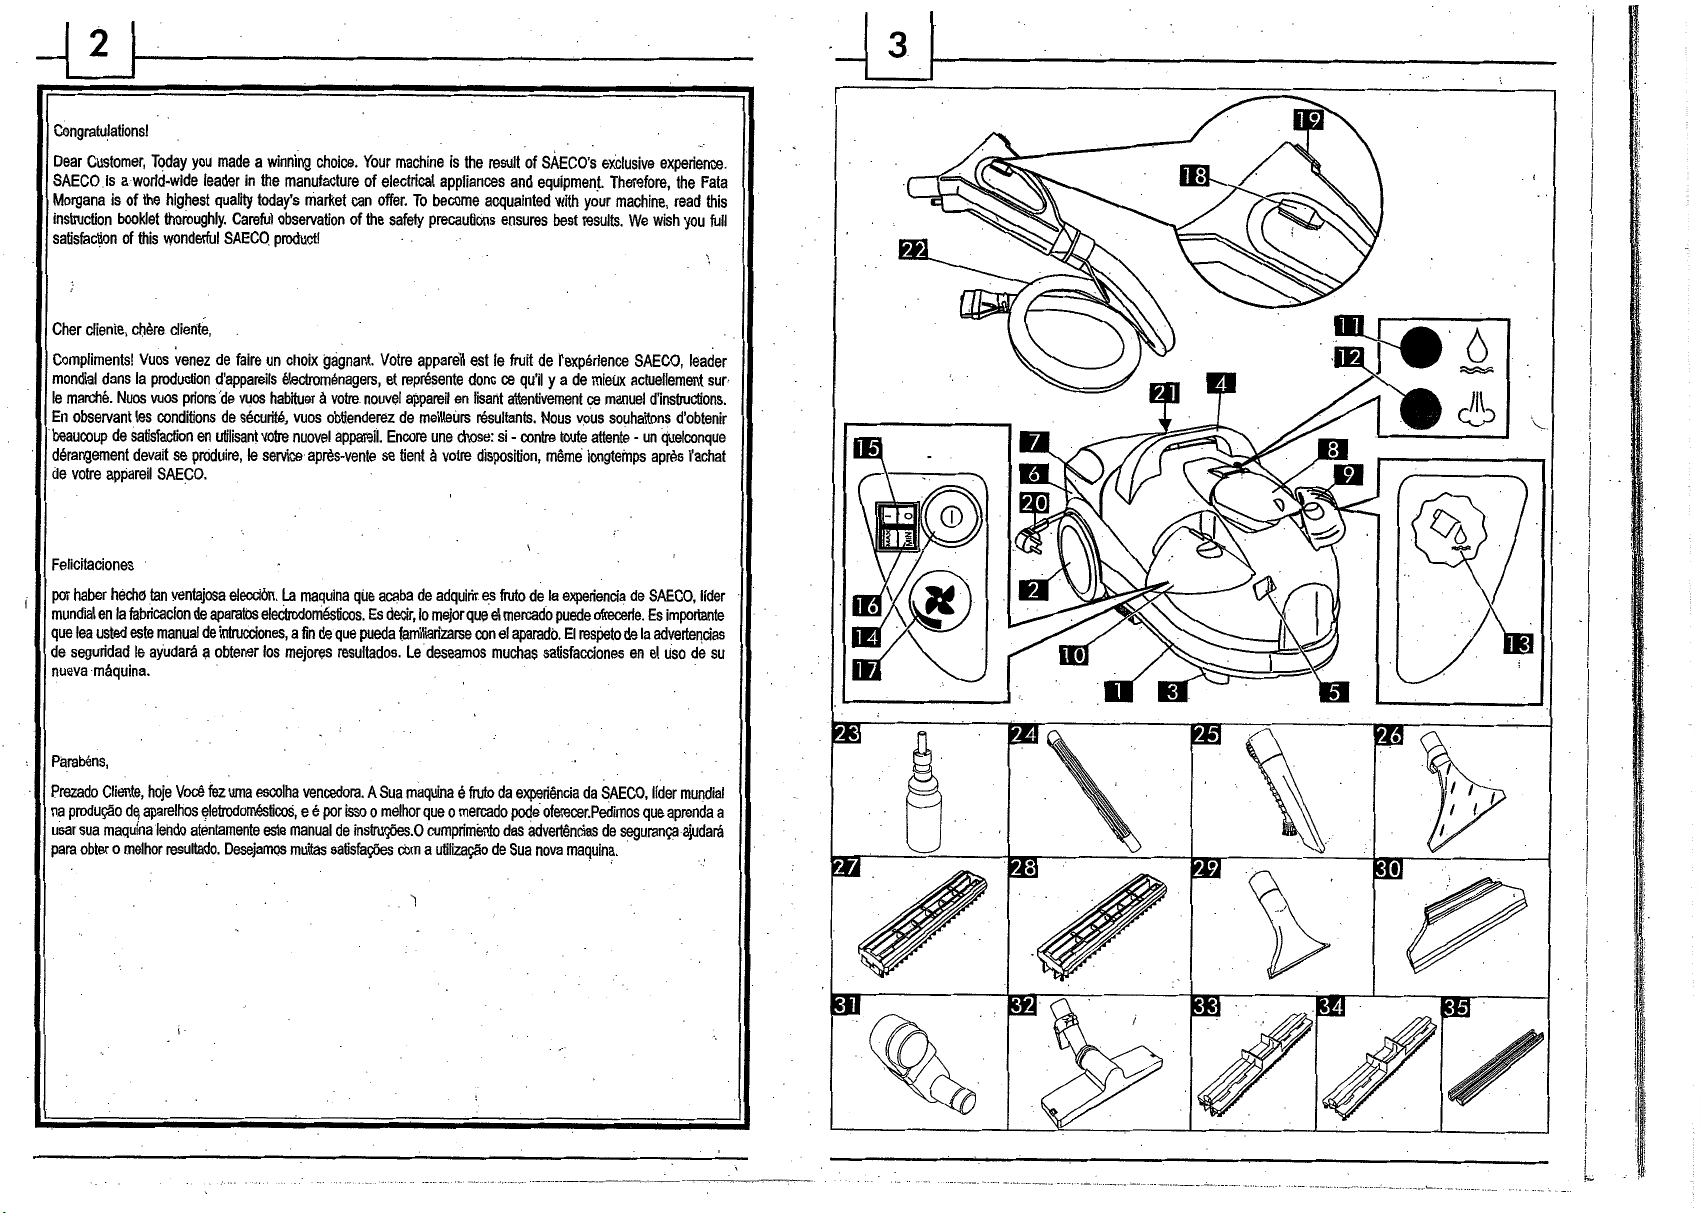
KEY OF THE MACHINE COMPONENTS
Key to the cleaner components and accessories
Appliance casing
Rear wheels
01
Front casters
Handle for moving cleaner about
Brush attachment point
Watertank
0
Water tank cover
Multi-purpose socket cover
01
Boiler cap cover
00
Controls cover
m
Boiler empty warning light
Temperature ready light
boiler filling cap
Steam
m
Main ONIOFF switch
00
Steam ONlOFF switch
m
MINIMAX steam quantity switch
00
Vacuum power adjustment knob
Steam hitch
'00
Vacuum push
W
Power cord
Air in Bloom system
Accessories
Handgrip with controls, flexible hose and multi-purpose connector
Bottle with safety top for filling the boiler
00
Extension tube
Steam nozzle with brush (to be used to unscrew the boiler cap
Large bnrsh attachment
Mat and carpet cleaning insert
Floor cleaning insert
Small brush attachment
Window cleaner
Blow attachment
5
Professional articulated brush attachment
Mat and carpet cleaning insert
5
Floor cleaning insert
Rubber strips to
Note: Press the vacuum
steam hnctions.
(on handle)
(on handle)
(under water tank)
(to be fitted on the large brush attachment)
(to be fitted on the large brush attachment)
Ito be fitted on the small brush attachment)
'
(Optional)
(to be fitted on the professional brush attachment) Optional
(to be fitted on the professional brush attachment) Optional
be
fitted on the carpet cleaning insert of the professionai brush attachment. Optional
(18)
and the steam
(19)
switches on the handle to activate vacuum1
13)
11
-
Page 8

4
INSTALLATION
Strictly observe the "safety rul& indicated
section 3 for your own safety and that of others.
iti
;Q.1 Removing packing materials
Unpack the appliance and its accessories and
place them in a suitable area.
The original packing has been designed and made
to protect the appliance during transport.
It is recommended to keep the packing for
possible future use.
The packing materials must not be left within
the reach of children, as they are potentially
hazardous.
4.2
Cautionary notes
When cleaning fabricslmaterials, observe
the manufacturer's instructions. If none are
provided, request information accordingly from
rnanlrfadurerof the material.
the
*
This multi-purpose cleaner must
fabricslmaterials that may be cleaned using this
type of appliance.
It is not recommended to use adaptors, multiple
plugs andlor extension cords.
Never touch the cleaner with wet hands
andlor feet.
Do not expose the cleaner to atmospheric
agents (rain, sun, frost etc.)
If the thermal protection switch should trip the
cleaner will stop
authorized service center check the cleaner
before starting it again.
The multi-purpose cleaner must not be
plugged into the power socket while
A
you are preparing
The appliance may be set in different
operating modes according to your
needs:
automaticald. Have an
it
for use.
be
used only on
Steam output only;
Vacuum cleaning only;
a
Steam and vacuum combined.
Toprepare the appliance according to your needs,
follow the directions provided' in 'the sections
below.
-
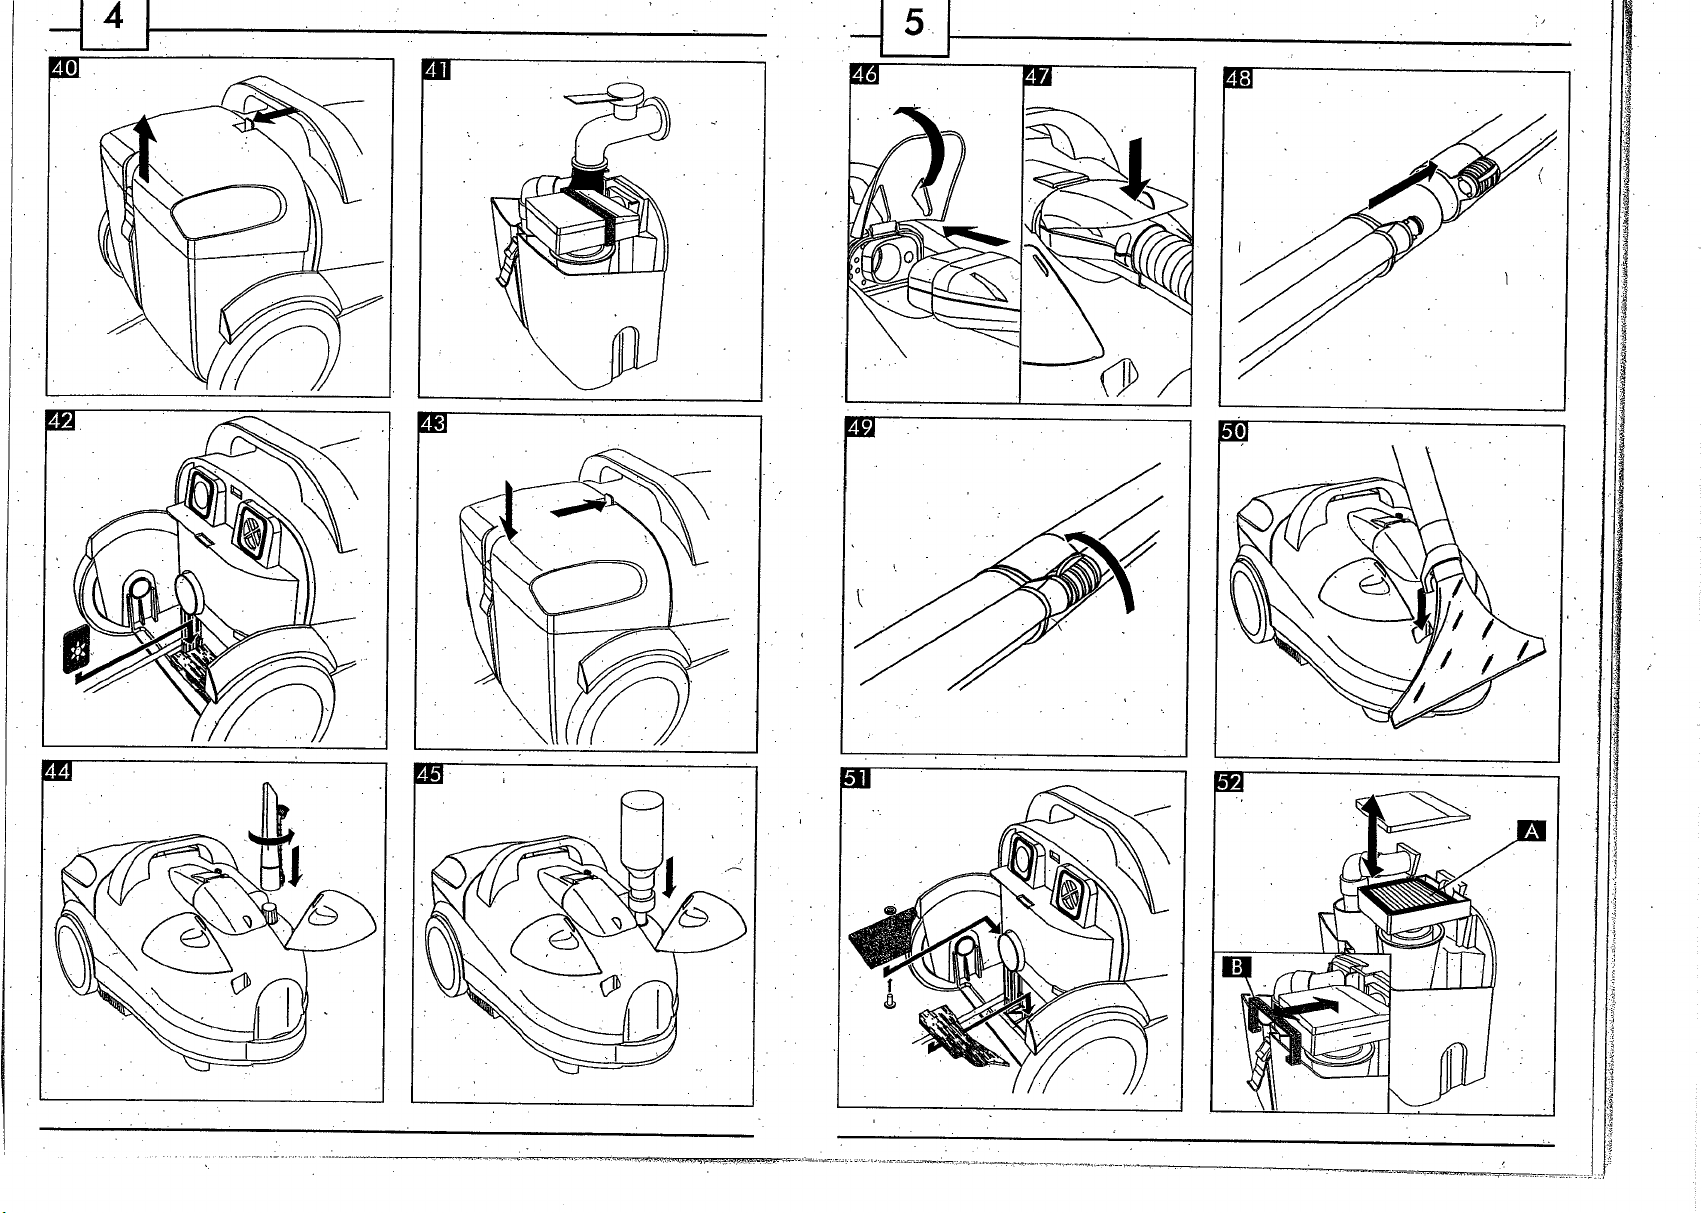
4.3 Preparing the multi-purpose
cleaner for vacuuming
A
The multigurpose cleaner can operate
only in the horizontal position. Do not use
in a vertical position for any reason
whatsoever. If the multi-purpose cleaner is
used upright, the water inside the tank
could spill out.
The cleaner iust be prepared for use
it
when
socket.
with an exclusive
to pleasantly scent the room with the
system fill the relative tank:
is cold and unplugged from the power
The multi-purpose cleaner is equipped
"Air
in Bloom" device used
fragrance desired. Simply insert the tablets
supplied in the dedicated point situated under
the water tank. As the cleaner is being used
the fragrance is let out into the room.
Only one scented tablet may be used at a time.
For the correct efficiency of the water suction
take the water tank (6) out by releasing
the locking device;
take the cover
releasing the locking device;
m
fill the tank
(MIN) level indicated on the tank itself; do not
fill
above the(MAX) level indicated on the water
tank.
Note: when the appliance is used as a
R
vacuum cleaner there must always be
enough water inside the tank
(7)
off the water tank (6) by
(6)
with clean water up to the
(6)
to allow for
it
(6)
START-UP - INSTRUCTIONS FOR USE
the correct filtration of dirt, othehise the air
will not be filtered efficiently.
put the cover
in place with the locking device;
*
If desired, unwrap an "Air in Bloomn
scented tablet and put it in the specific point
provided (21);
Put the water tank (6) back in place; make
sure that
transparent fastener on the end of the cover
must
cleaner casing.
4.4
Preparing the multi-purpose
(7)
back on the tank (6); secure it
it
locks into the correct position; the
be
pushed forwards until it engages the
,
/
cleaner for generating steam
Note: before using this function,
always make sure that the boiler is full
of water.
(23)
Note: The bottle
fill
the boiler. The bottle
with a valve that enables the water to be
poured out only when
The boiler must be filled in order for the appliance
to generate steam:
*
unscrew the cap on the bottle (23) supplied;
fill the bottle
(for water quality and the longevity of the
appliance, refer to
close the bottle again using the cap provided;
open
by hand.
m
filling
rotating it counterclockwise;
m
of the boiler and pour water inside; to do so press
the bottle down onto the hole;
when the boiler is full, close it with the cap (13)
provided by turning it clockwise; make sure that
it seals firmly.
with
demineralized water ortap water
Descaling section p.
the
boiercover
-
using the accessory (25), open the boiler
cap
(13) by pressing downwards while
turn the bottle upside down over the hole
MUST be used to
cap
is fitted
it
is pressed.
35);
(9)
by swiveling it outwards
13
-
d
4.5
Preparing the multi-purpose
cleaner for combined operation
Carefully follow all the directions
provided in secti~ns
this way will the appliance be enabled to
perform the, steam output and vacuum
cleaning functions.
It will then be possible to use both functions
simultaneously.
4.6
Plugging into the
Electrical current may be hazardous.
Therefore strictly observe the safety
rules.
Never use damaged cords!
Damaged cords and plugs must be
replaced immediately by an authorized service
center. Do not use extension cords.
The voltage of the cleaner has been set by the
manufacturer.
Make sure that the outlet voltage corresponds to
the specifications provided on the rating plate on the
bottom of the cleaner.
Open the control's cover and make sure that the
ONIOFF switch
main
Insert the plug
suitable voltage.
5
INSTRUCTIONS FOR USE
5.1. preparing
After having plugged in the appliance, connect
the flexible hose (22) to the point provided on the
handle with the controls.
To connect the hose, proceed as follows:
lift up the cover
socket situated in the appliance casing;
(20)
for
4.3
e 4.4.0, in
AIC
outlet
(14)
is turned OFF.
into a power socket with
.
use
(8)
of the multi-purpose
:
Page 9

attach the multi-purpose connector of the flexible
hose (22) into the socket beneath the cover (8);
it
can only be inserted in one way to connect the
hose;
lower the cover (8) of the multi-purpose
socket to ensure that the hose is connected
firmly.
Never force the multi-purpose
A
connectcir into the sock&. If some
problems are encountered in making this
connection contact an authorized service
center.
Make sure that the switches (18) and (19), on the
handle, are not enabled.
Open the controls cover '(10) by turning it
.
.
outwards.
Press the main ONlOFF switch (14) to turn the
appliance on.
.
Adjust the vacuum power using the knob (17)
Note: turning on the appliance with
the main switch
E
the vacuum-cleaning function.
To activate the steam function it is necessary to
move the switch (1 5) to ON (I position); move the
(15) to OFF (0 position) to tum off the steam.
switch
Select the desired STEAM power setting using
the MlNlMAX switch (16).
*
When the temperature-ready light (12) goes on,
.the appliance is ready to output steam. The light
&
will go on
constantly heats up to temperature.
appliance is being used.
to the handle.
off during use as the appliance
Note: the vacuum power and steam
settings can be altered while the
Note: Before using the appliance
connect the accessory you want to use
(14)
will only activate
.
..
INSTRUCTIONS FOR USE.
5.2
Connecting accessories
Accessories can -be connected directly .to
the handle. For your convenience, extension
tubes can be placed between .the handle and
the accessory when the working conditions so
require.
To join the various components simply:
insert the male end of one into the female
end of the other;
then turn the lock ring to secure the
connection.
Hazardous situations may be
encountered
A
firmly locked in place with the ring provided
as the accessories could suddenly fall off
during use.
All accessories can:
output steam;
vacuum up dirt;
use the vacuum and steam functions at the
same time.
To detach the accessories:
stop the output of steam by pressing the switch
(18) on the handle;
stop the vacuum function by pressing the switch
(19) on the handle;
release the ring locking the accessories in
place.
The accessories may now bedetached.
5.3
Using the appliance
The appliance may be used only when
the accessories are fitted correctly and
locked in place with the locking ring.
After you have connected the desired accessory,
you may use the operating'controls located in
if
the accessories are not
INSTRUCTIONS FOR USE
15
I-
u
the handleto:
output steam (if the function is enabled) by,
pressing the switch (18);
activate the vacuum function by pressing the
blue switch (19);
output steam and vacuum simultaneously by
pressing the switches (18) and (19) at the
same time.
To stop the output of steam or the vacuum-
cleaning function simply turn the respective
switch off.
E
professional brush attachment
'
fitted into the brush attachment point
situated on the body of the cleaner; this
serves to keep the handle in an upright
position for optimal use.
E'
the vacuum function running for a few
seconds.,This.will allow you to clean out the
tubes of any residual water and steam.
5,3.1
This operation must be carried out only if the
steam function is to be used.
When the waming light (11) lights up it means
that the boiler is empty.
If you wish to continue using steam the water level
inside the boiler must be replenished as follows:
using the accessory installed, press the steam
switch (18) on the handle to discharge the residual
steam pressure;
turn the appliance off by pressing the main ON1
OFF switch (14) and unplug the power cord
(20);
after having discharged the pressure, open the
During normal operation, only the
large brush attachment
Note: when the cleaning jobs 'have
been completed it is advisable to leave
Filling up the water boiler
,
(26)
(32)
and the
can be
(5)
boiler cover by swiveling it outwards;
m
using the accessory (25), open the boiler
filling cap (13) by pressing downwards while
rotating
it
counter-clockwise;
wait for the residual steam to be discharged
The boiler cap
safetydevice that prevents it from
being opened if there is high pressure inside
the boiler.
Always make sure that all the pressure
'A
has been released from the boiler
before unscrewing the cap,
burst out while you are performing this
operation.
Fill the boiler as directed below.
:
fill the water bottle (23) with demineralized water;
filling hole and fill with water. To do this disable
the safety device by pressing the bottle down
onto the hole of the boiler;
*
when the boiler is full, close it with the cap (13)
provided; make sure that it seals firmly.
Press the main ONlOFF (14) switch to turn the
appliance on;
When the temperature ready waming light (12)
lights up it means that the cleaner is ready to be
used.
5.3.2
E
change in the sound made by the motor and
the vacuum function will automatically stop.
To restore the vacuum function, you must
empty the water tank
Stop the output of steam (if enabled) by
pressing the switch (18) and the vacuum
function by pressing the
Dailger of scalding1
tip the bottle upside down over the boiler
Emptying the water tank
When the
in the water tank
(13)
is equipped with a
(13).
Steam could
(MAX)
level has been rea~hed
(6),
you will hear a
(6).
blue switch (19); then
.
.
-
.
'
Page 10

IIXI
INSTRUCTIONS FOR USE - DESCRIPTION OF THE ACCESSORIES
DESCRIPTION OF
THE ACCESSORIES
17-
proceed as follows:
a
take the water tank (6) out by releasing the
locking device;
take the cover (7) off the water tank (6) by
releasing the locking device;
empty the dirty water into a suitable container;
refill the tank (6) with clean water up to
the MIN level indicated on the tank itself:
put the cover (7) back on the water tank
(6) and secure it in place using the locking
device provided; put the tank (6) back in place.
Make sure that it locks into the correct position.
The transparent fastener on the end of the
cover must be pushed forwards until it engages
the cleaner casing.
Once the
inside the tank the appliance may be used again.
6
normal water level has been restored
DESCRIPTION
OF
THE
ACCESSORIES
6.1
Large multi-purpose brush
attachment
The large multi-purpose brush attachment is ideal
for cleaning large surfaces. The brush may be
fitted with two types of bristle inserts allowing you to
clean all kinds of surfaces.
The bristle insert (28) with rubber
cleaning hard surfaces.
The bristle insert (27) with hard inserts is ideal for
deaning mats and carpets.
To replace these inserts, simply slide them out and
insert them as shown in the picture.
6.2
Steam nozzle with brush
This is ideal for cleaning narrow crevices where
the dirt is more stubborn. This accessory (25) is
complete with a brush with plastic bristles to aid
in these cleaning jobs.
If required the brush can be removed simply by
pulling it outwards.
6.3
Small multi-purpose brush
attachment
The small multi-purpose brush attachment (29)
completes the range of fabriccleaning tools. It is
ideal for cleaning medium-small surfaces that are
impossible to reach with the large brush.
-
window cleaner
insertsis id&l for
The small brush (29) with an additional insert
transforms into an ideal window-cleaning tool.
The window cleaner insert is applied by fitting it
,
as shown in the picture.
Proceed as follows to use
*
spray steam over the surface to be 'cleaned;
press the squeegee against the -surface and
remove the water, moving the squeegee in
straight lines from top to bottom.
6.4
Blow attachmept
Note: the blow attachment
a
be used without the water tank; all the
accessofles can be used to "blow" air.
it
correctly
(31)
(30)
must
To use this accessory, proceed as follows:
take out the water tank (6) by releasing the
locking device;
*
insert the accessofy (31) on the-back of the
appliance.
At this point when you press the vacuum switch
a
(19) on the handle, the appliance will output
air; the power of the jet of air can be adjusted using
the knob
To restore the appliance to its normal operating
condiions, tum off the vacuum switch (19), remove
the accessory (31) and set the water tank properly
back in place (6).
6.5
(17).
.
Professional articulated brush
jet of
attachment (optional)
The, professional articulated brush - attachment
(32) is ideal for cleaning large surfaces and
guarantees a professional-type result.
The brush may
allowing you to dean a! kinds of surfaces.
The bristle insert
cleaning hard surfaces.
The bristle insert
carpets; this insert may be fitted with strips (35)
according to individual needs.
be
fitted with two types of inserts
(33)
with rubber strips is ideal for
. .
(34)
is ideal for cleaning mats and
.
.
Warning: never direct jets of air
towards people andlor animals.
Do not use the accessory for blowing air into
water or any other liquid.
Make sure that the surfaces you are blowing
air on are compatible with this kind of
treatment.
Fitting this accessory in the appliance allows
you to blow out air simply by pressing the
vacuum switch (19).
Page 11

-1
I8
CLEANING AND MAINTENANCE
,
DESCALING - JURIDICAL INFORMATION
hd
To replace the inserts you need only:
Press the tab on the upper part of the brush
(32) and slide off the insert fitted previously;
Slide on the outer part as shown in the picture;
Then attach the new insert.
The inserts (35) should be fitted as shown in the
picture.
7
USER MAINTENANCE
INSTRUCTIONS
After you have finished cleaning with the multi-
it
purpose cleaner unplug
and allow it to cool down.
Remove the water tank, empty out the dirty
water and wash the tank with tap water.
*
Make sure all pressure has.been released from
(5.3.1).
boiler
*
Clean the outside of the cleaner on a periodic
basis using a damp cloth and dry it
afterwards.
Do not place it on rough surfaces.
On a periodic basis and depending on how
often the cleaner is used, wash or replace the
two tubes inside the tank
All accessories can be cleaned and sanitized
using jets of steam.
Unscrew cap and empty boiler.
from the power socket
(6).
Replace the scented tablet on a periodic basis.
7.1
Filter cleaning
The following filters require periodic cleaning:
*
the filter situated in the cord reel compartment;
the filter situated in proximity to the 'Air in
Bloomn tablet.,
a
To clean these filters, proceed as follows:
remove the dirty water tank (6);
remove the filter in proximity to the Air in Bloom
scented tablet;
*
remove. the filter in the cord reel compartment;
remove the'locking device to take the filter out;
wash the filters with water and neutral detergent.
dry the, filters;
fit the filters- back in place,. being careful to
secure the'one in the cord reel compartment with
the locking device provided;
5
put the tank back in place (6).
!-
5
She filter inside the water tank requires
periodic cleaning; to clean the filter, proceed as
follows:
remove and open the container as directed in
section 7.2.
*
remove the lock (B)
open the filter cover (A)
remove the filter (A) from the tube and wash it
with water and neutral detergent;
*
dry the filter;
*
set the filter back in place, handling it with care
to zivoid damaging it;
*
close the cover;
set the lock
close the compartment and reinsert the tank
as directed in section
7.2
Cleaning the water tank
The water tank is to
Proceed as follows:
a
locking device;
(B)
take out the water tank
-
back in place
7.2.
be
cleaned on a periodic basis.
(6)
by releasing the
remove the water tank cover; to do this release
the locking device;
*
5
remove the water filtering devices;
carefully wash all the components with water
and neutral detergents (See section 7.1);
fit the filtering devices back in place.
put the cover back on the water tank and secure
it
with the locking device;
fit
the water tank back in place. Make sure
that it locks into the correct position.
8
DESCALING
To descale the appliance an appropriate descalerl
be
decaldfier product must
boiler while the appliance is not in use. This product
may be purchased from our Service Centers.
Warning! Do not use the multi-purpose
cleaner when the
the boiler.
The formation of
is used; the scale must be removed every
2-3 months of use of the multi-purpose cleaner and1
or when a reduction in the steam capacity is noticed
or if the cleaner has not been used for a long time.
The highler the use
frequent descaling should be.
We recommend the Saeco descaler. You
A
can also use any citric based, non toxic and
non-chemical descalerldecaldfier for
DO NOT-use vinegar
A
Always make sure that all the pressure
has been released from the boiler before
unscrewing the cap
turn off the steam function by pressing the steam
ONIOFF switch (15);
using the accessory installed, press the switch
8)
on the handle to discharge the residual steam
(1
pressure;
turn the appliance off by pressing the main ON1
(14)
OFF
switch and unplug the power cord;
added to the water in the
descalerldecalcifier is in
scale
occurs
as the cleaner
I
water hardness, the more
these
systems.
(13).
once the pressure has been discharged open
(9)
the boiler cover
m
using the accessory (25), open the boiler
filling cap (13) by pressing downwards while
.
rotating
it
counterclockwise;
wait for the residual steam to be discharged.
Allow the cleaner to cool down.
Unscrew the cap (13). Empty any water left in
the boiler by simply turning the niulti-purpose
cleaner with the handle turned downwards and
discharge the water into a suitable container.
Mithe descaler ldecalldfier
on the package; fill the boiler with this solution
using the bottle. Allow the solution to act for at
least one hour with the cleaner in a horizontal
position, unplugged and cold.
Empty the solution in the boiler into a suitable
container as indicated previously then rinse the
boiler out at least
The cleaner is now ready to be used. Consult
the speciiicchapters to perform the jobs desired.
8:
If
Y~hse a descaling I decalcifying
productother than Saeco's, follow the
manufacturer's directions on the package to
mix the right quantity
as
descale
9
The operating instructions provided herein
contain the information required for the proper
use,
The knowledge and observance of these
instructions are essential to ensure safe use
and prevent hazards while the appliance is
being operated or undergoing maintenance.
You are requested to contact your local dealer
or the manufacturer directly for any further
information you may require, or in the event
that particular problems encountered are not
sufficiently explained
Furthermore, we point out that the contents of
these operating instructions are not part of any
described above.
JURIDICAL INFORMATION
operation
by swiveling it outwards;
with
water as direded
4
times with fresh water.
of
product I water. Then
and maintenance of the appliance.
in
these instructions.
Page 12

20
-
previous or currently existent agreement or legal
contract, nor dothey affect the terms of the latter.
All the manufacturer's legal obligations are based
on the relative sales contract, which also contains
complete and exclusive provisions concerning
'
the terms of the guarantee.
The tens of guarantee provided by contract are
neither restricted nor extended by the
explanations given here.
The operating instructions contain information
that is protected by copyright.
It is forbidden to photocopy or translate them
into other languages without the Manufacturer's
written authorization.
10
DISPOSAL
An
appliance that is no longer in use must be
rendered unworkable.
,
*
Remove the plug and cut the power cord at the
base.
Take unused appliances to aqualified disposal
center.
OF
THE
APPLIANCE
JURIDICAL INFORMATION - DISPOSAL OF THE APPLIANCE
NOTES
.
'
.
.
 Loading...