

Dirt Devil Handy Pro, Handy Pro M131, Handy Pro M132, Handy Pro M133, Handy Pro M134 Operating Manual
Page 1

Handy Pro
Page 2

Bedienungsanleitung ................................................................................ 4 - 10
Instructions ................................................................................................ 11 - 17
Instructions de service......................... ............................... ....................... 18 - 24
Bedieningshandleiding ........................ ...................................................... 25 - 31
Instrucciones de uso.................................................................................. 32 - 38
Instrução de serviço ........................................................ ... ....................... 39 - 45
DGFOEPQooooo
Instrukcja obslugi....................................................................................... 46 - 52
Návod k obsluze ......................................................................................... 53 - 59
Návod na obsluhu .................. ............................ ... ............................ ... ...... 60 - 66
Navodila za uporabo..................... .............................................................. 67 - 73
Upute za uporabu .................................... ... ................................................ 74 - 80
Használati utasítás...................................................................................... 81 - 87
CZSK
SLO
HRH
2
Page 3
D
1
3
10
2
6
9
7
8
1
2
1
5
4
Abb. 1
4
3
2
1
1
2
2
Abb. 2
Abb. 3
3
Abb. 4
1 2
4
1
3
Abb. 6
1
5
4
2
3
Abb. 8
2
Abb. 5
Abb. 7
Abb. 9
3
Page 4
Vielen Dank!
Es freut uns, dass Sie sich für den AkkuHandstaubsauger Handy Pro entschieden haben! Wir wünschen Ihnen viel Freude mit dem
Gerät und danken Ihnen für den Kauf!
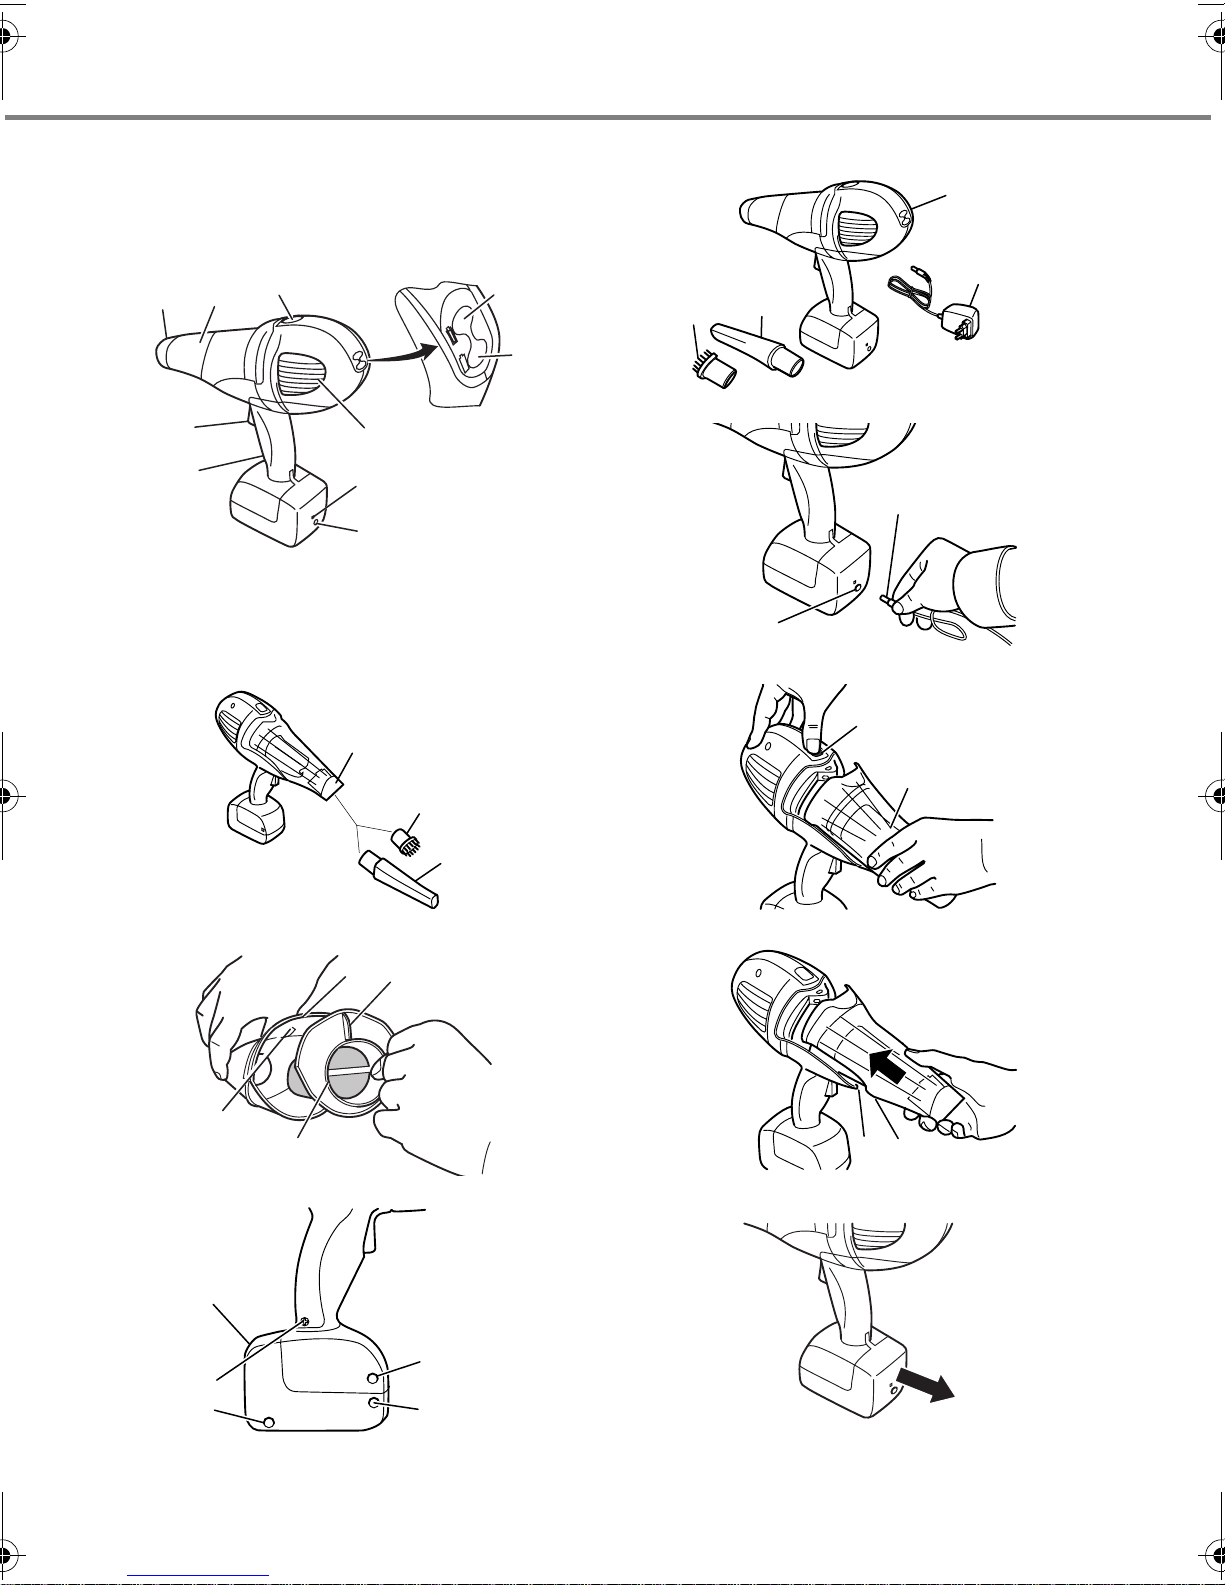
Überblick
(Abb. 1):
1 Saugdüse
2 Staubbehälter
3 Entriegelungstaste
4 Leuchte Tiefentladeschutz (rot)
5 Betriebsleuchte (grün)
6 Luftaustrittsöffnungen
7 Ladeleuchte
8 Buchse für Netzteilanschluss
9 Handgriff
10 Ein-/Ausschalter
Lieferumfang
(Abb. 2):
1 Akku-Handsauger
2 Netzteil
3 Fugendüse
4 Möbelbürste
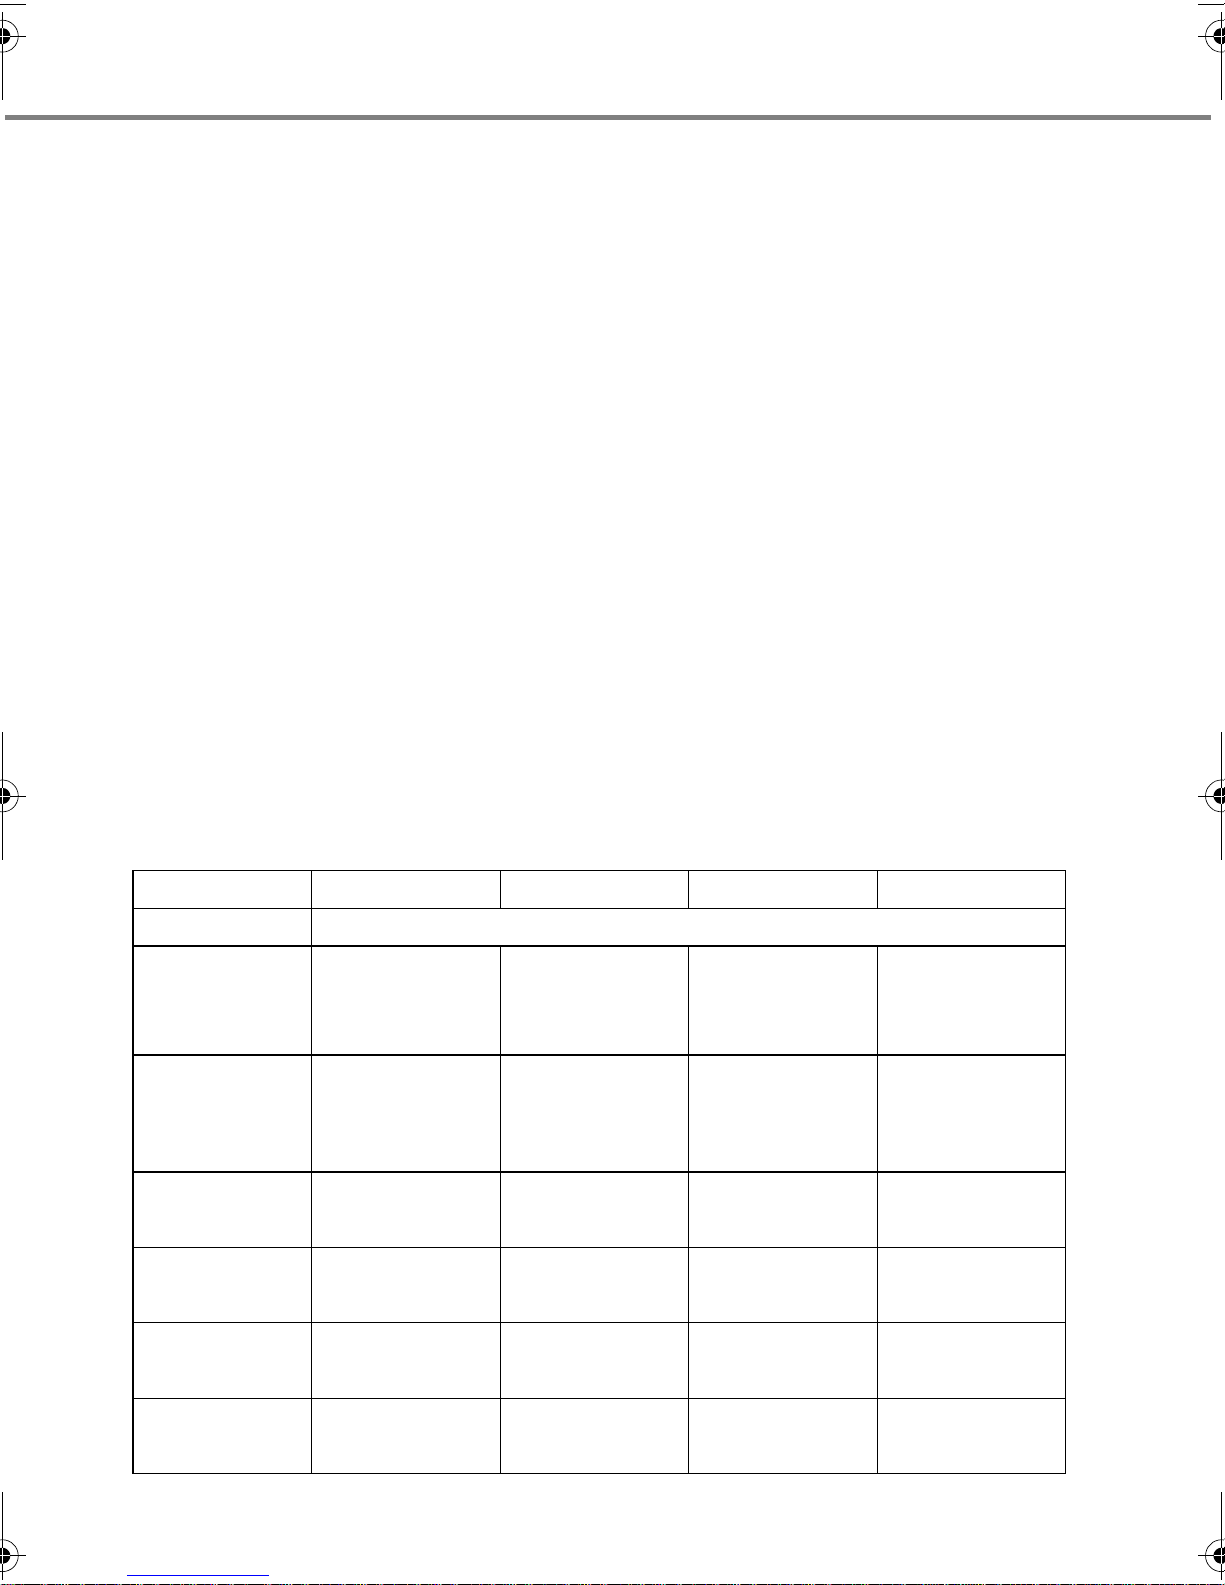
Technische Daten
Modell Handy Pro M131 Handy Pro M132 Handy Pro M133 Handy Pro M134
Geräteart Akku-Handstaubsauger
Netzteil 230 - 240 V
~50 Hz
9 V DC
200 mA
Batterie NiCd
7.2 V DC
1300 mAh
Ladezeit 14-16 h
max. Betriebsdauer
Leistung 80 W nom. 90 W nom. 100 W nom. 120 W nom.
Staubbehälter 0,22 Liter
Gewicht ca. 1,03 kg ca. 1,13 kg ca. 1,23 kg ca. 1,33 kg
ca. 8 min ca. 10 min ca. 12 min ca. 15 min
auswaschbar
230 - 240 V
~50 Hz
15 V DC
200 mA
NiCd
9,6 V DC
1300 mAh
Ladezeit 14-16 h
0,22 Liter
auswaschbar
230 - 240 V
~50 Hz
15 V DC
300 mA
NiCd
12 V DC
1300 mAh
Ladezeit 14-16 h
0,22 Liter
auswaschbar
230 - 240 V
~50 Hz
18 V DC
300 mA
NiCd
14,4 V DC
1300 mAh
Ladezeit 14-16 h
0,22 Liter
auswaschbar
4
Page 5
1 Sicherheitshinweise
1 Sicherheitshinweise
1.1 zur Bedienungsanleitung
Lesen Sie diese Bedienungsanleitung vollständig durch, bevor Sie mit dem Gerät arbeiten. Bewahren Sie die Anleitung gut auf. Falls
Sie das Gerät an Dritte weitergeben, geben
Sie auch die Bedienungsanleitung mit.
Die Nichtbeachtung dieser Anleitung kann
zu schweren Verletzungen oder Schäden
am Gerät führen.
Für Schäden, die aufgrund der Nichtbeachtung dieser Bedienungsanleitung entstehen,
übernehmen wir keine Haftung.
Das Gerät darf nur im Haushalt eingesetzt
werden. Es ist für eine gewerbliche Nutzung
nicht geeignet.
1.2 zu den verwendeten Symbolen
Wichtige Hinweise für Ihre Sicherheit sind besonders gekennzeichnet. Beachten Sie diese
Hinweise unbedingt, um Unfälle und Schäden
am Gerät zu vermeiden:
WARNUNG:
Warnt vor Gefahren für Ihre Gesundheit und
zeigt mögliche Verletzungsrisiken auf.
ACHTUNG:
Weist auf mögliche Gefährdungen für das
Gerät oder andere Gegenstände hin.
HINWEIS:
Hebt Tipps und Informationen für Sie hervor.
1.3 zur Stromversorgung
Das Gerät wird mit elektrischem Strom
aufgeladen und betrieben, dabei besteht
grundsätzlich die Gefahr eines elektrischen
Schlags. Achten Sie daher besonders auf Folgendes:
- Fassen Sie das Netzteil niemals mit nassen Händen an.
- Wenn Sie das Netzteil aus der Steckdose
herausziehen wollen, ziehen Sie immer
direkt am Stecker. Niemals am Kabel, es
könnte reißen.
- Achten Sie darauf, dass das Stromkabel
nicht geknickt, eingeklemmt, überfahren
wird, oder mit Hitzequellen in Berührung
kommt.
- Tauchen Sie das Gerät/Netzteil niemals
in Wasser oder andere Flüssigkeiten und
halten Sie es vor Regen und Nässe fern.
- Laden Sie das Gerät nur, wenn die auf
dem Netzteil angegebene elektrische
Spannung mit der Spannung Ihrer Steckdose übereinstimmt. Eine falsche Spannung kann das Netzteil zerstören.
1.4 zu den Akkus
Das Gerät enthält wiederaufladbare NickelCadmium-Akkus.
Die Akkus nicht ins Feuer werfen oder ho-
hen Temperaturen aussetzen. Es besteht Explosionsgefahr.
Bei falscher Anwendung kann Flüssigkeit
aus dem Akku austreten. Diese kann zu Hautreizungen führen. Vermeiden Sie den Kontakt
mit der Flüssigkeit. Bei Kontakt die Flüssigkeit
mit viel Wasser abspülen. Wenn die Flüssigkeit in die Augen gelangt, sofort 10 min. mit
Wasser ausspülen und unverzüglich einen
Arzt aufsuchen.
Sollte es erforderlich sein, die Akkus aus-
zutauschen, wenden Sie sich an einen Fachhändler oder den Royal
dienst. Für Schäden durch unsachgemäß
ausgetauschte Akkus übernehmen wir keine
Haftung.
®
Appliance Kunden-
1.5 zu Kindern
Lassen Sie das Gerät nicht unbeaufsich-
tigt und verwenden Sie es mit größter Vorsicht, wenn Kinder oder Personen, die die Gefahren nicht einschätzen können, in der Nähe
sind.
Kinder oder Personen, die die Gefahren
nicht einschätzen können, dürfen das Gerät
nicht benutzen. Bewahren Sie es unzugänglich auf.
Verpackungsmaterialien dürfen nicht zum
Spielen verwendet werden. Es besteht Erstickungsgefahr.
D
5
Page 6
2 Auspacken und Anschließen
1.6 zur bestimmungsgemäßen
Verwendung
Der Akku-Handsauger ist ausschließlich für
das Aufsaugen kleiner Mengen Staub zu verwenden. Jede weitere Verwendung gilt als
nicht bestimmungsgemäß und ist untersagt.
Insbesondere die im Folgenden aufgeführten Tätigkeiten dürfen auf keinen Fall mit
dem Akku-Handsauger ausgeführt werden:
Das Saugen von:
- glühender Asche, brennenden Zigaretten oder Streichhölzern. Es kann zum
Brand kommen.
- spitzen Gegenständen, wie Glassplittern, Nägeln, etc. Diese Gegenstände
zerstören den Filter.
- Wasser und anderen Flüssigkeiten, insbesondere feuchten Teppich-Reinigungsmitteln. Feuchtigkeit im Inneren
des Gerätes kann zum Kurzschluss führen.
- Toner (für Laserdrucker, Kopierer, etc.).
Es besteht Brand und Explosionsgefahr.
- Gips, Zement, etc. Der Filter kann verstopfen.
Das Absaugen von Menschen und Tieren
(z.B. Haare, Finger und andere Körperteile)
sowie das Hineinstecken von Körperteilen in
die Öffnungen des Gerätes. Es besteht Verletzungsgefahr.
Die Verwendung in der Nähe von explosi-
ven oder leicht entzündlichen Stoffen. Es besteht Brand oder Explosionsgefahr.
Die Verwendung im Freien. Es besteht die
Gefahr, dass Regen und Schmutz das Gerät
zerstören.
Das Hineinstecken von Gegenständen in
die Öffnungen des Gerätes. Es könnte überhitzen.
1.7 falls das Gerät defekt ist
Betreiben Sie niemals ein defektes Gerät,
oder ein Gerät mit einem defekten Kabel. Es
besteht erhebliches Verletzungsrisiko.
Geben Sie ein defektes Gerät zur Repara-
tur an einen Fachhändler oder den Royal
Appliance Kundendienst.
2 Auspacken und Anschließen
2.1 Auspacken
Packen Sie das Gerät und alle Zubehörteile
aus und überprüfen Sie den Inhalt auf Vollständigkeit.
ACHTUNG:
Transportieren/versenden Sie das Gerät
grundsätzlich immer in der Originalverpackung, damit es keinen Schaden nimmt.
Heben Sie dazu die Verpackung auf.
Entsorgen Sie nicht mehr benötigtes Verpackungsmaterial entsprechend den in Ihrem
Land geltenden Vorschriften.
HINWEIS:
Sollten Sie einen Transportschaden bemerken, wenden Sie sich umgehend an Ihren
Händler.
2.2 Akku laden
ACHTUNG:
Verwenden Sie zum Laden der Akkus nur
das mitgelieferte Ladegerät. Bei Missachtung können Schäden am Gerät auftreten
oder die Akkus schwer beschädigt werden.
Bevor Sie mit dem Gerät arbeiten können,
muss der Akku geladen werden. Dazu:
1. Schließen Sie das Netzteil (Abb. 2/2) an
das Gerät an. Stecken Sie dazu den Anschlussstecker (Abb. 3/2) in die Buchse
(Abb. 3/1) am Gerät.
2. Stecken Sie dann das Netzteil in die
Steckdose.
Die Ladeleuchte (Abb. 1/7) leuchtet rot.
®
6
3. Lassen Sie den Akku nun 14-16 Stunden
laden.
Page 7

3 Bedienung
HINWEIS:
Der Akku-Handsauger ist mit einem Überladeschutz ausgestattet. Wenn die maximale
Ladekapazität der Akkus erreicht ist, schaltet das Gerät automatisch auf Erhaltungsladung. So wird der Akku vor Schäden
geschützt, auch wenn die angegebene
Ladezeit überschritten wird.
4. Ziehen Sie nach d em Laden das Netzteil
zunächst aus der Steckdose und dann
den Anschlussstecker aus dem Gerät.
2.3 Weitere Düsen (Zubehör) ver-
wenden
Mit der im Lieferumfang enthaltenen Fugendüse (Abb. 2/3) und der Möbelbürste
(Abb. 2/4) lässt sich der Akku-Handsauger
vielseitig verwenden.
WARNUNG:
Schalten Sie den Akku-Handsauger aus,
bevor Sie das Zubehör montieren oder
abnehmen.
Das Zubehör können Sie einfach in die
Saugdüse (Abb. 4/1) stecken. Führen Sie die
Einführstutzen des Zubehörs bis zum Anschlag in die Saugdüse ein (Abb. 4).
Verwenden Sie das Zubehör wie folgt:
- Möbelbürste (Abb. 4/2)
Benutzen Sie diese, um Staub von Gegenständen zu saugen, die empfindliche Oberflächen haben (z.B. Schränke,
Tische).
- Fugendüse (Abb. 4/3)
Benutzen Sie diese, um Staub aus
schwer zugänglichen Stellen zu saugen.
3 Bedienung
3.1 Saugen
.
WARNUNG:
Prüfen Sie den Akku-Handsauger vor jeder
Benutzung. Ein beschädigtes Gerät darf
nicht verwendet werden. Es besteht Verletzungsrisiko.
1. Schalten Sie den Akku-Handsauger am
Ein-/Ausschalter (Abb. 1/10) ein.
ACHTUNG:
Achten Sie darauf, dass die Luftaustrittsöffnungen (Abb. 1/6) frei sind. Die Saugwirkung lässt sonst stark nach.
2. Bei Bedarf können Sie zum Saugen auch
das Zubehör verwenden ZKapitel 2.3,
„Weitere Düsen (Zubehör) verwenden“.
3. Um den Sauger auszuschalten, drücken
Sie erneut den Ein-/Ausschalter
(Abb. 1/10).
HINWEIS:
Das Gerät ist mit einem Tiefentladeschutz
ausgestattet. Wenn die minimale Ladekapazität des Akkus erreicht ist, leuchtet die Tiefentladeschutzleuchte (Abb. 1/4) rot auf und
der Akku-Handsauger schaltet automatisch
ab. Laden Sie den Akku vollständig auf,
bevor Sie das Gerät wieder in Betrieb nehmen.
3.2 Gerät abstellen
ACHTUNG:
Stellen Sie das Gerät nie direkt neben Wärmequellen ab (z.B. Heizung, Ofen). Vermeiden Sie direkte Sonneneinstrahlung. Die
Hitze kann das Gerät beschädigen.
D
Wenn Sie das Gerät längere Zeit lagern
möchten, leeren Sie den Staubbehälter und
reinigen Sie ihn. Bewahren Sie das Gerät in
einem kühlen, trockenen Raum auf.
7
Page 8

4 Dauerfilter reinigen
3.3 Staubbehälter ausleeren
Leeren Sie den Staubbehälter regelmä-
ßig.
ACHTUNG:
Bevor Sie den Staubbehälter leeren, schalten Sie das Gerät aus.
1. Halten Sie den Staubbehälter (Abb. 5/2)
mit einer Hand fest. Drücken Sie nun die
Entriegelungstaste (Abb. 5/1) um den
Staubbehälter zu lösen.
2. Ziehen Sie den Staubbehälter grade vom
Gerät ab (Abb. 5).
3. Zum Entleeren, halten Sie den Staubbehälter tief über einen Mülleimer.
4. Entnehmen Sie den Dauer filter (Abb. 6/3)
und schütten Sie den Staub in den Mülleimer.
5. Klopfen Sie Staubrückstände vorsichtig
aus.
1. Entfernen und leeren Sie den Staubbehälter und entnehmen Sie den Dauerfilter,
ZKapitel 3.3, „Staubbehälter ausleeren“,
Punkt 1-5.
2. Klop fen Sie den D auerfilter zur Grobreinigung über einem Mülleimer aus.
3. Bürsten Sie Gewebe und Kunststoffteile
bei Bedarf ab.
HINWEIS:
Falls der Dauerfilter stark verschmutzt ist,
spülen Sie ihn mit lauwarmem Wasser aus.
Lassen Sie den Dauerfilter anschließend
trocknen (ca. 15 Stunden bei Raumtemperatur). Setzen Sie ihn erst wieder in das
Gerät ein, wenn er vollkommen trocken
sind.
4. Setzen Sie den Dauerfilter wieder ein und
montieren Sie den Staubbehälter am Gerät, ZKapitel 3.3, „Staubbehälter
ausleeren“, Punkt 6 -7.
6. Stecken Sie den Dauerfilter (Abb. 6/3)
wieder in den Staubbehälter (Abb. 6/1).
Richten Sie hierbei den Dauerfilter so aus,
dass die Markierung am Dauerfilter
(Abb. 6/2) auf dem oberen Abstandshalter
im Staubbehälter (Abb. 6/4) liegt.
7. Schieben Sie die untere Führung
(Abb. 7/2) des Staubbehälters in die Führungsschiene (Abb. 7/1) am Akku-Handsauger. Drücken Sie nun den Staubbehälter an das Gerät, bis er hörbar einrastet.
4 Dauerfilter reinigen
Der Akku-Handsauger besitzt einen Dauerfilter (Abb. 6/3), der die eingesaugte Luft filtert.
Der Dauerfilter kann nach einiger Zeit ver-
stopfen und dadurch die Saugleistung reduzieren. Deshalb ist es wichtig, dass der Dauerfilter regelmäßig gereinigt wird.
Falls Sie feststellen, dass der Dauerfilter beschädigt ist, ersetzen Sie diesen umgehend.
HINWEIS:
Wir empfehlen, den Dauerfilter regelmäßig
zu reinigen oder auszutauschen.
ACHTUNG:
Bevor Sie den Dauerfilter entnehmen,
schalten Sie das Gerät aus.
8
Page 9

5 Fehlerbehebung
5 Fehlerbehebung
Bevor Sie das Gerät an den Royal® Appliance
Kundendienst einschicken, überprüfen Sie
anhand der folgenden Tabelle, ob Sie den
Fehler selbst beseitigen können.
WARNUNG:
Bevor Sie sich auf Fehlersuche begeben,
schalten Sie das Gerät aus. Verwenden Sie
niemals ein defektes Gerät.
Fehler mögliche Ursache
Lösung
Ladelampe leuchtet nicht
Gerät läuft nicht Akkus leer.
Gerät geht nach
kurzem Betrieb
von alleine aus
Gerät nimmt keinen Schmutz auf
Netzteil ist nicht eingesteckt.
Netzteil einstecken.
ZKapitel 2.2, „Akku
laden“
Steckdose führt keinen
Strom.
Testen Sie das Netzteil
an einer anderen Steckdose, bei der Sie sicher
sind, dass diese Strom
führt.
Akkus laden.
ZKapitel 2.2, „Akku
laden“
Akkus leer.
Akkus laden.
ZKapitel 2.2, „Akku
laden“
Staubbehälter ist voll
oder verstopft.
Staubbehälter leeren/reinigen.
ZKapitel 3.3,
„Staubbehälter
ausleeren“
6 Reinigung
WARNUNG:
Bevor Sie das Gerät reinigen, schalten Sie
es aus.
Reinigen Sie das Gehäuse ausschließlich
mit einem trockenen oder mit einem leicht angefeuchteten Tuch. Verwenden Sie keine
Reinigungsmittel, Scheuermittel oder Alkohol,
da diese das Gehäuse beschädigen können.
7 Entsorgung
Der Filtereinsatz ist aus umweltverträglichen
Materialien hergestellt und kann im Hausmüll
entsorgt werden.
Wenn das Gebrauchsende erreicht
ist, insbesondere, wenn Funktions-
störungen auftreten, machen Sie
das ausgediente Gerät unbrauchbar, indem
Sie den Netzstecker aus der Steckdose ziehen und das Stromkabel durchtrennen. Entsorgen Sie das Gerät entsprechend der in Ihrem Land geltenden Umweltvorschriften.
Elektrische Abfälle dürfen nicht zusammen
mit Haushaltsabfällen entsorgt werden. Wenden Sie sich für Ratschläge bezüglich des Recyclings an Ihre Kommunalbehörde oder Ihren Händler.
Das Gerät enthält Nickel-Cadmium Akkus, die
nicht in den Hausmüll gelangen dürfen. Die
Akkus befinden Sich in dem Gehäuseteil am
unteren Ende des Handgriffs (Abb. 8/1). Dieser Batterie-Einsatz ist mit 2 Schrauben
(Abb. 8/2,5) am Gehäuse befestigt.
ACHTUNG:
Bevor Sie den Einsatz demontieren und die
Akkus entfernen, schalten Sie das Gerät
aus.
1. Lösen Sie beide Schrau ben und entneh-
men Sie diese aus dem Gehäuse.
2. Schieben Sie den Batterie-Einsatz nach
hinten (Abb. 9) und lösen Sie die Verbindungsstecker im Handgriff durch entriegeln der Raste am Stecker.
D
9
Page 10

8 Ersatzteile
3. Lösen Sie nun die restlichen Schrauben
(Abb. 8/4,3) des Batterie-Einsatzes. Entnehmen Sie die Akkus und geben Sie sie
zur Entsorgung an die entsprechenden
Sammelstellen, an Ihren Händler oder direkt an Royal
®
Appliance.
8 Ersatzteile
Zubehörteile sowie Ersatzteile können nachbestellt werden. Diese erhalten Sie bei den
Firmen:
Zubehör-Ersatzteile-Service-Versand
Ina Riedmüller
Frankenstraße 34
D-89233 Neu-Ulm
Tel.: 0 73 07 / 51 75
Fax: 0 73 07 / 41 56
Riedmueller.service@t-online.de
Zubehör-Ersatzteile-Service-Versand
Staubsauger-Center Feuerbach KG
Corneliusstraße 75
D-40215 Düsseldorf
Tel.: 02 11 / 38 10 07
Fax: 02 11 / 37 04 97
Staubsaugercenter@t-online.de
Bei Eingriffen durch eine nicht von uns autorisierte Stelle oder bei Verwendung anderer als
original Royal
die Garantie. Verschleißteile fallen nicht unter
die Garantie und sind deshalb kostenpflichtig!
Die Garantie tritt nur in Kraft, wenn das Kaufdatum durch Stempel und Unterschrift des
Händlers auf der Garantiekarte bestätigt ist
oder eine Rechnungskopie dem eingeschickten Gerät beiliegt. Garantieleistungen bewirken weder eine Verlängerung der Garantiezeit, noch beginnt dadurch ein Anspruch auf
eine neue Garantie!
Versenden Sie das Gerät mit entleertem
Staubbehälter und einer kurzen Fehlerbeschreibung in Blockschrift. Versehen Sie das
Anschreiben mit dem Vermerk „Zur Garantie“.
Senden Sie es zusammen mit der Garantiekarte oder einer Rechnungskopie an folgende
Adresse:
®
Royal
Abt. Kundenservice
Itterpark 7-9
40724 Hilden
Germany
Appliance International GmbH
®
Appliance Ersatzteile erlischt
9 Garantie
Wir übernehmen für das von uns vertriebene Gerät eine Garantie von 24 Monaten
ab Kaufdatum.
Innerhalb dieser Garantiezeit beseitigen wir
nach unserer Wahl durch Reparatur oder
Austausch des Gerätes oder des Zubehörs
(Schäden an Zubehörteilen führen nicht automatisch zum Umtausch des kompletten Gerätes) unentgeltlich alle Mängel, die auf Material- oder Herstellungsfehlern beruhen. Von der
Garantie sind Schäden ausgenommen, die
auf unsachgemäßen Gebrauch (Betrieb mit
falscher Stromart/-spannung, Anschluss an
ungeeignete Stromquellen, Bruch, etc.) zurückzuführen sind sowie normaler Verschleiß
und Mängel, die den Wert oder die Gebrauchstauglichkeit des Gerätes nur unerheblich beeinflussen.
10
Tel.: 02103 / 20 07 10
Fax: 02103 / 20 07 77
www.dirtdevil.de
Page 11

Many thanks!
We are pleased that you decided on the
Handy Pro battery powered hand-held
vacuum cleaner! We hope you enjoy using
your appliance and we would like to thank you
for your purchase!
G
Overview
(Fig. 1):
1 Suction nozzle
2 Dust container
3 Release button
4 Light for deep discharge protection (red)
5 Service light (green)
6 Air outlet openings
7 Charging light
8 Socket f or mains adapter connection
9 Handle
10 On/off button
Scope of delivery
(Fig. 2):
1 Battery powered hand-held vacuum
cleaner
2 Power unit
3 Crevice nozzle
4 Furniture brush
Technical data
Model Handy Pro M131 Handy Pro M132 Handy Pro M133 Handy Pro M134
Type of Battery powered hand-held vacuum
Power unit 230 - 240 V
~50 Hz
9 V DC
200 mA
Battery NiCd
7.2 V DC
1300 mAh
Charging time 14-
230 - 240 V
~50 Hz
15 V DC
200 mA
NiCd
9.6 V DC
1300 mAh
Charging time 14-
230 - 240 V
~50 Hz
15 V DC
300 mA
NiCd
12 V DC
1300 mAh
Charging time 14-
230 - 240 V
~50 Hz
18 V DC
300 mA
NiCd
14.4 V DC
1300 mAh
Charging time 14-
Max. operating
time
Output 80 W nom. 90 W nom. 100 W nom. 120 W nom.
Dust container 0.22 litre
Weight approx. 1.03 kg approx. 1.13 kg approx. 1.23 kg approx. 1.33 kg
approx. 8 min approx. 10 min approx. 12 min approx. 15 min
washable
0.22 litre
washable
0.22 litre
washable
0.22 litre
washable
11
Page 12

1 Safety instructions
1 Safety instructions
1.1 Regarding the operating
manual
Read this operating manual through
completely before working with the appliance.
Keep the operating manual safe. If you pass
the appliance on to a third party, give them the
operating manual as well.
Non-compliance with these instructions
can lead to serious injuries or damage to
the appliance.
We assume no liability for damage that occurs
as a result of non-compliance with this
operating manual.
The appliance may only be operated in
households. It is not suitable for industrial or
commercial use.
1.2 for the symbols used
Important notes for your safety are especially
marked. You must observe these instructions
to avoid accidents and damage to the
appliance:
W ARNING:
Warns against hazards for your health and
indicates possible risks of injury.
ATTENTION:
Indicates possible hazards for the appliance
or other objects.
NOTE:
Highlights tips and information for you.
1.3 Regarding the power supply
The appliance is charged and operated
with electrical power which means there is in
principle a risk of electric shock. Pay particular
attention to the following:
- Never immerse the appliance/power unit
in water or other fluids and keep it away
from rain and moisture.
- Only charge the appliance if the electrical
voltage stated on the power unit matches
the voltage of your socket. Wrong voltage
can destroy the power unit.
1.4 Regarding the batteries
The appliance contains rechargeable nickelcadmium batteries.
Do not throw the batteries into fire or
subject to high temperatures. There is a risk of
explosion.
If used wrongly, fluid can leak from the
battery. This can cause skin irritations. Avoid
any contact with the fluid. If you experience
contact with the fluid, rinse with lots of water.
If the fluid comes into contact with your eyes,
rinse immediately for 10 min. with water and
find a doctor straightaway.
If it is necessary to replace the batteries,
contact a specialist dealer or Royal
Appliance Customer Services. We assume no
liability for any damage resulting from
improperly replaced batteries.
1.5 Regarding children
Never leave the appliance unattended,
and use it with the greatest of care if children
or persons who cannot assess the risks are
nearby.
Children or persons who cannot assess
the risks may not use the appliance. Store it
so it is inaccessible.
Packing material must not be used to play
with. There is a danger of suffocation.
®
- Never touch the power unit with wet
hands.
- If you want to pull the power unit out of the
socket, always pull directly on the plug.
Never pull on the cable as it could break.
- Make sure that the power cable is not
bent, caught or run over, and that it does
not come into contact with heat sources.
12
Page 13

2 Unpacking and connecting
1.6 Regarding intended use
The battery powered hand-held vacuum
cleaner must be used exclusively for
vacuuming up small quantities of dust. Any
other use is considered non-intended use and
is prohibited. In particular, the activities
listed in the following may under no
circumstances be carried out with the
battery powered hand-held vacuum
cleaner:
Do not vacuum:
- hot ash, burning cigarettes or matches.
These can cause fire.
- pointed objects such as glass fragments,
nails, etc. These objects destroy the filter.
- water and other fluids, especially damp
carpet cleaning agents. Dampness inside
the appliance can lead to a short-circuit.
- toner (for laser printers, copy machines,
etc.). There is a risk of fire and explosion.
- plaster, cement, etc. The filter can
become blocked.
Do not vacuum people or animals (e.g.
hair, fingers and other body parts) or push
body parts into the openings of the appliance.
There is a danger of injury.
Do not use near explosive or easily
flammable substances. There is a risk of fire
or explosion.
Do not use in the open-air. There is a risk
of the appliance being destroyed by rain and
dirt.
Do not push objects into the openings of
the appliance. It could overheat.
1.7 If the appliance is defective
Never operate a defective appliance or an
appliance with a defective cable. There is a
considerable risk of injury.
Bring or send defective appliances to a
specialist dealer or to Royal
Customer Services for repair.
®
Appliance
2 Unpacking and
connecting
2.1 Unpacking
Unpack the appliance and all accessory parts
and check that the contents are complete.
ATTENTION:
Always transport/send the appliance in its
original packaging so that it does not
become damaged. Keep the packing
material for this purpose.
Dispose of any packing material that is no
longer required in accordance with the
provisions applicable in your country.
NOTE:
If you should notice damage due to
transport, then contact your dealer
immediately.
2.2 Charge the battery
ATTENTION:
Only use the charger supplied with the
appliance for charging the battery. If this
condition is disregarded, the appliance may
incur damage or the batteries may be
severely damaged.
G
The battery must be charged before being
able to work with the appliance. To do this:
1. Connect the power unit (Fig. 2/2) to the
appliance. Push the plug for this (Fig. 3/2)
into the socket (Fig. 3/1) on the handle.
2. Then plug the power unit into the socket.
The charging light (Fig. 1/7) is illuminat ed
red.
3. Now leave the battery to char ge for 14- 16
hours.
13
Page 14

3 Operating
NOTE:
The battery powered hand-held vacuum is
equipped with an overload protection. Once
the maximum charging capacity of the
battery has been reached, the appliance
automatically switches to floating operation
This protects the battery against damage
even if the specified charging time is
exceeded.
4. After charging, pull the power unit out of
the socket first and then remove the
connection plug from the appliance.
2.3 Using other nozzles
(accessories)
The battery powered hand-held vacuum
cleaner can be used for many different
purposes when combined with the crevice
nozzle (Fig. 2/3) and furniture brush (Fig. 2/4)
which are included in the scope of delivery.
W ARNING:
Switch the battery powered hand-held
vacuum cleaner off before assembling or
removing the accessories.
You can simply push the accessory into
the suction nozzle (Fig. 4/1). Insert the
connection for the accessory into the suction
nozzle to the stop point (Fig. 4).
Use the accessories as follows:
- Furniture brush (Fig. 4/2)
Use this to vacuum dust off objects that
have sensitive surfaces (e.g. cupboards,
doors).
- Crevice nozzle (Fig. 4/3)
Use this to vacuum dust from hard to
reach places.
3 Operating
3.1 Vacuuming
.
W ARNING:
Check the battery powered hand-held
vacuum cleaner before each use. A
damaged appliance must never be used.
There is a risk of injury.
1. Switch on the battery powered hand-held
vacuum cleaner using the on/off switch
(Fig. 1/10).
ATTENTION:
Make sure that the air outlet openings
(Fig. 1/6) are free. Otherwise the suction
power will be extremely impaired.
2. If necessary, you can also use the
accessories for vacuuming Zchapter 2.3,
„Using other nozzles (accessories)“.
3. To switch off the vacuum cleaner, press
the on/off switch (Fig. 1/10) again.
NOTE:
The appliance is equipped with an
exhaustive discharge protection. Once the
minimum charging capacity of the battery is
reached, the deep discharge protection light
(Fig. 1/4) lights up red and the battery
operated hand-held vacuum cleaner
switches off automatically. Charge up the
battery completely before using the
appliance again.
3.2 Putting away the appliance
ATTENTION:
Never position the appliance directly against
heat sources (e.g. heating, oven). Avoid
direct sunlight. Heat can damage the
appliance.
14
If you want to store the appliance for a
longer period of time, empty the dust
container and clean it. Store the appliance in
a cool, dry room.
Page 15

4 Cleaning the permanent filter
3.3 Emptying the dust container
Empty the dust container regularly.
Switch off the appliance before removing
ATTENTION:
Switch off the appliance before emptying
the dust container.
1. Hold the dust container (Fig. 5/2) firmly
with one hand. Now press the release
button (Fig. 5/1) to release the dust
container.
2. Pull the dust container out of the appliance
while holding it level (Fig. 5).
3. When emptying the dust container, hold it
low over a dustbin.
4. Remove the permanent filter (Fig. 6/3)
and tip the dust into the dustbin.
5. Carefully knock the remaining dust loose.
6. Re-insert the permanent filter (Fig. 6/3)
into the dust container (Fig. 6/1). When
doing this, align the permanent filter in
such a way that the mark on the
permanent filter (Fig. 6/2) lies on the
upper spacer in the dust container (Fig. 6/
4).
7. Push the lower guide (Fig. 7/2) on the dust
container into the guide rail (Fig. 7/1) on
the battery powered hand-held vacuum
cleaner. Now press the dust container
against the appliance until it audibly clicks
into place.
the permanent filter.
1. Remove and empty the dust container and
remove the permanent filter, Zchapter
3.3, „Emptying the dust container“,
Point 1-5.
2. Knock the permane nt filter over a dustbin
for a rough clean.
3. Brush off the fabric and plastic parts, as
necessary.
NOTE:
If the permanent filter is extremely dirty,
rinse it with lukewarm water.
The leave the permanent filter to dry
(approx. 15 hours at room temperature).
Only insert it back into the appliance when it
is completely dry.
4. Re-insert the permanent filter and
assembly the dust container onto the
appliance, Zchapter 3.3, „Emptying the
dust container“, Point 6 -7.
NOTE:
We recommend that you clean and replace
the permanent filter regularly.
ATTENTION:
G
4 Cleaning the permanent
filter
The battery powered hand-held vacuum
cleaner has a permanent filter (Fig. 6/3) which
filters sucked-in air.
The permanent filters can become
blocked after some time and can reduce the
suction power as a result. It is therefore
important that the permanent filters are
cleaned regularly.
If you determine that a permanent filter is
damaged, replace it immediately.
15
Page 16

5 Correcting malfunctions
5 Correcting malfunctions
Before sending the appliance to Royal
Appliance Customer Services, use the
following table to check whether you can
correct the malfunctions yourself.
W ARNING:
Switch off the appliance before troubleshooting. Never use a defective appliance.
Malfunction Possible cause
Solution
Charging light is
not illuminated
Appliance does
not work
After a short
period of
operation, the
appliance stops
Appliance does
not suck up any
dirt
Power unit has not been
inserted.
Insert power unit.
Zchapter 2.2, „Charge
the battery“
Socket does not carry
any current.
Test the power unit at
another socket which
you are sure carries
current.
Batteries dead.
Charge the batteries.
Zchapter 2.2, „Charge
the battery“
Batteries dead.
Charge the batteries.
Zchapter 2.2, „Charge
the battery“
Dust container is full or
blocked.
Empty/clean dust
container.
Zchapter 3.3, „Emptying
the dust container“
6 Cleaning
®
W ARNING:
Switch off the appliance before cleaning it.
Only clean the housing with a dry or
slightly damp cloth. Do not use any cleaning
agent, scouring agent or alcohol as these can
damage the housing.
7 Waste disposal
The filter insert is made from environmentally
compatible materials and can be disposed of
with the domestic waste.
When the service life of the
appliance has expired, in particular if
malfunctions occur, make the
finished appliance unusable by removing the
mains plug from the socket and disconnecting
the power cable. Dispose of the appliance
according to the environmental provisions
applicable in your country. Electrical waste
must not be disposed of with domestic waste.
Contact your municipal authority or your
dealer for any advice regarding recycling.
The appliance contains nickel-cadmium
batteries that must not end up in the domestic
waste. The batteries are located in the section
of housing on the lower end of the handle
(Fig. 8/1). This battery insert is secured to the
housing with 2 screws (Fig. 8/2.5).
ATTENTION:
Switch off the appliance before dismantling
the insert and removing the batteries
1. Loosen both screws and remove them
from the housing.
2. Push the battery insert to the back (Fig. 9)
and release the appliance plug in the
handle by unlocking the catch on the plug.
16
Page 17

8Spare parts
3. Now release the remaining screws (Fig. 8/
4.3) on the battery insert. Remove the
batteries and pass them on for waste
disposal to the corresponding collection
sites, to your dealer or directly to Royal
Appliance.
8 Spare parts
Accessory parts and spare parts can be
reordered. Zpage 89, „Royal Appliance Int.
GmbH International Service“.
9Warranty
We offer a warranty of 24 months from the
date of purchase for the appliances we
sell.
Within this warranty period, we will remove all
defects free of charge that are due to material
or manufacturing faults, either by repair work
or replacing the appliance or accessories, at
our discretion (damage to accessory parts
does not automatically lead to the entire
appliance being replaced). The warranty does
not cover damage due to improper use
(operating with the wrong power type/voltage,
connecting to unsuitable power sources,
breakage, etc.), normal wear and defects that
only insignificantly affect the value or the
ability of the appliance to be used.
The warranty is made null and void if any work
is carried out by a site not authorized by us or
if spare parts other than Royal
spare parts are used. Wear parts are not
included in the warranty and are therefore at
the customer's expense!
®
Appliance
The warranty only comes into force if the
purchase date is confirmed by a stamp and
signature of the dealer on the warranty card or
®
if a copy of the invoice is included with the
appliance when it is sent in. Any warranty
work does not extend the warranty time nor
does it constitute a claim for a new warranty!
Send the appliance with an emptied dust
container and a short description of the fault in
block capitals. Write the comment "Regarding
warranty" on the address label. Send it
together with the warranty card or a copy of
the invoice to the following address:
Zpage 89, „Royal Appliance Int. GmbH
International Service“.
G
17
Page 18

Royal Appliance Int. GmbH International Service
Royal Appliance Int. GmbH I nternational Service
F
o
Sona France
21 rue Eugene Sue
F-94700 Maisons Alfort
Tel: +33 1 43 78 00 42
Fax: +33 1 43 78 01 38
A
o
Zmugg Elektronik Service
und Vertriebges. M.b.H.
Fabriksgasse 27
A - 8020 Graz
Tel: +43 316 772 120
Fax: +43 316 772 120 10
H
o
SERVICE-COOP
Hegedus Gyula u. 35-37
H-1136 Budapest
Tel: +36 1 349 5972
Fax: +36 1 350 1167
E
o
Royal Appliance Espana, SL
Royal, Dirt Devil, Stellar
C/ Jazmin, 66 - 3°
E-28033 Madrid
Tel: +34 902 430 663
oCZo
Le Cygne electronic service
spol. s r.o.
Jablonecká 722/8
190 00 Praha 9
Tel: +420 286883940
Fax: +420 286885064
DK
o
Scandia Serviceteknik A/S
Hedeager 5
DK - 2605 Brondby
Tel: +45 432 02710
Fax: +45 432 02719
SK
NL
o
Z.E.S. Goes B.V.
T.a.v. afd. Service
Pearyweg 1
NL-4462 GT Goes
Tel: +31 0113 240700
Fax: +31 0113 24075 0
Mail: dirtdevil@zesgoes.nl
PL
o
SERV-SERWIS Sp. z o.o.
ul. Poniatowskiego 4/1
45-049 Opole
Tel: +77 453 61-39
Fax: +77 453 61-38
Mail: adabrowski
@serv-serwis.pl
SK
o
EURO ELECTRONIC SERVIS
SK s. r. o.
Stefanikova 736
908 73 Velke Levare
Tel: +42 134 774 8051
Mail: eessk@stonline.sk
SLO
o
Strojinc Ciril s.p.
Koseskega ul. 1a
SLO - 1000 LJUBLJANA
Tel: +386 -1- 422 8489
Garantiekarte
Warranty Card
Card de garantie
Garantiekaart
Certificado de garantía
Certificado de garantia
P
o
Portugies
Famatecnica
Rua Antonio Enes No. 20
1050-025 Lisboa
Tel: +351 213 14 3510
Karta gwarancyjna
Garantikort
Záruční list
Garanclalevěl
Záručný list
Garancijski list
Handy Pro
Stempel und Unterschrift des Händlers / Stamp and sign of dealer / Cachet et sig n atur du vendeur / Stempe l e n handtekening van de han delaar / Sello y firma
del distribuidor / Carimbo e assinatura do revendedor / Stempel i podpis sprzedającego / Selgers stempel og underskrift / Razítko a podpis obchodníka /
A kereskedő pecsétje és aláírása / Pečiatka a podpis pre dajcu / Žig i podpis trgovca
Fehlerbeschreibung / Descrip tion of fault / Description de l’erreur / Beschrijving van de fouten / Descripción del error
Descrição do problema / Opis usterki / Feilbeskrivelse /
Popis závad / Hiba leírása / Popi s chyby / Opis napak
Kaufdatum / Date of purchase / Date d´achat / Koopdatum / Fecha de compra / Data da compra Data zakupu /
Kjøpsdato / D atum koupě / Vásárlás napja / Dátum kúp y / Datum kup a
 Loading...