

Page 1
Handy / Handy deluxe
Royal Appliance International GmbH
Jagenbergstraße 19
41468 Neuss
Germany
+49 - 2131 - 60 90 0
+49 - 2131 - 60 90 60 95
info@dirtdevil.de
Roya-11726-1 • A5 • 04.01.2011
www.dirtdevil.de
Handsauger
DE
Bedienungsanleitung
Hand-held vacuum cleaner
GB
Operating Manual
Aspirateur à main
FR
Mode d’emploi
Handzuiger
NL
Bedieningshandleiding
Aspiradora de mano
ES
Manual de instrucciones
Aspirador manual
PT
Instrução de serviço
Mini odkurzacz
PL
Instrukcja obsugi
Runí vysava
CZ
Návod k obsluze
Runý vysáva
SK
Návod na obsluhu
Roni sesalec
SI
Navodila za uporabo
Rucni usisavac
HR
Uputa za upotrebu
Kézi porszívó
HU
Kezelési útmutató
Page 2

Bedienungsanleitung ................................................................................ 4 - 10
Operating Manual ....................................................................................... 11 - 17
Mode d‘emploi............................................................................................. 18 - 24
Bedieningshandleiding .............................................................................. 25 - 31
Manual de instrucciones............................................................................ 32 - 38
DE
GBFRNLESPLCZSKSIHRHU
Instrução de serviço .................................................................................. 39 - 45
Instrukcja obsugi ....................................................................................... 46 - 52
Návod k obsluze ......................................................................................... 53 - 59
Návod na obsluhu ...................................................................................... 60 - 66
Navodila za uporabo................................................................................... 67 - 73
Uputa za upotrebu ..................................................................................... 74 - 80
Kezelési útmutató ...................................................................................... 81 - 87
PT
2
Page 3
D
5
4
3
2
6
1
7
2
3
1
10
7
8
9
2
3
1
6
3
BA
4
2
10
8
9
Abb. 1
Abb. 3
1
Abb. 5
6
5
4
2
1
1
3
1
3
4
Abb. 2
3
Abb. 4
2
1
Abb. 6
2
5
Abb. 7
2
1
Abb. 9
Abb. 8
Abb. 10
3
Page 4

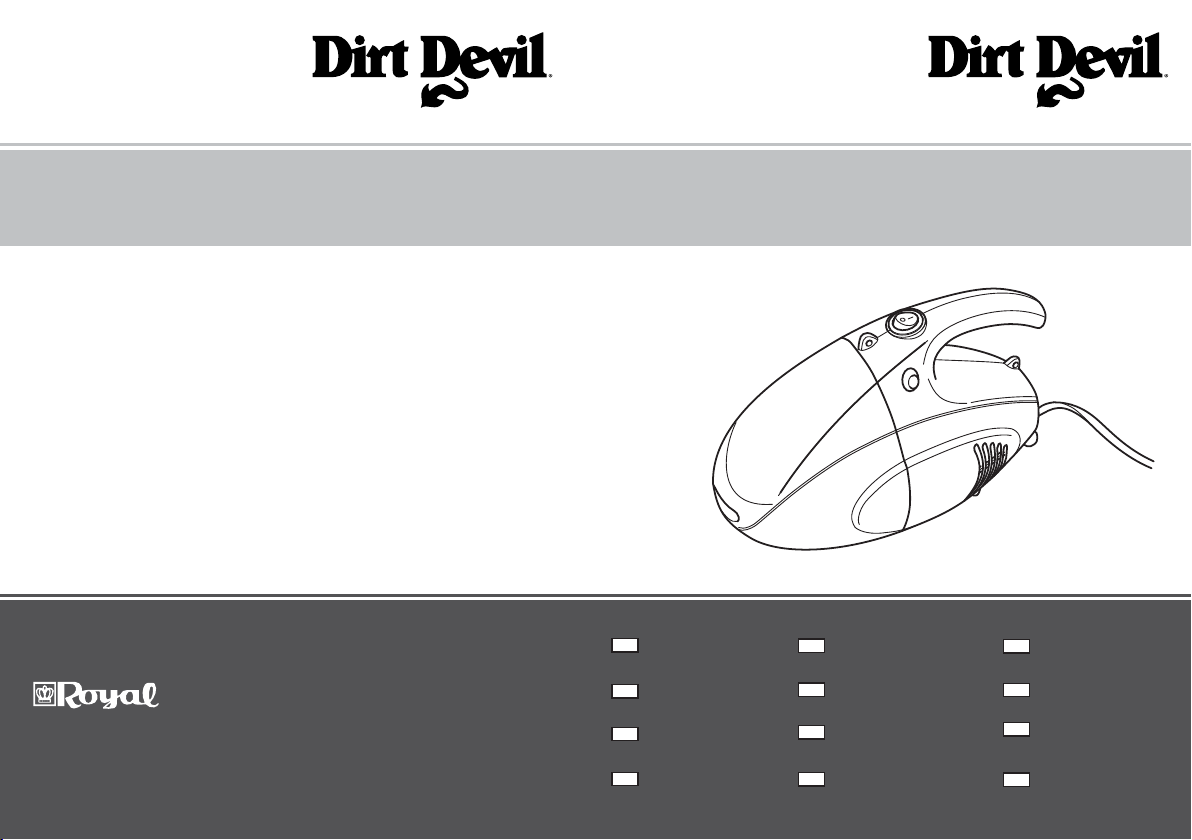
1 Sicherheitshinweise
Vielen Dank!
Es freut uns, dass Sie sich für den
Handsauger „Handy“ bzw. „Handy deluxe“
entschieden haben! Wir wünschen Ihnen viel
Freude mit dem Gerät und danken Ihnen für
den Kauf!
Überblick
(Abb. 1):
1 Saugdüse
2 Staubbehälter
3 Entriegelungstaste für Staubbehälter
4 Öse für Schultergurt
5 Ein-/Aus-Schalter
6 Handgriff
7 Öse für Schultergurt
8 Stromkabel
9 Luftaustrittsöffnungen
10 Standfüße
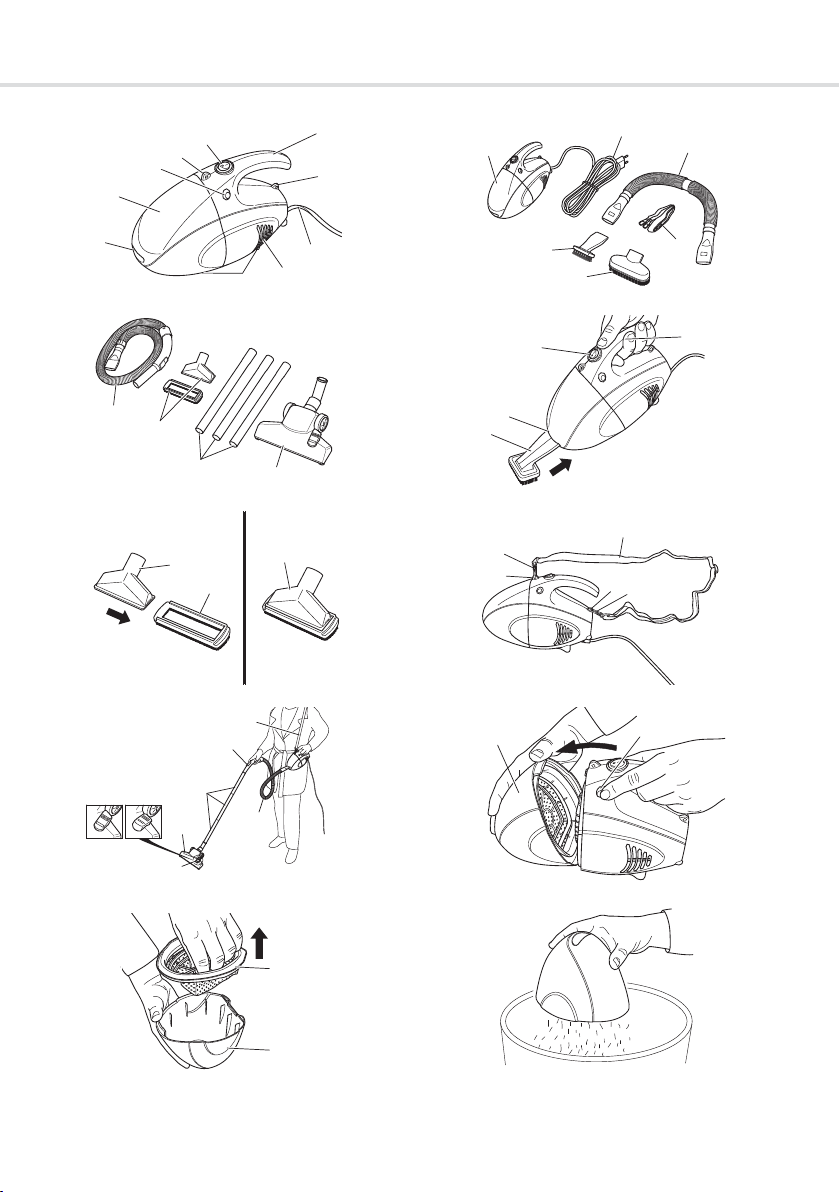
Lieferumfang
Ausführung „Handy“ (Abb. 2):
1 Handsauger
2 Stromkabel
3 Kleiner Saugschlauch
4 Schultergurt
5 Möbelbürste
6 Möbelpinsel
Zusätzlich bei der Ausführung „Handy deluxe“
(Abb. 3)*:
7 Langer Saugschlauch mit Handgriff
8 2 in 1 Kombidüse, bestehend aus Polster-
düse und Bürstenaufsatz
9 Steckrohre (3 Stück)
10 Bodendüse
* Nicht im Lieferumfang der Ausführung
„Handy“ enthalten.
Technische Daten
Geräteart : Handsauger
Modell : Handy
Handy deluxe
[M629 (-0/-1/......./-8/-9)]
Spannung : 220-240 V~, 50/60 Hz
Leistung : 700 W nom.
850 W max.
Staubbehälter : 0,5 Liter
auswaschbar
Filter : Dauerfilter, auswaschbar
& Ausblasfilter
Kabellänge : ca. 6 m
Gewicht : ca. 1,3 kg
1 Sicherheitshinweise
1.1 zur Bedienungsanleitung
Lesen Sie diese Bedienungsanleitung vollständig durch, bevor Sie mit dem Gerät arbeiten. Bewahren Sie die Anleitung gut auf. Falls
Sie das Gerät an Dritte weitergeben, geben
Sie auch die Bedienungsanleitung mit.
Die Nichtbeachtung dieser Anleitung kann
zu schweren Verletzungen oder Schäden
am Gerät führen.
Für Schäden, die durch Nichtbeachtung dieser Bedienungsanleitung entstehen, übernehmen wir keine Haftung.
Wichtige Hinweise für Ihre Sicherheit sind besonders gekennzeichnet. Beachten Sie diese
Hinweise unbedingt, um Unfälle und Schäden
am Gerät zu vermeiden:
WARNUNG:
Warnt vor Gefahren für Ihre Gesundheit und
zeigt mögliche Verletzungsrisiken auf.
ACHTUNG:
Weist auf mögliche Gefährdungen für das
Gerät oder andere Gegenstände hin.
HINWEIS:
Hebt Tipps und Informationen für Sie hervor.
4
Page 5

1 Sicherheitshinweise
1.2 zur Stromversorgung
Das Gerät wird mit elektrischem Strom be-
trieben, dabei besteht grundsätzlich die Gefahr eines elektrischen Schlags. Achten Sie
daher besonders auf Folgendes:
- Fassen Sie den Stecker nie mit nassen
Händen an.
- Wenn Sie das Stromkabel aus der
Steckdose ziehen wollen, ziehen Sie immer direkt am Stecker. Ziehen Sie niemals am Stromkabel, es könnte reißen.
- Achten Sie darauf, dass das Stromkabel
nicht geknickt, eingeklemmt oder überfahren wird oder mit Hitzequellen in Berührung kommt.
- Tauchen Sie das Gerät niemals in Wasser oder andere Flüssigkeiten und halten Sie es von Regen und Nässe fern.
- Betreiben Sie das Gerät nur, wenn die
auf dem Typenschild angegebene elektrische Spannung mit der Spannung Ihrer Steckdose übereinstimmt. Falsche
Spannung kann das Gerät zerstören.
1.3 zu Kindern
Dieses Gerät ist nicht dafür bestimmt,
durch Personen (einschließlich Kinder) mit
eingeschränkten physischen, sensorischen
oder geistigen Fähigkeiten oder mangels Erfahrung und/oder mangels Wissen benutzt zu
werden, es sei denn, sie werden durch eine für
ihre Sicherheit zuständige Person beaufsichtigt oder erhielten von ihr Anweisungen, wie
das Gerät zu benutzen ist. Bewahren Sie es
für diesen Personenkreis unzugänglich auf.
Kinder sollten beaufsichtigt werden, um
sicherzustellen, dass sie nicht mit dem Gerät
spielen.
Verpackungsmaterialien dürfen nicht zum
Spielen verwendet werden. Es besteht Erstickungsgefahr.
1.4 zur bestimmungsgemäßen
Verwendung
Verwenden Sie den Handsauger ausschließlich für das Reinigen trockener, normal verschmutzter Böden, Teppiche, Läufer, etc.
Jede weitere Verwendung gilt als nicht bestimmungsgemäß und ist untersagt.
Das Gerät darf nur im Haushalt eingesetzt
werden. Es ist für eine gewerbliche Nutzung
nicht geeignet.
Verboten ist insbesondere:
Das Saugen von:
- Haaren, Fingern und anderen Körperteilen. Sie könnten eingezogen und verletzt werden.
- Kleidungsstücken (Schals, etc.). Sie
könnten eingezogen werden und Verletzungen hervorrufen.
- Wasser und anderen Flüssigkeiten, insbesondere feuchten Teppich-Reinigungsmitteln. Feuchtigkeit im Inneren
kann zum Kurzschluss führen.
- Toner (für Laserdrucker, Kopierer, etc.).
Es besteht Brand- und Explosionsgefahr.
- glühender Asche, brennenden Zigaretten oder Streichhölzern. Es kann zum
Brand kommen.
- spitzen Gegenständen, wie Glassplittern, Nägeln, etc. Das Gerät kann beschädigt werden.
- Gips, Zement, Bauschutt, Schminke,
Puder usw. Das Gerät kann beschädigt
werden.
Die Verwendung in der Nähe von explo-
siven oder leicht entzündlichen Stoffen. Es
besteht Brand- oder Explosionsgefahr.
Die Verwendung im Freien. Es besteht die
Gefahr, dass Regen und Schmutz das Gerät
zerstören.
Das Hineinstecken von Gegenständen in
die Öffnungen des Gerätes. Es könnte überhitzen.
1.5 bei defektem Gerät
Betreiben Sie niemals ein defektes Gerät,
oder ein Gerät mit einem defekten Kabel.
Wenn die Anschlussleitung dieses Gerätes
beschädigt wird, muss sie durch den Hersteller oder seinen Kundendienst oder eine ähnlich qualifizierte Person ersetzt werden, um
Gefährdungen zu vermeiden.
Geben Sie ein defektes Gerät zur Repara-
tur an einen Fachhändler oder den Royal Appliance-Kundendienst.
Adresse: ZSeite 10, „Garantie“.
DE
5
Page 6

2 Auspacken und Anschließen
2 Auspacken und Anschlie-
ßen
2.1 Auspacken
Packen Sie das Gerät und alle Zubehörteile
aus und überprüfen Sie den Inhalt auf Vollständigkeit.
ACHTUNG:
Transportieren/versenden Sie das Gerät
grundsätzlich immer in der Originalverpackung, damit es keinen Schaden nimmt.
Heben Sie dazu die Verpackung auf.
Entsorgen Sie nicht mehr benötigtes Verpackungsmaterial entsprechend den in Ihrem
Land geltenden Vorschriften.
HINWEIS:
Sollten Sie einen Transportschaden bemerken, wenden Sie sich umgehend an Ihren
Händler.
2.2 Verwenden des Zubehörs
Mit dem im Lieferumfang enthaltenen Zubehör (Abb. 2 und Abb. 3) lässt sich der
Handsauger vielseitig verwenden. Die besten
Saugergebnisse erhalten Sie, wenn Sie den
Handsauger zusammen mit einer der im Zubehör mitgelieferten Düsen verwenden.
WARNUNG:
Schalten Sie den Handsauger aus, bevor
Sie das Zubehör montieren oder abnehmen.
Die Düsen und Schläuche (z. B. den Mö-
belpinsel (Abb. 4/1) können Sie einfach in die
Saugdüse (Abb. 4/2) einstecken und beliebig
kombinieren.
2.3 Anwendung der Düsen
Möbelbürste (Abb. 2/5)
Benutzen Sie diese, um Staub von Gegenständen zu saugen, die empfindliche Oberflächen haben (z. B. Schränke, Tische).
Möbelpinsel (Abb. 2/6)
Benutzen Sie diesen wie die Möbelbürste,
wenn diese zu breit ist.
2 in 1 Kombidüse (nur „Handy deluxe“)
(Abb. 6) nur zu verwenden mit dem langen
Saugschlauch (Abb. 3/7) als:
- Möbelbürste (Abb. 5/1)
Benutzen Sie diese, um Staub von Gegenständen zu saugen, die empfindliche
Oberflächen haben (z. B. Schränke, Tische).
- Polsterdüse (Abb. 5/2)
Durch einfaches Abnehmen des Bürstenaufsatzes (Abb. 5/3) können Sie aus der
2 in 1 Kombidüse eine Polsterdüse
(Abb. 5/2) machen. Verwenden Sie diese
zum Reinigen von weichen, kratzfesten
Oberflächen (z. B. Polstermöbel).
Bodendüse nur zu verwenden mit dem
langen Saugschlauch (Abb. 3/7), (Abb. 3/10,
nur „Handy deluxe“) ZKapitel 2.5, „Umbau
zum Bodenstaubsauger“.
2.4 Anbringen des Schultergurtes
Den Schultergurt können Sie zur Erleichterung beim Tragen des Handsaugers verwenden, wenn Sie diesen mit einem
Saugschlauch einsetzen.
Haken Sie einfach die beiden Karabiner-
haken (Abb. 6/1) des Schultergurtes
(Abb. 6/2) in die Ösen (Abb. 6/3) ein.
6
Page 7

3 Bedienung
2.5 Umbau zum Bodenstaubsauger
Mit wenigen Handgriffen können Sie den
Handsauger „Handy deluxe“ zum voll funktionsfähigen Bodenstaubsauger umrüsten
(Abb. 7):
1. Bringen Sie den Schultergurt (Abb. 7/1)
an ZKapitel 2.4, „Anbringen des
Schultergurtes“.
2. Stecken Sie den langen Saugschlauch mit
Handgriff (Abb. 7/2) in die Saugdüse.
3. Stecken Sie die 3 Steckrohre (Abb. 7/3)
zusammen und anschließend in den
Handgriff.
4. Stecken Sie die Bodendüse (Abb. 7/4)
auf.
5. Stellen Sie je nach Bodenbelag den Um-
schalter Teppich/Hartboden (Abb. 7/5)
ein:
- Hartboden (Abb. 7/A)
Laminat, Fliesen, PVC, etc.
- Teppich (Abb. 7/B)
Lang- und kurzflorige Teppiche, Läufer,
etc.
HINWEIS:
Mit dem Nebenluftregler (Abb. 7/6) können
Sie die Saugleistung nach Wunsch reduzieren.
3 Bedienung
3.1 Saugen
WARNUNG:
Prüfen Sie das Gerät vor jeder Benutzung.
Ein beschädigtes Gerät darf nicht verwendet werden. Es besteht Verletzungsrisiko.
ACHTUNG:
Verwenden Sie das Gerät nur, wenn der Filter intakt, trocken und korrekt eingesetzt ist.
Stellen Sie sicher, dass keine Öffnungen
verstopft sind. Anderenfalls kann das Gerät
beschädigt werden.
.
1. Setzen Sie das gewünschte Zubehör ein
ZKapitel 2.2, „Verwenden des Zubehörs“.
WARNUNG:
Durch die hohe Motorleistung erzeugt der
Handsauger beim Einschalten einen kräftigen Drehimpuls.
Wird der Handsauger eingeschaltet, ohne
festgehalten zu werden, besteht die Gefahr,
dass er sich unkontrolliert bewegt und dabei
herunterfällt oder Gegenstände umreißt.
Halten Sie den Handsauger deshalb beim
Einschalten immer fest. Achten Sie vor dem
Einstecken des Steckers darauf, dass der
Ein-/Aus-Schalter (Abb. 4/4) in Stellung „0“
steht.
2. Stecken Sie den Stecker in die Steckdose.
3. Halten Sie den Handsauger am Handgriff
fest (Abb. 4/3).
4. Schalten Sie den Handsauger am Ein-/
Aus-Schalter (Abb. 4/4) ein.
ACHTUNG:
Achten Sie darauf, dass die Luftaustrittsöffnungen (Abb. 1/9) frei sind. Die Saugwirkung lässt sonst nach.
3.2 Abstellen
1. Schalten Sie den Bodenstaubsauger am
Ein-/Aus-Schalter (Abb. 4/4) aus und ziehen Sie den Stecker aus der Steckdose.
2. Wickeln Sie das Kabel auf.
3. Verstauen Sie das Gerät und nicht mehr
benötigtes Zubehör an einem kühlen, trockenen Ort.
ACHTUNG:
Stellen Sie das Gerät nie direkt neben Wärmequellen ab (z. B. Heizung, Ofen). Vermeiden Sie direkte Sonneneinstrahlung. Die
Hitze kann das Gerät beschädigen.
Wenn Sie das Gerät längere Zeit lagern
möchten, leeren Sie den Staubbehälter und
reinigen Sie ihn.
DE
7
Page 8

4Wartung
4Wartung
ACHTUNG:
Schalten Sie das Gerät aus und ziehen Sie
den Stecker, bevor Sie mit den hier
beschriebenen Arbeiten beginnen.
4.1 Staubbehälter ausleeren
Leeren Sie den Staubbehälter regelmäßig.
HINWEIS:
Den Inhalt des Staubbehälters können Sie
im Hausmüll entsorgen, sofern er keine für
den Hausmüll verbotenen Bestandteile enthält.
1. Halten Sie den Staubbehälter (Abb. 8/1)
mit einer Hand fest.
2. Drücken Sie nun die Entriegelungstaste
(Abb. 8/2), um den Staubbehälter zu entnehmen.
3. Drehen Sie den Staubbehälter (Abb. 9/1)
so, dass der Filter nach oben zeigt. So
vermeiden Sie, dass versehentlich Staub
herausfällt.
4. Entnehmen Sie den Dauerfilter (Abb. 9/2).
5. Halten Sie den Staubbehälter zum Entlee-
ren tief über einen Mülleimer (Abb. 10).
6. Reinigen Sie den Staubbehälter bei star-
ker Verschmutzung gründlich durch Spülen mit warmem Wasser (max. 40 °C).
7. Lassen Sie den Staubbehälter trocknen.
Setzen Sie ihn erst ein, wenn er vollständig trocken ist.
ACHTUNG:
Der Staubbehälter ist nicht spülmaschinengeeignet. Verwenden Sie zum Reinigen des
Behälters nie Reinigungsmittel, Scheuermittel oder Alkohol, da diese den Staubbehälter beschädigen.
8. Reinigen Sie bei dieser Gelegenheit auch
gleich den Dauerfilter ZKapitel 4.2,
„Dauerfilter reinigen“.
9. Setzen Sie den Staubbehälter samt Dau-
erfilter wieder ein (Abb. 8/entgegen der
Pfeilrichtung). Er rastet hörbar ein.
4.2 Dauerfilter reinigen
Der Dauerfilter kann nach einiger Zeit ver-
stopfen und so die Saugleistung reduzieren.
Deshalb ist es wichtig, dass Sie den Dauerfilter regelmäßig reinigen.
Falls Sie feststellen, dass der Dauerfilter beschädigt ist, ersetzen Sie diesen umgehend.
1. Entnehmen Sie den Staubbehälter, öffnen
und entleeren Sie ihn ZKapitel 4.1,
„Staubbehälter ausleeren“, Punkte 1-5.
2. Klopfen Sie den Dauerfilter zur Grobreini-
gung mit leichten Schlägen aus.
3. Zur gründlichen Reinigung spülen Sie den
Dauerfilter mit warmem Wasser (max.
40 °C) aus.
4. Lassen Sie den Dauerfilter mindestens 24
Stunden bei Raumtemperatur trocknen.
Setzen Sie ihn erst ein, wenn er vollständig trocken ist.
ACHTUNG:
Der Dauerfilter ist nicht spülmaschinengeeignet. Verwenden Sie für die Reinigung
weder Bürsten noch spitze oder harte
Gegenstände. Setzen Sie nur vollkommen
trockene Filter wieder in den Staubsauger
ein. Filter/Gerät werden sonst beschädigt.
5. Setzen Sie den Staubbehälter samt Dau-
erfilter wieder ein (Abb. 8/entgegen der
Pfeilrichtung). Er rastet hörbar ein.
4.3 Gerät reinigen
Reinigen Sie das Gehäuse ausschließlich
mit einem leicht angefeuchteten Tuch.
ACHTUNG:
Verwenden Sie zum Reinigen niemals Reinigungsmittel, Scheuermittel oder Alkohol,
da diese das Gehäuse beschädigen können.
8
Page 9

5 Problembehebung
5 Problembehebung
5.1 Bevor Sie das Gerät einsenden
Bevor Sie das Gerät an den Royal Appliance
Kundendienst einschicken, überprüfen Sie
anhand der folgenden Tabelle, ob Sie das
Problem selbst beseitigen können.
WARNUNG:
Bevor Sie sich auf Problemsuche begeben,
schalten Sie das Gerät aus. Verwenden Sie
niemals ein defektes Gerät.
Problem mögliche Ursache
Lösung
Gerät läuft
nicht
Gerät nimmt
keinen
Schmutz auf
oder läuft ungewöhnlich
laut
5.2 Reinigung
WARNUNG:
Bevor Sie das Gerät reinigen, schalten Sie
es aus.
Reinigen Sie das Gehäuse ausschließlich
mit einem leicht angefeuchteten Tuch. Verwenden Sie keine Reinigungsmittel, Scheuermittel oder Alkohol, da diese das Gehäuse beschädigen können.
Stecker nicht gesteckt.
Stecker einstecken.
Steckdose führt keinen
Strom.
Testen Sie den Stecker an einer Steckdose, bei der Sie sicher sind, dass diese Strom
führt.
Staubbehälter voll/verstopft.
Staubbehälter leeren/reinigen
ZKapitel 4.1, „Staubbehälter
ausleeren“.
Dauerfilter verstopft.
Dauerfilter reinigen.
ZKapitel 4.2, „Dauerfilter
reinigen“.
Saugkanal verstopft.
Entfernen Sie die Verstopfung.
5.3 Ersatzteile
Artikel-Nr. Beschreibung
06 29 001 1 Dauerfilter (2-teilig)
Zubehör- und Ersatzteile können nachbestellt
werden. Diese erhalten Sie bei den Firmen:
Zubehör-Ersatzteile-Service-Versand
Ina Riedmüller
Frankenstraße 34
89233 Neu-Ulm
Deutschland
Tel.: +49 (0) 7307 - 51 75
Fax: +49 (0) 7307 - 41 56
Riedmueller.service@t-online.de
Zubehör-Ersatzteile-Service-Versand
Staubsauger-Center Feuerbach KG
Corneliusstraße 75
40215 Düsseldorf
Deutschland
Tel.: +49 (0) 211 - 38 10 07
Fax: +49 (0) 211 - 37 04 97
Staubsaugercenter@t-online.de
5.4 Entsorgung
Der Dauerfilter ist aus umweltverträglichen
Materialien hergestellt und kann im Hausmüll
entsorgt werden.
Wenn das Gebrauchsende erreicht
ist, insbesondere, wenn Funktionsstörungen auftreten, machen Sie
das ausgediente Gerät unbrauch-
bar, indem Sie den Netzstecker aus
der Steckdose ziehen und das Stromkabel
durchtrennen. Entsorgen Sie das Gerät entsprechend der in Ihrem Land geltenden Umweltvorschriften. Elektrische Abfälle dürfen
nicht zusammen mit Haushaltsabfällen entsorgt werden. Wenden Sie sich für Ratschläge bezüglich des Recyclings an Ihre Kommunalbehörde oder Ihren Händler.
DE
9
Page 10

6 Garantie
0180 501 50 50*
In Deutschland stehen wir Ihnen
für Fragen, Anregungen oder bei
Problemen gerne zur Verfügung.
Mo.-Fr. 8-20 Uhr
*0,14€ /Min. aus dem deutschen Festnetz
(deutscher Mobilfunkhöchstpreis 0,42€/Min.)
SERVICE-HOTLINE
6 Garantie
Wir übernehmen für das von uns vertriebene Gerät eine Garantie von 24 Monaten
ab Kaufdatum.
Innerhalb dieser Garantiezeit beseitigen wir
nach unserer Wahl durch Reparatur oder
Austausch des Gerätes oder des Zubehörs
(Schäden an Zubehörteilen führen nicht automatisch zum Umtausch des kompletten Gerätes) unentgeltlich alle Mängel, die auf Material- oder Herstellungsfehlern beruhen.
Von der Garantie sind Schäden ausgenommen, die auf unsachgemäßen Gebrauch (Betrieb mit falscher Stromart/-spannung, Anschluss an ungeeignete Stromquellen, Bruch,
etc.) zurückzuführen sind, normaler Verschleiß und Mängel, die den Wert oder die
Gebrauchstauglichkeit des Gerätes nur unerheblich beeinflussen.
Bei Eingriffen durch eine nicht von uns autorisierte Stelle oder bei Verwendung anderer als
original Royal
die Garantie. Verschleißteile fallen nicht unter
die Garantie und sind deshalb kostenpflichtig!
Die Garantie tritt nur in Kraft, wenn das Kaufdatum durch Stempel und Unterschrift des
Händlers auf der Garantiekarte bestätigt ist
oder eine Rechnungskopie dem eingeschickten Gerät beiliegt. Garantieleistungen bewirken weder eine Verlängerung der Garantiezeit, noch beginnt dadurch ein Anspruch auf
eine neue Garantie!
Appliance Ersatzteilen erlischt
Versenden Sie das Gerät mit entleertem
Staubbehälter und einer kurzen Fehlerbeschreibung in Blockschrift. Versehen Sie das
Anschreiben mit dem Vermerk „Zur Garantie“.
Senden Sie es zusammen mit der Garantiekarte oder einer Rechnungskopie an folgende
Adresse:
Royal Appliance International GmbH
Abt. Kundenservice
Jagenbergstraße 19
41468 Neuss
Deutschland
Tel.: +49 (0) 21 31 / 60 90 0
Fax: +49 (0) 21 31 / 60 90 60 95
www.dirtdevil.de
info@dirtdevil.de
10
Page 11

1 Safety instructions
Many thanks!
We are pleased that you decided on the
Handy or Handy Deluxe hand-held vacuum
cleaner! We hope you enjoy using your
appliance and we would like to thank you for
your purchase!
Overview
(Fig. 1):
1 Suction nozzle
2 Dust container
3 Release button for dust container
4 Eyelets for the shoulder strap
5 On/off button
6 Handle
7 Eyelets for the shoulder strap
8 Electric cable
9 Air outlet openings
10 Stands
Scope of delivery
Handy model (Fig. 2):
1 Hand-held vacuum cleaner
2 Electric cable
3 Small suction hose
4 Shoulder strap
5 Furniture brush
6 Fine furniture brush
Additional extras on the Handy Deluxe model
(Fig. 3)*:
7 Long suction hose with handle
8 2-in-1 combi-nozzle, comprising of an
upholstery nozzle and a brush attachment
9 Insert tubes (3 items)
10 Floor nozzle
* Not included in the scope of delivery for the
Handy model.
Technical data
Type of
appliance
Model : Handy
Voltage : 220 V-240 V~, 50/60 Hz
Output : 700 W nom.
Dust container : 0.5 litre
Filters : Permanent filter,
Cable length : approx. 6 m
Weight : approx. 1.3 kg
: Hand-held vacuum
cleaner
Handy Deluxe
[M629 (-0/-1/......./-8/-9)]
850 W max.
washable
washable & exhaust filter
1 Safety instructions
1.1 Regarding this manual
Read this operating manual through
completely before working with the appliance.
Keep the operating manual safe. If you pass
the appliance on to a third party, give them the
operating manual as well.
Non-compliance with these instructions
can lead to serious injuries or damage to
the appliance.
We assume no liability for damage that occurs
as a result of non-compliance with this
operating manual.
Important notes for your safety are especially
marked. You must observe these instructions
to avoid accidents and damage to the
appliance:
WARNING:
Warns against hazards for your health and
indicates possible risks of injury.
ATTENTION:
Indicates possible hazards for the appliance
or other objects.
GB
NOTE:
Highlights tips and information for you.
11
Page 12

1 Safety instructions
1.2 Regarding the power supply
The appliance is operated with electrical
power which means there is in principle a risk
of electric shock. Pay particular attention to
the following:
- Never touch the plug with wet hands.
- If you want to pull the electric cable out
of the socket, always pull directly on the
plug. Never pull on the electric cable as
this could damage it.
- Make sure that the electric cable is not
bent, caught or run over, and that it does
not come into contact with heat sources.
- Never immerse the appliance in water or
other liquids and keep it away from rain
and moisture.
- Only operate the appliance if the
electrical voltage stated on the type
plate matches the voltage of your
socket. Wrong voltage can destroy the
appliance.
1.3 Regarding children
This appliance is not intended to be used
by persons (including children) with impaired
physical, sensorial or mental abilities and/or
insufficient experience or knowledge, unless
they are supervised by a person responsible
for their safety or have been instructed in the
proper use of the appliance by this person.
Keep the appliance out of reach of people of
these groups.
Children should be supervised in order to
make sure that they don’t play with the
appliance.
Packing material must not be used to play
with. There is a danger of suffocation.
1.4 Regarding intended use
Only use the hand-held vacuum cleaner for
cleaning dry, normally dirty floors, carpets,
runners, etc. Any other use is considered
inappropriate usage and is prohibited.
The appliance may only be operated in
households. It is not suitable for industrial or
commercial use.
The following is prohibited in particular:
Do not vacuum:
- hair, fingers and other body parts. They
could be pulled in and injured.
- pieces of clothing (scarves, etc.). They
could be pulled right in and cause
injuries.
- water and other fluids, especially damp
carpet cleaning agents. Internal
dampness can lead to a short-circuit.
- toner (for laser printers, copy machines,
etc.). There is a risk of fire and
explosion.
- hot ash, burning cigarettes or matches.
These can cause fire.
- pointed objects such as glass
fragments, nails, etc. These might
damage the appliance.
- rubble, plaster, cement, fine drillingdust, makeup, etc. These might damage
the appliance.
Do not use near explosive or easily
flammable substances. There is a risk of fire
or explosion.
Do not use in the open-air. There is a risk
of the appliance being destroyed by rain and
dirt.
Do not push objects into the openings of
the appliance. It could overheat.
1.5 If the appliance is defective
Never use a defective appliance or
operate an appliance with a defective power
cord. If the power cord of this appliance is
damaged it must be replaced by the
manufacturers, their authorised service
representative or a similarly qualified person
to avoid danger.
Bring or send defective appliances to a
specialist dealer or to Royal Appliance
Customer Services for repair.
Address: Zpage 17, „Warranty“.
12
Page 13

2 Unpacking and connecting
2 Unpacking and connecting
2.1 Unpacking
Unpack the appliance and all accessory parts
and check that the contents are complete.
ATTENTION:
Always transport/send the appliance in its
original packaging so that it does not
become damaged. Keep the packing
material for this purpose.
Dispose of any packing material that is no
longer required in accordance with the
provisions applicable in your country.
NOTE:
If you should notice damage due to
transport, then contact your dealer
immediately.
2.2 Using the accessories
The hand-held vacuum cleaner can be used
in versatile ways with the accessories (Fig. 2
and Fig. 3) included in the scope of delivery.
You will get the best suction results if you use
the hand-held vacuum cleaner with one of the
nozzles delivered with it as an accessory.
WARNING:
Switch the hand-held vacuum cleaner off
before assembling or removing the
accessories.
The nozzles and hoses (e. g. the fine
furniture brush (Fig. 4/1) can simply be
pushed into the suction nozzle (Fig. 4/2) and
can be combined in whichever way you wish.
2.3 Using the nozzles
Furniture brush (Fig. 2/5)
Use this to vacuum dust off objects that have
sensitive surfaces (e. g. cupboards, tables).
Fine furniture brush (Fig. 2/6)
Use this like the furniture brush when the
furniture brush is too wide.
2-in-1 combi-nozzle (only on Handy
Deluxe) (Fig. 5) must only be used with the
long suction hose (Fig. 3/7) as:
- Furniture brush (Fig. 5/1)
Use this to vacuum dust off objects that
have sensitive surfaces (e. g.
cupboards, tables).
- Upholstery nozzle (Fig. 5/2)
By simply removing the brush
attachment (Fig. 5/3) you can make an
upholstery brush (Fig. 5/2) from the 2-in1 combi-nozzle. Use this to clean soft,
scratch-resistant surfaces (e. g.
upholstered furniture).
Only use the floor nozzle with the long
suction hose (Fig. 3/7) (only on the Handy
Deluxe) (Fig. 3/10) ZChapter 2.5,
"Converting to a standing cylinder vacuum
cleaner".
2.4 Attaching the shoulder strap
You can use the shoulder strap to make it
easier to carry the hand-held vacuum cleaner
if you are using the vacuum cleaner with a
suction hose.
Just hook both snaplinks (Fig. 6/1) on the
shoulder strap (Fig. 6/2) into the eyelets
(Fig. 6/3).
GB
13
Page 14

3 Operating
2.5 Converting to a standing
cylinder vacuum cleaner
With a few manoeuvres you can convert the
Handy Deluxe hand-held vacuum cleaner into
a fully functioning cylinder vacuum cleaner
(Fig. 7):
1. Attach the shoulder strap (Fig. 7/1)
ZChapter 2.4, "Attaching the shoulder
strap".
2. Push the long suction hose with the
handle (Fig. 7/2) into the suction nozzle.
3. Push the 3 insert tubes (Fig. 7/3) together
and then push them into the handle.
4. Put on the floor nozzle (Fig. 7/4).
5. Adjust the carpet/hard floor switch (Fig. 7/
5) depending on the type of flooring:
- Hard floor (Fig. 7/A)
Laminate flooring, tiles, PVC flooring,
etc.
- Carpet (Fig. 7/B)
Long and short pile carpets, runners,
etc.
NOTE:
Using the secondary air controller (Fig. 7/6)
you can reduce the suction power as
desired.
3 Operating
3.1 Vacuuming
WARNING:
Check the appliance before each use. A
damaged appliance must never be used.
There is a risk of injury.
ATTENTION:
Only use the appliance if the filter is intact
and dry, and inserted correctly. Make sure
that none of the openings are blocked.
Otherwise, the appliance can become
damaged.
.
1. Use the desired accessory ZChapter 2.2,
"Using the accessories".
WARNING:
Due to the high motor output, the hand-held
vacuum cleaner produces a powerful
angular momentum when switched on.
If the hand-held vacuum cleaner is switched
on without holding tight to it, there is a risk
that it will move in an uncontrolled way and
fall or knock down surrounding objects.
Therefore always hold the hand-held
vacuum cleaner firmly when switching it on.
Before plugging it in, make sure that the on/
off switch (Fig. 4/4) is set to "0".
2. Insert the plug into the plug socket.
3. Hold the hand-held vacuum cleaner firmly
by the handle (Fig. 4/3).
4. Switch on the hand-held vacuum cleaner
using the on/off switch (Fig. 4/4).
ATTENTION:
Make sure that the air outlet openings
(Fig. 1/9) are free. Otherwise the suction
power will decrease.
3.2 Putting away
1. Switch off the cylinder vacuum cleaner
using the on/off switch (Fig. 4/4) and pull
the plug out of the socket.
2. Wind up the cable.
3. Store the appliance and any accessories
no longer required in a cool and dry place.
ATTENTION:
Never position the appliance directly against
heat sources (e. g. heating, oven). Avoid
direct sunlight. Heat can damage the
appliance.
If you want to store the appliance for a
longer period of time, empty the dust
container and clean it.
14
Page 15

4 Maintenance
4 Maintenance
ATTENTION:
Turn the appliance off and pull out the plug
before starting any of the work described
below.
4.1 Emptying the dust container
Empty the dust container regularly.
NOTE:
You can dispose of the contents of the dust
container with the normal domestic waste
as long as it does not contain any elements
prohibited for domestic waste.
1. Hold the dust container (Fig. 8/1) firmly
with one hand.
2. Now press the release button (Fig. 8/2) to
remove the dust container.
3. Turn the dust container (Fig. 9/1) in such a
way that the filter points up. This will stop
the dust falling out by accident.
4. Remove the permanent filter (Fig. 9/2).
5. Hold the dust container low over a dustbin
(Fig. 10) to empty it.
6. If the dust container is extremely dirty,
clean it thoroughly by rinsing it with warm
water (max. 40 °C).
7. Leave the dust container to dry. Only use
it again when it is completely dry.
9. Reinsert the dust container together with
the permanent filter (Fig. 8/in the opposite
direction to the arrow). It clicks audibly into
place.
4.2 Cleaning the permanent filter
The permanent filter can become blocked
after some time and can reduce the suction
power as a result. It is therefore important that
you clean the permanent filter regularly.
If you determine that a permanent filter is
damaged, replace it immediately
1. Empty the dust container, open and
remove it ZChapter 4.1, "Emptying the
dust container", Points 1-5.
2. For a rough clean, knock the permanent
filter lightly.
3. For a thorough clean, rinse the permanent
filter with warm water (max. 40 °C).
4. Allow the permanent filter to dry for at
least 24 hours at room temperature. Only
use it again when it is completely dry.
ATTENTION:
The permanent filter is not suitable for the
dishwasher. Do not use either brushes or
pointed or hard objects as cleaning
implements. Reinsert the filter into the
vacuum cleaner only when it is completely
dry. Otherwise the filter/appliance will be
damaged.
GB
ATTENTION:
The dust container is not suitable for the
dishwasher. Never clean the container with
any cleaning agent, scouring agent or
alcohol as these damage the dust container.
8. Take this opportunity to clean the
permanent filter as well ZChapter 4.2,
"Cleaning the permanent filter".
5. Reinsert the dust container together with
the permanent filter (Fig. 8/in the opposite
direction to the arrow). It clicks audibly into
place.
4.3 Cleaning the appliance
Only clean the housing with a slightly
damp cloth.
ATTENTION:
Never use any cleaning agent, scouring
agent or alcohol as these can damage the
housing.
15
Page 16

5 Troubleshooting
5 Troubleshooting
5.1 Before you send in the
appliance
Before sending the appliance to Royal
Appliance Customer Services, use the
following table to check whether you can
correct the malfunctions yourself.
WARNING:
Switch off the appliance before
troubleshooting. Never use a defective
appliance.
Malfunction Possible cause
Solution
Appliance does
not work
Appliance does
not suck up any
dirt or is running
unusually loud.
Plug not plugged in.
Insert plug.
Socket does not carry
any current.
Test the plug at another
socket which you are
sure carries current.
Dust container is full/
blocked.
Empty/clean dust
container ZChapter 4.1,
"Emptying the dust
container".
Permanent filter is
blocked.
Clean permanent filter.
ZChapter 4.2, "Cleaning
the permanent filter".
Suction passage is
blocked.
Remove the blockage.
5.2 Cleaning
WARNING:
Switch off the appliance before cleaning it.
Only clean the housing with a slightly
damp cloth. Do not use any cleaning agent,
scouring agent or alcohol as these can
damage the housing.
5.3 Spare parts
Item No. Description
06 29 001 1 Permanent filter (2-part)
Accessory parts and spare parts can be
reordered. You can get these from the
following companies:
Zpage 88, „International Service“
5.4 Waste disposal
The permanent filter is made from
environmentally compatible materials and can
be disposed of with the domestic waste.
When the service life of the
appliance has expired, in particular
if malfunctions occur, make the
finished appliance unusable by
removing the mains plug from the
socket and disconnecting the power cable.
Dispose of the appliance according to the
environmental provisions applicable in your
country. Electrical waste must not be
disposed of with domestic waste. Contact
your municipal authority or your dealer for any
advice regarding recycling.
16
Page 17

6 Warranty
6Warranty
We offer a warranty of 24 months from the
date of purchase for the appliances we
sell.
Within this warranty period, we will remove all
defects free of charge that are due to material
or manufacturing faults, either by repair work
or replacing the appliance or accessories, at
our discretion (damage to accessory parts
does not automatically lead to the entire
appliance being replaced). The warranty does
not cover damage due to improper use
(operating with the wrong power type/voltage,
connecting to unsuitable power sources,
breakage, etc.), normal wear and defects that
only insignificantly affect the value or the
ability of the appliance to be used.
The warranty is made null and void if any work
is carried out by a site not authorized by us or
if spare parts other than Royal
spare parts are used. Wear parts are not
included in the warranty and are therefore at
the customer's expense!
The warranty only comes into force if the
purchase date is confirmed by a stamp and
signature of the dealer on the warranty card or
if a copy of the invoice is included with the
appliance when it is sent in. Warranty work
does not extend the warranty time nor does it
constitute a claim for a new warranty!
Send the appliance with an emptied dust
container and a short description of the fault in
block capitals. Write the comment "Regarding
warranty" on the address label. Send it
together with the warranty card or a copy of
the invoice to the following address:
Appliance
GB
Zpage 88, „International Service“
17
Page 18

1 Consignes de sécurité
Merci beaucoup !
Nous sommes heureux de vous compter
parmi les utilisateurs de l'aspirateur à main
Handy et Handy deluxe ! Nous vous
souhaitons beaucoup de plaisir avec votre
appareil et nous vous remercions de votre
achat !
Aperçu
(ill. 1):
1 Buse d'aspiration
2 Bac à poussière
3 Bouton de déverrouillage pour le bac à
poussière
4 Oeillet pour la bandouillère
5 Bouton marche/arrêt
6 Poignée
7 Oeillet pour la bandouillère
8 Cordon d’alimentation
9 Orifices de sortie d'air
10 Socle
Contenu de livraison
Version Handy (ill. 2)
1 Aspirateur à main
2 Cordon d’alimentation
3 Petit tuyau flexible d'aspiration
4 Bandouillère
5 Brosse à meubles
6 Pinceau à meuble
Supplément pour la version Handy deluxe
(ill. 3).
7 Long tuyau flexible d’aspiration avec
poignée
8 Brosse 2 en 1 composée d’un suceur plat
et d'un embout brosse
9 Tubes emboîtables (3 pièces)
10 Suceur universel
Caractéristiques techniques
Type d'appareil : Aspirateur à main
Modèle : Handy, Handy deluxe
M629 (-0/-1/......./-8/-9)
Tension : 220 V-240 V~, 50/60 Hz
Puissance : 700 W nom.
850 W max.
Bac à
poussière
Filtre : Filtre permanent lavable
Longueur de
câble
Poids : env. 1,3 kg
: 0,5 Litres
lavable
& filtre de sortie d’air
: env. 6 m
1 Consignes de sécurité
1.1 relatives à ce mode d'emploi
Veuillez lire attentivement et intégralement ce
mode d'emploi, avant de vous servir de
l'appareil. Conservez précieusement ce mode
d'emploi. Donnez toujours le mode d'emploi à
toute personne se servant de l'appareil.
Le non respect de ce mode d'emploi peut
entraîner des blessures graves ou des
dommages irrévocables sur l'appareil.
Nous déclinons toute responsabilité pour des
dommages résultant du non respect de ce
mode d'emploi.
Les consignes importantes pour votre
sécurité sont mises en relief. Respectez
impérativement ces consignes afin d'éviter
tout accident ou dommage de l'appareil :
AVERTISSEMENT:
Attire votre attention sur des dangers
imminents pour votre santé et vous informe
sur les risques de blessures possibles.
ATTENTION:
Indique les risques pour l'appareil ou tout
autre objet.
* pas compris dans les fournitures de la
version Handy.
18
REMARQUE:
Vous fournit des conseils et des informations.
Page 19

1 Consignes de sécurité
1.2 Alimentation électrique
L'appareil est alimenté par du courant
électrique, entraînant ainsi des risques
d'électrocution. Respectez par conséquent
les points ci-dessous :
- Ne touchez jamais la prise avec des
mains mouillées.
- Pour débrancher le cordon
d'alimentation, tirez toujours
directement sur la fiche. Ne tirez jamais
sur le cordon d’alimentation car il
pourrait s'abîmer.
- Assurez-vous que le cordon
d'alimentation n'est pas plié, coincé,
écrasé ou encore en contact direct avec
une source de chaleur.
- Ne plongez jamais l'appareil dans de
l'eau ou tout autre liquide, et conservezle à l'abri de la pluie.
- N'exploitez l'appareil que si la tension
indiquée sur la plaque signalétique
correspond bien avec celle de votre
prise. Une tension différente détruirait
l'appareil.
1.3 Remarques relatives aux
enfants
Cet appareil ne convient pas aux person-
nes (y compris les enfants) qui ne sont pas en
mesure de se servir de manière sûre de l'appareil, en raison de leurs capacités physiques
ou sensorielles, de leurs capacités mentales,
de leur inexpérience ou d'un manque de
connaissances. Elles ne doivent pas utiliser
cet appareil sans surveillance ou sans bénéficier des indications d'une personne responsable. Rangez l'appareil hors de portée des personnes répondant à ces critères.
Les enfants doivent être surveillés afin de
s'assurer qu'ils ne jouent pas avec l'appareil.
Ne jouez pas avec le matériel d'emballage
: risque d'asphyxie.
1.4 Utilisation conforme
Utilisez l'aspirateur à main exclusivement
pour le nettoyage des sols secs d'un degré de
saleté normal, des moquettes et tapis, etc.
Toute autre utilisation est considérée comme
non conforme et non autorisée.
Cet appareil convient exclusivement à un
usage domestique. Toute utilisation à titre
professionnelle est strictement interdite.
Cette interdiction concerne en particulier :
L'aspiration de :
- cheveux, doigts et autres parties du
corps. Ils peuvent être aspirés et
entraîner des blessures graves.
- de bouts de vêtements (par ex.
écharpes, etc.). Elles peuvent être
aspirées et entraîner des blessures.
- eau ou autre liquide, en particulier les
lessives de moquettes. Toute humidité
à l'intérieur de l'appareil peut entraîner
un court-circuit.
- Toner (par ex. des imprimantes laser,
copieurs, etc.). Risque d'incendie et
d'explosion.
- cendres incandescentes, cigarettes ou
allumettes non éteintes. Risque
d'incendie.
- objets pointus comme des bris de verre,
des clous etc. L'appareil pourrait être
endommagé.
- de plâtre, ciment, décombres de
chantiers, produits de maquillage,
poudre, etc. L'appareil pourrait être
endommagé.
l'utilisation à proximité d'explosifs ou de
matières très inflammables. Risque
d'incendie et d'explosion.
Utilisation à l'extérieur. La pluie et la saleté
peuvent endommager l'appareil.
d'introduire des objets dans les ouvertures
de l'appareil. Il surchaufferait.
1.5 Appareils défectueux
N'utilisez jamais un appareil défectueux
ou ayant un cordon d'alimentation abîmé. Si
le cordon de raccordement au secteur de cet
appareil est endommagé, faites-le remplacer
par le fabricant, son service après-vente ou
toute personne ayant des compétences
similaires, ceci afin d'éviter tout danger.
Faites réparer l'appareil par un magasin
spécialisé ou par votre SAV Royal.
Adresse : ZPage 24, „Garantie“.
FR
19
Page 20

2 Déballage et branchement
2 Déballage et branchement
2.1 Déballage
Déballez l'appareil et tous ses accessoires,
puis vérifiez si le contenu est bien complet.
ATTENTION:
Transportez et expédiez l'appareil
uniquement dans son emballage d'origine
afin d'éviter tout dommage. Pour ce faire,
conservez précieusement l'emballage.
Jetez l'emballage dont vous n'avez plus
besoin en tenant compte des
réglementations nationales et locales en
vigueur.
REMARQUE:
Si vous constatez des défauts ou des
dommages dus au transport, contactez
immédiatement votre revendeur.
2.2 Utilisation des accessoires
La série d'accessoires optionnels (ill. 2 et
ill. 3) offre de multiples possibilités d'utilisation
de l'aspirateur. Les meilleures résultats sont
obtenus en utilisant l’aspirateur avec l’une
des buses livrées avec les accessoires.
AVERTISSEMENT:
Coupez l'aspirateur à main avant de
procéder au montage ou au démontage des
accessoires.
Il vous suffit d'enficher les buses et tuyaux
dans la buse d'aspiration (par ex. le pinceau
de meuble (ill. 4/1) et de procéder à une
combinaison facultative (ill. 4/2).
2.3 Utilisation des buses
Brosse à meubles (ill. 2/5)
Utilisez celle-ci pour aspirer des surfaces
fragiles (comme par ex. les armoires et les
tables).
Pinceau de meuble (ill. 2/6)
Utilisez-le à la place de la brosse de meubles
si elle est trop large.
La brosse 2 en 1 (ill. 5, seulement Handy
deluxe) à utiliser uniquement avec le long
tuyau flexible d’aspiration (ill. 3/7)
- Brosse à meubles (ill. 5/1)
Utilisez celle-ci pour aspirer des
surfaces fragiles (comme par ex. les
armoires et les tables).
- Suceur plat (ill. 5/2)
En ôtant simplement la brosse
emboîtable (ill. 5/3), vous pouvez
transformer la brosse 2 en 1 en un
suceur plat (ill. 5/2). Utilisez-le pour
nettoyer des surfaces souples
inrayables (par exemple les canapés).
La brosse universel à utiliser uniquement
avec le long tuyau flexible d’aspiration (ill. 3/7),
(ill. 3/10, seulement Handy deluxe) ZChapitre
2.5, „Transformation en aspirateur de sol“.
2.4 Montage de la bandouillère
Vous pouvez utiliser la bandouillère pour
faciliter le port de l’aspirateur à main quand
vous l’utiliser avec un tuyau d’aspiration.
Acrochez simplement les deux
mousquetons (ill. 6/1) de la bandouillère
(ill. 6/2) dans les oeillets (ill. 6/3).
20
Page 21

3Emploi
2.5 Transformation en aspirateur
de sol
Vous pouvez transformer en quelques
mouvements votre aspirateurs à main Handy
deluxe en un aspirateur de sol complet (ill. 7):
1. Mettez la bandouillère (ill. 7/1) ZChapitre
2.4, „Montage de la bandouillère“.
2. Emboîtez le long tuyau flexible d’aspiratin
avec poignée (ill. 7/2) dans la buse
d’aspiration.
3. Emboîtez les 3 pièces du tube (ill. 7/3) et
ensuite dans la poignée.
4. Fixez la buse universel (ill. 7/4).
5. Changez le type de brosse (moquettes /
sols lisses) (ill. 7/5) suivant le type de sols
à nettoyer :
- Sols durs (ill. 7/A)
sols stratifiés, carrelage, lino, etc.
- moquettes et tapis (ill. 7/B)
moquettes et tapis à longs et courts
poils, tapis d'escalier, etc.
REMARQUE:
En vous servant du variateur mécanique de
puissance (ill. 7/6), vous pouvez réduire à
souhait la puissance d'aspiration,
.
1. Emboîtez l'accessoire requis, ZChapitre
2.2, „Utilisation des accessoires“.
AVERTISSEMENT:
La puissance élevée du moteur de
l’aspirateur à main produit une impulsion
rotative forte lors de l'enclenchement
Quand l’aspirateur est enclenché sans être
bien tenu, il risque de se mettre en
mouvement sans contrôle de tomber ou de
renverser des objets.
Pour cette raison, veuillez tenir l’aspirateur
fermement quand vous l’enclenchez. Avant
vous le branchez, veillez à ce que la touche
marche/arrèt soit bien (ill. 4/4) en position
«0».
2. Branchez la fiche dans la prise de courant.
3. Maintenez fixement l'aspirateur à main au
niveau de la poignée (ill. 4/3).
4. Appuyez le bouton d'arrêt/marche
(ill. 4/4).
ATTENTION:
Assurez-vous que les orifices de sortie d'air
(ill. 1/9) sont libres. Sinon, l'efficacité de
l'aspirateur diminuera.
FR
3Emploi
3.1 Aspirer
AVERTISSEMENT:
Avant tout emploi, vérifiez l'appareil.
N'utilisez jamais un appareil qui est
endommagé. Risque de blessures.
ATTENTION:
N'utilisez l'aspirateur que lorsque le filtre est
intact, sec et bien inséré. Assurez-vous
qu'aucune ouverture n'est bouchée.
Autrement, vous risquez d'endommager
l'aspirateur.
3.2 Rangement
1. Éteignez l'aspirateur grâce au bouton
arrêt/marche (ill. 4/4), puis débranchez
l'aspirateur.
2. Enroulez le cordon d'alimentation.
3. Rangez l’appareil et les accessoires dans
un lieu frais et sec.
ATTENTION:
Ne rangez ou ne posez jamais l'appareil à
proximité directe d'une source de chaleur
(par ex. chauffage, four). Évitez de l'exposer
aux rayons du soleil. La chaleur peut
endommager l'appareil.
Si vous rangez l'appareil pour une période
prolongée, videz le bac à poussière et
nettoyez-le.
21
Page 22

4 Maintenance
4 Maintenance
ATTENTION:
Avant de commencer le travail, éteignez
l'appareil et retirez la fiche.
4.1 Vider le bac à poussière
Videz le bac à poussière régulièrement.
REMARQUE:
Le contenu du bac à poussière peut être
mis à la poubelle s'il ne contient pas de
composants dont la présence est interdite
dans les ordures ménagères.
1. Retenez le bac à poussière (ill. 8/1) avec
une main.
2. Appuyez sur la touche de déverouillage
(ill. 8/2) afin de retirer le bac à poussière.
3. Tournez le bac à poussière (ill. 9/1) vers le
haut. Vous évitez ainsi que la poussière
tombe.
4. Retirez le filtre permanent (ill. 9/2).
5. Maintenez le bac à poussière à l'intérieur
d'une poubelle afin de le vider (ill. 10).
6. En cas de fortes salissures, nettoyez
l'aspirateur en profondeur en le rinçant à
l'eau chaude (maxi. 40 °C).
7. Séchez le bac à poussière. Remettez-le
uniquement une fois qu'il est bien sec.
ATTENTION:
Le bac à poussière ne doit pas être nettoyé
dans le lave-vaisselle. N'utilisez en aucun
cas des produits de nettoyages, des
détergents ou de l'alcool pour nettoyer le
bac car ces produits endommageraient le
bac à poussière.
8. Profitez de cette occasion pour nettoyer
aussi le filtre permanent ZChapitre 4.2,
„Nettoyez le filtre permanent“.
9. Remettez le bac à poussière avec le filtre
permanent dans l'aspirateur (ill. 8/dans le
sens inverse de la flèche). Vous
entendrez un clic lorsqu'il s'enclenche.
4.2 Nettoyez le filtre permanent
Passé une certaine période, le filtre
permanent peut se boucher et ainsi entraîner
une baisse de la puissance d'aspiration. C'est
la raison pour laquelle il est important de
nettoyer régulièrement le filtre permanent.
Si vous constatez la défection du filtre
permanent, remplacez-le immédiatement.
1. Retirez le bac à poussière, ouvrez et
videz-le ZChapitre 4.1, „Vider le bac à
poussière“, points 1-5.
2. Pour un nettoyage sommaire, tapotez
légèrement le filtre permanent.
3. Pour un nettoyage en profondeur, rincez
le filtre permanent à l'eau chaude (maxi.
40 °C).
4. Faites ensuite sécher le filtre permanent
au moins 24 heures à température
ambiante. Remettez-le uniquement une
fois qu'il est bien sec.
ATTENTION:
Le filtre permanent ne doit pas être nettoyé
dans le lave-vaisselle. Pour le nettoyage,
n'utilisez ni une brosse, ni un objet pointu ou
dur. Ne remettez le filtre dans l'aspirateur
que lorsqu'il est entièrement sec.
Autrement, vous risquez d'endommager le
filtre/l'appareil.
5. Remettez le bac à poussière avec le filtre
permanent dans l'aspirateur (ill. 8/dans le
sens inverse de la flèche). Vous
entendrez un clic lorsqu'il s'enclenche.
4.3 Nettoyer l'appareil
Nettoyer le corps de l'aspirateur
uniquement avec un chiffon légèrement
humide.
ATTENTION:
N'utilisez en aucun cas des nettoyants,
détergents ou de l'alcool car cela
endommagerait le corps de l'aspirateur.
22
Page 23

5 Remèdes en cas d'anomalies
5 Remèdes en cas
d'anomalies
5.1 Avant d'envoyer l'appareil
Avant de ramenez votre aspirateur chez le
SAV l de Royal Appliance, veuillez vérifier, en
vous aidant du tableau ci-dessous, si vous ne
pouvez pas remédier à l'anomalie vous-même.
AVERTISSEMENT:
Avant de recherche la cause de l'anomalie,
éteignez l'appareil. N'utilisez jamais un
appareil défectueux.
Anomalie Cause possible
Remède
L'appareil de
fonctionne pas
L'appareil
n'aspire aucune
saleté et
fonctionne de
manière
inhabituellement
bruyante
La fiche n'est pas branchée.
Brancher la fiche.
Il n'y pas de courant à la
prise.
Essayez de brancher la
fiche à une autre prise dont
vous êtes sûr qu'elle
fonctionne.
Le bac à poussière est plein
ou bouché.
Videz le bac à poussière
et/ou nettoyez-le
ZChapitre 4.1, „Vider le
bac à poussière“.
Le filtre permanent est
bouché.
Nettoyez le filtre
permanent.
ZChapitre 4.2, „Nettoyez
le filtre permanent“.
La conduite d'aspiration est
bouchée.
Débouchez-les.
5.2 Nettoyage
AVERTISSEMENT:
Avant de nettoyer l'appareil, éteignez-le.
Nettoyer le corps de l'aspirateur
uniquement avec un chiffon légèrement
humide. N'utilisez en aucun cas des
nettoyants, détergents ou de l'alcool car cela
endommagerait le corps de l'aspirateur.
FR
5.3 Pièces de rechange
Réf. de l'art. Description
06 29 001 1 Filtre permanent (2 pièces)
Vous pouvez commander ultérieurement les
pièces de rechange et les accessoires auprès
des sociétés suivantes :
ZPage 88, „International Service“
5.4 Élimination
Le filtre permanent est conçu avec des
matériaux écologiques et peut être mis à la
poubelle.
À la fin du cycle de vie de votre
produit, lorsque des
dysfonctionnements apparaissent,
rendez l'appareil inutilisable en le
débranchant et en coupant le
cordon d'alimentation. Éliminez l'appareil en
tenant compte des réglementations locales et
nationales en vigueur. Les déchets
électriques ne doivent pas être jetés avec les
déchets domestiques. Pour toute question
relative au recyclage des déchets, demandez
conseil à votre responsable communal ou à
votre revendeur.
23
Page 24

6 Garantie
6 Garantie
Nous assurons une garantie de 24 mois
sur votre appareil à compter de la date
d'achat.
Pendant la garantie, nous nous réservons le
droit de réparer ou de remplacer l'appareil ou
l'accessoire gratuitement (des accessoires
endommagés n'impliquent pas forcément le
remplacement de l'appareil) afin de remédier
à tout défaut lié au matériel ou à la fabrication.
Tout dommage résultant d'une utilisation non
conforme (emploi d'une tension ou d'un
courant erroné, branchement à une prise non
adaptée ou lorsque l'appareil est cassé) est
exclu de la garantie, de même que l'usure et
les défauts liés à l'usage normal de l'appareil
n'influençant pas le bon fonctionnement de
l'appareil.
Dans le cas de l'intervention d'une personne
ou d'un service non habilité ou lors de
l'utilisation de pièces détachées ne provenant
pas de Royal
deviennent caducs. Les pièces d'usure sont
exclues de la garantie et leur remplacement
est payant !
La garantie s'applique uniquement lorsque la
date d'achat et le tampon du revendeur
confirmé par sa signature sont portés sur le
bon de garantie ou sur présentation du bon
d'achat. Les services de garantie n'impliquent
en aucune façon ni le prolongement de la
durée de garantie ni des droits à une nouvelle
garantie !
Expédiez l'appareil en ayant pris soin de vider
le bac à poussière et en indiquant brièvement
et en majuscule, les symptômes de l'anomalie. Envoyez le tout par courrier recommandé
avec la mention "Zur Garantie" ("Pour la garantie“). N'oubliez pas d'y joindre le bon de
garantie ainsi qu'une copie du ticket de caisse
ou de la facture à l'adresse suivante:
Appliance, les droits de garantie
ZPage 88, „International Service“
24
Page 25

International Service
International Service
DE
Royal Appliance Int. GmbH
Abt. Kundenservice
Jagenbergstraße 19
41468 Neuss
DEUTSCHLAND
Tel.: +49 - 2131 - 60 90 0
Fax: +49 - 2131 - 60 90 60 95
www.dirtdevil.de
info@dirtdevil.de
CZ ES FR
Le Cygne electronic service spol. s r.o.
Jablonecká 722/8
190 00 Praha 9
ESKÁ REPUBLIKA
Tel: +420 - 28 68 83 940
Fax: +420 - 28 68 85 064
servis@lce.cz
AT
Zmugg Elektronik Service
und Vertriebges. M.b.H.
Fabriksgasse 27
8020 Graz
ÖSTERREICH
Tel. +43 - 316 - 77 21 20
Fax +43 - 316 - 77 21 20 10
Tel. Ersatzteile: +43 - 316 - 77 21 20 14
Fax Ersatzteile: +43 - 316 - 77 21 20 15
zmuggelektronik@utanet.at
Royal Appliance España S.L.
C/Cronos 20, Portal 2, 3º-13.
28037 Madrid
ESPAÑA
Tel: +34 - 902 - 43 06 63
atencion.cliente@dirtdevil.es
Bluepoint-Service SAGL
Via Cantonale 14
6917 Barbengo
SWITZERLAND
Tel. +41 (0)91 980 49 73
info@bluepoint-service.ch
www.bluepoint-service.ch
OPM France Nant’Est entreprise
33 rue du bois Briand
44316 Nantes cdx 3
FRANCE
Tel. +33 - 2 - 40 49 64 25
Fax +33 - 2 - 40 93 96 22
www.opm-france.com
CH
HR
TD ''MEDJIMURKA'' D.D.
Trg Republike 6
40000 akovec
HRVATSKA
Tel.: +385 - 40 - 31 27 60
Fax: +385 - 40 - 32 86 61
PL
SERV-SERWIS Sp. z o.o.
ul. Poniatowskiego 4/1
45-049 Opole
POLSKA
tel. (077) 453-61-39
fax: (077) 453-61-38
dabrowski1@serv-serwis.pl
RUS
OOO RTC „Sovinservice“
127081 Moscow
Jasny proezd, 10
ROSSIJSKAJA FEDERAZIJA
Tel.: +7 - 495 - 47 39 003
88
HU
Aspico Kft.
Puskás Tivadar út.4.
9027 Gyr
MAGYARORSZÁG
Tel.: +36 - 96 - 51 12 91
szerviz@aspico.hu
PT
Royal Appliance España S.L.
C/Cronos 20, Portal 2, 3º-13.
28037 Madrid
ESPAÑA
Tel: +34 - 902 - 43 06 63
atencion.cliente@dirtdevil.es
SK
Aspico Slovakia s r.o.
Kracanska 40/104
92901 Dunajská Streda
SLOVAKIA
Tel: +42 - 031 - 55 11 815
NL
Z.E.S. Goes B.V.
T.a.v. afd. Service
Pearyweg 1
4462 GT Goes
NEDERLAND
Tel: +31 - 113 - 24 07 00
Fax: +31 - 113 - 24 07 50
dirtdevil@zesgoes.nl
BE
PYC
"#$%<$",
127081 =. >$?X,
\$#^_ `<%{|, |. 10
}\ }\
%. +7 - 495 - 47 39 003
SI
Strojinc Ciril s.p.
Koseskega ul. 1a
1000 Ljubljana
SLOVENIJA
Tel: +386 -1- 42 28 489
Page 26

Garantiekarte
Warranty Card
Card de garantie
Garantiekaart
Tarjeta de garantía
Certificado de garantia
Karta gwarancyjna
Záruní list
Záruný list
Garancijski list
Jamstveni list
Garanclalevl
Handy / Handy deluxe
Stempel und Unterschrift des Händlers / Stamp and sign of dealer / Cachet et signatur du vendeur / Stempel en handtekening van de handelaar / Sello y firma
del distribuidor / Carimbo e assinatura do estabelecimento de comércio / Piecztka i podpis sprzedawcy / Razítko a podpis obchodníka / Peiatka a podpis predajcu
Žig i podpis trgov ca / Peat i potpis trgovca / A keresked pecsétje és al áírása
Fehlerbeschreibung / Description of fault / Description de l’erreur / Beschrijving van de fouten / Descripción del error
Descrição da falha / Opis usterki / Popis poruchy
Kaufdatum / Date of purchase / Date d´achat / Koopdatum / Fecha de compra / Data de aquisição / Data zakupu /
Datum zakoupení / Dátum zakúpenia / Datum nakupa / Datum kupnje / Vásárlás napja
/
Popis poruchy / Opis napake / Opis greške / Hiba leírása
 Loading...