

Page 1
POWErLiTE
SEriES
Cyclonic Vacuum
USEr gUiDE
DD U01-E01-P01
Page 2

Warning
BASIC SAFETY PRECAUTIONS
• This vacuum cleaner is
intended for household use
only and NOT for commercial
or industrial use.
• Only use the vacuum cleaner
indoors on dry surfaces and
keep the area you’re cleaning
well lit.
• Keep ngers, hair and loose
clothing away from moving
parts and openings whilst
using the vacuum cleaner.
• This vacuum cleaner can be
used by children aged from 8
years and above and persons
with reduced physical, sensory
or mental capabilities or lack of
DON'TS
• Don’t use the vacuum cleaner
if it has been dropped,
damage or left outdoors.
• Don’t run over the power cord
or use vacuum cleaner if the
power cord or plug is
damaged. Please contact our
Customer Care Line on:
0330 026 2626 (Mon-Fri
9:00am-5:00pm).
• Don’t handle the plug or use
the vacuum cleaner with
wet hands.
experience and knowledge if
they have been given
supervision or instruction
concerning use of the vacuum
cleaner in a safe way and
understand the hazards
involved. Children shall not
play with the vacuum cleaner.
Cleaning and user
maintenance shall not be made
by children without supervision.
• Only Dirt Devil recommended
tools should be used with the
vacuum cleaner, use of
non-branded Dirt Devil
accessories/tools will invalidate
your guarantee.
handle, pull the power cord
around corners, sharp edges
or close a door over the
power cord.
• Don’t unplug the vacuum
cleaner by pulling on the power
cord.
• Don’t vacuum up any
ammable or combustible
materials (lighter uid, petrol,
kerosene etc) or use the
vacuum cleaner in an area with
explosive vapours or liquid.
• Don’t pull or carry the vacuum
cleaner by the power cord.
• Don’t use the power cord as a
2
• Don’t vacuum up hot coals,
cigarette butts, matches or
smoking hot burning items
Page 3

Warning
DON'TS CONTI N U ED...
or use in an area where there
may be harmful uids (chlorine,
bleach, and ammonia drain
cleaner).
• Don’t attempt to remove
blockages with sharp objects
as this may cause damage
to the vacuum cleaner, remove
blockages only as instructed in
this guide.
DO'S
• Turn off all controls on the
vacuum cleaner before
disconnecting or connecting
the plug from the mains socket.
• Always keep the power cord
away from the brushes during
use. After use always wrap the
power cord around the cord
clips provided.
• Always make sure both the
pre-motor/post-motor lters are
in place before use.
• Always make sure the brush
bar is switched off when using
the vacuum cleaning on stairs
or when using the hose and
accessories. Take extra when
positioning the vacuum cleaner
on the stairs.
• Always switch off the vacuum
cleaner before disconnecting
or connecting the hose and
accessories.
• Don’t vacuum up hard or sharp
objects such as glass, nails,
screws or coins etc.
• Don’t use the vacuum cleaner
with incorrect voltage as this
may result in damage or injury
to the user. The correct voltage
is listed on the ratings label.
• Keep all openings clear and
free from debris as this may
affect the airow/suction.
• Always replace the fuse in the
plug with a British 13amp fuse.
Always protect the power
cable from heated surfaces
and open ames.
• Use only CE approved 13amp
extension cords, non-approved
extension cords may overheat.
Care should be taken to
arrange the extension cord as
it can be a trip hazard.
• Store the vacuum cleaner in a
cool, dry area. If the lters have
been cleaned as per user the
guide instructions ensure they
are thoroughly dry before
storing away.
PLEASE KEEP INSTRUCTIONS
FOR FURTHER USE.
3
Page 4
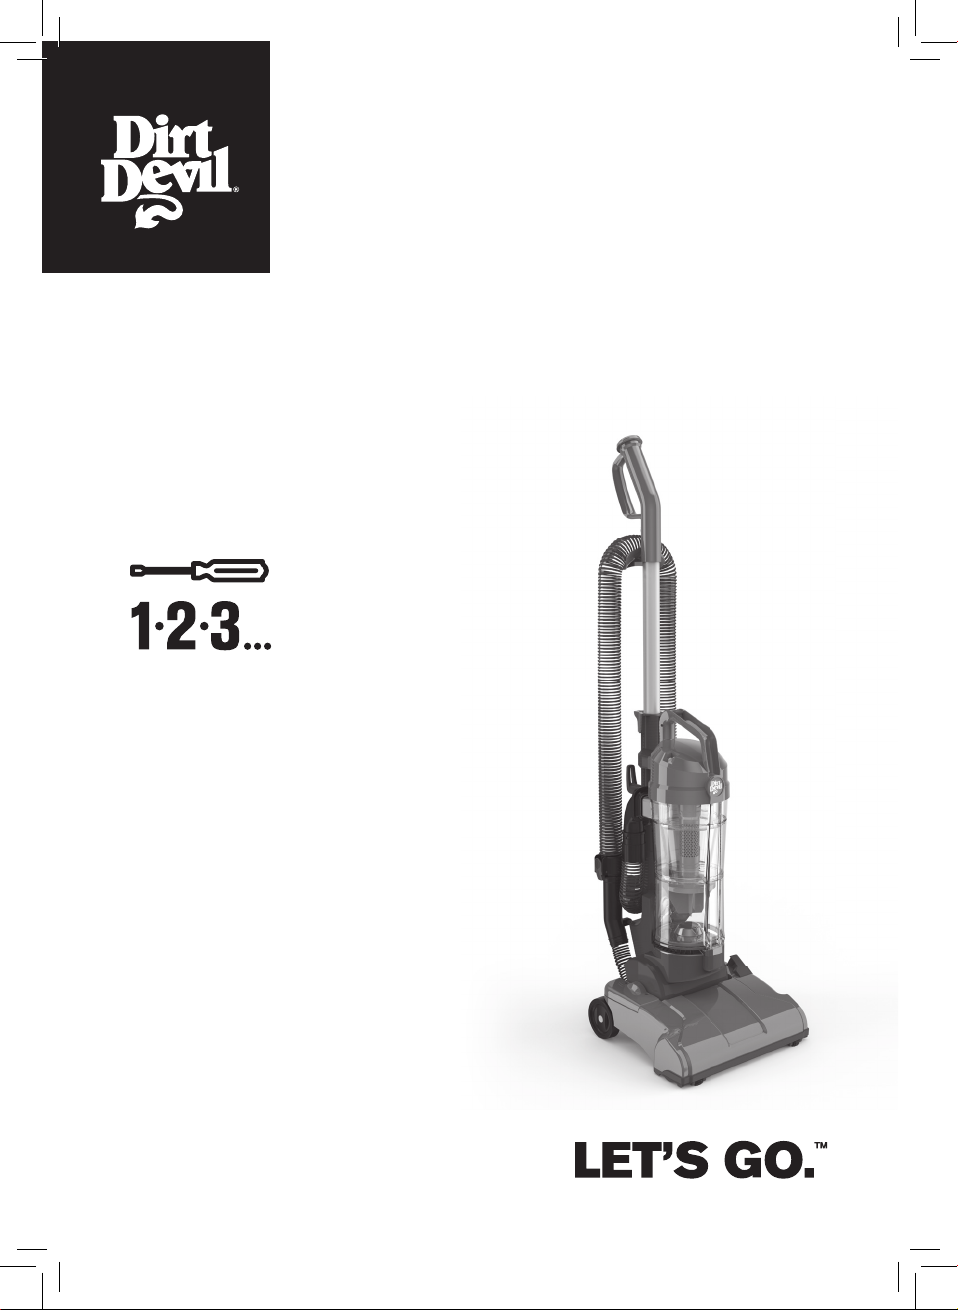
HI. WElCOM E.
Congrats on purchasing your new POWERLITE
cyclonic vacuum. Inside, you’ll fi nd everything
you want to know from tools to how to.
So what are you waiting for? LET’S GO.
Thank you for choosing a Dirt Devil product.
Please enter the complete model and serial
number in the spaces provided.
MODEL
SERIAL NUMBER
Serial number located on the machine’s rating
label
Hint: Attach your sales receipt to this owner’s
manual. Verification of date of purchase may be
required for warranty service of your Dirt devil
product.
6113641413011111
Model
Wattage
DDU01-E01
1000W
SERIAL NUMBER
(Label located on bottom of vacuum)
™
4
Page 5

TAB lE OF
CONTE NTS
Safety information 3
Contents 5
Machine overview 6
Quick start 7
Hard floor cleaning 12
Using your machine 12
Maintenance 13
Troubleshooting 18
Other information 19
Limited guarantee 19
5
Page 6
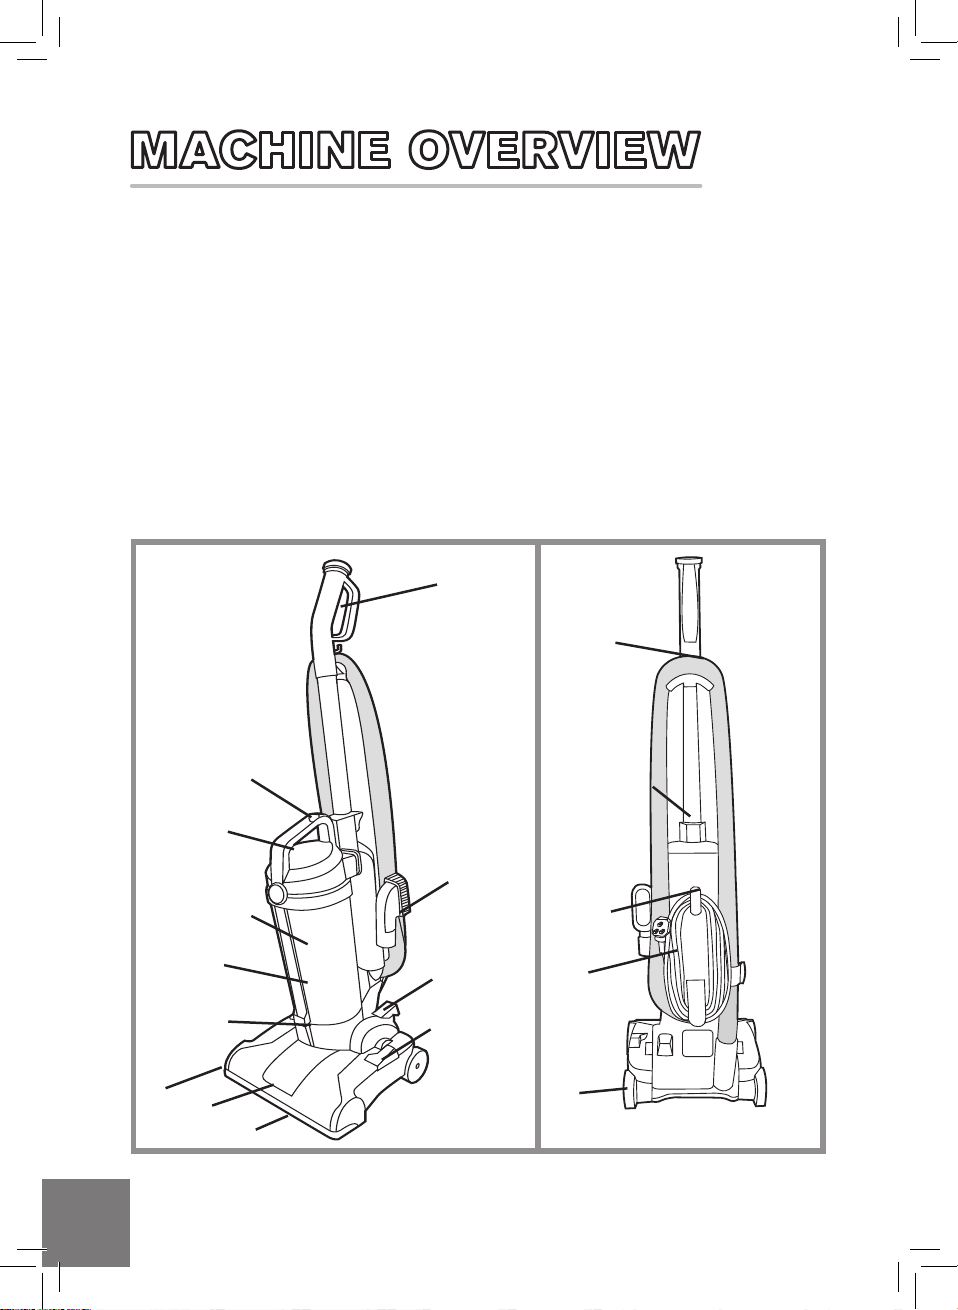
VACUUM DESCRIPTION
1. Handle
2. Stretch Hose
3. Dusting Brush
4. Dirt Bin Release Button
5. Shroud and Separator
6. Dirt Bin
7. Filters
8. System Check Indicator
9. Crevice Tool (Attached to
handle and stored in cleaner)
4
8
10. Hose Holder
11. Quick Release Cord Hook
12. Power Cord
13. Wheels
14. On/Off Pedal
15. Brushbar Control Button
16. Hard Floor Adaptor
1
10
9
3
16
5
6
7
14
15
8
11
12
13
9
6
Page 7

WHAT'S IN THE BOX
Remove all parts from carton and
identify each item shown. Make
sure all parts are located before
disposing of packaging.
A
C
D
G
A. Handle
B. Crevice Tool (Attached to
handle)
C. Main Body
D. Dirt Bin
E. Dusting Brush
F. Hard Floor Adaptor
G. TurboTool (certain models only)
E
B
F
7
7
Page 8

ATTACH HANDLE
B
1. Insert handle into
body of cleaner. Push
down until handle locks
into place.
A
2. Position hose over
hose holder (A) and into
hose tube (B).
IMPORTANT: Hose must be connected as shown for all operations.
ATTACH
DIRT BIN
STORE TOOLS
D
E
C
3. To remove handle,
remove hose and press
handle/wand release
button (C) to remove.
Place bottom of
dirt bin into
vacuum body first.
Pivot Bin into
vacuum. Dirt Bin
is secure when
you hear a click.
8
1. Snap dusting
brush (D) into
storage area on
side of cleaner.
2. Crevice tool is
permanently
attached to end
of handle/wand
and inserted into
cleaner body for
storage.
3. TurboTool is
included in certain
models and will
be a separate
addition. Attach
TurboTool to hose
end for use.
DO NOT ATTACH
TURBOTOOL TO
HANDLE.
Page 9

CaUTiOn
Not to be used for grooming a pet.
HANDLE
RELEASE
FLOOR/
CARPET
CLEANING
Pull back handle
to tilt back. Press
on the front of
nozzle if needed.
Move the handle
and adjust it to the
desired position
for operating the
cleaner, and
lowering handle to
clean under
furniture.
CLEANING TOOLS
This vacuum cleaner is fitted with a
constantly rotating brush bar. To avoid
damage to your flooring, make sure
the brush bar is turned off when
using the hose, accessories and when
using on stairs.
SUCTION
ONLY MODE
A
For optimal
cleaning
performance on
hard floors,
brushbar should
be turned off. The
vacuum is shipped
with the brushbar
in the ON position.
To turn brushbar
OFF for Suction
Only Mode, step
on pedal (A).
CARRY
HANDLE
Use the carry
handle to move
the cleaner from
room to room.
CAUTION: Caution: Turn brushbar off
before disconnecting and connecting hose
to hose tube (A). To use hose, lift hose end
as shown.
A
7
9
Page 10

SELECT PROPER TOOL Tools may vary per model)
A. Dusting brush may be used for
carved furniture, table tops, books,
C
A
D
B
lamps, lighting fixtures, venetian
blinds, baseboards, shutters, and
registers.
B. Crevice tool (permanently fixed to
the bottom of the handle/wand) may
be used in tight spaces, corners and
along edges in such places as dresser
drawers, upholstered furniture, stairs
and baseboards.
C. The handle/wand is used to give
extra length to your hose. Can also be
used with dusting brush. Dusting
brush can only be used when inserted
into the crevice tool.
D. TurboTool is designed to help you
remove pet hair from your home
easily. Can only be used with hose.
ATTACH WAND AND TOOLS
Remove the hose from hose caddy.
Connect tools to end of hose or use
hose alone.
To use handle wand, first remove hose
from hose holder then remove handle
from main body by pressing the handle
release button. Attach hose to top of
handle.
To use brush tool remove from machine
and place over crevice tool.
To use Turbo Tool attach to hose end.
10
Page 11

STAIR CLEANING
Use the hose or crevice tool for stair
cleaning.
With handle in upright position, clean
from bottom to top.
CaUTiOn
Use extra care when cleaning on stairs. To avoid personal injury or damage, and to prevent the
vacuum from falling, always place cleaner at bottom of stairs or on floor. Do not place vacuum on
stairs or furniture, as it may result in injury or damage. When using tools or on stairs the
brush bar must be switched to the off position.
7
11
Page 12

Always turn off the brushbar.
Apply the Hard Floor Adapter for optimum results on hard floors.
IMPORTANT: To ensure the Hard Floor Adaptor is correctly fitted, the wheels should be towards
the back of the floor tool when attached to vacuum cleaner.
1. Hard floor cleaning
tool.
2. Lie vacuum cleaner
on its back exposing
brushbar.
CORD RELEASE/STORAGE
Turn the quick cord release for easy
cord removal. Store cord in cord guide
to keep out of the way while
vacuuming. Wrap cord around cord
hooks for convienient storage. Attach
the plug end to the cord.
3. Line up adapter with
base of vacuum cleaner,
push it until it clicks into
place.
ON/OFF PEDAL
Plug cord into electrical outlet. Turn
vacuum on by depressing foot pedal
located on the back left side of the
vacuum. Turn vacuum off by
depressing foot pedal again.
12
Actual model may vary from images shown.
Page 13

CaUTiOn
To reduce the risk of personal injury - Unplug before cleaning or servicing. Do not operate
vacuum without either the dirt bin or filters in place. Very fine materials, such as face powder or
cornstarch, may seal the filter and cause a reduction in performance. When using the vacuum
for this type of dust, empty the bin and clean the filters often.
Familiarise yourself with these home
maintenance tasks as proper use
and care of your cleaner will ensure
continued cleaning effectiveness.
The System Check Indicator located
at (A), alerts you to possible system
performance issues. Please refer to
Trouble shooting page 18 to see the
possible causes and solutions.
IMPORTANT: The vacuum cleaner is equipped with a thermal cut-out. If for any reason the
vacuum cleaner does overheat the thermostat will automatically turn the vacuum cleaner off.
If this happens switch the vacuum cleaner off and unplug from electrical socket. Remove and
empty the dirt container also check the vacuum cleaner for blockages.
A
Allow the vacuum cleaner to cool for approximately 1 hour (if you have cleaned the filters please
wait 24 hours for the filters to fully dry before putting back into the machine).
7
13
Page 14

HOW TO EMPTY THE DIRT BIN
1. To remove dirt bin press release
button.
2. Hold dirt bin over rubbish bin and
press quick release dirt bin button to
empty. Make sure bin bottom center
opening is clear of debris. Click bin
back into place after emptying.
CAUTION: To reduce the risk of personal injury - Unplug before cleaning or servicing. Do not
operate vacuum without either the dirt bin or filters in place.
14
Page 15

HOW TO CLEAN THE PREMOTOR FILTER
REMOVE DIRT BIN
1. Twist dirt bin lid
counter clockwise
and lift up to
remove.
2. Remove filter
cartridge from
dirt bin.
3. Separate foam
filter from filter
cartridge.
HOW TO CLEAN THE POSTMOTOR FILTER
1. Click the button at the
back of the post-motor
filter cover to unlock.
2. Remove the foam filter.
3. Hold foam filter under
running water to wash.
Wring excess water out
of filter.
4. Hold filter cartridge
over rubbish bin and tap
off dirt and debris. The
sponge filter can be
cleaned by running under
water to wash. Leave to
dry for 24 hours or until
fully dry before replacing.
To replace bin lid line up
with lock and twist
clockwise to lock in
place.
Leave filter for 24 hours
or until fully dry before
replacing.
7
15
Page 16

HOW TO CLEAN THE SHROUD AND SEPARATOR
A
1. Hold dirt bin by carry handle and
press release button (A) to empty dirt
bin.
2. Twist umbrella tube anti-clockwise
and pull out of dirt bin. Hold over bin
and shake free of dirt and debris.
To replace shroud and separator, insert
back into dirt bin, align slots and twist
clockwise until tube locks in place.
CAUTION: To reduce the risk of personal injury - Unplug before cleaning or servicing. Do not
operate vacuum without either the dirt bin or filters in place.
HOW TO REPLACE THE BELT AND BRUSHBAR
1. Lay the vacuum flat
and flip it to expose the
nozzle base. The base
should lay flat and face
up. Remove the five
screws.
2. Pull and lift the nozzle
guard off.
3. Lift and remove the
brushbar. Dispose of the
old belt.
1216
Page 17

SLOTS
TABS
HOW TO REPLACE THE BELT AND BRUSHBAR
CONTINUED...
4. Slide belt onto
motorshaft.
7. Reattach nozzle guard. 9. Replace all five screws
CAUTION: To reduce the risk of injury from moving parts - Unplug vacuum before servicing.
5. Place new belt in area
of brushbar without
bristles.
SLOTS
TABS
8. Secure by aligning the
three tabs in the base
slots.
6. With new belt in place,
pull and slide brushbar
into nozzle making sure
that the brushbar end
caps are in the correct
orientation. Rotate
brushbar manually to
make sure belt is
properly aligned.
to secure nozzle guard.
7
13717
Page 18

If a minor problem occurs, it usually can be solved quite easily when the
cause is found by using the checklist below.
CaUTiOn
To reduce the risk of personal injury - Unplug before cleaning or servicing.
PROBLEM POSSIBLE CAUSE POSSIBLE SOLUTION
Cleaner won't run.
Power cord not firmly plugged into
outlet.
Blown fuse. Check the fuse in the plug if this
Thermal protector activated. Check the vacuum cleaner for
Plug unit in firmly.
needs replacing, always replace
with a britsh13amp fuse.
blockages. Allow the vacuum
cleaner to cool for approximately
1 hour (if you have cleaned the
filters please wait 24 hours for
the filters to fully dry before putting back into the machine).
The Performance Indicator
is red or the cleaner won't
pick up or low suction.
Brush bar not turning.
Dust escaping from the
cleaner.
18
Dirt bin not installed correctly.
Dirt bin full. Empty and clean the dirt bin.
Broken or worn belt. Replace belt.
Clogged filter. Remove filter and clean.
Nozzle/brushbar clogged. Check nozzle/brush bar; remove
Hose clogged. Remove hose; remove clog.
Clogged brush bar. Remove brush bar and clean.
Brush bar worn. Replace brush bar.
Broken or worn belt. Replace belt.
Dirt bin full. Clean and empty dirt bin.
Dirt bin not installed correctly. Review dirt bin removal and
Hose clogged or not installed
correctly.
Filter clogged or not installed
correctly.
Review dirt bin removal and
replacement.
obstruction/clog.
replacement.
Check hose for clog and review
hose installation.
Clean filter and review filter
removal and replacement.
Page 19

UK SERVICE & HELP
Any queries or concerns about using your Dirt Devil, simply visit; www.DirtDevil.co.uk
or call the Dirt Devil Careline on 0330 026 2626. Calls are charged at the UK local rate.
Please make a note of the serial number and model number of the vacuum cleaner
before calling.
DIRT DEVIL CARELINE:
UK 0330 026 2626
Monday-Friday 9:00am to 5:00pm
TECHNICAL SPECIFICATION
Voltage: See rating label on machine for full details
Wattage: See rating label on machine for full details
Capacity: 1.5l
Cord length: 6m
Weight: 5.5kg
SUBJECT TO TECHNICAL CHANGE WITHOUT NOTICE.
LIMITED GUARANTEE
It’s quick and easy to register for your free 1 year guarantee online at
www.DirtDevil.co.uk. Register online.
Please retain your original receipt for proof of purchase.
Please make a note of the serial number and model number of the product before
calling.
7
19
Page 20

Call our
Customer Care Line
on 0330 026 2626
Monday-Friday 9:00am to 5:00pm.
www.dirtdevil.co.uk
Vax Limited, trading as Dirt Devil.
2 Colmore Square, 38 Colmore Circus, Queensway, Birmingham, B4 6BN.
EEC Statement of Compliance: Manufacturer/EEC importer: Vax Limited trading as Dirt Devil, hereby
on our own responsibility, declare that the DDU01-E01-P01 series is manufactured in compliance with the
following Directives: Safety: 2006/95/EC Low Voltage Directive. EMC: 2004/108/EC Electromagnetic
Compatibility Directive
Waste electrical products should not be disposed of with household waste. Please recycle where facilities
exist. Check with your Local Authority or retailer for recycling advice.
 Loading...