

Page 1
USER’S GUIDE
HIGH POWER - EASY CLEANING
VISIT OU R WEBSITE: WWW.DIRTD EVIL.CO.UK
bagless cylinder
DCC005
2200W
cyclonic
Page 2

2
www.dirtdevil.co.uk
Page 3

INTRODUCTION
Introduction
Thank you for purchasing this Dirt Devil product which has been
designed and manufactured to give you many years of trouble
free service.
You may already be familiar with using a similar product, but do
please take the time to read these instructions - they have been
written to ensure that you get the very best from your purchase.
Support
If you require any help, setting up or using your Dirt Devil
product, our customer services team will be happy to help you.
You can contact them on 0870 873 0081.
Safety is important
To ensure your safety and the safety of others, please
!
!
Keep this information in a safe place for future reference.
ensure you read the Safety Instructions before you
operate this vacuum cleaner.
Please pay particular attention to the sections of this
guide that carry this warning symbol
Customer Helpline: 0870 873 0081
3
Page 4

CONTENTS
Contents
Introduction ............................................................................................ 3
Support ....................................................................................................................... 3
Safety is important .................................................................................................. 3
Provided Cleaning Heads ...................................................................... 6
Carpet Floor Brush ................................................................................................... 6
Intense Turbo Brush ................................................................................................ 6
Safety Instructions ................................................................................. 7
Power Source ............................................................................................................ 7
Using your Vacuum Cleaner ................................................................................. 7
Transporting your Vacuum Cleaner .................................................................. 8
Service ......................................................................................................................... 8
Electrical Information ............................................................................ 9
Parts Identification ............................................................................... 12
In the Box .................................................................................................................. 12
Front View ................................................................................................................13
Rear View ..................................................................................................................14
Assembly ............................................................................................... 15
Fitting the Flexible Hose .....................................................................................15
Telescopic Extension Tube ................................................................................. 15
Using your Vacuum Cleaner................................................................. 16
Suction Control.......................................................................................................16
Switching On ........................................................................................................... 16
Accessory Tools.......................................................................................................17
Switching Off ...........................................................................................................17
Rewinding the Power Cable .............................................................................. 18
Emptying the Dust Canister ................................................................ 19
Removing Blockages ............................................................................................20
Cleaning the Intense Turbo Brush ...................................................................21
4
www.dirtdevil.co.uk
Page 5

CONTENTS
Maintenance ......................................................................................... 22
Filter Cleaning/Replacement .............................................................................22
2 Stage HEPA high grade Filter .........................................................................22
Mesh Cone Filter Cover ........................................................................................23
Exhaust Filter ...........................................................................................................24
Troubleshooting ................................................................................... 25
Thermal Cut Out .....................................................................................................25
Spare Parts and Consumables ..........................................................................25
Disposal ................................................................................................. 26
Guarantee ............................................................................................. 26
Customer Helpline: 0870 873 0081
5
Page 6
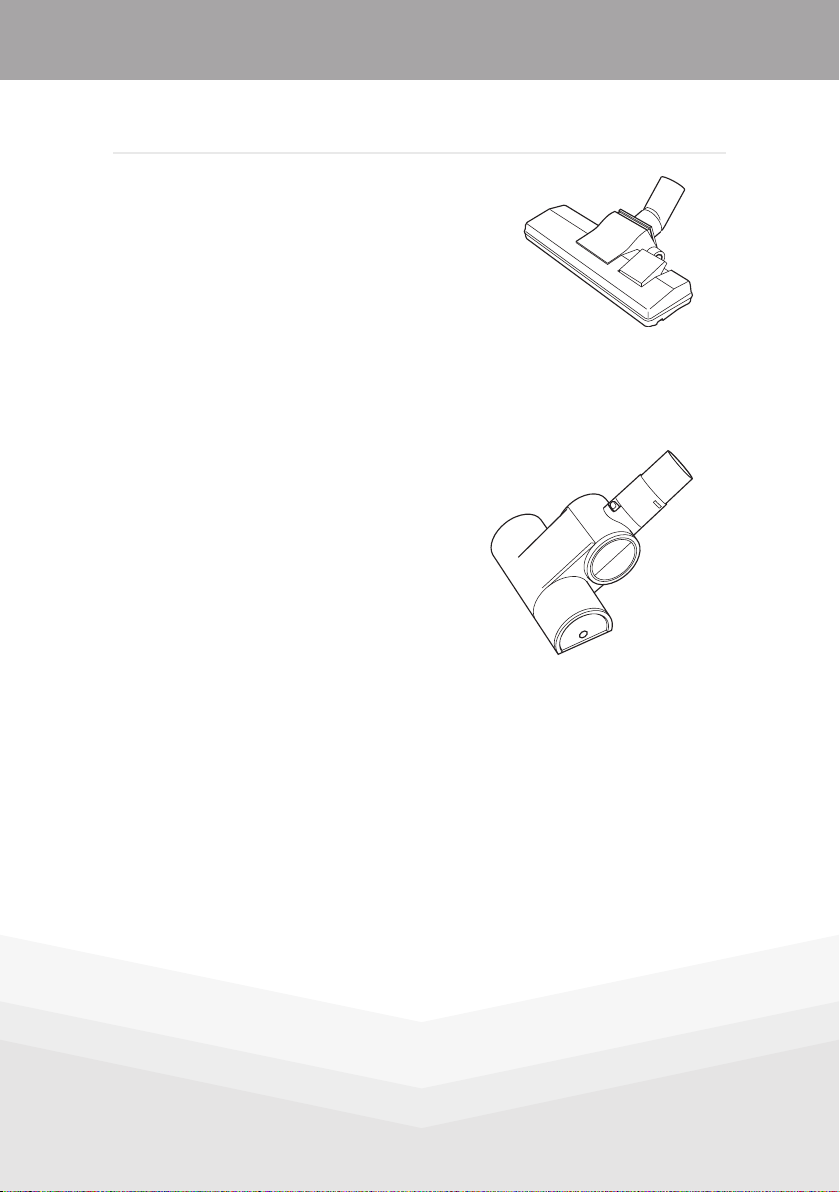
PROVIDED CLEANING HEADS
Provided Cleaning Heads
Carpet Floor Brush
Wheeled floor brush with
brush height adjustment lever
for either carpet or hard floor
setting.
Intense Turbo Brush
A compact rotating brush that is
powered by the strong air flow
from the vacuum cleaner.
Provides a stronger cleaning
performance on most fabrics
and is better than a standard
carpet brush at two jobs:
6
www.dirtdevil.co.uk
Picking up ground-in dirt from
•
carpets
picking up hairs (especially pet
•
hairs from seats, car surfaces
and furniture).
This is an intense cleaning
brush - if cleaning a fabric
surface with the brush for the
first time, always test the brush
on a discreet unseen area to
make sure the fabric surface is
compatible and is undamaged
by the fast moving bristles.
Page 7

SAFETY INSTRUCTIONS
Safety Instructions
WARNING!
!
This product is not suitable for use by children, and may not be
suitable for persons requiring supervision unless they receive
instruction by a competent person on how to safely use the
product.
Close supervision is necessary when this appliance is used by or
near children.
Power Source
Your vacuum cleaner requires a 230V to 240V AC 50 Hz supply. Do
not use any other supply.
THIS VACUUM CLEANER SHOULD NEVER BE LEFT
UNATTENDED WHEN CONNECTED TO THE MAINS
SUPPLY.
Using your Vacuum Cleaner
Never vacuum wet surfaces, pick up wet objects or use in wet
•
conditions.
Never use your vacuum cleaner to pick-up burning objects or
•
hot objects such as coal and ashes.
Do not use the vacuum cleaner to pick up large objects that are
•
likely to cause blockages or damage.
Never operate the vacuum cleaner without the dust canister or
•
filters installed.
For domestic use only - industrial or commercial use invalidates
•
warranty.
Do not block the exhaust outlet as this will cause the motor to
•
overheat.
Customer Helpline: 0870 873 0081
7
Page 8

SAFETY INSTRUCTIONS
Do not let children use the vacuum cleaner unattended.
•
Do not run over the mains cable with the vacuum cleaner.
•
Consult your dealer if you are in any doubt about the assembly,
•
operation or safety of your vacuum cleaner.
Most new carpets have a running-in period, during which only
•
light vacuuming is recommended.
Transporting your Vacuum Cleaner
To move your vacuum cleaner from room to room, unplug the
•
mains cable and carry the unit using the carry handle.
If you need to lift and carry the vacuum cleaner, use its carrying
•
handle. DO NOT carry the vacuum cleaner by the dust canister
handle.
Never pull the vacuum cleaner by its mains cable.
•
Service
For your safety, the plug must be removed from the wall socket
•
before emptying the vacuum cleaner, cleaning the vacuum
cleaner or undertaking any maintenance operation.
8
www.dirtdevil.co.uk
If the mains cable is damaged in any way, do not use the
•
vacuum cleaner. The cable must be replaced by a qualified
service agent.
Page 9

ELECTRICAL INFORMATION
Electrical Information
This appliance is fitted with either a moulded or rewirable BS1363,
13 amp plug. The fuse should be rated at 13 amps and be ASTA
approved to BS1362.
If the fuse in a moulded plug needs to be changed, the fuse cover
must be refitted. The appliance must not be used without the fuse
cover fitted.
If the plug is unsuitable, it should be dismantled and removed
from the supply cord and an appropriate plug fitted as detailed
below. If you remove the plug it must not be connected to a 13
amp socket and the plug must be disposed of immediately.
As the colours of the wires in the mains lead of this appliance
may not correspond with the coloured markings identifying the
terminals in your plug, proceed as follows:
The blue wire must
•
be connected to the
terminal marked with
the letter N or coloured
black.
Plug should be BS1363/A approved
Fit a 13 Amp Fuse
13 Amp
Fuse
The brown wire must
•
be connected to the
terminal marked with
the letter L or coloured
red.
Do not connect either
•
wire to the earth
terminal of the plug.
BLUE
(Neutral)
Ensure that the outer sheath of the cable
is rmly held by the clamp
BROWN
(Live)
If a 13 Amp (BS1363/A) plug is used, a 13 Amp fuse (BS1362) must
be fitted, or if any other type of plug is used a 13 Amp fuse must
be fitted, either in the plug, adapter or in the distribution board.
This symbol indicates that this unit is a Class II appliance
and therefore an earth connection is not required.
Customer Helpline: 0870 873 0081
9
Page 10

SPECIFICATION
Extra Hygiene
Vacuum cleaners pick up dust around the home
• Dust collects until the cleaner is emptied
• Bacteria, mould and mildew can invade any home
• These common contaminants can accumulate inside the dust container
or dust bag and spread to other parts of the home
• In collaboration with Microban®, a world leader in built-in antibacterial
solutions, Dirt Devil has created a range of vacuum cleaners that have an
extra level of hygiene protection
• Independently proven effective against common household bacteria*
• The hygienic action works for the lifetime of the treated surface
• Microban® will not rub off or in any way transfer to another surface
• Microban® is safe for use in the home
Microban® is also used in these other household products
*Independently tested to be up to 99.9% effective against common household bacteria, moulds and mildew. Also works against growth of tested mould
and mildew on treated surfaces, and reduces bad smells from inside the vacuum cleaner by combating odour producing bacteria.
10
www.dirtdevil.co.uk
Page 11

Extra Hygiene
www.microban.com
• The hygienic action works for the lifetime of the treated surface
• Microban® will not rub off or in any way transfer to another surface
• Microban® is safe for use in the home
Microban® Treated Bagless Dust Canister
Dirt Devil bagless products treated with
Microban® have protection on all plastic surfaces
of the dust canister.
Microban® Treated Dust Bags
Ideal for asthma sufferers, hygienic dust bags are
sealable for the best protection, eliminating
contact with the contents while disposing of the
dust bag.
Microban® Treated Filters
Filters provide additional containment, and give
extra protection during removal and
replacement of the air filters.
®
MICROBAN is a registered trademark of Microban Products Company
.
©2007 Microban Products Company. All rights reserved.
Brand names are registered trademarks of their respective companies.
SPECIFICATION
Customer Helpline: 0870 873 0081
11
Page 12

PARTS IDENTIFICATION
Parts Identification
In the Box
Motor and
Dust Canister Unit
Telescopic Extension Tube
Furniture Brush
Carpet
Floor Brush
Spare HEPA Filter
Flexible Hose
Accessory holder Spare Foam Filter
Intense
Turbo Brush
Crevice Tool
Spare Exhaust Filter
Upholstery
Brush
12
www.dirtdevil.co.uk
Page 13

Front View
Canister
Full/Blockage
Indicator
Dust Canister
Release Button
Dust
canister
PARTS IDENTIFICATION
Variable
Power
Control
On/Off
Button
Handle
Hose
Inlet
Socket
Customer Helpline: 0870 873 0081
13
Page 14

PARTS IDENTIFICATION
Rear View
Variable Power
Control
Exhaust Filter
Cover
Cable
Rewind
Button
Floor Brush
Hook
Mains
Cable
14
www.dirtdevil.co.uk
Page 15

Assembly
Fitting the Flexible Hose
Push the flexible hose connector
into the hose inlet socket until
it latches into place (see right).
To release the flexible hose
connector, press the two buttons
on the side of the flexible hose
connector and pull it out of the
hose inlet socket.
Telescopic Extension Tube
This model incorporates a
telescopic extension tube.
To extend the tube, push the
locking catch forwards and pull the
tube to the desired length. Release
the locking catch to lock the tube
into position.
ASSEMBLY
Accessory Holder
Clip the accessory holder to the
extension tube as shown. Use it to
store the crevice tool, upholstery
brush and furniture brush.
Customer Helpline: 0870 873 0081
15
Page 16

USING YOUR VACUUM CLEANER
Using your Vacuum Cleaner
Suction Control
A thumb operated suction control
is located on the hose handle. This
allows you to reduce or increase
the amount of suction to suit the
vacuuming task.
Maximum suction gives the best
results during normal vacuuming,
however, reduced suction may
be more appropriate if you are
vacuuming fabrics or upholstery.
Switching On
Pull the power cable to the desired
length. When you are nearing the
maximum, a yellow marker will be
visible on the cable. A red marker
indicates that you have reached the
maximum cable length.
Insert the mains plug into the mains
socket and switch the socket on.
Variable
Power
Control
Suction
Control
Power
On/Off
Button
16
www.dirtdevil.co.uk
Press the Power On/Off button to
switch the vacuum cleaner on. This
vacuum cleaner has a soft start
facility and will take a few seconds
to reach full power. The power can
be adjusted using the variable
power control.
Page 17

USING YOUR VACUUM CLEANER
Accessory Tools
Crevice tool
The crevice tool can be used to
clean hard to reach places. Attach
it directly to the handle for greater
control. Alternatively, attach it to the
telescopic extension tube for greater
reach.
Upholstery brush
Fit the upholstery brush directly
to the handle for greater control.
Alternatively, attach it to the
telescopic extension tube for greater
reach.
Furniture brush
Fit the furniture brush directly
to the handle for greater control.
Alternatively, attach it to the
telescopic extension tube for greater
reach.
Switching Off
After use, press the Power On/Off
button to switch your vacuum
cleaner off. Always unplug your
vacuum cleaner when not in use.
Customer Helpline: 0870 873 0081
17
Page 18

USING YOUR VACUUM CLEANER
Rewinding the Power Cable
WARNING
!
!
Holding the power cable in one hand, press the cable rewind
button with your foot and carefully feed the cable back into the
vacuum cleaner.
Take great care when using the cable rewind button,
particularly when children or pets are nearby, as the
rewind action may cause the cable to ‘whip’.
CAUTION
Always ensure that your vacuum cleaner is unplugged
from the mains supply before using the cable rewind
button.
18
www.dirtdevil.co.uk
Page 19

EMPTYING THE DUST CANISTER
Emptying the Dust Canister
WARNING
!
When the canister-full/blockage indicator changes to red, the dust
canister needs to be emptied.
• Unplug the vacuum cleaner.
Always make sure that your vacuum cleaner is
unplugged before emptying the dust canister or
checking for blockages.
Canister
Full/ Blockage
Indicator
• Press the dust canister release button and lift the dust canister
out of the vacuum cleaner body.
Customer Helpline: 0870 873 0081
19
Page 20

EMPTYING THE DUST CANISTER
Hold the dust canister over a
•
refuse bin and press the bottom
flap release catch to empty the
contents into the bin as shown
opposite. Take care not to breath
the dust.
Close the dust canister and
•
install it in the vacuum cleaner.
Gently push the dust canister
into the vacuum cleaner until
you hear a click.
Removing Blockages
If the suction of the vacuum cleaner seems to be reduced, check
that the dust canister is empty. If it is then there is probably a
blockage in one of the hoses, or the base. The filters may also need
cleaning.
WARNING
!
Always make sure that your vacuum cleaner is
unplugged before emptying the dust canister or
checking for blockages.
20
www.dirtdevil.co.uk
If the suction still seems to be
lower than expected after the dust
canister has been emptied, there
may be a blockage in one of the
tubes or attachments. Disconnect
from the mains supply and rewind
the cable and check the following
areas for blockages:
The hose inlet socket
•
The joint where the flexible hose
•
connects to the attachments
The inlet to the floor brush
•
Page 21

EMPTYING THE DUST CANISTER
If you cannot see the blockage, it may be in one of the kneejoints situated at the end of the plastic hose. To undo these joints,
remove the storage part of the handle, then use a flat-bladed
screwdriver (or similar tool) to carefully press in the release lugs
and pull the joint apart. Remove any blockage, then push the joint
together again until the lugs latch into place.
Cleaning the Intense Turbo Brush
If used to clean large quantities of loose material or long hair the
impeller and brush can become blocked.
Ensure the intense turbo brush has been disconnected from the
•
vacuum cleaner.
Slide the cover release catch forward and open the cover.
•
Remove any blockages from inside the intense turbo brush.
•
Close the cover and slide the catch back to lock the cover
•
closed.
Customer Helpline: 0870 873 0081
21
Page 22

MAINTENANCE
Maintenance
Depending on usage, you will need to periodically clean the dust
canister and filters.
CAUTION
!
Filter Cleaning/Replacement
Your vacuum cleaner is fitted with filters which trap particles
of dust. We recommend that the filters in the dust canister are
cleaned each time the dust canister is emptied.
When you start using a high filtration system you will find that
you need to clean the filters more frequently as you will be
removing finer particles than your previous cleaning system
could remove.
Your vacuum cleaner is supplied with a spare set of filters. Swap
to the spare set of filters when the used filters need washing.
Additional spare parts (including filters) are available from Spares
on 0870 873 0094.
The dust canister and filters must be fitted before the
cleaner is used, to avoid damaging the motor.
22
www.dirtdevil.co.uk
2 Stage HEPA high grade Filter
The high grade HEPA filter and foam filter in the dust canister
should be replaced after 6 washes as the filtration efficiency will
start to reduce after repeated washing.
To wash the filters, remove the dust canister.
•
Remove the filter and the foam filter from the dust canister and
•
tap them over a waste bin to remove loose dust particles.
Wash them in cold water (without soap or detergent) and rinse
•
thoroughly under running water to remove all fine particles.
Allow the filters to dry naturally. DO NOT force dry.
•
Page 23

MAINTENANCE
Use the spare set of filters provided when you are washing the
•
used set of filters.
DO NOT USE THIS VACUUM CLEANER WITHOUT FILTERS IN PLACE,
YOU COULD DAMAGE THE MOTOR.
Mesh Cone Filter Cover
Remove the HEPA filter and the foam filter.
1.
Press the bottom flap release catch and open the flap.
2.
Rotate the cone filter clockwise until it stops.
3.
Remove the cone filter.
4.
Tap the cone filter over a waste bin to remove loose dust
5.
particles. Wash the cone filter in cold water (without soap
or detergent) and rinse thoroughly under running water to
remove all fine particles.
Allow the cone filter to dry naturally. DO NOT force dry.
•
Refit the cone filter by reversing the above steps.
•
Replace the HEPA filter and the foam filter in the dust canister
•
Customer Helpline: 0870 873 0081
23
Page 24

MAINTENANCE
Gently push the dust canister into the vacuum cleaner until you
•
hear a click.
DO NO USE THIS VACUUM CLEANER WITHOUT THE FILTER IN
PLACE. YOU COULD DAMAGE THE MOTOR.
Exhaust Filter
This Microban Microfilter should be replaced after 9 months, as
the filtration efficiency will start to reduce after repeated washing.
To wash this filter, remove
•
from the vacuum cleaner, and
tap the filter over a waste bin
to remove loose dust particles.
Wash the filter in cold water
•
(without soap or detergent)
and rinse thoroughly under
running water to remove all
fine particles.
24
www.dirtdevil.co.uk
Allow the filter to dry naturally.
•
DO NOT force dry.
Use the spare set of filters
•
provided when you are
washing the used set of filters.
Replace a filter in the vacuum
•
cleaner.
DO NOT USE THIS VACUUM
CLEANER WITHOUT FILTERS IN
PLACE, YOU COULD DAMAGE
THE MOTOR.
Page 25

TROUBLESHOOTING
Troubleshooting
Thermal Cut Out
Your vacuum cleaner is fitted with a thermal cut out that protects
the vacuum cleaner if the motor overheats due to a blockage or
clogged filters. If the vacuum cleaner exhaust gets hot and the
product stops suddenly of its own accord, follow this procedure:
Switch off the vacuum cleaner and unplug from the mains
1.
supply.
Check for the source of the overheating problem (blocked
2.
hose, clogged filter, etc.).
Swap to the spare filters and wash the current set of filters
3.
taking care to remove fine dust.
Wait for approximately 40 minutes to allow the motor to cool
4.
and automatically release the safety mechanism.
After 40 minutes, plug in the vacuum cleaner and switch it on
5.
- it should now work.
If the problem persists, check the fuse in the mains plug
6.
taking the necessary safety precautions described on pages 7
and 8.
If the vacuum cleaner still does not work, unplug it, wait
7.
another 20 minutes and try again to see if the safety
mechanism is just taking longer to release.
If your vacuum cleaner is still not functioning correctly,
8.
contact the Troubleshooting Helpline on 0870 873 0081.
Spare Parts and Consumables
Spare parts and consumables can be obtained by calling the
Spares Helpline on: 0870 873 0094
Customer Helpline: 0870 873 0081
25
Page 26

DISPOSAL
Disposal
Guarantee
Please keep your sales receipt in a safe place since it is important
- You may want to staple it to the cover of this user guide.
This vacuum cleaner is guaranteed for twelve months from the
date it was purchased. If any defect arises during this period, due
to faulty materials or workmanship, the unit may be replaced,
repaired free of charge (where possible) or a refund given by the
dealer from which the appliance was purchased. To qualify for
the guarantee, the appliance must have been used in accordance
with the enclosed instructions and Quick Start Guide (where
included). This includes regularly washing filters to avoid clogged
airflow and heating.
At the end of its useful life, please dispose of this vacuum
cleaner in an environmentally friendly manner.
26
www.dirtdevil.co.uk
Dirt Devil shall not be liable to replace or repair the goods under
the terms of the Guarantee where:
The appliance has not been correctly assembled and operated
•
in accordance with the instructions contained in this manual.
The fault is attributable to accidental damage, mis-use such
•
as not cleaning of filters, or any use contrary to the Safety
Instructions contained in this guide.
The appliance has been used on a voltage supply other than
•
that marked on the product rating label, or has been subjected
to a power surge.
Page 27

GUARANTEE
The appliance has been used without the dust canister or filters
•
fitted in place.
The filters have not been maintained thereby leading to
•
clogging, repeated overheating and motor failure.
The appliance has been used for more than domestic purposes.
•
The appliance has been used for hire purposes, resold or has
•
been damaged by inexpert repair.
The manufacturer disclaims any liability for incidental or
consequential damages.
This guarantee excludes consumables such as filters.
This guarantee is only valid in the UK and Ireland.
This guarantee is in addition to, and does not diminish, your
statutory or legal rights.
Customer Helpline: 0870 873 0081
27
Page 28

HIGH POWER - EASY CLEANING
Issue 2 08/09
 Loading...