

Page 1
OWNER'S MANUAL
Operating and Servicing
Instructions
c3
Please read these
instructions carefully before
using your All Surface Swive
11
Glide?
Let us help you put your
cleaner together or answer
any questions, call:
1-800-321 -1 134
(USA)
1-800-661 -6200
(Canada)
website: www.dirtdeviI.com
For quick reference, please record your vacuum
information below.
Model
#:
Mfg. Code:
(Mfg,
code located on the lower backside
of
cleaner)
Espaiiol - pagina El
02000
All
rights reserved
#I
-1
1
3026-033
3/00
Page 2
CONGRATULATIONS
You are now the proud owner of the Dirt DevilB All Surface Swivel GlideB, the
world's most maneuverable upright with patented Swivel CastersTM for effortless
maneuvering on all types of floors. We trust your new purchase will bring you
many hours of satisfaction.
Our company designed and developed this product with you in mind. We have
included built-in tools and a powerful motor in a lightweight design for deep cleaning all household areas. Superior bare floor cleaning can be achieved with the stop
brush control feature.
We are very proud of our products and hope that you are equally satisfied with
their quality and performance.
Thank you for your support of Dirt DevilB products.
Visit our
website at www.dirtdevil.com
TABLE
OF
CONTENTS
Safety Instructions
............................................................................
Page
3
Feature Descriptions.
........................................................................
Page
4
How To Assemble
.............................................................................
Page
4
.....................................................
Hose Assembly and Tool Storage
Page
5
................................................................................
How To Operate Page
5
FloorICarpet Cleaning
.................................................................
Page
5
Barefloor and Above Floor Cleaning
...........................................
Page
5
How To Transport Cleaner
................................................................
Page
6
Belt or Brush Roll Removal and Replacement
.................................
Page
7
Filter Removal and Replacement
.....................................................
Page
8
...............................................
Lightbulb Removal and Replacement
Page
8
Troubleshooting Guide
......................................................................
Page
9
LIMITED
WARRANTY
To the consumer, Royal Appliance Mfg. Go. warrants this vacuum cleaner to be free of defects in material or workmanship commencing upon the date of the original purchase. Refer to your vacuum cleaner carton for the length of warranty and save your original sales receipt to validate start of warranty period.
If the vacuum cleaner should become defective within the warranty period, we will repair or replace any defective parts free of charge. The complete machine must
be delivered
DreDaid
to any ROYAL Authorized Sales & Warranty Service Station. Please include complete description of the problem, day of purchase, copy of
original sales receipt and your name, address and telephone number. If you are not near a Warranty Station, call the factory for assistance at USA: 1-800-321-1
134
/CANADA: 1-800-661-6200. Use only genuine Royal replacement parts.
The warranty does not include unusual wear, damage resulting from accident or unreasonable use of the vacuum cleaner. This warranty does not cover belts, brush-
es, bags, bulbs or fan damage. This warranty does not cover unauthorized repairs. This warranty gives you specific legal rights and you may also have other rights.
(Other rights may vary from state to state in the USA).
Page 3
THIS CLEANER IS INTENDED FOR HOUSEHOLD USE ONLY
IMPORTANT SAFETY INSTRUCTIONS
When
you
use
an
appliance,
basic
precautions
should
be
followed,
including
the
following:
READ ALL INSTRUCTIONS BEFORE USING THE APPLIANCE.
ALWAYS FOLLOW THESE SAFETY INSTRUCTIONS.
BRING CLEANER TO UPRIGHT POSITION WHEN USING THE HOSE AND ATTACHMENTS.
DO NOT LEAVE CLEANER UNATTENDED WHEN PLUGGED IN.
REGULARLY
CHECKTHE FILTERS TO CLEAN OR REPLACE.
WARNING: DO NOT USE SHARP OBJECTS TO CLEAN
OUTTHE HOSE SINCE THEY COULD CAUSE DAMAGE.
OCCASIONALLY REMOVE BRUSH AND CLEAN DEBRIS FROM END CAPS TO KEEP BRUSH ROTATING SMOOTHLY.
READ ALL INSTRUCTIONS BEFORE USING THE APPLIANCE.
WARNING: TO REDUCE THE RISK OF FIRE,
ELECTRIC SHOCK OR INJURY:
Do not leave appliance when plugged in. Unplug from outlet when not in use and before servicing.
Do not use outdoors or on wet surfaces. Electrical shock could occur.
Do not allow to be used as a toy. Close attention is necessary when used by or near children.
Use only as described in this manual. Use only manufacturer's recommended attachments.
Do not use with damaged cord or plug. If appliance is not working as it should, has been dropped, damaged, left outdoors,
or dropped into water, return it to a service center for inspection. Call
1-800-321
-1
134 for the nearest service center.
Do not pull or carry by cord, use cord as handle, close a door on cord, or pull cord around sharp edges or corners. Do
not run appliance over cord. Keep cord away from heated surfaces.
Do not unplug by pulling on cord. To unplug, grasp the plug, not the cord.
Do not handle plug or appliance with wet hands.
Do not put any objects into openings. Do not use with any opening blocked; keep free of dust, lint, hair, and anything that
may reduce air flow.
Keep hair, loose clothing, fingers, and all parts of body away from openings and moving parts.
Do not pick up anything that is burning or smoking, such as cigarettes, matches, or hot ashes.
Do not use without dirt container and filters in place.
Turn off all controls before unplugging.
Use extra care when cleaning on stairs.
Do not use to pick up flammable or combustible liquids, such as gasoline, or use in areas where they may be present.
Keep the vacuum cleaner on the floor. Only the hand-held vacuum cleaners may be set on furniture.
Cleaner must be in the upright position to lift the rotating brush off the carpet when doing above floor cleaning.
Do not use an extension cord with this vacuum cleaner.
Store the vacuum cleaner indoors. Put the vacuum cleaner away after use to prevent tripping accidents.
Using improper voltage may result in damage to the motor and possible injury to the user. Proper voltage is listed on the
cleaner plate.
SAVE THESE INSTRUCTIONS
WARNING:
To reduce the risk of electric shock, this appliance has a polarized plug (one blade wider than the other). This plug will
fit in a polarized outlet only one way. If the plug does not fit fully in the outlet, reverse the plug.
If
it still does not fit, con-
tact a qualified electrician to install the proper outlet. Do not change the plug in any way.
Page 4
Fiu
1
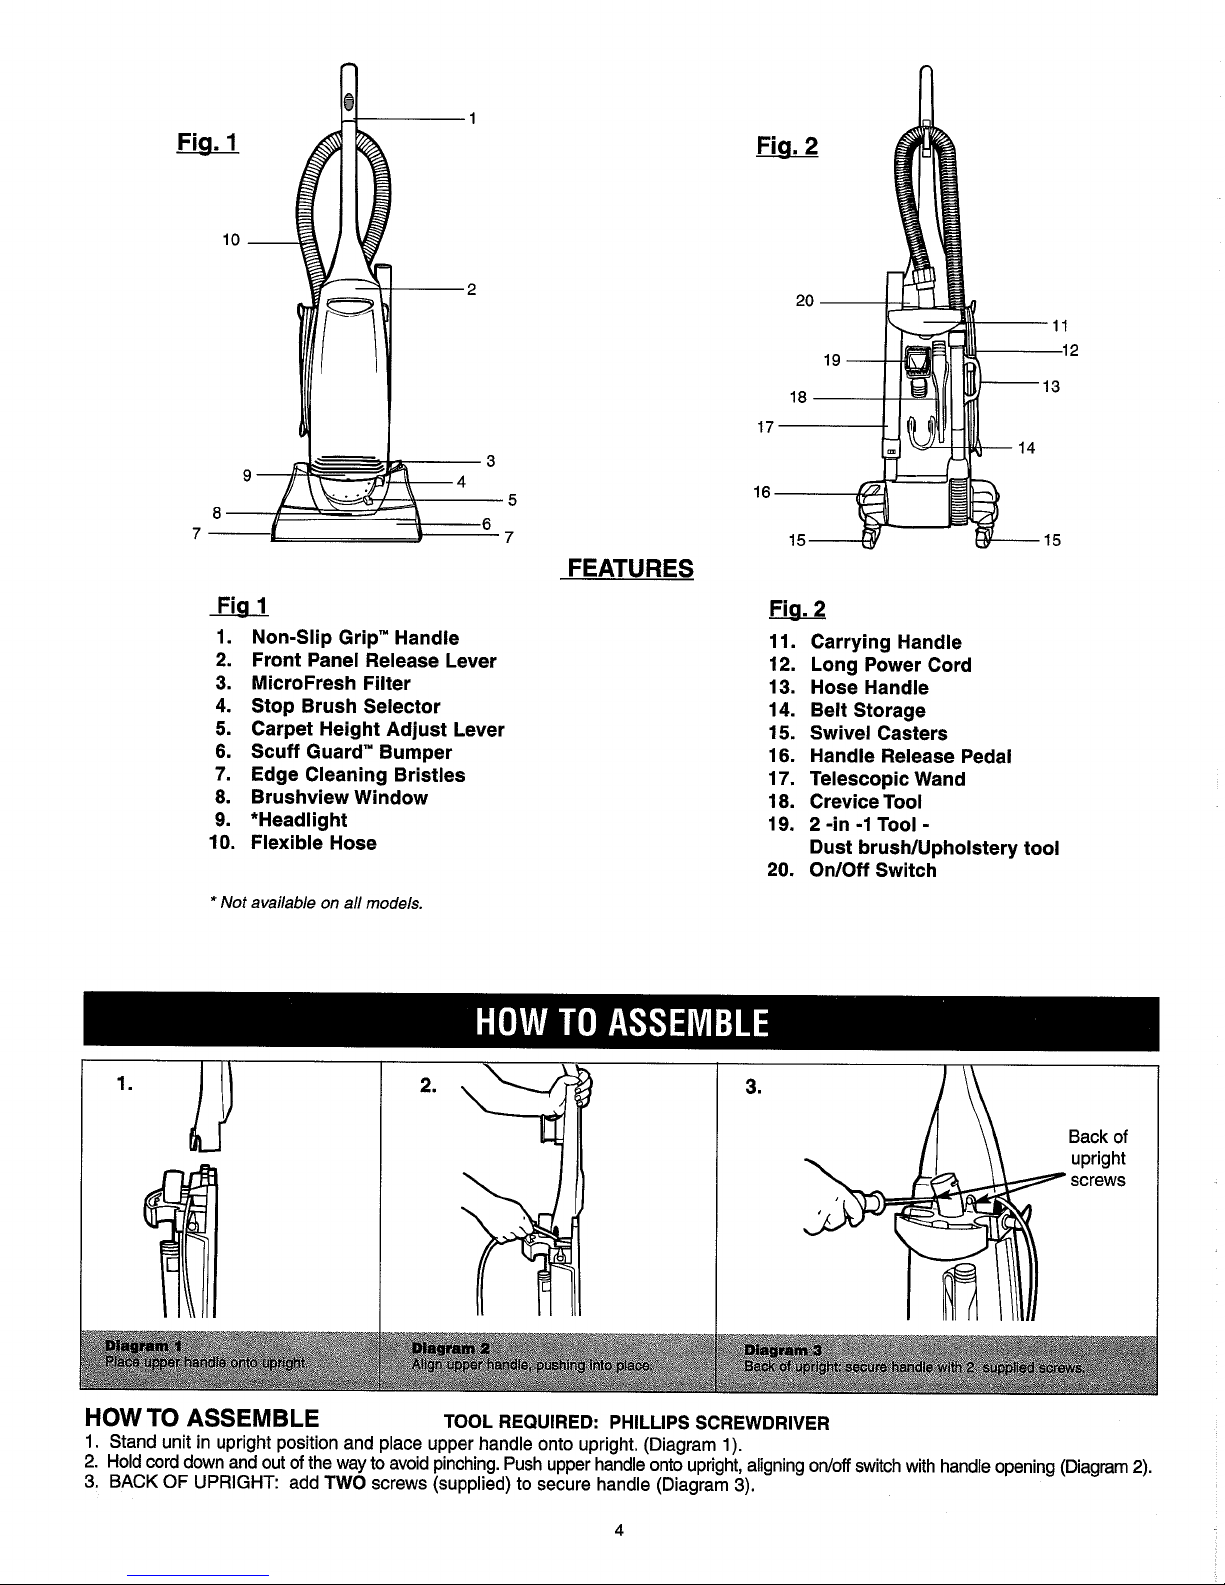
1.
Non-Slip Grip" Handle
2.
Front Panel Release Lever
3.
MicroFresh Filter
4.
Stop Brush Selector
5.
Carpet Height Adjust Lever
6.
Scuff Guard" Bumper
7.
Edge Cleaning Bristles
8.
Brushview Window
9.
*Headlight
10.
Flexible Hose
*
Not
available on all models.
FEATURES
Fia.
2
Carrying Handle
Long Power Cord
Hose Handle
Belt Storage
Swivel Casters
Handle Release Pedal
Telescopic Wand
Crevice Tool
2
-in
-1
Tool
-
Dust brush1Upholstery tool
OnIOff Switch
\\
Back of
upright
screws
HOW TO ASSEMBLE
TOOL REQUIRED: PHILLIPS SCREWDRIVER
1. Stand unit in upright position and place upper handle onto upright. (Diagram 1).
2.
Hold cord down and out of the way to avoid pinching. Push upper handle onto upright, aligning odoff switch with handle opening (Diagram
2).
3.
BACK
OF
UPRIGHT: add
TWO
screws (supplied) to secure handle (Diagram
3).
Page 5

&an
1'.
Am
flex)b/e
hose
to
cleaner.
.?
HOSE ASSEMBLY AND TOOL STORAGE
1.
ATTACH HOSE:
Attach the flexible hose to the cleaner(Diagram 1). Match the long arrow on the cuff to the arrow on the inlet (DiagramlA).
Push down firmly on the cuff and turn clockwise. Insert the hose handle into the side of the cleaner. Press down firmly to secure (Diagram 2).
2.
ATTACH TOOLS:
Refer to (Diagram 3) for tool placement.
3.
CORD STORAGE:
For tidy cord storage, wrap cord around hooks on side of cleaner with quick cord release (Diagram 4).
HOW TO OPERATE
I.
To release your cord without unwinding it, turn the top cord hook to the left or right (Diagram 1). 2. Plug
cord into electrical outlet. 3. Turn cleaner "on". Switch located on base of handle (Diagram 2). 4. Release handle by depressing pedal
(Diagram 3) 5. Select brush roll "on" or "off" (Diagram 4).
NOTE:
Cleaner must be "on" when activating/deactivating brushroll.
FLOOWCARPET CLEANING -TURN BRUSH ROLL ON
1. Use the window on the nozzle to see if the brush roll is moving.
2. As you switch to different carpet piles, move the height adjust knob to match the surface being cleaned (Diagram 4).
3.
The edge bristles (Diagram 5), provide effective baseboard cleaning.
4. Depressing handle release a second time while in use will lower cleaner to lie flat, allowing to clean under furniture.
NOTE:
Rotating brush could cause area rug fringe to become tangled within cleaner. Use caution when vacuuming throw rugs with fringe.
BAREFLOOR AND ABOVE FLOOR CLEANING -TURN BRUSH ROLL OFF
1. Turn brush roll off. NOTE: Cleaner must be "on" when activatingldeactivating brush roll.
2.
Continue to vacuum barefloors and rugs or use attachments for above floor cleaning.
3.
A threshold sto~ is incor~orated into the cleaner which enables it to be transported from barefloor to carpet by lowering the handle
.
.
back until th'e nozzle'is lifted off of the floor.
4.
TO USE ATTACHMENTS
Remove the hose from the side of the cleaner using the handle (Diagram 6).
Choose any of the handy accessories or use the hose alone. Simply push the attachment firmly onto the end of the wand or hose
handle. To remove tool, twist and pull apart gently.
If additional length is needed use the telescopic wand (See page 6).
Page 6
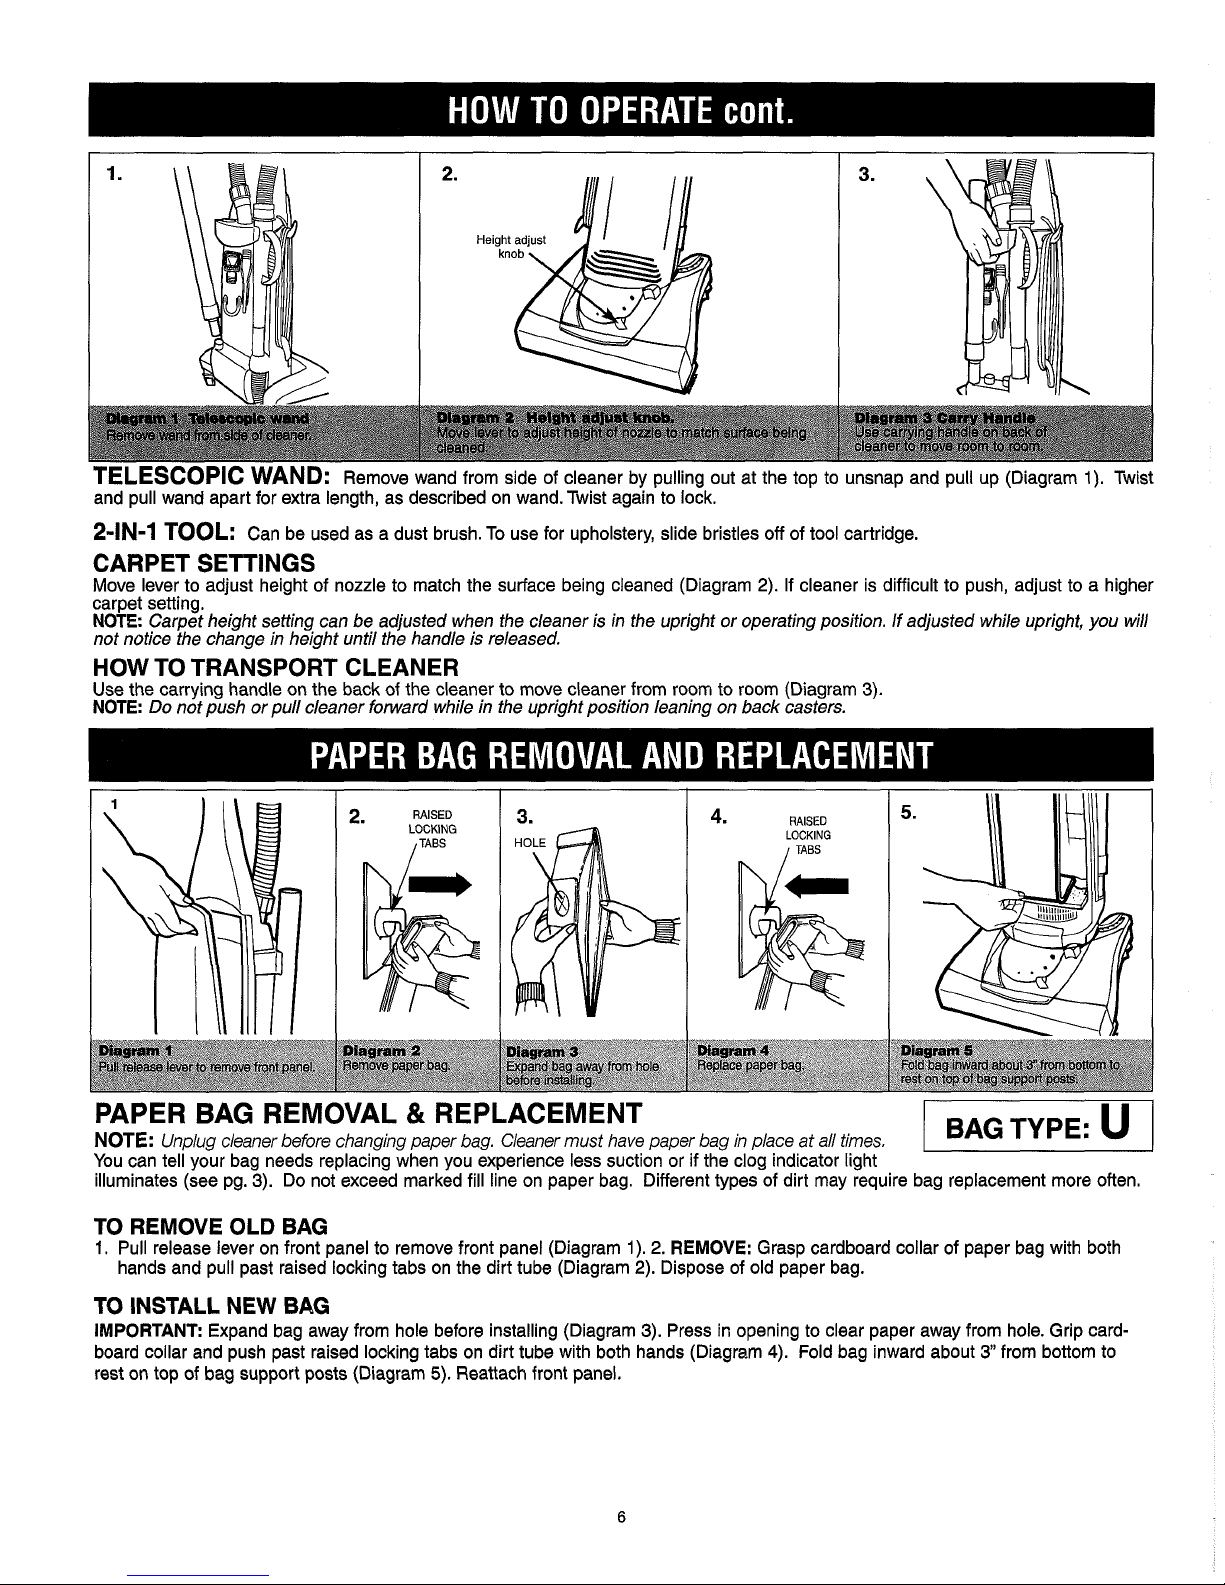
TELESCOPIC WAND:
Remove wand from side of cleaner by pulling out at the top to unsnap and pull up (Diagram
1).
Twist
and pull wand apart for extra length, as described on wand. Twist again to lock.
2-IN-1 TOOL:
Can be used as a dust brush. To use for upholstery, slide bristles off of tool cartridge.
CARPET SETTINGS
Move lever to adjust height of nozzle to match the surface being cleaned (Diagram 2). If cleaner is difficult to push, adjust to a higher
carpet setting.
NOTE:
Carpet height setting can be adjusted when the cleaner is in the upright or operating position.
If
adjusted while upright, you will
not notice the change in height until the handle is released.
HOW TO TRANSPORT CLEANER
Use the carrying handle on the back of the cleaner to move cleaner from room to room (Diagram
3).
NOTE:
Do not push or pull cleaner forward while in the upright position leaning on back casters.
RAISED
2'
LOCKING
/TABS
4.
RAISED
LOCKING
I
TABS
PAPER BAG REMOVAL & REPLACEMENT
NOTE:
Unplug cleaner before changing paper bag. Cleaner must have paper bag in place at all times.
You can tell your bag needs replacing when you experience less suction or if the clog indicator light
illuminates (see pg. 3). Do not exceed marked fill line on paper bag. Different types of dirt may require bag replacement more often.
DiWP'am
f
Pull
release
lever
to
remove
fmnt
panel.
>
TO REMOVE OLD BAG
1.
Pull release lever on front panel to remove front panel (Diagram
1).
2.
REMOVE:
Grasp cardboard collar of paper bag with both
hands and pull past raised locking tabs on the dirt tube (Diagram 2). Dispose of old paper bag.
TO INSTALL
NEW
BAG
IMPORTANT:
Expand bag away from hole before installing (Diagram 3). Press in opening to clear paper away from hole. Grip card-
board collar and push past raised locking tabs on dirt tube with both hands (Diagram
4).
Fold bag inward about
3"
from bottom to
rest on top of bag support posts (Diagram
5).
Reattach front panel.
Diagram
2
Remove
paper bag.
Diagram
3
Expand
bag
away
from
hole
before
installing.
Dfagram
4
Replace
paper bag
Dlsgram
S
FoM
bag inward
about
P
horn
bottomto
..
rest
on
top
of
bag
support
Page 7
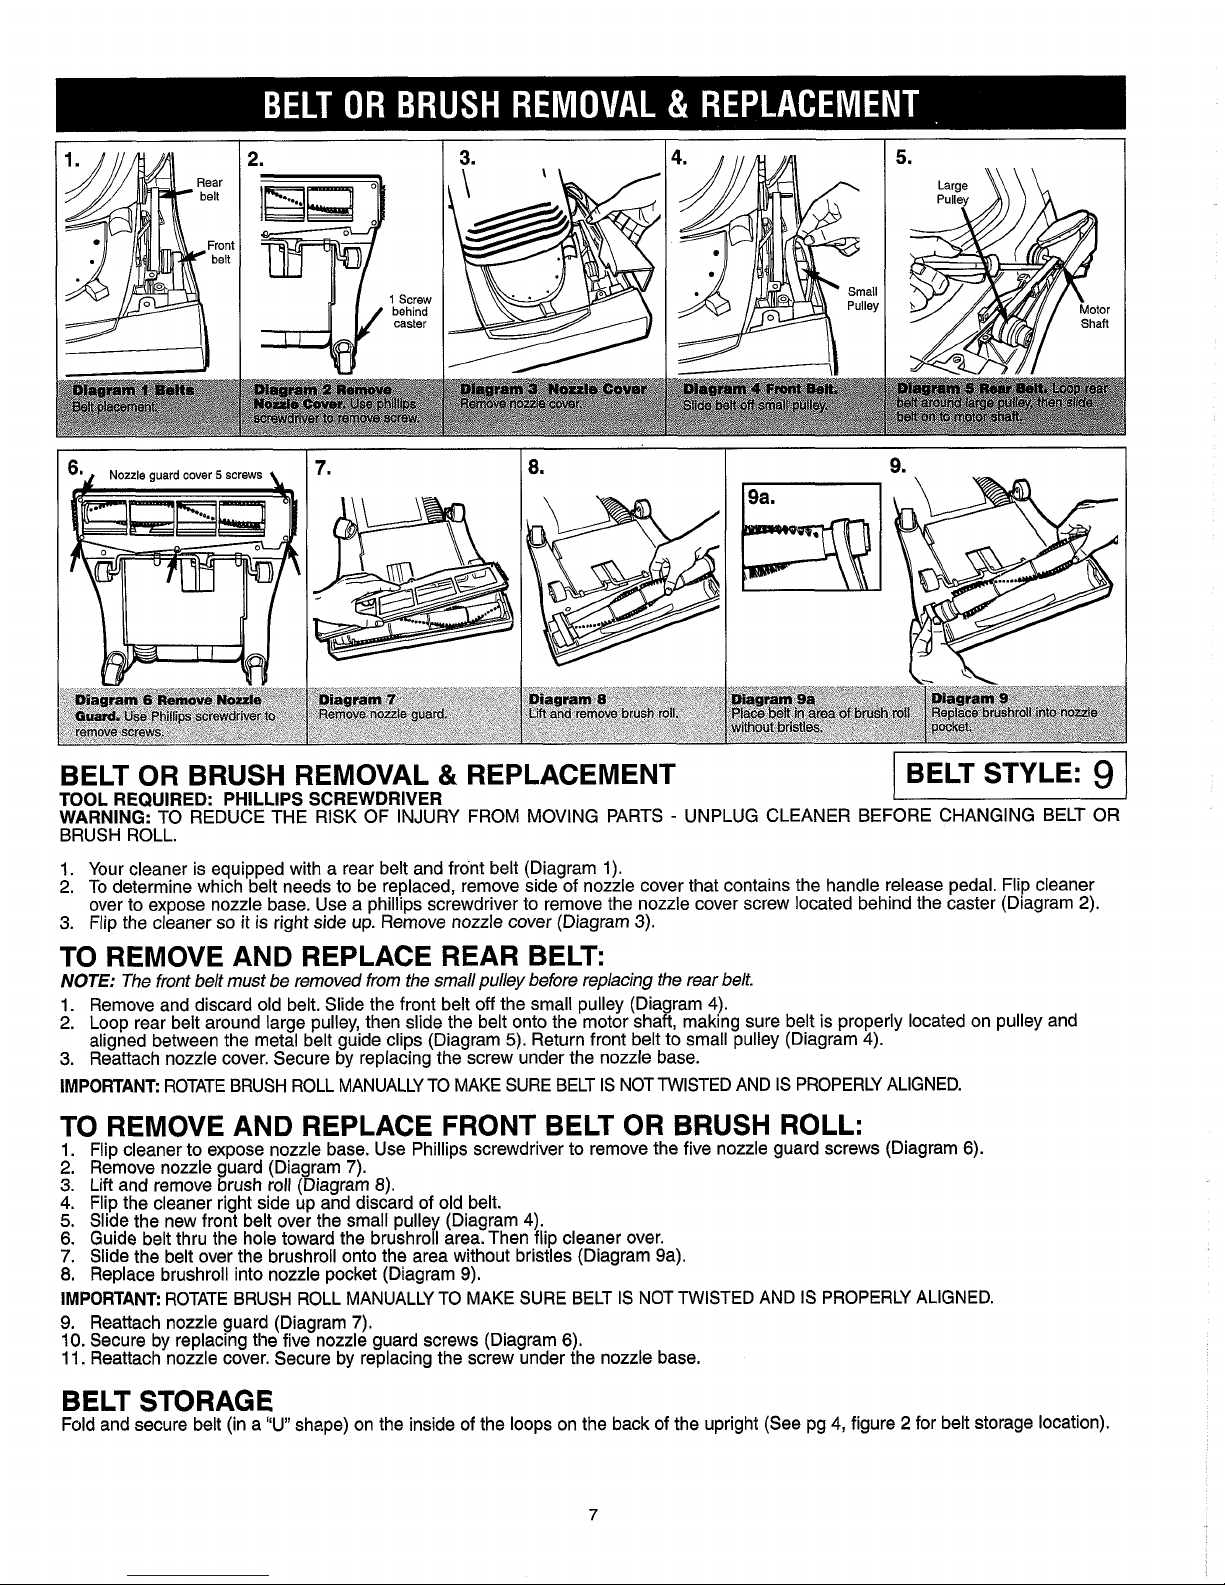
BELT STORAGE
Fold and secure belt (in a "U" shape) on the inside of the loops on the back of the upright (See pg 4, figure 2 for belt storage location).
BELT OR BRUSH REMOVAL & REPLACEMENT
BELT STYLE:
9
1
TOOL REQUIRED: PHILLIPS SCREWDRIVER
WARNING:
TO REDUCE THE RISK OF INJURY FROM MOVING PARTS - UNPLUG CLEANER BEFORE CHANGING BELT OR
BRUSH ROLL.
1.
Your cleaner is equipped with a rear belt and front belt (Diagram 1).
2. To determine which belt needs to be replaced, remove side of nozzle cover that contains the handle release pedal. Flip cleaner
over to expose nozzle base. Use a phillips screwdriver to remove the nozzle cover screw located behind the caster (Diagram 2).
3. Flip the cleaner so it is right side up. Remove nozzle cover (Diagram 3).
TO REMOVE AND REPLACE REAR BELT:
NOTE:
The front belt must be removed from the small pulley before replacing the rear belt.
1. Remove and discard old belt. Slide the front belt off the small pulley (Diagram 4).
2. Loop rear belt around large pulley, then slide the belt onto the motor shaft, making sure belt is properly located on pulley and
aligned between the metal belt guide clips (Diagram
5).
Return front belt to small pulley (Diagram 4).
3. Reattach nozzle cover. Secure by replacing the screw under the nozzle base.
IMPORTANT:
ROTATE BRUSH ROLL MANUALLY TO MAKE SURE BELT IS NOTTWISTED AND IS PROPERLY ALIGNED.
TO REMOVE AND REPLACE FRONT BELT OR BRUSH ROLL:
1.
Flip cleaner to expose nozzle base. Use Phillips screwdriver to remove the five nozzle guard screws (Diagram 6).
2.
Remove nozzle guard (Diagram 7).
3.
Lift and remove brush roll (Diagram 8).
4.
Flip the cleaner right side up and discard of old belt.
5.
Slide the new front belt over the small pulley (Diagram 4).
6.
Guide belt thru the hole toward the brushroll area. Then flip cleaner over.
7. Slide the belt over the brushroll onto the area without bristles (Diagram 9a).
8. Replace brushroll into nozzle pocket (Diagram 9).
IMPORTANT:
ROTATE BRUSH ROLL MANUALLY TO MAKE SURE BELT IS NOT TWISTED AND IS PROPERLY ALIGNED.
9.
Reattach nozzle guard (Diagram
7).
10.
Secure by replacing the five nozzle guard screws (Diagram 6).
11.
Reattach nozzle cover. Secure by replacing the screw under the nozzle base.
Page 8
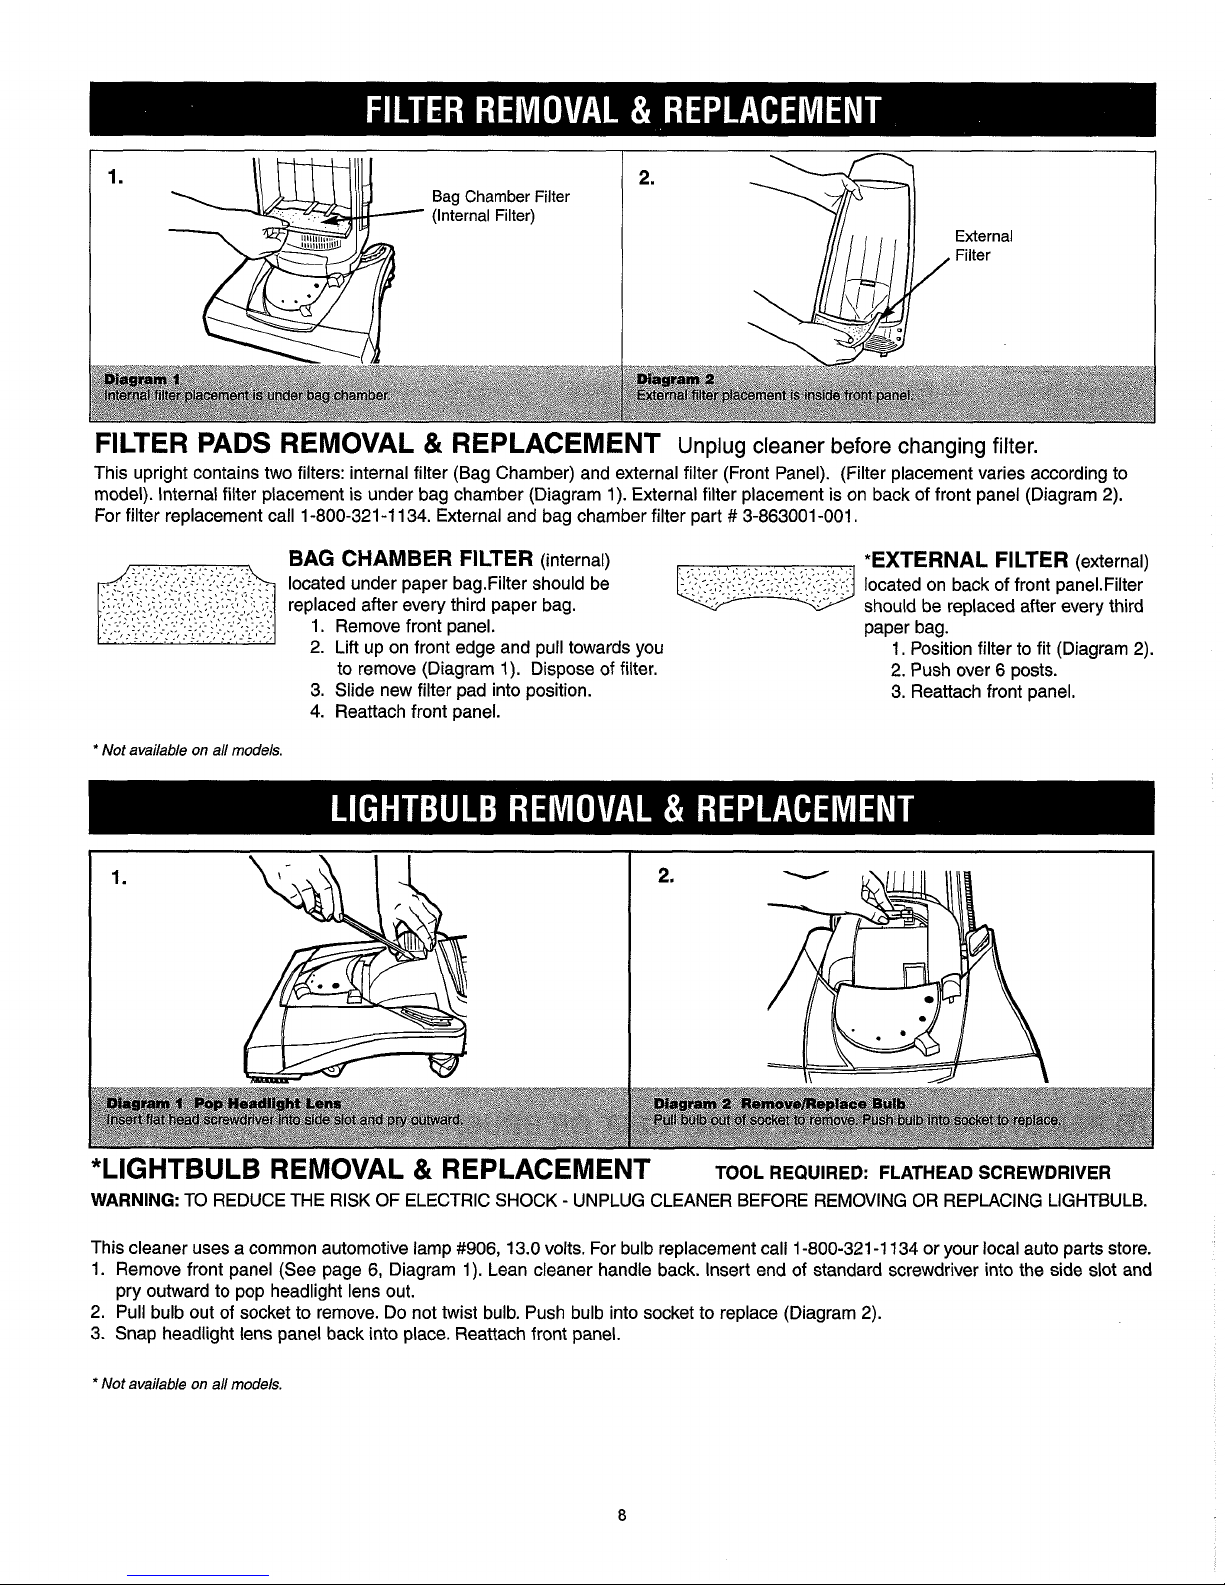
1.
2.
Bag Chamber Filter
(Internal Filter)
External
Filter
FILTER PADS REMOVAL & REPLACEMENT
Unplug cleaner before changing filter.
This upright contains two filters: internal filter (Bag Chamber) and external filter (Front Panel). (Filter placement varies according to
model). Internal filter placement is under bag chamber (Diagram 1). External filter placement is on back of front panel (Diagram 2).
For filter replacement call 1-800-321 -1 134. External and bag chamber filter part
#
3-863001 -001.
Magram
1
lnt&nal
filter
placement
is
under
bag
chamber.
*
Not available on all models.
Diiagrgm
2
External filter placement
is
inside front panel.
BAG CHAMBER FILTER
(internal)
*EXTERNAL FILTER
(external)
located under paper bag.Filter should be
located on back of front panel.Filter
replaced after every third paper bag.
should be replaced after every third
1. Remove front panel.
paper bag.
2. Lift up on front edge and pull towards you
1. Position filter to fit (Diagram
2).
to remove (Diagram 1). Dispose of filter.
2.
Push over 6 posts.
3. Slide new filter pad into position.
3. Reattach front panel.
4.
Reattach front panel.
*LIGHTBULB REMOVAL & REPLACEMENT
TOOL REQUIRED: FLATHEAD SCREWDRIVER
WARNING:
TO REDUCE THE RISK OF ELECTRIC SHOCK - UNPLUG CLEANER BEFORE REMOVING OR REPLACING LIGHTBULB.
This cleaner uses a common automotive lamp #906, 13.0 volts. For bulb replacement call 1-800-321 -1 134 or your local auto parts store.
1. Remove front panel (See page
6, Diagram 1). Lean cleaner handle back. Insert end of standard screwdriver into the side slot and
pry outward to pop headlight lens out.
2. Pull bulb out of socket to remove. Do not twist bulb. Push bulb into socket to replace (Diagram 2).
3. Snap headlight lens panel back into place. Reattach front panel.
*
Not available on all models.
Page 9
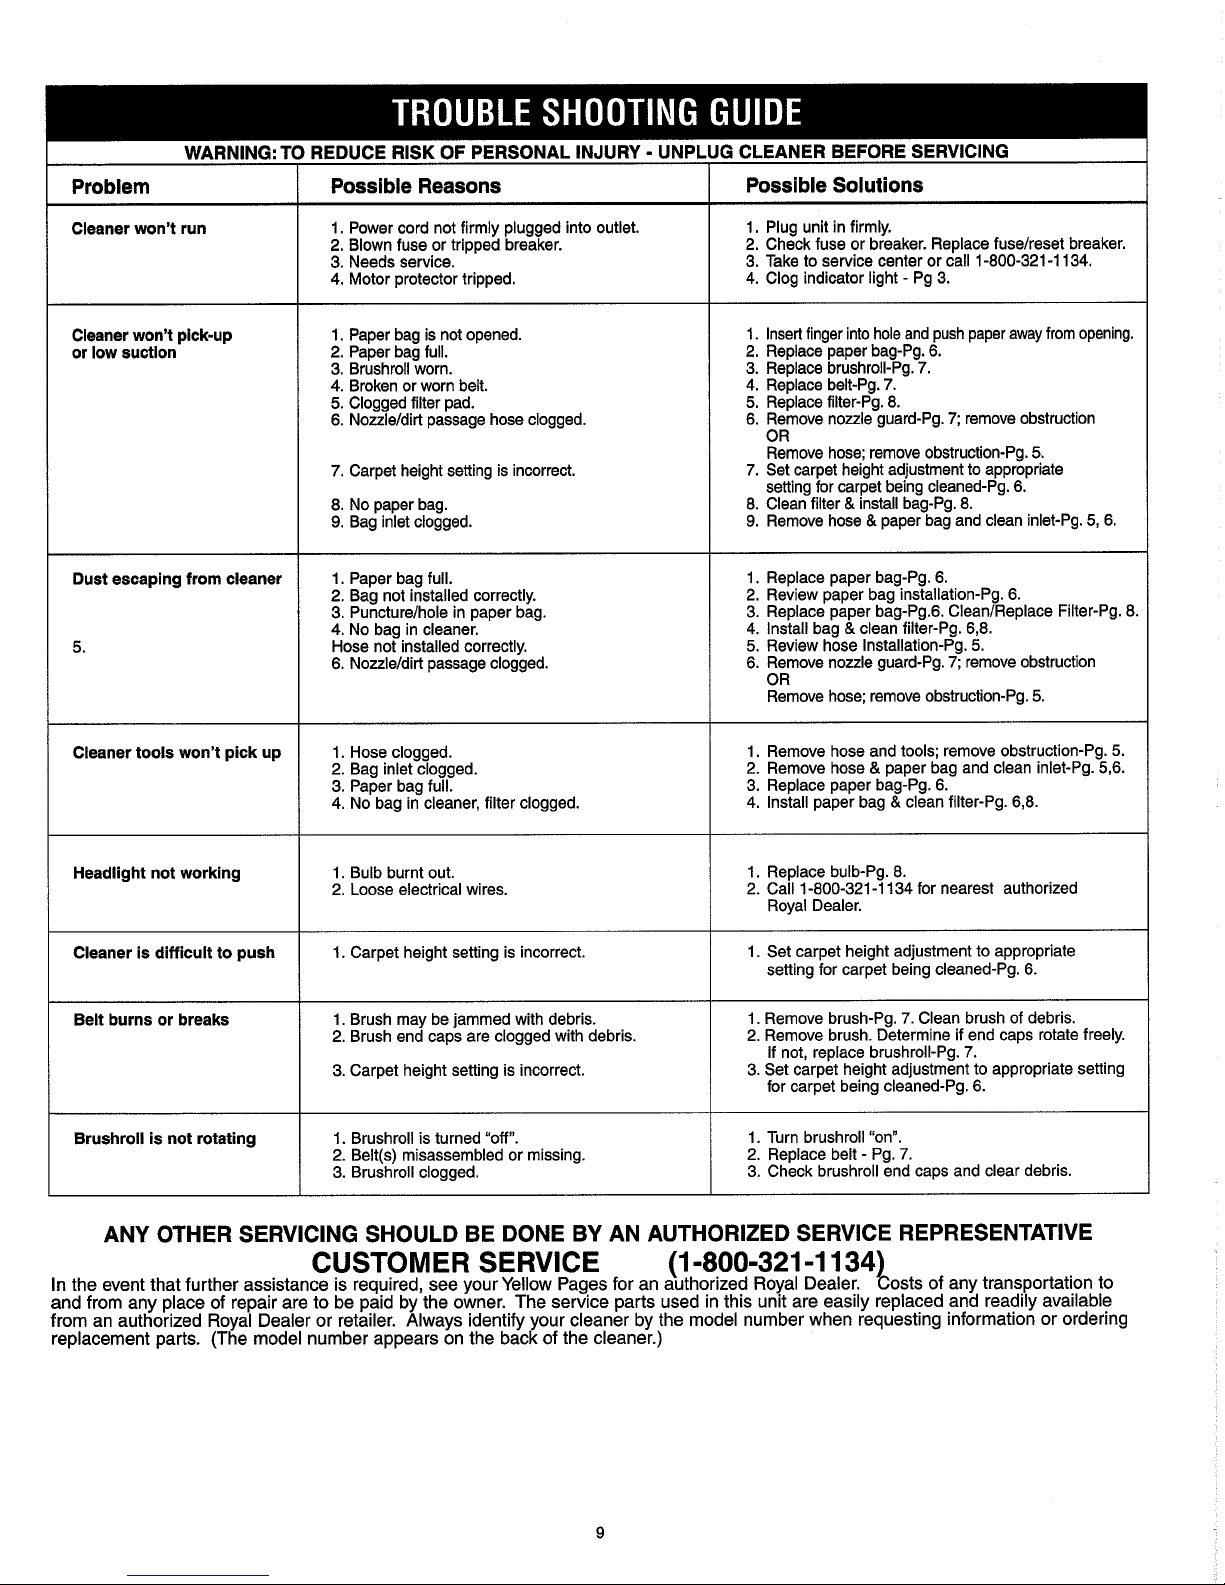
WARNING:
TI
Problem
Cleaner won't run
Cleaner won't pick-up
or low suction
Dust escaping from cleaner
k
Cleaner tools won't pick up
Possible Reasons
1.
Power cord not firmly plugged into outlet.
2.
Blown fuse or tripped breaker.
3.
Needs sewice.
4.
Motor protector tripped.
1.
Paper bag is not opened.
2.
Paper bag full.
3.
Brushroll worn.
4.
Broken or worn belt.
5.
Clogged filter pad.
6. Nozzleldirt passage hose clogged.
7. Carpet height setting is incorrect.
8.
No paper bag.
9.
Bag inlet clogged.
1.
Paper bag full.
2.
Bag not installed correctly.
3.
Puncturelhole in paper bag.
4.
No bag in cleaner.
Hose not installed correctly.
6.
Nouleldirt passage clogged.
1.
Hose clogged.
2.
Bag inlet clogged.
3.
Pa~er baa full.
Possible Solutions
1.
Plug unit in firmly.
2.
Check fuse or breaker. Replace fuselreset breaker.
3.
Take to service center or call
1-800-321
-1
134.
4.
Clog indicator light - Pg
3.
1.
Insert finger into hole and push paper away from opening.
2.
Replace paper bag-Pg. 6.
3.
Replace brushroll-Pg. 7.
4.
Replace belt-Pg. 7.
5.
Replace filter-Pg.
8.
6.
Remove nozzle guard-Pg. 7; remove obstruction
OR
Remove hose; remove obstruction-Pg.
5.
7. Set carpet height adjustment to appropriate
setting for carpet being cleaned-Pg.
6.
8.
Clean filter & install bag-Pg.
8.
9.
Remove hose & paper bag and clean inlet-Pg.
5,
6.
I.
Replace paper bag-Pg. 6.
2.
Review paper bag installation-Pg.
6.
3.
Replace paper bag-Pg.6. CleanlReplace Filter-Pg.
8.
4.
Install bag & clean filter-Pg.
6,8.
5.
Review hose Installation-Pg.
5.
6.
Remove nozzle guardPg. 7; remove obstruction
OR
Remove hose; remove obstruction-Pg.
5.
1.
Remove hose and tools; remove obstruction-Pg.
5.
2.
Remove hose & paper bag and clean inlet-Pg.
5,6.
3.
Redace wawer baa-Pa. 6.
Headlight not working
1.
Set carpet height adjustment to appropriate
setting for carpet being cleaned-Pg.
6.
Cleaner is difficult to push
Belt burns or breaks
4.
NO
bag ilcleaner, filter clogged.
1.
Bulb burnt out.
2.
Loose electrical wires.
1.
Carpet height setting is incorrect.
1.
Brush may be jammed with debris.
2.
Brush end caps are clogged with debris.
4.
lniall
p*&
bag 8 clean filter-Pg.
6,8.
1.
Replace bulb-Pg.
8.
2.
Call
1-800-321
-1
134
for nearest authorized
Royal Dealer.
3.
Carpet height setting is incorrect.
1.
Remove brush-Pg.
7.
Clean brush of debris.
2.
Remove brush. Determine if end caps rotate freely.
If not, replace brushroll-Pg. 7.
3.
Set carpet height adjustment to appropriate setting
for carpet being cleaned-Pg.
6.
1.
Turn brushroll "on".
2.
Replace belt - Pg.
7.
3.
Check brushroll end caps and clear debris.
Brushroll is not rotating
ANY OTHER SERVICING SHOULD BE DONE BY AN AUTHORIZED SERVICE REPRESENTATIVE
1.
Brushroll is turned "off.
2.
Belt(s) misassembled or missing.
3.
Brushroll clogged.
CUSTOMER SERVICE
(1
-800-321
-1
134E
In
the event that further assistance is required, see your Yellow Pages for
an
authorized Royal Dealer.
osts of any transportation to
and from
any place of repair are to be paid by the owner. The service parts used
in
this unit are easily replaced and readily available
from an authorized Royal Dealer or retailer. Always identify your cleaner by the model number when requesting information or ordering
replacement parts. (The model number appears on the
back
of the cleaner.)
Page 10

MANUAL DEL USUARIO
lnstrucciones para el funcionamiento
y
el servicio
@
Por favor lea cuidadosamente
estas instrucciones antes de usar
su aspiradora All Surface Swivel
Glide?
Dejenos ayudarle a ensamblar
su aspiradora o a contestarle
cualquier duda, llame al:
1-800-321 -1 134
(EE.UU.)
1-800-661 -6200
(Canada)
we bsite: www,dirtdeviI.com
Para tener 10s datos a la mano, por favor Ilene la
informacion sobre su aspiradora a continuacion.
Modelo
#:
Codigo del Fabricante:
(El c6digo del fabricante se localiza
en
la parte inferior,
atras de la aspiradora)
O
2000
Derechos reservados
#
1-1 13026-033
3/00
Page 11

FELICITACIONES
Usted es ahora el orgulloso propietario de una All Surface Swivel GlideB de Dirt
DevilB, la aspiradora vertical m8s maniobrable del mundo con ruedas giratorias
patentadas para una maniobrabilidad sin esfuerzo en todo tipo de pisos. Confiamos
que su nueva compra le traerii muchas horas de satisfacci6n.
Nuestra compafiia disefi6 y desarroll6 este product0 teniendo en cuenta a Usted.
Hemos incluido accesorios interconstruidos
y
un poderoso motor en un diseiio ligero
para una limpieza profunda en todas las partes de la casa. Se puede lograr una
limpieza superior de pisos descubiertos a1 usar la caracteristica de control de par0
del cepillo.
Estamos muy orgullosos de nuestros productos
y
esperamos que Usted est6 igual-
mente satisfecho con su calidad
y
funcionamiento.
Le agradecemos su preferencia por 10s productos Dirt Devil?
Visite nuestro website en www.dirtdevil.com
lnstrucciones de Seguridad
..............................................................
Pagina
E3
Descripsiones de las Caracteristicas
...............................................
Pagina
E4
Como Ensamblar
..............................................................................
Pagina
E4
Montaje de manguera y almacenamiento de accesorios
.................
Pagina E5
Como Operar
....................................................................................
Pagina E5
Limpieza del pisolalfombra
.........................................................
Pagina E5
Limpieza del piso
y
por encima del piso
.....................................
Pagina E5
Como Vaciar
y
Limpiar el Tanque de Agua Sucia
............................
Pagina
E6
Remocion y reemplazo de la banda o del cepillo rotatorio
..............
Pagina
E7
Remocion y reemplazo de 10s filtros
................................................
Pagina
E8
Remocion y reemplazo del foco
.......................................................
Pagina
E8
Guia para la Deteccion y Solucion de Problemas
............................
Pagina
E9
Para el consumidor, Royal Appliance Mfg. Co. garantiza esta aspiradora contra defectos de materia prima o de maflo.de obra, a partir de la fecha de la compra original. Vea en la caja del empaque la duraci6n de la garantia y guarde su rec~bo de compra or~gmal para vahdar el
I~ICIO
del perlodo de garantia.
Si la aspiradora se descompone dentro del periodo de la garantia, repararemos o reemplazaremos las partes defectuosas sin cargo alguno. Se debe enviar todo el
aparato con porte pagado con anticipacion a cualquier Estacion de Servicio de Ventasy Garantia autorizada por Royal. Por favor incluya la descripci6n com leta del
problems,
el dia de compra. copia del recibo original de compra y su nombre, direccion y nOmero telef6nico. Si no se encuemra cerca d~ una Estacidn de earantia.
lame a la fabrica para que le asistan en EE.UU.: 1-800-321-1134 /CANADA: 1-800-661-6200. Use On~camente piezas de repuesto genulnas de Royal.
La garantia no
incluye el desgaste inusual, 10s daiios que resulten de accidentes o del uso no razonable de la aspiradora. Esta garantia no cubre el daiio a las bandas, cepillos, bolsas, focos ni al ventilador. Esta garantia no cubre reparaciones no autorizadas. Esta garantia le otorga derechos especificos legales y puede tener
tambih otros derechos. (Otros derechos pueden variar de estado a estado en 10s EE.UU.)
Page 12

ESTA ASPIRADORA ES SOLO PARA US0 DOMESTIC0
INSTRUCCIONES DE SEGURIDAD IMPORTANTES
Cuando se use un aparato el6ctric0, deben tomarse ciertas ~recauciones basicas de seauridad, incluvendo las siauientes:
LEA
TODAS
LAS
INSTRUCCIONES
ANTES
DE
USAR
EL
APARATO.
- -
SIEMPRE SlGA ESTAS INSTRUCCIONES DE SEGURIDAD.
PONGA LA ASPIRADORA EN POSICION VERTICAL CUANDO USE LA MANGUERAY LOS ACCESORIOS.
NO DEJE LA ASPIRADORA DESATENDIDA CUANDO ESTE CONECTADA.
REVISE REGULARMENTE LOS FILTROS PARA SACUDIRLOS
0
REEMPLAZARLOS.
ADVERTENCIA: NO USE OBJETOS AFILADOS PARA SACAR OBJETOS DE LA MANGUERAYA QUE PODRIAN
DANARLA.
OCASIONALMENTE QUITE EL CEPILLO Y LlMPlE LAS TAPAS DE LOS EXTREMOS PARA PERMlTlR QUE EL
CEPILLO GlRE UNIFORMEMENTE.
LEA TODAS LAS INSTRUCCIONES ANTES DE USAR EL APARATO.
ADVERTENCIA: PARA EVITAR PELIGRO DE INCENDIO,
DESCARGAS ELECTRICAS
0
LESIONES:
No deje la aspiradora conectada. Desconectela del tomacorriente cuando no la use y antes de darle servicio.
No la use a la intemperie ni en superficies humedas, ya que podria ocasionar una descarga eiectrica.
No permita que jueguen con
ella. Se necesita supervision cuando la usa un nifio o cuando se usa donde hay nifios.
Usela solo de la manera descrita en este manual. Utilice solo 10s accesorios recomendados por el fabricante.
No use la aspiradora si la clavija o el cordon estan dafiados. Si la aspiradora no funciona como debiera o se ha
caido, dafiado o se
dejb a la intemperie, o se cay6 al aqua, llevela a un centro de servicio para que la revisen. Llame
al
1-800-321 -1 134
Dara localizar el centro de servido mas-cercano.
No la jale ni la cargue del cordon, ni use el cordon como mango, ni cierre la puerta sobre el cordon, ni pase el cordon
alrededor de bordes o esquinas filosas. No ruede la aspiradora
sobre el cordon. Mantenga el cordon alejado de
superficies calientes.
No desconecte la aspiradora jalando el cordon. Para desconectarla, hagalo tomando del enchufe, no del cordon.
No toque el enchufe ni la aspiradora con las
manos mojadas.
No coloque objetos en las aberturas. No la utilice con las aberturas obstruidas; mantengalas libres de polvo, pelusa,
cabellos o cualquier cosa que reduzca el paso de aire.
Mantenga el cabello, la ropa suelta, 10s dedos y todas las partes del cuerpo lejos de las aberturas
y
las partes moviles.
No aspire nada que este quemandose o que este desprendiendo hum0 como podrian ser cigarrillos, cerillos o
cenizas calientes.
No la use sin la bolsa para polvo
ni/o sin 10s filtros en su lugar.
Apague todos 10s controles antes de desconectarla.
Tenga mucho cuidado cuando aspire escaleras.
No la utilice para aspirar liquidos inflamables o combustibles como por ejemplo gasolina ni la use en areas donde
estos puedan encontrarse presentes.
Mantenga la aspiradora en el
piso. Solamente las aspiradoras de mano se pueden usar en 10s muebles.
La aspiradora debe estar en
posicion vertical para levantar el cepillo rotatorio de la alfombra cuando se aspire arriba del piso.
No use extension de cordon con esta aspiradora.
Guarde la aspiradora en interiores. Coloque la aspiradora en su lugar para evitar tropezones.
El utilizar un voltaje
incorrect0 puede dafiar el motor
y
causar lesiones al usuario. El voltaje apropiado esta inscrito en
la placa de la aspiradora.
GUARDE ESTAS INSTRUCCIONES
ADVERTENCIA:
Para reducir el riesgo de descargas electricas, esta aspiradora tiene un enchufe polarizado (una paietilla mas ancha que
la otra). Este enchufe entrara en un tomacorriente polarizado, solo de una manera. Si el enchufe no entra completamente en el tomacorriente, inviertalo. Si alin asi no entra, consulte a un electricista calificado para instalar el tomacorriente apropiado. No cambie el enchufe de ninguna manera.
Page 13

Fia.
1
10
CARACTERISTICAS
Fia
1
Fia.
2
1. Asa Non-Slip GripTM 11. Asa para transporte
2. Palanca de Liberacion del Panel Frontal
12. Cordon Electric0 Largo
3.
Filtro MicroFresh
13.
Asa de la Manguera
4. Selector de Paro del Cepillo
14. Lugar para la Banda
5. Palanca de Ajuste de Altura para Alfombra
15. Ruedas Giratorias
6. Tope Scuff GuardTM 16. Pedal de Liberacion del Asa
7. Cerdas de Limpieza de Orillas 17. Baston Telescopico
8. Ventana del Cepillo 18. Accesorio para Hendiduras
9.
*Luz 19. Accesorio 2 en
1
10. Manguera Flexible
Accesorio de Cepillo para Polvo /Tapiceria
20. lnterruptor Encendido
1
Apagado
*No esta disponible en todos 10s modelos.
Parte trasera
de 10s tornil10s de la
aspiradora
COMO ENSAMBLAR
HERRAMIENTA NECESARIA: DESTORNILLADOR PHILLIPS
1.
Coloque la unidad en posicion vertical y coloque el asa superior en la aspiradora (Diagrama
1).
2.
Sostenga el cordon electric0 abajo y fuera del camino para evitar pellizcarlo. Empuje el asa superior hacia la aspiradora, alineando
el interruptor de encendido
I
apagado con la abertura del asa (Diagrama
2).
3.
PARTE TRASERA DE
LA
ASPIRADORA: ponga 10s DOS tornillos (incluidos) para asegurar el asa (Diagrama
3).
E4
Diiagrama
1
Coloque el
asa
superior
en
la aspiradora.
DiagmiB
2
"
Alinee
,el
asa
superior, empuje hasta
que
asiente
\
\
.
<
\'
11,
F(*
a
.+
>v
r
Dlagwma
3
%,:,
,.
&fi
,
Pare
lrqsera
de
18
aspiradwa: Asagure
ei*&
~cp+l%~.~'t&&
inclui4os.
A
j
-
,,,.;
.
<%a,":
Page 14

Alinee
las
fle-
chas con
las
lenguetas
en
la
entrada de
la
rnanguera.
&&pg&#,
;..'y'y+;ry$*;,{
,?yBy&y
*
&jcqge~*tne$w$y
~&p~ep~~a~~~~r~~w~
.'
<,
"
&
*'"
.
*2<
:$
".:
~NSAMBLAJE
DE
LA
MANG
.
COLOCACION DE LA MANGUERA:
con la flecha en la entrada (Diaarama
i
U
E
LOS ACCESORIOS
Coloque la manguera flexible en la aspiradora (Diagrama 1) Alinee la flecha larga en el yugo
1A) Empuje firmemente hacia abajo en el yugo y gire en el sentido de las manecillas del reloj.
lnserte el asa de la manguera en el lado de la aspiradora. Presione firmemente hacia abajo para asegurar (Diagrama 2).
2. COLOCACION DE LOS ACCESORIOS: Refierase al (Diagrama 3) para ver la colocacion de 10s accesorios.
3.
GUARDADO DEL CORDON ELECTRICO: Para u? guardado adecuado del cordon electrico, enrolle el cordon alrededor de 10s gan-
chos en el lado de la asplradora con el hberador rapldo del cordon electrlco (Dlagrama 4).
COMO OPERAR
1.
Para liberar el cordon electrico sin desenrollarlo, gire el gancho superior hacia la izquierda o hacia la
derecha (Diagrama 1) 2. Conecte el cordon electrico en una toma de corriente. 3. "Encienda" la aspiradora. El interruptor esta localizado en la base del asa (Diagrama 2)
4.
Libere el asa al pisar el pedal (Diagrama 3)
5.
Seleccione la rotacion del cepillo "activada" o
"desactivada" (Diagrama 4).
NOTA:
La aspiradora debe estar "encendida" cuando active o desactive la rotacion del cepillo.
LlMPlEZA DE PlSOS I ALFOMBRAS - ACTIVE LA ROTACION DEL CEPILLO
1. Vea a traves de la ventana si el se cepillo esta moviendo.
2. Al tiempo que cambia a diferentes tipos de alfombras, mueva la palanca de ajuste de altura para igualar la superficie que esta siendo limpiada (Diagrama 4).
3. Las cerdas para las orillas (Diagrama
5)
proveen una buena limpieza de las juntas con las paredes.
4.. Pisando por segunda vez el pedal liberador del asa cuando esta funcionando la aspiradora, hara que la misma se acueste por completo, permitiendole limpiar por debajo de 10s muebles.
NOTA:
A1 girar, el cepillo puede provocar que se atoren 10s flecos de la alfombra con la aspiradora. Tenga cuidado cuando aspire
alfombras
con
flecos.
LlMPlEZA DE PlSOS DESCUBIERTOS Y POR ENCIMA DEL NlVEL DEL PIS0 - DESACTIVE LA ROTACION DEL CEPILLO
1. Desactive la rotacion del cepillo.
NOTA: La aspiradora debera estar "encendida" cuando active o desactive la rotacion del cepillo.
2. Continlle con la limpieza de 10s pisos descubiertos o alfombras o use 10s accesorios para la limpieza por encima del nivel del piso.
3.
Se incorpora en la aspiradora un sistema de par0 minimo, el cual permite transportar la aspiradora desde un piso descubierto a
una alfombra al bajar el asa hasta atras hasta que la boquilla se levante del piso.
4. US0 DE LOS ACCESORIOS
Remueva la manguera del lado de la aspiradora usando el asa (Diagrama 6).
Escoja cualquiera de 10s practicos accesorios o use la manguera sola. Simplemente empuje el accesorio firmemente en el
extremo del baston de extension o del asa de la manguera. Para quitar el accesorio, gire y jale suavemente.
Si necesita de un largo adicional, use el baston telescopico (vea la pagina 6).
E5
Page 15

BASTON TELESCOPICO:
Remueva el baston del lado de la aspiradora al jalar el tope para liberarlo, jale hacia arriba
(Diagrama
1)
Gire y jale el baston para darle largo adicional, como se describe en el baston. Gire nuevamente para asegurar.
Accesorio 2 en
1
:
Puede usarse como cepillo para polvo. Para usarlo en tapiceria, deslice las cerdas hacia fuera del cartucho
de accesorios.
AJUSTES PARA LlMPlAR LAS ALFOMBRAS
Mueva la palanca para ajustar la altura de la boquilla para que iguale la altura de la superficie que esta siendo limpiada (Diagrama
2)
Si es dificil de empujar la aspiradora, ajuste a una altura de alfombra mayor.
NOTA: El ajuste de la altura de la alfombra puede hacerse cuando la aspiradora esta en posicion vertical o en posicion de operacidn.
Si se ajusta cuando esta vertical, Usted no notara el cambio en la altura hasta que se libere el asa.
COMO TRANSPORTAR LA ASPIRADORA
Use el asa de transporte en la parte trasera de la aspiradora para moverla de cuarto en cuarto (Diagrama
3)
NOTA: No empuje o jale la aspiradora hacia delante cuando este en la posicidn vertical y apoyandose en /as ruedas traseras.
LENGOETAS EN
2.
RELIEVE PARA
ASEGURAR
4.
LENGOETAS
EN
RELIEVE PARA
ASEGURAR
REMOCION Y REEMPLAZO DE LA BOLSA DE PAPEL
NOTA: Desconecte la aspiradora antes de cambiar la bolsa de papel. La aspiradora debe tener una
bolsa de papel todo el tiempo.
Usted puede enterarse que necesita reemplazar la bolsa, cuando observe que hay menos succion o cuando se ilumina el indicador
de atascos (vea la pagina 3). No exceda la linea de llenado de la bolsa de papel. Diferente tip0 de suciedad puede requerir cambio
de la bolsa mas frecuente.
PARA REMOVER LA BOLSA VlEJA
1.
Jale la palanca de liberacion en el panel frontal para removerlo (Diagrama
1)
2.
REMUEVA:
Tome el collar de carton con ambas
manos y jale pasando las lenguetas de seguro en el tub0 (Diagrama
2)
Deseche la bolsa de papel.
PARA INSTALAR LA BOLSA NUEVA
IMPORTANTE: Alargue la bolsa antes de instalarla (Diagrama 3) Oprima la abertura para abrir el sello de papel del orificio. Tome la
bolsa por el collar de carton y emplijela pasando las lenguetas de seguro en el tubo usando las dos manos. (Diagrama
4)
Doble la
bolsa hacia adentro alrededor de 3 pulgadas
(7.8
cm) del fondo para apoyarla sobre 10s postes de apoyo de la bolsa (Diagrama
5)
Reponga el panel frontal.
Page 16

1. Quite y deseche la banda usada. Zafe la banda frontal de la polea pequeiia (Diagrama 4).
2. Ponga la banda posterior alrededor de la polea grande, luego deslice la bando sobre el eje del motor, asegurandose que la
banda este colocada apropiadamente sobre la polea
y
alineados entre 10s sujetadores metalicos de guia de banda (Diagrama
5).
Vuelva a colocar la banda frontal en la polea pequeiia (Diagrama
4).
3. Vuelva a fijar la tapa de la boquilla. Aseglirela volviendo a colocar el tornillo debajo de la base de la boquilla.
IMP0,RTANTE: GlRE EL CEPILLO ROTATOR10 MANUALMENTE PARA ASEGURARSE QUE LA BANDA NO
ESTE
TORCIDAY QUE
ESTE ALINEADA APROPIADAMENTE.
PARA QUITAR Y REEMPLAZAR LA BANDA FRONTAL 0 EL CEPILLO ROTATORIO:
REMOCION Y REEMPLAZO DE LA BANDA 0 DEL CEPILLO ROTATOR10
HERRAMIENTA REQUERIDA: DESTORNILLADOR DE CRUZ
ADVERTENCIA: PARA REDUCIR EL RIESGO DE LESION DEBIDO A LAS PARTES EN MOVlMlENTO
-
DESCONECTE LA ASPI-
RADORA ANTES DE CAMBIAR
LA
BANDA 0 EL CEPILLO ROTATORIO.
1. Voltee la aspiradora para ver la base de la boquilla. Use un destornillador de cruz para quitar 10s cinco tornillos de la proteccion
de la boquilla (Diagrama 6).
2.
Quite la proteccion de la boquilla (Diagrama 7).
3.
Levante y quite el cepillo rotatorio (Diagrama 8).
4.
Voltee la aspiradora de forma que el lado derecho este arriba y deseche la banda usada.
5.
Ponga la nueva banda frontal sobre la polea pequeiia (Diagrama 4).
6. Pase la banda hacia la cavidad que esta por el area del cepilla rotatorio. Luego voltee la aspiradora.
7. Ponga la banda sobre el cepillo rotatorio sobre el area sin cerdas (Diagrama 9a).
8. Vuelva a colocar el cepillo rotatorio en el espacio de la boquilla (Diagrama 9).
IMPOPTANTE: GlRE EL CEPILLO ROTATOR10 MANUALMENTE PARA ASEGURARSE QUE LA BANDA NO
ESTE
TORCIDAY QUE
ESTE ALINEADA APROPIADAMENTE.
9. Vuelva fijar la proteccion de la boquilla (Diagrama 7).
10.
Asegljrela colocando 10s cinco tornillos de la proteccion de la boquilla (Diagrama
6).
11. Vuelva a fijar la tapa de la boquilla. Asegurela volviendo a colocar el tornillo debajo de la base de la boquilla.
ALMACENAMIENTO DE BANDA
Doble y asegure la banda (en forma de "U") en el interior de las presillas en la parte trasera de la aspiradora (Vea en la pAg.
4,
figura
2
la posicion para guardar la banda).
E7
I.
su
aspiradora viene equipada con una banda posterior y una frontal (Diagrama I).
ESTILO DE
BANDA
9
2. Para determinar cual banda necesita cambiarse, quite la tapa lateral de la boquilla que
contiene el pedal liberador del mango. Voltee la aspiradora para ver la base de la boquilla. Utilice un destornillador de cruz para
sacar el tornillo de la tapa de la boquilla ubicado detras de la rueda (Diagrama 2).
3.
Voltee la aspiradora de forma que el lado derecho este arriba. Quite la tapa de la boquilla (Diagrama 3).
PARA QUITAR Y REEMPLAZAR LA BANDA POSTERIOR:
NOTA: la banda frontal debe quitarse de la polea pequeiia antes de reemplazar la banda posterior.
Page 17

Flltro de la ckmara de la
bolsa (Flltro Interno)
REMOCION Y REEMPLAZO DE LOS FILTROS
Desconecte la aspiradora antes de cambiar el filtro.
Esta aspiradora contiene dos filtros: el filtro interno (Clmara de la bolsa) y el filtro externo (panel frontal) (La localizaci6n del filtro
varia de acuerdo con el modelo) La localizacidn del filtro interno es bajo la clmara de la bolsa (Diagrama 1) La localizaci6n del filtro
externo es en la parte de atrls
del panel frontal (Diagrama
2)
Para 10s reemplazos de filtros llame al: 1 - 800 - 321 - 1134. NQmero
de parte de 10s filtros externo
y
de la clmara de la bolsa: # 3 - 863001 - 001.
I
,.~_..
I.
,.._
-
I.
-'
-
,.
,.',
:<,.
;,.
:.,',:.:
FILTRO
DE
LA CAMARA
DE
LA BOLSA
.
.:::::.-
,..
j:
_,-
::.::.;:.I:
.,-::,:;.;,,:'
.
':
*FILTRO EXTERNO
(externo)
..-,
,.,.
,..
>,...
,>..
>,..,
,
\::-$,..
.
,
(interno) Localizado bajo la bolsa de papel. El
rJ
Localizado en la parte trasera del
,;?,;<:;:;<-;,-,<:;:,*-;,:<:;<
,,,:,.
,,;
,,,,
<,;,:;
,,,,
<,.
,.
,
1
,..
,
.
.
,...
,;
,
.,..,.,,
.
,
.
.
,..,
.,.
filtro debe ser reemplazado cada tercer bolsa
.
panel frontal. El filtro debe ser reem-
:..,.;<::;,.::~:,.,:,::;,.,{::,.:<:~;.,:,
-1
de papel.
plazado 1. Ponga cada el filtro tercer en su bolsa lugar de papel.
1. Remueva el panel frontal.
(Diagrama 2)
2. Levante la orilla frontal
y
jalela hacia Usted
2.
Empujelo sobre 10s 6 postes.
para removerla (Diagrama 1) Deseche el filtro.
3. Reponga el panel frontal.
3. Ponga en posicion el nuevo filtro.
4.
Reponga el panel frontal.
'No estd disponible en todos 10s modelos.
*REMOCION Y REEMPLAZO DEL FOCO
HERRAMIENTA NECESARIA: DESTORNILLADOR PLAN0
ADVERTENCIA: PARA REDUCIR EL RIESGO DE CHOQUE ELECTRICO, DESCONECTE
LA
ASPIRADORA ANTES DE
REMOVER
0
REEMPLAZAR EL FOCO.
Esta aspiradora utiliza un foco comun automotriz
#
906, de 13 voltios. Para el reemplazo del foco llame al 1-800-321-1 134 o a la
tienda de refacciones automotrices de su localidad.
1. Remueva el panel frontal (vea la pagina
6,
Diagrama 1) Incline el asa de la aspiradora hacia atras. lnserte la cabeza del destornil-
lador estandar en la ranura lateral
y
levante la mica hasta que salga.
2.
Jale el foco y saquelo del receptaculo. No gire el foco. lnserte el foco nuevo de reemplazo (Diagrama 2).
3. Reponga la mica presionandola contra el panel. Reponga el panel frontal.
'No estci disponible en todos 10s modelos.
Page 18

I
Problema
La aspiradora no funciona
La asplradora no asplra o
la succldn est6 baja
Sale polvo de la aspiradora.
Los accesorios no
aspiran
No funciona la luz
Es dificil de ernpujar la aspirado~
I----
La banda se quema o se rompe.
r
El cepillo no gira
L
Causas Posibles
1.
El cordon electrico no esta puesto firmemente en la
toma de corriente.
2.
Fusible fundido o interruptor activado.
3.
Necesita sewicio.
4.
Protector del motor activado.
1.
La bolsa de papel no ha sido abierta.
2.
La bolsa de papel esta Ilena.
3. Cepillo rotatorio desgastado.
4.
Banda rota o desgastada.
5.
Filtro tapado.
6.
La boquilla / manguera del paso de basura esta tapada.
7.
La altura seleccionada es incorrecta.
8.
No tiene bolsa de papel.
9. La entrada de la bolsa esth tapada.
1.
La bolsa de papel estl Ilena.
2.
La bolsa de papel no esta instalada correctamente.
3.
Perforaci6n en la bolsa de papel.
4.
No hay bolsa en la aspiradora.
5.
La manguera no esta instalada correctamente.
6.
La boquilla / 10s pasajes estan tapados.
1.
La manguera esta tapada.
2.
Entrada de la bolsa de aire tapada.
3.
Bolsa de papel Ilena.
4.
No hay bolsa de papel en la aspiradora, filtro tapado.
1.
Foco fundido.
2.
Alambres electricos sueltos.
1.
La seleccion de altura de la alfombra es incorrecta.
1.
El cepillo puede estar atorado con basura.
2.
Las tapas en 10s extremos del cepillo estan atorados
con basura.
3.
La seleccidn de altura de la alfombra es incorrecta.
1.
El cepillo no esta "activado"
2.
La (s) banda (s) esta (n) ma1 puesta (s) o hace (n) falta.
3.
El cepillo esta atorado.
Soluciones Posibles
1.
Conecte la clavija firmemente.
2.
Verifique el fusible o el interruptor. Reemplace el fusible
1
desactive el interruptor.
3.
Lleve la aspiradora al centro de sewicio o llame a1
1-800-
321-1 134.
4.
Luz indicadora de atascos (pag. 3)
1.
Meta el dedo en el orificio y empuje el papel para abrir el orificio
2.
Reemplace la bolsa de papel - plg.
7.
3.
Reemplace el cepillo giratorio - plg. 8.
4.
Reemplace la banda - pdg.
8.
5.
Reemplace el filtro - plg.
7.
6.
Remueva la cubierta de la boquilla de la base - pag. 8;
remueva la obstrucci6n
0
remueva la manguera; remueva
la obstrucci6n
-
pag.
5.
7.
Ajuste apropiadamente el nivel a la altura de la alfombra quc
esta siendo limpiada
-
pag.
6.
8.
Limpie el filtro e instale una bolsa - plg.
6.
9. Remueva la manguera y la bolsa de papel
y
limpie la entra
da
-
pag. 3,
7.
1.
Reemplace la bolsa de papel - pag.
7.
2.
Revise la instalaci6n de la bolsa de papel - pag.
7.
3.
Reemplace la bolsa de papel - pag.
7.
Limpie 1 reemplace e
filtro
-
pag.
7.
4.
lnstale la bolsa y limpie el filtro - pag.
7.
5.
Revise la instalaci6n de la manguera - pag.
5.
6.
Remueva la cubierta de la boquilla de la base - pag. 8;
remueva la obstruccion
0
remueva la manguera; remueva
la obstrucci6n
-
pag.
5.
1.
Remueva la manguera y 10s accesorios; remueva la
obstrucci6n.
-
pag. 3.
2.
Remueva la manguera y la bolsa de papel y limpie la entra
da.
-
pag. 3,
7.
3. Reemplace la bolsa de papel.
-
pig.
7.
4.
lnstale la bolsa de papel y limpie el filtro - plg.
7.
1.
Reemplace el foco - pag. 8.
2.
Llame al
1
-
800 - 321 - 1134 para informacion del
distribuidor autorizado Royal mas cercano.
1.
Ajuste la altura de acuerdo a la alfombra que se esta
limpiando.
-
pag.
6.
1.
Remueva el cepillo. - pag. 8. Limpie el cepillo.
2.
Remueva el cepillo. Determine si las tapas de 10s extremos
giran libremente. Si no lo hacen, reemplace el cepillo-pag. 8
3. Ajuste la altura de acuerdo a la alfombra que se esta
limpiando.
-
pig.
6.
1.
"Active" el cepillo
2.
Reemplace la (s) banda (s) -Pag.
7.
3.
Verifique que el cepillo y las tapas no tengan basura.
CUALQUIER OTRO SERVlClO DEBE SER REALIZADO POR UN REPRESENTANTE AUTOREADO DE SERVlClO
SERVlClO AL CLIENTE
(1
-800-321
-1
1
34)
En caso de necesitar mayor ayuda, busque en la Seccion Amarilla un Distribuidor Royal autorizado. Los gastos de transporte desde y hacia cualquier
centro de reparacion son responsabilidad del duefio. Las partes de servicio usadas en esta unidad son facilmente reemplazables y fhciles de conseguir en
un Distribuidor Royal o de un vendedor al menudeo de productos Royal autorizado. Cuando solicite informacion o haga un pedido de partes, siempre
identifique su aspiradora mediante el
modelo y numero de serie (el numero de modelo se encuentra en la parte posterior de la aspiradora).
Page 19

Page 20

MANUEL DU
PROPRIETAIRE
Notice d'utilisation et
d'entretien
Veuillez lire ces instructions avec
soin avant d'utiliser votre All
Surface Swivel Glide?
Permettez-nous de vous aider
a
assembler votre aspirateur ou de
repondre
a
vos questions en
appelant
le
:
1-800-321
-1
134
(E.-u.)
1-800-661 -6200 (Canada)
site web
:
www.dirtdeviI.com
Consignez les renseignements concernant votre aspirateur
ci-dessous pour pouvoir les retrouver rapidement.
Nqe modele
:
Code de
fab.
:
(Le code de fabrication se trouve sur le cBte infhrieur arriere de
I'aspirateur.)
Espaiiol - pagina
El
Page 21

FELICITATIONS
!
Vous Gtes dksormais l'heureux propriktaire de l'aspirateur Dirt DevilB toutes surfaces Swivel GlideB, l'aspirateur vertical le plus maniable du monde avec les
roulettes orientables brevetkes, pour des manoeuvres sans effort sur tous types de
sols. Nous sommes certains que ce nouvel achat vous procurera de nombreuses
ann6es de satisfaction.
Notre socikt6 a congu et dkvelopp6 ce produit en pensant
B
vous. Nous avons inclus
des outils encastrables et un moteur puissant, tout cela dans une conception lkghre
pour un nettoyage en profondeur de toute la maison. Le nettoyage au-dessus de
sols nus peut se faire griice
B
la caractkristique commande d'arrst de la brosse.
Nous sommes extrgmement fiers de nos produits et espCrons que, tout comme
nous, vous 6tes satisfaits de leur qualit6 et de leur performance.
Merci pour votre
soutien des produits Dirt Devil?
Venez visiter notre site web au www.dirtdevil.com.
Consignes de securite
......................................................................
Page
3
...............................................................................................
Pieces Page
4'
......................................................................................
Assemblage Page
4
................................
Assemblage du tuyau et rangement des outils Page
5
..................................................................
Utilisation de I'aspirateur Page
5
Nettoyage des planchers et tapis
................................................
Page
5
Nettoyage des planchers nus et au-dessus du plancher
............
Page
5
...................................................................
Transport de I'aspirateur Page
6
.........
Retrait et remplacement de la courroie ou du rouleau-brosse Page
7
Retrait et remplacement des filtres
...................................................
Page
8
Retrait et remplacement de I'ampoule
..............................................
Page
8
Guide de depannage
........................................................................
Page
9
Royal Appliance Mfg. Co. garantit au consommateur que cet aspirateur est exempt de tout vice de mat@iau ou de fabrication a compter de la date d'achat originale.
Consultez le carton d'emballage de I'asp~rateur pour
determiner
la duree de la garant~e et conservez I'orlglnal de votre rey d'achat pour justifier la date d'entree en
vigueur de la garantie.
Si I'aspirateur fait defaut durant la periode couverte par la garantie, nous reparerons ou remplacerons toutes pieces defectueuses gratuitement. L'aspirateur au complet
doit 6tre livr6, ort pavi.
a
n'importe quel point de vente et de service ROYAL agree. Veuillez inclure une description detaillde du probleme, la date d'achat, une
copie du rey alacRt original, ainsi que vos noms. adresse et numdro de telephone. S'il n'y a pas de point de vente dans votre region, appelez i'usine, au 1-800-
321-1134 aux ETATS-UNIS et au 1-800-661-6200
au CANADA. N'utilisez que des pieces de rechange Royal authentiques.
La garantie ne couvre pas I'usure inhabituelle, ni les deteriorations dues
a
un accident ou a un usage abusif de I'aspirateur. Elk ne couvre pas non plus les cour-
roies, les brosses, les sacs, les ampoules ou le ventilateur. Cette garantie ne couvre pas les reparations non auto[isees. Cette garantie vous confere des droits
juridiques precis, mals vous pouvez Bgalement disposer d'autres drolts (ces derniers variant d'un Etat
i
I'autre au seln des Etats-Un~s).
Page 22

CET
ASPIRATEUR
N'EST DESTINE
QU'A
CUSAGE
DOMESTIQUE.
INSTRUCTIONS IMPORTANTES POUR VOTRE
SECURITE
Lors
de
I'utilisation
d'un
appareil
electro-menager,
certaines precautions
de
base
doivent
toujours
&re
respectees,
notamment
les
suivantes
:
LIRE TOUTES LES INSTRUCTIONS AVANT D'UTILISER CAPPAREIL.
TOUJOURS RESPECTER CES INSTRUCTIONS DE
SECURITE.
PLACER CASPIRATEUR EN POSITION VERTICALE LORS DE CUTlLlSATlON DU TUYAU ET DES ACCESSOIRES.
NE JAMAIS LAISSER CASPIRATEUR SANS SURVEILLANCE LORSQU'IL EST
BRANCHE.
VERIFIER
REGULIEREMENT
LES FILTRES ET LES NETTOYER OU LES REMPLACER.
AVERTISSEMENT : NE JAMAIS UTlLlSER D'OBJETS
A
ARETE
VlVE POUR NETTOYER LE TUYAU CAR CECl
POURRAIT CENDOMMAGER.
ENLEVER
LA
BROSSE
ET
NETTOYER
LES
DEBRIS
DES
CHAPEAUX
D'EXTREMITE
DETEMPS
A
AUTRE
AFIN WE LA BROSSE PIVOTE
UNIFORMEMENT.
URETOUTES LES INSTRUCTIONS AVANT D'LmUSER
CET
APPAREIL
.
AVERTISSEMENT : AFIN DE
REDUIRE
LES RISQUES
D'INCENDIE, DE CHOC ELECTRIQUE OU DE BLESSURE
:
Ne pas quitter I'appareil lorsqu'il est branche. Debrancher de la prise lorsqu'il n'est pas utilise et avant entretien.
Ne pas utiliser dehors ou sur des surfaces humiges. Un choc electrique pourrait se produire.
Ne pas permettre qu'il soit utilise comme jouet. Etre particulierement attentif lors de I'utilisation par des enfants ou
a
leur proximite.
Ne I'utiliser que tel que decrit dans ce manuel. N'utiliser que les accessoires recommandes par le fabricant.
Ne pas
utiliser si le cordon d'alimentation ou la fiche est endommage(e). Si cet aspirateur ne fonctionne pas comme
il
le
devrait,
si on I'a fait tomber, s'il a 6tB endommag6 ou bien encore si on I'a laisse tomber dans I'eau, le rapporter
a
un centre de service
pour le faire inspecter. Appeler le numet-o sans frais 1-800-661-6200 pour obtenir I'adresse du centre de service le plus proche.
Ne pas tirer sur le cordon Blectrique ou porter I'aspirateur par le cordon. Ne pas utiliser le cordon comme poignee, ne pas fermer de
porte sur le cordon, et ne pas entourer le cordon autour de bords tranchants ou de coins. Ne pas passer I'appareil au dessus du
cordon. Tenir le cordon distance des surfaces chauffees.
Ne pas debrancher en tirant sur le cordon. Pour debrancher, tenir la fiche, non le cordon.
Ne pas manipuler la prise ou I'appareil avec des mains mouillees.
Ne pas introduire d'objets dans les ouvertures. Ne pas utiliser avec une ouverture bloquee
;
maintenir celles-ci exemptes de
poussihre, de peluche, de cheveux, et de tout ce qui pourrait affecter le passage de I'air.
Garder les cheveux, les v6tements' les doigts et toutes les parties du corps loin des ouvertures et des pieces en mouvement.
Ne pas ramasser quoi que ce soit qui brirle ou qui fume, tel que les cigarettes, les allumettes, ou les cendres chaudes.
Ne pas
utiliser I'aspirateur sans avoir le vide-poussiere et les filtres en place.
Mettre toutes les commandes sur arr6t avant de debrancher.
Etre particulierement
attentif lors du nettoyage d'escaliers.
Ne pas utiliser I'aspirateur pour ramasser des liquides inflammables ou combustibles, tels que I'essence, ou utiliser le dispositif dans
des endroits ou ceux-ci pourraient 6tre presents.
Maintenir I'aspirateur
a
m6me le sol. Seuls les aspirateurs tenus en main peuvent 6tre utilises sur du mobilier.
Caspirateur doit 6tre en position verticale pour soulever la brosse pivotante du tapis lorsque I'on nettoie au-dessus du plancher.
Ne pas utiliser de rallonge electrique avec cet aspirateur.
Ranger I'aspirateur
a
I'interieur. Ranger I'aspirateur apres usage pour eviter les accidents.
L'emploi d'une tension incorrecte peut endommager le moteur et potentiellement blesser I'utilisateur. La tension adequate est
indiquee sur la plaque de I'aspirateur.
CONSERVER CES INSTRUCTIONS
1
AVERTISSEMENT
:
I
Afin de reduire le risque de choc electrique, cet appareil est muni d'une fiche polarisee (avec une lame plus large que
I'autre). Cette fiche ne peut se placer que d'une seule faqon dans une prlse polarisee. Si la fiche ne rentre pas
completement dans la prise, tourner la-fiche. Si el!e ne rentre toujours pas, rendre contact-avec un electricien
professionnel afin de faire installer une pnse appropnee. Ne pas modifier la fiche c!e quelque manlere que ce so~t.
Page 23

Fig.
1
Fia
1
1.
Poignee antiglisse Non-SlipTM
2.
Levier de deblocage du panneau avant
3.
Filtre MicroFresh
4.
Selecteur d'arrQt de la brosse
5.
Levier de reglage de hauteur de tapis
6.
Pare-chocs Scuff GuardTM
7.
Balais pour nettoyer les bords
8.
Regard de brosses
9.
*Phare
10.
Tuyau flexible
*
Non
disponible sur tous les modeles
Fia.
2
PIECES
Fia.
2
11.
Poignee de transport
12.
Long cordon electrique
13.
Poignee du tuyau
14.
Compartiment a courroies
15.
Roulettes orientables
16.
Pedale de deblocage de la poignee
17.
BIton telescopique
18.
Outil pour fentes
19.
Outil 2 en
1
-
Brosse a poussiere I outil a tapisseries
20.
lnterrupteur marche I arrQt
Vis de I'ar-
ribre de
I'aspirateur.
ASSEMBLAGE
OUTIL NECESSAIRE : TOURNEVIS
PHILLIPS
1.
Mettre I'unite en position verticale et placer la partie superieure de la poignee sur I'aspirateur (schema
1).
2.
Tenir le cordon vers le bas et loin de vous pour eviter de vous pincer. Enfoncer la partie superieure de la poignee en alignant I'inter-
rupteur marche
/
arrgt avec I'ouverture de la poignee (schema
2).
3. ARRIERE DE L'ASPIRATEUR : ajouter DEUX vis (fournies) pour fixer la poignee (schema 3).
Page 24

ASSEMBLAGE DU TUYAU ET RANGEMENT DES OUTILS
1.
ATTACHER LETUYAU : attacher le tuyau flexible a I'aspirateur (schema
1).
Aligner la grande fldche du manchon avec la flhche du
raccord (schema 1A). Bien enfoncer le manchon et le tourner dans le sens des aiguilles d'une montre. lnserer la poignee du tuyau
dans le cat6 de I'aspirateur. Appuyer fermement pour fixer (schema
2).
2.
INSTALLER LES OUTILS : se referer au (schema 3) pour le placement des outils.
3. RANGEMENT DU CORDON
:
pour un rangement soigne du cordon, enrouler ce dernier autour des crochets sur le c6te de I'aspi-
rateur avec le systeme de rellchement rap~de du cordon (schema 4).
UTlLlSATlON
DE
CASPIRATEUR
1.
Pour rellcher le cordon sans le derouler, tourner le crochet d'enroulement du cordon,
situe en haut, vers la gauche ou la droite (schema
1).
2.
Brancher le cordon dans une prise electrique. 3. Mettre I'aspirateur en
a
marche
..
L'interrupteur se trouve a la base de la poignee (schema
2).
4. Debloquer la poignee en appuyant sur la pedale (schema 3).
5.
Selectionner la position du rouleau-brosse, marche
))
ou
(<
arr6t
,)
(schema 4).
REMARQUE
:
I'aspirateur doit Btre en
<<
marche n quand vous activez / desactivez le rouleau-brosse.
NETTOYAGE DES SOLS ETTAPIS
-
METTRE LE ROULEAU-BROSSE EN MARCHE
1.
Utiliser le regard situe sur le suceur pour voir si le rouleau-brosse tourne.
2.
Lorsque I'on change de velours de tapis, deplacer la manette de reglage de hauteur pour s'adapter a la surface a nettoyer (schema 4).
3. Les balais pour nettoyer les bords (schema
5)
offrent un nettoyage efficace des plinthes.
4. Appuyer de nouveau sur la pedale de deblocage de la poignee, alors que I'aspirateur est en marche, abaissera I'aspirateur pour le
mettre a plat afin de pouvoir nettoyer sous le mobilier.
REMARQUE
:
les franges de carpette peuvent sfemmBler dans le rouleau-brosse de I'aspirateur lorsque ce dernier tourne. Faire atten-
tion lors du passage de I'aspirateur sous le mobilier.
NErrOYAGE DE SOLS NUS ET AU-DESSUS DU SOL
-
METTRE LE ROULEAU-BROSSE A L'ARRET
1.
Mettre le rouleau-brosse a 11arr6t. REMARQUE : I'aspirateur doit &re en
<<
marche
,)
quand vous activez / desactivez le rouleau-brosse.
2.
Continuer d'aspirer les sols nus et les carpettes ou utiliser les accessoires pour le nettoyage au-dessus du sol.
3.
Une butee de seuil est incorporee a I'aspirateur pour permettre de le transporter d'un sol nu a un tapis en abaissant le dos de la
poignee jusqu'a ce que le suceur soit souleve du sol.
4. POUR
UTlLlSER LES ACCESSOIRES
Retirer le tuyau du c6te de I'aspirateur en utilisant la poignee (schema
6).
Choisir I'un des accessoires pratiques ou utiliser le tuyau seul. II suffit simplement de pousser I'accessoire fermement sur I'extremite
du blton ou de la poignee du tuyau. Pour enlever I'outil, tourner et degager avec soin.
S'il faut plus de longueur, utiliser le blton telescopique (voir page
6).
5
Page 25

BATON
TELESCOPIQUE
:
enlever le baton du c6t6 de I'aspirateur en le tirant par le haut pour le degager et tirer vers le haut
(schema 1). Tourner et etirer le baton pour obtenir une longueur supplementaire, tel que decrit sur le baton. Tourner de nouveau pour bloquer.
OUTlL 2 EN
1
:
peut s'utiliser comme brosse a poussiere. Pour les tapisseries, faire glisser les balais en dehors de la cartouche d'outil.
REGLAGES
POUR LES TAPIS
Deplacer le levier pour regler la hauteur du suceur en fonction de la surface a nettoyer (schema 2). Si I'aspirateur est difficile a pousser, utiliser une hauteur de tapis plus elevee.
REMARQUE
:
le reglage de la hauteur pour les tapis peut se faire quand I'aspirateur est en position verticale ou en fonctionnement.
Si
vous le reglez alors qu'il est en position verticale, vous ne remarquerez le changement dans la hauteur que lorsque la poignee sera
debloquee.
TRANSPORT
DE
L'ASPIRATEUR
Utiliser la poignee de transport a I'arriere de I'aspirateur pour le deplacer de piece en piece (schema 3).
REMARQUE
:
ne pas pousser ou tirer I'aspirateur vers I'avant quand il est en position verticale et reposant sur les roulettes arriere.
RETRAIT ET REMPLACEMENT DES SACS EN PAPIER
REMARQUE
:
ddbrancher I'as~irateur avant de chanaer un sac en w~ier. L'as~irateur doit contenir un
I
TYPE
DE
SAC:
U
I
-
. .
sac en papier tout
le
temps.
I
I
Vous saurez s'il faut remplacer un sac quand I'aspiration se fait moindre, quand I'indicateur* de remplissage des sacs est jaune ou si
le voyant de I'indicateur d'obstruction s'allume (voir page
3).
Ne pas d6passer la ligne limite de remplissage sur les sacs en papier.
Differents types de saletes peuvent requerir un remplacement des sacs plus souvent.
RETRAIT D'UN ANCIEN SAC
1. Tirer le levier de deblocage sur le panneau avant pour retirer ce dernier (schema
1).
2.
RETIRER
:
saisir le collet de carton du sac en papier A deux mains et tirer au-dela des languettes de blocage relevees sur le tube
sale (schema
2).
Jeter I'ancien sac en papier.
INSTALLATION D'UN NOUVEAU SAC
IMPORTANT
:
elargir le sac depuis le trou avant de I'installer (schema
3).
Appuyer en ouvrant pour eloigner le papier du trou. Saisir
le collet de carton et pousser au-dela des languettes de blocage relevees sur le tube sale (schema
4).
Plier le sac vers I'interieur a
environ 3 pouces du bas de faqon a ce qu'il repose sur les montants de support des sacs (schema
5).
Refermer le panneau avant.
Page 26

I
c
5
vis
du couvercle de pare-
I
n
1
RETRAIT ET REMPLACEMENT DE LA COURROIE OU DE LA BROSSE
OUTlL
NECESSAIRE : TOURNEVIS CRUCIFORME
w
1
Y
AVERTISSEMENT
:
POUR
REDUIRE
LES-RISQUES DE BLESSURES DUES
A
DES
PIECES
EN MOUVEMENT,
DEBRANCHER
L'ASPI-
RATEUR AVANT DE CHANGER
LA
COURROIE OU LE ROULEAU-BROSSE.
1. Cet aspirateur est equipe Uune courroie arriere et d'une courroie avant (Schema 1).
IMODELE
DE
COURROIE
:
9
2. Pour determiner quelle courroie a besoin d'gtre remplacee, retirer le cbte du couvercle de suceur qui contient la pedale de deblocage du manche. Retourner I'aspirateur pour exposer la base du suceur. Utiliser
un tournevis cruciforme pour retirer la vis du couvercle de suceur situee derriere la roulette (Schema 2).
3.
Retourner I'aspirateur de maniere a le remettre a I'endroit. Retirer le couver$le du suceur (Schema
3).
POUR ENLEVER ET REMPLACER LA COURROIE ARRIERE
:
REMARQUE
:
La courroie avant doit &re enlevee de la petite poulie avant de remplacer la courroie arriere.
1.
Retirer et jeter la courroie usee. Faire glisser la courroie avant de la petite poulie (Schema 4).
2. Enrouler la courroie arriere sur la grande poulie, puis faire glisser la courroie sur I'arbre du moteur en veillant
a
ce que la courroie
soit correctement situee sur la poulie et alignee entre les clips de guide de courroie metalliques (Schema 5). Remettre la courroie
avant sur la petite poulie
(Schema 4).
3.
Remonter le couvercle du suceur. Fixer en remettant en place la vis sous le socle du suceur.
IMPORTANT
:
FAIRE TOURNER LE ROULEAU-BROSSE
A
LA
MAlN POUR S'ASSURER QUE
LA
COURROIE N'EST PAS TORDUE ET QU'ELLE
EST CORRECTEMENT
ALIGN~E.
POUR ENLEVER ET REMPLACER LA COURROIE AVANT OU LE ROULEAU-BROSSE
:
kMma
6
Retirer
le pare-choc
du
suceur.
Retirer les vis B I'aide d'un
tournews cruciforme Philhps.
1.
Retourner I'aspirateur de manikre
a
exposer la base du suceur. Retirer les cinq vis du pare-choc de suceur I'aide d'un tournevis
cruciforme Phillips (Schema
6).
2. Retirer le pare-choc du suceur (Schema
7).
3.
Soulever et enlever le rouleau-brosse (Schema
8).
4. Remettre I'aspirateur a I'endroit et jeter la courroie usagee.
5. Faire glisser la nouvelle courroie avant sur la petite poulie (Schema 4).
6.
Guider la courroie par le trou vers la section du rouleau-brosse, puis retourner I'aspirateur.
7.
Faire glisser la courroie sur le rouleau-brosse sur la portion sans balais (Schema 9a).
8.
Remettre le rouleau-brosse en place dans le compartiment suceur (Schema 9).
IMPORTANT
:
FAIRE TOURNER LE ROULEAU-BROSSE
A
LA
MAlN POUR S'ASSURER QUE
LA
COURROIE N'EST PASTORDUE ET QU'ELLE
EST CORRECTEMENT
ALIGNEE.
9. Remonter le pare-choc du suceur (Schema
7).
10. Fixer en remettant en place les cinq vis du pare-choc du suceur (Schema
6).
11. Remonter le couvercle du suceur. Fixer en remettant en place la vis sous le socle du suceur.
RANGEMENT DE LA COURROIE
Plier et fixer la courroie (en forme de
tc
U
,>
a
I'interieur des boucles a I'arriere de I'aspirateur (voir I'emplacement du dispositif de
rangement de la courroie
a
la Page 4, figure 2).
7
Schema
7
Retirer le pare-choc
du
suceur,
Schima
8
Soulever
et
enlever
le
rouleau-
brosse.
Schha
Sa
Placer la
cour-
role
dans
la
portion
du rouleau-
brosse
sans bala~s.
Schema
9
Remettre le
rouleau-brosse en place dans le
compartiment suceur.
Page 27

RETRAIT ET REMPLACEMENT DES TAMPONS FILTREURS
Debrancher
l'aspirateur
avant
de
changer
le
filtre.
Cet aspirateur vertical contient deux filtres : un filtre interne (chambre du sac) et un filtre externe (panneau avant). (Le placement des
filtres varie en fonction du modele). Le filtre interne se place sous la chambre du sac (schema 1). Le filtre externe se place
a
I'arriere
du panneau avant (schema 2). Pour des renseignements sur le remplacement des filtres, appeler le 1-800-661 -6200. Numero de
piece du filtre de la chambre du sac et du filtre externe
:
#
3-863001-001.
FILTRE DE LA CHAMBRE DU SAC
1,-3
'FILTRE EXTERNE
(externe)
(interne)
:,/\,,;;$:~-,;:,-,-
.
,..
.,:
3:-.':::,:;:::
Situe a I'arriere du panneau avant.
1.
,..
Situe sous le sac en papier. Le filtre doit Qtre
Le filtre doit Qtre remplace apres
remplace apres tous les troisiemes sacs en
tous les troisiemes sacs en papier.
papier.
1. Positionner le filtre pour qu'il
1. Retirer le panneau avant.
s'adapte (schema 2).
2. Soulever le bord avant et tirer vers vous pour
2. Pousser sur les 6 montants.
enlever (schema 1). Jeter le filtre.
3. Refermer le panneau avant.
3. Glisser un nouveau tampon filtreur en place.
4.
Refermer le panneau avant.
*
Non disponible sur tous les mod&les
*RETRAIT ET REMPLACEMENT DE L'AMPOULE
OUTIL
NECESSAIRE :TOURNEVIS
ATETE
PLATE
AVERTISSEMENT : POUR
REDUIRE
LES RISQUES DE CHOCS
ELECTRIQUES,
DEBRANCHER
L'ASPIRATEUR AVANT DE
RETIRER OU DE REMPLACER UNE AMPOULE.
Cet aspirateur utilise une lampe d'automobile
#
906 de 13,O volts. Pour des renseignements sur le remplacement des ampoules,
appeler le 1-800-661-6200 ou votre magasin de pieces auto le plus proche.
1. Retirer le panneau avant (voir page 6, schema
1).
Pencher la poignee de I'aspirateur vers I'arriere. lnserer le bout d'un tournevis
standard dans la fente laterale et soulever pour ejecter la lentille de I'ampoule.
2. Sortir l'ampoule de la douille pour retirer. Ne pas tordre I'ampoule. Remettre I'ampoule dans la douille pour remplacer (schema 2).
3. Remettre en place la lentille du phare
a
I'arriere du panneau. Refermer le panneau avant.
*
Non disponible sur tous les rnodeles
Page 28

Probleme
L'aspirateur ne rnarche pas
L'aspirateur ne ramasse pas
ou I'aspiration est faible
De la
poussihre s'echappe
de I'aspirateur
Les outils de I'aspirateur
ne ramassent pas
Le phare ne
marche pas
L'aspirateur est difficile
a
pousser
La
courroie brQle ou se casse
Le rouleau-brosse ne
tourne pas
R
REDUIRE LE RISQUE DE SE BLESSER,
DEB
Raisons possibles
1.
Le cordon electrique n'est pas bien insere dans la prise
2.
Fusible saute ou disjoncteur declenche
3.
A
besoin d'entretien.
4.
Protection du moteur d6clenchee.
1. Le sac en papier n'est pas ouvert.
2. Sac en
papier plein.
3. Rouleau-brosse use.
4.
Courroie cassee ou usee.
5.
Tampon filtreur bouche.
6.
Suceur 1 tuyau pour le passage de la salete bouche.
7. RBglage incorrect de la hauteur de tapis.
8. Pas de sac en papier.
9.
Raccord du sac bouchk.
1. Sac en papier plein.
2. Sac pas bien install&.
3. Sac en papier creve ou troue.
4.
Pas de sac dans I'aspirateur.
5.
Tuyau pas bien installe.
6.
Suceur / passage de la salete bouche.
1. Tuyau bouche.
2. Raccord du sac bouche.
3. Sac en papier plein.
4.
Pas de sac dans I'aspirateur, filtre bouche.
1. Ampoule grillbe.
2. Fils Blectriques detendus.
1. RBglage incorrect de la hauteur de tapis.
1. La brosse peut 6tre coincee avec des debris.
2. Les bouchons au bout de la brosse sont bouches.
3. RBglage incorrect de la hauteur de tapis.
1. Le rouleau-brosse est sur la position
cc
arr6t
n.
2. Courroie(s) ma1 assemblee(s) ou manquante (s).
3.
Rouleau-brosse bouch6.
Solutions possibles
1. Bien inserer la fiche dans la prise.
2. Verifier le fusible ou le disjoncteur. Rernplacer le fusible
recaler le disjoncteur.
3.
Transporter au centre
de
SACS
ou appeler le
1
-800-661
-62CC
4.
Colrnater le voyant indicateur-Pg.
3.
1. lnserer un doigt dans le trou et pousser et eloigner le
sac de I'ouverture.
2. Remplacer
le sac en papier-Pg. 7.
3. Remplacer le rouleau-brosse-Pg.
8.
4.
Remplacer la courroie-Pg. 8.
5.
Remplacer le filtre-Pg.
7.
6.
Retirer le couvercle a la base du suceur - page
8;
retirer
I'obstruction
OU
retirer le tuyau; retirer I'obstruction-Pg.
5.
7.
Regler la hauteur de tapis de fa~on appropriee en fonc
tion du tapis
a
nettoyer-Pg.
6.
8.
Nettoyer le filtre et installer un sac-Pg.
6.
9.
Retirer le tuyau et le sac en papier et nettoyer le
raccord-Pg. 3, 7.
1. Remplacer
le sac en papier-Pg. 7.
2.
Revoir I'installation des sacs en papier-Pg. 7.
3. Remplacer le sac en papier-Pg.7. Nettoyerlremplace
le filtre-Pg. 7.
4.
Installer un sac et nettoyer le filtre-Pg. 7.
5.
Revoir I'installation du tuyau-Pg.
5.
6.
Retirer le couvercle a la base du suceur - page
8;
retirer I'obstruction
OU
retirer le tuyau; retirer I'obstruction-Pg.
5.
1. Retirer le tuyau et les outils; retirer I'obstruction-Pg. 3.
2. Retirer le tuyau et le sac en papier et nettoyer le rac
cord-Pg.
3,7.
3. Remplacer le sac en papier-Pg. 7.
4.
Installer un sac en papier et nettoyer le filtre-Pg. 7.
1.
Remplacer I'ampoule-Pg. 8
2. Appeler le 1-800-321 -1 134 pour connaitre le reven
deur Royal agree le plus proche.L'aspirateur est
difficile
a
pousser.
1.
RBgler la hauteur de tapis de fagon appropriee en
fonction du tapis
a
nettoyer-Pg.
6
1. Retirer la brosse-Pg. 8. Enlever les debris sur la
brosse.
2. Retirer la brosse. S'assurer que les bouchons au
bout tournent librement. Si ce n'est pas le cas, rem
placer le rouleau-brosse-Pg.
8.
3. RBgler la hauteur de tapis de fapon approprihe en
fonction du tapis
a
nettoyer-Pg.
6
1. Mettre le rouleau-brosse sur la position . marche
m.
2. Remplacer la courroie - Pg.
7
3. Verifier les bouchons au bout du rouleau-brosse et
nettoyer les debris.
TOUT AUTRE ENTRETIEN ET
REPARATION
DOlT
~TRE EFFECTUE
PAR UN
REPRESENTANT
AGREE
DU
SERVICE.
SERVICE
A
LA
CLIENTELE
(1 800 661-6200)
Pour obtenir une aide suppl6mentaire, consulter les Pages Jaunes pour rep6rer le nom d'un dstributeur agree Royal. ~:coC~t aller-retour du transport pour effectuer
les r6parations est
B
la charge du propri6taire. Les pieces de I'aspirateur se remplacent facilement et sont en vente chez un distributeur agr66 Royal ou chez un
d6taillant. Lorsqu'on commande des pieces de rechange ou qu'on demande des renseignements,
il
faut toujours donner le nurndro du modble
(le num6ro du modhle figure au dos de I'aspirateur.)
 Loading...