

Page 1
Bedienungsanleitung
Doppelbürstkehrer
DE
Akku
Blitz
Operating Manual
Double-brush sweeper
Mode d'emploi
Balayeuse à brosse double
Bedieningshandleiding
Dubbele borstelveger
Manual de instrucciones
Escoba eléctrica d ob l e
GB
FR
NL
ES
Roya-11928-2 • A5 • 01.04.2011
Istruzioni per l'uso
Scopa elettrica doppia
Kullanim Klavuzu
Çift fırçalı süpürge
IT
TR
Page 2
Bedienungsanleitung ................................................................... 4 - 9
Operating Manual ......................................................................... 10 - 15
Mode d'emploi ............................................................................... 16 - 21
Bedieningshandleiding................................................................. 22 - 27
DE
Manual de instrucciones .............................................................. 28 - 33
Istruzioni per l'uso ........................................................................ 34 - 39
Kullanim Klavuzu .......................................................................... 40 - 45
TR IT ES NL FR GB
2
Page 3
D
1
1
2
3
5
2
2
3
6
6
5
1
4
5
4
3
4
6
2
1
1
2
3
4
3
2
1
5 6
1
7
2
3
8
Page 4
1 Sicherheitshinweise
Vielen Dank!
Es freut uns, dass Sie sich für den Bürstkehrer Akku-Blitz entschieden haben! Wir wünschen Ihnen viel Freude mit dem Gerät und
danken Ihnen für den Kauf!
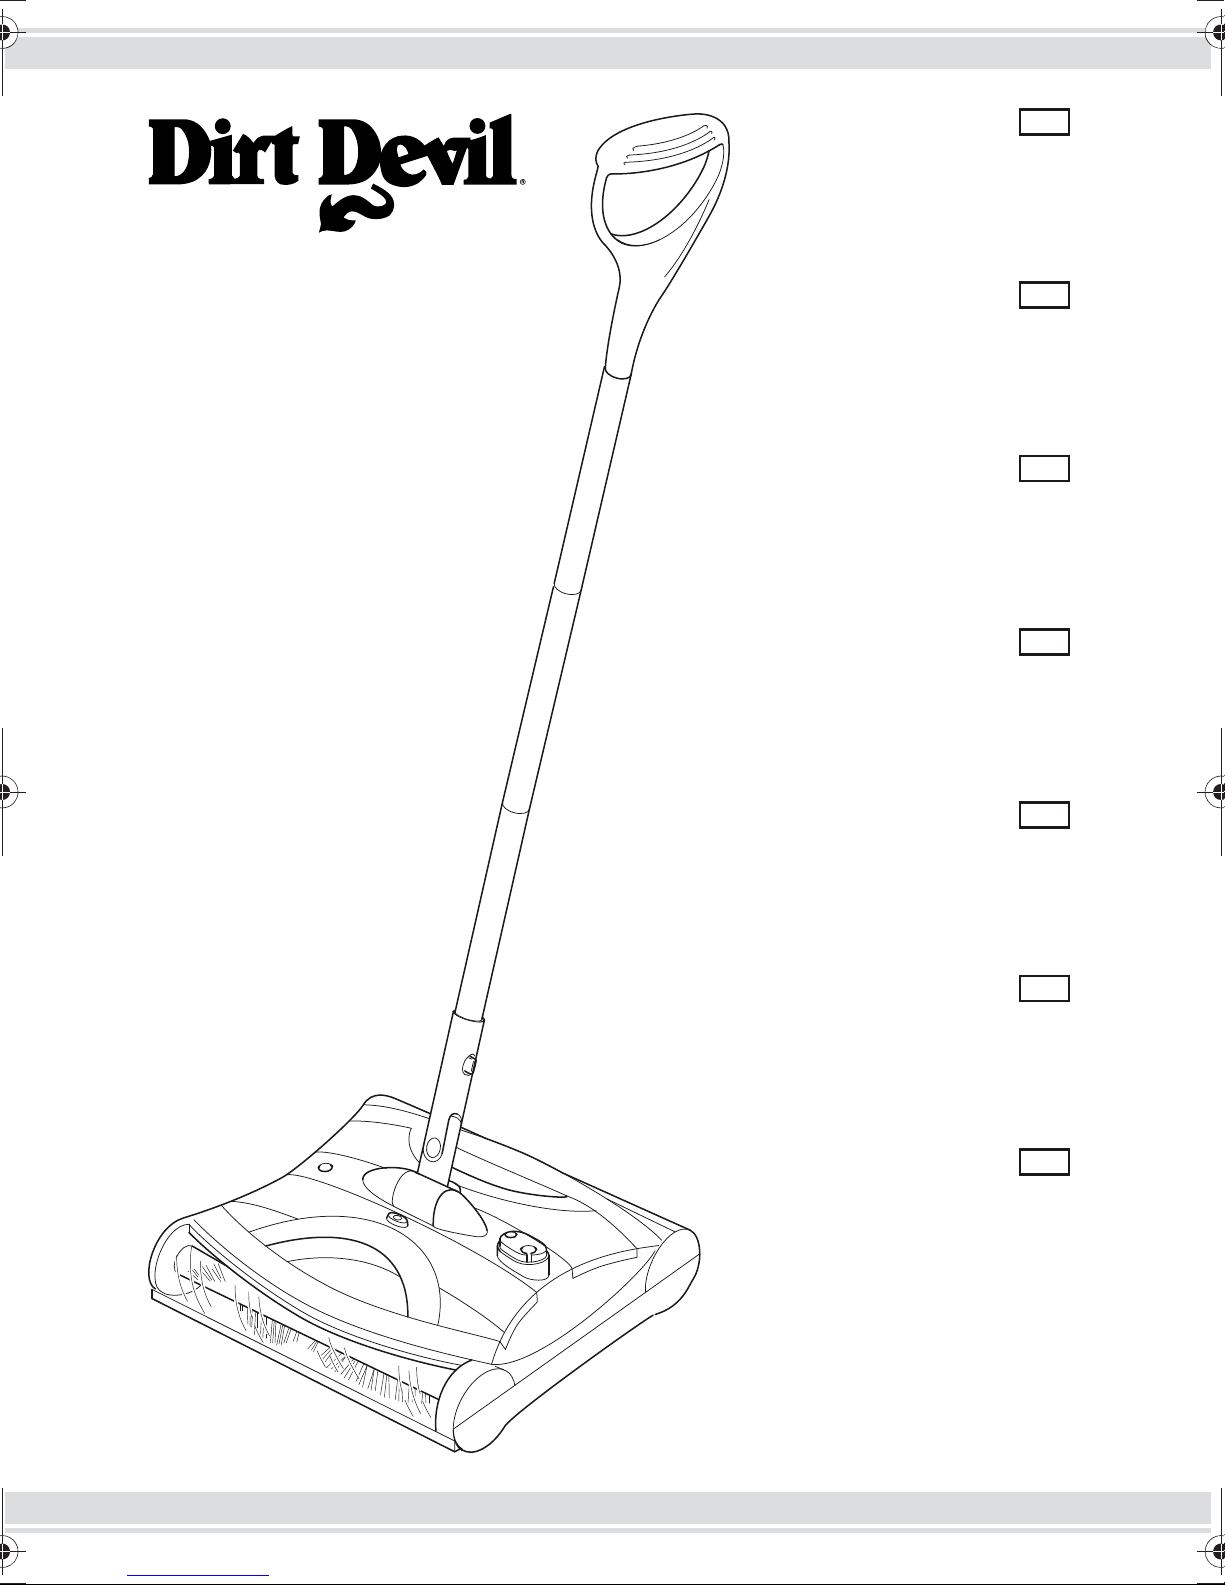
Überblick
(Abb. 1):
1 Handgriff
2 Stiel (3-teilig)
3 Ein-/Aus-Schalter
4 Bürstwalzen (2 Stück)
5 Staubbehälter (2 Stück)
6 Entriegelungstasten (2 Stück)
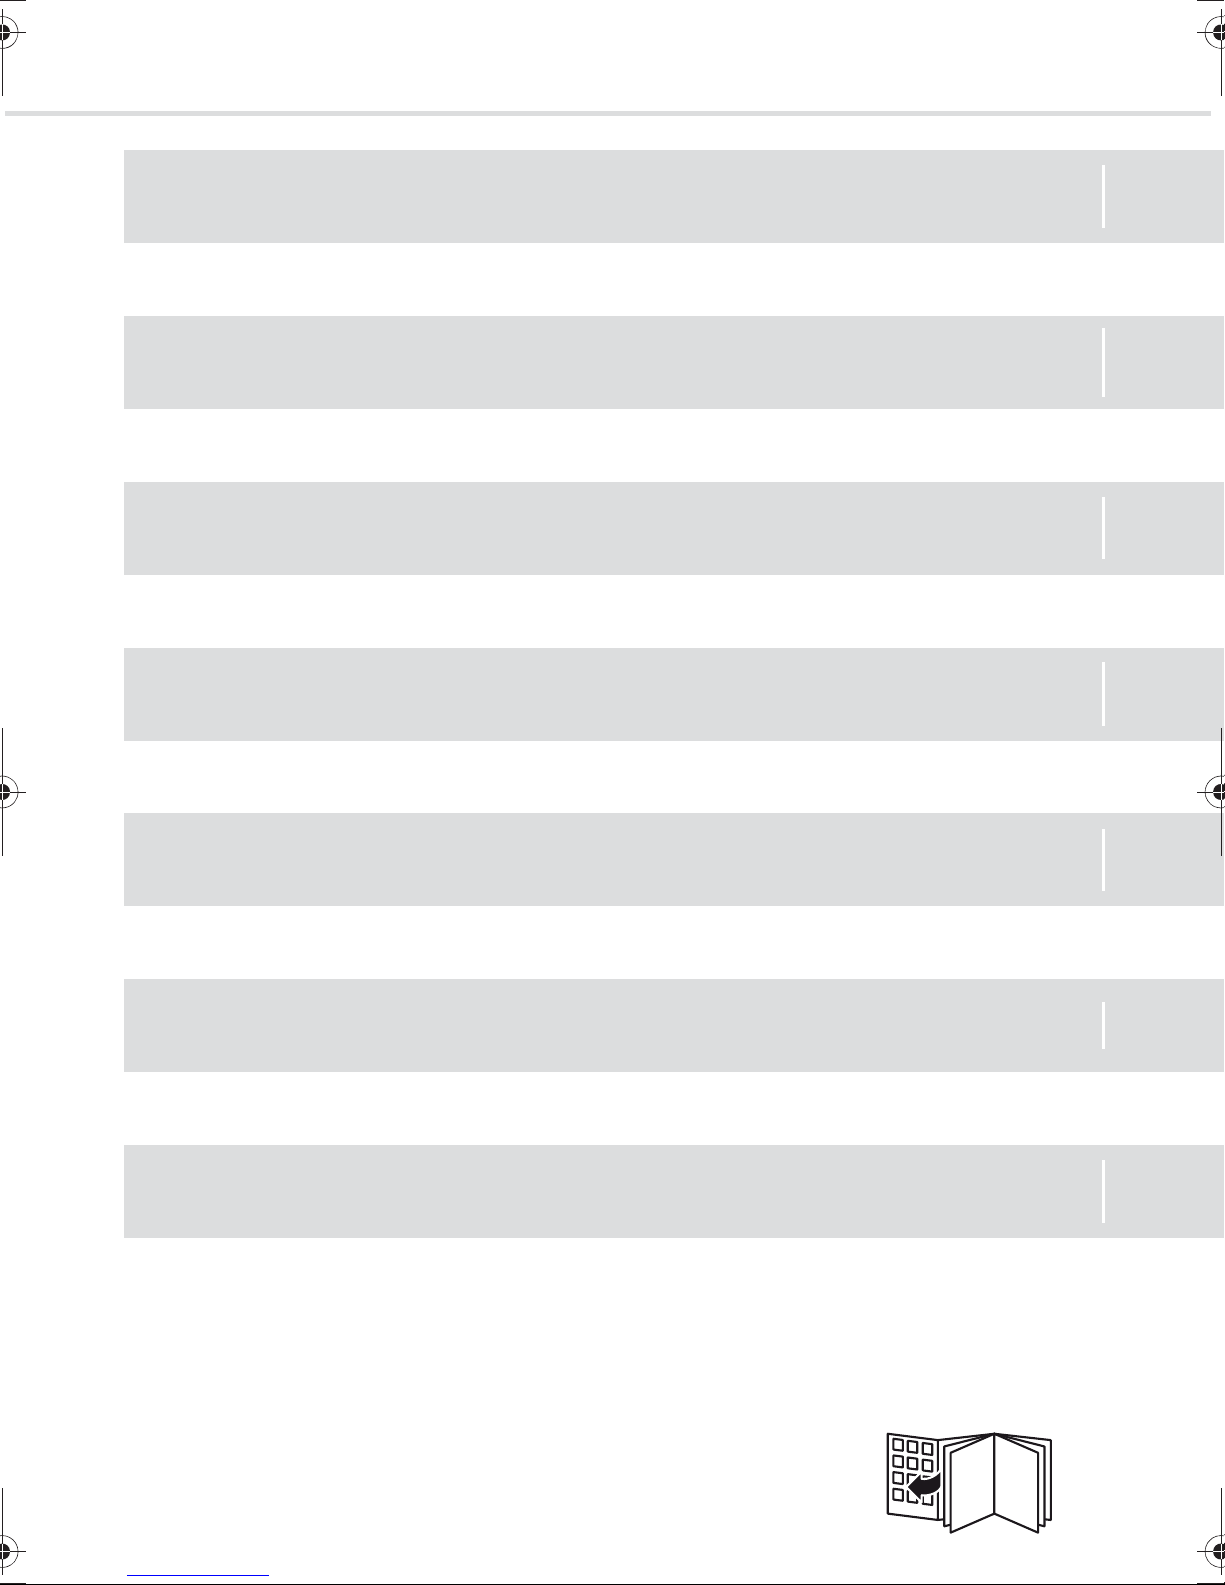
Lieferumfang
(Abb. 2):
1 Bürstfuß
2 Steckrohr, unteres Segment
3 Steckrohr, mittleres/oberes Segment
4 Handgriff
5 Netzteil
6 Bedienungsanleitung
1 Sicherheitshinweise
1.1 zur Bedienungsanleitung
Lesen Sie diese Bedienungsanleitung vollständig durch, bevor Sie mit dem Gerät arbeiten. Bewahren Sie die Anleitung gut auf. Falls
Sie das Gerät an Dritte weitergeben, geben
Sie auch die Bedienungsanleitung mit.
Die Nichtbeachtung dieser Anleitung kann
zu schweren Verletzungen oder Schäden
am Gerät führen.
Für Schäden, die aufgrund der Nichtbeachtung dieser Bedienungsanleitung entstehen,
übernehmen wir keine Haftung.
Wichtige Hinweise für Ihre Sicherheit sind besonders gekennzeichnet. Beachten Sie diese
Hinweise unbedingt, um Unfälle und Schäden
am Gerät zu vermeiden:
WARNUNG:
Warnt vor Gefahren für Ihre Gesundheit und
zeigt mögliche Verletzungsrisiken auf.
ACHTUNG:
Weist auf mögliche Gefährdungen für das
Gerät oder andere Gegenstände hin.
Technische Daten
Geräteart : Doppelbürstkehrer
Modell : Akku-Blitz
[M3131 (-0/-1/.../-8/-9)]
Netzteil : 230 V~, 50 Hz
9 V DC, 200 mA
Batterie : Ni-MH
7,2 VDC, 2.000 mAh
Ladezeit ca. 16 h
max. Betriebsdauer : ca. 30–60 min
(je nach Untergrund)
Staubbehälter : 2 x ca. 100ml,
auswaschbar
Gewicht : ca. 1,7 kg
Technische und gestalterische Änderungen im Zuge
stetiger Produktverbesserungen vorbehalten.
© Royal Appliance International GmbH
HINWEIS:
Hebt Tipps und Informationen für Sie hervor.
1.2 zur Stromversorgung
Das Gerät wird mit elektrischem Strom
aufgeladen und betrieben, dabei besteht
grundsätzlich die Gefahr eines elektrischen
Schlags. Achten Sie daher besonders auf Folgendes:
- Fassen Sie das Netzteil niemals mit nassen Händen an.
- Wenn Sie das Netzteil aus der Steckdose
herausziehen wollen, ziehen Sie immer
direkt am Stecker. Ziehen Sie niemals am
Kabel, es könnte beschädigt werden.
- Achten Sie darauf, dass das Stromkabel
nicht geknickt, eingeklemmt, überfahren
wird oder mit Hitzequellen in Berührung
kommt.
4
Page 5

1 Sicherheitshinweise
- Tauchen Sie das Gerät niemals in Wasser oder andere Flüssigkeiten und halten
Sie es von Regen und Nässe fern.
- Laden Sie das Gerät nur, wenn die auf
dem Netzteil angegebene elektrische
Spannung mit der Spannung Ihrer Steckdose übereinstimmt. Eine falsche Spannung kann das Netzteil zerstören.
1.3 zu den Akkus
Das Gerät enthält wiederaufladbare Akkus.
Die Akkus nicht ins Feuer werfen oder ho-
hen Temperaturen aussetzen. Es besteht Explosionsgefahr.
Bei falscher Anwendung kann Flüssigkeit
aus dem Akku austreten. Diese kann zu
Hautreizungen führen. Vermeiden Sie den
Kontakt mit der Flüssigkeit. Bei Kontakt die
Flüssigkeit mit viel Wasser abspülen. Wenn
die Flüssigkeit in die Augen gelangt, sofort 10
min. mit Wasser ausspülen und unverzüglich
einen Arzt aufsuchen.
Sollte es erforderlich sein, die Akkus aus-
zutauschen, wenden Sie sich an einen Fachhändler oder den Royal Appliance Kundendienst. Für Schäden durch unsachgemäß
ausgetauschte Akkus übernehmen wir keine
Haftung.
1.4 zu Kindern
Dieses Gerät ist nicht dafür bestimmt,
durch Personen (einschließlich Kinder) mit
eingeschränkten physischen, sensorischen
oder geistigen Fähigkeiten oder mangels Erfahrung und/oder mangels Wissen benutzt zu
werden, es sei denn, sie werden durch eine
für ihre Sicherheit zuständige Person beaufsichtigt oder erhielten von ihr Anweisungen,
wie das Gerät zu benutzen ist. Bewahren Sie
das Gerät für diesen Personenkreis unzugänglich auf.
Kinder sollten beaufsichtigt werden, um
sicherzustellen, dass sie nicht mit dem Gerät
spielen.
Verpackungsmaterialien dürfen nicht zum
Spielen verwendet werden. Es besteht Erstickungsgefahr.
1.5 zur bestimmungsgemäßen
Verwendung
Das Gerät darf nur im Haushalt eingesetzt
werden. Es ist für eine gewerbliche Nutzung
nicht geeignet.
Der Bürstkehrer ist ausschließlich für das
Reinigen von normal verschmutzten Böden
und Teppichen zu verwenden. Jede weitere
Verwendung gilt als nicht bestimmungsgemäß und ist untersagt.
Insbesondere die im Folgenden aufgeführten Tätigkeiten dürfen auf keinen Fall mit
dem Bürstkehrer ausgeführt werden:
Das Kehren von:
- Menschen, Tieren, Pflanzen. Insbesondere Haaren, Fingern und anderen Körperteilen sowie am Körper befindlichen
Kleidungsstücken. Sie könnten eingezogen werden und schwere Verletzungen
hervorrufen.
- glühender Asche, brennenden Zigaretten
oder Streichhölzern. Es kann zum Brand
kommen.
- Wasser und anderen Flüssigkeiten.
Feuchtigkeit im Inneren kann zum Kurzschluss führen.
- Toner (für Laserdrucker, Kopierer etc.).
Es besteht Brand- und Explosionsgefahr.
Die Verwendung in der Nähe von explo-
siven oder leicht entzündlichen Stoffen. Es
besteht Brand- und Explosionsgefahr.
Die Verwendung im Freien. Es besteht die
Gefahr, dass Regen und Schmutz das Gerät
zerstören.
1.6 falls das Gerät defekt ist
Betreiben Sie niemals ein defektes Gerät.
Wenn das Netzteilkabel dieses Gerätes beschädigt wird, muss es durch den Hersteller
oder seinen Kundendienst oder eine ähnlich
qualifizierte Person ersetzt werden, um Gefährdungen zu vermeiden.
Geben Sie ein defektes Gerät zur Repara-
tur an einen Fachhändler oder den Royal Appliance Kundendienst, ZKapitel 4.2,
„Garantie“.
DE
5
Page 6
2 Bedienung
2 Bedienung
2.1 Vor dem Gebrauch
1. Packen Sie das Gerät und alle Zubehör-
teile aus und überprüfen Sie den Inhalt auf
Vollständigkeit (Abb. 2).
ACHTUNG:
Transportieren/versenden Sie das Gerät
grundsätzlich immer in der Originalverpackung, damit es keinen Schaden nimmt.
Heben Sie dazu die Verpackung auf.
Entsorgen Sie nicht mehr benötigtes Verpackungsmaterial entsprechend den in Ihrem
Land geltenden Vorschriften.
HINWEIS:
Falls Sie einen Transportschaden bemerken,
wenden Sie sich umgehend an Ihren Händler.
1. Montieren Sie den Stiel, indem Sie die
Steckrohre und den Handgriff entsprechend (Abb. 3) zusammenstecken. Das
untere Steckrohr (Abb. 3/1) ist an der Entriegelungstaste (Abb. 3/2) erkennbar.
2. Stecken Sie den Stiel (Abb. 4/1) in die
Aufnahme (Abb. 4/2). Er rastet hörbar ein.
HINWEIS:
Falls Sie den Stiel wieder herausnehmen
möchten, drücken Sie die Entriegelungstaste (Abb. 4/3) und ziehen Sie den Stiel
(Abb. 4/1) nach oben.
2.2 Akku laden
ACHTUNG:
Verwenden Sie zum Laden des Akkus nur
das mitgelieferte Ladegerät. Bei Missachtung können Schäden am Gerät auftreten
oder der Akku schwer beschädigt werden.
Bevor Sie mit dem Gerät arbeiten können,
muss der Akku geladen werden. Dazu:
Die Ladelampe (Abb. 5/3) leuchtet.
4. Lassen Sie den Akku nun 16 Stunden la-
den.
ACHTUNG:
Vermeiden Sie längere Ladezeiten. Diese
verkürzen die Lebensdauer des Akkus.
5. Ziehen Sie nach dem Laden das Netzteil
zunächst aus der Steckdose und dann
aus dem Bürstfuß.
HINWEIS:
Laden Sie den Akku erst wieder auf, wenn
dieser vollständig leer ist. So erhöhen Sie
seine Lebensdauer.
2.3 Kehren
WARNUNG:
Prüfen Sie den Bürstkehrer vor jeder Benutzung. Ein beschädigtes Gerät darf nicht verwendet werden.
1. Schalten Sie den Bürstkehrer am Ein-/
Aus-Schalter (Abb. 1/3) ein.
2. Schieben Sie den Bürstkehrer zum Kehren
wie einen Staubsauger vor und zurück.
2.4 Ausschalten und Abstellen
1. Schalten Sie den Bürstkehrer nach dem
Kehren am Ein-/Aus-Schalter (Abb. 1/3)
aus.
2. Stellen Sie den Bürstkehrer außerhalb
des Arbeitsbereiches ab und arretieren
Sie den Stiel in der senkrechten Position.
So vermeiden Sie Unfälle.
ACHTUNG:
Stellen Sie das Gerät nie direkt neben Wärmequellen ab (z. B. Heizung, Ofen). Vermeiden Sie direkte Sonneneinstrahlung. Die
Hitze kann das Gerät beschädigen.
1. Stellen Sie sicher, dass das Gerät ausge-
schaltet ist. Anderenfalls lässt sich der
Akku nicht laden.
2. Schließen Sie das Netzteil zunächst am
Bürstfuß an (Abb. 5/1).
3. Stecken Sie dann das Netzteil in die
Steckdose (Abb. 5/2).
6
Wenn Sie das Gerät längere Zeit lagern
möchten, leeren Sie die Staubbehälter und
reinigen Sie diese, ZKapitel 3.1,
„Staubbehälter leeren“.
Bewahren Sie das Gerät in einem kühlen,
trockenen Raum auf.
Page 7
3Wartung
3 Wartung
WARNUNG:
Bevor Sie das Gerät warten, schalten Sie es
aus.
3.1 Staubbehälter leeren
Leeren Sie die Staubbehälter regelmäßig.
Gehen Sie dabei wie folgt vor:
1. Fassen Sie den Staubbehälter am Griff an
und ziehen Sie ihn nach oben aus dem
Gerät (Abb. 6). Drücken Sie dabei noch
nicht die Entriegelungstaste.
2. Zum Entleeren halten Sie den Staubbe-
hälter mit dem Boden nach unten tief über
einen Mülleimer.
3. Drücken Sie die Entriegelungstaste
(Abb. 7/1). Der Boden (Abb. 7/2) öffnet
sich und der Staub rieselt in den Mülleimer.
4. Klopfen Sie Staubrückstände vorsichtig
aus.
5. Klappen Sie den Boden wieder an.
6. Setzen Sie den Staubbehälter in den
Bürstfuß zurück.
7. Wiederholen Sie den Vorgang mit dem
zweiten Staubbehälter.
3.2 Gehäuse reinigen
3.3 Bürstwalzen reinigen
Reinigen Sie die Bürstwalzen regelmäßig.
Gehen Sie dabei wie folgt vor:
1. Klappen Sie das Visier auf (Abb. 8).
2. Entfernen Sie Haare, Fusseln usw. von
Hand.
3. Sollte dies im Fall von hartnäckigen Ver-
schmutzungen nicht ausreichen, können
Sie auch eine Schere einsetzen. Verwenden Sie diese mit Vorsicht. Achten Sie
darauf, dass Sie die Borsten der Bürstwalze nicht mit abschneiden.
HINWEIS:
Lassen Sie es gar nicht erst zu hartnäckigen Verschmutzungen der Bürstwalze kommen. Reinigen Sie diese besser häufiger
von Hand.
4. Wiederholen Sie den Vorgang mit der
zweiten Bürstwalze.
3.4 Ersatzteile
Zubehör- und Ersatzteile können nachbestellt
werden. Diese erhalten Sie:
im Dirt Devil Onlineshop unter
www.dirtdevil.de
per E-Mail unter:
ersatzteilshop@dirtdevil.de
oder bei den Firmen:
DE
ACHTUNG:
Verwenden Sie keine Reinigungsmittel,
Scheuermittel oder Alkohol, da diese das
Gehäuse beschädigen können.
Reinigen Sie das Gehäuse ausschließlich
mit einem leicht angefeuchteten Tuch.
Service-Versand Ina Riedmüller
Frankenstraße 34
89233 Neu-Ulm
Deutschland
Tel.: + 49 (0) 7307 - 51 75
Fax: + 49 (0) 7307 - 41 56
Riedmueller.service@t-online.de
Staubsauger-Center Feuerbach KG
Corneliusstraße 75
40215 Düsseldorf
Deutschland
Tel.: + 49 (0) 211 - 38 10 07
Fax: + 49 (0) 211 - 37 04 97
dirtdevil-service@t-online.de
www.dirtdevil-service.de
7
Page 8
4 Problembehebung
0180 501 50 50
*
In Deutschland stehen wir Ihnen
für Fragen, Anregungen oder bei
Problemen gerne zur Verfügung.
Mo.-Fr. 8-20 Uhr
*0,14€ /Min. aus dem deutschen Festnetz
(deutscher Mobilfunkhöchstpreis 0,42€ /Min.)
SERVICE-HOTLINE
4 Problembehebung
4.1 Bevor Sie das Gerät einsenden
Bevor Sie das Gerät an den Royal Appliance
Kundendienst einschicken, überprüfen Sie
anhand der folgenden Tabelle, ob Sie das
Problem selbst beseitigen können.
WARNUNG:
Bevor Sie sich auf Problemsuche begeben,
schalten Sie das Gerät aus. Verwenden Sie
niemals ein defektes Gerät.
Problem mögliche Ursache / Lösung
Ladelampe
(Abb. 5/3)
leuchtet
nicht
Gerät läuft
nicht
Gerät
nimmt keinen
Schmutz
auf
Netzteil ist nicht eingesteckt.
Stecken Sie das Netzteil in
eine Steckdose.
Steckdose führt keinen Strom.
Testen Sie das Netzteil an einer anderen Steckdose, bei
der Sie sicher sind, dass diese
Strom führt.
Akku leer.
Laden Sie den Akku, ZKapitel
2.2, „Akku laden“.
Staubbehälter sind überfüllt.
Staubbehälter, ZKapitel 3.1,
„Staubbehälter leeren“.
Bürstwalze wird blockiert.
Reinigen Sie die Bürstwalze,
ZKapitel 3.3, „Bürstwalzen
reinigen“.
4.2 Garantie
Wir übernehmen für das von uns vertriebene Gerät eine Garantie von 24 Monaten
ab Kaufdatum.
Innerhalb dieser Garantiezeit beseitigen wir
nach unserer Wahl durch Reparatur oder
Austausch des Gerätes oder des Zubehörs
(Schäden an Zubehörteilen führen nicht automatisch zum Umtausch des kompletten Gerätes) unentgeltlich alle Mängel, die auf Material- oder Herstellungsfehlern beruhen. Von
der Garantie sind Schäden ausgenommen,
die auf unsachgemäßen Gebrauch (Betrieb
mit falscher Stromart/-spannung, Anschluss
an ungeeignete Stromquellen, Bruch etc.) zurückzuführen sind, normaler Verschleiß und
Mängel, die den Wert oder die Gebrauchstauglichkeit des Gerätes nur unerheblich beeinflussen. Bei Eingriffen durch eine nicht von
uns autorisierte Stelle oder bei Verwendung
anderer als original Royal Appliance Ersatzteile erlischt die Garantie. Verschleißteile fallen nicht unter die Garantie und sind deshalb
kostenpflichtig! Die Garantie tritt nur in Kraft,
wenn das Kaufdatum durch Stempel und Unterschrift des Händlers auf der Garantiekarte
bestätigt ist oder eine Rechnungskopie dem
eingeschickten Gerät beiliegt. Garantieleistungen bewirken weder eine Verlängerung
der Garantiezeit, noch beginnt dadurch ein
Anspruch auf eine neue Garantie! Versenden
Sie das Gerät mit entleertem Staubbehälter
und einer kurzen Fehlerbeschreibung in
Blockschrift. Versehen Sie das Anschreiben
mit dem Vermerk „Zur Garantie“. Senden Sie
es zusammen mit der Garantiekarte oder einer Rechnungskopie an folgende Adresse:
8
Royal Appliance International GmbH
Abt. Kundenservice
Jagenbergstraße 19
41468 Neuss
Tel.: +49 (0) 180 - 501 50 50*
Fax: +49 (0) 2131 - 60 90 60 95
www.dirtdevil.de
info@dirtdevil.de
*0,14 €/Minute aus dem deutschen Festnetz
(deutscher Mobilfunkhöchstpreis 0,42 €/Minute)
Page 9

5 Entsorgung
5 Entsorgung
ACHTUNG:
Gefahr von Umweltschäden! Das Gerät
enthält Akkus, die nicht in den Hausmüll
gelangen dürfen. Geben Sie das Gerät und
den ausgebauten Akku separat zur Entsorgung an die entsprechenden Sammelstellen.
WARNUNG:
Gefahr eines elektrischen Schlages!
Bevor Sie den Akku ausbauen, stellen Sie
sicher, dass:
das Gerät Netzteil nicht eingesteckt ist,
der Akku leer gelaufen ist und
das Gerät ausgeschaltet ist.
DE
Elektrische Abfälle dürfen nicht
zusammen mit Haushaltsabfällen entsorgt werden. Entsorgen
Sie das Gerät entsprechend den
in Ihrem Land geltenden Umweltschutzvorschriften.
Wenn das Gebrauchsende des Geräts, insbesondere des Akkus, erreicht ist oder wenn
etwa Funktionsstörungen auftreten, machen
Sie das ausgediente Gerät unbrauchbar, indem Sie den Akku ausbauen.
5.1 Ausbauen des Akkus
WARNUNG:
Verletzungsgefahr durch unsachgemäßen
Umgang mit Akkus!
Schließen Sie den Akku niemals kurz,
d. h. berühren Sie niemals beide Pole zur
gleichen Zeit, insbesondere nicht mit elektrisch leitenden Gegenständen.
Nehmen Sie den Akku niemals ausein-
ander.
1. Betreiben Sie das Gerät so lange, bis der
Akku völlig leergelaufen ist und der Motor
des Geräts stoppt.
2. Lösen Sie die 2 Schrauben an der Unter-
seite des Bürstfußes (Abb. 9/1) mit einem
Schraubendreher.
1
2
9
3. Nehmen Sie die Abdeckung ab (Abb. 9/2).
4. Trennen Sie die Steckverbindung (Abb. 10).
Setzen Sie den Akku niemals hohen
Temperaturen aus.
Bei unsachgemäßem Umgang kann
Flüssigkeit aus dem Akku austreten. Diese
kann zu Hautreizungen führen. Vermeiden
Sie den Kontakt mit der Flüssigkeit.
Sollte es erforderlich sein, den Akku
auszutauschen, wenden Sie sich an einen
Fachhändler oder den Royal ApplianceKundendienst.
Ersetzen Sie den Akku niemals selbst.
Ersetzen Sie den Akku erst recht nicht durch
andere Akkus oder Batterien.
10
5. Entnehmen Sie den ausgedienten Akku
aus dem Akkufach.
6. Setzen Sie die Abdeckung wieder auf und
schrauben Sie die 2 Schrauben an der
Unterseite des Bürstfußes wieder fest.
7. Geben Sie das Gerät und den ausge-
bauten Akku nun separat zur Entsorgung
an die entsprechenden Sammelstellen.
9
Page 10

1 Safety notes
Many thanks!
We are pleased that you decided on the AkkuBlitz Brush Sweeper! We hope you enjoy using your appliance and we would like to thank
you for your purchase!
Overview
(Fig. 1):
1 Handle
2 Handle (3-part)
3 On/Off switch
4 Rotary brushes (2 pieces)
5 Dust container (2 pieces)
6 Release buttons (2 pieces)
Scope of delivery
(Fig. 2):
1 Brush base
2 Connecting tube, lower segment
3 Connecting tube, middle/upper segment
4 Handle
5 AC adapter
6 Operating Manual
1 Safety notes
1.1 Regarding the operating manual
Read this operating manual through completely before working with the appliance.
Keep the operating manual safe. If you pass
the appliance on to a third party, give them the
operating manual as well.
Non-compliance with these instructions
can lead to serious injuries or damage to
the appliance. We assume no liability for
damage that occurs as a result of non-compliance with this operating manual.
Important notes for your safety are especially
marked. You must observe these notes to
avoid accidents and damage to the appliance:
WARNING:
Warns against hazards for your health and
indicates possible risks of injury.
ATTENTION:
Indicates possible hazards for the appliance
or other objects.
Technical data
Type of appliance : Double-brush sweeper
Model : Akku-Blitz
[M3131 (-0/-1/.../-8/-9)]
AC adapter : 230 V~, 50 Hz
9 V DC, 200 mA
Battery : Ni-MH 7.2 VDC,
2,000 mAh, Charging
time approx. 16 hrs.
Max. operating time : approx. 30–60 Min.
depending on the type
of flooring
Dust container : 2 x approx. 100ml,
washable
Weight : approx. 1.7 kg
(3.75 lbs)
Technical and design specifications may be
changed in the course of continuous product improvement. © Royal Appliance International GmbH
10
NOTE:
Highlights tips and information for you.
1.2 Regarding the power supply
The appliance is charged and operated
with electrical power which means there is in
principle a risk of electric shock. Pay particular
attention to the following:
- Never touch the power unit with wet hands.
- If you want to pull the power unit out of the
socket, always pull directly on the plug.
Never pull on the cable as it could break.
- Make sure that the power cable is not
bent, caught or run over, and that it does
not come into contact with heat sources.
- Never immerse the appliance in water or
other fluids and keep it away from rain
and wetness.
- Only charge the appliance if the electrical
voltage stated on the power unit matches
the voltage of your socket. Wrong voltage
can destroy the power unit.
Page 11

1 Safety notes
1.3 Regarding the batteries
The appliance contains rechargeable batteries.
Do not throw the batteries into fire or sub-
ject to high temperatures; there is a risk of explosion.
If used wrongly, fluid can leak from the
battery. This can cause skin irritations. Avoid
any contact with the fluid. If you experience
contact with the fluid, rinse with lots of water.
If the fluid comes into contact with your eyes,
rinse immediately for 10 min. with water and
find a doctor straightaway.
If it is necessary to replace the battery,
contact a specialist dealer or Royal Appliance
Customer Services. We assume no liability for
any damage resulting from improperly replaced batteries.
1.4 Regarding children
This appliance is not intended to be used
by persons (including children) with impaired
physical, sensorial or mental abilities and/or insufficient experience or knowledge, unless
they are supervised by a person responsible
for their safety or have been instructed in the
proper use of the appliance by this person.
Keep the appliance out of reach of people of
these groups.
Children should be supervised in order to
make sure that they don’t play with the appliance.
Packing material must not be used to play
with. There is a danger of suffocation.
1.5 Regarding intended use
The appliance may only be operated in
households. It is not suitable for industrial or
commercial use.
The brush sweeper must only be used for
cleaning normally dirty floors and carpets.
Any other use is considered non-intended use
and is prohibited.
In particular, the activities listed in the following may under no circumstances be
carried out with the brush sweeper:
Sweeping of:
- people, animals, plants, especially hair,
fingers and other parts of the body as well
as pieces of clothing worn on the body.
They could be pulled in and cause severe
injuries.
- hot ash, burning cigarettes or matches.
These can cause fire.
- water and other liquids. Internal dampness can lead to a short-circuit.
- toner (for laser printers, copy machines,
etc.). There is a risk of fire and explosion.
Use near explosive or easily flammable
substances. There is a risk of fire or explosion.
Use in the open-air. There is a risk of the
appliance being destroyed by rain and dirt.
1.6 If the appliance is defective
Never use a defective appliance. If the
power cord of the AC adapter for this appliance is damaged it must be replaced by the
manufacturers, their authorised service representative or a similarly qualified person to
avoid danger.
GB
Pass defective appliances to a specialist
dealer or to Royal Appliance Customer Services
for repair, Zpage 48, „International Service“.
11
Page 12

2 Operating
2 Operating
2.1 Before use
Unpack the appliance and all accessory parts
and check that the contents are complete
(Fig. 2).
ATTENTION:
Always transport/send the appliance in its
original packaging so that it does not
become damaged. Keep the packing for this
purpose. Dispose of any packing material
that is no longer required in accordance with
the provisions applicable in your country.
NOTE:
If you should notice damage due to transport,
then contact your dealer immediately.
1. Assemble the sweeper stick by inserting
the insert tube and the handle correspondingly (Fig. 3). The lower insert tube (Fig. 3/
1) is recognizable by the release button
(Fig. 3/2).
2. Insert the sweeper stick (Fig. 4/1) into the
receiving end (Fig. 4/2). It clicks audibly
into place.
NOTE:
If you want to remove the sweeper stick
again, press the release button (Fig. 4/3)
and pull the sweeper stick (Fig. 4/1) up.
2.2 Charging the battery
ATTENTION:
Only use the charger supplied with the
appliance for charging the battery. If this
condition is disregarded, the appliance may
incur damage or the batteries may be
severely damaged.
The battery must be charged before being
able to work with the appliance. To do this:
The charging indicator (Fig. 5/3) lights up.
4. Now leave the battery to charge for 16
hours.
ATTENTION:
Avoid longer charging times. These shorten
the operating life of the battery.
5. After charging, pull the power unit out of
the socket first and then out of the brush
foot.
NOTE:
Only recharge the battery again if it is completely dead. This will increase its operating
life.
2.3 Sweeping
.
WARNING:
Check the brush sweeper before each use.
A damaged appliance must never be used.
There is a risk of injury.
1. Switch on the brush sweeper using the on/
off switch (Fig. 1/3).
2. To sweep, push the brush sweeper back
and forth like a vacuum cleaner.
2.4 Switching off and storing
1. Switch off the brush sweeper after sweep-
ing by using the on/off switch (Fig. 1/3).
2. Place the brush sweeper outside of the
working area and lock the sweeper stick in
a vertical position. This will help avoid accidents.
ATTENTION:
Never position the appliance directly against
heat sources (e.g. heating, oven). Avoid
direct sunlight. Heat can damage the appliance.
1. Make sure that that appliance is switched
off. Otherwise, the battery cannot be
charged.
2. Connect the power unit to the brush base
first (Fig. 5/1).
3. Then plug the AC adapter into the socket
(Fig. 5/2).
12
If you want to store the appliance for a
longer period of time, empty the dust containers and clean them, ZChapter 3.1, "Emptying
the dust container".
Store the appliance in a cool, dry room.
Page 13

3 Maintenance
3 Maintenance
WARNING:
Switch off the appliance before cleaning it.
3.1 Emptying the dust container
Empty the dust containers regularly.
Proceed as follows to do this:
1. Grasp the dust container by the handle
and pull it up out of the appliance (Fig. 6).
Do not press the release button yet.
2. To empty the dust container, hold it low
over a dustbin with the bottom side down.
3. Push the release button (Fig. 7/1). The
bottom (Fig. 7/2) opens, and the dust
drops into the dustbin.
4. Carefully tap out the remaining dust.
5. Fold the bottom plate back up.
6. Reinsert the dust container into the brush
base.
7. Repeat this procedure for the second dust
container.
3.3 Cleaning the rotary brushes
Clean the rotary brushes regularly. Pro-
ceed as follows to do this:
1. Open the visor (Fig. 8).
2. Remove hair, lint, etc. by hand.
3. If this proves insufficient for stubborn dirt,
you may use a pair of scissors. Use the
scissors with caution, taking care not to
cut off any bristles.
NOTE:
Better still, avoid stubborn dirt collecting on
the brushes by cleaning them more often by
hand.
4. Repeat this procedure for the second dust
container.
3.4 Spare parts
Accessory parts and spare parts can be reordered. You can get these:
at the dirt devil online shop at
www.dirtdevil.de
GB
3.2 Cleaning the housing
ATTENTION:
Do not use cleaning or scouring agents or
alcohol, as these might damage the appliance housing.
Clean the outside of the housing using a
slightly damp cloth only.
or from
Zpage 48, „International Service“
13
Page 14

4 Troubleshooting
4 Troubleshooting
4.1 Before you send in the appliance
Before sending the appliance to Royal Appliance Customer Services, use the following table to check whether you can solve the
problem yourself.
WARNING:
Switch off the appliance before you start
troubleshooting. Never use a defective
appliance.
Problem Possible cause
Solution
Charging
indicator
(Fig. 5/3)
is not lit
The appliance does
not run
The appliance does
not pick up
dirt
AC adapter is not plugged in.
Connect the adapter to a socket.
The socket does not carry current.
Test the adapter at another
socket which you are sure carries current.
The rechargeable battery is
empty.
Recharge the battery, ZChapter
2.2, "Charging the battery".
The dust container is full.
Dust container, ZChapter 3.1,
"Emptying the dust container".
Rotary brush is blocked.
Clean the rotary brush,
ZChapter 3.3, "Cleaning the rotary brushes".
4.2 Warranty
We grant a warranty of 24 months from the
date of purchase for the distributed appliance.
Within this warranty period, we will remove all
defects free of charge that are due to material
or manufacturing faults, either by repair work
or replacing the appliance or accessories, at
our discretion (damage to accessory parts
does not automatically lead to the entire appliance being replaced). Damages due to inappropriate use (operation on wrong voltage or
type of current, connecting to unsuitable power supplies, breakage, etc.) are exempt from
warranty, as are normal wear and minor defects that only negligibly affect the appliance's
value or serviceability.
Intrusions by unauthorised parties or the use
of parts other than Original Royal Appliance
Spare Parts cause the warranty to become
null and void. Consumable parts are not included in the warranty and are therefore at the
customer's expense!
The warranty is only valid if the date of purchase has been acknowledged by the dealer's stamp and signature on the warranty card
or if a copy of the invoice is included with sentin appliance. Warranty work does not extend
the warranty period nor does it constitute a
claim for a new warranty!
Send us the appliance with its dust container
empty and a short description of the defect in
printed letters. Head your accompanying letter with the notice "warranty claim". Send it to
the following address, including the warranty
card or a copy of the purchase slip:
NOTE:
If you cannot solve the problem following
these instructions, contact our service hotline or the Royal Appliance Customer Service (contact data Zpage 48, „International
Service“).
14
Zpage 48, „International Service“
Page 15

5 Disposal
5 Disposal
ATTENTION:
Danger of pollution! The appliance contains
rechargeable batteries that must not disposed of in your domestic waste. Give the
appliance and the removed batteries separately to the respective disposal points.
WARNING:
Danger of electric shock! Before removing
the battery, make sure that:
the AC adapter is not connected,
the battery is empty and
the appliance switched off.
Electrical waste must not be disposed of with domestic waste. Dispose of the appliance in compliance
with the environmental protection
laws of your country.
When the appliance, especially the battery,
has reached the end of its service life or when
dysfunctions recur, disable the appliance by
removing the battery.
5.1 Removing the batteries
WARNING:
Danger of injury by improper handling of
batteries!
Never short-circuit the battery, i.e. never
touch both poles simultaneously, especially
with metal objects.
Never dismantle the battery.
Never expose the battery to high tem-
peratures.
1. Run the appliance until the battery is com-
pletely empty and the motor stops.
2. Loosen the two screws on the bottom of the
brush base (Fig. 9/1) with a screwdriver.
1
2
9
3. Remove the cover (Fig. 9/2).
4. Disconnect the battery (Fig. 10).
GB
Improper handling can lead to liquid
leaking from the battery. This can cause
skin irritations. Avoid any contact with the
fluid.
If the battrery needs replacing, contact a
specialist dealer or Royal Appliance Customer Services.
Never exchange the battery yourself,
and by no means replace it with batteries of
a different type.
10
5. Remove the exhausted battery from the
battery compartment.
6. Put the cover back on and refasten the
two screws on the bottom side of the
brush base.
7. Give the appliance and the removed bat-
tery to the respective separate disposal
points.
15
Page 16

1 Consignes de sécurité
Merci !
Nous sommes heureux de vous compter parmi les utilisateurs de l'aspirateur-balais akku
blitz ! Nous vous souhaitons beaucoup de
plaisir à utiliser votre appareil et nous remercions de votre achat !
Aperçu
(ill. 1):
1 Poignée
2 Manche (3 pièces)
3 Interrupteur marche-arrêt
4 Brosses rotatives (2 pièces)
5 Bac à poussière (2 pièces)
6 Touches de déverrouillage (2 pièces)
Contenu de livraison
(ill. 2):
1 Pied de brosse
2 Tube emboîtable, partie inférieure
3 Tube emboîtable, partie centrale/supé-
rieure
4 Poignée
5 Bloc d'alimentation
6 Mode d'emploi
Caractéristiques techniques
1 Consignes de sécurité
1.1 relatives à ce mode d'emploi
Veuillez lire attentivement et intégralement ce
mode d'emploi, avant de vous servir de l'appareil. Conservez précieusement ce mode
d'emploi. Donnez toujours le mode d'emploi à
toute personne se servant de l'appareil.
Le non respect de ce mode d'emploi peut
entraîner des blessures graves ou des
dommages irrévocables sur l'appareil.
Nous déclinons toute responsabilité pour des
dommages résultant du non respect de ce
mode d'emploi.
Les consignes importantes pour votre sécurité sont mises en relief. Respectez impérativement ces consignes afin d'éviter tout accident
ou dommage de l'appareil:
AVERTISSEMENT:
Attire votre attention sur des dangers imminents pour votre santé et vous informe sur
les risques de blessures.
ATTENTION:
Indique les risques pour l'appareil ou tout
autre objet.
Type d'appareil :Balayeuse à brosse dou-
ble
Modèle :Akku-Blitz
[M3131 (-0/-1/.../-8/-9)]
Bloc d'alimentation
Accumulateur :Ni-MH
Durée maximum
de fonctionnement
Bacs à poussière :2 x environ 100 ml,
Poids :env. 1,7 kg
Toutes modifications d'ordre technique ou conceptuel liées à l'évolution du produit sont réservées.
© Royal Appliance International GmbH
:230 V~, 50 Hz, 9 V cou-
rant continu, 200 mA
7,2 V courant continu,
2.000 mAh, Temps de
chargement env. 16 h
:env. 30–60 min
(suivant le type de sol)
lavable
REMARQUE:
Vous fournit des conseils et des informations,
1.2 Alimentation électrique
L'appareil est chargé par du courant élec-
trique, entraînant ainsi des risques d'électrocution. Respectez par conséquent les points
ci-dessous :
- Ne jamais toucher le chargeur avec des
mains mouillées.
- Pour débrancher le chargeur, tirez toujours sur la fiche. Ne tirez jamais sur le câble car il pourrait se couper.
- Assurez-vous que le cordon d'alimentation ne soit ni plié, coincé, écrasé ou encore en contact direct avec une source de
chaleur.
16
Page 17

1 Consignes de sécurité
- Ne plongez jamais l'appareil dans de l'eau
ou tout autre liquide, et conservez-le à
l'abri de la pluie.
- Ne chargez l'appareil que si la tension du
chargeur correspond bien avec celle de la
prise. Une tension différente détruirait le
chargeur.
1.3 Les batteries
L'appareil contient des batteries rechargeables.
Ne jetez par les batteries dans le feu ou ne
les soumettez pas à la chaleur. Risque d'explosion.
Du liquide peut s'écouler des batteries lors
d'une utilisation incorrecte. Cela peut provoquer des démangeaisons. Évitez tout contact
avec ce liquide. Dans le cas d'un contact avec
le liquide, rincez abondamment avec de l'eau.
Si le liquide atteint les yeux, rincez immédiatement avec de l'eau pendant 10 min et rendez-vous immédiatement chez votre médecin
traitant.
Si vous devez remplacer les batteries,
contactez votre revendeur agréé ou le SAV de
Royal
ponsabilité sur des dommages engendrés par
une utilisation non conforme.
Appliance. Nous déclinons toute res-
1.4 Remarques relatives aux
enfants
Cet appareil ne convient pas aux person-
nes (y compris les enfants) qui ne sont pas en
mesure de se servir de manière sûre de l'appareil, en raison de leurs capacités physiques
ou sensorielles, de leurs capacités mentales,
de leur inexpérience ou d'un manque de
connaissances. Rangez l'appareil hors de portée des personnes répondant à ces critères.
Les enfants doivent être surveillés afin de
s'assurer qu'ils ne jouent pas avec l'appareil.
Ne jouez pas avec le matériel d'emballa-
ge : risque d'asphyxie.
1.5 Utilisation conforme
Cet appareil convient exclusivement à un
usage domestique. Toute utilisation à titre
professionnelle est strictement interdite.
L'aspirateur-balai doit uniquement servir à
nettoyer des sols d'un degré de saleté normal,
des moquettes et tapis. Toute autre utilisation
est considérée comme non conforme et donc
strictement interdite.
En particulier, les tâches suivantes ne doivent en aucun cas être effectuées avec
l'aspi balai :
Le balayage de :
- personnes, animaux, plantes, en particulier de cheveux, de doigts et d'autres parties du corps ainsi que d'habits portés par
des personnes est interdit. Ils peuvent
être aspirés et entraîner des blessures
graves.
- cendres incandescentes, cigarettes ou allumettes non éteintes. Risque d'incendie.
- eau ou tout autre liquide. Toute humidité
à l'intérieur de l'appareil peut entraîner un
court-circuit.
- toner (par ex. des imprimantes laser, copieurs, etc.). Risque d'incendie et d'explosion.
l'utilisation à proximité d'explosifs ou de
matières très inflammables. Risque d'incendie et d'explosion.
utilisation dehors. La pluie et la saleté
peuvent endommager l'appareil.
1.6 Si l'appareil est défectueux
N'utilisez jamais un appareil défectueux.
Si le cordon d'alimentation de cet appareil est
endommagé, faites-le remplacer par le fabricant, son service après-vente ou toute personne ayant des compétences similaires, ceci
afin d'éviter tout danger.
Amenez l'appareil à réparer chez un ma-
gasin spécialisé ou chez votre SAV Royal,
ZPage 48, „International Service“.
FR
17
Page 18

2Emploi
2Emploi
2.1 Avant utilisation
Déballez l'appareil et tous ses accessoires,
puis vérifiez que le contenu soit bien complet
(ill. 2).
ATTENTION:
Transportez et expédiez l'appareil uniquement dans son emballage d'origine afin d'éviter tout dommage. De ce fait, conservez précieusement l'emballage. Jetez l'emballage
dont vous n'avez plus besoin en tenant
compte des réglementations nationales et
locales en vigueur.
REMARQUE:
Si vous constatez des défauts ou des dommages dus au transport, contactez immédiatement votre revendeur.
1. Montez le manche en emboîtant les tubes
et la poignée comme dans (ill. 3). Vous reconnaîtrez le tube emboîtable inférieur
(ill. 3/1) par sa réglette de verrouillage
(ill. 3/2).
2. Emboîtez le manche (ill. 4/1) de l'ouvertu-
re (ill. 4/2). Vous entendrez un clic lorsqu'il
s'enclenche.
3. Branchez le bloc d'alimentation à la prise
(ill. 5/2). Le voyant de chargement (ill. 5/3)
s'allume.
4. Chargez les batteries pendant 16 heures.
ATTENTION:
Évitez de charger l'appareil plus longtemps.
Cela réduit la longévité de vos batteries.
5. Après le chargement, débranchez le char-
geur de la prise, puis retirez-le de la brosse.
REMARQUE:
Rechargez les batteries que lorsqu'elles
sont complètement vides. Vous augmentez
sa longévité.
2.3 Balayer
.
AVERTISSEMENT:
Avant tout emploi, vérifiez l'aspirateur-balai
sans fil. N'utilisez jamais un appareil qui est
endommagé. Risque de blessures.
1. Appuyez le bouton d'arrêt/marche (ill. 1/3)
afin de mettre l’aspirateur-balai en marche.
2. Poussez l'aspirateur-balai vers l'avant et
l'arrière comme un aspirateur traîneau.
REMARQUE:
Si vous voulez retirer le manche, appuyez
sur la réglette de verrouillage (ill. 4/3) puis
tirez le manche (ill. 4/1) vers le haut.
2.2 Recharger l'aspirateur-balai
ATTENTION:
Utilisez uniquement le chargeur pour charger les piles. En cas de non respect, l'appareil pourrait s'endommager ou les piles
pourraient sérieusement s'abîmer.
Avant de pouvoir utiliser l'appareil, vous devez charger les batteries. Pour cela :
1. Assurez-vous que l'appareil est éteint. Si-
non l'accumulateur ne peut pas se recharger.
2. Raccordez tout d'abord le chargeur au
pied de brosse (ill. 5/1).
2.4 Arrêt et rangement
1. Appuyez le bouton d'arrêt/marche (ill. 1/3)
afin d'arrêter l'aspirateur-balai après avoir
balayé.
2. Rangez l'aspirateur-balai hors de la zone
de travail et bloquez le manche en position
verticale. Vous éviterez ainsi les accidents.
ATTENTION:
Ne rangez ou ne posez jamais l'appareil à
proximité direct d'une source de chaleur
(par ex. chauffage, four). Évitez de l'exposer
aux rayons du soleil. La chaleur peut
endommager l'appareil.
Si vous rangez l'appareil pour une période
prolongée, videz les bacs à poussière et nettoyez-les, ZChapitre 3.1, „Vidange du bac à
poussière“.
Rangez l'appareil dans un endroit frais et
sec.
18
Page 19

3Entretien
3Entretien
AVERTISSEMENT:
Avant de procéder à la maintenance de
l'appareil, éteignez-le.
3.1 Vidange du bac à poussière
Videz les bacs à poussière régulièrement.
Procédez pour cela comme suit :
1. Saisissez la poignée du bac à poussière
et puis retirez-le de l'appareil en le tirant
vers le haut (ill. 6). N'appuyez pas encore
sur la touche de déverrouillage.
2. Maintenez le bac à poussière à l'intérieur
d'une poubelle avec le fond vers le bas
pour le vider.
3. Appuyez sur la touche de déverrouillage
(ill. 7/1). Le fond (ill. 7/2) s'ouvre et la
poussière tombe dans la poubelle.
4. Tapotez légèrement pour faire tomber les
restes de poussière.
5. Rabattez à nouveau le fond.
6. Remettez à nouveau le bac à poussière
dans le pied de brosse.
7. Répétez ce processus avec le deuxième
bac à poussière.
3.3 Nettoyage des brosses rotatives
Nettoyez régulièrement les brosses rotati-
ves. Procédez pour cela comme suit :
1. Ouvrez la fenêtre (ill. 8).
2. Retirez à la main les cheveux, les accu-
mulations de poussière, etc.
3. En cas de présence de salissures tena-
ces, vous pouvez aussi vous servir de ciseaux. Servez-vous en avec prudence.
Prenez garde à ne pas couper les soies
de la brosse rotative.
REMARQUE:
Évitez que des salissures trop tenaces
soient nettoyées par la brosse à rotative. Il
vaut alors mieux enlever d'abord ce type de
salissures à la main.
4. Répétez ce processus avec la deuxième
brosse rotative.
3.4 Pièces de rechange
Vous pouvez commander ultérieurement des
pièces de rechange et des accessoires Vous
pouvez les acheter auprès :
de la boutique en ligne de Dirt Devil sous
www.dirtdevil.de
FR
3.2 Nettoyage du boîtier de l'appareil
ATTENTION:
N'utilisez en aucun cas des produits de nettoyage, des détergents ou de l'alcool, car
cela pourrait endommager le boîtier.
Nettoyez le boîtier uniquement avec un
chiffon légèrement humide.
ou auprès des entreprises suivantes :
ZPage 48, „International Service“
19
Page 20

4 Élimination des anomalies
4 Élimination des anomalies
4.1 Avant d'envoyer l'appareil
Avant d'expédier l'appareil au service aprèsvente de Royal Appliance, veuillez vérifier, en
vous aidant du tableau ci-dessous, si vous ne
pouvez pas remédier vous-même à l'anomalie.
AVERTISSEMENT:
Éteignez l'appareil avant de rechercher la
cause d'une anomalie. N'utilisez jamais un
appareil défectueux.
Problème Cause possible
Solutions proposées
Le voyant
de chargement
(ill. 5/3) ne
s'allume
pas
L'appareil
de fonctionne pas
L'appareil
n'aspire pas
la poussière
Le chargeur n'est pas branché.
Branchez le chargeur dans une
prise de courant.
Il n'y pas de courant à la prise.
Essayez de brancher le chargeur à une autre prise dont
vous êtes sûr qu'elle fonctionne.
L'accumulateur est déchargé
Rechargez l'accumulateur,
ZChapitre 2.2, „Recharger
l'aspirateur-balai“.
Les bacs à poussière sont trop
pleins.
Bacs à poussière, ZChapitre
3.1, „Vidange du bac à poussière“.
La brosse rotative est bloquée.
Nettoyez la brosse rotative,
ZChapitre 3.3, „Nettoyage des
brosses rotatives“.
4.2 Garantie
Nous assurons une garantie de 24 mois
sur votre appareil à compter de la date
d'achat.
Pendant la garantie, nous nous réservons le
droit de réparer ou de remplacer l'appareil ou
ses accessoires gratuitement (des accessoires endommagés n'impliquent pas forcément
le remplacement de l'appareil) afin de remédier à tout défaut lié au matériel ou à la fabrication. Tout dommage résultant d'une utilisation non conforme (emploi d'une tension ou
d'un courant erroné, branchement à une prise
non adaptée ou lorsque l'appareil est cassé)
est exclu de la garantie, de même que l'usure
et les défauts liés à l'usage normal de l'appareil et qui n'influencent pas le bon fonctionnement de celui-ci.
En cas d'intervention d'une personne ou d'un
service non habilité ou lors de l'utilisation de
pièces détachées ne provenant pas de Royal
Appliance, les droits de garantie deviennent
caducs. Les pièces sujettes à usure sont exclues de la garantie et leur remplacement est
payant !
La garantie s'applique uniquement lorsque la
date d'achat, le tampon du revendeur et sa signature figurent sur le bon de garantie ou si
une copie de la facture sont joints à l'appareil.
Les prestations de garantie n'impliquent en
aucune façon le prolongement de la durée de
garantie ou un droit à une nouvelle garantie !
Expédiez l'appareil en ayant pris soin de vider
le bac à poussière et en indiquant brièvement
et en majuscule les causes de l'anomalie.
Mentionnez "Zur Garantie" ("Appareil sous
garantie“) sur l'étiquette d'envoi. N'oubliez
pas d'y joindre le bon de garantie ainsi qu'une
copie du ticket de caisse ou de la facture et
envoyez le tout à l'adresse suivante :
REMARQUE:
Prenez contact avec notre assistance par
téléphone ou le service à la clientèle Royal
si vous ne pouvez pas remédier vousmême à l'anomalie au moyen de ce tableau
(adresses de contact ZPage 48,
„International Service“).
20
ZPage 48, „International Service“
Page 21

5 Élimination
5 Élimination
ATTENTION:
Prenez garde de ne pas polluer l'environnement ! L'appareil est équipé d'un accumulateur qui ne doit pas être jeté dans les ordures ménagères. Remettez séparément
l'appareil et l'accumulateur préalablement
retiré de l'appareil à un point de collecte.
AVERTISSEMENT:
Risques d'électrocution ! Avant de retirer
l'accumulateur, assurez-vous que :
le bloc d'alimentation de l'appareil ne soit
pas branché à un prise
l'accumulateur soit déchargé et
que l'appareil soit éteint.
Les déchets électriques ne doivent
pas être jetés avec les déchets de
ménage. Éliminez l'appareil en tenant compte des réglementations
nationales en vigueur en matière
de protection de l'environnement.
Lorsque l'appareil arrive en fin de vie, en particulier à cause de l'accumulateur ou lorsque
des dérangements de fonctionnement apparaissent, rendez l'appareil inutilisable en retirant l'accumulateur.
5.1 Retrait de l'accumulateur
AVERTISSEMENT:
Il existe un risque de se blesser en cas de
manipulation non conforme de l'accumulateur !
Ne court-circuitez jamais l'accumula-
teur, c'est-à dire ne touchez jamais les deux
pôles simultanément, en particulier avec
des objets conduisant le courant électrique.
1. Utilisez l'appareil jusqu'à ce que l'accumu-
lateur soit entièrement déchargé et que le
moteur s'arrête.
2. Dévissez les deux vis de la partie inférieu-
re du pied de brosse (ill. 9/1) au moyen
d'un tournevis.
1
2
9
3. Retirez le couvercle (ill. 9/2).
4. Retirez la connexion enfichable (ill. 10).
FR
Ne cherchez jamais à démonter l'accu-
mulateur.
N'exposez jamais l'accumulateur à de
hautes températures.
Du liquide peut s'écouler de l'accumula-
teur en cas de manipulation incorrecte. Cela
peut provoquer des irritations de la peau.
Evitez tout contact avec ce liquide.
S'il est nécessaire de remplacer l'accu-
mulateur, contactez votre revendeur agréé ou
le service après-vente de Royal Appliance.
Ne remplacez jamais vous-même l'ac-
cumulateur. Ne remplacez à plus forte raison pas l'accumulateur par d'autres piles ou
accumulateurs.
10
5. Retirez l'accumulateur usagé hors de son
compartiment.
6. Remettez en place le couvercle et vissez
à nouveau fermement les deux vis sur la
face inférieure du pied de brosse.
7. Remettez séparément l'appareil et l'accu-
mulateur maintenant retiré de l'appareil à
un point de collecte.
21
Page 22

International Service
International Service
DE
D
Royal Appliance International GmbH
Abt. Kundenservice
Jagenbergstraße 19
41468 Neuss
DEUTSCHLAND
Tel.: +49 (0) 180 - 501 50 50*
Fax: +49 (0) 2131 - 60 90 60 95
www.dirtdevil.de
info@dirtdevil.de
*0,14 €/Minute aus dem deutschen Festnetz
(deutscher Mobilfunkhöchstpreis 0,42 €/Minute)
CH
Bluepoint-Service SAGL
Via Cantonale 14
6917 Barbengo
SWITZERLAND
Tel. +41 (0)91 980 49 73
E-Mail: info@bluepoint-service.ch
www.bluepoint-service.ch
AT
Zmugg Elektronik Service
und Vertriebges. M.b.H.
Fabriksgasse 27
8020 Graz
ÖSTERREICH
Tel. +43 - 316 - 77 21 20
Fax +43 - 316 - 77 21 20 10
Tel. Ersatzteile: +43 - 316 - 77 21 20 14
Fax Ersatzteile: +43 - 316 - 77 21 20 15
zmuggelektronik@utanet.at
Z.E.S. Goes B.V.
T.a.v. afd. Service
Pearyweg 1
4462 GT Goes
NEDERLAND
Tel: +31 - 113 - 24 07 00
Fax: +31 - 113 - 24 07 50
dirtdevil@zesgoes.nl
CZ ES
Le Cygne electronic service spol. s r.o.
Jablonecká 722/8
190 00 Praha 9
ESKÁ REPUBLIKA
Tel: +420 - 28 68 83 940
Fax: +420 - 28 68 85 064
servis@lce.cz
Royal Appliance Espana, SL
Royal, Dirt Devil, Stellar
C/Cronos, Nº 20 , Portal 2 ,3º 13
28037 Madrid
ESPAÑA
Tel: +34 - 902 - 43 06 63
BE
FR
OPM France Nant’Est entreprise
33 rue du bois Briand
44316 Nantes cdx 3
FRANCE
Tel. +33 - 2 - 40 49 64 25
Fax +33 - 2 - 40 93 96 22
www.opm-france.com
IT
Smart s.r.l.
Via Tintoretto, 12
21012, Cassano Magnago, (VA)
ITALIA
Assistenza Tecnica: 199 24 44 24
Orari: 9:00 - 13:00h / 14:00 - 18:00h
Fax: +39 0331 181 21 37
info-dirtdevil@smartsrl.net
SI
Strojinc Ciril s.p.
Koseskega ul. 1a
1000 Ljubljana
SLOVENIJA
Tel: +386 -1- 42 28 489
HR
TD ''MEDJIMURKA'' D.D.
Trg Republike 6
40000 akovec
HRVATSKA
Tel.: +385 - 40 - 31 27 60
Fax: +385 - 40 - 32 86 61
NL
Z.E.S. Goes B.V.
T.a.v. afd. Service
Pearyweg 1
4462 GT Goes
NEDERLAND
Tel: +31 - 113 - 24 07 00
Fax: +31 - 113 - 24 07 50
dirtdevil@zesgoes.nl
SK
Aspico Slovakia s r.o.
Kracanska 40/104
92901 Dunajská Streda
SLOVAKIA
Tel: +421 - 31 - 55 11 815
HU
Aspico Kft.
Puskás Tivadar út.4.
9027 Gyr
MAGYARORSZÁG
Tel.: +36 - 96 - 51 12 91
szerviz@aspico.hu
PL
OBSUGA GWARANCYJNA I
SERWISOWA
QUADRA-NET Sp. z o.o.
61-888 Pozna, ul. Skadowa 5
infolinia: 66 444 88 00
DYSTRYBUTOR I GWARANT
DSV Sp. z o.o. S.K.A. Gdynia,
Plac Kaszubski 8
48
Page 23

DE
NUR GÜLTIG MIT RECHNUNGSKOPIE!
GB
VALID ONLY INCLUDING A COPY OF THE PURCHASE SLIP!
FR
VALABLE UNIQUEMENT AVEC UNE COPIE DE LA FACTURE!
NL
ALLEEN GELDIG MET KOPIE VAN DE REKENING!
ES
¡VÁLIDO SÓLO CON COPIA DE FACTURA!
IT
VALIDO SOLO SE CORREDATO DA UNA COPIA DELLA FATTURA!
TR
SADECE FATURA SURET LE GEÇERLDR!
Akku Blitz M3131
Garantiekarte•Warranty Card•Card de garantie•Garantiekaart
Certificado de garantía
Name • Name • Nom • Naam • Nombres y apellidos • Nome • sim
Straße und Hausnummer • Street and house number • Rue et numéro de maison • Straat en huisnummer • Calle y número • Via e numero civico • Sokak ve ev no
PLZ und Ort • Zip code and town • Numéro postal et lieu • Postcode en plaats • C.P. y ciudad • CAP e località • Posta kodu ve yer
E-Mail • email • Courriel • E-mail • Correo electrónico • e-mail • E-Posta
•
Tagliando di garanzia•Garanti Kart
Telefon mit Vorwahl • Phone number with area code • Téléphone avec indicatif • Telefoon met kengetal • Teléfono con prefijo • Telefono con prefisso • ehirleraras kodla telefon
Fehlerbeschreibung • Description of the malfunction • Description du problème
Omschrijving van de fout • Descripción del fallo • Descrizione del difetto • Hata tanm
Bitte diesen Abschnitt ausschneiden und dem Gerät beilegen. • Please detach this part and send it in with the appliance.
Veuillez détacher cette partie et la joindre à l'appareil. • Dit deel a.u.b. uitknippen en bij het apparaat leggen.
Por favor, recorte este resguardo y añádelo al aparato. • Per cortesia ritagliare questa sezione e allegarla all'apparecchio.
Lütfen bu bölümü kesin ve cihazn yanna ekleyin.
:
Page 24

Royal Appliance International GmbH
Jagenbergstraße 19
41468 Neuss
Germany
+49 (0) 2131 - 60 90 0
+49 (0) 2131 - 60 90 60 95
info@dirtdevil.de
www.dirtdevil.de
 Loading...