

Page 1
AC150, 250, 350
DEGBFR
NLESIT
TR
Bedienungsanleitung
Luftreiniger
Bedieningshandleiding
Luchtreiniger
Kullanim Klavuzu
Hava temizleyici
Roya-30033 • A5 • 12.02.2015
Operating Manual
Air cleaner
Manual de instrucciones
Purificador de aire
Mode d'emploi
épurateur d’air
Istruzioni per l'uso
Purificatore d'aria
Page 2

Bedienungsanleitung ....................................................... 4 - 17
Operating Manual ............................................................. 18 - 31
Mode d'emploi ................................................................... 32 - 45
Bedieningshandleiding..................................................... 46 - 59
Manual de instrucciones ................................................... 60 - 73
DE
Istruzioni per l'uso......................................................... 74 - 87
Kullanim Klavuzu............................................................... 88 - 101
2
TR IT ES NL FR GB
Page 3

5
2 3 4
5
8
7
9
12
13
10
6
11
14
1
1
D
3
Page 4
Ihr Luftreiniger
Es freut uns, dass Sie sich für unseren Luftreiniger entschieden haben.
Wir danken Ihnen für den Kauf und das entgegengebrachte Vertrauen!
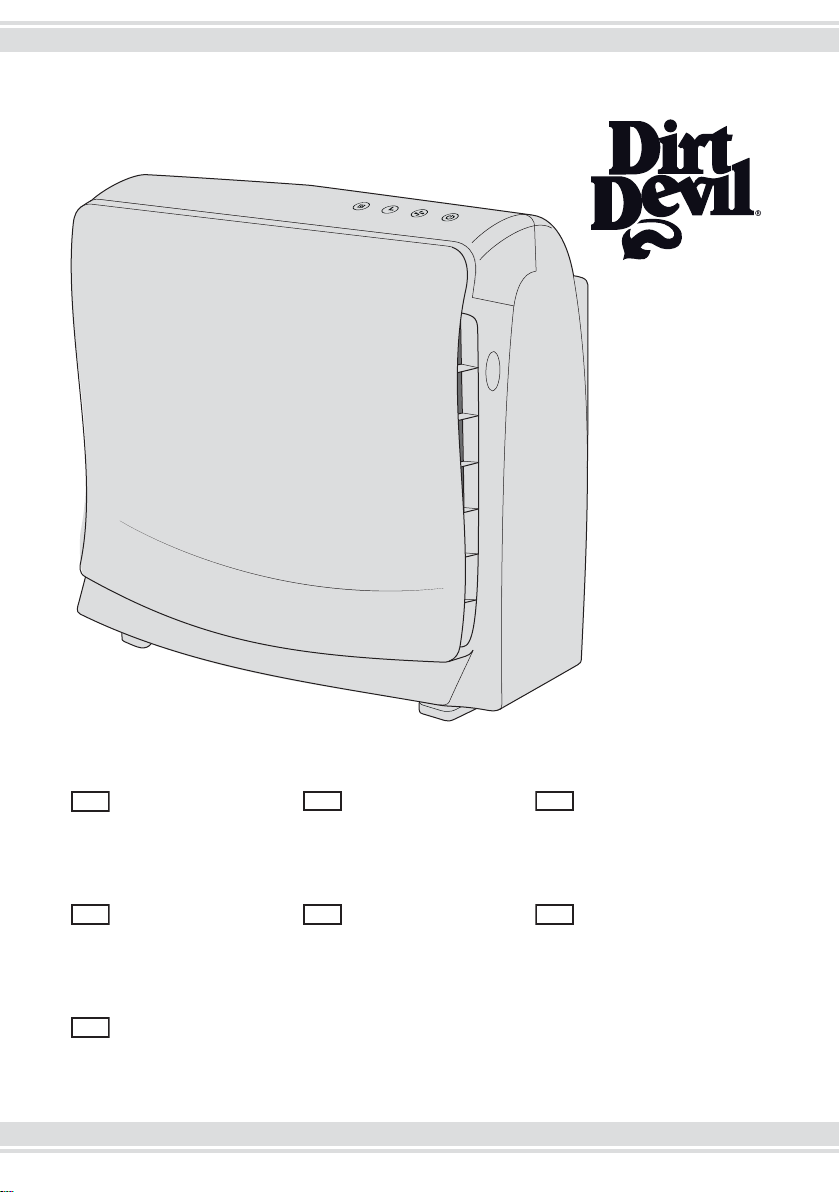
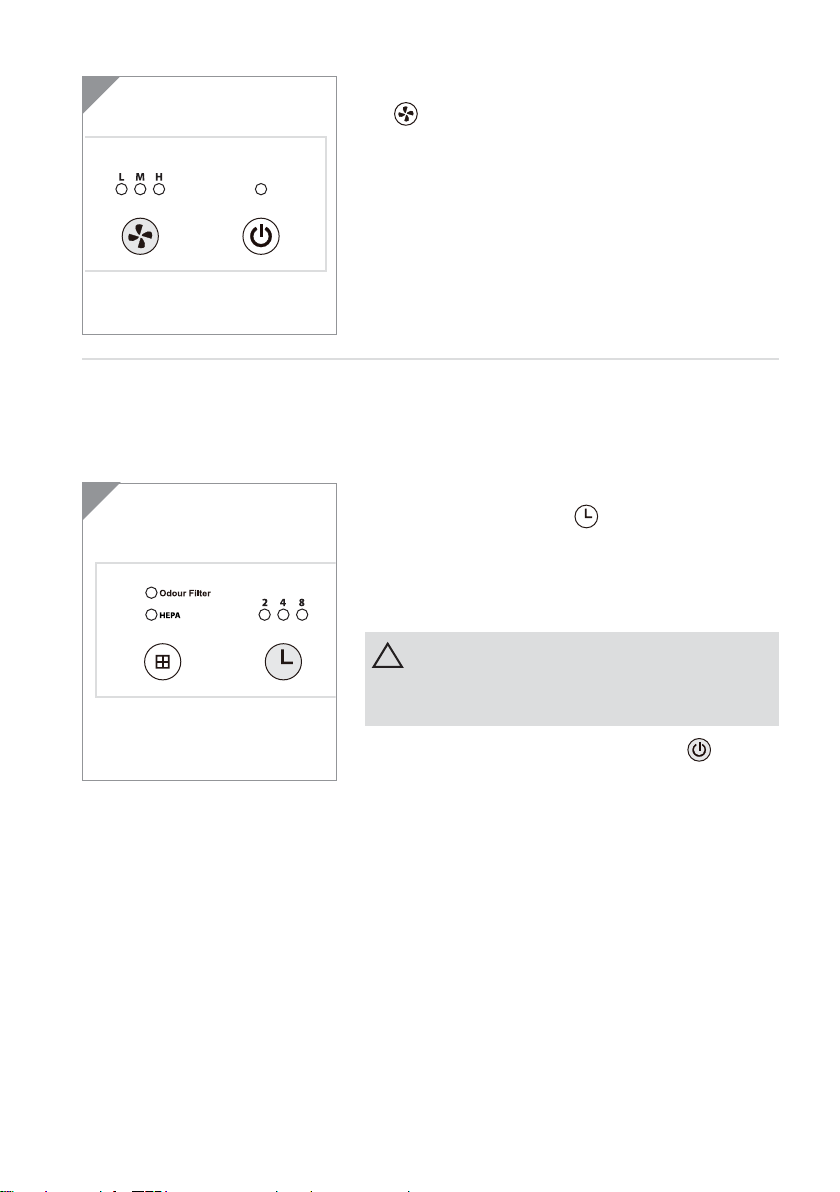
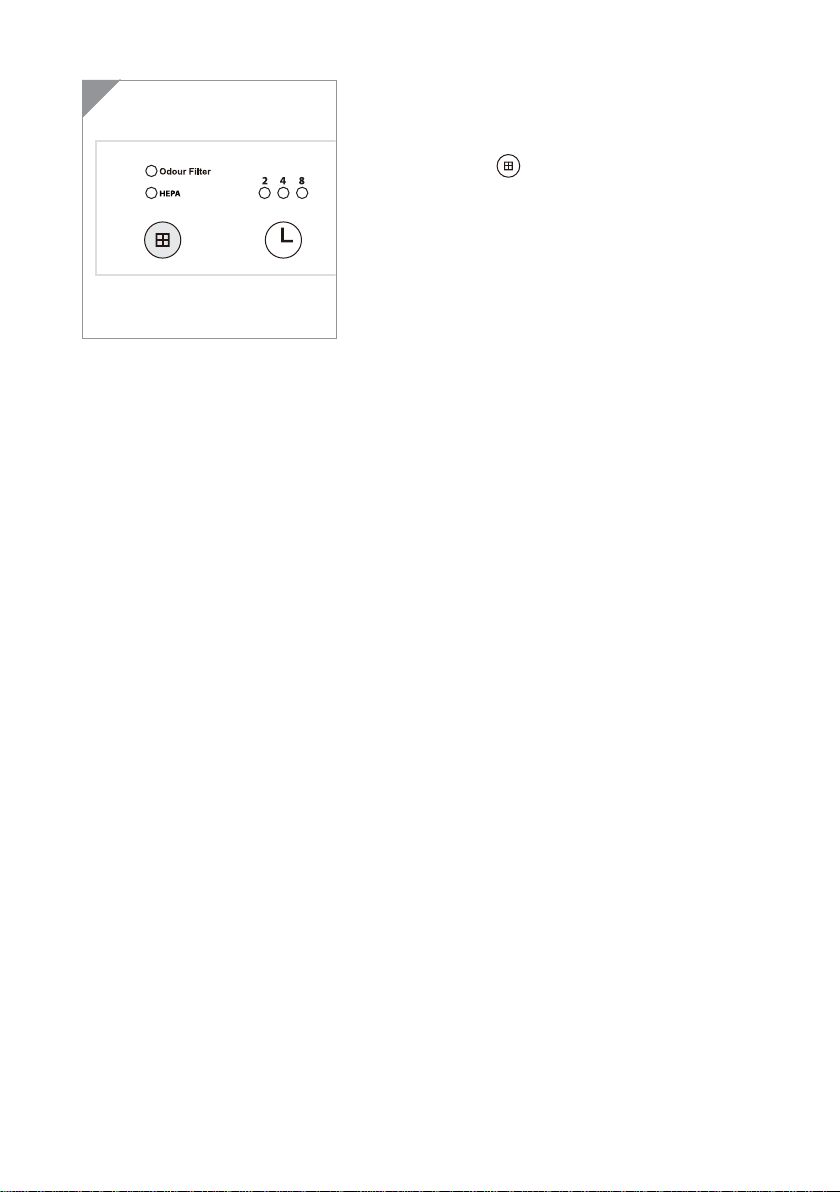
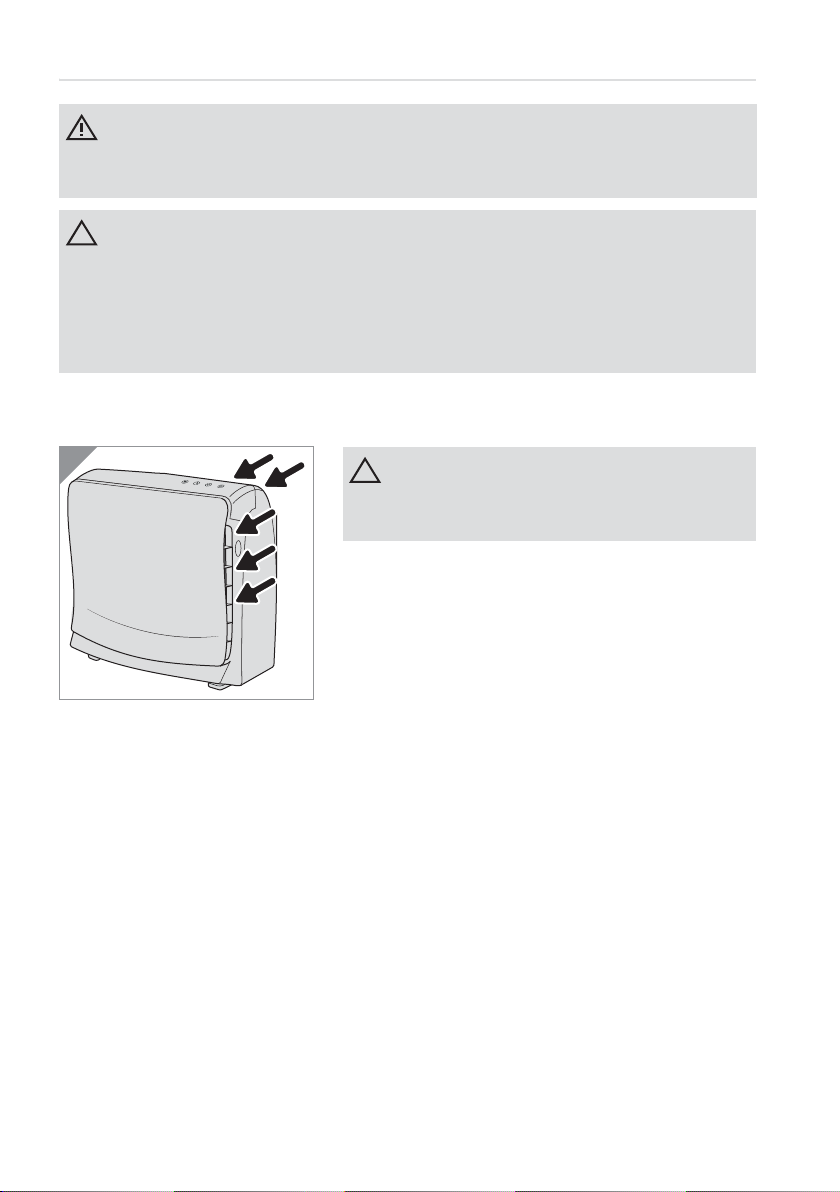
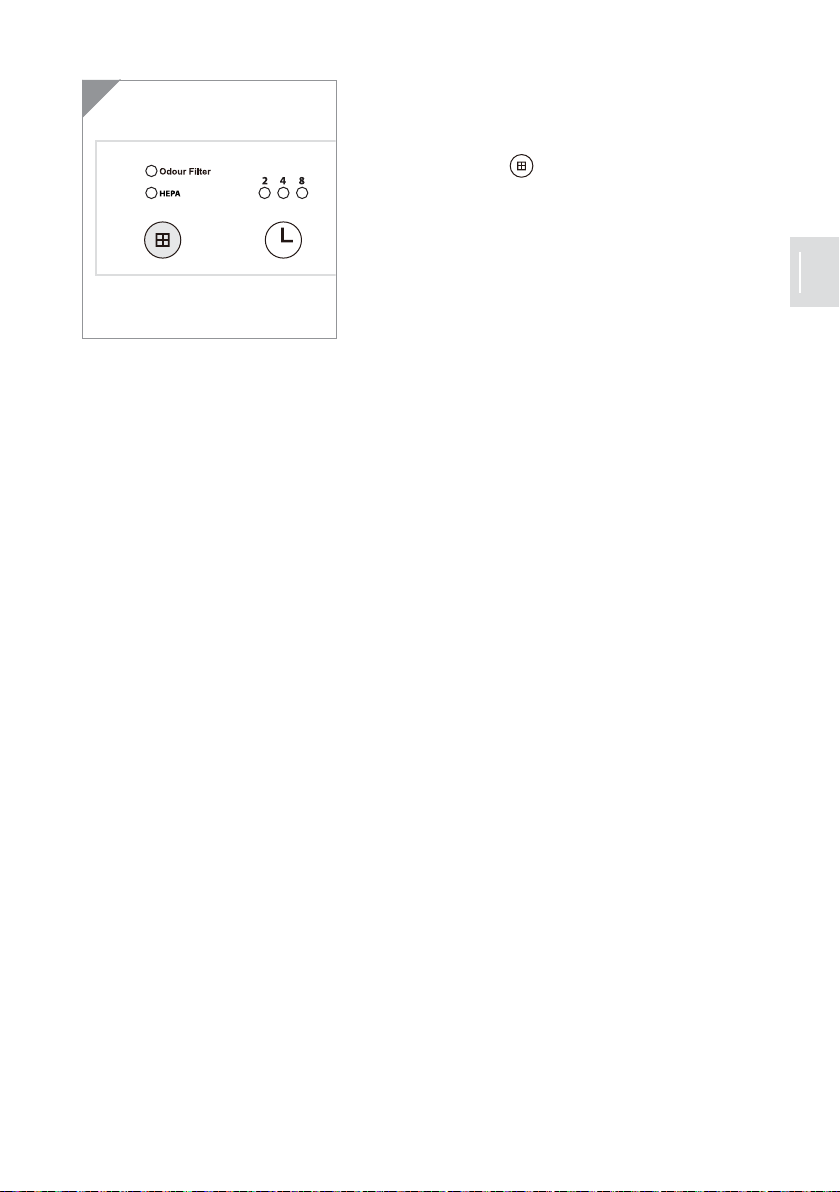
Bedienpanel und Geräteteile (Abb. 1)
1 Filter wechseln und resetten
| „Odor Filter“: Karbon-Filter wechseln
| „HEPA“: HEPA-Filter wechseln
Z Kapitel 4.2, „Karbon-Filter wechseln“
Z Kapitel 4.3, „HEPA-Filter wechseln“
Z Kapitel 4.4, „Filterwechsel LED zurücksetzen“
2Timer
| „2“: nach 2 Stunden abschalten
| „4“: nach 4 Stunden abschalten
| „8“: nach 8 Stunden abschalten
Z Kapitel 3.4, „Timer einstellen“
3Leistung
| „L“: Gerät läuft besonders leise
| „M“: mittlere Einstellung
| „H“: Gerät läuft mit hoher Drehzahl
Z Kapitel 3.3, „Leistung wählen“
Technische Daten
4 Power
| Gerät ein-/ausschalten
Z Kapitel 3.2, „Einschalten“
5 Tasten zur Entriegelung der Frontblende
6 Einsetzmarkierung des HEPA-Filters
7 HEPA-Filter
8 Karbon-Filter
9 Gebläse
10 Frontblende
11 Standfuß mit Aussparung für die Frontblende
12 Lufteinlass
13 Stecker und Stromkabel
14 Luftaustritt
nicht abgebildet:
Bedienungsanleitung
Modellname: PUREZA
Modell: AC150 AC250 AC350
Geräteart: Luftreiniger
Spannung: 220 V
Kabellänge: ca. 1,8 m
Leistung: 33/42/67 W (L/M/H) 45/62/85 W (L/M/H) 63/81/107 W (L/M/H)
Gewicht: ca. 3,6 kg ca. 4,7 kg ca. 6,4 kg
Technische und gestalterische Änderungen im Zuge
ständiger Produktverbesserung vorbehalten.
© Royal Appliance International GmbH
4
150
250
PUREZA
− 240 V~, 50 Hz
PUREZA
350
Page 5

Inhaltsverzeichnis
1 Sicherheitshinweise ................................................................ 6
1.1 zur Bedienungsanleitung................................................................................................... 6
1.2 zu bestimmten Personengruppen ..................................................................................... 6
1.3 zur Stromversorgung......................................................................................................... 7
1.4 falls das Gerät defekt ist..................................................................................................... 7
1.5 zur bestimmungsgemäßen Verwendung .......................................................................... 8
2 Auspacken und Aufstellen........................................................ 9
2.1 Auspacken ......................................................................................................................... 9
2.2 Aufstellort wählen............................................................................................................. 9
3 Anschließen und Bedienen....................................................... 10
3.1 Anschließen....................................................................................................................... 10
3.2 Einschalten........................................................................................................................ 10
3.3 Leistung wählen................................................................................................................ 11
3.4 Timer einstellen................................................................................................................. 11
4 Gerät pflegen.......................................................................... 12
4.1 Gehäuse reinigen............................................................................................................... 12
4.2 Karbon-Filter wechseln...................................................................................................... 13
4.3 HEPA-Filter wechseln ........................................................................................................ 14
4.4 Filterwechsel LED zurücksetzen ......................................................................................... 15
5 Probleme beheben.................................................................. 16
5.1 Probleme selbst beheben .................................................................................................. 16
5.2 Hotline und Kundenservice................................................................................................ 17
5.3 Zubehör- und Ersatzteilliste............................................................................................... 17
5.4 Gewährleistung ................................................................................................................. 17
5.5 Entsorgung........................................................................................................................ 17
5
Page 6

1 Sicherheitshinweise
WARNUNG:
ACHTUNG:
HINWEIS:
1.1 zur Bedienungsanleitung
Lesen Sie diese Bedienungsanleitung vollständig durch, bevor Sie mit dem Gerät arbeiten. Bewahren Sie die Anleitung gut auf. Falls Sie das Gerät an Dritte weitergeben,
geben Sie auch die Bedienungsanleitung mit.
Die Nichtbeachtung dieser Anleitung kann zu schweren Verletzungen oder Schäden
am Gerät führen. Für Schäden, die aufgrund der Nichtbeachtung dieser Bedienungsanleitung entstehen, übernehmen wir keine Haftung.
Wichtige Hinweise sind in den nachfolgenden Kapiteln besonders gekennzeichnet.
Warnt vor Gefahren für Ihre Gesundheit und zeigt mögliche Verletzungsrisiken auf.
Weist auf mögliche Gefährdungen für das Gerät oder andere Gegenstände hin.
Hebt Tipps und Informationen hervor.
1.2 zu bestimmten Personengruppen
Diese Geräte können von Kindern ab 8 Jahren und darüber und von Personen mit
verringerten physischen, sensorischen oder mentalen Fähigkeiten oder Mangel an Erfahrung und/oder Wissen benutzt werden, wenn sie beaufsichtigt werden oder bezüglich des sicheren Gebrauchs des Gerätes unterwiesen wurden und die daraus resultierenden Gefahren verstanden haben.
Kinder dürfen nicht mit dem Gerät spielen. Reinigung und Benutzer-Wartung
dürfen nicht durch Kinder ohne Beaufsichtigung durchgeführt werden.
Halten Sie Verpackungsmaterial von Kindern fern. Es besteht Erstickungsgefahr.
Halten Sie die Fernbedienung sowie die Batterie von Kindern fern. Es besteht die
Gefahr, dass Kinder die Batterie verschlucken.
6
Page 7

1.3 zur Stromversorgung
Das Gerät wird mit elektrischem Strom betrieben, dabei besteht grundsätzlich die Gefahr eines elektrischen Schlags. Deshalb:
Tauchen Sie das Gerät niemals in Wasser oder andere Flüssigkeiten. Halten Sie es
von Regen und Nässe fern. Betreiben Sie das Gerät nicht im Freien oder in Räumen mit
hoher Luftfeuchtigkeit.
Fassen Sie den Stecker nie mit nassen Händen an. Wenn Sie den Stecker aus der
Steckdose herausziehen wollen, ziehen Sie immer direkt am Stecker. Ziehen Sie niemals am Kabel, es könnte beschädigt werden. Transportieren Sie das Gerät zudem
niemals am Kabel.
Achten Sie darauf, dass das Stromkabel nicht geknickt, eingeklemmt, überfahren
wird oder mit Hitzequellen oder scharfen Kanten in Berührung kommt. Es darf außerdem nicht zur Stolperfalle werden.
Stellen Sie vor dem Anschließen an die Stromversorgung sicher, dass die auf dem
Typenschild angegebene elektrische Spannung mit der Spannung Ihrer Steckdose
übereinstimmt.
Bevor Sie das Gerät reinigen oder warten, schalten Sie das Gerät aus und ziehen
Sie den Stecker aus der Steckdose.
1.4 falls das Gerät defekt ist
Betreiben Sie niemals ein defektes Gerät oder ein Gerät mit einem defekten Ka-
bel. Wenn die Anschlussleitung dieses Gerätes beschädigt wird, muss sie durch den
Hersteller oder seinen Kundendienst oder eine ähnlich qualifizierte Person ersetzt
werden, um Gefährdungen zu vermeiden.
Geben Sie ein defektes Gerät zur Reparatur an einen Fachhändler oder den Kun-
dendienst. Adresse
ZSeite 17, „Hotline und Kundenservice“.
7
Page 8

1.5 zur bestimmungsgemäßen Verwendung
Setzen Sie den Luftreiniger ausschließlich im Haushalt ein. Er ist für eine gewerbliche
Nutzung nicht geeignet.
Setzen Sie den Luftreiniger ausschließlich im Haushalt für das Reinigen von kühler,
trockener Raumluft ein. Jede weitere Verwendung gilt als nicht bestimmungsgemäß
und ist untersagt.
Verboten ist insbesondere:
Das Ansaugen von Luft, die mit giftigen Dämpfen oder Gasen sowie Abgasen
oder Rauchgasen oder mikrobiologisch belastet ist. Ebenso darf Luft, deren Staubund Spänebelastung über haushaltsübliche Konzentrationen hinausgeht, nicht angesaugt werden. Ihre Gesundheit könnte unter derart belasteter Luft leiden.
Der Einsatz in der Nähe von explosiven, brennenden, brandfördernden, brandbe-
schleunigenden, entzündlichen oder flüchtigen Stoffen oder das Ansaugen derselben. Setzen Sie das Produkt z. B. nicht gleichzeitig mit Imprägniermitteln, Haarsprays, Insektiziden oder anderen entzündlichen Fluiden und Duftstoffen oder in
chlorhaltiger Umgebung ein. Es besteht Brand- und Explosionsgefahr.
Das Ansaugen fettiger oder heißer Luft, z. B. in der Nähe von Kaminen, Öfen, Her-
den, Grills, Toastern usw. oder brennenden Kerzen. Es besteht Brandgefahr.
Der Einsatz als Ersatz für eine ordnungsgemäße Belüftung z. B. zur Frischluftzu-
fuhr. Das Gerät kann ordnungsgemäßes Lüften und Belüften nicht ersetzen. Es kann
die Luftfeuchtigkeit auch nicht regulieren (weder erhöhen noch senken).
Der Einsatz als Ersatz für Abzugshauben oder Absaugungen z. B. in Küchen oder
Tischlereien.
Der Einsatz im Freien oder in Feuchträumen (z. B. in Bädern und Saunen). Es be-
steht die Gefahr, dass Feuchtigkeit das Gerät beschädigt.
Das Hineinstecken von Gegenständen in die Öffnungen des Gerätes. Halten Sie
insbesondere Haare und lose Kleidungsstücke vom Gerät fern. Verletzungsgefahr!
Der Einsatz, ohne dass alle Filter korrekt installiert sind.
Das Abdecken des Geräts oder das Abstellen von Gegenständen auf dem Gerät.
Selbstständiges Umbauen oder Reparieren.
8
Page 9
2 Auspacken und Aufstellen
ACHTUNG:
HINWEIS:
WARNUNG:
WARNUNG:
WARNUNG:
ACHTUNG:
2.1 Auspacken
Packen Sie das Gerät und alle Zubehörteile aus und überprüfen Sie den Inhalt auf Unversehrtheit und Vollständigkeit (ZSeite 4, „Ihr Luftreiniger“).
Versenden Sie das Gerät grundsätzlich in der Originalverpackung, damit es keinen Schaden nimmt. Heben Sie
dazu die Verpackung auf. Entsorgen Sie nicht mehr benötigtes Verpackungsmaterial gemäß den in Ihrem Land
geltenden Vorschriften.
Sollten Sie einen Transportschaden bemerken, wenden Sie sich umgehend an unsere Serviceniederlassung
ZSeite 17, „Hotline und Kundenservice“.
2.2 Aufstellort wählen
Brand- und Explosionsgefahr! Stellen Sie das Gerät an einem Platz auf, an dem es weder mit Chemikalien oder
Hitzequellen in Kontakt kommen, noch explosive, heiße oder fettige Luft ansaugen kann.
Gefahr für Ihre Gesundheit! Stellen Sie das Gerät so auf, dass die verschmutzte Luft nicht über Personen hinweg
angesaugt wird, insbesondere wenn diese schlafen.
Sturzgefahr! Wickeln Sie nur so viel Kabel ab, dass Sie den Stecker bequem in die nächstgelegene Steckdose stecken können. Wickeln Sie das restliche Kabel wieder auf die im Boden befindliche Kabelaufwicklung auf. Verlegen Sie das Kabel stets so, dass es nicht zur Stolperquelle werden kann.
Achten Sie darauf, dass Sie das Gerät auf eine stabile, waagerechte Fläche stellen. Stellen Sie das Gerät niemals
auf weiche Oberflächen wie die von Betten oder Sofas. Stellen Sie das Gerät zudem nicht in Schwenkbereiche von
Türen und Fenstern oder in Bereichen auf, in denen Sie sich häufig bewegen müssen.
Achten Sie darauf, dass die Luft frei von Hindernissen angesaugt und abgegeben werden kann.
9
Page 10
3 Anschließen und Bedienen
WARNUNG:
ACHTUNG:
2
ACHTUNG:
3
3.1 Anschließen
Verletzungsgefahr! Prüfen Sie das Gerät und das Stromkabel vor jeder Benutzung. Ein beschädigtes Gerät darf
nicht verwendet werden.
Verwenden Sie das Gerät nur, wenn alle Filter ordnungsgemäß eingesetzt sind und sichergestellt ist, dass keine
Öffnungen verstopft sind.
1. Stellen Sie sicher, dass der Aufstellort die Bedingungen unter
ZKapitel 2.2, „Aufstellort wählen“ erfüllt.
2. Stellen Sie sicher, dass die Steckdose, die Sie benutzen wollen,
dieselbe elektrische Spannung führt, wie auf dem Typenschild
auf der Unterseite des Geräts ausgewiesen.
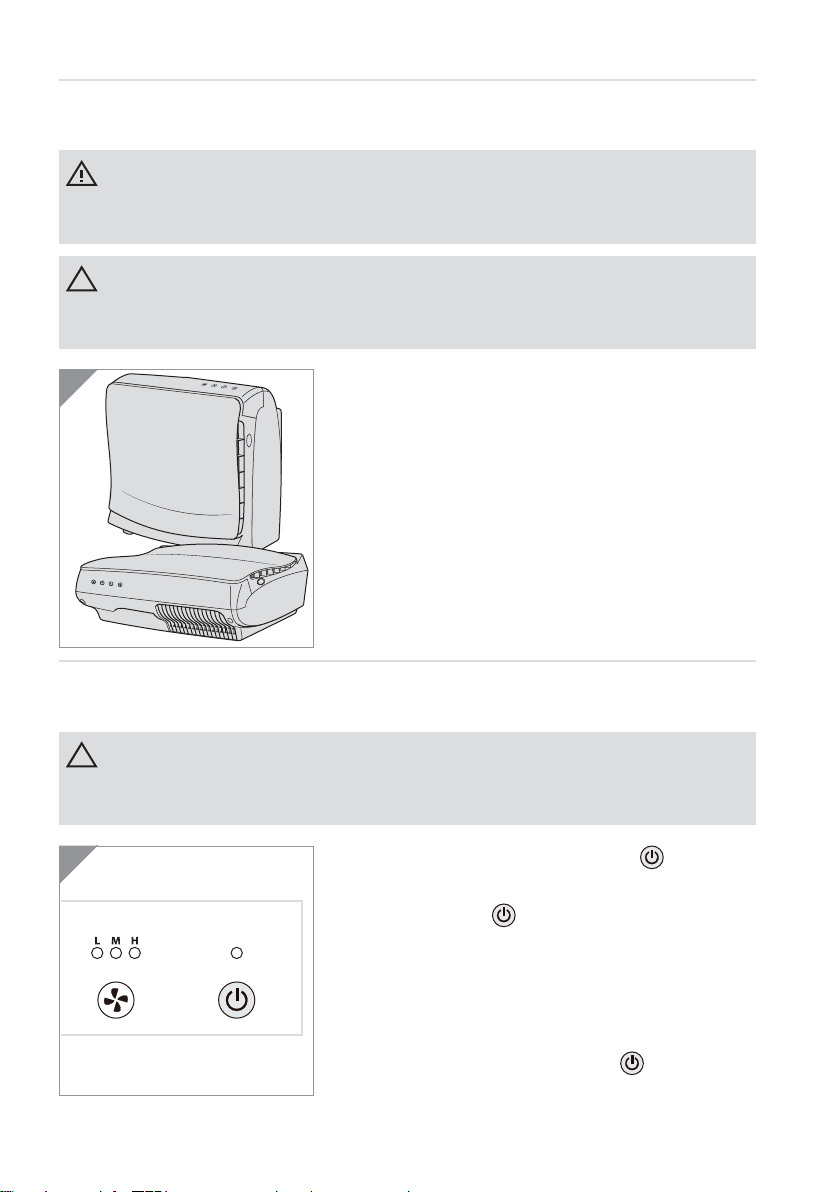
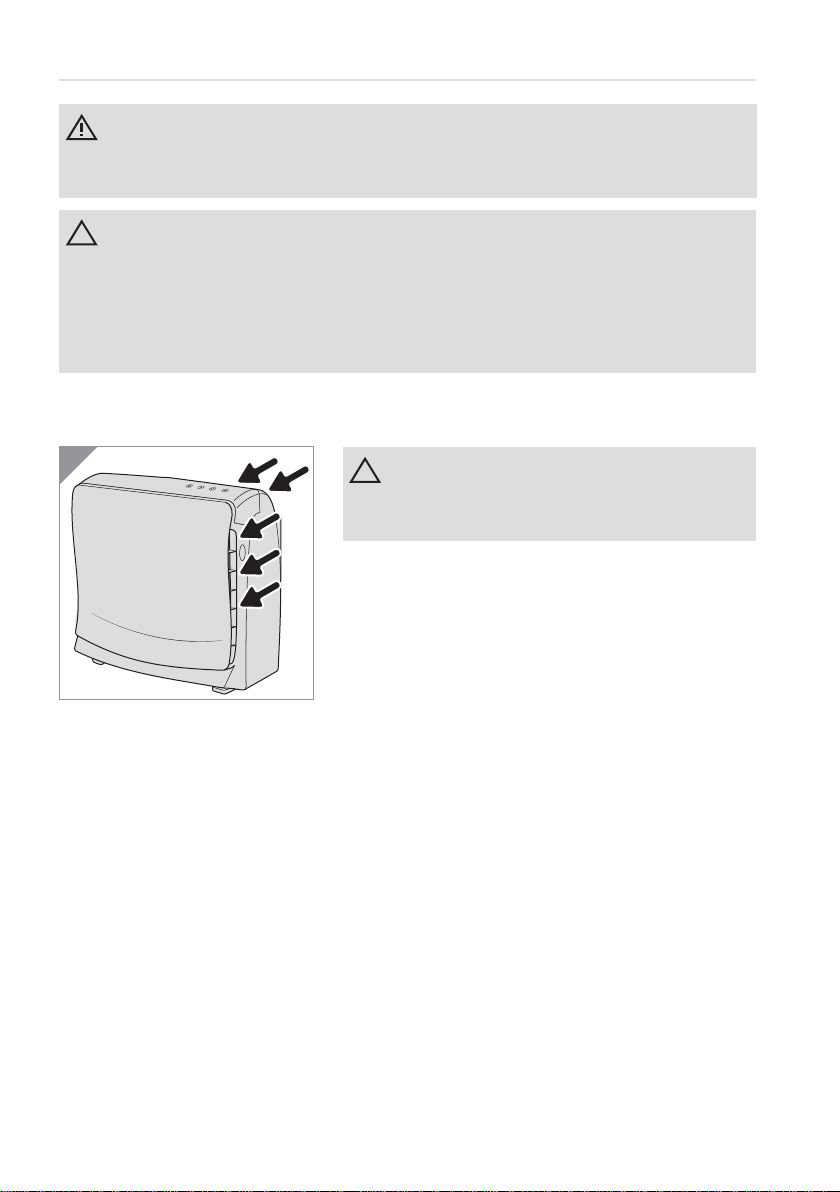
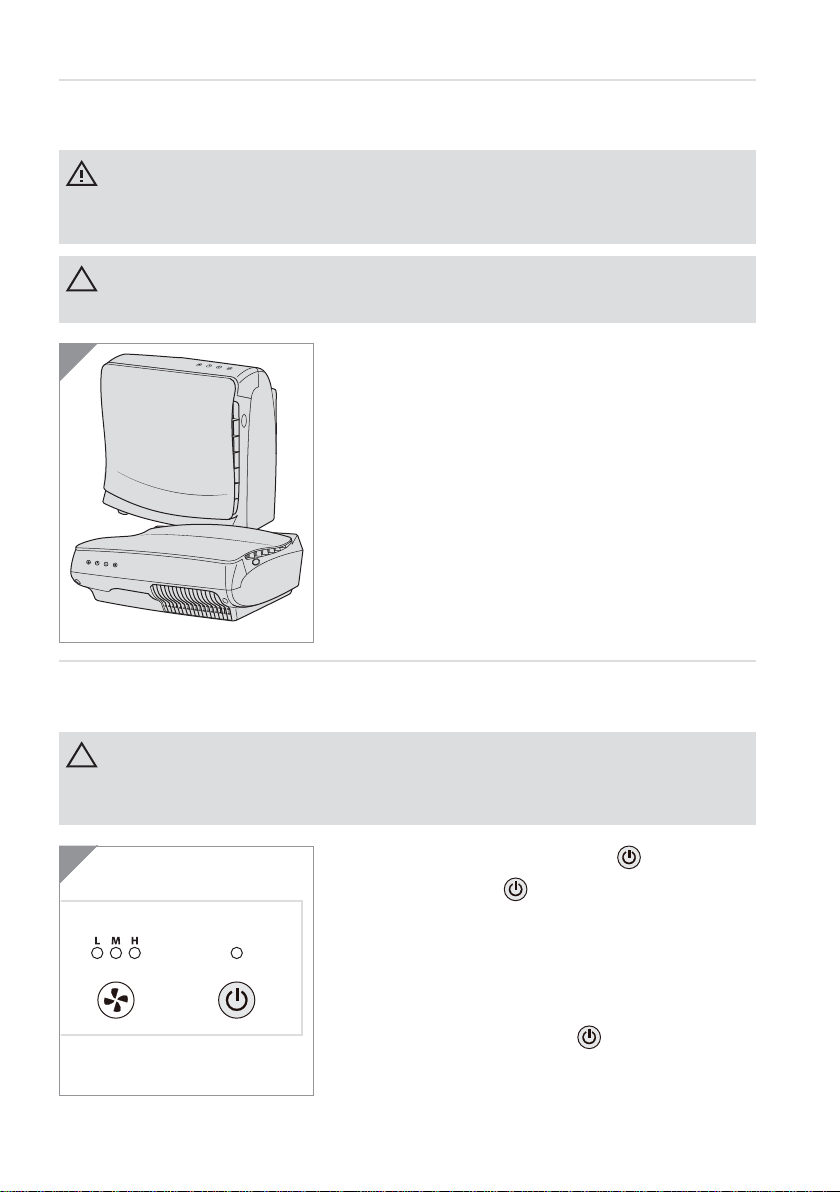
3. Sie können das Gerät nun stehend oder liegend aufstellen
(Abb. 2). Dafür sind 4 Füße auf der jeweiligen Unterseite vorgesehen.
4. Stellen Sie sicher, dass um Lufteinlass und Luftaustritt herum
ausreichend Freiraum herrscht.
3.2 Einschalten
Sie brauchen die Tasten des Bedienpanels nur ganz leicht berühren. Ein kraftvolles Betätigen ist nicht nötig und
kann dazu führten, dass die Tasten beschädigt werden.
1. Schalten Sie das Gerät ein, in dem Sie die -Taste (Abb. 3)
drücken.
10
- Die LED über der -Taste leuchtet.
- Wenn Sie die Leistung anpassen wollen: ZKapitel 3.3, „Leis-
tung wählen“.
- Wenn sich das Gerät nach einem bestimmten Zeitraum ausschalten soll: ZKapitel 3.4, „Timer einstellen“.
Um das Gerät auszuschalten, drücken Sie die -Taste (Abb. 3) erneut. Alle LEDs erlöschen und das Gebläse stoppt.
Page 11
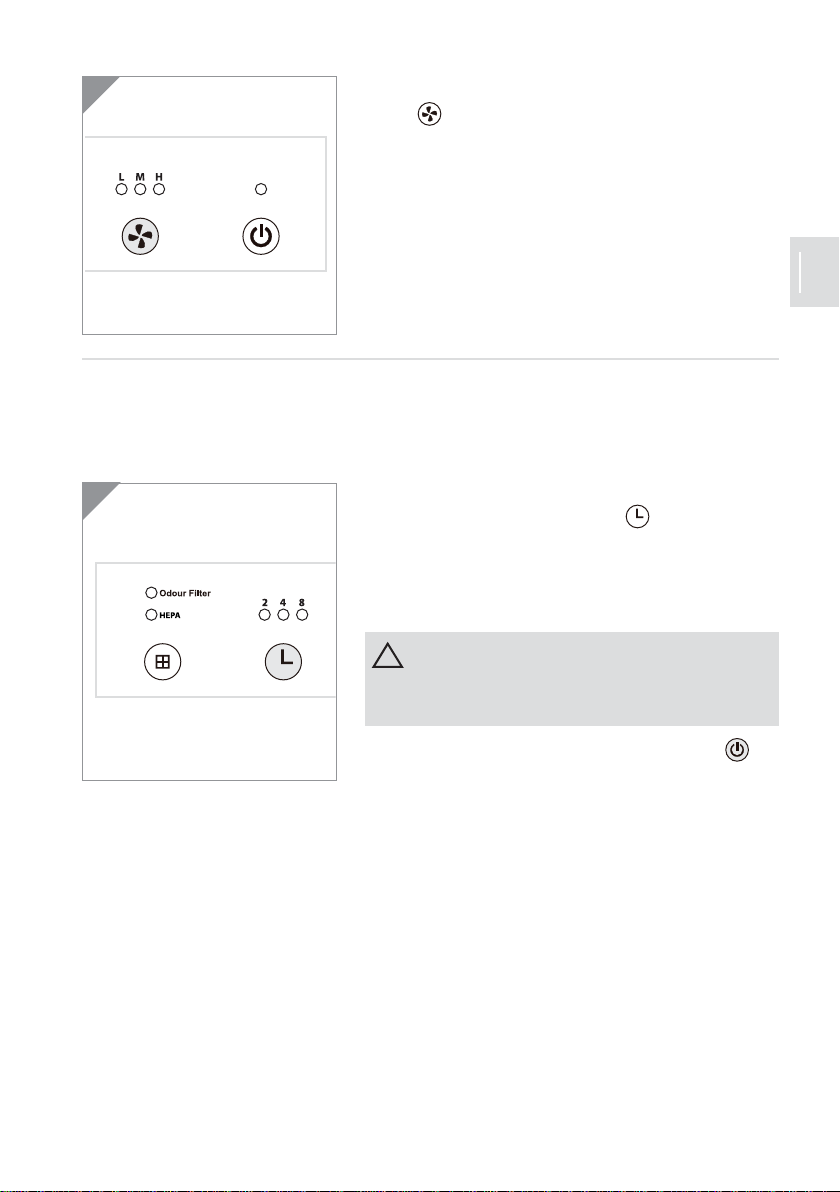
3.3 Leistung wählen
4
ACHTUNG:
5
1. Wählen Sie am eingeschalteten Gerät die Leistung über die
-Taste (Abb. 4):
-„L“: Gerät läuft besonders leise
-„M“: mittlere Einstellung
-„H“: Gerät läuft mit hoher Drehzahl.
Die LED zeigt die jeweils aktuelle Einstellung an.
3.4 Timer einstellen
Wenn das Gerät eine bestimmte Zeit laufen und sich danach selbstständig abschalten soll, empfiehlt sich die Verwendung der Timer-Funktion:
1. Wählen Sie am eingesc halteten Gerät die Dauer bis zur automa-
tischen Abschaltung über die -Taste (Abb. 5):
-„2“: Gerät schaltet sich nach 2 Stunden ab
-„4“: Gerät schaltet sich nach 4 Stunden ab
-„8“: Gerät schaltet sich nach 8 Stunden ab
Achten Sie darauf, dass die LED Ihrer Wahl leuchtet. Wenn keine
der 3 Timer-LEDs leuchtet, läuft das Gerät weiter!
Sie können das Gerät nach wie vor jederzeit über die -Taste ausschalten.
11
Page 12
4 Gerät pflegen
WARNUNG:
ACHTUNG:
ACHTUNG:
6
Verletzungsgefahr! Bevor Sie das Gerät reinigen oder warten, schalten Sie das Gerät aus und ziehen Sie den Stecker aus der Steckdose.
Ein nicht ausreichend gepflegtes Gerät arbeitet weniger effizient.
bei Bedarf: Gehäuse reinigen (ZKapitel 4.1, „Gehäuse reinigen“).
alle 3 Monate bzw. sobald die LED „Odor Filter“ leuchtet: ZKapitel 4.2, „Karbon-Filter wechseln“
alle 6 Monate bzw. sobald die LED „HEPA“ leuchtet: ZKapitel 4.3, „HEPA-Filter wechseln“
4.1 Gehäuse reinigen
Verwenden Sie keine Reinigungsmittel, Scheuermittel oder Alkohol, da diese das Gehäuse beschädigen können.
1. Befreien Sie die Lüftungsschlitze des ausgeschalteten Geräts
mithilfe eines Staubsaugers von Flusen und Staub (Abb. 6).
2. Reinigen Sie die restlichen Oberflächen mit einem weichen, fus-
selfreien Tuch.
12
Page 13
4.2 Karbon-Filter wechseln
ACHTUNG:
HINWEIS:
HINWEIS:
7
8
9
10
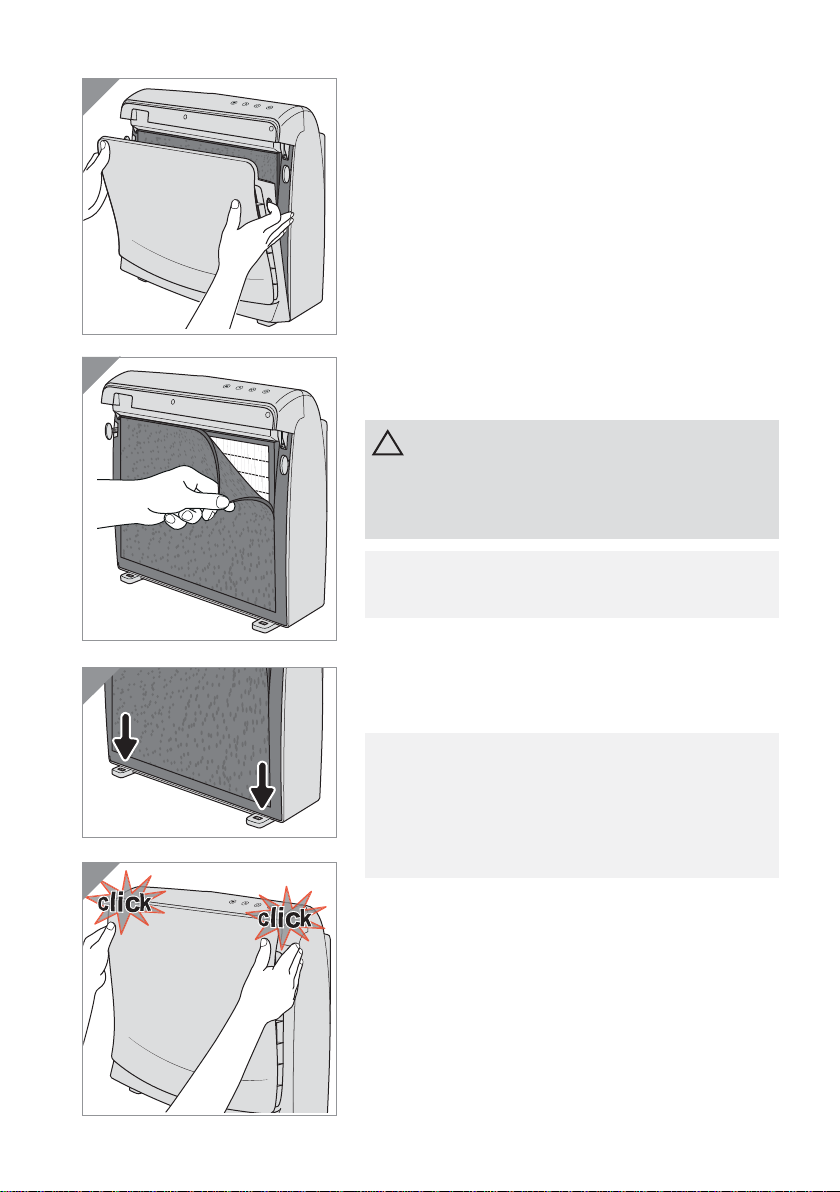
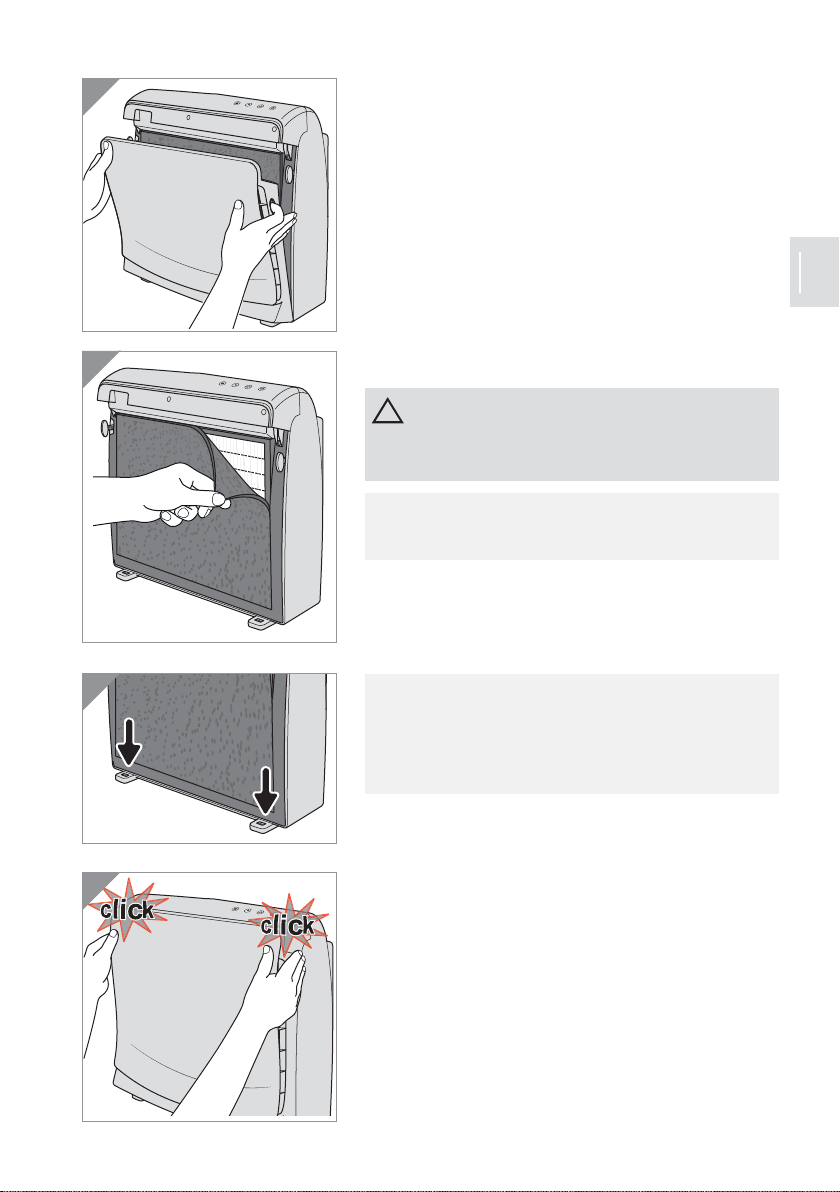
1. Stellen Sie sicher, dass der Stecker aus der Steckdose gezogen
ist.
2. Drücken Sie die Entriegelungstasten der Frontblende (Abb. 7).
Nehmen Sie die Frontblende vorsichtig ab.
3. Ziehen Sie den ausgedienten Karbon-Filter vom HEPA-Filter
(Abb. 8).
Der Karbon-Filter kann nicht gereinigt werden. Er kann nur ersetzt
werden (Bestelldaten siehe ZKapitel 5.3, „Zubehör- und Ersatz-
teilliste“).
Den ausgedienten Filter können Sie im Hausmüll entsorgen.
4. Packen Sie den neuen Karbon-Filter aus.
5. Bringen Sie den neuen Karbon-Filter auf den Klettverschlüssen
des HEPA-Filters an.
Mit welcher Seite Sie den neuen Filter anbringen, ist dabei egal.
Sobald der Filter jedoch benutzt wurde, können Sie ihn nicht
mehr drehen, da sonst der Schmutz in den HEPA-Filter eingetragen würde.
6. Setzen Sie die Frontblende zuerst in die Aussparungen in den
Standfüßen des Geräts (Abb. 9/Pfeile).
7. Klappen Sie die Frontblende dann an (Abb. 10), bis die Entriege-
lungstasten hörbar und sichtbar einrasten.
13
Page 14
4.3 HEPA-Filter wechseln
HINWEIS:
ACHTUNG:
HINWEIS:
HINWEIS:
11
12
13
14
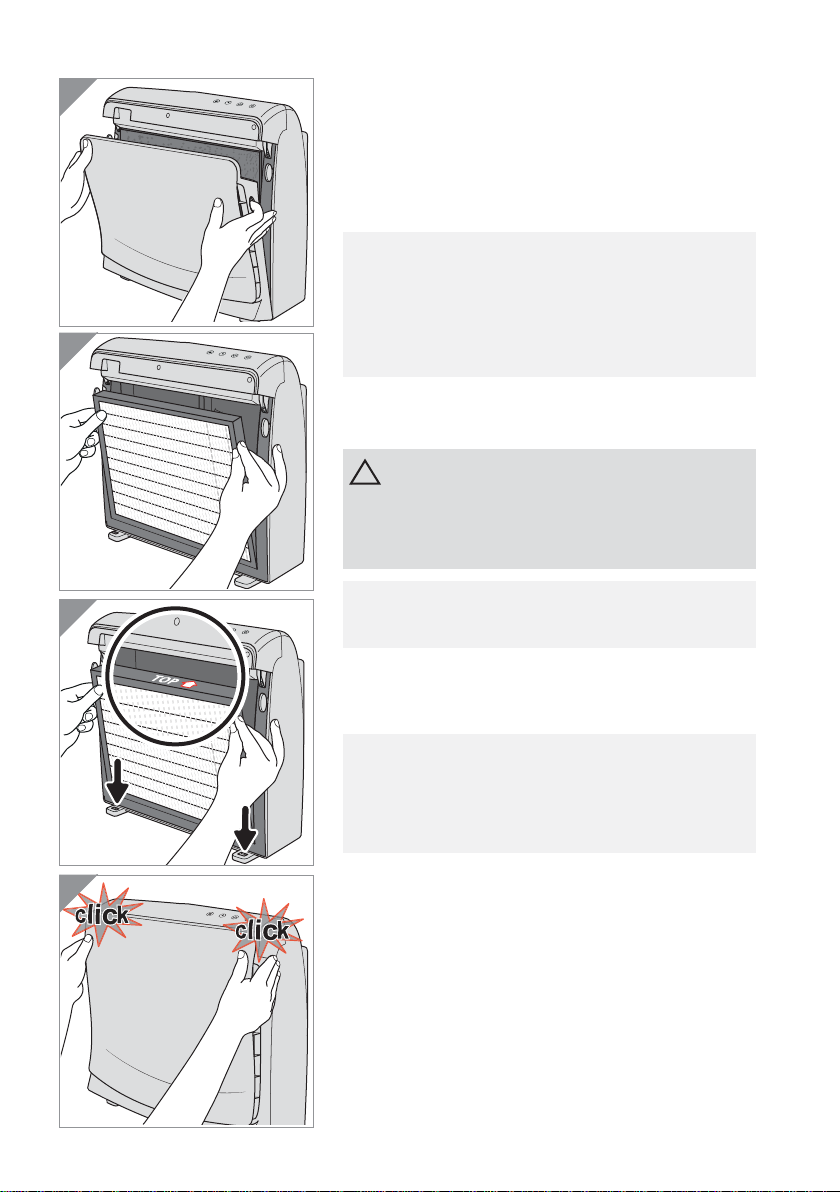
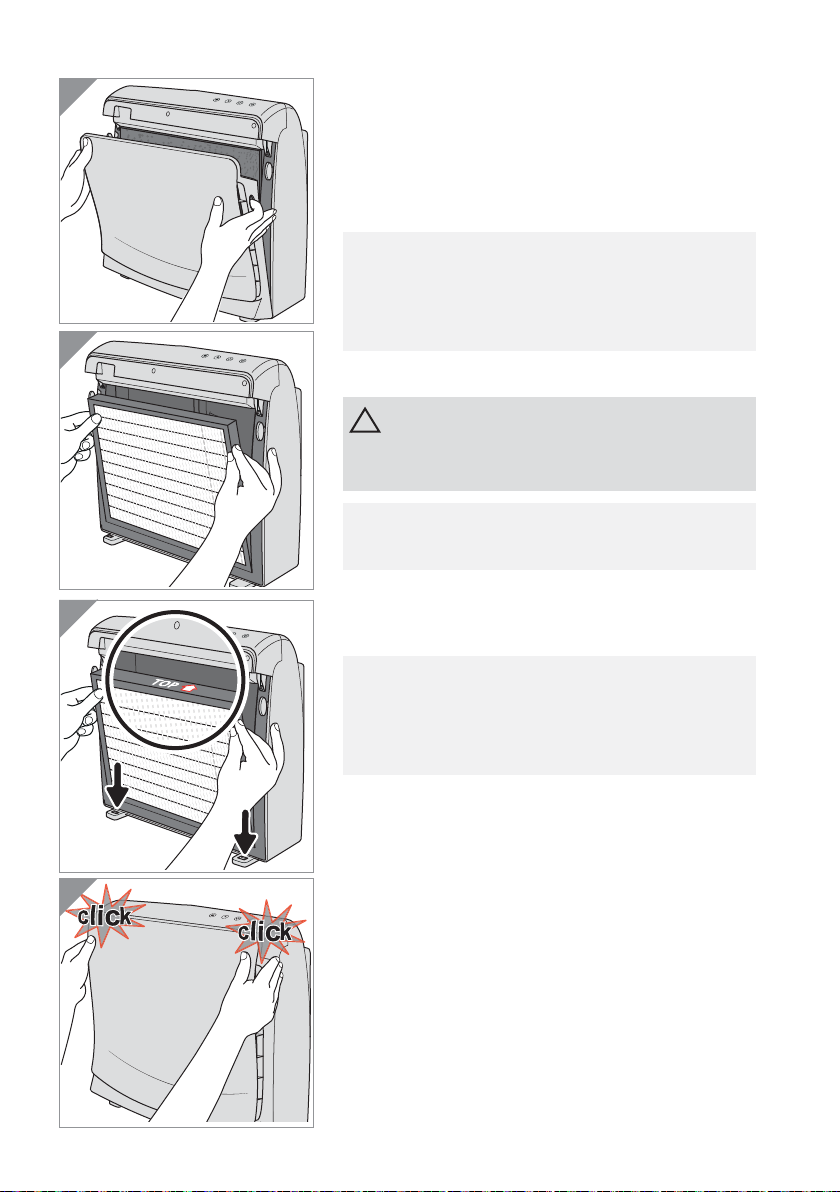
1. Stellen Sie sicher, dass der Stecker aus der Steckdose gezogen
ist.
2. Drücken Sie die Entriegelungstasten der Frontblende (Abb. 11).
Nehmen Sie die Frontblende vorsichtig ab (Abb. 11).
3. Ziehen Sie den Karbon-Filter vom HEPA-Filter (Abb. 8).
Wenn Sie den Karbon-Filter nicht auch gleich ersetzen wollen,
merken Sie sich, welche Seite dem HEPA-Filter zugewandt war.
Dies ist wichtig, damit nach dem Wiederanbringen weiterhin kein
Schmutz in den HEPA-Filter eingetragen wird.
4. Ziehen Sie den ausgedienten HEPA-Filter (Abb. 12) aus seiner
Konsole.
Der HEPA-Filter kann nicht gereinigt werden. Er kann stets nur
ersetzt werden (Bestelldaten siehe ZKapitel 5.3, „Zubehör- und
Ersatzteilliste“).
Den ausgedienten Filter können Sie im Hausmüll entsorgen.
14
5. Packen Sie den neuen HEPA-Filter aus.
6. Setzen Sie den neuen HEPA-Filter in seine Konsole.
Achten Sie darauf, dass die „TOP“-Markierung (Abb. 13/“TOP“) auf
dem HEPA-Filter nach oben und die Pfeilspitze (Abb.13/Pfeil) ins
Geräteinnere zeigt.
7. Bringen Sie den Karbon-Filter wieder auf den Klettverschlüssen
des HEPA-Filters an (Abb. 8). Falls Sie keinen neuen Karbon-Filter einsetzen, achten Sie darauf, dass die Seite des Karbon-Filters innen liegt, die auch zuvor innen lag.
8. Setzen Sie die Frontblende zuerst in die Aussparungen in den
Standfüßen des Geräts (Abb. 13/Pfeile).
9. Klappen Sie die Frontblende dann an (Abb. 14), bis die Entriege-
lungstasten hörbar und sichtbar einrasten.
Page 15
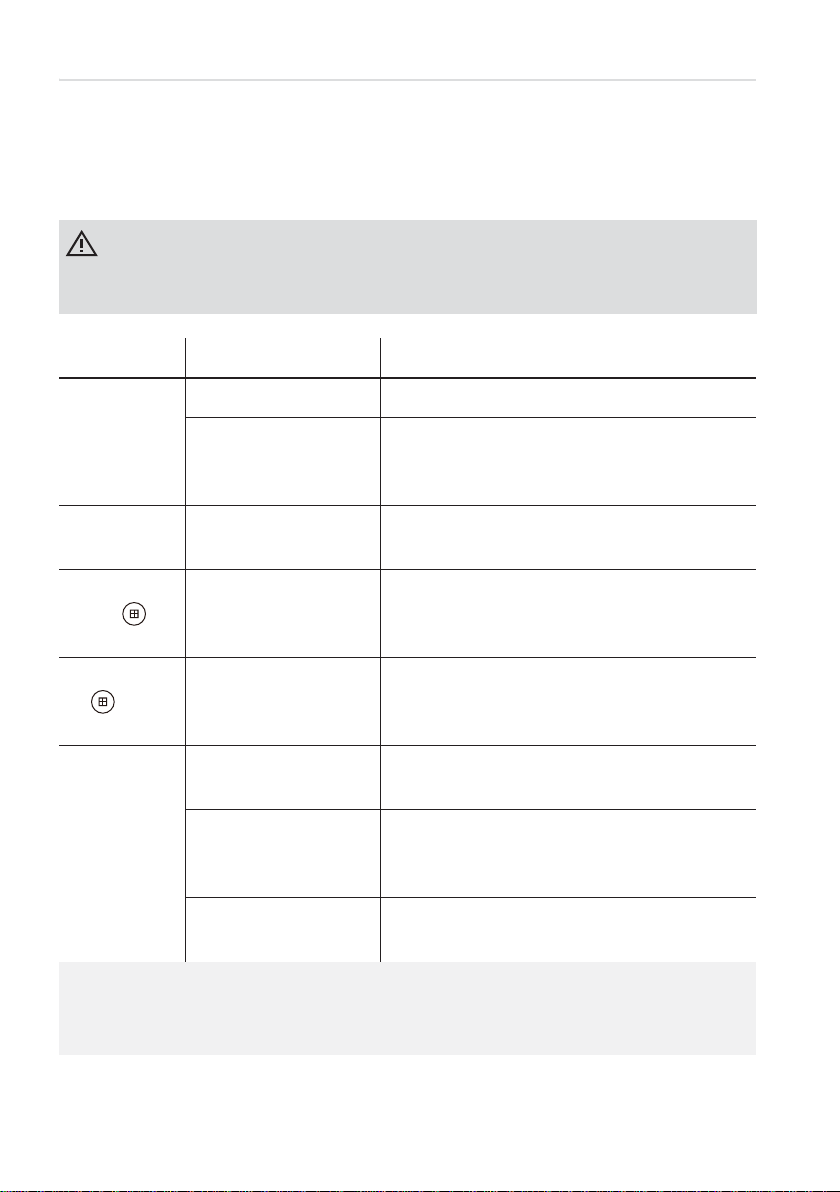
4.4 Filterwechsel LED zurücksetzen
15
Wenn eine der beiden Filterwechsel-LEDs („Odor Filter“ bzw.
„HEPA“) nach dem Filterwechsel noch immer leuchtet, obwohl sie
den betreffenden Filter gegen einen neuen getauscht haben:
1. Drücken Sie die -Taste und halten diese gedrückt, bis die
LED erlischt.
15
Page 16
5 Probleme beheben
WARNUNG:
HINWEIS:
5.1 Probleme selbst beheben
Bevor Sie die Service-Hotline (+49 (0) 180 - 501 50 50 *) kontaktieren, überprüfen Sie anhand der folgenden Tabelle, ob Sie das Problem selbst beheben können.
Verwenden Sie niemals ein defektes Gerät oder ein Gerät mit defektem Stromkabel.
Bevor Sie das Problem suchen, schalten Sie das Gerät aus und ziehen Sie den Stecker aus der Steckdose.
Problem mögliche Ursache Lösung
*0,14 €/Minute aus dem deutschen Fe stnetz (deutscher Mobilfunkhöchstpreis 0,42 €/Minute)
Gerät lässt sich
nicht einschalten
Gerät schaltet sich
von allein ab
LED „Odor Filter“
über der -Taste leuchtet
LED „HEPA“ über
der -Taste
leuchtet
Gerät läuft übermäßig laut
Stecker ist nicht eingesteckt. Stecken Sie den Stecker in die Steckdose.
Frontblende oder HEPA-/Karbon-Filter sind nicht ordnungsgemäß eingesetzt.
Timer-Funktion war angewählt.
Karbon-Filter muss gewechselt werden.
HEPA-Filter muss gewechselt
werden.
Höchste Leistungsstufe („H“)
eingestellt.
Einer der Filter ist verschmutzt und muss gewechselt werden.
Lufteinlass oder -austritt ist
nicht frei von Hindernissen.
Prüfen Sie, ob Frontblende bzw. HEPA-/Karbon-Filter korrekt eingesetzt sind, siehe ZKapitel 4.2, „Karbon-Filter
wechseln“ bzw. ZKapitel 4.3, „HEPA-Filter wechseln“.
Zum An- und Abwählen der Timerfunktion siehe ZKapitel
3.4, „Timer einstellen“.
Wechseln Sie den Karbon-Filter wie unter ZKapitel 4.2,
„Karbon-Filter wechseln“ beschrieben.
Wechseln Sie den HEPA-Filter wie unter ZKapitel 4.3, „HE-
PA-Filter wechseln“ beschrieben.
Wählen Sie eine für Sie angenehmere Leistung, ZKapitel
3.3, „Leistung wählen“.
Wechseln Sie die Filter wie unter ZKapitel 4.2, „Karbon-Fil-
ter wechseln“ und ZKapitel 4.3, „HEPA-Filter wechseln“ beschrieben.
Sorgen Sie für ausreichend Freiraum im Bereich des Lufteinlasses oder -austritts.
Wenn Sie das Problem mit Hilfe dieser Tabelle nicht beheben konnten, kontaktieren Sie die Service-Hotline
(Zsiehe oben) oder den Dirt Devil-Kundenservice (ZKapitel 5.2, „Hotline und Kundenservice“).
16
Page 17
5.2 Hotline und Kundenservice
HINWEIS:
ACHTUNG:
Royal Appliance International GmbH
Abt. Kundenservice
Jagenbergstr. 19
41468 Neuss
Deutschland
Tel.: +49 (0) 180 - 501 50 50*
Fax: +49 (0) 2131 / 60 90 60 95
de@dirtdevil-service.eu
www.dirtdevil.de
*0,14 €/Minute aus dem deutschen Festnetz (deutscher Mobilfunkhöchstpreis 0,42 €/Minute)
Die Kosten für Telefonate aus dem Ausland richten sich nach den Gebühren der jeweiligen ausländischen Anbieter und der jeweiligen aktuellen Tarife.
Diese Bedienungsanleitung steht Ihnen auch elektronisch zur Verfügung. Gehen Sie dafür einfach auf
www.dirtdevil.de in den Download-Bereich unter „BEDIENUNGSANLEITUNGEN“.
Geben Sie die Modellnummer des Geräts ein und laden das zugehörige PDF herunter.
5.3 Zubehör- und Ersatzteilliste
AC150 AC250 AC350
150012 Frontblende
(Abb. 1/10)
150022 Filterset (1 HEPA-,
2 Karbon-Filter)
250012 Frontblende
(Abb. 1/10)
250022 Filterset (1 HEPA-,
2 Karbon-Filter)
350012 Frontblende
(Abb. 1/10)
350022 Filterset (1 HEPA-,
2 Karbon-Filter)
5.4 Gewährleistung
Es gelten die gesetzlichen Gewährleistungsregeln nach EU-Richtlinie 1999/44/EG.
In Nicht-EU-Ländern gelten die im jeweiligen Land gültigen Mindestansprüche der Gewährleistung.
5.5 Entsorgung
Umweltschäden bei nicht sachgerechter Entsorgung! Elektrische Abfälle dürfen nicht zusammen mit Haushaltsabfällen entsorgt werden. Nutzen Sie stattdessen die örtlichen Sammelstellen zur Rückgabe von Altgeräten.
17
Page 18
Your air purifier
We are pleased that you have chosen our air purifier.
Thank you for your purchase and your confidence in us.
Operating panel and parts of the appliance (Fig. 1)
1 Replacing and resetting the filter
| "Odor Filter": Replacing the carbon filter
| "HEPA": Replacing the HEPA filter
Z chapter 4.2, „Replacing the carbon filter“
Z chapter 4.3, „Replacing the HEPA filter“
Z chapter 4.4, „Resetting the filter change LED“
2Timer
| "2": shuts off after 2 hours
| "4": shuts off after 4 hours
| "8": shuts off after 8 hours
Z chapter 3.4, „Setting the timer“
3Power
| "L": appliance runs particularly quietly
| "M": medium setting
| "H": appliance runs at high speed
Z chapter 3.3, „Selecting the power“
Technical data
4 Power
| Switches the appliance on/off
Z chapter 3.2, „Switching on“
5 Buttons to release the front panel
6 Insertion mark for the HEPA filter
7 HEPA filter
8 Carbon filter
9 Blower
10 Front panel
11 Base with recess for the front panel
12 Air inlet
13 Plug and power cord
14 Air outlet
not shown:
Operating manual
Model name: PUREZA
Model: AC150 AC250 AC350
Type of appliance: Air purifier
Voltage: 220 V
Cord length: approx. 1.8 m
Power: 33/42/67 W (L/M/H) 45/62/85 W (L/M/H) 63/81/107 W (L/M/H)
Weight: approx. 3.6 kg approx. 4.7 kg approx. 6.4 kg
We reserve the right to make changes to technical and design specifications in the interest of continuous product improvement.
© Royal Appliance International GmbH
18
150
PUREZA
− 240 V~, 50 Hz
250
PUREZA
350
Page 19

Table of contents
1 Safety instructions .................................................................. 20
1.1 Re: Operating Manual........................................................................................................ 20
1.2 Concerning certain groups of persons................................................................................ 20
1.3 Re: Power supply ............................................................................................................... 21
1.4 If the appliance is faulty..................................................................................................... 21
1.5 Re: Proper use.................................................................................................................... 22
2 Unpacking and setting up ........................................................ 23
2.1 Unpacking ......................................................................................................................... 23
2.2 Selecting the location for installation ................................................................................ 23
3 Connecting and operating........................................................ 24
3.1 Connecting ........................................................................................................................ 24
3.2 Switching on...................................................................................................................... 24
3.3 Selecting the power........................................................................................................... 25
3.4 Setting the timer ............................................................................................................... 25
GB
4 Caring for the appliance........................................................... 26
4.1 Cleaning the housing......................................................................................................... 26
4.2 Replacing the carbon filter................................................................................................. 27
4.3 Replacing the HEPA filter................................................................................................... 28
4.4 Resetting the filter change LED.......................................................................................... 29
5 Solving problems .................................................................... 30
5.1 Correcting problems yourself............................................................................................. 30
5.2 Hotline and customer service............................................................................................. 31
5.3 Accessories and spare parts ............................................................................................... 31
5.4 Warranty ........................................................................................................................... 31
5.5 Disposal ............................................................................................................................. 31
19
Page 20
1 Safety instructions
WARNING:
CAUTION:
NOTE:
1.1 Re: Operating Manual
Read the operating manual completely before working with the appliance. Keep the
operating manual in a safe place. If you pass the appliance on to someone else, give
them the operating manual as well.
Failure to comply with this operating manual can lead to serious injuries or damage
to the appliance. We assume no liability for damage that occurs as a result of failure
to comply with the instructions in this operating manual.
Important notes in the following chapters is specially marked.
Warns of health hazards and identifies possible risks of injury.
Indicates possible dangers to the appliance or other objects.
Highlights tips and information.
1.2 Concerning certain groups of persons
These appliances can be used by children of 8 years and upwards and persons
with impaired physical, sensory or mental abilities, or insufficient experience or
knowledge, providing they are supervised or have been instructed in the proper use
of the appliance and understand the risks involved.
Children must not play with the appliance. Children must not perform cleaning
or user maintenance tasks without supervision.
Keep packaging material out of the reach of children. There is risk of asphyxia-
tion.
Keep the remote control and battery out of the reach of children. There is a risk
that children will swallow the battery.
20
Page 21

1.3 Re: Power supply
The appliance is operated with electrical power, which means there is always a risk of
electric shock. Therefore:
Never immerse the appliance in water or other liquids. Keep it away from rain
and moisture. Do not operate the appliance outdoors or in rooms with a high level of
humidity.
Never touch the plug with wet hands. Always pull directly on the plug if you want
to disconnect the appliance from the mains. Never pull on the cord as this could damage it. Never carry the appliance by its cord.
Take care that the power cord is not bent, pinched, or rolled over, and does not
touch heat sources or sharp edges. Also take care that it does not become a stumbling
hazard.
Before connecting to the power supply, make sure that the voltage stated on the
type plate matches the voltage of your plug socket.
Before you clean or maintain the appliance, switch off the appliance and pull the
plug from the mains socket.
1.4 If the appliance is faulty
Never operate a faulty appliance or an appliance with a faulty cord. If the power
cord of this appliance is damaged it must be replaced by the manufacturer, their authorised service representative or a similarly qualified person to avoid danger.
Hand over a faulty appliance to an authorised dealer or the Customer Service de-
partment for repairs. Address
Zpage 102, „International Service“.
GB
21
Page 22

1.5 Re: Proper use
Only ever use the air purifier domestically. It is not suitable for commercial use.
Only use the air purifier domestically for purifying cool, dry room air. Any other use is
considered improper use and is prohibited.
In particular, the following is prohibited:
Suctioning air which is contaminated with toxic vapours or gases, exhaust or flue
gases or has microbiological contamination. Air which has a level of contamination
from dust or chippings which exceeds the normal domestic concentration must not be
suctioned either. Your health may be at risk from air with this type of contamination.
Use in the vicinity of explosive, burning, oxidising, accelerating, combustible or
volatile substances or suctioning said substances. Do not use the product simultaneously with, e.g. impregnating agents, hair sprays, insecticides or other combustible
fluids and scents or in an chlorinated environment. There is risk of fire or explosion.
Suctioning fatty or hot air, e.g. in the vicinity of chimneys, ovens, hobs, grills,
toasters etc., or burning candles. There is a risk of fire.
Use as a substitute for proper ventilation, e.g. as a fresh air supply. The appliance
is not a suitable substitute for airing or ventilation. It cannot regulate (neither increase nor reduce) air humidity either.
Use as a substitute for extractor hoods or extractor units, e.g. in kitchens or car-
penter's workshops.
Use outdoors or in wet rooms (e.g. in bathrooms or saunas). There is a risk of the
appliance being damaged by moisture.
Sticking objects into the appliance's openings. Take particular care to keep hair
and loose items of clothing away from the appliance. Risk of injury!
Use without all filters being correctly installed.
Covering the appliance or placing objects on the appliance.
Modifying or repairing the appliance yourself.
22
Page 23
2 Unpacking and setting up
CAUTION:
NOTE:
WARNING:
WARNING:
WARNING:
CAUTION:
2.1 Unpacking
Unpack the appliance and all accessory parts and check that the contents are undamaged and complete
(Zpage 18, „Your air purifier“).
Always dispatch the appliance in its original packaging to avoid transport damage. Keep the packaging for this
purpose. Dispose of packaging material which is no longer required in accordance with the applicable regulations
of your country.
Contact our service representative immediately if you notice any transport damage Zpage 102, „International
Service“.
2.2 Selecting the location for installation
Risk of fire or explosion! Set the appliance up in a place in which it cannot come into contact with chemicals or
heat sources and cannot suction explosive, hot or fatty air.
GB
Hazard to your health! Set the appliance up so that the soiled air is not suctioned past persons, in particular if
they are sleeping.
Risk of falling! Only unwind the sufficient length of cord so that you can connect the plug to the nearest socket.
Wind the rest of the cord back onto the cord winder in the base. Always lay the cord so that it cannot become a
stumbling hazard.
Make sure that you place the appliance on a stable, horizontal surface. Never place the appliance on soft surfaces,
such as beds or sofas. Do not set up the appliance in the pivoting range of doors or windows or in areas in which
you have to move it frequently.
Make sure that the air can be suctioned and given off free from obstructions.
23
Page 24
3 Connecting and operating
WARNING:
CAUTION:
2
CAUTION:
3
3.1 Connecting
Risk of injury! Check the appliance and its power cord before every use. A damaged appliance must never be
used.
Only use the appliance if you have made sure that all the filters are properly in place and no openings are blocked.
1. Make sure that the location for installation meets all the re-
quirements in Zchapter 2.2, „Selecting the location for installa-
tion“.
2. Make sure that the socket which you intend to use carries the
same electrical voltage as that shown on the type plate on the
underside of the appliance.
3. You can now set up the appliance upright or lying flat (Fig. 2).
There are 4 feet provided on the respective underside for this
purpose.
4. Make sure that there is sufficient free space around the air inlet
and air outlet.
3.2 Switching on
You only need to touch the buttons on the operating panel very lightly. It is not necessary to actuate them with
force. This can cause damage to the buttons.
1. Switch on the appliance by pressing the button (Fig. 3).
24
- The LED above the button lights up.
- If you wish to adjust the power: Zchapter 3.3, „Selecting the
power“.
- If you want the appliance to switch off after a certain period
of time: Zchapter 3.4, „Setting the timer“.
To switch off the appliance, press the button (Fig. 3) again. All
the LEDs go out and the blower stops.
Page 25
3.3 Selecting the power
4
CAUTION:
5
1. Select the power on the appliance when it is switched on using
the button (Fig. 4):
-"L": appliance runs particularly quietly
-"M": medium setting
-"H": appliance runs at high speed.
The LED shows the respective current setting.
3.4 Setting the timer
If you want the appliance to run for a certain tim e and then switch off automatically, it is recommendable to use the
timer function:
1. Select the duration until automatic deactivation on the appli-
ance when it is switched on using the button (Fig. 5):
-"2": the appliance switches off after 2 hours
-"4": the appliance switches off after 4 hours
-"8": the appliance switches off after 8 hours
GB
Make sure that the LED to match your selection lights up. If none
of the 3 timer LEDs light up, the appliance will continue to run.
You can still switch off the appliance at any time using the button.
25
Page 26
4 Caring for the appliance
WARNING:
CAUTION:
CAUTION:
6
Risk of injury! Before you clean or maintain the appliance, switch off the appliance and pull the plug from the
mains socket.
The appliance will run less efficiently if it is not cared for sufficiently.
As required: Clean the housing (Zchapter 4.1, „Cleaning the housing“).
Every 3 months or as soon as the "Odor Filter" LED lights up: Zchapter 4.2, „Replacing the carbon filter“
Every 6 months or as soon as the "HEPA" LED lights up: Zchapter 4.3, „Replacing the HEPA filter“
4.1 Cleaning the housing
Do not use cleaning agents, scouring agents or alcohol, as these
may damage the housing.
1. With the appliance switched off, remove any fluff and dust from
the ventilation slats with a vacuum cleaner (Fig. 6).
2. Clean the remaining surfaces with a soft, lint-free cloth.
26
Page 27
4.2 Replacing the carbon filter
CAUTION:
NOTE:
NOTE:
7
8
9
10
1. Make sure that the plug has been disconnected from the mains
socket.
2. Push the release catches on the front panel (Fig. 7).
Carefully remove the front panel.
3. Remove the used carbon filter from the HEPA filter (Fig. 8).
The carbon filter cannot be cleaned. It can only be replaced (for
ordering details see Zchapter 5.3, „Accessories and spare parts“).
Dispose of the used filter with the domestic waste.
4. Unpack the new carbon filter.
5. Fit the new carbon filter to the hook and eye fasteners on the
HEPA filter.
GB
It does not matter which way round you attach the new filter.
However, as soon as the filter has been used, you can no longer
turn it round as dirt would otherwise get into the HEPA filter.
6. Place the front panel in the recesses in the bases of the appli-
ance (Fig. 9/arrows).
7. Then push down the front panel (Fig. 10) until you hear and see
the release catches click into place.
27
Page 28
4.3 Replacing the HEPA filter
NOTE:
CAUTION:
NOTE:
NOTE:
11
12
13
14
1. Make sure that the plug has been disconnected from the mains
2. Push the release catches on the front panel (Fig. 11).
3. Remove the carbon filter from the HEPA filter (Fig. 8).
If you do not want to replace the carbon filter at the same time,
make a note of which side was facing the HEPA filter. This is
important so that no dirt gets into the HEPA filter when re-fitting.
4. Remove the used HEPA filter (Fig. 12) from its fitting.
The HEPA filter cannot be cleaned. It can only ever be replaced (for
ordering details see Zchapter 5.3, „Accessories and spare parts“).
Dispose of the used filter with the domestic waste.
5. Unpack the new HEPA filter.
6. Place the new HEPA filter in its fitting.
socket.
Carefully remove the front panel (Fig. 11).
Make sure that the "TOP" marking (Fig. 13/"TOP") on the HEPA filter points upwards (Fig.13/arrow) into the inside of the appliance.
7. Fit the carbon filter to the hook and eye fasteners on the HEPA
fi lter aga in ( Fig . 8 ). I f you do n ot i nse rt a new carb on f ilt er, mak e
sur e tha t th e sid e of t he ca rbon filt er wh ich i s on t he in side is th e
side which was on the inside beforehand.
8. Place the front panel in the recesses in the bases of the appli-
ance (Fig. 13/arrows).
9. Then push down the front panel (Fig. 14) until you hear and see
the release catches click into place.
28
Page 29
4.4 Resetting the filter change LED
15
If one of the two filter change LEDs ("Odor Filter" or "HEPA") is still
lit up after replacing the filter although you have replaced the filter
in question with a new one:
1. Press and hold the button until the LED goes out.
GB
29
Page 30
5 Solving problems
WARNING:
NOTE:
5.1 Correcting problems yourself
Before contacting the service hotline (Zpage 102, „International Service“), please check if you can solve the problem yourself using the following table.
Never use a faulty appliance or operate an appliance with a faulty power cord.
Before you try to localise the problem, switch off the appliance and pull the plug from the mains socket.
Problem Possible cause Solution
The appliance will
not start
The appliance
switches itself off
The "Odor Filter"
LED above the
button lights
up
The "HEPA" LED
above the
button lights up
The appliance is
unusually loud
when running
The power cord is not
plugged in.
The front panel or the
HEPA/carbon filter is not
inserted properly.
The timer function had
been activated.
The carbon filter needs to
be replaced.
The HEPA filter needs to
be replaced.
The highest power level
("H") has been set.
One of the filters is soiled
and has to be replaced.
The air inlet or outlet is not
free from obstructions.
Insert the plug into the mains socket.
Check whether the front panel and the HEPA/carbon filter are
inserted correctly, see Zchapter 4.2, „Replacing the carbon fil-
ter“ or Zchapter 4.3, „Replacing the HEPA filter“ respectively.
See Zchapter 3.4, „Setting the timer“ for information on selecting and deselecting the timer function.
Replace the carbon filter as described in Zchapter 4.2, „Re-
placing the carbon filter“.
Replace the HEPA filter as described in Zchapter 4.3, „Replac-
ing the HEPA filter“.
Select a power level which you find more pleasant, Zchapter
3.3, „Selecting the power“.
Replace the filters as described in Zchapter 4.2, „Replacing the
carbon filter“ and Zchapter 4.3, „Replacing the HEPA filter“.
Make sure that there is sufficient free space around the air inlet
and outlet.
If you cannot solve the problem using this table, contact the Dirt Devil customer service department (Zpage
102, „International Service“).
30
Page 31

5.2 Hotline and customer service
NOTE:
CAUTION:
Zpage 102, „International Service“
This operating manual is available in electronic form. Simply visit
www.dirtdevil.com and look for "OPERATING MANUALS" in the download area.
Enter the model number of the appliance and download the corresponding PDF.
5.3 Accessories and spare parts
AC150 AC250 AC350
150012 Front panel (Fig. 1/10)
150022 Filter set (1 HEPA,
2 carbon filters)
250012 Front panel (Fig. 1/10) 350012 Front panel (Fig. 1/10)
250022 Filter set (1 HEPA,
2 carbon filters)
350022 Filter set (1 HEPA,
2 carbon filters)
5.4 Warranty
The statutory warranty regulations in accordance with the EU Directive 1999/44/EC apply.
In non-EU countries the minimum requirements of the warranty in the respective country apply.
5.5 Disposal
Risk of environmental damage in case of improper disposal! Electrical waste must not be disposed of together with domestic waste. Use local old-appliance collection points instead.
GB
31
Page 32

Votre épurateur d’air
Nous sommes heureux de vous compter parmi les utilisateurs de notre épurateur d’air !
Nous vous remercions de cet achat et de votre confiance !
Tableau de commande et éléments de l'appareil (Ill. 1)
1 Changer les filtres et reset
| „Odor Filter“ : Changer le filtre en carbone
| „HEPA“ : Changer le filtre HEPA
Z chapitre 4.2, „Changer le filtre en carbone“
Z chapitre 4.3, „Changer le filtre HEPA“
Z chapitre 4.4, „Réinitialiser la LED du changement“
2Minuterie
| „2“: s'arrête 2 heures après
| „4“: s'arrête 4 heures après
| „8“: s'arrête 8 heures après
Z chapitre 3.4, „Réglage de la minuterie“
3 Puissance
| „L“ : L'appareil est particulièrement silencieux
| „M“ : Réglage moyen
| „H“ : L'appareil fonctionne à régime élevé
Z chapitre 3.3, „Sélection de la puissance“
Caractéristiques techniques
4 Power
| Marche/Arrêt de l'appareil
Z chapitre 3.2, „Mise en marche“
5 Touche de déverrouillage du cache avant
6 Marque de mise en place du filtre HEPA
7 Filtre HEPA
8 Filtre en carbone
9 Soufflante
10 Cache avant
11 Pied avec encoche pour le cache avant
12 Arrivée d'air
13 Fiche avec cordon d'alimentation
14 Sortie d'air
Non illustrée :
Mode d'emploi
Nom du modèle : PUREZA
Modèle : AC150 AC250 AC350
Type d'appareil : Epurateur d’air
Tension : 220 V
Longueur du câble : env. 1,8 m
Puissance : 33/42/67 W (L/M/H) 45/62/85 W (L/M/H) 63/81/107 W (L/M/H)
Poids : env. 3,6 kg env. 4,7 kg env. 6,4 kg
Sous réserve de modifications d'ordre technique ou co nceptuel liées à l'évolution du produit.
© Royal Appliance International GmbH
32
150
250
PUREZA
− 240 V~, 50 Hz
PUREZA
350
Page 33

Sommaire
1 Consignes de sécurité .............................................................. 34
1.1 À propos du mode d'emploi............................................................................................... 34
1.2 Indications relatives à certains groupes de personnes ....................................................... 34
1.3 À propos de l'alimentation électrique................................................................................ 35
1.4 Si l'aspirateur est défectueux............................................................................................. 35
1.5 Utilisation conforme à la destination................................................................................. 36
2 Déballage et installation ......................................................... 37
2.1 Déballage .......................................................................................................................... 37
2.2 Choix du lieu d'installation ................................................................................................ 37
3 Branchement et fonctionnement ............................................. 38
3.1 Branchement..................................................................................................................... 38
3.2 Mise en marche ................................................................................................................. 38
3.3 Sélection de la puissance ................................................................................................... 39
3.4 Réglage de la minuterie..................................................................................................... 39
FR
4 Entretien de l'appareil............................................................. 40
4.1 Nettoyage du boîtier de l'aspirateur .................................................................................. 40
4.2 Changer le filtre en carbone............................................................................................... 41
4.3 Changer le filtre HEPA........................................................................................................ 42
4.4 Réinitialiser la LED du changement ................................................................................... 43
5 Solutions en cas de problèmes.................................................. 44
5.1 Résoudre vous-même les problèmes ................................................................................. 44
5.2 Assistance téléphonique et service clientèle...................................................................... 45
5.3 Liste des accessoires et des pièces de rechange ................................................................. 45
5.4 Garantie légale .................................................................................................................. 45
5.5 Élimination........................................................................................................................ 45
33
Page 34

1 Consignes de sécurité
AVERTISSEMENT:
ATTENTION:
REMARQUE:
1.1 À propos du mode d'emploi
Veuillez lire attentivement et intégralement ce mode d'emploi, avant de vous servir
de l'appareil. Conservez précieusement ce mode d'emploi. Remettez toujours le mode
d'emploi à toute personne se servant de l'appareil.
Le non-respect de ce mode d'emploi peut entraîner des blessures graves ou des dommages irréparables à l'appareil. Nous déclinons toute responsabilité pour des dommages résultant du non respect de ce mode d'emploi.
Les informations importantes sont particulièrement mises en évidence dans les chapitres suivants.
Nous vous avertissons des dangers pouvant mettre en péril votre santé et nous vous informons sur les éventuels
risques de blessures.
Nous attirons votre attention sur les risques éventuels pour l'appareil ou pour tout autre objet.
Les astuces et les informations sont bien mises en évidence.
1.2 Indications relatives à certains groupes de personnes
Ces appareils peuvent être utilisés par des enfants d'au moins 8 ans et par des
personnes se caractérisant par des capacités physiques, sensorielles ou mentales réduites ou disposant de peu d'expérience et/ou de connaissances. Elles doivent cependant avoir été rendues attentives à une utilisation sûre de cet appareil et des dangers
qu'impliquent son utilisation.
Les enfants ne doivent pas jouer avec cet appareil. Le nettoyage et l'entretien de
l'appareil ne doivent pas être exécutés par des enfants si ceux-ci ne sont pas sous surveillance.
Tenez les matériaux d'emballage hors de portée des enfants. Il existe un risque
d'asphyxie.
34
Page 35

Gardez la télécommande ainsi que la pile hors de portée des enfants. Les enfants
risquent d'avaler la pile.
1.3 À propos de l'alimentation électrique
L'appareil est alimenté par du courant électrique, ce qui implique par principe un
risque d'électrocution. C'est pourquoi :
Ne trempez jamais l'appareil dans l'eau ou dans d'autres liquides. Conservez-le à
l'abri de la pluie et de l'eau. N'utilisez jamais l'appareil à l'extérieur ou dans des locaux
très humides.
Ne touchez jamais la prise avec des mains mouillées. Pour débrancher l'appareil,
tirez toujours sur la fiche. Ne tirez jamais sur le câble, car il pourrait être endommagé.
Ne portez jamais l'appareil en le tenant par le cordon d'alimentation.
Assurez-vous que le cordon d'alimentation n'est pas plié, coincé, écrasé ni en
contact direct avec une source de chaleur ni ne touche une arête tranchante. Il ne doit
pas non plus risquer de faire trébucher les gens.
Assurez-vous, avant le branchement au réseau d'alimentation, que la tension
électrique indiquée sur la plaque signalétique correspond à celle de la prise.
Avant de nettoyer ou d'entretenir l'appareil, éteignez-le et débranchez-le.
FR
1.4 Si l'aspirateur est défectueux
N'utilisez jamais un appareil défectueux ou ayant un cordon d'alimentation dé-
fectueux. Si le cordon de raccordement au secteur de cet appareil est endommagé,
faites-le remplacer par le fabricant, son service après-vente ou toute personne ayant
des compétences similaires, ceci afin d'éviter tout danger.
Amenez l'appareil à réparer dans un magasin spécialisé ou au service après-
vente. Adresse
Zpage 102, „International Service“.
35
Page 36

1.5 Utilisation conforme à la destination
Utilisez l'épurateur d’air uniquement à domicile. Toute utilisation à titre professionnel
est strictement interdite.
Utilisez l'épurateur d’air uniquement à domicile, pour purifier de l'air ambiant frais et
sec. Toute autre utilisation est considérée comme non conforme et est interdite.
Cette interdiction concerne en particulier :
L'aspiration d'air contaminé par des vapeurs ou gaz toxiques ainsi que des gaz
d'échappement et des gaz de combustion ou l'aspiration d'air contaminé microbiologiquement. De même, l'air dont la charge de poussière et de copeaux dépasse les
concentrations domestiques ne doit pas être aspiré. Votre santé pourrait être affectée
par un air pollué de la sorte.
L'utilisation à proximité de substances explosives, en flammes, comburantes, in-
cendiaires, inflammables ou volatiles ou l'aspiration de ces substances. N'utilisez pas
le produit p. ex. simultanément avec des agents d'imprégnation, laques pour cheveux, insecticides, avec d'autres fluides et parfums inflammables, ni dans des environnements contenant du chlore. Il y a un risque d'incendie et d'explosion.
L'aspiration d'air graisseux ou chaud, par exemple à proximité de cheminées,
poêles, fours, grills, grille-pain, etc. ou de bougies allumées. Il y a risque d'incendie.
L'utilisation pour remplacer une ventilation conforme, p. ex. pour une alimentation
d'air frais. L'appareil ne peut pas remplacer une ventilation et une aération correctes.
Il ne peut pas non plus réguler l'humidité de l'air (augmentation ou diminution).
L'utilisation pour remplacer les hottes d'aspiration ou les systèmes d'aspiration,
p. ex. dans les cuisines ou les menuiseries.
L'utilisation à l'extérieur ou dans des pièces humides (p. ex. dans des salles de
bains et saunas). L'humidité risque d'endommager l'appareil.
L'introduction d'objets dans les ouvertures de l'appareil. En particulier, tenez les
cheveux et les vêtements amples éloignés de l'appareil. Risque de blessures !
L'utilisation sans que tous les filtres soient installés correctement.
Le fait de couvrir l'appareil ou de placer des objets sur l'appareil.
Les transformations et les réparations faites par vous-même.
36
Page 37

2 Déballage et installation
ATTENTION:
REMARQUE:
AVERTISSEMENT:
AVERTISSEMENT:
AVERTISSEMENT:
ATTENTION:
2.1 Déballage
Déballez l'appareil et tous ses accessoires, puis vérifiez si le contenu est bien complet et en bon état (Zpage 38,
„Votre épurateur d’air“).
Expédiez l'appareil uniquement dans son emballage d'origine afin d'éviter tout dommage. Conservez à cet effet
soigneusement l'emballage. Jetez les emballages dont vous n'avez plus besoin conformément aux réglementations nationales et locales en vigueur.
Si vous constatez des dommages dus au transport, contactez immédiatement notre filiale de service après-vente
Zpage 102, „International Service“.
2.2 Choix du lieu d'installation
Risque d'incendie et d'explosion ! Placez l'appareil dans un endroit où il ne peut pas entrer en contact avec des
produits chimiques ou des sources de chaleur, ni aspirer d'air explosif, chaud ou huileux.
FR
Danger pour la santé ! Installez l'appareil de telle sorte que l'air pollué ne soit pas aspiré là où se trouvent des personnes, surtout si elles dorment.
Risque de chute ! Déroulez juste assez de câble pour que vous puissiez brancher facilement le connecteur dans la
prise la plus proche. Enroulez le câble restant sur le rangement du cordon situé dans le fond. Disposez toujours le
cordon d'alimentation de telle manière que personne ne puisse trébucher dessus.
Assurez-vous que vous placez l'appareil sur une surface stable et horizontale. Ne placez jamais l'appareil sur une
surface molle comme celle des lits ou des canapés. De plus, ne placez pas l'appareil dans les zones d'ouverture
des portes et des fenêtres, ou dans les zones où vous devez vous déplacer fréquemment.
Faites attention à ce que l'air puisse être aspiré ou rejeté librement.
37
Page 38

3 Branchement et fonctionnement
AVERTISSEMENT:
ATTENTION:
2
ATTENTION:
3
3.1 Branchement
Risque de blessures ! Avant tout emploi, vérifiez l'appareil et le cordon d'alimentation. N'utilisez jamais un appareil qui est endommagé.
Utilisez l'appareil uniquement lorsque tous les filtres sont correctement montés et après vous être assuré
qu'aucune ouverture ne soit bouchée.
1. Assurez-vous que le lieu d'installation remplit les conditions in-
diquées au Zchapitre 2.2, „Choix du lieu d'installation“.
2. Assurez-vous que la prise de courant à utiliser conduit la même
tension électrique que celle indiquée sur la plaque signalétique
sous l'appareil.
3. Vous ne pouvez mettre l'appareil en place que debout ou cou-
ché (Ill. 2). Pour cela, il y a 4 pieds prévus en dessous.
4. Assurez-vous qu'il y a suffisamment de place autour de l'arrivée
et de la sortie d'air.
3.2 Mise en marche
Il suffit de toucher légèrement les touches du tableau de commande. Ce n'est pas la peine d'appuyer fortement,
cela pourrait endommager les touches.
1. Mettez l'appareil en marche en appuyant sur la touche
(Ill. 3).
38
- La LED au-dessus de la touche s'allume.
- Pour régler la puissance : Zchapitre 3.3, „Sélection de la puis-
sance“.
- Si l'appareil s'arrête après un certain temps : Zchapitre 3.4,
„Réglage de la minuterie“.
Pour arrête l'appareil, rappuyer sur la touche (Ill. 3). Toutes les
LED s'éteignent et la soufflante s'arrête.
Page 39

3.3 Sélection de la puissance
4
ATTENTION:
5
1. Sélectionner la puissance sur l'appareil en marche avec la
La LED indique le réglage actuel.
touche (Ill. 4) :
-„L“ : L'appareil est particulièrement silencieux
-„M“ : Réglage moyen
-„H“ : L'appareil fonctionne à régime élevé.
3.4 Réglage de la minuterie
Si l'appareil doit fonctionner pendant un certain temps, et s'arrêter ensuite tout seul, il est recommandé d'utiliser la
fonction Minuterie :
1. Sélectionner la durée jusqu'à l'arrêt automatique sur l'appareil
en marche avec la touche (Ill. 5) :
-„2“ : L'appareil s'arrête 2 heures après
-„4“ : L'appareil s'arrête 4 heures après
-„8“ : L'appareil s'arrête 8 heures après
Faites attention à ce que la LED sélectionnée soit allumée. Si
aucune des 3 LED de la minuterie n'est allumée, l'appareil reste en
marche !
Vous pouvez arrêter l'appareil à tout moment avec la touche .
FR
39
Page 40

4 Entretien de l'appareil
AVERTISSEMENT:
ATTENTION:
ATTENTION:
6
Risque de blessures ! Avant de nettoyer ou d'entretenir l'appareil, éteignez-le et débranchez-le.
Un appareil qui n'est pas assez entretenu, est moins efficace.
Si nécessaire : nettoyez le corps de l'appareil (Zchapitre 4.1, „Nettoyage du boîtier de l'aspirateur“).
Tous les 3 mois ou dès que la LED „Odor Filter“ s'allume : Zchapitre 4.2, „Changer le filtre en carbone“
Tous les 6 mois ou dès que la LED „HEPA“ s'allume : Zchapitre 4.3, „Changer le filtre HEPA“
4.1 Nettoyage du boîtier de l'aspirateur
N'utilisez en aucun cas des produits de nettoyage, des détergents
ou de l'alcool, car cela peut endommager le boîtier.
1. Enlevez les peluches et la poussière des fentes d'aération de
l'appareil arrêté, avec un aspirateur (Ill. 6).
2. Nettoyez les autres surface avec un c hiffon doux non pelucheux.
40
Page 41

4.2 Changer le filtre en carbone
ATTENTION:
REMARQUE:
REMARQUE:
7
8
9
10
1. Assurez-vous que l'appareil est débranché.
2. Appuyez sur les touches de déverrouillage du cache avant
(Ill. 7). Enlever avec précaution le cache avant.
3. Enlevez le filtre en carbone usager du filtre HEPA (Ill. 8).
Il n'est pas possible de nettoyer le filtre en carbone. Il faut le changer (données pour la commande, cf. Zchapitre 5.3, „Liste des
accessoires et des pièces de rechange“).
Les filtres usagés peuvent être jetés avec les ordures ménagères.
4. Déballez le filtre en carbone neuf.
5. Mettez le filtre en carbone neuf sur les bandes velcro du filtre
HEPA.
FR
Vous pouvez utiliser le filtre du côté que vous voulez. Cependant,
dès que le filtre a été utilisé, vous ne pouvez plus le retourner, car
sinon la saleté rentrerait dans le filtre HEPA.
6. Insérez d'abord le cache avant dans les encoches des pieds de
l'appareil (Ill. 9/flèches).
7. Appuyez ensuite sur le cache avant (Ill. 10), jusqu'à ce que les
touches de déverrouillage s'enclenchent visiblement et de manière audible.
41
Page 42

4.3 Changer le filtre HEPA
REMARQUE:
ATTENTION:
REMARQUE:
REMARQUE:
11
12
13
14
1. Assurez-vous que l'appareil est débranché.
2. Appuyez sur les touches de déverrouillage du cache avant
(Ill. 11).
Enlever avec précaution le cache avant (Ill. 11).
3. Enlevez le filtre en carbone du filtre HEPA (Ill. 8).
Si vous ne voulez pas changer en même temps le filtre en carbone,
notez le côté qui se trouve contre le filtre HEPA. C'est important
pour qu'après la remise en place, il n'y ait toujours pas de saletés
qui rentrent dans le filtre HEPA.
4. Enlevez le filtre HEPA usager (Ill. 12) de son support.
Il n'est pas possible de nettoyer le filtre HEPA. Il faut toujours le
changer (données pour la commande, cf. Zchapitre 5.3, „Liste des
accessoires et des pièces de rechange“).
Les filtres usagés peuvent être jetés avec les ordures ménagères.
42
5. Déballez le filtre HEPA.
6. Mettez le filtre HEPA neuf sur son support.
Faites attention à ce que la marque „TOP“ (Ill. 13/“TOP“) du filtre
HEPA soit en haut, et à ce que la pointe de la flèche (Ill. 13/flèche)
soit orientée vers l'intérieur de l'appareil.
7. Remettez le filtre en carbone sur les bandes velcro du filtre HEPA
(Ill. 8). Si vous ne changez pas le filtre en carbone, faites attention à le remettre en place du bon côté.
8. Insérez d'abord le cache avant dans les encoches des pieds de
l'appareil (Ill. 13/flèches).
9. Appuyez ensuite sur le cache avant (Ill.14), jusqu'à ce que les
touches de déverrouillage s'enclenchent visiblement et de manière audible.
Page 43

4.4 Réinitialiser la LED du changement
15
Si l'une des deux LED de changement du filtre („Odor Filter“ ou
„HEPA“) est encore allumée après le changement du filtre, bien que
vous ayez changé le filtre correspondant :
1. Appuyez sur la touche , et maintenez-là enfoncée jusqu'à ce
que la LED s'éteigne.
FR
43
Page 44

5 Solutions en cas de problèmes
AVERTISSEMENT:
REMARQUE:
5.1 Résoudre vous-même les problèmes
Avant de contacter l'assistance téléphonique (Zpage 102, „International Service“), vérifiez si vous pouvez éliminer
le problème par vous-même à l'aide du tableau ci-après.
N'utilisez jamais un appareil défectueux ou ayant un cordon d'alimentation abîmé.
Avant de rechercher la cause du problème, éteignez et débranchez l'appareil.
Problème Cause possible Solution
Impossibilité de
mettre en
marche l'appareil
L'appareil s'arrête tout seul
La LED „Odor Fil-
ter“ au-dessus
de la touche
est allumée
La LED „HEPA“
au-dessus de la
touche est
allumée
L'appareil fait
beaucoup de
bruit
La fiche n'est pas branchée à
la prise.
Le cache avant ou le filtre HEPA/en carbone ne sont pas
mis en place correctement.
La fonction minuterie a été
sélectionnée.
Il fau t cha nge r le fil tre en ca rbone.
Il faut changer le filtre HEPA. Changez le filtre HEPA de la manière indiquée au Zchapitre
Le niveau de puissance le
plus élevé („H“) a été réglé.
L'un des filtres est sale et il
faut le changer.
Branchez la fiche dans la prise de courant.
Contrôlez si le cache avant ou le filtre HEPA/en carbone ont
été mis en place correctement, cf. Zchapitre 4.2, „Changer le
filtre en carbone“ ou Zchapitre 4.3, „Changer le filtre HEPA“.
Pour activer ou désactiver la fonction minuterie, cf.
Zchapitre 3.4, „Réglage de la minuterie“.
Changez le filtre en carbone de la manière indiquée au
Zchapitre 4.2, „Changer le filtre en carbone“.
4.3, „Changer le filtre HEPA“.
Sélectionnez une puissance plus agréable, Zchapitre 3.3,
„Sélection de la puissance“.
Changez les filtre de la manière indiquée au Zchapitre 4.2,
„Changer le filtre en carbone“ et au Zchapitre 4.3, „Changer
le filtre HEPA“.
Prenez contact avec le Service Après-Vente de Dirt Devil si vous ne pouvez pas remédier vous-même à l'anomalie
au moyen de ce tableau (Zpage 102, „International Service“).
44
L'arrivée ou la sortie d'air est
bouchée.
Dégagez la zone de l'arrivée ou de la sortie d'air.
Page 45

5.2 Assistance téléphonique et service clientèle
REMARQUE:
ATTENTION:
Zpage 102, „International Service“
Ce manuel est également disponible sous forme électronique. Il suffit d'aller pour cela sur le site
www.dirtdevil.de dans la zone de téléchargement à "MODES D'EMPLOI".
Tapez le numéro du modèle de l'appareil, et téléchargez le fichier PDF correspondant.
5.3 Liste des accessoires et des pièces de rechange
AC150 AC250 AC350
150012 Cache avant (Ill. 1/10)
150022 Kit de filtres (1 filtre HE-
PA, 2 filtres en carbone)
250012 Cache avant (Ill. 1/10) 350012 Cache avant (Ill. 1/10)
250022 Kit de filtres (1 filtre HE-
PA, 2 filtres en carbone)
350022 Kit de filtres (1 filtre HE-
PA, 2 filtres en carbone)
5.4 Garantie légale
Les règles de garantie légale suivant la directive européenne 1999/44/CE sont applicables. Pour les pays hors de
l'UE, les exigences minimum de garantie légale en vigueur dans le pays respectif sont applicables.
5.5 Élimination
Une élimination non conforme peut entraîner des dommages écologiques ! Les déchets électriques ne doivent pas être jetés avec les déchets domestiques. Utilisez donc les emplacements
locaux servant à la restitution d'appareils usagés.
FR
45
Page 46

Uw luchtreiniger
Het verheugt ons dat u voor onze luchtreiniger gekozen heeft.
Wij danken u voor de aankoop en voor het in ons gestelde vertrouwen!
Bedieningspaneel en apparaatonderdelen (afb. 1)
1 Filter vervangen en resetten
| "Odor filter": Carbonfilter vervangen
| "HEPA": HEPA-filter vervangen
Z hoofdstuk 4.2, „Carbonfilter vervangen“
Z hoofdstuk 4.3, „HEPA-filter vervangen“
Z hoofdstuk 4.4, „Filtervervanging led resetten“
2Timer
| "2": na 2 uur uitschakelen
| "4": na 4 uur uitschakelen
| "8": na 8 uur uitschakelen
Z hoofdstuk 3.4, „Timer instellen“
3Vermogen
| "L": apparaat loopt bijzonder stil
| "M": gemiddelde instelling
| "H": apparaat loopt met een hoog toerental
Z hoofdstuk 3.3, „Vermogen kiezen“
Technische gegevens
4 Power
| Apparaat in-/uitschakelen
Z hoofdstuk 3.2, „Inschakelen“
5 Toetsen om de frontafscherming te ontgrendelen
6 Inzetmarkering van het HEPA-filter
7 HEPA-filter
8 Carbonfilter
9 Blazer
10 Frontafscherming
11 Standvoet met uitsparing voor de frontafscherming
12 Luchtinlaat
13 Stekker en stroomkabel
14 Luchtuitlaat
niet afgebeeld:
Bedieningshandleiding
Modelnaam: PUREZA
Model: AC150 AC250 AC350
Soort apparaat: Luchtreiniger
Spanning: 220 V
Snoerlengte: ca. 1,8 m
Vermogen: 33/42/67 W (L/M/H) 45/62/85 W (L/M/H) 63/81/107 W (L/M/H)
Gewicht: ca. 3,6 kg ca. 4,7 kg ca. 6,4 kg
Technische en designwijziginge n in verband
met voortdurende productverbeteringen voorbehouden.
© Royal Appliance International GmbH
46
150
250
PUREZA
− 240 V~, 50 Hz
PUREZA
350
Page 47

Inhoudsopgave
1 Veiligheidsinstructies.............................................................. 48
1.1 m.b.t. deze handleiding..................................................................................................... 48
1.2 m.b.t. bepaalde groepen van personen ............................................................................. 48
1.3 m.b.t. de stroomvoeding................................................................................................... 49
1.4 indien het apparaat defect is ............................................................................................. 49
1.5 m.b.t. het doelmatig gebruik............................................................................................. 50
2 Uitpakken en opstellen............................................................ 51
2.1 Uitpakken.......................................................................................................................... 51
2.2 Opstelplaats selecteren...................................................................................................... 51
3 Aansluiten en bedienen........................................................... 52
3.1 Aansluiten ......................................................................................................................... 52
3.2 Inschakelen ....................................................................................................................... 52
3.3 Vermogen kiezen............................................................................................................... 53
3.4 Timer instellen................................................................................................................... 53
NL
4 Apparaat onderhouden ........................................................... 54
4.1 Behuizing reinigen ............................................................................................................ 54
4.2 Carbonfilter vervangen...................................................................................................... 55
4.3 HEPA-filter vervangen ....................................................................................................... 56
4.4 Filtervervanging led resetten............................................................................................. 57
5 Problemen verhelpen.............................................................. 58
5.1 Zelf problemen verhelpen ................................................................................................. 58
5.2 Hotline en klantenservice .................................................................................................. 59
5.3 Lijst van toebehoren en reserveonderdelen....................................................................... 59
5.4 Garantie............................................................................................................................. 59
5.5 Afvalverwijdering.............................................................................................................. 59
47
Page 48

1 Veiligheidsinstructies
WAARSCHUWING:
OPGELET:
AANWIJZING:
1.1 m.b.t. deze handleiding
Lees deze bedieningshandleiding volledig door voordat u het apparaat gaat gebruiken. Berg de handleiding goed op. Als u dit apparaat aan een ander doorgeeft, voeg
er dan ook de bedieningshandleiding bij.
Het niet in acht nemen van deze handleiding kan zwaar letsel of schade aan het apparaat tot gevolg hebben. Voor schade ontstaan door het niet in acht nemen van deze
bedieningshandleiding aanvaarden wij geen aansprakelijkheid.
Belangrijke aanwijzingen zijn in de volgende hoofdstukken speciaal aangeduid.
Waarschuwt voor gevaren voor uw gezondheid en wijst op mogelijk verwondingsrisico.
Wijst op mogelijke gevaren voor het apparaat of andere voorwerpen.
Benadrukt tips en informatie.
1.2 m.b.t. bepaalde groepen van personen
Deze apparaten kunnen door kinderen van 8 jaar en ouder en door personen met
beperkte fysieke, sensorische of geestelijke vaardigheden of met gebrek aan ervaring
en/of kennis worden gebruikt, als ze onder toezicht staan of instructies hebben gekregen aangaande het veilige gebruik van het apparaat en de daaruit resulterende gevaren begrepen hebben.
Kinderen mogen niet met het apparaat spelen. Reiniging en gebruikersonder-
houd mogen niet door kinderen worden uitgevoerd, als ze niet onder toezicht staan.
Houd verpakkingsmateriaal buiten bereik van kinderen. Er bestaat verstikkings-
gevaar.
Houd de afstandsbediening alsmede de batterij uit de buurt van kinderen. Er be-
staat gevaar dat kinderen de batterij inslikken.
48
Page 49

1.3 m.b.t. de stroomvoeding
Het apparaat werkt op elektrische stroom, waarbij in principe altijd het gevaar van
een elektrische schok bestaat. Daarom:
Dompel het apparaat nooit in water of andere vloeistoffen. Houd het uit de buurt
van regen en vochtigheid. Gebruik het apparaat nooit in de openlucht of in ruimtes
met een hoge luchtvochtigheid.
Raak de stekker nooit aan met natte handen. Trek altijd aan de stekker zelf als u
deze uit het stopcontact wilt trekken. Trek nooit aan de kabel, omdat die beschadigd
zou kunnen worden. Transporteer het apparaat bovendien nooit aan de stroomkabel.
Zorg ervoor dat de stroomkabel niet geknikt, geklemd of eroverheen gereden
wordt en dat hij niet met verwarmingsbronnen of scherpe randen in aanraking komt.
Hij mag bovendien geen struikelgevaar vormen.
Controleer vóór het aansluiten aan de stroomvoeding of de op het typeplaatje
vermelde spanning overeenkomt met de spanning van uw stopcontact.
Voordat u het apparaat gaat reinigen of onderhouden, schakelt u het uit en trekt
u de stekker uit het stopcontact.
NL
1.4 indien het apparaat defect is
Gebruik een apparaat nooit als het defect is of een defecte kabel heeft. Als de
aansluitkabel van dit apparaat wordt beschadigd, moet deze, om risico te voorkomen,
door de fabrikant of de klantenservice van de fabrikant of door iemand met dezelfde
competentie worden vervangen.
Geef een defect apparaat voor reparatie aan een vakhandelaar of de klantenser-
vice. Adres
Zpagina 103, „International Service“.
49
Page 50

1.5 m.b.t. het doelmatig gebruik
Gebruik de luchtreiniger uitsluitend voor huishoudelijk gebruik. Hij is niet geschikt
voor industrieel gebruik.
Gebruik de luchtreiniger uitsluitend in het huishouden voor het reinigen van koele,
droge kamerlucht. Elke andere vorm van gebruik geldt als niet conform de voorschriften en is niet toegestaan.
Verboden is met name:
Het aanzuigen van lucht die met giftige dampen of gassen alsmede met afvoer-
gassen of rookgassen of microbiologisch belast is. Eveneens mag lucht waarvan de
stof- en spaanderbelasting boven de gebruikelijke huishoudelijke concentraties uitgaat niet worden aangezogen. Uw gezondheid zou onder een dergelijke belaste lucht
te lijden kunnen hebben.
Het gebruik in de buurt van explosieve, brandende, brandbevorderende, brand-
versnellende, ontvlambare of vluchtige stoffen of het aanzuigen van deze stoffen. Gebruik het product bijv. niet gelijktijdig met impregneermiddelen, haarsprays, insecticide of andere ontvlambare vloeistoffen en reukstoffen of in een chloorhoudende
omgeving. Dit kan brand- en explosiegevaar tot gevolg hebben.
Het aanzuigen van vettige of hete lucht, bijv. in de buurt van haarden, kachels,
fornuizen, grills, toasters enz. of brandende kaarsen. Er bestaat brandgevaar.
Het gebruik als vervanging voor een reglementaire ventilatie, bijv. voor de aanvoer
van verse lucht. Het apparaat kan reglementair luchten en beluchten niet vervangen.
Het kan eveneens de luchtvochtigheid niet regelen (noch verhogen noch verlagen).
Het gebruik als vervanging voor afzuigkappen of afzuigingen, bijv. in keukens of
meubelmakerijen. Het gebruik in de openlucht of in vochtige ruimtes (bijv. in badkamers en sauna's). Er bestaat gevaar dat vochtigheid het apparaat beschadigt.
Voorwerpen in de openingen van het apparaat steken. Houd vooral haren en los-
se kledingstukken uit de buurt van het apparaat. Verwondingsgevaar!
Het gebruik zonder dat alle filters correct geïnstalleerd zijn.
Het afdekken van het apparaat of het neerzetten van voorwerpen op het apparaat.
Zelfstandig ombouwen of repareren.
50
Page 51

2 Uitpakken en opstellen
OPGELET:
AANWIJZING:
WAARSCHUWING:
WAARSCHUWING:
WAARSCHUWING:
OPGELET:
2.1 Uitpakken
Pak het apparaat en alle toebehoren uit en controleer of de inhoud ongeschonden en volledig is (Zpagina 46, „Uw
luchtreiniger“).
Verzend het apparaat steeds in de originele verpakking, zodat het niet wordt beschadigd. Bewaar daarom de verpakking. Verwerk verpakkingsmateriaal dat u niet meer nodig heeft volgens de in uw land geldende voorschriften.
Mocht u transportschade constateren, neem dan onmiddellijk contact op met onze servicevestiging Zpagina
103, „International Service“.
2.2 Opstelplaats selecteren
Brand- en explosiegevaar! Stel het apparaat op een plaats op waar het noch in contact met chemicaliën noch met
warmtebronnen kan komen, noch explosieve, hete of vettige lucht kan aanzuigen.
Gevaar voor uw gezondheid! Stel het apparaat zo op, dat de vervuilde lucht niet langs personen heen wordt aangezogen, met name wanneer deze slapen.
Gevaar voor vallen! Wikkel slechts zoveel kabel af waarmee u de stekker gemakkelijk in het meest nabijgelegen
stopcontact kunt steken. Wikkel de rest van de kabel weer op de zich in de bodem bevindende kabelopwikkeling.
Leg de kabel steeds zo, dat deze geen struikelbron kan worden.
Let erop dat u het apparaat op een stabiel, horizontaal oppervlak plaatst. Zet het apparaat nooit op zachte oppervlakken als die van bedden of banken. Zet het apparaat bovendien niet in zwenkbereiken van deuren en ramen of
in bereiken waarin u zich vaak moet bewegen.
Let erop dat de lucht vrij van hindernissen kan worden aangezogen en afgegeven.
NL
51
Page 52

3 Aansluiten en bedienen
WAARSCHUWING:
OPGELET:
2
OPGELET:
3
3.1 Aansluiten
Verwondingsgevaar! Controleer het apparaat en de stroomkabel vóór elk gebruik. Een beschadigd apparaat mag
niet worden gebruikt.
Gebruik het apparaat alleen als alle filters er goed zijn ingezet en als gegarandeerd is dat er geen openingen verstopt zijn.
1. Controleer of de plaats van opstelling aan de voorwaarden in
Zhoofdstuk 2.2, „Opstelplaats selecteren“ voldoet.
2. Controleer of het stopcontact dat u wilt gebruiken over dezelfde
elektrische spanning beschikt als op het typeplaatje aan de onderkant van het apparaat vermeld staat.
3. U kunt het apparaat nu staand of liggend opstellen (afb. 2).
Hiervoor zijn 4 voeten aan de betreffende onderkant voorzien.
4. Zorg ervoor dat er genoeg vrije ruimte is rondom de luchtinlaat-
en uitlaat.
3.2 Inschakelen
U hoeft de toetsen van het bedieningspaneel slechts zeer licht aan te raken. Een krachtig bedienen is niet nodig
en kan ertoe leiden dat de toetsen beschadigd raken.
1. Schakel het apparaat in door de -toets (afb. 3) in te drukken.
- De led boven de -toets brandt.
52
- Als u het vermogen wilt aanpassen: Zhoofdstuk 3.3, „Vermogen kiezen“.
- Als het apparaat na een bepaalde tijd uitgeschakeld moet
worden: Zhoofdstuk 3.4, „Timer instellen“.
Om het apparaat uit te schakelen drukt u opnieuw op de -toets
(afb. 3). Alle leds gaan uit en de blazer stopt.
Page 53

3.3 Vermogen kiezen
4
OPGELET:
5
1. Kies op het ingeschakelde apparaat het vermogen met de -
toets (afb. 4):
-"L": apparaat loopt bijzonder stil
-"M": gemiddelde instelling
-"H": apparaat loopt met een hoog toerental.
De led geeft telkens de actuele instelling aan.
3.4 Timer instellen
Als het apparaat een bepaalde tijd moet lopen en daarna zelfstandig uitgeschakeld moet worden, is het gebruik van
de timerfunctie aan te bevelen:
1. Kies op het ingeschakelde apparaat de duur tot de automatische
uitschakeling met de -toets (afb. 5):
-"2": apparaat wordt na 2 uur uitgeschakeld
-"4": apparaat wordt na 4 uur uitgeschakeld
-"8": apparaat wordt na 8 uur uitgeschakeld
Let erop dat de led van uw keuze brandt. Als geen van de 3 timerleds brandt, loopt het apparaat verder!
NL
U kunt het apparaat nog steeds altijd met de -toets uitschakelen.
53
Page 54

4 Apparaat onderhouden
WAARSCHUWING:
OPGELET:
OPGELET:
6
Verwondingsgevaar! Voordat u het apparaat gaat reinigen of onderhouden, schakelt u het uit en trekt u de stekker uit het stopcontact.
Een onvoldoende onderhouden apparaat werkt minder efficiënt.
indien nodig: Behuizing reinigen (Zhoofdstuk 4.1, „Behuizing reinigen“).
iedere 3 maanden of zodra de led "Odor filter" brandt: Zhoofdstuk 4.2, „Carbonfilter vervangen“
iedere 6 maanden of zodra de led "HEPA" brandt: Zhoofdstuk 4.3, „HEPA-filter vervangen“
4.1 Behuizing reinigen
Gebruik geen reinigingsmiddelen, schurende middelen of alcohol,
aangezien deze de behuizing kunnen beschadigen.
1. Ontdoe de ventilatiesleuf van het uitgeschakelde apparaat
m.b.v. een stofzuiger van pluizen en stof (afb. 6).
2. Reinig de rest van het oppe rvlak met een zachte, pluisvrije doek.
54
Page 55

4.2 Carbonfilter vervangen
OPGELET:
AANWIJZING:
AANWIJZING:
7
8
9
10
1. Controleer of de stekker uit het stopcontact is getrokken.
2. Druk op de ontgrendelingstoetsen van de frontafscherming
(afb. 7). Haal de frontafscherming er voorzichtig af.
3. Trek het verbruikte carbonfilter van het HEPA-filter (afb. 8).
Het carbonfilter kan niet gereinigd worden. Het kan alleen vervangen worden (zie voor bestelgegevens Zhoofdstuk 5.3, „Lijst
van toebehoren en reserveonderdelen“).
NL
Het verbruikte filter kunt u samen met het gewone huisvuil weggooien.
4. Pak het nieuwe carbonfilter uit.
5. Breng het nieuwe carbonfilter op de klittenbandsluitingen van
het HEPA-filter aan.
Het maakt daarbij niet uit met welke zijde u het nieuwe filter aanbrengt. Zodra het filter echter gebruikt is, kunt u het niet meer
omdraaien, omdat het vuil anders in het HEPA-filter komt.
6. Plaats de frontafscherming eerst in de uits paringen in de stand-
voeten van het apparaat (afb. 9/pijlen).
7. Klap de frontafscherming dan dicht (afb. 10), tot de ontgrende-
lingstoetsen hoorbaar en zichtbaar vastklikken.
55
Page 56

4.3 HEPA-filter vervangen
AANWIJZING:
OPGELET:
AANWIJZING:
AANWIJZING:
11
12
13
14
1. Controleer of de stekker uit het stopcontact is getrokken.
2. Druk op de ontgrendelingstoetsen van de frontafscherming
(afb. 11).
Haal de frontafscherming er voorzichtig af (afb. 11).
3. Trek het carbonfilter van het HEPA-filter (afb. 8).
Als u het carbonfilter niet ook tegelijk wilt vervangen, onthoud
dan welke zijde naar het HEPA-filter gericht was. Dat is belangrijk
om ervoor te zorgen dat er na het opnieuw aanbrengen nog
steeds geen vuil in het HEPA-filter komt.
4. Trek het verbruikte HEPA-filter (afb. 12) uit de console.
Het HEPA-filter kan niet gereinigd worden. Het kan altijd alleen
vervangen worden (zie voor bestelgegevens Zhoofdstuk 5.3,
„Lijst van toebehoren en reserveonderdelen“).
Het verbruikte filter kunt u samen met het gewone huisvuil weggooien.
56
5. Pak het nieuwe HEPA-filter uit.
6. Zet het nieuwe HEPA-filter in de console.
Let erop dat de "TOP"-markering (afb. 13/"TOP") op het HEPA-filter naar boven en de pijlpunt (afb.13/pijl) naar de binnenzijde
van het apparaat wijst.
7. Breng het carbonfilter weer op de klittenbandsluitingen van het
HEPA-filter aan (afb. 8). Als u geen nieuw carbonfilter plaatst,
let er dan op dat de zijde van het carbonfilter die eerder aan de
binnenkant lag ook nu aan de binnenkant ligt.
8. Plaats de frontafscherming eerst in de uitsparingen in de stand-
voeten van het apparaat (afb. 13/pijlen).
9. Klap de frontafscherming dan dicht (afb. 14), tot de ontgrende-
lingstoetsen hoorbaar en zichtbaar vastklikken.
Page 57

4.4 Filtervervanging led resetten
15
Als één van de twee filtervervangingsleds ("Odor filter" of "HEPA")
na de filtervervanging nog steeds brandt, hoewel u het betreffende
filter door een nieuw filter heeft vervangen:
1. Druk op de -toets en houd deze ingedrukt tot de led uitgaat.
NL
57
Page 58

5 Problemen verhelpen
WAARSCHUWING:
AANWIJZING:
5.1 Zelf problemen verhelpen
Voordat u contact opneemt met de Service-Hotline (Zpagina 103, „International Service“), controleert u a.u.b. aan
de hand van de volgende tabel of u het probleem zelf kunt verhelpen.
Gebruik nooit een defect apparaat of een apparaat met een defecte stroomkabel.
Voordat u het probleem gaat opsporen, schakelt u het apparaat uit en trekt u de stekker uit het stopcontact.
Probleem Mogelijke oorzaak Oplossing
Apparaat kan niet
aangezet worden
Het apparaat
wordt vanzelf uitgeschakeld
Led "Odor filter"
boven de toets brandt
Led "HEPA" boven de -toets
brandt
Apparaat maakt
te veel lawaai
Stekker zit niet in het stopcontact.
Frontafscherming of HEPA/carbonfilter zijn niet correct
geplaatst.
De timerfunctie was geselecteerd.
Carbonfilter moet vervangen
worden.
HEPA-filter moet vervangen
worden.
De hoogste vermogensstand
("H") is ingesteld.
Eén van de filters is vuil en
moet vervangen worden.
De luchtinlaat of -uitlaat is
niet vrij van hindernissen.
Steek de stekker in het stopcontact.
Controleer of frontafscherming resp. HEPA-/carbonfilter
correct geplaatst zijn, zie Zhoofdstuk 4.2, „Carbonfilter ver-
vangen“ resp. Zhoofdstuk 4.3, „HEPA-filter vervangen“.
Zie voor het selecteren en deselecteren van de timerfunctie
Zhoofdstuk 3.4, „Timer instellen“.
Vervang het carbonfilter zoals beschreven in Zhoofdstuk
4.2, „Carbonfilter vervangen“.
Vervang het HEPA-filter zoals beschreven in Zhoofdstuk
4.3, „HEPA-filter vervangen“.
Kies een aangenamer vermogen, Zhoofdstuk 3.3, „Vermo-
gen kiezen“.
Vervang de filters zoals beschreven in Zhoofdstuk 4.2,
„Carbonfilter vervangen“ en Zhoofdstuk 4.3, „HEPA-filter
vervangen“.
Zorg voor voldoende vrije ruimte in het gebied van de luchtinlaat en -uitlaat.
Als u het probleem met behulp van deze tabel niet kunt verhelpen, neem dan contact op met de Dirt Devil-klantenservice (Zpagina 103, „International Service“).
58
Page 59

5.2 Hotline en klantenservice
AANWIJZING:
OPGELET:
Zpagina 103, „International Service“
Deze handleiding is ook elektronisch beschikbaar. Ga daarvoor gewoon naar
www.dirtdevil.de in het downloadgedeelte onder "HANDLEIDINGEN".
Voer het modelnummer van het apparaat in en download het bijbehorende pdf-bestand.
5.3 Lijst van toebehoren en reserveonderdelen
AC150 AC250 AC350
150012 Frontafscherming
(afb. 1/10)
150022 Filterset (1 HEPA-,
2 carbonfilters)
250012 Frontafscherming
(afb. 1/10)
250022 Filterset (1 HEPA-,
2 carbonfilters)
350012 Frontafscherming
(afb. 1/10)
350022 Filterset (1 HEPA-,
2 carbonfilters)
5.4 Garantie
Er gelden de wettelijke garantieregels conform de EU-richtlijn 1999/44/EG.
In niet-EU-landen gelden de in het betreffende land geldende minimale eisen waaraan een garantie moet voldoen.
5.5 Afvalverwijdering
Milieuschade bij niet-vakkundige verwijdering! Elektrisch afval mag niet samen met huishoudelijk afval worden weggegooid. Maak in plaats daarvan gebruik van de plaatselijke inzamelpunten om oude apparaten in te leveren.
NL
59
Page 60

Su purificador de aire
Nos complace que se haya decidido por nuestro purificador de aire.
¡Le agradecemos su compra y la confianza depositada en nosotros!
Panel de mando y piezas del aparato (Fig. 1)
1 Cambiar y reiniciar los filtros
| "Odor Filter“: Cambiar el filtro de carbono
| "HEPA“: Cambiar el filtro HEPA
Z Capítulo 4.2, „Cambiar el filtro de carbono“
Z Capítulo 4.3, „Cambiar el filtro HEPA“
Z Capítulo 4.4, „Reiniciar el LED de cambio de filtro“
2 Temporizador
| "2“: desconectar a las 2 horas
| "4“: desconectar a las 4 horas
| "8“: desconectar a las 8 horas
Z Capítulo 3.4, „Ajustar el temporizador“
3 Potencia
| "L“: el aparato funciona muy silencioso
| "M“: ajuste medio
| "H“: el aparato funciona a velocidad elevada
Z Capítulo 3.3, „Seleccionar la potencia“
Datos técnicos
4Encendido
| Conectar y desconectar el aparato
Z Capítulo 3.2, „Arrancar“
5 Teclas para el bloqueo de la pantalla frontal
6 Indicación de uso del filtro HEPA
7 Filtro HEPA
8 Filtro de carbono
9 Soplador
10 Pantalla frontal
11 Pie de apoyo con escotadura para pantalla frontal
12 Entrada de aire
13 Enchufe y cable eléctrico
14 Salida de aire
no representados:
Manual de instrucciones
Nombre de modelo: PUREZA
Modelo: AC150 AC250 AC350
Tipo de aparato: Purificador de aire
Tensión: 220 V
Longitud de cable: aprox. 1,8 m
Potencia: 33/42/67 W (L/M/H) 45/62/85 W (L/M/H) 63/81/107 W (L/M/H)
Peso: aprox. 3,6 kg aprox. 4,7 kg aprox. 6,4 kg
Nos reservamos el derecho a realizar cambios técnicos y de diseño
en el marco de la mejora permanente de nuestro s productos.
© Royal Appliance International GmbH
60
150
PUREZA
− 240 V~, 50 Hz
250
PUREZA
350
Page 61

Índice
1 Indicaciones de seguridad........................................................ 62
1.1 Sobre el manual de instrucciones ...................................................................................... 62
1.2 Sobre determinados grupos de personas ........................................................................... 62
1.3 Sobre el suministro de corriente ........................................................................................ 63
1.4 En caso de que el aparato esté defectuoso......................................................................... 63
1.5 Sobre el uso conforme ....................................................................................................... 64
2 Desembalar y emplazar ........................................................... 65
2.1 Desembalaje...................................................................................................................... 65
2.2 Seleccionar el lugar de emplazamiento ............................................................................. 65
3 Conectar y manejar.................................................................. 66
3.1 Conectar ............................................................................................................................ 66
3.2 Arrancar............................................................................................................................. 66
3.3 Seleccionar la potencia ...................................................................................................... 67
3.4 Ajustar el temporizador ..................................................................................................... 67
4 Conservar el aparato................................................................ 68
4.1 Limpiar la carcasa .............................................................................................................. 68
4.2 Cambiar el filtro de carbono............................................................................................... 69
4.3 Cambiar el filtro HEPA........................................................................................................ 70
4.4 Reiniciar el LED de cambio de filtro.................................................................................... 71
5 Solucionar problemas .............................................................. 72
5.1 Subsanar uno mismo los problemas .................................................................................. 72
5.2 Línea de atención y servicio de atención al cliente............................................................. 73
5.3 Lista de accesorios y de piezas de recambio ....................................................................... 73
5.4 Garantía............................................................................................................................. 73
5.5 Eliminación........................................................................................................................ 73
ES
61
Page 62

1 Indicaciones de seguridad
AVISO:
ATEN CÍ ON :
ADVERTENCIA:
1.1 Sobre el manual de instrucciones
Lea este manual de instrucciones por completo antes de utilizar el aparato. Guarde
bien las instrucciones. En caso de que entregue este aparato a una tercera persona,
entréguele también el manual de instrucciones.
La inobservancia de este manual puede ser origen de graves lesiones o de daños en el
aparato. No asumimos la responsabilidad por daños causados debido a la inobservancia de este manual de instrucciones.
En los siguientes capítulos, las indicaciones importantes están identificadas de forma
especial.
Advierte sobre peligros para su salud y muestra posibles riesgos de lesión.
Indica la posibilidad de que el aparato u otros objetos corran peligro.
Destaca consejos e informaciones.
1.2 Sobre determinados grupos de personas
Estos aparatos pueden ser usados por niños a partir de los 8 años y por personas
con capacidad física, sensorial o mental restringida o con falta de experiencia y/o de
conocimientos, si son supervisados o han recibido instrucciones de cómo usar el aparato de manera segura y han comprendido los posibles riesgos que de él derivan.
Los niños no deben jugar con el aparato. No está permitido que los niños lleven a
cabo la limpieza o el mantenimiento del aparato sin supervisión.
Mantenga el material de embalaje fuera del alcance de los niños. Existe peligro
de asfixia.
Mantenga el mando a distancia y la pila fuera del alcance de los niños. Existe ries-
go de que los niños se traguen la pila.
62
Page 63

1.3 Sobre el suministro de corriente
El aparato funciona con corriente eléctrica; por tanto, existe en general peligro de descarga eléctrica. Por esa razón:
Jamás sumerja el aparato en agua u otro líquido. Manténgalo alejado de la lluvia
y la humedad. No opere el aparato al aire libre o en recintos con alta humedad del aire.
Jamás toque la clavija con las manos mojadas. Quite siempre la clavija de la caja
de enchufe tirando directamente de la primera. No tire nunca directamente del cable
porque podría dañarlo. Además no transporte nunca el aparato del cable eléctrico.
Procure que el cable eléctrico no se doble o quede enganchado y evite que se
pase por encima de él o que haga contacto con fuentes de calor o con superficies de
bordes afilados. Además, no se debe convertir en una fuente de tropiezos.
Antes de la conexión al suministro de corriente cerciórese de que la tensión eléc-
trica indicada en la placa de características se corresponde con la tensión de su caja de
enchufe.
Antes de limpiar o mantener el aparato, desconéctelo y desenchufe la clavija de
la toma de corriente.
1.4 En caso de que el aparato esté defectuoso
Jamás utilice un aparato defectuoso o un aparato con un cable en mal estado.
Para evitar riesgos, si el cable de conexión de este aparato está dañado, deberá ser
reemplazado por el fabricante o por su servicio de atención al cliente o por una persona igualmente calificada.
Entregue un aparato defectuoso para su reparación a un distribuidor especializa-
do o al servicio de atención al cliente. Dirección
ZPágina 103, „International Service“.
63
ES
Page 64

1.5 Sobre el uso conforme
Utilice el purificador de aire exclusivamente en el ámbito doméstico. No es adecuado
para un uso comercial.
Utilice el purificador de aire exclusivamente en el ámbito doméstico para purificar aire
fresco y seco. Cualquier otra utilización se considera como inadecuada y está prohibida.
Queda especialmente prohibido lo siguiente:
Aspirar aire que contenga vapores o gases tóxicos, gases de escape o de combus-
tión ni agentes microbiológicos. Tampoco puede aspirarse aire cuyo contenido de polvo o virutas sea superior a la concentración común en el ámbito doméstico. Su salud
podría resultar perjudicada en un aire de esas características.
El uso cerca de sustancias explosivas, combustibles, favorecedoras o aceleradoras
de incendios, inflamables o volátiles así como la aspiración de las mismas. No utilice
el aparato p. ej. simultáneamente con productos impregnantes, lacas, insecticidas o
cualquier otro fluido inflamable y aromático ni en entornos que contengan cloro. Existe riesgo de incendio y explosión.
La aspiración de aire graso o caliente, el uso cerca de chimeneas, hornos, cocinas,
parrillas, tostadoras, etc. o de velas encendidas. Existe peligro de incendio.
El uso como sustitutivo de una ventilación correcta, p. ej. como entrada de aire
limpio. El aparato no puede utilizarse como sustitución de una ventilación y entrada
de aire correctas. Tampoco puede regular la humedad (ni aumentarla ni reducirla).
El uso como sustitución de campanas extractoras o sistemas de extracción de aire
p. ej. en cocinas o carpinterías.
El uso al aire libre o en estancias con gran humedad (p. ej. baños y saunas). La hu-
medad puede dañar el aparato.
La introducción de objetos en las aberturas del aparato. Mantenga especialmen-
te el cabello y las prendas sueltas alejadas del aparato. ¡Peligro de lesiones!
El uso sin la colocación correcta de todos los filtros.
Cubrir el aparato o colocar objetos sobre él.
Modificaciones o reparaciones por cuenta propia.
64
Page 65

2 Desembalar y emplazar
ATEN CÍ ON :
ADVERTENCIA:
AVISO:
AVISO:
AVISO:
ATEN CÍ ON :
2.1 Desembalaje
Desembale el aparato y todos los accesorios y compruebe que el contenido esté sin daños y completo (ZPágina 60,
„Su purificador de aire“).
Envíe el aparato siempre en su embalaje original para que no resulte dañado. Para ello guarde el embalaje. Elimine el material de embalaje que ya no haga falta según las normas vigentes en su país.
Si detecta algún daño debido al transporte, diríjase inmediatamente a nuestro servicio de atención al cliente
ZPágina 103, „International Service“.
2.2 Seleccionar el lugar de emplazamiento
¡Peligro de incendio y de explosión! Emplace el aparato en un lugar en el que no pueda entrar en contacto con
productos químicos ni fuentes de calor, ni pueda aspirar aire explosivo, caliente o graso.
¡Peligro para su salud! Emplace el aparato de forma que el aire contaminado no pueda aspirarse junto a personas,
especialmente cuando duerman.
¡Peligro de caída! Desenrolle solo el cable necesario para poder enchufar la clavija cómodamente en la caja de
enchufe más cercana. Enrolle el cable restante en el mecanismo de enrollado de cable situado en el suelo. Tienda
el cable siempre de forma que no pueda ser una fuente de tropiezo.
Asegúrese de colocar el aparato sobre una superficie estable y plana. No emplace el aparato nunca sobre superficies blandas, como camas o sofás. Asimismo, no emplace el aparato en el área de abatimiento de puertas o ventanas, ni en zonas por las que Usted deba moverse mucho.
Asegúrese de que el aire pueda aspirarse y liberarse sin obstáculos.
ES
65
Page 66

3 Conectar y manejar
AVISO:
ATEN CÍ ON :
2
ATEN CÍ ON :
3
3.1 Conectar
¡Peligro de lesiones! Antes de cada uso compruebe el aparato y el cable eléctrico. Un aparato dañado no debe ser
utilizado.
Utilice el aparato únicamente si todos los filtros están colocados correctamente y garantizando que ninguna
abertura quede tapada.
1. Asegúrese de que el lugar de emplazamiento cumple los requi-
sitos indicados en ZCapítulo 2.2, „Seleccionar el lugar de empla-
zamiento“.
2. Asegúrese de que la caja de enchufe utilizada suministre la ten-
sión eléctrica indicada en la placa de características colocada en
la parte inferior del aparato.
3. Ya puede emplazar el aparato en posición vertical u horizontal
(Fig. 2). Para ello el a parato cuen ta con 4 pies e n la parte in ferior.
4. Asegúrese de dejar suficiente espacio libre alrededor de la en-
trada y salida de aire.
3.2 Arrancar
Solo hay que tocar suavemente las teclas del panel de mando. No es necesario pulsarlas fuertemente, y de hecho
al hacerlo podrían resultar dañadas.
1. Conecte el aparato pulsando la tecla (Fig. 3).
- El LED situado sobre la tecla se enciende.
66
- Para adaptar la potencia: ZCapítulo 3.3, „Seleccionar la potencia“.
- Si desea que el aparato se desconecte transcurrido un tiempo
determinado: ZCapítulo 3.4, „Ajustar el temporizador“.
Para desconectar el aparato vuelva a pulsar la tecla (Fig. 3). Todos los LEDs se apagan y el soplador se para.
Page 67

3.3 Seleccionar la potencia
4
ATEN CÍ ON :
5
1. Con el aparato encendido, seleccione la potencia que desee con
ayuda de la tecla (Fig. 4):
-"L“: el aparato funciona muy silencioso
-"M“: ajuste medio
-"H“: el aparato funciona a velocidad elevada
El LED indica el ajuste actual.
3.4 Ajustar el temporizador
Si desea que el aparato funcione un tiempo determinado y después se desconecte por sí solo, recomendamos utilizar
la función de temporizador:
1. Con el aparato encendido, seleccione el tiempo hasta la desco-
nexión automática con ayuda de la tecla (Fig. 5):
-"2“: El aparato se desconecta transcurridas 2 horas
-"4“: El aparato se desconecta transcurridas 4 horas
-"8“: El aparato se desconecta transcurridas 8 horas
ES
Asegúrese de que se enciende el LED correspondiente a la elección
realizada. Si no se enciende ninguno de los 3 LEDs de temporizador, el aparato continuará funcionando.
El aparato puede desconectarse en cualquier momento a través de la
tecla .
67
Page 68

4 Conservar el aparato
AVISO:
ATEN CÍ ON :
ATEN CÍ ON :
6
¡Peligro de lesiones! Antes de limpiar o mantener el aparato, desconéctelo y desenchufe la clavija de la toma de
corriente.
Un aparato sometido a un mal mantenimiento funciona de forma menos eficiente.
En caso necesario: Limpiar la carcasa (ZCapítulo 4.1, „Limpiar la carcasa“).
Cada 3 meses o en cuanto se encienda el LED "Odor Filter“: ZCapít ulo 4 .2, „C ambia r el f iltr o de ca rbon o“
Cada 6 meses o en cuanto se encienda el LED "HEPA“: ZCapítulo 4.3, „Cambiar el filtro HEPA“
4.1 Limpiar la carcasa
No utilice productos de limpieza, abrasivos o alcohol, ya que pueden dañar la carcasa.
1. Retire la pelusa y el polvo de las ranuras de ventilación con el
aparato desconectado y con ayuda de un aspirador (Fig. 6).
2. Limpie el resto de superficies con un paño suave que no libere
pelusa.
68
Page 69

4.2 Cambiar el filtro de carbono
ATEN CÍ ON :
ADVERTENCIA:
ADVERTENCIA:
7
8
9
10
1. Asegúrese de que la clavija esté desenchufada.
2. Pulse las teclas de desbloqueo de la pantalla frontal (Fig. 7).
Retire la pantalla frontal con cuidado.
3. Retire el filtro de carbono gastado del filtro HEPA (Fig. 8).
El filtro de carbono no puede limpiarse. Solo puede sustituirse
(consulte los datos de pedido en ZCapítulo 5.3, „Lista de acceso-
rios y de piezas de recambio“).
El filtro gastado puede desecharse con los residuos domésticos.
4. Extraiga el filtro de carbono nuevo del embalaje.
5. Coloque el filtro de carbono nuevo sobre los cierres adhesivos
del filtro HEPA.
ES
El filtro nuevo puede colocarse por ambos lados, es irrelevante.
Sin embargo, en cuanto el filtro comience a usarse no se puede
girar, ya que de lo contrario la suciedad se transferiría al filtro
HEPA.
6. Inserte primero la pantalla frontal en las escotaduras de los pies
de apoyo del aparato (Fig. 9/flechas).
7. A continuación, abata la pantalla frontal (Fig. 10) hasta que las
teclas de bloqueo encastren de forma audible y visible.
69
Page 70

4.3 Cambiar el filtro HEPA
ADVERTENCIA:
ATEN CÍ ON :
ADVERTENCIA:
ADVERTENCIA:
11
12
13
14
1. Asegúrese de que la clavija esté desenchufada.
2. Pulse las teclas de desbloqueo de la pantalla frontal (Fig. 11).
Retire la pantalla frontal con cuidado (Fig. 11).
3. Retire el filtro de carbono del filtro HEPA (Fig. 8).
Si no desea cambiar simultáneamente el filtro de carbono,
recuerde cuál era el lado orientado hacia el filtro HEPA. Esto es
importante para que después de colocarlo no entre suciedad en el
filtro HEPA.
4. Extraiga el filtro HEPA gastado (Fig. 12) de la consola.
El filtro HEPA no puede limpiarse. Solo puede sustituirse (consulte
los datos de pedido en ZCapítulo 5.3, „Lista de accesor ios y de pie-
zas de recambio“).
El filtro gastado puede desecharse con los residuos domésticos.
5. Extraiga el filtro HEPA nuevo del embalaje.
6. Coloque el filtro HEPA nuevo en su consola.
70
Asegúrese de que la marca "TOP“ (Fig.13/“TOP“) del filtro HEPA
está orientado hacia arriba y que la punta de la flecha
(Fig. 13/flecha) señale al interior del aparato.
7. Coloque el filtro de carbono de nuevo sobre los cierres adhesivos
del filtro HEPA (Fig. 8). Si no utiliza un filtro de carbono nuevo,
asegúrese de colocar el usado con el mismo lado hacia dentro
que estaba antes.
8. Inserte primero la pantalla frontal en las escotaduras de los pies
de apoyo del aparato (Fig. 13/flechas).
9. A continuación, abata la pantalla frontal (Fig. 14) hasta que las
teclas de bloqueo encastren de forma audible y visible.
Page 71

4.4 Reiniciar el LED de cambio de filtro
15
Si uno de los dos LEDs de cambio de filtro ("Odor Filter" o bien
"HEPA“) continúa encendiéndose tras el cambio de filtro correspondiente por uno nuevo:
1. Pulse la tecla y manténgala pulsada hasta que el LED se
apague.
ES
71
Page 72

5 Solucionar problemas
AVISO:
ADVERTENCIA:
5.1 Subsanar uno mismo los problemas
Antes de contactar con la línea de atención al cliente (ZPágina 103, „International Service“), compruebe con ayuda
de la siguiente tabla si usted mismo puede solucionar el problema.
No utilice nunca un aparato defectuoso o un aparato con un cable de corriente averiado.
Antes de iniciar la localización del problema, desconecte el aparato y desenchufe la clavija de la caja de enchufe.
Problema Posible causa Solución
No es posible conectar el aparato
El aparato se desconecta por sí solo
El LED "Odor Fil-
ter“ situado sobre la tecla se
enciende
El LED "HEPA“ situado sobre la tecla se enciende
El aparato funciona con ruido excesivo
La clavija no está enchufada. Enchufe la clavija en una caja de enchufe.
La pantalla frontal o el filtro
HEPA o de carbono no están
colocados correctamente.
La función de temporizador
estaba activada.
Hay que sustituir el filtro de
carbono.
Hay que sustituir el filtro HEPA.
Está ajustada la máxima potencia ("H“).
Uno de los filtros está sucio y
debe cambiarse.
La entrada y salida de aire no
están libres de obstáculos.
Compruebe si la pantalla frontal o el filtro HEPA o de carbono
están bien colocados, consulte ZCapítulo 4.2, „Cambiar el
filtro de carbono“ o ZCapítulo 4.3, „Cambiar el filtro HEPA“.
Para activar y desactivar la función de temporizador consulte
ZCapítulo 3.4, „Ajustar el temporizador“.
Sustituya el filtro de carbono de la forma descrita en
ZCapítulo 4.2, „Cambiar el filtro de carbono“.
Sustituya el filtro HEPA de la forma descrita en ZCapítulo
4.3, „Cambiar el filtro HEPA“.
Seleccione una potencia confortable para Usted, ZCapítulo
3.3, „Seleccionar la potencia“.
Sustituya los filtros de la forma descrita en ZCapítulo 4.2,
„Cambiar el filtro de carbono“ y ZCapítulo 4.3, „Cambiar el
filtro HEPA“.
Asegúrese de que hay suficiente espacio libre en la zona de
entrada y salida de aire.
Si no ha podido solucionar el problema con la ayuda de esta tabla, contacte con el servicio de atención al cliente
de Dirt Devil (ZPágina 103, „International Service“).
72
Page 73

5.2 Línea de atención y servicio de atención al cliente
ADVERTENCIA:
ATEN CÍ ON :
ZPágina 103, „International Service“
Este manual de instrucciones también está disponible en formato electrónico. Vaya a
www.dirtdevil.de y allí acceda al área de descarga en "MANUALES DE INSTRUCCIONES“.
Introduzca el número de modelo del aparato y descargue el PDF correspondiente.
5.3 Lista de accesorios y de piezas de recambio
AC150 AC250 AC350
150012 Pantalla frontal
(Fig. 1/10)
150022 Juego de filtros
(1 filtro HEPA,
2 filtros de carbono)
250012 Pantalla frontal
(Fig. 1/10)
250022 Juego de filtros
(1 filtro HEPA,
2 filtros de carbono)
350012 Pantalla frontal
(Fig. 1/10)
350022 Juego de filtros
(1 filtro HEPA,
2 filtros de carbono)
5.4 Garantía
Se aplican las regulaciones legales en materia de garantías según la Directiva UE 1999/44/CE. En países no pertenecientes a la UE se aplican los requisitos mínimos en materia de garantías vigentes en el país en cuestión.
5.5 Eliminación
¡Daños medioambientales en caso de eliminación incorrecta! Los aparatos eléctricos inservibles
no se pueden desechar con los residuos domésticos. Entréguelos a un punto de recogida local
para aparatos eléctricos usados.
ES
73
Page 74

Il vostro purificatore d'aria
Ci congratuliamo con voi per aver dato la preferenza al nostro purificatore d'aria!
Vi ringraziamo per l'acquisto e per la fiducia accordataci!
Pannello di comando e componenti dell'apparecchio (Fig. 1)
1 Sostituzione e ripristino filtro
| „Filtro odore“: sostituzione filtro di carbonio
| „HEPA“: sostituzione filtro HEPA
Z Capitolo 4.2, „Sostituzione filtro di carbonio“
Z Capitolo 4.3, „Sostituzione filtro HEPA“
Z Capitolo 4.4, „Ripristino del LED Sostituzione filtro“
2Timer
| „2“: disattivare dopo 2 ore
| „4“: disattivare dopo 4 ore
| „8“: disattivare dopo 8 ore
Z Capitolo 3.4, „Impostazione del timer“
3 Potenza
| „L“: l'apparecchio funziona in modo silenzioso
| „M“: impostazione media
| „H“: l'apparecchio funziona ad alto numero di giri
Z Capitolo 3.3, „Selezione potenza“
Dati tecnici
4 Power
| Attivazione / disattivazione dell'apparecchio
Z Capitolo 3.2, „Attivazione“
5 Tasti di sblocco del rivestimento frontale
6 Contrassegno per inserire il filtro HEPA
7 Filtro HEPA
8 Filtro di carbonio
9 Ventola
10 Rivestimento frontale
11 Piede d'appoggio con rientranze per il rivestimento
frontale
12 Entrata aria
13 Spina e cavo elettrico
14 Uscita aria
non raffigurato:
Istruzioni per l'uso
Nome del modello: PUREZA
Modello: AC150 AC250 AC350
Tipo di apparecchio: Purificatore d'aria
Tensione: 220 V
Lunghezza del cavo: ca. 1,8 m
Potenza: 33/42/67 W (L/M/H) 45/62/85 W (L/M/H) 63/81/107 W (L/M/H)
Peso: ca. 3,6 kg ca. 4,7 kg ca. 6,4 kg
Con riserva di modifiche tecniche e costruttive finalizzate al costante perfezionamento del prodotto.
© Royal Appliance International GmbH
74
150
250
PUREZA
− 240 V~, 50 Hz
PUREZA
350
Page 75

Indice
1 Avvertenze di sicurezza............................................................ 76
1.1 sulle istruzioni per l'uso ..................................................................................................... 76
1.2 su determinati gruppi di persone....................................................................................... 76
1.3 sull'alimentazione elettrica ............................................................................................... 77
1.4 se l'apparecchio è guasto................................................................................................... 77
1.5 sull'impiego conforme alla destinazione d'uso .................................................................. 78
2 Disimballo e installazione........................................................ 79
2.1 Disimballo ......................................................................................................................... 79
2.2 Selezione del luogo d'installazione.................................................................................... 79
3 Collegamento e comando......................................................... 80
3.1 Collegamento .................................................................................................................... 80
3.2 Attivazione ........................................................................................................................ 80
3.3 Selezione potenza.............................................................................................................. 81
3.4 Impostazione del timer...................................................................................................... 81
4 Cura dell'apparecchio .............................................................. 82
4.1 Pulizia dell'alloggiamento................................................................................................. 82
4.2 Sostituzione filtro di carbonio............................................................................................ 83
4.3 Sostituzione filtro HEPA..................................................................................................... 84
4.4 Ripristino del LED Sostituzione filtro.................................................................................. 85
5 Eliminazione dei problemi ....................................................... 86
5.1 Eliminazione in proprio dei problemi................................................................................. 86
5.2 Hotline e servizio di assistenza clienti................................................................................ 87
5.3 Elenco degli accessori e ricambi......................................................................................... 87
5.4 Garanzia ............................................................................................................................ 87
5.5 Smaltimento...................................................................................................................... 87
IT
75
Page 76

1 Avvertenze di sicurezza
AVVERTIMENTO:
ATTENZIONE:
INDICAZIONE:
1.1 sulle istruzioni per l'uso
Prima di lavorare con l'apparecchio leggere interamente e con attenzione le presenti
istruzioni per l'uso. Conservare le istruzioni accuratamente. Se l'apparecchio è ceduto
a terzi consegnare anche le istruzioni per l'uso.
La mancata osservanza delle presenti istruzioni può infatti causare gravi lesioni o danni all'apparecchio. Non rispondiamo di eventuali danni derivanti dalla mancata osservanza delle presenti istruzioni per l'uso.
Le avvertenze importanti sono contrassegnate distintamente nei capitoli successivi.
Avverte di pericoli sanitari e possibili rischi di lesioni.
Segnala possibili pericoli di danni all'apparecchio o ad altri oggetti.
Evidenzia suggerimenti e informazioni.
1.2 su determinati gruppi di persone
Questi apparecchi possono essere usati dai bambini a partire dagli 8 anni di età e
da persone con limitate capacità fisiche, sensoriali o intellettive o che non dispongano
di sufficiente esperienza e/o conoscenze soltanto sotto sorveglianza o se sono state
istruite sull'uso sicuro dell'apparecchio e hanno compreso i pericoli che ne derivano.
I bambini non devono giocare con l'apparecchio. Pulizia e manutenzione non de-
vono essere eseguite da bambini non sorvegliati.
Tenere il materiale da imballo sempre fuori dalla portata dei bambini. Esiste il
pericolo di soffocamento.
Tenere il telecomando e la batteria fuori dalla portata dei bambini. Esiste il peri-
colo che bambini inghiottano la batteria.
76
Page 77

1.3 sull'alimentazione elettrica
L'apparecchio è azionato a energia elettrica; quindi in linea di principio esiste il rischio
di una scossa elettrica. Per questo motivo:
Non immergere mai l'apparecchio in acqua o altri liquidi. Tenerlo lontano da
pioggia e umidità. Non far funzionare l'apparecchio all'aperto o in ambienti con elevata umidità dell'aria.
Non toccare mai la spina a mani bagnate. Per staccare la spina dalla presa elettri-
ca, afferrare sempre direttamente la spina. Non tirare mai il cavo, in quanto potrebbe
venir danneggiato. Inoltre, non trasportare mai l'apparecchio per il cavo.
Verificare che il cavo elettrico non sia piegato o incastrato, che non venga calpe-
stato e che non entri a contatto con fonti di calore o spigoli taglienti. Inoltre, non deve
essere posato in modo che ci si possa inciampare.
Prima di eseguire il collegamento all'alimentazione elettrica, controllare che la
tensione indicata sulla targhetta d'identificazione coincida con quella della presa.
Prima di pulire l'apparecchio o di sottoporlo a manutenzione, spegnerlo e stacca-
re la spina dalla presa elettrica.
1.4 se l'apparecchio è guasto
Non far mai funzionare l'apparecchio se è difettoso o se il relativo cavo è difetto-
so. Se il cavo di allacciamento di questo apparecchio è danneggiato, per prevenire
eventuali pericoli, deve essere sostituito dal produttore, dal servizio di assistenza
clienti o da un tecnico adeguatamente qualificato.
Per la riparazione inviare l'apparecchio difettoso a un rivenditore specializzato o
al servizio di assistenza clienti. Indirizzo
ZPagina 103, „International Service“.
77
IT
Page 78

1.5 sull'impiego conforme alla destinazione d'uso
Impiegare il purificatore d'aria esclusivamente in ambito domestico. Non è adatto per
l'impiego industriale.
Usare il purificatore d'aria esclusivamente in ambito domestico per depurare l'aria fresca e secca all'interno dell'ambiente. Ogni altro utilizzo è considerato non conforme
alla destinazione d'uso e, pertanto, vietato.
È particolarmente vietato:
aspirare aria contaminata da vapori o gas tossici così come da gas di scarico, gas
di combustione o da sostanze microbiologiche. Non si può allo stesso modo aspirare
aria il cui carico di polveri e trucioli superi le concentrazioni usuali in ambiente domestico. L'aria così contaminata potrebbe pregiudicare la vostra salute.
l'impiego in prossimità di sostanze esplosive, in fiamme, comburenti, acceleranti
della combustione, infiammabili o volatili o l'aspirazione delle stesse. Per esempio
non impiegare il prodotto contemporaneamente con sostanze impregnanti, spray per
capelli, insetticidi o altri fluidi e sostanze aromatiche infiammabili o in ambienti clorosi. Esiste il pericolo di incendio ed esplosione.
l'aspirazione di aria oleosa o calda, p. es. in prossimità di camini, forni, cucine,
grill, tostapani, ecc. o di candele accese. Esiste il pericolo di incendio.
l'impiego per sostituire l'aerazione regolare, p. es. per l'alimentazione di aria fre-
sca. L'apparecchio non può sostituire l'aerazione e la ventilazione regolari. Non può
nemmeno regolare (aumentare o ridurre) l'umidità dell'aria.
l'impiego in sostituzione di cappe o sistemi di aspirazione, p. es. in cucine o fale-
gnamerie.
l'impiego all'aperto o in ambienti umidi (p. es. in stanze da bagno e saune). Vi è
il pericolo che l'umidità danneggi l'apparecchio.
l'inserimento di oggetti nelle aperture dell'apparecchio. Tenere particolarmente
capelli e indumenti sciolti lontani dall'apparecchio. Pericolo di lesioni!
l'impiego senza che siano installati correttamente tutti i filtri.
la copertura dell'apparecchio o il deposito di oggetti sull'apparecchio.
modifiche o riparazioni autonome.
78
Page 79

2 Disimballo e installazione
ATTENZIONE:
INDICAZIONE:
AVVERTIMENTO:
AVVERTIMENTO:
AVVERTIMENTO:
ATTENZIONE:
2.1 Disimballo
Sballare l'apparecchio e tutti gli accessori e controllare che il contenuto sia integro e completo (ZPagina 74, „Il vostro purificatore d'aria“).
In linea di principio l'apparecchio deve essere spedito nell'imballo originale in modo che non subisca danni. Pertanto è necessario conservare l'imballaggio. Il materiale da imballo non più necessario va smaltito in conformità
alle normative vigenti localmente.
Se si rilevano danni da trasporto, rivolgersi immediatamente alla nostra filiale di assistenza ZPagina 103, „Inter-
national Service“.
2.2 Selezione del luogo d'installazione
Pericolo di incendio ed esplosione! Installare l'apparecchio in un luogo in cui non potrà né venir a contatto con
sostanze chimiche o fonti di calore, né aspirare aria esplosiva, calda o oleosa.
Pericolo per la salute! Installare l'apparecchio in modo tale da garantire che l'aria inquinata non possa essere
aspirata passando dove si trovano persone, in particolare se queste dormono.
Pericolo di cadute! Srotolare il cavo solo il tanto necessario per poter inserire la spina comodamente nella presa di
corrente più vicina. Riavvolgere il cavo residuo sull'avvolgimento cavo disposto nel fondo. Posare il cavo sempre
in modo tale che non possa rappresentare un punto di ostacolo.
Accertarsi di collocare l'apparecchio su una superficie stabile e orizzontale. Non collocare mai l'apparecchio su
superfici morbide come quelle di letti o divani. Inoltre, non collocare l'apparecchio nel raggio di azione di porte e
finestre o in zone in cui ci si muove di frequente.
Accertarsi che l'aria venga aspirata ed emessa liberamente senza ostacoli.
IT
79
Page 80

3 Collegamento e comando
AVVERTIMENTO:
ATTENZIONE:
2
ATTENZIONE:
3
3.1 Collegamento
Pericolo di lesioni! Prima di ogni utilizzo verificare sempre l'apparecchio e il cavo elettrico. Non usare mai l'apparecchio se difettoso.
Utilizzare l'apparecchio soltanto se tutti i filtri sono montati correttamente ed è stato accertato che nessuna delle
aperture sia ostruita.
1. Accertarsi che il luogo d'installazione soddisfi le condizioni de-
scritte al ZCapitolo 2.2, „Selezione del luogo d'installazione“.
2. Accertarsi che la tensione elettrica della presa di corrente, che si
intende usare, sia conforme a quella riportata sulla targhetta
d'identificazione applicata sul fondo dell'apparecchio.
3. Ora si può installare l'apparecchio in posizione verticale od oriz-
zontale (Fig. 2). A questo scopo sono previsti 4 piedini sul rispettivo lato inferiore.
4. Assicurarsi che ci sia abbastanza spazio libero intorno all'entrata
e all'uscita dell'aria.
3.2 Attivazione
È sufficiente toccare i tasti del pannello di comando soltanto molto leggermente. Non è necessario premere energicamente, diversamente si potrebbero danneggiare i tasti.
1. Accendere l'apparecchio premendo il tasto (Fig. 3).
- Si accende il LED sopra il tasto .
80
- Se si intende adattare la potenza: ZCapitolo 3.3, „Selezione
potenza“.
- L'apparecchio deve disattivarsi dopo un determinato intervallo di tempo: ZCapitolo 3.4, „Impostazione del timer“.
Per disattivare l'apparecchio, premere nuovamente il tasto
(Fig. 3). Tutti i LED si spengono e la ventola si ferma.
Page 81

3.3 Selezione potenza
4
ATTENZIONE:
5
1. Selezione la potenza nell'apparecchio acceso premendo il tasto
(Fig. 4):
-„L“: l'apparecchio funziona in modo particolarmente silen-
zioso
-„M“: impostazione media
-„H“: l'apparecchio funziona ad un alto numero di giri.
Il LED indica la rispettiva impostazione attuale.
3.4 Impostazione del timer
Se l'apparecchio deve funzionare per un determinato intervallo di tempo e poi spegnersi automaticamente, si raccomanda l'uso della funzione Timer:
1. Selezionare la durata fino allo spegnimento automatico nell'ap-
parecchio acceso premendo il tasto (Fig. 5):
-„2“: l'apparecchio si spegne dopo 2 ore
-„4“: l'apparecchio si spegne dopo 4 ore
-„8“: l'apparecchio si spegne dopo 8 ore
Accertarsi che il LED corrispondente alla vostra scelta sia acceso. Se
non è acceso nessuno dei 3 LED del timer, l'apparecchio continua a
funzionare.
IT
Tuttavia, l'apparecchio può essere ancora disattivat o in qualsiasi momento con il tasto .
81
Page 82

4 Cura dell'apparecchio
AVVERTIMENTO:
ATTENZIONE:
ATTENZIONE:
6
Pericolo di lesioni! Prima di pulire l'apparecchio o di sottoporlo a manutenzione, spegnerlo e staccare la spina
dalla presa elettrica.
Un apparecchio non curato a sufficienza funziona in modo meno efficiente.
se necessario: pulire l'alloggiamento (ZCapitolo 4.1, „Pulizia dell'alloggiamento“).
ogni 3 mesi o non appena si accende il LED "Filtro odore": ZCapitolo 4.2, „Sostituzione filtro di carbonio“
ogni 6 mesi o non appena si accende il LED "Filtro HEPA": ZCapitolo 4.3, „Sostituzione filtro HEPA“
4.1 Pulizia dell'alloggiamento
Non usare detergenti, mezzi abrasivi o alcool in quanto possono
danneggiare l'alloggiamento.
1. Liberare le feritoie di ventilazione dell'apparecchio disattivato
con l'ausilio di un aspirapolvere eliminando pelucchi e polvere
(Fig. 6).
2. Pulire le superfici residue con un panno morbido, non filamen-
toso.
82
Page 83

4.2 Sostituzione filtro di carbonio
ATTENZIONE:
INDICAZIONE:
INDICAZIONE:
7
8
9
10
1. Assicurarsi che la spina sia staccata dalla presa elettrica.
2. Premere i tasti di sblocco del rivestimento frontale (Fig. 7).
Rimuovere attentamente il rivestimento frontale.
3. Staccare il filtro di carbonio esaurito dal filtro HEPA (Fig. 8).
Il filtro di carbonio non può essere pulito e va sostituito (per i dati
di ordinazione rimandiamo al ZCapitolo 5.3, „Elenco degli acces-
sori e ricambi“).
Il filtro esaurita può essere smaltito tramite i rifiuti domestici.
4. Disimballare il nuovo filtro di carbonio.
5. Applicare il nuovo filtro di carbonio sulle chiusure con velcro del
filtro HEPA.
Durante questa operazione non importa con quale lato si applica il
filtro nuovo. Tuttavia, non appena il filtro è stato utilizzato, non è
più possibile girarlo, perché diversamente la sporcizia si depositerebbe nel filtro HEPA.
6. Dapprima applicare il rivestimento frontale nelle rientranze nel
piede d'appoggio dell'apparecchio (Fig. 9/frecce).
7. Poi sollevare il rivestimento frontale ribaltandolo (Fig. 10) fino
a che i tasti di sblocco non scatteranno in posizione in maniera
percettibile a livello sia uditivo che visibile.
83
IT
Page 84

4.3 Sostituzione filtro HEPA
INDICAZIONE:
ATTENZIONE:
INDICAZIONE:
INDICAZIONE:
11
12
13
14
1. Assicurarsi che la spina sia staccata dalla presa elettrica.
2. Premere i tasti di sblocco del rivestimento frontale (Fig. 11).
3. Staccare il filtro di carbonio dal filtro HEPA (Fig. 8).
4. Estrarre il filtro HEPA esaurito (Fig. 12) dalla sua mensola.
5. Disimballare il nuovo filtro HEPA.
6. Inserire il nuovo filtro HEPA nella relativa mensola.
Rimuovere attentamente il rivestimento frontale (Fig. 11).
Se non si vuole sostituire contemporaneamente il filtro di carbonio, annotare quale lato era rivolto verso il filtro HEPA. Ciò è
importante affinché non si possa depositare sporcizia nel filtro
HEPA dopo la riapplicazione.
Il filtro HEPA non può essere pulito e va sempre sostituito (per i
dati relativi all’ordinazione rimandiamo al ZCapitolo 5.3, „Elenco
degli accessori e ricambi“).
Il filtro esaurita può essere smaltito tramite i rifiuti domestici.
84
Accertarsi che il segno "TOP" (Fig. 13/"TOP") riportato sul filtro
HEPA sia rivolto verso l'alto e la punta della freccia (Fig. 13/freccia)
sia rivolta verso l'interno dell'apparecchio.
7. Riapplicare il filtro di carbonio sulle chiusure con velcro del filtro
HEPA (Fig. 8). Se non viene inserito un nuovo filtro di carbonio,
accertarsi che sia rivolto verso l'interno quel lato del filtro di carbonio che era rivolto verso l'interno anche prima.
8. Dapprima applicare il rivestimento frontale nelle rientranze nel
piede d'appoggio dell'apparecchio (Fig. 13/frecce).
9. Poi sollevare il rivestimento frontale ribaltandolo (Fig. 14) fino
a che i tasti di sblocco non scatteranno in posizione in maniera
percettibile a livello sia uditivo che visibile.
Page 85

4.4 Ripristino del LED Sostituzione filtro
15
Se dopo la sostituzione uno dei due LED per indicare una sostituzione necessaria del filtro (Filtro odore" o "HEPA") rimane acceso,
anche se il filtro interessato è stato sostituito:
1. premere il tasto e tenerlo premuto fino a che il LED non si
spegnerà.
IT
85
Page 86

5 Eliminazione dei problemi
AVVERTIMENTO:
INDICAZIONE:
5.1 Eliminazione in proprio dei problemi
Prima di contattare la hot line di servizio (ZPagina 103, „International Service“), controllare, in base alla tabella seguente, se l'anomalia può essere eliminata.
Non usare mai l'apparecchio se lo stesso o il relativo cavo elettrico sono difettosi.
Prima di procedere con la diagnostica, spegnere l'apparecchio e staccare la spina della presa elettrica.
Problema Causa possibile Soluzione
Non si riesce ad
accendere l'apparecchio
L'apparecchio si
spegne automaticamente
Si accende il LED
„Filtro Odore“
sopra il tasto
Si accende il LED
"HEPA" sopra il
tasto
L'apparecchio
produce un rumore eccessivamente forte
Spina non inserita. Inserire la spina nella presa elettrica.
Il rivestimento frontale o il filtro HEPA/di carbonio non sono
inseriti in modo corretto.
È stata selezionata la funzione
del timer.
Bisogna sostituire il filtro di carbonio.
Bisogna sostituire il filtro HEPA. Sostituire il filtro HEPA come descritto al ZCapitolo 4.3,
È stato impostato il massimo livello di potenza ("H").
Uno dei filtri è intasato e deve
essere sostituito.
Entrata o uscita dell'aria ostacolate.
Controllare se il rivestimento frontale o il filtro HEPA/di
carbonio sono inseriti correttamente, vedi ZCapitolo 4.2,
„Sostituzione filtro di carbonio“ ovvero ZCapitolo 4.3,
„Sostituzione filtro HEPA“.
Per l'attivazione e disattivazione della funzione del timer
rimandiamo al ZCapitolo 3.4, „Impostazione del timer“.
Sostituire il filtro di carbonio come descritto al ZCapitolo
4.2, „Sostituzione filtro di carbonio“.
„Sostituzione filtro HEPA“.
Scegliere una potenza più gradevole, ZCapitolo 3.3, „Selezione potenza“.
Sostituire il filtro come descritto al ZCapitolo 4.2, „Sostituzione filtro di carbonio“ e ZCapitolo 4.3, „Sostituzione
filtro HEPA“.
Provvedere a sufficiente spazio nell'ambito di entrata o
uscita dell'aria.
Se non si è riusciti a eliminare il problema con l'ausilio della presente tabella, contattare il servizio di assistenza
clienti Dirt Devil (ZPagina 103, „International Service“).
86
Page 87

5.2 Hotline e servizio di assistenza clienti
INDICAZIONE:
ATTENZIONE:
ZPagina 103, „International Service“
Queste istruzioni per l'uso sono disponibili anche in forma elettronica. A questo scopo richiamare semplicemente
il sito
www.dirtdevil.de e l'area Download, "ISTRUZIONI PER L'USO".
Immettere il numero di modello dell'apparecchio e scaricare il rispettivo file PDF.
5.3 Elenco degli accessori e ricambi
AC150 AC250 AC350
150012 Rivestimento frontale
(Fig. 1/10)
150022 Set di filtri (1 filtro HE-
PA, 2 filtri di carbonio)
250012 Rivestimento frontale
(Fig. 1/10)
250022 Set di filtri (1 filtro HE-
PA, 2 filtri di carbonio)
350012 Rivestimento frontale
(Fig. 1/10)
350022 Set di filtri (1 filtro HE-
PA, 2 filtri di carbonio)
5.4 Garanzia
Valgono i regolamenti sulla garanzia di legge conformi alla Direttiva UE 1999/44/CE.
Nei paesi non facenti parte dell'UE valgono i requisiti di garanzia minimi vigenti nella relativa nazione.
5.5 Smaltimento
Danni all'ambiente in caso di smaltimento non appropriato! I rifiuti elettrici non devono essere
smaltiti assieme a quelli domestici. Avvalersi dei centri di raccolta locali che effettuano il ritiro
degli apparecchi usati.
IT
87
Page 88

Hava temizleme cihazınız
Kararınızı hava temizleme cihazımızdan yana verdiğiniz için teşekkür ederiz.
Ürünümüzü satın aldığınız ve bize duyduğunuz güven için teşekkür ederiz!
Kontrol paneli ve cihaz parçaları (Res. 1)
1 Filtre değiştirme ve sıfırlama
| „Koku filtresi“: Karbon filtrenin değiştirilmesi
| „HEPA“: Hepa filtrenin değiştirilmesi
Z Bölüm 4.2, „Karbon filtrenin değiştirilmesi“
Z Bölüm 4.3, „Hepa filtrenin değiştirilmesi“
Z Bölüm 4.4, „Filtre değiştirme LED ışığını sıfırlama“
2Timer
| „2“: 2 saat sonra kapatma
| „4“: 4 saat sonra kapatma
| „8“: 8 saat sonra kapatma
Z Bölüm 3.4, „Zamanlayıcıyı ayarlama“
3Güç
| „L“: Cihaz çok sessiz çalışır
| „M“: Orta ayar
| „H“: Cihaz yüksek devirde çalışır
Z Bölüm 3.3, „Çalışma gücünü seçme“
Teknik Veriler
4 Power
| Cihazı çalıştırma/kapatma
Z Bölüm 3.2, „Çalıştırma“
5 Ön panonun açılması için düğmeler
6 HEPA filtresini yerleştirme işareti
7 HEPA filtre
8 Karbon filtre
9 Fan
10 Ön pano
11 Ön pano için oluklu ayak
12 Hava girişi
13 Elektrik kablosu ve fiş
14 Hava çıkışı
resim yok:
Kullanma talimatı
Model ismi: PUREZA
Model: AC150 AC250 AC350
Cihaz türü: Hava temizleyici
Gerilim: 220 V
Kablo uzunluğu: yakl. 1,8 m
Güç: 33/42/67 W (L/M/H) 45/62/85 W (L/M/H) 63/81/107 W (L/M/H)
Ağırlık: yakl. 3,6 kg yakl. 4,7 kg yakl. 6,4 kg
Sürekli ürün iyileştirme kapsamında teknolojide ve
ve tasarımda değişiklik yapma hakkı saklıdır.
© Royal Appliance International GmbH
88
150
250
PUREZA
− 240 V~, 50 Hz
PUREZA
350
Page 89

İçindekiler
1 Güvenlik bilgileri..................................................................... 90
1.1 Kullanma Talimatına ilişkin olarak..................................................................................... 90
1.2 Belirli kişi gruplarına ilişkin olarak..................................................................................... 90
1.3 Elektrik beslemesine ilişkin olarak ..................................................................................... 91
1.4 Cihaz arızalıysa .................................................................................................................. 91
1.5 Amaca uygun kullanıma ilişkin olarak ............................................................................... 92
2 Ambalajdan çıkarma ve kurma ................................................. 93
2.1 Ambalajdan çıkarma.......................................................................................................... 93
2.2 Kuruluş yerini seçme.......................................................................................................... 93
3 Kabloyu bağlama ve kullanım .................................................. 94
3.1 Bağlantıyı kurma ............................................................................................................... 94
3.2 Çalıştırma .......................................................................................................................... 94
3.3 Çalışma gücünü seçme ...................................................................................................... 95
3.4 Zamanlayıcıyı ayarlama..................................................................................................... 95
4 Cihazın bakımı ........................................................................ 96
4.1 Muhafazanın temizlenmesi ............................................................................................... 96
4.2 Karbon filtrenin değiştirilmesi ........................................................................................... 97
4.3 Hepa filtrenin değiştirilmesi .............................................................................................. 98
4.4 Filtre değiştirme LED ışığını sıfırlama................................................................................. 99
5 Sorunların giderilmesi .............................................................100
5.1 Sorunların tarafınızdan giderilmesi ................................................................................... 100
5.2 Yardım hattı ve müşteri hizmeti ........................................................................................ 101
5.3 Donanım ve yedek parça listesi.......................................................................................... 101
5.4 Garanti kapsamı................................................................................................................. 101
5.5 Atma/İmha Etme............................................................................................................... 101
89
TR
Page 90

1 Güvenlik bilgileri
Uyarı:
Dikkat:
Açıklama:
1.1 Kullanma Talimatına ilişkin olarak
Cihazla çalışmaya başlamadan önce bu Kullanma Talimatını tamamen okuyun. Talimatı her zaman bulabileceğiniz bir yerde muhafaza edin. Cihazı üçüncü kişilere verdiğinizde, bu Kullanma Talimatını da beraberinde verin.
Bu Talimatın dikkate alınmaması, ağır yaralanmalara veya cihazda zararlara sebebiyet verebilir. Bu Kullanma Talimatının dikkate alınmaması sebebiyle meydana gelen
zararlar için herhangi bir sorumluluk üstlenmeyiz.
Önemli bilgiler müteakip bölümlerde belirgin olarak işaretlenmiştir.
Sağlığınız açısından söz konusu tehlikelere karşı uyarır ve olası yaralanma risklerine işaret eder.
Cihaza veya başka nesnelere yönelik olası tehlikelere dikkat çeker.
Önerileri ve bilgileri gösterir.
1.2 Belirli kişi gruplarına ilişkin olarak
Bu cihazlar, gözlemlenmeleri veya cihazın güvenli kullanımına ilişkin bilgilendi-
rilmeleri ve buradan doğan tehlikeleri anlamaları halinde 8 yaşından büyük çocuklar
ve düşük fiziksel, duyumsal veya mental yeteneklere sahip kişiler veya kullanım deneyimi ve/veya bilgisi olmayan kişiler tarafından kullanılabilir.
Çocuklar cihazla oynamamalıdır. Temizlik ve kullanıcı tarafından yapılacak ba-
kımlar çocuklar tarafından sadece gözlemlenirken yapılabilir.
Ambalaj malzemelerini çocuklardan uzak tutun. Aksi takdirde havasız kalarak
boğulma riski bulunmaktadır.
Uzaktan kumandayı ve pilleri çocuklardan uzak tutunuz. Çocukların pili yutma
riski bulunmaktadır.
90
Page 91

1.3 Elektrik beslemesine ilişkin olarak
Cihaz elektrikle işletilmekte olup, burada prensip olarak elektrik çarpma tehlikesi söz
konusudur. Bu nedenle:
Cihazı asla suya veya başka sıvılara daldırmayın. Yağmurdan ve ıslaklıktan uzak
tutun. Cihazı açıkta veya rutubetli odalarda çalıştırmayın.
Prizi/fişi asla ıslak ellerle ellemeyin. Fişi prizden çekeceğiniz zaman, her zaman
doğrudan fişten çekin. Asla kablosundan çekmeyin, bunun zarar görme tehlikesi vardır. Cihazı ayrıca asla kablodan taşımayın.
Elektrik kablosunun bükülmemesine, sıkışmamasına, üzerinden ağır nesnelerin
geçmemesine veya ısı kaynakları ile veya keskin kenarlarla temas etmemesine dikkat
edin. Ayrıca, takılıp düşmeyeceğiniz şekilde bulundurun.
Elektrik beslemesine bağlarken, model etiketi üzerinde belirtilen elektrik gerili-
minin, prizinizin gerilimi ile uygun olduğundan emin olun.
Cihazı temizlemeden veya bakım yapmadan önce, cihazı kapatın ve fişini prizden
çekin.
1.4 Cihaz arızalıysa
Asla arızalı bir cihazı veya arızalı bir kabloya sahip bir cihazı çalıştırmayın. Bu ci-
hazın bağlantı hattı zarar gördüğünde, tehlikelerin önlenmesi için, bunun üretici tarafından veya müşteri hizmetleri tarafından veya benzer yetkili bir kişi tarafından değiştirilmesi gerekir.
Arızalı bir cihazı tamir için yetkili satıcınıza veya müşteri hizmetlerine yollayın.
Adres
ZSayfa 102, „International Service“.
91
TR
Page 92

1.5 Amaca uygun kullanıma ilişkin olarak
Hava temizleme cihazını sadece ev içinde kullanın. Cihaz ticari kullanım için uygun değildir.
Cihazı sadece ev içinde kuru ve temiz oda havasının temizlenmesi için kullanın. Her
türlü farklı kullanım, amaca uygun olmayan kullanım olarak kabul edilir ve yasaktır.
Özellikle yasak olan hususlar:
Zehirli dumanlarla, gazlarla, atık gazlarla, baca gazları ile veya mikro biyolojik
olarak kirlenmiş havanın emilmesi. Yine aynı şekilde toz ve talaş oranı alışılmış olan
ev konsantrasyonunun üzerinde olan havanın emilmesi de yasaktır. Sağlığınız bu
oranda kirlenmiş olan hava yüzünden riske girebilir.
Cihazın patlayıcı, yanıcı, oksitleyici, ateş hızlandırıcı, hızlı tutuşan veya uçucu
maddelerin yakınında kullanılması veya bu maddelerin emilmesi. Cihazı örneğin emdirme maddeleri, saç spreyleri, böcek ilaçları veya diğer uçucu maddeler ve koku maddeleri ile birlikte veya klor ihtiva eden ortamlarda kullanmayın. Yangın ve patlama
tehlikesi mevcuttur.
Yağ ihtiva eden veya sıcak havanın, örn. şömine, fırın, ocak, mangal, tost aleti vs.
veya yanmakta olan mumların yakınında havanın emilmesi. Yangın tehlikesi vardır.
Nizami bir havalandırma örn. temiz hava beslemesi için yedek cihaz niyetine kul-
lanım. Cihaz nizami bir havalandırma sisteminin yerine geçmez. Hava nemini de ayarlayamaz (Ne yükseltebilir ne de düşürebilir).
Örn. mutfakta veya marangozhanede davlumbaz veya emiş fanı niyetine kulla-
nım.
Açık havada veya nemli mekanlarda kullanım (Örn. hamamlarda veya saunalar-
da). Nemli havanın cihaza hasar verme tehlikesi vardır.
Cihazın açıklıkları içine yabancı maddelerin sokulması. Özellikle saçlarınızı veya
bol kıyafetlerinizi cihazdan uzak tutun. Yaralanma tehlikesi!
Tüm filtreler düzgün olarak monte edilmeden kullanım.
Cihazın üstünün örtülmesi veya cihazın üstüne başka cisimlerin konulması.
Kendi başına değişiklik yapma veya tamir etme.
92
Page 93

2 Ambalajdan çıkarma ve kurma
Dikkat:
Açıklama:
Uyarı:
Uyarı:
Uyarı:
Dikkat:
2.1 Ambalajdan çıkarma
Cihazı ve tüm donanım parçalarını ambalajdan çıkarın ve içeriğin hasarsız ve eksiksiz olduğunu kontrol edin
(ZSayfa 88, „Hava temizleme cihazınız“).
Cihazı, zarar görmemesi için, prensip olarak orijinal ambalajında gönderin. Bunun için ambalajı muhafaza edin.
Gereksiz ambalaj materyalini, ülkenizde geçerli yönetmeliklere uygun olarak atın/imha edin.
Eğer taşımadan kaynaklanan bir zarar tespit ederseniz, hemen servis şubemiz ile irtibata geçin ZSayfa 102,
„International Service“.
2.2 Kuruluş yerini seçme
Yangın ve patlama tehlikesi! Cihazı, kimyasal maddeler veya sıcaklık kaynakları ile temas etmeyecek, patlayıcı,
sıcak veya yağlı havanın emilme imkanı olmayan bir mekana koyun.
Sağlığınız için tehlike! Cihazın yerini, kirli havanın insanların üzerinden, özelikle de uyumakta oldukları bir
esnada, emilmeyeceği bir şekilde seçin.
Düşme tehlikesi! Fişi en yakındaki elektrik prizine rahatça takabilecek kadar kablo boşaltın. Geri kalan kabloyu alt
kısımda bulunan kablo sarma düzeneğine tekrar sarın. Kabloyu tökezlenmeye meydan vermeyecek şekilde uzatın.
Cihazın sağlam ve düz bir yere konulmasına dikkat edin. Cihazı kesinlikle yatak veya kanepe üzerine koymayın.
Cihazı kapıların ve pencelerin açılma alanlarına veya çok sık gidip geldiğiniz alanlara koymayın.
Havanın, engellenmeden emilerek tekrar dışarı verildiğine dikkat edin.
TR
93
Page 94

3 Kabloyu bağlama ve kullanım
Uyarı:
Dikkat:
2
Dikkat:
3
3.1 Bağlantıyı kurma
Yaralanma tehlikesi! Cihazı ve elektrik kablosunu her kullanımdan önce kontrol edin. Hasar görmüş cihaz kullanılmamalıdır.
Cihazı sadece, tüm filtreler düzgün şekilde yerleştirildiğinde ve hiçbir açıklığın tıkanmadığı temin edildiğinde
kullanın.
1. Cihazın kurulacağı yerin ZBölüm 2.2, „Kuruluş yerini seçme“
bölümündeki açıklamalara uygun olduğunu sağlayın.
2. Kullanmak istediğiniz elektrik prizindeki gerilimin, cihazın alt
kısmında yer alan model etiketinde belirtilen elektrik gerilimi
ile aynı olduğunu kontrol edin.
3. Şimdi cihazı ayakta veya yatırarak kullanabilirsiniz (Res. 2). İlgili
kullanma konumuna göre alt kısımda 4 ayak bulunmaktadır.
4. Hava giriş ve hava çıkış kısımlarında yeterli derecede boş alan
kaldığına dikkat edin.
3.2 Çalıştırma
Kontrol panelinin butonlarına hafifçe dokunmanız yeterlidir. Butonlara kuvvetli şekilde bastırmanıza gerek yoktur, aksi taktirde butonlara zarar verebilirsiniz.
1. -butonuna (Res. 3) basarak cihazı çalıştırın.
- -butonunun üzerindeki LED yanar.
94
- Çalışma gücünü ayarlamak için: ZBölüm 3.3, „Çalışma gücünü seçme“.
- Cihazın belirli bir süre sonra kapanmasını istiyorsanız:
ZBölüm 3.4, „Zamanlayıcıyı ayarlama“.
Cihazı kapatmak için tekrar -butonuna (Res. 3) basın. Bütün LED
ışıkları söner ve fan durur.
Page 95

3.3 Çalışma gücünü seçme
4
Dikkat:
5
1. Çalıştırılmış cihazda -butonunun (Res. 4) üzerindeki buton-
lardan çalışma gücünü seçin:
-„L“: Cihaz çok sessiz çalışır
-„M“: Orta ayar
-„H“: Cihaz yüksek devirde çalışır.
LED ışığı aktüel ayarı gösterir.
3.4 Zamanlayıcıyı ayarlama
Eğer cihazın belirli bir süre çalıştıktan sonra otomatik olarak durmasını istiyorsanız, zamanlama fonksiyonunu kullanmanızı öneriyoruz:
1. Çalıştırılmış cihazda -butonunun (Res. 5) üzerindeki buton-
lardan cihazın otomatik duruncaya kadar çalışma süresini seçin:
-„2“: Cihaz 2 saat sonra kapanır
-„4“: Cihaz 4 saat sonra kapanır
-„8“: Cihaz 8 saat sonra kapanır
Seçimini yaptığınız fonksiyonun LED ışığının yandığına dikkat
edin. Zamanlayıcı LED ışıklarının 3 ünden hiçbirisi yanmazsa, cihaz
çalışmasına devam eder!
Cihazı -butonu ile her zaman kapatma imkanınız bulunmaktadır.
TR
95
Page 96

4 Cihazın bakımı
Uyarı:
Dikkat:
Dikkat:
6
Yaralanma tehlikesi! Cihazı temizlemeden veya bakım yapmadan önce, cihazı kapatın ve fişini prizden çekin.
Yeterli derecede bakıma tabi tutulmayan cihazlar verimli çalışamaz.
İhtiyaç halinde: Gövdeyi temizleme (ZBölüm 4.1, „Muhafazanın temizlenmesi“).
Her 3 ayda bir veya „Koku filtresi“ LED ışığı yanınca: ZBölüm 4.2, „Karbon filtrenin değiştirilmesi“
Her 6 ayda bir veya „HEPA“ LED ışığı yanınca: ZBölüm 4.3, „Hepa filtrenin değiştirilmesi“
4.1 Muhafazanın temizlenmesi
Temizlik için temizleme maddeleri, ovma maddeleri veya alkol
kullanmayın, çünkü bunlar muhafazaya zarar verebilir.
1. Cihaz kapatıldıktan sonra hava deliğini elektrik süpürgesi ile lif
birikintilerinden ve tozdan arındırın (Res. 6).
2. Diğer kısımları lif bırakmayan nemli bir bezle temizleyin.
96
Page 97

4.2 Karbon filtrenin değiştirilmesi
Dikkat:
Açıklama:
Açıklama:
7
8
9
10
1. Elektrik fişinin prizden çekili olduğundan emin olun.
2. Ön panodaki kilit açma düğmelerine bastırın (Res. 7).
Ön panoyu dikkatlice çıkarın.
3. Eski karbon filtreyi HEPA filtresinden çıkarın (Res. 8).
Karbon filtrenin temizlenmesi mümkün değildir. Mutlaka yenilenmesi gerekir (Sipariş verileri için bkz ZBölüm 5.3, „Donanım ve
yedek parça listesi“).
Eski filtreyi ev çöpüne atabilirsiniz.
4. Yeni filtreyi ambalajından çıkarın.
5. Yeni karbon filtreyi HEPA-filtresinin cırt bantının üzerine koyun.
Filtrenin hangi yönünü koyarsanız koyun, farketmez. Filtre kullanılır kullanılmaz döndürülmemesi gerekir, aksi taktirde pislikler
HEPA filtresinin içine aktarılır.
6. Ön panoyu önce cihazın ayaklarında bulunan oluklara yerleşti-
rin (Res. 9/Ok).
7. Daha sonra ön panoyu kapatın, kilitleme düğmeleri (Res. 10),
duyulacak ve görülecek şekil yerine oturmalıdır.
97
TR
Page 98

4.3 Hepa filtrenin değiştirilmesi
Açıklama:
Dikkat:
Açıklama:
Açıklama:
11
12
13
14
1. Elektrik fişinin prizden çekili olduğundan emin olun.
2. Ön panodaki kilit açma düğmelerine bastırın (Res. 11).
Ön panoyu dikkatlice çıkarın (Res. 11).
3. Karbon filtreyi HEPA filtresinden çıkarın (Res. 8).
Karbon filtreyi yenilemek istemiyorsanız, HEPA filtresinin hangi
yüzünün kullanıldığına dikkat edin. Filtrenin tekrar takılmasından
sonra, HEPA filtresinin içine pisliklerin aktarılmaması için bu
önemlidir.
4. Eski HEPA filtresini (Res. 12) konsolünden çıkarın.
HEPA filtresinin temizlenmesi mümkün değildir. Filtrenin mutlaka
yenilenmesi gerekir (Sipariş verileri için bkz ZBölüm 5.3, „Dona-
nım ve yedek parça listesi“).
Eski filtreyi ev çöpüne atabilirsiniz.
5. Yeni HEPA filtresini ambalajından çıkarın.
6. Yeni HEPA filtresini konsolün içine geri takın.
98
HEPA filtresindeki „TOP“ işaretinin (Res. 13/“TOP“) yukarı doğru
dönük olduğuna ve ok ucunun (Res. 13/Ok) cihazın iç tarafına gösterdiğine dikkat edin.
7. Karbon filtreyi tekrar HEPA-filtresinin cırt bantının üzerine ko-
yun (Res. 8). Yeni karbon filtre kullanmayacaksanız, eski karbon
filtrenin iç kısmının içeri tarafa gelmesine dikkat edin.
8. Ön panoyu önce cihazın ayaklarında bulunan oluklara yerleşti-
rin (Res. 13/Ok).
9. Daha sonra ön panoyu kapatın, kilitleme düğmeleri (Res. 14),
duyulacak ve görülecek şekil yerine oturmalıdır.
Page 99

4.4 Filtre değiştirme LED ışığını sıfırlama
15
Filtre değiştirme LED ışıklarından („Koku filtresi“ veya „HEPA“) birisi,
kirli filtrenin yeni filtre ile değiştirilmesinden sonra hala yanıyorsa:
1. -butonuna basın ve LED ışığı sönünceye kadar basılı tutun.
TR
99
Page 100
5 Sorunların giderilmesi
Uyarı:
Açıklama:
5.1 Sorunların tarafınızdan giderilmesi
Servis yardım hattını (ZSayfa 102, „International Service“) aramadan önce, aşağıdaki tablo yardımıyla, sorunu kendiniz giderip gideremeyeceğinizi kontrol edin.
Asla arızalı bir cihazı veya elektrik kablosu arızalı bir cihazı kullanmayın.
Cihazda meydana gelen sorunu aramadan önce, cihazı kapatın ve fişini prizden çekin.
Sorun Olası sebep Çözüm
Cihaz çalışmıyor Fiş takılı değil. Fişi prize takın.
Cihaz kendiliğinden kapanıyor
-butonunun
üstündeki „Ko-
ku filtresi“ LED
ışığı yanıyor
-butonunun
üzerindeki „HE-
PA“ LED ışığı yanıyor
Cihaz aşırı derecede gürültülü
çalışıyor
Ön pano veya HEPA/karbon filtresi yerine düzgün
takılmadı.
Zamanlayıcı fonksiyonu
ayarlandı.
Karbon filtrenin değiştirilmesi gerekiyor.
HEPA filtresinin değiştirilmesi gerekiyor.
En yüksek çalışma gücü
(„H“) ayarlandı.
Filtrelerden biri kirli ve değiştirilmesi gerekli.
Hava girişinin veya hava
çıkışının önünde engel var.
Ön pano veya HEPA/karbon filtresinin yerine düzgün takılıp takılmadığını kontrol edin, bkz ZBölüm 4.2, „Karbon filtrenin de-
ğiştirilmesi“ veya ZBölüm 4.3, „Hepa filtrenin değiştirilmesi“.
Zamanlayıcı fonksiyonunun ayarlanması, iptal edilmesi için bkz
ZBölüm 3.4, „Zamanlayıcıyı ayarlama“.
Karbon filtreyi aşağıda ZBölüm 4.2, „Karbon filtrenin değiştirilmesi“ açıklandığı şekilde değiştirin.
HEPA filtreyi aşağıda ZBölüm 4.3, „Hepa filtrenin değiştirilmesi“ açıklandığı şekilde değiştirin.
Sizin için uygun bir çalışma gücü seçin, ZBölüm 3.3, „Çalışma
gücünü seçme“.
Filtreyi, ZBölüm 4.2, „Karbon filtrenin değiştirilmesi“ ve
ZBölüm 4.3, „Hepa filtrenin değiştirilmesi“ bölümlerinde açık-
landığı şekilde değiştirin.
Cihazın hava girişi veya hava çıkışı kısmında yeterli derecede
boş alan bırakın.
Sorunu bu tablo yardımıyla çözemediyseniz, Dirt Devil Müşteri Hizmetlerine danışın (ZSayfa 102, „International
Service“).
100
 Loading...