

Page 1
il®
iNSTRUCTiON MANUAL
Pleaseread theseinstructions carefullybeforeusing your Dirt Devil"
HandVac.
Letus helpyou putyour cleanertogether or answerany questions,call:
1-800-321-1134 (USA & Canada). website: www.dirtdevil.com
WARNING:
Cleanerassembly may includesmall
parts.Small partscanpresenta
chokinghazard.
For quick reference, please recordyour
vacuum informationbelow.
Model #:
Mfg. Code:
(Mfg. codelocatedon thelower backsideof cleaner)
MODE D'EMPLOI
. Veuillezlireattentivementcesinstructionsavantd'utiliservotreaspirateura
mainDirt Devil'.
, Nouspouvonsvous aider a assemblercetappareiletrepondre a vos
questions, pour celacomposezle :
1-800-321-1134 (Canadaet Etats-Unis). siteWeb ' www.dirtdevil.com
AVERTISSEMENT:
L'assemblagede I'appareil comprend
despetitespieces.Cesdernieres
presententun dangerd'etouffement.
Consignez los renseignements ci-dessous pour
pouvoir los consulter rapidement.
N° de modele :
Code de fabrication :
(Lecodedefabrication setrouve sur la pattie inferieure
arriere de I'aspirateur)
MANUAL DE INSTRUCCIONES
o Porfavor lea estasinstruccionescon cuidadoantesdeusar su aspiradora
verticalHandVac.de Dirt DeviFh.
o Permitanosayudarleaensamblarsuaspiradoraoacontestarsuspreguntas,Ilameal:
1-800-321-1134 (EE.UU.y Canad_i)• Sitio Web: www.dirtdevil.com
z ADVERTENCIA:
Elensambledelaaspiraderapuedeincluir
paltes pequehas. Las pa[tes _uel_as
puedenpresenterriesgodeahogamiento.
Para tenor una referencia rapida, anote pot
favor la informacion de su aspiradora aqui.
No, de Modelo:
Codigo de Fabricante:
(Elcodigodel fabricanteapareceerrla parteposterior e
inferior de laaspiradora).
Page 2
THISVACUUMIS INTENDEDFORHOUSEHOLDUSEONLY,
IMPORTANTSAFETYINSTRUCTIONS
SAVETHESEINSTRUCTIONS
Whenusinganelectricalappliance,basicprecautionsshouldalwaysbefollowed,includingthefollowing:
o READALL INSTRUCTIONSBEFOREUSING THEAPPLIANCE.
oALWAYSFOLLOW THESESAFETYINSTRUCTIONS.
o DO NOT LEAVECLEANERUNATTENDED
oWARNING - FULLYASSEMBLE CLEANER BEFOREOPERATING
o WARNING: THE CORDS,WIRES AND/OR CABLESSUPPLIED WITH THIS PRODUCT
CONTAINSCHEMICALS, INCLUDING LEAD OR LEAD COMPOUNDS, KNOWNTOTHE
STATEOFCALIFORNIATOCAUSECANCERANDBIRTHDEFECTSOROTHERREPRODUCTIVE
HARM. WASH HANDS AFTER USING.
WARNING:TOREDUCETHERISKOFFIRE,
ELECTRICSHOCK OR INJURY:
o Do not leave appliance when plugged
in. Unplug from outlet when not in use
and before servicing.
o Do not use outdoors or on wet surfaces.
o Do not allow to be used as a toy. Close
attention is necessary when used by or
near children.
. Useonlyasdescribedinthismanual.Useonly
manufacturer'srecommendedattachments.
o Do not usewith damagedcord or plug. If
applianceis not working as it should, has
beendropped,damaged, leftoutdoors, or
dropped into water,return it to aservice
center for inspection. Call 1-800-321-
1134 for the nearestservicecenter.
o Do not pull or carry by cord, use cord
as a handle, close a door on cord, or
pull cord around sharp edges or cor-
ners. Do not run appliance over cord.
Keep cord away from heated surfaces.
o Do not unplug by pulling on cord. To
unplug, grasp the plug, not the cord.
, Do not handle plug or appliance with
wet hands.
, Do not put any object into openings.
Do not use with any opening blocked;
keep free of dust, lint, hair and any-
thing that may reduce air flow.
o Keep hair, loose clothing, fingers, and
all parts of body away from openings
and moving parts.
o Turn off all controls before unplugging.
o Use extra care when cleaning on stairs.
o Do not use to pick up flammable or
combustible liquids, such as gasoline, or
use in areaswhere they may be present.
o Look on your vacuum cleaner and fol-
low all label and marking instructions.
o Donotuseanextensioncordwiththiscleaner.
• Keependof hose,wandsandotheropenings
awayfrom yourfaceandbody. Keepyour
hands,feet,hairandclothingawayfrom
movingparts;especiallythe revolvingbrush.
• Do not use the vacuum cleanerwithout
dirt container and/or filters in place.
• Do not pick up anything that is burning
or smoking, such as cigarettes, match-
es, or hot ashes.
SAVETHESE INSTRUCTIONS
WARNING:Toreducethe risk of electricshock,this appliancehasa polarizedplug
(one bladeis wider thanthe other), This plug will fit in a polarizedoutlet only one way, If
the plug does not fit fully in the outlet, reversethe plug, If it still doesnot fit, contacta qual-
ifiedelectricianto install the proper outlet, Donot changethe plug in anyway,
Page 3
13 1
10
12
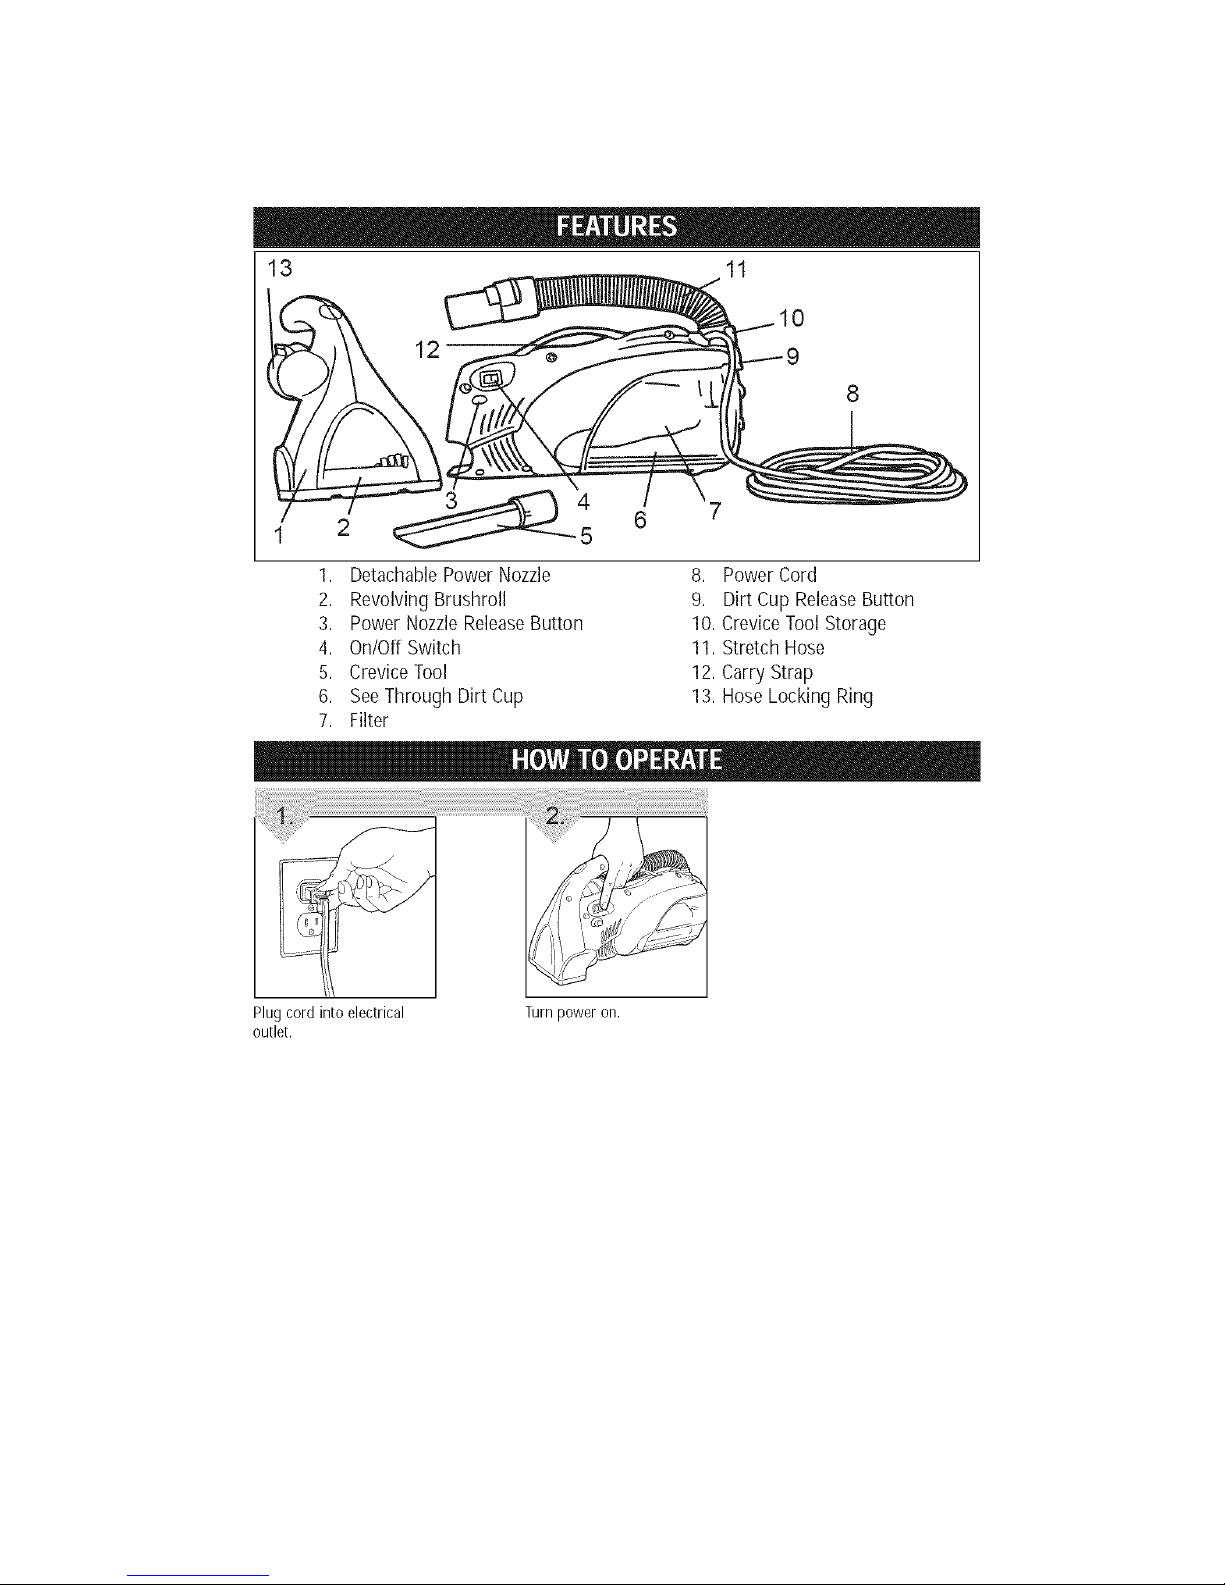
1, DetachablePower Nozzle
2, Revolving Brushroll
3, Power NozzleReleaseButton
4, On/Off Switch
5, CreviceTool
6, SeeThrough Dirt Cup
7, Filter
6
8, Power Cord
9, Dirt Cup ReleaseButton
10, CreviceTool Storage
11, Stretch Hose
12, Carry Strap
13, Hose Locking Ring
Plug cord into electrical Turn power on.
outlet.
Page 4
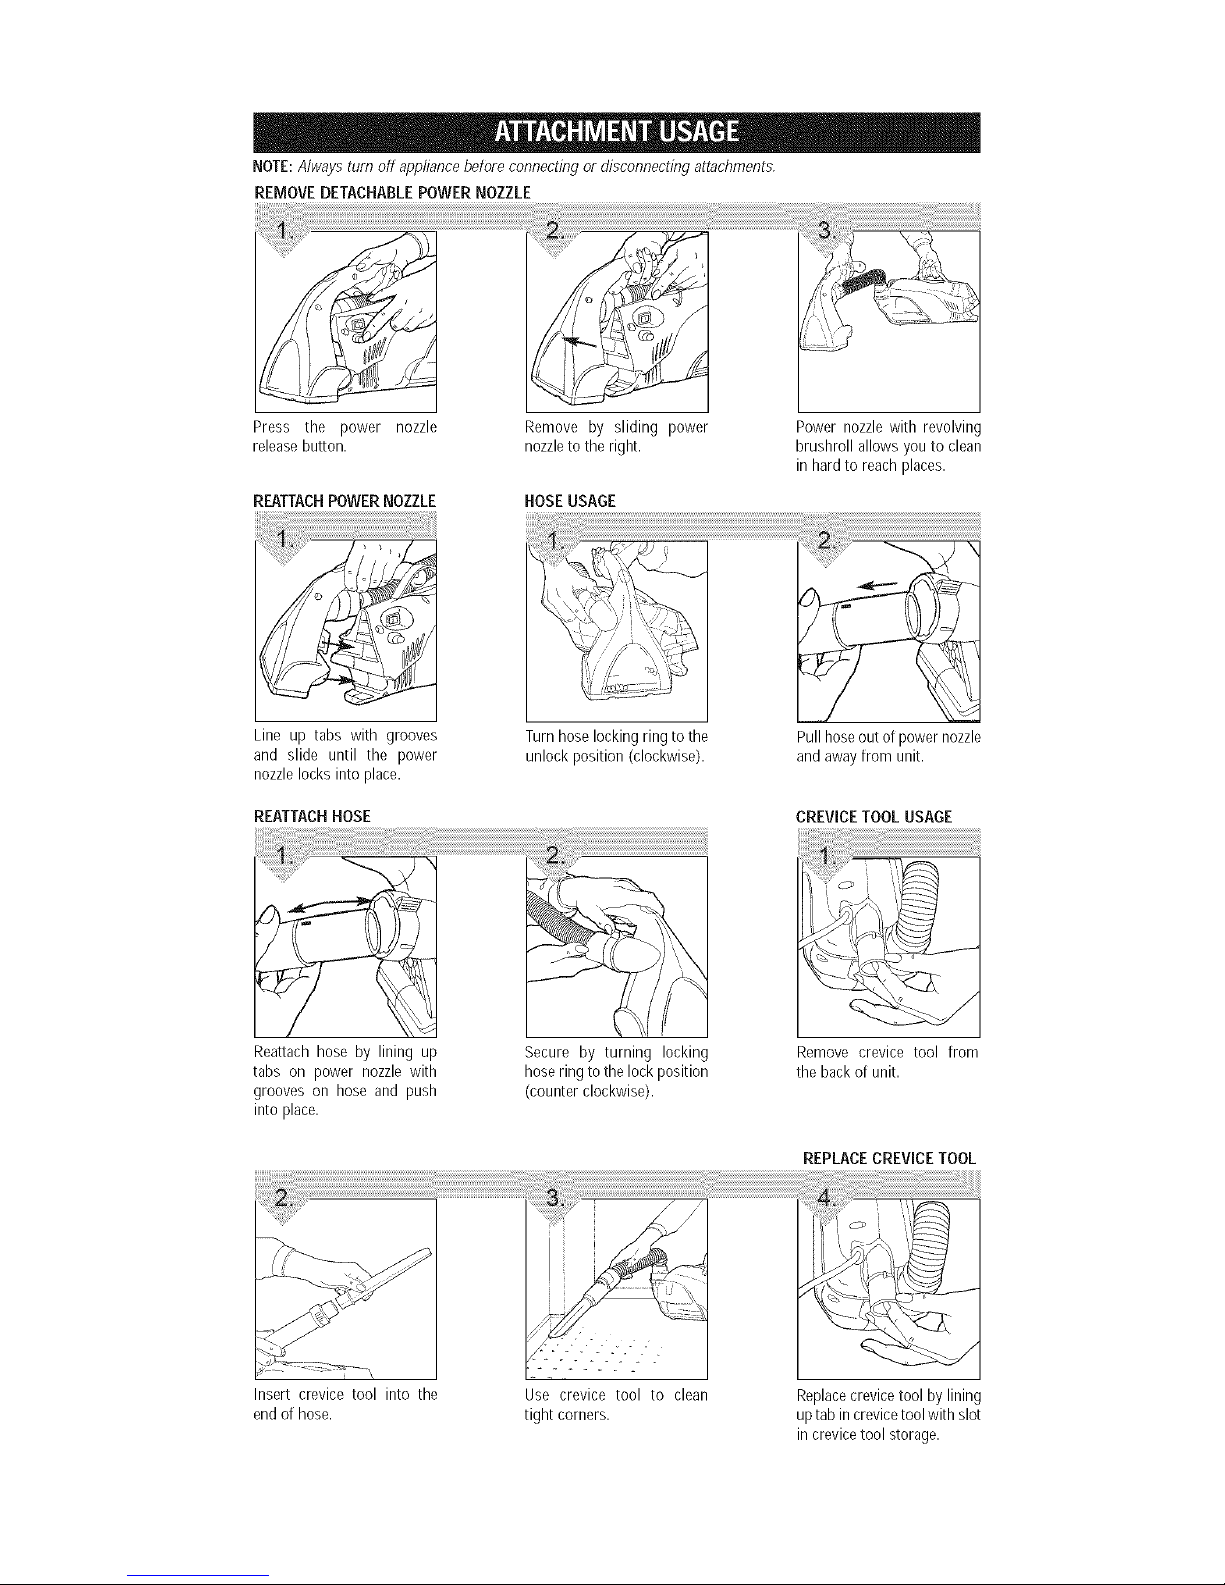
NOTE:Always turn off appliance before connecting or disconnecting attacbments,
REMOVE DETACHABLE POWER NOZZLE
Press the power nozzle
releasebutton.
REATTACH POWER NOZZLE
Remove by sliding power
nozzleto the right.
HOSE USAGE
Power nozzle with revolving
brushroll allows you to clean
in hard to reach places.
Line up tabs with grooves
and slide until the power
nozzle locks into place.
REATTACH HOSE
Turn hose locking ring to the
unlock position (clockwise).
Pull hoseout of power nozzle
and away from unit.
CREVICE TOOL USAGE
Reattaeh hose by lining up
tabs on power nozzle with
grooves on hose and push
into place.
Secure by turning locking
hose ring to the lock position
(counter clockwise).
Remove crevice tool from
the back of unit.
REPLACE CREVICE TOOL
Insert crevice tool into the
end of hose.
Use crevice tool to clean
tight corners.
Replacecrevice tool by lining
uptab in crevicetool with slot
in crevicetool storage.
Page 5
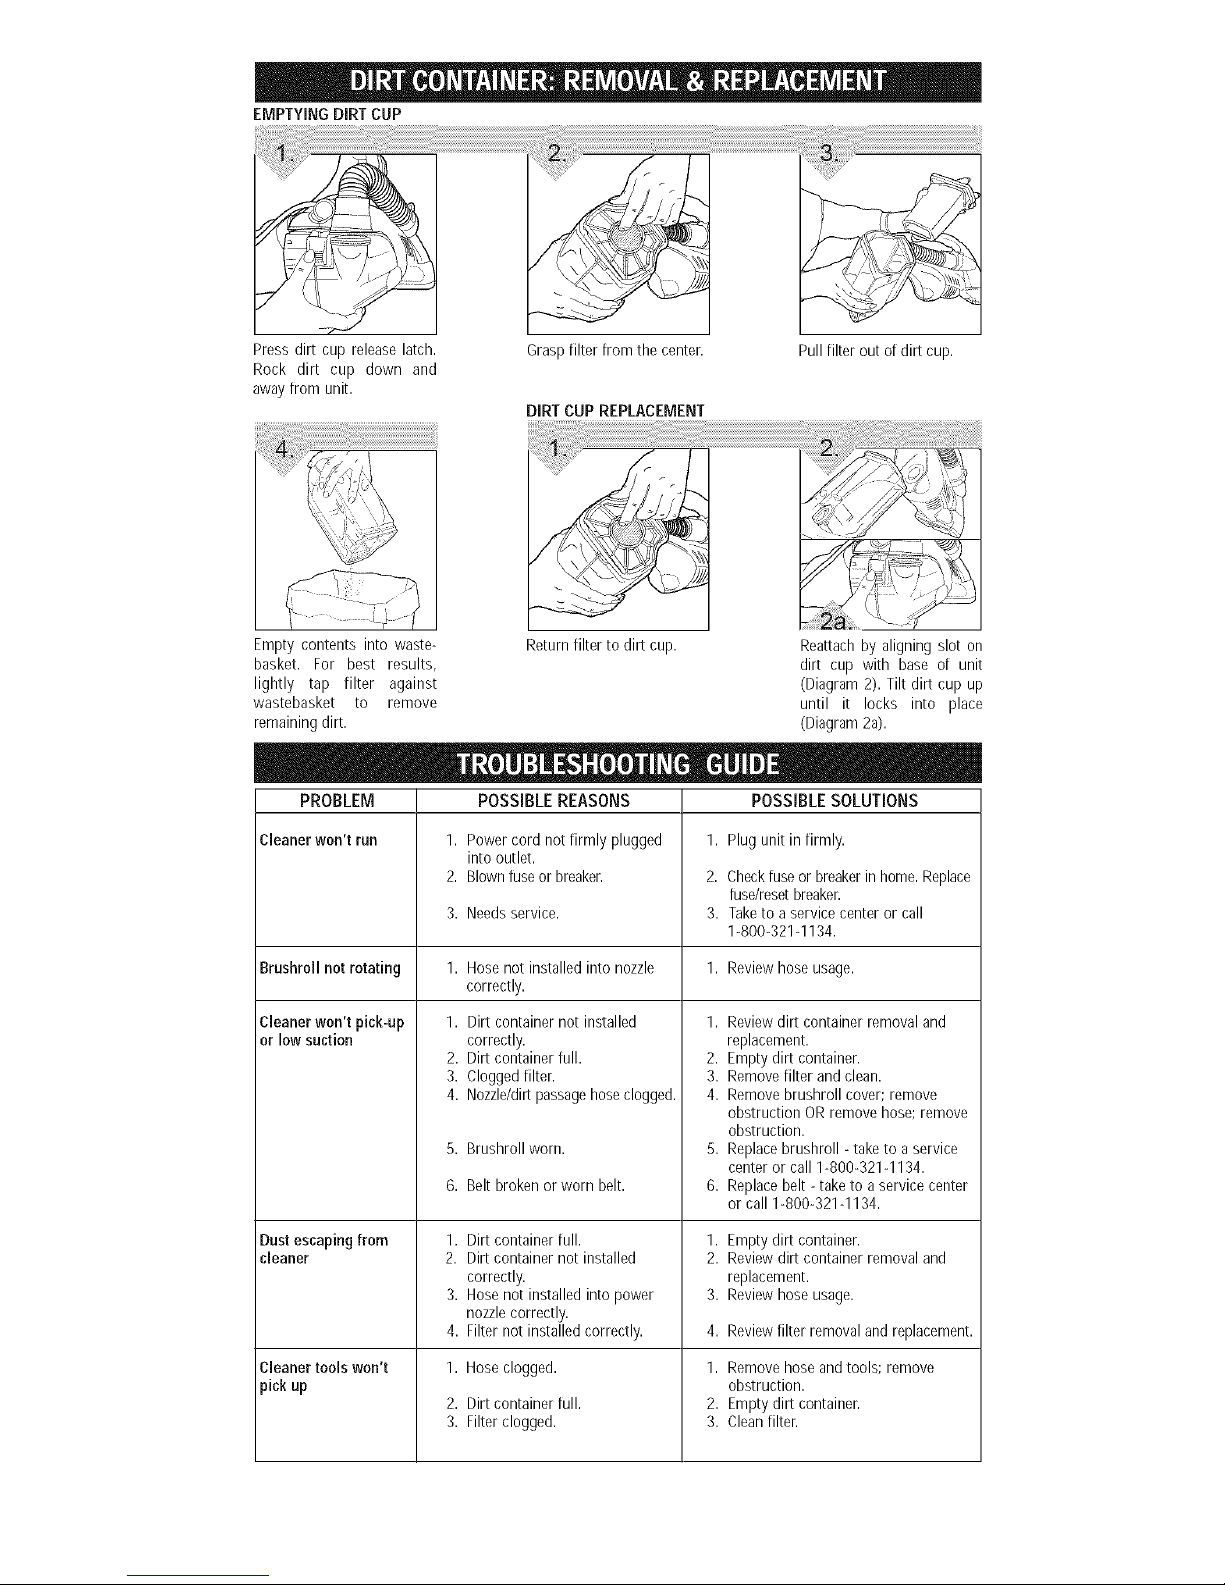
EMPTYINGDiRTCUP
Press dirt cup release latch.
Rock dirt cup down and
away from unit.
Graspfilter from the center.
DiRT CUP REPLACEMENT
Pull filter out of dirt cup.
Empty contents into waste- Return filter to dirt cup. Reattach by aligning slot on
basket. For best results, dirt cup with base of unit
lightly tap filter against (Diagram 2). Tilt dirt cup up
wastebasket to remove until it locks into place
remaining dirt. (Diagram 2a).
PROBLEM POSSIBLESOLUTIONS
Cleaner won'trun
POSSIBLE REASONS
1. Power cord not firmly plugged
into outlet.
2. Blownfuse or breaker.
3. Needsservice.
1,
2.
3.
Plug unit in firmly.
Checkfuse or breakerin home. Replace
fuse/resetbreaken
Taketo a service center or call
1-800-321-1134.
Brushroll not rotating 1. Hose not installed into nozzle 1. Review hose usage.
correctly.
1. 1.Dirt container not installed
correctly.
2. Dirt container full.
3. Clogged filter.
4. Nozzle/dirtpassagehoseclogged.
5. Brushroll worn.
6. Belt broken or worn belt.
1,
2.
3.
4.
1.
2.
3.
Dirt container full.
Dirt container not installed
correctly.
Hose not installed into power
nozzlecorrectly.
Filternot installed correctly.
Hose clogged.
Dirt container full.
Filterclogged.
Cleaner won't pick-up
or low suction
Dust escaping from
cleaner
Cleaner tools won't
pick up
Reviewdirt container removal and
replacement.
2. Empty dirt container.
3. Remove filter and clean.
4. Remove brushroll cover; remove
obstruction OR remove hose; remove
obstruction.
5. Replace brushroll - take to a service
center or call 1-800-321-1134.
6. Replace belt - take to a service center
or call 1-800-321-1134.
1,
2.
3.
4.
I.
2.
3.
Empty dirt container.
Review dirt container removal and
replacement.
Review hose usage.
Reviewfilter removal andreplacement.
Remove hose andtools; remove
obstruction.
Empty dirt container.
Clean filter.
Page 6

ANY OTHER SERVICING SHOULD BE DONE BY AN
AUTHORIZED SERVICE REPRESENTATIVE
CUSTOMERSERVICE (1-800-321-1134)
In the event that further assistance is required, see your Yellow Pages for an authorized RoyaP Dealer. Costs of any
transportation to and from any place of repair are to be paid by the owner. The service parts used in this unit are
easily replaced and readily available from an authorized RoyaV Dealer or retailer. Always identify your cleaner by the
model number and manufacturing code when requesting information or ordering replacement parts. (The model
number appears on the bottom of the cleaner.)
LiMiTED WARRANTY
Tothe consumer, Royal Appliance Mfg. Co. warrants this vacuum cleaner 1obe free of defects in material or workman-
slfip commencing upon the date of the original purchase. Refer to your vacuum cleaner carton for the length of war-
ranty and save your original sales receipt to validate start of warranty period.
If the vacuum cleaner should become defective withirl the warranty period, we will repair or replace any defective parts
free of charge. The complete machine must be delivered _ to any ROYALAuthorized Sales& Warranty Service
Station. Please include complete description of the problem, day of purchase, copy of original sales receipt and your
name, address aridtelephone rlumber. If you are not rlear a Warranty Station, call the factory for assistance at USA:
1-800-321-1134 / CANADA: 1-800-321-1134. Useorfly gerluine Royal replacement parts.
The warranty does rmt include unusual wear, damage resulting from accident or unreasonable use of the vacuum
cleaner. This warranty does rmt cover belts, brushes, bags, filters, bulbs or fan damage. This warranty does riot cover
unauthorized repairs. This warranty gives you specific legal rights arid you may also have other rights. (Other rights
may vary from state to state in the USA).
NOTE: RETURN WARRANTY CARD TO REGISTER YOUR CLEANER
, CETASPIRATEURA ETECON(j:UPOURUSAGEDOMESTIQUESEULEMENT,
INFORMATIONSDESTINEESAUX CONSOMMATEURS
IMPORTANTESINSTRUCTIONSDE SECURITE
Lorsque vous utilisez un appareil menager,vous devriez toujours suivre certainesprecau-
tions de securite, dont les suivantes:
° LISEZTOUTESLES INSTRUCTIONSAVANTD'UTILISERCETAPPAREIL
• RESPECTEZTOUJOURSA LA LETTRECES INSTRUCTIONSDESECURITE
• NELAISSEZPASL'ASPIRATEURSANSSURVEILLANCE
• MISEENGARDE- ASSEMBLEZL'ASPIRATEURENENTIERAVANTDELEMETTREEN
MARCHE
Page 7

• AVERTISSEMENT: LESCORDONS,LESFILS ELECTRIQUESET/OULESCABLES
FOURNISAVECCEPRODUITCONTIENNENTDES PRODUITSCHIMIQUESCON-
TENANTDU PLOMBOU DESCOMPOSESDU PLOMBCONSlDERESPARL'ETATDE
CALIFORNIECOMMEPRODUITSCANCEROGENESETCAUSANTDESMALFORMATIONS
CONGENITALESOUAUTRESANOMALIESDELA REPRODUCTION,SE LAVERLES
MAINSAPRESUTILISATION,
AVERTBSEMENT: POUR REDUIRELES
RISQUES D'INCENDIE, DE CHOC ELECTRIQUE
ETDELESION:
• NelaissezpasI'appareilsanssurveillancequandil est branche,Debranchez-lequandil n'est
pasutiliseainsiqu'avantd'en faireI'entretien,
• N'utilisez pas I'appareila I'exterieurou sur des surfaces mouillees,
• Nelaissez pas les enfantsjouer avec I'appareil, Exercezunesurveillance etroite quand
I'appareilest utilise par les enfants ou a proximite de ceux-ci,
• Utilisez I'appareil seulementcomme indique dans ce manuel, Utilisez seulementles
accessoiresrecommandes par le fabricant,
• N'utilisez pas I'appareilsi la fiche ou le cordon est endommage, Si I'aspirateur ne fonc-
tionne pascomme prevu,s'il a eteechappe,endommage, laissea I'exterieur,ou s'il est
tombe dans I'eau,expediez-lea un centre de service pour verification, Telephonezau
1-800-321-1134 pour connaitre le centre de service le plus pres de chezvous,
• Netirez pas I'appareil parson cordon, ne vous servez pasdu cordon comme poignee,
nefermez pasde portes sur le cordon et ne tirez pasle cordon sur descoins ou bords
tranchants, Evitezde passersur le cordon d'alimentation avec
I'appareil, Gardezle cordon a I'ecart des surfaces chauffees,
• NedebranchezpasI'appareilen tirant sur le cordon, Pour le debrancher,saisissez la
fiche et non le cordon,
• Nemanipulez pasla fiche ou I'aspirateur avecles mains mouillees,
• N'inserezpas d'objets dansles ouvertures, N'utilisez pasI'appareilsi les ouvertures
sont obstruees; gardez lesouvertures libres de poussiere, de peluches, de cheveuxet de
tout cequi pourrait reduire le debit d'air,
• Gardezlescheveux, lesvetements amples,les doigts et toute pattie du corps
I'ecartdesouvertures et des pieces en mouvement,
• Fermeztoutes les commandes avantde debrancher I'appareil,
• Soyeztres prudents quand vous nettoyezles marchesd'escalier,
• N'aspirezpas les liquides inflammables ou combustibles comme I'essence;n'utilisez pas
I'appareilen presencede ces materiaux,
• Examinezvotre aspirateur et suivez toutes lesinstructions sur lesetiquettes,
• N'utilisezpas de rallongeelectriqueaveccet aspirateur,
• Gardezleboutdu tuyau,les rallongeset autresouvertures adistancedu visageet du
corps, Gardezvos mains,vos pieds,vos cheveuxetvos vetementsa distancedespieces
mobiles,tout specialementde la brosse rotative,
• N'utilisezpas sansle godeta poussiereni lesfiltres,
• RangezI'aspirateura I'interieur, RangezI'appareilapresson utilisationpour eviterde
trebucherdessus,
• Evitezd'aspirercequibr01eoufume,commelescigarettes,lesallumettesetlescendreschaudes,
• Letuyau contient des fils electriques,N'utilisezpas I'appareilIorsque lafiche ou le cordon
est endommage,coupeou perce,Evitezd'aspirer desobjets tranchants,
• Metteztoujours I'interrupteur de I'appareilen position d'arret avantde connecterou de
deconnecterles suceurs motorises,
VEUILLEZCONSERVER CES INSTRUCTIONS
Page 8

AVERTISSEMENT: Afindereduirelesrisquesdechocelectdque,cetappareil
estmunid'unefichepolarisee(unetigeestpluslargequel'autre),Cettefichenepeutetre
insereedansuneprisedecourantpolariseequedansun sens,Silafichene s'inserepas
completementdanslaprise,inversez-la,Siellenes'inseretoujourspas,demandeza un
electricienqualifie@installerlapriseappropriee,Ne modifiezd'aucunefaqonlafiche,
13 11
10
1, Suceur motorise detachable
2, Brosse a rouleau rotative
3, Bouton de declenchement du suceur
motorise
4, Interrupteur marche/arret (ON/OFF)
5, Suceur plat
6, Godet a poussiere transparent
7, Filtre
6
8, Cordon d'alimentation electrique
9, Bouton de degagement du godet a
poussiere
10, Entreprosage du suceur plat
11, Tuyauelastique
12, Courroie de transport
13, Anneau de verrouillage du tuyau
Branchez lecordon dans une
prise de eouranL
Mettez I'aspirateur en marche
(ON).
F N 'A/S
Page 9

REMARQUE:Arretez I'apparefl avant deconnecter ou de de.connecterles accessories,
RETIREZ LE SUCEUR MOTORISE DETACHABLE
Appuyez sur le bouton de
declenchement du suceur
motorise.
ATTACNEZ DE NOUVEAU LE
SUCEUR MOTORISE
Retirez-le en le faisant glisser
sur la droite.
UTILISATION DU TUYAU
Le suceur motorise a broeserota-
tive vous perrnet de nettoyer lee
endroits difficiles d'acces.
Alignez les pattes aux encoches
et faites glisser le suceur
motorise jusqu'a ce qu'il soit
verrouille en place.
ATTACHEZ DE NOUVEAU LE TUYAU
Toumez le tuyau jusqu'a ce que
I'anneau de verrouillage soit
deverrouille (dans le sens des
aiguilles d'une rnontre).
Detachez le tuyau du suceur
motorise et de I'unite.
UTILISATIONDU SUCEUR
PLAT
Attachez de nouveau le tuyau en
alignant les pattes du suceur
motorise aux encoches du tuyau
et en poussant en place.
Fixez bien en place en tournant
ranneau de verrouillage du tuyau
dans la position verrouillee
(dans le sens anti-horaire).
Retirez le suceur plat de I'arriere
de unite..
REMISE EN PLACE DU
SUCEUR PLAT
Inserez le suceur plat sur I'ex- Utilisezlesuceur plat pour nettoy- Replacezlesuceur plat en alignant
tremite du tuyau, er les endroits difficiles d'acces, sa parlea I'encx)ched'entreposage.
Page 10

VIDAGE DU VIDE-POUSSIERE
Appuyez sur le Ioquet du godet
poussiere. Secouez le gode[
poussiere vers le has pour le
retirer de I'unite.
Saisissez le filtre parson centre. Soulevez le filtre pour le sortir du
gode[ a poussiere.
REMISE EN PLACE DU GODETA POUSSI[RE
Videz le COl][el]u dans uI]e
poubelle.Pour obtenir de meilleurs
resultats,secouez legerementle fil-
tre centre la poubelle pour levider
cornpletement.
Replacezle filtre dans le godet t_
poussiere.
Attachez de nouveau en alignant
I'encoche du gode[ a poussiere
la base de I'unite.(Schema 2).
Inclinez le godet a poussiere vers
le haut jusqu'a ce qu'il soit bien
fixe en place (Schema 2a).
PROBLEME CAUSESPOSSIBLES SOLUTIONSPOSSIBLES
L'aspirateur ne 1. La fiche n'est pas bien inseree dans la 1. Bien enficher le cordon d'alirnerltation.
fonetionne pas prise de courant.
2. Le fusible est grille ou le disjoncteur 2. Verifia lefusibleou ledisjoncteur.Rernplacerle
estde.clenche, fusible ou re.enclencher le disjoncteur.
3. II est temps de preceder a 3. Apportez I'appareil au centre de service
I'erltretien. ou telephorrnz au 1-800-321-1134.
Le reuleau-brosse ne 1. Le tuyau n'es[ pas irrntalle correctemen[ 1. Consultez la ser;tion sur I'utilisation du tuyau.
tourne pas dallS le suceur,
Page 11

PROBLEME CAUSESPOSSIBLES SOLUTIONSPOSSIBLES
L'appareil n'aspire
pas oufaible succion
De la poussiem
s'eehappe de I'aspirateur
1. Le godet ti poussiere n'est pas installe
correctemerlt.
2. Le godet ti poussiere est pleirl.
3. Le flltre est obstrue.
4. Le suceur ou le tuyau d'aspiration est
obstrue.
5. La brosse a rouleau est usee.
6. La courmieest bri_ ou erldommagee.
1. Le godet a poussiere est pleirl.
2. Le godet a poussiere n'est pas
installe correctement.
3. Le tuyau n'est pas installe correctement
dans le suceur motorise.
4. Le filtre n'_t pas install6correctement.
1. Revoyez renlevement et la reinstallation du
godet a poussiere.
2. Videz le godet a poussiere.
3. Retirez le filtre et nettoyezde.
4. Retirez le couvemle de la base du tuyau,
enlevez les matieres qui obstruent rembouchure
ONenlevez le tuyau et, ensuite, les matieres
qui robstruent.
5. Remplacez brosse a rouleau - Apportez
rappareil au centre de service ou telephonez
au 1-800-321-1134.
6. Remplacez la eourroie -Apportez I'appareil au
centrede serviceou telephorlezau1-800-321-1134.
1. Videz le godet a poussiere.
2. Revoyez rerllevement et Is remise en
place du godet a poussiere.
3. Consultez la section sur rutilisation du tuyau.
4. Corlsultezla section sur renlevementet le rein
placementdu filtie.
Lesaccesseiresde 1. Letuyau est obstrue. 1. Retirezletuyau etlesaccessoireset
['apparei[ n'aspirent pas degagezI'obstructiorl.
2. Le godet a poussiere est plein. 2. Videz le godet a poussiere.
3. Le filtre est obstrue. 3. Nettoyez le filtre.
TOUTAUTRE ENTRETIENDOITETREEFFECTUEPAR UN REPRESENTANTAUTORISE
SERVICECLIENTELE(1-800-321-1134)
Pour obterlir de raide supplemerltaire, eonsultez lesPagesjaunes afirl de corlnaitre les deposibdres Royal autorises. Lesfrais de
transport aller-retour de rendroit ot] sorlt effectuees les reparations sont a la charge du proprietaire de rappareil. Les pieces
detachees utilisees dans cet appareil peuvent facilement etre remplacees et snnt disponibles aupres des deposimires ou revendeurs
Royal autnrises. Identifiez toujours rappareil par le numero du mndele et le code defabrication Inrsque vnus demandez desinfor-
mations ou que vnus commandez des pieces de rechange. (Le rlumero de modele figure au bas de rappareil).
GARANTIELIIVlITEE
Royal Appliance Mfg. Co. gmarltit au consommateur que cet aspirateur est exempt de vices de materiau ou de fabrica-
tion a compter de sa date d'acllat d'ofigine. Consultez le croton d'emballage de rappmeil pour determiner la dm#.e de
la garantie et conservez votie requ d'acllat d'origine pourjustifiei la date d'entiee en viguem de la periode de garantie.
Si rappareil tombe en panne perldant la periode couverte par lagarantie, nous reparerons ou remplacerons gratuitement
toute piece ddectueuse. L'appareil entier doit etre retourne port payet_ n'importe quel point de vente ou de service en
vertu des garanties autorise ROYAL_. Veuillez inclure unedescription de.tailleedu probleme, la date d'aellat, urle eopie
du requd'achat d'origine ainsi que vos nora, adresse et numero de telephone. Si aucun centre de reparatiorl ne se trou-
ve dans votre region, appelez rusine au1-800-321-1134 aux ETATS-UNIS.CANADA: 1-800-321-1134. N'utilisez que
les pieces de recharlge RoyaP.
Cette garantie ne couvre pas rusure inhabituelle, les dommages causes par les accidents ou un usage abusif de rap-
pareil. Elle rle couvre pas norl plus les courroies, les brosses, les sacs, les filtres, les ampoules ou les dommages au
verltilateur. Cette gararltie necouvre pas les reparations non autorisees. Ceue gararltie vous confere desdroits recon-
nus par la Ioi et peut-etre aussi d'autres droits. (Les autres droits peuvent varier d'un Data rautre des Etats-Nnis.)
Page 12

REIVlARQUE:RETOURNEZ LA FICHE DE GARANTIE POUR ENREGISTRER
VOTRE ASPIRATEUR
ESTAASPIRADORA ESTA DISEklADA PARA USO DOMESTICO SOLAMENTE,
INFORMACIONPARAELCONSUMIDOR
INSTRUCCIONESDE SEGURIDAD IMPORTANTES
Cuandouseun electrodomestico se deben seguir siempre las precaucionesbasicas,
incluyendo las siguientes:
• LEATODAS LAS INSTRUCCIONES ANTES DE USAR ESTEAPARATO
• SIEMPRE SIGA ESTAS INSTRUCCIONES DE SEGURIDAD
• NO DEJE LA ASPIRADORA FUNCIONANDO SOLA
• ADVERTENCIA- ENSAMBLE TOTALMENTE LA ASPIRADORA ANTES DE USARLA
• ADVERTENCIA: LOS CORDONES, ALAMBRES Y/O CABLES SUMINISTRADOS
CON ESTE PRODUCTO CONTIENEN PRODUCTOS QUiMICOS QUE INCLUYEN
PLOMO O COMPUESTOS DE PLOMO ACERCA DE LOS CUALES SE HA SABIDO
EN EL ESTADO DE CALIFORNIA, PRODUCENCANCER, DEFECTOSDE NACIMIE
TO U OTROS DAKIOSREPRODUCTIVOS.LAVESELAS MANOSDESPUESDESU USO.
ADVERTENCIA: PARA REDUCIR ELRIESGO DE
INCENDIO,CHOQUE ELECTRICO0 LESIONES
• Nodeje solo el aparatocuando est(_conectado.Desconectelode la toma de corriente
cuando no Io usey antes dedarle servicio.
° NoIo utilice en exteriores o en superficies mojadas.
• Nopermita que se usecomojuguete. Pongamucha atencion cuando Io useun nino o
cerca de ninos.
° 0selo solamente como se indica en este manual. Use solamente los accesorios
recomendadospor el fabricante.
• NoIo utilice con el cordon electrico o la clavija danados. Si el aparatono trabaja como
debiera,se ha caido, dar_ado,dejadoen extenoreso caido en agua, regreseloa un cen-
tro de servicio para su inspeccion. Llameal 1-800-321-1134 para encontrar el centro
de servicio mas cercano a su domicilio.
° Notire ni Io transporte tomandole del cordon electrico, no utilice el cordon electrico
como asa, no cierre la puerta sobre el cordon electrico, o tire del cordon electrico
alrededor de rebordeso esquinas agudos. No paseel aparatosobre el cordon electrico.
Mantengael cordon electrico lejos de superficies calientes.
• NoIo desconectetirando del cordon electrico. Paradesconectarlo,tome la clavija, no el
cordon electrico.
° Notome la clavija o el aparatocon las manos mojadas.
° Nocoloqueobjetosen lasaperturas. No Iousecon unaapertura bloqueada;mantengalo
librede polvo,pelusa,peloy cualquiercosaque puedareducirel flujo de aire.
Mantengalejos de las aperturas y partes moviles el pelo, ropa suelta, dedos y todas las
pares del cuerpo.
• Apaguetodos los controles antes de desconectar.
• Tengamascuidado cuando aspire escaleras.
NoIo use para aspirar liquidos inflamableso combustibles, tales como gasolina, ni Io
useen areas donde pudieran estar presentes.
• Sigalas instrucciones de la etiquetay lasmarcas que se encuentran en su aspiradora.
Nouseuna extensionelectricaal usar estaaspiradora.
• Mantengalejosde su caray cuerpo la manguera,lanzasy otras aperturas. Mantengasus
manos,pies, pelo y ropa lejos de las partesmoviles;especialmentedel cepillo giratorio.
• Nouse la aspiradorasin teneren su sitio el recipientede polvo y los filtros.
Guardelaaspiradora en interiores. Guardelaaspiradoradespuesde su usopara evitar
accidentesde tropiezos.
• Noaspireobjetos que estenquemandoseo emitiendo humo, talescomo cigarrillos, ceril-
loso cenizascalientes.
• Lamangueracontienealambreselectricos.Nola utilice si se encuentradanada,cortadao
perforada.Eviteaspirarobjetos con filo.
• Siempreapagueesteaparatoantesde conectaro desconectarla boquillaelectrica.
Page 13

ADVERTENCIA:p_ reducire,riesgode choqueeBctrico,esteaparatotieneuna
clavUapolarizada(unahojaes mas anchaque laotra.)EstaclavVaencajaraenunatoma decorri-
ente polarizada de una manera solamente. Si la clavija no encajatotalmente en la toma de corri-
ente, invierta la clavija. Si aun no encaja,pongase en contacto con un electricista calificado para
instalar latoma de corriente apropiada. No modifique la clavija de ninguna manera.
13
12
10
6
1, Boquilla Electrica Desprendible
2, Cepillo Giratorio
3, Boton de Liberacion de la Boquilla
Electrica
4, Interruptor Encendido / Apagado
5, Herramienta para Hendiduras
6, Recipiente de Polvo Transparente
7, Filtro
8, CordOn Electrico
9, Botonde Liberaciondel Recipientede
Polvo
10, Almacenamiento de la
Herramienta para Hendiduras
11, MangueraExtensible
12, Correa de Transporte
13, Anillo del Seguro de la Manguera
Conecte el cordon eBctrico en la Enciendala aspiradora.
toma de corriente.
Page 14

NOTA: Siempre apague este aparato antes de conectar o desconectar los accesorios,
RETIRE LA BOQUILLA ELECTRICA DESPRENDIBLE
Oprima el boron de liberacion de Retire la boquilla eloctrica
la boquilla electrica, deslizandola hacia la derecha.
FIJEDE NUEVO LA
BOOUILLA ELECTRICA
USO DE LA IVlANGUERA
La boquilla ele.ctrica con cepillo
giratorio le permite limpiar sitios
dificiles de alcanzar.
Alin_ las lenguetascon las canale-
b_sy deslicelahastaque laboquil-
la eleetricase asegureen su sitio.
FUEDENUEVOLAMANGUERA
Gire el anillo del seguro de la
manguera hacia la posicion de
soltado (en el sentido de las
manecillas del reloj.)
Tire la boquilla electrica hacia
fuera de la unidad.
USO DE LA HERRAMIENTA
PARA HENDIDURAS
Fije de nuevo la manguera al
alinear las leng(Jetas de la
boquilla electriea con las canale-
tas en la manguera y empuje
hasta que quede en su sitio.
Asegurela al girar el anillo del
seguro de la manguera hacia la
posicion de asegurado (en el
sentido opuesto alas manecillas
del reloj.)
Retire la herrarnienta para hen-
diduras de la parte posterior de
la unidad.
Page 15

REEMPLACELA
HERRAMIENTAPARA
HENDIDURAS
Inserte la herramienta para hen-
diduras en el extremo de la
manguera.
VAClADODELREClPIENTEDEPOLVO
Utilice la herramienta para hen-
diduras para limpiar esquinas
muy cerradas.
Reemplace la herramienta para
hendiduras alalinearla lengtJetade
la herramienta para hendiduras
con laranura en el compaitinliellto
de la herrarnierltaparahendidums.
Optima la palanca de liberacion
del recipiente de polvo. Tire del
recipiente de polvo hacia abajo y
afuera de la unidad.
Tomeel filtro por el centro.
Saque el filtro del recipiente
de polvo.
REEMPLAZO DEL RECIPIENTE DEPOLVO
Vacie el contenido en un
basurero. Para obtener mejores
resultados, golpee suavemente
el filtro contra el basurero para
retirar el polvo restante.
Coloque de nuevo el filtro en el
recipiente de polvo.
F_elode nuwo al alinearla ranura
enel recipientede polvocon labase
dela unidad(Diagrama2). Inclineel
recipiente de polvo hasta que se
asegureen su sitio (Diagram 2a).
Page 16

PROBLEMA POSIBLESCAUSAS SOLUCIONESPOSIBLES
La aspiradora no funciona 1. Elcordon electdco rio esbi bienconectado 1. Conectela unidad con firmeza.
en la tornade corriente.
2. Fusiblequemadoo interruptor 2. Reviseel fusible o el interrupter en casa.
desconectado. Reemplaceel fusible / reajusteel interrupter.
3. Necesita servicio. 3. Llevela al centro de servicio o Ilame al
1-800-321-1134.
El cepillo giratono no 1. La manguera no esta instalada de rnanera 1. Revise el uso de la rnanguera.
gira correcta en la boquilla.
1. 1.
La aspiradora no aspira o
la succion es muy dGbil
El polvo sale dela
aspiradora
Los accesorios de la
aspiradora no funeionan
2,
3.
4.
El recipiente de polvo no esta instalado
correctamente.
El recipiente de polvo esta Ileno.
Filtro tapado.
Estatapada la boquilla / el paso de
polvo de la rnanguera.
5. Depillo giratorio desgastado.
6. Banda rota o desgastada.
1, El recipiente de polvo esta Ileno,
2. El recipiente de polvo no esta instalado
correctamente.
3. La manguera rio esbi instalada de manera
correcta en la boquilla el#.ctrica.
4. El flltro no esta instalado.
1. Manguera tapada
2. El recipiente de polvo esta Ileno.
3. Filtro tapado.
Revise la forma de retire y reernplazo del
recipientede polvo.
2. Vacie el recipiente de polvo.
3. Retire y limpie el filtro.
4. Retire la cubierta de la boquilla de la base,
retire la obstruccion O retire la manguera;
retire la obstruccion.
5. Reemplaceelcepillo giratorio - Llevela al centro
de servicio o Ilarneal 1-800-321-1134.
6. Reernplace la banda - Llevela al centre de
servicio o Ilarne al 1-800-321-1134.
1. Vacie el recipiente de polvo.
2. Revise la forrna de retiro y reemplazo
del recipiente de polvo.
3. Revise el uso de la manguera.
4. Revise el retiro y reemplazo del filtro.
1. Retire la manguera y los accesorios; retire
la obstruccion.
2. Vacie el recipiente de polvo.
3. Lirnpie el filtro.
CUALQUIER OTRO SERVIClO DEBERA SER EFECTUADO POR UN REPRESEN-
TANTE DE SERVICIO AUTORIZADO
SERVIClOAL CLIENTE (1-800-321-1134)
En case de necesitar mas ayuda, yea en las Paginas Amarillas para encontrar a un Distribuidor Autorizado Royal. Los costos de
transporte hacia y desde el sitio dereparacion seran pagados por el propietario. Las partes de repuesto utilizadas en esta unidad
son de reemplazo facil y esbin disponibles con un Distribuidor Autorizado Royal o en otras tiendas. Siempre identifique su
aspiradora por medio del numero de modelo cuando pida informacion u ordene partes de repuesto. (El numero de modelo
aparece en la parte posterior de la aspiradora.)
GARANTiALIMITADA
AI consumidor Royal Appliance Mfg. Co. le garantiza queesta aspiradora rio tiene defectos ni de material ni de mane
de obra, lagarantia comienza en la fecha de compra original. Veala caja para informaci0n de laduracion de la garan-
tia y guarde el recibo de compra original para hacer valido el inicio del periodo de garantiu.
En caso que la aspiradora muestre algun defecto dentro del periodo de garantia, repararemos o reemplazarernos de
manera gratuita cualquier parte defectuosa. La maquina completa debe ser enviada con porte pagado a cualquier
Estacion Autorizada ROYAL de Ventas y Servicio de Garantia. Por favor incluya una descripcion cornpleta del proble-
rna, fecha de cornpra, copia del recibo de compra original y su hombre, domicilio y numero de teldono. Si no se
encuentra cerca de una Estacion de Garantia, Ilame a la f_ibricapara pedir asistencia en los EE.UU.: 1-800-321-1134 /
CANADA: 1-800-321-1134. Usesolamerlte partes derepuesto genuinas Royal.
La garantia rio incluye el desgaste anormal, dane come resultado de un accidente o del use rio adecuado de la aspi-
radora. Esta garantia rio cubre las bandas, los cepillos, bolsas, filtros, feces o dano al ventilador. Esta garantia no
cubre reparaciones no autorizadas. Esta garantia le confiere derechos legales especificos y podria haber otros dere-
chos tambien. (Los otros derechos varian de esb_doa estado en los EE.LJLJ.)
NOTA: REGRESELA TARJETADEGARANTJAPARAREGISTRARSU ASPIRADORA
 Loading...