


DB3

Designed by Installers for Installers
INSTALLATION GUIDE
DB3
2016 Dodge/Ram 1500 - 403.CHRYSLER6 2.04 RXT
© 2017 Directed, Vista CA
This product is intended for installation by a professional installer only! Attempts to install this
product by a person other than a trained professional may result in severe damage to a vehicle’s
electrical system and components.

Contents
Introduction 4
Pre-installation and application warnings 5
Installation 6
Wiring diagram 7
Vehicle connections 8
SmartStart/XL202 installation notes 10
Connecting the module 11
Module programming 12
LED diagnostics and troubleshooting 13
Soft reset 18
Hard reset 19
Feature programming 15
Feature and option list 16
Limited one year consumer warranty 17
Quick reference guide 20

Warning! Safety first
The following safety warnings must be observed at all times:
• Due to the complexity of this system, installation of this product must only be performed by an authorized Directed dealer.
• When properly installed, this system can start the vehicle via a command signal from the remote control. Therefore, never
operate the system in an area that does not have adequate ventilation.
The following precautions are the sole responsibility of the user; however, authorized Directed dealers should:
• Never use a test light or logic probe when installing this unit. Always use a multimeter.
• Never operate the system in an enclosed or partially enclosed area without ventilation (such as a garage).
• When parking in an enclosed or partially enclosed area or when having the vehicle serviced, the remote start system must
be disabled using the installed toggle switch. It is the user’s sole responsibility to properly handle and keep out of reach from
children all remote controls to assure that the system does not unintentionally remote start the vehicle.
• USER MUST INSTALL A CARBON MONOXIDE DETECTOR IN OR ABOUT THE LIVING AREA ADJACENT TO THE VEHICLE.
ALL DOORS LEADING FROM ADJACENT LIVING AREAS TO THE ENCLOSED OR PARTIALLY ENCLOSED VEHICLE
STORAGE AREA MUST REMAIN CLOSED AT ALL TIMES.
Use of this product in a manner contrary to its intended mode of operation may result in property damage, personal injury, or
death. Except when performing the Safety Check outlined in this installation guide, (1) Never remotely start the vehicle with
the vehicle in gear, and (2) Never remotely start the vehicle with the keys in the ignition. The user is responsible for having the
neutral safety feature of the vehicle periodically checked, wherein the vehicle must not remotely start while the car is in gear.
This testing should be performed by an authorized Directed dealer in accordance with the Safety Check outlined in this product
installation guide. If the vehicle starts in gear, cease remote start operation immediately and consult with the user to fix the problem
immediately.
OPERATION OF THE REMOTE START MODULE IF THE VEHICLE STARTS IN GEAR IS CONTRARY TO ITS INTENDED MODE OF
OPERATION. OPERATING THE REMOTE START SYSTEM UNDER THESE CONDITIONS MAY RESULT IN PROPERTY DAMAGE
OR PERSONAL INJURY. IMMEDIATELY CEASE THE USE OF THE UNIT AND REPAIR OR DISCONNECT THE INSTALLED REMOTE
START MODULE. DIRECTED WILL NOT BE HELD RESPONSIBLE OR PAY FOR INSTALLATION OR REINSTALLATION COSTS.
Remote starters for manual transmission pose significant risks if not properly installed and operated. When testing to ensure the
installation is working properly, only remote start the vehicle in neutral gear, on a flat surface and with a functional, fully engaged
parking brake. Do not allow anyone to stand in front of or behind the vehicle.
This product should not be installed in any convertible vehicles, soft or hard top with a manual transmission. Installation in such
vehicles may pose certain risk.
3 403.CHRYSLER6 2.04 2016 Dodge/Ram 1500
© 2017-01-26 Directed. All rights reserved.

Introduction
This solution is compatible with the 2016 Dodge/Ram 1500 and offers the following features:
• AV-Panic Mode Activation
• AV-Parking Lights Control
• DL-Arm Factory Security
• DL-Disarm Factory Security
• DL-Door Lock Control
• DL-Door Unlock
• DL-Driver Priority Unlock
• FOB-Control of aftermarket alarm with OEM remote
• Key2GO
• PK-Immobilizer Bypass-Data No Key Req'd
• RS-3x LOCK START (Start control using OEM Remote)
• RS-OEM Remote Start Activation using XL-202 or RF kit
• RS-RAP Shut Down (Retained ACC Power)
• RS-Remote Start Ready
• RS-SmartStart
• RS-Tach / RPM Output
• SS-Entry Monitoring ALL Door Pins
• SS-Entry Monitoring Hood Pin
• SS-Factory Alarm Trigger Monitoring
• ST-Brake Status (foot brake)
• ST-Door Locks Status
• ST-E-Brake Status
• ST-Ignition Status
This module can only be flashed and configured using DirectLink at www.directechs.com or using the Directechs
Mobile application for smartphones. Refer to “Connecting the module” for more information.
DB3 is an all-in-one door lock and override module. This guide supports the installation of a DB3 in Range
Extender Ready (RXT) mode with an RF System or a SmartStart (both sold separately).
Warning!
4 403.CHRYSLER6 2.04 2016 Dodge/Ram 1500
© 2017-01-26 Directed. All rights reserved.
Pre-installation and application warnings
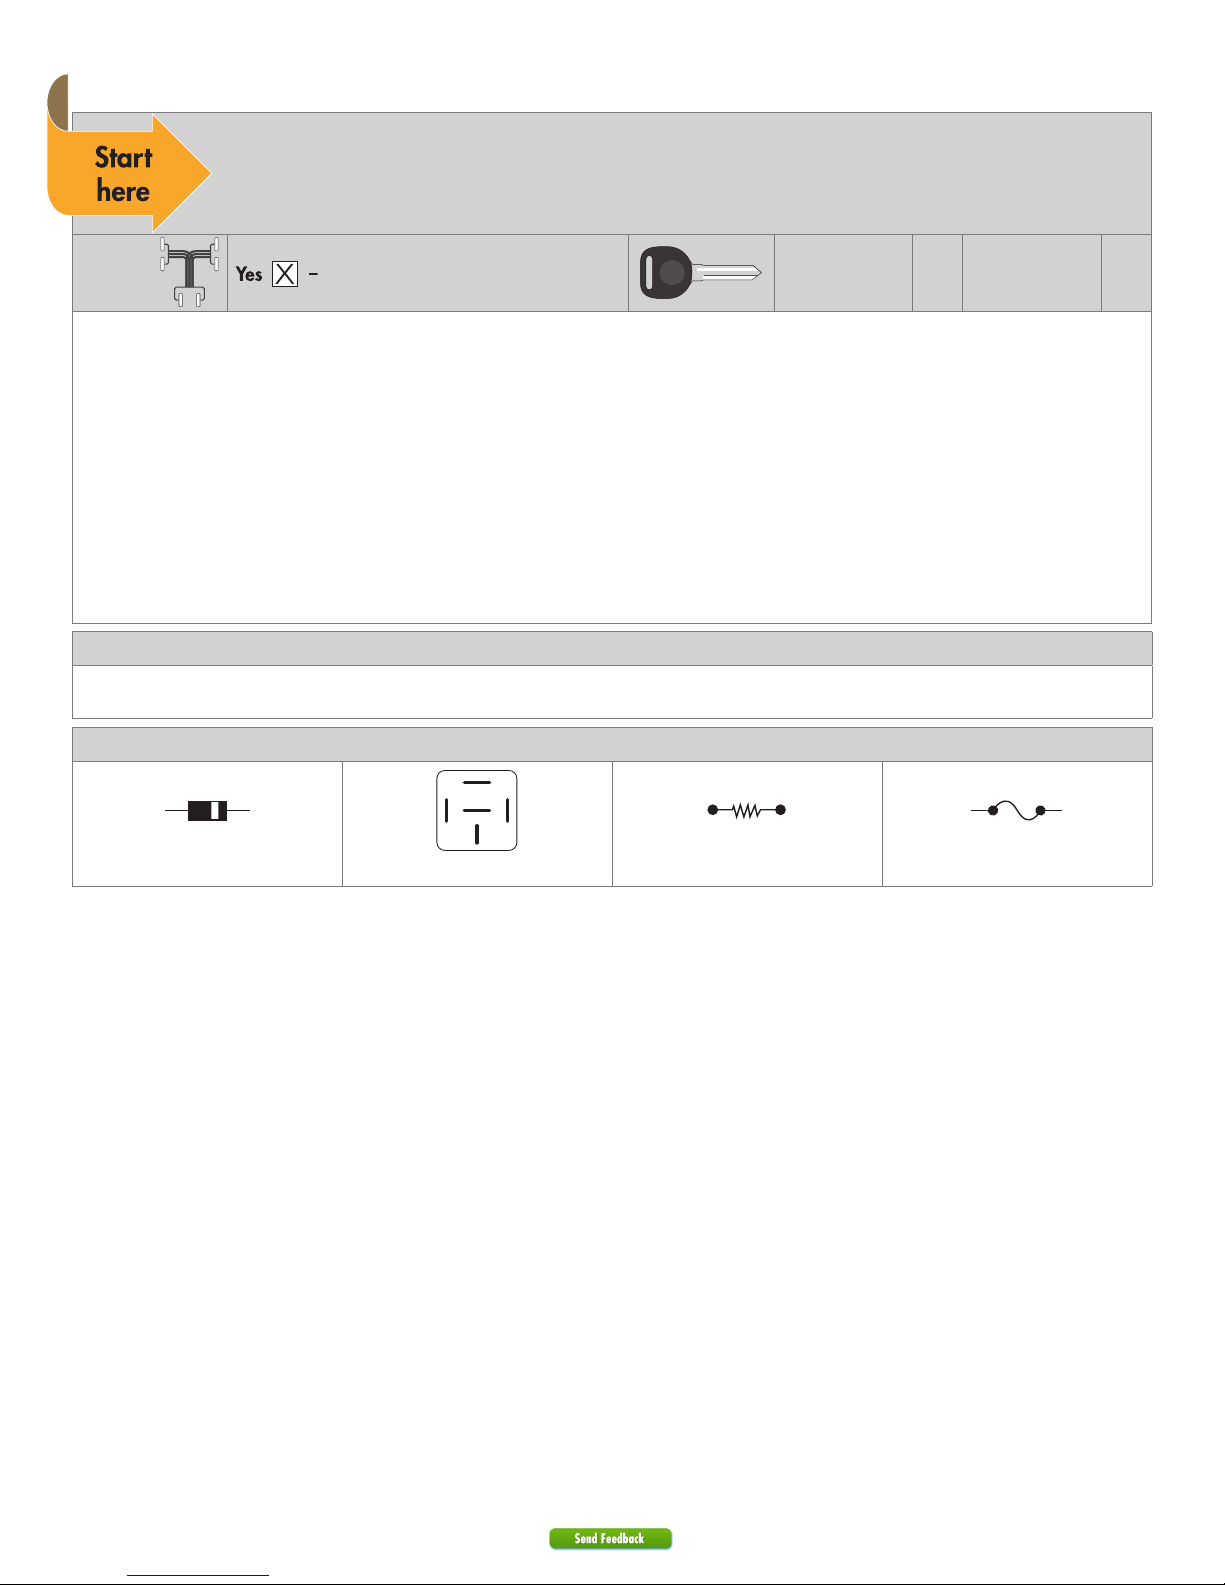
Firmware notes: This section highlights important information for this specific firmware and will assist in
pricing accordingly, as well as bringing awareness to any operational or vehicle limitations.
T-Harness
compatible
THCHD3
Keys required for
programming
Keys required for
1
operation
Important! RXT installations are ONLY compatible with vehicles equipped with factory-installed remote starter.
Range Extender Ready (RXT) is used to dramatically increase the factory remote start activation range compared to the
factory transmitter. Refer to the "Quick reference guide" for more information.
SmartStart Compatible: SmartStart is equipped with D2D, which means it can be connected to an interface module
and used in Range Extender Ready (RXT) mode without the use of a remote starter. See "Module programming" for more
information.
The optional Plug & Play THCHD3 T-Harness is sold separately.
The OBDII Diagnostic Connector features will remain the same even when the T-Harness is installed.
Unless specified otherwise, all connectors are displayed from the wire side, with the exception of the OBDII diagnostic
connector.
Refer to "Vehicle connections" following the wiring diagram.
General notes: This section highlights important information for this specific firmware.
[1] HS CAN 2 connections are required for heated seats.
Additional parts required (maximum required):
87
87a
86 85
0 x 1A Diodes
30
0 x Resistor
0 x Fuse
0 x Relay
0
5 403.CHRYSLER6 2.04 2016 Dodge/Ram 1500
© 2017-01-26 Directed. All rights reserved.
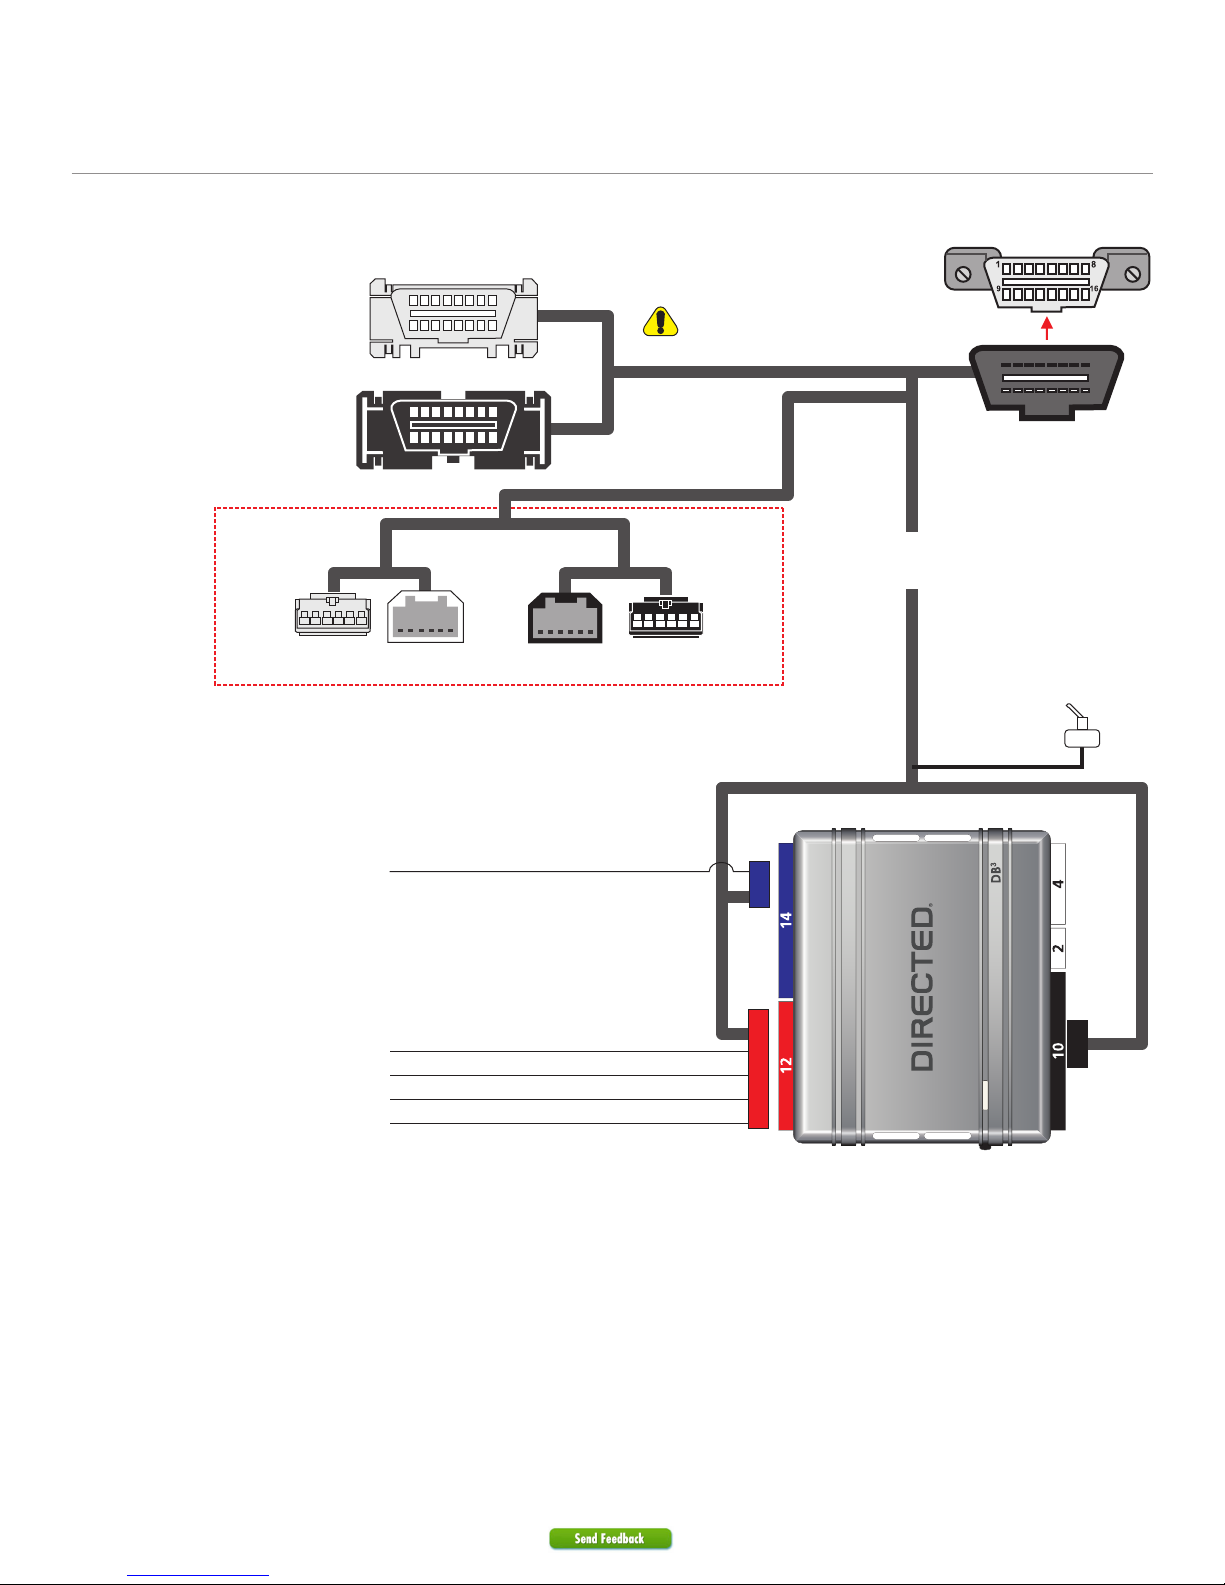
Wiring diagram with T-Harness (THCHD3)
T-02
6-pin White
Connectors
OR
NOT Used
These T-Harness connectors are
NOT interchangeable. They will fit
ONLY the appropriate vehicles.
T-01
pin Black
6Connectors
THCHD3 Rev. 1
(Optional T-Harness)
Diagnostic 16-pin Connector
Remote Start Safety
Override Switch
OBDII
(vehicle side)
OBDII
N/C: Yellow/Red
N/C: Violet/White
N/C: Violet/Brown
N/C: Orange/Black
N/C: Blue/Red
6 403.CHRYSLER6 2.04 2016 Dodge/Ram 1500
© 2017-01-26 Directed. All rights reserved.
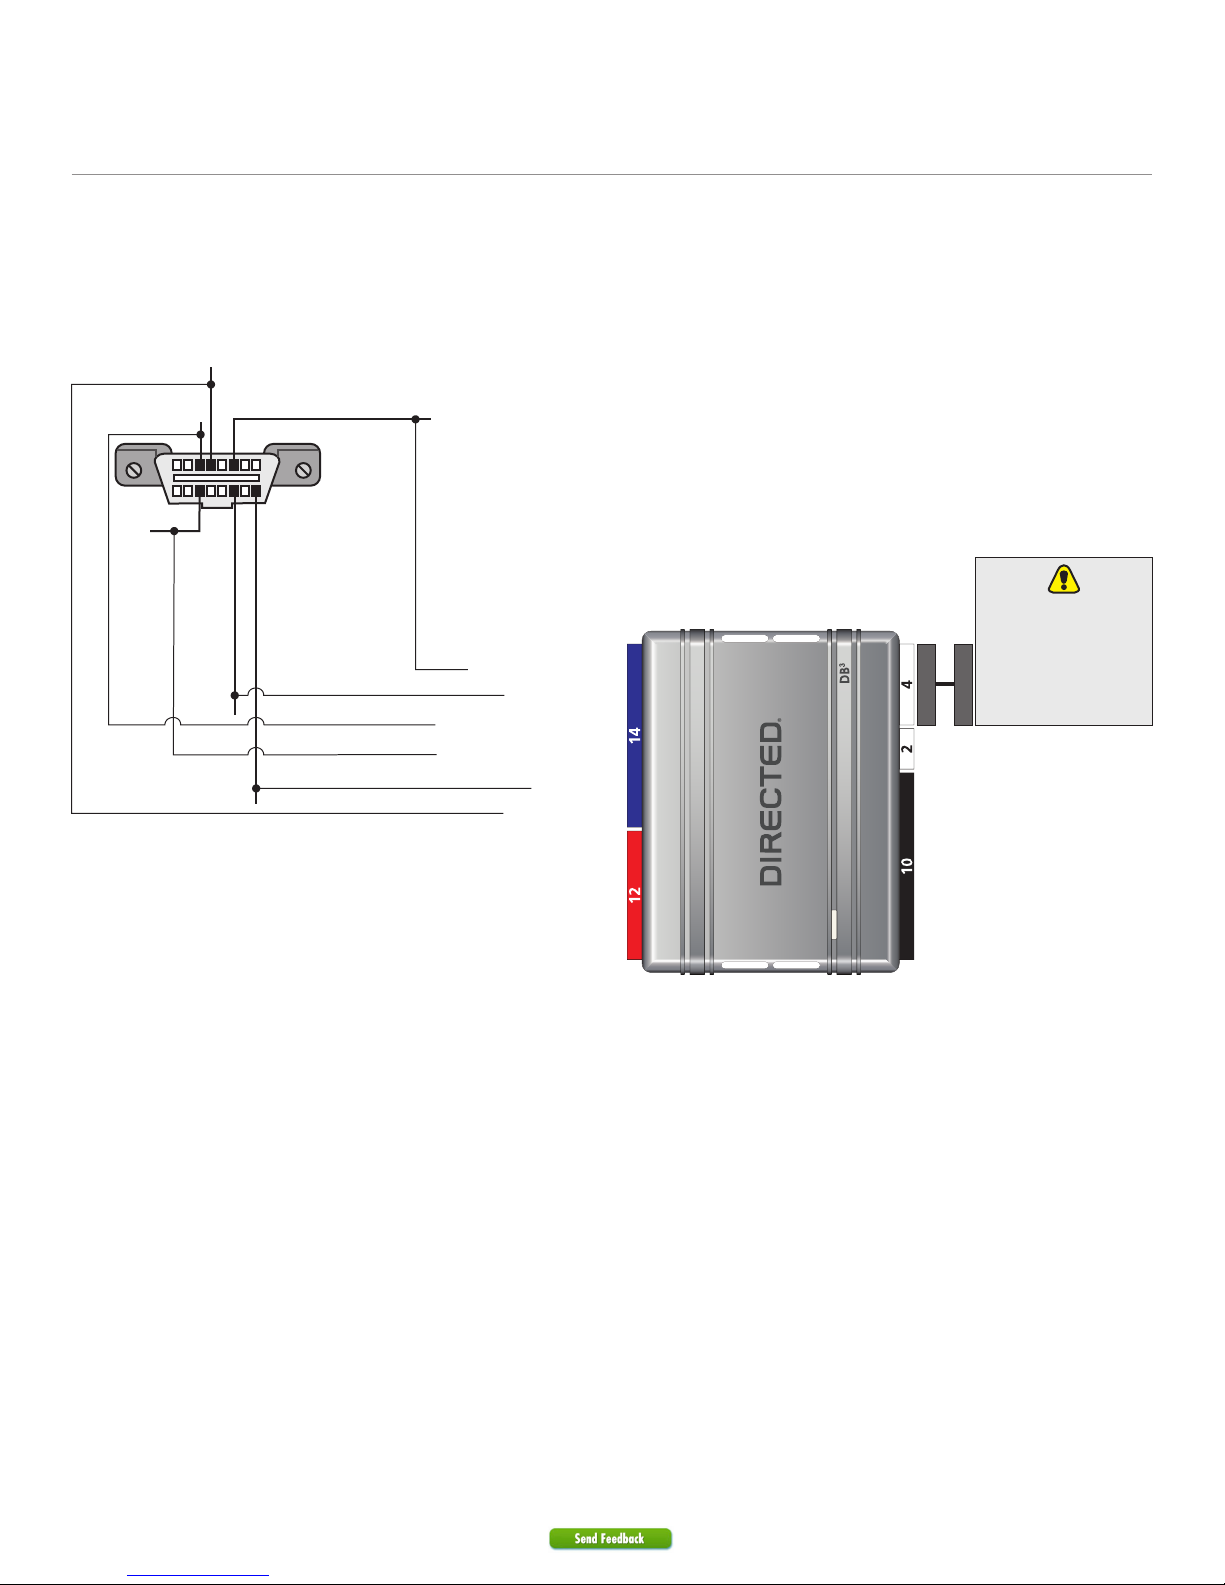
Wiring diagram
(-) Ground, pin 4
CAN I HS High:
Gray, pin 3
1 8
CAN C High: Gray/White, pin 6,
OBDII
Diagnostic
(+) 12V: Red, pin 16
Connector
HS CA N High: Tan/Black: 3
HS CA N Low: Tan: 4
HS CA N2 High: Orange/Green: 5
HS CA N2 Low: Orange/Brown: 6
(+) 12V: Red: 13
(-) Ground: Black: 14
You can connect to either
a XL202 R FTD OR a
SmartStart module.
Refer to the
SmartStart/XL202
Installation Notes for
more information.
169
CAN C Low:Yellow, pin 14
CAN IHS Low: White, pin 11
7 403.CHRYSLER6 2.04 2016 Dodge/Ram 1500
© 2017-01-26 Directed. All rights reserved.
 Loading...