

Dinex Perfect Temp User Manual
Perfect•Temp
Users Guide
Revised July, 2007
INTERNATIONAL, INC. 628-2 HEBRON AVE, GLASTONBURY, CT 06033
WWW.DINEX.COM 800-523-9752

Perfect•Temp User’s Guide
Thank you for purchasing the
Dinex Perfect•Temp System.
For more than 35 years, Dinex has been the leader in contemporary,
innovative products for healthcare foodservice.
Today, Dinex is the industry standard for healthcare systems,
equipment and tray-top products throughou t the United States and
Canada.
The Dinex range of products extends from basic traytop ware and
disposables to high-tech induction heating and cook-chill
rethermalization s ystems.
We appreciate your business.
1

Table of Contents
Introduction
Perfect•Temp System Overview........................................................................... 3
Perfect•Temp Principles of Operation................................................................... 3
Advantages of Cook-Chill .................................................................................... 4
Equipment
Perfect•Temp Cart................................................................................................ 6
Perfect•Temp Main Controller ............................................................................ 10
Operation and Programming ……………………………………………………… 11
Perfect•Temp Trays and Dishware
Overview............................................................................................................ 24
Classic ................................................................................................................ 25
Classic II………………………………………………………………………….. 29
Menus and Plating Recommendations
Menus ................................................................................................................ 34
Garnishes and Sauces ......................................................................................... 35
Plating Recommendations .................................................................................. 37
General Plating Guidelines and Procedures......................................................... 38
Production Specifics........................................................................................... 39
Plating Diagrams (Food Placement).................................................................... 42
Meal Assembly and Delivery
Tray Assembly................................................................................................... 47
Rethermalization ................................................................................................ 50
Sanitation........................................................................................................... 51
Satelliting........................................................................................................... 54
System Troubleshooting......................................................................................... 57
Product Warranties................................................................................................ 59
2

Introduction
Perfect•Temp System Overview
The Perfect•Temp system consists of a walk-in or roll- in refr igerator , a Perfect •Temp
rethermalization cart, an electronic controller, a set of serving trays with insulated covers,
and an assortment of reusable and disposable dishware.
The purpose of this system is to permit cold plating of patient meals in advance so as to
achieve maximum productivity from the kitchen staff. The cold plating of the meals enables
the staff to prepare three meals per standard eight-hour shift, thus eliminating the evening
shift that previously prepared the dinner meal. Plating the meals in advance allows the staff
to prepare the next day’s breakfast meal the day before, eliminating the need for the work
shift to start at 5:30 or 6:00 a.m. Normal 7:00 to 3:30 work shifts are possible.
Principles of Operation
The front of the serving tray has two open compartments (“Classic or Classic II”
server) into which a ceramic, reusable plastic or disposable dish is placed. The rear of the
serving tray has a large cold compartment. These compartments are enclosed and separated
from each other by either insulated tray covers or insulated domes, so no temperature transfer
occurs. The open wing of the tray is used for silverware, condiments, and a frozen dessert or
a hot beverage. The Classic tray style incorporates individual dome covers for the entrée
dish and soup/cereal bowl and the Classic II uses insulated tray covers.
The ceramic, reusable plastic or disposable dishes protrude below the bottom of the
serving tray. When the tray assembly is completed, an insulated cover is placed on the tray
or domes on the soup and entree, and the whole assembly is then inserted into the
Perfect•Temp cart. The dishes protruding from the tray automaticall y align with the
individual heating pads.
When the Perfect•Temp cart has been filled with the desired number of trays, the cart is
placed into a refrigerator to keep all the food on each tray at a safe temperature.
Approximately thirty-five minutes before the meal is to be served, the rethermalization
cycle begins, activated either manual ly or automatically. During this cycle, the heater pads
warm up and transfer their heat to the dishes. By the end of the cycle, the food in each dish
will have reached 170°F. or higher.
The insulated cover (or dome) confines the transfer of heat to the entrée and soup,
while the cold foods on the tray stay cold. The residual heat in the heater pads helps to
maintain food temperatures during meal delivery.
3

Advantages of Cook-Chill
The Perfect•Temp meal delivery system is based upon cook-chill technology, which
allows food to be prepared in advance of service, rapidly chilled, and held in chilled
inventory (food bank). Patient meals are plated chilled and held under refrigeration. Just
prior to service, foods to be served hot are rethermalized.
Advantages
:
1. Rapid chilling and chilled storage techniques simplify handling to such an extent that
fluctuations in daily workloads can be virtually eliminated.
2. Since all meals are prepared in advance, production can be scheduled to make the best
use of equipment, space and staff. “Cook to order” is eliminated.
3. Chilled food’s nutritional value, appearance and texture is better than that of food
produced conventionally and held hot for long periods prior to service; and compared to
frozen food, chilled food suffers only minimal storage effects.
4. Food can be purchased in bulk, resulting in lower food costs.
5. Waste decreases due to flexible stock control, recipe standardization, increased menu
variety, and greater ability to respond to population fluctuations.
6. Staff working conditions are improved due to less peak mealtime tension. Daily tasks
proceed at a more even pace and the staff can focus on the quality and appetizing
appearance of food presented.
7. Labor costs are reduced. The success of cook-chill relies on the improved use of both
skilled and unskilled labor. By concentrating food production, meal assembly, and meal
delivery into self-sufficient, centr al uni ts, each unit can operate at maximum efficiency.
Production can occur on a five-day schedule, and meal assembly for breakfast, lunch and
dinner can be done during a single, eight-hour shift. All of this means reduced labor
costs.
8. Consolidation of production and assembly for several patient units into a single operation
can further enhance the benefits of cook-chill.
9. Savings also can be achieved in costs associated with space.
4

Equipment
5

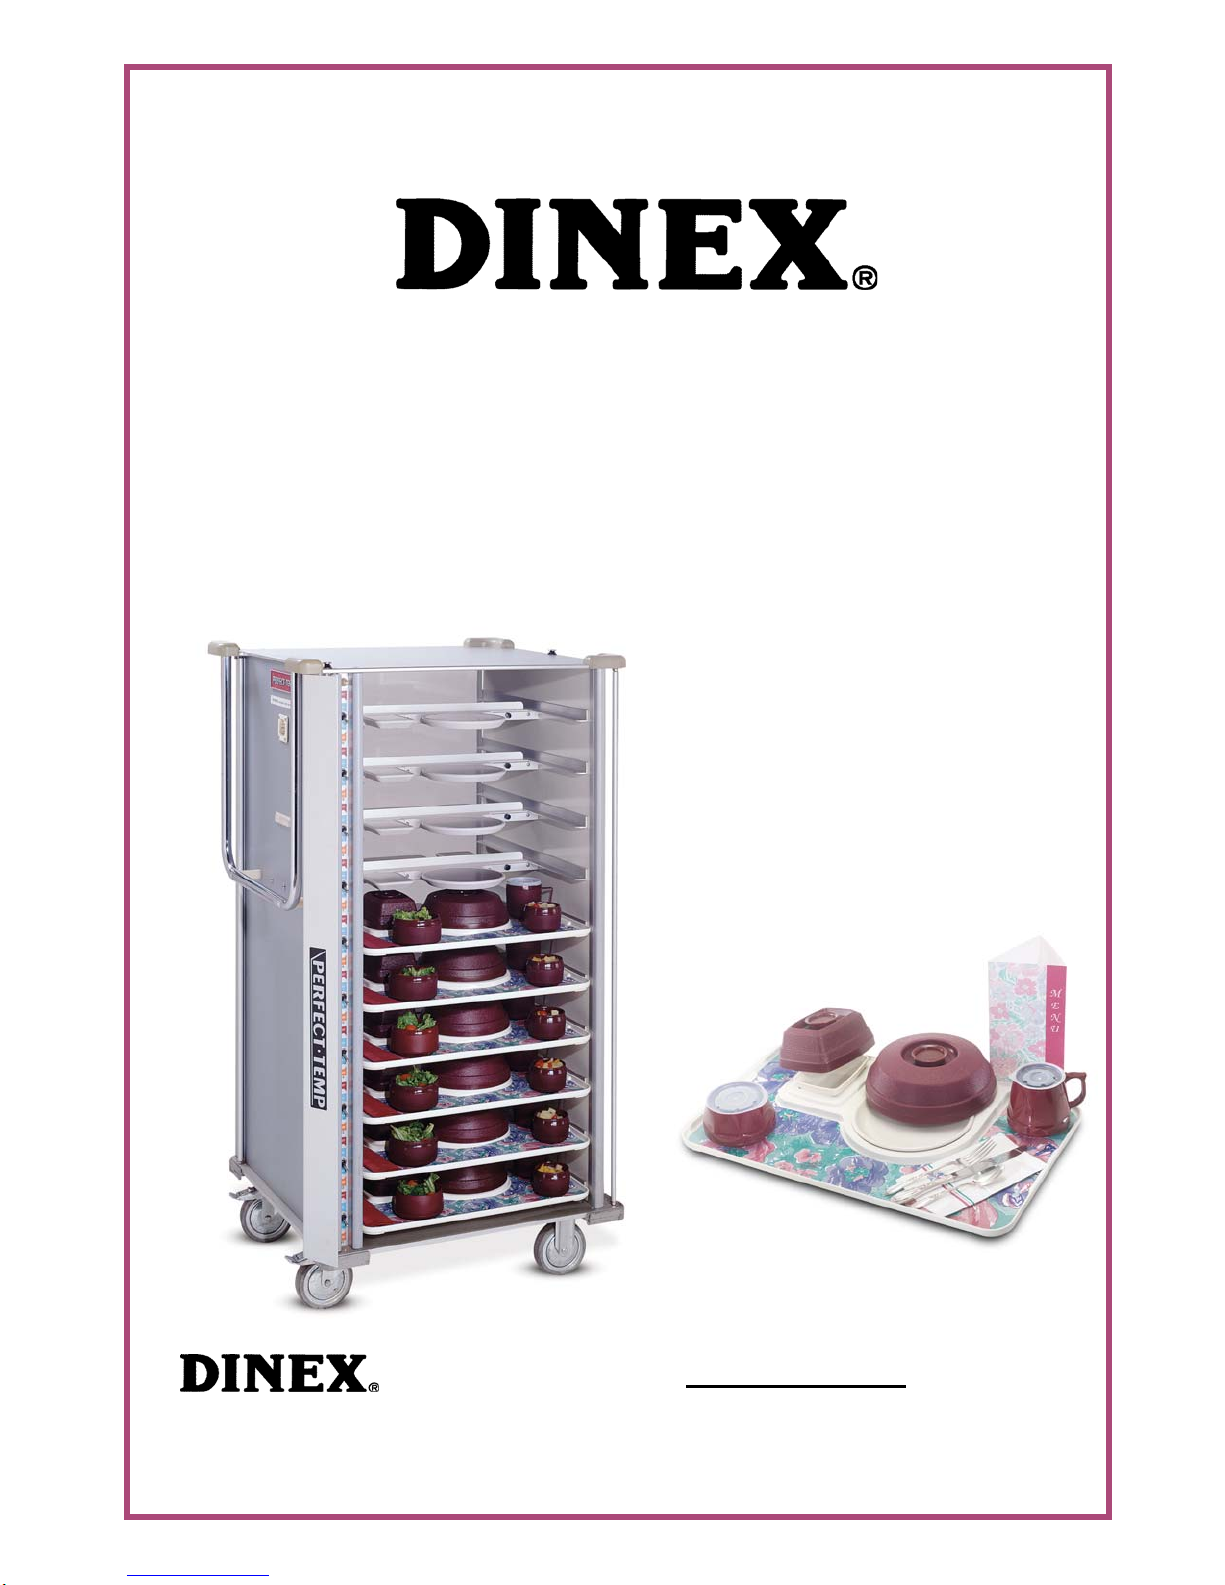
Equipment
The Perfect• Temp Cart
The Perfect•Temp rethermalization cart is the culmination of many years of
development and testing. Its design has addressed the deficiencies of similar
rethermalization systems on the market and has produced a rethermalization cart that
surpasses the competition in appearance, flexibility, durability—and most importantly,
performance.
Feature Highlights:
• Solid 3/8” aluminum top and bottom surfaces provide exceptional wear resistance and
caster support.
• Aluminum extrusions provide maximum strength and durability while offering a
clean, efficient appear ance.
• Individual heater pad design eliminates sagging of the heater shelf and reduces costs
and downtime when replacing heater pads.
• Nonstick heater pad surfaces improve sanitation and reduce cleaning time.
• The simple, effective selector switch to activate heater pads is not sensitive to tray
motion during transit and does not require tray reversal for cold meals.
• The selector switch is available in two or three position versions so that any tray can
hold a cold entrée (sandwich) but still hold hot soup and a side dish.
• Selector switch positioning makes it possible to change the heat program for any tray
without removing the cart from the refrigerator.
• The “quick disconnect” electrical connection is at eye level, eliminating doubt about
power connection to the cart and the need to run test sequences.
• A multi-function power controller provides maximum flexibility on rethermalization
times, rethermalization duration, and hold cycles.
• Switch shields prevent tray slippage and eliminate accidental contact with selector
switches.
6

The Perfect• Temp Cart Stru ct u re
The Perfect•Temp cart has a solid aluminum base, 3/8” thick, which has been machined
to accept the aluminum corner extrusions. The top of the cart is the mirror image of the
bottom, which securely locks the vertical corner extrusions into place.
The side panels of the cart incorporate a sandwich design consisting of an aluminum
outer panel, a 3/8” thick, honeycomb panel, and another aluminum inner panel. All three
components are bonded together, then secured in the channel raceway of the corner
extrusion.
The side wall, which includes the tubular aluminum handle, is actually two walls with a
hollow core. This core is used as a raceway to run the electrical wiring harness and to
enclose the panel-mounted main electrical connection.
Along the side walls are track angles that support the trays when they are inserted into
the Perfect•Temp cart. Each tray is slid along the tracks until it travels over the heater pads.
A tray stop prevents misalignment of the tray, which would cause improper rethermalization.
Along the two open sides of the Perfect•Temp cart are large numerals that designate the
number of the tray level. This serves as an aid when determining which tray levels are to be
activated or deactivated by the selector switches.
At the top of the cart, centered between the tubular handles, is the electrical connection
to the main controller. The main controller is supplied with a cable assembly that includes a
4- or 5-pin, quick disconnect bayonet plug. The plug connects directly to the receptacle on
the cart to ensure a positive electrical connection. This connection must be made whenever
the cart is to be used to rethermalize meals.
All vertical edges of the Perfect•Temp cart are capped with high-strength aluminum
alloy extrusions. Each extrusion (6 total) includes an integral, replaceable PVC vinyl
bumper, which runs the entire height of the cart for optimum performance.
Adjacent to the selector switch location, pivoting between the top and bottom plate, is
the aluminum switch shield extrusion. When rotated to the “open” position, full access to the
selector switches is possible. When “closed,” the switch shield hides the selector switches
from view, preventing accidental contact or tampering.
The switch shield also acts as a tray stop to prevent serving trays from sliding out of the
cart during transport.
The Perfect•Temp insulated tray cover featur es the patented “cold cone, ” which
promotes superior cold food temperatures, yet works to retain food temperature integrity
when the tray is in transit. Since food trays will be delivered and served from the
Perfect•Temp cart, hot food will actually stay hotter longer, since the heater pads are
insulated and help reduce cool-down from below the dishes.
Tray presentation to patients is enhanced by the availability of insulated covers in a
variety of colors with matching mugs, placemats and china dishware. The full cover in the
7

Classic II system permits the placing of salads, desserts, and so on, directly on the tray
without cumbersome and unattractive plastic over-wraps. Patient perception is enhanced;
convenience is improved for both patients and dietary staff; and clean-up is reduced. The
ability to use disposable, reusable plastic, or china dishware interchangeably is helpful in
fulfilling specific patient needs.
The limits of dietary staffing require staggering the delivery of Perfect•Temp carts to
patient areas. The “Station Commander” controller enables the system to stagger completion
times as needed, preset the frequency and duration of holding cycles, and run automatically
or manually. An indicator on each controller verifies that the cart has been placed in the
refrigerator, has been electricall y connected, and is ready for the rethermalization cycle to
begin. Once started, other indicators on the controller indicate rethermalization, holding, or
ready status. A 10-second buzzer sounds at the end of every heating or hold cycle.
Perfect•Temp Cart Heater Pad Design
Each tray level on the Perfect•Temp cart is equipped with two heater pads. The small
pad is primarily for the rethermalization of hot cereals and soups. The larger pad is for the
entrée.
The heater pad assembly consists of an engineered resin casting, a computer-designed
heating grid, a layer of insulation, thermostat and thermal fuse. The entire assembly is
permanently sealed to prevent water penetration and eliminate potential residue build-up. .
The heater pad fixture serves a dual purpose. First, it provides a protective shell into
which the heater pad is assembled. Second, the casting is designed to be fastened
mechanically in the cart, offering superior strength and durability.
The heater pad fixture is fabricated with a flanged end that mates to a box channel
running the width of the cart at each tray level. All electrical wires run inside the box channel
and connect to each heater pad. The heater pad casting is then secured with two screws that
pass through the flange of the casting into the box channel.
The top surface of the heater pad is a layer of coated (nonstick) aluminum. A
computer-designed heater grid is vulcanized to the underside of the aluminum. The design of
the heater grid is specific to the heating requirements, which means that the grid pattern for
each of the pads is different. The purpose of changing the grid pattern is to develop the
thermal patterns necessary for each application. The needs of the soup or hot cereal heating
pad are not the same as the needs for the entrée heating pad. Three different grid patterns
resulted.
Beneath the top layer of aluminum and its bonded heater grid is fiberglass insulation to
help direct the transfer of heat toward the dish and to shield the tray and cover below from
unnecessary thermal conductivity.
The insulation is protected from moisture by the bottom of the heater pad fixture. The
resulting assembly is then completely sealed with silicone sealant.
8

The design of the heater pad assembly offers the advantage of being field replaceable
without affecting the adjoining heater pads. Separate pads also minimize heat conductivity to
the Perfect•Temp cart body, reducing electrical loads and improving efficiency.
Heater Pad Control (On-Off)
Depending upon the cart model, each Perfect•Temp cart will have 16, 20 or 24 tray
levels. Each tray level consists of two heater pads. Each level is controlled by one or two
selector sw i t c h es.
On the outside of the Perfect•Temp cart, along the vertical extrusion closest to the
handles, are the selector switches. The toggle switches have three positions: all pads hot, all
pads cold, or side dish pads hot. An optional two-position , two switch per server is
available. This allows individual control of each heater pad.
Cart Lexan Door Option
An optional set of Lexan doors is available for the Perfect•Temp rethermalization cart.
The purpose of these doors is to enclose the tray areas of the cart to reduce or eliminate the
need to over-wrap exposed plated foods. The doors also restrict incidental contact from
unauthorized personnel or patients, reducing pilferage of food products from the patient
trays.
Each Lexan door is secured along one vertical edge by an aluminum extrusion which
provides rigidity and acts as the hinge. The remaining three edges of the door are chamfered
to provide a smooth appearance and eliminate sharp edges.
When closed, the doors are held in place by the switch shield extrusion that encloses
the switches, as well as the edge of the door. To rotate the switch shield, lift the plunger pin
which is secured to the top plate of the cart.
When fully open, the two doors are nested, one in front of the other, against the front
wall of the cart opposite the handle. Once again, release the plunger pin to nest or de-nest the
doors.
9

Perfect•Temp Main Controller
The primary purpose of the main controller is to deliver consistent, precisely controlled
electrical voltage to the heater pads. The controller accepts 200 to 240 VAC input and
delivers the necessary output voltage and current to the pads.
The second function of the main controller is to time there rethermalization cycle.
Once the cycle has started, a red digital display begins counting down from the programmed
time. When the programmed time has elapsed, a signal will sound for 10 seconds.
If the main controller is not turned off at the completion of the rethermalization cycle, a
hold cycle will begin which will apply heat to the food for two minutes. At the end of the
two-minute heat cycle, the alarm will once again sound for 10 seconds. This sequence will
repeat indefinitely until the main controller is turned off.
The last feature, which is standard on the model Station Commander controller, is a
three-event, 24-hour, automatic timer. Once set for the start times of all three meals, the
automatic timer will automatically start there rethermalization cycle at each mealtime. This
feature eliminates the need for each rethermalization cycle to be started manually. This
feature is especially suited to applications where multiple Perfect•Temp carts are in use and
are to be started sequentially according to the serving schedule.
A safety system automatically disconnects power from the Perfect•T emp car t whenever
the roll-in refrigerator door is opened.
The controllers also include a standard indicator light which illuminates whenever the
rethermalization cycle i s in process, as well as a “ready” light that lights whenever the car t
has been plugged in and is ready to be activated.
Summary of Perfect•Tem p Control ler
Station Commander
• Flush mounted above door of roll-in refrigerators
• Input and output cables terminated in junction boxes mounted on top of refrigerator
• UL approved
10

PERFECT-TEMP STATION COMMANDER CONTROLLER –
MODEL PT-SC SERIES OPERATION INSTRUCTIONS
Introduction
The PT-SC controller (Station Commander) is configured into two independent modules, the
Operator Module and the Power Module which are linked together by an interconnecting,
low-voltage cable.
The software, or programming information, is entered and stored in the operator module
which may be wall mounted or installed in a roll-in refrigerator bezel.
The electrical connection from the building electrical supply and the output to the PerfectTemp cart(s) are done within the power module which is available as either a single cart
version (Single Power Module) or a eight (8) cart version (Quad Power Module).
Programming Overview
The Station Commander Operator Module is capable of being programmed to facilitate the
following:
• Program for up to eight (8) Perfect-Temp carts.
• Automatic rethermalization start for breakfast, lunch and dinner.
• Ability to accept a second start time for a second cart at breakfast, lunch and dinner.
• Independent rethermalization cycle times for each meal.
• Automatic “hold” cycle at the completion of the rethermalization cycle. “Hold” cycles
can be customized for each meal, by selecting “hold” cycle duration, heat, and no-heat
sequencing.
• Keypad entered pass codes for entry into the programming menu or for manual starting of
the rethermalizati on cycle.
• Programmable pass codes (2 levels).
11

No meals programmed for this cart. This cart is unplugged.
No meals programmed for this cart. Cart is plugged in.
Meals are programmed for this cart. This cart is unplugged.
Meals are programmed for this cart. Cart is plugged in.
Cart is rethermalizing meal. Remaining time is shown in center of icon.
Meal is ready. Outer box area will blink.
Hold time is exceeded. Rethermalization has stopped.
Warning or informational message. This icon does not appear on the main
screen, but accompanies message displayed as a result of main screen
interactions.
Error. Indicates that there has been a user entry error or that the requested
operation can not be performed at this time. This icon does not appear on the
main screen, but accompanies message displayed as a result of main screen
interactions.
Cart is being Stopped. This icon appears temporarily when a cart is manually
stopped. This icon will remain for approximately one minute after
disconnecting cart.
12

Programming Number of Carts Displayed and Speaker
1) Press the “PROGRAM” key
2) Display will prompt:
Select:
Program Meal Times
Configure Unit
3) Use the “ “ keys to highlight “Configure Unit”.
4) Press the “YES” key to select.
5) Enter pass code “15037” on the keypad.
6) Display will prompt:
Select:
System Setup
Set Meal Parameters
Set Pass co d e s
Set Time of Day
Reset
7) Use the “ “ keys to highlight “System Setup”.
8) Press the “YES” key to select.
9) Display will prompt:
System Setup
Number of Carts: 8
Alarm : ON/OFF
Key Click: ON/OFF
10) Use the keypad to enter the number of carts to be displayed (1-8).
11) Use the “ “ keys to change the Alarm to ON/OFF setting.
12) Pr ess the “SAVE ” key t o store the change(s).
13) Press the “CANCEL” key to exit programming.
13

Meal Parameters
The Station Commander operator module has the capability of programming the carts under
its control for different rethermali zati on cycle lengths for each meal. This means that the
breakfast meal rethermalization cycle could be less than the dinner and lunch cycles, should
this be desirable.
In addition, an automatic hold cycle can be programmed to supply intermittent heating after
the normal rethermalization cycle is complete. This allows carts to be held for a
programmable period of time without significant loss of heat to hot food items.
The hold cycle is comprised of two parts, the “ready” time and “maintain” time. At the
completion of the rethermal izat ion cycle, the electrical power t o the Perfect- T em p cart is
switched “off”. The duration of time that the power remains “off” is known as “ready” time.
When the “ready” time duration expires, electrical power to the Perfect-Temp cart is
switched “on”. The duration of time that the power remains “on” is known as “maintain”
time. At the expiration of the “maintain” time, the power again is switched “off” for another
“ready” time. This sequence continues until the total elapsed time of both the “ready” and
“maintain” time exceeds the programmed “hold” time.
When the duration of the programmed “hold time” is exceeded, the Station Commander
automatically discontinues further activity with that particular cart and displays the “Hold
Time Exceeded” symbol.
Programming Meal Parameters
1) Press the “PROGRAM” key
2) Display will prompt:
Select:
Program Meal Times
Configure Unit
3) Use the “ “ keys to highlight “Configure Unit”.
4) Press the “YES” key to select.
5) Enter pass code “15037” on the keypad.
6) Display will prompt:
Select: System Setup
Set Meal Parameters
Set Pass co d e s
Set Time of Day
Reset
7) Use the “ “ keys to highlight “Set Meal Parameters”.
14

8) Press the “YES” key to select.
9) Display will prompt:
Retherm Hold Maintain(on) Ready(off)
Breakfast 35 30 01 02
Lunch 37 30 01 02
Dinner 37 30 01 02
The retherm times depend on the type of dishes used. Fro example: HH Disposables average
37 minutes; HH Resuables average 38 minutes; china averages 40 minutes.
10) Use the “ “ keys to highlight the parameter you would like to change.
11) Use the keypad to enter the new parameters.
12) Repeat steps 26-27 to update additional parameters
13) Press the “SAVE” key to store the change(s).
14) Press the “CANCEL” key to exit programming
Pass Cod es
Each operator module is equipped with three levels of pass codes to provide security and
prevent tampering with cart rethermalization programming or initiation.
1) The Maste r p a ss co d e al l o w s e n t r y i n to the system. T h e Maste r p a ss co d e n umber is
15037.
2) The Supervisor pass code is a 4-digit pass code that permits access to mealtime
programming. This code can be selected and changed at any time. See Programming
Pass Codes section.
3) The User pass code is a 3-digit pass code and permits access to the manual start
function. As with the Supervisor code, this code can be selected and changed at any
time. See Programming Pass Codes section.
Progra m ming Pass Cod e s
1) Press the “PROGRAM” key
2) Display will prompt:
Select:
Program Meal Times
Configure Unit
15

3) Use the “ “ keys to highlight “Configure Unit”.
4) Press the “YES” key to select.
5) Enter pass code “15037” on the keypad.
6) Display will prompt:
Select: System Setup
Set Meal Parameters
Set Pass co d e s
Set Time of Day
Reset
7) Use the “ “ keys to highlight “Pass codes”.
8) Press the “YES” key to select.
9) Display will prompt:
Change Pass codes
Supervisor: 4444
User 333
Note: These are the default factory settings.
10) Use the keypad to enter new pass codes.
11) Pr ess the “SAVE ” key t o store the changes.
12) Press the “CANCEL” key to exit programming.
Programming Time of Day
Notes: 1. All programming is done in military time (0 to 2400) to reduce the chance of
programming errors.
2. You must change the Station Commander manually for daylight savings time.
1) Press the “PROGRAM” key
2) Display will prompt:
Select:
Program Meal Times
Configure Unit
3) Use the “ “ keys to highlight “Configure Unit”.
4) Press the “YES” key to select.
16

5) Enter pass code “15037” on the keypad.
6) Display will prompt:
Select: System Setup
Set Meal Parameters
Set Pass co d e s
Set Time of Day
Reset
7) Use the “ “ keys to highlight “Set Time of Day”.
8) Press the “YES” key to select.
9) Use the keypad to enter a new time.
10) Pr ess the “SAVE ” key t o store the change(s).
11) Press the “CANCEL” key to exit programming
Resetting the Controller
Note: Resetting the controller will reset “Meal Parameters” to default factory settings and
remove all “Meal Times”
1) Press the “PROGRAM” key
2) Display will prompt:
Select:
Program Meal Times
Configure Unit
3) Use the “ “ keys to highlight “Configure Unit”.
4) Press the “YES” key to select.
5) Enter pass code “15037” on the keypad.
6) Display will prompt:
Select:
System Setup
Set Meal Parameters
Set Pass co d e s
Set Time of Day
Reset
17

7) Use the “ “ keys to highlight “Reset”.
8) Press the “YES” key to select.
9) Display will prompt:
Resetting the unit will
Destroy all programming information.
Do you wish to continue?
10) Press the “YES” key to complete the resetting process.
11) Press the “CANCEL” key to exit programming.
Meal Times
The meal times programmed are the actual meal times that the Perfect-Temp cart is expected
to be ready for meal service.
When mealtime is programmed, the Station Commander will automatically calculated the
correct rethermalization start time based upon the programmed length of there thermalization
cycle.
For example, if the Perfect-Tem p cart is to be ready for meal delivery at 11:00 a.m., and a
rethermalization cycle of 35 minutes is programmed. Then 11:00 is programmed as the
mealtime and the controller automatically starts the rethermalization cycle at 10:25 a.m.
(11:00 minus the 35 minute rethermalization cycle).
A second cart may be programmed for any cart location for breakfast, lunch or dinner. Some
consideration should be given to the programming of the second cart time. The
rethermalization time for the cart and the amount of time needed to change out the carts
needs to be considered.
For example, if the rethermalization time is 35 minutes and you need 5 minutes to get the
carts changed out, Then the second cart meal time should be at least 40 minutes after the first
(35 minute rethermalization cycle plus 5 minutes for changing carts).
Programming Meal Times
1) Press the “PROGRAM” key
2) Display will prompt:
Select:
Program Meal Times
Configure Unit
3) Use the “ “ keys to highlight “Program Meal Times”.
18

4) Press the “YES” key to select.
5) Enter pass code “4444” on the keypad.
6) Display will prompt:
Select:
Program Meals
Copy Meals
7) Use the “ “ keys to highlight “Program Meals”.
8) Press the “YES” key to select.
9) Display will prompt:
Select Cart:
1 2 3 4 5 6 7 8
10) Use the “ “ keys to highlight the cart you would like to program.
11) Pr ess the “YE S ” key to select.
12) Display will prompt:
Meal 2nd Cart
Breakfast --:-- --:- Lunch --:-- --:- Dinner --:-- --:--
13) Use the keyboard to enter meal times. The cursor will automatically jump from field to
field. Use the “ “ keys for extra mobility. The “NO” key may be used to
remove existing meal times.
14) Pr ess the “SAVE ” key t o store the change(s).
15) Press the “CANCEL” key to exit programming or repeat steps 6-14 for the next cart.
IMPORTANT: The Perfect Temp cart must be hooked up to the drop cord 15 minutes prior
to the start of the cycle. Failure to do so may cause the Station Commander to not recognize
that the cart is plugged in, and may not start.
19
 Loading...