

Page 1
PFH30 & PFH30R Compact Commercial Fan Heaters
08/35102/3 (UK) Issue 3
The product complies with the European Safety Standards EN60335-2-30 and the European Standard Electromagnetic Compatibility (EMC)
EN55014, EN60555-2 and EN60555-3 which cover the essential requirements of EEC Directives 2006/95/EC and 2004/108/EC
PFH30
PFH30R
Page 2
1
3
2
81
1.8m Min.
250 Min.
5
6 7
4
*
1
2
3
4
5
6
60
50
‘d’
‘c’
(1)
(2)
(3)
(4)
z
w
y
PFH30
PFH30R
230
300
226
378
216
334
40
O
120
O
MAX.
‘a’
‘b’
‘c’
*
1
2
3
4
5
6
250 Min.
60
30
81
(A)
(B)
(C)
‘z’
‘x’
‘y’
PFH30R
PFH30
M
ML
S1
L
N
S2
S1
S2
N
E
L
IN
L
OUT
S1
S2
T
FH
NEON
TB2
EL
TB1
RC
T
RS
ML
EL
M
TB
FH
L
N
NEON
Page 3

IMPORTANT : THESE INSTRUCTIONS SHOULD BE READ CAREFULLY AND RETAINED FOR FUTURE REFERENCE
Important Safety Advice
DO NOT use the heater in the immediate
surroundings of a bath, a shower or a swimming
pool.
DO NOT place the heater directly below a xed
socket outlet.
DO NOT COVER or obstruct the air inlet and
outlet openings in any way.
DO NOT operate the heater with the mains lead
overhanging the front outlet grille.
The heater carries the warning symbol to
indicate that it must not be covered.
WARNING: In order to avoid overheating do not
cover the heater.
The instruction leaet belongs to the appliance
and must be kept in a safe place. If changing
owners, the leaet must be surrendered to the
new owner.
IMPORTANT: If the mains lead of this appliance is
damaged, it must be replaced by the manufacturer
or its service agent or a similarly qualied person
in order to avoid a hazard.
WARNING: In order to avoid a hazard due to
inadvertent resetting of the thermal cut-out,
this appliance must not be supplied through an
external switching device, such as a timer, or
connected to a circuit that is regularly switched
on and off by the utility.
This appliance can be used by children aged from
8 years and above and persons with reduced
physical, sensory or mental capabilities or lack of
experience or knowledge if they have been given
supervision or instruction concerning the use of
the appliance in a safe way and understand the
hazards involved. Children shall not play with the
appliance. Cleaning and user maintenance shall
not be made by children without supervision.
Children of less than 3 years should be kept away
unless continuously supervised. Children aged
from 3 years and less than 8 years shall only
switch on/off the appliance provided that it has
been placed or installed in its intended normal
operating position and they have been given
supervision or instruction concerning the use of
the appliance in a safe way and understand the
hazards involved. Children aged from 3 years and
less than 8 years shall not plug in, regulate and
clean the appliance or perform user maintenance.
CAUTION: Some parts of this product can
become very hot and cause burns. Particular
attention has to be given where children and
vulnerable people are present.
Avoid use of an extension cord because the
extension cord may overheat and cause risk of
re.
Ensure the PFH30R remote control unit is earthed.
Always disconnect the supply before working on the product.
Always ensure combustible materials such as drapes or
other furnishings are kept clear of the air inlet and air outlet.
This product should be mounted safely to a solid wall.
Ensure the supply cables are of adequate current carrying
capacity and are protected by a suitable fuse.
General
Thank you for purchasing this high power wall mounted fan heater.
Designed to provide heating for small commercial environments
such as garages and workshops.
The heaters work by gradually raising the air temperature in a
garage or workshop and should be positioned at head height
approximately (1.8m - 2.3m - see Fig. 2) where the controls can
reached.
The PFH30 and PFH30R heaters have an output of 3kW.
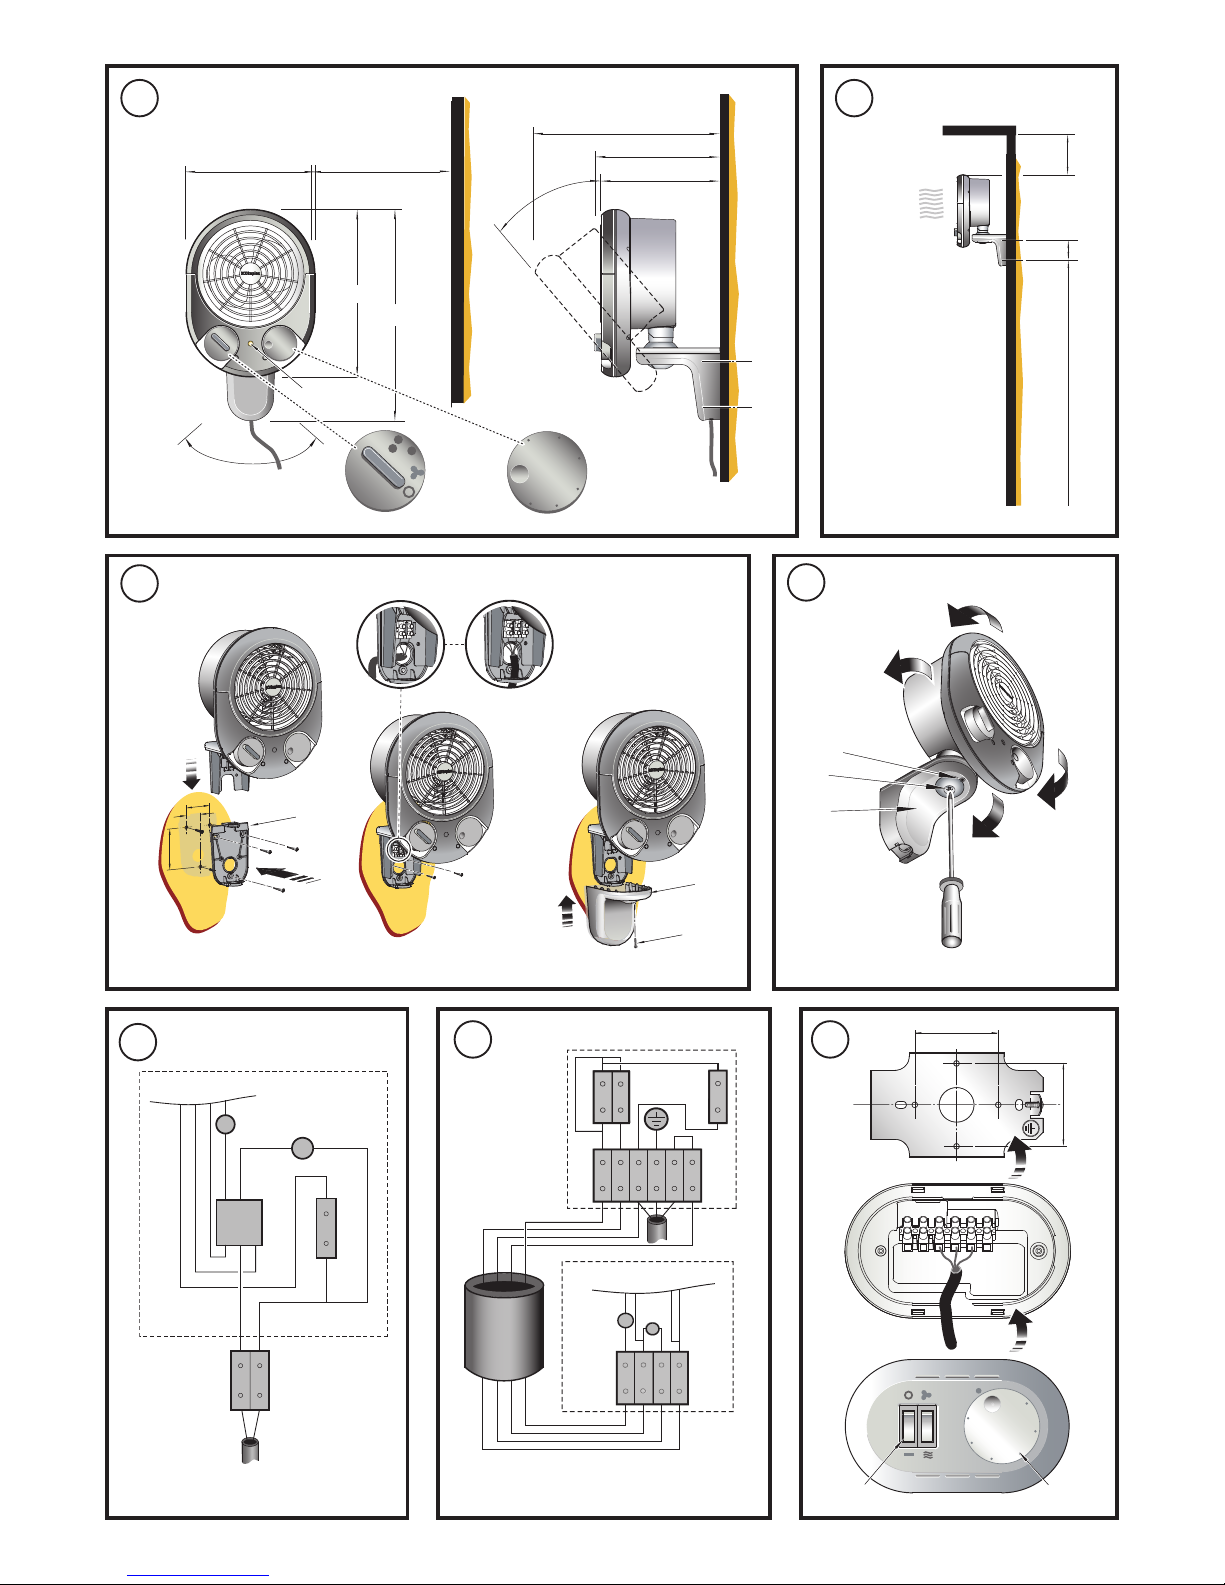
The angle the appliance is mounted at may be adjusted horizontally
and vertically - see Fig. 1 and Fig. 4.
Electrical
The installation of this appliance should be carried out by a
competent electrician and be in accordance with the current
IEE wiring regulations. The supply cable is not supplied with the
appliance.
Note: A suitable local isolating switch must be provided in the
electrical supply circuit as close as possible to the heater with at
least 3mm clearance on each pole.
Wall Mounting
Remove the screw (see ‘z’ in Fig. 3C) to remove the cover bracket.
Use the wall mounting bracket (see ‘x’ in Fig. 3A) as a guide to
mark off the hole positions on a suitable wall (a minimum height
of 1.8 metres is required from the oor level to the bottom hole of
the bracket - see Fig. 2). Solid brick or concrete block walls must
be drilled and plugged using the screws and wall plugs provided.
Fix the wall mounting bracket to the wall and slide the heater down
on to the bracket as shown in Fig. 3A.
Note: Ensure there is enough clearance above the wall mounting
bracket for the user to slide the heater onto the bracket.
The heater is held in place to the wall mounting bracket with 2
screws - see Fig. 3B.
Once electrical connections have been completed - see ‘Electrical
Installation’, re-attach the bracket cover (see ‘y’ in Fig. 3C) by
sliding into place and secure with the screw - see ‘z’ in Fig. 3C.
Pivot and rotate the heater into the desired position and tighten
the screw to secure - see ‘w’ in Fig. 4.
Electrical Installation
Before undertaking electrical installation, ensure the electricity
supply is disconnected from any relevant xed wiring. With the
bracket cover removed proceed to feed the supply cord through
the cable entry at the bottom of the mounting bracket (drill knockout to suit).
Dimplex Compact Commercial Fan Heater
Models : PFH30 and PFH30R (Remote Control)
Page 4

PFH30R Remote Control - see Fig. 6
Remove the wall mounting bracket from the remote control unit.
Feed the supply cord through the desired cable entry (1-4 see Fig.
7). Connect the mains lead (ML) to terminal block - see Fig. 6.
Connect the 4 core cable (not supplied) from the remote control
to the appliance - see Fig. 6.
Key - see Wiring Diagrams Fig. 5 -PFH30 & Fig. 6 -PFH30R
RS Rotary Switch TB Terminal Block
ML Mains Lead TB1 Terminal Block 1
S1 Switch 1 TB2 Terminal Block 2
S2 Switch 2 T Thermostat
EL Element L Live
N Neutral E Earth
L in Live In L out Live Out
M Motor NEON Neon
RC Remote Control FH Fan Heater
Note: All 4 core cable wires must be 1.5mm
2
* When the heat control is set to ‘ ’ for cool blow, set the
thermostat control to maximum.
Position ‘ ’ will turn the heater on and off to maintain a
temperature of approximately 5°C.
Controls - PFH30 - see Fig. 1
The mains neon (see ‘b’ in Fig. 1) will light up to show that the
heater is connected to the mains supply.
Heat Control - see ‘a’ in Fig. 1
The heat control positions are as follows:
- OFF
- Cool Blow*
- Half heat
- Full heat
Thermostat Control - see ‘c’ in Fig. 1
The heat output is controlled by the thermostat, according to the
room temperature.
Turn the thermostat knob fully clockwise to maximum setting
initially. When the room is warm enough, reduce the setting slowly
until the heater just clicks off.
The heater will now cycle on and off to maintain your selected room
temperature. An audible click may be heard when the thermostat
operates - this is normal.
Note : If the heater does not come on when the thermostat is at
a low setting, this is normally because the room is warmer than
the thermostat setting and is not a fault.
Controls - PFH30R
The PFH30R is supplied with a wall mounted control unit. This
may be mounted on a wall in a convenient location away from
direct sunlight or draughty areas.
Using the mounting bracket as a guide, mark the hole positions
and drill and plug the wall to suit using the screws and wall plugs
provided.
The heat output is controlled by the thermostat, according to the
room temperature.
Turn the thermostat knob fully clockwise to maximum setting
initially. When the room is warm enough, reduce the setting slowly
until the heater just clicks off.
The heater will now cycle on and off to maintain your selected room
temperature. An audible click may be heard when the thermostat
operates - this is normal.
Note : If the heater does not come on when the thermostat is at
a low setting, this is normally because the room is warmer than
the thermostat setting and is not a fault.
Thermal Safety Cut-outs
The power supply to the heater may also be interrupted if one or
a combination of the following abnormal events occurs:
1. Air inlet or outlet grilles are obstructed.
2. Internal ventilation is impaired due to build up of dust and
uff.
3. Blower unit stalls.
In the event that the above events occur the cut-out switches off
the heater automatically. To bring the heater back into operation,
remove the cause of the overheating, then turn off the electrical
supply to the heater for a few minutes. When the heater has cooled
sufciently re-connect and switch on the heater.
If the cut-out operates repeatedly, contact your supplier.
Recycling
For electrical products sold within the European
Community.
At the end of the electrical products useful life it
should not be disposed of with household waste.
Please recycle where facilities exist. Check with
your local authority or retailer for recycling advice
in your country.
Cleaning
WARNING: DISCONNECT SUPPLY before carrying out
maintenance.
External appearance can be maintained by wiping occasionally
with a damp cloth. For stain removal, a weak soap solution can
be applied with a cloth and the surface wiped dry. Care must be
taken to avoid any moisture ingress into the product.
After Sales Service
Your product is guaranteed for one year from the date of purchase.
After sales information or assistance with this product can be
found on our website:
www.dimplex.co.uk/support.
Your rights under this guarantee are additional to your statutory
rights, which in turn are not affected by this guarantee.
Please do not return a faulty product to us as this may result in loss
or damage and delay in providing you with a satisfactory service.
If after following these steps your product still does not operate
you should return it to your point of purchase.
Please retain your receipt as proof of purchase.
[c] GDC Group Ltd,
All rights reserved. Material contained in this publication may not be reproduced in whole or in part, without prior permission in writing of Dimplex.
A division of GDC Group Ltd.
 Loading...