

Page 1
INSTALLATION
Installation and service must be performed by qualified
personnel. Hand dryer must be grounded.
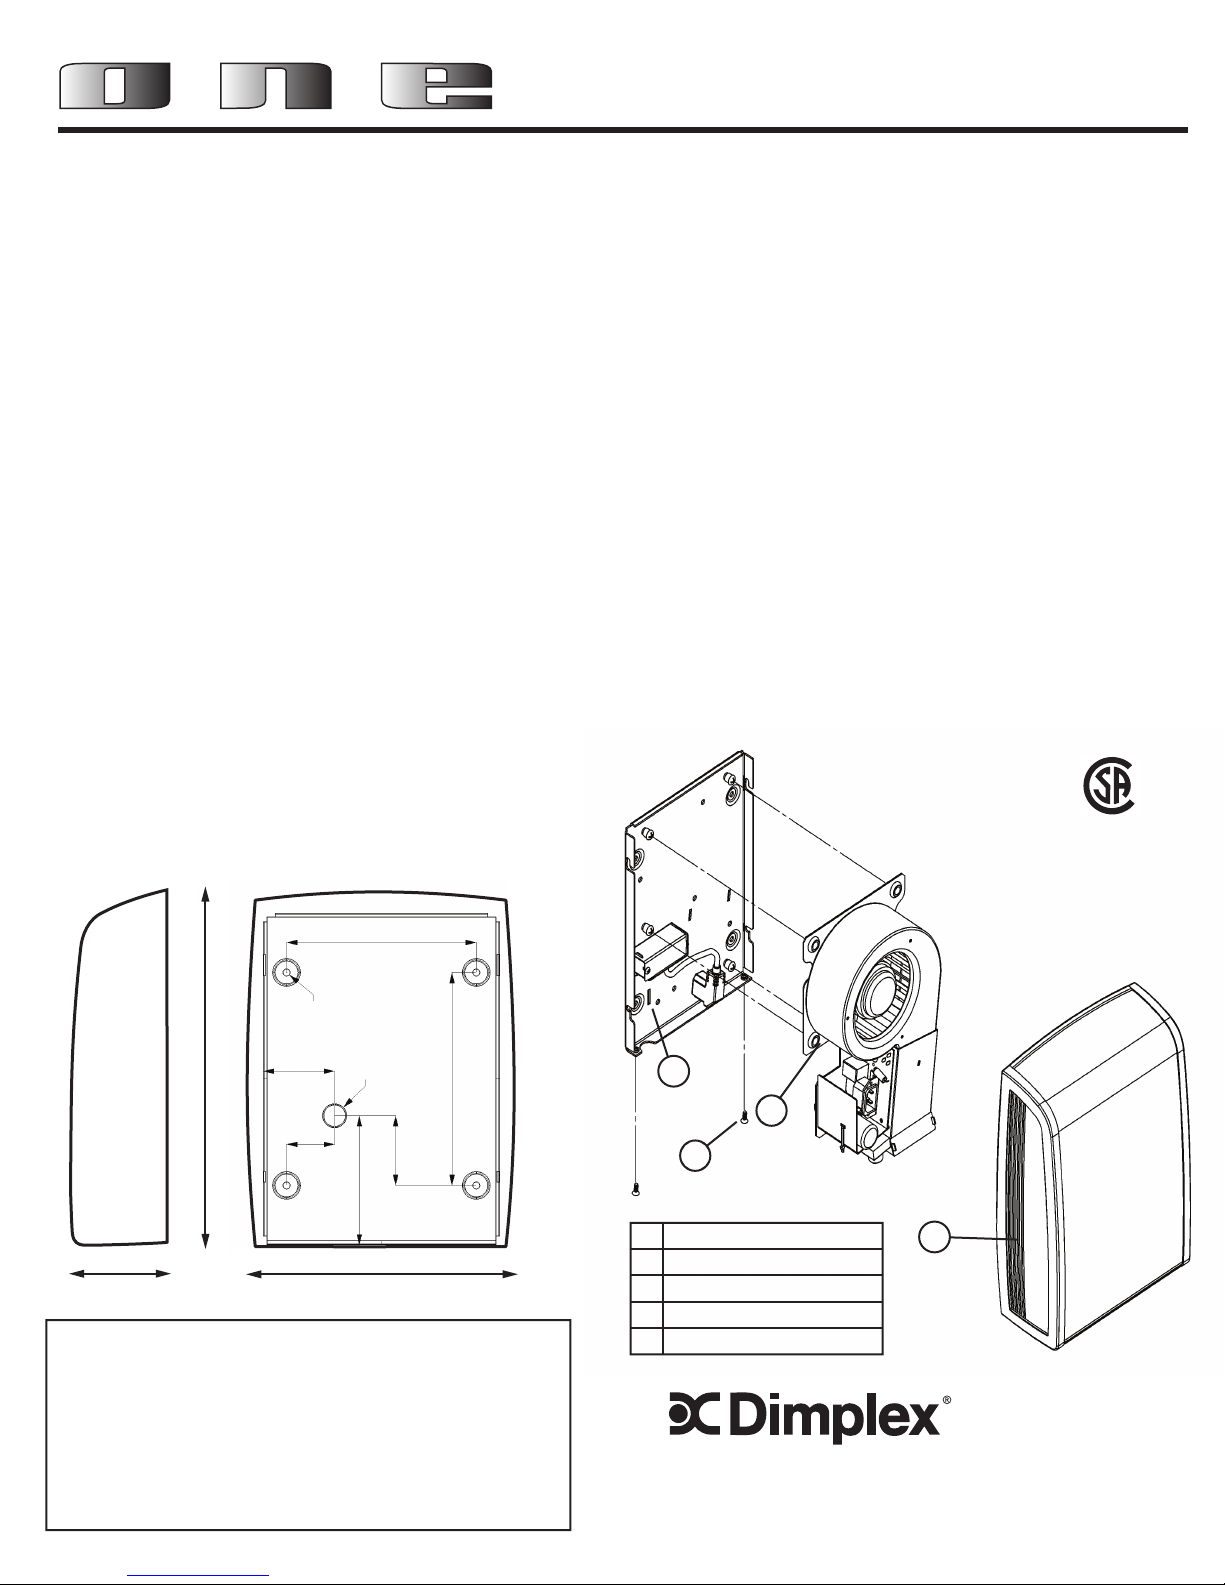
· Remove the two tamper-proof cover attachment screws using the
supplied key. Gently pry the cover from the wallplate with a screwdriver inserted alternately into the left and right bottom rear corners of
the dryer.
· Unplug the power cable from the circuit board. Remove the four
screws that pass through the rubber grommets and remove the
mechanism from the wallplate. Remove the cover from the electrical
junction box on the wallplate by loosening the single screw.
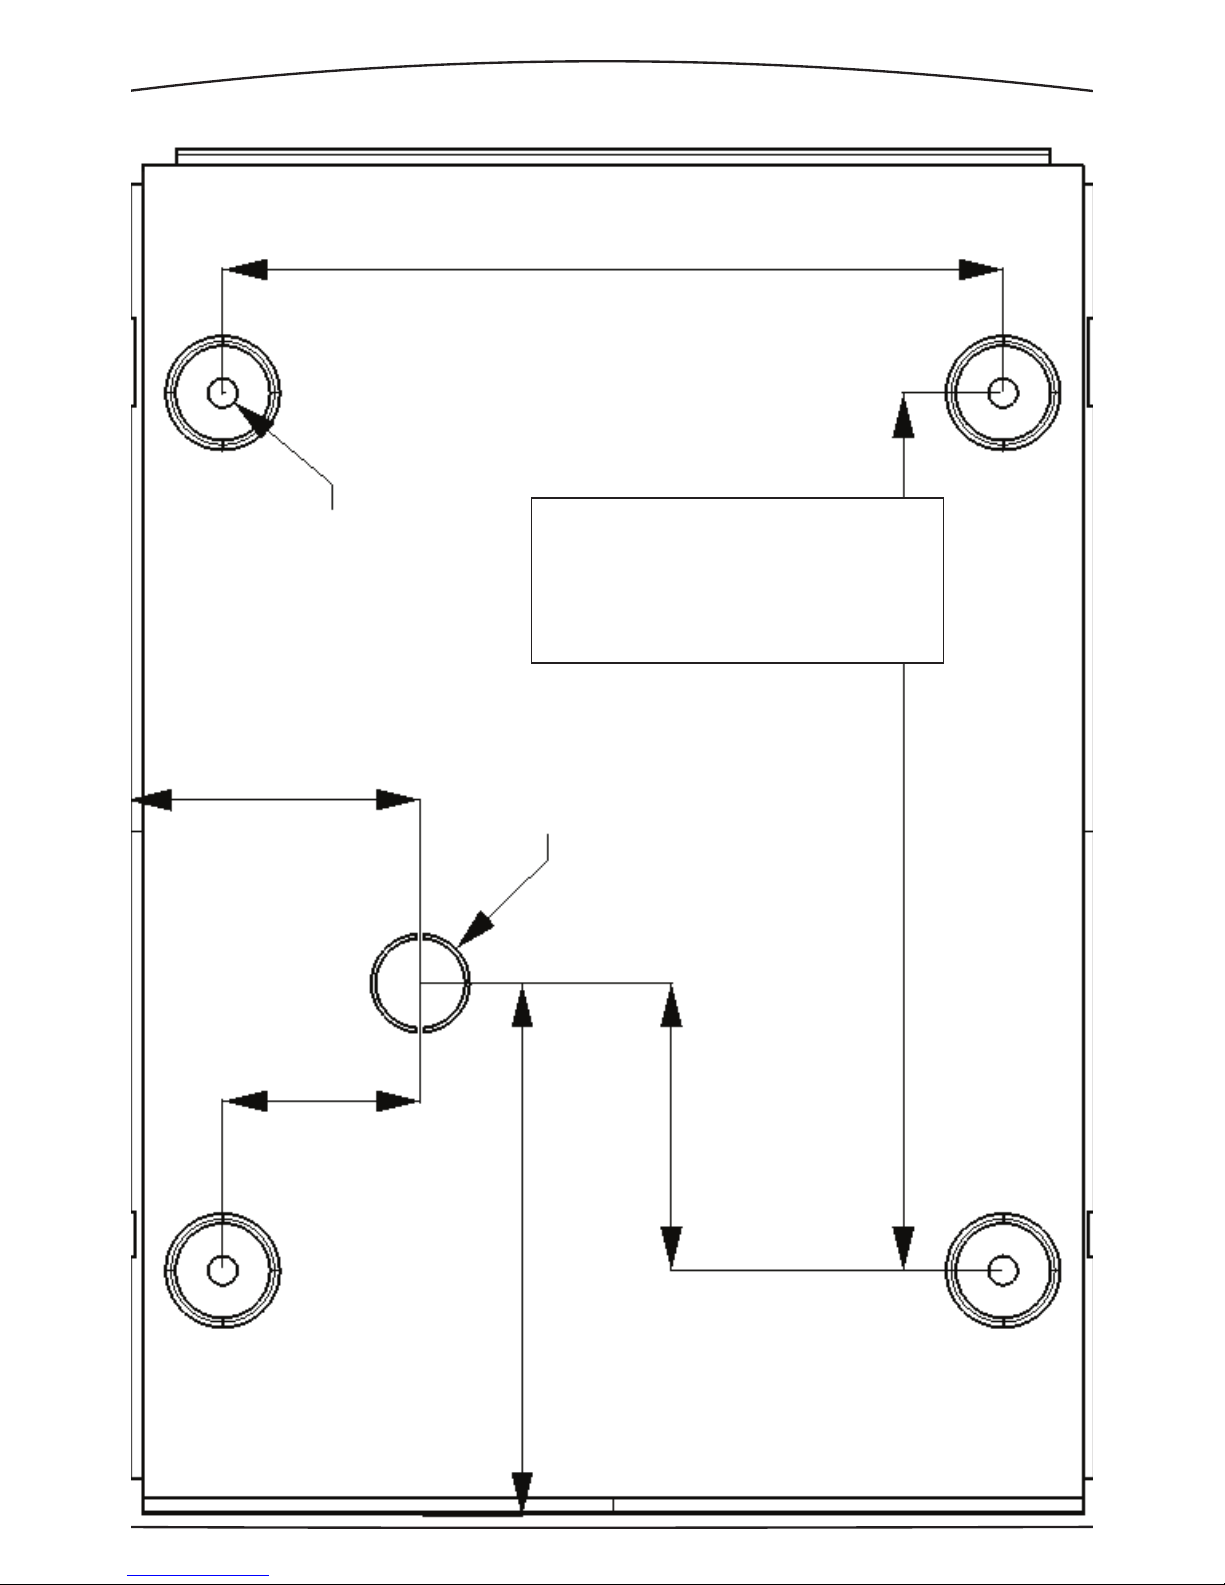
· Use the chart below to determine the correct height of the wallplate.
When two or more dryers are installed, they should be placed no
closer than 60cm (24”) from center to center. Mark the location of the
four mounting holes.
· All dryers must be fed by two power conductors and one ground
wire. For wall wiring, remove the electrical knockout from the
wallplate and mark the location of the wire entry. Carry the electrical
wire to the dryer and attach it to the wallplate knockout using an
approved connector.
· Attach the wallplate firmly to the wall. For wood walls or wood
studs, use No. 16 screws of proper length to ensure 25mm (1”)
minimum stud penetration. For masonry walls use expansion bolts or
anchors for 6mm (1/4”) screws of proper length to ensure
6mm (1/4”) deeper than anchor. Shim if necessary to ensure that the
wallplate is level and flat against the wall.
· For surface wiring, remove the knockouts from the dryer cover and
the electrical junction box and bring the conduit to the dryer from
below. Attach the conduit to the junction box using an approved
connector.
penetration
· Connect the two power leads to the power cable using the supplied
wire nuts. Attach the ground wire securely to the ground screw on
the wallplate. Replace the junction box cover and tighten the screw.
· Reinstall the mechanism and replace the four mechanism mounting
screws. Plug the power cable into the circuit board and push firmly
until it is fully seated.
· Replace the dryer cover. Slide the cover onto the wallplate horizontally and then upward while continuing to push the bottom of the
cover towards the wall. The cover should hook at the top and click
into place at the bottom. Replace the two tamper-proof screws,
taking care not to cross-thread or over-tighten them.
USE AND CARE
- Regularly clean exterior surfaces and wash with mild soap.
- Remove accumulated dust from air inlet areas.
- Ensure that infrared sensor lens is clean and unobstructed.
Once per year, or more frequently if dryer is installed in a dusty,
greasy, or heavy use environment:
- Remove tamperproof screws and slide cover downward and away
from wall at the bottom to remove.
- Disconnect power plug. Caution: do not touch exposed wires.
- Gently remove accumulated dust from mechanism and fan blades
with a vacuum. Inspect for worn or damaged parts.
- Replace power plug and reinstall cover as described above.
C US
6-7/8” - 175mm
(4)1/4” - 6mm
DIA. HOLES
4” - 100mm
13-3/4” - 349mm
1-3/4”
44mm
2-5/8”
67mm
7/8” - 22mm
KNOCKOUT
2-1/2” - 64mm
4-3/4” - 121mm
10-3/8” - 263mm
7-3/4” - 197mm
Distance from bottom edge of dryer to floor:
Men ... .......... .....47 in ....119 cm
Women ... . ......... .....44 in ....112 cm
Children 8-10 years
Children 11-13 years ..... . . ...38 in .....97cm
Children 14-16 years ..... . . ...44 in ....112 cm
Disabled ... . ......... .....36 in ... ..91 cm
..... .....35 in ... ..89 cm
1
2
4
Replacement Parts
1 Wallplate Assembly
2 Mechanism
3 Cover
4 Tamper-proof screw
5 Tamper-proof key
1367 Industrial Road Cambridge ON Canada N1R 7G8
Tel. 1-800-668-6663 Fax. 1-800-668-6665
www.dimplexheating.com
3
Printed in Canada
7211180100R00
Page 2
6-7/8” - 175mm
2-5/8” - 67mm
1-3/4”
44mm
7/8” - 22mm
KNOCKOUT
4-3/4” - 121mm
7-3/4” - 197mm
2-1/2” - 64mm
(4)1/4” - 6mm
HOLES
Distance from bottom edge of dryer to floor:
Men . . . . . . . . . . . . . . . . . . 47 in . . . . 119 cm
Women . . . . . . . . . . . . . . . . . . 44 in . . . . 112 cm
Children 8-10 years
Children 11-13 years . . . . . . . . . . 38 in . . . . . 97cm
Children 14-16 years . . . . . . . . . . 44 in . . . . 112 cm
Disabled . . . . . . . . . . . . . . . . . . 36 in . . . . . 91 cm
. . . . . . . . . . 35 in . . . . . 89 cm
 Loading...