

Page 1
H 260E
H 260E eco
Montage- und
Gebrauchsanweisung
Installation and
Operating Instructions
Instructions de montage
et d‘utilisation
Istruzioni d‘uso
e di montaggio
Montage- en
gebruiksaanwijzing
DeutschEnglish
FrançaisItaliano
Nederlands
Badezimmer-Schnellheizer
Fan heater for bathrooms
Aérotherme pour salle de bain
Riscaldamento per bagni
Snelverwarmer voor de bad-
kamer
08/54030/0 - Issue 5
Page 2
Deutsch H 260E, H 260E eco
HINWEIS
ACHTUNG!
ACHTUNG!
ACHTUNG!
ACHTUNG!
ACHTUNG!
ACHTUNG!
ACHTUNG!
ACHTUNG!
ACHTUNG!
ACHTUNG!
HINWEIS
1. Hinweise für den Benutzer
Das Gerät ist so zu installieren, dass es nicht
Sehr geehrter Kunde,
bewahren Sie die Anweisung sorgfältig auf und geben
Sie diese gegebenenfalls an Nachbesitzer weiter.
von einer sich in der Badewanne oder unter
der Dusche befindlichen Person berührt wer-
den kann!
Diese Gerät kann von Kindern ab 8 Jahren
und darüber sowie von Personen mit verringerten physischen, sensorischen oder menta-
len Fähigkeiten oder Mangels an Erfahrung
und Wissen benutzt werden, wenn sie beaufsichtigt oder bezüglich des sicheren Ge-
brauchs des Gerätes unterwiesen wurden
und die daraus resultierenden Gefahren ver-
stehen! Kinder dürfen nicht mit dem Gerät
spielen. Reinigung und Benutzerwartung dür-
fen nicht durch Kinder ohne Aufsicht erfolgen!
Kinder jünger als 3 Jahre sind fernzuhalten,
es sei den, sie werden ständig überwacht.
Kinder ab 3 Jahren und jünger als 8 Jahre
dürfen das Gerät ein- und ausschalten, wenn
sie beaufsichtigt werden oder bezüglich des
sicheren Gebrauchs des Gerätes unterwie-
sen wurden und die daraus resultierenden
Gefahren verstanden haben, vorausgesetzt,
dass das Gerät in seiner normalen Ge-
brauchslage platziert oder installiert ist!
Wenn das Netzkabel beschädigt ist, muss es
vom Hersteller oder dessen Kundendienstvertretung oder einer vergleichbar qualifizierten Person ausgetauscht werden, um Gefah-
renquellen auszuschalten!
Um eine Gefährdung durch ein unbeabsich-
tigtes Rücksetzen des Überhitzungsschutzes
zu vermeiden, darf das Gerät nicht über eine
externe Schalteinrichtung, wie z.B. eine Zeit-
schaltuhr versorgt werden oder mit einem
Stromkreis verbunden sein, der regelmäßig
ein- und ausgeschaltet wird!
Je nach Raumgröße, Wärmebedarf und Thermostateinstellung können Räume bei unbe-
aufsichtigtem Betrieb überheizt werden. Dies
kann zu Gefahren für Personen führen, die
nicht in der Lage sind, den Raum bei über-
höhter Temperatur zu verlassen.
Kinder ab 3 Jahren und jünger als 8 Jahre
dürfen das Gerät nicht einschalten, das Gerät
nicht reinigen oder die Wartung durchführen!
Das nebenstehende Symbol ist am
Heizgerät angebracht und bedeutet, dass das Heizgerät nicht abge-
deckt werden darf!
Einige Teile des Gerätes können sehr heiß
werden und Verbrennungen verursachen. Besondere Vorsicht ist bei Kindern oder schutz-
bedürftigen Personen geboten!
In Räumen, in denen feuergefährliche Stoffe
verwendet werden (z.B. Lösungsmittel), darf
das Heizgerät nicht betrieben werden.
Das Gerät darf nur zur Raumlufterwärmung innerhalb
geschlossener Räume verwendet werden.
DE-1 1907/D www.dimplex.de
Page 3
H 260E, H 260E eco Deutsch
ACHTUNG!
HINWEIS
HINWEIS
HINWEIS
HINWEIS
250300
1000
405
280
190
308
B
A
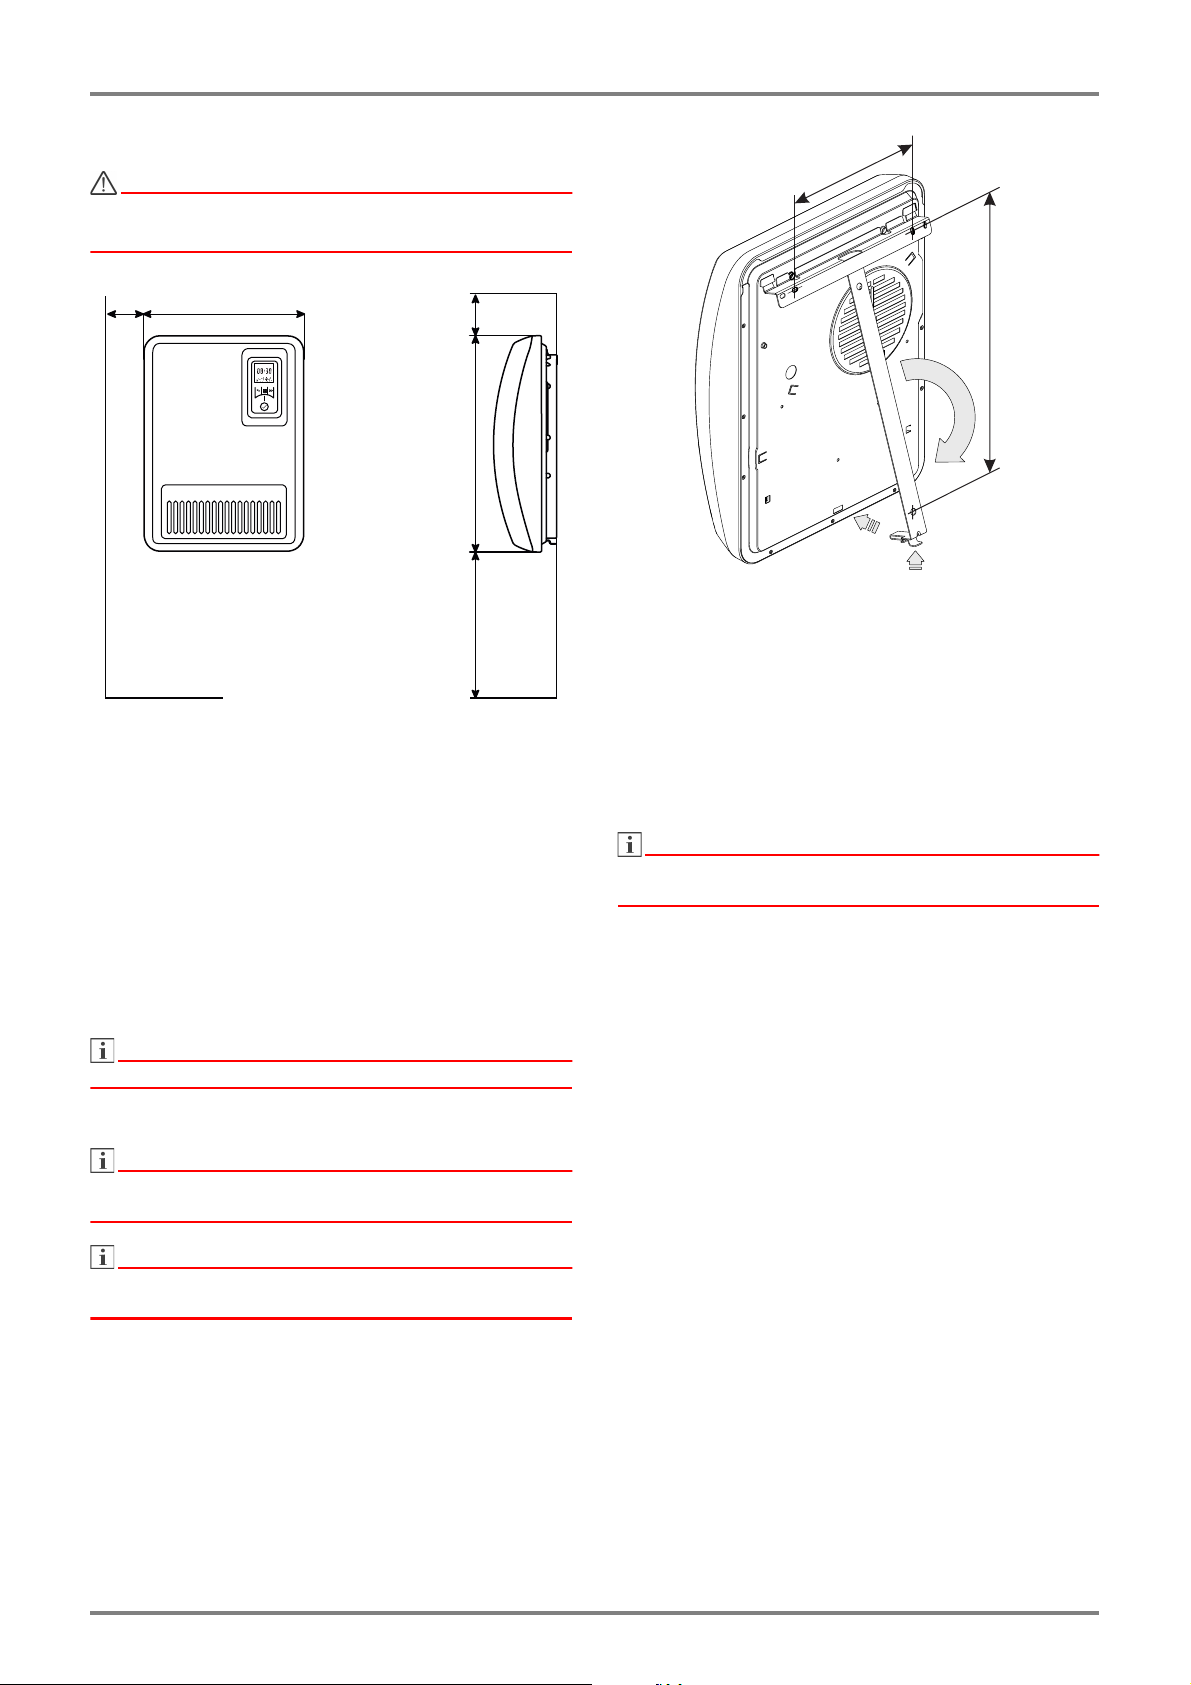
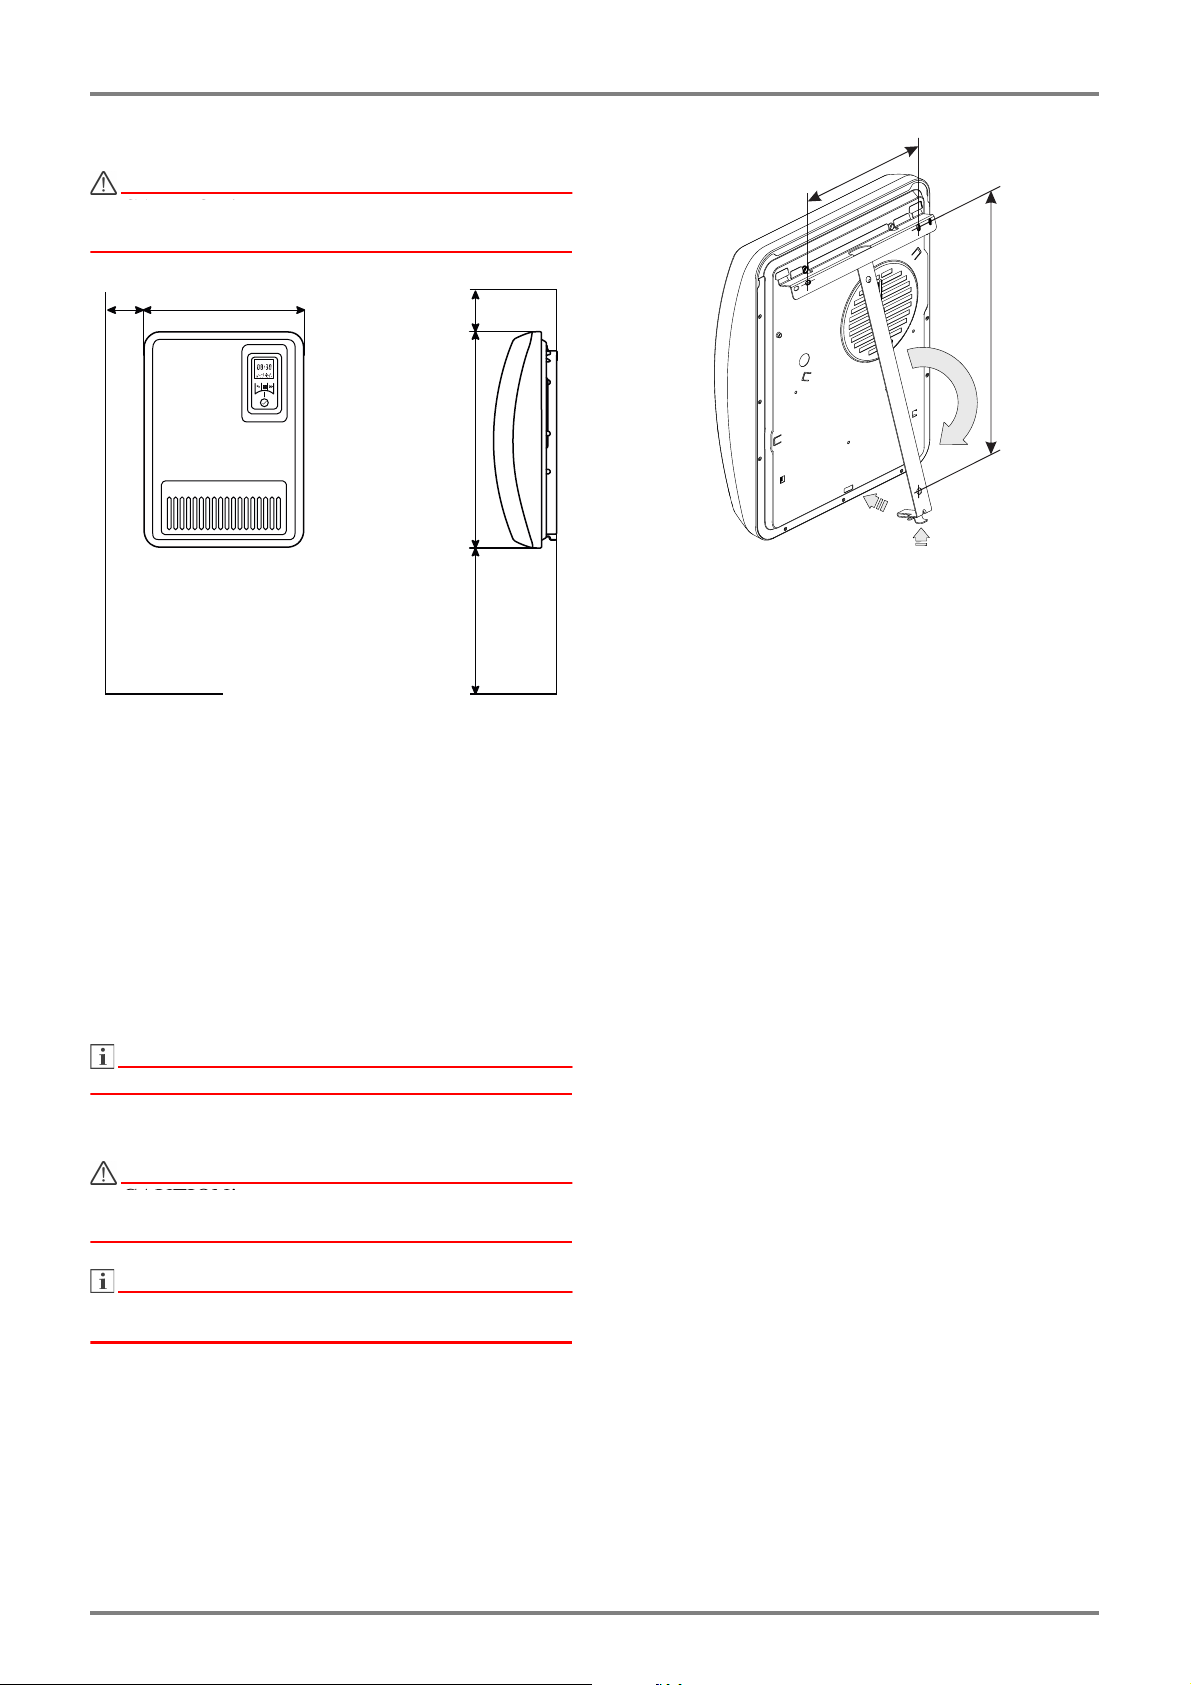
2. Montage, Installation, Mindestabstände
Das Gerät nicht unter einer Wandsteckdose
installieren!
3. Elektrischer Anschluss
Die Spannungsangabe auf dem Typschild muss mit
der Netzspannung übereinstimmen.
Die Leitung darf nicht am Gehäuse anliegen.
Die Mindestabstände müssen eingehalten werden.
Ferner ist an der Gerätevorderseite ein Abstand von
750 mm vorzusehen.
Das Heizgerät muss horizontal ausgerichtet an einer
senkrechten Wand, wie im Bild dargestellt, installiert
werden. Alle Maße in mm.
Bei der Montage ist der Schutzbereich nach den aktuellen Installationsvorschriften zwingend zu beachten.
Die Steckdose muss nach der Montage zugänglich
sein.
Darauf achten, dass die Luft am Gerät ungehindert
austreten kann
.
Eine Montage an Holzwänden ist zulässig.
Wandmontage
Der an der Rückseite des Gerätes mitgelieferte Original-Wandhalter muss verwendet werden.
Es ist empfehlenswert, für die Stromversorgung einen
eigenen Stromkreis vorzusehen.
Stecker in Steckdose einstecken. Stecker muss für
Notfälle immer zugänglich sein.
Das Gerät darf nur an eine Schutzkontakt-Steckdose
angeschlossen werden.
4. Überhitzungsschutz
Zu Ihrer Sicherheit ist das Heizgerät mit einem Überhitzungsschutz ausgerüstet. Wird die Luftzirkulation gestört (z.B. durch Verhängen oder Zustellen des Luftgitters), so schaltet das Gerät automatisch ab. Im Display
erscheint die Anzeige Err35.
In diesem Fall muss die Stromversorgung des Heizgerätes für einige Minuten unterbrochen werden (Stecker ziehen, Sicherung ausschalten), damit sich das Gerät ausreichend abkühlen kann.
Vor Wiederinbetriebnahme des Gerätes Ursachen für
das Ansprechen des Überhitzungsschutzes beseitigen.
Beim Bohren auf in der Wand befindliche Elektro- oder
Rohrleitungen achten!
Wandhalter unten entriegeln (A) und vom Gerät ab-
nehmen.
Befestigungslöcher für Wandhalter bohren und
Dübel einsetzen.
Wandhalter horizontal ausrichten und fest an die
Wand schrauben.
Gerät in den Wandhalter einhängen.
Heizgerät nach unten schwenken und einrasten (B).
www.dimplex.de 1907/D DE-2
5. Reinigung
Zur Reinigung muss das Gerät vom Netz getrennt und
abgekühlt sein. Die Außenseite kann durch Abwischen
mit einem weichen, feuchten Lappen gereinigt werden.
Zur Reinigung keine Scheuerpulver oder Möbelpolituren verwenden, da diese die Oberfläche beschädigen
können. Staubansammlungen im Gerät können von
außen mit einem Staubsauger entfernt werden.
Page 4
Deutsch H 260E, H 260E eco
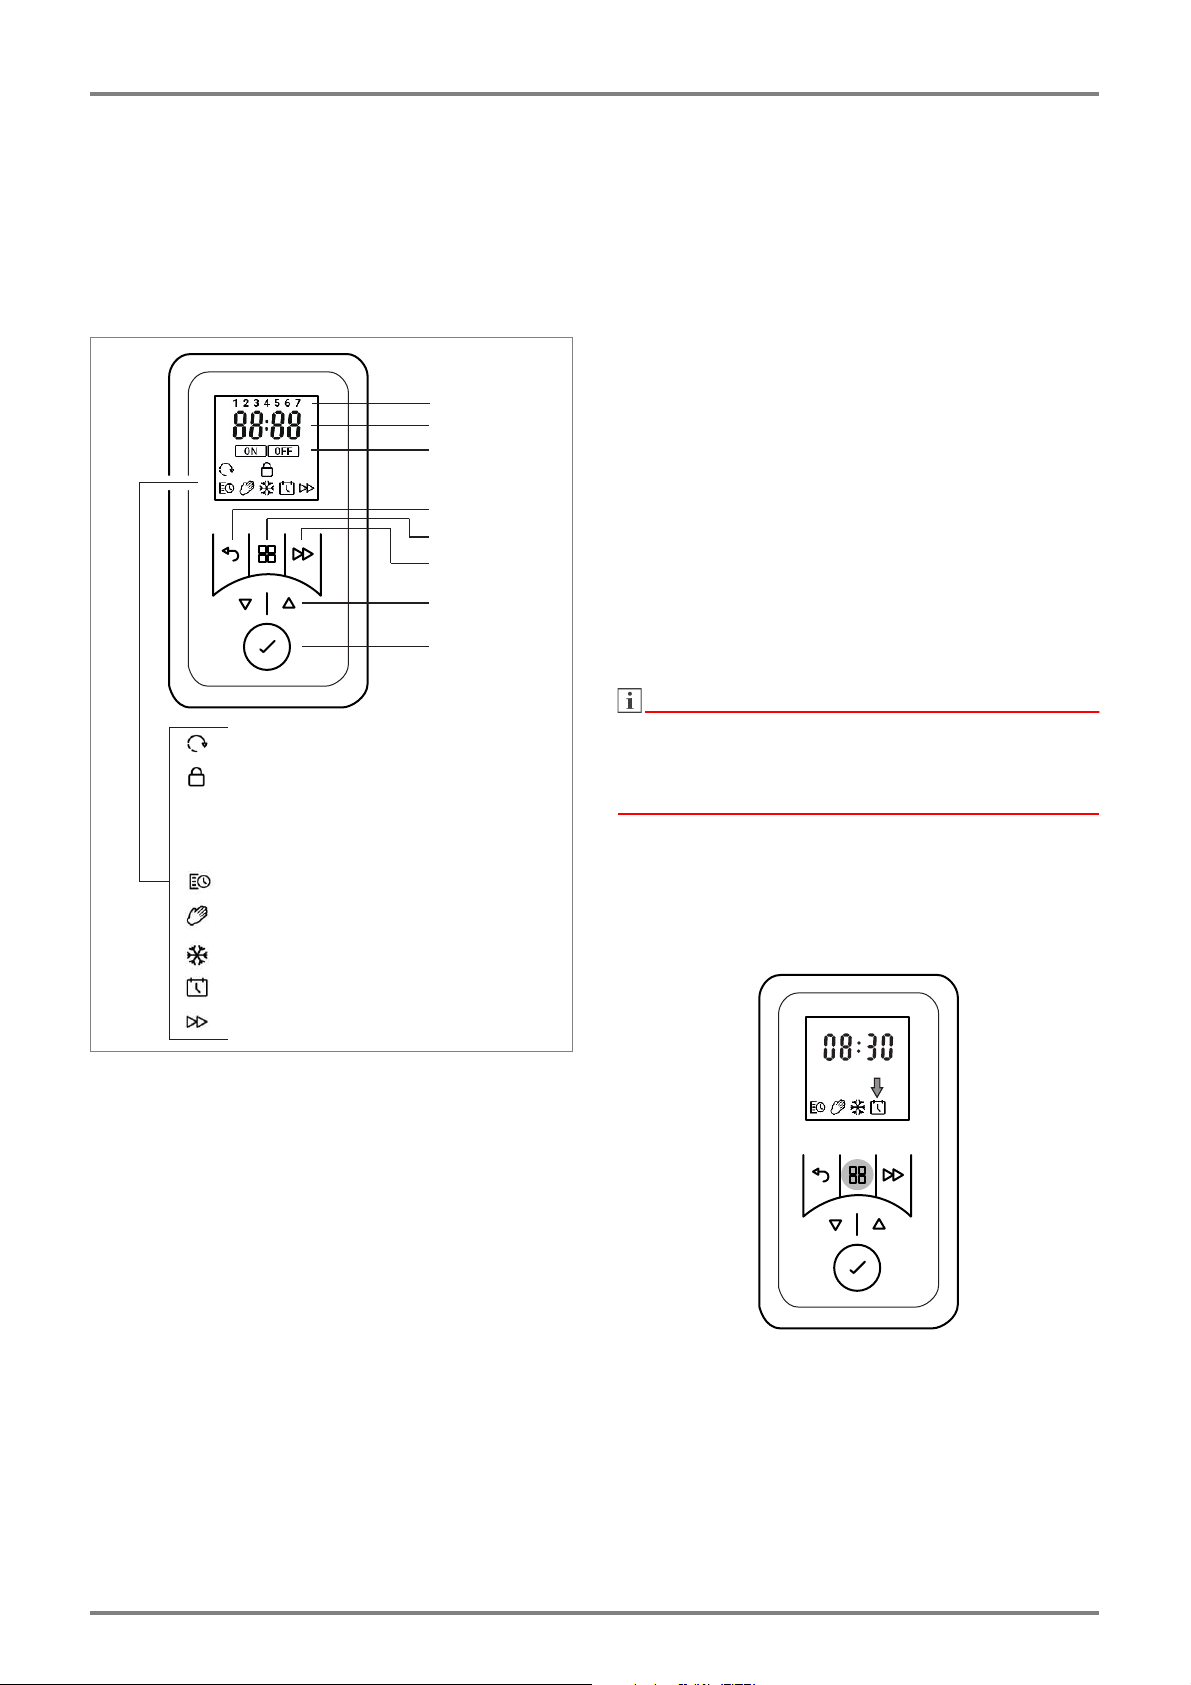
HINWEIS
Adaptiver Start
Gesperrt
Audio
Verbindung
Timer
Manuell
Frostschutz
Uhrzeit/Datum
Vorzug
Wochentag
Uhrzeit
Ein/Aus
Zurück
Menü
Vorzug
Einstelltasten
Taste Enter
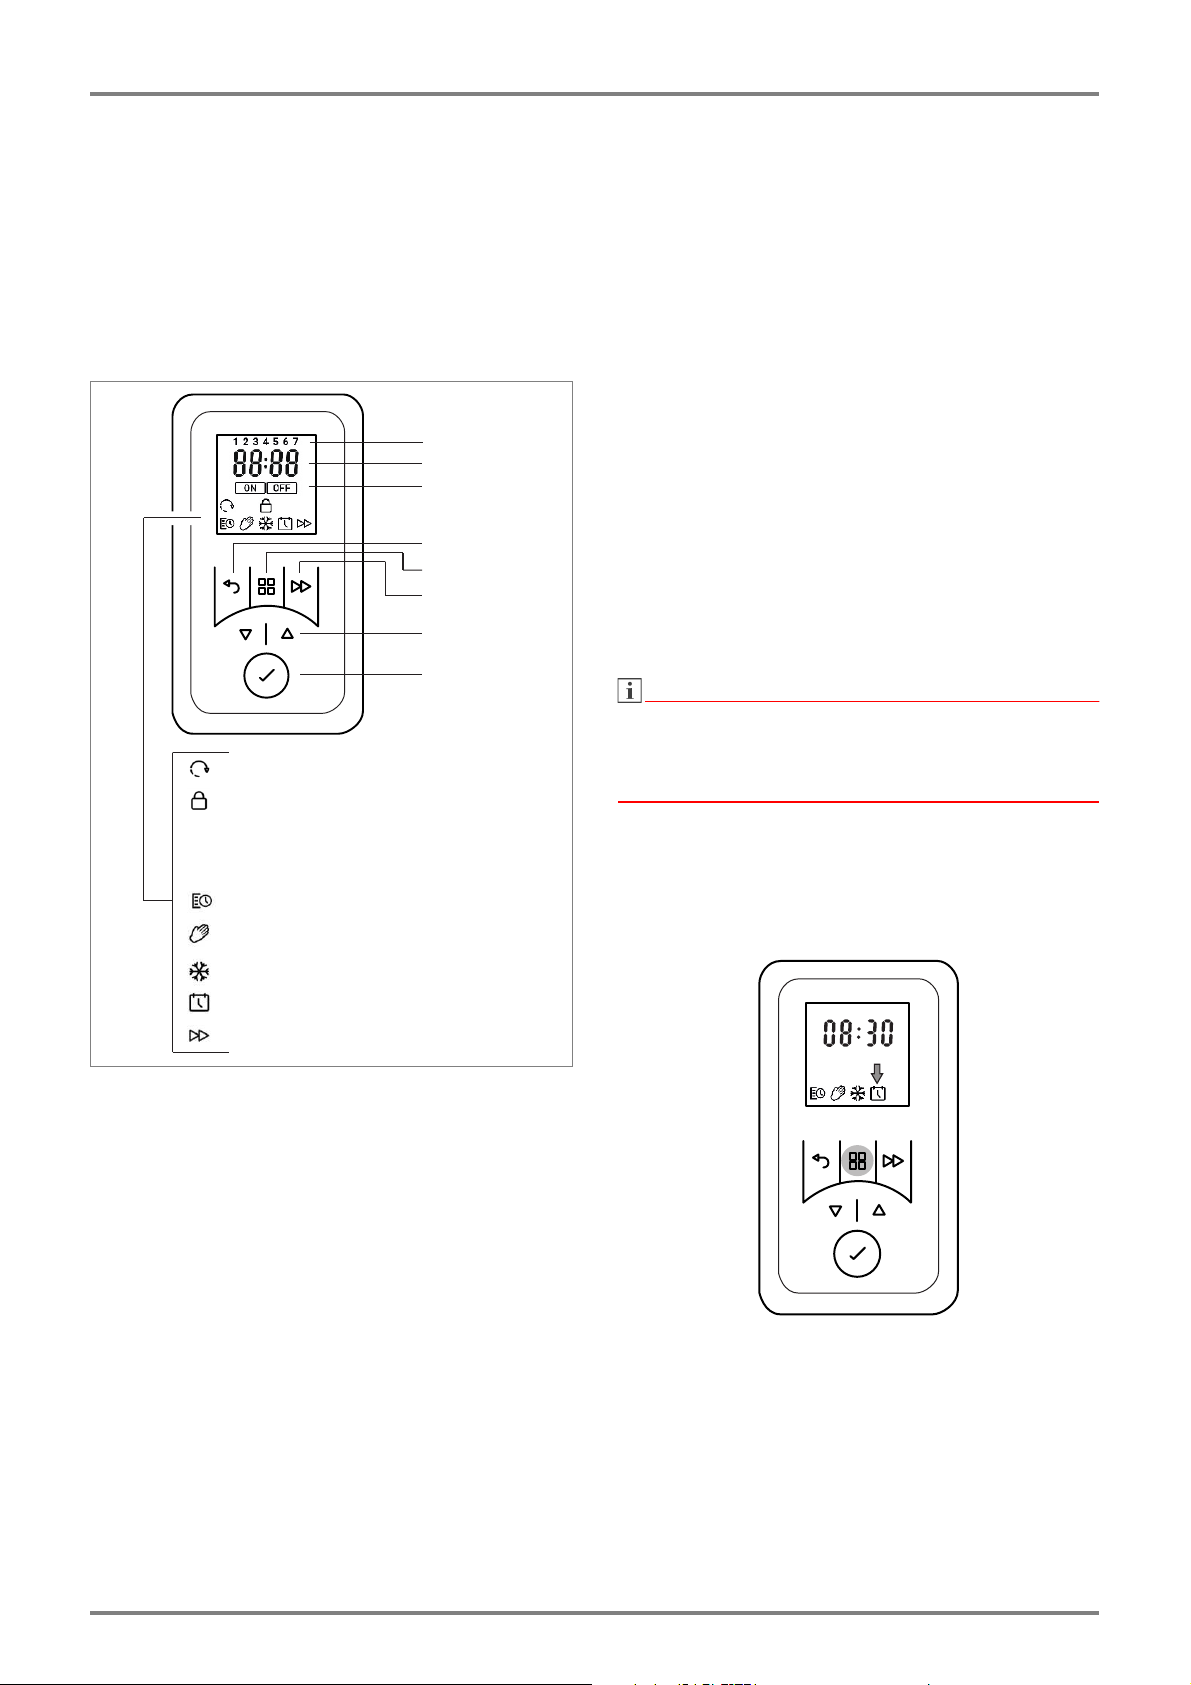
6. Reglerbeschreibung
6.1 Bedieneinheit
Das Heizgerät ist mit einem einstellbaren elektronischen Regler, bestehend aus einem Display und sechs
Touchscreen Tasten, ausgestattet. Die Bedieneinheit
befindet sich auf der Oberseite rechts. Alle Einstellungen können mit Hilfe der sechs Tasten auf der Bedienoberfläche eingestellt werden.
Auf dem Display werden die eingestellten Funktionen
und Werte angezeigt.
6.3 Display
Bei Betätigung einer Taste leuchtet das Display auf.
Erfolgt für eine längere Zeit keine Änderung erlischt die
Anzeige. Wird keine Taste betätigt, kehrt die Anzeige
nach 30 Sekunden zum Hauptmenü zurück.
Durch Drücken der ENTER-Taste wird die 4-stellige
Geräte PIN anzeigt.
7. Betriebsarten
7.1 Timer Wochenprogramm
Bis zu vier Heizprogramme (Ein/Aus) für jeden Wochentag einstellbar. Jedem Heizprogramm kann eine
Raumtemperatur vorgegeben werden.
Symbol TIMER wird im Display angezeigt.
7.2 Manueller Betrieb
Manuelle Vorgabe der Raumtemperatur.
Symbol HAND wird im Display angezeigt.
7.3 Frostschutz
Vorgabe einer Frostschutztemperatur von 7° C.
Symbol FROST wird im Display angezeigt.
6.2 Tastenfunktionen
HAUPTMENÜ
Einstellung Datum und Zeit
Timer Wochenprogramm
Manueller Betrieb
Frostschutz-Betrieb
ZURÜCK
Rückkehr zum vorherigen Programmpunkt
In allen Betriebsarten kann die Raumtemperatur mit
den oder Tasten verändert werden.
Im Timer-Programm wird diese Änderung nur für das
aktuelle Zeitprogramm ausgeführt.
8. Inbetriebnahme
8.1 Einstellen der Uhrzeit und des Datums
Die Steuerung beinhaltet eine Echtzeituhr mit Kalenderfunktion.
Tasten
Dienen zur Navigation durch das Menü und ändern der
Einstellwerte.
ENTER
Speichern der Einstellungen.
VORZUG
Sonderfunktionen wie wechseln zum nächsten Programmpunkt im Timer-Betrieb oder aktivieren des
Rücklauf-Timers.
DE-3 1907/D www.dimplex.de
Zur Einstellung von Datum und Zeit folgende Schritte
ausführen:
Taste MENÜ betätigen.
Mit Tasten
oder
Symbol DATUM & ZEIT aus-
wählen. Symbol blinkt.
Taste ENTER betätigen. Stundenanzeige blinkt.
Mit Tasten
oder
Stunden und Minuten ein-
stellen. Jede festgelegte Stelle mit Taste ENTER
bestätigen.
Page 5
H 260E, H 260E eco Deutsch
HINWEIS
OFF
OFFON
Die Uhrzeit wird gespeichert und die Anzeige dAY
blinkt kurzzeitig.
Mit Tasten
Jede festgelegte Stelle mit Taste ENTER bestäti-
oder Tag einstellen.
gen. Anzeige 1- 12 blinkt kurzzeitig.
Mit Tasten
Jede festgelegte Stelle mit Taste ENTER bestäti-
oder Monat einstellen.
gen. Anzeige YEAr blinkt kurzzeitig.
Mit Tasten
Jede festgelegte Stelle mit Taste ENTER bestäti-
oder Jahr einstellen.
gen. Anzeige dSt (Sommerzeit) ON blinkt.
Empfehlung: Anzeige ON mit Taste ENTER bestä-
tigen. Dies bewirkt eine automatische Zeitanpassung Sommer/Winter.
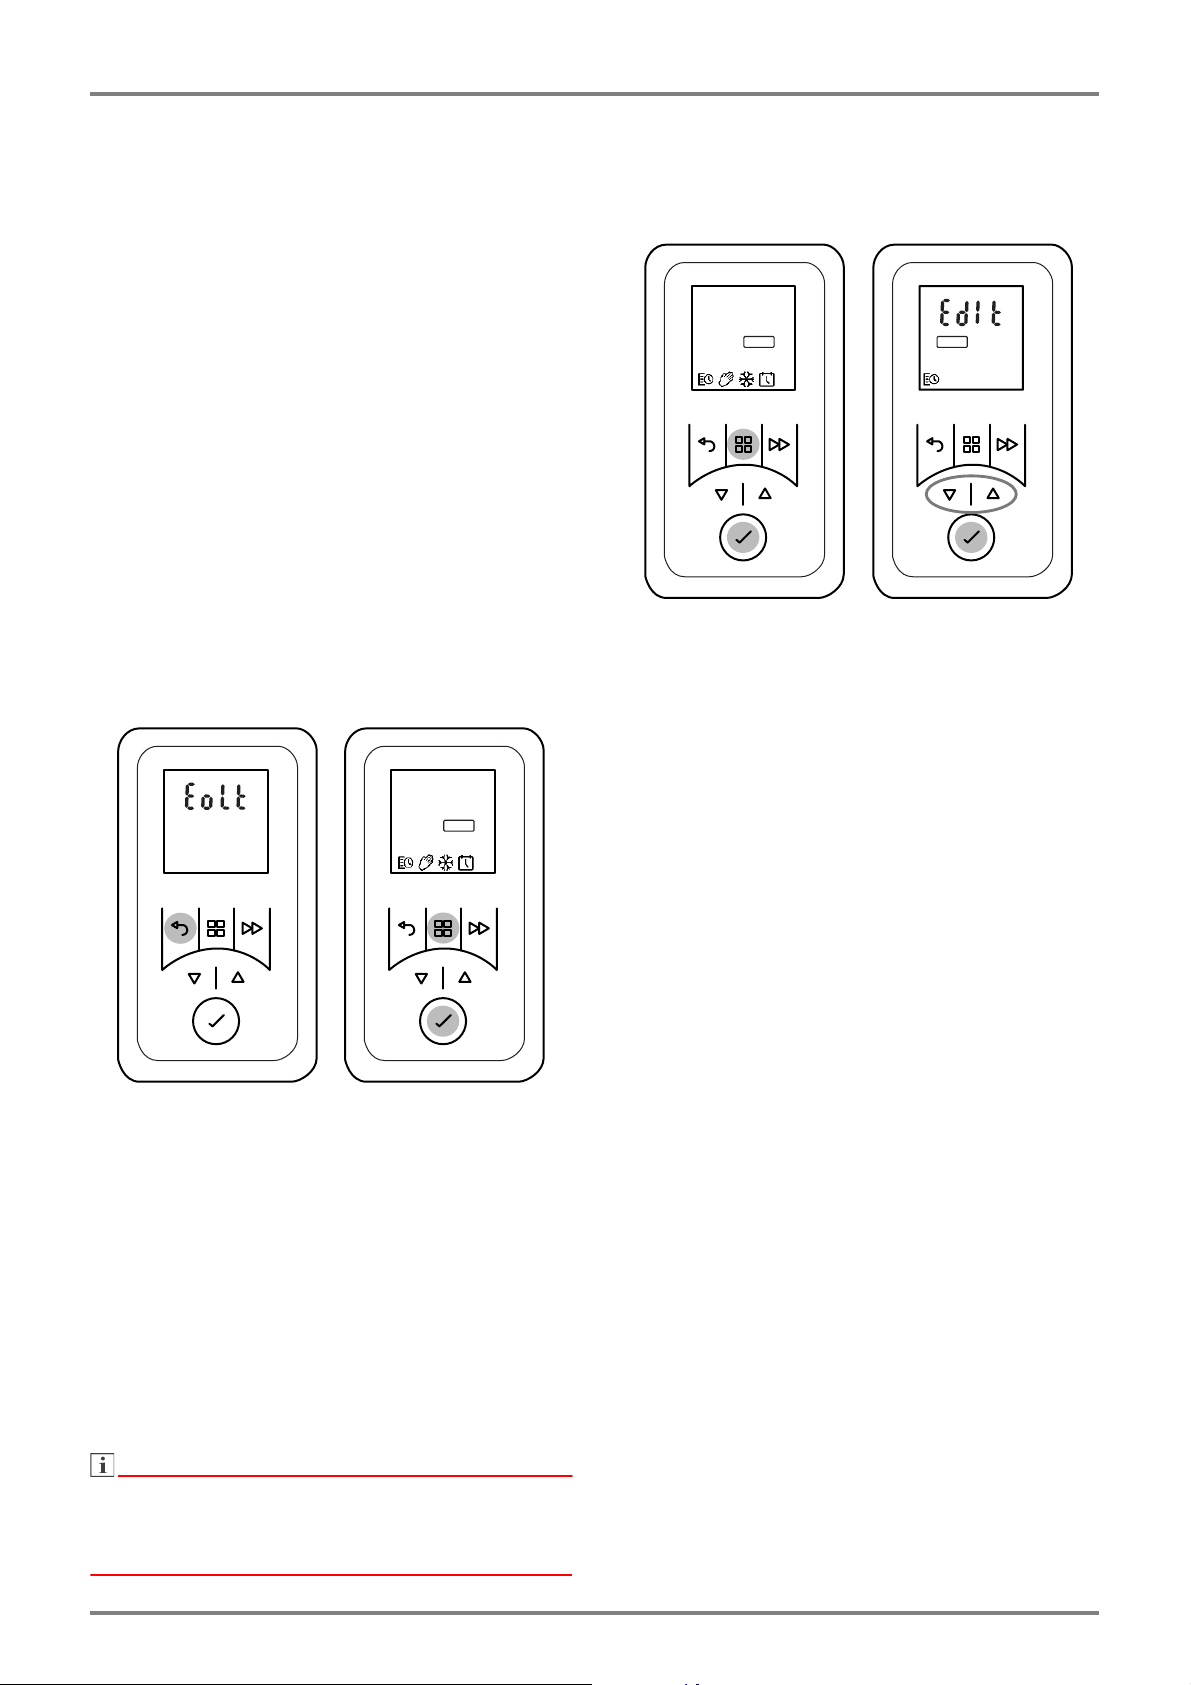
9. Bedienung
9.1 Standby-Modus (Wartestellung)
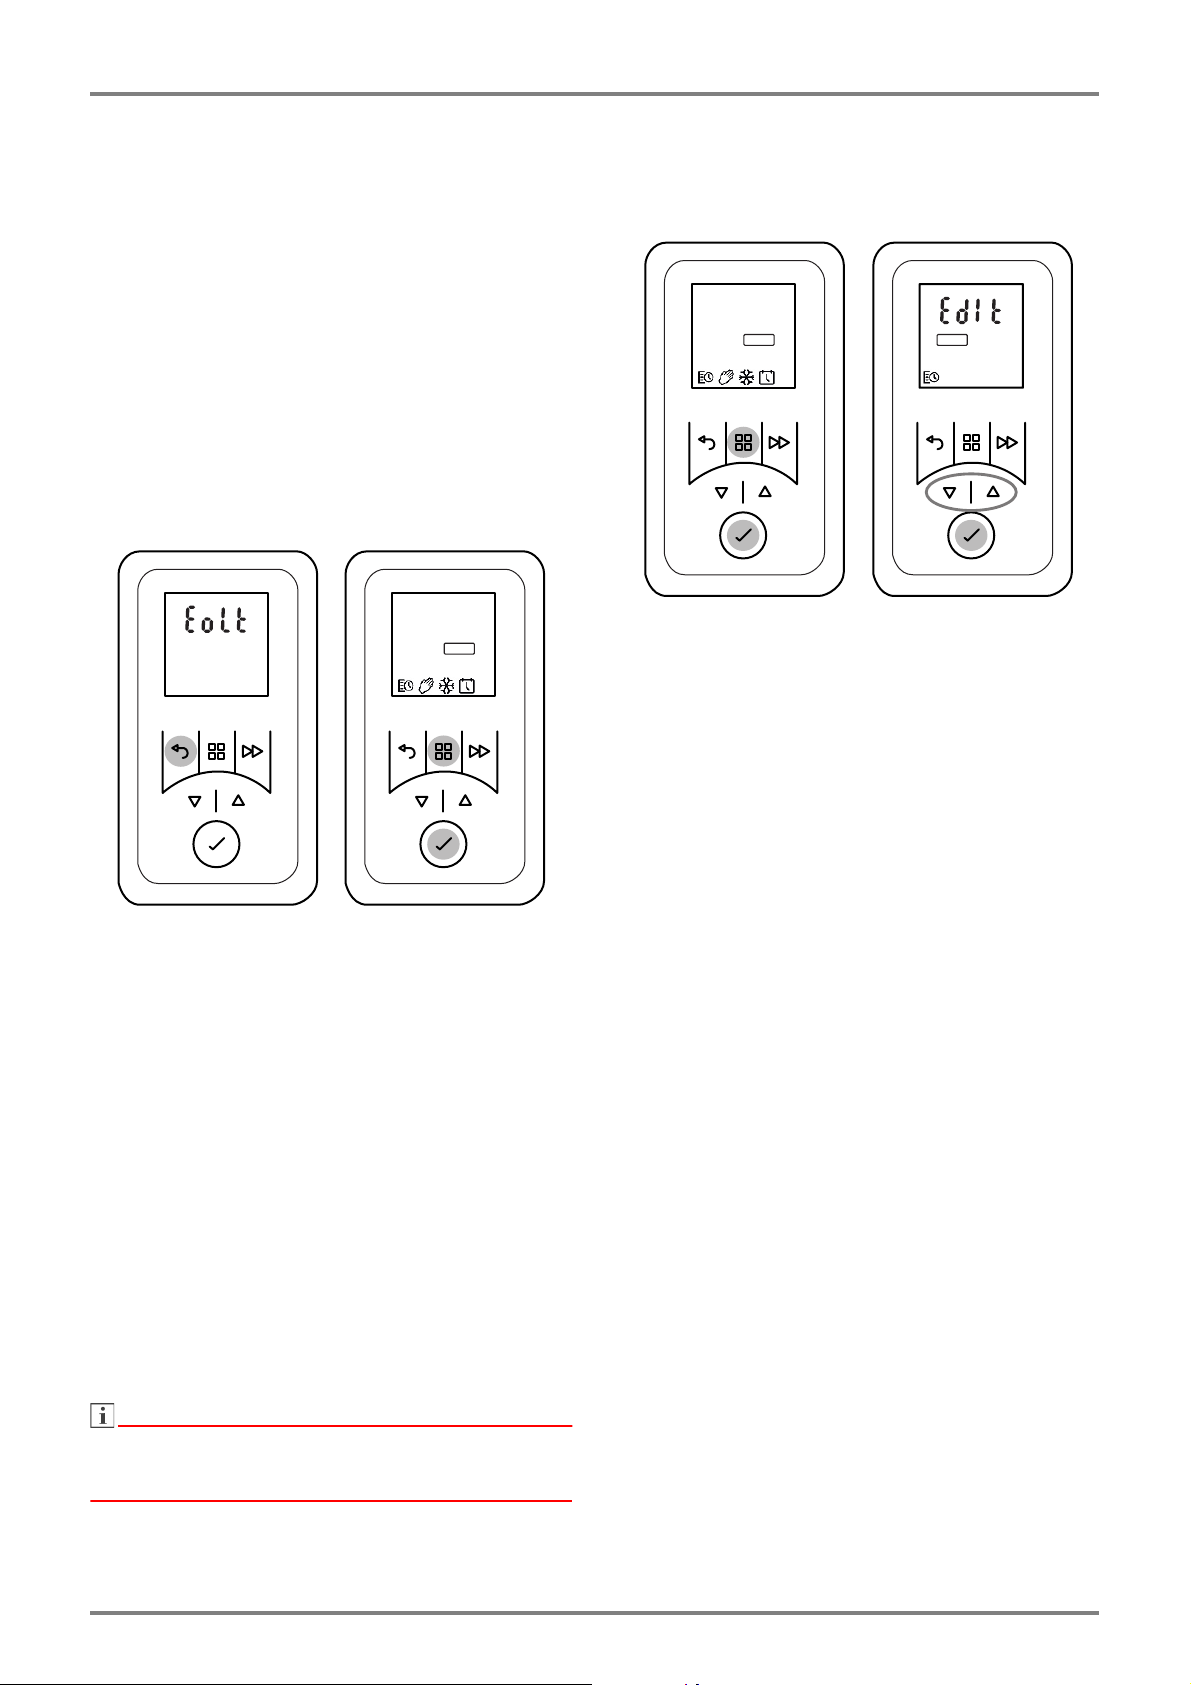
Taste ZURÜCK gedrückt halten bis Anzeige Eolt
erscheint. Heizgerät ist im Standby-Modus.
Um zum vorherigen Betriebszustand zurückzukeh-
ren, Taste ZURÜCK kurz betätigen.
9.2 Heizbetrieb einschalten/ausschalten
Heizbetrieb einschalten
Taste HAUPTMENÜ betätigen. Symbol TIMER blinkt.
Mit Tasten oder
wählen. Symbol blinkt.
Mit Taste ENTER bestätigen.
Heizbetrieb ausschalten
Taste HAUPTMENÜ betätigen. Symbol TIMER blinkt.
Mit Tasten oder
bol OFF blinkt.
Mit Taste ENTER bestätigen.
Heizbetrieb Aus bedeutet nicht, dass das Gerät von
der Stromversorgung vollständig getrennt ist. Um das
Gerät vom Netz zu trennen, bitte Stecker ziehen.
gewünschte Betriebsart aus-
Symbol OFF auswählen. Sym-
9.3 Timer Wochenprogramm
Der Timer ist werkseitig vorprogrammiert. Vier Zeitblöcke pro Tag stehen zur Verfügung und diese können
für jeden Wochentag individuell angepasst werden.
Zum Ändern dieser Profile nachfolgende Schritte
durchführen:
Taste MENÜ betätigen. Symbol TIMER blinkt.
Taste ENTER betätigen. Symbol ON blinkt.
Mit Tasten
oder
Anzeige EdIt auswählen. An-
zeige EdIt blinkt.
Taste ENTER betätigen. Wochentag blinkt.
Mit Tasten
oder Tag auswählen.
1 = Montag 5 = Freitag
2 = Dienstag 6 = Samstag
3 = Mittwoch 7 = Sonntag
4 = Donnerstag
Taste ENTER betätigen. P1 (Programm 1) blinkt.
Taste ENTER betätigen. Einschaltzeit blinkt.
Mit Tasten
oder
Stunden und Minuten ein-
stellen. Jede festgelegte Stelle mit Taste ENTER
bestätigen.Raumtemperatur blinkt.
Mit Tasten
oder Temperatur einstellen. Taste
ENTER betätigen. Ausschaltzeit blinkt.
Mit Tasten
oder
Stunden und Minuten ein-
stellen. Jede festgelegte Stelle mit Taste ENTER
bestätigen. P2 (Programm 2) blinkt.
Die Programme P2, P3 und P4 können auf gleiche
Weise eingestellt werden.
Um die neu eingestellten Programme P1 - P4 auf
weitere Tage zu kopieren, Taste VORZUG gedrückt halten. Anzeige COPY blinkt kurzzeitig.
Die eingestellten Tageswerte werden kopiert.
Mit Tasten
oder
neuen Wochentag auswäh-
len. Wochentag blinkt.
Taste ENTER gedrückt halten. Anzeige PStE blinkt
kurzzeitig. Die kopierten Tageswerte werden dem
neuen Wochentag zugewiesen.
Abschließend Taste HAUPTMENÜ betätigen.
www.dimplex.de 1907/D DE-4
Page 6
Deutsch H 260E, H 260E eco
HINWEIS
HINWEIS
ON
ON
9.4 Manueller Betrieb
Im manuellen Betrieb ist der Timer Wochenprogramm
deaktiviert.
Die Vorgabe der Raumtemperatur erfolgt manuell.
Taste MENÜ betätigen. Symbol TIMER blinkt.
Mit Tasten
oder Symbol HAND auswählen.
Symbol HAND blinkt. Taste ENTER betätigen.
Bei Bedarf mit Tasten
oder Raumtemperatur
einstellen.
9.5 Frostschutz
Vorgabe einer Frostschutztemperatur von 7° C.
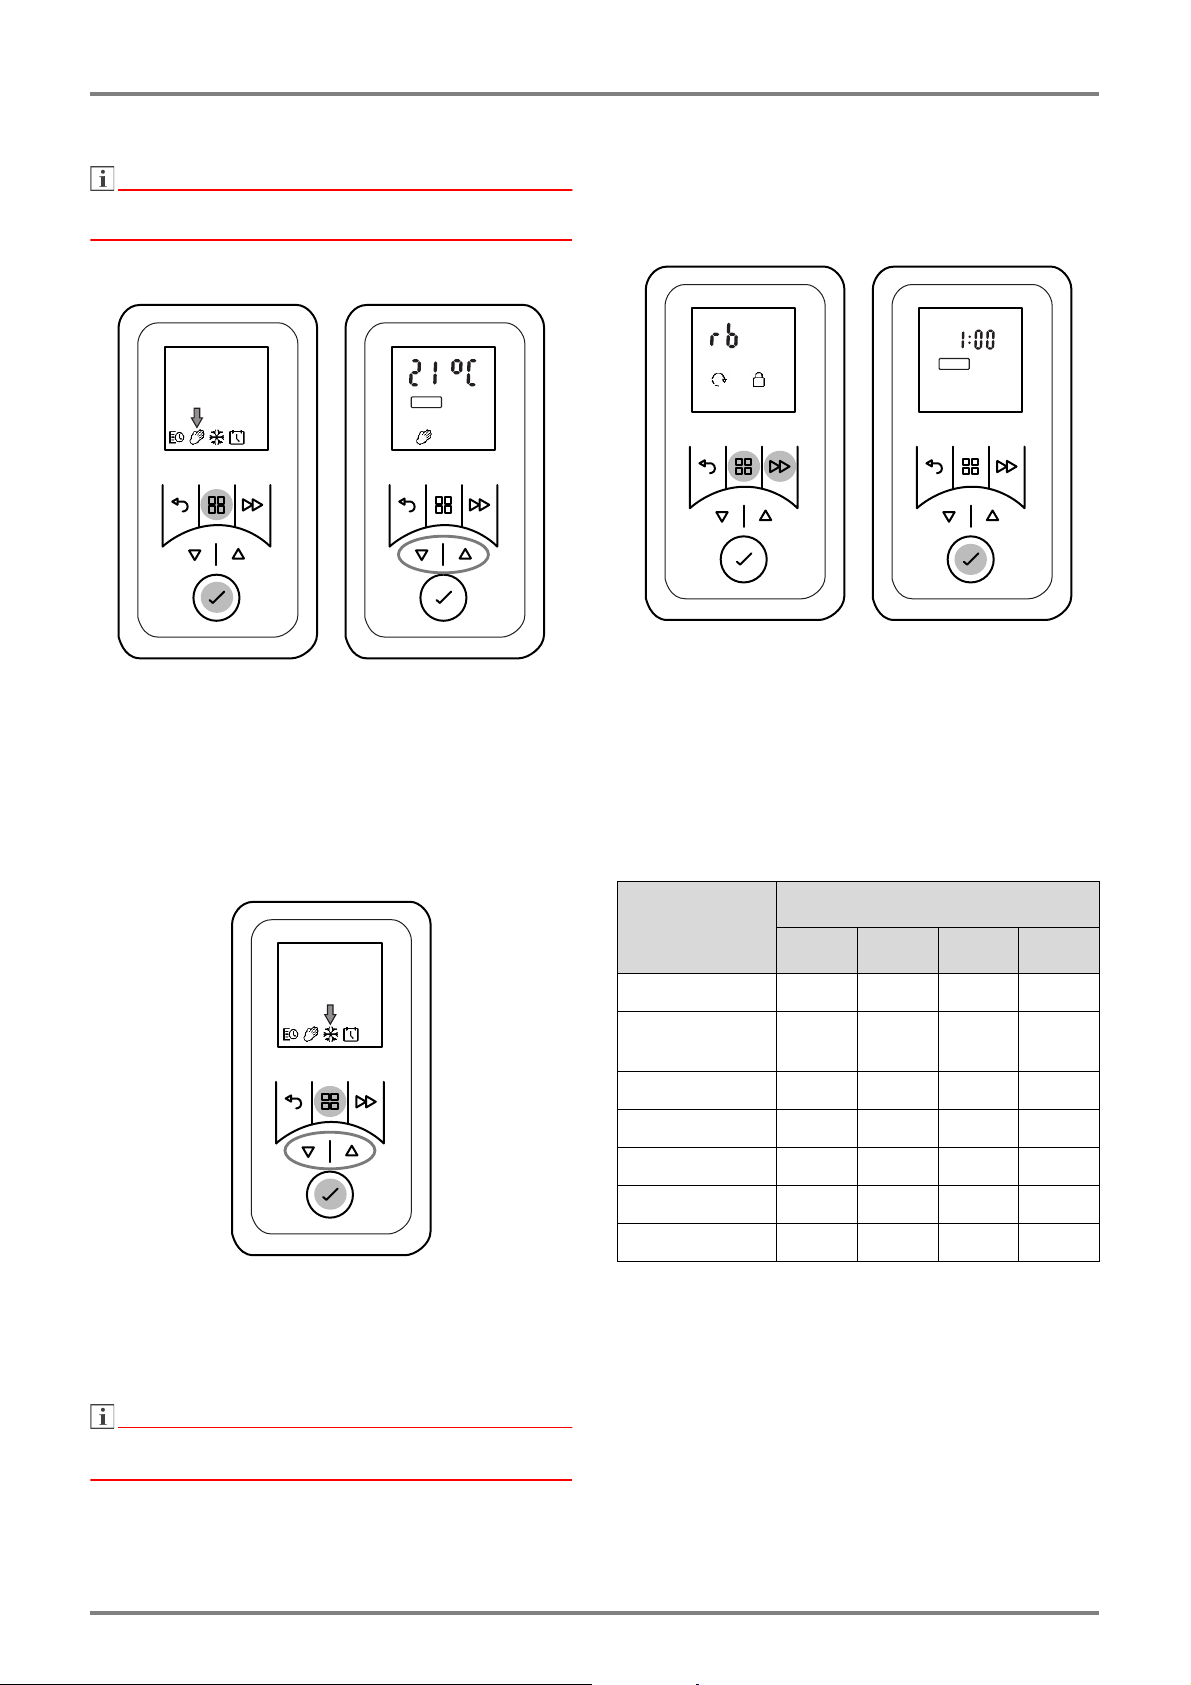
9.6 Rücklauf-Timer
Der Rücklauf-Timer ermöglicht, ein einmaliges, zeitlich
begrenztes Heizprogramm auszuführen.
Grundeinstellung
Taste MENÜ und Taste VORZUG gedrückt halten
bis Anzeige rb blinkt.
Taste ENTER betätigen. Anzeige ON/OFF blinkt.
Mit Tasten
Taste ENTER betätigen. Maximale Rücklaufzeit
blinkt.
Bei Bedarf mit Tasten
passen.
oder Anzeige ON auswählen.
oder
Rücklaufzeit an-
Taste MENÜ betätigen.Symbol TIMER blinkt.
Mit Tasten
oder Symbol FROST auswählen.
Symbol FROST blinkt. Taste ENTER betätigen.
Anzeige Symbol FROST und Temperatur 7° C.
Der voreingestellte Temperaturwert 7° C kann mit den
Tasten oder verändert werden.
Maximale
Rücklaufzeit
30 Min. 00:15 00:20 00:25 00:30
01:00 h
(werkseitig)
01:30 h 00:15 00:30 01:00 01:30
02:00 h 00:30 01:00 01:30 02:00
04:00 h 01:00 02:00 03:00 04:00
06:00 h 01:30 03:00 04:30 06:00
08:00 h 02:00 04:00 06:00 08:00
Taste ENTER betätigen. Raumtemperatur blinkt.
Bei Bedarf Raumtemperatur mit den Tasten
Taste VORZUG betätigen:
1 mal 2 mal 3 mal 4 mal
00:15 00:30 00:45 01:00
oder verändern. Mit Taste ENTER bestätigen.
DE-5 1907/D www.dimplex.de
Page 7
H 260E, H 260E eco Deutsch
HINWEIS
HINWEIS
HINWEIS
ON
ONOFF
Rücklauf-Timer Ein
Nicht möglich, wenn Betriebsart TIMER eingestellt ist.
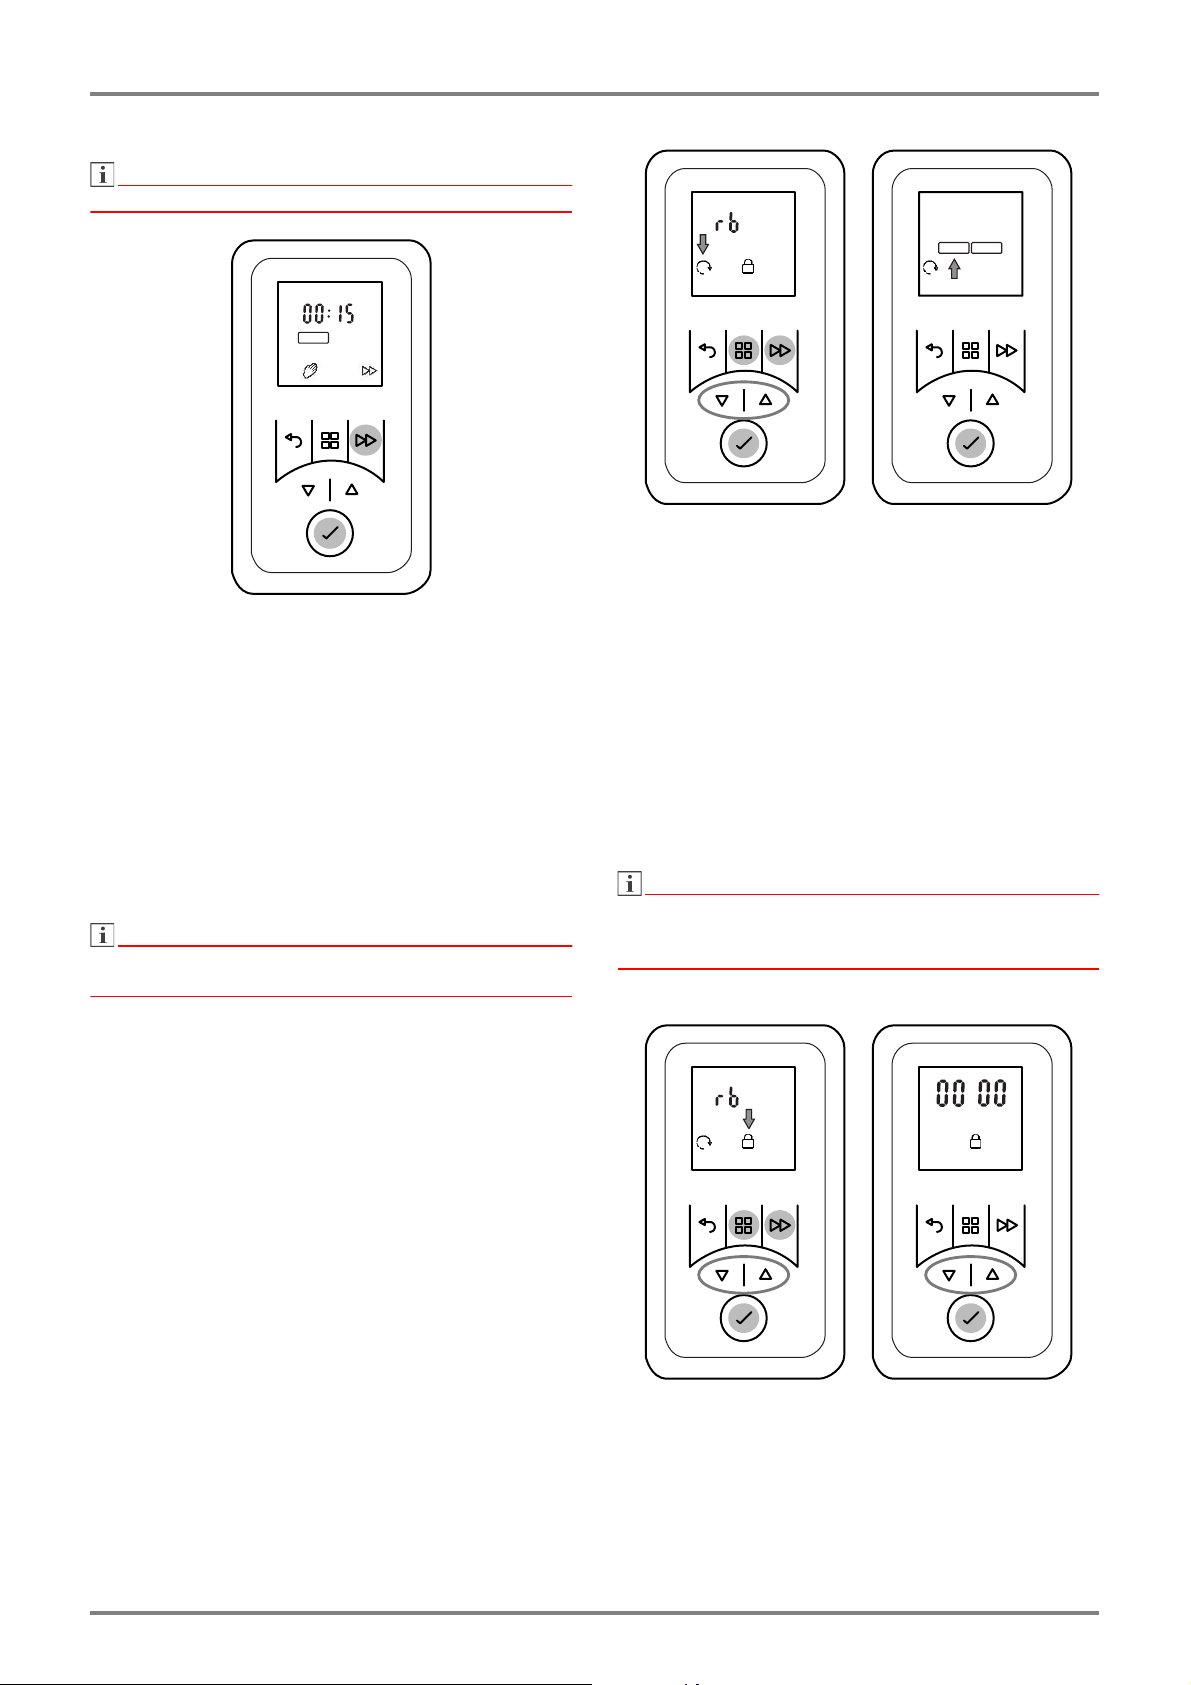
Taste MENÜ und Taste VORZUG gedrückt halten
bis Anzeige rb blinkt.
Taste VORZUG betätigen. Rücklaufzeit blinkt.
Durch mehrfaches Betätigen der Taste Vorzug
kann die Rücklaufzeit verändert werden.
Taste ENTER betätigen. Rücklauf-Timer = EIN.
Mit Tasten
START auswählen. Symbol blinkt.
Taste ENTER betätigen.
Mit Tasten
Funktion ein- oder auszuschalten.
oder Symbol ADAPTIVER
oder ON oder OFF wählen um die
Rücklauf-Timer Aus
Taste VORZUG mehrfach betätigen bis Anzeige
OFF blinkt.
Taste ENTER betätigen. Rücklauf-Timer = AUS.
9.7 Adaptiver Start
Diese Funktion wird nur ausgeführt, wenn Betriebsart
TIMER eingestellt ist.
Diese Funktion gewährleistet, dass die eingestellte
Raumtemperatur exakt zu Beginn der Einschaltzeit erreicht ist.
Beispiel:
Im Timermenü ist für 07:00 Uhr eine Soll-Raumtempe-
ratur von 22°C vorgegeben.Die aktuelle Raumtemperatur beträgt 17° C. Das Heizgerät schaltet entsprechend frühzeitig ein, damit die vorgegebene
Raumtemperatur von 22° C zum Zeitpunkt 07:00 Uhr
erreicht wird.
10. Optionen
10.1 Tasten sperren
Tastenfunktionen werden über einen frei wählbaren,
vierstelligen Nummerncode gesperrt.
Die Funktion des Rücklauf-Timers sowie das Wechseln zum nächsten Programmpunkt im Timer-Betrieb
ist auch bei aktiver Tastensperre möglich.
www.dimplex.de 1907/D DE-6
Page 8
Deutsch H 260E, H 260E eco
HINWEIS
HINWEIS
ONOFF
Entsperr-Code festlegen
Taste MENÜ und Taste VORZUG gedrückt halten
bis Anzeige rb blinkt.
Mit Tasten
oder
Symbol GESPERRT aus-
wählen. Symbol blinkt.
Taste ENTER betätigen. Nummer-Anzeige blinkt.
Mit Tasten
oder Nummer für Entsperr-Code
festlegen. Jede festgelegte Stelle mit Taste
ENTER bestätigen.
Sollte der festgelegte Sperr-Code nicht verfügbar sein,
kann die Sperre über die Eingabe der Nummer 4115
aufgehoben werden.
Tasten entsperren
Beliebige Taste betätigen. Vierstelliger Nummern-
code 0000 wird angezeigt.
Mit Tasten
oder Nummer für Entsperr-Code
eingeben. Jede festgelegte Stelle mit Taste
ENTER bestätigen.
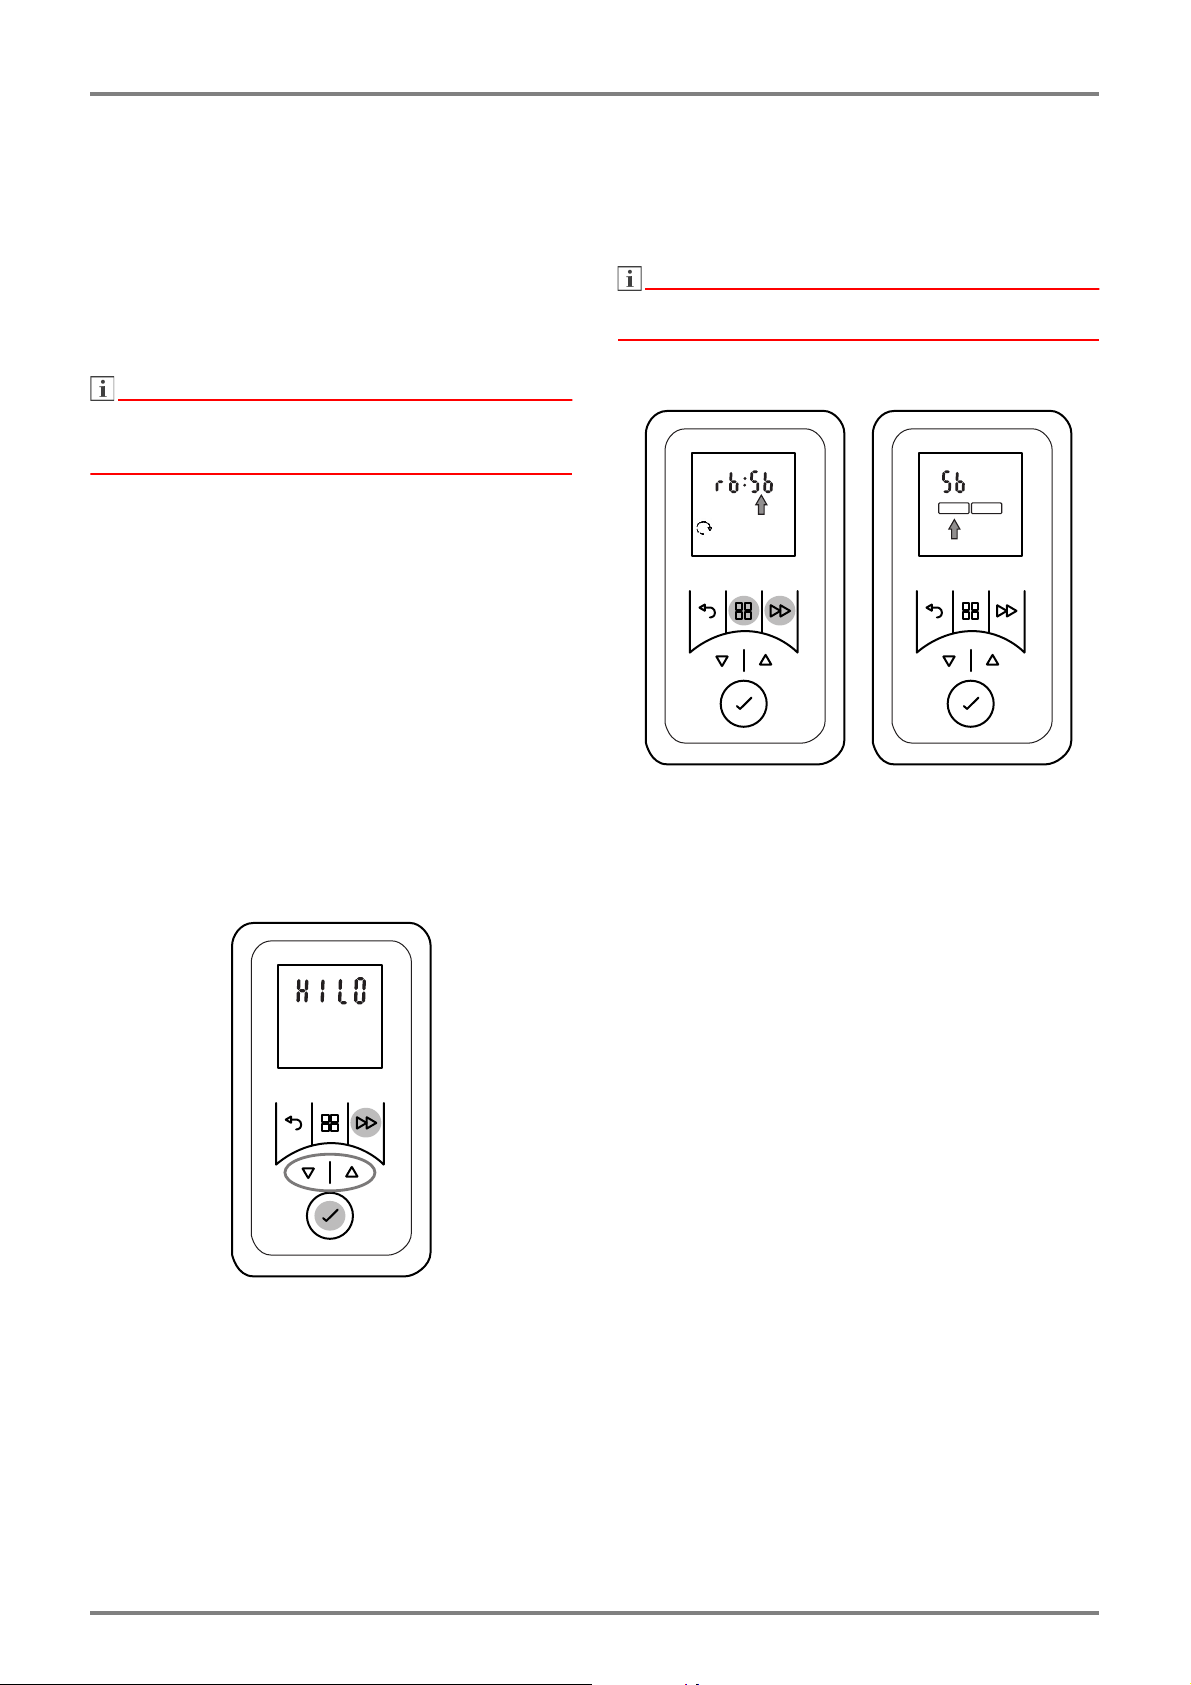
10.2 Wärmeleistung reduzieren, Kaltluftbetrieb
10.3 Mindest-Raumtemperatur
Mit dieser Funktion kann sichergestellt werden, dass
beispielsweise im Timer-Betrieb (Wochenprogramm)
auch während der OFF-Zeiten eine Mindest-Raumtemperatur vorgegeben wird.
Die Vorgabe gilt auch für die Funktion Rücklauftimer.
Frostschutzbetrieb hat Vorrang.
Modell H 260E
Die maximale Wärmeleistung von 2 kW kann auf 1 kW
reduziert werden. Alternativ kann das Gerät als Kaltluft-Ventilator betrieben werden.
Modell H 260E eco
Das Gerät kann alternativ als Kaltluft-Ventilator betrieben werden.
Taste MENÜ und Taste VORZUG gedrückt halten
bis Anzeige rb blinkt.
Taste
Taste ENTER betätigen. Das Symbol ON blinkt.
Taste ENTER betätigen. Die Mindest-Raumtempe-
betätigen. Das Anzeige Sb blinkt.
ratur (werkseitig 16° C) blinkt.
Mit Tasten
oder
die Mindest-Raumtempera-
tur einstellen und mit ENTER bestätigen.
Taste ZURÜCK betätigen um zur Standardanzeige
zurückzukehren.
DE-7 1907/D www.dimplex.de
Taste VORZUG gedrückt halten bis Anzeige HILO
erscheint.
Mit Tasten
oder
HI oder LO oder FAN aus-
wählen. Anzeige bedeutet:
HI = Normalbetrieb, volle Lüfterdrehzahl
LO = Lüfterdrehzahl reduziert, bei Modell H 260E
wird die Wärmeleistung auf 1 kW reduziert,
FAN = Kaltluft-Betrieb (ohne Wärmeabgabe).
Ausgewählte Einstellung mit ENTER bestätigen.
Page 9
H 260E, H 260E eco Deutsch
HINWEIS
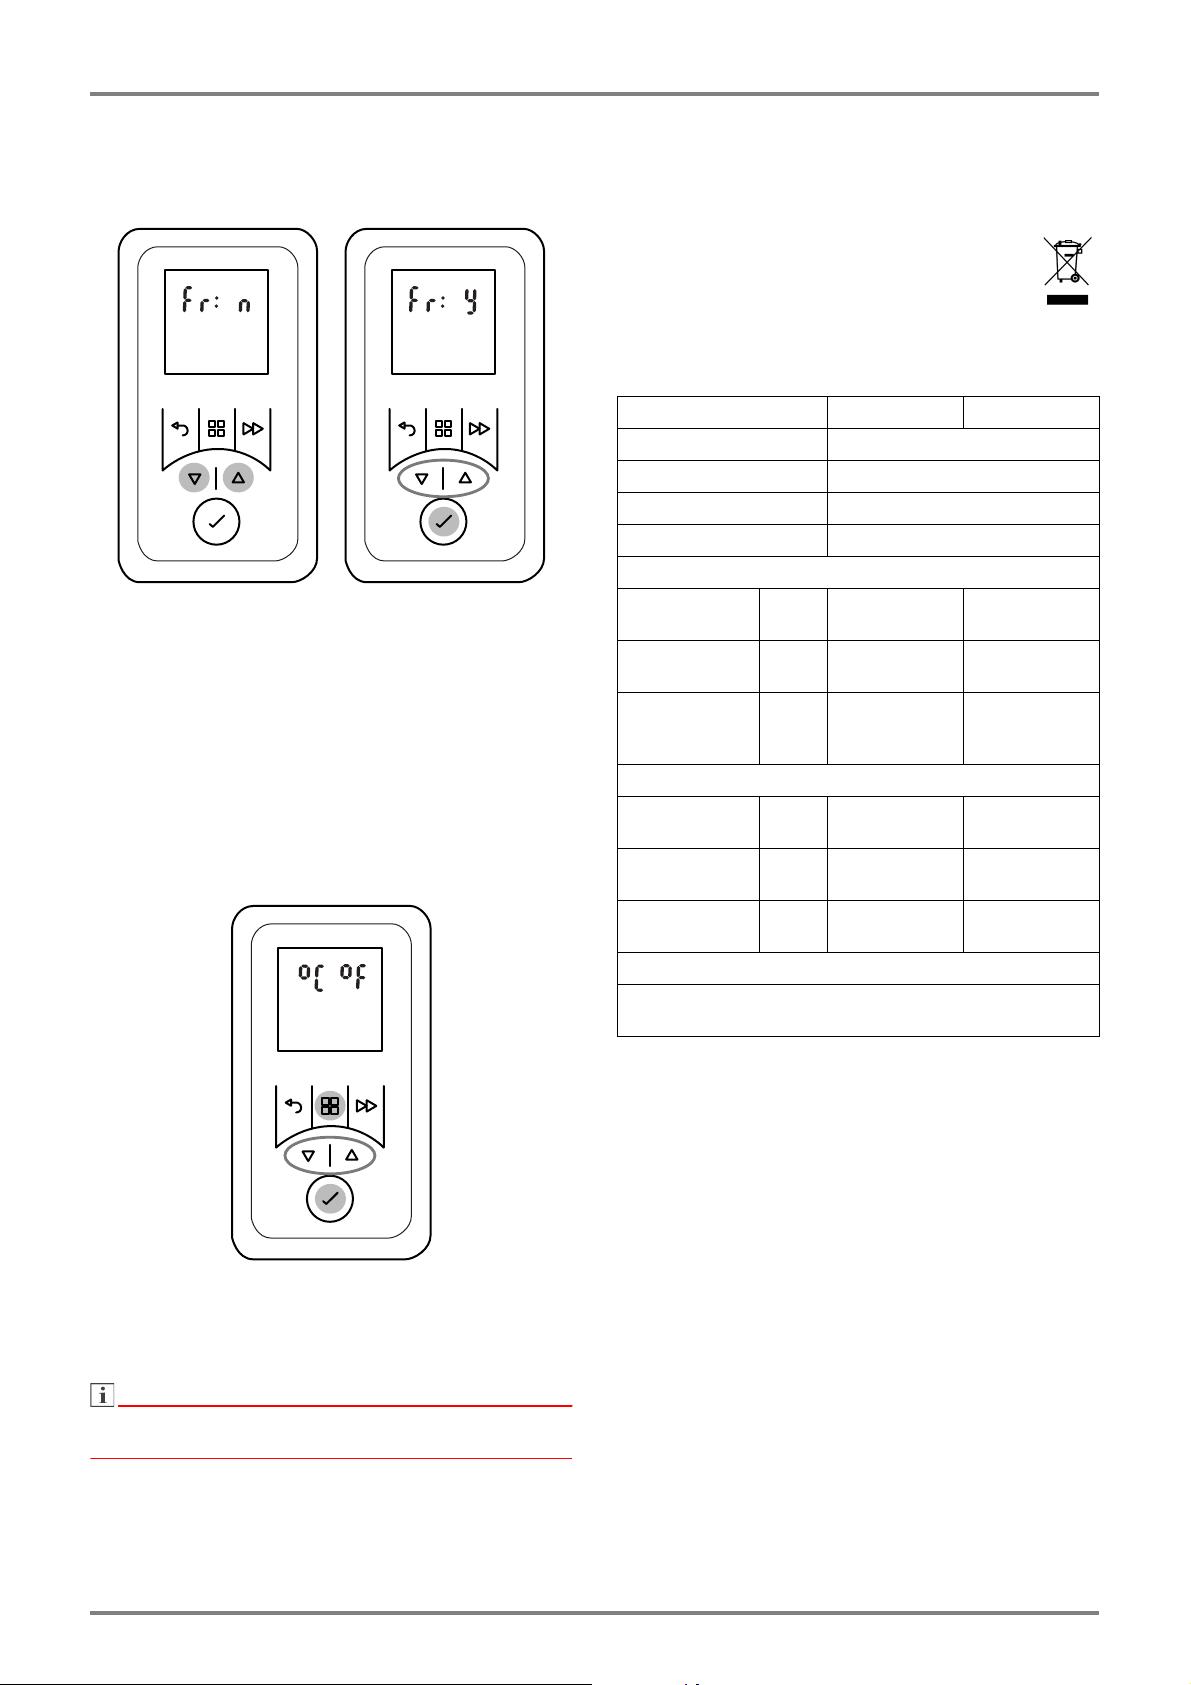
10.4 Rücksetzen auf Werkseinstellung
Setzt alle durch den Benutzer vorgenommenen Einstellungen auf die voreingestellten Werkseinstellungen
zurück.
Tasten
und gedrückt halten bis Anzeige Fr n
erscheint.
Mit Tasten
oder
Anzeige Y auswählen. Sym-
bol blinkt.
Taste ENTER betätigen. Alle Werte werden auf
Werkseinstellung zurückgesetzt. Anzeige Uhrzeit
erscheint.
Einstellungen Uhrzeit und Datum vornehmen.
10.5 Temperatur-Einheit
Anzeige wählbar zwischen Grad Celsius und Grad
Fahrenheit.
11. Garantie
Für dieses Produkt übernehmen wir 2 Jahre Garantie
gemäß unseren Garantiebedingungen.
12. Entsorgungshinweis
Das Gerät nicht im allgemeinen Hausmüll entsorgen, sondern einer örtlichen Entsorgungsstelle zuführen.
13. Technische Daten
Gerätetyp H 260E H 260E eco
Nennspannung 1/N/PE, 230 V~, 50 Hz
Schutzart IP24
Abmessungen (B x H x T) 300 x 405 x 120 mm
Gewicht 3,2 kg
Wärmeleistung
Nennwärmeleistung
Mindestwärmeleistung (Richtwert)
Maximale kontinuierliche Wärmeleistung
Eigenverbrauch
Bei Nennwärmeleistung
Bei Mindestwärmeleistung
Im Bereitschaftszustand
Regelorgan für Wärmeabgabe
Elektronischer Raumtemperaturregler mit Wochenprogramm,
adaptive Regelung des Heizbeginns und Betriebszeitbegrenzung
P
P
P
max, C
el
el
el
nom
min
max
min
SB
2,0 kW 1,0 kW
1,0 kW 1,0 kW
2,0 kW 1,0 kW
0,0 W 0,0 W
0,0 W 0,0 W
0,5 W 0,5 W
Glen Dimplex Deutschland GmbH Tel.: +49 9221 709 545
Am Goldenen Feld 18 Fax.: +49 9221 709 924545
D - 95326 Kulmbach Email: service@gdts.one
Taste MENÜ gedrückt halten bis Anzeige °C blinkt.
Mit Tasten
Mit Taste ENTER bestätigen.
oder °C oder °F auswählen.
In den meisten europäischen Ländern ist die Temperatureinheit ° C gebräuchlich.
www.dimplex.de 1907/D DE-8
Page 10
English H 260E, H 260E eco
NOTE
NOTE
CAUTION!
CAUTION!
CAUTION!
CAUTION!
CAUTION!
CAUTION!
CAUTION!
CAUTION!
CAUTION!
CAUTION!
NOTE
NOTE
1. Notes for the user
Install the device in such a manner that it can-
Dear customer,
Keep these instructions in a safe place and pass them
on to possible future owners.
not be touched by a person in the bathtub or
under the shower.
If the power cable is damaged, it must be re-
This device can be used by children aged 8
and over and by persons with limited physical,
sensory or mental aptitude or lack of experi-
ence and/or knowledge, providing they are
placed by the manufacturer or after-sales service representative or a person with compara-
ble qualifications for switching off danger
sources!
supervised or have been instructed in the safe
use of the device and understand the associ-
ated potential dangers. Children must not play
with the device. Cleaning and user maintenance may not be carried out by children with-
out supervision!
In order to avoid a hazard due to inadvertent
resetting of the thermal cutout, this appliance
must not be supplied through an external
switching device, such as a timer or con-
nected to a circuit that is regularly switched on
and off by the utility.
Children younger than 3 years of age must be
kept away unless they are supervised con-
stantly. Children between the ages of 3 and 8
may switch the device on and off if they are
supervised or have been instructed in the safe
use of the device and have understood the re-
sulting dangers, providing that the device is
Rooms can become overheated if left unat-
tended whilst being heated. Persons who are
not able to vacate the room if the temperature
becomes too high can thus be placed in dan-
ger.
positioned or installed in its normal place of
use!
Use device for room heating within enclosed rooms only.
Children between the ages of 3 and 8 may not
switch on the device, clean the device or carry
out maintenance!
The device carries the symbol
shown on the right, which indicates
that the heating device must under
no circumstances be covered with
any objects.
Some parts of the device can get very hot and
cause burns. Particular caution must be taken
with children or vulnerable people!
Do not operate the heating device in rooms
where highly inflammable substances are
used (e.g. solvents).
EN-1 1907/D www.dimplex.de/en
Page 11
H 260E, H 260E eco English
CAUTION!
NOTE
NOTE
CAUTION!
NOTE
NOTE
250300
1000
405
280
190
308
B
A
2. Assembly, installation, minimum clearance
Do not install the device directly below a wall
socket.
3. Electrical connection
The voltage specified on the type plate must match the
line voltage.
The cable must not be in contact with the casing.
The minimum clearances must be observed.
In addition, a clearance of 750 mm is to be maintained
in front of the unit.
The heating device must be aligned horizontally and
installed on a vertical wall (see illustration).
All dimensions in mm
During assembly, the safety area must be complied
with according to the current installation regulations.
The socket or supply connection socket must be
accessible after installation.
Make sure that the inflow and outflow of air at the
device are unimpeded
Installation on wooden walls is permissible.
Wall mounting
.
It is recommended that a separate circuit be provided
for the power supply.
Insert the plug in the socket. The plug must always be
accessible in case of emergencies.
The unit must be connected only to an earthed power
outlet.
4. Overload protector
For your safety, the heating device is equipped with an
overload protector. If the air circulation is interrupted
(e.g. due to the air grille being covered or closed), the
device switches off automatically. Err35 is shown on
the display.
In this case, the power supply to the heating device
should be disconnected for a few minutes (disconnect
the plug, switch off the fuse) to allow the device to cool
down sufficiently.
Before recommissioning the device, remove the
reasons for the overload protector being triggered.
The original wall bracket supplied on the rear
of the device must be used!
Look out for electric cables or pipework in the wall
when drilling.
Unlock the wall bracket (A) and remove from the
device.
Drill mounting holes for the wall bracket and insert
the dowels.
Align the wall bracket and firmly screw it onto the
wall.
Hang the device on the wall mount.
Pivot down the heater and push into place (B).
www.dimplex.de/en 1907/D EN-2
5. Cleaning
The device must be disconnected from the mains and
allowed to cool down before cleaning and
maintenance. Clean the outside of the device using a
soft, damp cloth. Do not use scouring powder or
furniture polish as this may damage the surface.
Dust which gathers inside the device can be removed
from the outside using a vacuum cleaner.
Page 12
English H 260E, H 260E eco
HINWEIS
Adaptive startup
Blocked
Audio
Connection
Timer
Manual
Frost protection
Time/date
Advance
Weekday
Time
On/Off
Back
Menu
Advance
Setting keys
Enter key
6. Control description
6.1 Control unit
The heating device is equipped with a configurable
electronic control, consisting of a display and six touchscreen keys. The control unit is located on the top on
the right. All settings can be selected using the six keys
on the user interface.
The set functions and values are shown on the display.
6.3 Display
The display lights up when a key is activated. If no
changes are made for a prolonged period, the display
switches off. If no key is pressed, the display returns to
the main menu after 30 seconds.
The 4-digit device PIN is displayed by pressing the
ENTER key.
7. Operating modes
7.1 Timer week program
Up to four heating programs (On/Off) can be set for
each weekday. A room temperature can be specified
for each heating program.
TIMER symbol is shown in the display.
7.2 Manual operation
Manual specification of the room temperature.
MANUAL symbol is shown in the display.
7.3 Frost protection
Specified frost protection temperature of 7° C.
FROST symbol is shown in the display.
6.2 Key functions
MAIN MENU
Setting date and time
Timer week program
Manual operation
Frost protection mode
BACK
Return to the previous program item
The room temperature can be changed with the or
keys in all operating modes.
In the timer program, this change is only carried out for
the current time program.
8. Commissioning
8.1 Setting the date and time
The control includes a real-time clock with calendar
function.
Keys
Used to navigate through the menu and to change the
setting values.
ENTER
Saving settings.
ADVANCE
Special functions such as switching to the next programme item in timer mode or activating the
run-back timer.
EN-3 1907/D www.dimplex.de/en
The date and time are set with the following steps:
Press the MENU key.
Press
or to select the DATE & TIME symbol.
The symbol flashes.
Press the ENTER key. The hours display flashes.
Use
or to set the hours and minutes. Confirm
every position specified with the ENTER key.
Page 13
H 260E, H 260E eco English
NOTE
NOTE
OFF
OFFON
The time is saved and the display dAY flashes
briefly.
Use
Confirm every position specified with the ENTER
or to set the day.
key. 1- 12 display flashes briefly.
Use
Confirm every position specified with the ENTER
or to set the month.
key. YEAr display flashes briefly.
Use
Confirm every position specified with the ENTER
or to set the year.
key. dSt (summer time) ON display flashes.
Recommendation: Confirm the ON display with the
ENTER key. This ensures the system will automatically change to summer/winter time.
9. Operation
9.1 Standby mode (waiting position)
Hold down the BACK key until the display Eolt ap-
pears. The heating device is in standby mode.
To return to the previous operating status, briefly
press the BACK key.
9.2 Switching heating operation on/off
Switching heating operation on
Press the MAIN MENU key. The TIMER symbol
flashes.
Press or to select the required operating mode.
The symbol flashes.
Confirm with the ENTER key.
Switching heating operation off
Press the MAIN MENU key. The TIMER symbol
flashes.
Press or to select the OFF symbol. The OFF
symbol flashes.
Confirm with the ENTER key.
Heating operation Off does not mean that the device is
completely disconnected from the power supply. To
disconnect the device from the electricity network,
please pull out the plug.
9.3 Timer week program
The timer is pre-programmed at the factory. Four time
blocks, which can be adapted individually for each
weekday, are available per day.
To change these profiles, carry out the following steps:
Press the MENU key. The TIMER symbol flashes.
Press the ENTER key. The ON symbol flashes.
Press
Press the ENTER key. The weekday flashes.
Use
Press the ENTER key. P1 (Program 1) flashes.
Press the ENTER key. Switch-on time flashes.
Use
Use
Use
The programs P2, P3 and P4 can be set in the
To copy the newly set programs P1 - P4 to other
Press
Hold down the ENTER key. PStE display flashes
Then press the MAIN MENU key.
or
to select the EdIt display. EdIt dis-
play flashes.
or to select the day.
1 = Monday 5 = Friday
2 = Tuesday 6 = Saturday
3 = Wednesday 7 = Sunday
4 = Thursday
or to set the hours and minutes. Confirm
every position specified with the ENTER key.
Room temperature flashes.
or to set the temperature. Press the
ENTER key. Switch-off time flashes.
or to set the hours and minutes. Confirm
every position specified with the ENTER key. P2
(Program 2) flashes.
same way.
days, hold down the ADVANCE key. COPY display
flashes briefly.
The day values selected are copied.
or
to select a new weekday. The week-
day flashes.
briefly. The day values copied are assigned to the
new weekday.
www.dimplex.de/en 1907/D EN-4
Page 14
English H 260E, H 260E eco
NOTE
NOTE
NOTE
NOTE
ON
ON
9.4 Manual operation
The timer week program is deactivated in manual
operation.
The room temperature specification takes place manually.
Press the MENU key. The TIMER symbol flashes.
Press
Use
or to select the MANUAL symbol. The
MANUAL symbol flashes. Press the ENTER key.
or to set the room temperature.
9.6 Run-back timer
The run-back timer can be used to activate a one-off,
time-limited heating program.
Basic settings
Hold down the MENU and ADVANCE keys until the
rb display flashes.
Press the ENTER key. ON/OFF display flashes.
Press
Use
or to select the ON display. Press the
ENTER key. Maximal run-back time flashes.
or to set the maximal run-back time.
9.5 Frost protection
Specified frost protection temperature of 7° C.
Press the MENU key. The TIMER symbol flashes.
Press
or to select the FROST symbol. The
FROST symbol flashes. Press the ENTER key.
FROST symbol and temperature 7° C are displayed.
Press the ADVANCE key:
Maximal run-
back time
30 minutes 00:15 00:20 00:25 00:30
01:00 h
(factory)
01:30 h 00:15 00:30 01:00 01:30
02:00 h 00:30 01:00 01:30 02:00
04:00 h 01:00 02:00 03:00 04:00
06:00 h 01:30 03:00 04:30 06:00
08:00 h 02:00 04:00 06:00 08:00
Press the ENTER key. Room temperature flashes.
Where necessary, change the room temperature
1 time
00:15 00:30 00:45 01:00
2
times3 times4 times
with or . Confirm with the ENTER key.
The pre-set temperature value of 7° C can be changed
with or .
EN-5 1907/D www.dimplex.de/en
Page 15

H 260E, H 260E eco English
NOTE
NOTE
NOTE
NOTE
NOTE
NOTE
ON
ONOFF
Run-back timer On
Not possible if operating mode TIMER is selected.
Hold down the MENU and ADVANCE keys until the
rb display flashes.
Press
or to select the ADAPTIVE START
symbol. The symbol flashes.
Press the ADVANCE key. Run-back time flashes.
The run-back time can be changed by pressing the
ADVANCE key several times.
Press the ENTER key. Run-back timer = ON.
Run-back timer Off
Press the ADVANCE key several times until the
OFF display flashes.
Press the ENTER key. Run-back timer = OFF.
Press the ENTER key.
Press
or to select ON or OFF to switch the
function on or off.
10. Options
10.1 Blocking keys
Key functions are blocked using a freely selectable
four-digit numerical code.
9.7 Adaptive start-up
This function is executed only when the operating
mode TIMER is selected.
This function guarantees that the set room temperature
is achieved exactly at the start of the switch-on time.
Example:
In the timer menu, a set room temperature of 22° C is
specified for 07:00. The current room temperature is
17° C. The heating device switches on early so that the
specified room temperature of 22° C is reached by
07:00.
The function of the run-back timer and switching to the
next programme item in timer mode is also possible
with active key lock.
www.dimplex.de/en 1907/D EN-6
Page 16

English H 260E, H 260E eco
NOTE
NOTE
NOTE
NOTE
ONOFF
Specifying unlock code
Hold down the MENU and ADVANCE keys until the
rb display flashes.
Press
or to select the BLOCKED symbol.
The symbol flashes.
Press the ENTER key. The number display flashes.
Press
or to specify the number for the unlock
code. Confirm every position specified with the
ENTER key.
If the specified lock code is not available, the block can
be cleared by entering the number 4115.
Unlocking keys
Press any button. The four-digit numerical code
0000 is displayed.
Press
or to enter the number for the unlock
code. Confirm every position specified with the
ENTER key.
10.2 Reducing heat output, cold air mode
Model H 260E
The maximal heat output of 2 kW can be reduced to 1
kW. Alternatively, the device can be operated as a cold
air fan.
Model H 260E eco
The device can be alternatively operated as a cold air
fan.
10.3 Minimum room temperature
This function can be used to ensure that a minimum
room temperature is specified even during OFF times,
for example in timer mode (week program).
The specification also applies to the runback timer
function. Frost protection mode has priority.
Hold down the MENU and ADVANCE keys until the
rb display flashes.
Press
Press the ENTER key. The ON symbol flashes.
Press the ENTER key. The minimum room temper-
Use
Press the BACK key to return to the standard dis-
. The Sb display flashes.
ature (factory setting 16° C) flashes.
or to set the minimum room temperature
and confirm with ENTER.
play.
Hold down the ADVANCE key until the HILO dis-
play appears.
Press
or
to select HI or LO or FAN. The dis-
play means:
HI = normal operation, full fan speed.
LO = fan speed reduction, heat reduction to 1 kW
on model H 260E.
FAN = cold air mode (no heat output).
Confirm selected setting with ENTER.
EN-7 1907/D www.dimplex.de/en
Page 17

H 260E, H 260E eco English
NOTE
NOTE
10.4 Reset to factory settings
Resets all settings made by the user to the pre-set factory settings.
Hold down
and
until the Fr n display ap-
pears.
Press
or to select the Y display. The symbol
flashes.
Press the ENTER key. All values are reset to the
factory settings. Time display appears.
Set the time and date.
10.5 Temperature unit
Display can be set to degrees Celsius and degrees
Fahrenheit.
12. Note on disposal
Do not dispose of the unit with general
household waste. The device must be taken to
a local waste disposal plant.
13. Technical data
Model reference H 260E H 260E eco
Nominal voltage 1/N/PE, 230 V~, 50 Hz
Degree of protection IP24
Dimensions (W x H x D) 300 x 405 x 120 mm
Weight 3.2 kg
Heat output
Nominal heat output
Minimum heat
output (indicative)
Maximum continuous heat output
Auxiliary electricity consumption
At nominal heat
output
At minimum heat
output
In standby mode el
Type of control
Electronic room temperature controller with week program,
adaptive control of the heating start and operating time limit
P
P
P
max, C
el
el
nom
min
max
min
SB
2.0 kW 1.0 kW
1.0 kW 1.0 kW
2.0 kW 1.0 kW
0.0 W 0.0 W
0.0 W 0.0 W
0.5 W 0.5 W
Hold down the MENU key until ° C display flashes.
Press
Confirm with the ENTER key.
or to select ° C or ° F.
The temperature unit ° C is customary in most
European countries.
11. Warranty
This product is supplied with a two-year warranty
according to our terms of guarantee.
Glen Dimplex Deutschland GmbH Tel.: +49 9221 709 545
Am Goldenen Feld 18 Fax.: +49 9221 709 924545
D - 95326 Kulmbach E-mail: service@gdts.one
www.dimplex.de/en 1907/D EN-8
Page 18

Français H 260E, H 260E eco
REMARQUE
ATTENTION !
ATTENTION !
ATTENTION !
ATTENTION !
ATTENTION !
ATTENTION !
ATTENTION !
ATTENTION !
ATTENTION !
ATTENTION !
REMARQUE
1. Remarques à l’attention de l’utilisateur
Ne jamais faire fonctionner l’appareil de
Cher client,
Conservez précieusement ces instructions et remettez-les le cas échéant au prochain propriétaire de l'appareil.
chauffage dans des pièces dans lesquelles
sont utilisées des substances inflammables
(p. ex. solvants).
Installer l'appareil de manière à ce qu'il ne
Les enfants âgés de plus de 8 ans ainsi que
les personnes dont les facultés physiques,
sensorielles et mentales sont réduites ou qui
puisse pas être accessible à toute personne
se trouvant dans la baignoire ou sous la
douche.
ne disposent pas de l’expérience ou de
connaissances suffisantes sont autorisées à
utiliser l’appareil sous la surveillance d’une
personne expérimentée et si elles ont été in-
formées des règles de sécurité à l’utilisation
de l’appareil et ont compris les risques
Si le câble secteur est endommagé, il doit être
remplacé par le fabricant, son SAV ou toute
personne qualifiée comparable, afin de préve-
nir tout risque de danger!
encourus ! Ne laissez pas les enfants jouer
avec l'appareil. Ne laissez pas les enfants
procéder sans surveillance au nettoyage et à
l’entretien par l’utilisateur de l’appareil !
Pour éviter tout risque provoqué par une réini-
tialisation involontaire du limiteur de sur-
charge, l'appareil ne doit pas être alimenté
par un dispositif de commutation externe
Maintenir les enfants de moins de 3 ans éloi-
gnés de l’appareil ou rester très attentif à
leurs mouvements. Les enfants âgés de 3 à
comme une minuterie p.ex. ou raccordé à un
circuit électrique régulièrement activé et dé-
sactivé !
8 ans sont autorisés à allumer et à éteindre
l’appareil sous la surveillance d’un adulte ou
s’ils ont été informés des règles de sécurité
liées à l’utilisation de l’appareil et ont compris
les risques encourus – à condition que l’appareil soit placé ou installé dans un lieu d’utilisa-
tion réputé normal !
Selon la taille de la chambre, la demande de
chaleur et le réglage du thermostat, les
chambres peuvent être chauffés par un
chauffage silencieux. Cela peut être dange-
reux pour les personnes qui ne sont pas en
mesure de quitter la salle en cas de tempéra-
ture plus!
Les enfants âgés de 3 à 8 ans ne sont pas au-
torisés à allumer l’appareil, à le nettoyer ni à
en effectuer la maintenance.
L'appareil est destiné uniquement au réchauffement de
l'air ambiant de pièces fermées.
Le symbole ci-contre est apposé
sur l’appareil ; il signifie que l’appa-
reil de chauffage ne doit pas être
recouvert !
Certaines pièces de l’appareil peuvent deve-
nir très chaudes et causer des brûlures. Des
précautions particulières doivent être prises
en présence d’enfants ou de personnes vul
nérables.
FR-1 1907/D www.dimplex.de/fr
-
Page 19

H 260E, H 260E eco Français
ATTENTION !
REMARQUE
REMARQUE
REMARQUE
REMARQUE
250300
1000
405
280
190
308
B
A
2. Montage, installation, distances minimales
Ne pas installer l’appareil sous une prise
murale !
Respecter les distances minimales prescrites.
Respecter en outre une distance de 750 mm minimum
par rapport à la face avant de l'appareil.
L’appareil de chauffage doit être installé à l’horizontale
sur un mur vertical (comme représenté sur l’image).
Toutes les dimensions sont exprimées en mm.
Lors du montage, il convient de respecter scrupuleusement les prescriptions d’installation en vigueur concernant la zone de protection.
La prise de courant ou de raccordement secteur doit
être accessible après le montage.
Veiller à ce que l’air puisse entrer et sortir librement de
l’appareil de chauffage
Il est permis de monter l'appareil sur une paroi en bois.
Montage mural
Utiliser impérativement la fixation murale d’origine qui
se trouve au dos de l’appareil !
Veiller à ne pas percer les câbles électriques ni les
tuyauteries qui se trouvent dans le mur.
Appuyez sur la languette de la partie inférieure du
support mural (A) pour dégager ce dernier de l'appareil.
Dans le mur, percez des trous pour fixer le support
et insérez les chevilles.
Positionnez le support mural et vissez-le ferme-
ment au mur.
Accrochez l'appareil au support mural.
Faites pivoter l'appareil vers le bas et enclenchez-
le (B).
3. Branchements électriques
La tension indiquée sur la plaque signalétique doit cor-
respondre à la tension du réseau.
Le câble ne doit pas être en contact avec la jaquette.
Pour l'alimentation électrique de l'appareil, il est
recommandé de mettre en place un circuit électrique
dédié.
Introduire la fiche dans la prise de courant. La fiche doit
toujours être accessible en cas de danger.
L'appareil doit être raccordé uniquement à une prise à
contacts de protection.
4. Limiteur de surcharge
.
L’appareil de chauffage est équipé d’un limiteur de sur-
charge pour votre sécurité. Si la circulation de l'air est
gênée (p. ex. par des rideaux ou un encombrement de
la grille d'aération), l’appareil se met automatiquement
à l’arrêt. L’indication Err35 apparaît sur l‘écran.
Dans ce cas, il convient de couper pendant quelques
minutes l’alimentation électrique de l’appareil de
chauffage (débrancher le connecteur, déconnecter le
fusible) afin que l’appareil puisse refroidir
suffisamment.
Avant la remise en marche de l’appareil, éliminer les
causes du déclenchement du limiteur de surcharge.
5. Nettoyage
Avant de procéder au nettoyage, mettre l'appareil hors
tension et le laisser refroidir. La surface extérieure de
l’appareil peut être nettoyée avec un linge doux et
humide. Pour le nettoyage, ne pas utiliser de poudre à
récurer ni d’encaustique qui pourraient endommager
les surfaces. Les dépôts de poussière dans l’appareil
peuvent être éliminés de l’extérieur à l’aide d’un
aspirateur.
www.dimplex.de/fr 1907/D FR-2
Page 20

Français H 260E, H 260E eco
REMARQUE
Démarrage adaptatif
Bloqué
Audio
Connexion
Minuterie
Manuel
Protection antigel
Heure/date
Avance
Jour de la semaine
Heure
Marche/Arrêt
Retour
Menu
Avance
Touches de réglage
Touche Enter
6. Description du régulateur
6.1 Unité de commande
L’appareil de chauffage est équipé d’un régulateur
électronique réglable, qui se compose d’un écran et de
six touches tactiles. L’unité de commande se trouve
sur la face supérieure, à droite. Tous les réglages
peuvent être réalisés à l'aide des six touches de l’interface de commande.
Les fonctions et valeurs réglées sont affichées à
l’écran.
tion du
minuteur décompteur.
6.3 Écran
L’écran s’allume en cas d’actionnement d’une touche.
Si aucune modification n’est effectuée pendant un cer-
tain temps, l’affichage s’éteint. Si aucune touche n’est
actionnée, l’affichage bascule à nouveau sur le menu
principal au bout de 30 secondes.
La touche ENTER permet d’afficher le numéro PIN à
4 chiffres de l’appareil.
7. Modes de fonctionnement
7.1 Programmation hebdomadaire de la
minuterie
Il est possible de régler jusqu’à quatre programmes de
chauffage maximum (Activé/Désactivé) par jour de la
semaine. Une température ambiante peut être attribuée à chaque programme de chauffage.
Le symbole MINUTERIE s’affiche à l’écran.
7.2 Mode manuel
Réglage manuel de la température ambiante.
Le symbole MANUEL s’affiche à l’écran.
6.2 Fonctions des touches
MENU PRINCIPAL
Réglage de la date et de l’heure
Programmation hebdomadaire de la minuterie
Mode manuel
Mode protection antigel
RETOUR
Retour au point de programmation précédent
7.3 Protection antigel
Réglage d’une température antigel de 7 °C.
Le symbole GEL s’affiche à l’écran.
La température ambiante peut être modifiée à l’aide
des touches ou
pour tous les modes de fonction-
nement.
Dans le cas du programme de minuterie, cette modification est uniquement appliquée au programme horaire actuel.
8. Mise en service
8.1 Réglage de l’heure et de la date
La commande comprend une horloge en temps réel
avec fonction calendrier.
Touches
Elles servent à naviguer dans le menu et à modifier les
valeurs de réglages.
ENTER
Enregistrement des réglages.
AVANCE
Fonctions spéciales comme le passage au point de
programmation suivant en mode minuterie ou l'activa-
FR-3 1907/D www.dimplex.de/fr
Page 21

H 260E, H 260E eco Français
REMARQUE
OFF
OFFON
La date et l’heure se règlent en réalisant les étapes
suivantes :
Appuyer sur la touche MENU.
Sélectionner le symbole DATE & HEURE à l’aide
des touches ou . Le symbole clignote.
Appuyer sur la touche ENTER. L’affichage des
heures clignote.
Régler les heures et les minutes à l’aide des
touches ou . Confirmer chaque réglage avec
la touche ENTER.
L’heure est enregistrée et l’affichage dAY clignote
un court instant.
Régler le jour à l’aide des touches
Confirmer chaque réglage avec la touche ENTER.
ou .
L’affichage 1- 12 clignote un court instant.
Régler le mois à l’aide des touches
Confirmer chaque réglage avec la touche ENTER.
ou .
L’affichage YEAr clignote un court instant.
Régler l’année à l’aide des touches
Confirmer chaque réglage avec la touche ENTER.
ou .
L’affichage dSt (heure d’été) ON clignote.
Recommandation : confirmer l'affichage ON avec
la touche ENTER. Ceci permet un passage automatique à l’heure d’été/hiver.
Éteindre le mode chauffage
Appuyer sur la touche MENU PRINCIPAL. Le symbole MINUTERIE clignote.
Sélectionner le symbole OFF à l’aide des touches
ou . Le symbole OFF clignote.
Confirmer avec la touche ENTER.
La désactivation du mode chauffage ne signifie pas
que l’appareil est entièrement coupé de l’alimentation
électrique. Pour couper l’appareil du secteur, veuillez
le débrancher.
9.3 Programmation hebdomadaire de la
minuterie
La minuterie est préprogrammée en usine. Quatre
plages horaires sont disponibles par jour. Elles
peuvent être adaptées en fonction des besoins individuels pour chaque jour de la semaine.
9. Utilisation
9.1 Mode veille (état d’attente)
Maintenir enfoncée la touche RETOUR jusqu’à ce
que l’affichage Eolt apparaisse. L’appareil de
chauffage est en mode veille.
Pour revenir à l’état de fonctionnement précédent,
appuyer brièvement sur la touche RETOUR.
9.2 Allumer/éteindre le mode chauffage
Allumer le mode chauffage
Appuyer sur la touche MENU PRINCIPAL. Le symbole MINUTERIE clignote.
Sélectionner le mode de fonctionnement souhaité à
l’aide des touches ou . Le symbole clignote.
Confirmer avec la touche ENTER.
Ces profils peuvent être modifiés en réalisant les
étapes suivantes :
Appuyer sur la touche MENU. Le symbole MINU-
TERIE clignote.
Appuyer sur la touche ENTER. Le symbole ON cli-
gnote.
Sélectionner l'affichage EdIt à l’aide des touches
ou . L’affichage EdIt clignote.
Appuyer sur la touche ENTER. Le jour de la se-
maine clignote.
Sélectionner le jour à l’aide des touches
ou .
1 = Lundi 5 = Vendredi
2 = Mardi 6 = Samedi
3 = Mercredi 7 = Dimanche
4 = Jeudi
Appuyer sur la touche ENTER. P1 (programme 1)
clignote.
Appuyer sur la touche ENTER. L’heure de mise en
marche clignote.
www.dimplex.de/fr 1907/D FR-4
Page 22

Français H 260E, H 260E eco
REMARQUE
REMARQUE
ON
Régler les heures et les minutes à l’aide des
touches ou . Confirmer chaque réglage avec
la touche ENTER. La température ambiante clignote.
Régler la température à l’aide des touches
. Appuyer sur la touche ENTER. L’heure de mise
ou
à l’arrêt clignote.
Régler les heures et les minutes à l’aide des
touches ou . Confirmer chaque réglage avec
la touche ENTER. P2 (programme 2) clignote.
Les programmes P2, P3 et P4 peuvent être réglés
de la même manière.
Pour copier les programmes P1 à P4 réglés et les
appliquer à d’autres jours, maintenir enfoncée la
touche AVANCE. L’affichage COPY clignote un
court instant.
Les valeurs de jour définies sont copiées.
Sélectionner un nouveau jour de la semaine à
l’aide des touches ou . Le jour de la semaine
clignote.
Maintenir enfoncée la touche ENTER. L’affichage
PStE clignote un court instant. Les valeurs de jour
copiées sont attribuées au nouveau jour de la semaine.
Appuyer ensuite sur la touche MENU PRINCIPAL.
9.5 Protection antigel
Réglage d’une température antigel de 7 °C.
Appuyer sur la touche MENU. Le symbole MINU-
TERIE clignote.
Sélectionner le symbole GEL à l’aide des touches
ou . Le symbole GEL clignote. Appuyer sur la
touche ENTER.
Affichage du symbole GEL et de la température de
7 °C.
9.4 Mode manuel
Dans le mode manuel, la programmation hebdomadaire de la minuterie est désactivée.
Le réglage de la température ambiante s’effectue manuellement.
Pour modifier la valeur de température de 7 °C prédéfinie, utiliser les touches ou .
Appuyer sur la touche MENU. Le symbole MINU-
TERIE clignote.
Sélectionner le symbole MANUEL à l’aide des
touches ou . Le symbole MANUEL clignote.
Appuyer sur la touche ENTER.
Si nécessaire, régler la température ambiante à
l’aide des touches ou .
FR-5 1907/D www.dimplex.de/fr
Page 23

H 260E, H 260E eco Français
REMARQUE
ON
ON
9.6 Minuteur décompteur
Le minuteur décompteur permet d'exécuter un programme de chauffage individuel limité dans le temps.
Réglage de base
Maintenir enfoncées les touches MENU et
AVANCE jusqu’à ce que l’affichage rb clignote.
Appuyer sur la touche ENTER. L’affichage ON/
OFF clignote.
Sélectionner l'affichage ON à l’aide des touches
ou . Appuyer sur la touche ENTER. La durée
maximale de décompte clignote.
Si nécessaire, adapter la durée de décompte à
l’aide des touches ou .
Durée maximale
de décompte
Appuyer sur la touche AVANCE :
1 fois 2 fois 3 fois 4 fois
Activation du minuteur décompteur
Impossible si le mode MINUTERIE a été sélectionné.
Appuyer sur la touche AVANCE. La durée de dé-
compte clignote.
Pour modifier la durée de décompte, appuyer plu-
sieurs fois sur la touche Avance.
Appuyer sur la touche ENTER. Minuteur décomp-
teur = ACTIVÉ.
Désactivation du minuteur décompteur
Appuyer plusieurs fois sur la touche AVANCE
jusqu’à ce que l’affichage OFF clignote.
Appuyer sur la touche ENTER. Minuteur décomp-
teur = DÉSACTIVÉ.
30 min 00:15 00:20 00:25 00:30
01:00 h
(configuration
usine)
01:30 h 00:15 00:30 01:00 01:30
02:00 h 00:30 01:00 01:30 02:00
04:00 h 01:00 02:00 03:00 04:00
06:00 h 01:30 03:00 04:30 06:00
08:00 h 02:00 04:00 06:00 08:00
Appuyer sur la touche ENTER. La température am-
00:15 00:30 00:45 01:00
biante clignote.
Si nécessaire, modifier la température ambiante à
l’aide des touches ou . Confirmer avec la
touche ENTER.
www.dimplex.de/fr 1907/D FR-6
Page 24

Français H 260E, H 260E eco
REMARQUE
REMARQUE
REMARQUE
ONOFF
9.7 Démarrage adaptatif
Cette fonction est uniquement possible en mode MINUTERIE.
Cette fonction garantit que la température ambiante
définie sera atteinte exactement à l’heure souhaitée.
Exemple :
Le menu de la minuterie prévoit une température am-
biante de consigne de 22 °C à 7 heures. La température ambiante actuelle est de 17 °C. L’appareil de
chauffage se met en marche suffisamment à l’avance
pour que la température ambiante prescrite de 22 °C
soit atteinte à 7 heures.
10. Options
10.1 Bloquer le clavier
Les fonctions des touches sont désactivées au moyen
d’un numéro de code à quatre chiffres défini par l’utilisateur.
L’utilisation de la fonction de minuteur décompteur
ainsi que le passage au point de programmation suivant en mode minuterie restent possibles pendant l’activation du blocage du clavier.
Maintenir enfoncées les touches MENU et
AVANCE jusqu’à ce que l’affichage rb clignote.
Sélectionner le symbole DÉMARRAGE ADAPTA-
TIF à l’aide des touches ou
. Le symbole cli-
gnote.
Appuyer sur la touche ENTER.
Sélectionner ON ou OFF à l’aide des touches
pour activer ou désactiver la fonction.
ou
Définir un code de déblocage
Maintenir enfoncées les touches MENU et
AVANCE jusqu’à ce que l’affichage rb clignote.
Sélectionner le symbole BLOQUÉ à l’aide des
touches ou . Le symbole clignote.
Appuyer sur la touche ENTER. L’affichage de nu-
méro clignote.
Définir un numéro de code de déblocage à l’aide
des touches ou . Confirmer chaque réglage
avec la touche ENTER.
Si le code de blocage défini n’est pas disponible, il est
possible de désactiver le blocage par saisie du numéro
4115.
Débloquer le clavier
Appuyer sur une touche quelconque. Le numéro de
code à quatre chiffres 0000 s'affiche.
Saisir le numéro de code de déblocage à l’aide des
touches ou . Confirmer chaque réglage avec
la touche ENTER.
FR-7 1907/D www.dimplex.de/fr
Page 25

H 260E, H 260E eco Français
REMARQUE
ONOFF
10.2 Réduire la puissance thermique, mode air
froid
Modèle H 260E
La puissance thermique maximale de 2 kW peut être
réduite à 1 kW. Il est également possible d’utiliser l’appareil comme ventilateur d’air froid.
Modèle H 260E eco
Il est également possible d’utiliser l’appareil comme
ventilateur d’air froid.
10.3 Température ambiante minimale
Cette fonction permet de garantir qu’une température
ambiante minimale sera également utilisée comme valeur prescrite pendant les périodes d’arrêt, par
exemple en cas d’utilisation du mode minuterie (programmation hebdomadaire).
Cette valeur prescrite s’applique également à la fonction de minuteur décompteur.
La protection antigel est prioritaire.
Maintenir enfoncée la touche AVANCE jusqu’à ce
que l’affichage HILO apparaisse.
Sélectionner HI, LO ou FAN à l’aide des touches
ou . Signification de l'affichage :
HI = mode de fonctionnement normal, vitesse de
ventilateur intégrale
LO = vitesse de ventilateur réduite ; la puissance
thermique est réduite à 1 kW dans le cas du modèle H 260E,
FAN = mode air froid (sans émission de chaleur).
Confirmer le réglage sélectionné avec ENTER.
Maintenir enfoncées les touches MENU et
AVANCE jusqu’à ce que l’affichage rb clignote.
Appuyer sur la touche
Appuyer sur la touche ENTER. Le symbole ON cli-
. L’affichage Sb clignote.
gnote.
Appuyer sur la touche ENTER. La température am-
biante minimale (réglée en usine sur 16 °C) clignote.
Régler la température ambiante minimale à l’aide
des touches ou et confirmer avec ENTER.
Appuyer sur la touche RETOUR pour revenir à l’af-
fichage standard.
www.dimplex.de/fr 1907/D FR-8
Page 26

Français H 260E, H 260E eco
REMARQUE
10.4 Retour aux réglages d’usine
Annule tous les réglages effectués par l’utilisateur et
rétablit les réglages usine.
Maintenir enfoncées les touches
et jusqu’à
ce que l’affichage Fr n apparaisse.
Sélectionner l’affichage Y à l’aide des touches
ou . Le symbole clignote.
Appuyer sur la touche ENTER. Tous les réglages
usine des valeurs sont rétablis. L’affichage de
l’heure apparaît.
Régler l’heure et la date.
10.5 Unité de température
Sélection possible entre degré Celsius et degré
Fahrenheit.
11. Garantie
Conformément aux conditions de garantie, nous
accordons 2 ans de garantie sur ce produit.
12. Remarque sur l’élimination de l’appareil
Ne pas éliminer l'appareil avec les ordures
ménagères, mais le déposer dans une
déchetterie locale.
13. Caractéristiques techniques
Modèle H 260E H 260E eco
Tension nominale 1/N/PE, 230 V~, 50 Hz
Indice de protection IP24
Dimensions montage
(l x h x p)
Poids 3,2 kg
Puissance thermique
Puissance thermique nominale
Puissance thermique minimale
(indicative)
Puissance thermique maximale
continue
Consommation d‘électricité auxiliaire
À la puissance thermique nominale
À la puissance thermique minimale
En mode veille el
Type de contrôle
Régulateur de température ambiante électronique avec programmation hebdomadaire, régulateur adaptatif du démarrage du
chauffage et limitation de la durée de fonctionnement
P
nom
P
min
P
max, C
el
max
el
min
SB
300 x 405 x 120 mm
2,0 kW 1,0 kW
1,0 kW 1,0 kW
2,0 kW 1,0 kW
0,0 W 0,0 W
0,0 W 0,0 W
0,5 W 0,5 W
Maintenir enfoncée la touche MENU jusqu’à ce que
l’affichage °C clignote.
Sélectionner le symbole °C ou °F à l’aide des
touches ou .
Confirmer avec la touche ENTER.
L’unité de température °C est habituellement utilisée
dans la plupart des pays européens.
FR-9 1907/D www.dimplex.de/fr
Glen Dimplex Deutschland GmbH Tél. : +49 9221 709 545
Am Goldenen Feld 18 Fax. : +49 9221 709 924545
D - 95326 Kulmbach E-mail : service@gdts.one
Page 27

H 260E, H 260E eco Italiano
AVVERTENZA
ATTENZIONE!
ATTENZIONE!
ATTENZIONE!
ATTENZIONE!
ATTENZIONE!
ATTENZIONE!
ATTENZIONE!
ATTENZIONE!
ATTENZIONE!
ATTENZIONE!
AVVERTENZA
1. Note per l'utente
Non è consentito l'utilizzo dell'apparecchio di
Gentile cliente,
La invitiamo a conservare con cura le istruzioni e a
consegnarle eventualmente al successivo proprietario.
riscaldamento in ambienti in cui si impieghino
prodotti infiammabili (p.es. solventi).
L'apparecchio deve essere installato in modo
L'apparecchio può essere usato dai bambini a
partire dagli 8 anni di età e anche dalle per-
sone con ridotte capacità fisiche, mentali o
tale da non poter essere toccato da una per-
sona che si trova nella vasca da bagno o sotto
la doccia!
sensoriali oppure con scarsa conoscenza ed
esperienza, purché siano sotto la sorve-
glianza di un adulto o sia stato insegnato loro
a usare l'apparecchio in modo sicuro ed essi
capiscano i pericoli che ne derivano! I bambini
non devono giocare con l'apparecchio. Non
far eseguire gli interventi di pulizia e di manu-
tenzione a cura dell'utente ai bambini senza la
In caso di danneggiamento del cavo di rete,
quest'ultimo deve essere sostituito dal produt-
tore, da un suo rappresentante del servizio
clienti o da una persona con qualifica equivalente, per escludere qualsiasi fonte di peri-
colo!
presenza di un adulto!
Tenere lontano i bambini di età inferiore ai 3
anni, a meno che non siano costantemente
sorvegliati da un adulto. I bambini a partire dai
3 anni e di età inferiore agli 8 anni possono
accendere e spegnere l'apparecchio sotto la
sorveglianza di un adulto o se è stato insegnato loro a usare l'apparecchio in modo si-
curo ed essi abbiano compreso i pericoli che
ne derivano, purché l'apparecchio si trovi
nella sua normale posizione di utilizzo!
I bambini a partire dai 3 anni e di età inferiore
agli 8 anni non devono accendere l’apparecchio né tantomeno pulirlo o eseguirne la ma-
nutenzione!
Il simbolo a fianco è applicato
sull'apparecchio da riscaldamento
e indica che quest'ultimo non deve
essere coperto!
Per evitare pericoli dovuti a un ripristino accidentale della protezione antisurriscaldamento, l'apparecchio non deve essere ali-
mentato tramite un dispositivo di
commutazione esterno (ad es. un timer) né
collegato a un circuito elettrico regolarmente
inserito e disinserito!
A seconda della dimensione della stanza, del
fabbisogno di calore e dell’impostazione del
termostato, si corre il rischio di surriscalda-
mento in ambienti non sottoposti a controllo del
riscaldamento. Ciò può comportare pericoli per
le persone che non sono in grado di abbando-
nare la stanza in caso di temperature elevate.
L'apparecchio può essere utilizzato solo per il riscaldamento dell'aria ambiente all'interno di ambienti chiusi.
Alcuni componenti dell'apparecchio possono
diventare molto caldi e provocare ustioni. Prestare particolare attenzione se ci sono bam-
bini o soggetti vulnerabili nelle vicinanze!
www.dimplex.de/it 1907/D IT-1
Page 28

Italiano H 260E, H 260E eco
ATTENZIONE!
AVVERTENZA
AVVERTENZA
AVVERTENZA
AVVERTENZA
250300
1000
405
280
190
308
B
A
2. Montaggio, installazione, distanze minime
Non installare l’apparecchio sotto una presa a
muro!
Le distanze minime devono essere rispettate.
Inoltre occorre calcolare una distanza di 750 mm dal
lato anteriore dell'apparecchio.
L'apparecchio da riscaldamento deve essere installato
in orizzontale su una parete verticale, come mostrato in
figura. Tutte le misure si intendono in mm.
Durante il montaggio, rispettare l’area protetta come in-
dicato nelle norme di installazione attuali.
La presa e la spina elettrica dell'apparecchio devono
essere accessibili dopo il montaggio.
Assicurarsi che l'aria possa entrare nell'apparecchio e
uscirne senza ostacoli
È consentito il montaggio su pareti in legno.
Montaggio a parete
Utilizzare il supporto a parete originale in dotazione
nella parte posteriore dell'apparecchio.
Durante la foratura, prestare attenzione alla possibile
presenza di tubazioni o cavi elettrici nel muro!
Sbloccare il supporto a parete in basso (A) e stac-
carlo dall'apparecchio.
Praticare dei fori di fissaggio per il supporto a pa-
rete e inserire i tasselli.
Allineare il supporto a parete e avvitarlo salda-
mente alla parete.
Appendere l'apparecchio al supporto a parete.
Girare l'apparecchio di riscaldamento verso il
basso e farlo scattare in sede (B)
IT-2 1907/D www.dimplex.de/it
3. Allacciamento elettrico
L'indicazione della tensione sulla targhetta dati deve
coincidere con la tensione di rete.
La linea non deve toccare la custodia.
Si consiglia di predisporre un circuito elettrico apposito
per l'alimentazione di corrente.
Inserire la spina nella presa di corrente. La spina deve
rimanere sempre accessibile per i casi di emergenza.
L'apparecchio deve essere collegato solo a una presa
di corrente con contatto di terra.
4. Protezione antisurriscaldamento
Per la sicurezza dell'utente, l'apparecchio da riscaldamento è munito di una protezione da surriscaldamento.
.
In caso di interruzioni nella circolazione dell'aria (dovute p.es. alla chiusura o alla copertura della griglia di
ventilazione), l'apparecchio si spegne automaticamente. Sul display viene visualizzato l'indicatore Err35.
In questo caso si consiglia di interrompere la corrente
di alimentazione dell'apparecchio da riscaldamento per
alcuni minuti (staccando la spina, disinserendo il fusibile), per dare modo all’apparecchio di raffreddarsi a
sufficienza.
Prima di rimettere in funzione l'apparecchio, eliminare
le cause che hanno fatto scattare la protezione antisurriscaldamento.
5. Pulizia
Per la pulizia occorre scollegare l'apparecchio dalla
rete elettrica e lasciarlo raffreddare. L'esterno può essere pulito strofinando con un panno morbido e inumidito. Non utilizzare polveri abrasive o lucido per mobili
per evitare di danneggiare la superficie. I depositi di
polvere nell'apparecchio possono essere rimossi
dall'esterno con un aspirapolvere.
Page 29

H 260E, H 260E eco Italiano
AVVERTENZA
Avvio con adattamento della temperatura
Blocco tasti
Audio
Collegamento
Timer
Manuale
Protezione antigelo
Data/Ora
Avanzata
Giorno della settimana
Ora
On/Off
Indietro
Menu
Avanzata
Tasti di regolazione
Tasto Enter
6. Descrizione del regolatore
6.1 Unità di comando
L'apparecchio da riscaldamento è dotato di un regolatore elettronico regolabile costituito da un display e sei
tasti touchscreen. L’unità di comando si trova in alto a
destra. Tutte le impostazioni possono essere effettuate
usando i sei tasti presenti nell’interfaccia utente.
Sul display vengono visualizzati le funzioni e i valori impostati.
6.3 Display
Premendo un tasto qualsiasi, il display si illumina. Se
non vengono effettuate modifiche per lungo tempo, il
display si spegne. Se non viene premuto nessun tasto,
l'indicatore, dopo 30 secondi, torna al menu principale.
Premendo il tasto ENTER viene visualizzato il PIN a 4
cifre dell’apparecchio.
7. Modalità d'esercizio
7.1 Timer con programma settimanale
Fino a quattro programmi di riscaldamento (On/Off) impostabili per ogni giorno della settimana. Per ciascun
programma di riscaldamento è possibile indicare una
temperatura ambiente prestabilita.
Sul display compare il simbolo TIMER.
7.2 Modalità manuale
Impostazione manuale della temperatura ambiente.
Sul display compare il simbolo di una MANO.
7.3 Protezione antigelo
Impostazione di una temperatura antigelo pari a 7 °C.
Sul display compare il simbolo del GHIACCIO.
6.2 Funzioni dei tasti
MENU PRINCIPALE
Impostazione di data e ora
Timer con programma settimanale
Modalità manuale
Modalità di protezione antigelo
INDIETRO
Ritorna al punto del programma precedente
Tasti
Per navigare attraverso il menu e modificare i valori impostati.
ENTER
Salvataggio delle impostazioni.
AVANZATA
Funzioni speciali come passare al punto del programma successivo nell’esercizio Timer o attivare il
timer alla rovescia.
www.dimplex.de/it 1907/D IT-3
Per tutte le modalità d'esercizio è possibile modificare
il valore della temperatura ambiente agendo sui tasti
o . Nel programma Timer tale modifica verrà applicata solamente per il programma orario attualmente
impostato.
8. Avviamento
8.1 Impostazione di data e ora
Il comando dispone di un orologio in tempo reale con
funzione calendario.
Per impostare data e ora, procedere nel seguente
modo:
Premere il tasto MENU.
Con l’aiuto dei tasti
DATA e ORA. Il simbolo lampeggerà.
o selezionare il simbolo
Page 30

Italiano H 260E, H 260E eco
AVVERTENZA
OFF
OFFON
Premere il tasto ENTER. L’indicatore delle ore ini-
zierà a lampeggiare.
Impostare le ore e i minuti aiutandosi con i tasti
o . Confermare il valore impostato premendo
ogni volta il tasto ENTER.
L’ora è stata memorizzata e inizierà a lampeggiare
brevemente l’indicatore dAY.
Impostare il giorno aiutandosi con i tasti o .
Confermare il valore impostato premendo ogni
volta il tasto ENTER. L’indicatore 1-12 inizierà a
lampeggiare brevemente.
Impostare il mese aiutandosi con i tasti o .
Confermare il valore impostato premendo ogni
volta il tasto ENTER. L’indicatore YEAr inizierà a
lampeggiare brevemente.
Impostare l’anno aiutandosi con i tasti o .
Confermare il valore impostato premendo ogni
volta il tasto ENTER. L’indicatore dSt (ora legale)
ON inizierà a lampeggiare.
Consiglio: confermare l’indicatore ON con il tasto
ENTER. In questo modo si passerà automaticamente all’ora legale o all’ora solare.
Disattivazione dell’esercizio di riscaldamento
Premere il tasto MENU PRINCIPALE. Il simbolo
TIMER inizierà a lampeggiare.
Con l’aiuto dei tasti o selezionare il simbolo
OFF. Il simbolo OFF inizierà a lampeggiare.
Confermare con il tasto ENTER.
Anche se l’esercizio di riscaldamento viene disattivato,
l’apparecchio rimane comunque collegato alla corrente
di alimentazione. Per scollegare l’apparecchio dalla
rete, staccare semplicemente la spina.
9.3 Timer con programma settimanale
Il timer è già programmato di default. Sono disponibili
quattro blocchi orari per giorno, che possono essere
adattati individualmente per ogni giorno della settimana.
9. Comando
9.1 Modalità stand-by (attesa)
Tenere premuto il tasto INDIETRO finché non com-
pare l’indicatore Eolt. L’apparecchio da riscaldamento è in modalità stand-by.
Per tornare allo stato d’esercizio precedente, pre-
mere il tasto INDIETRO per pochi secondi.
9.2 Attivazione/disattivazione dell’esercizio
di riscaldamento
Attivazione dell’esercizio di riscaldamento
Premere il tasto MENU PRINCIPALE. Il simbolo
TIMER inizierà a lampeggiare.
Con l’aiuto dei tasti o selezionare la modalità
d’esercizio desiderata. Il simbolo lampeggerà.
Confermare con il tasto ENTER.
Per modificare i vari profili, procedere nel seguente
modo:
Premere il tasto MENU. Il simbolo TIMER inizierà a
lampeggiare.
Premere il tasto ENTER. Il simbolo ON inizierà a
lampeggiare.
Con l’aiuto dei tasti
o selezionare l’indicatore
EdIt. L’indicatore EdIt inizierà a lampeggiare.
Premere il tasto ENTER. Il giorno della settimana
inizierà a lampeggiare.
Selezionare il giorno aiutandosi con i tasti o .
1 = lunedì 5 = venerdì
2 = martedì 6 = sabato
3 = mercoledì 7 = domenica
4 = giovedì
Premere il tasto ENTER. P1 (Programma 1) ini-
zierà a lampeggiare.
Premere il tasto ENTER. L’orario di attivazione ini-
zierà a lampeggiare.
Impostare le ore e i minuti aiutandosi con i tasti
o . Confermare il valore impostato premendo
ogni volta il tasto ENTER. La temperatura ambiente inizierà a lampeggiare.
IT-4 1907/D www.dimplex.de/it
Page 31

H 260E, H 260E eco Italiano
AVVERTENZA
AVVERTENZA
ON
ON
Impostare la temperatura aiutandosi con i tasti o
. Premere il tasto ENTER. L’orario di spegni-
mento inizierà a lampeggiare.
Impostare le ore e i minuti aiutandosi con i tasti
o . Confermare il valore impostato premendo
ogni volta il tasto ENTER. P2 (Programma 2) inizierà a lampeggiare.
Impostare i programmi P2, P3 e P4 seguendo i
passaggi descritti sopra.
Per copiare i programmi P1 - P4 appena impostati
negli altri giorni, tenere premuto il tasto AVANZATA. L’indicatore COPY inizierà a lampeggiare
brevemente.
I valori impostati per quel determinato giorno vengono copiati.
Con l’aiuto dei tasti
o selezionare un nuovo
giorno della settimana. Il giorno della settimana inizierà a lampeggiare.
Tenere premuto il tasto ENTER. L’indicatore PStE
inizierà a lampeggiare brevemente. I valori precedentemente copiati vengono assegnati al nuovo
giorno della settimana.
Premere infine il tasto MENU PRINCIPALE.
9.4 Modalità manuale
9.5 Protezione antigelo
Impostazione di una temperatura antigelo pari a 7 °C.
Premere il tasto MENU. Il simbolo TIMER inizierà a
lampeggiare.
Con l’aiuto dei tasti
del GHIACCIO. Il simbolo del GHIACCIO inizierà a
lampeggiare. Premere il tasto ENTER.
Verranno visualizzati il simbolo del GHIACCIO e la
temperatura di 7 °C.
o selezionare il simbolo
Nella modalità manuale, il timer con programma settimanale viene disattivato.
La temperatura ambiente viene impostata manualmente.
Premere il tasto MENU. Il simbolo TIMER inizierà a
lampeggiare.
Con l’aiuto dei tasti
o selezionare il simbolo
della MANO. Il simbolo della MANO inizierà a lampeggiare. Premere il tasto ENTER.
Se necessario, impostare la temperatura ambiente
usando i tasti o .
È possibile modificare il valore della temperatura impostato di default (7° C) usando i tasti o .
9.6 Timer alla rovescia
Il timer alla rovescia permette di eseguire un programma di riscaldamento per una sola volta e per un
periodo di tempo limitato.
Impostazione di base
Tenere premuti i tasti MENU e AVANZATA finché
non inizia a lampeggiare l’indicatore rb.
Premere il tasto ENTER. L’indicatore ON/OFF ini-
zierà a lampeggiare.
www.dimplex.de/it 1907/D IT-5
Page 32

Italiano H 260E, H 260E eco
AVVERTENZA
AVVERTENZA
ON
ONOFF
Con l’aiuto dei tasti
o selezionare l’indicatore
ON. Premere il tasto ENTER. Inizierà a lampeggiare il tempo di inversione massimo.
Se necessario, modificare il tempo di inversione
usando i tasti o .
Tempo di
inversione
massimo
30 min 00:15 00:20 00:25 00:30
01:00 h
(default)
01:30 h 00:15 00:30 01:00 01:30
02:00 h 00:30 01:00 01:30 02:00
04:00 h 01:00 02:00 03:00 04:00
06:00 h 01:30 03:00 04:30 06:00
08:00 h 02:00 04:00 06:00 08:00
Premere il tasto ENTER. La temperatura ambiente
Premere il tasto AVANZATA:
1 volta 2 volte 3 volte 4 volte
00:15 00:30 00:45 01:00
inizierà a lampeggiare.
Se necessario, modificare la temperatura ambiente
usando i tasti o
. Confermare con il tasto EN-
TER.
Timer alla rovescia OFF
Premere più volte il tasto AVANZATA finché l’indi-
catore OFF non inizierà a lampeggiare.
Premere il tasto ENTER. Il timer alla rovescia è di-
sattivato.
9.7 Avvio con adattamento della temperatura
Questa funzione viene eseguita solo se è impostata la
modalità d’esercizio TIMER.
Questa funzione consente all’apparecchio di raggiungere la temperatura ambiente impostata all’orario di attivazione previsto.
Esempio:
Nel menu del timer è preimpostata una temperatura
ambiente nominale di 22 °C per le ore 07:00, mentre la
temperatura ambiente attuale è di 17 °C. L’apparecchio da riscaldamento si accenderà quindi prima
dell’orario previsto in modo da raggiungere la temperatura ambiente prestabilita di 22 °C esattamente alle ore
07:00.
Timer alla rovescia ON
Non attivabile se è impostata la modalità d’esercizio TIMER.
Premere il tasto AVANZATA. Il tempo di inversione
inizierà a lampeggiare.
È possibile modificare il tempo di inversione pre-
mendo più volte il tasto AVANZATA.
Premere il tasto ENTER. Il timer alla rovescia è at-
tivato.
Tenere premuti i tasti MENU e AVANZATA finché
non inizia a lampeggiare l’indicatore rb.
Con l’aiuto dei tasti
o selezionare il simbolo
AVVIO CON ADATTAMENTO DELLA TEMPERATURA. Il simbolo lampeggerà.
Premere il tasto ENTER.
Con l’aiuto dei tasti
o , selezionare ON oppure
OFF per attivare o disattivare la funzione.
IT-6 1907/D www.dimplex.de/it
Page 33

H 260E, H 260E eco Italiano
AVVERTENZA
AVVERTENZA
AVVERTENZA
10. Opzioni
10.1 Blocco tasti
Le funzioni dei tasti vengono bloccate tramite un codice numerico a quattro cifre impostato dall’utente.
Le funzioni quali il timer alla rovescia e il passaggio al
punto del programma successivo nell’esercizio Timer
rimangono attive anche con il blocco tasti attivato.
10.2 Riduzione della resa termica, modalità
aria fredda
Modello H 260E
È possibile ridurre la resa termica massima di 2 kW
portandola a 1 kW. In alternativa, l’apparecchio può essere utilizzato come ventilatore ad aria fredda.
Modello H 260E eco
L’apparecchio può essere utilizzato in via opzionale
come ventilatore ad aria fredda.
Impostazione del codice di sblocco
Tenere premuti i tasti MENU e AVANZATA finché
non inizia a lampeggiare l’indicatore rb.
Con l’aiuto dei tasti
BLOCCO TASTI. Il simbolo lampeggerà.
Premere il tasto ENTER. Inizierà a lampeggiare
l’indicatore con il numero.
Con l’aiuto dei tasti
il codice di sblocco. Confermare il valore impostato
premendo ogni volta il tasto ENTER.
Se il codice di blocco impostato non dovesse essere disponibile, è possibile annullare l’interdizione immettendo il codice 4115.
Sblocco tasti
Premere un tasto qualsiasi. Verrà visualizzato il co-
dice numerico a quattro cifre 0000.
Con l’aiuto dei tasti
codice di sblocco. Confermare il valore impostato
premendo ogni volta il tasto ENTER.
o selezionare il simbolo
o impostare il numero per
o immettere il numero del
Tenere premuto il tasto AVANZATA finché non
compare l’indicatore HILO.
Con l’aiuto dei tasti
pure FAN. Significato degli indicatori:
HI = esercizio normale, ventilatore con numero di
giri completo;
LO = ventilatore con numero di giri ridotto (nel modello H 260E la resa termica viene ridotta a 1 kW);
FAN = modalità aria fredda (senza emissione di calore).
Confermare l’impostazione selezionata premendo
il tasto ENTER.
o
selezionare HI, LO op-
10.3 Temperatura ambiente minima
Grazie a questa funzione è possibile impostare una
temperatura ambiente minima da applicare ad esempio all’esercizio Timer (programma settimanale), anche
durante gli orari in cui l’apparecchio è spento.
L’impostazione vale anche per la funzione Timer alla
rovescia. La modalità di protezione antigelo ha comunque la priorità.
www.dimplex.de/it 1907/D IT-7
Page 34

Italiano H 260E, H 260E eco
AVVERTENZA
ONOFF
10.5 Unità di misura della temperatura
Permette di scegliere se visualizzare la temperatura in
gradi Celsius o Fahrenheit.
Tenere premuti i tasti MENU e AVANZATA finché
non inizia a lampeggiare l’indicatore rb.
Premere il tasto
. L’indicatore Sb inizierà a lam-
peggiare.
Premere il tasto ENTER. Il simbolo ON inizierà a
lampeggiare.
Premere il tasto ENTER. La temperatura ambiente
minima (16 °C come da impostazione di fabbrica)
inizierà a lampeggiare.
Impostare la temperatura ambiente minima con
l’aiuto dei tasti o e confermare con ENTER.
Premere il tasto INDIETRO per tornare alla visua-
lizzazione standard.
Tenere premuto il tasto MENU finché non compare
l’indicatore °C.
Con l’aiuto dei tasti o selezionare °C oppure °F.
Confermare con il tasto ENTER.
La maggior parte dei Paesi europei utilizza il °C come
unità di misura della temperatura.
11. Garanzia
Questo prodotto è garantito 2 anni secondo le condizioni di garanzia.
10.4 Ripristino delle impostazioni di fabbrica
Questa funzione consente di resettare tutte le impostazioni effettuate dall’utente ripristinando le impostazioni
di fabbrica iniziali.
12. Nota per lo smaltimento
L'apparecchio non deve essere smaltito nei rifiuti domestici generici, ma deve essere conferito a un centro di smaltimento locale.
Tenere premuti i tasti
l’indicatore Fr n.
Con l’aiuto dei tasti
Y. Il simbolo lampeggerà.
Premere il tasto ENTER. Tutti i valori verranno ri-
portati alle impostazioni di fabbrica. Comparirà l’indicatore dell’ora.
Impostare la data e l’ora.
IT-8 1907/D www.dimplex.de/it
e finché non compare
o selezionare l’indicatore
Page 35

H 260E, H 260E eco Italiano
13. Dati tecnici
Modello H 260E H 260E eco
Tensione nominale 1/N/PE, 230 V~, 50 Hz
Tipo di protezione IP24
Dimensioni apparecchio
(La x A x P)
Peso 3,2 kg
Potenza termica
Potenza termica
P
nom
nominale
Potenza termica
minima (indica-
P
min
tiva)
Massima potenza
termica continua
P
max, C
Consumo ausiliario di energia elettrica
Alla potenza termica nominale
Alla potenza ter-
el
max
el
min
mica minima
In modo stand-by el
Tipo di controllo
SB
Regolatore temperatura ambiente elettronico con programma settimanale, regolazione dell’attivazione del riscaldamento con adattamento della temperatura e limitazione del tempo di
funzionamento
300 x 405 x 120 mm
2,0 kW 1,0 kW
1,0 kW 1,0 kW
2,0 kW 1,0 kW
0,0 W 0,0 W
0,0 W 0,0 W
0,5 W 0,5 W
Glen Dimplex Deutschland GmbH Tel.: +49 9221 709 545
Am Goldenen Feld 18 Fax: +49 9221 709 924545
D - 95326 Kulmbach E-mail: service@gdts.one
www.dimplex.de/it 1907/D IT-9
Page 36

Nederlands H 260E, H 260E eco
OPMERKING
ATTENTIE!
ATTENTIE!
ATTENTIE!
ATTENTIE!
ATTENTIE!
ATTENTIE!
ATTENTIE!
ATTENTIE!
ATTENTIE!
ATTENTIE!
OPMERKING
1. Opmerkingen voor de gebruiker
Het toestel moet zodanig worden geïnstal-
Geachte klant,
Bewaar deze aanwijzing zorgvuldig en geef deze door
aan eventuele volgende eigenaars.
leerd dat het niet kan worden aangeraakt door
een persoon die zich in bad of onder de dou-
che bevindt!
Dit toestel kan worden gebruikt door kinderen
van 8 jaar en ouder en door personen met
verminderde fysieke, sensorische of mentale
vermogens of gebrek aan ervaring en kennis,
als zij onder toezicht staan of zijn geïnstru-
eerd in het veilige gebruik van het toestel en
de gevaren begrijpen die eruit voortvloeien!
Kinderen mogen niet met het toestel spelen.
Reiniging en gebruikersonderhoud mogen
niet worden uitgevoerd door kinderen die niet
onder toezicht staan!
Kinderen jonger dan 3 jaar moeten bij het toe-
stel vandaan worden gehouden, tenzij zij
voortdurend in de gaten worden gehouden.
Kinderen tussen 3 en 8 jaar mogen het toestel
in- en uitschakelen als ze onder toezicht
staan of geïnstrueerd zijn in het veilige ge-
bruik van het toestel en de gevaren hebben
begrepen die eruit voortvloeien, mits het toe-
stel in zijn normale gebruiksstand is geplaatst
of geïnstalleerd!
Wanneer de netkabel is beschadigd, moet het
door de fabrikant of diens klantenservice of
een vergelijkbaar gekwalificeerde persoon
worden vervangen om bronnen van gevaar te
elimineren!
Om het gevaar voor onbedoeld resetten van
de oververhittingsbeveiliging te voorkomen
mag het apparaat niet via een externe scha-
kelinrichting, bijvoorbeeld een tijdschakelklok
worden gevoed of zijn verbonden met een
stroomkring die regelmatig wordt in- en uitge-
schakeld!
Afhankelijk van de afmetingen van de ruimte,
de warmtebehoefte en de thermostaatinstelling kunnen ruimtes bij ongecontroleerd gebruik oververhit raken. Dit kan tot gevaar lei-
den voor personen die niet in staat zijn de
ruimte bij een te hoge temperatuur te verla-
ten.
Kinderen tussen 3 en 8 jaar mogen het toestel
niet inschakelen, het toestel niet reinigen of
het onderhoud uitvoeren!
Het verwarmingstoestel is voorzien
van nevenstaand symbool, dat be-
tekent dat het verwarmingstoestel
niet mag worden afgedekt!
Sommige delen van het toestel kunnen zeer
heet worden en brandwonden veroorzaken.
Bijzondere voorzichtigheid is vereist bij kinde-
ren of personen die bescherming behoeven!
In ruimtes waar brandgevaarlijke stoffen ge-
bruikt worden (bijv. oplosmiddelen), mag het
verwarmingstoestel niet gebruikt worden.
Het toestel mag alleen worden gebruikt voor het verwarmen van de ruimtelucht binnen gesloten ruimtes.
NL-1 1907/D www.dimplex.de/nl
Page 37

H 260E, H 260E eco Nederlands
ATTENTIE!
OPMERKING
OPMERKING
OPMERKING
OPMERKING
250300
1000
405
280
190
308
B
A
2. Montage, installatie, minimumafstanden
Het verwarmingstoestel naar beneden zwenken en
vastklikken (B).
Het toestel niet onder een wandcontactdoos
installeren!
De minimumafstanden moeten in acht genomen worden.
Bovendien dient aan de voorkant van het toestel een
afstand van 750 mm te worden voorzien.
Het verwarmingstoestel moet horizontaal tegen een
verticale muur in de juiste positie geplaatst, zoals in de
afbeelding weergegeven, geïnstalleerd worden. Alle
afmetingen in mm.
Bij de montage moet de veiligheidszone conform de
actuele installatievoorschriften te allen tijde in acht worden genomen.
Het stopcontact moet na montage toegankelijk zijn.
Erop letten dat de lucht aan het toestel ongehinderd
naar binnen en buiten kan stromen.
Montage op houten wanden is toegestaan.
Wandmontage
De meegeleverde originele wandhouder aan de achterkant van het toestel moet worden gebruikt.
Bij het boren letten op elektrische of andere leidingen
die door de muur lopen!
Wandhouder aan de onderkant ontgrendelen (A)
en van het toestel verwijderen.
Boor montagegaten voor de wandhouder en druk
de pluggen erin.
De wandhouder horizontaal in de juiste positie
plaatsen en aan de muur vastschroeven.
Toestel in de wandhouder hangen.
3. Elektrische aansluiting
De op het typeplaatje aangegeven spanning moet met
de netspanning overeenstemmen.
De leiding mag niet tegen de behuizing liggen.
Het is raadzaam voor de stroomvoorziening een eigen
stroomkring te reserveren.
Stekker in stopcontact steken. Stekker moet voor
noodgevallen altijd toegankelijk zijn.
Het toestel mag alleen op een geaard stopcontact worden aangesloten.
4. Oververhittingsbeveiliging
Voor uw veiligheid is het verwarmingstoestel voorzien
van een oververhittingsbeveiliging. Als de luchtcirculatie wordt verstoord (bijv. door bedekken of afsluiten van
het luchtrooster), dan wordt het toestel automatisch uitgeschakeld. Op het display verschijnt de indicatie
Err35.
In dat geval moet de stroomvoorziening van het verwarmingstoestel enkele minuten worden onderbroken (stekker uit het stopcontact trekken, zekering uitschakelen),
zodat het toestel voldoende kan afkoelen.
Vóór het opnieuw in bedrijf stellen van het toestel de oorzaken voor het reageren van de oververhittingsbeveiliging verhelpen.
5. Reiniging
Om het toestel te reinigen moet de stroomvoorziening
ervan zijn onderbroken en moet het toestel zijn afgekoeld. De buitenkant kan worden gereinigd door deze
af te vegen met een zachte, vochtige lap. Gebruik geen
schuurmiddel of meubelwas; dit zou het oppervlak kunnen beschadigen. Ophopingen van stof in het toestel
kunnen aan de buitenkant met een stofzuiger worden
verwijderd.
www.dimplex.de/nl 1907/D NL-2
Page 38

Nederlands H 260E, H 260E eco
OPMERKING
Weekdag
Aan/Uit
Tijdstip
Toets Enter
Adaptieve start
Geblokkeerd
Timer
Handmatig
Vorstbeveiliging
Tijd/datum
Vooruit
Fenster-Überwachung
Audio
Verbindung
Terug
Menu
Vooruit
Insteltoetsen
6. Beschrijving van de regelaar
6.1 Bedieningseenheid
Het verwarmingstoestel is uitgerust met een instelbare
elektronische regelaar die bestaat uit een display en
zes touchscreentoetsen. De bedieningseenheid bevindt zich rechts op de bovenkant. Alle instellingen
kunnen worden ingesteld met behulp van de zes toetsen op de bedieningsinterface.
Op het display worden de ingestelde functies en waarden weergegeven.
6.3 Display
Bij het drukken op een toets licht het display op. Als er
langere tijd niets verandert, verdwijnt de weergave. Als
er geen toets wordt bediend, keert de weergave na 30
seconden terug naar het hoofdmenu.
Door het indrukken van de ENTER-toets wordt de 4-cijferige toestel-PIN weergegeven.
7. Bedrijfsmodi
7.1 Timer weekprogramma
Maximaal vier verwarmingsprogramma's (Aan/Uit)
voor iedere weekdag instelbaar. Voor ieder verwarmingsprogramma kan een kamertemperatuur worden
vastgelegd.
Symbool TIMER wordt op het display weergegeven.
7.2 Handmatige modus
Handmatig instellen van de kamertemperatuur.
Symbool HAND wordt op het display weergegeven.
7.3 Vorstbeveiliging
Vastleggen van een vorstbeveiligingstemperatuur van
7 °C.
Symbool FROST wordt op het display weergegeven.
6.2 Toetsfuncties
HOOFDMENU
Instelling datum en tijd
Timer weekprogramma
Handmatige modus
Vorstbeveiligingsmodus
TERUG
Terugkeer naar het vorige programmapunt
Toetsen
Worden gebruikt om door het menu te navigeren en instelwaarden te wijzigen.
ENTER
Opslaan van de instellingen.
VOORUIT
Speciale functies zoals naar het volgende programmapunt in de timermodus gaan of activeren van de
retourtimer.
NL-3 1907/D www.dimplex.de/nl
In alle bedrijfsmodi kan de kamertemperatuur worden
gewijzigd met de toets of .
In het timerprogramma wordt deze wijziging alleen
voor het actuele tijdprogramma uitgevoerd.
8. Inbedrijfstelling
8.1 Instellen van de datum en de tijd
De besturing bevat een realtimeklok met kalenderfunctie.
Voor het instellen van datum en tijd de volgende stappen uitvoeren:
Op toets MENU drukken.
Met de toets
selecteren. Het symbool knippert.
Op toets ENTER drukken. Uuraanduiding knippert.
of het symbool DATUM & TIJD
Page 39

H 260E, H 260E eco Nederlands
OPMERKING
OFF
OFFON
Met toetsen
of uren en minuten instellen.
Elke vastgelegde positie met toets ENTER bevestigen.
De tijd wordt opgeslagen en de weergave dAY
knippert kort.
Met de toets
Elke vastgelegde positie met toets ENTER bevesti-
of de dag instellen.
gen. Weergave 1-12 knippert kort.
Met de toets
Elke vastgelegde positie met toets ENTER bevesti-
of de maand instellen.
gen. Weergave YEAr knippert kort.
Met de toets
Elke vastgelegde positie met toets ENTER bevesti-
of het jaar instellen.
gen. Weergave dSt (zomertijd) ON knippert.
Aanbeveling: Weergave ON met toets ENTER be-
vestigen. Dit zorgt voor een automatische tijdaanpassing zomer/winter.
9. Bediening
Verwarmingsmodus uit betekent niet dat het toestel
volledig van de stroomvoorziening is gescheiden. Om
het toestel van het net te scheiden, de stekker uittrekken.
9.3 Timer weekprogramma
De timer is in de fabriek voorgeprogrammeerd. Er zijn
vier tijdblokken per dag beschikbaar en deze kunnen
voor elke weekdag apart worden aangepast.
9.1 Stand-bymodus (wachtstand)
Toets TERUG ingedrukt houden tot de weergave
Eolt verschijnt. Verwarmingstoestel is in de standbymodus.
Om naar de vorige bedrijfstoestand terug te keren,
toets TERUG kort indrukken.
9.2 Verwarmingsmodus inschakelen/
uitschakelen
Verwarmingsmodus inschakelen
Op toets HOOFDMENU drukken. Het symbool
TIMER knippert.
Met toetsen of
lecteren. Het symbool knippert.
Met toets ENTER bevestigen.
Verwarmingsmodus uitschakelen
Op toets HOOFDMENU drukken. Het symbool
TIMER knippert.
Met de toets of het symbool OFF selecteren.
Symbool OFF knippert.
Met toets ENTER bevestigen.
de gewenste bedrijfsmodus se-
Voor het wijzigen van deze profielen de volgende stappen uitvoeren:
Op toets MENU drukken. Het symbool TIMER knip-
pert.
Op toets ENTER drukken. Symbool ON knippert.
Met toetsen
of de weergave EdIt selecteren.
Weergave EdIt knippert.
Op toets ENTER drukken. Weekdag knippert.
Met de toets
of de dag selecteren.
1 = maandag 5 = vrijdag
2 = dinsdag 6 = zaterdag
3 = woensdag 7 = zondag
4 = donderdag
Op toets ENTER drukken. P1 (programma 1) knip-
pert.
Op toets ENTER drukken. Inschakeltijd knippert.
Met toetsen
of uren en minuten instellen.
Elke vastgelegde positie met toets ENTER bevestigen. Kamertemperatuur knippert.
Met de toets
of de temperatuur instellen. Op
toets ENTER drukken. Uitschakeltijd knippert.
Met toetsen
of uren en minuten instellen.
Elke vastgelegde positie met toets ENTER bevestigen. P2 (programma 2) knippert.
De programma's P2, P3 en P4 kunnen op dezelfde
manier worden ingesteld.
Om de nieuw ingestelde programma's P1 - P4 naar
andere dagen te kopiëren, de toets VOORUIT ingedrukt houden. Weergave COPY knippert kort.
De ingestelde dagwaarden worden gekopieerd.
www.dimplex.de/nl 1907/D NL-4
Page 40

Nederlands H 260E, H 260E eco
OPMERKING
OPMERKING
ON
ON
Met toetsen
of nieuwe weekdag selecteren.
Weekdag knippert.
Toets ENTER ingedrukt houden. Weergave PStE
knippert kort. De gekopieerde dagwaarden worden
aan de nieuwe weekdag toegewezen.
Afsluitend op toets HOOFDMENU drukken.
9.4 Handmatige modus
In de handmatige modus is het timer-weekprogramma
gedeactiveerd.
Het vastleggen van de kamertemperatuur gebeurt
handmatig.
Op toets MENU drukken. Symbool TIMER knip-
pert.
Met de toets
of
het symbool FROST selecte-
ren. Het symbool FROST knippert. Op toets
ENTER drukken.
Weergave symbool FROST en temperatuur 7°C.
De vooringestelde temperatuurwaarde 7°C kan met de
toetsen of worden veranderd.
9.6 Retourtimer
Met de retour-timer is het mogelijk om een eenmalig,
tijdelijk verwarmingsprogramma uit te voeren.
Basisinstelling
Op toets MENU drukken. Het symbool TIMER knip-
pert.
Met de toetsen
of
het symbool HAND selec-
teren. Het symbool HAND knippert. Op toets
ENTER drukken.
Indien nodig met toetsen
of
de kamertempe-
ratuur instellen.
9.5 Vorstbeveiliging
Vastleggen van een vorstbeveiligingstemperatuur van
7 °C.
Toets MENU en toets VOORUIT ingedrukt houden
tot de weergave rb knippert.
Op toets ENTER drukken. Weergave ON/OFF
knippert.
Met toetsen
of weergave ON selecteren. Op
toets ENTER drukken. Maximale retourtijd knippert.
Indien nodig met toetsen
of
retourtijd aan-
passen.
Maximale
retourtijd
30 min 00:15 00:20 00:25 00:30
01:00 h
(fabrieksinstel-
ling)
01:30 h 00:15 00:30 01:00 01:30
02:00 h 00:30 01:00 01:30 02:00
Op toets VOORUIT drukken:
1 keer 2 keer 3 keer 4 keer
00:15 00:30 00:45 01:00
NL-5 1907/D www.dimplex.de/nl
04:00 h 01:00 02:00 03:00 04:00
06:00 h 01:30 03:00 04:30 06:00
08:00 h 02:00 04:00 06:00 08:00
Page 41

H 260E, H 260E eco Nederlands
OPMERKING
OPMERKING
OPMERKING
ON
ONOFF
Op toets ENTER drukken. Kamertemperatuur knip-
pert.
Desgewenst kamertemperatuur met de toets
veranderen. Met toets ENTER bevestigen.
of
Retourtimer aan
Niet mogelijk als de bedrijfsmodus TIMER is ingesteld.
Toets MENU en toets VOORUIT ingedrukt houden
tot de weergave rb knippert.
Met de toets
of het symbool ADAPTIEVE
START selecteren. Het symbool knippert.
Op toets ENTER drukken.
Met de toets
of ON of OFF selecteren om de
functie in- of uit te schakelen.
Op toets VOORUIT drukken. Retourtijd knippert.
Door het meermaals indrukken van de toets
VOORUIT kan de retourtijd worden veranderd.
Op toets ENTER drukken. Retourtimer = AAN.
Retourtimer uit
Toets VOORUIT meermaals indrukken tot de weer-
gave OFF knippert.
Op toets ENTER drukken. Retourtimer = UIT.
9.7 Adaptieve start
Deze functie wordt alleen uitgevoerd als de bedrijfsmodus TIMER is ingesteld.
Deze functie garandeert dat de ingestelde kamertemperatuur exact aan het begin van de inschakeltijd is bereikt.
Voorbeeld:
In het timermenu is voor 07:00 uur een gewenste ka-
mertemperatuur van 22 °C vastgelegd. De actuele kamertemperatuur bedraagt 17 °C. Het verwarmingstoestel wordt in overeenstemming hiermee vroegtijdig
ingeschakeld, zodat de vastgelegde kamertemperatuur van 22 °C op het tijdstip 07:00 uur bereikt wordt.
10. Opties
10.1 Toetsen blokkeren
Toetsfuncties worden via een vrij selecteerbare, viercijferige nummercode geblokkeerd.
De functie van de retourtimer alsook het wisselen naar
het volgende programmapunt in de timermodus is ook
bij een actieve toetsblokkering mogelijk.
www.dimplex.de/nl 1907/D NL-6
Page 42

Nederlands H 260E, H 260E eco
OPMERKING
OPMERKING
ONOFF
Deblokkeringscode vastleggen
Toets MENU en toets VOORUIT ingedrukt houden
tot de weergave rb knippert.
Met toetsen
of
symbool GEBLOKKEERD se-
lecteren. Het symbool knippert.
Op toets ENTER drukken. Nummerweergave knip-
pert.
Met toetsen
of
nummer voor deblokkerings-
code vastleggen. Elke vastgelegde positie met
toets ENTER bevestigen.
Als de vastgelegde deblokkeringscode niet beschikbaar is, kan de blokkering via het invoeren van het
nummer 4115 worden opgeheven.
Toetsen deblokkeren
Op willekeurige toets drukken. Viercijferige num-
mercode 0000 wordt weergegeven.
Met toetsen
of
nummer voor deblokkerings-
code invoeren. Elke vastgelegde positie met toets
ENTER bevestigen.
10.3 Minimale kamertemperatuur
Met deze functie kunt u ervoor zorgen dat bijvoorbeeld
in de timer-modus (weekprogramma) ook tijdens de
OFF-tijden een minimale kamertemperatuur wordt
vastgelegd.
De instelling geldt ook voor de functie Retour-timer.
Vorstbeveiligingsmodus heeft voorrang.
10.2 Warmtevermogen reduceren,
koudeluchtmodus
Model H 260E
Het maximale warmtevermogen van 2 kW kan tot 1 kW
worden gereduceerd. Alternatief kan het toestel als
koudeluchtventilator worden gebruikt.
Model H 260E eco
Het toestel kan alternatief als koudeluchtventilator worden gebruikt.
Toets MENU en toets VOORUIT ingedrukt houden
tot de weergave rb knippert.
Toets
Op toets ENTER drukken. Het symbool ON knip-
indrukken. De weergave Sb knippert.
pert.
Op toets ENTER drukken. De minimale kamertem-
peratuur (in de fabriek ingesteld op 16 °C) knippert.
Met de toets
of
de minimale kamertempera-
tuur instellen en met ENTER bevestigen.
Op toets TERUG drukken om terug te keren naar
de standaardweergave.
Toets VOORUIT ingedrukt houden tot de weergave
HILO verschijnt.
Met toetsen
Indicatie betekent:
HI = normaal bedrijf, maximaal ventilatortoerental
LO = ventilatortoerental gereduceerd, bij model H
260E wordt het warmtevermogen tot 1 kW gereduceerd,
FAN = koudeluchtbedrijf (zonder warmteafgifte).
Geselecteerde instelling met ENTER bevestigen.
NL-7 1907/D www.dimplex.de/nl
of HI of LO of FAN selecteren.
Page 43

H 260E, H 260E eco Nederlands
OPMERKING
10.4 Terugzetten naar fabrieksinstelling
Zet alle door de gebruiker uitgevoerde instellingen
terug naar de vooraf ingestelde fabrieksinstellingen.
Toetsen
en ingedrukt houden tot weergave
Fr n verschijnt.
Met de toets
of de weergave Y selecteren.
Het symbool knippert.
Op toets ENTER drukken. Alle waarden worden
naar fabrieksinstelling teruggezet. Weergave tijd
verschijnt.
Instellingen datum en tijd uitvoeren.
10.5 Temperatuureenheid
Weergave selecteerbaar in graden Celsius en graden
Fahrenheit.
11. Garantie
Wij geven op dit product 2 jaar garantie volgens onze
garantievoorwaarden.
12. Aanwijzing voor de afvalverwijdering
Verwijder het toestel niet met het algemene
huisvuil, maar breng het naar een lokaal opslagterrein voor afvalstoffen.
13. Technische gegevens
Type toestel H 260E H 260E eco
Nominale spanning 1/N/PE, 230 V~, 50 Hz
Beschermingsgraad IP24
Afmetingen (B x H x D) 300 x 405 x 120 mm
Gewicht 3,2 kg
Warmtevermogen
Nominaal warmtevermogen
Minimaal warmtevermogen (richtwaarde)
Maximaal continu
warmtevermogen
Eigen verbruik
Bij nominaal
warmtevermogen
Bij minimaal
warmtevermogen
In stand-bymodus
Regelorgaan voor warmteafgifte
Elektronische kamertemperatuurregelaar met weekprogramma,
adaptieve regeling van het verwarmingsbegin en bedrijfstijdbegrenzing
P
P
P
max, C
el
el
el
nom
min
max
min
SB
2,0 kW 1,0 kW
1,0 kW 1,0 kW
2,0 kW 1,0 kW
0,0 W 0,0 W
0,0 W 0,0 W
0,5 W 0,5 W
Glen Dimplex Deutschland GmbH Tel.: +49 9221 709 545
Am Goldenen Feld 18 Fax.: +49 9221 709 924545
95326 Kulmbach, Duitsland E-mail: service@gdts.one
Toets MENU ingedrukt houden tot weergave °C
knippert.
Met de toets
Met toets ENTER bevestigen.
of °C of °F selecteren.
In de meeste Europese landen is de temperatuureenheid °C gebruikelijk.
www.dimplex.de/nl 1907/D NL-8
Page 44

Deutsch H 260E, H 260E eco
www.dimplex.de
 Loading...