

Page 1
Girona Panel Heaters
AUS/NZ
Installation and Operating Instructions
INDGAUP7RG Issue 0
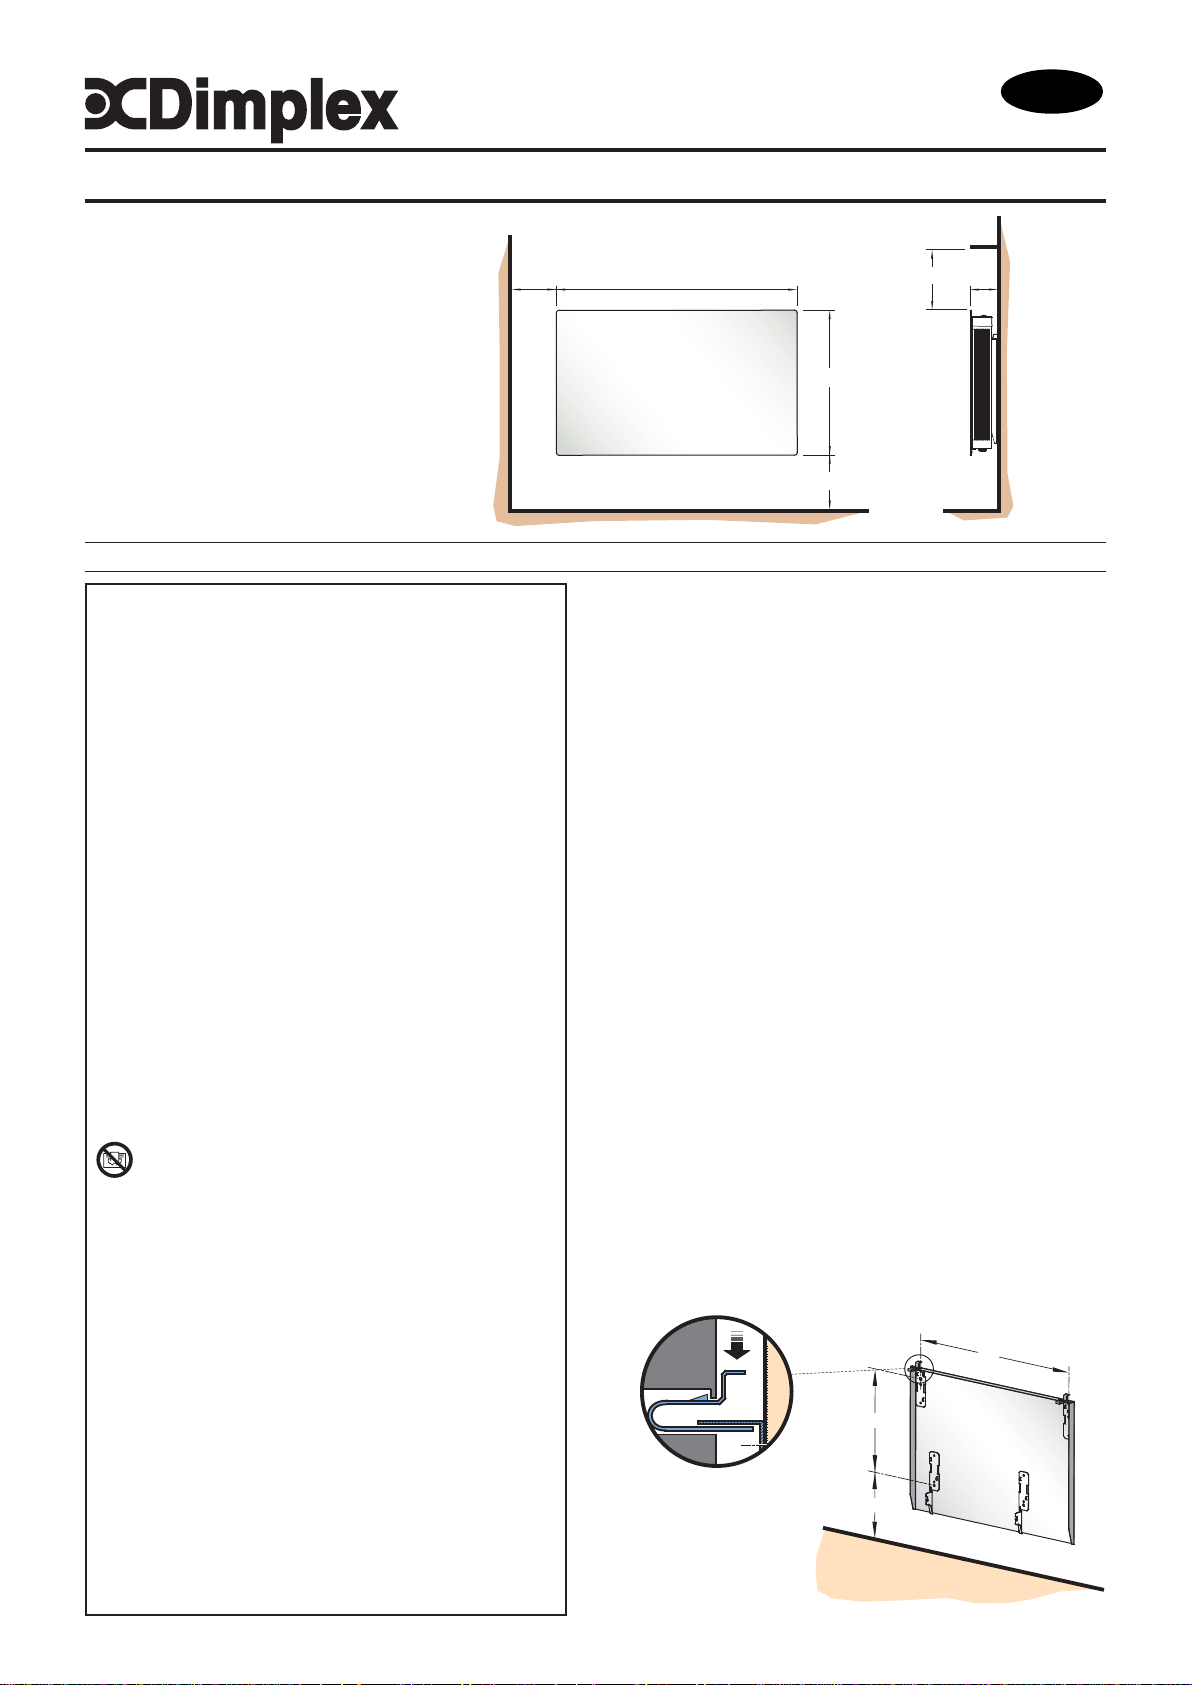
Dimensions
(millimetres)
Model(s) Watt A B
GFP200 W 2.0kW 940 107
GFP200 B 2.0kW 940 107
IMPORTANT: THESE INSTRUCTIONS SHOULD BE READ CAREFULL Y AND RET AINED FOR FUTURE REFERENCE
Important Safety Advice
When using electrical appliances, basic precautions
should always be followed to reduce the risk of fire,
electrical shock, and injury to persons, including the
following:
IIMPORTANT – The wall bracket supplied with the
appliance must be used.
WARNING - DO NOT USE THIS HEA TER IN THE IMMEDIA TE
SURROUNDINGS OF A BATH, A SHOWER OR A SWIMMING
POOL.
IMPORTANT – If the heater is installed in a room
containing a bath or shower , it must be so installed that
switches and other controls cannot be touched by a
person using a bath or shower.
Do not use outdoors.
Do not locate the heater immediately in front of or below
a fixed socket outlet or connection box.
Do not cover the heater. Do not place material or
garments on the heater, or obstruct the air circulation
around the heater, for inst ance by curtains or furniture,
as this could cause overheating and a fire risk.
NEVER cover or obstruct in any way the heat outlet slots
at the top of the heater or the air inlet slots in the base of
the heater.
The heater carries the Warning symbol indicating
that it must not be covered.
WARNING – THE SURF ACES OF THIS HEATER CAN BE HOT .
Momentary contact with any part of the heater should
not cause injury.
This appliance is not intended for use by persons
(including children) with reduced physical, sensory or
mental capabilities, or lack of experience and
knowledge, unless they have been given supervision or
instruction concerning use of the appliance by a person
responsible for their safety. Children should be
supervised to ensure that they do not play with the
appliance.
Note that due care and consideration must be taken
when using this heater in series with a thermal control,
a program controller, a timer or any other device that
switches on the heat automatically, since a fire risk
exists when the heater is accidentally covered or
displaced.
If the supply cord is damaged, it must be replaced by a
special cord or assembly available from the
manufacturer or its service agent.
150
Min.
shelf
A
565
150 Min.
300 Min.
B
Fig. 1
Electrical
WARNING – THIS APPLIANCE MUST BE EARTHED
The heater is fitted with a cable and plug. The length of flexible
cable type H05VV-F size 3 x 1.0mm
2
on all models.
General
The heater is designed for wall mounting on the wall bracket
supplied. It should only be operated when in the upright
position - see Fig. 1.
All models are splashproof to IPX4 standard and may be
used in bathrooms, however not in the immediate vicinity of
baths, showers, water connections, wash basins or
swimming pools.
Before connecting the heater check that the supply voltage is
the same as that stated on the heater.
Wall Mounting
IMPORTANT – The wall bracket supplied with the appliance
must be used. The heater should be positioned observing
the minimum clearances stated around the heater - see
Fig. 1.
DO NOT locate the heater immediately below a fixed socket
outlet or connection box.
1. Remove wall mounting bracket from the back of the
heater by depressing the spring latch at the top of
each bracket - see Fig. 2.
2. Fix the wall bracket securely to the wall through the
four screw holes provided.
3. Present the heater to the wall bracket, and engage
lower slots in the back with bracket.
4. Raise the heater to upright position and push the
heater onto bracket to engage top latch.
C
D
C D
GFP200W 800 300
GFP200B 800 300
255 Min.
Fig. 2
Page 2
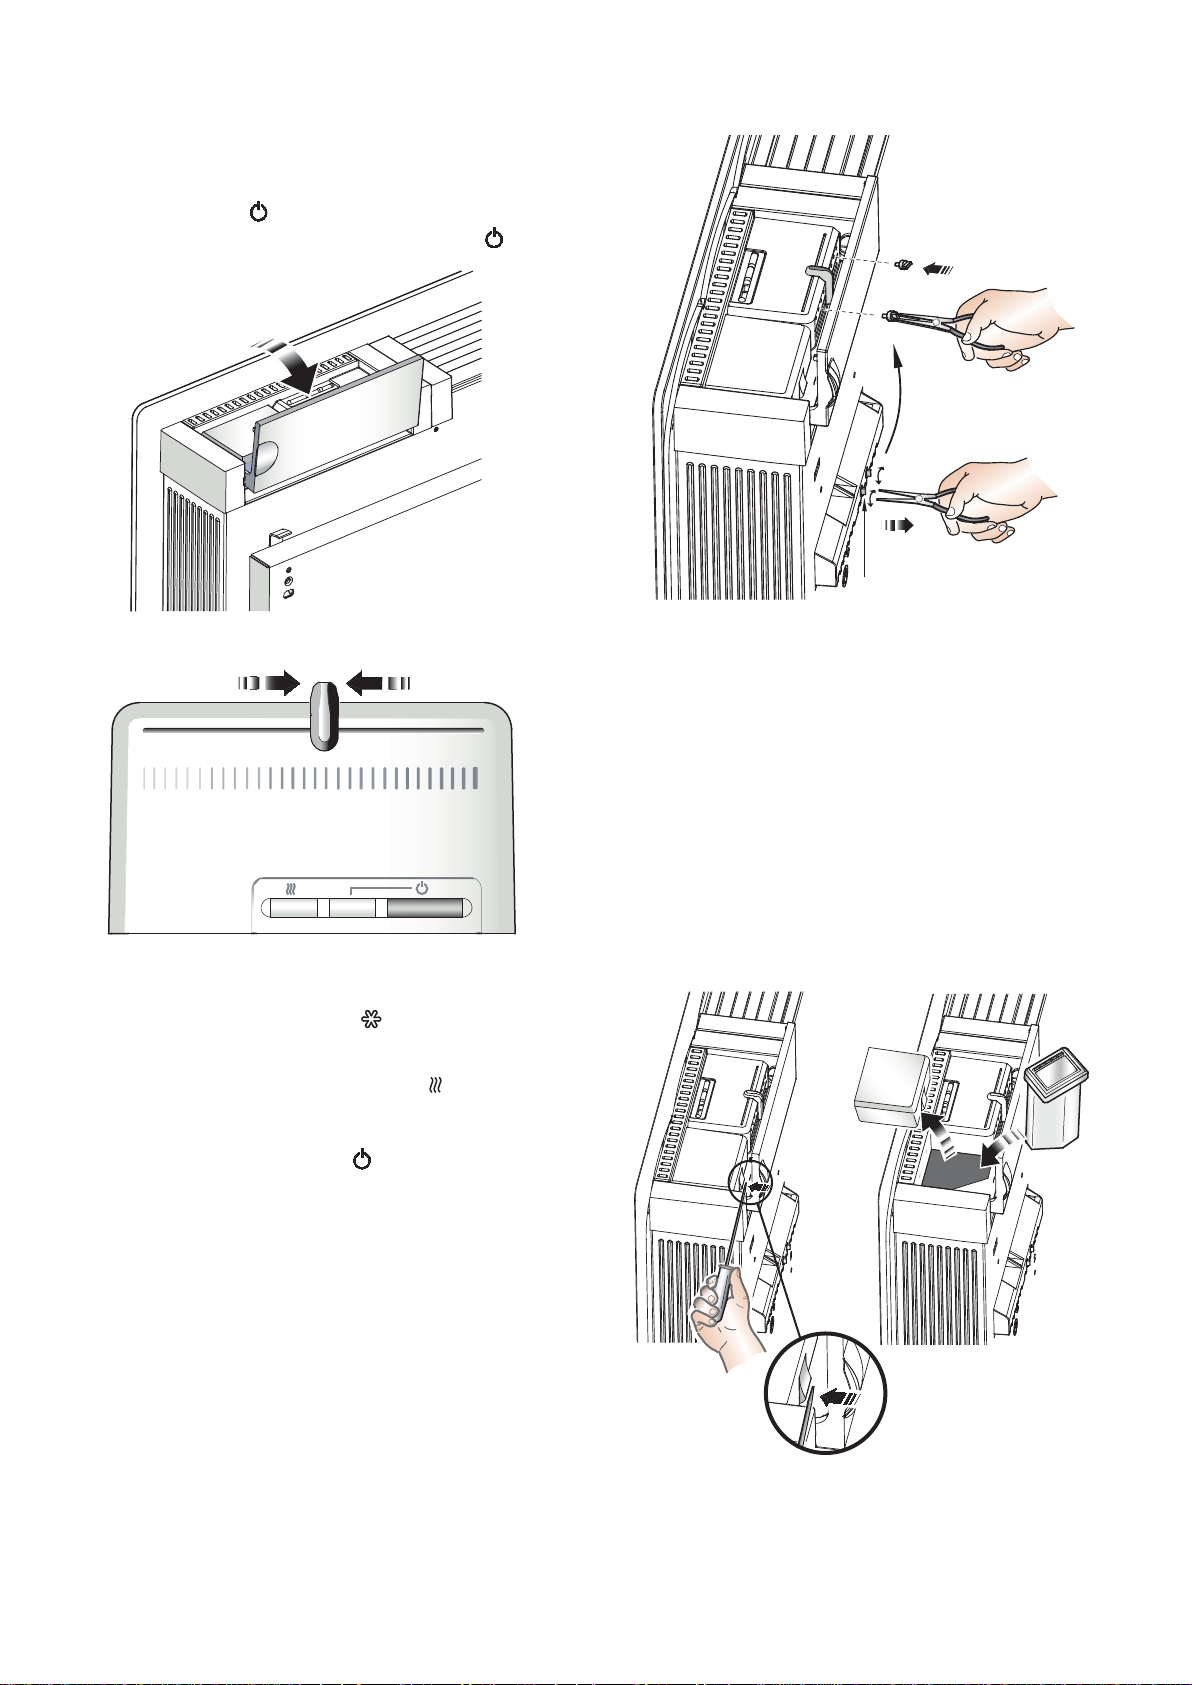
Operation
Switching On the Heater (see Fig. 3)
The controls are located on the right hand side on top of the
appliance, lift flap to access the controls - see Fig. 3.
The button marked ‘ ’ controls the electricity supply to the
electronic thermostat. An indicator beside the ‘
shows when the unit is powered ‘ON’.
’ button
‘x’ in Fig. 5) from the rear of the thermostat moulding using
pliers and inserting them in the preferred holes to limit the
slider movement.
Fig. 3
Setting Desired Temperature (see Fig. 4)
*
The heater is fitted with an adjustable thermostat enabling
the room temperature to be controlled by adjusting the slider
accordingly. The min setting ‘ ’ represents a room
temperature of approximately 5
protection against frost. The ‘MAX’ setting represents a room
temperature of approximately 300C. The ‘ ’ symbol glows
when the elements are actually heating.
Turn on the heater using the ‘
thermostat slider to the desired position. When the room
temperature has reached the desired level, the power to the
elements will be reduced, the heater will then maintain the
room temperature at the chosen level.
NOTE - Should your heater fail to come on when the
thermostat slider is at a low setting, this may be due to the
room temperature being higher than the thermostat setting.
0
C and may be used for
’ button and move the
MAX
Fig. 4
‘x’
Fig. 5
Accessory Modules
Optional accessory modules are available for use with this
range of heaters - see separate User Instructions for details
on the operation of each accessory module.
Before fitting a control module switch the heater off at the
mains supply.
To insert a module, the plug-in protective cover on the right
hand side of the thermostat unit at the back of the heater
must first be removed.
Insert a flat-head screwdriver into the side of the cover and
prise away from the heater - see Fig. 6.
Lift the cover away from the heater to reveal the slide in
compartment.
Background T emperature
When used in conjunction with a remote programming device
supporting a background/setback setting, the heater will
automatically operate at a room temperature setting of 50C
less than the thermostat setting when the programme is in
background/setback mode.
Limiting the thermostat setting
Before wall mounting the product the installer may wish to
limit the heat selection slider movement for the operator.
This may be achieved by removing the two plastic pins (see
Fig. 6
Insert the accessory module into the slot ensuring it is
positively located in position - see Fig. 6.
Switch the heater on at the mains supply.
Page 3

Safety - Overheat protection
For your safety this appliance is fitted with a thermal cutout. In the event that the product overheats for some reason,
the cut-out prevents excessive temperatures on the product
by cutting the power to the heater. Once the heater has
cooled down, it will reset automatically, it will continue to
cycle on and off automatically until the reason for
overheating is removed.
Cleaning
WARNING – AL W AYS DISCONNECT FROM THE POWER
SUPPL Y BEFORE CLEANING THE HEATER.
Before commencing cleaning, unplug the heater and allow
it to cool. Disconnect the electricity supply to the appliance.
The outside can be cleaned by wiping it over with a soft
damp cloth and then dried. Do not use abrasive cleaning
powders or furniture polish, as this can damage the surface
finish.
To release heater from the wall bracket for cleaning or
redecoration, depress latch on both brackets (see Fig. 2)
and hinge forward.
Recycling
At the end of the electrical products useful life it
should not be disposed of with household
waste. Please recycle where facilities exist.
Check with your Local Authority or retailer for
recycling advice in your country.
After Sales Service
Please see the separate Warranty leaflet for details of your
Warrantee & after sales service including contact details.
Should you require after sales service, please get in touch
with the supplier through whom you purchased the
appliance, or the contact number on your Warranty leaflet.
Please retain your receipt as proof of purchase.
Page 4

Energy Saving Tips
Around half the energy used in the home is for heating and
hot water, so using your heating system efficiently will not
only help the environment, but also save you money!
Energy efficiency tips for heating and hot water
1. Don’t set the temperature too high…
By reducing the thermostat setting by just 1ºC can reduce
your energy use by as much as 10%. And if you’re going
away for the winter, leave the thermostat on the frost protection
setting to provide protection from freezing at a minimum cost.
2. Use it where you need it…
Set the appropriate temperature on your heaters for the room
they are in; for example, leave the thermostat on a heater in a
spare bedroom on a lower setting.
3. Use it when you need it…
Use heaters fitted with timers or linked to central controllers
to turn the heating on only when you need it and automatically
switch it off when you don’t.
4. Curtains…
Close your curtains at dusk to stop heat escaping through
the windows.
5. Windows…
Nearly 25% of heat loss can occur through poorly insulated
frames and single glazing. If you can’t afford to double glaze
all your windows, go for the rooms you heat most.
6. Water …
Use a shower if you have one to save time, money and water.
o
Don’t set the thermostat too high on your water heater - 60
140oF is usually adequate for bathing and washing.
Put the plug in when running hot water in your sink - leaving
hot taps running is both wasteful and expensive.
Ensure dripping taps are repaired quickly. In just one day,
you could waste enough water to fill a bath
C/
2. Cooking
Use the right size pan for the food and cooker hob.
Keep saucepan lids on - this enables you to turn down the
heat.
Boil water for cooking in a kettle.
After Sales Contact Details
Glen Dimplex Australasia Ltd.
38 Harris Road,
East Tamaki, Auckland, New Zealand
Ph: +64 9 274 8265
Fax: +64 9 274 8472
Glen Dimplex Australia Pty Ltd
2/205 Abbotts Road
Dandenong South VIC 3175
Ph: 1300 556 816
Fax: 1800 058 900
Other Energy Saving Tips for Around the Home
1. Lights
Turn off lights whenever you leave a room for more than ten
minutes.
Use low-energy bulbs wherever you can as they use less
than a quarter of the electricity used by ordinary light bulbs
and last ten times longer!
Specification subject to change without prior notice
N16269
 Loading...