

Dimplex DuoHeat Duo300i, Duo400i, Duo500i, DuoHeat Duo500i, DuoHeat Duo400i Operating Instructions Manual
Page 1
Dimplex DuoHeat Radiator
Models: Duo300i, Duo400i and Duo500i
Operating Instructions
85601 Issue 5
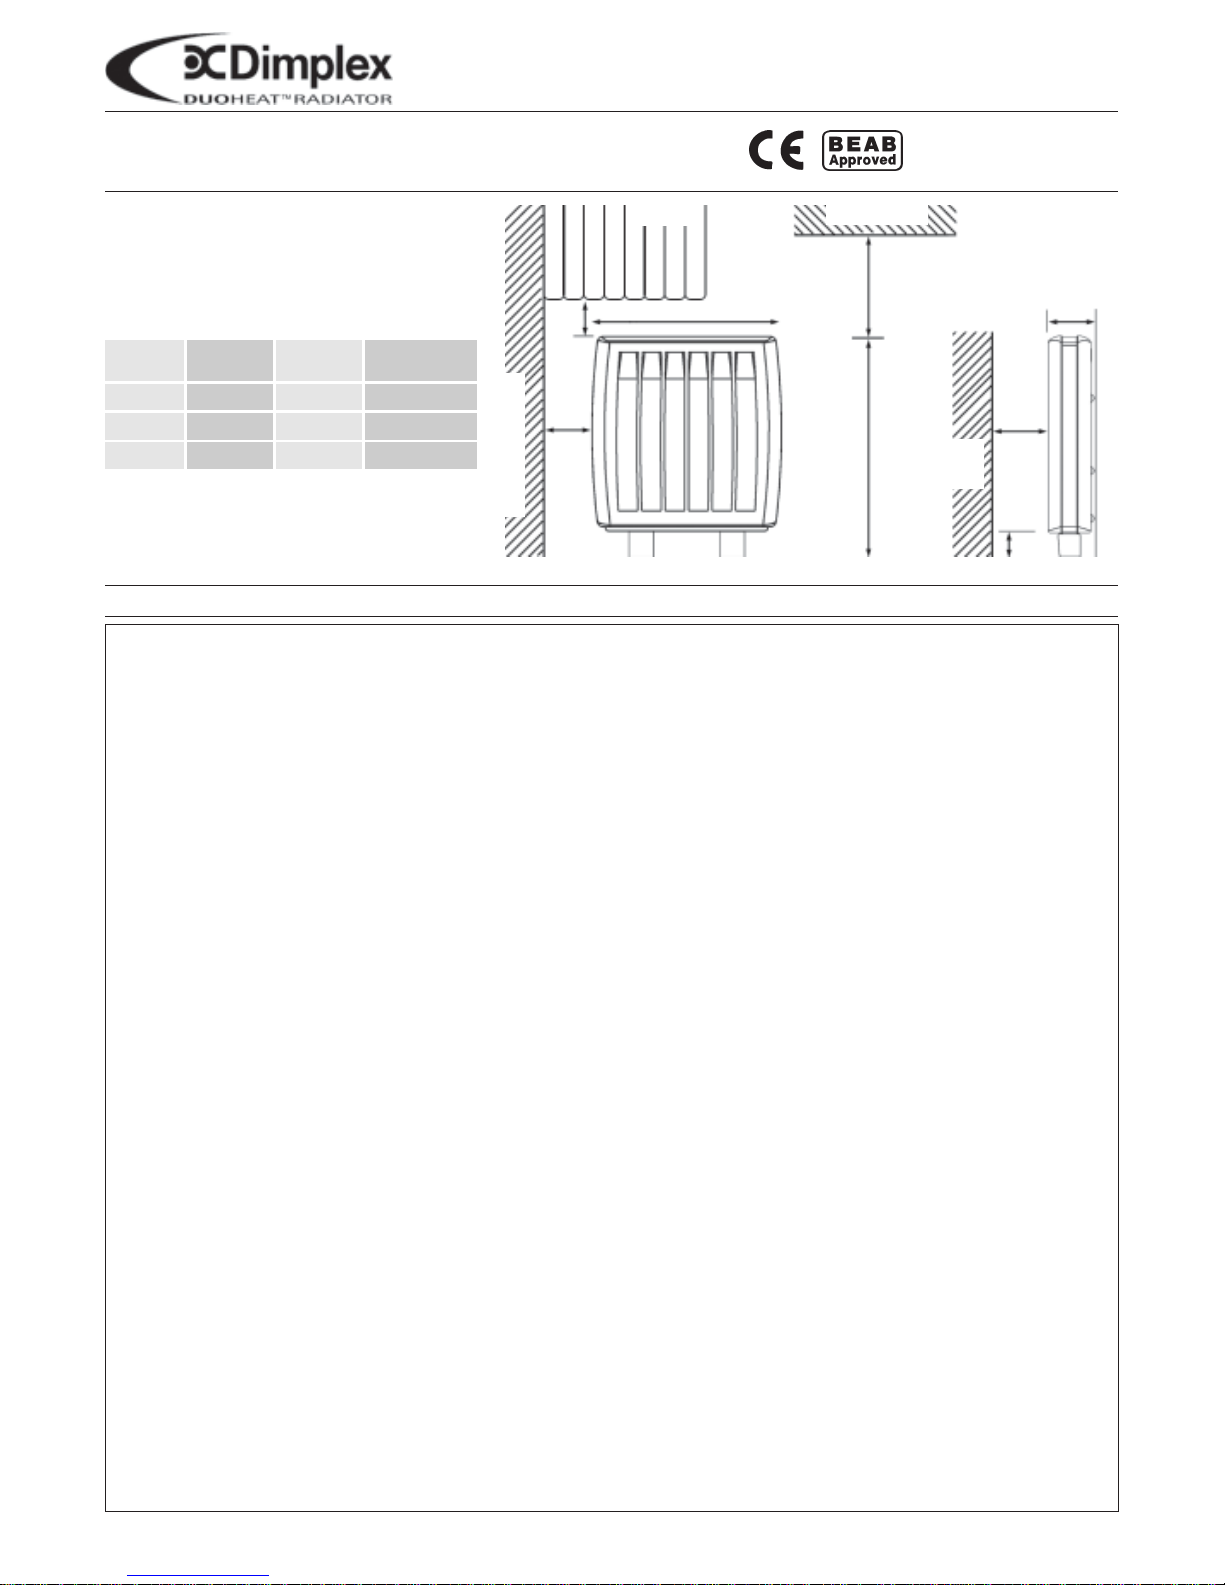
Dimensions (millimetres)
Models Specification Rated Charge
300i 1.3kW / 0.28kW 9.1kWh
400i 1.95kW / 0.34kW 13.65kWh
500i 2.6kW / 0.39kW 18.2kWh
THESE INSTRUCTIONS SHOULD BE READ CAREFULLY AND RETAINED FOR FUTURE REFERENCE
IMPORTANT SAFETY INFORMATION
WARNING - THE SURFACE OF THIS RADIATOR CAN BE HOT.
The surface temperatures of this radiator are within the requirements of EN60-335 the European Standard covering the safety
requirements of electric heating appliances, and momentary contact with any part of the radiator should not cause injury.
However, in order to be effective, radiators of any type do get hot, especially around the air outlet grille.
Therefore, if aged or infirm persons, or young children, are likely to be left unsupervised in the vicinity of a radiator
precautions should be taken to ensure that prolonged contact with the radiator cannot occur. We recommend that a
guard is fitted around the radiator, as is normal with some types of heating appliances in similar circumstances. If you require
further information on these guards, please contact Dimplex Customer Services on 0870 7270 101.
• WARNING - IN ORDER TO AVOID OVERHEATING, DO NOT COVER THE SURFACES OF THE RADIATOR AND DO
NOT OBSTRUCT AIR OUTLET GRILLES Surfaces of the radiator should not be covered or obstructed as this can cause
excessive temperatures that can be hazardous and may cause safety cut-outs to operate. For example, do not put clothes,
fabrics or any combustible materials on the radiator or allow curtains to come within 75mm (3”) of the top and ends of the
radiator. Do not allow furniture to be pushed up against the radiator, a minimum clearance of 150mm is critical for safety,
however to ensure radiator performance is not affected a clearance of 250mm is recommended.
DO NOT PLACE OBJECTS IN CONTACT WITH THE RADIATOR
• WARNING – The radiator must not be located below a socket outlet.
• PLEASE NOTE: THIS RADIATOR IS HEAVY AND MUST BE SECURELY FIXED TO A SOUND WALL. No attempt
should be made to move the radiator without first seeking specialist advice. If you are not happy that the radiator has
been securely fixed, please inform your installer.
UNDER NO CIRCUMSTANCES SHOULD YOU ATTEMPT TO MOVE THE RADIATOR OR LOOSEN WALL FIXINGS
WITHOUT FIRST REMOVING ALL ENERGY RETENTION CELLS FROM THE RADIATOR.
• DO NOT SIT OR STAND ON THE RADIATOR.
• DO NOT SPILL LIQUIDS ONTO THE APPLIANCE. IF YOU DO, SWITCH THE RADIATOR OFF AND GET A QUALIFIED
ELECTRICIAN TO CHECK IT.
• DO NOT POKE OBJECTS THROUGH THE GRILLE.
• DO NOT PLACE OBJECTS IN THE SPACE BEHIND THE RADIATOR.
• DO NOT USE POLISHES ON THE RADIATOR OR ON FURNITURE NEAR TO IT. The hot interior of the radiator can
produce paraffin smells from polish vapours which may last for a number of hours.
• In case of breakdown or other failure, switch off the radiator at both wall switches and contact your supplier or Dimplex Customer
Services. Always ensure that the radiator is switched off at the wall and fuse is removed before any repair is carried out.
• IMPORTANT - Due to the newness of the materials the radiator will produce a slight smell for the first few days of operation.
ROOMS MUST BE WELL VENTILATED AND YOUNG CHILDREN, CAGED BIRDS OR PERSONS WITH RESPIRATORY
COMPLAINTS MUST NOT REMAIN IN CLOSE PROXIMITY TO THE RADIATOR DURING THE FIRST 48 HOURS OF
THE COMMISSIONING PERIOD. Running the radiator at maximum temperature for the first few days will help to dispel
any smells more quickly.
Wall, Curtains or Furniture
Curtains
Shelf or Overhang
Furniture
or other
obstruction
110mm
150mm
min.
250mm
min.
75mm
min.
A
B
C
75mm
min.
Radiator Positioning A minimum clearance of 150mm to the
front of the radiator is essential for safety, however to enable the
radiator to attain its maximum performance ensure that any
furniture or other obstruction is not placed closer than 250mm.
Model
Height
A
Width
B
Depth
C
Duo300i 712mm 600mm 130mm +10mm
Duo400i 712mm 830mm 130mm +10mm
Duo500i 712mm 1060mm 130mm +10mm
Page 2
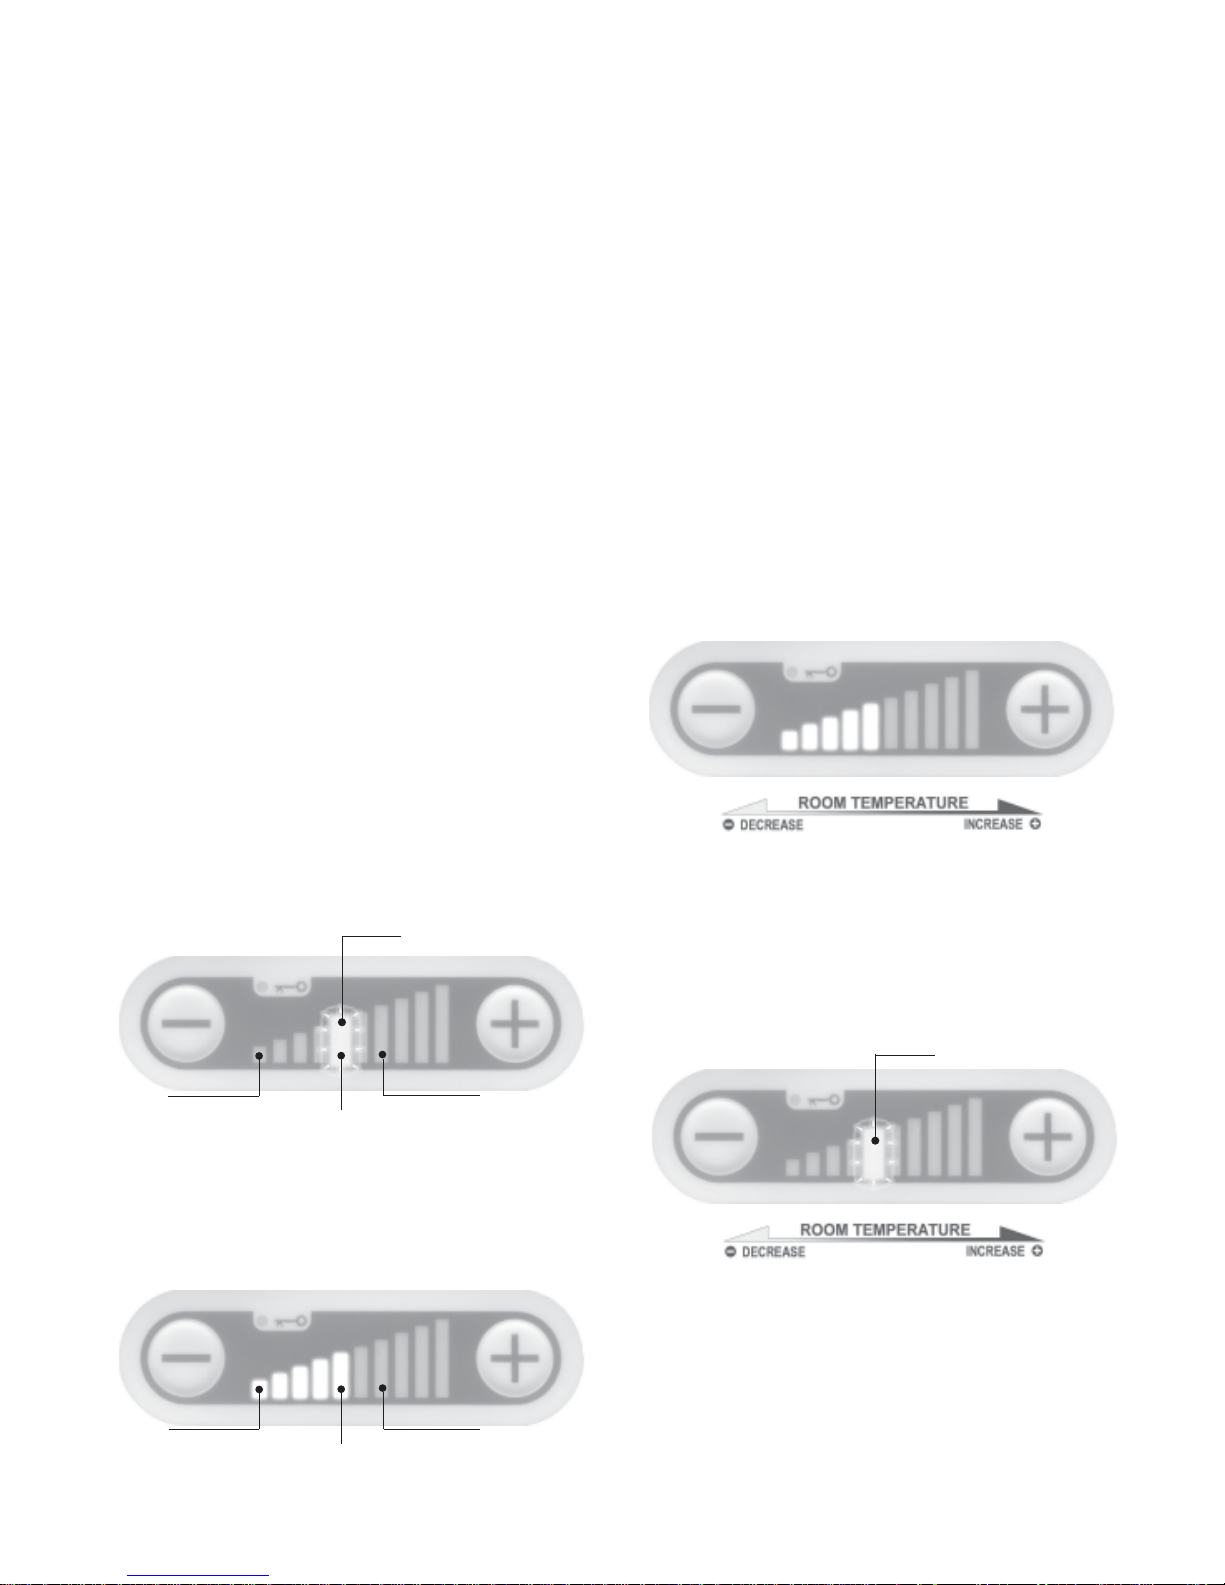
Controls
Your DuoHeat radiator works by providing continual warmth from a carefully balanced combination of “retained” and “radiant” heating. Some
energy is taken in by the radiator when electricity tariffs are low and this is supplemented whenever needed by top up heat from a radiant front
panel, to ensure room temperatures remain to your preferred level throughout the day.
DuoHeat has two output modes Comfort (Radiant Heat) and
Background (Retained Heat). Each needs to be set to the
correct level to provide the optimum level of comfort.
For DuoHeat to operate correctly, both electricity
supplies must be switched on at all times.
Initial Set Up
When the radiator is switched on red lights will illuminate on the
temperature control display located on the top right hand side of
the radiator. The radiator will automatically be in Comfort mode.
Depending on your comfort requirements, there are three
recommended settings:-
“Low” (e.g. holiday home during period of vacancy)
“Normal “ (e.g. average use)
“High” (e.g. sheltered accommodation)
Both the Comfort and Background heat settings need to be set
accordingly.
Please note that at high setting the room temperature will be
warmer with a corresponding increase in running costs.
“Normal” Setting
This is the factory default setting, however you should check this
has not been altered by the installer.
Set the Background setting at the mid point (5th bar). To do
this, press the
+
button until 10 bars are illuminated and continue
to hold for a further 7 seconds. Adjust by pressing the
+
or
-
buttons.
After 20 seconds, the display will revert to the standard Comfort
mode.
Set the Comfort at the mid point (5 bar) by pressing the
+
or
-
buttons to change the number of illuminated bars.
“Low” Setting
Reduce the Background setting to 1 bar.
Reduce the Comfort control to 1 bar.
“High” Setting
Increase the Background setting to between 7 bars.
Increase the Comfort control to between 7.
Operate the radiator for 24 hours before making further
adjustments to the settings.
Achieving Optimum Comfort Level
If the room is not at the desired temperature in the afternoon /
evening, adjust the Comfort Heat simply by pressing the + or
-
button to achieve a higher or lower room temperature.
If the morning room temperature is not at the desired level, then
adjust the Background heat level by pressing and holding down
the
+
button on the temperature control display until 10 red
lights are illuminated, continue to hold the
+
button for a further
7 seconds and a single red light will flash. Use the
+
button to
increase room temperature and the flashing red light will move
to the right. Use the
-
button to decrease room temperature
and the flashing red light will move to the left.
After 20 seconds the temperature control will display will return
to the Comfort Heat control mode.
It may require a few days fine-tuning to achieve an optimum
comfort level. On subsequent days increase or decrease
the temperature by one red light until a satisfactory comfort
level has been established. Once established the radiator
will automatically adjust to suit seasonal changes in
temperature. During mild weather background heat may not
operate as Comfort Heat will be sufficient.
In order for the radiator to operate effectively both electricity supplies must
be left switched ON at ALL times.
Low
Normal
High
Low
Normal
High
Flashing Bar
Flashing Bar
Page 3

Two Zone Wall Mounted Programmer (only applicable if Programmer is fitted to DuoHeat installation)
The programmer has two modes (i) AUTO or (ii) MANUAL
(i) In “Auto” mode, the radiator will change between Comfort and Setback modes (as shown in the table below) depending
on your seven day programme. To change the programme settings or temporarily over ride the programme, see the
appropriate programmer instructions.
(ii) “Manual” mode will override the auto programme setting. There are four “Manual” mode settings shown in the table below.
RX010006 - Pilot Wire, or
RX010007 - Mains Borne Signalling
H
J
Note: It will take 24 hours for room temperature to reach a comfortable level when resetting
from “Setback”, “Frost Protect”, “Off” to “Comfort”.
Everyday Operation
Once the Background level has been set (see Achieving
Optimum Comfort Level above), this should not require any
further adjustment.
Adjust the Comfort setting as required to suit your comfort needs
and occupancy pattern. For a short period of non occupancy
the control can be lowered slightly (we recommend by no more
than 2 bars) to save energy when the room is unoccupied and
increased again when more heat is needed.
Non Occupancy (vacant)
For long periods of non occupancy, reduce the Background
and the Comfort to their lowest settings.
It will take 24 hours for room temperature to reach a
comfortable level when resetting from Low settings to
Normal settings.
Child Lock Operation
To activate the child lock simultaneously depress the
+
and
-
buttons for a period of 3 seconds. After this period the child lock
is in operation and the LED will illuminate for short period and
then revert to the setback setting. The LED beside the key symbol
will illuminate while the child lock is in operation.
Once in the locked position, if either of the controls are operated
the LED will resume maximum illumination for a short period before
reverting back to the setback position.
To deactivate the child lock, depress the buttons simultaneously
again for 3 seconds and the buttons will become active.
Safety - Overheat Protection
For your safety, this appliance is fitted with thermal cut-outs. In
the event that the product overheats, the cut-outs switch the
radiator off automatically. In the event of these safety cut-outs
activating please inform the installer or Dimplex Customer Services
for advice in order to reset the cut-outs.
Programmer Mode Temperature Setting DuoHeat Radiator –
“Temperature control display setting”
Comfort Setting (radiator setting). Each
Comfort Radiator will operate as set in “controls” Display will remain as shown in Quick Start Guide
section of Operating Instructions.
Setback will reduce the Comfort setting by Display will show two red bars less.eg. if “Comfort”
Setback 2°C, and will leave the Background displays 5, “Setback” will display 3 red bars.
unaffected.
Frost Protect Room temperature will be maintained at Display will show one red bar.
16°C with Background operating.
This will completely switch off radiators,
Off e.g. during the summer heating may not be Display will show one red bar.
required.
Page 4

Glen Dimplex UK Limited
Millbrook House
Grange Drive
Hedge End
Southampton
Hampshire SO30 2DF
This appliance complies with the European Standards EN 60 335-1, EN 60 335-2-61, EN 61000-3-2,
EN 61000-3-3, EN 55014 and EN55104 for Safety & Electromagnetic Compatibility.
These standards cover the requirement of the EMC Directives 89/336 & 73/23
Cleaning
To maintain the external appearance of the radiator it need only be wiped over occasionally with a dry duster. During the summer months,
or at other times when the appliance is not is use and is completely cold, the opportunity should be taken to wipe over with a damp cloth.
Do not use abrasive cleaning powders or furniture polish.
Discoloration of wall finishes can sometimes occur immediately above a radiator due to the properties of some paints and decorating
materials or the presence of environmental impurities in the air (such as soot or incense generated from the burning of candles etc.).
After Sales Service
Your Dimplex DuoHeat radiator is guaranteed for two years from date of purchase. We undertake to exchange or repair free of
charge within this period any part found to be defective due to a manufacturing fault. This guarantee in no way prejudices your rights
under common law.
Should you require after sales assistance, please contact Dimplex Customer Services on the number listed below.
Please do not return a faulty appliance or part of an appliance to us as this may result in transit damage and/or delay in providing
service. Let us know the difficulty quoting the products model and serial numbers. We will then take the appropriate action.
© Glen Dimplex UK Limited
All rights reserved. Material contained in this publication may not be reproduced in whole or part, without prior permission in writing from Glen Dimplex UK Limited.
Customer Help Line 0845 600 5111
8am–5pm Mon–Fri and 8:30am–1pm Sat (Autumn–Winter only)
Fax 01489 773 050
Web-site www.dimplex.co.uk
e-mail customer.services@glendimplex.com
Republic of Ireland 01 842 4833
 Loading...