

Page 1

Dimplex
Dimplex
Dual-Cool
Page 2
2
Important Safeguards.
1. Read all Instructions.
2. Disconnect the power plug before dismantling, assembling or before cleaning.
3. Avoid touching mobile parts of the fan.
4. Be sure fan is on dry and even surface.
5. Never insert fingers, pencils or any other objects through the guards whenever the
power plug is connected, especially while running.
6. The appliance is not intended for use by young children or infirm persons without
supervision.
7. Young children or infirm persons should be supervised to ensure that they do not
play with the appliance.
8. Do not use the appliance for any other purpose than its intended use.
9. The fan must not be used if the guards are not fastened according to instructions.
10. When the power cord is damaged, it must be replaced by the manufacturer or its
service agent or a similarly qualified person in order to avoid a hazard.
11. Do not use your appliance with an extension cord unless it has been checked and
tested by a qualified electrician or electrical supplier.
Read all Instructions before operating.
Dimplex
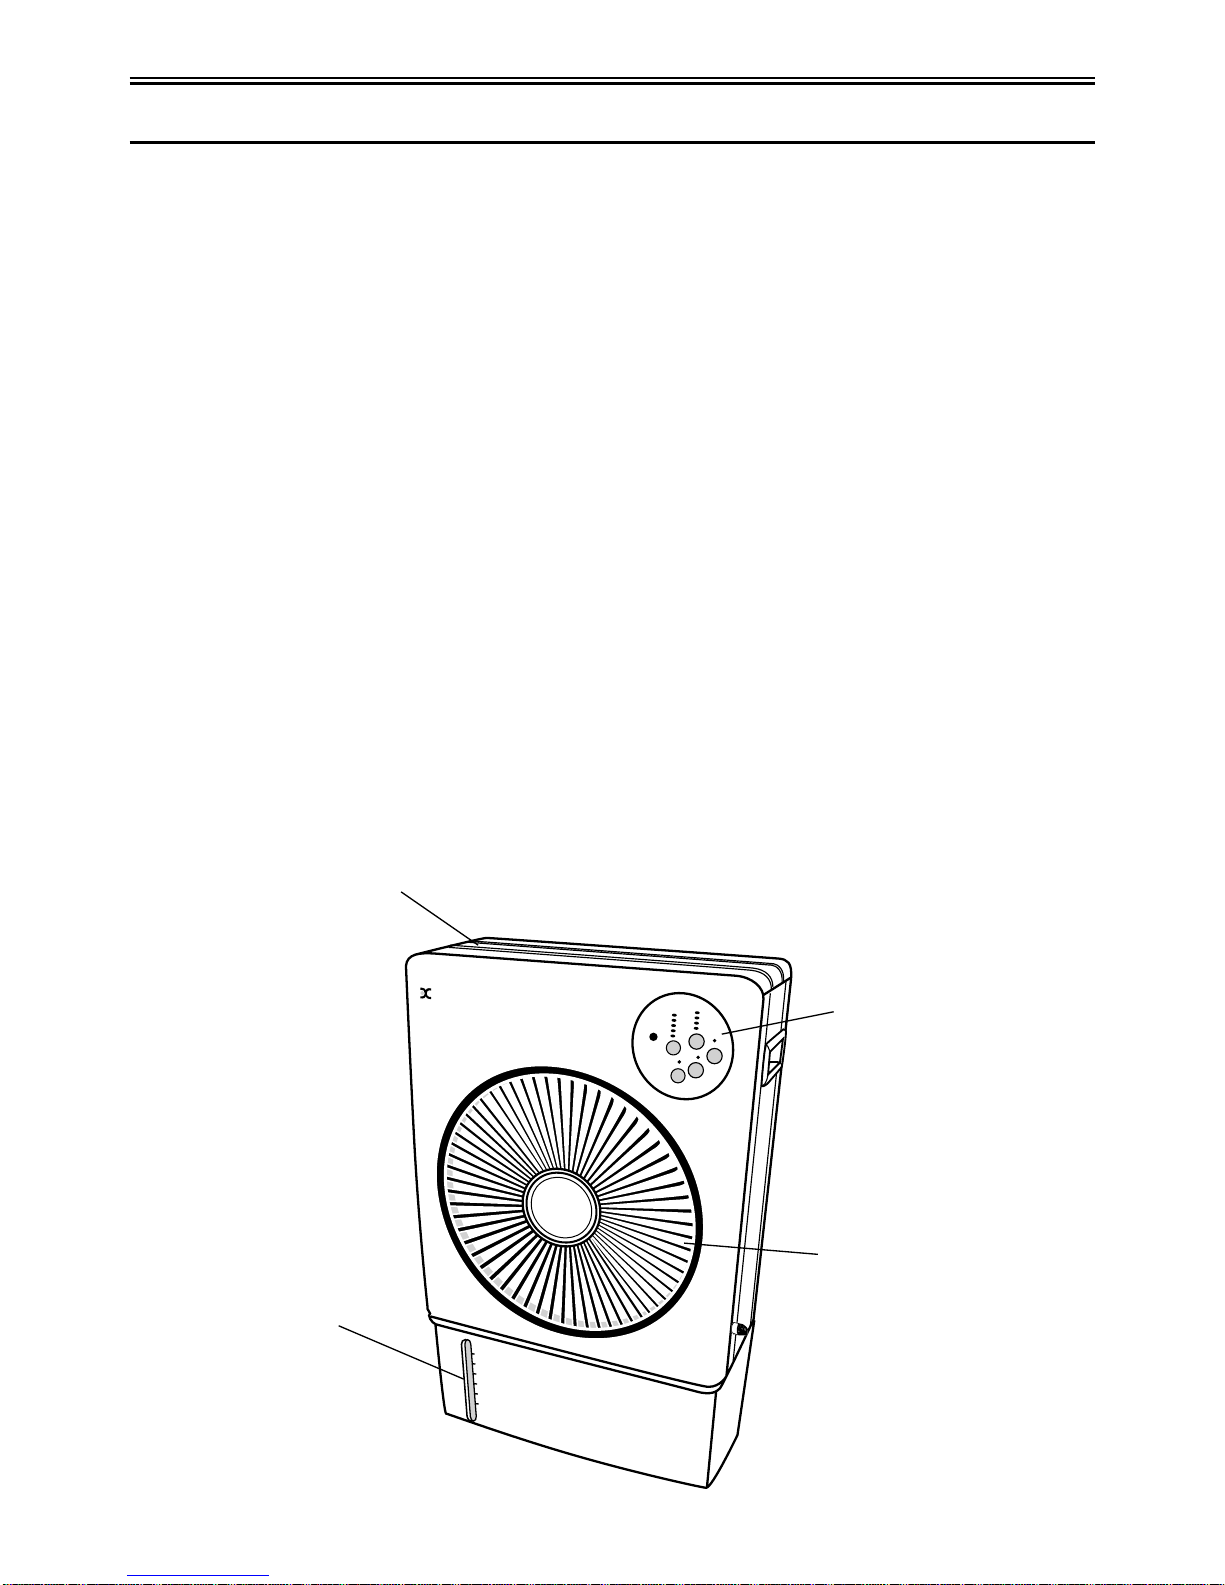
Ice chamber
Water level
guage
Fan louver
Control
panel
Page 3

3
Product Introduction.
The Dual-Cool works in a similar way as the ocean breeze.The wind blowing over the
surface of the water causes the water to evaporate.The water vapour mixes with the
air turning it into a cooling breeze.
Water in the Dual-Cool tank is pumped to the top of the unit then seeps down the
curtain.
Operation.
• Unpack the Dual-Cool from it’s box.
• Place the Dual-Cool on a level surface.
• Slowly fill the tank to the maximum level with clean, cold water by pouring into the
top Ice Chamber or directly into the tank by lifting the rear filter. Ice cubes can also
be added to the top Ice Chamber to increase the cooling effect.
• The unit can also be used with out water, just like a fan.
• For best results we recommended that the Dual-Cool be positioned with the back of
the unit towards an open door or window. Always open another door or window on
the other side of the room to create airflow.
• Plug the unit into the power outlet.
• Be careful if moving the unit around with water in the tank, water may splash out of
the unit.
• Do not obstruct the ventilation inlet or outlet.
On/Off
The indicator on the control panels will illuminate when the unit is connected to the
power.
Press the ‘ON/OFF’ on the Control Panel or Remote, the fan will start at low speed,
push again and the unit will turn off.
Speed
Each time the Speed button is pressed the fan speed increases ‘L’ Low,‘M’ Medium,‘H’
High returning to ‘L’ Low.
Swing
Press the SWING button to start the Louver rotation, press again and the rotation will
stop.
Timer
With each press the timing will increase in lots of 30 minutes, 1 hour, 1.5 hours, 2 hours
up to total of 7.5 hours.
Page 4

4
Cool
Press this to start the cooling effect. Please note the water tank must be full of water.
NEVER RUN THE COOLING WITHOUT WATER IN THE TANK.
Mode – On The Remote Control Only.
Pushing the MODE on the Remote Control will select Random or Sleep modes.The
modes are described in the follow diagrams.
End of Season Cleaning for Storage and General Cleaning
• The rear dust filter should be removed and cleaned every 2 weeks
• We recommend that you clean the water tank a least once a month. Remove the plug
from the power outlet. Remove the drain plug and drain the tank.Wipe the inside of
the tank curtain with a clean wet cloth where possible. Replace the plug and refill
with clean water unless the unit is to be stored away.
Specification
Voltage & Frequency: 220/240 V 50Hz
Description Net Power Water Water Ice Dimension
Weight Consumption Capacity Tank
Ice Cooler 6.8 kgs 80 W Est 0.7 litres/h 10 litres 0.9 litres L: 43.5 cm
W: 34 cm
L: 64.5 cm
Page 5

5
Operating Block Diagram Analysis.
RANDOM MODE
STRONG RANDOM WIND PATTERN
MEDIUM RANDOM WIND PATTERN
LOW RANDOM WIND PATTERN
0
S
M
L
2.5 5 7.5 10 12.5 15 17.5 20 22.5 25 27.5 30 32.5 35 37.5 40 42.5 45 47.5 50 52.5 55 57.5 60 62.5 65 67.5 70 72.5 75 77.5 80
0
S
M
L
2.5 5 7.5 10 12.5 15 17.5 20 22.5 25 27.5 30 32.5 35 37.5 40 42.5 45 47.5 50 52.5 55 57.5 60 62.5 65 67.5 70 72.5 75 77.5 80
0
S
M
L
2.5 5 7.5 10 12.5 15 17.5 20 22.5 25 27.5 30 32.5 35 37.5 40 42.5 45 47.5 50 52.5 55 57.5 60 62.5 65 67.5 70 72.5 75 77.5 80
(SEC)
(SEC)
(SEC)
SPEED
Low Middle
0.5hr 1hr 2hr 4hr
Push Push Push
Push
Push Push Push
Push
Off
Off
Normal Rhythm Sleep
On
TIMER
SWING
MODE
ON/OFF
High
Push Push Push Push Push
Page 6

6
Operating Block Diagram Analysis cont.
SLEEP MODE
STRONG SLEEP WIND PATTERN
Strong
Random wind
Medium
Random wind
Low Random wind
Low Random wind
S
M
0.5 HR 1 HR TIME
L
MEDIUM SLEEP WIND PATTERN
Medium
Random wind
S
M
0.5 HR 1 HR TIME
L
LOW SLEEP WIND PATTERN
Low Random wind
S
M
0.5 HR 1 HR TIME
L
 Loading...