

Page 1
Digital Ceramic Heater
DPH1563
IMPORTANT INSTRUCTIONS
When using electrical appliances, basic precautions should
always be followed to reduce the risk of re, electric shock,
and injury to persons, including the following:
1. Read all instructions before using this heater.
2. This heater is hot when in use. To avoid burns, do not let
bare skin touch hot surfaces. Keep combustible materials, such as furniture, pillows, bedding, papers, clothes,
etc. and curtains at least 3 ft. (0.9 m) from the front of the
heater.
3. Extreme caution is necessary when any heater is used
by or near children or invalids and whenever the unit is
left operating and unattended.
4. Always unplug the heater when not in use.
5. Do not operate any unit with a damaged cord or plug, or
if the heater has malfunctioned, or if the heater has been
dropped or damaged in any manner. Return heater to
authorized service facility for examination, electrical or
mechanical adjustment or repair.
6. Do not use outdoors.
7. The heater is not intended for use in bathrooms, laundry
areas and similar indoor locations. Never locate heater
where it may fall into a bathtub or other water container.
8. Do not run the cord under carpeting. Do not cover cord
with throw rugs, runners or the like. Arrange cord away
from trafc area and where it will not be tripped over.
9. To disconnect the unit, turn the controls off, then remove
the plug from the outlet.
10. Do not insert or allow foreign objects to enter any ventilation or exhaust opening as this may cause an electric
shock or re, or damage to the heater.
11. To prevent a possible re, do not block air intake or ex-
haust in any manner. Do not use on soft surfaces, like a
bed, where openings may become blocked.
12. All electrical heaters have hot and arcing or sparking
parts inside. Do not use in areas where gasoline, paint,
or ammable liquids are used or stored or where the unit
will be exposed to ammable vapours.
13. Do not modify the heater. Use it only as described in
this manual. Any other use not recommended by the
manufacturer may cause re, electric shock or injury to
persons.
14. To reduce the risk of electric shock, this appliance has a
polarized plug (one blade is wider than the other). This
plug will t in a polarized outlet only one way. If the plug
does not t fully in the outlet, reverse the plug. If it still
does not t, contact a qualied electrician to install the
proper outlet. Always plug heaters directly into a wall
outlet/receptacle. Never use with an extension cord or
relocatable power tap (outlet/power strip).
15. Always use properly grounded, fused and polarized
outlets.
16. Disconnect all power supply before performing any
cleaning, maintenance or relocation of the unit.
17. When transporting or storing the unit and cord, keep in a
dry place, free from excessive vibration and store so as
to avoid damage.
SAVE THESE INSTRUCTIONS
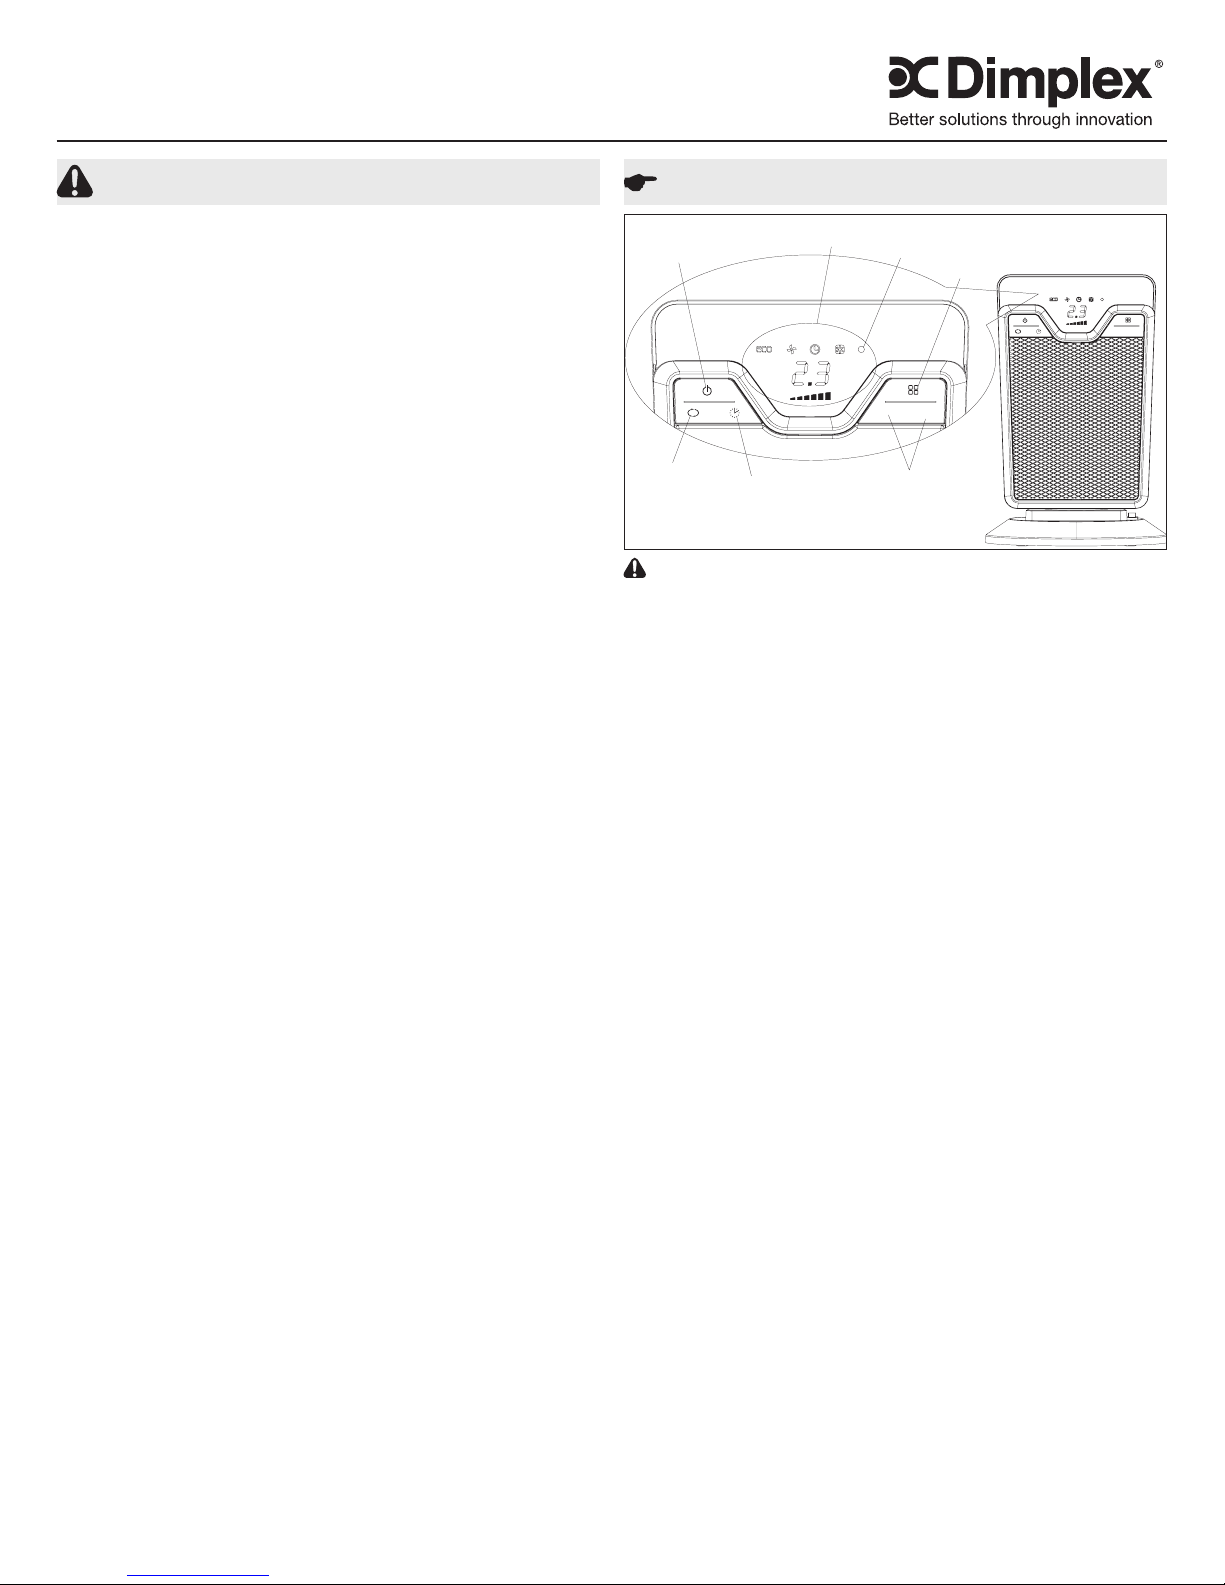
Operation
Figure 1
A
C
CAUTION: Ensure that the unit is placed on a rm, level
surface and not located directly below a convience electrical outlet before operation.
!
NOTE: The unit is equipped with a tip over safety switch
where if the unit is not sitting on a level surface, if it is lifted or
tipped, it will turn off.
When the heater is initially plugged in, there will be three
beeps and the red light (G) will come on indicating that there
is power to the unit. The red light will remain lit until the heater is unplugged from the electrical outlet.
D
Manual Controls (Figure 1)
The heater can be turned ON by pressing the On/Off button
(A). This will turn the unit on to the last setting it operated in
and the current temperature will be displayed on the screen
(F).
!
NOTE: The temperature scale can be changed by hold-
ing down the “+” button for 8 seconds.
Control Settings
The heater has ve different controls settings which can be
cycled through by pressing the MODE selection button (E).
The control settings are:
• ECO - In this setting the user can using the temperature
adjustment buttons (B) to set the desired room temperature and the unit will control the heater and fan to maintain that temperature. The room temperature can be set
between 60 - 90 oF (16 - 32 oC).
To adjust set temperature, Press the button + to increase
the desired temperature and the button - to decrease the
desired temperature.
!
NOTE: When the air temperature reaches the set temperature, the heater will turn off and the fan will run for 25
seconds to cool down. When the air temperature drops 2 degrees below the set temperature, the unit will come back on.
• FAN - The fan setting runs just the fan to circulate air
throughout the room.
• ANTI-FREEZE - The heater will run to keep the room at
45 oF (7 oC), to prevent freezing.
!
NOTE: The anti-freeze temperature cannot be adjusted.
• LOW HEAT - In this setting the heater and fan will run at
the minimum power level.
• HIGH HEAT - The heater will operate at maximum power
for rapid heating of a room.
F
G
E
- +
- +
B
7212890100R07
Page 2
Oscillation
If you want the appliance to distribute the airow over a larger area, press the oscillation button (C). The heater will then
oscillate right and left. To stop the oscillation in the desired
position, just press oscillation button (C) again.
!
NOTE: When adjusting the set temperature or the mode,
the heater will stop oscillating, then in 5 seconds it will being
oscillating again.
24-Hour Digital Timer
This function can be activated from any operating mode.
Delayed switch-on - With the appliance in the OFF position,
press the timer button (D). The display shows the clock symbol and the time remaining before the unit switches on.
To set the timer, use the + and - adjustment buttons (B),
then wait a few seconds for the programming to be set. The
display shows the clock symbol to indicate you have set the
timer. When the programmed time has been reached, the
appliance turns on with the same settings it had during the
previous operation.
Delayed shut-off - With the appliance ON, press the timer
button (D). The display shows the clock symbol and the time
remaining before shut-off.
To set the timer, use the + and - adjustment buttons (B), then
wait a few seconds for the programming to be set. The display returns to show the current settings and the symbol to
indicate you have set the timer. When the programmed time
as been reached the appliance shuts off automatically.
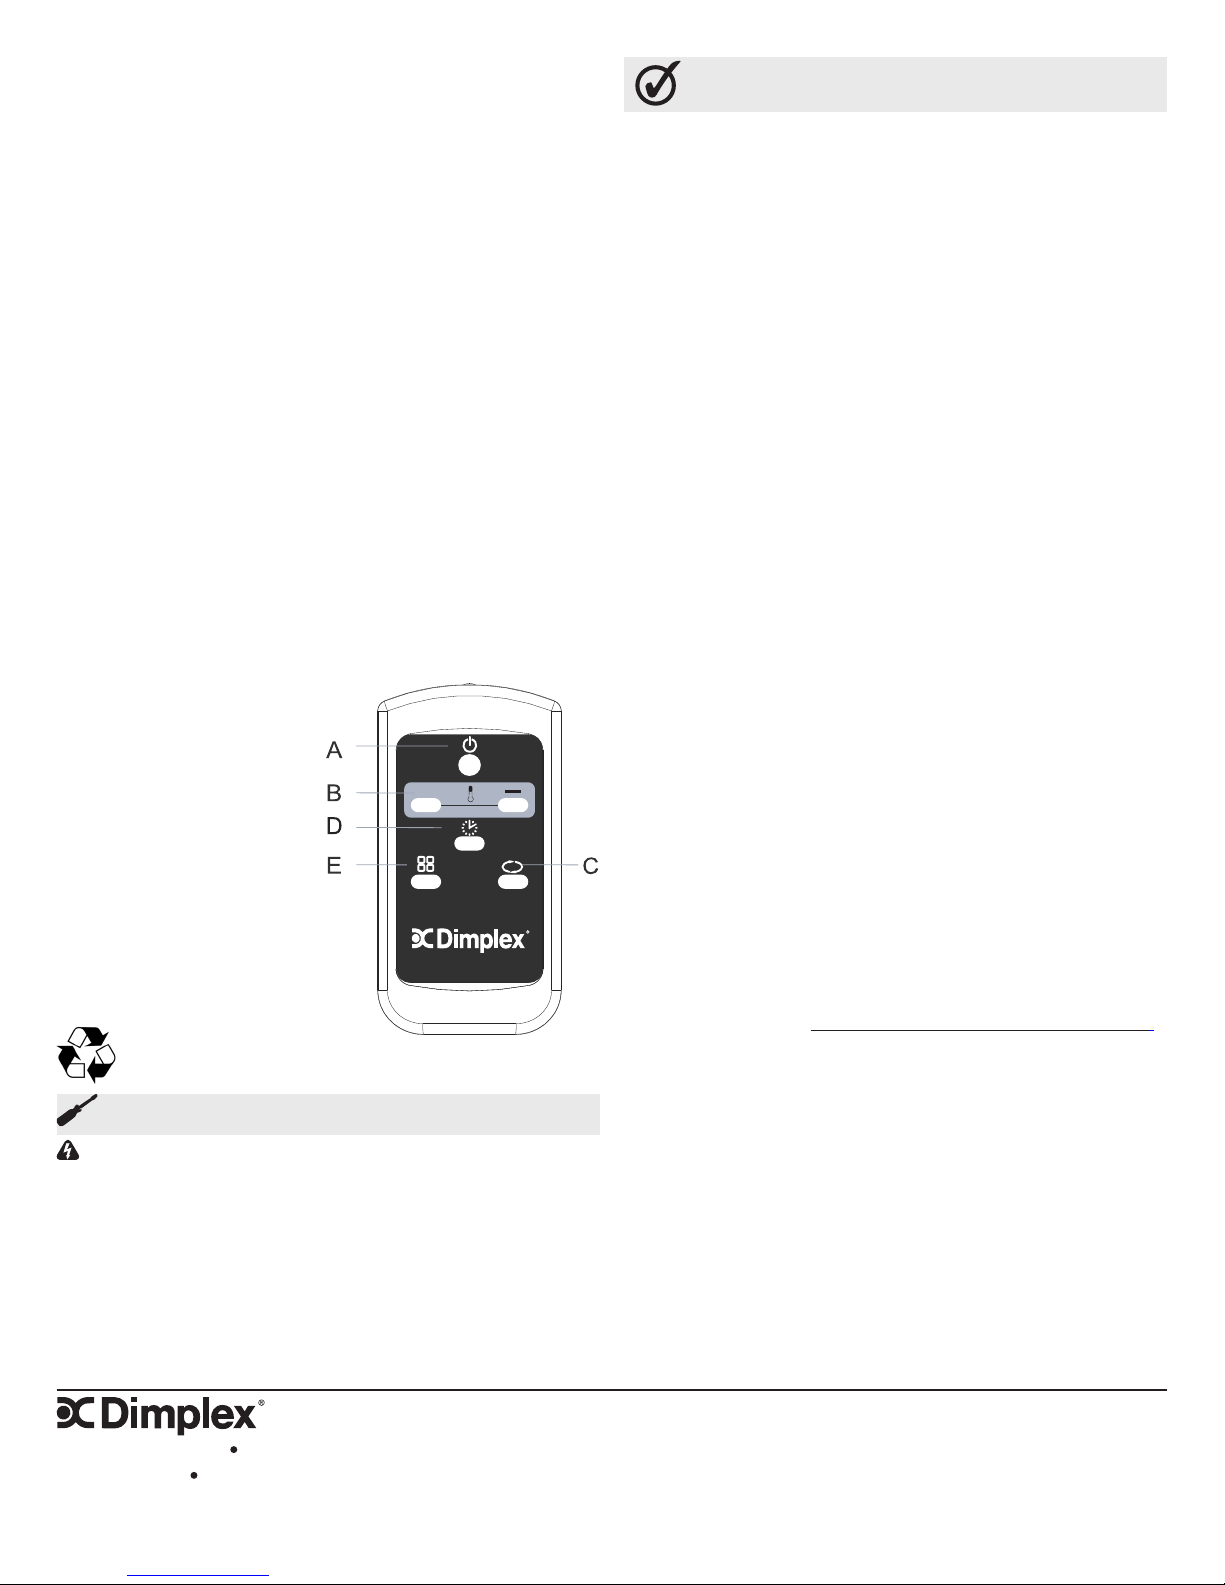
Remote Control
The controls on the remote
control correspond to the
ones that are on the heater.
See the manual controls for
details.
Battery Replacement
1. On the back of the remote
control, turn the battery
cover counter-clockwise
to remove the cover.
2. Correctly install one (1) 3
Volt (CR2032) battery in
the battery holder.
3. Close the battery cover.
Battery must be recycled
or disposed of properly. Check with your Local Authority or Retailer for recycling advice in your area.
Maintenance
WARNING: Disconnect power before attempting any
maintenance or cleaning to reduce the risk of re, electric
shock or damage to persons.
It is essential that the heater is not operated with an accumu-
lation of dust or dirt on the heater, as this can cause a build
up of heat and eventual damage. Any build up of dust or dirt
can be easily removed using a vacuum cleaner. It is recommended that the heater be inspected regularly, depending
upon conditions and at least at yearly intervals.
The surface of the unit can be cleaned using a warm damp
cloth. Do not use abrasive cleaners.
Figure 2
+
Warranty
Products to which this limited warranty applies
This limited warranty applies to your newly purchased electric heater. This
limited warranty applies only to purchases made in any province of Canada
except for Yukon Territory, Nunavut, or Northwest Territories or in any of the
50 States of the USA (and the District of Columbia) except for Hawaii and
Alaska. This limited warranty applies to the original purchaser of the product
only and is not transferable.
Products excluded from this limited warranty
Products purchased in Yukon Territory, Nunavut, Northwest Territories, Hawaii, or Alaska are not covered by this limited warranty. Products purchased
in these States, provinces, or territories are sold AS IS without warranty or
condition of any kind (including, without limitation, any implied warranties or
conditions of merchantability or tness for a particular purpose) and the entire risk of as to the quality and performance of the products is with the pur-
chaser, and in the event of a defect the purchaser assumes the entire cost of
all necessary servicing or repair.
What this limited warranty covers and for how long
Products covered by this limited warranty have been tested and inspected
prior to shipment and, subject to the provisions of this warranty, products are
to be free from defects in material and workmanship for a period of 1 year
from the date of the rst purchase of such product.
The limited 1 year warranty period also applies to any implied warranties that
may exist under applicable law. Some jurisdictions do not allow limitations
on how long an implied warranty lasts, so the above limitation may not apply
to the purchaser.
What this limited warranty does not cover
This limited warranty does not apply to products that have been repaired or
otherwise altered. This limited warranty does further not apply to defects resulting from misuse, abuse, accident, neglect, incorrect installation, improper
maintenance or handling, or operation with an incorrect power source.
What to do when your unit ceases to operate as described in this manual
Defects must be brought to the attention of your local dealer. Please have
proof of purchase, catalogue/model and serial numbers available when
calling. Limited warranty service requires a proof of purchase of the
product.
What your local dealer will do in the event of a defect
In the event a product or part covered by this limited warranty is proven to
be defective in material or workmanship during the 1 year limited warranty
period you have the following rights:
• This limited warranty does not entitle the purchaser to on-site or in-home
services.
• The purchaser is responsible for removal and transportation of such
product or part (and any repaired or replacement product or part) to and
from the authorized dealer’s or service agent’s place of business.
• Your dealer will not be responsible for, and the limited warranty services
shall not include, any expense incurred for installation or removal of the
product or part (or any replacement product or part) or any labour or
transportation costs. Such costs shall be the purchaser’s responsibility.
• The retailer will replace the product or refund the purchase price.
What your local dealer is also not responsible for:
IN NO EVENT WILL YOUR DEALER, OR ITS DIRECTORS, OFFICERS,
OR AGENTS, BE LIABLE TO THE PURCHASER OR ANY THIRD PARTY,
WHETHER IN CONTRACT, IN TORT, OR ON ANY OTHER BASIS, FOR
ANY INDIRECT, SPECIAL, PUNITIVE, EXEMPLARY, CONSEQUENTIAL,
OR INCIDENTAL LOSS, COST, OR DAMAGE ARISING OUT OF OR IN
CONNECTION WITH THE SALE, MAINTENANCE, USE, OR INABILITY
TO USE THE PRODUCT, EVEN IF YOUR DEALER OR ITS DIRECTORS,
OFFICERS, OR AGENTS HAVE BEEN ADVISED OF THE POSSIBILITY OF SUCH LOSSES, COSTS OR DAMAGES, OR IF SUCH LOSSES,
COSTS, OR DAMAGES ARE FORESEEABLE. IN NO EVENT WILL YOUR
DEALER, OR ITS OFFICERS, DIRECTORS, OR AGENTS BE LIABLE FOR
ANY DIRECT LOSSES, COSTS, OR DAMAGES THAT EXCEED THE PURCHASE PRICE OF THE PRODUCT.
SOME JURISDICTIONS DO NOT ALLOW THE EXCLUSION OR LIMITATION OF INCIDENTAL OR CONSEQUENTIAL DAMAGES, SO THE ABOVE
LIMITATION OR EXCLUSION MAY NOT APPLY TO THE PURCHASER.
How State and Provincial law apply
Thislimitedwarrantygivesyouspeciclegalrights,andyoumayalso
have other rights which vary from jurisdiction to jurisdiction. The provisions of the United Nations Convention on Contracts for the Sale of
Goods shall not apply to this limited warranty or the sale of products
covered by this limited warranty.
1367 Industrial Road Cambridge ON Canada N1R 7G8
1-888-346-7539 www.dimplex.com
In keeping with our policy of continuous product improvement, we reserve the right to make changes without notice.
© 2013 Dimplex North America Limited
 Loading...