

Page 1
08/19635/4 Issue 4
UK NL FR
Chalbury CHB20BR & CHB20CH Fires
Page 2

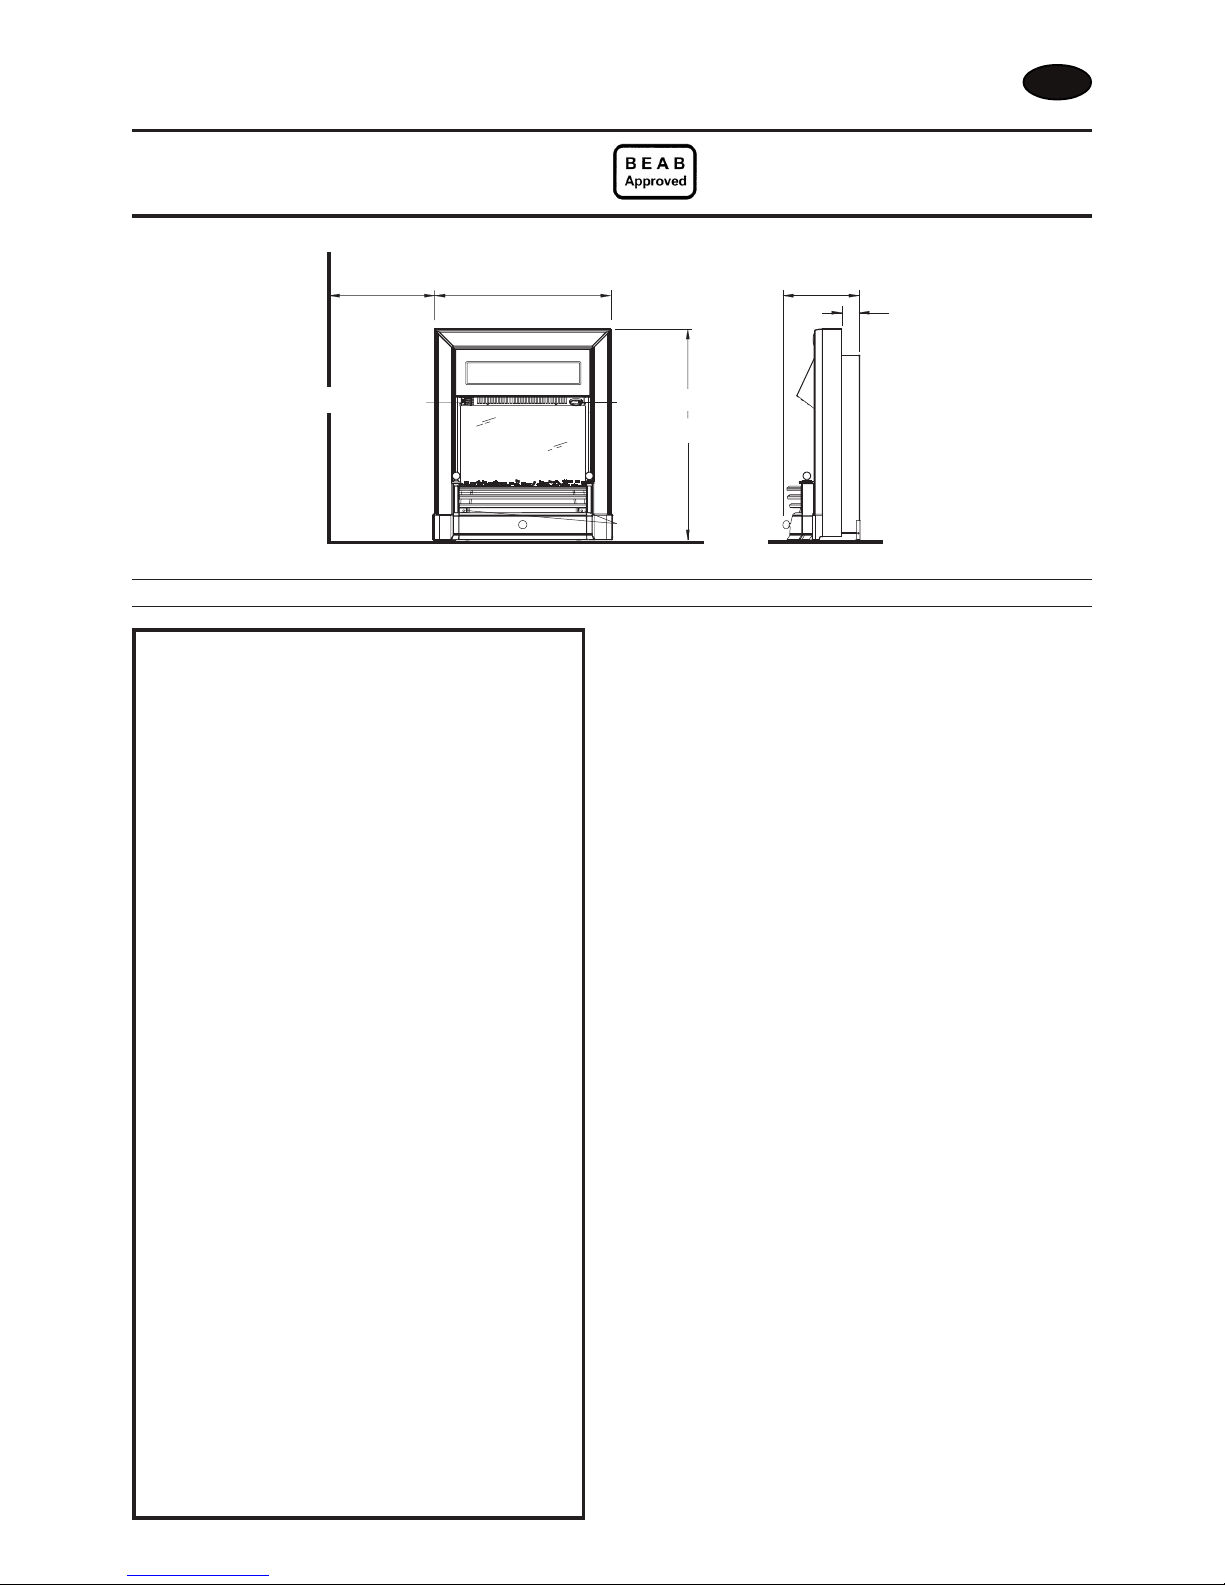
Dimensions
(millimetres)
Installation and Operating Instructions
Dimplex Chalbury Fire
Model(s) : CHB20BR & CHB20CH
Important Safety Advice:
When using electrical appliances, basic precautions
should always be followed to reduce the risk of fire,
electrical shock, and injury to persons, including the
following:
••
••
• If the appliance is damaged, check with the
supplier before installation and operation.
••
••
• Do not use outdoors.
••
••
• Do not use in the immediate surroundings of a
bath, shower or swimming pool.
••
••
• Do not locate the heater immediately below a fixed
socket outlet or connection box.
••
••
• Do not cover the heater. Do not place material or
garments on the heater, or obstruct the air
circulation around the heater, for instance by
curtains or furniture, as this could cause
overheating and a fire risk.
••
••
• This appliance is not intended for use by children
or other persons without assistance or
supervision if their physical, sensory or mental
capabilities prevent them from using it safely.
Children should be supervised to ensure that they
do not play with the appliance.
••
••
• Do not use this heater in series with a thermal
control, a program controller, a timer or any other
device that switches on the heat automatically,
since a fire risk exists when the heater is
accidentally covered or displaced.
••
••
• Ensure that furniture, curtains or other
combustible material are positioned no closer
than 1 metre from the heater.
••
••
• In the event of a fault unplug the heater.
••
••
• Unplug the heater when not required for long
periods.
••
••
• Although this heater complies with safety
standards, we do not recommend its use on deep
pile carpets or on long hair type of rugs.
••
••
• The appliance must be positioned so that the plug
is accessible.
••
••
• If the supply cord is damaged it must be replaced
by the manufacturer or service agent or a similarly
qualified person in order to avoid a hazard.
General
Unpack the heater carefully and retain the packaging for
possible future use, in the event of moving or returning the
fire to your supplier. Loose coals are packed separately within
the carton.
The heater is designed for use inset into a 407mm (16") or
457mm (18") wide by 559mm (22") high fireplace opening
see also section “Installation in a fire place opening”.
A 2kw fan heater discreetly positioned in the canopy of the
fire provides heating in cold weather. Switching allows half
or full heat.
Before connecting the heater check that the supply voltage
is the same as that stated on the heater.
Electrical
WARNING – THIS APPLIANCE MUST BE EARTHED
This heater must be used on an AC ~ supply only and the
voltage marked on the heater must correspond to the supply
voltage.
Before switching on, please read the safety warnings and
operating instructions.
Installation in a Fireplace Opening
At the rear of the fire, two adjustable supports are provided
for levelling the fire where the base of the fireplace opening is
raised above the level of the hearth.
Adjust by removing the two screws holding each bracket in
position, then refit the bracket and the two screws in the
required position.
The metal surround may be removed to allow the fire to be
fully inset.
Note: The fire must be positioned a minimum distance of
500mm from a wall as indicated in Fig. 1.
Fig. 1
IMPORTANT: THESE INSTRUCTIONS SHOULD BE READ CAREFULLY AND RETAINED FOR FUTURE REFERENCE
UK
617
515 225
50
500
Min.
controls
screws
thermostat
Page 3

The product complies with the European Safety Standards EN60335-2-30 and the European Standard Electromagnetic Compatibility
(EMC) EN55014, EN60555-2 and EN60555-3 which cover the essential requirements of EEC Directives 73/23 and 89/336
Operation
The unique flame effect may be enjoyed whether or not the
heating elements are in operation.
Controls
The heater controls are located on the left hand side of the
canopy heat outlet - see Fig. 1.
Three switches provide a choice of heat settings - see Fig. 2.
A switch is in the ON position when the red indicator mark on
the switch is visible.
Switch 1 - Controls the electricity supply to the heater
and the flame effect.
Note: This switch must be in the ON position
for the heater to operate
.
Switch 2 - Provides 1kw heat output.
Switch 3 - Provides 2kw heat output with switch 2.
Setting the Thermostat
Plug in and set all switches to ON. Turn the thermostat knob to
MAX to warm the room rapidly. When the room temperature
has reached the desired level, turn the thermostat knob back
slowly until the thermostat just clicks off. The heater will then
maintain the room temperature at the chosen level.
NOTE – Should your heater fail to come on when the thermostat
is at a low setting, this may be due to the room temperature
being higher than the thermostat setting.
Maintenance
WARNING – BEFORE UNDERTAKING ANY MAINTENANCE
OR CLEANING, REMOVE PLUG OR DISCONNECT FROM
THE ELECTRICITY SUPPLY.
Lamp Replacement
There are two lamps located beneath the fuel effect.
To gain access to the lamp, the grate / fuel effect secured by
two screws, must be removed (see Fig. 1).
Remove the coal and carefully lift the grate / fuel effect clear
and set aside.
Replace the defective lamp with a 240V 60 Watt E14 SES
clear candle lamp.
Replace grate/fuel effect, secure with screws.
Safety cut-out
For your safety, this appliance has been fitted with thermal
cut-out. In the event that the product overheats, the cut-out
switches the heat off automatically.
To bring the heat back into operation, remove the cause of
the overheating, then unplug or turn off the electrical supply
to the heater for up to 10 minutes.
When the heater has cooled sufficiently, re-connect and switch
on the heater.
Caution: In order to avoid a hazard due to inadvertent
resetting of the thermal cutout, this appliance must not be
supplied through an external switching device, such as a
timer, or connected to a circuit that is regularly switched on
and off by the utility.
Cleaning
Before commencing cleaning, unplug the heater and allow it
to cool.
The surfaces of the heater should be given an occasional
wipe over with a dry soft cloth.
Do not use detergents, abrasive cleaning powder or polish
on the metal body of the heater.
The glass screen should be cleaned carefully with a chamois
leather. DO NOT use proprietary cleaners.
To remove any accumulation of dust or fluff the soft brush
attachment of a vacuum cleaner should occasionally be used
to clean the outlet grille of the fan heater located under the
canopy.
To clean the fuel effect, remove the coal pieces or pebbles
and wash in warm water. The plastic tray should be wiped
clean with a damp cloth. When dry replace the coal pieces or
pebbles and arrange for best effect.
After Sales Service
Should you require after sales service or should you need to
purchase any spares, please contact the retailer from whom
the appliance was purchased or contact the service number
relevant to your country on the warranty card.
Please do not return a faulty product to us in the first instance
as this may result in loss or damage and delay in providing
you with a satisfactory service.
Please retain your receipt as proof of purchase.
Switch 1
Switch 2
Switch 3
Fig. 2
UK
Page 4
Afmetingen
(millimeter)
Installatie- en gebruiksinstructies
Dimplex Chalbury kachel
Model(len): CHB20BR & CHB20CH
Belangrijke veiligheidsinformatie
Bij gebruik van elektrische apparaten moeten altijd
bepaalde voorzorgsmaatregelen in acht worden
genomen om het risico van brand, elektrische schok
en letsel te verminderen. Dit betekent o.a.:
••
••
• Als het apparaat is beschadigd, raadpleegt u de
leverancier voordat u het installeert en gebruikt.
••
••
• Niet buitenshuis gebruiken
••
••
• Niet gebruiken in de onmiddellijke nabijheid van
een bad, douche of zwembad.
••
••
• Plaats de kachel nooit onmiddellijk onder een vaste
wandcontactdoos of verdeelkast.
••
••
• Dek de kachel nooit af. Plaats geen materiaal of
kledingstukken op de kachel en zorg ook dat de
luchtcirculatie om de kachel niet gehinderd wordt
door bijvoorbeeld gordijnen of meubilair, omdat dit
oververhitting en brandgevaar kan veroorzaken.
••
••
• Dit apparaat mag niet zonder hulp of toezicht
worden gebruikt door kinderen of andere
personen met lichamelijke, zintuiglijke of
geestelijke beperkingen die tot onveilig gebruik
van het apparaat kunnen leiden. Houd toezicht op
kinderen en zorg dat ze niet met het apparaat
spelen.
••
••
• Gebruik deze kachel niet in serie met een thermisch
regelapparaat, een programma-regelapparaat, een
tijdklok of enig ander apparaat dat de kachel
automatisch inschakelt, omdat er brandgevaar
ontstaat als de kachel per ongeluk is afgedekt of
op de verkeerde plaats is gezet.
••
••
• Zorg dat meubilair, gordijnen of ander brandbaar
materiaal zich minstens 1 meter uit de buurt van
de kachel bevindt.
••
••
• In geval van een storing haalt u de stekker van de
kachel uit het stopcontact.
••
••
• Haal de stekker uit het stopcontact als de kachel
gedurende lange tijd niet gebruikt zal worden.
••
••
• Hoewel deze kachel voldoet aan de
veiligheidsnormen, is het niet raadzaam om hem
op hoogpolige vloerbedekking of op een langharig
kleed te gebruiken.
••
••
• Het apparaat moet zodanig worden geplaatst dat
de stekker bereikbaar blijft.
••
••
• Als het voedingssnoer beschadigd is, moet dit, om
risico’s te vermijden, door de fabrikant of een
servicebedrijf of een gelijkwaardig bevoegd
persoon worden vervangen.
Afb. 1
BELANGRIJK: NEEM DEZE INSTRUCTIES ZORGVULDIG DOOR EN BEWAAR ZE VOOR NASLAGDOELEINDEN
NL
617
515 225
50
500
Min.
schroeven
Algemeen
Pak de kachel voorzichtig uit en bewaar de verpakking voor
eventueel toekomstig gebruik voor geval u gaat verhuizen of de
kachel naar de leverancier wilt terugsturen. Losse kolen worden
apart verpakt in de doos meegeleverd.
De kachel is ontworpen voor inbouw in een schouw van 407 mm
(16 inch) of 457 mm (18 inch) breed en 559 mm (22 inch) hoog, zie
ook “Installatie in een schouw”.
Een afzonderlijk in het frame ingebouwde ventilatorkachel van
2 kW zorgt bij koud weer voor verwarming. Met de knoppen regelt
u de verwarmingssterkte: half of volledig.
Controleer voordat u de kachel aansluit of de voedingsspanning
hetzelfde is als op de kachel is aangegeven.
Elektrisch
WAARSCHUWING - DIT APPARAAT MOET WORDEN GEAARD
Deze kachel mag alleen met wisselstroom worden gebruikt en de
voedingsspanning moet overeenkomen met de op de kachel
aangegeven spanning.
Neem alle veiligheidswaarschuwingen en gebruiksinstructies door
voordat u de kachel aanzet.
Installatie in een schouw
Aan de achterzijde van de kachel bevinden zich twee steunen die u
kunt bijstellen als de afmetingen van de kachel en de haard niet
volledig overeenkomen.
Stel bij door de twee schroeven te verwijderen die de steunen op
hun plaats houden en plaats vervolgens de steunen met de schroeven
terug in de gewenste stand.
Het metalen omhulsel mag worden verwijderd om de haard volledig
in te kunnen bouwen.
NB: De kachel moet minimaal 500 mm van de wand af worden
geplaatst, zie afb.1.
bedieningsorganen
thermostaat
Page 5

NL
Bediening
Terwijl u geniet van het prachtige vlammenspel heeft u de keuze om
de verwarmingselementen in - of uit te schakelen.
Bedieningsorganen
De bedieningselementen van de kachel bevinden zich links van de
warmte-uitlaat op het frame, zie afb. 1.
Drie schakelaars geven u een keuze voor de warmte-instelling, zie
afb. 2.
Een schakelaar staat in de AAN-stand wanneer de rode indicator op
de schakelaar zichtbaar is.
Schakelaar 1 - regelt de elektriciteitstoevoer naar de kachel en het
vlameffect.
NB: Deze schakelaar moet in de AAN-stand
staan, anders werkt de kachel niet.
Schakelaar 2 - levert 1 kW uitgangshitte.
Schakelaar 3 - levert 2 kW uitgangshitte met schakelaar 2.
De thermostaat instellen
Sluit het apparaat aan en zet alle schakelaars in de AAN-stand. Zet
de thermostaatknop op MAX om de ruimte snel te verwarmen. Als
de ruimte op de gewenste temperatuur is gebracht, draait u de
thermostaatknop weer langzaam terug totdat u aan het klikje hoort dat
de thermostaat uit staat. De kachel behoudt dan de kamertemperatuur
op het geselecteerde niveau.
NB – Als uw kachel niet aanspringt wanneer de thermostaat op een
lage instelling staat, kan dit komen doordat de kamertemperatuur hoger
is dan de thermostaatinstelling.
Onderhoud
WAARSCHUWING – VOORDAT U ONDERHOUDS- OF
SCHOONMAAKWERKZAAMHEDEN UITVOERT, MOET U DE
STEKKER VERWIJDEREN OF HET APPARAAT LOSKOPPELEN VAN
DE ELEKTRISCHE VOEDING.
Lamp vervangen
Achter het vuureffect bevinden zich twee lampen.
Om hierbij te kunnen moet u het rooster/vuureffect dat met twee
schroeven vast zit, verwijderen (zie afb. 1.)
Verwijder de kolen en til het rooster/vuureffect voorzichtig eruit en
zet het apart.
Vervang de kapotte lamp door een heldere peer van 240 V, 60 Watt,
E14 SES.
Plaats het rooster/vuureffect terug en zet het vast met de schroeven.
Beveiliging tegen oververhitting
Ter verhoging van uw veiligheid is dit apparaat uitgerust met een
afslagmechanisme voor thermische beveiliging. Mocht het product
te heet worden, dan wordt het apparaat automatisch uitgeschakeld.
Om de kachel daarna weer te kunnen gebruiken, verwijdert u de
oorzaak van de oververhitting. Daarna haalt u de stekker uit het
stopcontact of zet u het toestel gedurende maximaal 10 minuten uit.
Als het apparaat voldoende is afgekoeld, steekt u de stekker weer
in het stopcontact en zet u de kachel weer aan.
Let op: om brandgevaar te voorkomen als gevolg van een
onbedoelde nulstelling van de afslagbeveiliging, dient u dit toestel
niet van stroom te voorzien via een extern schakelinstrument,
zoals een timer, of op een stroomkring aan te sluiten die regelmatig
aan en uit wordt gezet door het elektriciteitsbedrijf.
Reiniging
Trek de stekker van de kachel uit en laat hem afkoelen voordat u de
kachel gaat reinigen.
De buitenkant van de kachel moet zo nu en dan afgeveegd worden
met een zachte, droge doek.
Gebruik geen afwasmiddelen, schuurmiddelen of poetsmiddelen op
de metalen behuizing van het apparaat.
De glazen ruit moet voorzichtig met een zeem worden gereinigd.
Gebruik GEEN reinigingsmiddel speciaal voor glas.
Voor het verwijderen van eventueel aangekoekt stof of pluis, kunt u
af en toe met het zachte borstelhulpstuk van een stofzuiger het
uitlaatrooster van de ventilatorkachel onder het deksel schoonmaken.
Als u het vuureffect wilt schoonmaken, verwijdert u de kolen of
kiezels en wast u ze in warm water af. De kunststof tray moet met
een vochtige doek worden afgenomen. Als de kolen of kiezels droog
zijn, legt u ze weer op hun plaats en rangschikt u ze voor het
mooiste effect.
After-sales service
Als u na aankoop service nodig hebt of als u reserve-onderdelen
wilt aanschaffen, neem dan contact op met de winkel waar u de
kachel hebt gekocht of bel het servicenummer voor uw land dat op
het garantiebewijs staat.
Stuur nooit meteen een kapotte kachel naar ons op omdat dit verlies
of schade zou kunnen veroorzaken en u misschien langer op
bevredigende service moet wachten.
Bewaar de bon als bewijs van aankoop.
schakelaar 1
schakelaar 2
schakelaar 3
Afb. 2
Het product voldoet aan de European Safety Standards EN60335-2-30 en de European Standard Electromagnetic Compatibility (EMC) EN55014,
EN60555-2 en EN60555-3 die de essentiële eisen omschrijven zoals vermeld in de EEC-richtlijnen 73/23 en 89/336.
Page 6

Dimensions
(millimètres)
Instructions d’installation et d’utilisation
Cheminée Dimplex Chalbury
Modèle(s) : CHB20BR et CHB20CH
Consignes de sécurité importantes :
Lors de l’utilisation d’appareils électriques, toujours
prendre des précautions élémentaires pour réduire les
risques d’incendie, de choc électrique et de blessures
corporelles, parmi lesquelles :
••
••
• Si l’appareil est endommagé, consulter le
fournisseur avant de procéder à l’installation et à
l’utilisation.
••
••
• Ne pas utiliser à l’extérieur.
••
••
• Ne pas utiliser à proximité immédiate d’une
baignoire, d’une douche ou d’une piscine.
••
••
• Ne pas placer l’appareil de chauffage juste en
dessous d’une prise murale ou d’un boîtier de
connexion.
••
••
• Ne pas recouvrir l’appareil de chauffage. Ne pas
placer de matériaux ou de vêtements sur l’appareil
de chauffage ou entraver la circulation d’air autour
de l’appareil avec des rideaux ou des meubles par
exemple, car ceci est susceptible de causer une
surchauffe et un risque d’incendie.
••
••
• Cet appareil ne doit pas être utilisé par des enfants
sans surveillance ou toute personne dont les
capacités physiques, sensorielles ou mentales ne
leur permettent pas de l’utiliser en toute sécurité
sans assistance. Cet appareil n’est pas un jouet,
veiller à ne pas laisser les enfants s’en servir sans
surveillance.
••
••
• Ne pas utiliser l’appareil de chauffage en série avec
un régulateur thermique, un système de
commande programmé, une minuterie ou tout
autre dispositif déclenchant automatiquement de
la chaleur, car il existe un risque d’incendie lorsque
l’appareil de chauffage est accidentellement
recouvert ou déplacé.
••
••
• S’assurer que les meubles, les rideaux ou les
autres matériaux combustibles sont positionnés à
au moins 1 mètre de l’appareil de chauffage.
••
••
• Débrancher l’appareil en cas d’anomalie.
••
••
• Débrancher l’appareil lorsque celui-ci n’est pas
utilisé pendant une période prolongée.
••
••
• Bien que cet appareil de chauffage soit conforme
aux normes de sécurité, nous recommandons de
ne pas l’utiliser sur une moquette extra-épaisse
ou sur des tapis à poils longs.
••
••
• L’appareil doit être positionné de façon à rendre la
prise accessible.
••
••
• Si le cordon d’alimentation est endommagé, le faire
remplacer par le fabricant ou un réparateur ou
toute personne suffisamment qualifiée afin
d’écarter tout risque.
Figure 1
IMPORTANT : LIRE ATTENTIVEMENT CES INSTRUCTIONS ET LES CONSERVER SOIGNEUSEMENT POUR POUVOIR LES CONSULTER ULTÉRIEUREMENT.
FR
617
515 225
50
500
Min.
commandes
vis
Informations générales
Déballer l’appareil avec précaution et conserver l’emballage pour
une utilisation ultérieure éventuelle, que ce soit pour un
déménagement ou un retour du produit au fournisseur. Les
morceaux de charbon sont emballés séparément dans le carton.
Cet appareil est conçu pour être utilisé dans un insert de cheminée
doté d’une ouverture de 407 ou 457 mm de large et de 559 mm de
haut (voir également la partie « Installation dans une ouverture
de cheminée »).
Un ventilateur de 2 kW discrètement placé dans la partie supérieure
de l'appareil fournit une chaleur continue par temps froid. Une
commande permet d’utiliser l’appareil à une puissance maximale ou
moyenne.
Avant de brancher l’appareil de chauffage, vérifier que la tension
d’alimentation du secteur est identique à celle indiquée sur l’appareil.
Installation électrique
AVERTISSEMENT - CET APPAREIL DOIT ÊTRE RELIÉ À
LA MASSE
Cet appareil de chauffage doit être utilisé en courant alternatif
(~) uniquement et la tension d’alimentation du secteur doit
correspondre à la tension indiquée sur l’appareil.
Lire attentivement les consignes de sécurité et les instructions
d’utilisation avant de mettre l’appareil en marche.
Installation dans une ouverture de cheminée
À l’arrière de l’appareil, deux supports réglables sont fournis pour
mettre l’appareil à niveau lorsque la base de l’ouverture de la cheminée
est située au-dessus du niveau du foyer.
Pour effectuer le réglage, retirer les deux vis qui maintiennent chaque
support en place, puis ajuster le support et les deux vis selon la
position souhaitée.
Le cadre en métal peut être retiré pour insérer complètement l’appareil.
Remarque : L’appareil doit être placé à au moins 500 mm d’un mur,
comme indiqué à la figure 1.
thermostat
Page 7

FR
Fonctionnement
Il est possible d'apprécier l'effet flamme même lorsque les éléments
de chauffage ne fonctionnent pas.
Commandes
Les commandes de chauffage se trouvent sur la partie gauche de la
sortie d’air la partie supérieure de l'appareil (voir figure 1).
Trois interrupteurs offrent plusieurs options de chauffage (voir
figure 2).
Lorsqu’un interrupteur est en position de MARCHE, son voyant rouge
est éclairé.
Interrupteur 1 - Commande l’alimentation électrique de l’appareil
de chauffage et l’effet flamme.
Remarque : Cet interrupteur doit être en
position de MARCHE pour que l’appareil
fonctionne
.
Interrupteur 2 - Fournit une puissance calorifique de 1 kW.
Interrupteur 3 - Fournit une puissance calorifique de 2 kW
avec l’interrupteur 2.
Réglage du thermostat
Mettre tous les interrupteurs en position de MARCHE. Tourner le bouton
du thermostat au MAXIMUM pour chauffer rapidement une pièce.
Lorsque la pièce a atteint la température désirée, tourner le bouton du
thermostat dans l’autre sens jusqu’à ce que le thermostat émette un
déclic. La température de la pièce va alors être maintenue.
REMARQUE : Si l’appareil de chauffage ne se déclenche pas lorsque
le thermostat est réglé pour une température peu élevée, cela peut
signifier que la température de la pièce est plus élevée que celle du
thermostat.
Maintenance
AVERTISSEMENT – AVANT TOUT NETTOYAGE OU
MAINTENANCE, DÉBRANCHER L'APPAREIL OU LE METTRE
HORS TENSION.
Remplacement de l’ampoule
L’appareil comporte deux ampoules situées sous l’effet combustible.
Pour y accéder, retirer les deux vis de fixation de la grille et de l’effet
combustible (voir figure 1).
Retirer le charbon et soulever doucement la grille et l’effet combustible
pour les enlever complètement.
Remplacer l’ampoule défectueuse par une ampoule flamme
240V 60 Watt E14 SES.
Repositionner la grille et l’effet combustible et fixer à l’aide des vis.
Coupe-circuit
Pour des raisons de sécurité, cet appareil est doté d’un disjoncteur
thermique, qui se déclenche automatiquement en cas de surchauffe.
Pour redémarrer l’appareil, trouver la cause et la solution à la
surchauffe, puis débrancher ou désactiver l’alimentation électrique
pendant 10 minutes (maximum).
Une fois l’appareil suffisamment refroidi, reconnecter l’alimentation
électrique et remettre l’appareil de chauffage en marche.
Attention : Pour éviter les risques liés à la réinitialisation
accidentelle du coupe-circuit, cet appareil ne doit pas être alimenté
par un dispositif de connexion externe, tel qu’une minuterie, ou
branché à un circuit régulièrement mis hors et sous tension.
Nettoyage
Avant tout nettoyage, débrancher l’appareil de chauffage et le laisser
refroidir.
La surface de l’appareil doit faire l’objet d’un nettoyage occasionnel
à l’aide d’un chiffon sec.
Ne pas utiliser de détergent, de produit abrasif ou tout produit de
polissage sur la partie métallique de l'appareil de chauffage.
La vitre doit être nettoyée délicatement avec une peau de chamois.
NE PAS utiliser de produit spécifiquement conçu pour le nettoyage.
Utiliser la brosse douce d’un aspirateur de temps à autre pour
nettoyer la grille du ventilateur située sous le conduit et éliminer la
poussière et les peluches qui se sont accumulées.
Laver l'effet combustible à l'eau chaude après avoir retiré les
morceaux de charbon. Essuyer le plateau en plastique avec un
chiffon humide. Lorsque le plateau est sec, remettre les morceaux
de charbon en place et les disposer pour obtenir le meilleur effet
possible.
Service après-vente
Pour solliciter le service après vente ou se procurer des pièces
détachées, contacter le vendeur du produit ou le service
d’assistance du pays désiré au numéro indiqué sur le bon de garantie.
Ne pas nous retourner un produit défectueux sans nous avoir averti
au préalable car celui-ci risquerait de se perdre ou de subir des
dommages durant le transport ; le délai requis pour offrir un service
satisfaisant à l’utilisateur en serait inévitablement affecté.
Conserver soigneusement la facture en guise de preuve d’achat.
Interrupteur 1
Interrupteur 2
Interrupteur 3
Figure 2
Ce produit est conforme aux normes de sécurité européennes EN60335-2-30 et aux normes européennes en matière de compatibilité électromagnétique
(CEM) EN55014, EN60555-2 et EN60555-3, lesquelles couvrent les principales exigences des directives 73/23 et 89/336 de la CEE.
Page 8

Page 9

.
Page 10

.
Page 11

DE - Garantie
Die nachstehenden Ausführungen über Umfang der Garantie, Garantiefristen und die Anmeldung von Garantieansprüchen gelten ausschließlich für die
Bundesrepublik eutschland.
Wir räumen dem Käufer nach seiner Wahl zusätzlich zu den ihm gegen den Verkäufer ausstehenden gesetzlichen Gewährleistungsansprüchen einen Anspruch nach Maßgabe
der nachfolgenden Garantieverpflichtung ein:
I. Dauer und Beginn der Garantie
1. Grundsätzlich wird für jedes im Haushalt eingesetzte Gerät die auf der Garantiekarte ausgezeichnete Garantiezeit gewährt.
2. Bei gewerblicher Nutzung der von der Bauart her für den Haushalt bestimmten Geräte beträgt die Garantiezeit lediglich sechs Monate.
3 Die Garantie ist mit dem Zeitpunkt der Übergabe des Gerätes wirksam.
4. Bewahren Sie die vom Verkäufer ausgefüllte Garantie-Urkunde mit der Rechnung, dem Lieferschein oder einem anderen Kaufnachweis auf.
5. Durch Garantieleistungen tritt keine Verlängerung der ursprünglichen Garantiezeit ein.
6. Garantieansprüche können nur geltend gemacht werden, wenn die Mängelrüge innerhalb von 14 Tagen nach Entdeckung des Mangels schriftlich bei uns eingeht.
II. Inhalt und Unfang der Garantie
1. Ihr Gerät wird sorgfältig geprüft. Für den Fall, daß der Garantieanspruch zu Recht besteht, entscheiden wir, auf welche Art der Schaden behoben wer den soll / wird. Im
Reparaturfall sorgen wir für eine fachgerechte Ausführung.
2. Bei der Einsendung zur Reparatur sind Garantie-Urkunde und Kaufnachweis beizufügen.
3. Innerhalb der ersten sechs Monate erbringen wir die Garantieleistungen ohne Berechnung von Nebenkosten (Fahrt- und Wegzeitkosten, Fracht- und Verpackungskosten).
4. Darüber hinausgehende Ansprüche, insbesondere Schadenersatzansprüche, sind ausgeschlossen, soweit eine Haftung nicht gesetzlich angeordnet ist.
III. Einschränkungen der Garantie
1. Eine Garantie besteht nicht bei Fehlern oder Mängeln, die auf folgendes zurückzuführen sind:
a) Reparaturen und Abänderungen, die von nicht autorisierter dritter Stelle vorgenommen werden oder wurden;
b) äußere Einwirkungen, zum Beispiel Transportschäden, Beschädigungen durch Stoß oder Schlag, Schäden durch Witterungseinflüsse oder sonstige Naturerscheinungen;
c) unsachgemäße / fehlerhafte Bedienung oder Beanspruchung;
d) Verwendung von ungeeigneten Reinigungsmitteln, Chemikalien usw.
2. Die Garantie erstreckt sich nicht auf leicht zerbrechliche Teile, zum Beispiel Glas, Kunststoff, Glühlampen.
3. Geringfügige Änderungen gegenüber Prospekten oder Mustern oder früher gelieferter Ware gelten nicht als Mangel. Gleiches gilt bei lediglich geringfügigen Abweichungen
von der Sollbeschaffenheit, die für Wert- und Gebrauchstauglichkeit des Gerätes unerheblich ist.
4. Im Ausland gelten die von unserer jeweils zuständigen Landesvertretung herausgegebenen Garantiebedingungen.
DE - Garantie Für dieses Gerät gelten
die in dem Kaufland herausgegebenen
Garantie-bedingungen. Einzelheiten teilt
Ihnen der Händler, bei dem Sie das Gerät
gekauft haben, auf Anfrage jederzeit mit.
Die Inanspruchnahme von Garantieleistungen setzt die Vorlage des
Kaufbeleges und die Einhaltung der
Garantiefrist voraus. Der
Garantieanspruch verfällt, wenn das Gerät
beschädigt, nicht sachgemäß benutzt oder
unbefugte Eingriffe vorgenommen
wurden.
UK - Warranty The warranty conditions
in the country of purchase apply to this
appliance. Information can be obtained at
any time from the retailer from whom the
appliance was purchased. For claims under
guarantee the sales receipt must be
produced and the claims must be
forwarded within the guarantee period.
The right to claim under guarantee expires
in case that the device has been damaged,
used in an inappropriate way or that
unauthorized manipulations have been
carried out.
FR- Garantie Pour cet appareil, les
garanties applicables sont celles en vigueur
dans le pays où a lieu l’achat. Votre
revendeur vous en communiquera à tout
moment les détails sur simple demande. La
revendication au droit à la garantie est
assujettie à la présentation de la preuve
d’achat et du respect du délai de garantie.
Le droit à la garantie expire lorsque
l’appareil a été endommagé, utilisé de
manière inadéquate ou que des
interventions ont été effectuées par des
tiers.
IT - Garanzia Per questo apparecchio
valgono le condizioni di garanzia
pubblicate nel Paese d’acquisto. I dettagli
a riguardo vengono forniti, in ogni
momento, su richiesta, dal rivenditore
presso il quale viene acquistato
l’apparecchio. Il diritto alla prestazione di
garanzia ha come premessa l’esibizione
dello scontrino di acquisto e l’osservanza
del termine di garanzia. Il diritto alla
copertura di garanzia non sussiste, se
l’apparecchio è stato danneggiato, se non
è stato utilizzato a regola d’arte e sono
stati effettuati su di esso interventi non
autorizzati.
ES- Garantía Para este aparato tienen
validez las condiciones de garantía
entregadas en el país de compra. En caso
de preguntas, el vendedor al que usted
compró el aparato, estará en todo
momento dispuesto a informarle sobre los
detalles al respecto. La solicitud de
prestaciones que estén incluidas en las
disposiciones de garantía presupone, que
usted presente el ticket de compra y que
haga su solicitud en el plazo de garantía.
Los derechos de garantía caducan, si el
aparato se ha dañado, si se ha utilizado de
manera inadecuada, o si en él se han
efectuado intervenciones desautorizadas.
PT - Garantia As condições de garantia
do país de compra aplicam-se a este
aparelho. Pode obter informação em
qualquer altura do retalhista de onde
adquiriu o aparelho. Todas as reclamações
ao abrigo da garantia terão de se fazer
acompanhar do documento comprovativo
da compra e de serem enviadas dentro do
período da garantia. O direito de
reclamação ao abrigo da garantia expira
no caso do aparelho ter sido danificado,
utilizado de forma incorrecta ou de se
terem efectuado manipulações não
autorizadas.
NL- Garantie Voor dit apparaat gelden
de in het kooplanf uitgegeven
garantievoorwaarden. Details deelt U Uw
dealer, waar U het apparaat heeft gekocht,
op aanvrag altijd mee. De gebruikmaking
van garantievergoedingen vereist het
overleggen van het koopbewijs en de
nakoming van de garantietermijn. De
garantieclaim vervalt, wanneer het
apparaat werd beschadigd, niet juist werd
gebruikt of onbevoegde ingrepen werden
uitgevoerd.
DK- Garanti Apparatet er omfattet af
de garantibetingelser, som er gældende i
købslandet. Nærmere detaljer kan fås hos
den forhandler, hvor du har købt apparatet.
Der kan kun støttes ret på garantien ved
forelæggelse af købskvittering og kun
inden for garantiperioden. Garantien
bortfalder, hvis apparatet er blevet
beskadiget, anvendt forkert eller i tilfælde
af uautoriseret indgreb i apparatet.
SE- Garanti För denna apparat gäller
de för inköpslandet utgivna
garantibestämmelserna. På förfrågan
kan detaljerna i
garantibestämmelserna erhållas från
inköpsstället där apparaten har köpts.
Om garantin tas i anspråk måste
inköpskvitto kunna uppvisas inom
garantitiden. Alla garantianspråk
NO- Garanti For dette apparatet
gjelder kun de betingelsene som er
offentliggjort i forretningen det er kjøpt.
Deltaljer ang. dette kan man til enhver
tid få hos den fagforhandleren hvor du
har kjøpt apparatet. For å ha fulle
garantirettigheter må man kunne
fremlegge kvitteringen og
garantifristen må ikke være utløpt.
Garantien gjelder ikke når apparatet er
skadet, ikke er brukt etter forskriftene
eller ukvalifiserte inngrep er foretatt.
FI - Takuu Laitteella on ostomaassa
voimassa olevat takuuehdot.
Yksityiskohdat näistä ehdoista ilmoittaa
sinulle kauppias, jolta olet laitteen ostanut.
Takuusuorituksia voi vaatia takuuajan
ollessa voimassa esittämällä ostotodistus.
Takuu ei ole voimassa, mikäli laitetta on
käytetty sen ollessa vaurioitunut, sitä on
käytetty väärin tai ammattitaidoton henkilö
on korjannut laitetta.
PL- Gwarancja Dla tego urządzenia
obowiązują warunki gwarancji wydane
w kraju zakupu. W każdej chwili
sprzedawca, u którego dokonano
zakupu urządzenia, przekaże Państwu
odpowiednie szczegóły. Wykorzystanie
świadczeń gwarancyjnych jest
uwarunkowane przedłożeniem
pokwitowania zakupu i zachowaniem
terminu gwarancji. Prawo do gwarancji
przepada, gdy urządzenie zostanie
uszkodzone, niepoprawnie używane
lub dokonane zostaną niedozwolone
manipulacje.
CZ- Záruka Pro tento přístroj jsou
platné záruční podmínky, které byly
vydány v zemi kupujícího. S
podrobnostmi Vás kdykoliv na
požádání seznámí Váš prodejce, u
kterého jste přístroj zakoupili. Uznání
záruky předpokládá předložení
dokladu o koupi a dodržení záruční
lhůty. Nárok na záruku propadá, je-li
přístroj poškozený, neodbor ně
provozovaný a nebo byly-li na něm
provedené neodborné zásahy.
LV- Garantija Đai ierîcei ir spçkâ
pircçja valstî izdotie garantijas
noteikumi. Par to jűs sîkâku informâciju
saňemsiet veikalâ, kurâ jűs đo ierîci
nopirkât. Garantijas pieteikđanai jums
ir nepiecieđa ma pirkđanas kvîts. Bez
tam ir svarîgi, lai garantijas termiňđ
nebűtu notecçjis. Garantija netiek
sniegta, ja jűs ierîci sabojâjât,
ekspluatçjât neatbilstođi lietođanas
instrukcijai, veicât patvaďîgi demontâţu
vai mçěinâjât pađi to remontçt.
SI- Garancija Za to napravo veljajo
garancijski pogoji izdani v državi
nakupa. Na vašo željo vas bo o
podrobnostih kadarkoli obvestil
trgovec, pri katerem ste kupili napravo.
Pogoj za uveljavljanje storitev
določenih v garanciji je predložitev
računa in upoštevanje garancijskega
roka. Pravica do garancije zapade, če
je naprava poškodovana, če naprava
ni bila ustrezno uporabljana ali če so
bili izvedeni nepoobljščeni posegi v
napravo.
SK- Záruka Pre tento prístroj platia
záručné podmienky vydané v krajine
jeho zakúpenia. S podrobnosťami Vás
na požiadanie kedykoľvek zoznámi
predajca, u ktorého ste prístroj
zakúpili. Nárok na záručné služby
predpokladá predloženie dokladu
o kúpe a dodržanie záručnej lehoty.
Nárok na záruku zaniká, ak bol prístr oj
poškodený, neodborne používaný
alebo na ňom boli urobené
neoprávnené zásahy.
LT - Garantija Điam prietaisui galioja
pirkimo đalyje iđleistos garantijos
sŕlygos. Jums pasiteiravus bet kuriuo
metu pardavëjas, pas kurá Jus pirkote
prietaisŕ, infor muos apie smulkmenas.
Garantijos vykdymo pasinaudojimo
sŕlyga yra kasos čekio pateikimas ir
garantinio termino iđlaikymas.
Garantinis reikalavimas pasibaigia,
jeigu prietaisas sugadintas, netinkamai
buvo naudotas arba buvo atlikti
neleistini ásikiđimai.
EE- Garantii Seadme kohta kehtivad
selle riigi garantiitingimused, kus seade
on ostetud. Seadme edasimüüja
annab Teile pőhjalikku informatsiooni
garantii üksikasjade kohta.
Garantiiteenuste osutamise aluseks
garantiiaja jooksul on ostudokument.
Garantii ei kehti, kui seade on
kahjustunud, seda on kasutatud
ebaotstarbeliselt vői seadet on
demonteeritud.
HU- Garancia A készülékre a
vásárlási országban kiadott garanciális
feltételek érvényesek. Ennek
részleteiről kérésre szívesen nyújt
információt az a kereskedő, akitől a
készüléket vásárolta. A garanciális
teljesítés igénybe vételének előfeltétele
a vásárlási bizonylat bemutatása és a
garanciális határidő betartása. A
garanciális igény nem érvényes, ha a
készülék sérült, nem szakszerűen
használták vagy illetéktelen
beavatkozásokat végeztek rajta.
HR- Jamstvo Uvjeti jamstva koji važe
u državi kupnje važe i za ovaj uredaj.
Podaci se mogu dobiti u svako doba
od dobavljaca od kojega ste kupili
proizvod. Za zahtjeve po osnovi
jamstva morate priložiti racun koji ste
dobili pri kupnji, a zahtjev treba
podnijeti u toku trajanja jamstvenog
perioda. Pravo iz jamstva istice u
slucaju da je uredaj oštecen, korišten
na neodgovarajuci nacin ili su na
njemu provedene neovlaštene
popravke.
GR- Εγγύηση Για την παρούσα
συσκευή ισχύουν οι κανονισµοί
εγγύησης του ισχύουν στην χώρα
που αγοράστηκε. Λεπτοµέρειες
θα σας παρέχει ο έµπορος απ τον
οποίο προµηθευτήκατε την
συσκευή οποιαδήποτε στιγµή του
το ζητήσετε. Απαραίτητες
προϋποθέσεις για την διεκδίκηση
παροχών που περιλαµβάνονται
στην εγγύηση είναι η απδειξη
αγοράς και η τήρηση της
προθεσµίας εγγύησης. Η εγγύηση
εκπίπτει εφσον η συσκευή υπέστη
βλάβη, δεν χρησιµοποιήθηκε ορθά
ή έλαβαν χώρα επεµβάσεις σε αυτή
απ µη εξουσιοδοτηµένο
προσωπικ.
BG- Гаранция За настоящия уред
важат гаранционните условия,
валидни за страната, в която е
купен. С подробностите ще Ви
запознае продавачът, от който сте
купили уреда и към който Вие
можете да се обърнете по всяко
време. За да се предоставят
гаранционни услуги, е необходимо
да се представи документът за
закупуване и да не е изтекъл
гаранционният срок. Гаранцията се
губи, ако уредът е повреден,
неправилно използуван или с
недопустими изменения.
RU- Гарантия В отношении этого
прибора действительны условия
гарантии, предоставленные в
стране приобретения. Более
подробную информацию по вашему
запросу в любое время
предоставит магазин, в котором вы
приобрели прибор. Для
гарантийного обслуживания
необходимо в течение гарантийного
срока предъявить квитанцию о
покупке. Гарантия утрачивает силу,
если прибор был поврежден,
использовался ненадлежащим
образом или был подвергнут
недозволенным вмешательствам.
KZ
.
Page 12

2. Garantiezeitraum 3. Modell(e)
4. Modellbezeichnung
5. Kaufdatum 6. Stempel & Unterschrift des
Einzelhändlers
7. Fehler/Defekt
8.
1. Garantiekarte
DE
1. Garantiekarte
2. Garantiezeitraum (in Jahre)
3. Modell(e)
4. Modellbezeichnung
5. Kaufdatum
6. Stempel & Unterschrift
des Einzelhändlers
7. Fehler/Defekt
8. Kontakt-Tel.-Nr. & - Anschrift
UK
1. Warranty Card
2. Guarantee Period (in Years)
3. Model(s)
4. Model Name
5. Date of Purchase
6. Stamp & Signature of retailer
7. Fault/Defect
8. Contact Number & Address
FR
1. Bon de garantie
2. Période de garantie (en
années)
3. Modèle(s)
4. Intitulé du modèle
5. Date d’achat
6. Cachet et signature du vendeur
7. Anomalie/Défaut
8. Nom et adresse du contact
IT
1. Scheda di garanzia
2. Periodo di garanzia (in anni)
3. Modello(i)
4. Nome del modello
5. Data di acquisto
6. Timbro e firma del rivenditore
7. Guasto/difetto
8. Indirizzo e numero di contatto
ES
1. Tarjeta de garantía
2. Período de garantía (en años)
3. Modelo(s)
4. Nombre del modelo
5. Fecha de adquisición
6. Sello y firma del distribuidor
7. Avería/Defecto
8. Número y dirección de contacto
6. Žig in podpis prodajalca
7. Pomanjkljivost/okvara
8. Kontaktna številka in naslov
SK
1. Zárucný list
2. Zárucné obdobie (v rokoch)
3. Model(y)
4. Názov modelu
5. Dátum kúpy
6. Peca t & Podpis obchodníka
7. Porucha/závada
8. Kontaktujte císlo & adresu
LT
1. Garantijos kortele
2. Garantijos laikotarpis (metais)
3. Modelis (modeliai)
4. Modelio pa vadinimas
5. Pirkimo data
6. Prekybininko antspaudas ir
parašas
7. Gedimas / defektas
8. Numeris ir adresas kontaktams
EE
1. Garantiikaart
2. Garantiiaeg (aastates)
3. Mudel(id)
4. Mudeli nimi
5. Ostukuupäev
6. Kaupluse tempel & allkiri
7. Viga/defekt
8. Kontaktnumber & aadress
HU
1. Garancialevél
2. Garancia idotartama (években)
3. Modell(ek)
4. Modell neve
5. Vásárlás idopontja
6. Eladó bélyegzoje és aláírása
7. Hiba/Hiány megnevezése
8. Értesítési telefonszám és cím
HR
1. Jamstvena kartica
2. Jamstveni period (u godinama)
3. Model(i)
4. Naziv modela
5. Datum kupnje
6. Peca t i potpis dobavljaca
7. Kvar/defekt
8. Broj i adresa za kontakt
GR
1. Κάρτα εγγύησης
2. Περίοδος ισχύος της
εγγύησης (έτη)
3. Μοντέλο(α)
4. *νοµα µοντέλου
5. Ηµεροµηνία αγοράς
6. Σφραγίδα και υπογραφή
εµπρου
7. Σφάλµα/Ελάττωµα
8. Αριθµς τηλεφώνου και
διεύθυνση επικοινωνίας
BG
1. Гаранционна карта
2. Гаранционен период (в
години)
3. Модел(и)
4. Наименование на модела
5. Дата на покупка
6. Печат и подпис на
търговеца
7. Неизправност/Дефект
8. Адрес и телефон за
контакт
KZ
RU
1. Гарантийная карта
2. Срок действия гарантии(в
годах)
3. Модель (модели)
4. Наименование модели
5. Дата покупки
6. Штамп и подпись
озничного продавца
7. Неисправность/дефект
8. Номер контактного
телефона и адрес
)
5.
6.
PT
1. Cartão de Garantia
2. Período de Garantia (em anos)
3. Modelo(s)
4. Nome do Modelo
5. Data de Compra
6. Carimbo e Assinatura do
retalhista
7. Falha/Defeito
8. Número de Contacto e Morada
NL
1. Garantiebewijs
2. Garantieperiode (in jaren)
3. Model(len)
4. Modelnaam
5. Aankoopdatum
6. Stempel & Ondertekening
detaillist
7. Fout/Defect
8. Telefoonnummer & Adres
DK
1. Garantikort
2. Garantiperiode (i år)
3. Model(ler)
4. Modelnavn
5. Købsdato
6. Detailhandlers stempel &
underskrift
7. Fejl/defekt
8. Kontaktnummer & -adresse
SE
1. Garantikort
2. Garantitid (i år)
3. Modell(er)
4. Modellnamn
5. Inköpsdag
6. Återförsäljarens stämpel och
underskrift
7. Fel
8. Telefonnummer och adress för
kontakt
NO
1. Garantikort
2. Garantiperiode (i år)
3. Modell(er)
4. Modellnavn
5. Kjøpsdato
6. Selgers stempel og signatur
7. Feil/defekt
8. Kontaktnummer og adresse
FI
1. Takuukortti
2. Takuuaika (vuosina)
3. Malli(t)
4. Mallin nimi
5. Ostopäivämäärä
6. Myyntiliikkeen leima ja
allekirjoitus
7. Vika/vaurio
8. Yhteysnumero ja osoite
PL
1. Karta gwarancyjna
2. Okres gwarancji (w latach)
3. Model(e)
4. Nazwa modelu
5. Data zakupu
6. Pieczec i podpis sprzedawcy
7. Usterka
8. Telefon i adres kontaktowy
CZ
1. Záruční list
2. Záruční doba (roky)
3. Model(y)
4. Název modelu
5. Datum zakoupení
6. Razítko a podpis prodejce
7. Porucha/chyba
8. Kontaktní číslo a adresa
LV
1. Garantijas talons
2. Garantijas periods (gadi)
3. Modelis(li)
4. Modela nosaukums
5. Legades datums
6. Mazumtirgotaja zimogs un
paraksts
7. Bojajums/defekts
8. Ko ntakttalrunis un adrese
SI
1. Garancijski list
2. Obdobje veljavnosti
garancije (v letih)
3. Model(i)
4. Ime modela
5. Datum nakupa
UK
Glen Dimplex UK Limited
Millbrook House
Grange Drive
Hedge End
Southampton
Hampshire. SO30 2DF
0870 7270101
Fax. 0870 7270102
customer.services@glendimplex.com
1 CHALBURY CHB20BR & CHB20CH
NL
Saturnus 8 NL-8448 CC Heerenveen
Postbus 219 NL-8440 AE Heerenveen
T. + 31(0)513 656500
F. + 31(0)513 656501
 Loading...