


Dimplex BPH100M User Manual

INSTRUCTION MANUAL
Installation and Operating
Dimplex Bathroom Panel Heater
Models: BPH100M / BPH100G
These instructions should be read carefully and
retained for future use. Note also the information
presented on the appliance.
13547-10 ISSUE: 10 Series: D Software Version UI: 89
1
IMPORTANT
THESE INSTRUCTIONS SHOULD BE READ CAREFULLY AND RETAINED FOR
FUTURE REFERENCE. Note also the information presented on the appliance
CAUTION: FAILURE TO FOLLOW THESE INSTRUCTIONS MAY CAUSE INJURY AND/OR
DAMAGE AND MAY INVALIDATE YOUR GUARANTEE
IMPORTANT SAFETY ADVICE
When using electrical heaters, basic precautions should always be followed to reduce the risk of
fi re, electrical shock, and injury to persons, including the following:
IMPORTANT – The wall bracket supplied with the heater must be used.
IMPORTANT – All packaging should be disposed of in an appropriate manner.
OVERHEATING WARNING
WARNING - In order to avoid overheating, do not cover or obstruct the heater. Only use supplied
towel rail to hang garments. Do not place material or garments on the heater, or obstruct the air
circulation around the heater, for instance by curtains or furniture, as this could cause overheating and
a fi re risk. NEVER cover or obstruct in any way the heat outlet slots at the top of the heater or the air
inlet slots in the base of the heater.
WARNING - THE SURFACES ON THIS HEATER CAN BE HOT.
The heater carries a warning ‘DO NOT COVER’ to alert the user to the risk of fi re that exists
if the heater is accidentally covered.
CAUTION - Some parts of this product can become very hot and cause burns. Particular
attention has to be given where children and vulnerable people are present.
For your safety this heater is fi tted with a thermal cut-out. In the event that the product overheats
for some reason, the cut-out prevents excessive temperatures on the product by cutting the
power to the heater. Once the heater has cooled down, it will reset automatically, it will continue
to cycle on and off automatically until the reason for overheating is removed.
The display screen may fl ash red to indicate the product has overheated. To reset the display,
remove the obstruction and hold Enter for 10 seconds.
SUITABLE APPLICATIONS
WARNING - This heater is suitable for normal domestic household purposes and should not be
used in any other type of environment. This product should only be used in the country where it
was purchased from by a recognised commercial retailer. Do not use outdoors.
WARNING: The appliance is intended only for drying textiles washed in water.
SERVICING AND REPAIRS
WARNING - Servicing and product repairs should only be undertaken by the manufacturers
approved service agent or a similarly trained or qualifi ed/competent person, using only exact
manufacturer approved spare parts. When working on the heater, suitable PPE must be worn.
PLEASE NOTE: Lit cigarettes, candles and oil burners, combined with the convection eff ect of
electric heaters can cause signifi cant soot deposits to build up on the surface directly above
and to the sides of the heater. This is not a fault of the heater. Extensive burning of candles or
smoking in the operating environment of this product can produce heavy discolouration within a
few months of use.
OPERATING WARNINGS
IMPORTANT: Remember to observe all safety warnings and precautions when operating the
heater on the automatic or timer modes, either attended or unattended since a fi re risk exists
when the heater is accidentally covered or displaced.
CAUTION: Do not use if the heater’s mains power lead is damaged. If the supply cord is damaged
it must be replaced by the manufacturer or an approved service partner.
2

ELECTRICAL INSTALLATION
WARNING - If the heater is installed in a room containing a bath or shower, in
accordance with the current wiring regulations BS 7671, minimum clearances
and IP zone requirements must be adhered to. Any area that contains a bath
or shower must be protected by a suitably rated RCD.
WARNING - The electrical installation of this heater must be carried out by a suitably qualifi ed or
trained electrician, and be in strict accordance with the current wiring Regulations BS 7671. The
supply must be connected via a switched fused spur with a fuse rated suitably for the appliances
fl ex. Failure to follow these instructions will mean that the manufacturer’s instructions have not
been adhered to. THERE ARE NO EXCEPTIONS.
The wires in this mains lead are coloured in accordance with the following code:
GREEN AND YELLOW: EARTH
BLUE: NEUTRAL
BROWN: LIVE
• This heater must be earthed
• Not suitable for connection via a plug top
• Do not locate the heater immediately below a fi xed electrical point i.e. socket outlet.
The heater is fi tted with a length of fl exible cable type H05VV-F size 3 x 1.0mm² for connection
to the fi xed wiring of the premises through a suitable connection box positioned adjacent to the
heater. A means for disconnection must be incorporated in the fi xed wiring of the premises in
accordance with the current wiring regulations. The supply circuit to the heater must incorporate
a double pole isolating switch having a contact separation of at least 3mm. Products that are
supplied without a plug are for installation into the fi xed wiring of the property, via a suitable
double pole switched fused spur with a fuse rated suitably for the appliances fl ex. Typical fuse
ratings for 230V equipment - Up to 700W = 3A, over 700W = 13A.
In installation the supply cord may be cut to the appropriate length for the electrical connection
point. Excess cable should not be inserted and stored behind the heater.
WARNING: This heater must not be connected to the electricity supply via an external switching
device (such as a timer) or a circuit that is regularly switched on and off by the utility supplier.
Failure to follow this warning could result in the heater’s thermal cut-off being inadvertently reset
and could create a fi re hazard. Cables/fl exes that are supplied pre-fi tted to the product must NOT
be extended.
CHILD SAFETY
WARNING - Towel rail fi xing kit screws are a potential choking hazard.
WARNING - This appliance is not intended for use by persons (including children) with reduced
physical, sensory or mental capabilities, or lack of experience and knowledge, unless they have been
given supervision or instruction concerning use of appliance by a person responsible for their safety.
This appliance can be used by children from 8 years and above and persons with reduced
physical, sensory or mental capabilities or lack of experience and knowledge if they have been
given supervision or instruction concerning use of the appliance. Children shall not play with the
appliance. Cleaning and user maintenance shall not be made by children without supervision.
Children of less than 3 years should be kept away unless continuously supervised. Children
aged from 3 years and less than 8 years shall only switch on/off the appliance provided that it
has been placed or installed in its intended normal operating position and they have been given
supervision or instruction concerning use of the appliance in a safe way and understand the
hazards involved. Children aged from 3 years and less than 8 years shall not plug in, regulate
and clean the appliance or perform user maintenance.
WARNING: In order to avoid a hazard for very young children, this appliance should be
installed so that the lowest rail is at least 600mm above the fl oor.
3
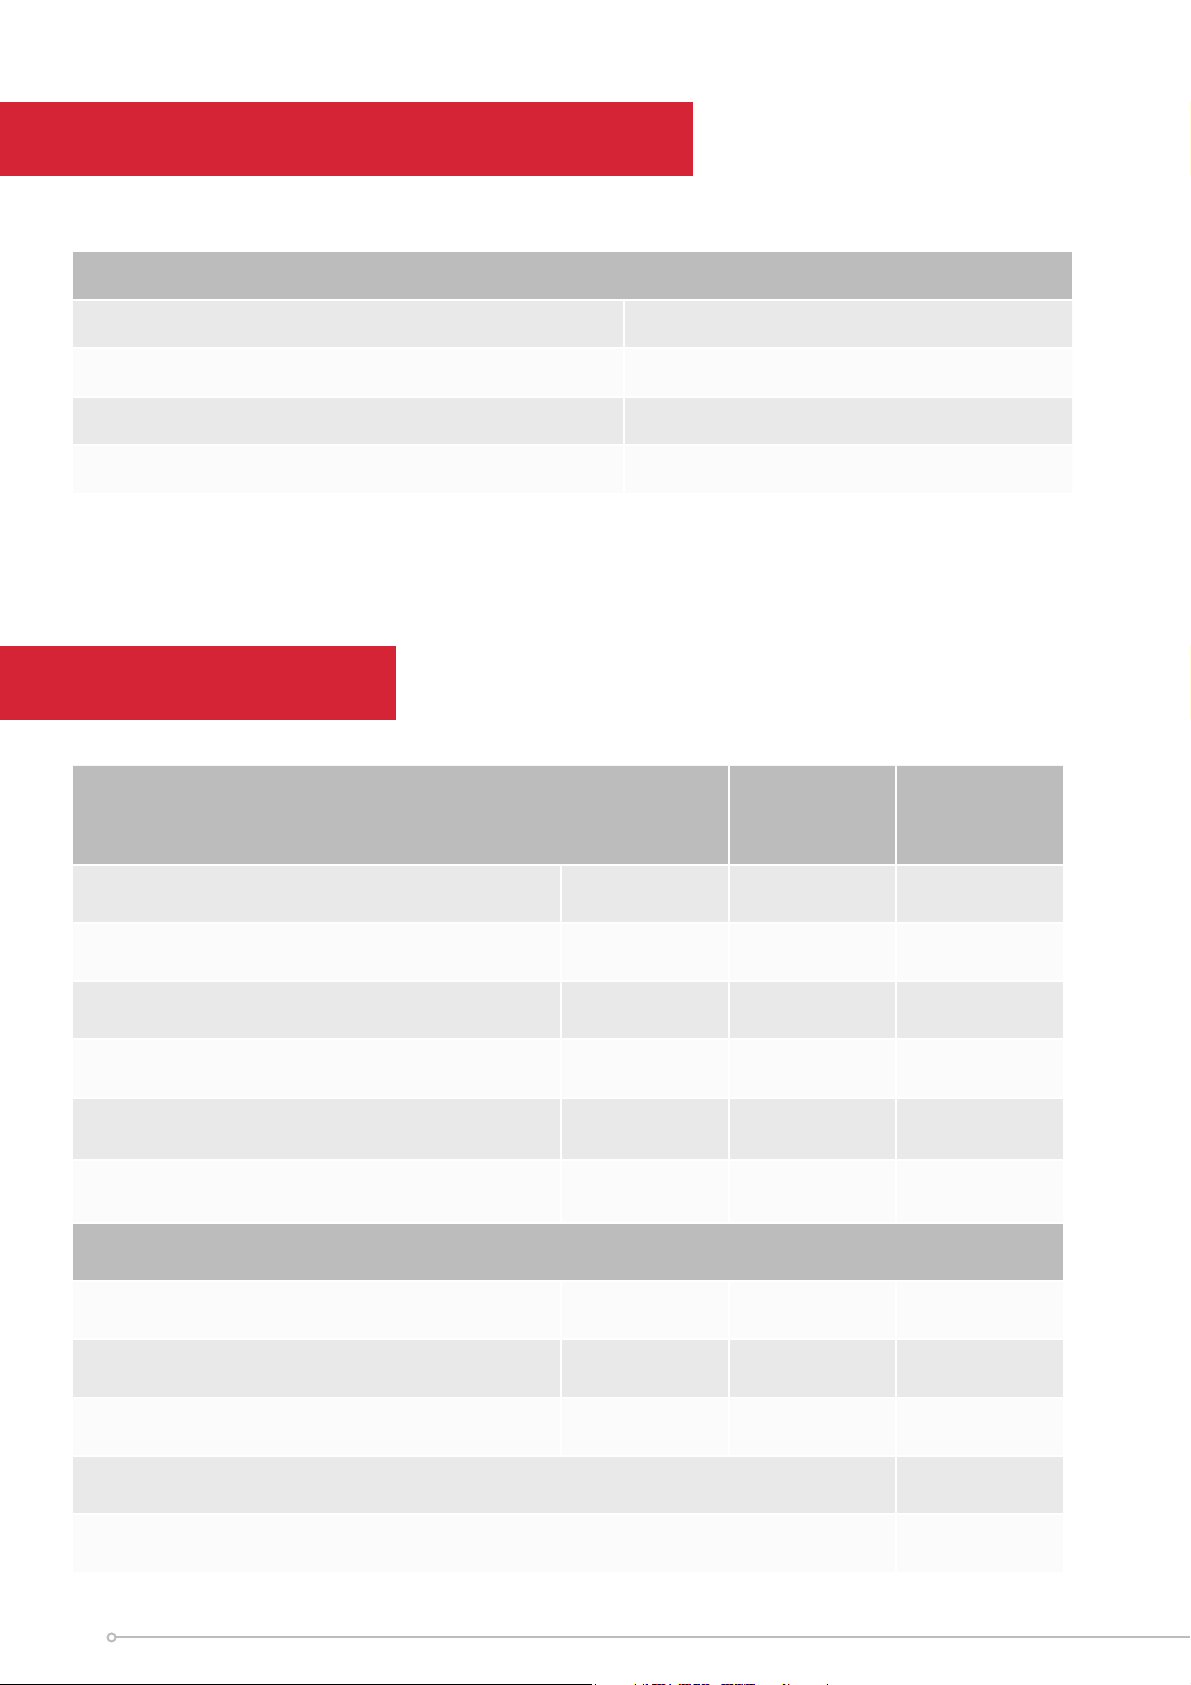
Energy Related Product Directive
This product meets the Ecodesign requirements for an electric fi xed local space heater. Commission Regulation
(EU) 2015/1188.
Type of heat output/ room temperature control
With electronic room temperature control
Electronic room temperature control plus week timer
With open window detection
With adaptive start control
Contact details
Glen Dimplex Heating and Ventilation
Millbrook House, Grange Drive, Hedge End, Southampton, SO30 2DF
Tel: 0344 879 3588
Yes
Yes
Yes
Yes
Technical Details
Model Identifi er(s):
Nominal heat output Pnom 1.00kW 1.00kW
BPH100M BPH100G
Height (mm) 1100 1073
Width (mm) 430 418
Depth (mm) 265 271
Minimum heat
output (indicative)
Maximum continuous
heat output
Auxiliary Electricity Consumption
At nominal heat output elmax 0.00 0.00
At minimum heat output elmin 0.00 0.00
In standby mode elSB
With open window detection
Pmin N.A N.A
Pmax,c 0.5 0.75
<0.0005 <0.0005
Yes
With adaptive start control
4
Yes

Controls
Controller UI
All Models
Digitally controlled, Electronic Thermostat accurate to (±0.2oC)
Timer modes:
7 Day Programmable User Timer, Out All Day, Home All Day, Away Mode
Continuous heat modes:
Eco, Manual, Frost Protect, Setback
• Open window detection, Adaptive-start
• Advance time period
• Adjustable max setpoint range (7-30°C)
• Bluetooth for software updates
• Child Lock & Landlord Lock (PIN-based)
Construction
Colour/ Finish
Element
Installation Wall-mounted design for quick fi xing installation
Safety
IP Rating IP25
Battery
Supply
Polyester powder coated steel or mirror front panel providing convection heat with a brushed
aluminium towel rail.
Metal or tinted Mirror
Compact, fi nned, mineral fi lled sheathed element operated via an advanced controller
equipped with seasonal adjustment to prevent room temperature overshoot
• Thermal cut-out. Auto reset type
• Overheat detection
3.3V coin cell battery to backup real time clock. Battery life >5 years.
1.3 metres fi tted, 3 core for fused spur installation, 1/N/PE ~230-240 V, 50Hz
Class I, with earth wire
Approvals CE and BEAB
Warranty 2 years
Country of Origin United Kingdom
Manufacturer
Glen Dimplex Heating & Ventilation
(GDC Group Ltd.)
5

General Information
Please read the instructions closely before fi rst using the product.
The heater is designed for wall mounting using the wall bracket supplied. It should only be operated
when in the upright position as shown - see Fig.3 and Fig.4. All models are splash proof to IP25
standard and may be used in bathrooms. Before connecting the heater check that the supply
voltage is the same as that stated on the heater.
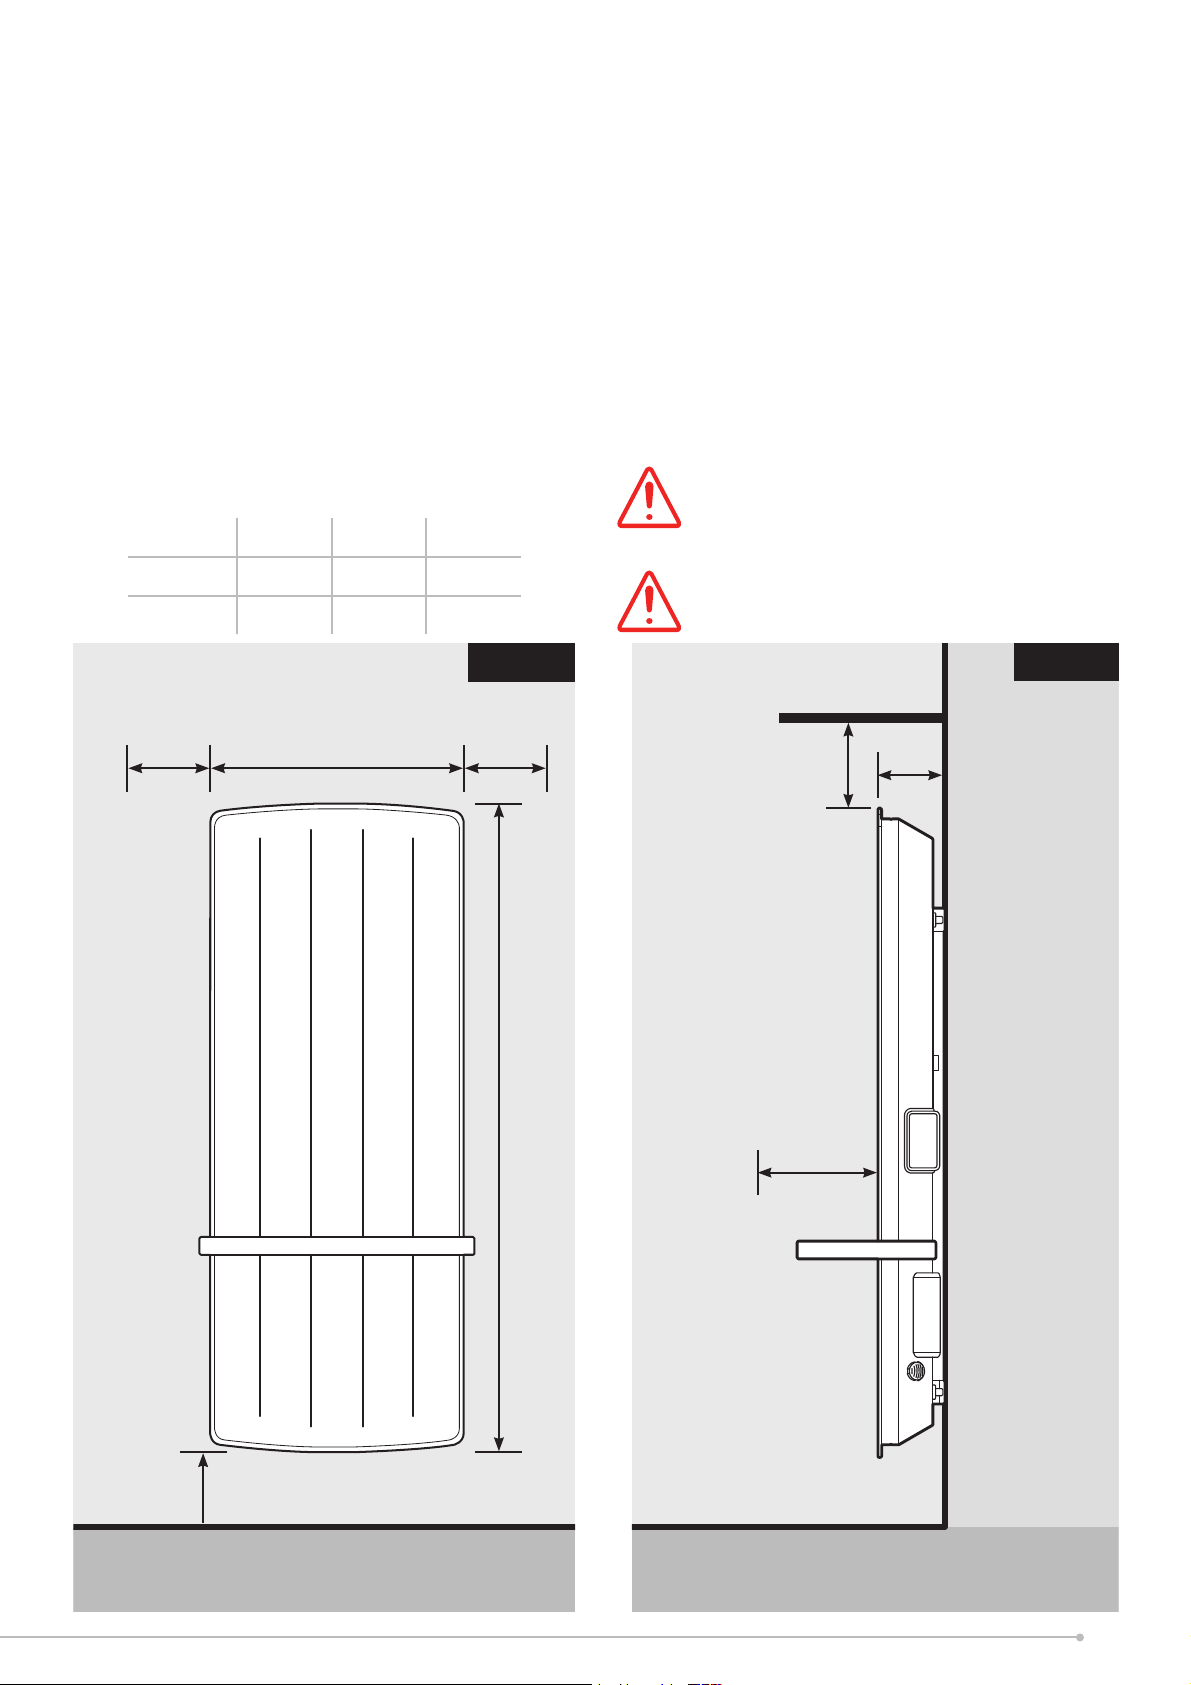
Wall Mounting Instructions
IMPORTANT - The wall bracket supplied with the heater must be used and the heater must
be installed in the correct orientation. Appropriate fi xings should be used to secure the bracket
to the particular wall on which the heater will be installed. The heater should be positioned
observing the minimum clearances stated around the heater - see Fig. 2, Fig. 3 and Fig. 4.
DO NOT locate the heater immediately below a fi xed socket outlet or connection box.
Fig. 1
244
Fig. 2
mm
800mm
235
mm
374mm
Minimum mounting clearance
6
To mount the towel rail:
The heater is supplied with two towel rails. There
are 4 possible towel rail mounting locations on
the heater indicated by screw holes and guides,
as shown in Fig.1. The towel rail(s) should be
fi tted prior to mounting the heater on the wall,
using the 4 screws supplied for each rail.
1. Remove protective plastic sleeving from
the rail.
2. With the heater detached from the wall,
position the towel rail in the desired location
by sliding over the top or bottom of the heater.
3. Fix the rail in position using 4 screws provided.
Model A(mm) B(mm) C(mm)
BPH100M 418 1073 271
BPH100G 430 1100 265
To mount the heater to the wall:
1. Remove wall mounting bracket from the back
of the heater by depressing the spring latch
at the side of each bracket - see Fig.2.
2. Fix the wall bracket securely to the wall through
the four screw holes. Ensure suitable screw
fi ttings are used for the particular wall type.
3. Present the heater to the wall bracket, and
engage left hand slots in the back with bracket
hooks.
4. Press heater into locked position and ensure
the clips on the right hand side are engaged.
NOTE:
Maximum hanging weight should not exceed
3kg per rail. The rail should not be used for
any other purpose e.g. mobility aid.
WARNING:
This product is heavy and care should be
taken in installation
Fig. 3
150mm (min) 150mm (min)
A
B
Shelf / Ceiling / Obstruction
300mm (min)
Minimum front clearance
300mm
Fig. 4
114mm
C (min)
Minimum mounting clearance
*Please note correct product orientation is
with controller facing right side only
7
First Time Power-On
A setup wizard will display when the product is powered on for
the fi rst time. This will set the following:
• Time, Date, Daylight Savings Time
• Sound On/Off
For information on using the Heaters controls, refer to page 10.
The Heater will then take the User to the Home Screen with the
‘Out All Day’ Timer Mode active.
Important
During initial heat-up, some odour may be
emitted due to the newness of materials used in
manufacture. This is normal and will disappear
after a short period of use. It is however advisable
to keep the room well ventilated.
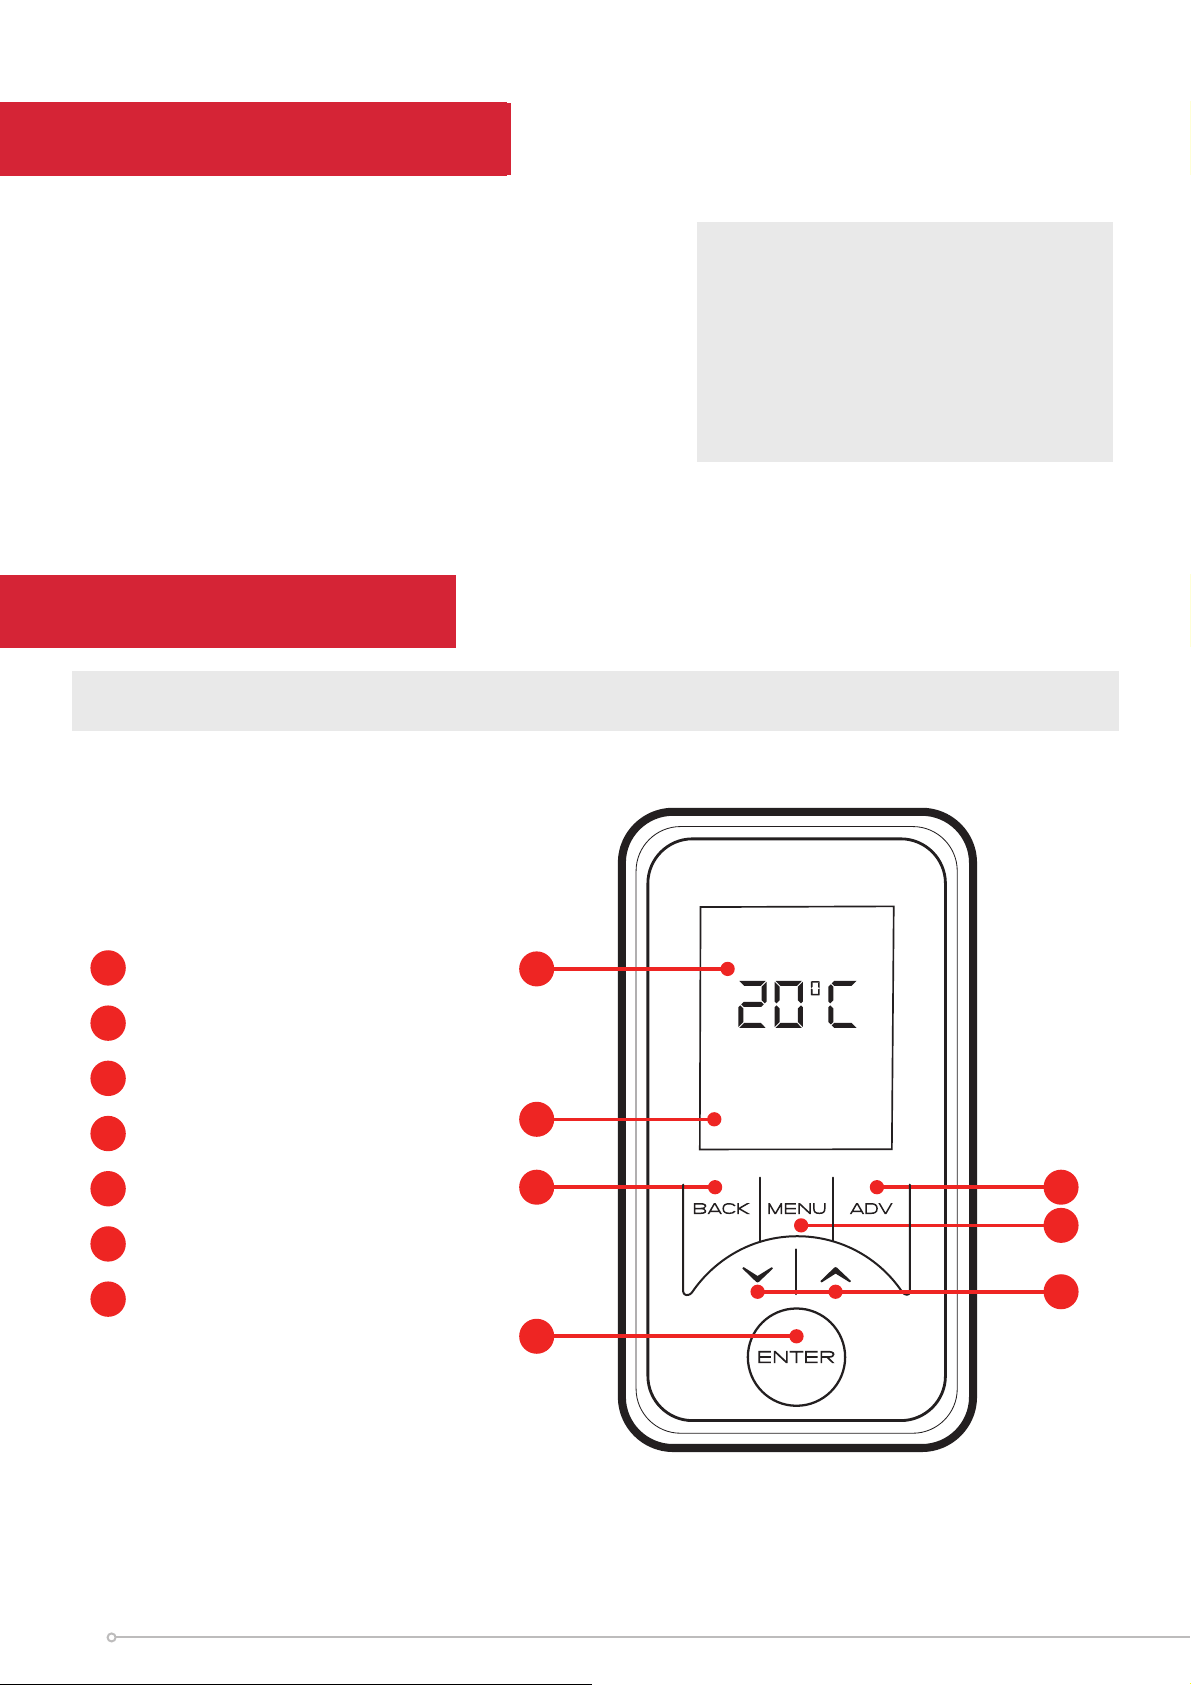
Operation Manual
WARNING: FAILURE TO FOLLOW THESE OPERATING INSTRUCTIONS MAY RESULT IN INJURY AND/OR DAMAGE.
The controls are located on top of the heater. This consists of a display screen and six touch sensitive buttons.
1
Display Screen
2
‘Menu’ Button
3
‘Back’ Button
4
‘Up and Down’ Arrows
5
‘Enter’ Button
1
7
Heating ON
63
2
6
‘Advance’ Button
7
Heating Status
4
5
The heater is fi tted with an adjustable thermostat enabling the room temperature to be controlled. The minimum
room temperature is 7°C. The maximum temperature is set to 30°C. A temperature of 21°C is a common comfortable
room temperature.
8