

Page 1
PRACTICAL USER’S GUIDE
FOR THE ELECTRIC FIREPLACE
BF SERIES WITH FILTER AND LOGSET
Serial Number
Model Number
CAT Number
Quality checked by:
Valued Customer,
We are pleased that you have chosen to purchase an electric
fi replace product manufactured by Dimplex North America Ltd.
Over the years, valuable memories will occur around the warmth
and comfort of your hearth. Thank you for allowing our product
to be the backdrop for those special moments.
7207920100REV02
Page 2

QUICK REFERENCE GUIDE
1. Prior to the fi rst use of the fi replace verify the following:
• Are the circuit breakers for the fi replace on?
• Are the light bulbs in your fi replace loose? (to check, follow the
instructions for replacing the light bulbs under the Maintenance
section of this manual)
2. The heater on your fi replace may emit a slight, harmless odor when
fi rst used. This odor is a normal condition caused by the initial
heating of internal heater parts and will not occur again.
3. If your heater does not emit heat, ensure the main switch is on, the
built-in thermostat is set above the current room temperature and any
wall switches for the unit are on. If this does not work, switch the unit
off for 5 minutes and try again. Consult operation section of your
practical users guide for further information.
4. The information regarding the model of your fi replace can be found
on the rating plate located on the side adjacent to the supply cord.
5. If you have any technical questions regarding the operation of your
fi replace, or require service for your fi replace contact Dimplex
Customer Service.
CONTENTS
PAGE 1 Important Instructions
PAGE 2 Model and Serial Number
Information
PAGE 3 Operation
PAGE 4 Maintenance
PAGE 6 Accessories
PAGE 7 Warranty
Page 3

IMPORTANT INSTRUCTIONS
PLEASE RETAIN THIS USER’S GUIDE FOR FUTURE REFERENCE
When using electrical appliances, basic precautions should always be followed to reduce the risk of fi re,
electric shock, and injury to persons, including the following:
1. Read all instructions before using the electric fi replace.
2. This fi replace is hot when in use. To avoid burns, do not let bare skin touch hot surfaces. The trim
around the heater outlet becomes hot during heater operation. Keep combustible materials, such as
furniture, pillows, bedding, papers, clothes, and curtains at least 0.9 meters (3 feet) from the front of
the unit.
3. Extreme caution is necessary when any heater is used by or near children or invalids and whenever
the unit is left operating and unattended.
4. Young children should be supervised to ensure that they do not play with the appliance.
5. The appliance is not intended for use by young children or infi rmed persons unless they have been
adequately supervised by a responsible person to ensure they can use the appliance safely.
6. The appliance must be positioned so that the plug is accessible.
7. Always unplug the electric fi replace when not in use.
8. If the supply cord is damaged, it must be replaced by the manufacturer, or its service agent, or a
qualifi ed person in order to avoid a hazard.
9. Do not operate any unit with a damaged cord or plug, or if the heater has malfunctioned, or if the
electric fi replace has been dropped or damaged in any manner. Return heater to authorized service
facility for examination, electrical or mechanical adjustment, or repair.
10. Do not use outdoors.
11. Do not use this fi replace in the immediate surroundings of a bath, a shower or a swimming pool.
12. Do not install the fi replace directly on carpet or a similar surface which may restrict air circulation
beneath the unit.
13. Do not run the cord under carpeting. Do not cover cord with throw rugs, runners, or the like.
Arrange cord away from traffi c area and where it will not be tripped over.
14. Do not locate the heater immediately below a fi xed socket-outlet.
15. Do not locate the appliance in front of a fi xed socket-outlet
16. To disconnect the fi replace, turn the controls off, then remove the plug from the outlet.
17. Do not insert or allow foreign objects to enter any ventilation or exhaust opening as this may cause an
electric shock or fi re, or damage to the heater.
18. To prevent a possible fi re, do not block air intake or exhaust in any manner. Do not use on soft
surfaces, like a bed, where openings may become blocked.
19. All electrical heaters have hot and arching or sparking parts inside. Do not use in areas where
gasoline, paint, or fl ammable liquids are used or stored or where the unit will be exposed to
fl ammable vapors.
20. Do not modify the electric fi replace. Use it only as described in this manual. Any other use not
recommended by the manufacturer may cause fi re, electric shock or injury to persons.
21. Avoid the use of an extension cord. Extension cords may overheat and cause a risk of fi re. If you
must use an extension cord, the cord must be 3-core type and have a rating no less than 13 amps.
22. Do not burn wood or other materials in the electric fi replace.
23. Do not strike the fi replace glass.
24. Always use a certifi ed electrician should new circuits or outlets be required.
25. Always use properly grounded, fused and polarized outlets.
26. Disconnect all power supply before performing any cleaning, maintenance or relocation of the unit.
27. When transporting or storing the unit and cord, keep in a dry place, free from excessive vibration and
store so as to avoid damage.
28. WARNING: In order to avoid overheating, do not cover the heater
29. CAUTION: In order to avoid a hazard due to the inadvertent resetting of the thermal cutout, this
appliance must not be supplied through an external switching device, such as a timer, or connected
to a circuit that is regularly switched on and off by the utility
SAVE THESE INSTRUCTIONS
1
Page 4
NOTE: Procedures and techniques that are considered important enough to emphasize.
Firebox
Model Number
Serial Number
Firebox
CAUTION: Procedures and techniques which, if not carefully followed, will result in damage to the
equipment.
WARNING: Procedures and techniques which, if not carefully followed, will expose the user to the risk of
fi re, serious injury, illness or death.
MODEL AND SERIAL NUMBER INFORMATION
If you have any questions about our products please have the product model and serial numbers
available upon calling Dimplex Customer Service. To locate the model and serial number labels see
below. (FIGURE 1)
Model Number
Serial Number
Firebox
Model
Number
Label
Serial
Number
Label
Carton
Model
Number
Serial
Number
FIGURE 1
2
Page 5
OPERATION
REMOTE CONTROL (FIGURE 2)
The remote control has a range of approximately 15.25 meters (50 feet). It does not
have to be pointed at the fi replace and can pass through most obstacles (including walls).
REMOTE CONTROL INITIALIZATION
This procedure is may be required if there is a loss of power to the remote control in
the fi replace. (i.e. power failure, breaker tripped, main power switch is turned off) or
if a new remote is used.
1. Ensure that power is supplied through main service panel.
2. Locate manual controls (FIGURE 3)
3. Activate main power switch.
4. Press — (on) button located on the Manual Selection Control for 3 seconds
(FIGURE 4). All 3 indicators will fl ash.
5. Press the ON button on the transmitter (FIGURE 2). The indicators will fl ash
rapidly and then turn off. This will synchronize the remote control transmitter
and receiver.
Manual Controls and Indicator Lights
FIGURE 3
FIGURE 4
FIGURE 2
Thermostat
Control
Main Power Switch
REMOTE CONTROL USAGE
The remote control operates the fi replace levels sequentially. The level is increased every time the ON
button on the transmitter is pressed. The fi replace can be turned off at any point by pressing the OFF
button on the remote control transmitter.
Level 1: The fl ame effect is turned on and the fi rst red indicator light is activated.
Level 2: The fl ame effect remains on, and the Purifi reTM is activated. The fi rst and second red
indicator lights are activated.
Level 3: The fl ame effect remains on, the heater is activated, and all three red indicator lights are
activated.
MANUAL CONTROLS
The fi replace can also be controlled in a similar manner to the remote control with switches located on the
fi replace (FIGURE 5).
A. On Switch
Operates fi replace in the same manner as the remote control transmitter. Pressing this button
has the same effect as the ON button on the remote control. Pressing once activates Level
1, twice activates Level 2, three times activates Level 3.
B. Off Switch
Pressing this button has the same effect as the OFF button on the remote control. Pressing once
to shut the unit off.
3
Page 6
FIGURE 5
A. On Switch B. Off Switch
Level 1 Indicator
Level 2 Indicator
Level 3 Indicator
HEATER THERMOSTAT CONTROL
To adjust the temperature to your individual requirements, turn the thermostat control clockwise all the
way to turn on the heater. When the room reaches the desired temperature, turn the thermostat knob
counter clockwise until you hear a click. Leave in this position to maintain the room temperature at this
setting. For additional heat, turn clockwise until you hear the click again and the heater will turn on.
NOTE
The heater may emit a slight harmless odor when fi rst used. This odor is a normal condition caused by
initial heating of internal parts and will not occur again.
THE TEMPERATURE CUTOUT SWITCH
The heater on this fi replace is protected with a safety device to prevent overheating. Should the heater
overheat, an automatic cut out will turn the heater off. The heater will re-activate once the heater has
cooled. The overheat cutout may be triggered if the fi lter is dirty. Follow fi lter maintenance on Page 6.
CAUTION
If the heater continuously resets, disconnect the power at the main service panel and call your local
dealer.
MAINTENANCE
WARNING
Disconnect all power coming to fi replace at main service panel before attempting maintenance or
cleaning to reduce risk of fi re, shock or damage to persons.
NOTE
Allow at least 5 minutes for light bulbs to cool off before touching bulbs to avoid accidental burning of skin.
TOOL REQUIREMENTS: Screwdriver
LIGHT BULB REPLACEMENT
Allow at least 5 minutes for light bulbs to cool off before touching bulbs to avoid accidental burning of skin.
Light bulbs need to be replaced when you notice a dark section of the fl ame or when the clarity and detail
of the log exterior disappears. There are four bulbs under the log set which generate the fl ames and
embers.
4
Page 7
SCREWS
LIGHT BULB REQUIREMENTS
Quantity of 4 clear chandelier or candelabra bulbs with an E-14 socket base, 60 watt rating.
DO NOT EXCEED 60 WATTS PER BULB.
CAUTION
When handling log only apply force to the ember bed section not directly to the logs.
HELPFUL HINTS
It is a good idea to replace all light bulbs at one time if they are
close to the end of their rated life. Group replacement will
reduce the number of times you need to open the unit to
replace light bulbs. Long life bulbs are recommended to
reduce the frequency of bulb changes.
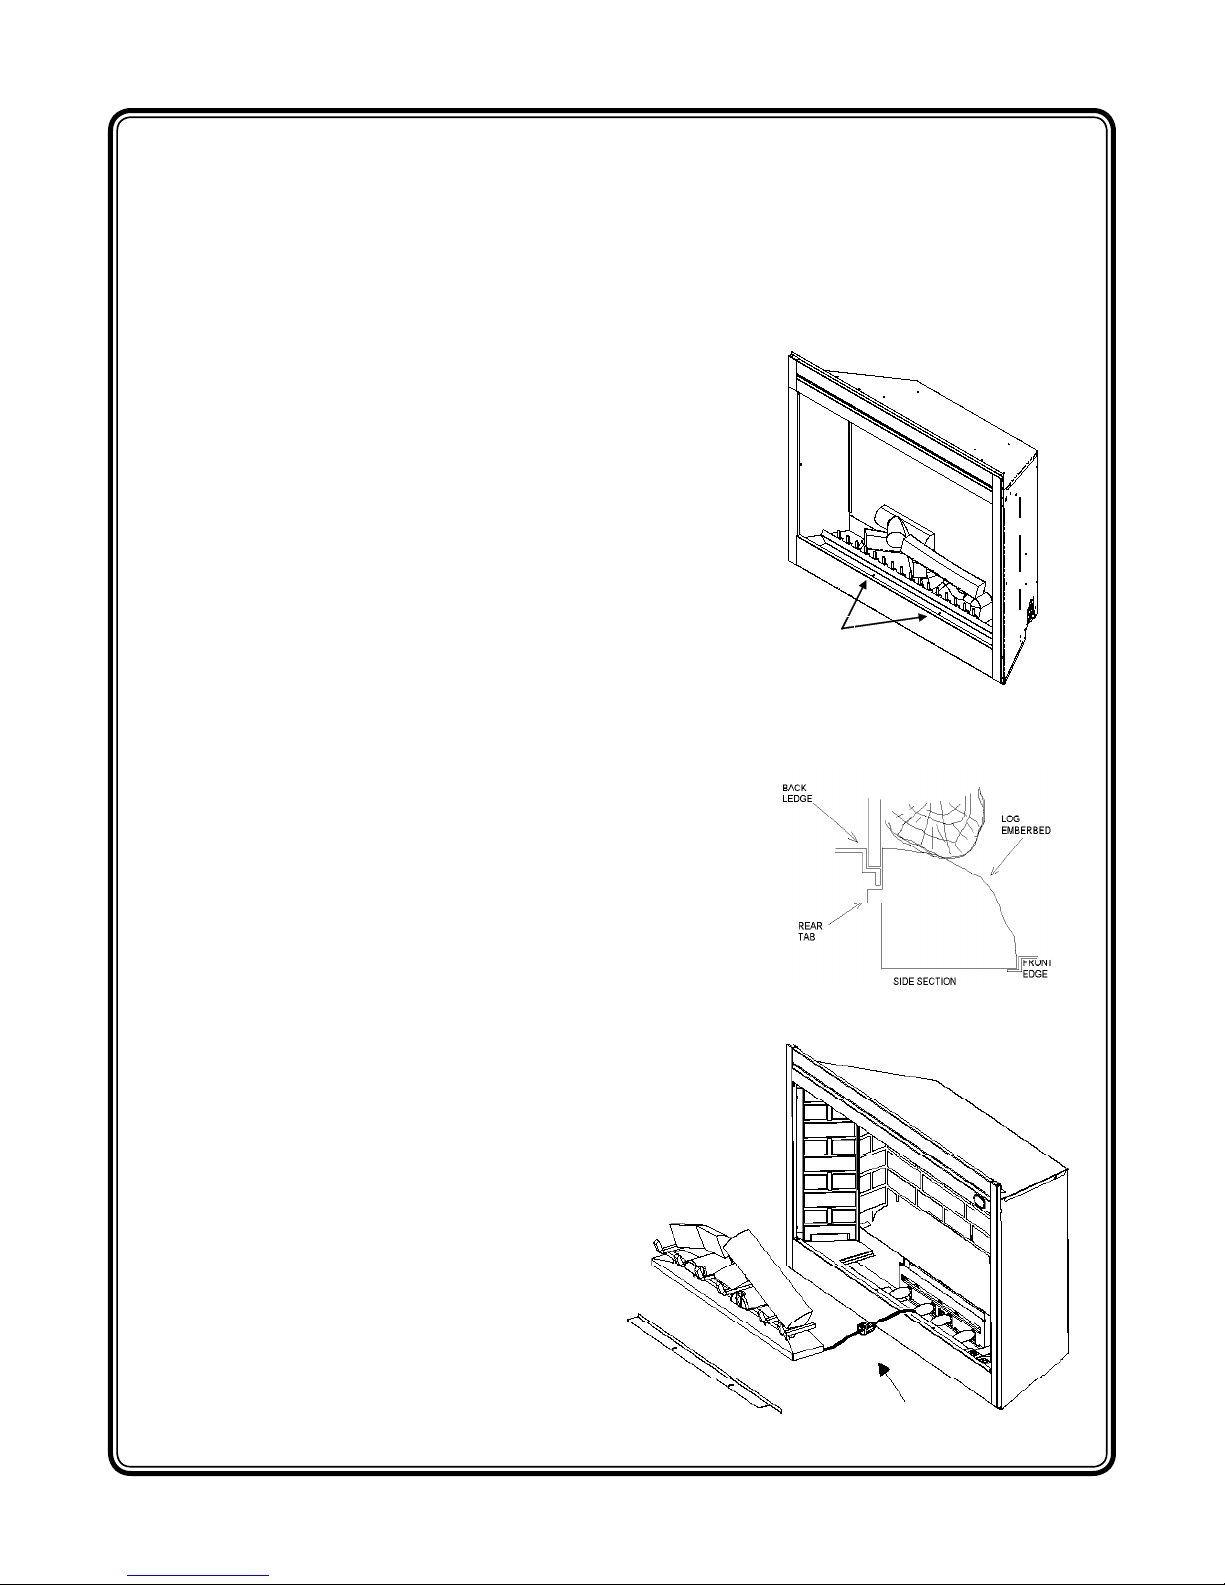
TO ACCESS THE LIGHT BULB AREA
1. Open steel curtain (remove glass doors if applicable).
2. Remove two screws on log bracket and set aside.
(FIGURE 6)
3. Pull front edge of plastic ember bed or plastic grate
up and forward until rear tab releases from the ledge
located at the bottom of the mirror. (FIGURE 7)
NOTE Log set fi ts tightly into fi rebox, some force may be
necessary to remove.
4. Set logset in front of fi rebox.
5. Disconnect the logset LED wire harness from unit.
(FIGURE 8)
6. Examine the bulbs to determine which bulbs require
replacement.
7. Unscrew bulbs counter clockwise.
8. Insert new bulbs.
9. Re-connect the logset LED wire harness to the unit.
10. Replace the logset by inserting the rear tab of the logset
under the back ledge of the fi replace and push down
on the front edge of the logset until it snaps into place.
(FIGURE 7)
11. Replace log grate using two screws previously
removed.
FIGURE 6
Screws
FIGURE 7
PURIFIRE™ FILTER
The Purifi re™ fi lter supplied in your fi replace is
reusable and washable. The fi lter should be
cleaned or replaced on average once a year. To
clean the fi lter gently tap fi lter on a hard surface to
dislodge any loose dirt or debris, and then clean
with water. No soap or cleaning products are
recommended. The fi lter size is 508mm x 254mm x
25.4mm (20 inch x 10 inch x 1 inch) rated at MERV 10.
If using an after market fi lter follow the manufacturers
recommended replacement instructions.
FIGURE 8
LED Wire Harness
5
Page 8

TO REPLACE FILTER (FIGURE 9)
1. Remove the 2 mounting screws from the air fi lter bracket.
2. Slide forward to remove the air fi lter bracket assembly from the fi rebox.
3. Slide fi lter out of air fi lter bracket.
4. Reassemble in reverse order as above.
NOTE
If after market air fi lter is used ensure it is installed according to the manufacturers recommended
instructions.
Purifi re Filter
Filter Bracket
FIGURE 9
Mounting
Screws
MIRROR CLEANING
The mirror is cleaned in the factory during the assembly operation. During shipment, installation,
handling, etc., the mirror surface may collect dust particles; these can be removed by buffi ng lightly with a
clean dry cloth.
To remove fi ngerprints or other marks, the mirror can be cleaned with a damp cloth using good quality
household glass cleaner. The mirror should be completely dried with a lint free cloth to prevent water
spots. To prevent scratching, do not use abrasive cleaners or spray liquids on the clear door surface.
ACCESSORIES
Please contact your local dealer for genuine Dimplex accessories. Example: glass door kits, brass and
stainless steel trims, and cabinets designed to fi t your fi replace.
6
Page 9
WARRANTY
Dimplex Electric Fireplaces are tested and inspected prior to shipment and are guaranteed from defect
to the purchaser of each new product. Any part which proves to be defective in material or workmanship
under normal use within one year will be repaired or replaced without charge.* The Company will not be
responsible for any expense incurred for installation, removal for service, or transportation costs. Any
such defect should be brought to the attention of the Dealer where the product was purchased and is
authorized to repair or replace within the terms of this warranty.
The Company’s only obligation under this warranty will be at its sole option to repair or replace
any part proving defective or to refund the purchase price thereof.
The owner/user assumes all other risks, if any, including the risk of any direct, indirect or consequential
loss or damage arising out of the use of or inability to use the product.
The warranty will not apply if, in the sole judgment of the Company, damage or failure has resulted from
accident, alteration, misuse, abuse, incorrect installation, or operation on an incorrect power source.
The foregoing is in lieu of all other warranties expressed, implied, or statutory, and the Company
neither assumes, nor authorizes any person to assume for it any other obligation, or liability in
connection with said product.
*Light bulbs are not covered in the warranty.
SERVICE
Contact your local dealer for service or warranty information.
The product complies with the European Safety Standard EN60335-2-30 and
the European Standard for Electromagnetic Compatibility (EMC) EN55014,
EN6055-2 and EN60555-3 which cover the essential requirements of EEG
Directives 73/23 and 89/336.
7
Page 10

GUIDE PRATIQUE DE L’UTILISATEUR
DU FOYER ÉLECTRIQUE
SÉRIE BF AVEC FILTRE ET ENSEMBLE
DE BÛCHES À DEL
Système de fi ltration d’air
Numéros de Série
Numéros de Modèle
Numéros de CAT
Qualité vérifi ée par:
Cher client,
Nous vous remercions d’avoir choisi un foyer électrique fabriqué
par Dimplex North America Ltd.
Au fi l des années, votre foyer sera au cœur de moments
chaleureux vécus dans le confort. Nous sommes heureux que notre
produit soit la toile de fond de ces instants inoubliables.
7207920100REV02
Page 11

GUIDE DE RÉFÉRENCE RAPIDE
1. Avant d’utiliser votre foyer électrique pour la première fois, veuillez vérifi er
ce qui suit:
• Les disjoncteurs de la prise de courant dans laquelle sera branché
l’appareil sont-ils en position « marche » (ON)?
• Les ampoules électriques sont-elles bien vissées? (Pour les vérifi er,
suivre les instructions pour remplacer les ampoules électriques qui
se trouvent dans la section « ENTRETIEN » du présent guide.)
2. Les éléments chauffants peuvent dégager une légère odeur inoffensive
pendant la première utilisation, car ils chauffent pour la première fois.
Cette situation est normale et ne devrait plus se produire par la suite.
3. Si les éléments chauffants n’émettent pas de chaleur, s’assurer que
l’interrupteur principal est en position « marche » (ON), que le thermostat
intégré est réglé à une température supérieure à celle de la pièce et que
tous les interrupteurs muraux de l’appareil sont en position « marche »
(ON). Si l’appareil ne fonctionne toujours pas, l’éteindre pendant cinq
minutes et réessayer. Consulter la section « UTILISATION » du présent
guide pour obtenir de plus amples renseignements.
4. Les renseignements relatifs au modèle de votre foyer se trouvent sur la
plaque signalétique située sur le côté adjacent au cordon d’alimentation.
5. Pour toute question concernant le fonctionnement de votre foyer, ou s’il
doit faire l’objet d’une réparation, communiquer avec le Service à la
Clientèle de Dimplex.
TABLE DES MATIÈRES
PAGE 1 Instructions Importantes
PAGE 2 Renseignements Sur Les Numéros
de Modèle et de Série
PAGE 3 Utilisation
PAGE 4 Entretien
PAGE 6 Accessoires
PAGE 7 Garantie
Page 12

INSTRUCTIONS IMPORTANTES
VEUILLEZ CONSERVER CE GUIDE À DES FINS DE CONSULTATION ULTÉRIEURE
Lorsqu’un appareil électrique est utilisé, il est important de toujours prendre des précautions de base pour
réduire les risques d’incendie, de chocs électriques et de blessures:
1. Lire toutes les instructions avant de se servir du foyer électrique.
2. Le foyer devient chaud lorsqu’il est en marche. Pour éviter les brûlures, ne pas toucher les surfaces
chaudes. La bordure autour de la bouche de chaleur devient chaude lorsque les éléments chauffent.
Garder à au moins 0,9 mètre de l’appareil tout matériel combustible: meubles, oreillers, literie, papier,
vêtements et rideaux.
3. Faire preuve d’une grande prudence lorsque l’appareil est utilisé par des enfants ou des personnes
handicapées, s’il est en marche à proximité d’eux, ou s’il est en marche et laissé sans surveillance.
4. Surveiller les jeunes enfants pour éviter qu’ils ne jouent avec l’appareil.
5. L’appareil ne doit pas être utilisé par des jeunes enfants ou des personnes handicapées, à moins qu’ils
ne soient bien supervisés par une personne responsable qui veillera à ce qu’ils utilisent l’appareil
correctement.
6. L’appareil doit être installé de façon à ce que la fi che soit accessible.
7. Toujours débrancher le foyer électrique lorsqu’il ne sert pas.
8. Si le cordon d’alimentation est endommagé, il doit être remplacé par le fabricant ou par son fournisseur de
service, ou par une autre personne compétente pour éviter tout danger.
9. Ne pas se servir de l’appareil si la fi che ou le cordon sont endommagés, si les éléments chauffants
fonctionnent mal ou si le foyer électrique est tombé ou est endommagé de quelque manière que ce soit.
Pour le faire vérifi er, pour faire effectuer une mise au point électrique ou mécanique, ou pour le faire
réparer, communiquer avec un centre de service autorisé.
10. Ne pas utiliser à l’extérieur.
11. Ne pas utiliser ce foyer à proximité d’un bain, d’une douche ou d’une piscine.
12. Ne pas installer le foyer directement sur un tapis ou sur une surface similaire pouvant nuire à la circulation
de l’air sous l’appareil.
13. Éviter de passer le cordon sous un tapis. Ne pas couvrir le cordon de carpettes, de tapis de couloir ou
autres recouvrements de sol. Éloigner le cordon des endroits passants et éviter de le placer là où il
pourrait provoquer la chute d’une personne.
14. Ne pas installer le foyer immédiatement au-dessous d’une prise de courant fi xe.
15. Ne pas installer le foyer devant une prise de courant fi xe.
16. Pour débrancher le foyer, éteindre l’appareil, puis retirer la fi che de la prise de courant.
17. Ne pas introduire de corps étrangers dans la prise d’air de ventilation ou la bouche de sortie d’air, car cela
peut occasionner des chocs électriques, provoquer un incendie ou endommager le foyer.
18. Pour éviter un incendie, ne pas obstruer l’entrée ou la sortie d’air d’aucune façon. Ne pas utiliser l’appareil
sur des surfaces instables, comme un lit, où les ouvertures risquent de se bloquer.
19. Tous les appareils chauffants électriques contiennent des pièces qui chauffent et produisent des étincelles.
Ne pas faire fonctionner le foyer dans des endroits où de l’essence, de la peinture et autres produits
infl ammables sont utilisés ou rangés, ou s’il y a exposition à des vapeurs infl ammables.
20. Ne pas apporter de modifi cations au foyer. Se servir du foyer uniquement de la façon décrite dans le
présent guide. Toute autre utilisation non recommandée par le fabricant peut provoquer un incendie,
occasionner des chocs électriques ou des blessures.
21. Éviter d’utiliser une rallonge. Les rallonges peuvent surchauffer et causer un risque d’incendie. S’il est
nécessaire d’utiliser une rallonge, s’assurer que celle-ci soit tripolaire et d’intensité d’au moins 13 ampères.
22. Ne pas brûler de bois ni d’autres matériaux dans ce foyer électrique.
23. Ne pas frapper sur la vitre frontale du foyer.
24. Toujours faire appel à un électricien certifi é pour l’installation de nouveaux circuits ou de nouvelles prises
de courant.
25. Toujours se servir de prises correctement mises à la terre, polarisées et protégées.
26. Fermer toute source d’alimentation électrique de l’appareil avant de le nettoyer, de le réparer ou de le
déplacer.
27. Au moment du transport ou de l’entreposage de l’appareil, le conserver dans un endroit sec et à l’abri de
vibrations excessives, et le ranger pour éviter qu’il ne s’endommage.
28. AVERTISSEMENT: Pour éviter la surchauffe, ne pas couvrir le foyer.
29. MISE EN GARDE: Pour éviter les dangers engendrés par le réarmement involontaire du thermorupteur
1
Page 13

ne pas brancher cet appareil à un dispositif de connexion externe tel qu’une minuterie, ni le connecter
Firebox
Model Number
Serial Number
Firebox
à un circuit qui s’ouvre et se ferme régulièrement
NOTA: Marches à suivre et techniques considérées suffi samment importantes pour qu’on les souligne.
MISE EN GARDE: Marches à suivre et techniques qui, si elles ne sont pas bien respectées,
endommageront le matériel.
AVERTISSEMENT: Marches à suivre et techniques qui, si elles ne sont pas bien respectées, exposeront
l’utilisateur à des risques d’incendie, de blessure grave, de maladie ou de décès.
RENSEIGNEMENTS SUR LES NUMÉROS DE MODÈLE ET DE SÉRIE
Pour toute question relative à nos produits, communiquer avec le Service à la Clientèle de Dimplex en
ayant les numéros de modèle et de série à portée de main. Pour trouver ces numéros, se référer aux
croquis ci-dessous. (FIGURE 1)
Numéro de Modèle
Numéros de Série
Étiquette de
Numéro de
Modèle
Étiquette de
Numéro de
Série
Foyer
Boite
Étiquette
de
Numéro
de Modèle
Étiquette
de
Numéro
de Série
FIGURE 1
2
Page 14

UTILISATION
FIGURE 2
TÉLÉCOMMANDE (FIGURE 2)
La télécommande a une portée d’environ 15,25 m (50 po). Il n’est pas nécessaire de la
pointer vers le foyer, et elle peut franchir la plupart des obstacles (y compris les murs).
INITIALISATION DE LA TÉLÉCOMMANDE
Ce processus peut être nécessaire s’il y a interruption de courant à la télécommande
du foyer, notamment en cas de panne de courant ou de coupure du disjoncteur, ou
lorsque l’interrupteur d’alimentation principale est en position ARRÊT (OFF). Il est
également nécessaire si une nouvelle télécommande doit être utilisée.
1. S’assurer que le courant est alimenté par la boîte électrique principale.
2. Repérer les commandes manuelles. (FIGURE 3)
3. Activer l’interrupteur d’alimentation principale.
4. Appuyer sur le bouton — (MARCHE ou « ON ») situé sur le tableau de
commande manuelle pendant 3 secondes (FIGURE 4). Les trois témoins
lumineux clignoteront.
5. Appuyer sur le bouton MARCHE (ON) de la télécommande (FIGURE 2). Les
témoins lumineux clignoteront rapidement, puis s’éteindront. Ainsi, le transmetteur et le récepteur
de la télécommande seront synchronisés.
Commandes Manuelles et Témoins Lumineux
Bouton de
Commande
FIGURE 3
FIGURE 4
du
Thermostat
Interrupteur d’Alimentation Principale
UTILISATION DE LA TÉLÉCOMMANDE
La télécommande règle séquentiellement les niveaux de chauffage du foyer. Le niveau augmente
chaque fois que l’on appuie sur le bouton MARCHE (ON) du transmetteur. Il est possible d’éteindre le
foyer à tout moment en appuyant sur le bouton ARRÊT (OFF) du transmetteur de la télécommande.
Niveau 1: L’effet de fl amme est en marche, et le premier témoin lumineux rouge est allumé.
Niveau 2: L’effet de fl amme se maintient, et le système Purifi reMC est activé. Les premier et
deuxième témoins lumineux rouges sont allumés.
Niveau 3: L’effet de fl amme se maintient, les éléments chauffants fonctionnent et les trois témoins
lumineux rouges sont allumés
COMMANDES MANUELLES
Le foyer peut aussi être commandé d’une manière semblable à celle de la télécommande, grâce aux
interrupteurs qui se trouvent sur le foyer (FIGURE 5).
A. Interrupteur de Marche (ON)
Cet interrupteur fait fonctionner le foyer de la même manière que le transmetteur de la
télécommande. Ce bouton permet d’obtenir le même effet que le bouton MARCHE (ON) de la
télécommande. En appuyant une fois sur ce bouton, le niveau 1 est activé; en appuyant deux
fois, le niveau 2 est activé; et en appuyant trois fois, le niveau 3 est activé.
B. Interrupteur d’Arrêt (OFF)
Ce bouton permet d’obtenir le même effet que le bouton ARRÊT (OFF) de la télécommande. Le
foyer s’éteindra si vous appuyez une fois sur ce bouton.
3
Page 15

FIGURE 5
A. Interrupteur De MARCHE (ON)
Témoin - Niveau 1
Témoin - Niveau 2
A. Interrupteur d’Arrêt (OFF)
Témoin - Niveau 3
COMMANDE DU THERMOSTAT
Pour régler la température en fonction de vos besoins, tourner le bouton du thermostat jusqu’au bout
dans le sens horaire pour mettre en marche l’élément chauffant. Lorsque la température désirée est
atteinte dans la pièce, tourner le bouton du thermostat dans le sens antihoraire jusqu’à ce qu’un déclic se
fasse entendre. Garder cette position pour maintenir la température au réglage désiré. Pour augmenter
la chaleur, tourner le bouton dans le sens horaire jusqu’à ce que le déclic se fasse entendre de nouveau.
L’élément chauffant se mettra en marche.
NOTA
Les éléments chauffants peuvent dégager une légère odeur inoffensive pendant la première utilisation,
car ils chauffent pour la première fois. Cette situation est normale et ne devrait plus se produire par la
suite.
DISJONCTEUR DU CIRCUIT DE LA TEMPÉRATURE
L’appareil est équipé d’un dispositif de sécurité qui empêche la surchauffe. En cas de surchauffe, un
coupe-circuit automatique éteindra l’élément chauffant. Ce dernier sera réactivé une fois que
celui-ci aura refroidi. Si le fi ltre est sale, il est possible que le coupe-circuit soit activé. Voir les directives
d’entretien du fi ltre à la Page 6 du présent guide.
MISE EN GARDE
Si l’élément chauffant se réarme constamment, couper l’alimentation électrique dans la boîte électrique
principale et communiquer avec votre dépositaire.
ENTRETIEN
AVERTISSEMENT
Afi n de réduire les risques d’incendie, de chocs électriques ou de blessures, couper l’alimentation
électrique dans la boîte électrique principale avant de se livrer à tout travail d’entretien ou de nettoyage.
NOTA
Attendre au moins 5 minutes que les ampoules refroidissent avant d’y toucher pour éviter de se brûler
accidentellement.
OUTILS REQUIS: Un tournevis
REMPLACEMENT DES AMPOULES ÉLECTRIQUES
Attendre au moins 5 minutes que les ampoules refroidissent avant d’y toucher pour éviter de se brûler
accidentellement. Les ampoules électriques doivent être remplacées lorsqu’il y a une zone sombre
4
Page 16

SCREWS
dans les fl ammes, ou lorsque la luminosité faiblit et que les détails de la surface des bûches sont moins
visibles. Il y a quatre ampoules sous les bûches qui produisent l’effet de fl ammes et de braises.
AMPOULES REQUISES
Quatre ampoules transparentes de style chandelier ou candélabre à culot E-14 (petit) de 60 watts.
NE PAS EXCÉDER 60 WATTS PAR AMPOULE
MISE EN GARDE
En déplaçant les bûches, n’user de la force que sur la partie du lit de
braises et non pas directement sur les bûches.
CONSEILS UTILES
Il est conseillé de remplacer toutes les ampoules en même temps si
la fi n de leur durée utile approche. Ainsi, cela réduit le nombre de fois
qu’il faudra ouvrir l’appareil pour remplacer les ampoules. Il est
recommandé d’utiliser des ampoules longue durée afi n de réduire la
fréquence des remplacements.
POUR ACCÉDER AUX AMPOULES
1. Ouvrir le rideau en acier (enlever les portes vitrées si
nécessaire).
Vis
2. Retirer les deux vis sur le support à bûches et les mettre de côté.
(FIGURE 6)
3. Tirer l’extrémité avant du lit de braises en plastique ou de la grille en
plastique vers le haut, puis vers l’avant jusqu’à ce que le taquet
arrière se dégage de l’arrière du miroir. (FIGURE 7)
NOTA L’ensemble de bûches est solidement accroché au foyer, il
faudra peut-être user de force pour le retirer.
4. Mettre l’ensemble de bûches devant le foyer.
Rebord
Arriere
5. Débrancher de l’appareil le faisceau de câbles et de DEL de
l’ensemble de bûches. (FIGURE 8)
6. Examiner les ampoules pour déterminer lesquelles doivent
être remplacées.
7. Dévisser les ampoules dans le sens anti-horaire.
Taquet
Arriere
8. Installer de nouvelles ampoules.
9. Rebrancher le faisceau de câbles et de DEL de l’ensemble de bûches.
10. Replacer l’ensemble de bûches en insérant le taquet arrière
de l’ensemble de bûches sous le rebord arrière du foyer, et
pousser l’avant de l’ensemble de bûches vers le bas jusqu’à
ce qu’il s’enclenche. (FIGURE 7)
11. Remettre la grille en place et poser les vis enlevées initialement.
FIGURE 6
FIGURE 7
Vue Laterale
FIGURE 8
Lit de
Braises
Extrémité
Avant
FILTRE PURIFIRE
MC
Le fi ltre Purifi reMC dont est équipé votre foyer est lavable
et réutilisable. Ce fi ltre doit être nettoyé ou changé
environ une fois par an. Pour nettoyer le fi ltre, le
frapper doucement sur une surface dure pour en
déloger tout débris ou saleté, puis le laver à l’eau.
Le savon et les produits nettoyants sont déconseillés.
Le fi ltre, dont les dimensions sont 508 mm x 254 mm
x 25,4 mm, a une effi cacité minimale de fi ltration MERV
10. En cas d’utilisation d’un fi ltre de remplacement,
suivre les instructions du fabricant.
Faisceau de Câbles et de DEL
5
Page 17

POUR REMPLACER LE FILTRE (FIGURE 9)
1. Retirer les deux vis de montage du support du fi ltre à air.
2. Le faire glisser vers l’avant pour le retirer du foyer.
3. Faire glisser le fi ltre hors de son support.
4. Procéder dans l’ordre inverse pour rassembler le tout.
NOTA
Si vous utilisez un fi ltre de remplacement, assurez-vous de l’installer conformément aux instructions du
fabricant.
Filtre Purifi re
Support du Filtre
FIGURE 9
Vis de
Montage
NETTOYAGE DU MIROIR
Le miroir a été nettoyé à l’usine, pendant l’assemblage. Cependant, il se peut que des particules de
poussière s’y soient déposées pendant l’expédition, l’installation, la manipulation, etc.; pour les retirer,
polir doucement le miroir avec un chiffon propre et sec.
Pour retirer les empreintes digitales ou autres marques, nettoyer le miroir avec un chiffon humide et un
nettoyant pour vitres de bonne qualité. Pour prévenir les taches d’eau, le miroir doit être entièrement
asséché à l’aide d’un chiffon non pelucheux. Pour prévenir les rayures, ne pas utiliser de nettoyants
abrasifs et ne pas vaporiser de produits liquides sur la surface des portes vitrées.
ACCESSOIRES
Communiquer avec votre dépositaire relativement aux accessoires d’origine de Dimplex, notamment pour
se procurer un ensemble de portes vitrées, des bordures en laiton et en acier inoxydable et des caissons
conçus pour s’adapter à votre foyer.
6
Page 18

GARANTIE
Les foyers électriques Dimplex sont testés et inspectés avant d’être expédiés. Ils sont garantis contre
tout défaut pour l’acheteur de chaque nouveau produit. Toute pièce qui fait défaut en deçà de un an, en
ce qui a trait aux matériaux ou à la fabrication, dans des conditions normales d’utilisation, sera réparée ou
remplacée sans frais.* Dimplex n’assume aucune responsabilité pour les frais engagés dans l’installation
ou l’enlèvement du foyer, ou pour les coûts de transport. Toute défectuosité doit être portée à l’attention
du dépositaire où le produit a été acheté, lequel est autorisé à réparer ou à remplacer la pièce
conformément aux modalités de la présente garantie.
La seule obligation de Dimplex au titre de la présente garantie consiste à réparer ou à remplacer
toute pièce défectueuse, ou à rembourser à l’acheteur le prix d’achat de l’appareil et ce, à sa seule
discrétion.
Le propriétaire assume tous les autres risques, s’il en est, y compris les risques de dommages directs,
indirects ou consécutifs découlant de l’utilisation du produit ou de l’impossibilité de l’utiliser.
La garantie ne s’applique pas si, au seul jugement de Dimplex, les dommages ou les défaillances
découlent d’un accident, d’une modifi cation, d’un mauvais emploi, d’un emploi abusif, d’une installation
incorrecte ou d’une utilisation à partir d’une source d’électricité inadéquate.
La présente garantie remplace toutes les autres garanties explicites, tacites ou légales. Dimplex
n’assume ni n’autorise personne à assumer toute autre obligation ou responsabilité en ce qui a
trait audit produit.
* La garantie ne couvre pas les ampoules électriques.
SERVICES
Communiquer avec votre dépositaire obtenir des renseignements au sujet des services ou de la garantie.
Ce produit est conforme à la norme de sécurité européenne EN60335-2-30
ainsi qu’aux normes européennes de compatibilité électromagnétique (EMC)
EN55014, EN6055-2 et EN60555-3, qui couvrent les exigences essentielles
des directives EEG 73/23 et 89/336.
7
Page 19

GUIDA PRATICA PER L’UTENTE
DEL CAMINETTO ELETTRICO
SERIE BF CON FILTRO E CEPPO AL LED
Sistema di trattamento dell’aria
Numero di Serie
Numero di Modello
Numero di CAT
Controllo qualità
effettuato da:
Gentile Cliente,
La ringraziamo per aver acquistato un caminetto elettrico
fabbricato da Dimplex North America Ltd.
Siamo certi che potrà vivere di anno in anno momenti
indimenticabili intorno al calore e al confort del suo caminetto. La
ringraziamo di averci permesso di far parte, con il nostro prodotto,
7207920100REV02
di quei ricordi speciali.
Page 20

GUIDA DI RIFERIMENTO
1. Prima di utilizzare il caminetto per la prima volta, verifi care i seguenti
punti:
• Gli interruttori di circuito dell’apparecchio sono attivati?
• Le lampadine del caminetto sono ben avvitate? (Per controllare,
seguire le istruzioni del capitolo “Manutenzione” nel manuale
riguardo alla sostituzione delle lampadine)
2. L’elemento elettrico del caminetto potrebbe emettere un leggero
odore al momento dell’accensione. Tale odore innocuo è una
condizione normale provocata dal riscaldamento iniziale
dell’elemento e non si riprodurrà in futuro.
3. Se l’elemento elettrico non si scalda, assicurarsi che l’interruttore
sia attivato e che il termostato sia girato completamente in senso
orario e che tutti gli interruttori dell’apparecchio siano su ON.
Se ancora non funzionasse, spegnere l’apparecchio per 5 minuti e
riprovare. Per ulteriori informazioni, vedere la Guida dell’utente al
capitolo “Funzionamento”.
4. Le informazioni riguardo al modello del caminetto si trovano sulla
targhetta posta sul lato del cavo.
5. In caso di domande tecniche riguardo al funzionamento del caminetto
o per chiamate di servizio, contattare il Servizio alla Clientela di
Dimplex.
CONTENTS
PAGINA 1 Istruzioni Importanti
PAGINA 2 Dati Sui Numeri di Modello e di Serie
PAGINA 3 Funzionamento
PAGINA 4 Manutenzione
PAGINA 6 Accessori
PAGINA 7 Garanzia
Page 21

ISTRUZIONI IMPORTANTI
CONSERVARE QUESTA GUIDA DELL’UTENTE COME RIFERIMENTO
Quando si usano apparechi elettrici, occorre sempre rispettare alcune precauzioni fondamentali al fi ne di
ridurre il rischio di incendi, scosse elettriche e danni alle persone:
1. Leggere tutte le istruzioni prima di utilizzare il caminetto elettrico.
2. Durante l’uso, il caminetto è molto caldo. Per prevenire ustioni evitare il contatto con la pelle. Il
contorno dello sbocco del caminetto diventa caldo mentre l’apparecchio è in funzione. Tenere
materiali combustibili quali mobili, cuscini, lenzuola e coperte, carta, abiti e tende almeno a 0.9m (tre
piedi) dall’apparecchio.
3. È necessaria un’estrema attenzione quando l’apparecchio viene usato vicino a bambini o persone
invalide e se viene lasciato in funzione senza sorveglianza.
4. Occorre sorvegliare i bambini affi nché non giochino con l’apparecchio.
5. L’apparecchio non deve essere utilizzato da bambini o persone invalide senza sorveglianza.
6. L’apparecchio deve essere in una posizione tale che la spina sia accessibile.
7. Staccare sempre la spina quando l’apparecchio non viene usato.
8. Se il cavo è danneggiato, deve essere sostituito dal fabbricante o dall’impiegato del Centro di servizio
o da altra persona qualifi cata al fi ne di evitare incidenti.
9. Non usare l’apparecchio se il cavo o la spina sono danneggiati o se il caminetto non funziona bene o
se è stato lasciato cadere o danneggiato in qualunque modo. Riportare l’apparecchio al Centro di
servizio per verifi ca, messa a punto elettrica o meccanica, o riparazione.
10. Non usare all’aperto.
11. Non servirsi dell’apparecchio nelle immediate vicinanze di un bagno, una doccia o una piscina.
12. Non installare il caminetto direttamente sul tappeto o superfi cie simile che potrebbe impedire la
circolazione dell’aria sotto l’apparecchio.
13. Non far passare il cavo sotto il tappeto. Non coprire il cavo con stracci, passatoie o simili. Tenere il
cavo lontano da zone di passaggio per impedire che qualcuno vi inciampi.
14. Non collocare il caminetto immediatamente sotto una presa fi ssa.
15. Non collocare il caminetto davanti a una presa fi ssa.
16. Per spegnere il caminetto, girare tutte le manopole OFF e staccare la spina.
17. Non inserire oggetti nelle aperture di ventilazione o di scarico per evitare scosse elettriche o incendi o
danni all’apparecchio.
18. Al fi ne di evitare incendi, non bloccare le bocche d’aria di entrata o di scarico. Non usare su superfi ci
soffi ci come un letto dove le aperture si potrebbero bloccare.
19. Tutti gli apparecchi di riscaldamento elettrici contengono degli elementi caldi che possono provocare
contatti o scintille. Non usare vicino a benzina, pitture o liquidi infi ammabili o in luoghi in cui
l’apparecchio sarebbe esposto a vapori infi ammabili.
20. Non modifi care l’apparecchio. Usare solo come previsto dal presente manuale. Qualunque altro uso
non raccomandato dal fabbricante potrebbe provocare incendi, scosse elettriche o danni alle
persone.
21. Evitare l’uso di prolunghe, in quanto queste potrebbero surriscaldarsi e provocare un incendio. Se
proprio bisogna usare una prolunga, questa deve essere tripolare e adatta per almeno 13 A.
22. Non bruciare legna o altri materiali nel caminetto elettrico.
23. Non danneggiare il vetro del caminetto.
24. Se fossero necessari nuovi circuiti elettrici o prese, affi darsi sempre ad un elettricista certifi cato.
25. Utilizzare sempre prese con messa a terra polarizzate e munite di fusibili.
26. Prima di pulire, fare la manutenzione o spostare l’apparecchio, togliere la corrente.
27. Nel trasportare o immagazzinare l’apparecchio e il suo cavo, collocarlo in un luogo asciutto lontano
da vibrazioni eccessive in modo da evitare di danneggiarlo.
28. AVVERTENZA: Per evitare surriscaldamento, non coprire l’apparecchio.
29. ATTENZIONE: Per evitare pericoli dovuti alla continua attivazione dell’interruttore di sicurezza,
l’apparecchio non deve essere alimentato da un interruttore esterno, come un timer, o collegato ad un
circuito che si apre e si chiude regolarmente.
CONSERVARE QUESTE ISTRUZIONI
1
Page 22

NOTA: Procedure e tecniche abbastanza importanti per essere sottolineate.
Firebox
Model Number
Serial Number
Firebox
ATTENZIONE: Procedure e tecniche che, se non rispettate, potrebbero danneggiare l’apparecchio.
AVVERTENZA: Procedure e tecniche che, se non rispettate scrupulosamente, potrebbero esporre
l’utente a rischio di incendio, ferite gravi, malattia o perfi no morte.
DATI SUI NUMERI DI MODELLO E DI SERIE
Per qualsiasi domanda riguardo ai nostri prodotti, indicare sempre i numeri di modello e di serie al
Servizio alla Clientela di Dimplex. Per localizzare questi numeri, riferirsi allo schema qui di seguito.
(FIGURA 1)
Numero di Modello
Numero di Serie
Apparecchio
Etichetta
di
Numero
di Modello
Etichetta
di
Numero
di Serie
Scatola
Numero di
Modello
Numero di
Serie
FIGURA 1
2
Page 23

FUNZIONAMENTO
FIGURA 2
USO DEL COMANDO A DISTANZA (FIGURA 2)
Il caminetto è provvisto di un comando radio a distanza che funziona fi no a un massimo
di circa 15.25 m (50 piedi). Non è necessario puntarlo verso il caminetto e attraversa
quasi tutti gli ostacoli (compresi i muri).
INIZIALIZZAZIONE DEL COMANDO A DISTANZA
Tale procedura potrebbe rendersi necessaria se manca la corrente nel caminetto (es.:
interruzione di corrente, qualcuno inciampa sull’interruttore, l’interruttore principale viene
disattivato) o se si usa un nuovo comando a distanza.
1. Assicurarsi che la corrente arrivi dal pannello centrale.
2. Localizzare i comandi manuali (FIGURA 3)
3. Attivare l’interruttore principale.
4. Premere il tasto — (ON) sul comando a distanza (Manual Selection Control)
per 3 secondi (FIGURA 4). Tutti e 3 gli indicatori lampeggiano.
5. Premere ON sul trasmettitore (FIGURA 2). Gli indicatori lampeggiano
rapidamente. Poi spegnere. In tal modo il trasmettitore e il ricevitore del comando a distanza
saranno sincronizzati.
Controlli Manualie Indicatori Luci
Controllo
FIGURA 4
FIGURA 3
Termostato
Interruttore Principale
USO DEL COMANDO A DISTANZA
Il comando a distanza regola i livelli del caminetto in modo sequenziale. Il livello sale ogni qualvolta si
preme il tasto ON sul trasmettitore. Il caminetto si può spegnere in qualunque momento premendo il
tasto OFF sul trasmettitore del comando a distanza.
Livello 1: L’effetto fi amma viene attivato e si accende il primo indicatore rosso.
Livello 2: L’effetto fi amma rimane e viene attivato il Purifi reTM. Si accendono il primo e il secondo
indicatore rosso.
Livello 3: L’effetto fi amma rimane, viene attivato l’elemento di riscaldamento e tutti e tre gli
indicatori rossi si accendono.
COMANDI MANUALI
Il caminetto può funzionare anche manualmente mediante gli interruttori posti sull’apparecchio
(FIGURA 5).
A. Interruttore On
Fa funzionare il caminetto esattamente come il comando a distanza. Premendo il tasto si ottiene
lo stesso risultato del tasto ON sul comando a distanza: premere una volta per attivare il Livello 1,
due volte per attivare il Livello 2, e tre volte per attivare il Livello 3.
B. Interruttore Off
Premendo il tasto si ottiene lo stesso risultato del tasto OFF sul comando a distanza. Premendo
una volta l’apparecchio si spegne.
3
Page 24

FIGURA 5
A. Interruttore On B. Interruttore Off
Indicatore Livello 1
Indicatore Livello 2
Indicatore Livello 3
COMANDO DEL TERMOSTATO
Per regolare la temperature, girare la manopola di comando del termostato in senso orario
completamente per accendere l’apparecchio. Quando la stanza ha raggiunto la temperatura desiderata,
girare la manopola del termostato in senso antiorario fi no a sentire un click. Lasciare in questa posizione
per mantenere la temperatura a questo livello. Per ottenere maggior calore, girare la manopola in senso
orario fi no a sentire di nuovo il click e l’apparecchio riparte.
NOTA
L’apparecchio potrebbe emettere un leggero odore quando viene usato per la prima volta. Tale odore è
innocuo ed è causato dal riscaldamento iniziale degli elementi interni dell’apparecchio e non si riprodurrà
in futuro.
INTERRUTTORE DI SICUREZZA
L’elemento di riscaldamento di questo caminetto è protetto da un interruttore di sicurezza per prevenire il
surriscaldamento. In caso di surriscaldamento, la corrente dell’elemento di riscaldamento verrà
automaticamente interrotta. L’elemento verrà riattivato appena la temperatura sarà scesa. Questo
interruttore di sicurezza potrebbe essere attivato se il fi ltro fosse sporco. Seguire le istruzioni di
manutenzione del fi ltro a Pagina 6.
ATTENZIONE
Se l’interruttore di sicurezza scatta in continuazione, staccare la corrente del pannello di servizio centrale
e chiamare il distributore locale.
MANUTENZIONE
AVVERTENZA
Togliere la corrente dal pannello centrale prima di iniziare la manutenzione o la pulizia al fi ne di ridurre i
rischi di incendio, scossa elettrica o danni alle persone.
NOTA
Lasciare raffreddare le lampadine almeno 5 minuti prima di toccarle al fi ne di evitare ustioni.
STRUMENTI NECESSARI: Cacciavite
SOSTITUZIONE DELLE LAMPADINE
Attendere almeno 5 minuti dopo lo spegnimento prima di togliere la lampadina per evitare ustioni. Le
lampadine devono essere cambiate quando si nota che la fi amma si scurisce o quando i contorni del
ceppo spariscono. Vi sono quattro lampadine sotto il ceppo che generano gli effetti fi amma e tizzoni.
4
Page 25

SCREWS
SOSTITUZIONE LAMPADINE
Quattro lampadine tipo candelabro da 60 watt con una base E-14 (piccola).
NON USARE LAMPADINE DI PIU’ DI 60 WATT.
ATTENZIONE
Manipolando il ceppo, forzare sulla base dei tizzoni e non direttamente sul ceppo.
CONSIGLI UTILI
FIGURA 6
Sarebbe bene sostituire tutte le lampadine in una volta se si avvicina
la fi ne della loro durata. In tal modo si evita di dover aprire
l’apparecchio più volte. Attenzione quando si toglie il ceppo in quanto
questo contiene dei LED e dei cavi elettrici.
PER ACCEDERE AL COMPARTO LAMPADINE
1. Scartare la tenda d’acciaio (se necessario togliere le portine
di vetro).
2. Svitare due viti sul supporto del ceppo e mettere da parte.
(FIGURA 6)
3. Tirare la parte frontale della base in plastica dei tizzoni o
la grata in plastica in alto e in avanti fi no a quando si libera
l’aletta posteriore dalla sporgenza posta sotto lo specchio.
Viti
(FIGURA 7)
NOTA Il ceppo è incastrato nell’apparecchio per cui potrebbe essere
necessario sforzare per toglierlo.
4. Poggiare il ceppo davanti al caminetto.
5. Staccare la connessione del cavo LED del ceppo
dall’apparecchio. (FIGURA 8)
6. Esaminare le lampadine per vedere quale deve essere
cambiata.
Supporto
Posteriore
FIGURA 7
Base del
Ceppo
7. Svitare le lampadine in senso antiorario.
8. Inserire le nuove lampadine.
9. Ricollegare la connessione del cavo LED.
10. Risistemare il ceppo inserendolo nel caminetto e premendo
sulla parte posteriore della base dei tizzoni fi no a che si
incastra. (FIGURA 7)
11. Rimettere la grata del ceppo usando le due viti tolte in
Aletta
Posterio
Sezione Laterale
Bordo
Frontale
precedenza.
FIGURA 8
FILTRO DEL PURIFIRE
TM
Il fi ltro del Purifi re™ è riutilizzabile e lavabile. Il fi ltro
dovrebbe venir pulito o sostituito circa una volta all’anno.
Per pulire il fi ltro, sbatterlo leggermente su una superfi cie
dura per eliminare polvere e detriti e poi lavare. Non si
raccomandano sapone o detersivi. Le dimensioni del
fi ltro sono 508 mm x 254 mm x 25 mm, adatto per
MERV 10. Se si usa un fi ltro commerciale, seguire le
istruzioni del fabbricante per la sua sostituzione.
Connessione Cavo LED
5
Page 26

PER SOSTITUIRE IL FILTRO (FIGURA 9)
1. Togliere le due viti dal supporto del fi ltro ad aria.
2. Sfi lare in avanti per togliere il supporto del fi ltro dall’apparecchio.
3. Sfi lare il fi ltro dal suo supportot.
4. Rimontare in ordine inverso a quanto sopra indicato.
NOTA
Se si usa un fi ltro d’aria commerciale, seguire le istruzioni del fabbricante per la sua sostituzione.
Filtro Purifi re
Supporto Filtro
FIGURA 9
Viti Di
Montaggio
PULIZIA DEL VETRO
Il vetro viene pulito in fabbrica al momento del montaggio dell’apparecchio. Tuttavia, durante il trasporto
e il magazzinaggio, si potrebbero formare particelle di polvere che si possono rimuovere passando un
panno pulito e asciutto.
Per rimuovere segni di dita o altro, il portello trasparente si pulisce con un panno umido e si asciuga poi
con un panno senza fi lacce per evitare che rimangano segni d’acqua. Non utilizzare prodotti abrasivi
sulla superfi cie del vetro e non spruzzare liquidi direttamente sulla superfi cie.
ACCESSORI
Per ottenere gli accessori originali Dimplex, contattare il distributore locale. Esempio: kit per le portine di
vetro, fi nizioni in ottone e acciaio inox e armadietti che si adattano al vostro caminetto.
6
Page 27

GARANZIA
I caminetti elettrici Dimplex sono ispezionati e collaudati prima della spedizione e sono garantiti contro
difetti di fabbricazione. Qualunque parte del prodotto risulti difettoso per materiale o mano d’opera
durante il primo anno di funzionamento, verrà riparata o sostituita gratuitamente.* La ditta non è
responsabile delle spese incontrate per l’installazione, il trasporto al centro di servizio o i costi di
trasporto. Eventuali difetti devono essere notifi cati al negozio dove il prodotto è stato acquistato che è
autorizzato ad effetturare la riparazione o sostituzione alle condizioni della presente garanzia.
L’unico obbligo della ditta ai fi ni della presente garanzia è, a sua esclusiva scelta, di riparare o
sostituire le parti difettose o di rimborsare il prezzo di acquisto di tali parti.
Il cliente utilizzatore dell’apparecchio si assume tutti gli altri rischi, compreso il rischio diretto o indiretto o
consequenziale di perdita o danno dovuto al cattivo uso o all’incapacità di usare il prodotto.
La garanzia non si applica se, ad esclusiva discrezione della ditta, il danno o il non funzionamento deriva
da incidente, alterazione, cattivo uso, installazione scorretta o funzionamento con una corrente inadatta.
Quanto sopra sostituisce qualsiasi altra garanzia espressa, implicita o legale e la ditta non si
assume né autorizza altri ad assumersi alcuna responsabilità riguardo al prodotto.
*Le lampadine non sono coperte dalla garanzia.
SERVIZIO
Per ulteriori informazioni riguardo al servizio o alla garanzia, si prega di contattare il negoziante.
Il prodotto è conforme agli standard di sicurezza europei - EN60335-2-30 e
agli standard europei per compatibilità elettromagnetica (EMC) EN55014,
EN6055-2 e EN60555-3 che coprono le esigenze essenziali delle direttive della
Comunità Europea 73/23 e 89/336.
7
 Loading...