

Page 1

Wireless 802.11b/g/n USB Adapter
Quick Installation Guide
DN-7045
1 / 12
Page 2

1. Driver Installation
Please follow the following instructions to install your new
wireless USB Adapter:
1-1
Insert the USB wireless network card into an empty USB 2.0 port
of your computer when computer is switched on. Never use force
to insert the card, if you feel it’s stuck, flip the card over and try
again.
1-2
The following message will appear on your computer, click
‘Cancel / Close
’.
Under Windows XP
Under Windows Vista and Windows 7
1-3
Insert the driver CD into your CD-ROM. You can see autorun
screen below. if not, you can double click ‘autorun.exe’ on CD.
2 / 12
Page 3

Click ‘Install Driver’ to start the installation procedure
1-4
Please select the language you wish to use, then click
‘Next’.
1-5
Installation descriptions shown. Click ‘Next’ to
3 / 12
Page 4

continue
1-6
Once the installation is finished the computer will be asked to
reboot. you can click ‘Finish’ and reboot the computer to finish the
installation of driver files.
4 / 12
Page 5
2. Connect to Wireless Access Point
To use wireless network, you have to connect to a wireless
access point first. You can either use Client utility (comes with
network card driver), or Windows Zero Config utility (comes with
Windows operating system).
2-1 Using Client Utility
Please follow the following instructions to use Client
configuration utility to connect to wireless access point.
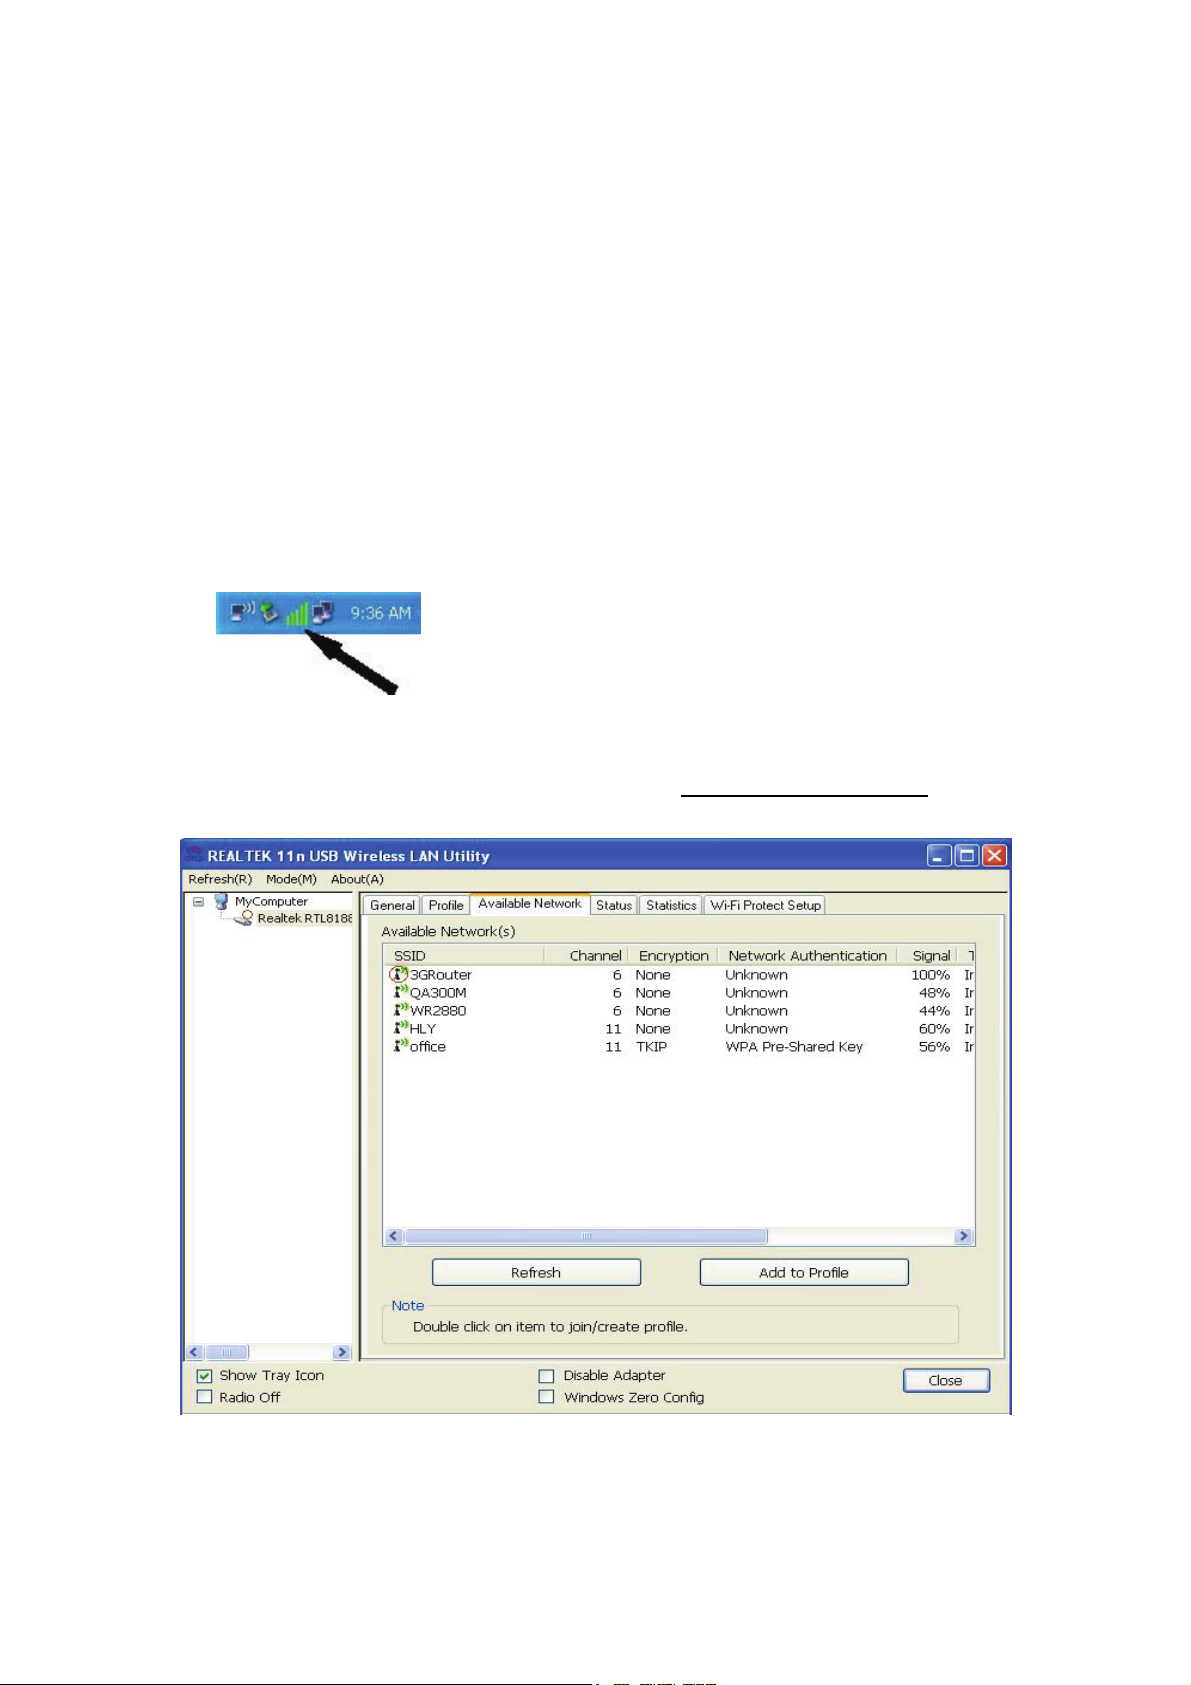
2-1-1. Left-click the Client configuration utility icon located at
lower-right corner of computer desktop, and configuration menu will
appear:
HERE!
2-1-2. Wireless utility will appear. Click ‘Available Network’ menu
to search for wireless access points nearby.
2-1-3. Please wait for a while, and all wireless access points which
can be reached by this wireless network card will be displayed here.
5 / 12
Page 6
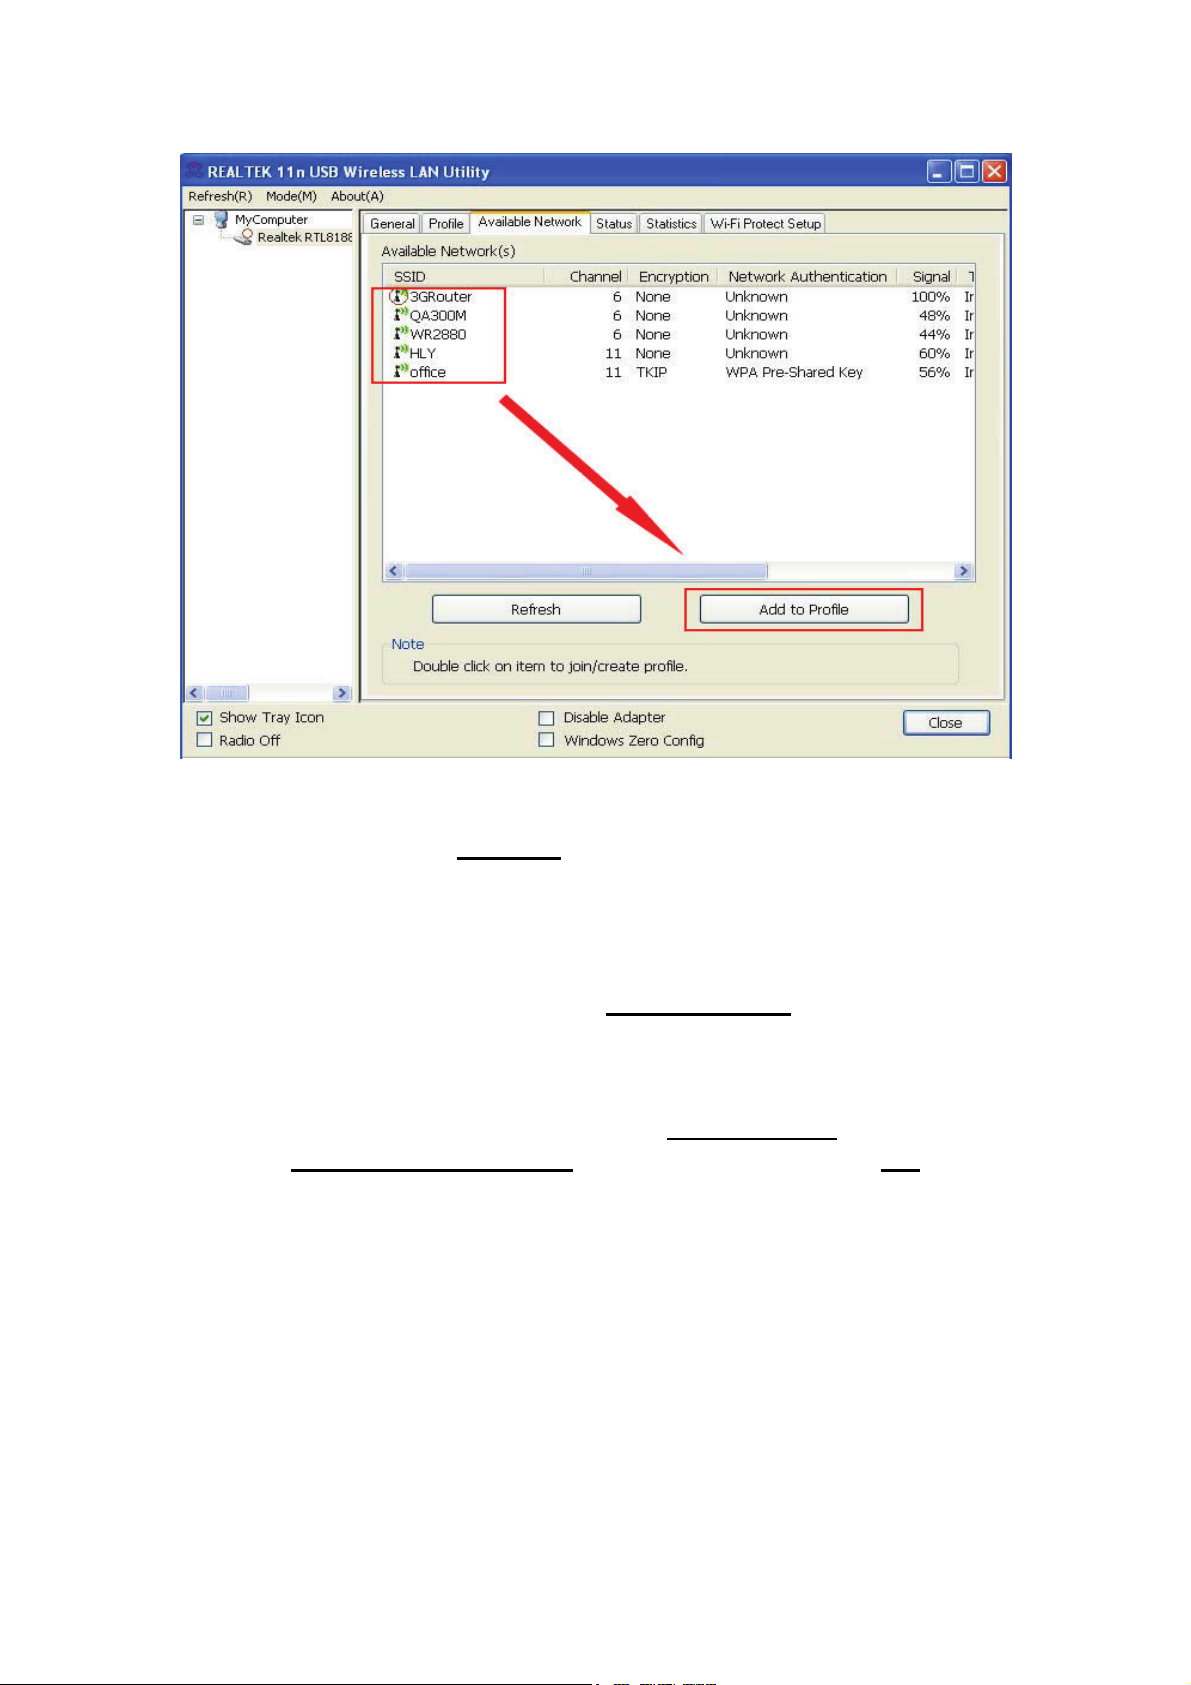
If the wireless access point you wish to connect does not appear
here, you can click ‘Refresh’ button to scan for wireless access
points again; if the wireless access point you’re looking for still not
appear, try to move the computer closer.
When the access point you’re looking for is on the list, left-click it
and then double click it or click ‘Add to Profile’.
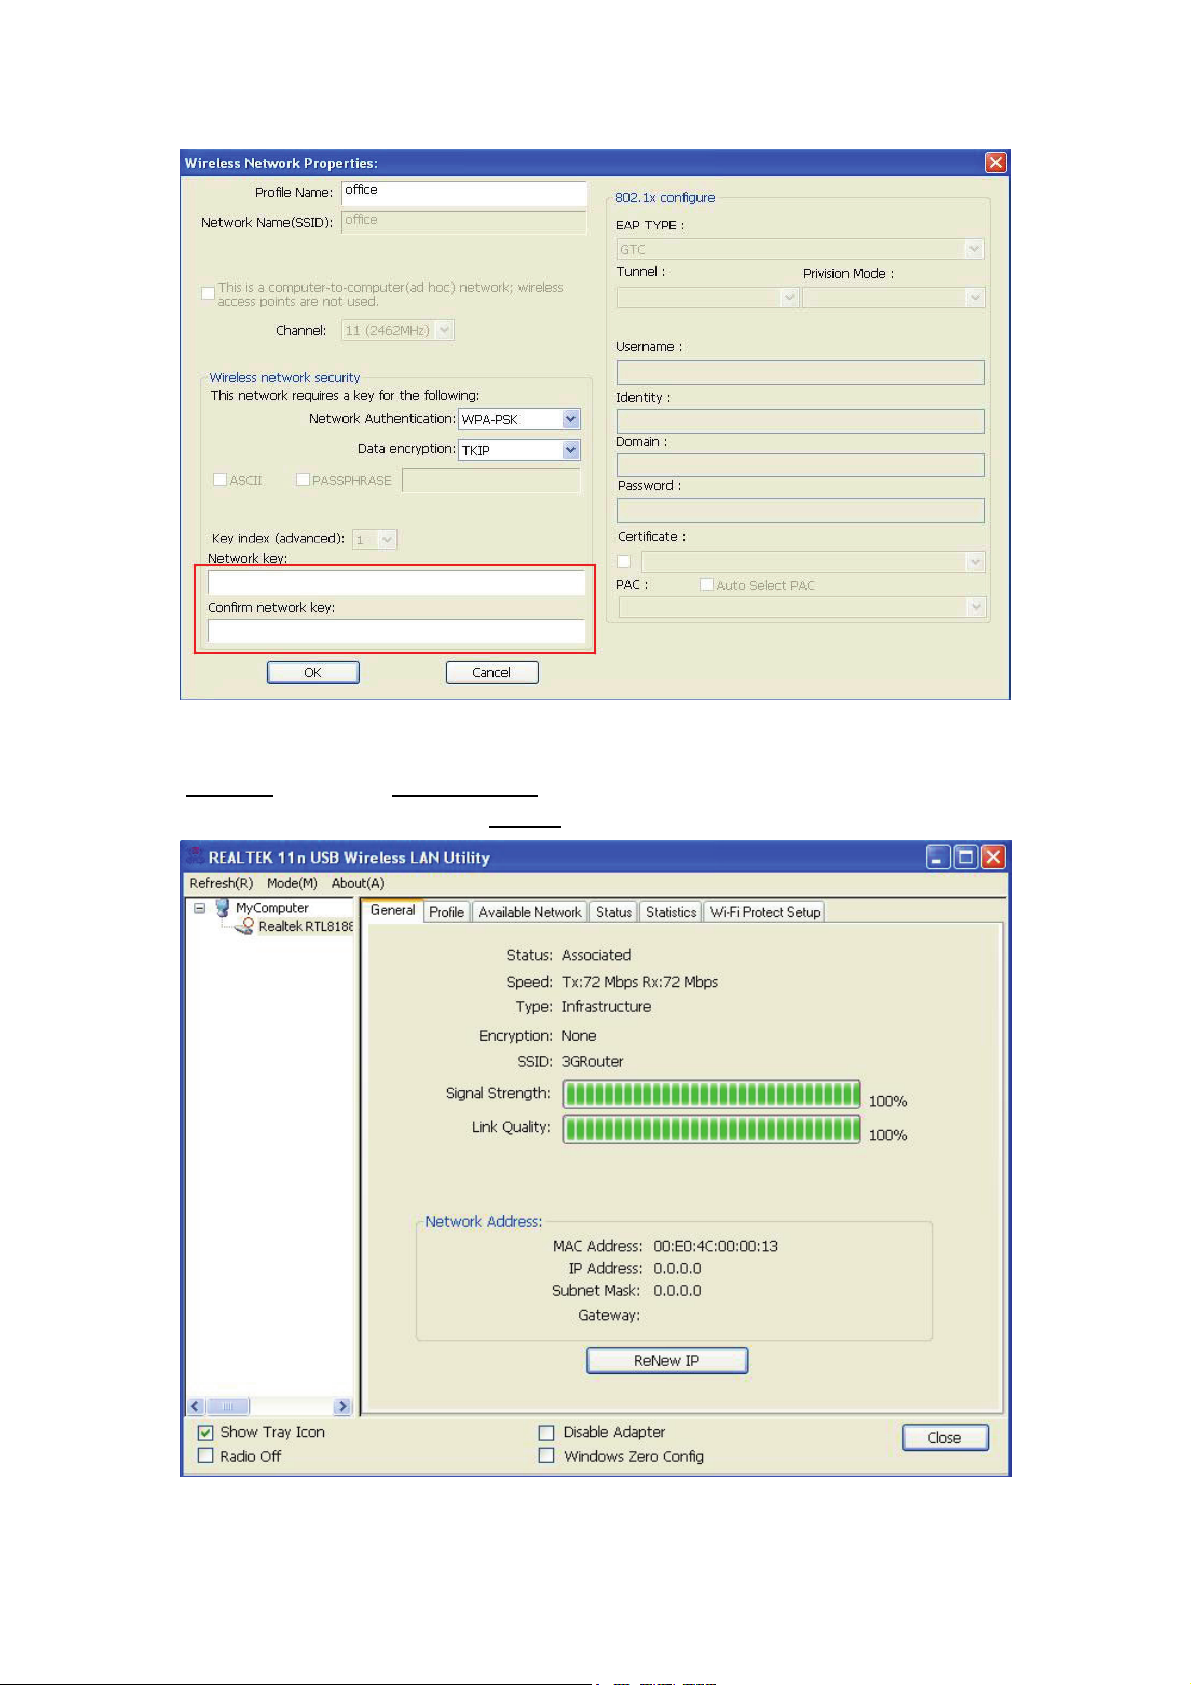
2-1-4. If a password (a.k.a. ‘Network Key’) is required to access the
wireless access point, please input it in ‘Network key
again in ‘Confirm network key
’ for confirmation). Click ‘OK’ when
’ (and input it
password is properly inputted.
6 / 12
Page 7
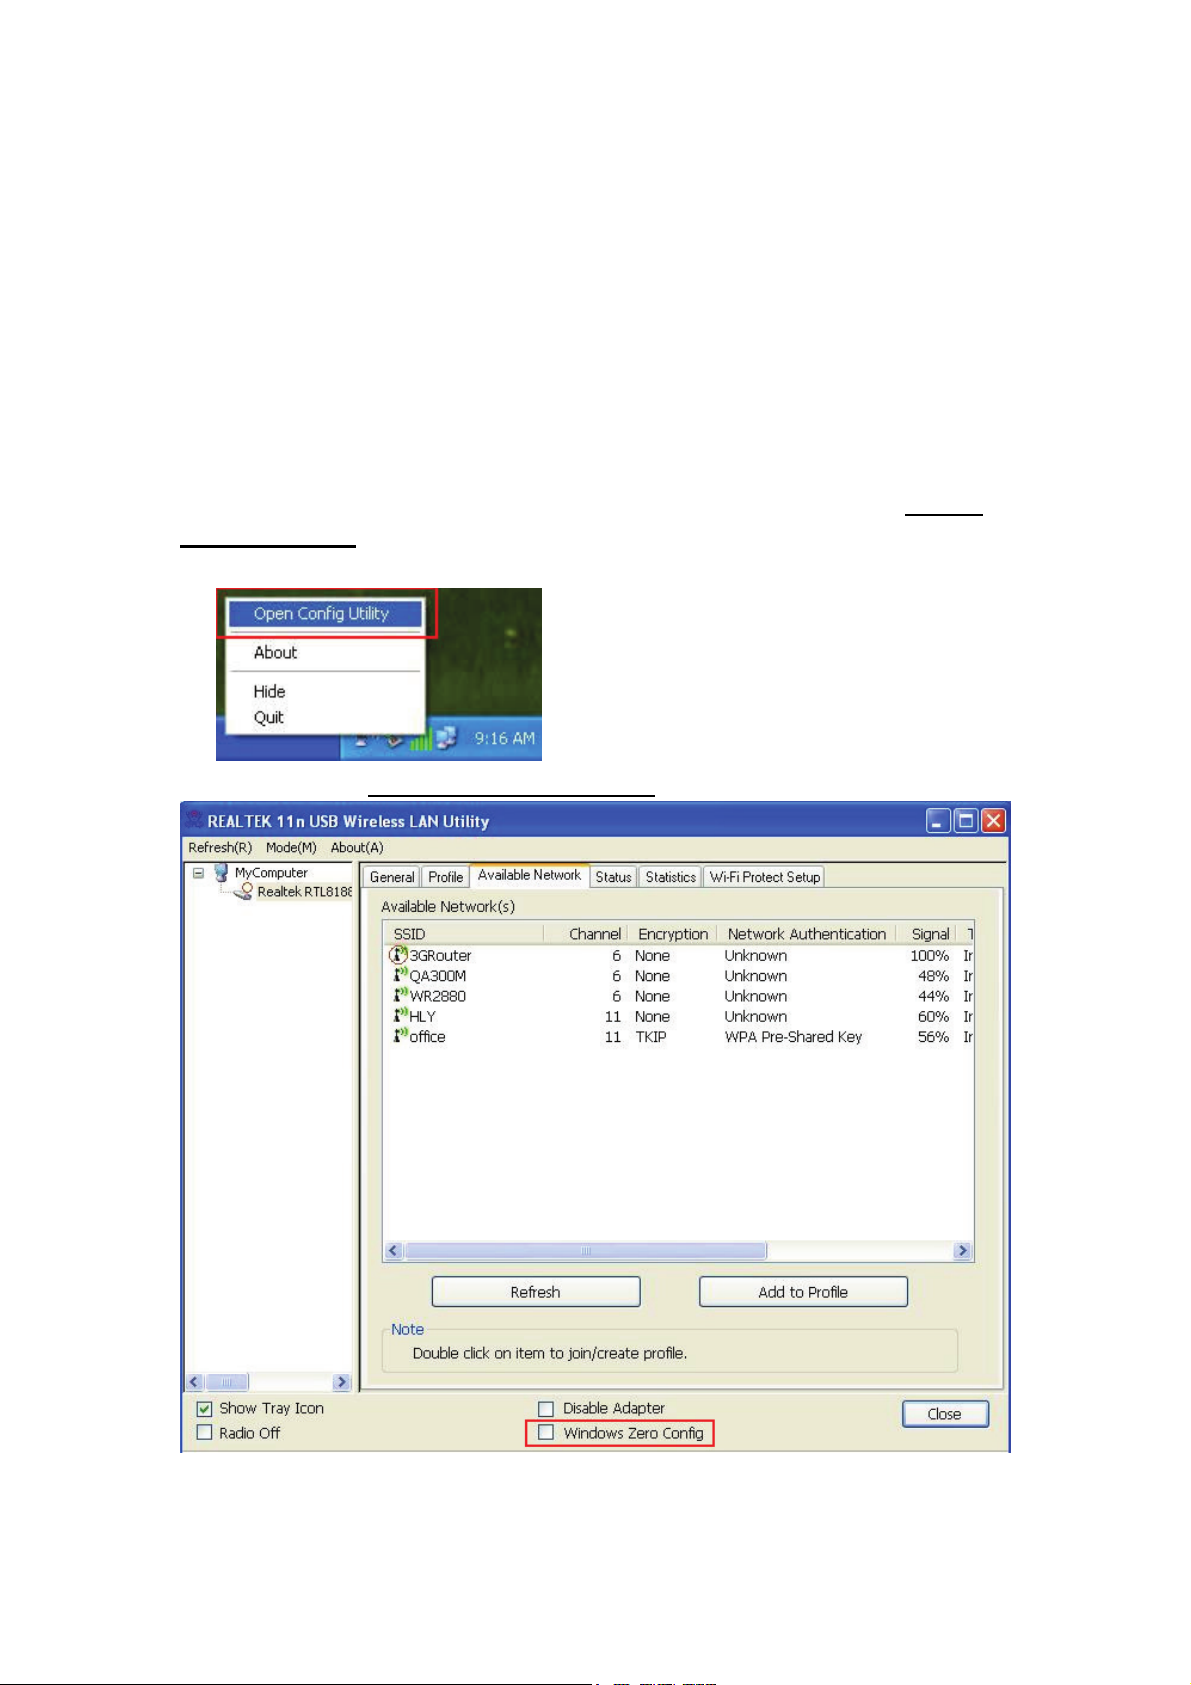
2-1-5. Network card will attempt to connect to access point now, this
may require few seconds to minutes, please be patient. When the
‘Status’ become ‘Associated’ , your computer is connected to access
point you selected. Click ‘Close’ to close configuration menu.
7 / 12
Page 8
NOTE: If you connected to an access point but the connection has
been dropped soon, please check security settings and re-check
password spelling.
2-2 Using Windows Zero Configuration
Windows XP and Vista has a built-in wireless network
configuration utility, called as ‘Windows Zero Configuration’
(WZC). You can also use WZC to configure your wireless network
parameter:
2-2-1. Right-click Client configuration utility icon, and click ‘Open
Config Utility’.
2-2-2. Check ‘Windows Zero Config’ box.
2-2-3. A message indicating that you’ve been switched to Windows
8 / 12
Page 9
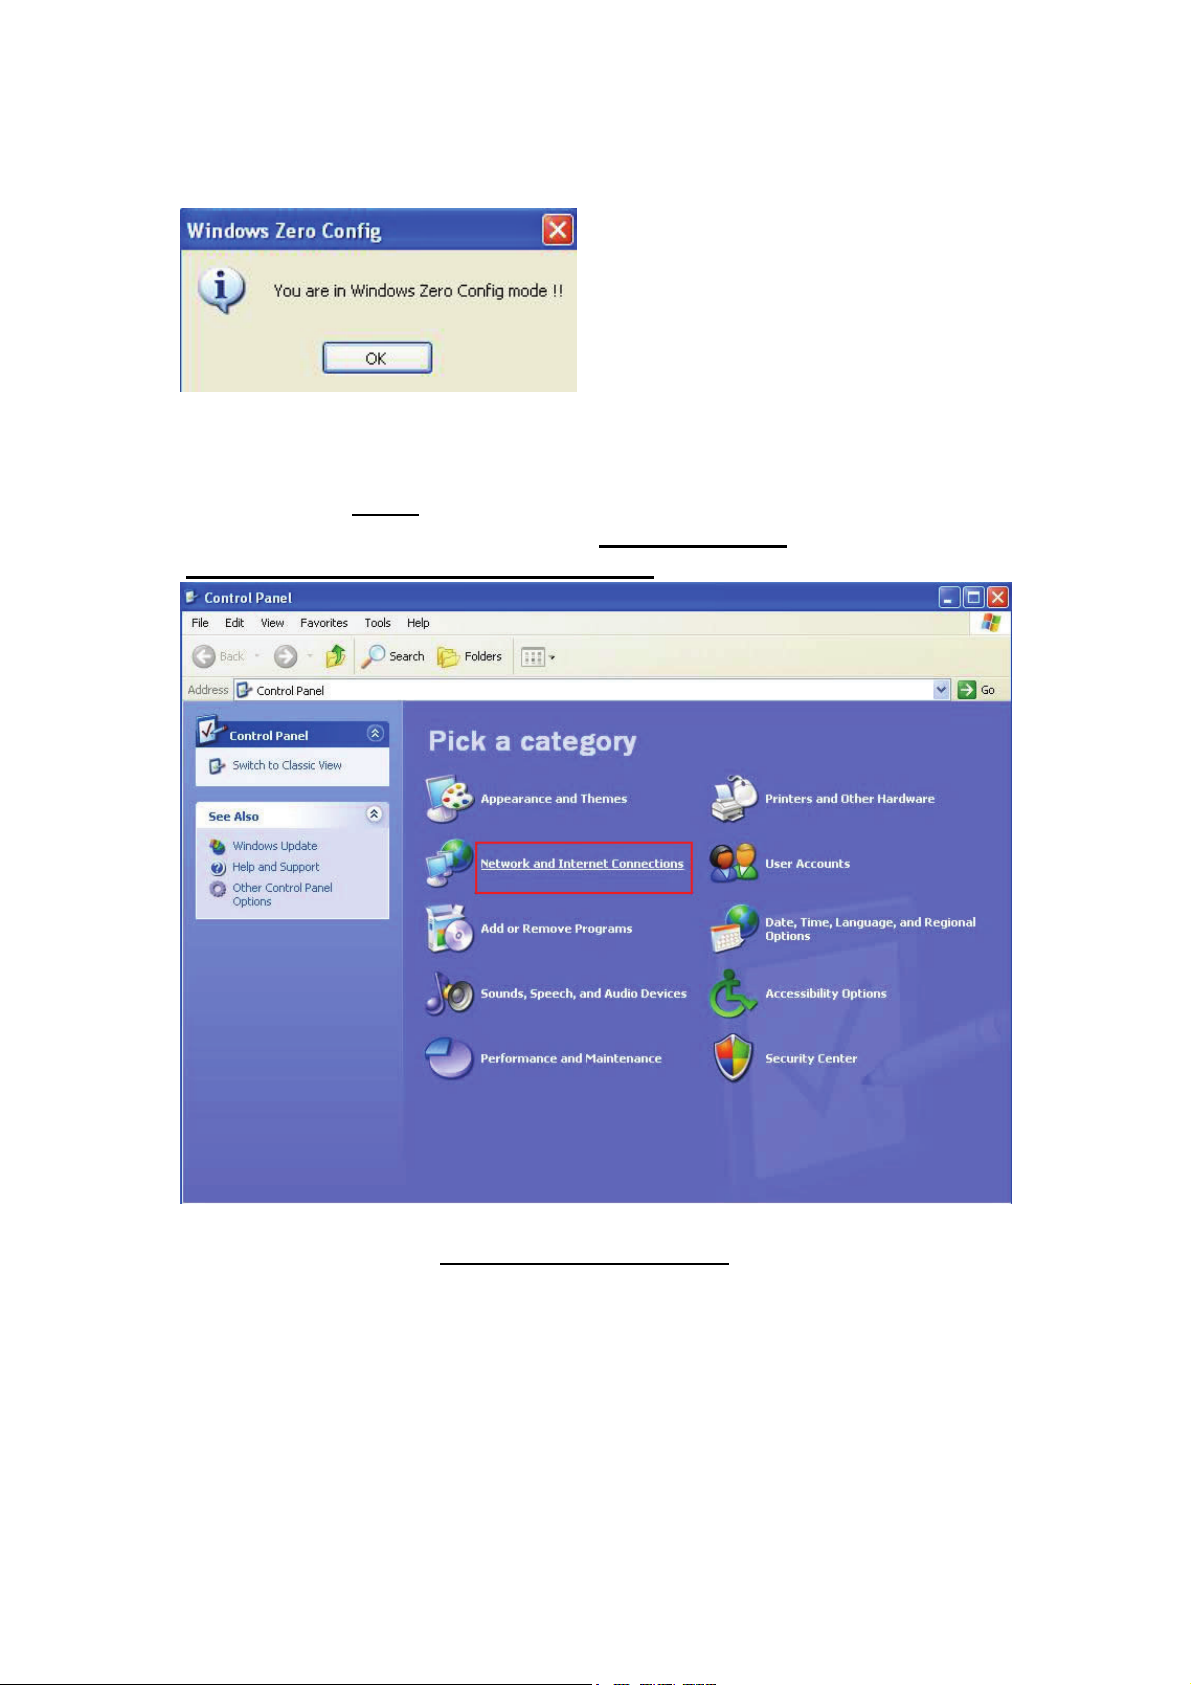
Zero.
NOTE: To return to use Client utility, uncheck ‘Windows Zero
Config’ box.
2-2-4. Click ‘Start
corner of windows desktop), click ‘Control Panel’
’ button (should be located at the bottom-left
, then click
‘Network and Internet Connections’ in Control Panel.
2-2-5. Double click ‘Network Connections’.
9 / 12
Page 10
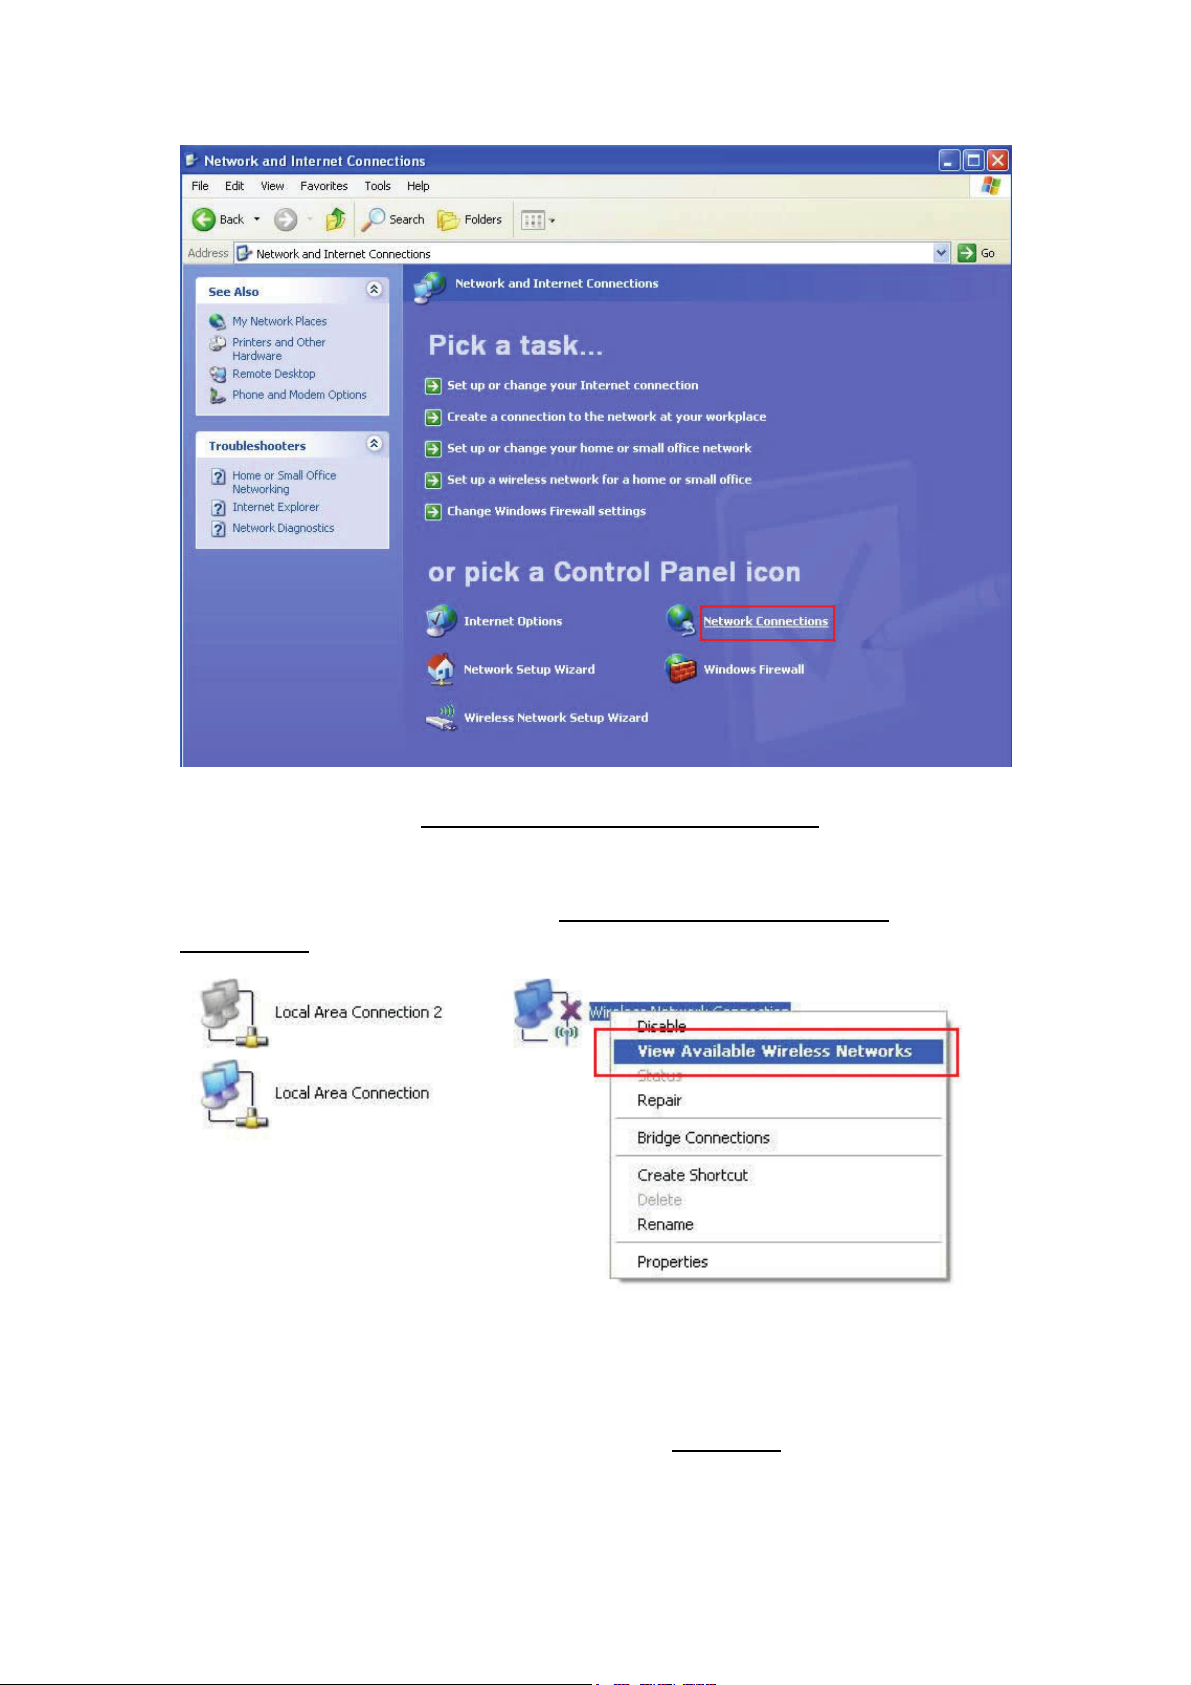
2-2-6. Right-click ‘Wireless Network Connection’ (it may have a
number as suffix if you have more than one wireless network card,
please make sure you right-click the Wireless LAN 802.11n USB
Network Adapter), then select ‘View Available Wireless
Networks’.
2-2-7. All wireless access points in proximity will be displayed here.
If the access point you want to use is not displayed here, please try to
move your computer closer to the access point, or you can click
‘Refresh network list’ to rescan access points. Click the access point
you want to use if it’s shown, then click ‘Connect
’.
10 / 12
Page 11
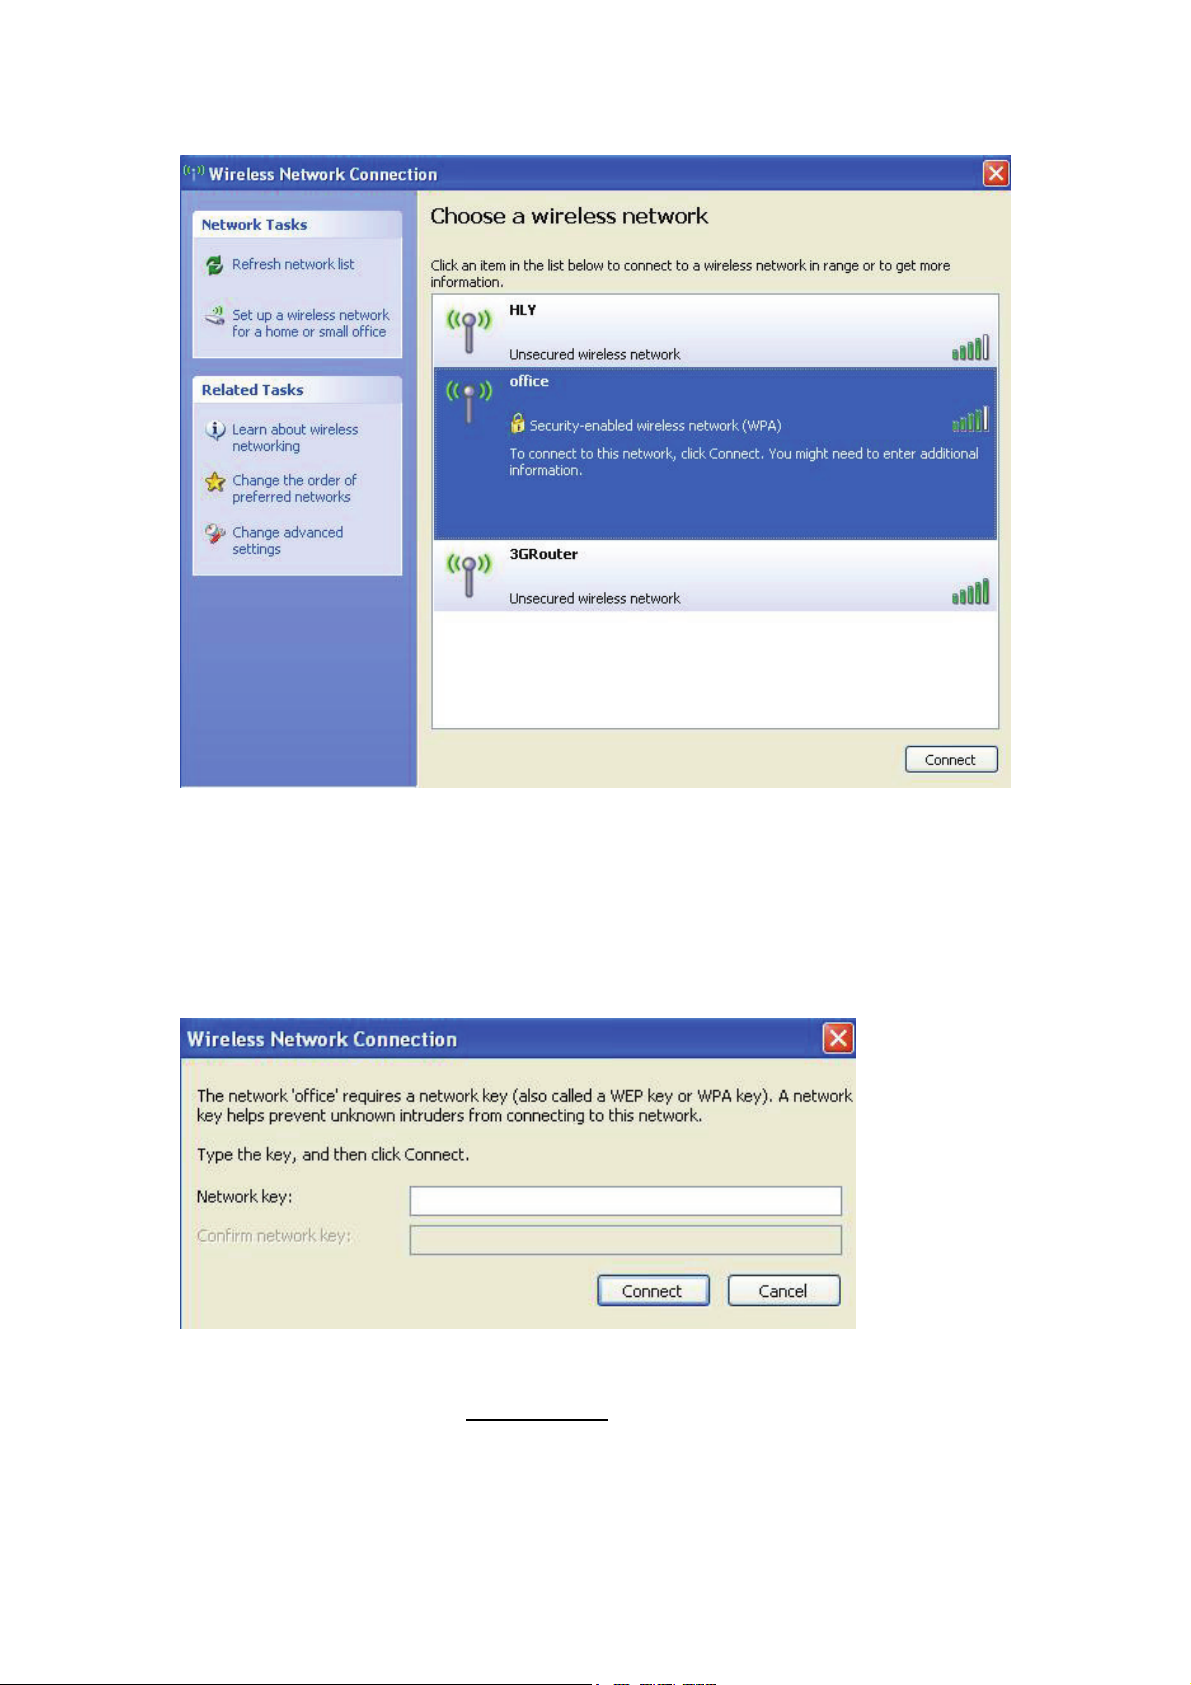
2-2-8. If the access point is protected by encryption, you have to
input its security key or passphrase here. It must match the
encryption setting on the access point. If the access point you
selected does not use encryption, you’ll not be prompted for security
key or passphrase.
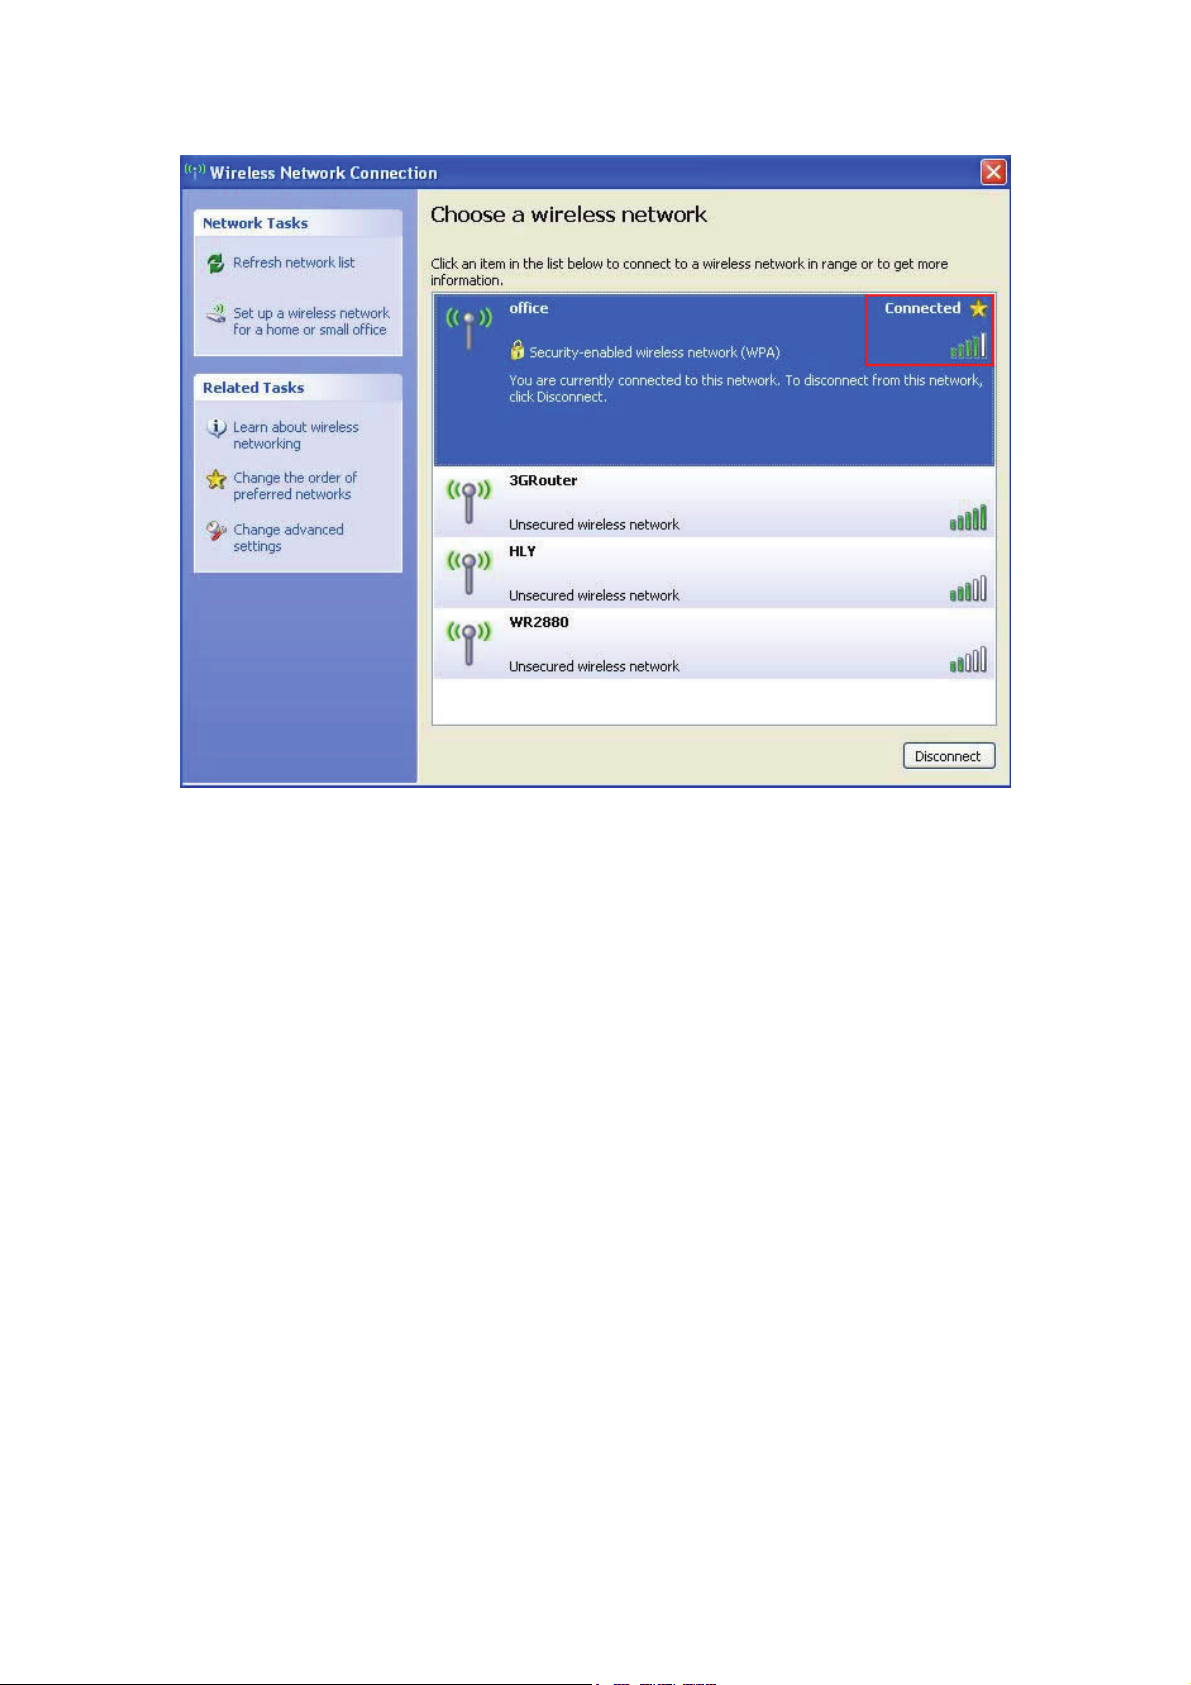
2-2-9. If you can see ‘Connected’ message, the connection
between your computer and wireless access point is successfully
established.
11 / 12
Page 12
12 / 12
 Loading...