

IP Network Camera
Pan/Tilt Remote Control &
With Audio & Night Vision
User’s Guide


1 TOP
TABLE OF CONTENTS
OVERVIEW
1.1 PRODUCT DESCRIPTION ..................................................................................................... 2
1.2 PRODUCT FEATURE ............................................................................................................ 2
1.3 PRODUCT SPECIFICATION .................................................................................................. 2
1.4 PRODUCT ACCESSORIES INCLUDE ..................................................................................... 3
1.5 SYSTEM REQUIREMENT ..................................................................................................... 3
1.6 IP CAM EXTERIOR FUNCTION INTRODUCE ......................................................................... 3
1.7 TV_OUT FUNCTION INTRODUCE TV_OUT............................................................................ 4
1.8 PRODUCT SET-UP................................................................................................................ 4
UTILITIES AND TOOLS
2.1 CAM_EZ SEARCH ............................................................................................................... 5
2.2 USE IP-CAM AND TEST THE IMAGE FUNCTION FOR THE FIRST TIME................................... 5
2.3 HOW TO SET UP IP CAM..................................................................................................... 7
2.4 SETTING THE WAY TO OBTAIN THE IP ADDRESS OF IP-CAM................................................ 7
2.5 IP-CAM NETWORK FRAMEWORK INSTALLATION................................................................11
2.6 INSTALLATION FOR IP SHARE ............................................................................................17
2.7 NTERNET IP SHAPING & AUDIO SETTING..................................................................................18
GETTING STARTED
3.1 SYSTEM LOGIN .................................................................................................................19
3.2 LIVEVIEW ..........................................................................................................................20
3.3 TAKE A SHOT......................................................................................................................21
ADVANCED FUNCTION WITH LIVEVIEW
4.1 IMAGE ADJUSTMENT ........................................................................................................22
4.2 AVI RECORD SETUP ...........................................................................................................22
4.3 ZOOM IN DISPLAY .............................................................................................................22
4.4 MOTION DETECTION SETUP ..............................................................................................23
4.5 MOTOR CONTROL .............................................................................................................23
ADVANCED APPLICATION
5.1 IMAGE SETUP ....................................................................................................................24
5.2 CAPTURE VIEW ..................................................................................................................24
5.3 EVENT TRIGGER .................................................................................................................25
5.4 NETWORK SETUP ...............................................................................................................26
5.5 SERVER SETUP ...................................................................................................................27
5.6 ADMINISTRATION SETUP....................................................................................................29
5.7 SOFTWARE UPDATE ...........................................................................................................30
APPENDIX
APPENDIX A. USING A PPPOE DIALUP CONNECTION AND DDNS WITH THE
IP CAM EZ IPCAM (USING A HUB )............................................................................................32
APPENDIX B. FAQ:....................................................................................................................38

2 TOP
OVERVIEW
1.1 PRODUCT DESCRIPTION
DN-16032 is an easy and effective IP Camera product for remote monitoring /administrating. The setup
for this device is simply. Built-in Web server allows you to use web browser (e.g., Microsoft IE) through
LAN or broadband network in any time and any place. Type the IP address of the IP-CAM camera on the
network address line to carry out the works of remote image monitoring and administration. Meanwhile,
the user can remote control the motor of the camera to change the direction of monitoring and handle
the real-time image of the monitored location.
In addition, the camera supports many network protocols such as PPPoE, DHCP, STATIC IP, DDNS, SMTP, FTP
and NTP with high-performance SDRAM control and memory card access. The built-in TV Out decoding/coding
device can display the most popular TV screen (supporting NTSC and PAL) in families with combining fast
Motion Detection and SD Expansion Card in hardware. Moreover, IP CAM is equipped with IR LED lightening,
so it has the function of night vision. Besides, this device also has the function of recording and real-time
photographing. To a family, such remote monitoring can reach professional security and have great fun.
1.2 PRODUCT FEATURE
- Use standard Web Browser ID to monitor, record, and shot remotely
- Maximum 640x480 Full screen
- Allow to view images from multi-camera
- Allow on-line image viewing remotely for multi-user simultaneously
- Motion Detect, monitor and store triggered photographs at any time for the whole day
- Remote real-time recoding to the device and trigger to sending images to FTP & E-Mail & SD Card & PC
- Support virtual IP and port switch in IP DSALM
- Support several communication protocols, TCP/IP, DHCP, SMTP, FTP, PPPoE, DDNS,
- Use functional authority setting, name registration and password protection
- Support the dynamic IP network function of DHCP
- Support ADSL network of PPPoE user
- Standard RJ-45 network connector, support 10/100 BaseT network transmission
1.3 PRODUCT SPECIFICATION
- Image Size: 160x120, 320x240, 640x480 adjustable
- Image Quality: Fine, Normal, Basic adjustable
- Video Frequency: 50 Hz for PAL, 60 Hz for NTSC
- Image Compression Format : M-JPEG
- Focal Distance Range : From 30mm to infinity adjustable
- Digital Zoom : 4X
- Video Recording : Video Frame rate setting : auto; 1, 3, 5, 10, fps
- Motion Detect Trigger Function, image sent to FTP & E-Mail & SD Card & PC
- Support TCP/IP, SMTP, FTP, PPPoE, DHCP Protocol
- Network DHCP or manual setting network IP, and support ADSL network of PPPoE user
- Build-in web server and the functions of Active-X and Java
- Remote single picture captured with JPG file format, remote continuous screen recorded with AVI format
- Microphone : High touch 10ø-40db±3
- TV OUT Video Output: support 50 Hz for PAL, 60 Hz for NTSC
- Night vision lightening illumination: Auto and Manual selection, IR LED x 6/ 5ø/850λ
- Monitoring angle: Vertical angle: Up/Down Tilt +180 to -35 degrees
Horizontal angle: Left / Right Pan +/- 175 degrees
- Standard RJ-45 network connector, support 10/100 BaseT network transmission
- 5V/ 1.5A exterior switching power adaptor
- Power Consumption : 650mA(max) 2.5W(max)
- Operating environment : 5˚C~40˚C
- Storage temperture : -0˚C~55˚C
- Humidity : 5%~85% non-condensing

3 TOP
1.4 PRODUCT ACCESSORIES INCLUDED
1. DN-16032 IP-Camera
2. Power adaptor, 5V/ 1.5A Switching Power adaptor
3. Ethernet Cable (red), used to connect to the network card of PC for testing and configuring the product
4. Ethernet Cable (blue), used to connect to Hub, ADSL modem, IP Share
5. TV OUT A/V Cable
6. Setup CD
7. This User's Guide
8. Accessory for hanging and fastening
1.5 SYSTEM REQUIREMENT
PC -Processor: Intel Pentium 4 1.4GHz or above is recommended
-RAM: 256MB or above
-Operation System: Windows 2000 or Windows XP
-Hard Disk: Minimum 10MB or above
Network -Network Card: 10/100 baseT
-Network Setup: Accessing Internet normally
-Web Browser: Microsoft Internet Explorer 6.0 or above
-Connect Network Equipment: ADSL modem, IP Share or Hub
-Active-X for activating control items and plug-in
1.6 IP CAM EXTERIOR FUNCTION INTRODUCE
*Usage of Reset Switch:
While the system is active
normally, press and hold
Reset Switch for a short
time (about 3 to 5 seconds)
till Status LED lights up.
The system will restart the
device and recover to the
factory default settings.
1.
5.
6.
7. 8.
2. 3. 4.
IR LED
X6
Microphone
Focus
Adjustable
Status
Light
DC
JACK
SD Card
Slot
TV OUT
JACK
RJ-45 JACK
*Reset Switch
4 TOP
1.7 TV OUT FUNCTION INTRODUCE
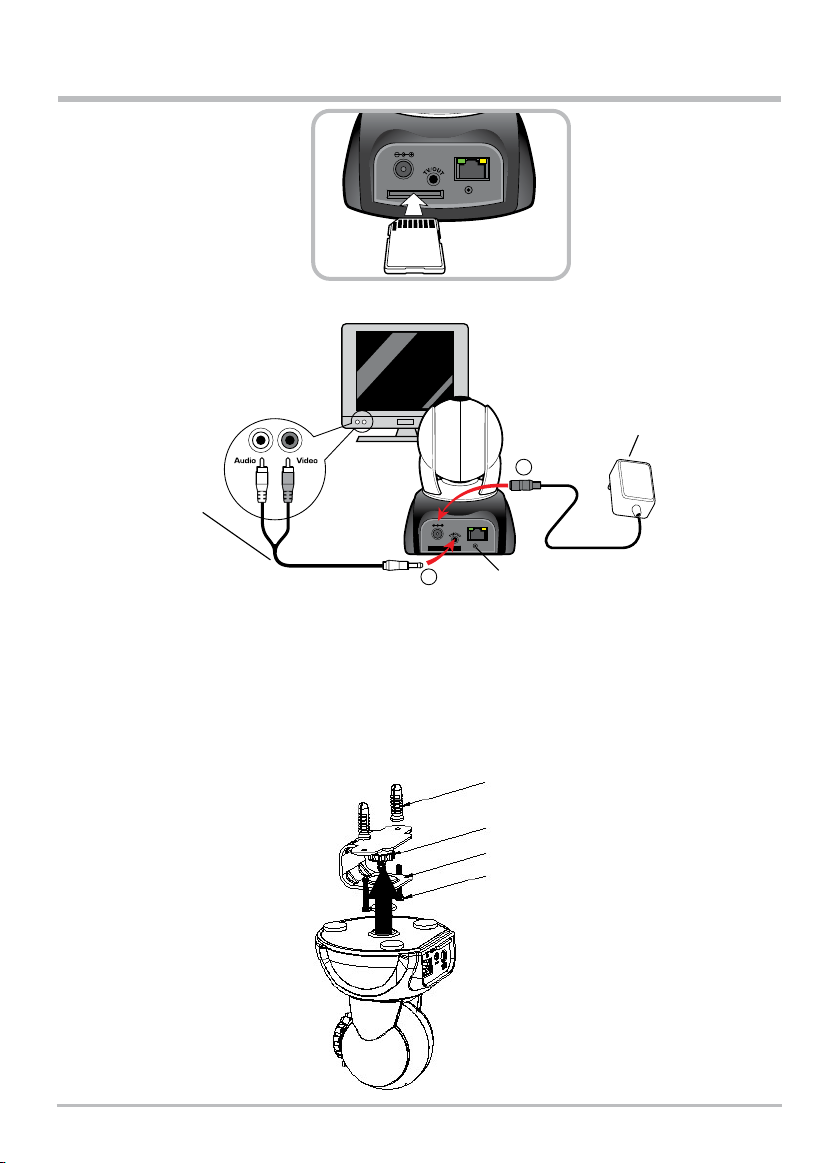
1. First, insert the TV_OUT cable to the place as shown in Figure 1.
2. Next, plug in power adapter as shown in Figure 2. Press and hold Reset switch for three seconds.
Then, release it. The IP-CAM will access into TV_OUT mode.
3. TV_OUT operation description:
a. Hold to change mode: For the default setting for TV_OUT is NTSC system, if you want to use
PAL system, please press and hold Reset switch about three seconds to switch between NTSC
and PAL systems.
b. Push to exit : Press Reset to access into TV screen and adjustable 50Hz, 60Hz, Outdoor
1.8 PRODUCT SET-UP
SD Card Usage Diagram:
1
2
Adapter
TV OUT cable
Reset Switch
Anchor
Screw
Frame
P head M3.5X25

5 TOP
CAM_EZ Search V2.6
255 IP CAM
IP Assignment: STATIC
Version: IP CAM_V3.1_F2
IP CAM
192.168.9.1
255.255.255.0
192.168.9.254
80
1500
Account@pppoe.com.tw
2.1 CAM EZ SEARCH
CAM_EZ Search is an IP search engine offered by this product. It can search IP CAM connected in LAN.
Through sending the inquiry of broadcasting packets, after IP CAM responds the question, the window
will display a list of all IP CAM in the network. And it allows you to modify the network settings of
specified IP CAM, such as IP address or IP CAM naming.
UTILITIES AND TOOLS
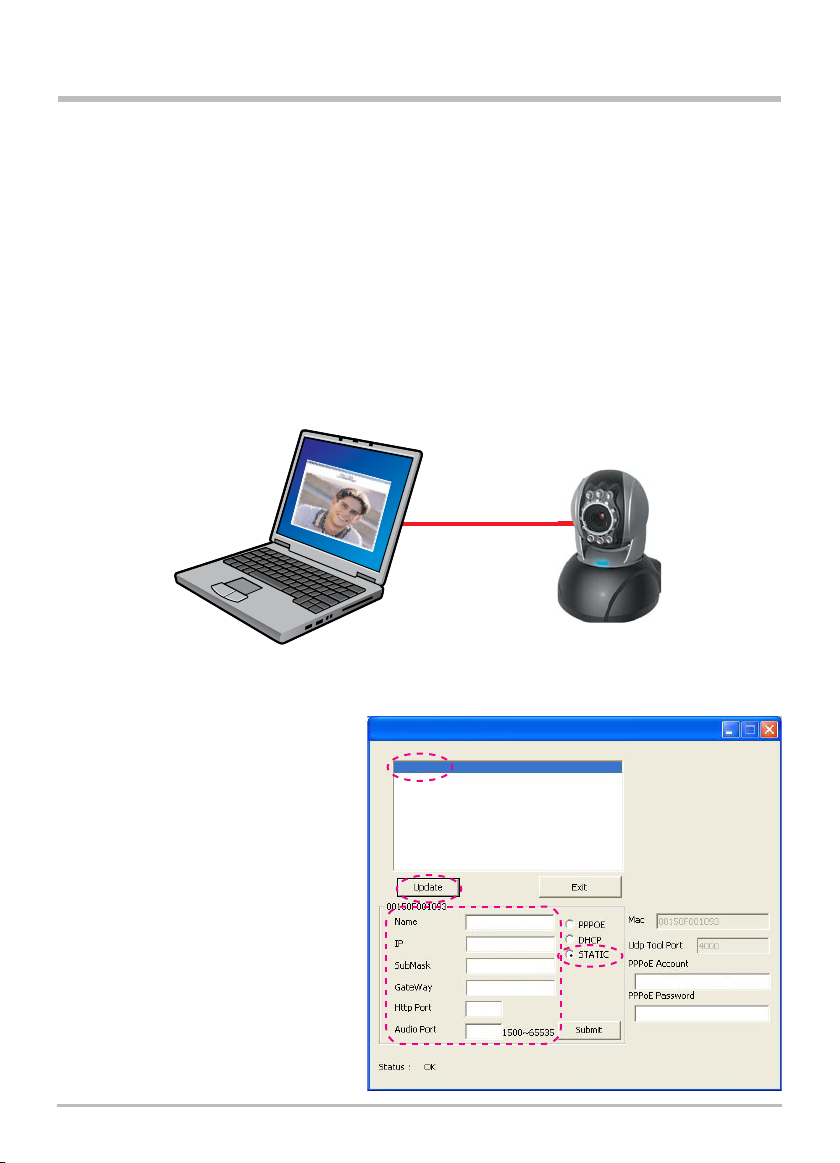
2.2 USE IP-CAM AND TEST THE IMAGE FUNCTION FOR THE FIRST TIME
■The following connection is suitable for IP-CAM test/fixed IP address change/program code update
(strongly recommended).
The operation steps are listed below:
A. Installing the Product for the first time:
- Your computer must be equipped with network card and RT-45 network connector.
- Connect the RJ-45 terminator on the rear of IP-CAM to the red test network cable. One end is
connected to the network card of computer; the other end is connected to the rear side of the
IP-CAM.
- Connect the power adaptor to the power port (on the rear) of IP-CAM. Now, the status LED
on the top of IP-CAM will light up.
NOTEBOOK
IP CAM
Version of
CAM_EZ Search
IP CAM List
Renew List
Mac Address
IP Cam Name
IP Address
Submask
Default Gateway
Communication Port
Display the
way to qet IP
Key in PPPoe
Renew executed
to obtain an IP
Audio UDP port
Version of
IP CAM
Choose the
way to get IP
6 TOP
B.Check if the IP addresses for PC network and CAM_EZ Search are on the same network section:
- Usually, static IP address will be used to access into Internet, so the IP address will vary. When
you want to change IP address, please write down the original IP address on your computer first.
Then you have to modify the IP address of your computer for testing if the IP-CAM can be
operated normally or not. After finishing the test, IP address for your computer should be
recovered to original settings.
- In general, the IP address for your computer in LAN will be set with "Auto Obtain IP address". To
test if the IP-CAM is normal or not, the IP address of your computer must be changed
temporarily. After finishing the test, it can be recovered to original settings.
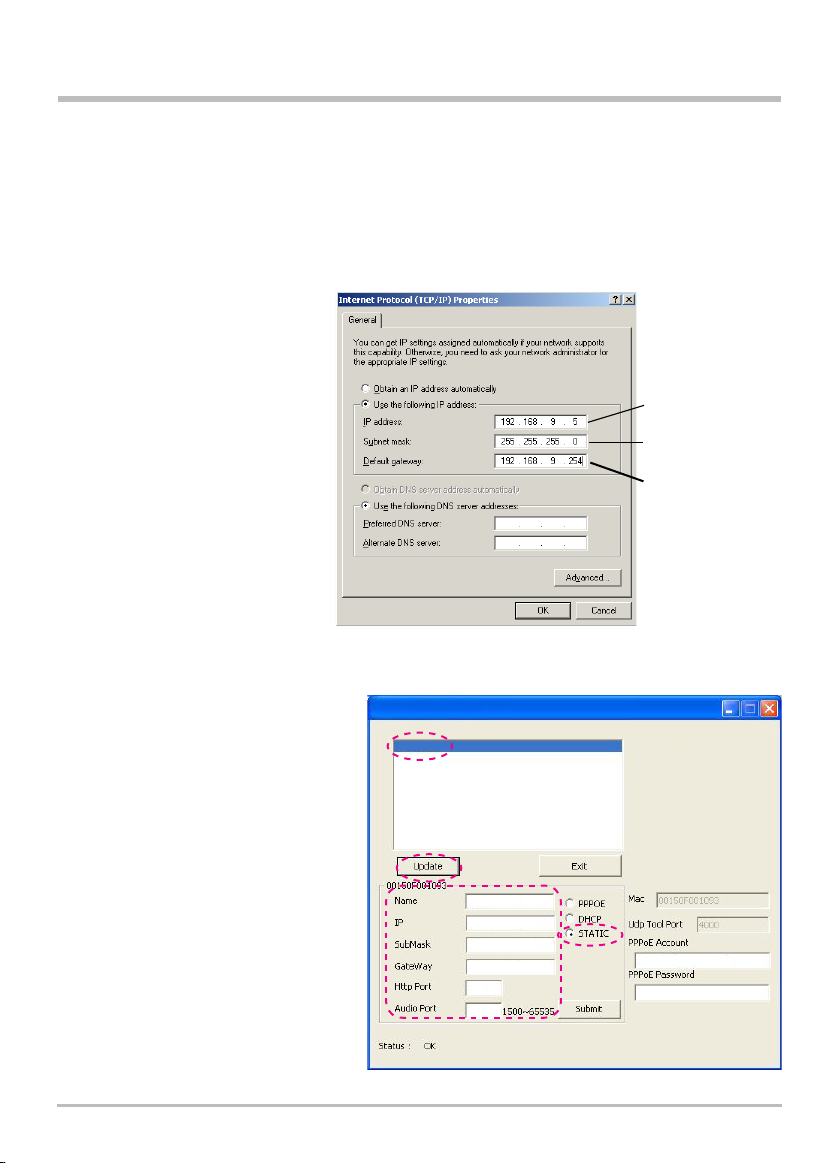
C. Next, choose Control Panel --->
Network Connections --->
choose the activated area
Network Connections ---> right
click your mouse --->select
Properties (P) ---> Select
Internet Protocol (TCP/IP) --->
Select Properties (R) , then you
can check the current IP
address status for the
computer. The way to modify
IP address is:
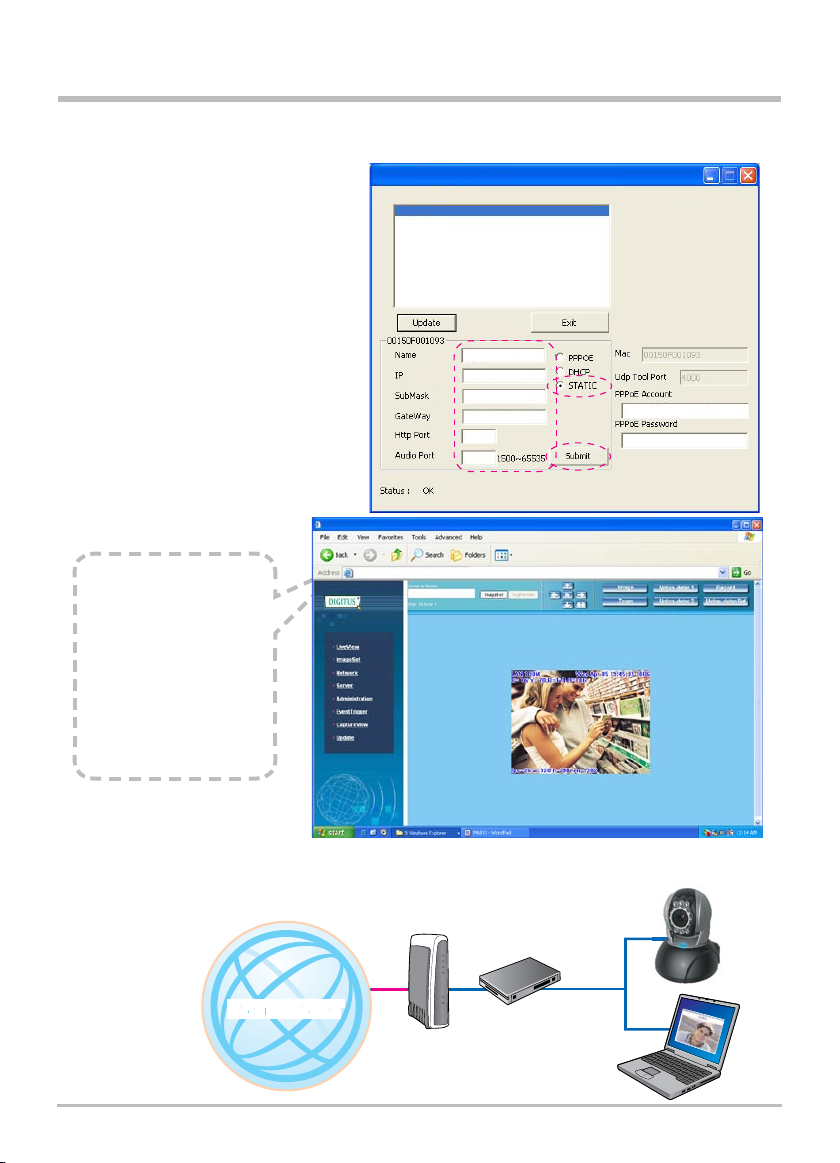
D. Open and execute CAM_EZ Search (as shown in Figure 2). The system will scan the IP-CAM that
you just installed automatically. Then, you will find 255IP CAM in the column of Camera Lists.
Click 255IP CAM with left mouse button. You can see the default settings for IP-CAM.
Step 1.
Click Update. You can see 255IP
CAM.
Step 2.
Click 255IP CAM. You can see
Name :IP CAM
IP :192.168.9.1
SubMask :255.255.255.0
GateWay :192.168.9.254
HTTP Port :Http communication
port. The default setting is 80.
UDP Port:UDP por, Pre-setting is
1500
Step 3.
Make sure the IP setting is STATIC.
Step 4.
Double click on 255IP CAM to open
the browser. Type ID/Password to
access into network monitoring
screen (for detailed information,
please refer to 3.1). If you can see
the image screen, it means that IPCAM is ready to be used.
IP Address (I):
192.168.9.5
Subnet Mask (U):
255.255.255.0
Default Gateway (D):
192.168.9.254
255 IP CAM
IP Assignment: STATIC
Version: IP CAM_V3.1_F2
IP CAM
192.168.9.1
255.255.255.0
192.168.9.254
80
4
1
3
2
Figure 2
CAM_EZ Search V2.6
Account@pppoe.com.tw
1500
7 TOP
2.3 HOW TO SET UP IP CAM
Before you set up IP CAM, you have to know the network environment and if the IP address is fixed or
float that provided by your ISP. If you do not know, please contact with your ISP. Section 2.5 will list the
common network structure (1 ~ 7 types). Users can refer to the structure to find out what type is suitable
for his/her computer and finish the setting up according to the instructions. To set up IP-CAM and IP
address, the common way that people use is to change the obtaining of IP address of IP-CAM. Detailed
information is listed as 2.4-1 ~ 2.4.3.
2.4 SETTING THE WAY TO OBTAIN THE IP ADDRESS OF IP-CAM
2.4-1 STATIC - IP Address Setting
- You computer must be equipped with network card and RT-45 network connector.
- Connect the RJ-45 terminator on the rear of IP-CAM to the red test network cable. One end is
connected to the network card of computer; the other end is connected to the rear side of the IP-CAM.
- Connect the power adaptor to the power port (on the rear) of IP-CAM. Now, the status LED on the
top of IP-CAM will light up.
- Open and execute CAM_EZ Search (as shown in Figure 3). The system will scan the IP-CAM that you
just installed automatically. Then, you will find 255IP CAM in the column of Camera Lists. Click
255IP CAM with left mouse button. You can see the default settings for IP-CAM.
Step 1.
Click Update. You can see 255IP CAM.
Step 2.
Click 255IP CAM. You can see
Name :IP CAM
IP :192.168.9.1
SubMask :255.255.255.0
GateWay :192.168.9.254
HTTP Port :Http communication port.
The default setting is 80.
(If you have multiple IP-CAMs installed
in the same network, you have to
divide them with different Port
numbers, e.g, 1025, 1026, 1039.....)
UDP Port:UDP por, Pre-setting is
1500
Step 3.
Make sure the IP setting is STATIC.
NOTEBOOK
IP CAM
255 IP CAM
IP Assignment: STATIC
Version: IP CAM_V3.1_F2
IP CAM
192.168.9.1
255.255.255.0
192.168.9.254
80
2
1
3
2
Figure 3
CAM_EZ Search V2.6
1500
Account@pppoe.com.tw
8 TOP
- Fill in Fixed IP Address as below. (If you do not know your fixed IP address, please contact with your
ISP. Below is an example of Fixed IP Address modification.)
Step 4.
Type Fixed IP.
Name :IP CAM
IP :211.78.174.94
SubMask :255.255.255.248
GateWay :211.78.174.89
HTTP Port :Http communication port.
The default setting is 80.
(If you have multiple IP-CAMs installed
in the same network, you have to
divide them with different Port
numbers, e.g, 1025, 1026, 1039.....)
UDP Port:UDP por, Pre-setting is
1500
Step 5.
Choose STATIC.
Step 6.
After finishing the settings, click
Submit. The network settings for IP
CAM IP-CAM will be renewed.
2.4-2 DHCP - IP Address Setting:
- Use RJ-45 Ethernet cable (red) to connect ADSL host and switching hub.
Then use RJ-45 Ethernet cable (blue) to connect PC and IP CAM (as shown below).
255 IP CAM
IP Assignment: STATIC
Version: IP CAM_V3.1_F2
IP CAM
211.78.174.94
255.255.255.248
211.78.174.89
1026
5
4
6
INTERNETINTERNET
Example:
1. Set up the IP CAM with
fixed IP address.
2. Turn on your computer
and open IE browser.
Type 211.78.174.94:
(1025, 1026, 1039....) in
the Address line. Now
you can access into the
monitoring screen of
network.
http://211.78.174.94/index.html-Microsoft Internet Explorer
http://211.78.174.94:1026/index.html
ADSL/
CABLE MODEM
LAN HUB
IP CAM
NOTEBOOK
CAM_EZ Search V2.6
Account@pppoe.com.tw
1500
IP CAM
9 TOP
- Connect the power adaptor to the power port (on the rear)
of IP-CAM. Now, the status LED on the top of IP-CAM will
light up.
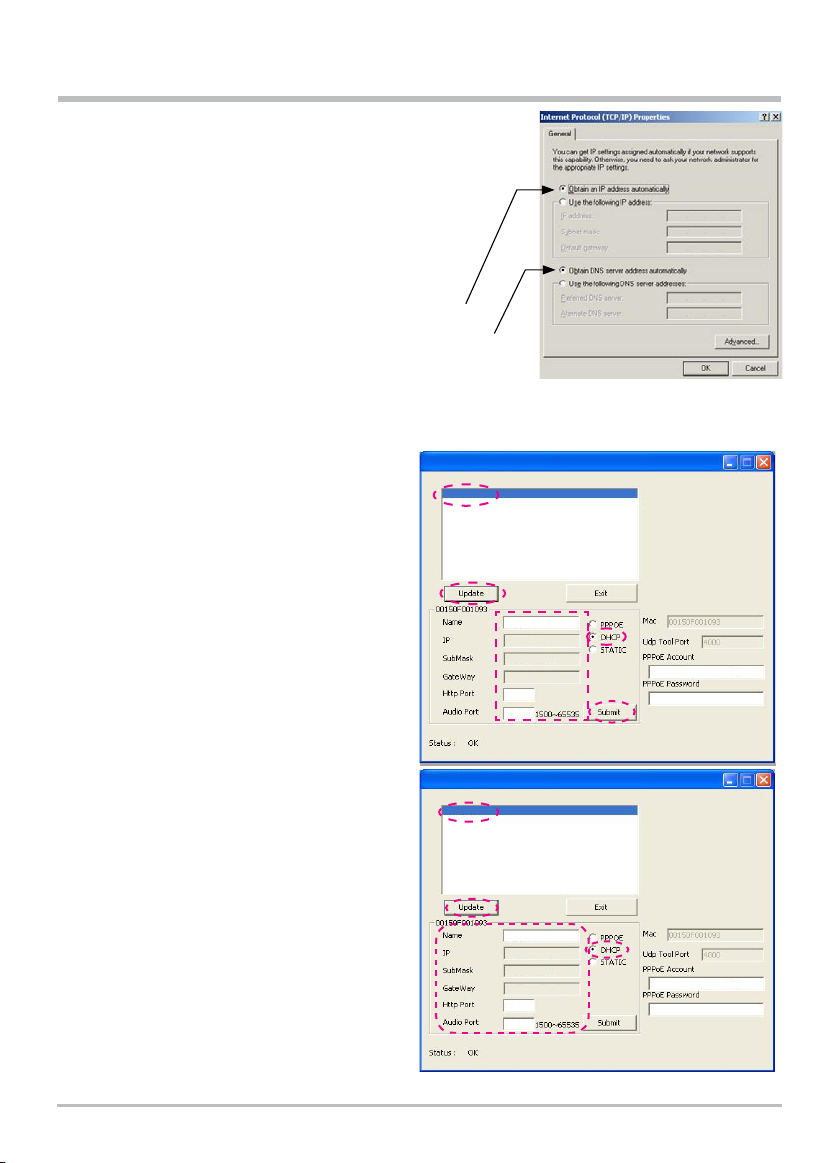
- Set up the connection way inside the PC network: Please go to
Control Panel ---> Network Connections ---> Choose
Activated LAN connection ---> right click your mouse --->
Select Properties (P) ---> Select Internet Protocol (TCP/IP)--->
Select Properties (R) --->Click Obtain an IP address
automatically (O), Obtain DNS server address
automatically (B).
- Open and execute CAM_EZ Search (as shown in Figure 3). Press Update to scan the IP-CAM that you
just installed automatically. Then, you will find 255IP CAM in the column of Camera Lists. Click
255IP CAM with left mouse button. You can see the default settings for IP-CAM.
Step 1.
Click Update. You can see 255IP CAM.
Step 2.
Click 255IP CAM. You can see
Name :IP CAM
IP :192.168.9.1
SubMask :255.255.255.0
GateWay :192.168.9.254
HTTP Port :Http communication port. The
default setting is 80.
Step 3.
Choose DHCP.
Step 4.
After finishing the settings, click Submit. The
network settings for IP CAM IP-CAM will be
renewed. (That is, you can obtain a virtual IP
address)
Step 5.
Click Update. You can see 255 IP CAM.
Step 6.
Click 255IP CAM. You can see the change of
IP-CAM
Name : IP CAM
IP : 10.1.10.82
SubMask :255.255.0.0
GateWay :10.1.10.252
HTTP Port:Http communication port. The
default setting is 80.
Step 7. The IP setting is DHCP.
Step 8.
Double click 255IP CAM to open IE browser to
access into network monitoring screen.
255 IP CAM
IP Assignment: STATIC
Version: IP CAM_V3.1_F2
IP CAM
192.168.9.1
255.255.255.0
192.168.9.254
80
2
1
2
3
255 IP CAM
IP Assignment: STATIC
Version: IP CAM_V3.1_F2
IP CAM
10.1.10.82
255.255.0.0
10.1.10.252
80
6
5
6
7
Figure 5
Obtain an IP address automatically (O)
Obtain DNS server address automatically (B)
CAM_EZ Search V2.6
CAM_EZ Search V2.6
1500
Account@pppoe.com.tw
Account@pppoe.com.tw
1500
4
10 TOP
http://10.1.10.82/index.html-Microsoft Internet Explorer
http://10.1.10.82/index.html
Example:
1. Now, IP-CAM is set up
with the IP address in LAN.
2. Or, use CAM_EZ
Search to access into
monitoring screen of
network according to the
instructions in Figure 5.
3. Or, turn on your PC
and open IE Browse. Type
10.1.10.82 in Address lint
to access into monitoring
screen of network.
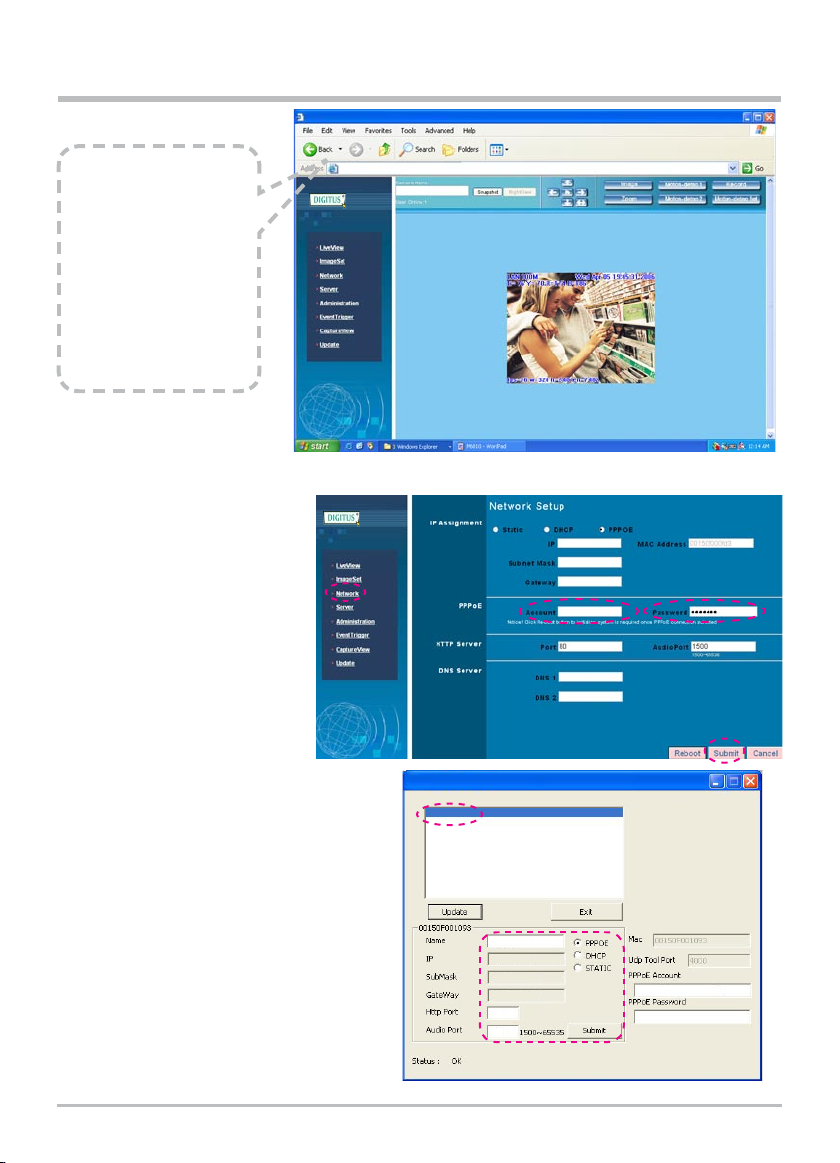
2.4-3 PPPoE - IP Address Setting
- Access into monitoring
screen of network by following
the way stated in 2.2.
- Click Network and open
Network menu. Please choose
PPPoE and key in the Account
and Password. (the following
example uses ADSL account
from AT&T), press Submit to
finish key in and then, please
reboot and re-enter.
- Open CAM_EZ Search and click Update. Wait
for 60 seconds (it varies according to the
connection quality). Then the system will search
IP CAM IP-CAM automatically.
1. Click the searched IP-CAM.
2. Check the IP address and Gateway. Floating
IP address, SubMask and Gateway will be
shown in dimmed color. It means that IP
CAM IP-CAM in LAN has been searched
successfully with PPPoE.
3.You can also directly use CAM_EZ Search and
key in PPPoE Account & Password.
- Select PPPoE. Click Submit to send out.
The IP CAM IP-CAM network settings will be
renewed.
- Now you can click the searched IP-CAM to
open IE Browser for accessing into IP-CAM web
configurator automatically.
10.1.10.82
255.255.0.0
10.1.10.262
Account@pppoe.com
80
192.168.9.254
0.0.0.0
255 IP CAM
IP Assignment: STATIC
Version: IP CAM_V3.1_F2
IP CAM
192.168.0.106
255.255.255.0
190.168.0.1
80
1
2
CAM_EZ Search V2.6
1500
71761864@hinet.net
********
IP CAM
11 TOP
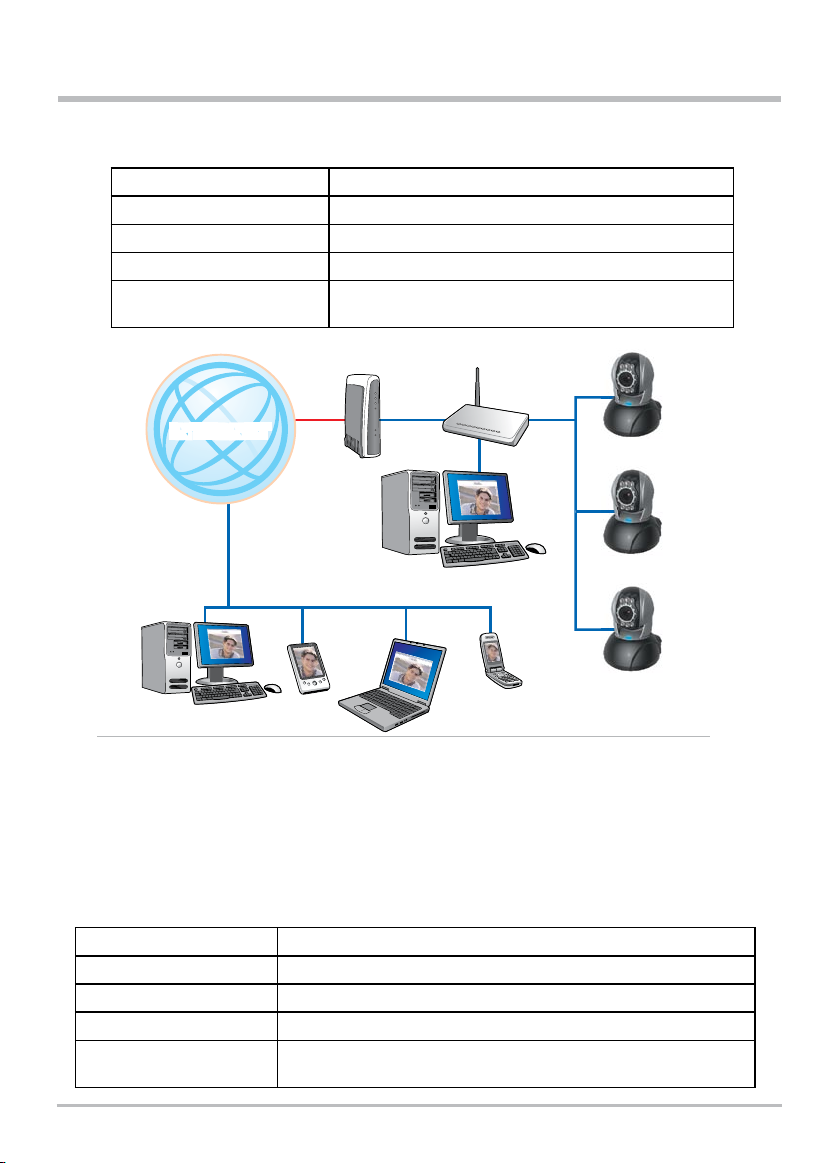
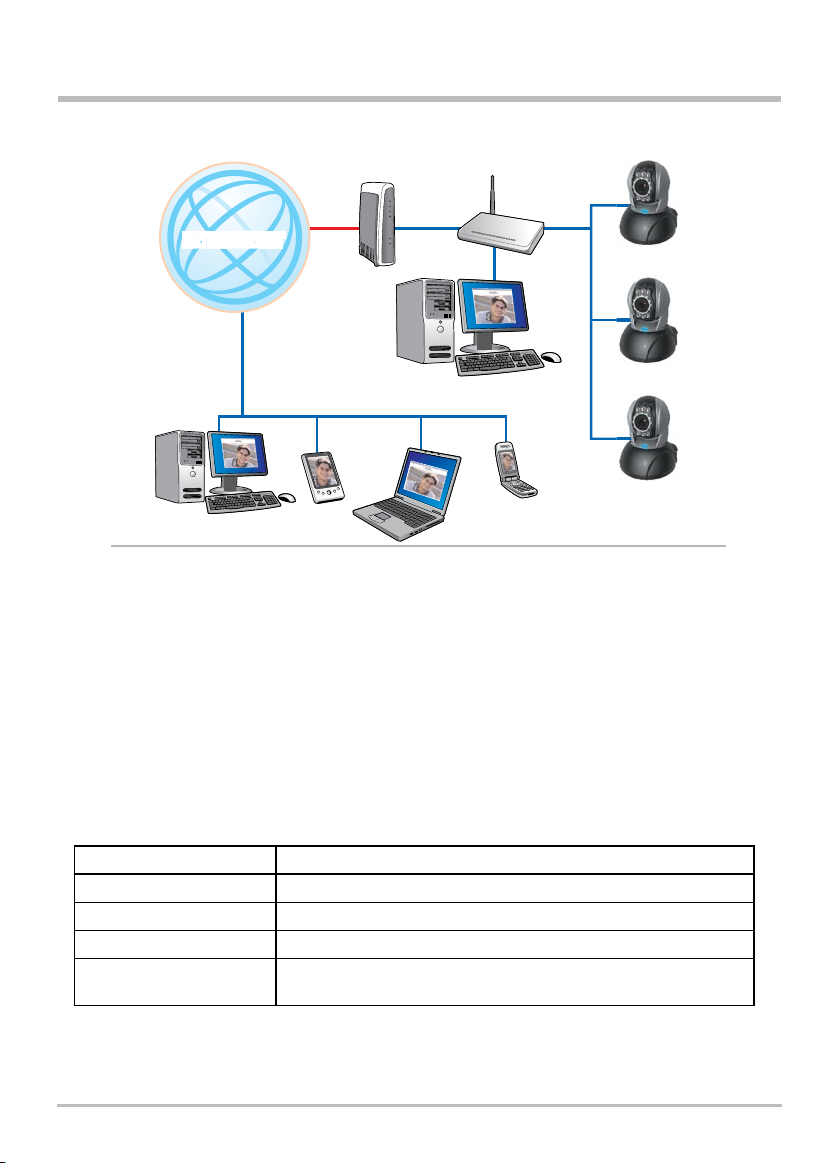
2.5 IP-CAM NETWORK FRAMEWORK INSTALLATION
(1) IP-CAM Network Framework Installation 1
Way to access Internet Use Permanent ADSL or Cable Modem
Physical IP Address Owns several physical IP addresses
IP Share or LAN Hub General model is OK.
Network Setup for IP -CAM LAN Enable / Manually
Suitable Objects Users with several physical fixed IP addresses and several
IP-CAMs installed
INTERNETINTERNET
ADSL/
CABLE MODEM
IP SHARING
OR LAN HUB
211.78.174.01
IP CAM
211.78.174.03
IP CAM
211.78.174.04
IP CAM
211.78.174.05
PC FOR IP CAM SETUP
211.78.174.02
DESKTOP PC
PDA
NOTEBOOK
3G MOBILE
PHONE
1. Connect the RJ-45 terminator on the rear of IP-CAM to the red test network cable. One end is connected
to the network card of computer; the other end is connected to the rear side of the IP-CAM.
2. Refer to 2.4-1 STATIC - IP Address Settings to type the IP address properly.
3. Set a physical IP address for each IP-CAM.
4. Set up the IP-CAM with fixed IP address.
5. For viewing images in IP-CAM from remote computer: Open IP browser and type in the physical IP
address of the IP-CAM, e.g., http://211.78.174.03
(2) IP-CAM Network Framework Installation 2
Way to access Internet Use Permanent ADSL or Cable Modem
Physical IP Address Owns several physical IP addresses
IP Share or LAN Hub Must be equipped with DHCP function
Network Setup for IP -CAM
LAN Enable / Manually Web Server Port Number, need to be adjusted
Suitable Objects Users with one physical fixed IP addresses, IP Share and several
IP-CAMs installed
12 TOP
1. Set a real physical IP address (e.g., 211.78.174.01) for the public IP of IP Share. Then, set another
private IP address and activate the DHCP server function of IP Share.
2. In the IP configuration for each IP-CAM, please assign different virtual IP address internally and
respectively. In the Http Port setting, please specify different port parameters. (Please refer to 2.4-1
STATIC - IP Address Settings to type the IP address properly.)
3. For the port transformation in IP Share, please refer to IP and port settings of camera to configure
accordingly.
4. For viewing images in IP-CAM from remote computer: Open IP browser and type in the physical IP
address of the IP Share and the port number of IP-CAM, e.g., http:// 211.78.174.01:1025.
(3) IP-CAM Network Framework Installation 3
Way to access Internet Use Permanent ADSL or Cable Modem
Physical IP Address Owns one float IP address (dispatched by ISP dynamically)
IP Share or LAN Hub Must be equipped with DHCP and NAT functions
Network Setup for IP -CAM
LAN Enable / Manually Web Server Port Number, need to be adjusted
Suitable Objects Users with dial-up ADSL, one float IP address and several IP-CAMs
installed
INTERNETINTERNET
ADSL/
CABLE MODEM
IP SHARING
OR LAN HUB
Public IP:211.78.174.01
Private Ip:192.168.0.254
IP CAM
192.168.0.2:1025
IP CAM
192.168.0.3:1026
IP CAM
192.168.0.4:1027
PC FOR IP CAM SETUP
192.168.0.1
DESKTOP PC
PDA
NOTEBOOK
3G MOBILE
PHONE
 Loading...