


USB 2.0
FAST ETHERNET PRINTSERVER
User Manual
DN-13003-1

|
TABLE OF CONTENTS |
|
|
COPYRIGHT........................................................................................................................................................ |
4 |
1. |
INTRODUCTION ...................................................................................................................................... |
5 |
|
PRODUCT OVERVIEW.......................................................................................................................................... |
5 |
|
COMPONENTS AND FEATURES ............................................................................................................................ |
5 |
|
HARDWARE INSTALLATION .................................................................................................................................. |
6 |
|
NETWORK ENVIRONMENT ................................................................................................................................... |
7 |
|
WIRED NETWORK WITH PRINT SERVER:............................................................................................................... |
7 |
2. PRINT SERVER INSTALLATION................................................................................................................... |
8 |
|
|
PREPARATION .................................................................................................................................................... |
8 |
|
CONFIGURATION SOLUTION TABLE ...................................................................................................................... |
9 |
3. SOFTWARE INSTALLATION....................................................................................................................... |
10 |
|
|
INSTALLING THE PSADMIN AND PRINT SERVER’S DRIVER ................................................................................... |
10 |
|
USING PSADMIN .............................................................................................................................................. |
19 |
|
WIZARD ........................................................................................................................................................... |
20 |
|
MANUAL SETUP................................................................................................................................................ |
22 |
|
REFRESH ......................................................................................................................................................... |
24 |
|
MULTIPLE PRINT QUEUES CONFIGURATION ....................................................................................................... |
25 |
|
UNINSTALLING THE PSADMIN ON WINDOWS PC................................................................................................. |
26 |
4. INTERNET PRINTER CONNECTION AND HP WEB JETADMIN .............................................................. |
27 |
|
|
IPP OVERVIEW................................................................................................................................................. |
27 |
|
HP WEB JETADMIN OVERVIEW ......................................................................................................................... |
29 |
|
INSTALLING HP WEB JETADMIN ........................................................................................................................ |
29 |
|
REMOVING HP WEB JETADMIN UTILITY ............................................................................................................. |
30 |
5. CONFIGURATION FROM EMBEDDED WEB SERVER ............................................................................. |
31 |
|
|
OVERVIEW ....................................................................................................................................................... |
31 |
|
USING EMBEDDED WEB SERVER....................................................................................................................... |
31 |
|
SETUP MENU ................................................................................................................................................... |
38 |
|
INSTALLING PRINT SERVER ON NETWARE 4.X/5.X.............................................................................................. |
43 |
|
SETTING UP A MACINTOSH COMPUTER.............................................................................................................. |
45 |
6. NETWORK PRINT MONITOR ...................................................................................................................... |
49 |
|
|
PREPARATION .................................................................................................................................................. |
49 |
|
TCP/IP PROTOCOL INSTALLATION..................................................................................................................... |
50 |
|
IPX/SPX-COMPATIBLE PROTOCOL INSTALLATION .............................................................................................. |
50 |
|
NETBEUI PROTOCOL INSTALLATION.................................................................................................................. |
51 |
|
WINDOWS 95/98/ME/NT/2000/XP/2003 MANUAL INSTALLATION PROCEDURE .................................................... |
51 |
|
UNINSTALLING NETWORK PRINT PORT ON WINDOWS 95/98/ME/NT/2000/XP/2003 ........................................... |
53 |
7. TCP/IP LPR PORT PRINTING INSTALLATION.......................................................................................... |
54 |
|
|
BASIC TCP/IP INSTALLATION OVERVIEW ........................................................................................................... |
54 |
|
ASSIGNING AN IP ADDRESS .............................................................................................................................. |
54 |
|
WINDOWS NT LPR PORT PRINTING INSTALLATION............................................................................................. |
54 |
|
WINDOWS 2000/XP/2003/VISTA/7 STANDARD TCP/IP PORT PRINTING INSTALLATION........................................ |
56 |
|
UNIX INSTALLATION ......................................................................................................................................... |
59 |
8. UPGRADING PRINT SERVER...................................................................................................................... |
63 |
|
|
OVERVIEW ....................................................................................................................................................... |
63 |
|
UPGRADING THE PRINT SERVER FROM PSADMIN................................................................................................ |
63 |
|
UPGRADING THE PRINT SERVER FROM WINDOWS 2000/XP/2003/VISTA/7 (THROUGH TCP/IP)............................ |
63 |
|
UPGRADING THE PRINT SERVER FROM UNIX (THROUGH TCP/IP) ....................................................................... |
64 |
|
UPGRADING THE PRINT SERVER FROM BROWSER ............................................................................................... |
65 |
9. TROUBLESHOOTING .................................................................................................................................. |
66 |
|
2
GENERAL TROUBLESHOOTING OVERVIEW............................................................................................... |
66 |
POWER RELATED PROBLEMS ............................................................................................................................ |
66 |
PRINT PORT RELATED PROBLEMS..................................................................................................................... |
66 |
WINDOWS 2000/XP/2003/VISTA/7 TROUBLESHOOTING ..................................................................................... |
67 |
MOVING THE PRINT SERVER TO A NEW SEGMENT............................................................................................... |
68 |
MOVING YOUR COMPUTER TO A NEW SEGMENT................................................................................................ |
69 |
NOVELL NETWARE TROUBLESHOOTING............................................................................................................. |
69 |
TCP/IP TROUBLESHOOTING ............................................................................................................................. |
70 |
APPENDIX ........................................................................................................................................................ |
72 |
FREQUENTLY ASKED QUESTIONS ...................................................................................................................... |
77 |
ADDITIONAL INSTALLATION INSTRUCTIONS ......................................................................................................... |
79 |

Trademarks
NetWare is a registered trademark of Novell Inc and Windows 95/98/Me and Windows NT/2000/XP/2003/Vista/7 are registered trademarks of Microsoft Corp. All other brands and product names are trademarks of their respective companies.
Copyright
No part of this publication may be reproduced in any form or by any means or used to make any derivative (such as translation, transformation or adaptation) without the express written consent of the manufacturer as stipulated by the United States Copyright Act of 1976.
FCC Warning
This equipment has been tested and found to comply with the limits for a Class B digital device, pursuant to subpart J of Part 15 of the FCC Rules. These limits are designed to provide reasonable protection against harmful interference when the equipment is operated in a commercial environment. This equipment generates, uses, and can radiate radio frequency energy and, if not installed and used in accordance with the instruction manual, may cause harmful interference to radio communications. Operation of this equipment in a residential area is likely to cause harmful interference in which the user will be required to correct the interference at their own expense.
All content is subject to change without prior notice.
4

1. Introduction
Product Overview
The external print servers enhance capability by letting you place your printers at convenient locations directly on the Ethernet network, and by increasing network printer performance and management. Please note that the print server does not support printing with host-based printers, e.g. CAPT, GDI, PPA.
Network Management
The print servers support the Simple Network Management Protocol (SNMP), which remote printer management and a warning. A standard SNMP agent is permanent on these print servers. Any standard SNMP-based application can be used to access and manage these print servers.
Network configuration
The print servers provide an embedded web server that can be accessed via a proper web browser. We also subsidiary Windows-based PSAdmin utility which help administrator to setup print server environment.
Components and Features
1-USB Port Print Server
˙1 USB2.0 port
˙Fast Ethernet network port: RJ-45 for 10Base-T or 100Base-TX
˙1 LED to indicate Status(Orange), 2 LED’s to indicate 10M(Orange) and 100M(Green) link lights
˙1 LED to indicate USB port: Green for USB2.0, Orange for USB1.1 ˙Built-in Reset Button
˙One Setup CD for Windows 95/98/Me/NT/2000/XP/2003/Vista/7, User’s Guide
˙One external AC power adapter ˙One Quick Installation Guide
LED Indicators
LED |
State |
|
Indication |
Status |
Blinking for |
POST |
When power switched on, the Status indicator will flash five |
(Orange) |
|
times, and then on. |
|
|
|
||
100Mbps |
On (Green) |
|
LAN Port has a valid network connection at 100Mbps. |
10Mbps |
On (Orange) |
|
LAN Port has a valid network connection at 10Mbps. |
USB |
On (Green) |
|
Connect with USB2.0 printer |
On (Orange) |
|
Connect with USB1.1 printer |
|
|
|
Before you start, you should prepare the following items:
One Windows-based computer with print server setup CD
One printer with a USB port
One USB printer cable
Hardware Installation
To install the print servers, you need to complete these steps:
˙Confirm that your printer USB port works well.
˙Connect the print server to the network and printer, and plug in the print server.
Follow these instructions to install the print servers, please refer to any peripheral you are connecting to the print server:
1.Turn off the printer’s power.
2.Connect the print server to your printer with the USB cable.
3.Turn the printer’s power on.
4.Plug the AC power adapter into the power connector on the print server.
5.Wait 10 seconds until all the LEDs have stopped flashing.
Note: The Status LED should be flash five times when POST. If not, please contact your local dealer for repair or replacement.
6
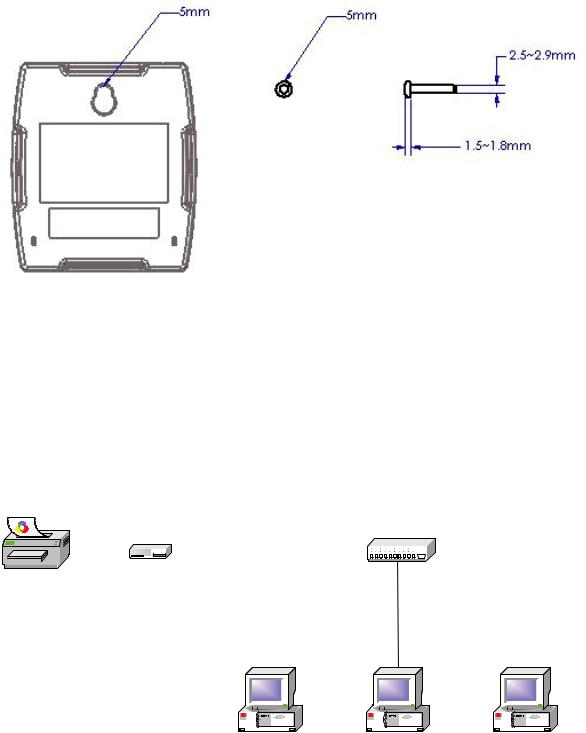
Wall-mount Information
Note: We are not responsible for damages incurred by insecure wall-mounting hardware.
Network Environment
Wired Network with Print Server:
|
|
|
|
|
|
|
|
|
|
|
|
|
|
|
|
|
|
|
|
|
|
|
|
|
|
|
|
|
|
|
|
|
|
|
|
|
|
|
|
|
|
|
|
|
|
|
|
|
|
|
|
|
|
|
|
|
|
|
|
|
|
|
|
|
|
|
|
|
|
|
|
|
|
|
|
|
|
|
|
|
|
|
|
|
|
|
|
Printer |
|
Print Server |
HUB |
|
|
|
|
|
|
|
|
|
|||||||||||||||
|
|
|
|
|
|
|
|
|
|
|
|
|
|
|
|
|
|
|
|
|
|
|
|
|
|
|
||
|
|
|
|
|
|
|
|
|
|
|
|
|
|
|
|
|
|
|
|
|
|
|
|
|
|
|
|
|
|
|
|
|
|
|
|
|
|
|
|
|
|
|
|
|
|
|
|
|
|
|
|
|
|
|
|
|
|
|
|
|
|
|
|
|
|
|
|
|
|
|
|
|
|
|
|
|
|
|
|
|
|
|
|
|
|
|
|
|
|
|
|
|
|
|
|
|
|
|
|
|
|
|
|
|
|
|
|
|
|
|
|
|
|
|
|
|
|
|
|
|
|
|
|
|
|
|
|
|
|
|
|
|
|
|
|
|
|
|
|
|
|
|
|
|
|
|
|
|
|
|
|
|
|
|
|
|
|
|
|
|
|
|
|
|
|
|
|
|
|
|
|
|
|
|
|
|
|
|
|
|
|
|
|
|
|
|
|
|
|
|
|
|
|
|
|
|
|
|
|
|
|
|
|
|
|
|
|
|
|
|
|
|
|
|
|
|
|
|
|
|
|
|
|
|
|
|
|
|
|
|
|
|
|
|
|
|
|
|
|
|
|
|
|
|
|
|
|
|
|
|
|
|
|
|
|
|
|
|
|
|
|
|
|
|
|
|
|
|
|
|
|
|
|
|
|
|
|
|
|
|
|
|
|
|
|
|
|
|
|
Computer |
Computer |
Computer |
2. Print Server Installation
Preparation
To meet users’ network printing needs in today’s heterogeneous and multiple protocol networking environments, the print server supports industrial standard protocols, including
TCP/IP, IPX/SPX, NetBEUI and AppleTalk. This means that the print server supports the most popular network operating systems today, including NetWare, Windows
2000/XP/2003/Vista/7, UNIX systems and Macintosh computer. As such, there might be several ways to deploy the print server on your network.
Supported Networks
Print server supports a variety of network protocols, including TCP/IP, IPX/SPX, NetBEUI and AppleTalk. In addition, we provide software for network configuration on the following networks:
˙Novell NetWare 3.12, 4.x, 5.x (Bindery and NDS) ˙Microsoft Windows 95/98/Me
˙Microsoft Windows NT/2000/XP/2003/Vista/7
˙Apple EtherTalk
˙UNIX /Linux system
˙Internet (via Internet Printer Connection software)
8
Configuration Solution Table
Setup |
Operating |
Function |
Remarks |
|
|
System |
|
|
|
|
|
PSAdmin utility / Setup Wizard |
|
|
|
||
Windows 95/98/Me |
Install a single network on a |
Easy printer |
installation runs |
||
Windows |
|
peer-to-peer or client-server |
from print server setup CD |
||
NT/2000/XP/2003/Vista/7 |
network |
|
|
|
|
Embedded Web server |
|
|
|
|
|
Windows 95/98/Me |
Remote setup print server |
Support Microsoft |
Internet |
||
Windows |
|
from private LAN |
Explorer 5.01 or higher, Mozilla |
||
NT/2000/XP/2003/Vista/7 |
|
Firefox, Netscape 7.2 or higher, |
|||
Mac OS, Linux… |
|
etc. |
|
|
|
HP Web JetAdmin |
|
|
|
|
|
Windows |
|
Remote management of |
Print server solution for continual |
||
NT/2000/XP/2003/ |
print server, include |
management |
of |
multiple |
|
|
|
alert and consumables |
printersanywhere on your LAN |
||
Internet Printing Protocol |
|
|
|
|
|
Windows |
|
Printing via the internet to |
Allows saving distribution of HQ |
||
NT/2000/XP/2003/Vista/7 |
Internet Printing Protocol- |
hardcopy document over |
|||
|
|
enabled print server |
Internet, replacing fax, mail |
||
Comment
Configuration solution Table has many installations way to setup Windows 95/98/Me, Windows NT/2000/XP/2003/Vista/7, NetWare, UNIX / Linux system and Mac computer.
Firstly, we introduce PSAdmin utility, HP Web JetAdmin program and Internet Printing
Protocol solution. Then we will discuss Embedded Web Server Installation with print server.

3. Software Installation
The PSAdmin is a proprietary Windows-based management program that can assist you in configuring and managing your print server in NetWare environments. The program can be installed from the setup CD of print server.
Installing the PSAdmin and Print Server’s Driver
1.To enable network communication with print server, your computer must have a proper IP address, e.g. 192.168.0.100 (the print server’s default IP is 192.168.0.10)
2.Insert the setup CD into your CD-drive, and the following message appears:
Note:
For setup wizard under Windows Vista/7, you have to choose the Run as administrator by right-click the icon on desktop.
10
3.Choose one to install the print server and configure the connected printer.
Note:
The setup CD will install the print server’s driver, PSAdmin and Setup Wizard into your computer. The default installation directory will be C:\Program files\Network Print Monitor.
4.Click Next, the wizard will automatically discover the print server.
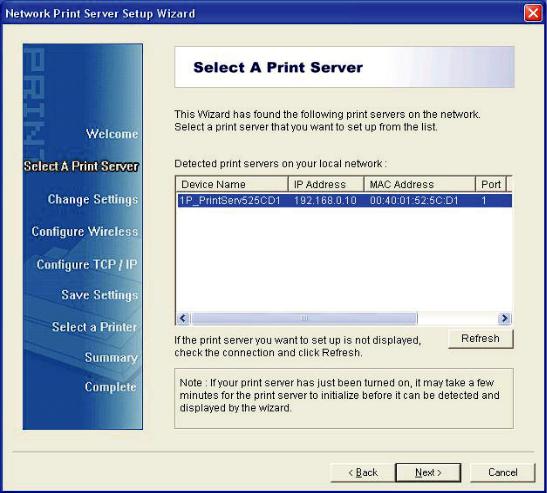
5.From the Select A Print Sever screen, select the print server that you want to configure and click Next.
12
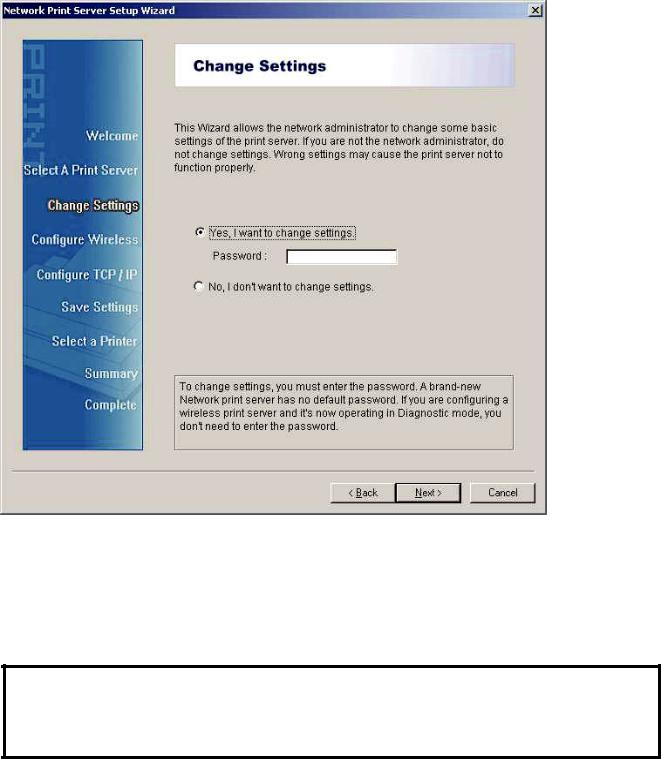
6.On the Change Settings screen, select No or Yes:
Click No if you want the print server to keep using the default IP address and keep the default settings:
IP address: 192.168.0.10
Subnet Mask: 255.255.255.0
Click Yes if you want change IP address of the print server, and then click Next.
Note:
1.The IP address of print server must be within the same subnet as your network adapter.
2.After you save the new IP address, the print server will automatic reboot once to make ready for the new IP address. It may take a couple of seconds.
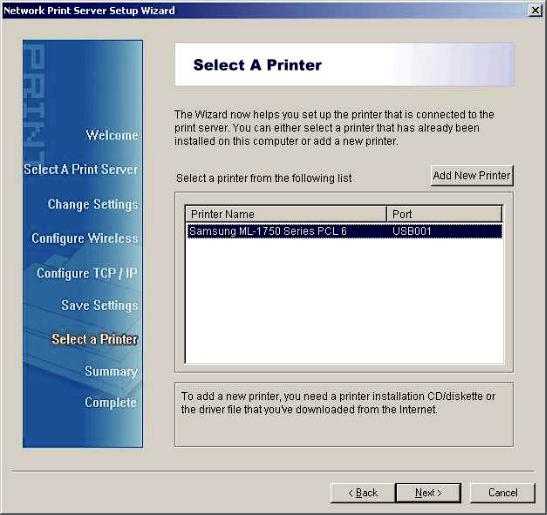
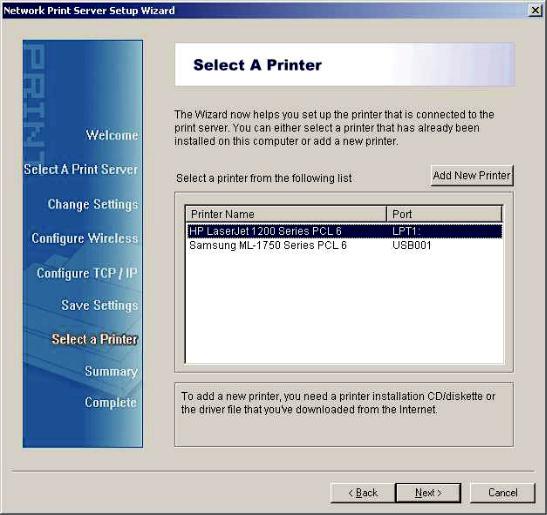
7.In the setup wizard, select an already configured printer from the list, click Next, Next and then Finish to complete the installation.
Or
Select Add New Printer if the print server is connected to a printer that hasn’t been installed before and does not appear in the list.
14
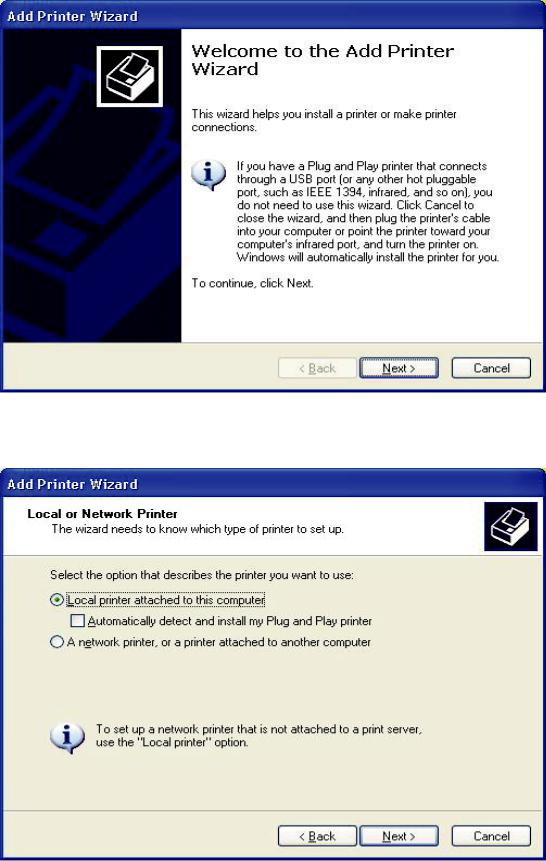
8.Click Add New Printer to launch Windows Add Printer Wizard.
9.Click Next and select Local Printer, make sure the Automatically detect and install my Plug and Play printer check box is NOT checked. Then click Next.
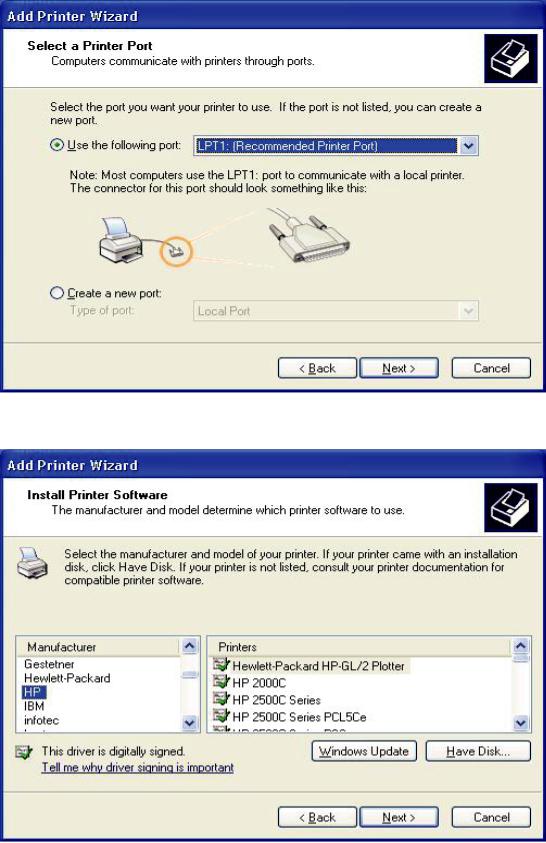
10.Make sure the Use the following port radio-button is clicked and select LPT1: (recommended Printer Port) from the pull-down list. Then click Next.
11.Select Manufacturer and Printer from the lists of printer’s driver. Then click Next.
16
12.If you already have the printer’s driver installed, you will be asked whether to keep it or to replace it. Click Next. Supply a name for the printer and choose whether you want to make it your default printer. Then click Next.
13.Then, choose whether you want to share the printer with other network user, print a test page (please select No.), etc. Select the appropriate radio-button and click Next and Finish.
14.In the setup wizard, finish the installation by highlighting the installed printer in the
Select a Printer list and click Next, NEXT -> Finish.

15.From Windows system, go to start -> Printers and Faxes and highlight your newly installed printer.
16.Right-click, select Properties -> Ports and verify that the print server’s port appears.
18

17.Go to General; click Print Test Page to verify the configuration.
18.Done.
Note:
If you want to install more print servers, start setup wizard from your Windows Start menu: start -> All Programs -> Network Print Server -> PSWizard and repeat the installation procedure.
Using PSAdmin
After the software of setup CD is successfully installed, starts PSAdmin utility from your
Windows Start menu: start -> All Programs -> Network Print Server -> PSAdmin. The screen will then appear as follow picture.
All print server(s) feature Novell NetWare function on the LAN will be displayed along with their respective device name, MAC Address, print server name, firmware version, and status.
The terms are defined as follows:
Device Name: The name of the print server hardware used for identification purposes.
MAC Address: The Ethernet address of the print server.
Print server Name: The print server to which the device is attached.
Version: The firmware version of the print server.
Status: To come up a Printer’s status presently.
Wizard
Wizard is a configuration program that can assist you in setting up the necessary parameters for your print server device to function. Setup a print server by using Wizard.
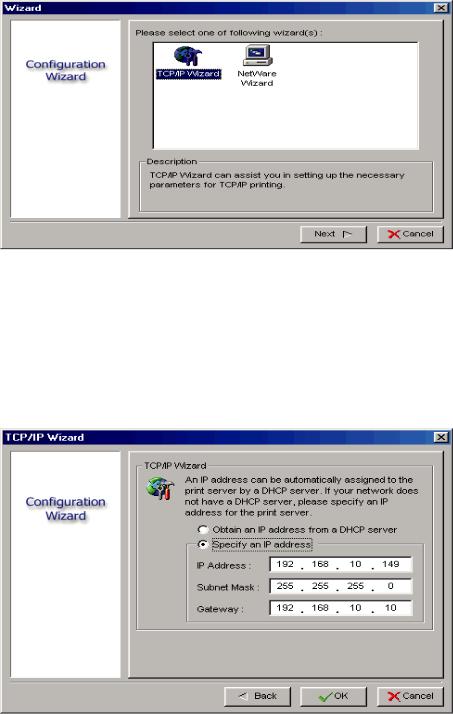
TCP/IP Wizard
1. Click Wizard button just like a picture  .and select TCP/IP Wizard.
2Select “Obtain an IP address from DHCP server”. If there is a DHCP server on your network. This option allows the print server to obtain IP-related settings automatically from your DHCP server. This setting, by default, is disabled. If you would like to manually specify an IP address to the device, please skip to the following step.
3In the IP Address option, type an IP address for the print server. The IP address must meet the IP addressing requirements of the network segment.
20
4(Optional) In the Subnet Mask option, type the Subnet Mask your LAN or network segment is currently configured to use.
5(Optional) In the Gateway field, type the IP address of gateway.
6When done, click OK button. The program will save the above settings into the print server.
7Done
NetWare Wizard
1.Log into your NetWare file server as a Supervisor (Admin.) or equivalent.
2.Click Wizard button just like a picture  .and select NetWare Wizard, as follow picture.
3.Select the NetWare File Server to which the print server device will be attached.
4.Type in a Print server.
5.Type in a Print Queue Names.
Note: Each print queue corresponds to each print port of the print server.
6.Click OK.
7.Done.
8.From your NetWare client computer, such as Windows 95/98/Me, create a printer that is connected (redirected) to one of the NetWare print queues serviced by the print server.
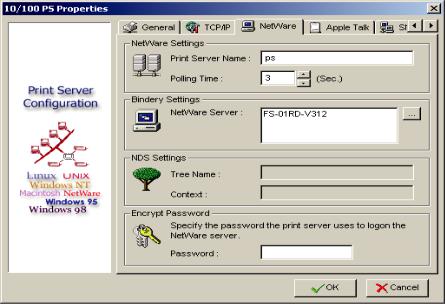
Manual Setup
Manual Setup is a configuration program designed for more experienced users of NetWare. To setup the print server by using Manual Setup follow the steps:
1.Run PCONSOLE in NetWare 3.x or NetWare 4.x and create the necessary parameters (Refer to your Novell NetWare print server/Services manual for details).
2.Log into your NetWare file server as a Supervisor (Admin.) or equivalent. From your Windows 95/98/Me, run PSAdmin.
3.Select the print server that you wish to configure.
4.Click Properties in the tool bar and the following screen will appear, Properties button just like a picture  , as follow picture.
5.Select NetWare and type in the Print server that created during PCONSOLE.
6.(Optional) In Bindery Settings, Select NetWare file server(s) that print server can do
Bindery mode.
7.(Optional) In NDS Settings, Select NetWare file server(s), NetWare 4.x or later that print server can do NDS mode.
8.Click OK. From your NetWare client computer, such as Windows 95/98/Me, create a printer that is connected (redirected) to one of the NetWare print queues serviced by the print server.
22
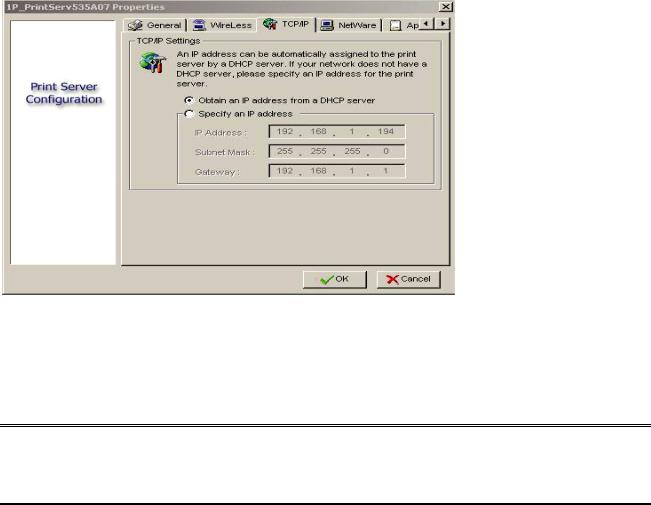
Properties –TCP/IP Options
The TCP/IP options allow you to modify the print server’s TCP/IP settings. Each option is detailed as follows.
Obtain an IP address from a DHCP server:
This option enables or disables the DHCP feature of the print server. When this option is enabled, the print server will obtain an IP address automatically from the DHCP server on your LAN. The default value is “Disable”.
Note: 1. Once this option is enabled, the following IP address, Subnet Mask, Gateway will be grayed out and are not available for editing.
2.While the print server supports DHCP, we strongly recommend you manually specify a fixed IP address to the print server.
Specify an IP address:
IP Address:
This option shows the print server’s current IP address maybe obtained from your DHCP server or manually specified. This option also allows you to manually specify an IP address to the print server, if DHCP option is disabled.
Subnet Mask:
This option shows the print server’s current subnet mask maybe obtained from the DHCP server or manually specified. This option also lets you manually specify a subnet mask to the print server, if DHCP option is disabled. This value is optional.
Gateway:
This option shows the print server’s current gateway address maybe obtained from the DHCP server or manually specified. The option also allows you to manually specify the IP address of the gateway to the print server, if DHCP option is disabled.
This value is optional
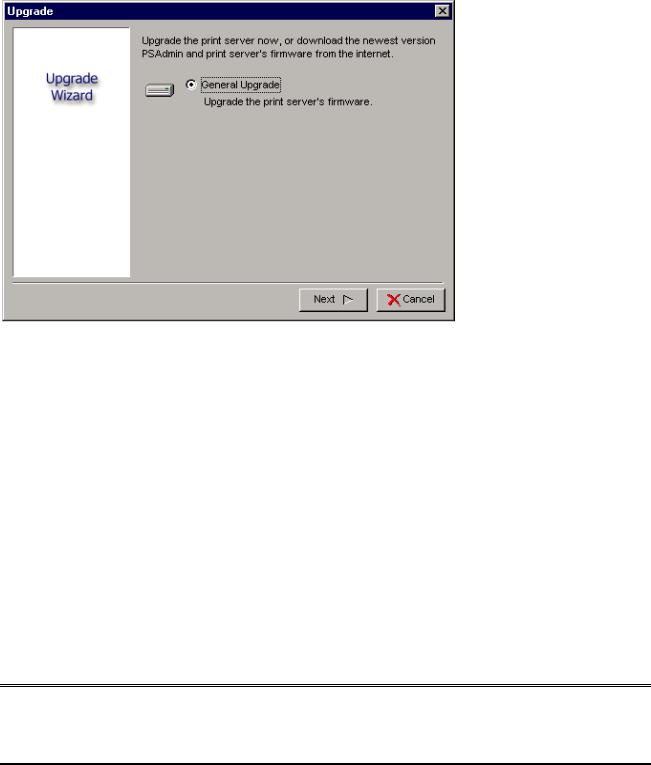
Upgrade
Upgrade allows the user to upgrade the print server device. In order to upgrade the unit please perform the steps as follows:
1.Click Upgrade button just like a picture  , as shown as follow picture
2.Select General Upgrade. Make sure that the upgrade file is located in the same
directory as PSAdmin.
Reset
1.Click Reset button just like a picture  .
.
2.Reset allows the user to reset the print server device in order to establish a new connection or for new settings to take effect.
Refresh
1.Click Reset button just like a picture  .
.
2.Refresh searches the network for all attached print server(s).
Note: Configure the print speed in the Advanced label, must match the printer’s speed which connect to the print server. Undependable configuration will cause printer to abnormal printing.
24
 Loading...