

Page 1

1
DIGITUS® Plug&View
IP Cameras
Quick Installation Guide
(QIG)
Page 2

2
Safety Precautions
Only use the Plug&View IP camera within the specified
temperature range for this camera
When not in use, store the product in a clean and dry place in
temperatures between 0°C and 40°C
Do not cover the camera
Do not let the camera come into contact with liquids (except
outdoor cameras with IP66 protective cover)
Plug&View IP cameras do not replace adult supervision.
Safeguard the health of your children, family members or pets by
regularly looking after them
Ensure that the indoor IP cameras are only used inside. These
cameras are not intended for outdoor use and can be damaged.
In this case use the specified outdoor models
Install the Plug&View IP cameras in close proximity to an easily
accessible wall outlet. Ensure that the power cord is not under
tension or stretched
Position the Plug&View IP cameras within the range of your Wi-Fi
router and ensure that there are no obstacles between camera
and router, which could interfere with the Wi-Fi signal
Page 3

3
Protect the Plug&View IP cameras from electrical and other HF
devices generating interferences (microwaves, mobile phones,
etc.)
Keep camera, network cable and power cord outside the reach of
children, since these components can be dangerous
Only use the supplied power adapter.
Never try to repair Plug&View IP cameras yourself. Repair and
maintenance work must be carried out by specialists.
In case of problems contact our customer service.
Observe all applicable laws regarding camera monitoring. The
Plug&View IP cameras are intended for private use at home.
Inform your family members, relatives and domestic helpers in
your household with regard to video monitoring. Ensure that
public areas and your neighbors’ properties cannot be seen.
Page 4

4
Personal Information
1 x Plug&View IP camera
1 x Power supply with cable
1 x Quick Installation Guide
1 x CD with utilities
Optional:
1 x Ethernet cable
1 x Ceiling/Wall mount
1 x Removable antenna*
EN
Read and accept the privacy policy for using the DIGITUS®
Plug&View systems under http://plug-view.com/privacy-policyfor-platform-apps/.
Select a password with a high degree of safety for your
Plug&View account to protect it from unauthorized access.
The password should contain at least 8 characters; we
recommend case-sensitive letters and alphanumeric characters.
Furthermore, the standard password of the camera should be
changed to avoid unauthorized access here as well.
Live stream, push notification and further services are
available via a cloud server. Despite backup solutions, system
stability and bandwidth management the uninterrupted
availability of the system cannot be guaranteed.
What's in the box
*The following cameras are equipped with a removable antenna:
DN-16029, DN-16039, DN-16043, DN-16048, DN-16049
Thank you for choosing a Plug&view IP-camera, which can be upand-running quick and easy without complicated network settings.
Page 5
5
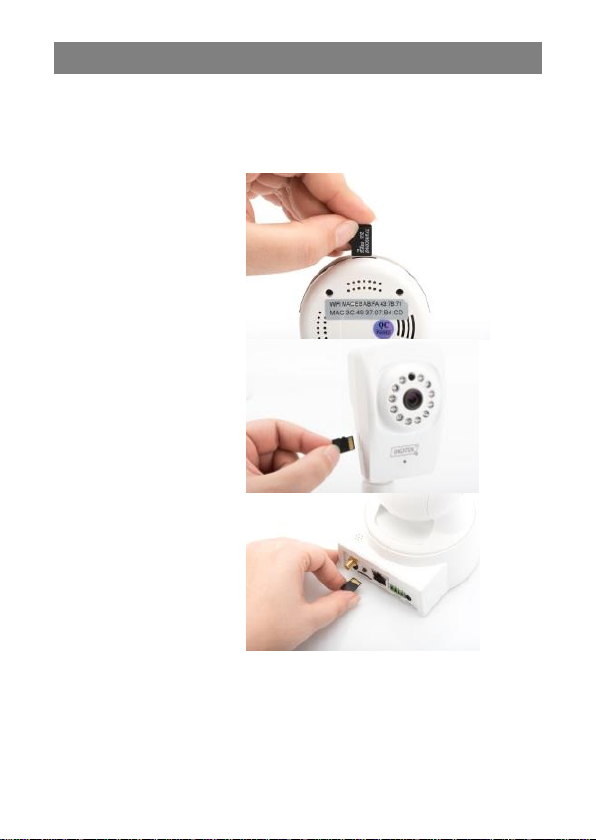
Install MicroSD Card
DN-16047
Install the SD card as
illustrated, with the
golden contacts
towards the camera
lens.
DN-16046
Install the SD card as
illustrated, with the
golden contacts
towards the camera
lens.
DN-16029
Install the SD card as
illustrated, with the
golden contacts up.
DIGITUS® indoor Plug&View cameras can be equipped with a
microSD card for recording.
Check installation option by means of the installation illustration.
Page 6
6
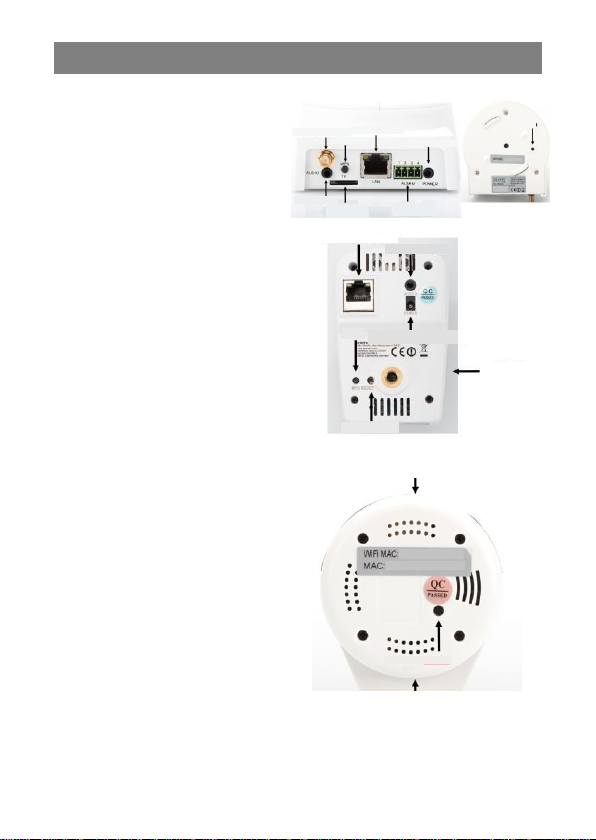
Camera Connections
LAN:
Connect the camera to the
LAN port of your router.
Reset:
Press and hold the Reset
button for 10 seconds after
starting the camera to reset the
camera to default settings.
Power:
Connect the supplied power
cord to supply the camera with
power.
MicroSD:
Insert a microSD card for local
storage.
Mic: Microphone (Audio In).
Audio output:
Connect an external speaker
via the 3.5mm audio cable.
WPS:
Press and hold WPS button for
8 seconds after camera bootsup to activate WPS mode.
(*DN-16029 and DN-16046
has WPS button)
Alarm:
Pin1: Alarm input
Pin2: Ground
Pin3: Not in use
Pin4: NO
Antenna port
WPS button
Network port
DC SV power supply
Reset
Alarm input/output
MicroSD card slot
Audio output
Network port
Audio output
WPS
DC 5V power supply
MicroSD card
slot
MicroSD card slot
Reset
Reset
DC 5V power supply
Page 7
7
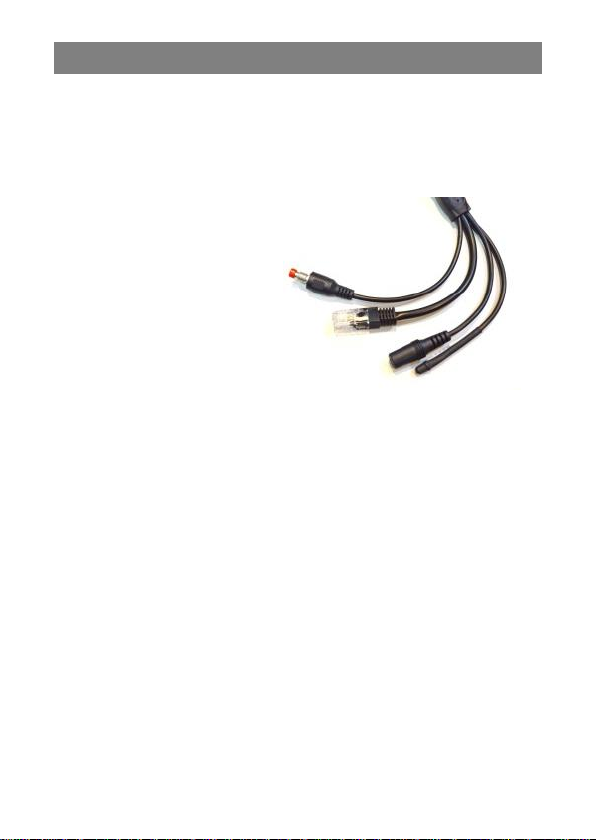
Camera Connections
Reset button:
Press and hold this
button for 10 seconds
after the camera is
connected and readyto-use. This resets the
camera to default
settings.
Network cable:
Connect the network
cable to you router on
the network to establish
Internet connection.
DC 12V power
connection:
Connect the external
power adapter to
supply the camera with
power.
LED status indicator:
The blue LED status
indicator shows if the
camera is supplied with
power.
DIGITUS® outdoor Plug&View cameras are equipped with a special
cable.
Check installation option by means of the installation illustration.
For DN-16039, DN-16043 and DN-16048, its power can be supplied
directly to the camera via the network cable in connection with a
PoE injector or PoE switch.
Page 8
8
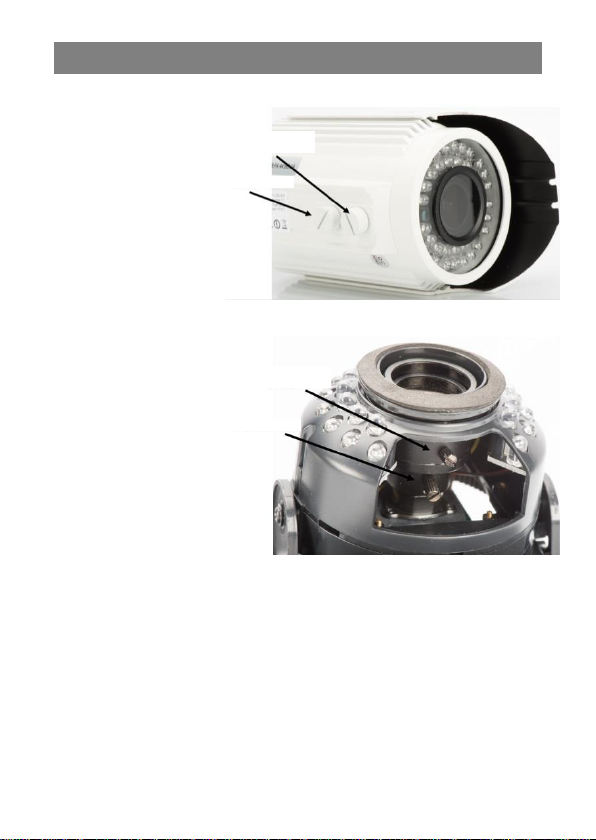
Lens Settings
DN-16039
DN-16043
You can adjust focus
and sharpness via
manual controls.
Use the camera live
image to adjust
focus and
sharpness as
required.
Set focus (angle)
Set sharpness
Set focus (angle)
Set sharpness
Page 9

9
1. Preparation
Before you can use your IP camera, some preparations must be
taken care of.
Connect antenna
Plug the wireless antenna into the connector and tighten the
mounting bolts.
Insert SD-card
The Plug&View IP cameras support MicroSD cards with up to 32
GB storage capacity, which you can buy at your resellers. Pictures
or videos taken with your IP camera are then stored on this card.
If your camera has an external port and does not have existing
internal memory, insert your MicroSD card into the corresponding
slot until it firmly snaps into place.
Connect power supply
Plug the cable of the enclosed power supply into the "Power"
connection of the camera.
Connect camera to router (e.g. AVM Fritz!Box,
Telekom Speedport etc.)*
Connect one end of the supplied network cable to the LAN port of
the camera. Connect the other end of the network cable to one of
the connectors marked as 'LAN' on the back of your router. Some
routers have only one LAN connection, others have multiple
connections. Your router must have a working Internet connection.
*You can skip this point with the access point mode of the cameras.
For DN-16047 this point must be skipped.
Page 10

10
2. Setting up the Plug&View User Account
Apple App Store®
Google™ Play
In order to use your Plug&View camera and to have a video
liveview at anytime and anywhere, you need to register your
camera in a Plug&View user account. The setup and control can
both be done either from your Smartphone/tablet as well as from a
PC/Notebook.
2.1 Create a user account with your
Smarthpone/tablet
If you have an Apple® iOS device, then you will find our "DIGITUS®
Plug&View" App in the Apple App Store®. For Smartphones and
tablets running on Google Android OS you can find our "DIGITUS®
Plug&View" App in the Google™ Play Store.
In the search field of the respective App Stores® enter "Digitus" or
"DIGITUS Plug&View".
Page 11

11
In the Search results the "DIGITUS® Plug&View"App will be marked with this symbol.
1. Sign in with Google
account
Click on “g” for "Google
account" login. Then you
can use your Google Mail
address and password to
log in.
Or
2. Create new account with
Plug&View
Click on "Create Account".
Then install the App on your mobile device.
Start the App on your tablet or on your Smartphone. You have
2 options to create your account:
1. If you already have a Google account, you can use your Google
account to use your Plug&View App, or
2. You directly create a new Plug&View account with an individual
user name and password.
Page 12

12
Accept the privacy
policy for using the
DIGITUS® Plug&View
system.
On the next page,
please choose a user
name, a password, and
confirm your e-mail
address.
Then tap on "Apply" to your Plug&View Account to create. Next you
will receive an e-mail with instructions on how to activate your
account. Then log into the App with "Login" using your user name and
password. Now you can add your camera to the account (proceed to
item 3).
2.2 Create user account with your PC
Besides App support, DIGITUS Plug&View system also supports
PC/Notebook via browser access.
Please visit the website http://plug-view.com
Then click on "Login” to enter Plug&View Web Portal.
Page 13

13
1. Sign in with Google
account
Click on "g” for Google
Login". Then you can use
your existing Google Mail
address and password to log
in.
Or
2. Create new account with
Plug&View
Click on "Create Account".
Please complete the
information on the next
page and confirm your
entries with "Apply". Next
you will receive an e-mail
with instructions on how to
unlock your account. On
the login page you can
then log in with your user
data and add your camera.
At this point, you have successfully created an account either by
App or by Web portal.
To continue WiFi setting for the IP camera via Access-Point mode,
please follow on Section 3 of this manual.
Please note that for DN-16047, it is a must to connect the camera
to Internet via Access-Point mode.
Skip to Section 4 of this manual if your camera is connected to your
router via LAN cable.
Page 14

14
Open the Wi-Fi settings on your
smartphone/tablet.
Search for available wireless
networks in the immediate vicinity.
The camera will be displayed as a
wireless network with its model
number and the last 6 characters of
its MAC address.
After smartphone/tablet is
connected to the camera you can
continue the Plug&View app
installation. Open the Plug&View
app.
3. Connect Plug&View IP Camera Via Wi-Fi
3.1 With Smartphone/tablet
Connect your smartphone/tablet to the IP camera via the Wi-Fi
connection.
Page 15

15
The Plug&View app detects
connection to a Plug&View camera
operated in access point mode and
prompts you to select the Wi-Fi
network, to which the camera is to
be connected.
Available networks in the vicinity will
be indicated. Please select here the
network, with which the camera
should be connected. If your network
is not displayed, the camera may
need to be repositioned.
ATTENTION: Hidden SSID´s, meaning hidden Wi-Fi networks,
are not supported by the camera. Please make your network
visible, if you want to install your camera into one of these.
Page 16

16
Enter the network password in the
password field, with which your WiFi network is encrypted and
confirm the input with OK.
Under Android operating systems
you are prompted after successful
connection to reconnect your
Smartphone/Tablet to your Wi-Fi
network again.
As a rule, this will happen
automatically. Should this not be
the case, please go to your
Smartphone/Tablet Wi-Fi settings
and connect to your Wi-Fi network
there.
Page 17

17
Press "+" to add a new
camera during the first
Plug&View camera
installation.
Navigate to settings (cogwheel icon
top right) and tap on "Add camera"
if there are already cameras. This is
easily done by scanning the QRcode with your Smartphone/tablet
or through manual entry of the
activation data.
4. Add Plug&view IP camera
4.1 With Smartphone/tablet
The following devices are suitable for scanning the QR-code: Apple
iPhone®, Apple iPad®, Android-Smartphone, Android-tablet (with
integrated rear camera).
The MAC-address, the activation code, and the QR-code can be
found on the last page of this guide.
Note: The Android version of the mobile device should be at least
2.3.5 or higher.
Page 18

18
On the next page, select the
option "Scan QR code".
The QR code scan function of
your mobile device is activated.
Adding the camera by scanning the QR-Codes
Please scan the QR code on the last page of this manual to add
the camera into your account.
During QR code scanning, you may need to move your mobile
device backwards and forwards until the code is recognized.
Adding the camera though manual input of MACaddress and activation code
The MAC-address and the activation code are located on the last
page of this guide. Navigate to "Manual input" after selecting "Add
camera" in the Plug&View app.
Enter the alphanumeric combination, which you find under "MAC".
Then enter your activation code and click "Apply".
Page 19

19
4.2 Add the camera to the PC via the Browser
For PC/Notebook users, you can also add cameras into your account,
which is the similar process as seen from 4.1 with mobile device.
After the first login into your camera administration page via
http://www.plug-view.com to “Login” with your account and
password, you will be prompt with “Download” page to install the
plug-in. Please press download and follow the instruction to install.
Page 20

20
After plug-in installation,
please enter the login page
again from http://www.plug-
view.com with your account.
Please press the “+” sign to
add the camera.
Then press “>” sign to go to
next page and follow the
steps.
Then please key-in the MAC address and Activation code as seen
from the last page of your user manual and press “Apply” to add the
camera.
Page 21

21
After successfully adding the camera to your account, please check
whether your camera is displayed with live-view.
If you plan to continue using your Plug&View camera with a
network cable, the setup is completed here.
If, however, you intend to use the wireless connection with Wi-Fi for
flexibility of location, please continue reading.
Page 22

22
To the right side of the camera
image, you will see some icons.
Click on the "Camera Configuration"
button to be directed to the user
interface of the camera.
5. Setting up Wi-Fi on PC/Notebook
The setup of the wireless (Wi-Fi) connection between the IP camera
and the Wi-Fi router/ Access-point can also be done on the
PC/notebook side via browser
After the successful installation of your camera, log in to the web
site "http://www.plug-view.com". Please click on "Login | My camera
administration".
Use your Plug&View account or select the Google-Login. If you are
not signed in to your Google account, you will be automatically
redirected to the Google login page.
After entering your login details you can see the camera live-view.
Page 23

23
Then it will open another window, which is the Web User interface
of the camera. Please login with default “camera” login account with
"admin" and password "admin". If you select the option "Autologin",
you will be logged in automatically next time you access the
configuration menu. Click on "Login".
In the user interface of the camera, click on Wi-Fi to carry out Wi-Fi
settings.
A search window will appear, in which the available wireless
networks in your environment will be displayed. Please select the
identifier (SSID) of your network and confirm with "OK".
Page 24

24
Please ensure that your
router is functioning as a
DHCP-server. This is the
factory setting of almost
all routers.
Next, the connection to
your wireless LAN is
established. If the
connection was
successfully established,
this will be displayed in a
separate window.
In the next window enter the Wi-Fi-key and confirm with "OK".
You can now remove the network cable from the camera and
close the browser window.
Congratulations. You have just completed your Plug&view IP
camera set up. Now you can access your IP camera at any time
from your Smartphone, tablet PC, or from a browser.
Page 25

25
To the right side of the camera
image, you will see some icons.
Click on the "Camera Configuration"
button to be directed to the user
interface of the camera.
6. Set Motion Detection and Recording
The DIGITUS® Plug&View system offers the options motion
detection and recording. To use this function, the SD card must be
formatted in the camera and motion detection must be activated.
For formatting the SD card, access the camera via the web portal.
Then it will open another window, which is the Web User interface
of the camera. Please login with default “camera” login account with
"admin" and password "admin". If you select the option "Autologin",
you will be logged in automatically next time you access the
configuration menu. Click on "Login".
You can access the SD card information via menu by going to
System -> Local storage. Format the SD card via menu item
"Format".
After formatting, motion detection can be activated.
Please go to “Parameters” -> “Motion Detect” on the Web UI.
Page 26

26
Activate motion detection by clicking on "ON". The colored area
within the video image is the motion detection area, i.e. the area in
which a movement triggers a picture or a video recording. In the
original delivery condition, almost the entire screen is covered with
red boxes. Click on the color markings to exclude certain areas
from motion detection. By doing this, you delete the marker for that
area. You can set the motion detection sensitivity in "Sensitivity".
Select from the following four levels: "Very high", "High", "Normal"
and "Low".
Activate "Alarm with recording" to save in case of detected motion
to SD card.
Time setting is affected via the schedule for motion detection. You
can record in Weekly, Workday or Full-time modes.
You can individually adjust the schedule.
Save the configuration with "Apply".
You have successfully set motion detection with recording.
Page 27

27
Germany
http://www.digitus.info
For explanations regarding the camera’s web interface see the
camera manual supplied on CD.
With questions access the FAQ area on our Plug&View page
(http://www.plug-view.com/) or contact our Hotline
(http://www.plug-view.com/support-de/support/).
Trademarks
DIGITUS is a registered trademark ASSMANN Electronic GmbH.
Apple, Apple App Store are registered trademarks of Apple Inc.
Android, Google, Google play are registered trademarks of Google
Inc.
AVM Fritz!Box is a registered trademark of AVM Computersysteme
Vertriebs GMBH.
Telekom Speedport is a registered trademark of Deutsche Telekom
AG.
Note:
All other trademarks not listed here, are the property of their
respective owners.
Trademarks or trade names mentioned in this manual are used to
describe the operating steps and do not imply that they are freely
available. In any case they are the property of the respective holder
of the rights.
ASSMANN Electronic GmbH declares that the product complies
with the requirements and provisions of directives 2014/53/EU and
RoHS 2011/65/EG. You can request the complete Declaration of
Conformity by mail at the manufacturer’s address as stated below.
ASSMANN Electronic GmbH
Auf dem Schüffel 3
58513 Lüdenscheid
 Loading...