

Digital Tigers SideCar MMS Series, SideCar PlusTwo MMS, SideCar PlusFour MMS Installation And User Manual

This page intentionally blank
(inside front cover)

Digital Tigers
SideCar MMS Series
SideCar PlusTwo MMS
SideCar PlusFour MMS
Thank you for your purchase of this Digital Tigers SideCar.
To ensure your successful use of this product, please carefully follow this
important installation and user guide.

© Copyright 2003 Digital Tigers, Inc.
All rights reserved. No portion of this publication may be reproduced in any form without prior written
consent of Digital Tigers, Inc.
Product specifications are subject to change without notice. Information presented here is believe d to be
accurate and reliable. However, Digital Tigers, Inc. assumes no liability for its use.
™Digital Tigers, the Digital Tigers “tiger” logo, SideCar, SideCar PlusTwo, SideCar PlusFour, LaunchPad,
Stratosphere and Tiger ATV are trademarks of Digital Tigers, Inc. Other trademarks are property of their
respective owners.
Printed in the United States of America
Digital Tigers, Inc.
Atlanta, GA USA
1-800-844-3721 – 1-404-240-9293
http://digitaltigers.com

Table of Contents
Chapter 1 - Introduction.............................................................................................................................. 2
The SideCar concept.................................................................................................................................. 2
The best of both worlds: multi-monitor power, notebook mobility............................................................ 6
The Digital Tigers product family ............................................................................................................. 8
Chapter 2 – Supported display configurations.......................................................................................... 9
SideCar PlusTwo MMS ............................................................................................................................. 9
SideCar PlusFour MMS.......................................................................................................................... 10
DVI vs. VGA connections ........................................................................................................................ 12
Chapter 3 - Hardware setup...................................................................................................................... 16
Chapter 4 - Windows XP/2000 driver installation................................................................................... 19
Chapter 5 - Monitor activation and configuration.................................................................................. 33
Using Display Properties ........................................................................................................................ 33
Using the notebook external monitor port............................................................................................... 39
Chapter 6 - Putting the SideCar to work: key tips.................................................................................. 40
Power-up sequence.................................................................................................................................. 40
Power-down sequence............................................................................................................................. 40
Use care when attaching the dual-monitor Y-cables ...............................................................................41
Avoid “Suspend” and “Hibernate” methods of shutdown...................................................................... 42
Chapter 7 - User options for multi-display ease of use............................................................................ 43
What is a “primary monitor”?................................................................................................................ 43
Designate a new primary monitor........................................................................................................... 44
Move or auto-hide the Windows Taskbar................................................................................................ 47
QuickDesk / PowerDesk utilities (window / dialog box positioning) ...................................................... 50
Enlarge and speed up the mouse pointer................................................................................................. 56
Chapter 8 - Disable the notebook display................................................................................................. 61
Reactivate the notebook LCD display...................................................................................................... 63
Chapter 9 - Advanced options................................................................................................................... 64
Adjust display color and contrast............................................................................................................ 64
ICC/ ICM color profiles .......................................................................................................................... 65
Chapter 10 - Monitor options.................................................................................................................... 67
Recommended flat-panel monitors.......................................................................................................... 68
Monitor arms and mounting options ....................................................................................................... 69
Carry-on luggage and shipping cases..................................................................................................... 69
Chapter 11 - Frequently asked questions (FAQs)....................................................................................70
Chapter 12 - Uninstalling the SideCar...................................................................................................... 72
Chapter 13 - Troubleshooting................................................................................................................... 73
Chapter 14 - Specifications........................................................................................................................ 76
Chapter 15 - Index...................................................................................................................................... 78

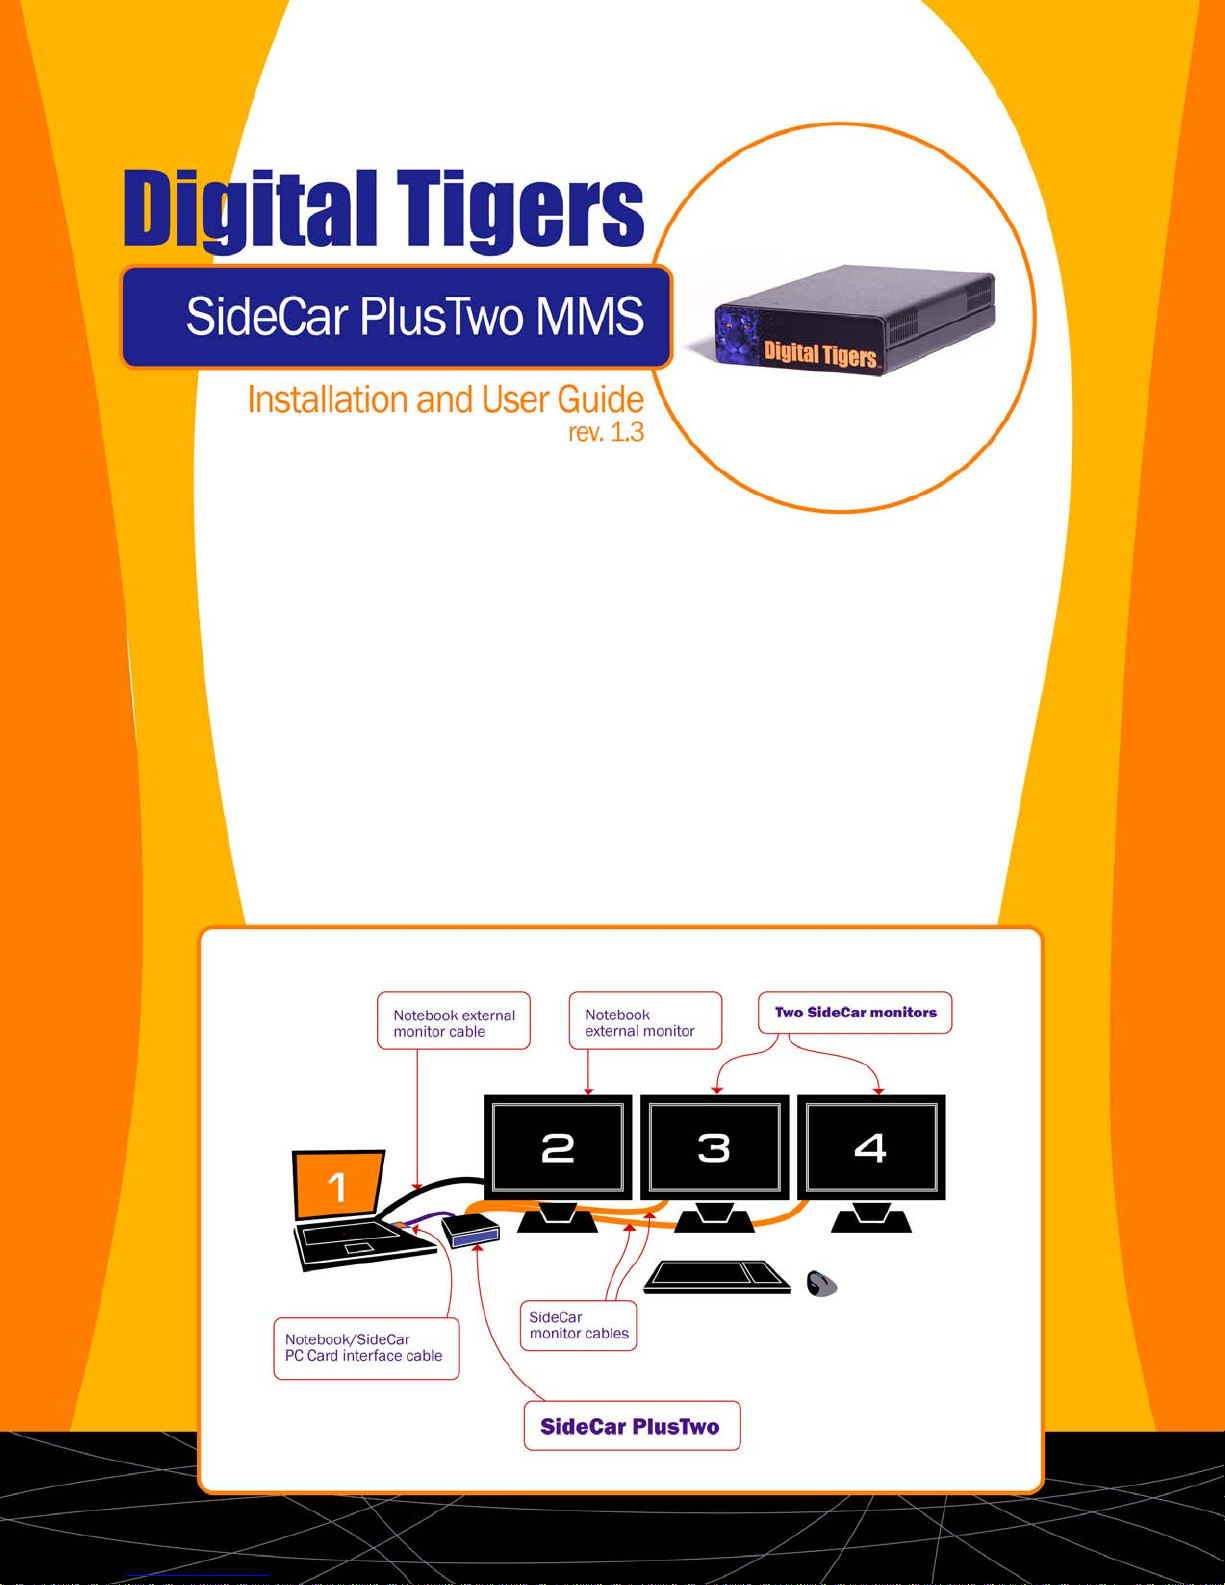
Chapter 1 - Introduction
SideCar shown with its notebook interface PC Card*,
which is inserted in the notebook and cabled to the SideCar.
The SideCar concept
The Digital Tigers SideCar is a portable notebook computer accessory that enables you to drive
up to four extra monitors from a Windows XP or Windows 2000 notebook.
This user manual is for the SideCar MMS series, based on Matrox G450 MMS graphics
technology which offers proven, professional 2D graphics performance from the longtime
industry leader in multi-monitor graphics.
The SideCar PlusTwo MMS adds up to two additional monitors
The SideCar PlusFour MMS adds up to four additional monitors
The SideCar attaches via a simple PC Card (PCMCIA) CardBus interface, enabling easy
docking and undocking of the notebook from the multi-monitor display setup.*
The SideCar supports both analog (VGA-type) and digital (DVI) monitors. Combined with a
notebook’s built-in LCD display and external monitor support, the SideCar PlusFour MMS
enables up to six displays to be driven by a single Windows notebook. The SideCar PlusTwo
MMS enables up to four displays to be driven by a single Windows notebook.
*As an alternative to the PC Card interface, the SideCar is also offered with a PCI adapter
interface, which can be installed in a notebook docking station or desktop PC. This user
manual will assume the PC Card interface as the default connection type, with the PCI
interface addressed in sidebars flagged with the PCI logo shown at left.
2- I
NTRODUCTION
SideCar PlusTwo MMS
Standard configuration (add up to two displays; Windows XP / 2000)
Extended configuration (add three displays; Windows XP only*)
*Most Windows 2000 notebooks cannot address the #2 external monitor as an independent disp lay, but can
use the #2 external monitor as a mirror (clone) of the notebook display. In this case, there are three external
displays, with the #2 display mirroring the notebook LCD (which can often be turned off or closed).
3- I
NTRODUCTION

SideCar PlusFour MMS
Standard configuration (add up to four displays; Windows XP / 2000)
Extended configuration (add five displays; Windows XP only*)
*Most Windows 2000 notebooks cannot address the #2 external monitor as an independent disp lay, but can
use the #2 external monitor as a mirror (clone) of the notebook display. In this case, there are five external
displays, with the #2 display mirroring the notebook LCD (which can often be turned off or closed).
4- I
NTRODUCTION
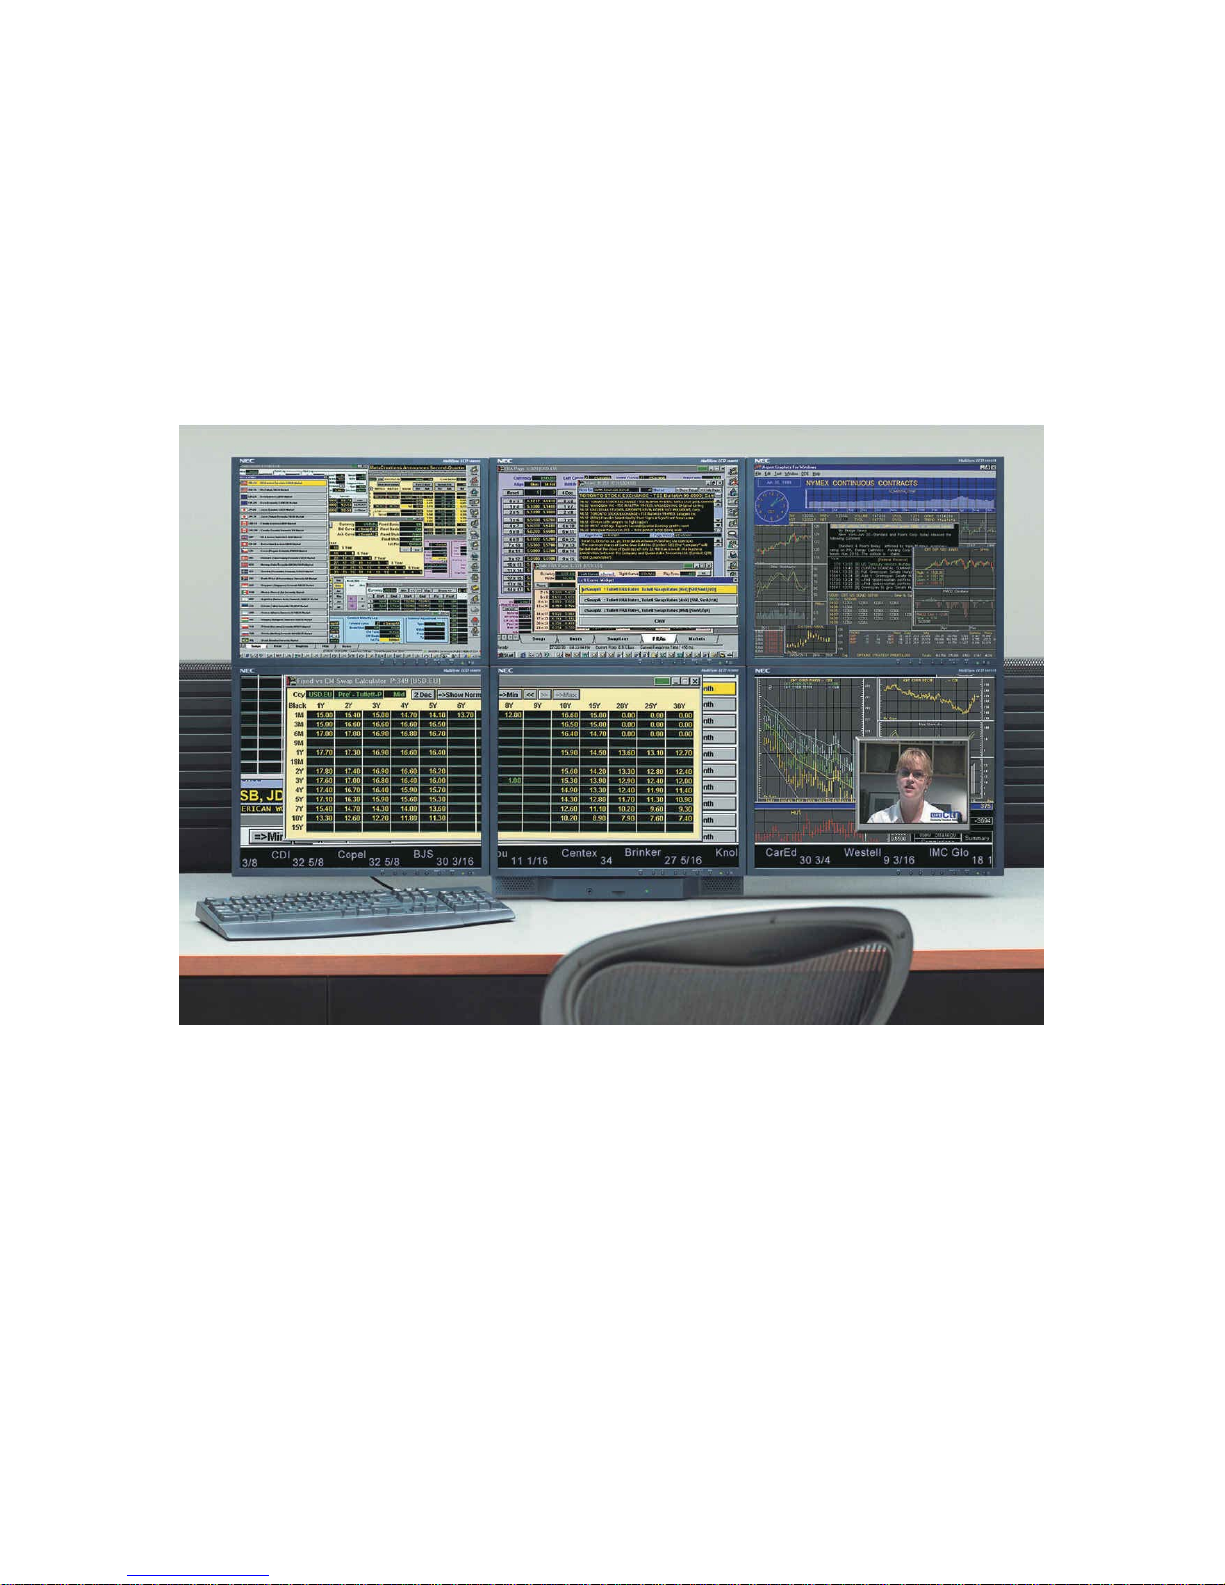
The power of multi-monitor workstations
Multi-monitor workstations enable professionals from video editors to financial traders to work
with a huge “virtual desktop”. Productivity is greatly increased when needed information is
always visible. Video and audio editors can work with large timelines, media bins and preview
windows simultaneously. Financial traders can track many different accounts and leading
indicators simultaneously. Other professionals – including graphic designers, illustrators, Web
developers and engineers – also benefit from such powerful multi-monitor workstations.
A typical financial trader multi-monitor workstation, with six monitors driven by a traditional, fixed tower PC.
5- I
NTRODUCTION

The best of both worlds: multi-monitor power, notebook mobility
With the SideCar, the power of a multi-monitor
workstation can be brought to a notebook
computer. This enables such flexible work
arrangements as:
Multi-monitor primary workstation,
with detachable notebook
For those who need a powerful multi-monitor workstation for their
primary work, but who want to be able to take their data and
applications everywhere they go in a convenient notebook package.
Home and office multi-monitor workstations
Shuttle the same notebook computer between locations,
with data and applications always in one place on that
notebook computer.
6- I
NTRODUCTION
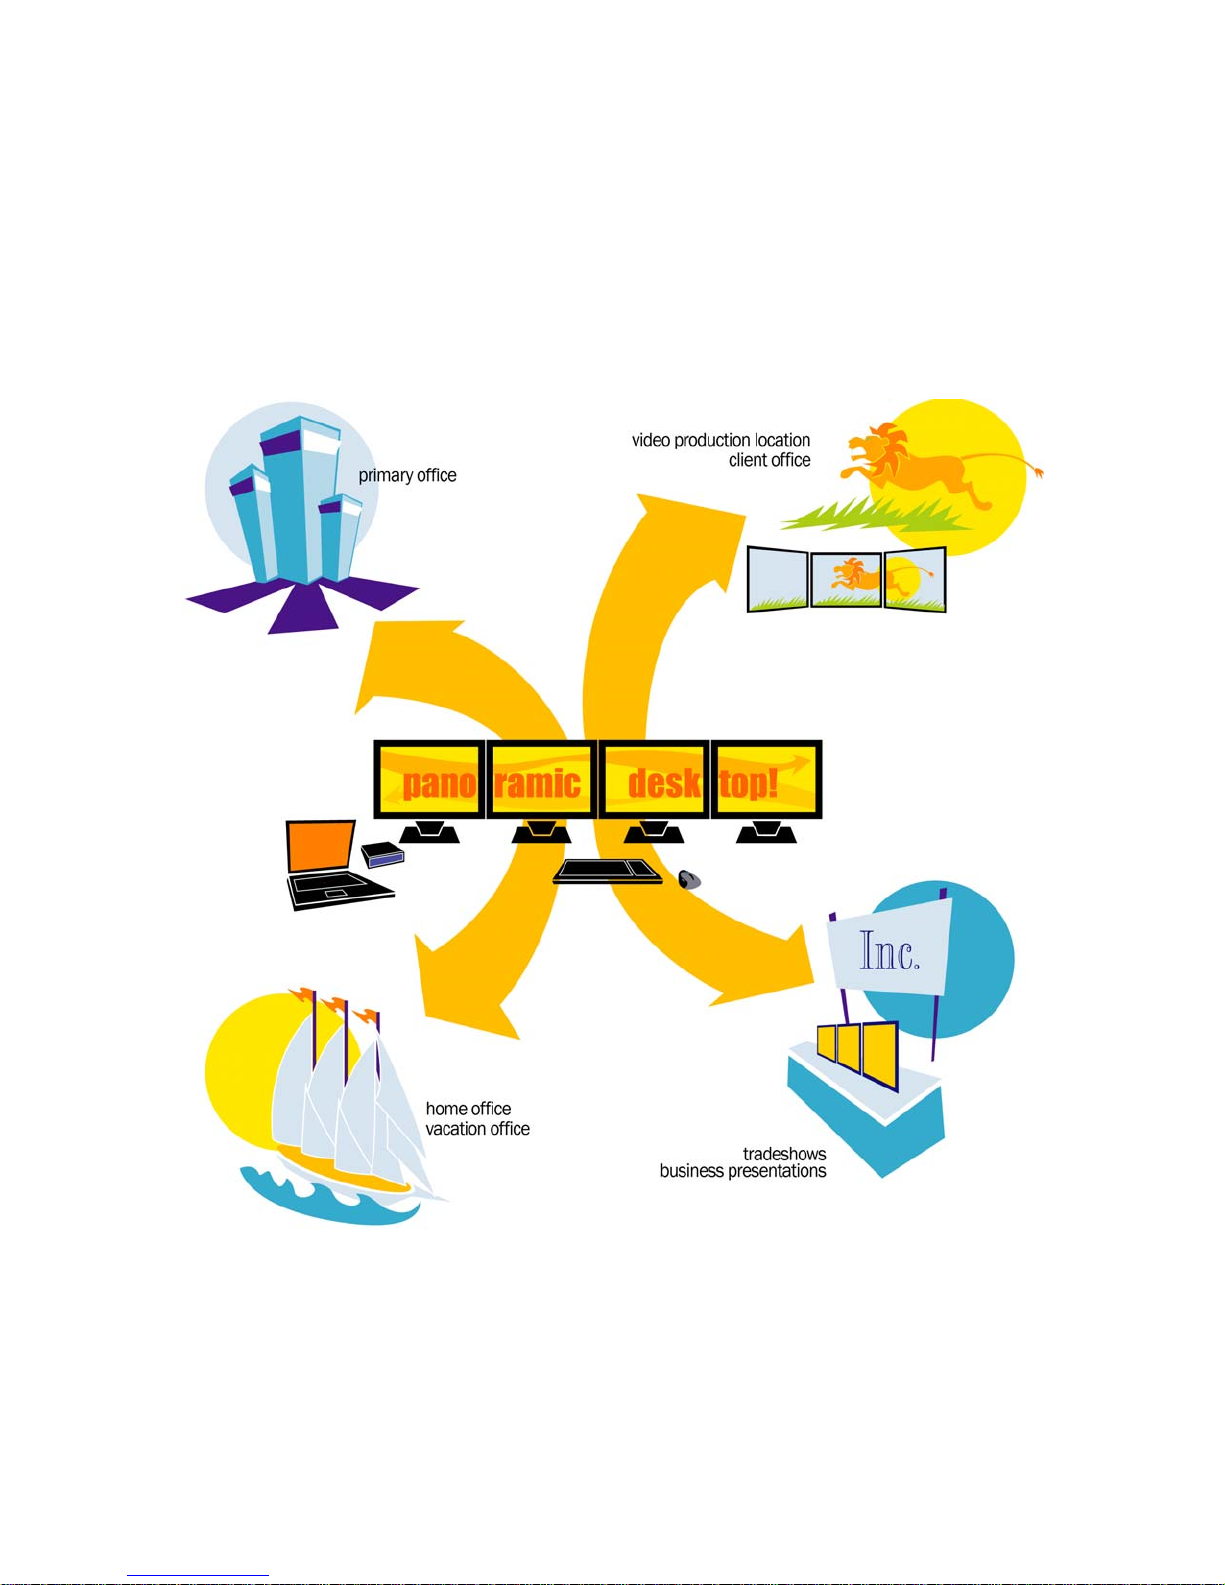
Mobile multi-monitor workstations
For those who need to set up multi-display workstations in several locations,
such as video editing on location, client presentations, client work sessions,
business executive presentations, trade show demonstrations, and more.
(Digital Tigers also offers shipping cases and carry-on luggage to enable
transport of such mobile multi-monitor workstations.)
7- I
NTRODUCTION

The Digital Tigers product family
The SideCar MMS series is part of the Digital Tigers family of mobile expansion systems for
notebook computers. Digital Tigers products include:
SideCar systems, which enable notebook computers to support up to four additional
monitors
LaunchPad mobile video editing expansion systems – which provide notebook
computers with multi-monitor support plus additional capabilities such as large, fast hard
drives (fixed or removable, with three times faster performance than most Firewire
drives), and 24-bit professional audio.
Tiger ATV integrated mobile video editing systems
LCD monitors optimized for multimonitor installations; monitor arms and other multi-
monitor mounting solutions
Shipping cases and carry-on luggage for systems and monitors
Many products support Macintosh as well as Windows XP/2000.
Please visit our web site at http://digitaltigers.com
products, or call toll-free 1-800-TIGER-21 (800-844-3721). Outside the U.S., call 1-404-240-
9293. Reseller inquiries are welcome.
for more information about our full line of
8- I
NTRODUCTION
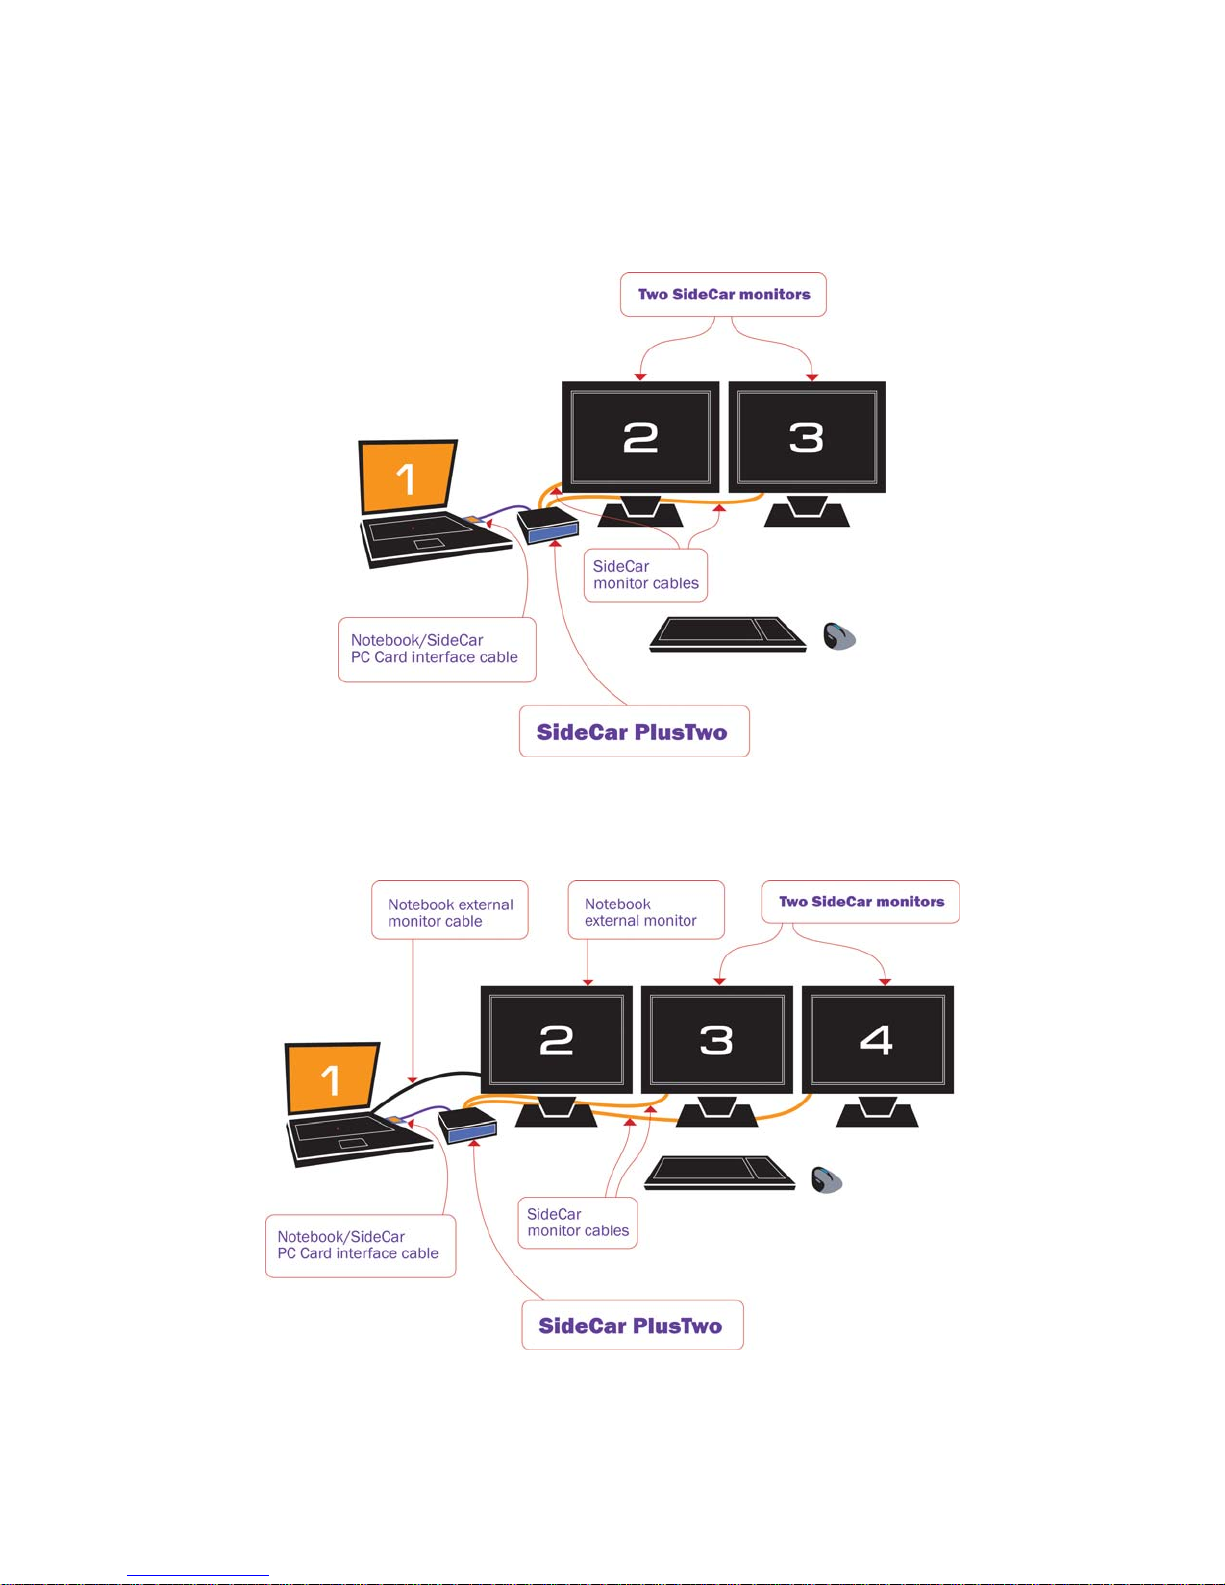
Chapter 2 – Supported display configurations
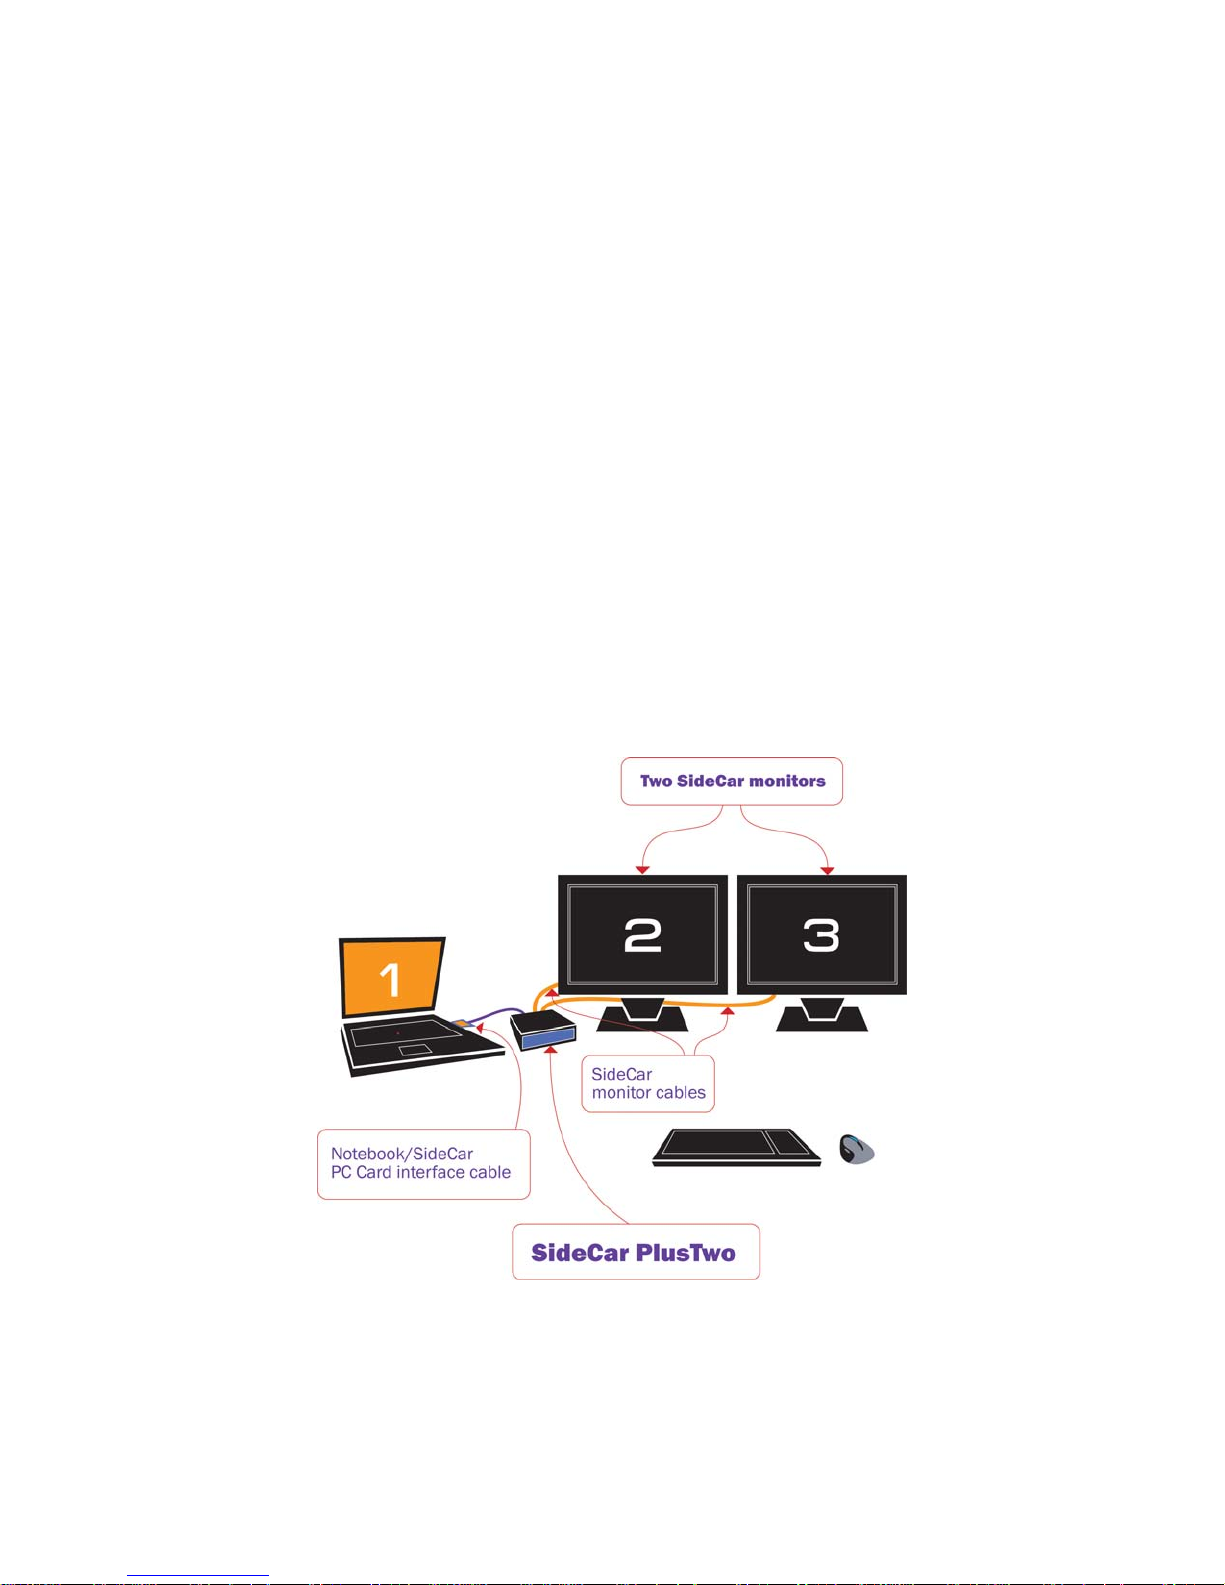
SideCar PlusTwo MMS
The SideCar PlusTwo MMS enables your notebook to drive two additional displays, for a
maximum total of three or four displays, depending on your configuration:
Display #1: The notebook LCD screen
Display #2: One external display connected to the notebook external monitor port. (This
typically can be driven as a unique display under Windows XP. Under Windows 2000,
the external monitor is typically just a mirror or replacement for the notebook LCD
display.)
Displays #3 - #4: Up to two displays connected to the SideCar PlusTwo.
Below are two common configurations supported by the SideCar PlusTwo MMS:
Two External Displays
(Windows XP, Windows 2000)
9– S
UPPORTED DISPLAY CONFIGURATIONS
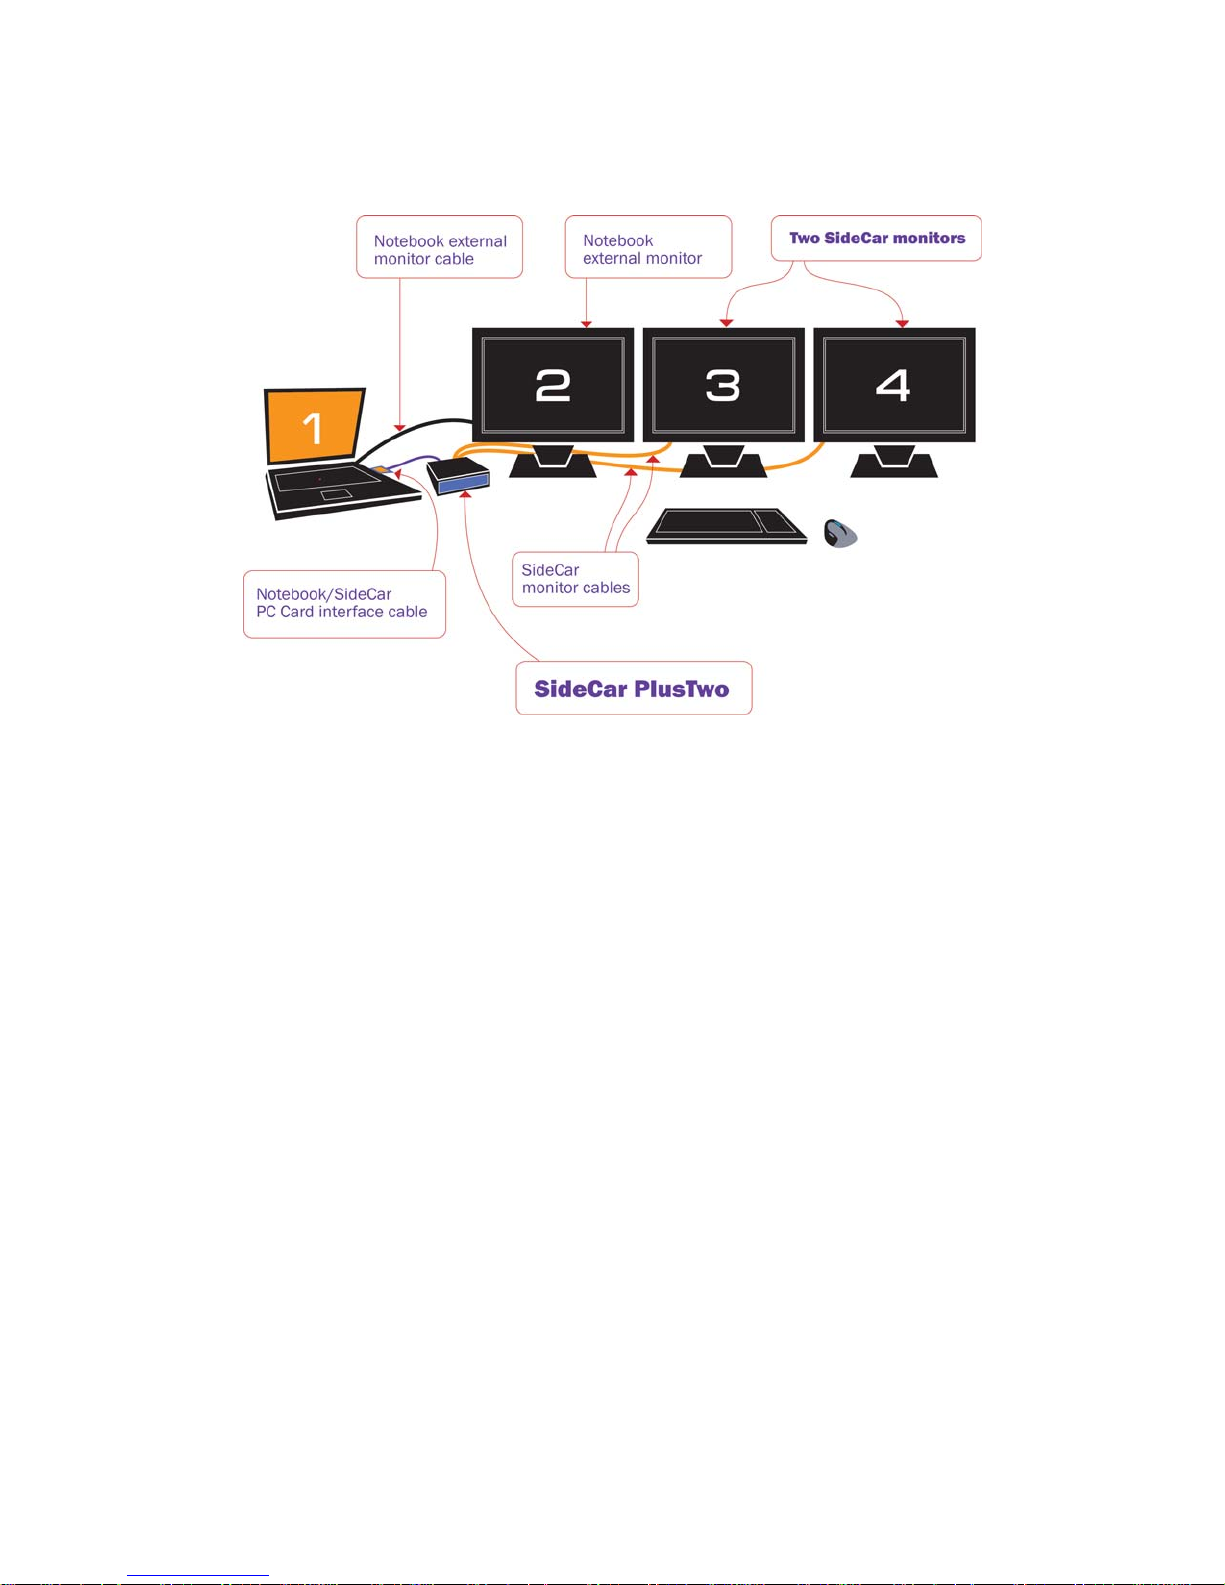
Three External Displays
(Windows XP*)
*Most Windows 2000 notebooks cannot address the #2 external monitor as an independent disp lay, but can
use the #2 external monitor as a mirror (clone) of the notebook display. In this case, there are three external
displays, with the #2 display mirroring the notebook LCD (which can often be turned off or closed).
SideCar PlusFour MMS
The SideCar PlusFour MMS enables your notebook to drive four additional displays, for a
maximum total of five or six displays, depending on your configuration:
Display #1: The notebook LCD screen
Display #2: One external display connected to the notebook external monitor port. (This
typically can be driven as a unique display under Windows XP. Under Windows 2000,
the external monitor is typically just a mirror or replacement for the notebook LCD
display.)
Displays #3 - #6: Up to four displays connected to the SideCar PlusFour.
Shown next are two common configurations supported by the SideCar PlusFour MMS:
10– S
UPPORTED DISPLAY CONFIGURATIONS
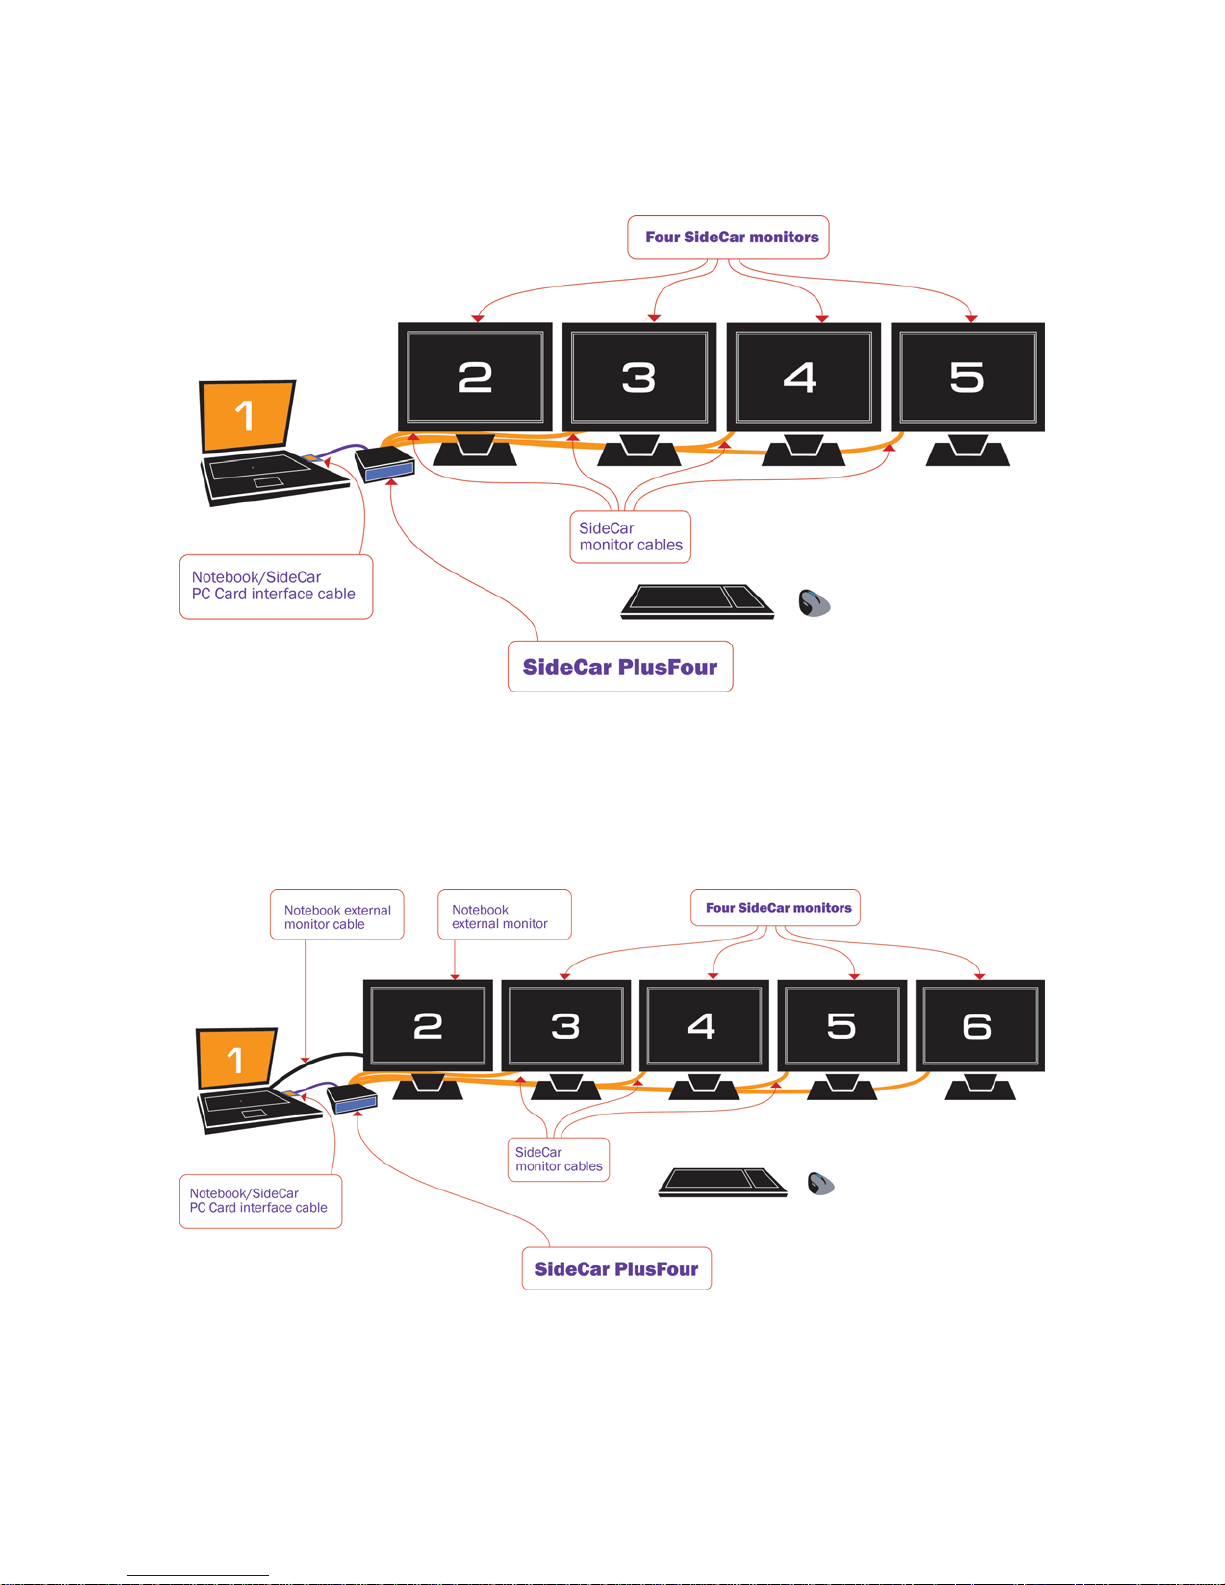
Four External Displays
(Windows XP, Windows 2000)
Five External Displays
(Windows XP*)
11– S
UPPORTED DISPLAY CONFIGURATIONS
Display types and connections
It is important to understand some basic differences among display types and connections, so that
you can match the right display with the right port or adapter. There are three major categories of
computer displays:
Flat-panel LCD or plasma displays
CRT computer monitors
Computer display projectors
All of these display types can be attached to your SideCar. However, you will need to determine
the required connection type for your display – DVI or VGA. This is easily determined from your
display documentation. You can also simply inspect your display cable connectors.
DVI vs. VGA connections
Most computer users are familiar with VGA
monitor connectors. Known technically as
HD15 or mini D-sub 15-pin connectors (see
next page), they became the computer industry
standard for monitor connections after the
VGA display standard was introduced in
1987. Display resolutions have since risen far
beyond the original VGA standard (640 x
480), but the same HD15 connector has
continued to be used and is still commonly
referred to as a VGA connector.
VGA (HD15) cabling supports only analog
display connections. Until recent years, almost
all computer displays were analog CRT monitors,
which is why the VGA connection standard is
analog.
More recently, flat-panel LCD displays and computer display projectors have become popular.
These displays are digital displays. To ensure broad compatibility, such displays are usually
offered with analog VGA connectors and cables. However, using a VGA connection with a
digital display (flat panel or projector) forces the computer’s display output to be converted from
digital to analog, then from analog back to digital. With high-quality components (a wellengineered display; high-quality, shielded cables; and high-quality computer graphics output) this
conversion process works well. With mediocre components in the chain, display quality can
suffer. Symptoms can include blurry text, inconsistent display sharpness, poor colors/contrast,
and a wavy shimmer effect.
Fortunately, an all-digital connection is possible using a digital DVI connection, based on the
DVI (Digital Visual Interface) standard introduced in 1999. Digital DVI display connections are
highly reliable and rarely suffer from the defects of some VGA connections.
Unlike analog CRT monitors, flat-panel displays
and computer projectors are digital devices and
are best used with digital (DVI) connections.
12– S
UPPORTED DISPLAY CONFIGURATIONS
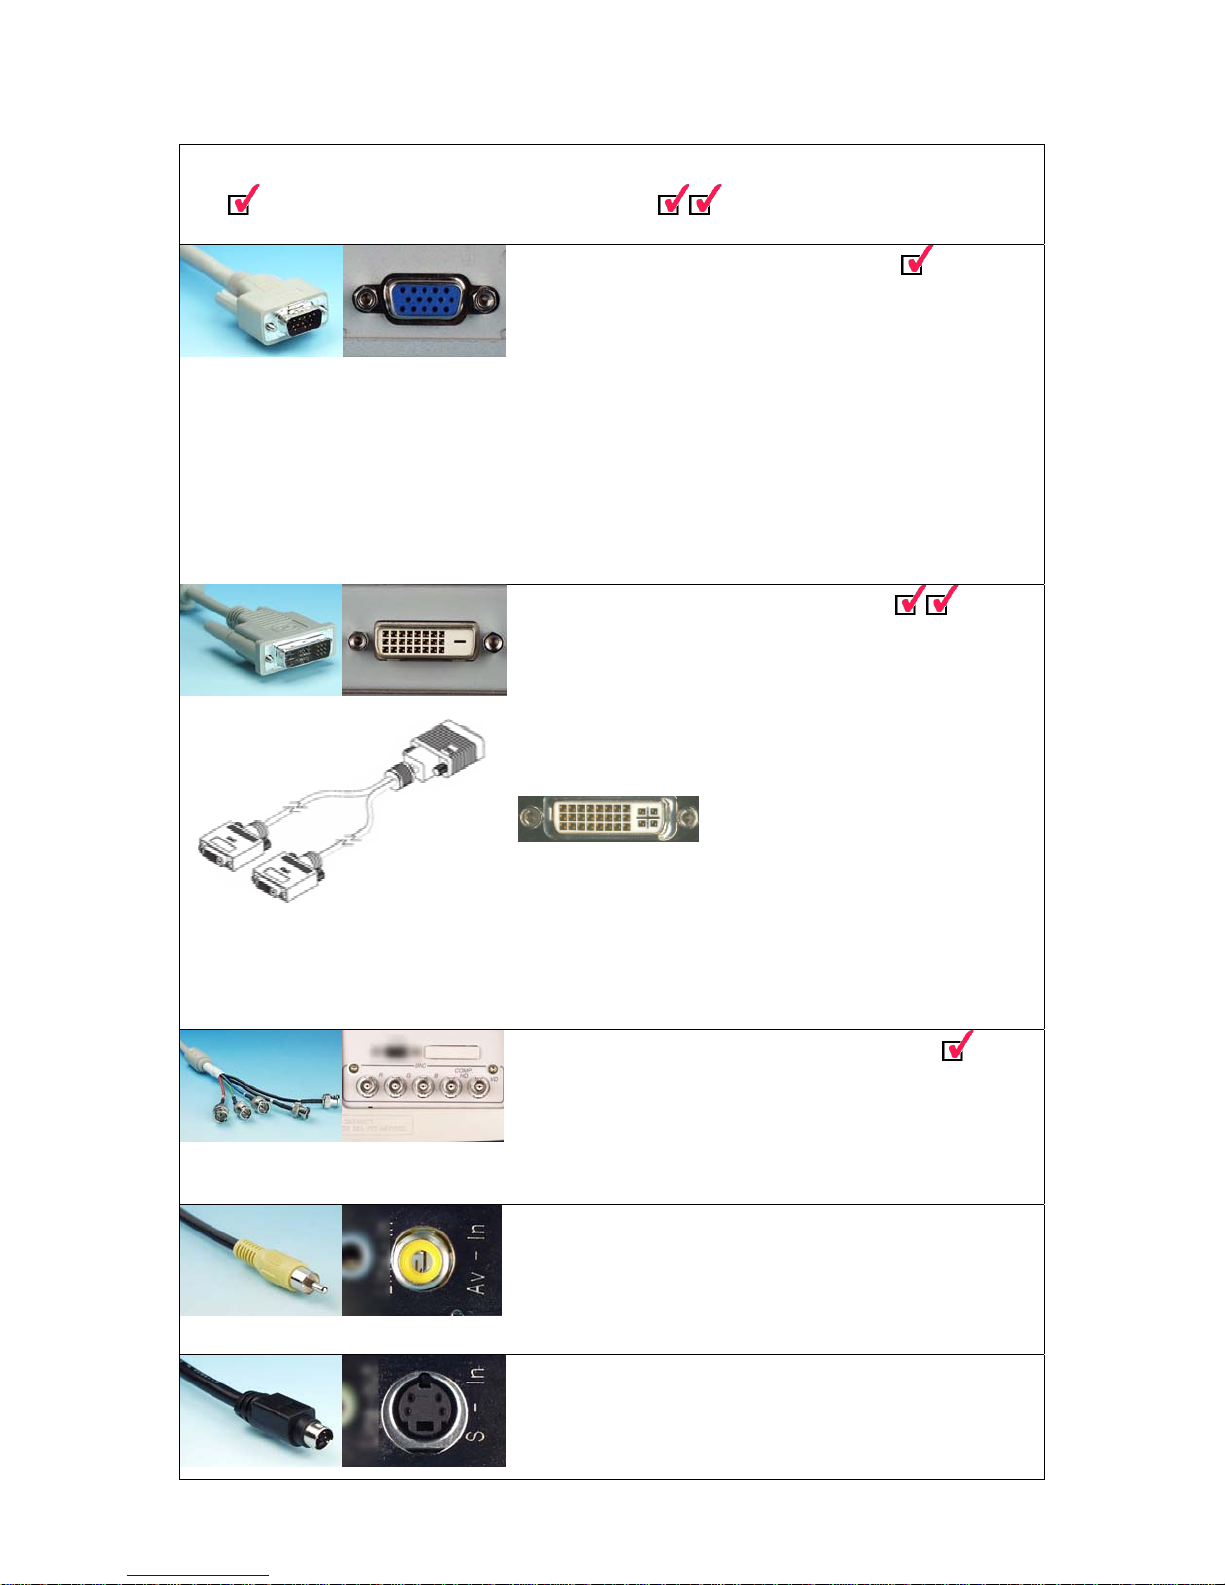
Display Connector Types
= compatible with SideCar MMS series = highest-quality connection
Analog VGA – all computer displays
The standard computer analog display connector, introduced in
1987. More precisely described as an HD15 or mini D-sub 15-pin
connector; D-sub 15 or D-sub for short. Male on left, female on right.
Supported computer displays include CRTs, LCD flat panels, data
projectors, and large plasma displays.
(Using a different signal standard – YPrPb component video – the
connector is also used for some dual-use projectors and plasma
displays, which support computer input and component video input
with the same connector and switchable signaling.)
The SideCar MMS series includes analog VGA adapters with HD15
female connectors, for standard computer VGA-type (RGB) signaling.
Digital DVI – flat panels / projectors
Abbreviated DVI-D, introduced in 1999. Superior digital connection
for high-quality flat-panel displays and data projectors. A related
connector is the DVI-I connector (below), which can carry either digital
or analog signals as needed. A DVI-I female connector is plugcompatible with DVI-D male connectors used by better flat-panel
displays and data projectors. DVI-I also supports VGA monitors with
an HD15 adapter (supplied).
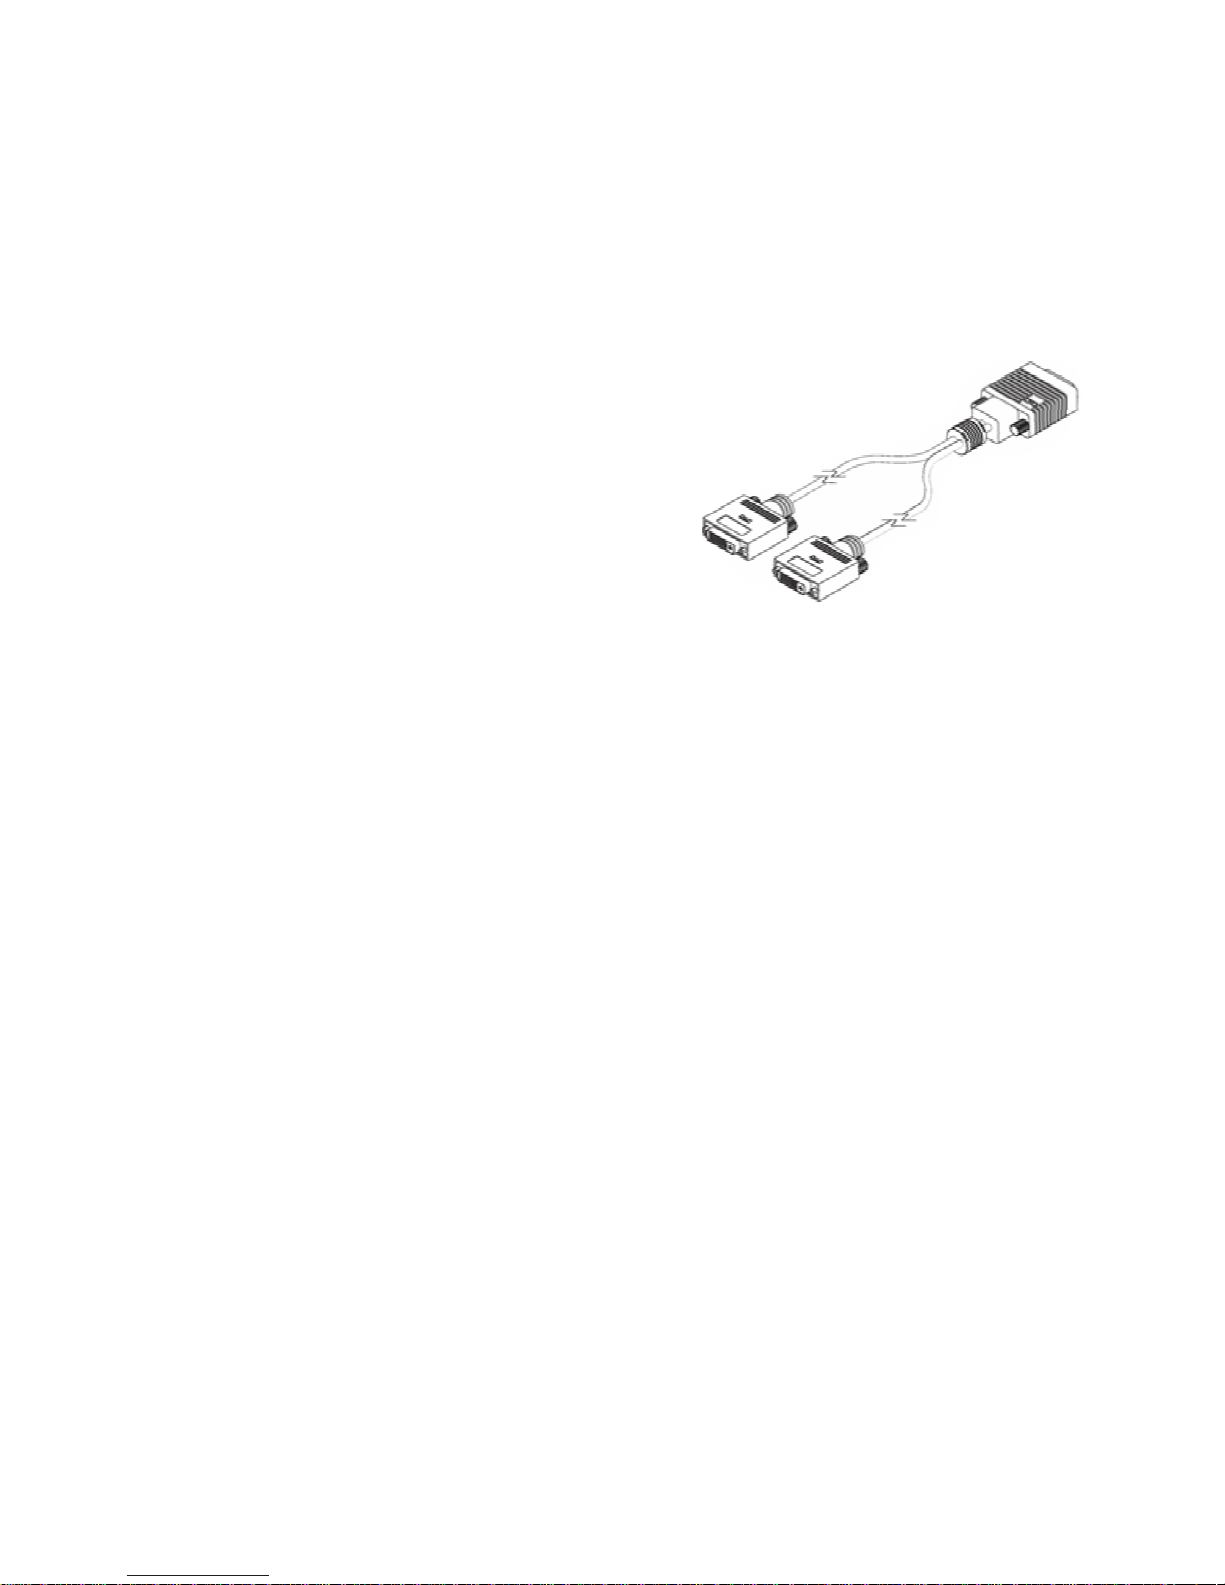
Dual-monitor DVI Y-cable
(supplied with the SideCar)
The SideCar includes one or two dual-monitor Y-cables (shown at
left) with two DVI-I female connectors. You may use these Y-cables
alone for DVI connections or add HD15 adapters (supplied) to support
analog VGA-style displays. If your displays can accept either DVI
or VGA inputs, use a DVI connection. (Unless you need resolution
higher than 1280 by 1024, which requires the analog VGA adapters
described in VGA section.)
DVI-I connector
Analog BNC-5 – best analog connection
Used by higher-quality analog CRT monitors and plasma displays;
supports higher resolutions and cable lengths than standard HD15
cables, due to signals being carried on five coaxial sub-cables. With
an HD15 (VGA) adapter supplied with most BNC-5 displays, BNC-5 is
supported by the SideCar MMS using its Y-cables and VGA adapters.
RCA – TV / video monitors
Standard RCA composite video connector for consumer TVs and
flat-panel monitors supporting TV input. RCA composite video is
supported by the SideCar MMS series only when the SideCar is
attached via a PCI interface to desktop PCs and docking stations.
S-video – TV / video monitors
Higher quality than RCA composite video. Used by consumer TVs,
NTSC monitors, and flat panels with TV input. Also known as Y/C.
S-video is supported by the SideCar MMS series only when the
SideCar is attached via a PCI interface (not PCMCIA/CardBus) .
13– S
UPPORTED DISPLAY CONFIGURATIONS

(Note: VGA connections can still achieve digital DVI quality when all components in the chain
are working optimally. Some top-quality flat-panel displays can even automatically adjust for
some defects in the analog signal. Using a digital DVI signal simply is a more reliable approach,
because it avoids signal conversion altogether.)
For cost reasons, entry-level flat-panel displays and data projectors are often offered with only
VGA connections, since all PCs support that connection type. Mid-market and premium flatpanel displays and projectors typically offer both analog VGA and digital DVI connections.
(Some premium displays offer only digital DVI connections, to ensure proper display quality.)
There are actually two types of DVI connectors found on flat-panel displays and data projectors.
DVI-D connectors are strictly digital connectors and support only a digital signal path. DVI-I
connectors support digital connections, but also offer backward support for analog connections.
Typically this support is offered via an adapter cable with a DVI connector on one end and a
VGA connector on the other end (to attach to a PC having only a VGA display output
connection).
For the most reliable quality, choose an flat-panel display or data projector offering a true
digital connection. A DVI-D connector is a sure sign of such support. If a DVI-I connector is
offered, be sure that the display supports a true digital connection through this connector. (In rare
cases, a display might use a DVI-I connector but offer only an analog connection.)
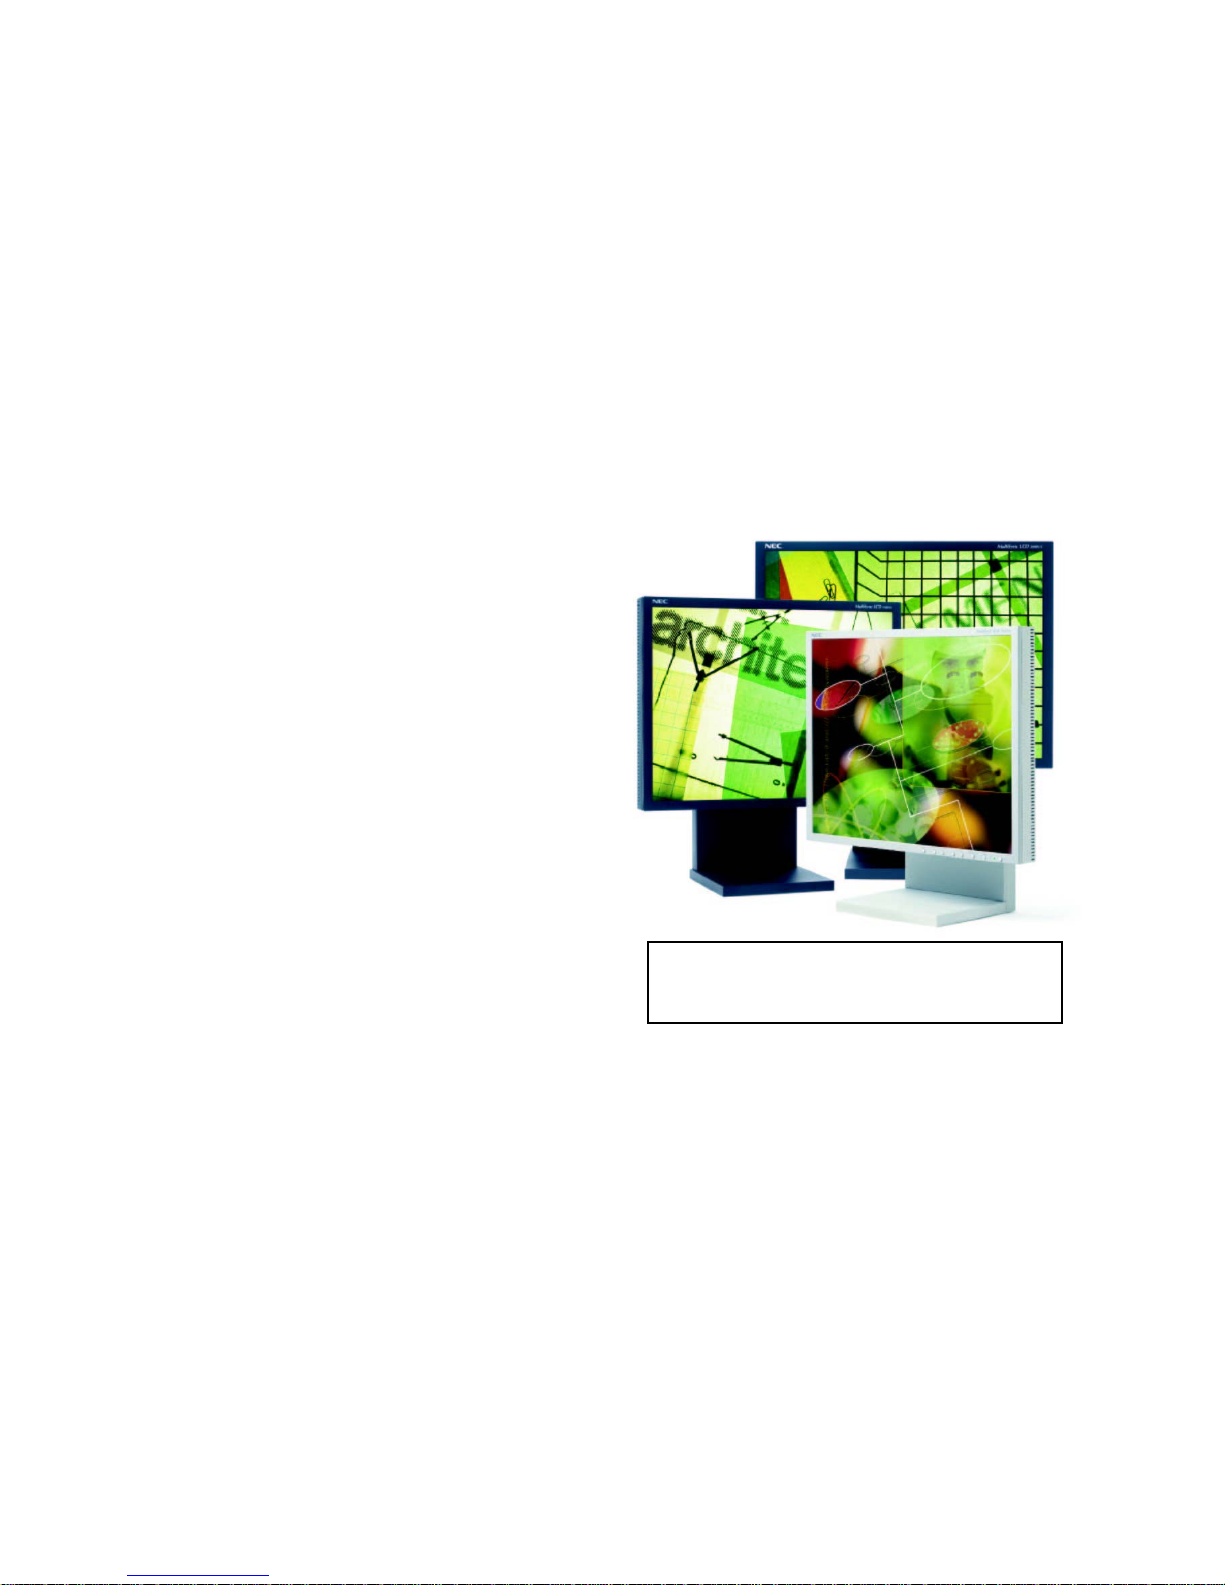
One excellent flat-panel display to consider is the NEC LCD1880SX, which offers a true
digital DVI connection at 1280 by 1024 resolution – the maximum digital DVI output resolution
of the SideCar MMS series.
See chapter 12 for more about flat-panel display features and options. You can also visit the
Digital Tigers Web site and use our online display database spanning hundreds of models.
14– S
UPPORTED DISPLAY CONFIGURATIONS
Supported display combinations
The SideCar MMS series supports any combination of digital DVI or analog VGA
connections.
A high-density LFH connector at the rear of the SideCar provides the display outputs.
(Two such connectors are supplied with the SideCar PlusFour MMS.)
A supplied Y-cable attaches to the LFH connector, supporting two displays
per Y-cable.
Each Y-cable has two DVI-I connectors to directly support
either DVI-D or DVI-I cables supplied with your display.
If your display has only a VGA cable, use the
supplied DVI-to-VGA adapters to convert the
DVI ends of the Y-cable to support VGA
connections.
Y-cable with dual DVI-I connectors
TV output is not supported by the SideCar MMS series except when the SideCar is attached via
a PCI interface to a desktop PC or notebook docking station.
Supported display combinations per Y-cable splitter include:
Up to two digital DVI displays (up to 1280 by 1024 resolution each)
Up to two analog VGA displays (up to 2048 by 1536 resolution each), using the supplied
VGA adapters attached to the Y-cable
A combination of one DVI display and one VGA display (using the DVI-to-VGA
adapter)
For complete display compatibility information, please see the Specifications section at the back
of this manual.
15– S
UPPORTED DISPLAY CONFIGURATIONS
Chapter 3 - Hardware setup
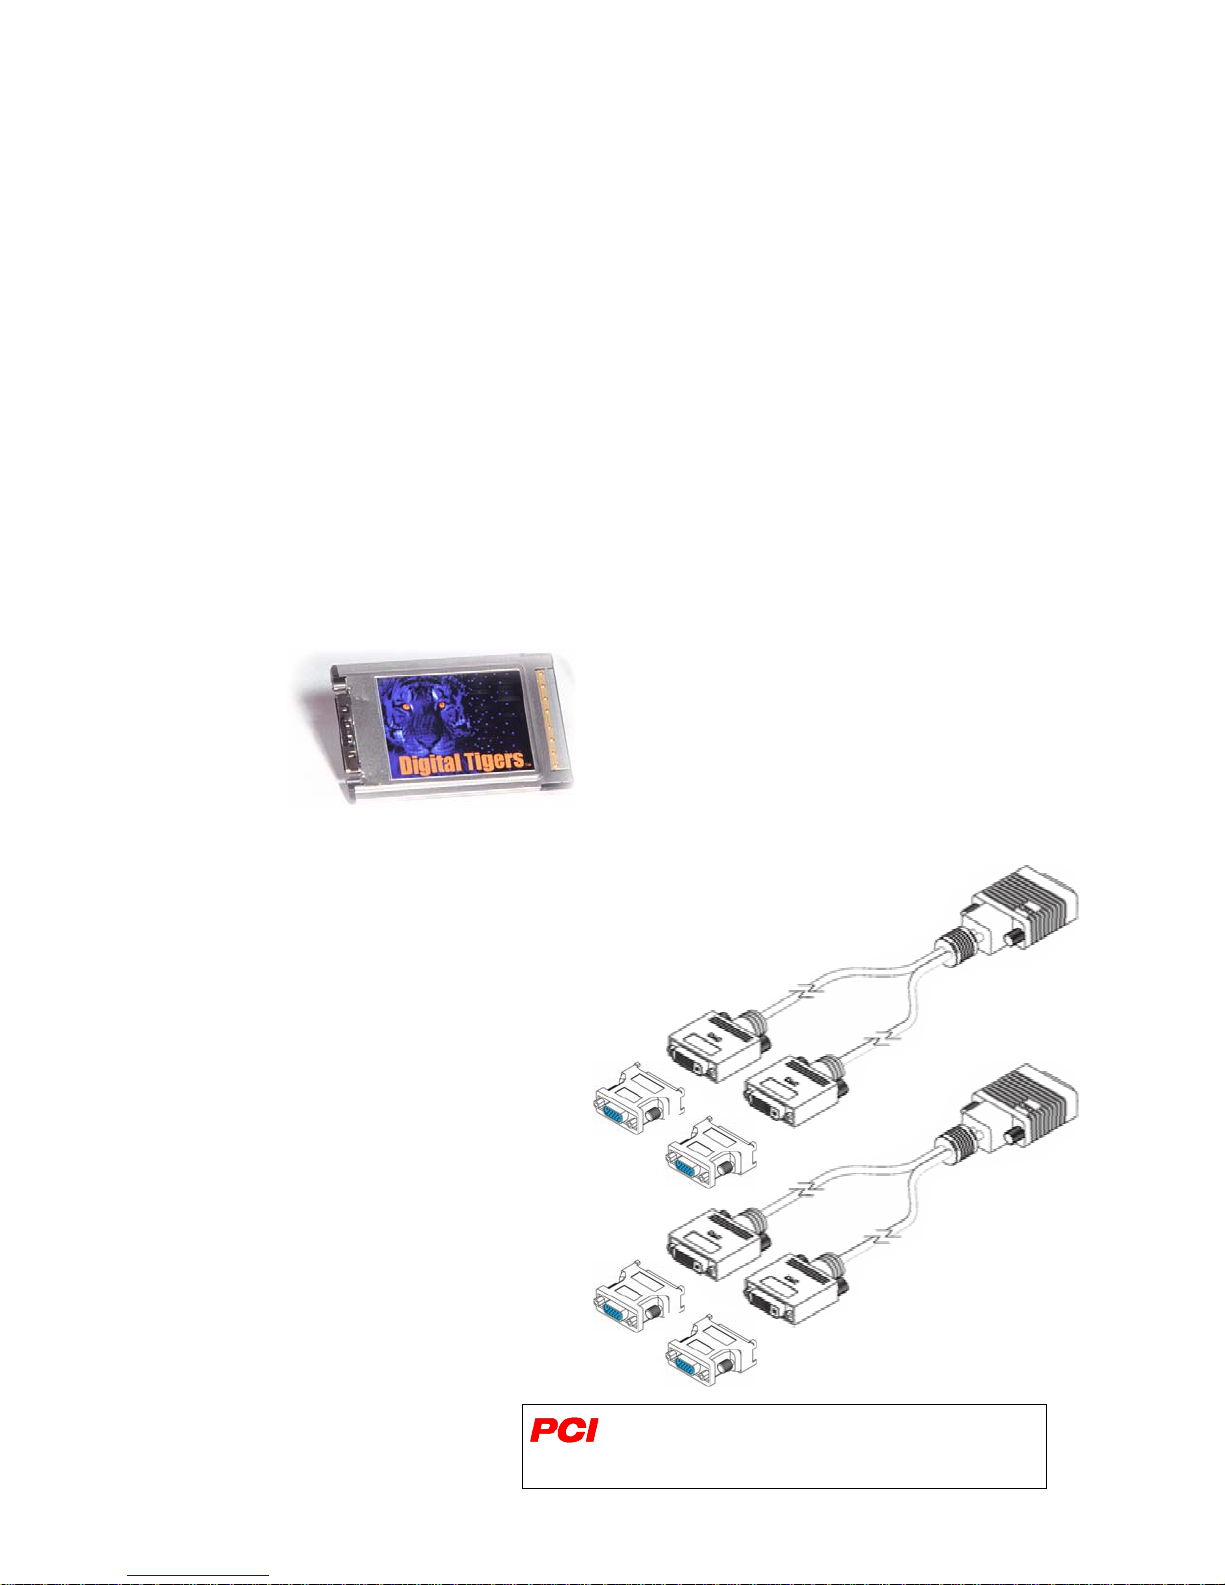
1. Unpack all SideCar components. You should have:
SideCar chassis
Power supply transformer and AC power cord
PC Card* notebook interface card; also known as PCMCIA card or CardBus interface
(shown below left)
1-meter SideCar / computer interface cable – connects SideCar to PC Card (or to PCI
adapter)
Y-cable dual-DVI display breakout cable(s) (shown below right)
o One breakout cable is supplied with the SideCar PlusTwo MMS.
Two are supplied with the SideCar PlusFour MMS.
DVI-to-VGA (HD15) display output adapters, one per DVI output connector (shown
below right next to Y-cables)
Installation CD
This user manual
Display output Y-cables with dual DVI
connectors, shown with optional VGA
(HD15) adapters (supplied). Each Y-cable
supports two displays. Large Y-cable
connector (right side) attaches to the
matching LFH connector on rear of the
SideCar. Be extremely careful not to
bend the closely spaced pins on the
SideCar LFH connectors. (Bending these
pins can temporarily disable one or more
displays.) Once the cable is attached to the
SideCar, tighten thumbscrews firmly.
PC Card notebook interface card* (left); also
known as PCMCIA card or CardBus interface.
Attach 1-meter interface cable to connector at left,
securely tighten cable thumbscrews, and insert
card firmly into notebook PC Card slot. (Use
bottom slot if two slots are available.) Connect
other end of interface cable to matching connector
at rear of the SideCar, and tighten firmly.
16- H
ARDWARE SETUP
*Some SideCar versions have a PCI adapter interface
as a substitute for the PC Card; the PCI adapter is
installed in a notebook docking station or desktop PC.

2. Locate and position monitors at the work location.
You may use DVI or VGA displays (see previous
chapter for further explanation).
Digital DVI displays are supported up to
1280 by 1024 resolution.
Analog VGA displays are supported up
to 2048 by 1536 resolution.
3. Turn off the monitors and gather together the ends
of the monitor input cables to the location where
you will place the SideCar. Ensure that the other
Using the Notebook External
Monitor Port
You may be able to add an additional
display by using your notebook’s
external monitor port. Most Windows
XP notebooks can address this
external monitor as a unique display,
though most Windows 2000 notebooks
cannot. (However, Windows 2000
notebooks can still mirror the notebook
display with the external monitor, or
use the external monitor as an
alternative to the notebook display.)
ends of the cables are attached to the monitors.
4. If you wish, position an extra monitor at the work
location if your notebook has its own external monitor port. (See note at right.)
5. Locate and position approved Windows XP/2000 notebook computer at the work
location. Turn off notebook. Ensure that the notebook is within one meter of the preferred
SideCar location (which itself must be in reach of the monitor cables).
For SideCars using a PCI adapter interface instead of a PC Card interface, it is time to
install the PCI interface in the notebook docking station or desktop PC. Keep the
computer powered off after installing the PCI adapter. Note: you may have to bend the
PCI adapter’s slot plate slightly to fit the adapter in IBM ThinkPad docking stations.
6. Carefully attach the supplied dual-monitor Y-cable(s) to the LFH-60 connector(s) at the
rear of the SideCar. Warning: the pins on the LFH-60 connector of the Y-cable are
closely spaced and easily bent (which can result in one or more displays becoming non-
functional until the problem is corrected.). To avoid damaging the LFH-60 connector on
your dual-monitor cable, carefully insert this male connector as straight as possible
into the matching LFH-60 connector on the SideCar. Tighten the thumbscrews firmly.
17- H
ARDWARE SETUP
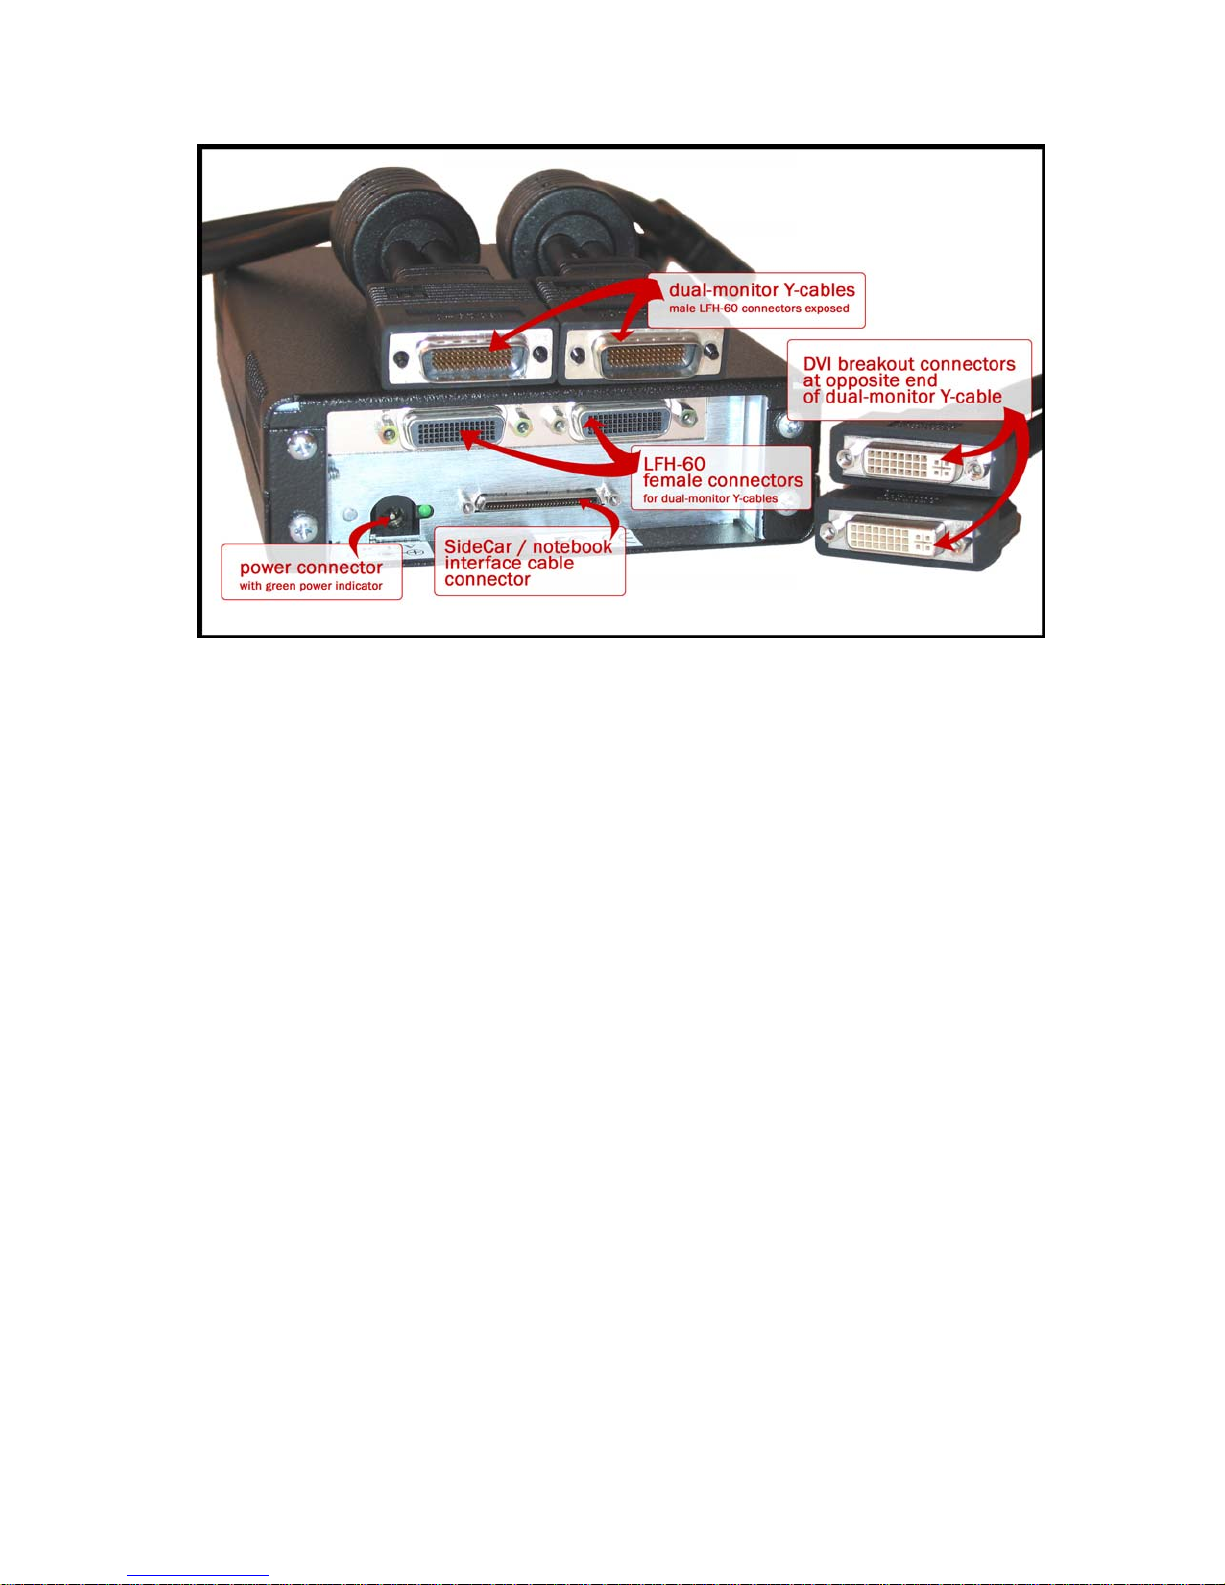
SideCar PlusFour MMS: Connectors at rear of chassis and on dual-monitor Y-cables
7. After attaching the Y-cable(s) to the SideCar, attach monitor cables to each Y-cable. If
your monitors use analog VGA connectors, add the supplied DVI-to-VGA (HD15)
adapters to the ends of the Y-cable. (Y-cables and adapters are shown in step 1.) Tighten
all thumbscrews securely.
8. Turn on the monitors.
9. Plug one end of the supplied 1-meter notebook interface cable to the Digital Tigers PC
Card (shown in step 1) or PCI interface, and tighten thumb screws securely.
10. Attach the other end of the 1-meter interface cable to the SideCar chassis (port at rear).
11. Insert the PC Card firmly in the PC Card (PCMCIA) slot of the notebook computer. If
there are two slots, try the lower slot first.
12. Power up the SideCar:
Attach power supply transformer to SideCar (round DC power port at rear).
Attach separate power cable to three-prong socket of transformer.
Plug in power cable to electrical outlet. SideCar will power up automatically. (Power
can be confirmed by green light at rear, and the sound of the SideCar internal fan.)
13. Continue to driver installation (next chapter)
18- H
ARDWARE SETUP

Chapter 4 - Windows XP/2000 driver installation
Overview
To enable your SideCar for use with your computer, you will follow a one-time driver installation
sequence that takes about 10 minutes and requires you to restart your computer more than once.
Several distinct installation stages are required to move through the SideCar chain of components
and enable your notebook to “see” the displays attached to the SideCar:
1. PCI bridges — You will install one or more PCI to PCI bridges (automatic procedure).
Always accept automatic installation of these bridges when prompted by Windows.
2. SideCar chassis — You will install Digital Tigers SideCar chassis drivers from your
installation CD that allow the SideCar to be recognized by your Windows XP/2000
notebook computer.
3. SideCar MMS display controllers — You will install drivers from your installation CD
for the Digital Tigers display controllers.
4. Monitors — You will install the monitors attached to the SideCar (automatic procedure).
Always accept automatic installation of your monitors when prompted by Windows.
Important: Please install only our Digital Tigers drivers for the SideCar. You will void your
technical support privileges if you install unapproved drivers including any drivers from thirdparty sources. The SideCar requires our certified drivers for best results and application stability.
Note: once you have completed this one-time installation, you can detach and reattach the
SideCar in the future without installing any additional software. Just be sure to attach and reattach
the SideCar when the notebook is fully powered off. Your notebook will power up and
immediately activate the displays attached to the SideCar, while restoring your preferred settings.
Power on monitors, SideCar and notebook
1. As indicated at the end of the last chapter: Power on your monitors, SideCar and
notebook – in that sequence – and boot to Windows.
2. Wait a full minute for Windows to automatically detect the SideCar. When Windows
recognizes the SideCar, you may be prompted to restart your computer so that default
Windows PCI bridge drivers can be activated. If prompted, restart the computer. If you
are presented with a “Found New Hardware Wizard” for a PCI to PCI bridge, see the
next page.
19- W
INDOWS
XP/2000
DRIVER INSTALLATION
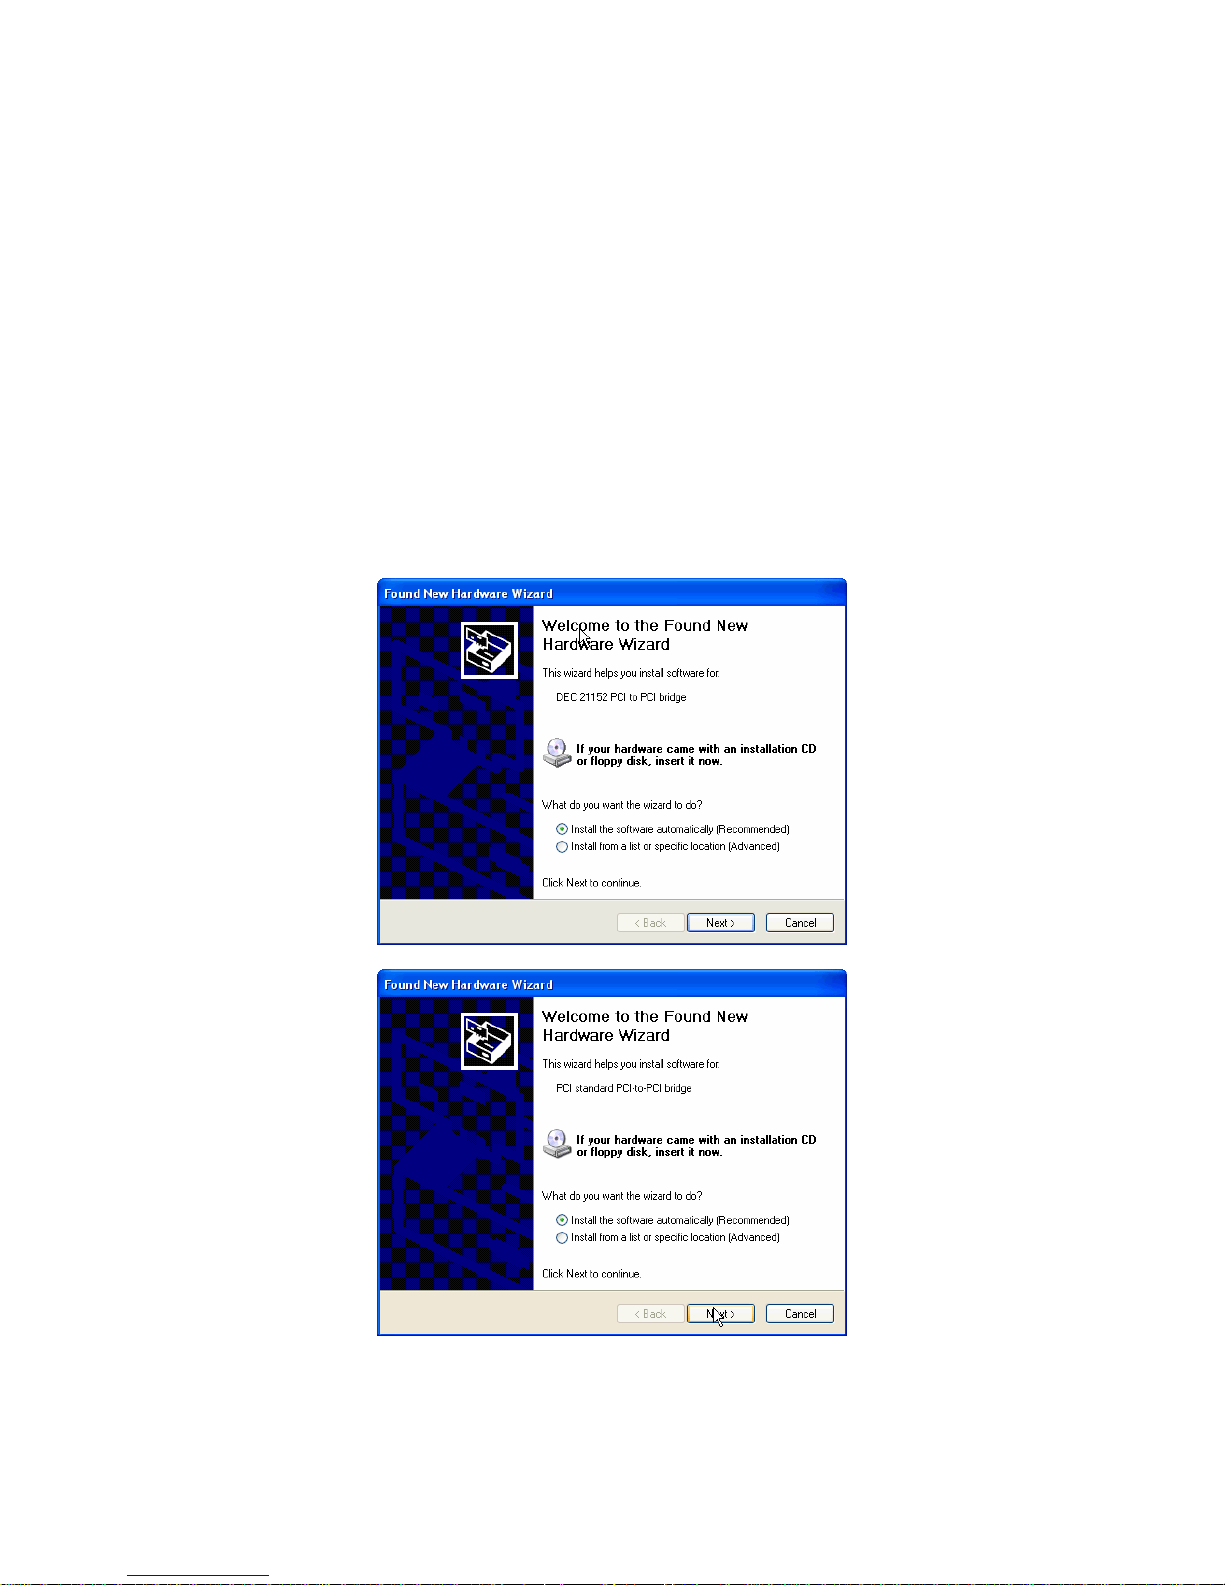
Stage 1. Install PCI to PCI bridge
During various stages of the installation, Windows will detect one or more devices called a “PCI
to PCI bridge.” Such as: “DEC 21152 PCI to PCI bridge” or “PCI standard PCI to PCI bridge.”
PCI bridges are part of the logical connection between your notebook and the SideCar. They are
industry-standard and are supported automatically by Windows XP/2000 once you follow the
installation wizard.
Always accept automatic installation of these bridges. Simply follow the prompts according to
your operating system (illustrated below) and restart your system when prompted.
Windows XP / Stage 1: Install PCI to PCI Bridge
Leave the default option selected: “Install the software automatically” — click “Next” and finally
“Finish” at the confirmation screen. (Two versions of the Windows XP wizard are shown.)
Now skip ahead three pages (past the Windows 2000 PCI to PCI Bridge section) to install your
SideCar MMS display controllers and attached monitors.
20- W
INDOWS
XP/2000
DRIVER INSTALLATION
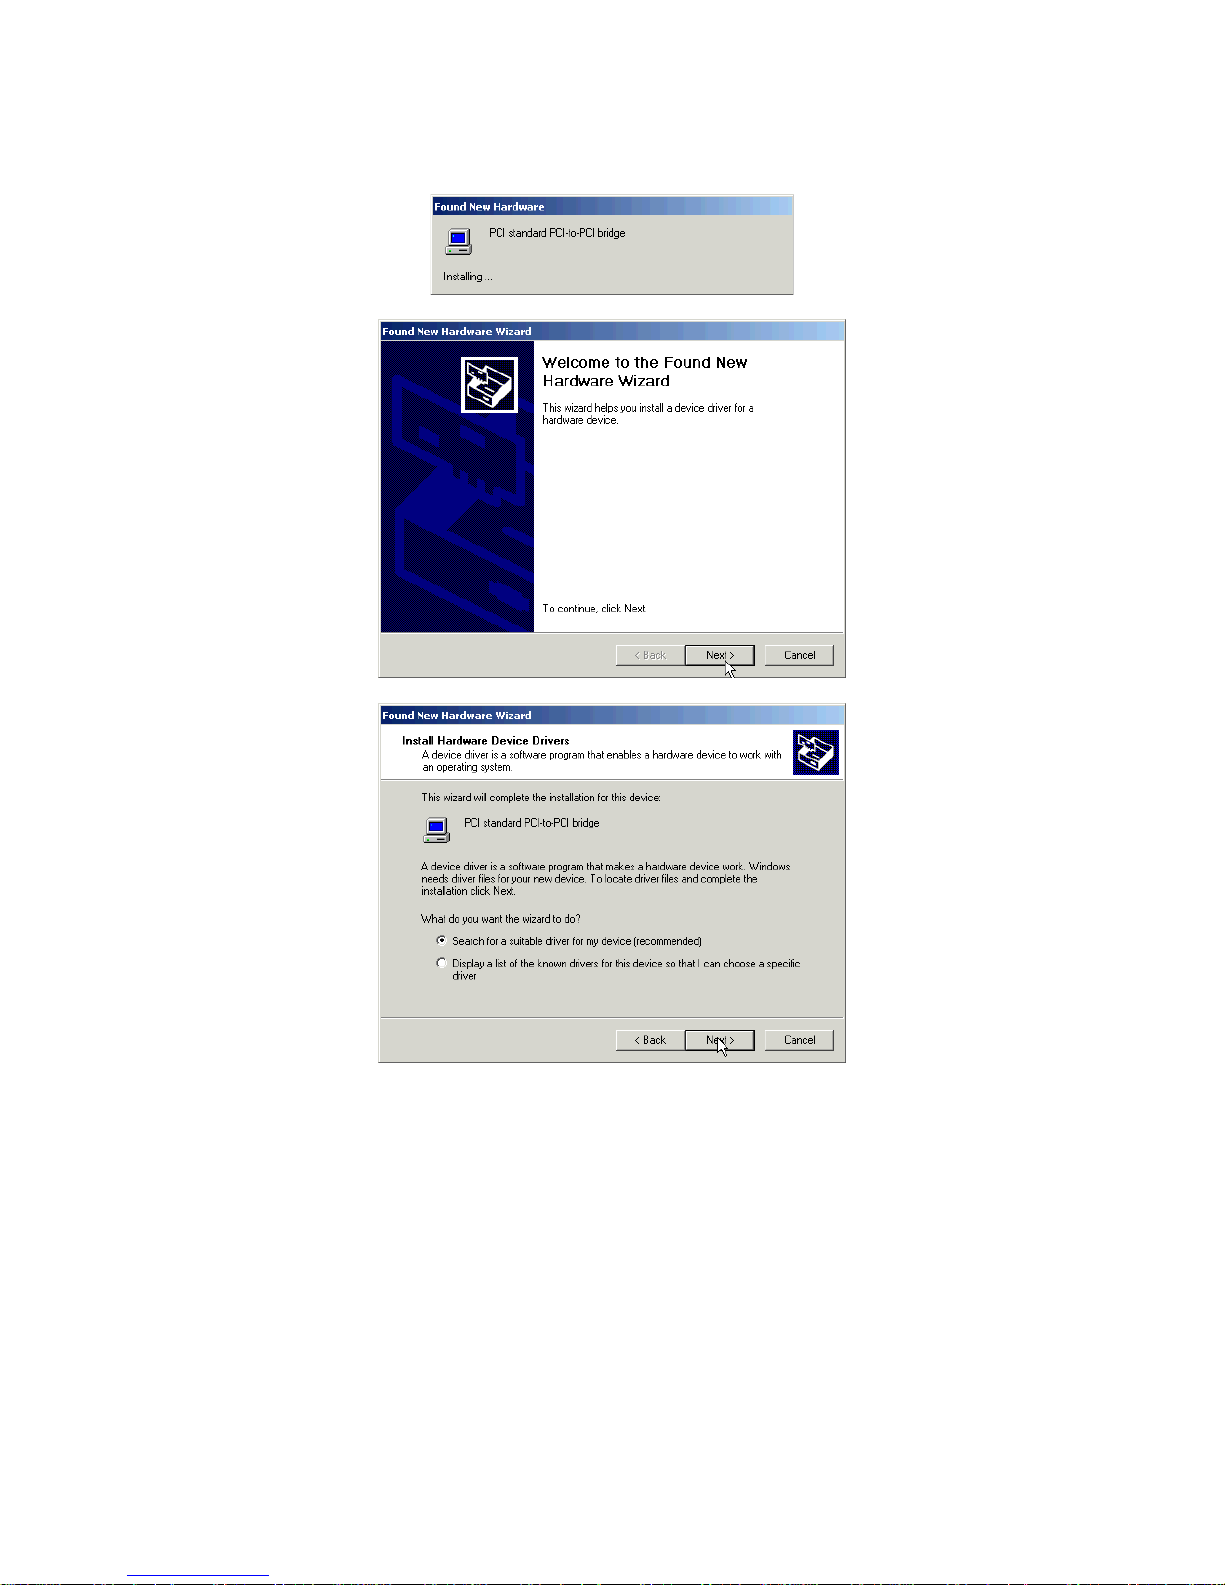
Windows 2000 / Stage 1: Install PCI to PCI Bridge
21- W
INDOWS
XP/2000
DRIVER INSTALLATION
 Loading...