

Page 1
Page 2

This page intentionally blank
(inside front cover)
Page 3

Digital Tigers
SideCar MMS Series
SideCar PlusTwo MMS
SideCar PlusFour MMS
Thank you for your purchase of this Digital Tigers SideCar.
To ensure your successful use of this product, please carefully follow this
important installation and user guide.
Page 4

© Copyright 2003 Digital Tigers, Inc.
All rights reserved. No portion of this publication may be reproduced in any form without prior written
consent of Digital Tigers, Inc.
Product specifications are subject to change without notice. Information presented here is believe d to be
accurate and reliable. However, Digital Tigers, Inc. assumes no liability for its use.
™Digital Tigers, the Digital Tigers “tiger” logo, SideCar, SideCar PlusTwo, SideCar PlusFour, LaunchPad,
Stratosphere and Tiger ATV are trademarks of Digital Tigers, Inc. Other trademarks are property of their
respective owners.
Printed in the United States of America
Digital Tigers, Inc.
Atlanta, GA USA
1-800-844-3721 – 1-404-240-9293
http://digitaltigers.com
Page 5

Table of Contents
Chapter 1 - Introduction.............................................................................................................................. 2
The SideCar concept.................................................................................................................................. 2
The best of both worlds: multi-monitor power, notebook mobility............................................................ 6
The Digital Tigers product family ............................................................................................................. 8
Chapter 2 – Supported display configurations.......................................................................................... 9
SideCar PlusTwo MMS ............................................................................................................................. 9
SideCar PlusFour MMS.......................................................................................................................... 10
DVI vs. VGA connections ........................................................................................................................ 12
Chapter 3 - Hardware setup...................................................................................................................... 16
Chapter 4 - Windows XP/2000 driver installation................................................................................... 19
Chapter 5 - Monitor activation and configuration.................................................................................. 33
Using Display Properties ........................................................................................................................ 33
Using the notebook external monitor port............................................................................................... 39
Chapter 6 - Putting the SideCar to work: key tips.................................................................................. 40
Power-up sequence.................................................................................................................................. 40
Power-down sequence............................................................................................................................. 40
Use care when attaching the dual-monitor Y-cables ...............................................................................41
Avoid “Suspend” and “Hibernate” methods of shutdown...................................................................... 42
Chapter 7 - User options for multi-display ease of use............................................................................ 43
What is a “primary monitor”?................................................................................................................ 43
Designate a new primary monitor........................................................................................................... 44
Move or auto-hide the Windows Taskbar................................................................................................ 47
QuickDesk / PowerDesk utilities (window / dialog box positioning) ...................................................... 50
Enlarge and speed up the mouse pointer................................................................................................. 56
Chapter 8 - Disable the notebook display................................................................................................. 61
Reactivate the notebook LCD display...................................................................................................... 63
Chapter 9 - Advanced options................................................................................................................... 64
Adjust display color and contrast............................................................................................................ 64
ICC/ ICM color profiles .......................................................................................................................... 65
Chapter 10 - Monitor options.................................................................................................................... 67
Recommended flat-panel monitors.......................................................................................................... 68
Monitor arms and mounting options ....................................................................................................... 69
Carry-on luggage and shipping cases..................................................................................................... 69
Chapter 11 - Frequently asked questions (FAQs)....................................................................................70
Chapter 12 - Uninstalling the SideCar...................................................................................................... 72
Chapter 13 - Troubleshooting................................................................................................................... 73
Chapter 14 - Specifications........................................................................................................................ 76
Chapter 15 - Index...................................................................................................................................... 78
Page 6
Chapter 1 - Introduction
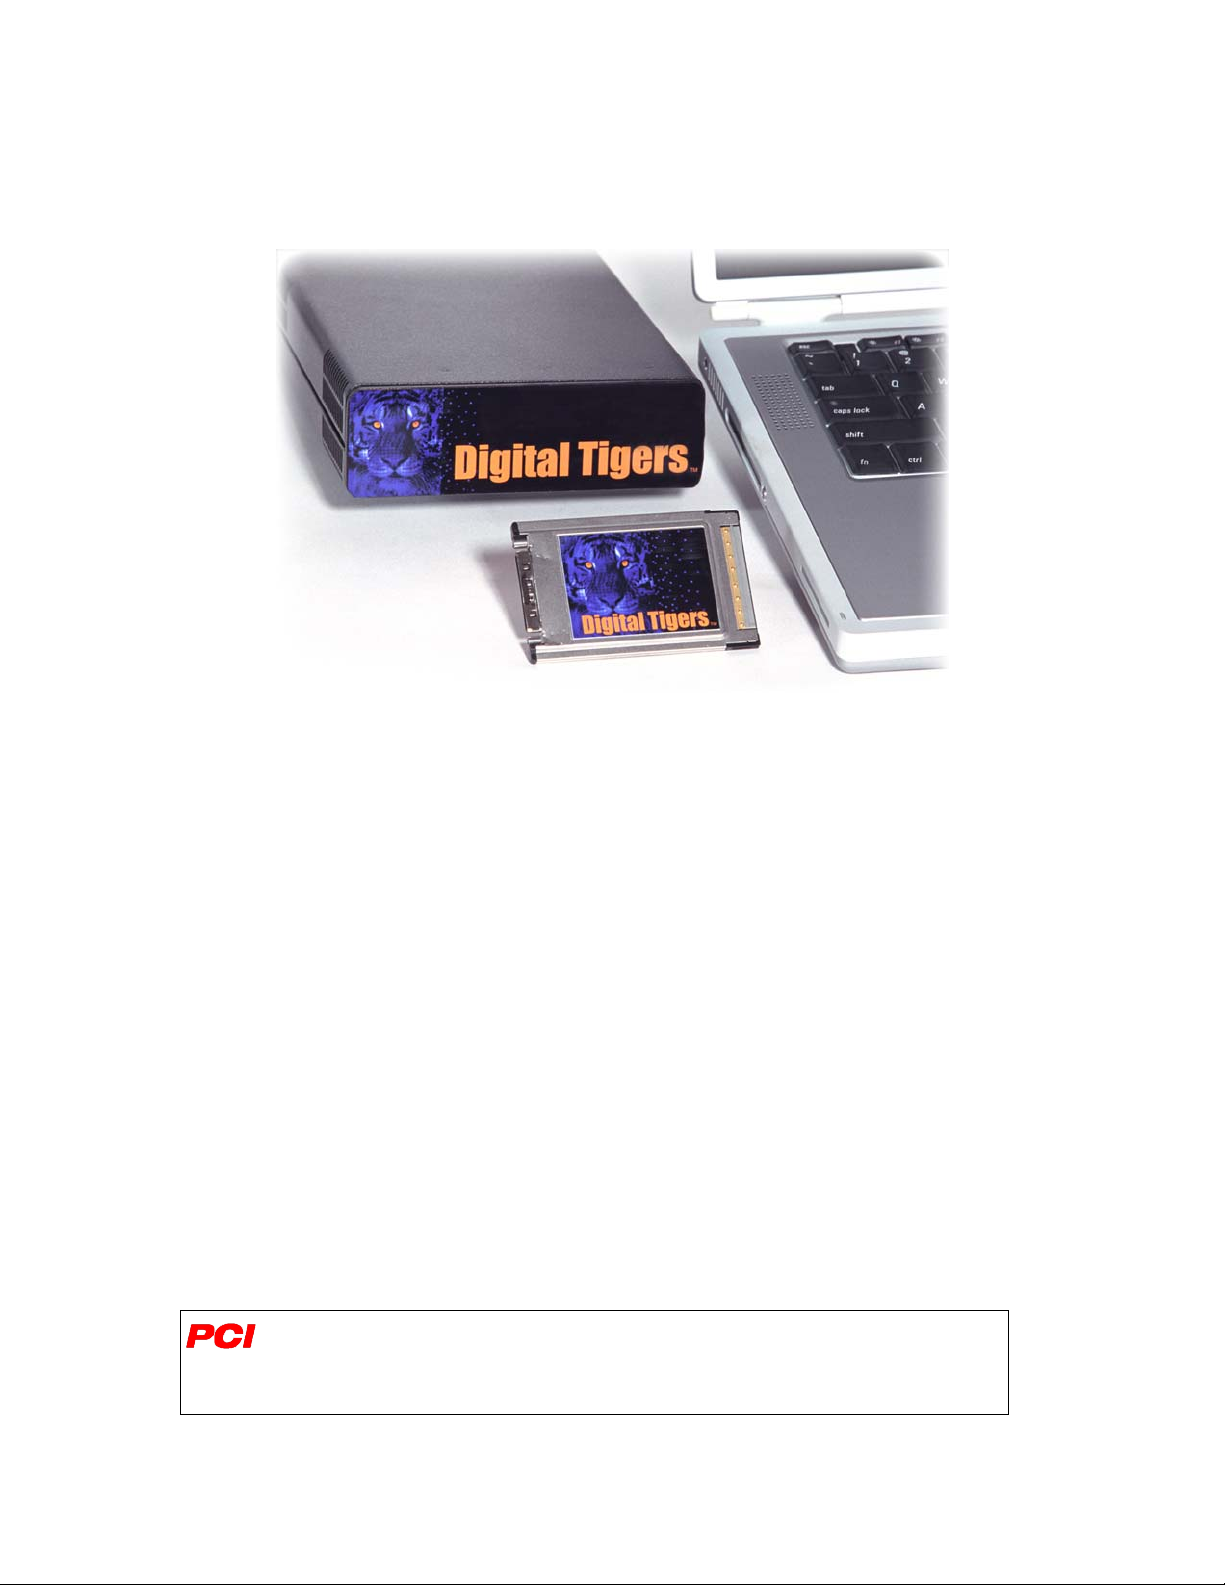
SideCar shown with its notebook interface PC Card*,
which is inserted in the notebook and cabled to the SideCar.
The SideCar concept
The Digital Tigers SideCar is a portable notebook computer accessory that enables you to drive
up to four extra monitors from a Windows XP or Windows 2000 notebook.
This user manual is for the SideCar MMS series, based on Matrox G450 MMS graphics
technology which offers proven, professional 2D graphics performance from the longtime
industry leader in multi-monitor graphics.
The SideCar PlusTwo MMS adds up to two additional monitors
The SideCar PlusFour MMS adds up to four additional monitors
The SideCar attaches via a simple PC Card (PCMCIA) CardBus interface, enabling easy
docking and undocking of the notebook from the multi-monitor display setup.*
The SideCar supports both analog (VGA-type) and digital (DVI) monitors. Combined with a
notebook’s built-in LCD display and external monitor support, the SideCar PlusFour MMS
enables up to six displays to be driven by a single Windows notebook. The SideCar PlusTwo
MMS enables up to four displays to be driven by a single Windows notebook.
*As an alternative to the PC Card interface, the SideCar is also offered with a PCI adapter
interface, which can be installed in a notebook docking station or desktop PC. This user
manual will assume the PC Card interface as the default connection type, with the PCI
interface addressed in sidebars flagged with the PCI logo shown at left.
2- I
NTRODUCTION
Page 7
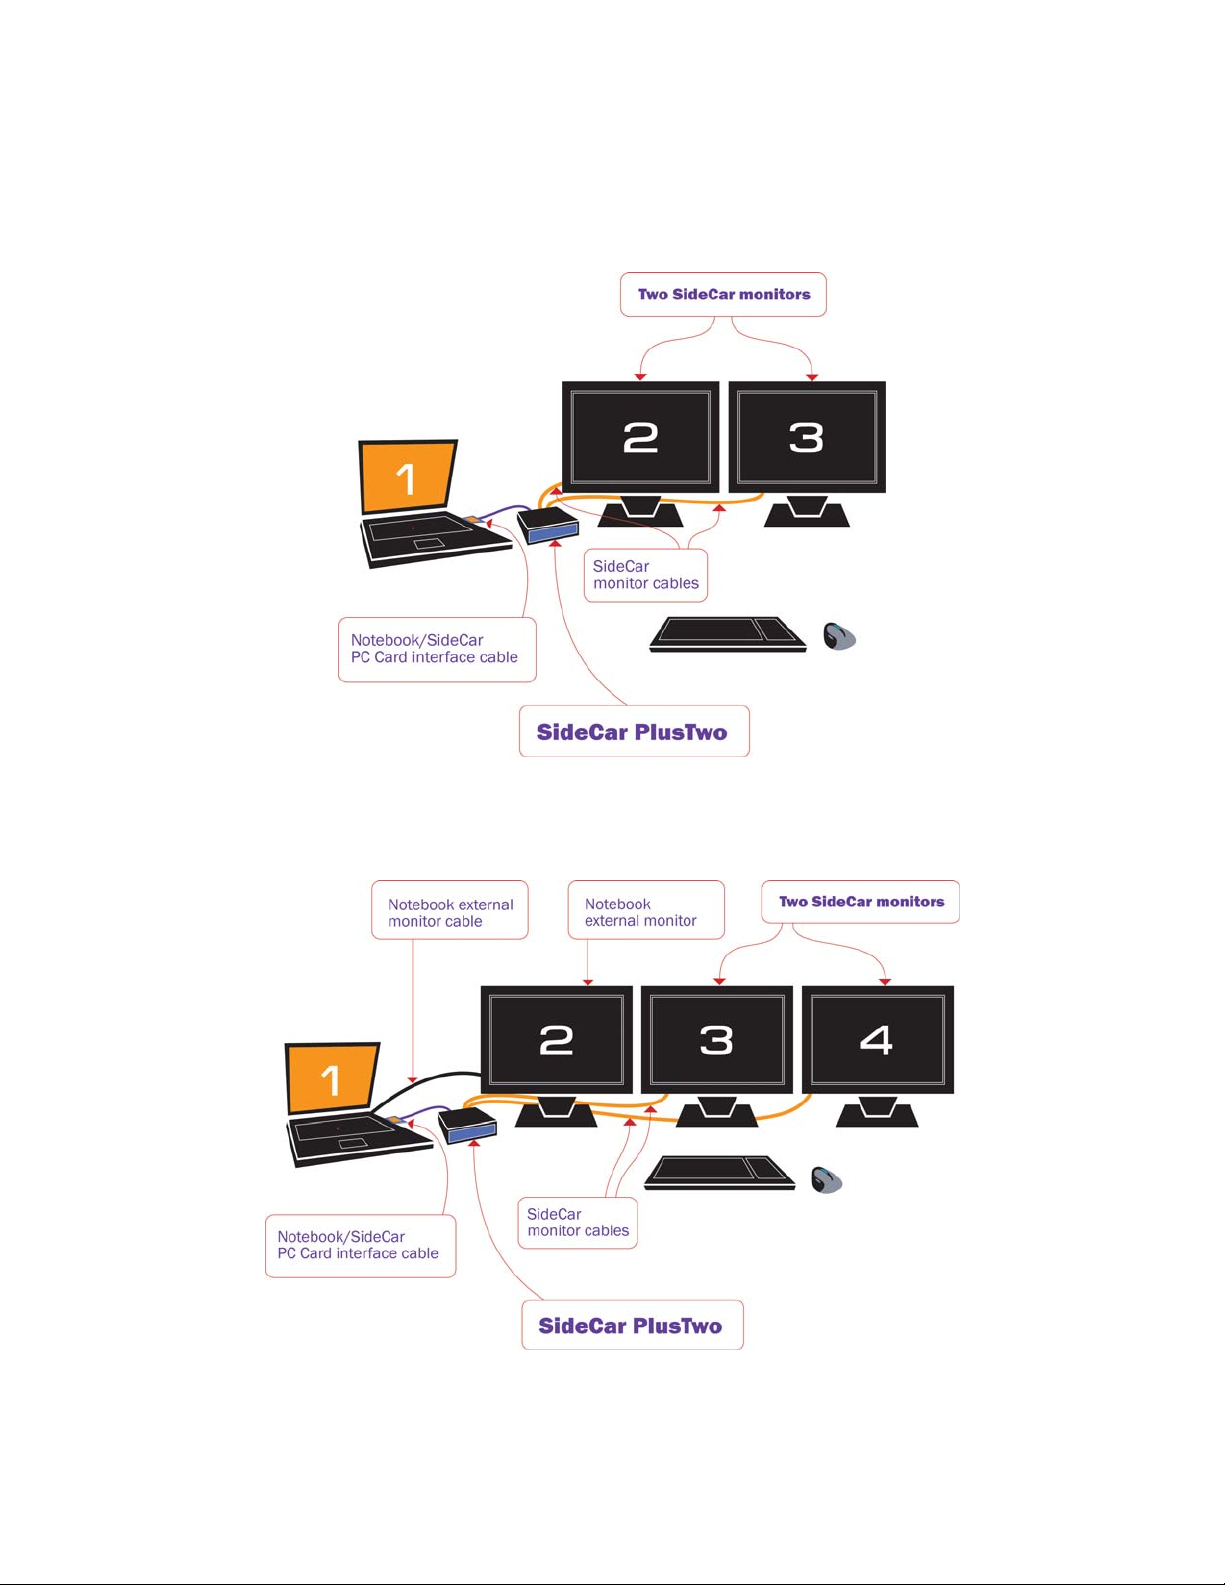
SideCar PlusTwo MMS
Standard configuration (add up to two displays; Windows XP / 2000)
Extended configuration (add three displays; Windows XP only*)
*Most Windows 2000 notebooks cannot address the #2 external monitor as an independent disp lay, but can
use the #2 external monitor as a mirror (clone) of the notebook display. In this case, there are three external
displays, with the #2 display mirroring the notebook LCD (which can often be turned off or closed).
3- I
NTRODUCTION
Page 8
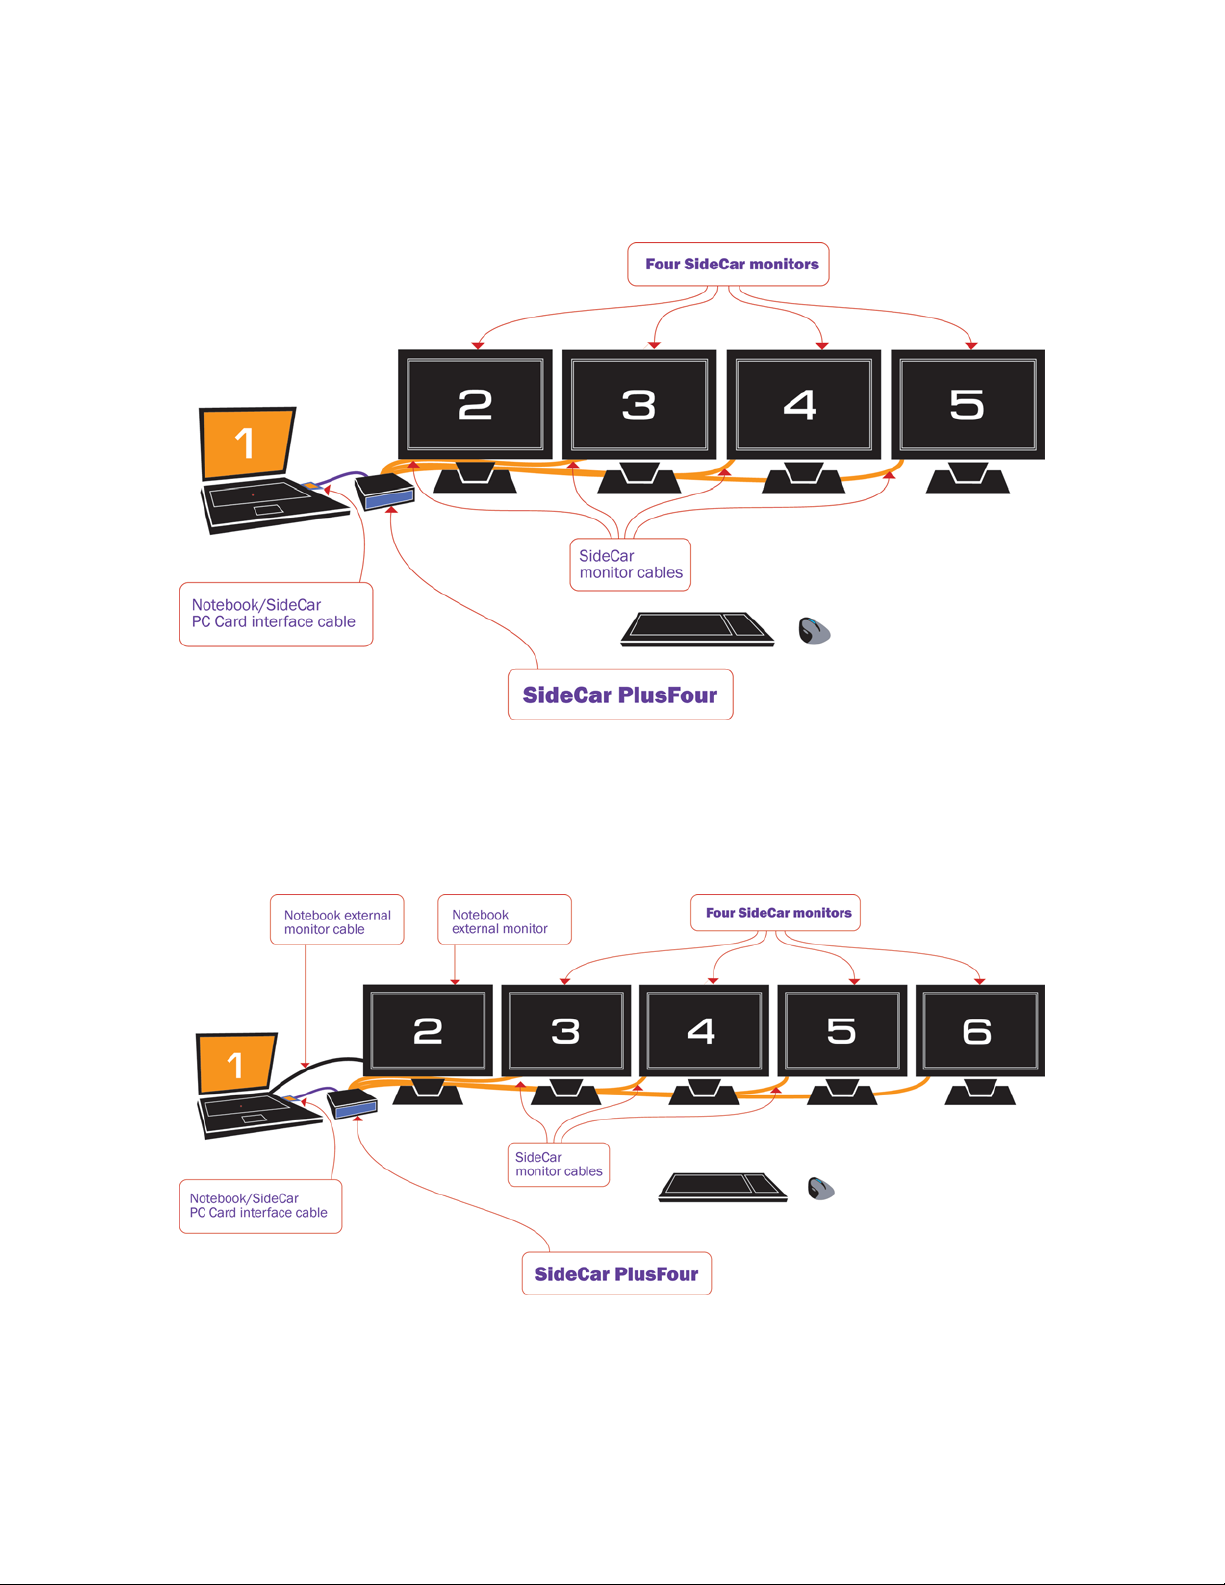
SideCar PlusFour MMS
Standard configuration (add up to four displays; Windows XP / 2000)
Extended configuration (add five displays; Windows XP only*)
*Most Windows 2000 notebooks cannot address the #2 external monitor as an independent disp lay, but can
use the #2 external monitor as a mirror (clone) of the notebook display. In this case, there are five external
displays, with the #2 display mirroring the notebook LCD (which can often be turned off or closed).
4- I
NTRODUCTION
Page 9
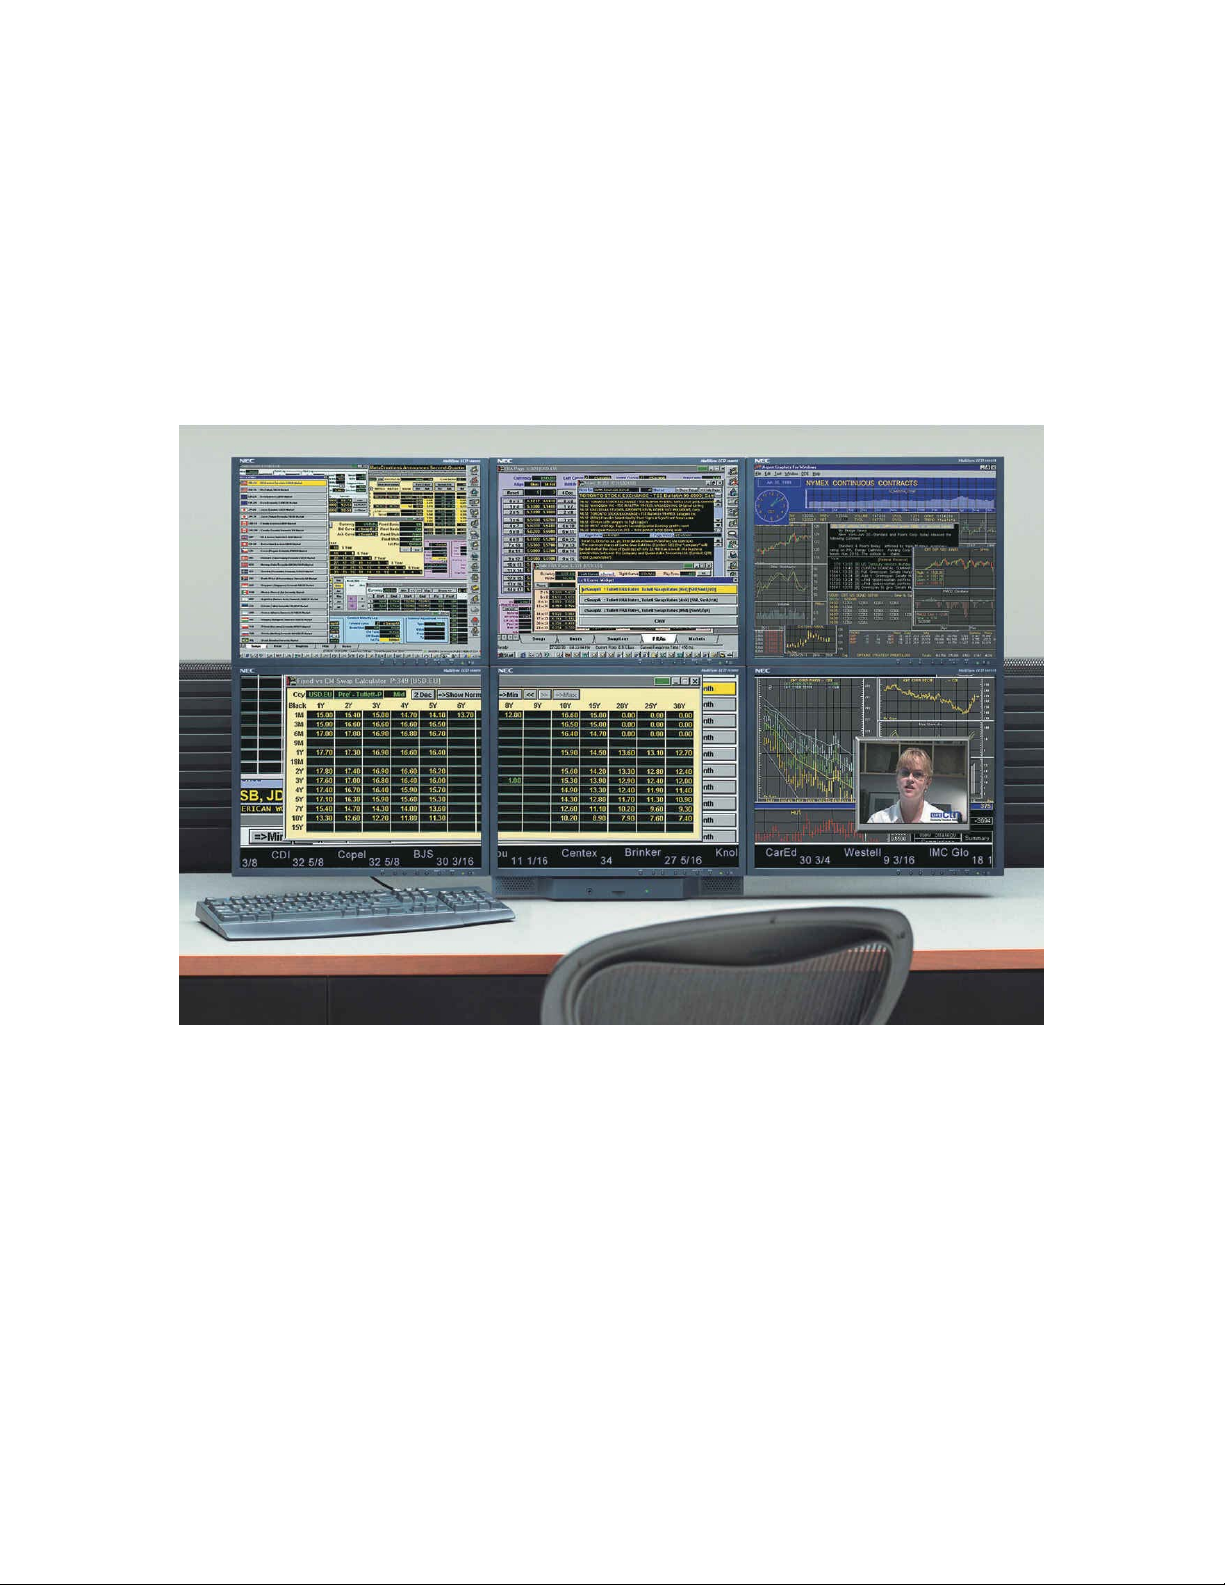
The power of multi-monitor workstations
Multi-monitor workstations enable professionals from video editors to financial traders to work
with a huge “virtual desktop”. Productivity is greatly increased when needed information is
always visible. Video and audio editors can work with large timelines, media bins and preview
windows simultaneously. Financial traders can track many different accounts and leading
indicators simultaneously. Other professionals – including graphic designers, illustrators, Web
developers and engineers – also benefit from such powerful multi-monitor workstations.
A typical financial trader multi-monitor workstation, with six monitors driven by a traditional, fixed tower PC.
5- I
NTRODUCTION
Page 10
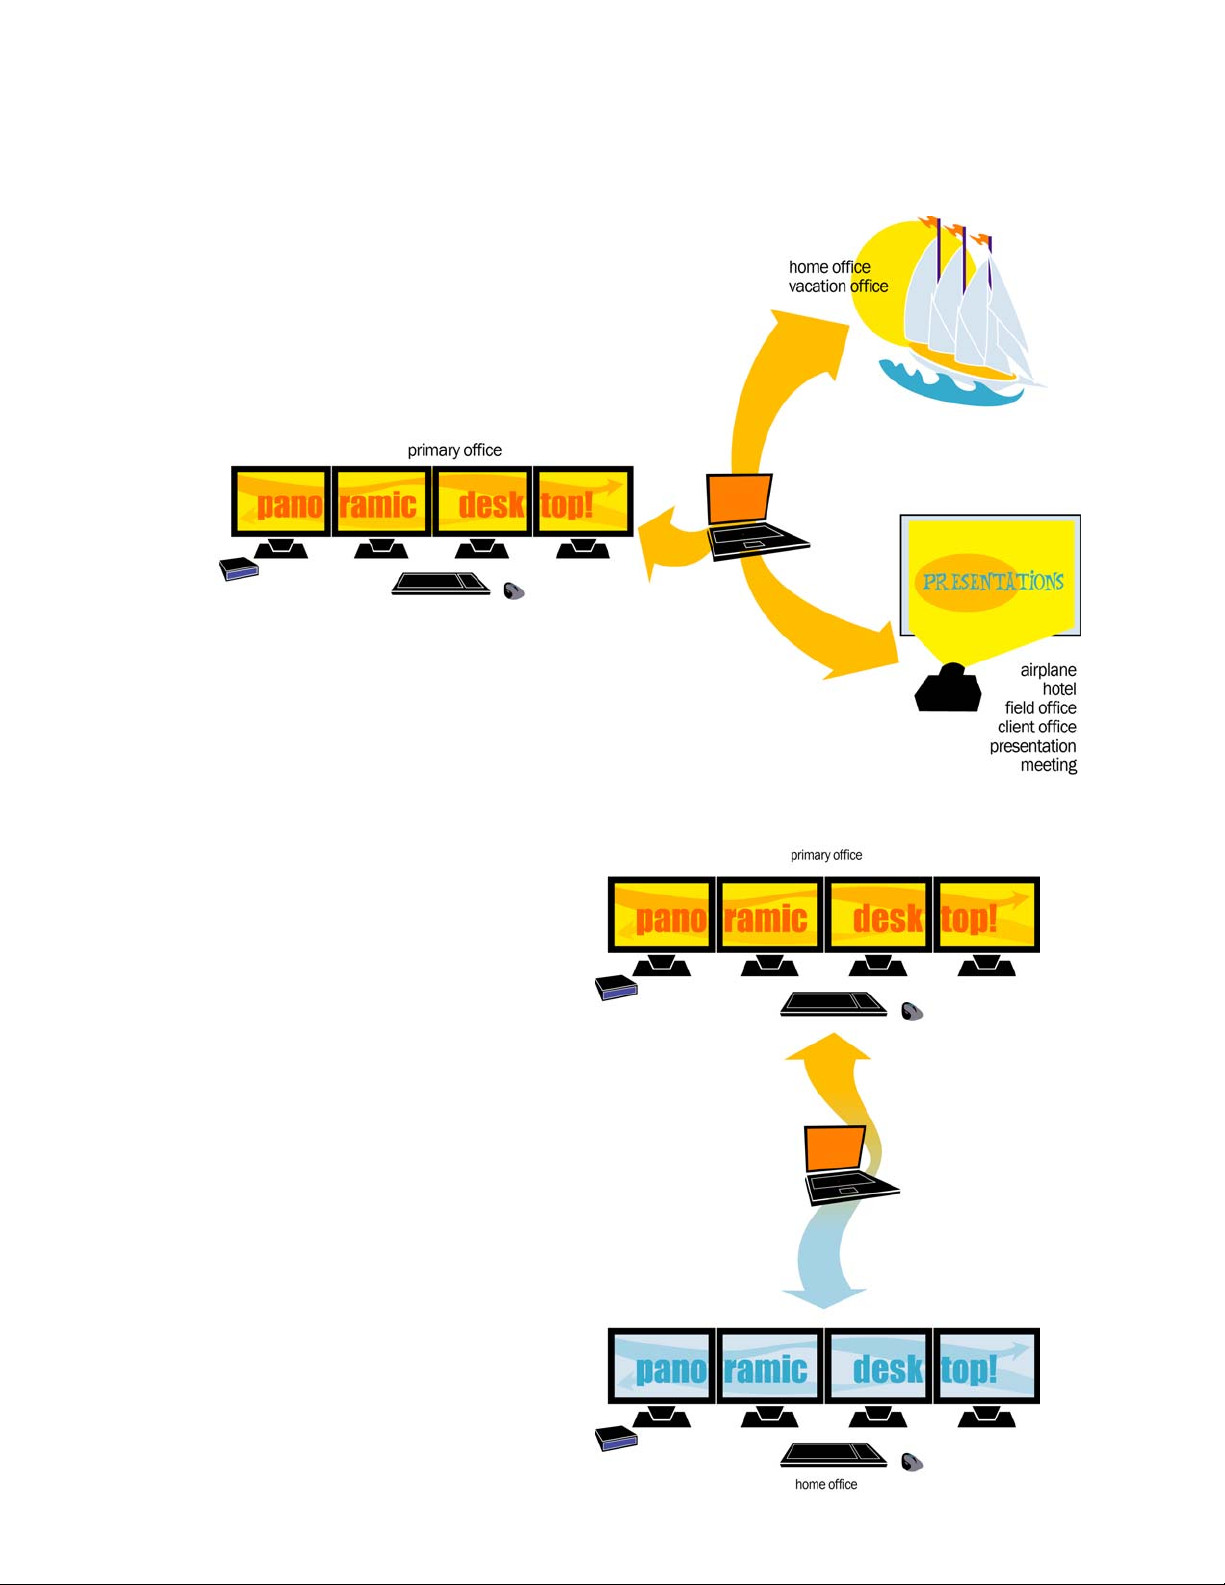
The best of both worlds: multi-monitor power, notebook mobility
With the SideCar, the power of a multi-monitor
workstation can be brought to a notebook
computer. This enables such flexible work
arrangements as:
Multi-monitor primary workstation,
with detachable notebook
For those who need a powerful multi-monitor workstation for their
primary work, but who want to be able to take their data and
applications everywhere they go in a convenient notebook package.
Home and office multi-monitor workstations
Shuttle the same notebook computer between locations,
with data and applications always in one place on that
notebook computer.
6- I
NTRODUCTION
Page 11
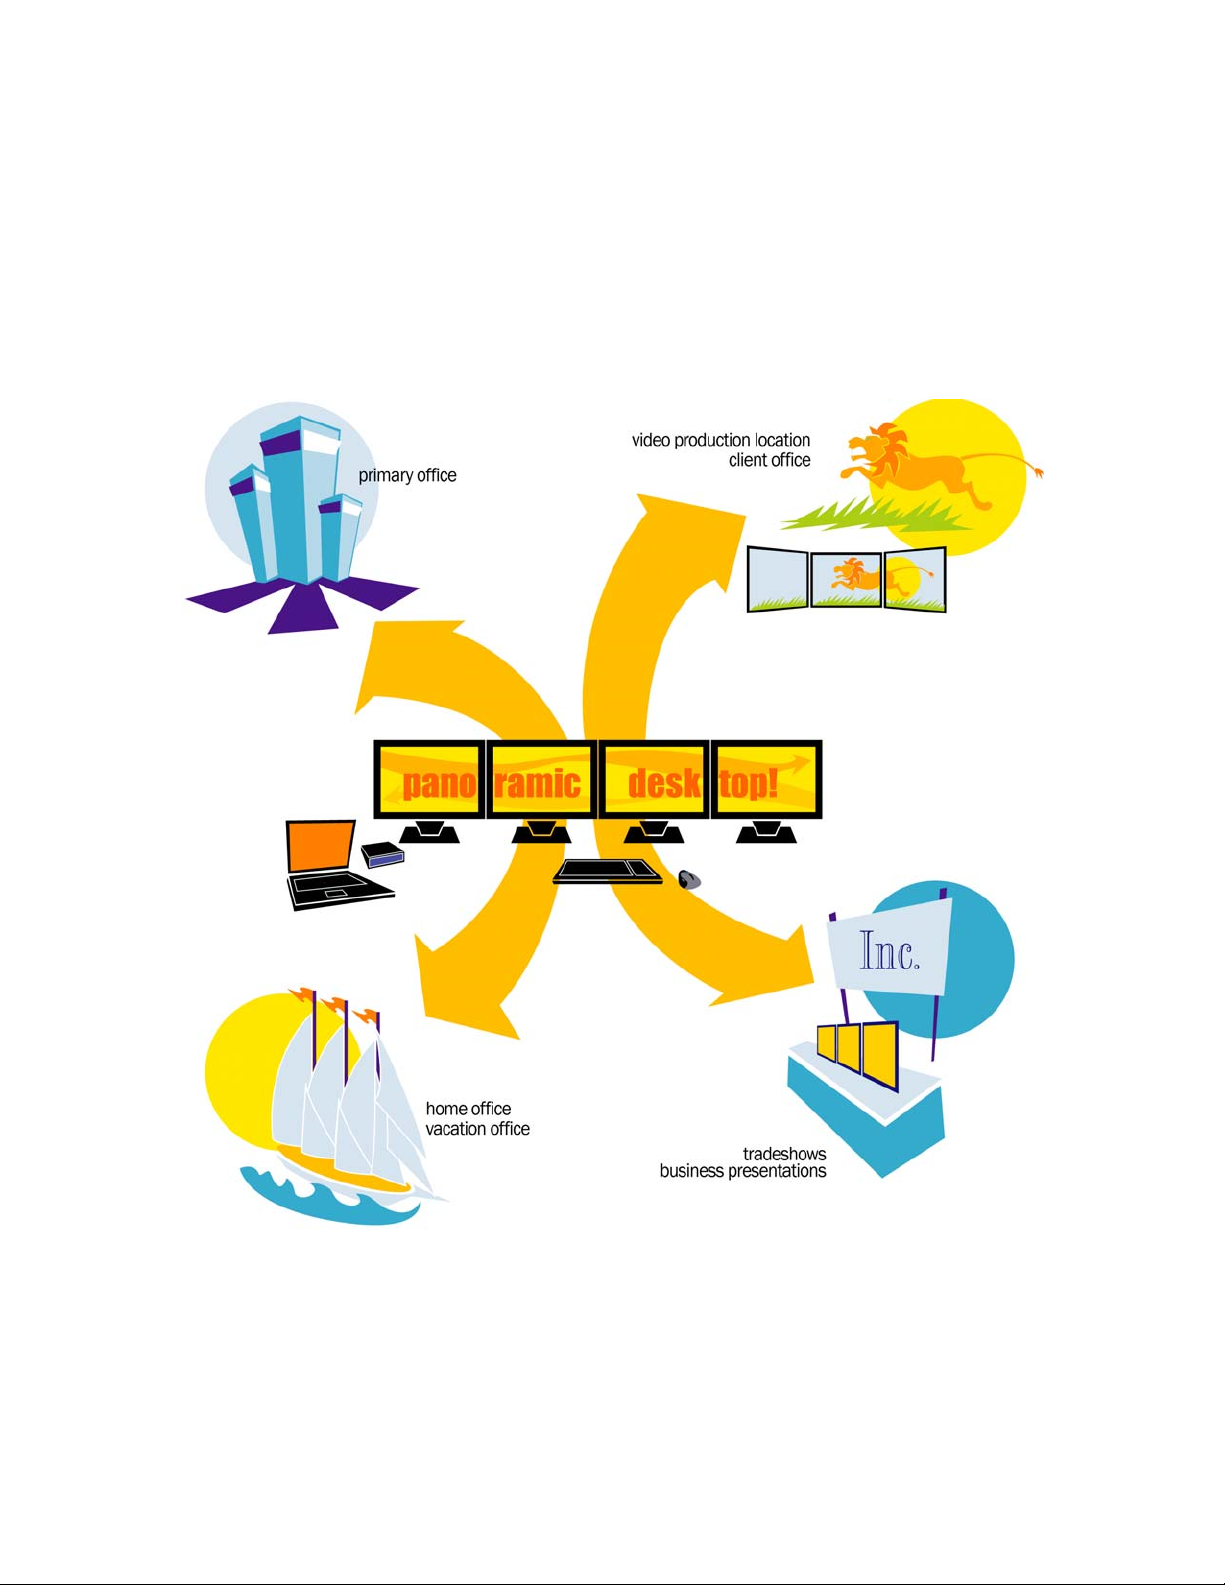
Mobile multi-monitor workstations
For those who need to set up multi-display workstations in several locations,
such as video editing on location, client presentations, client work sessions,
business executive presentations, trade show demonstrations, and more.
(Digital Tigers also offers shipping cases and carry-on luggage to enable
transport of such mobile multi-monitor workstations.)
7- I
NTRODUCTION
Page 12

The Digital Tigers product family
The SideCar MMS series is part of the Digital Tigers family of mobile expansion systems for
notebook computers. Digital Tigers products include:
SideCar systems, which enable notebook computers to support up to four additional
monitors
LaunchPad mobile video editing expansion systems – which provide notebook
computers with multi-monitor support plus additional capabilities such as large, fast hard
drives (fixed or removable, with three times faster performance than most Firewire
drives), and 24-bit professional audio.
Tiger ATV integrated mobile video editing systems
LCD monitors optimized for multimonitor installations; monitor arms and other multi-
monitor mounting solutions
Shipping cases and carry-on luggage for systems and monitors
Many products support Macintosh as well as Windows XP/2000.
Please visit our web site at http://digitaltigers.com
products, or call toll-free 1-800-TIGER-21 (800-844-3721). Outside the U.S., call 1-404-240-
9293. Reseller inquiries are welcome.
for more information about our full line of
8- I
NTRODUCTION
Page 13
Chapter 2 – Supported display configurations
SideCar PlusTwo MMS
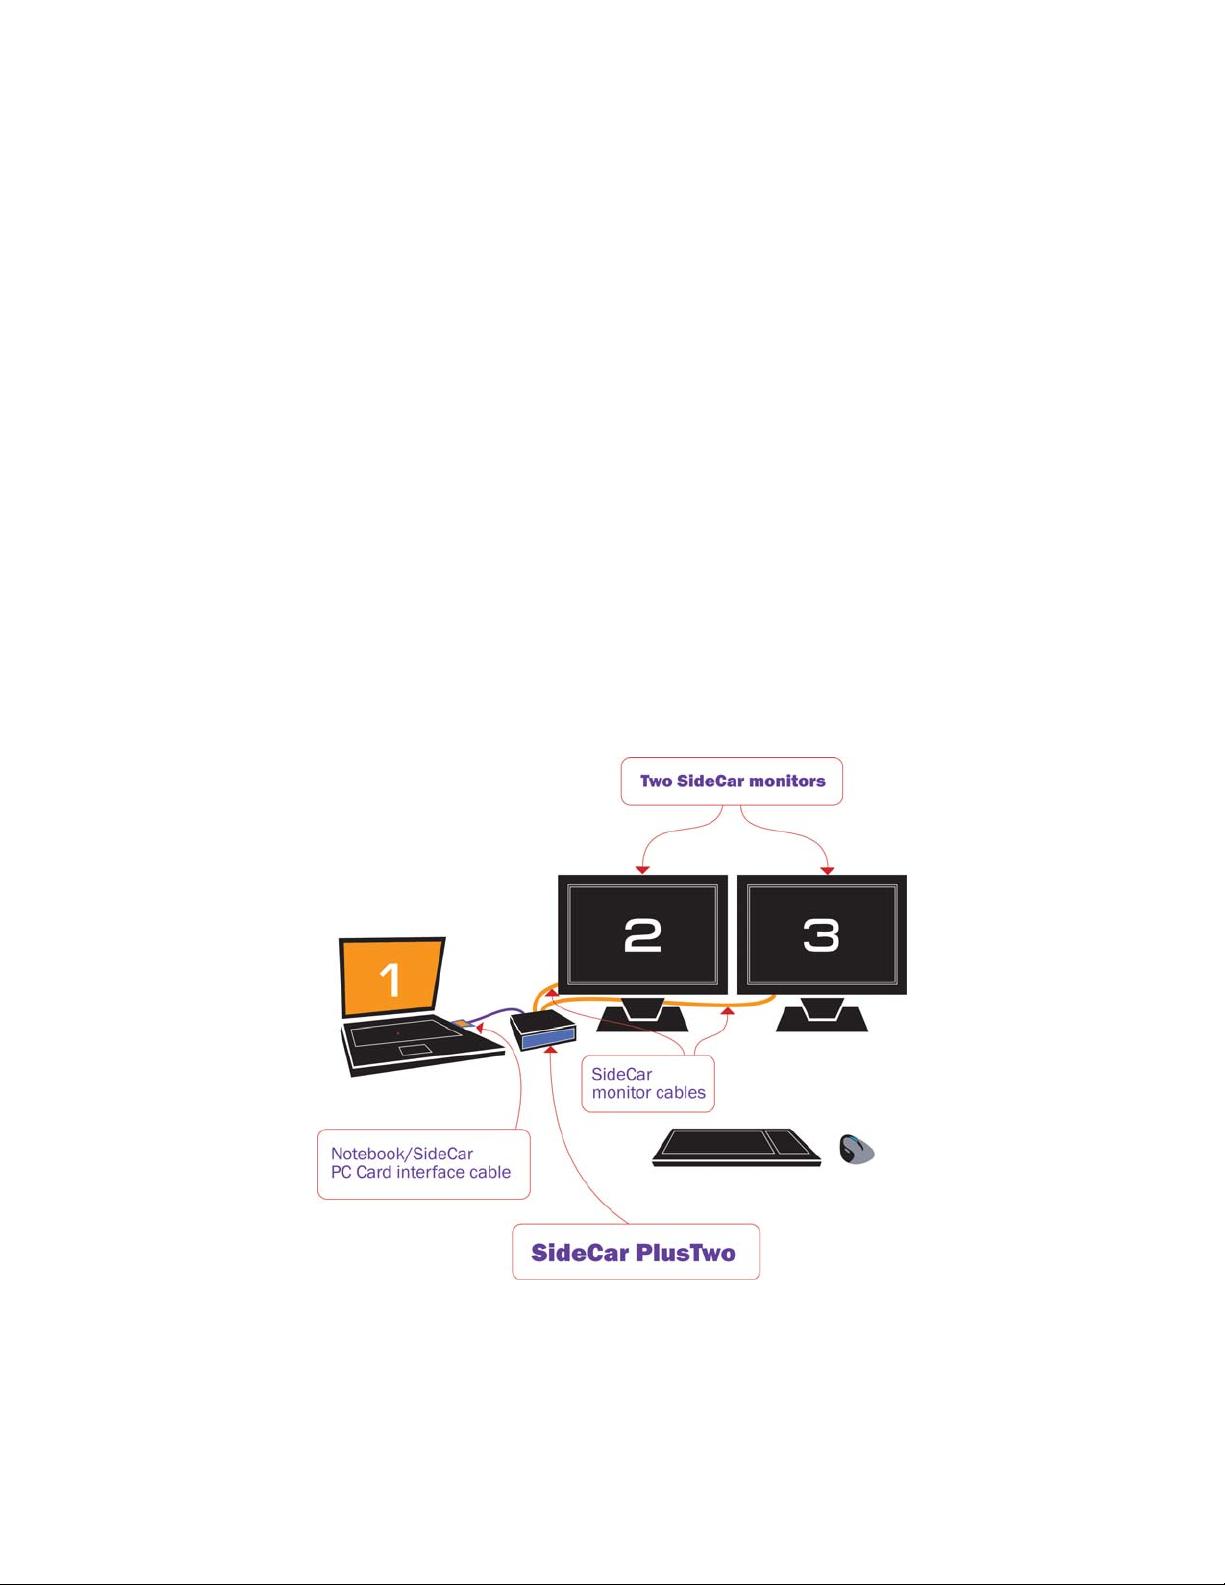
The SideCar PlusTwo MMS enables your notebook to drive two additional displays, for a
maximum total of three or four displays, depending on your configuration:
Display #1: The notebook LCD screen
Display #2: One external display connected to the notebook external monitor port. (This
typically can be driven as a unique display under Windows XP. Under Windows 2000,
the external monitor is typically just a mirror or replacement for the notebook LCD
display.)
Displays #3 - #4: Up to two displays connected to the SideCar PlusTwo.
Below are two common configurations supported by the SideCar PlusTwo MMS:
Two External Displays
(Windows XP, Windows 2000)
9– S
UPPORTED DISPLAY CONFIGURATIONS
Page 14
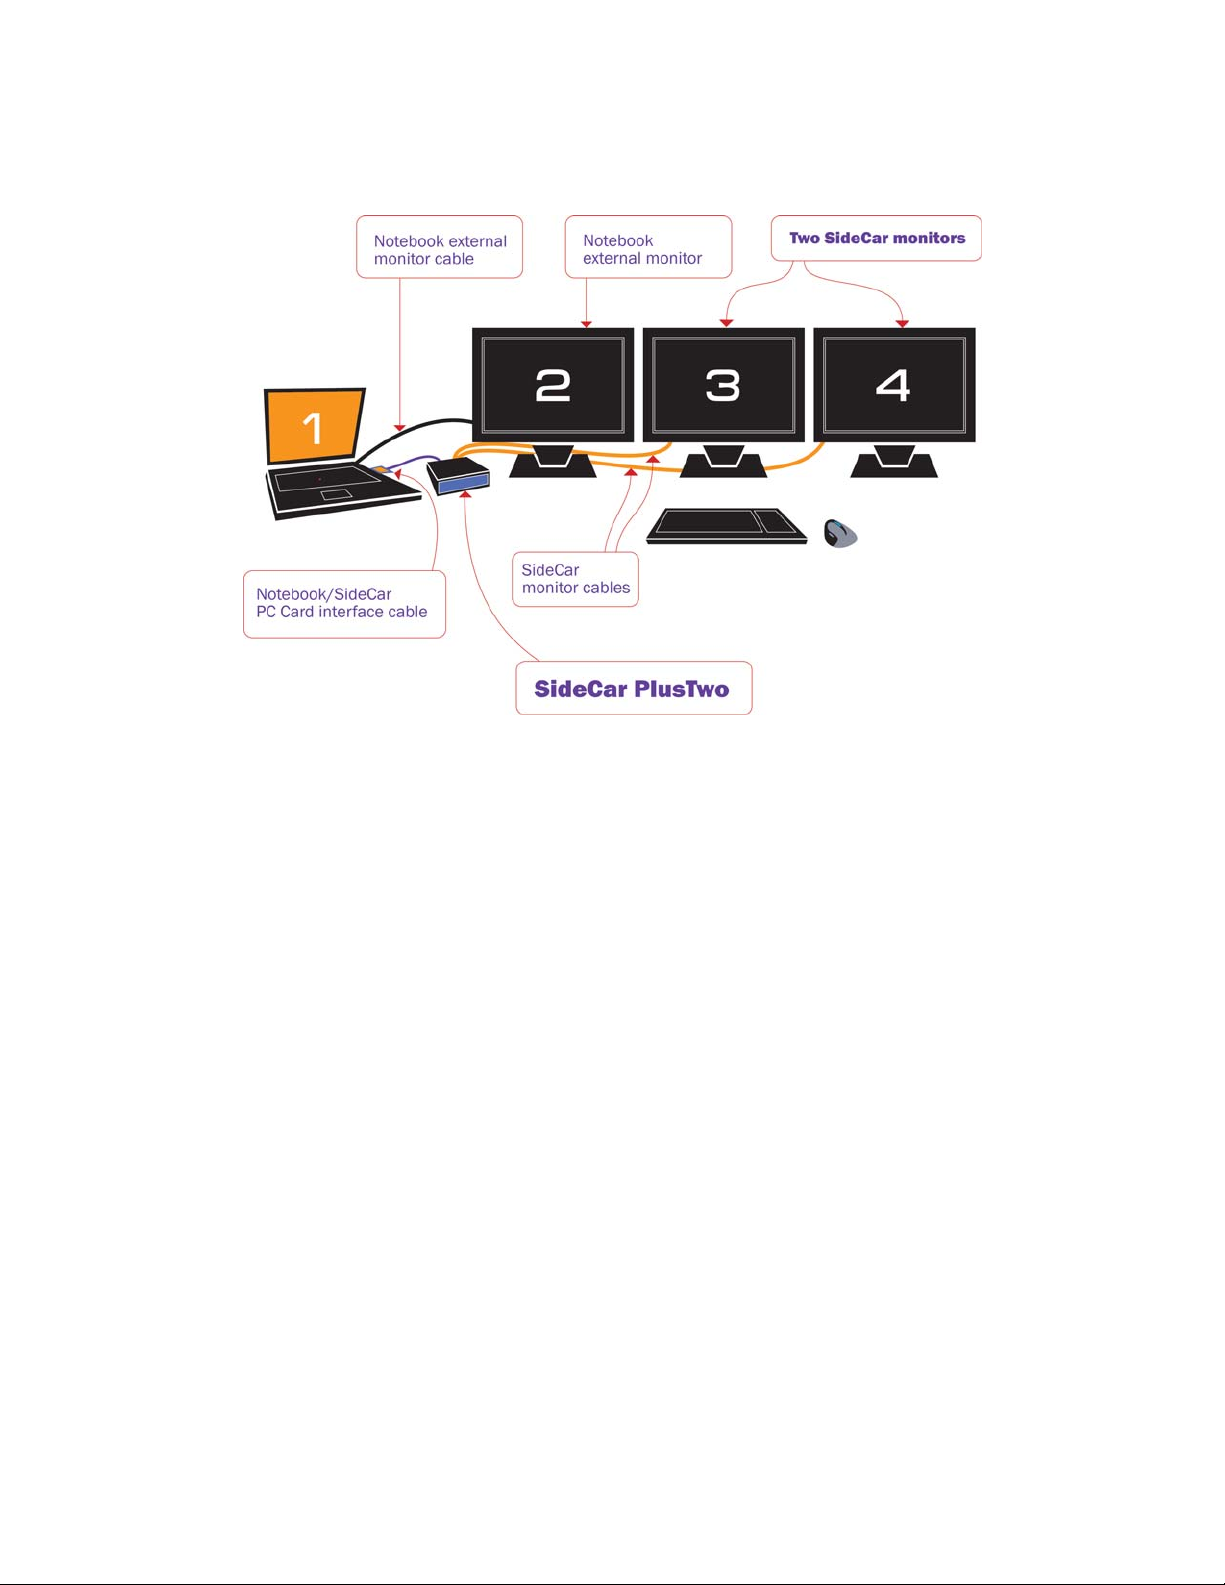
Three External Displays
(Windows XP*)
*Most Windows 2000 notebooks cannot address the #2 external monitor as an independent disp lay, but can
use the #2 external monitor as a mirror (clone) of the notebook display. In this case, there are three external
displays, with the #2 display mirroring the notebook LCD (which can often be turned off or closed).
SideCar PlusFour MMS
The SideCar PlusFour MMS enables your notebook to drive four additional displays, for a
maximum total of five or six displays, depending on your configuration:
Display #1: The notebook LCD screen
Display #2: One external display connected to the notebook external monitor port. (This
typically can be driven as a unique display under Windows XP. Under Windows 2000,
the external monitor is typically just a mirror or replacement for the notebook LCD
display.)
Displays #3 - #6: Up to four displays connected to the SideCar PlusFour.
Shown next are two common configurations supported by the SideCar PlusFour MMS:
10– S
UPPORTED DISPLAY CONFIGURATIONS
Page 15
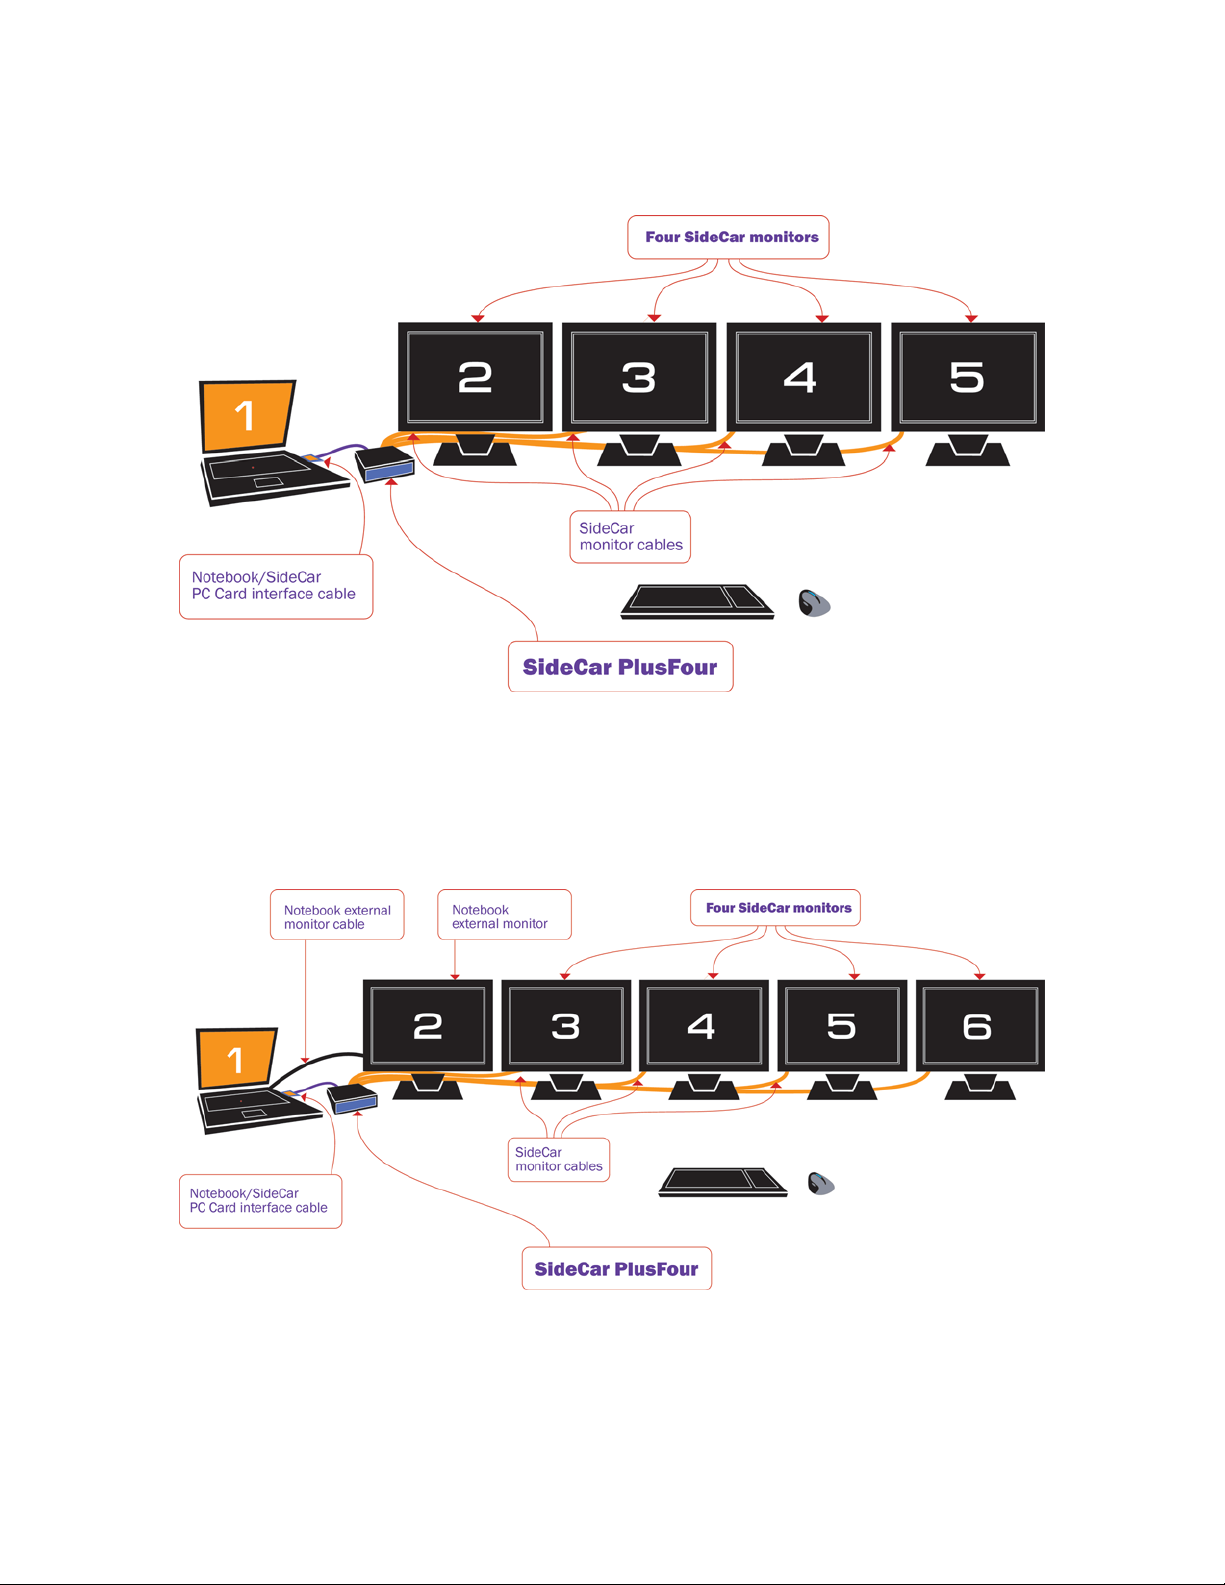
Four External Displays
(Windows XP, Windows 2000)
Five External Displays
(Windows XP*)
11– S
UPPORTED DISPLAY CONFIGURATIONS
Page 16
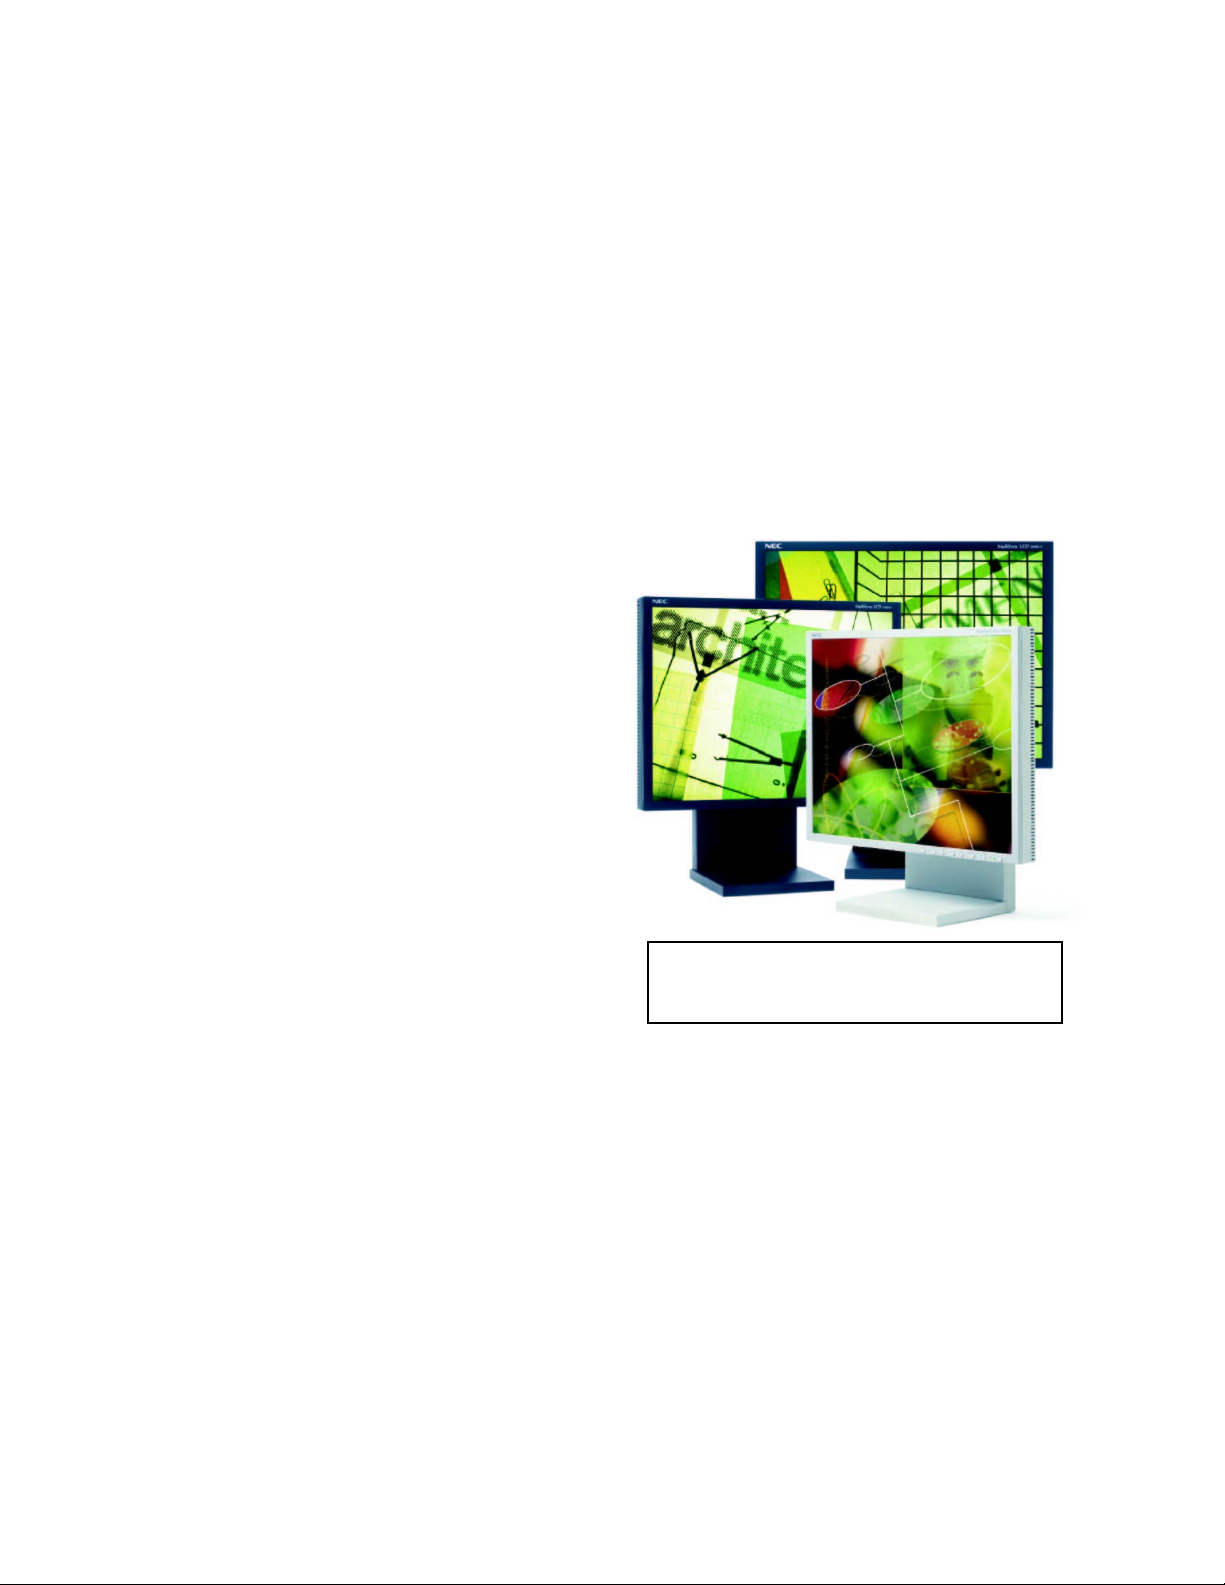
Display types and connections
It is important to understand some basic differences among display types and connections, so that
you can match the right display with the right port or adapter. There are three major categories of
computer displays:
Flat-panel LCD or plasma displays
CRT computer monitors
Computer display projectors
All of these display types can be attached to your SideCar. However, you will need to determine
the required connection type for your display – DVI or VGA. This is easily determined from your
display documentation. You can also simply inspect your display cable connectors.
DVI vs. VGA connections
Most computer users are familiar with VGA
monitor connectors. Known technically as
HD15 or mini D-sub 15-pin connectors (see
next page), they became the computer industry
standard for monitor connections after the
VGA display standard was introduced in
1987. Display resolutions have since risen far
beyond the original VGA standard (640 x
480), but the same HD15 connector has
continued to be used and is still commonly
referred to as a VGA connector.
VGA (HD15) cabling supports only analog
display connections. Until recent years, almost
all computer displays were analog CRT monitors,
which is why the VGA connection standard is
analog.
More recently, flat-panel LCD displays and computer display projectors have become popular.
These displays are digital displays. To ensure broad compatibility, such displays are usually
offered with analog VGA connectors and cables. However, using a VGA connection with a
digital display (flat panel or projector) forces the computer’s display output to be converted from
digital to analog, then from analog back to digital. With high-quality components (a wellengineered display; high-quality, shielded cables; and high-quality computer graphics output) this
conversion process works well. With mediocre components in the chain, display quality can
suffer. Symptoms can include blurry text, inconsistent display sharpness, poor colors/contrast,
and a wavy shimmer effect.
Fortunately, an all-digital connection is possible using a digital DVI connection, based on the
DVI (Digital Visual Interface) standard introduced in 1999. Digital DVI display connections are
highly reliable and rarely suffer from the defects of some VGA connections.
Unlike analog CRT monitors, flat-panel displays
and computer projectors are digital devices and
are best used with digital (DVI) connections.
12– S
UPPORTED DISPLAY CONFIGURATIONS
Page 17
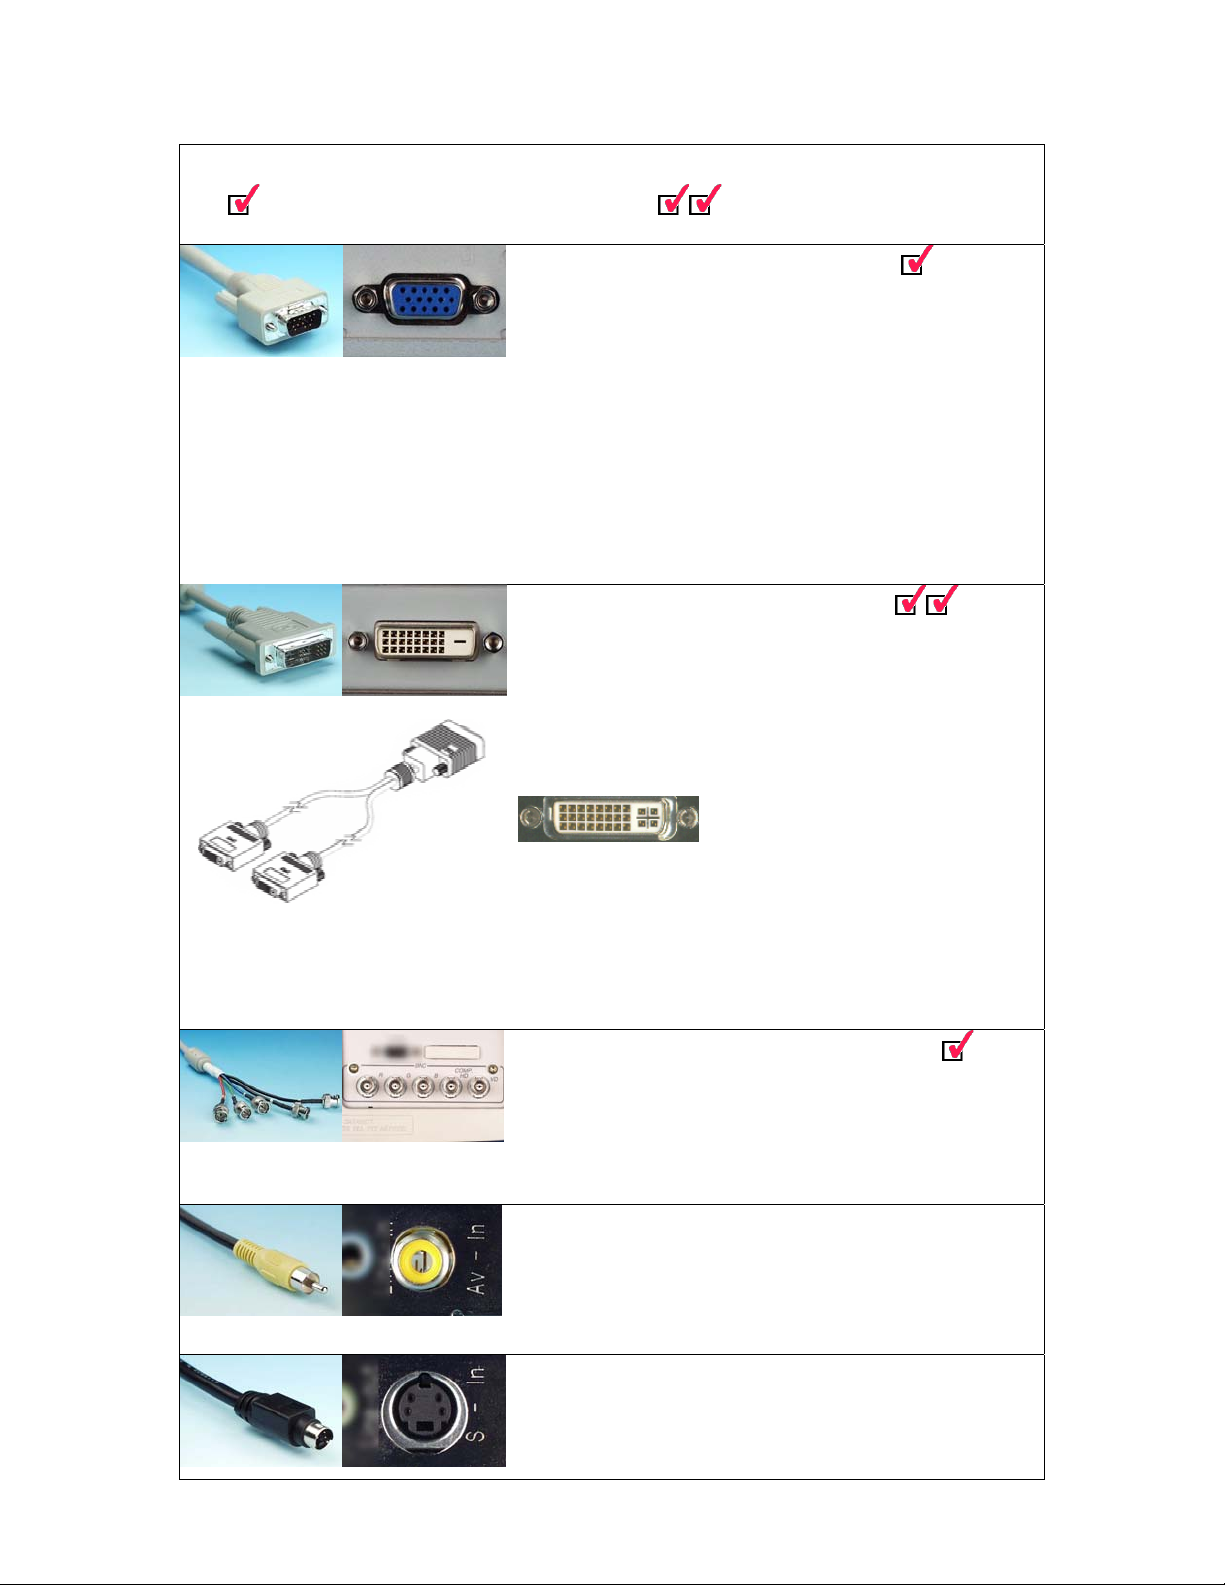
Display Connector Types
= compatible with SideCar MMS series = highest-quality connection
Analog VGA – all computer displays
The standard computer analog display connector, introduced in
1987. More precisely described as an HD15 or mini D-sub 15-pin
connector; D-sub 15 or D-sub for short. Male on left, female on right.
Supported computer displays include CRTs, LCD flat panels, data
projectors, and large plasma displays.
(Using a different signal standard – YPrPb component video – the
connector is also used for some dual-use projectors and plasma
displays, which support computer input and component video input
with the same connector and switchable signaling.)
The SideCar MMS series includes analog VGA adapters with HD15
female connectors, for standard computer VGA-type (RGB) signaling.
Digital DVI – flat panels / projectors
Abbreviated DVI-D, introduced in 1999. Superior digital connection
for high-quality flat-panel displays and data projectors. A related
connector is the DVI-I connector (below), which can carry either digital
or analog signals as needed. A DVI-I female connector is plugcompatible with DVI-D male connectors used by better flat-panel
displays and data projectors. DVI-I also supports VGA monitors with
an HD15 adapter (supplied).
Dual-monitor DVI Y-cable
(supplied with the SideCar)
The SideCar includes one or two dual-monitor Y-cables (shown at
left) with two DVI-I female connectors. You may use these Y-cables
alone for DVI connections or add HD15 adapters (supplied) to support
analog VGA-style displays. If your displays can accept either DVI
or VGA inputs, use a DVI connection. (Unless you need resolution
higher than 1280 by 1024, which requires the analog VGA adapters
described in VGA section.)
DVI-I connector
Analog BNC-5 – best analog connection
Used by higher-quality analog CRT monitors and plasma displays;
supports higher resolutions and cable lengths than standard HD15
cables, due to signals being carried on five coaxial sub-cables. With
an HD15 (VGA) adapter supplied with most BNC-5 displays, BNC-5 is
supported by the SideCar MMS using its Y-cables and VGA adapters.
13– S
RCA – TV / video monitors
Standard RCA composite video connector for consumer TVs and
flat-panel monitors supporting TV input. RCA composite video is
supported by the SideCar MMS series only when the SideCar is
attached via a PCI interface to desktop PCs and docking stations.
S-video – TV / video monitors
Higher quality than RCA composite video. Used by consumer TVs,
NTSC monitors, and flat panels with TV input. Also known as Y/C.
S-video is supported by the SideCar MMS series only when the
SideCar is attached via a PCI interface (not PCMCIA/CardBus) .
UPPORTED DISPLAY CONFIGURATIONS
Page 18

(Note: VGA connections can still achieve digital DVI quality when all components in the chain
are working optimally. Some top-quality flat-panel displays can even automatically adjust for
some defects in the analog signal. Using a digital DVI signal simply is a more reliable approach,
because it avoids signal conversion altogether.)
For cost reasons, entry-level flat-panel displays and data projectors are often offered with only
VGA connections, since all PCs support that connection type. Mid-market and premium flatpanel displays and projectors typically offer both analog VGA and digital DVI connections.
(Some premium displays offer only digital DVI connections, to ensure proper display quality.)
There are actually two types of DVI connectors found on flat-panel displays and data projectors.
DVI-D connectors are strictly digital connectors and support only a digital signal path. DVI-I
connectors support digital connections, but also offer backward support for analog connections.
Typically this support is offered via an adapter cable with a DVI connector on one end and a
VGA connector on the other end (to attach to a PC having only a VGA display output
connection).
For the most reliable quality, choose an flat-panel display or data projector offering a true
digital connection. A DVI-D connector is a sure sign of such support. If a DVI-I connector is
offered, be sure that the display supports a true digital connection through this connector. (In rare
cases, a display might use a DVI-I connector but offer only an analog connection.)
One excellent flat-panel display to consider is the NEC LCD1880SX, which offers a true
digital DVI connection at 1280 by 1024 resolution – the maximum digital DVI output resolution
of the SideCar MMS series.
See chapter 12 for more about flat-panel display features and options. You can also visit the
Digital Tigers Web site and use our online display database spanning hundreds of models.
14– S
UPPORTED DISPLAY CONFIGURATIONS
Page 19

Supported display combinations
The SideCar MMS series supports any combination of digital DVI or analog VGA
connections.
A high-density LFH connector at the rear of the SideCar provides the display outputs.
(Two such connectors are supplied with the SideCar PlusFour MMS.)
A supplied Y-cable attaches to the LFH connector, supporting two displays
per Y-cable.
Each Y-cable has two DVI-I connectors to directly support
either DVI-D or DVI-I cables supplied with your display.
If your display has only a VGA cable, use the
supplied DVI-to-VGA adapters to convert the
DVI ends of the Y-cable to support VGA
connections.
Y-cable with dual DVI-I connectors
TV output is not supported by the SideCar MMS series except when the SideCar is attached via
a PCI interface to a desktop PC or notebook docking station.
Supported display combinations per Y-cable splitter include:
Up to two digital DVI displays (up to 1280 by 1024 resolution each)
Up to two analog VGA displays (up to 2048 by 1536 resolution each), using the supplied
VGA adapters attached to the Y-cable
A combination of one DVI display and one VGA display (using the DVI-to-VGA
adapter)
For complete display compatibility information, please see the Specifications section at the back
of this manual.
15– S
UPPORTED DISPLAY CONFIGURATIONS
Page 20
Chapter 3 - Hardware setup
1. Unpack all SideCar components. You should have:
SideCar chassis
Power supply transformer and AC power cord
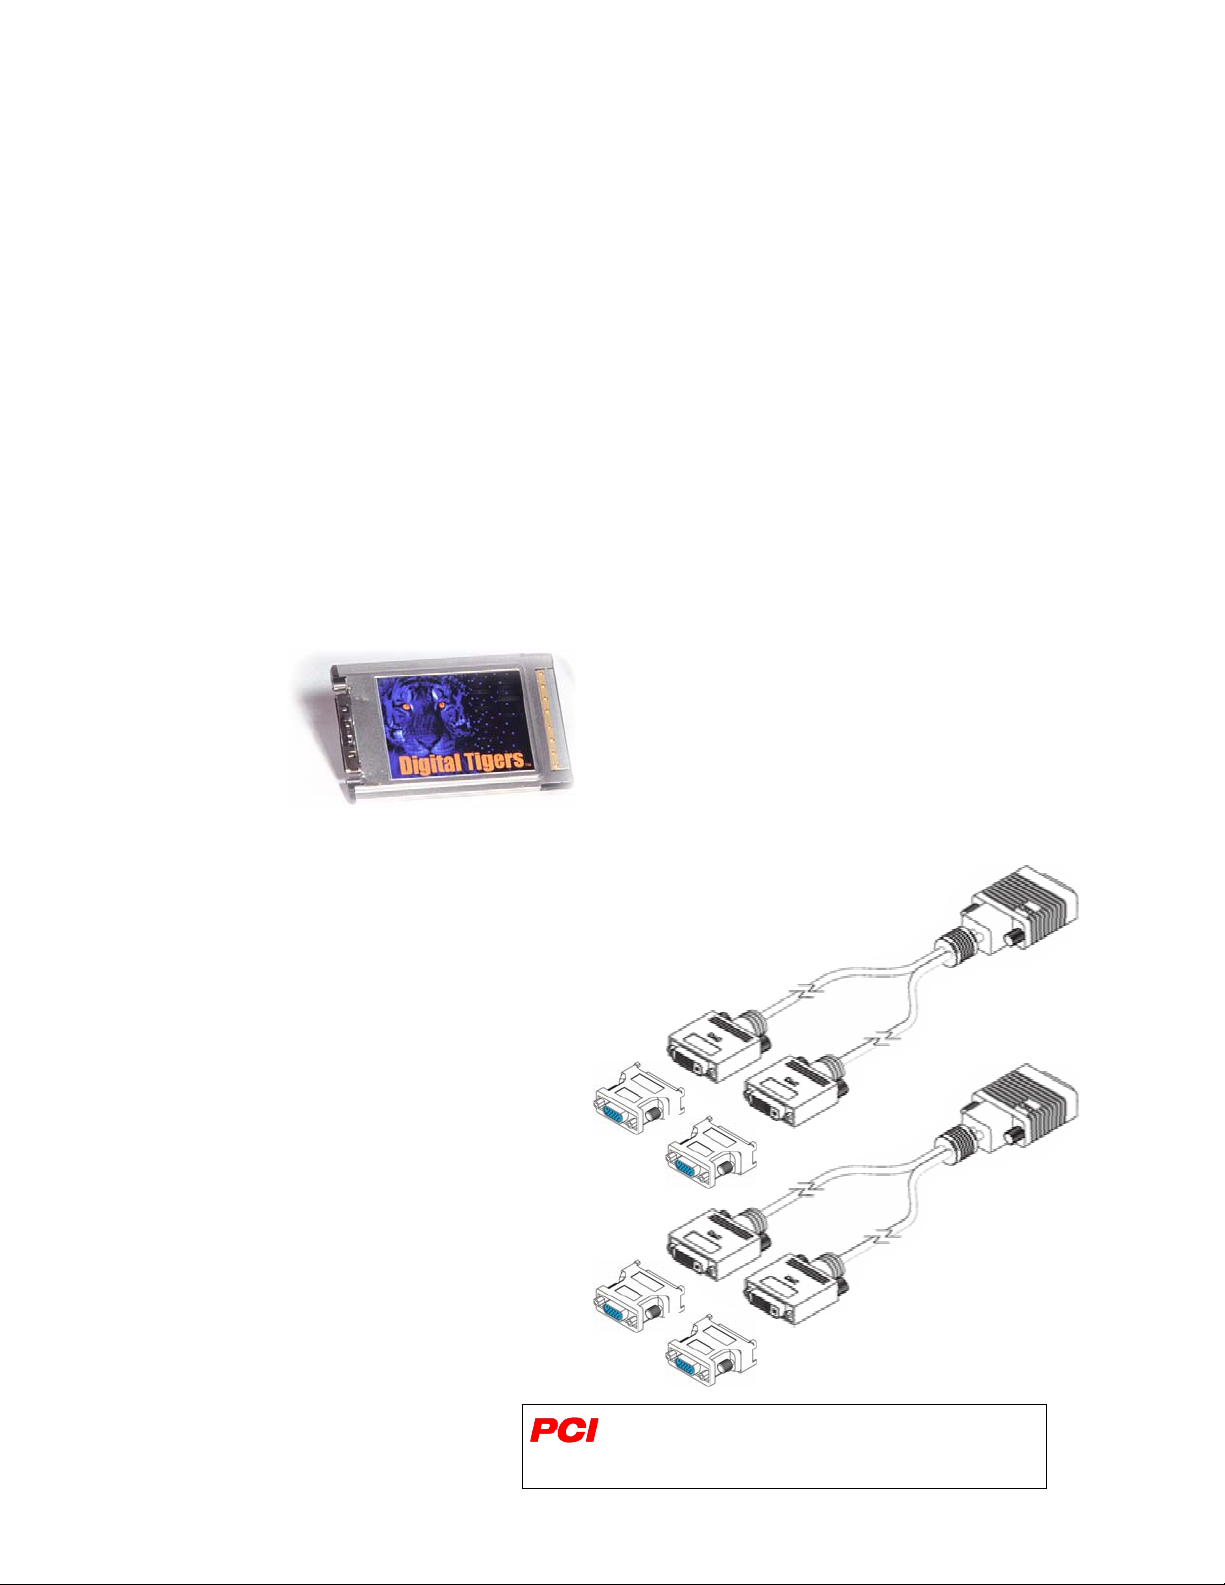
PC Card* notebook interface card; also known as PCMCIA card or CardBus interface
(shown below left)
1-meter SideCar / computer interface cable – connects SideCar to PC Card (or to PCI
adapter)
Y-cable dual-DVI display breakout cable(s) (shown below right)
o One breakout cable is supplied with the SideCar PlusTwo MMS.
Two are supplied with the SideCar PlusFour MMS.
DVI-to-VGA (HD15) display output adapters, one per DVI output connector (shown
below right next to Y-cables)
Installation CD
This user manual
Display output Y-cables with dual DVI
connectors, shown with optional VGA
(HD15) adapters (supplied). Each Y-cable
supports two displays. Large Y-cable
connector (right side) attaches to the
matching LFH connector on rear of the
SideCar. Be extremely careful not to
bend the closely spaced pins on the
SideCar LFH connectors. (Bending these
pins can temporarily disable one or more
displays.) Once the cable is attached to the
SideCar, tighten thumbscrews firmly.
PC Card notebook interface card* (left); also
known as PCMCIA card or CardBus interface.
Attach 1-meter interface cable to connector at left,
securely tighten cable thumbscrews, and insert
card firmly into notebook PC Card slot. (Use
bottom slot if two slots are available.) Connect
other end of interface cable to matching connector
at rear of the SideCar, and tighten firmly.
16- H
ARDWARE SETUP
*Some SideCar versions have a PCI adapter interface
as a substitute for the PC Card; the PCI adapter is
installed in a notebook docking station or desktop PC.
Page 21
2. Locate and position monitors at the work location.
You may use DVI or VGA displays (see previous
chapter for further explanation).
Digital DVI displays are supported up to
1280 by 1024 resolution.
Analog VGA displays are supported up
to 2048 by 1536 resolution.
3. Turn off the monitors and gather together the ends
of the monitor input cables to the location where
you will place the SideCar. Ensure that the other
Using the Notebook External
Monitor Port
You may be able to add an additional
display by using your notebook’s
external monitor port. Most Windows
XP notebooks can address this
external monitor as a unique display,
though most Windows 2000 notebooks
cannot. (However, Windows 2000
notebooks can still mirror the notebook
display with the external monitor, or
use the external monitor as an
alternative to the notebook display.)
ends of the cables are attached to the monitors.
4. If you wish, position an extra monitor at the work
location if your notebook has its own external monitor port. (See note at right.)
5. Locate and position approved Windows XP/2000 notebook computer at the work
location. Turn off notebook. Ensure that the notebook is within one meter of the preferred
SideCar location (which itself must be in reach of the monitor cables).
For SideCars using a PCI adapter interface instead of a PC Card interface, it is time to
install the PCI interface in the notebook docking station or desktop PC. Keep the
computer powered off after installing the PCI adapter. Note: you may have to bend the
PCI adapter’s slot plate slightly to fit the adapter in IBM ThinkPad docking stations.
6. Carefully attach the supplied dual-monitor Y-cable(s) to the LFH-60 connector(s) at the
rear of the SideCar. Warning: the pins on the LFH-60 connector of the Y-cable are
closely spaced and easily bent (which can result in one or more displays becoming non-
functional until the problem is corrected.). To avoid damaging the LFH-60 connector on
your dual-monitor cable, carefully insert this male connector as straight as possible
into the matching LFH-60 connector on the SideCar. Tighten the thumbscrews firmly.
17- H
ARDWARE SETUP
Page 22

SideCar PlusFour MMS: Connectors at rear of chassis and on dual-monitor Y-cables
7. After attaching the Y-cable(s) to the SideCar, attach monitor cables to each Y-cable. If
your monitors use analog VGA connectors, add the supplied DVI-to-VGA (HD15)
adapters to the ends of the Y-cable. (Y-cables and adapters are shown in step 1.) Tighten
all thumbscrews securely.
8. Turn on the monitors.
9. Plug one end of the supplied 1-meter notebook interface cable to the Digital Tigers PC
Card (shown in step 1) or PCI interface, and tighten thumb screws securely.
10. Attach the other end of the 1-meter interface cable to the SideCar chassis (port at rear).
11. Insert the PC Card firmly in the PC Card (PCMCIA) slot of the notebook computer. If
there are two slots, try the lower slot first.
12. Power up the SideCar:
Attach power supply transformer to SideCar (round DC power port at rear).
Attach separate power cable to three-prong socket of transformer.
Plug in power cable to electrical outlet. SideCar will power up automatically. (Power
can be confirmed by green light at rear, and the sound of the SideCar internal fan.)
13. Continue to driver installation (next chapter)
18- H
ARDWARE SETUP
Page 23

Chapter 4 - Windows XP/2000 driver installation
Overview
To enable your SideCar for use with your computer, you will follow a one-time driver installation
sequence that takes about 10 minutes and requires you to restart your computer more than once.
Several distinct installation stages are required to move through the SideCar chain of components
and enable your notebook to “see” the displays attached to the SideCar:
1. PCI bridges — You will install one or more PCI to PCI bridges (automatic procedure).
Always accept automatic installation of these bridges when prompted by Windows.
2. SideCar chassis — You will install Digital Tigers SideCar chassis drivers from your
installation CD that allow the SideCar to be recognized by your Windows XP/2000
notebook computer.
3. SideCar MMS display controllers — You will install drivers from your installation CD
for the Digital Tigers display controllers.
4. Monitors — You will install the monitors attached to the SideCar (automatic procedure).
Always accept automatic installation of your monitors when prompted by Windows.
Important: Please install only our Digital Tigers drivers for the SideCar. You will void your
technical support privileges if you install unapproved drivers including any drivers from thirdparty sources. The SideCar requires our certified drivers for best results and application stability.
Note: once you have completed this one-time installation, you can detach and reattach the
SideCar in the future without installing any additional software. Just be sure to attach and reattach
the SideCar when the notebook is fully powered off. Your notebook will power up and
immediately activate the displays attached to the SideCar, while restoring your preferred settings.
Power on monitors, SideCar and notebook
1. As indicated at the end of the last chapter: Power on your monitors, SideCar and
notebook – in that sequence – and boot to Windows.
2. Wait a full minute for Windows to automatically detect the SideCar. When Windows
recognizes the SideCar, you may be prompted to restart your computer so that default
Windows PCI bridge drivers can be activated. If prompted, restart the computer. If you
are presented with a “Found New Hardware Wizard” for a PCI to PCI bridge, see the
next page.
19- W
INDOWS
XP/2000
DRIVER INSTALLATION
Page 24
Stage 1. Install PCI to PCI bridge
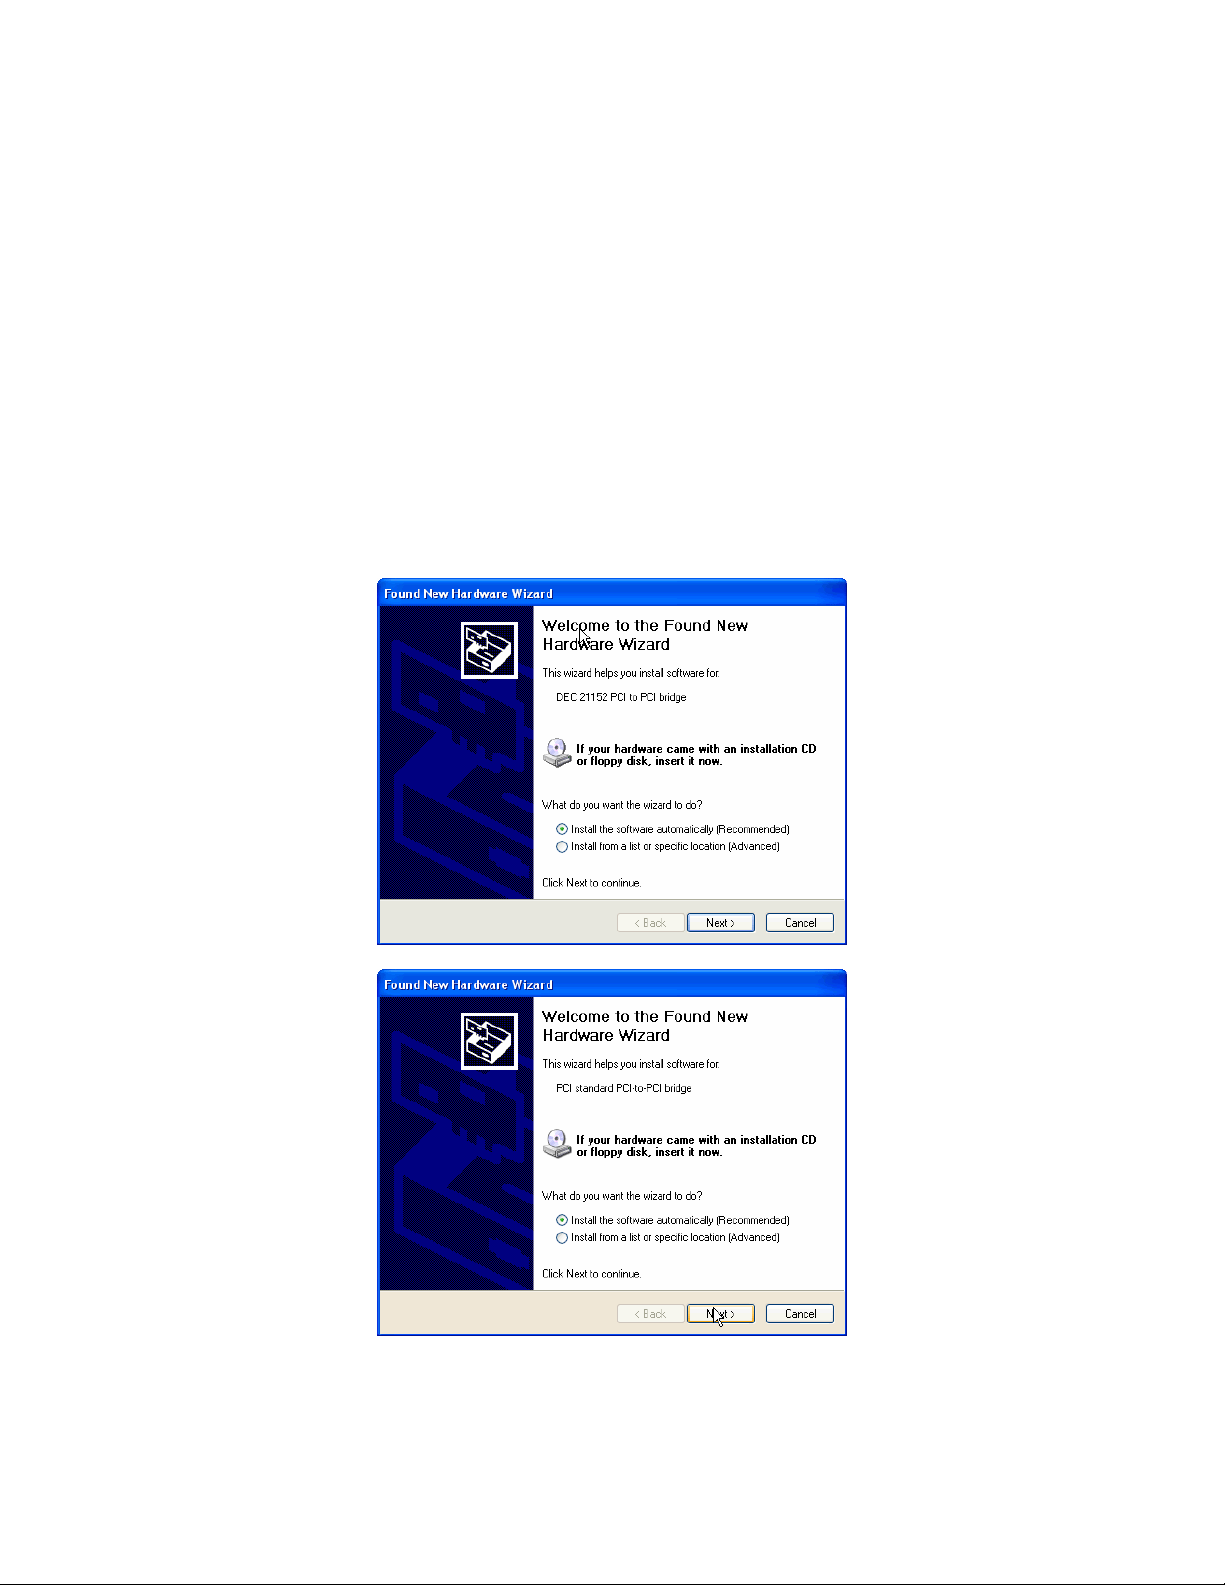
During various stages of the installation, Windows will detect one or more devices called a “PCI
to PCI bridge.” Such as: “DEC 21152 PCI to PCI bridge” or “PCI standard PCI to PCI bridge.”
PCI bridges are part of the logical connection between your notebook and the SideCar. They are
industry-standard and are supported automatically by Windows XP/2000 once you follow the
installation wizard.
Always accept automatic installation of these bridges. Simply follow the prompts according to
your operating system (illustrated below) and restart your system when prompted.
Windows XP / Stage 1: Install PCI to PCI Bridge
Leave the default option selected: “Install the software automatically” — click “Next” and finally
“Finish” at the confirmation screen. (Two versions of the Windows XP wizard are shown.)
Now skip ahead three pages (past the Windows 2000 PCI to PCI Bridge section) to install your
SideCar MMS display controllers and attached monitors.
20- W
INDOWS
XP/2000
DRIVER INSTALLATION
Page 25
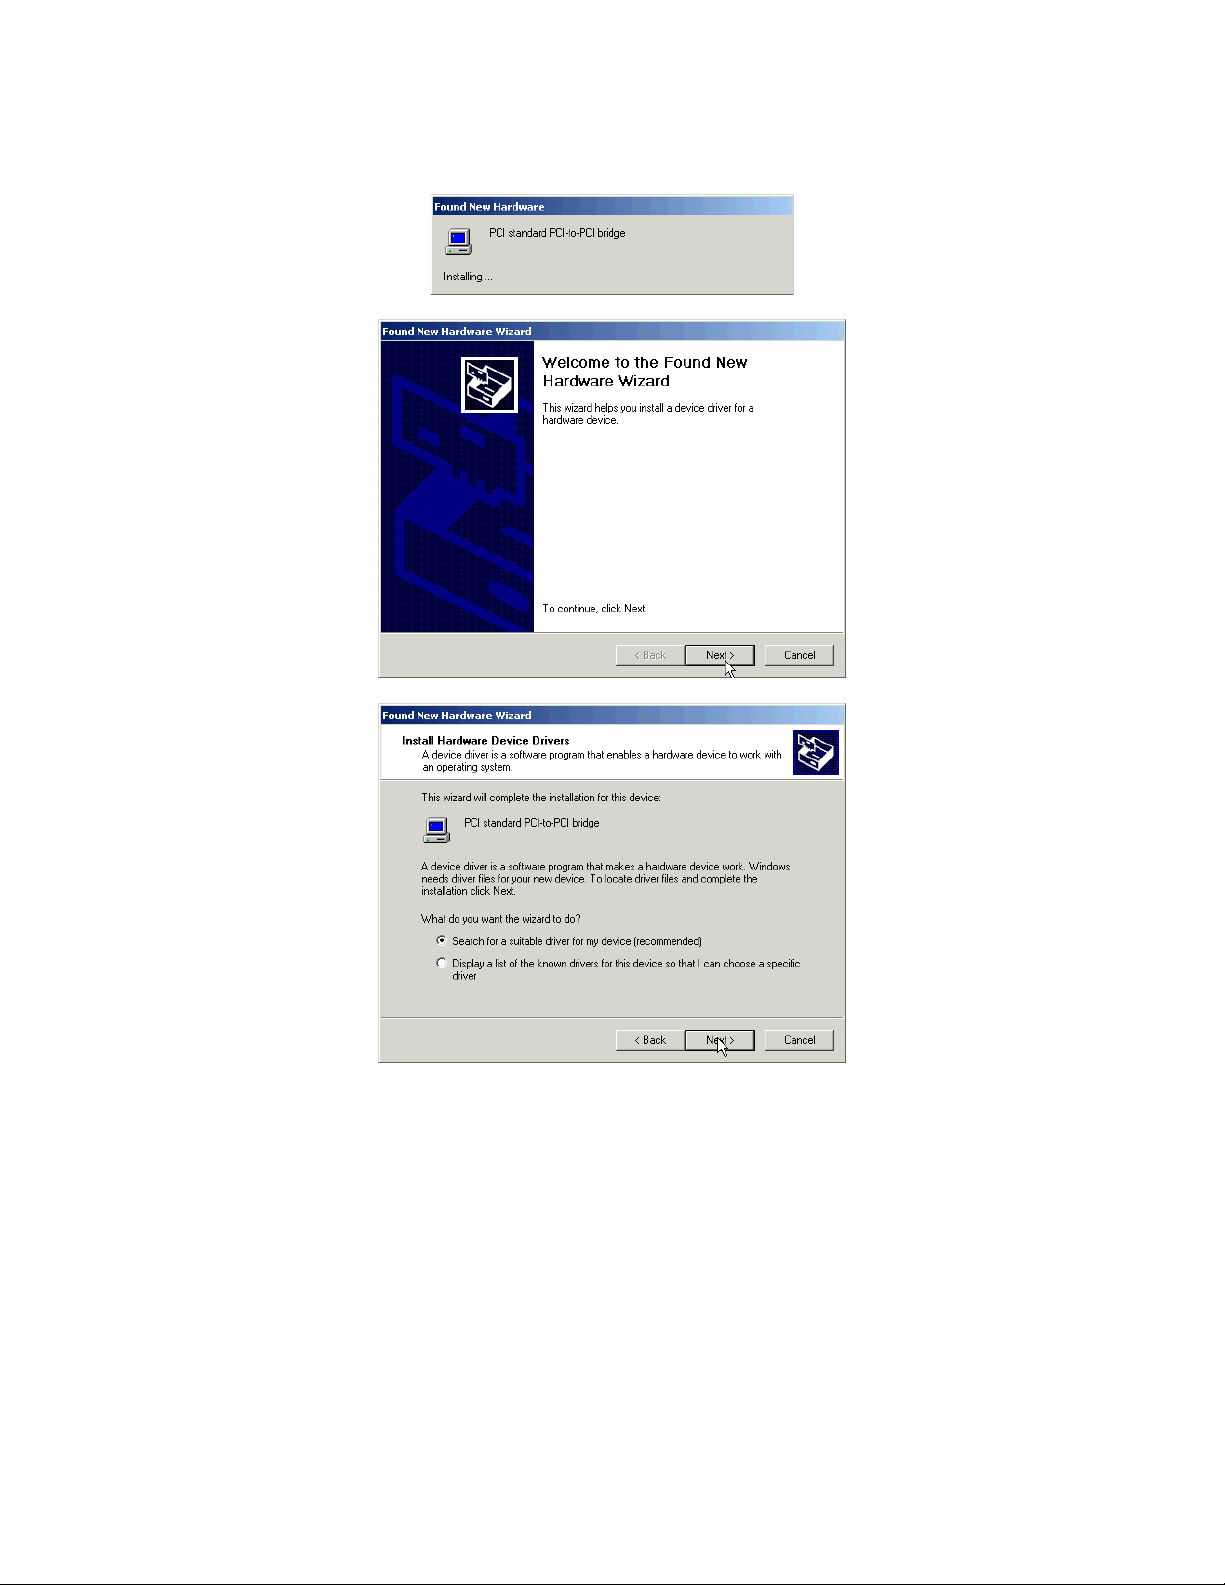
Windows 2000 / Stage 1: Install PCI to PCI Bridge
21- W
INDOWS
XP/2000
DRIVER INSTALLATION
Page 26
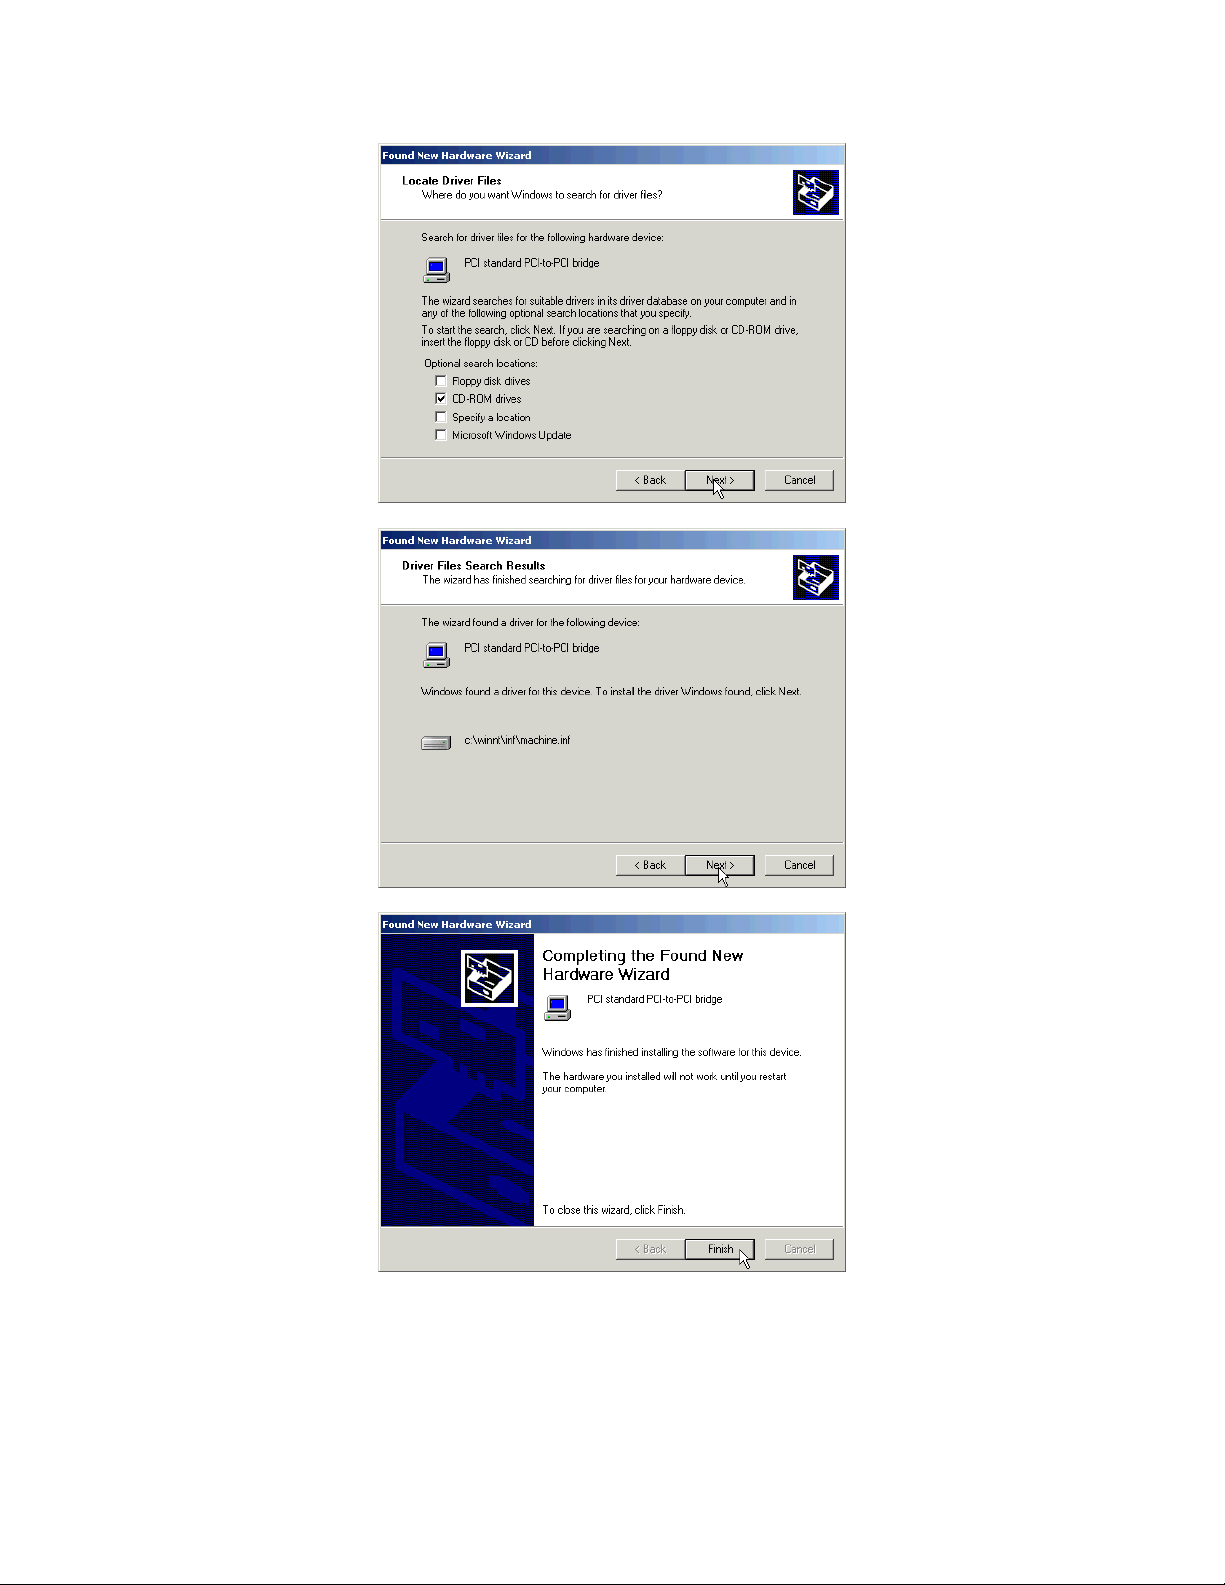
22- W
INDOWS
XP/2000
DRIVER INSTALLATION
Page 27
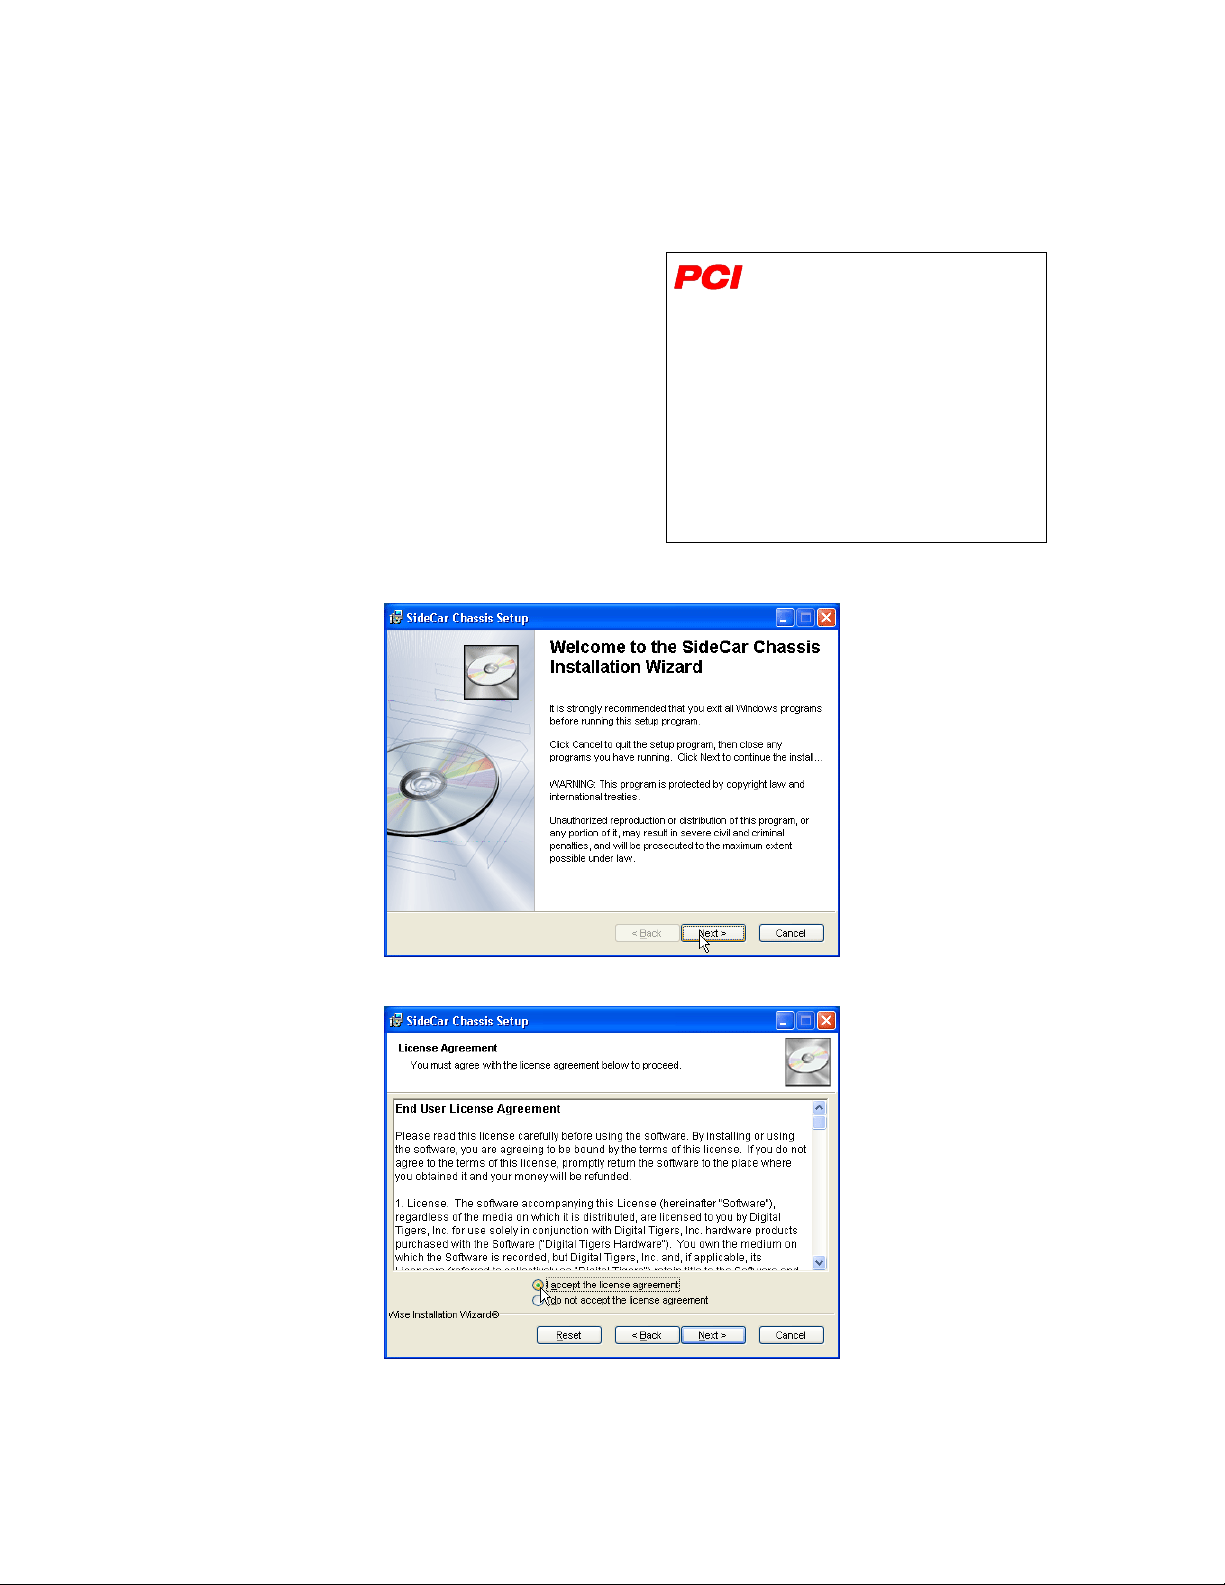
Stage 2. Install SideCar chassis driver (PC Card version only*)
1. After restarting your system (as prompted
by Windows after installing a PCI to PCI
bridge), insert the SideCar installation CD.
2. A setup program should launch. (On
notebooks with autorun disabled, browse to
the CD and launch Setup.exe from the root
directory of the CD). Follow the Setup
program prompts.
*SideCar chassis driver is not
required for SideCar versions using
a PCI adapter interface as a
substitute for the PC Card interface.
The PCI adapter forms a PCI-to-PCI
bridge and is supported natively by
Windows 2000 / XP by accepting an
automatic installation wizard.
However, display drivers are still
required. Power up your computer,
insert the installation CD, cancel the
Setup program shown below, and
skip to the PCI bridge section.
23- W
INDOWS
XP/2000
DRIVER INSTALLATION
Page 28
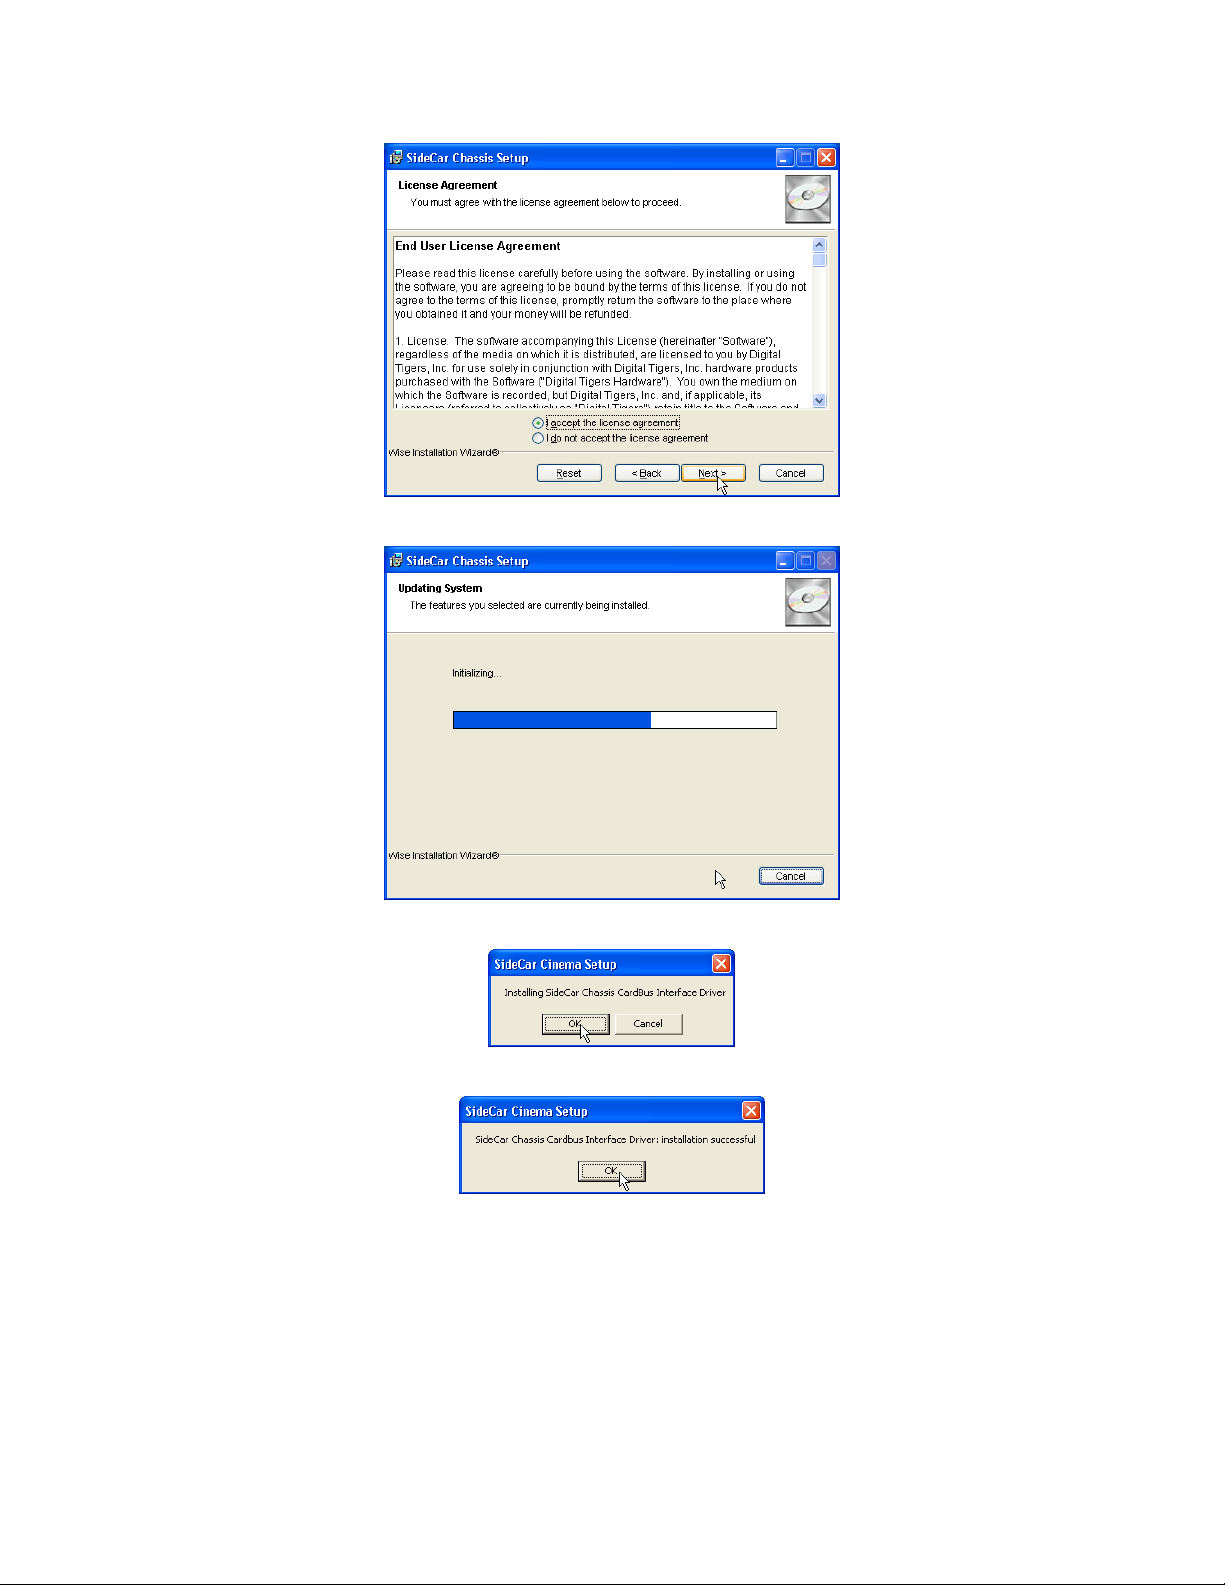
24- W
INDOWS
XP/2000
DRIVER INSTALLATION
Page 29
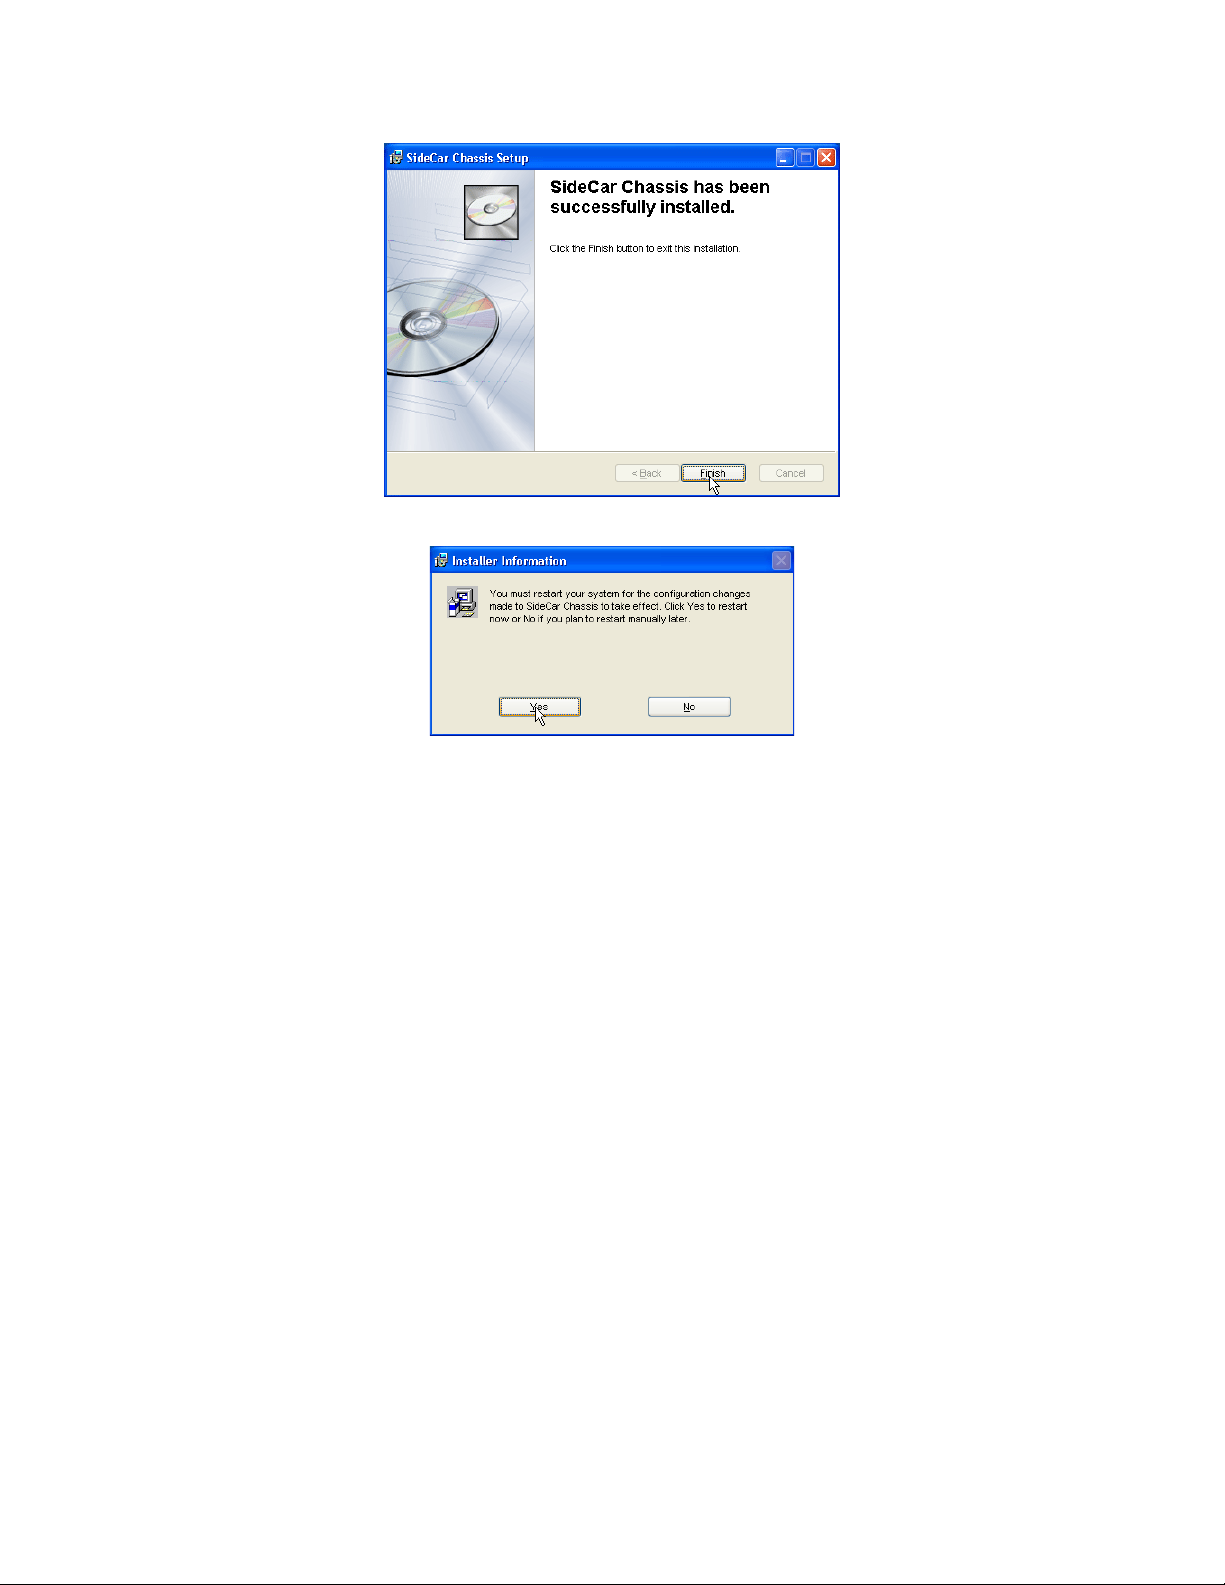
Restart your computer after Setup completes. (Clicking “Yes” at the closing dialog box will
automatically restart your computer.) Leave your SideCar CD in the drive for the next steps.
25- W
INDOWS
XP/2000
DRIVER INSTALLATION
Page 30
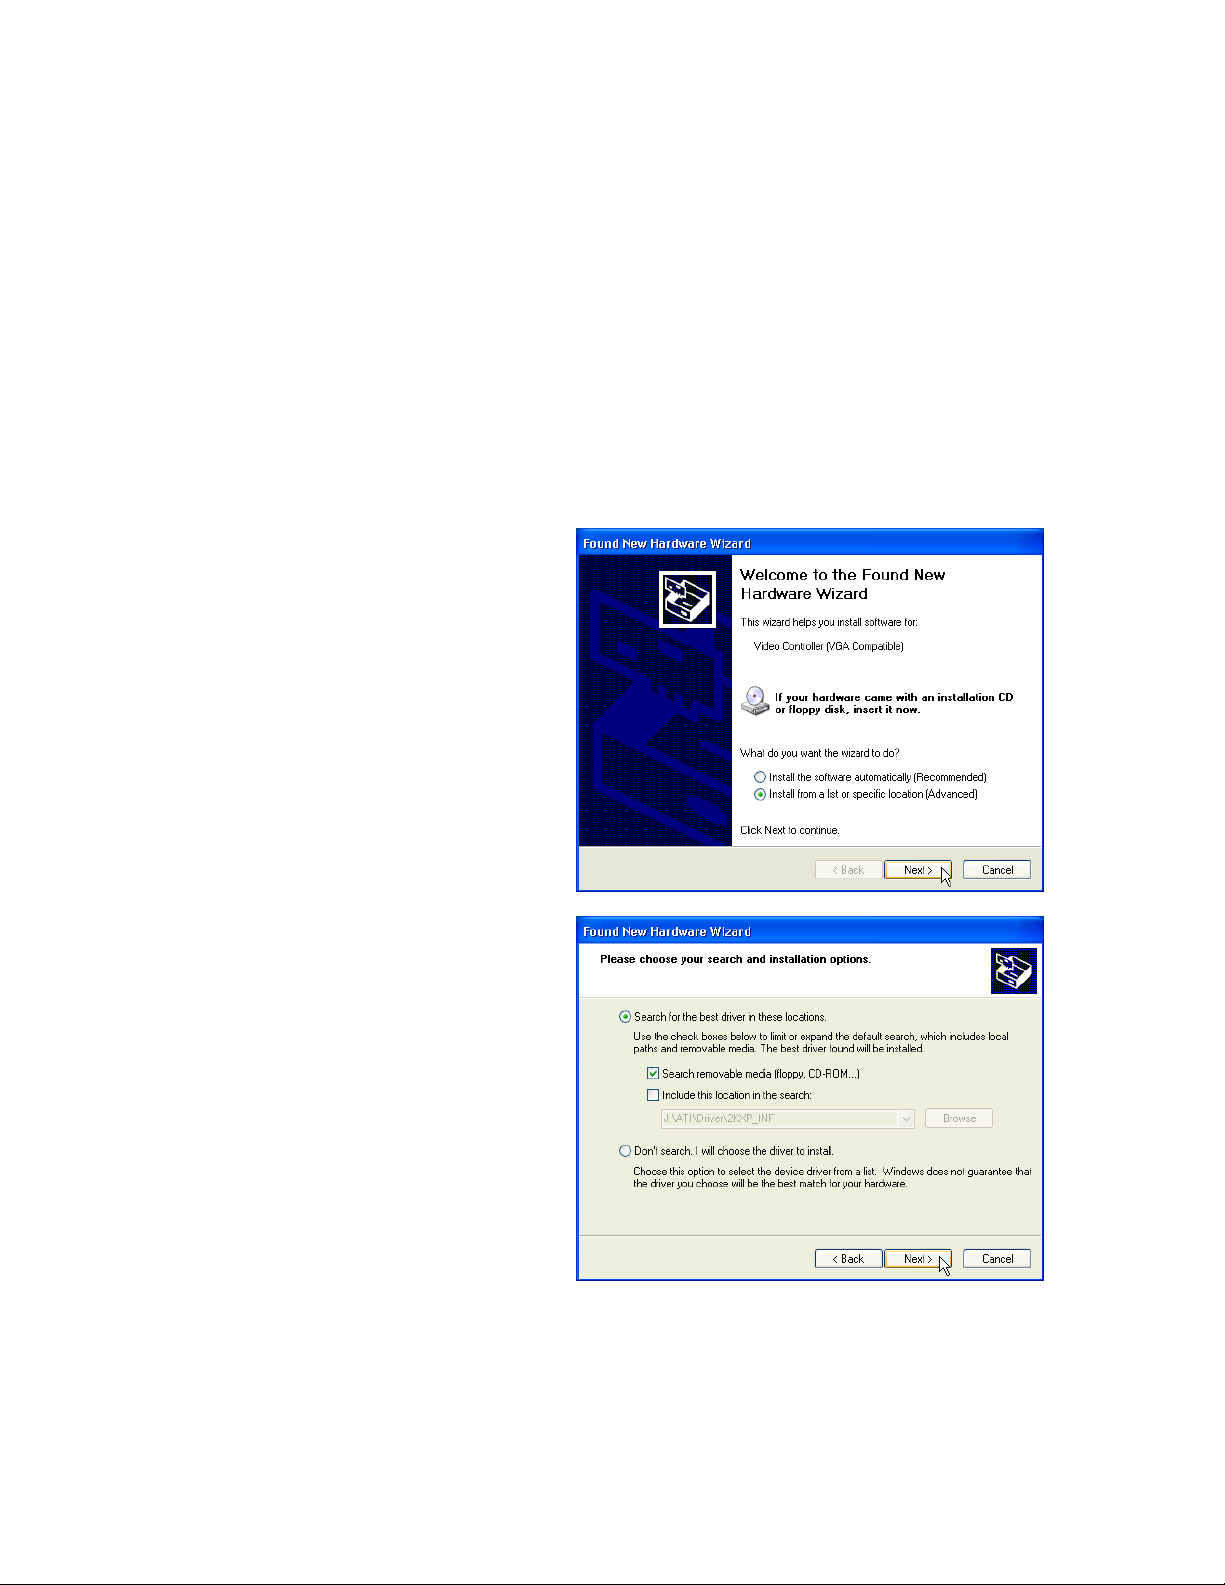
Stages 3 - 4: Install SideCar MMS display controllers and monitors
Next, Windows should detect the first SideCar MMS display controller and alert you with a
“Found New Hardware Wizard.”
Note: The SideCar MMS series contains multiple display controllers. These can be installed in
succession without restarting your computer. The procedure is the same for each controller and
attached monitor.
Windows XP: Follow the sequence below.
Windows 2000: Skip ahead four pages to the Windows 2000 section.
Windows XP / Stage 3: Install display drivers
1. After installing the PCI to PCI
bridge (previous section),
Windows XP will open this alert:
Click the option “Install from a
list or specific location
(Advanced)” — then click
“Next.”
2. The dialog box reports:
Ensure that “Search for the best
driver in these locations” is
selected, along with “Search
removable media (floppy, CDROM...)” — then click “Next.”
26- W
INDOWS
XP/2000
DRIVER INSTALLATION
Page 31
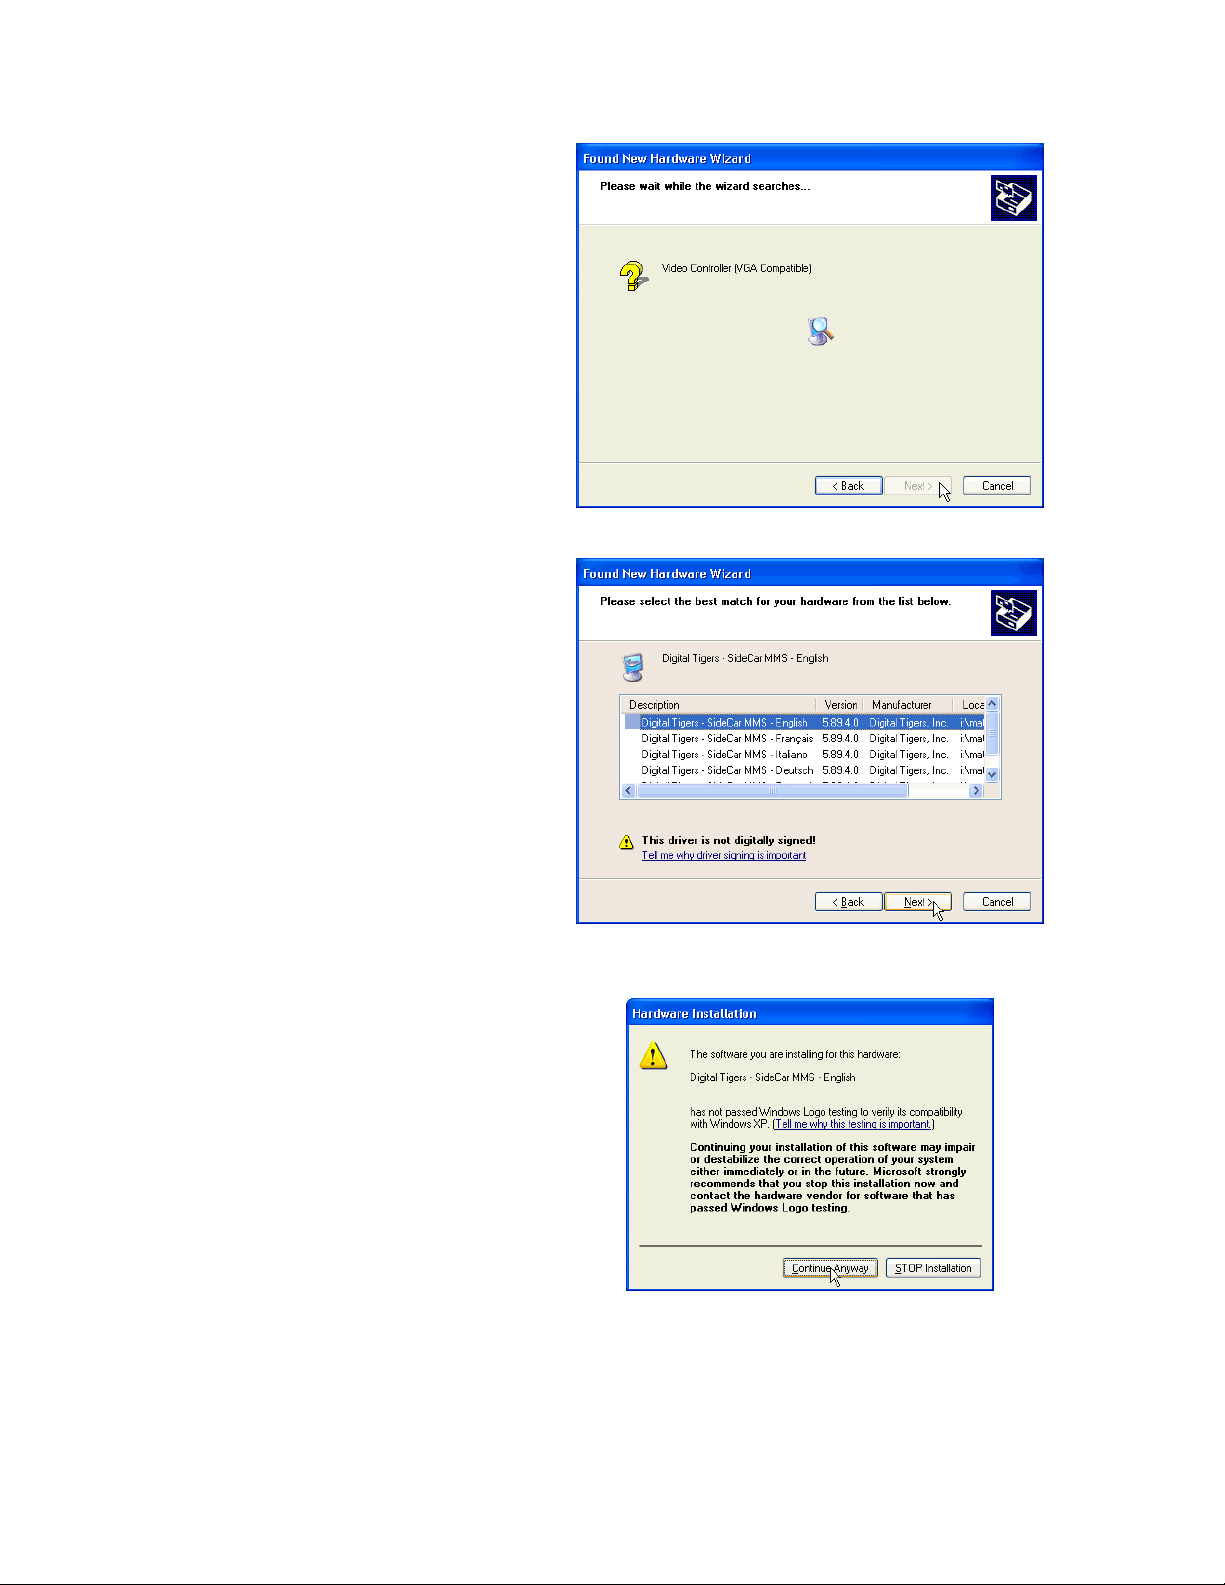
The wizard will show you a
progress screen while it searches
for drivers.
3. The dialog box reports:
“Please select the best match for
your hardware from the list
below.” The default option,
English, is selected.
If you wish to install in
English, leave “English”
selected and click “Next.”
If you wish to install in French,
Italian, German or Spanish,
select the appropriate language
and then click “Next.”
4. The dialog box reports:
Click “Continue Anyway.”
27- W
INDOWS
XP/2000
DRIVER INSTALLATION
Page 32
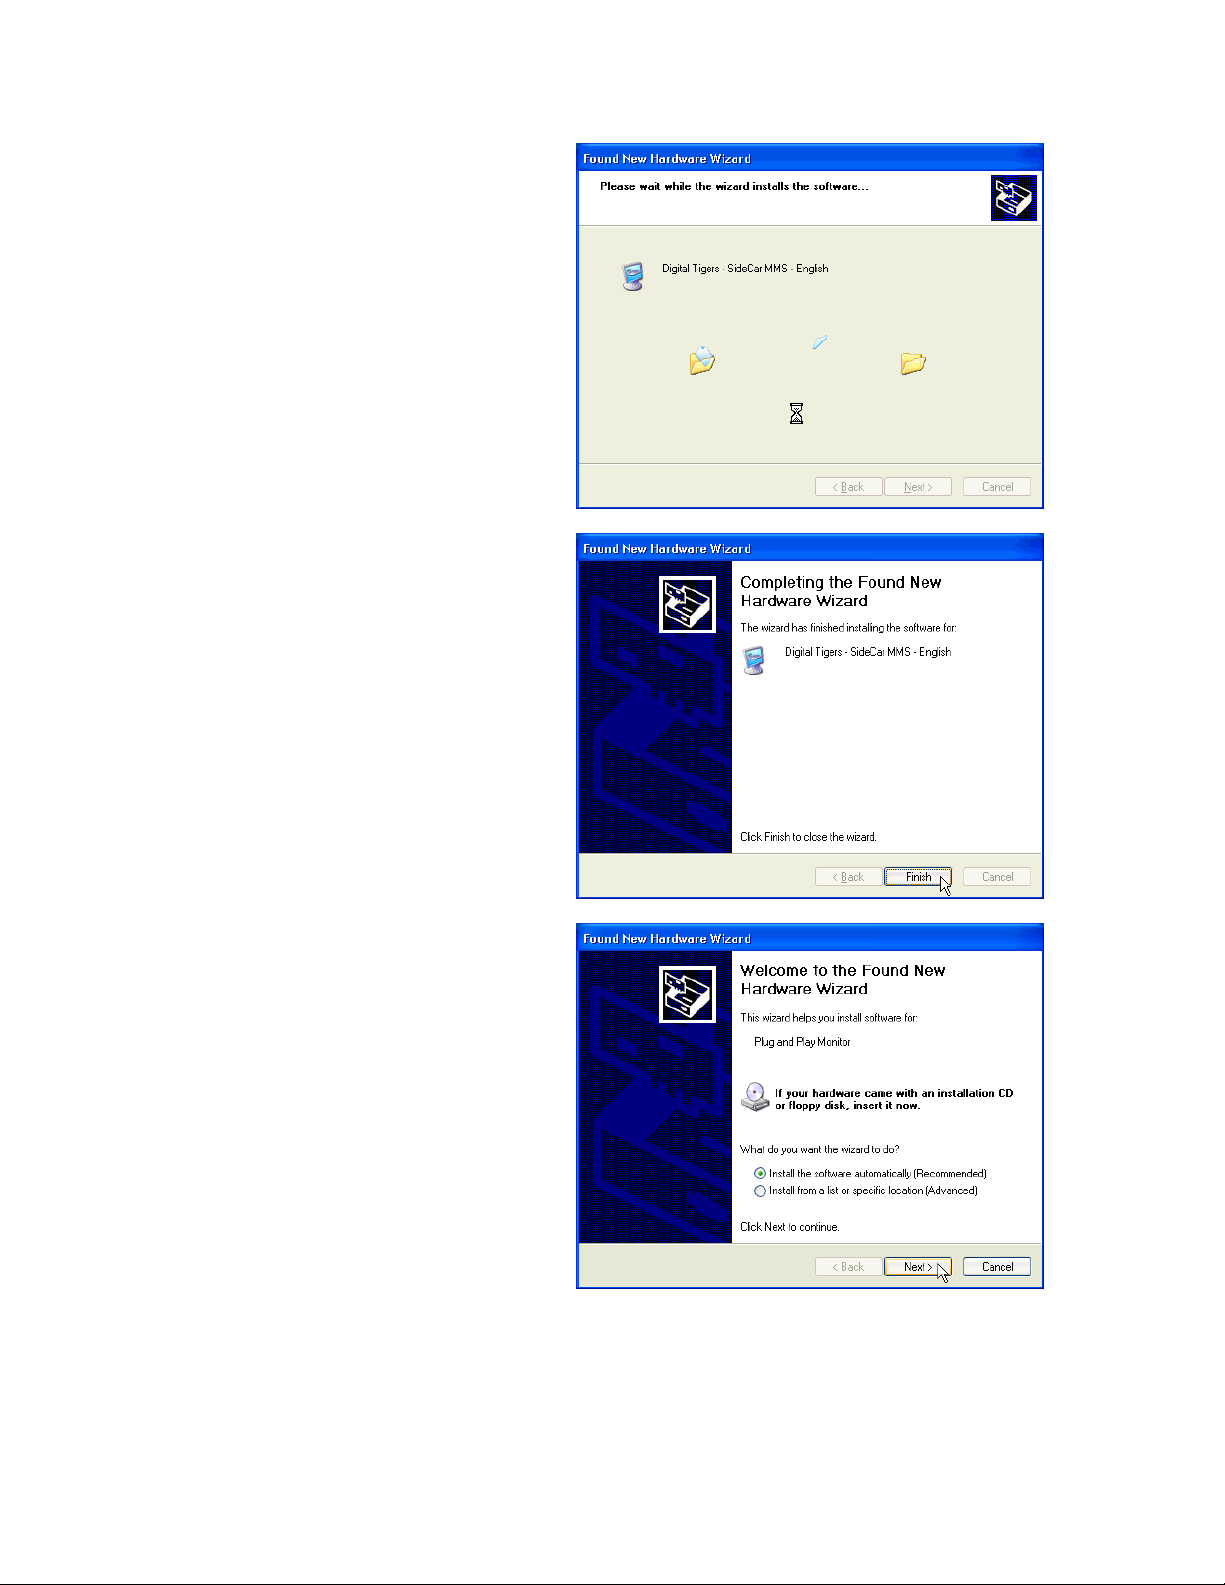
Wait while the drivers are
installed. Your screen may flicker
at times during this process.
5. The dialog box reports:
Click “Finish.”
Windows XP / Stage 4:
Install monitors
If your monitors are attached to the
SideCar and powered on, a dialog box
like this may open:
Accept the default option “Install the
software automatically
(Recommended)” and click “Next” —
and click “Finish” on the following screen
to complete the installation.
Windows XP: Install remaining SideCar MMS controllers and monitors
Repeat stages 3 and 4 until all controllers and monitors are installed.
Restart your system when prompted.
Then skip to Chapter 5 to activate and configure your monitors.
28- W
INDOWS
XP/2000
DRIVER INSTALLATION
Page 33
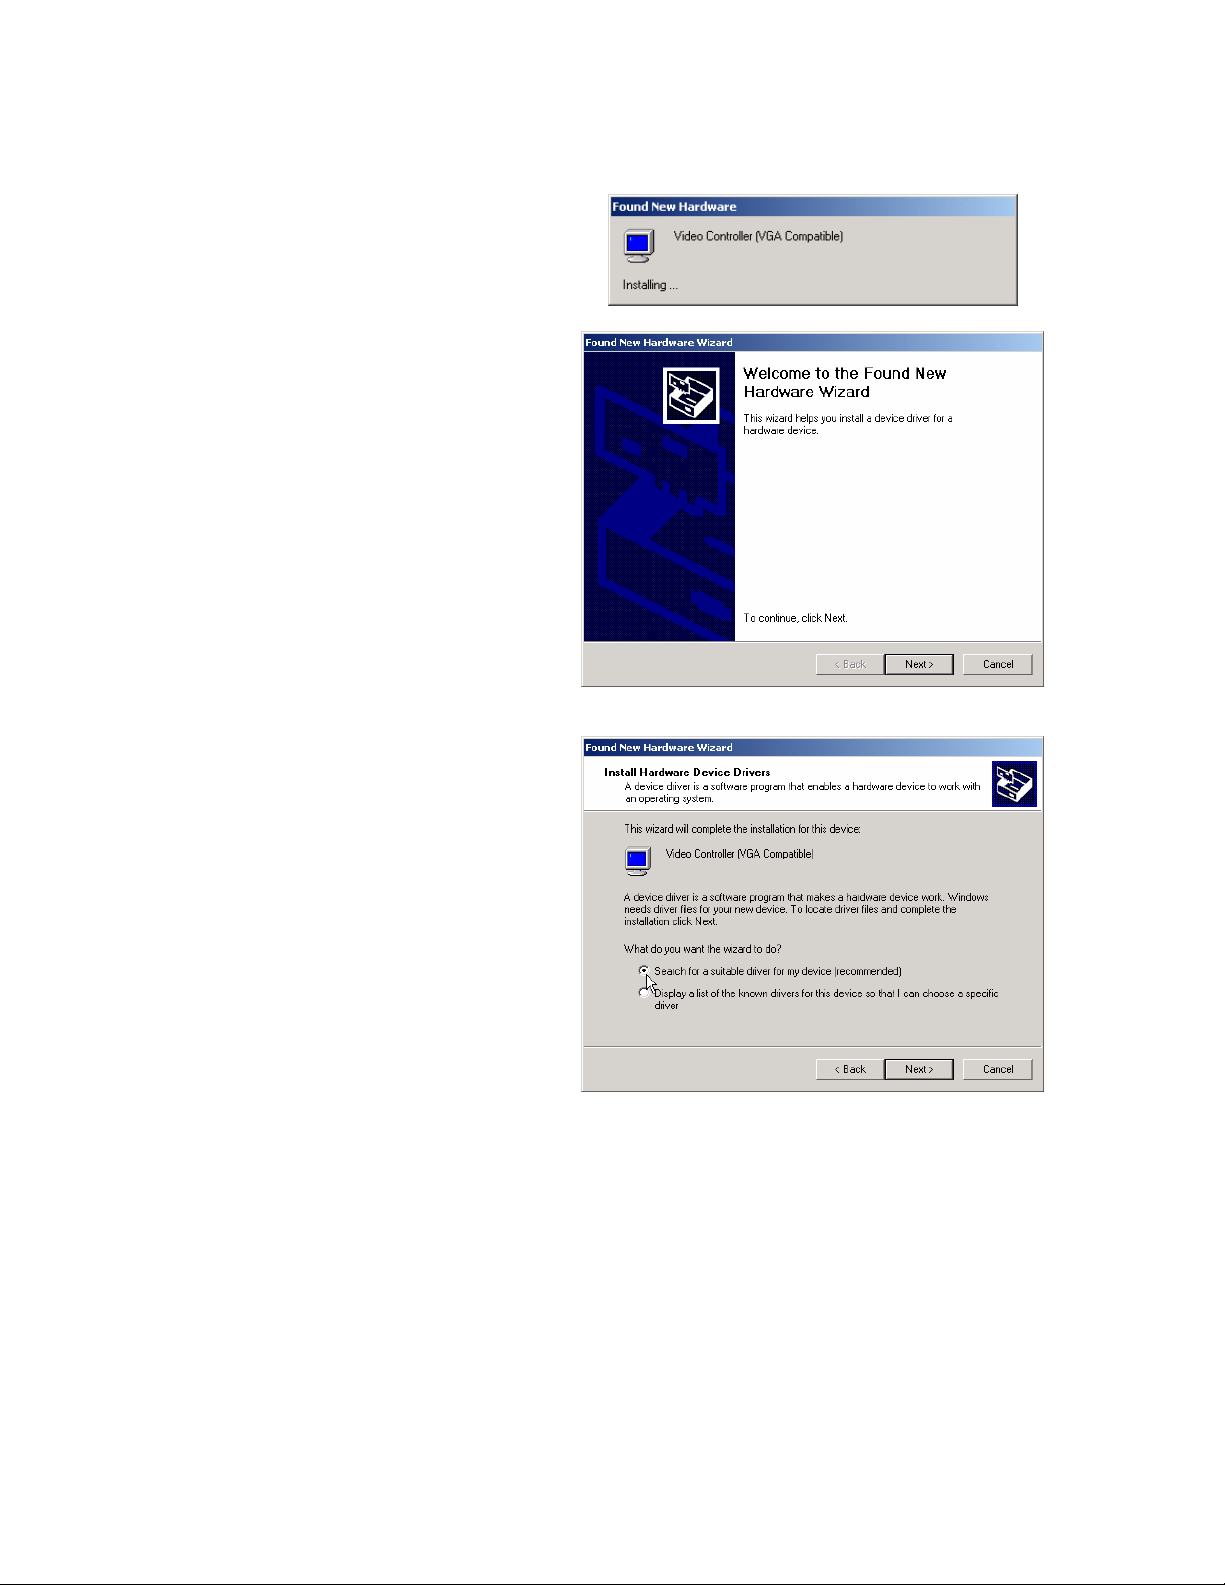
Windows 2000 / Stage 3: Install SideCar MMS display drivers
1. Windows 2000 will open these
alerts:
2. Click “Next” to continue.
3. The dialog box reports:
Ensure that “Search for a
suitable driver for my device
(recommended)” is selected, then
click “Next”.
29- W
INDOWS
XP/2000
DRIVER INSTALLATION
Page 34
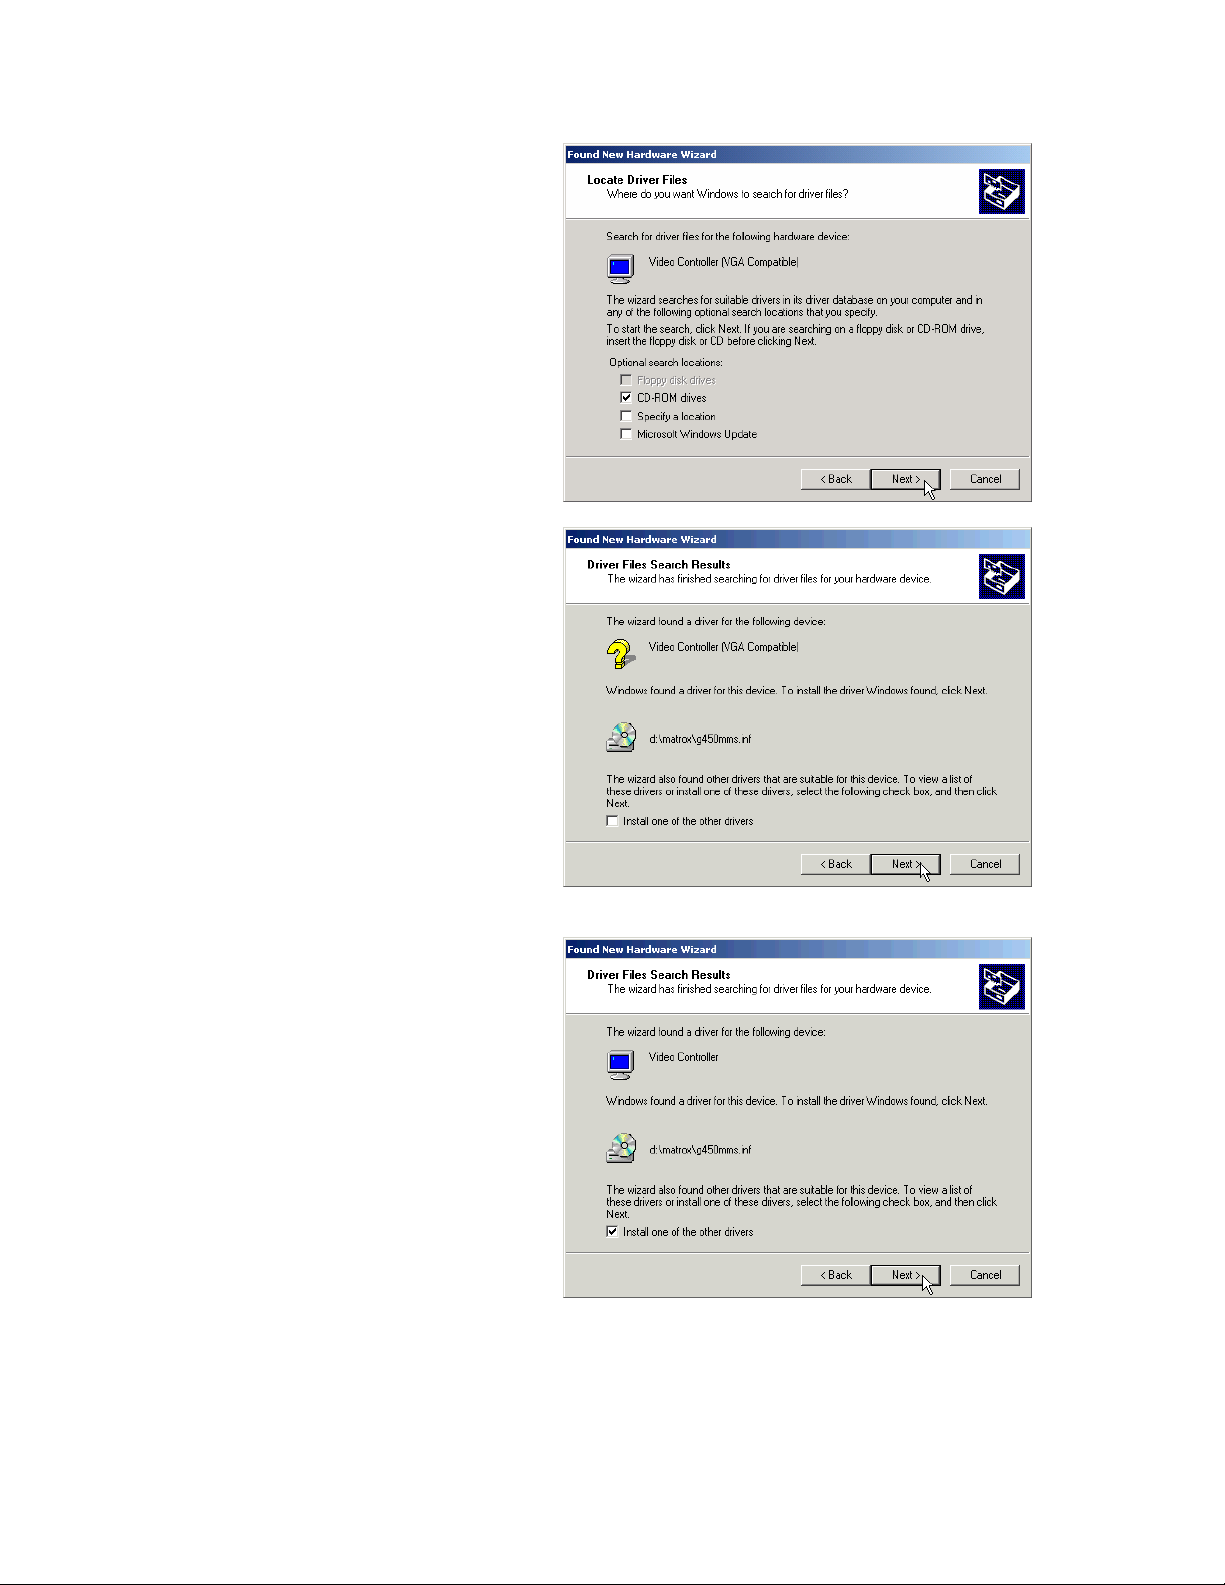
4. The dialog box reports:
Ensure that “CD-ROM
drives” is checked, then click
“Next”.
5. The installer finds the driver.
The dialog box reports:
If you wish to install in
English, click “Next” and
skip to step 7.
If you wish to install in
French, Italian, German
or Spanish, click the
checkbox “Install one of
the other drivers” and then
click “Next.”
6. (French, Italian, German
and Spanish users only)
Click the checkbox “Install
one of the other drivers” and
click “Next.”
30- W
INDOWS
XP/2000
DRIVER INSTALLATION
Page 35
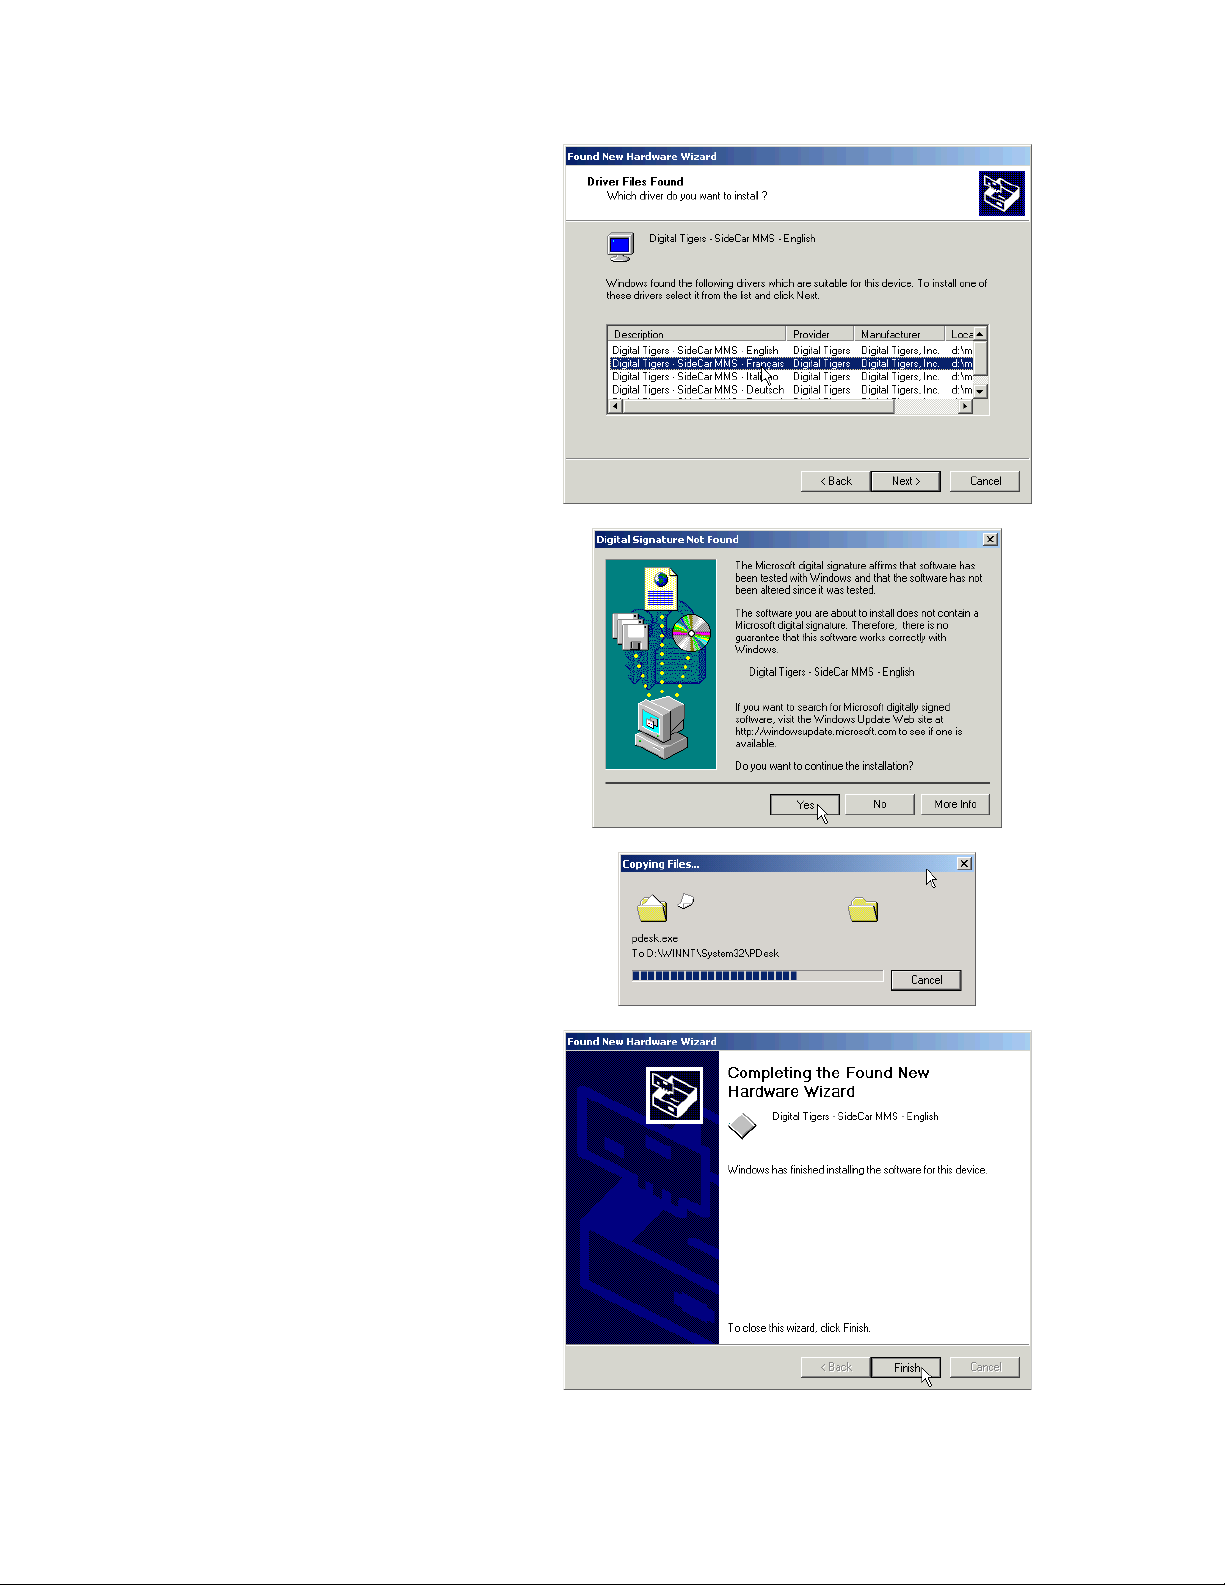
On the following screen,
choose your preferred
language and click “Next.”
7. (All users) The dialog box
reports:
Click “Yes” to continue.
8. The drivers will begin to be
installed:
Late in this process, your screen
may flicker briefly, and then you
will see the following completion
confirmation:
9. Click “Finish” to close the
dialog box.
Do not restart your
computer, even if prompted.
31- W
INDOWS
XP/2000
DRIVER INSTALLATION
Page 36

Windows 2000 / Stage 4: Install monitors
You may be prompted to install your monitor(s). If so, follow the default prompts and accept
automatic installation.
Windows 2000: Install remaining SideCar MMS controllers and monitors
Repeat stages 3 and 4 until all controllers and monitors are installed.
Then advance to chapter 5 to activate and configure your monitors.
32- W
INDOWS
XP/2000
DRIVER INSTALLATION
Page 37
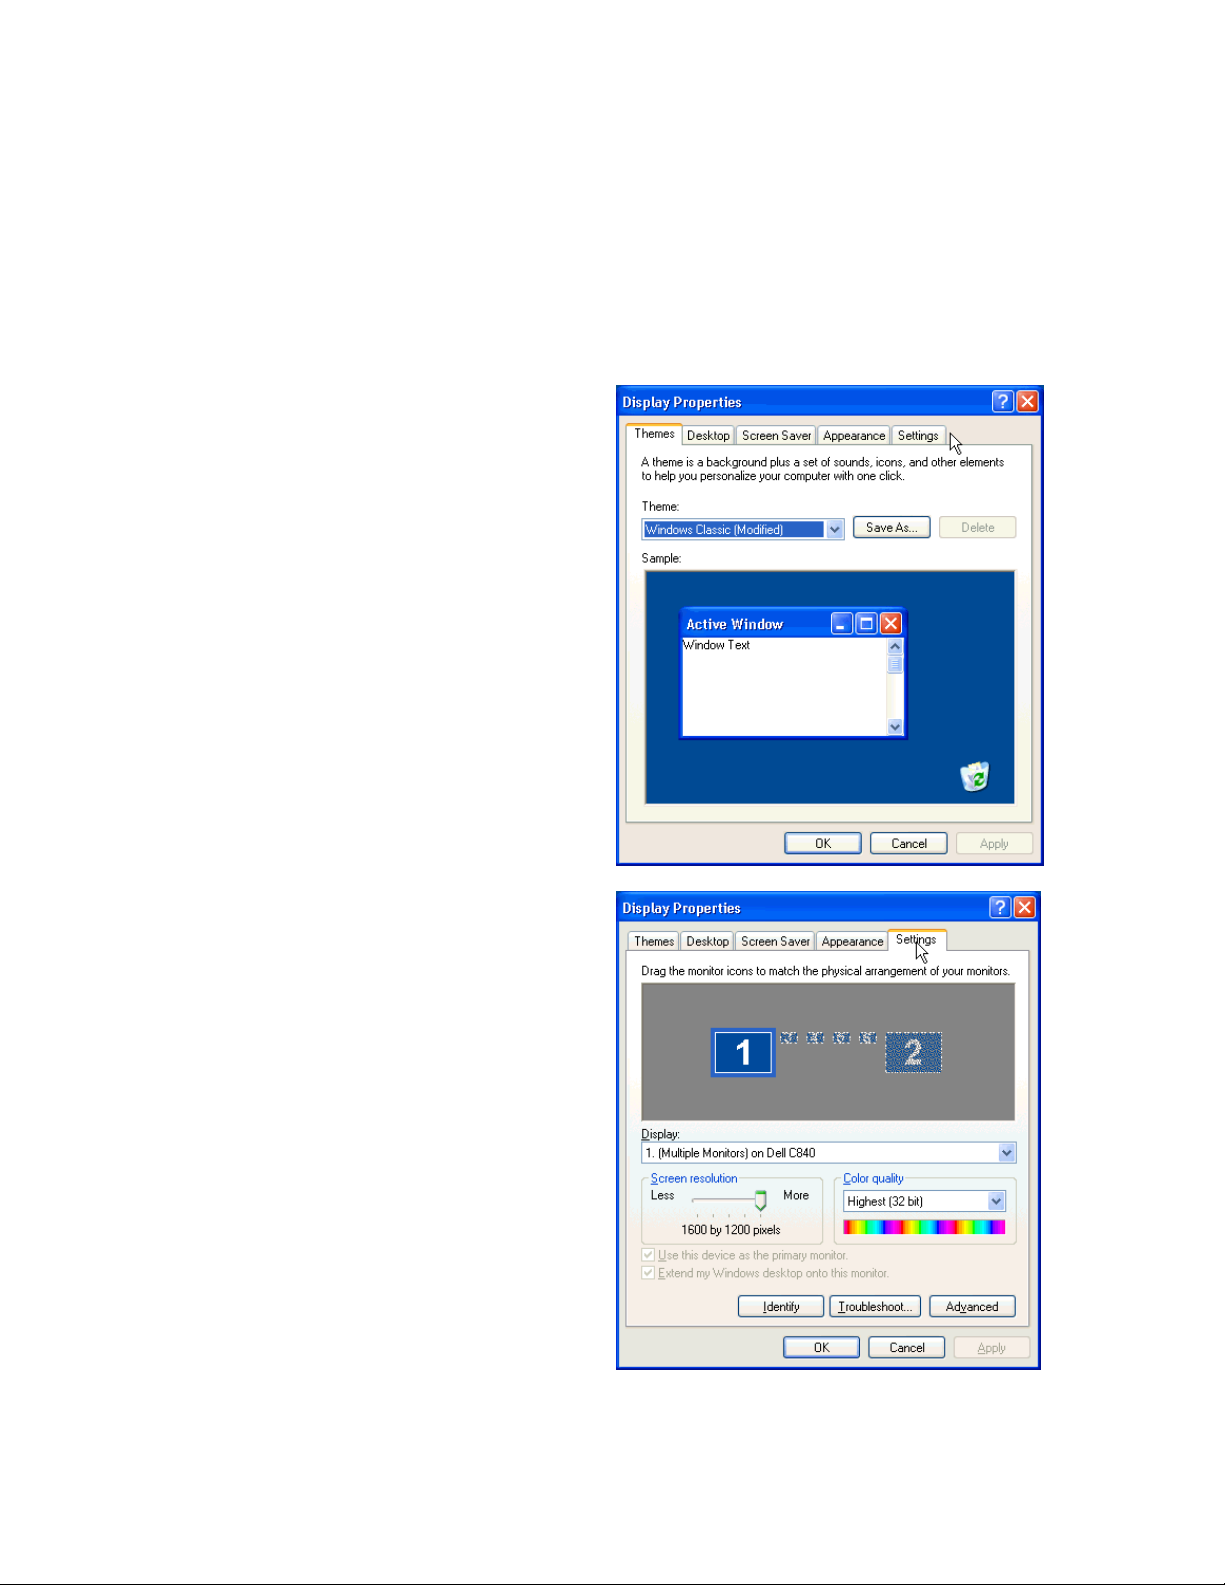
Chapter 5 - Monitor activation and configuration
This chapter guides you through the activation of your SideCar monitors. You must first install
the required drivers (Chapter 4) in order to activate your monitors.
Using Display Properties
1. Right-click on the Windows
desktop, and select “Properties”.
2. The following “Display Properties”
dialog box will open:
Select the “Settings” tab on the far
right.
You should see a screen similar to this
(SideCar PlusFour MMS version):
33- M
ONITOR ACTIVATION AND CONFIGURATION
Page 38

You should see an icon-based representation of three or four monitors, each with a
number. The “1” monitor is your notebook LCD display. The “grayed out” monitors
are inactive monitors
If you see a total of four or six monitors, the #2 monitor is typically (but not
always) a secondary monitor supported by your notebook’s secondary monitor
port (typically available only under Windows XP). In this case, the highernumber monitors are the monitors controlled by the SideCar. In typical examples:
SideCar PlusTwo MMS: monitors #3 and #4 are the SideCar monitors
SideCar PlusFour MMS: monitors #3 - #6 are the SideCar monitors
You should verify the monitor numbering by clicking on the displays and reading
the caption in the “Display” field.
If you see a total of three or five monitors, the higher-number monitors are the
monitors controlled by the SideCar.
SideCar PlusTwo MMS: monitors #2 and #3 are the SideCar monitors
SideCar PlusFour MMS: monitors #2 - #5 are the SideCar monitors
You should verify this by clicking on the display icons and reading the caption in
the “Display” field.
If you see only one or two monitors, the SideCar has not been fully recognized
by your notebook computer. In this event, reboot your computer and return to
these steps. If you still see only one or two monitors, reinstall drivers (previous
chapter) and try again. If you still see only one or two monitors, review the
troubleshooting steps in this documentation and contact Digital Tigers support if
necessary.
Most SideCar PlusFour MMS users using Windows XP will see six monitors in Display
Properties, with the SideCar displays #3, #4, #5 and #6. We will use this configuration in
the remainder of this chapter when explaining configuration settings. For other users:
“Monitor #3” refers to the lower-number SideCar monitor
“Monitors #4 - #6” are the higher-number SideCar monitors
34- M
ONITOR ACTIVATION AND CONFIGURATION
Page 39
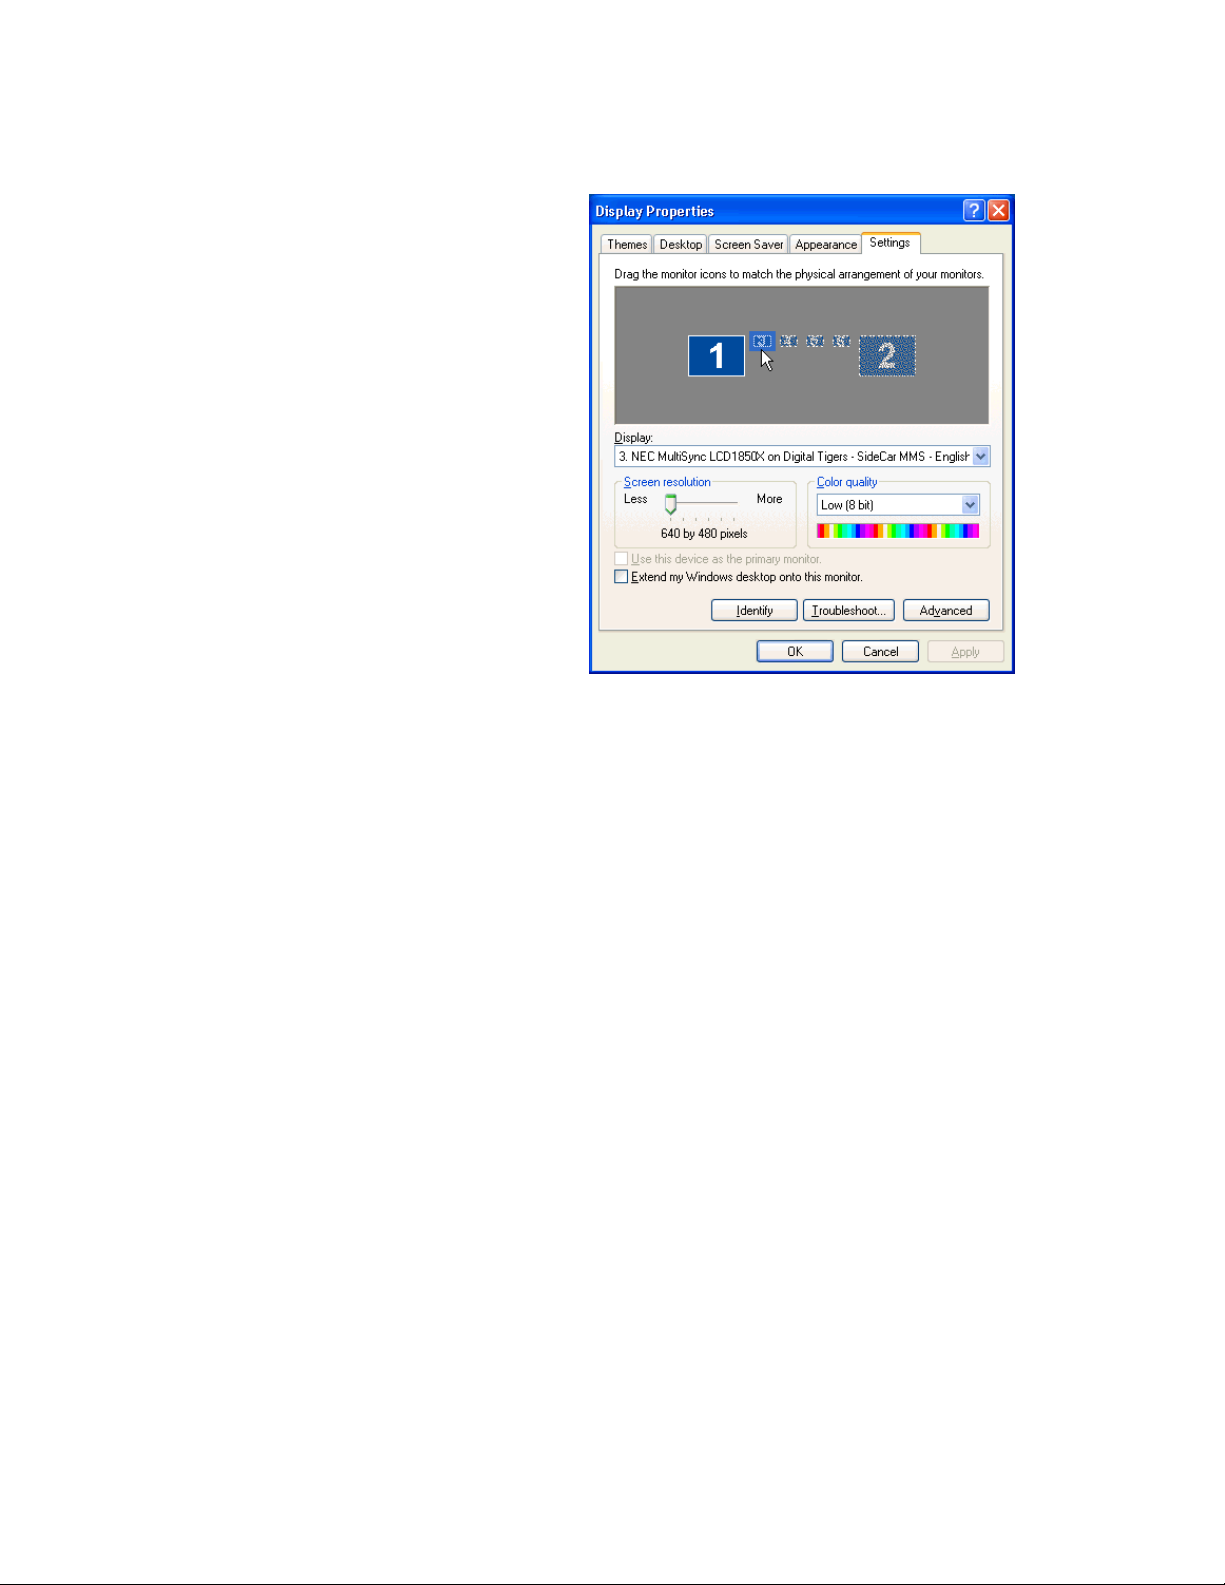
3. Select the lowest number SideCar monitor (click on the monitor with your mouse).
The following is the resulting
screen in a six-monitor
example:
The lower half of the dialog box will display the properties for this monitor:
Display: You should see a description such as, “Plug and Play Monitor on Digital
Tigers SideCar MMS”. (The monitor name may vary, but you should see the “Digital
Tigers SideCar MMS” portion regardless.)
Screen resolution: You should see a slider running from “Less” to “More”, with
corresponding numeric descriptions. The default is “640 by 480 pixels”. Screen
resolution controls how much information can be displayed on a given monitor.
Analog CRT monitors typically work at multiple resolution settings, but flat-panel
displays are typically optimized for a single resolution setting.
Color quality: You should see one of various drop-down field values, such as
“Highest (32 bit)”, “Medium (16 bit)”, and “Low (8 bit).”
Checkbox: “Use this device as the primary monitor” (grayed out by default)
Checkbox: “Extend my Windows desktop onto this monitor”
Identify: This button displays the identifying number of each monitor. (For example,
“1” will display on your notebook LCD by default.) This feature is useful to confirm
which settings control which monitor at your work area.
Troubleshoot: This button activates a Windows monitor troubleshooting wizard.
Advanced: This button provides access to advanced features discussed elsewhere in
this manual.
35- M
ONITOR ACTIVATION AND CONFIGURATION
Page 40
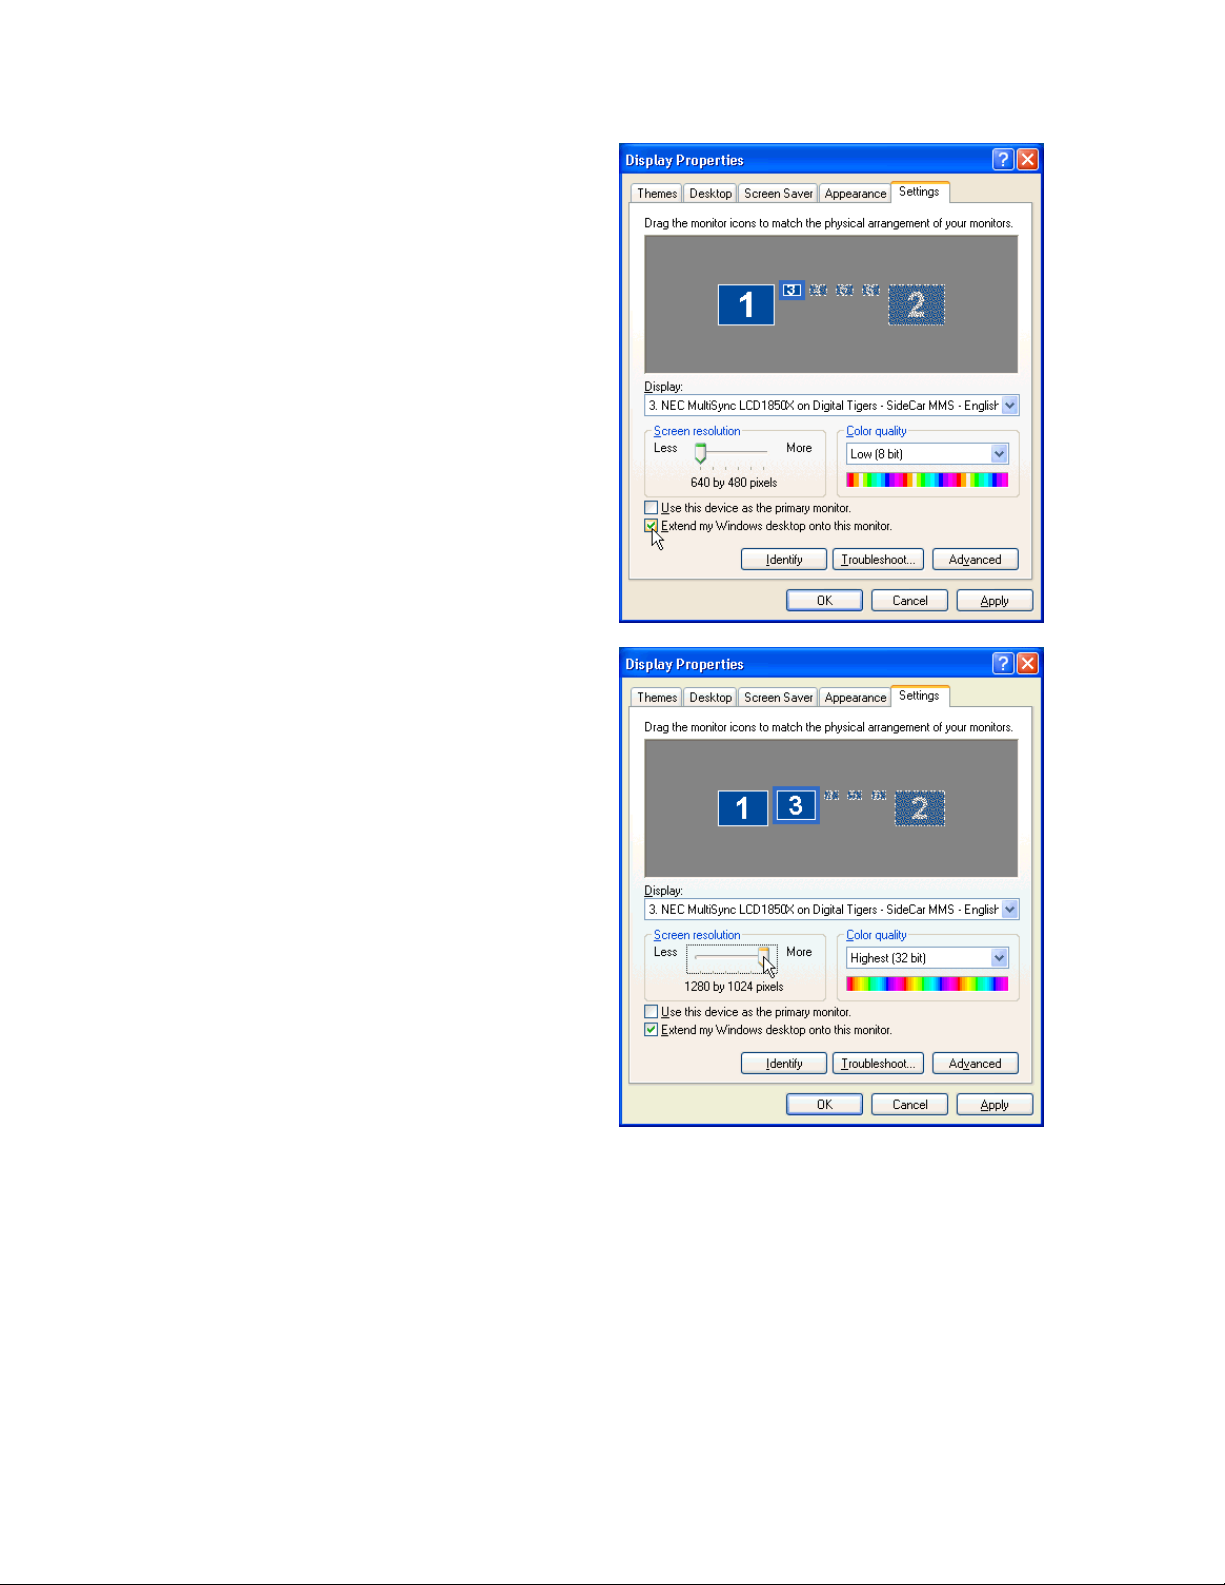
4. Click the checkbox “Extend my
Windows desktop onto this monitor.”
5. Determine the maximum resolution
of your monitor (available from your
monitor vendor’s documentation). You
should not attempt to operate your
monitor above its maximum
resolution. In most cases, Windows
will recognize your monitor and offer
you only those resolution options that
are compatible with your monitor.
Set the screen resolution at your
preferred setting. Flat-panel monitors
often must be run at the highest
setting available. Drag the screen
resolution slider until your preferred
resolution is displayed, such as “1280
by 1024 pixels”.
6. Set the color quality at your preferred setting. The “Highest (32 bit)” setting optimizes
color accuracy (important for imaging applications) but is slightly slower. The speed
difference is minor for most applications.
7. Leave unchecked the checkbox “Use this device as the primary monitor”, unless you
will be deactivating your notebook LCD screen or have other reasons to make one of
your SideCar monitors the primary monitor.
8. Click the “Apply” button on the lower right of the dialog box.
36- M
ONITOR ACTIVATION AND CONFIGURATION
Page 41
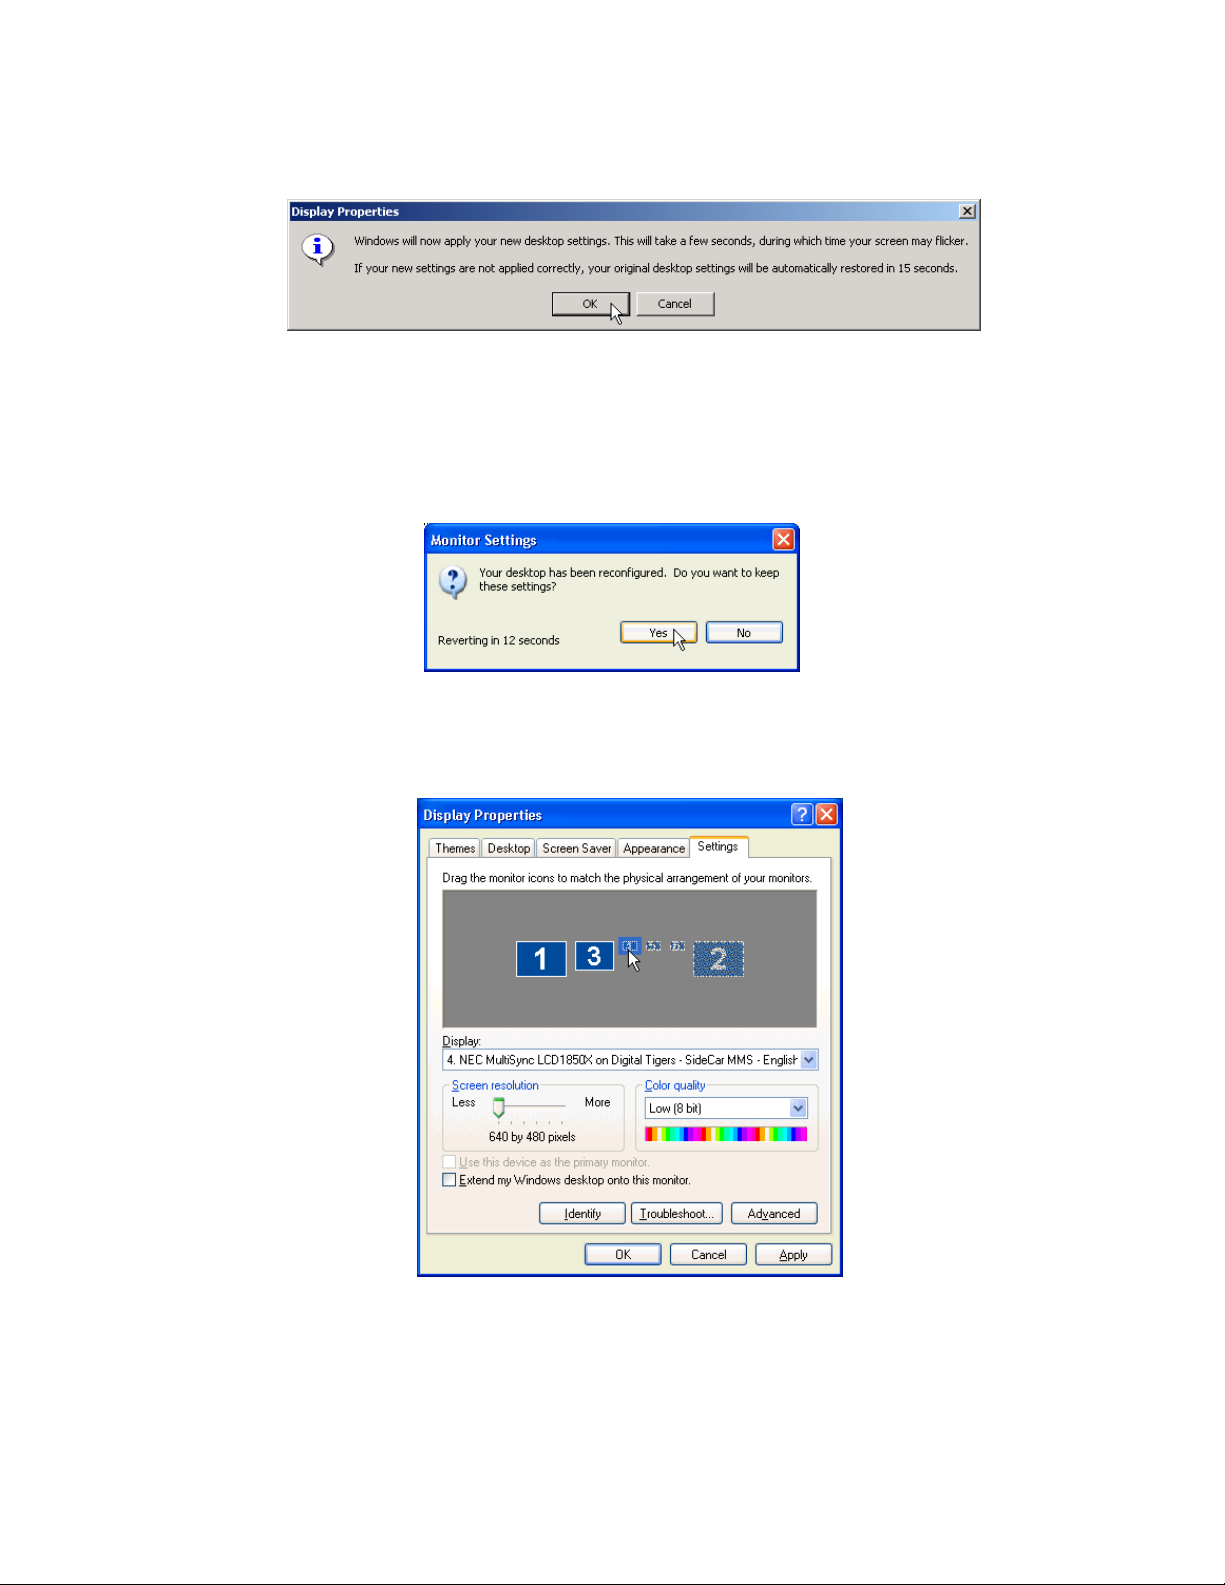
9. (Windows 2000 only) Windows will report:
Click “OK” to close the alert.
10. One of your monitors should now activate. (If not, confirm that both monitors are
powered on and are attached to the SideCar.)
Simultaneously, your notebook will display the pop-up dialog box:
Click “Yes” to accept the settings
11. Now activate the remaining SideCar monitors.
Select each monitor from the pictorial representation in the Display Properties
dialog box.
Repeat steps 3-10 to configure each monitor.
37- M
ONITOR ACTIVATION AND CONFIGURATION
Page 42
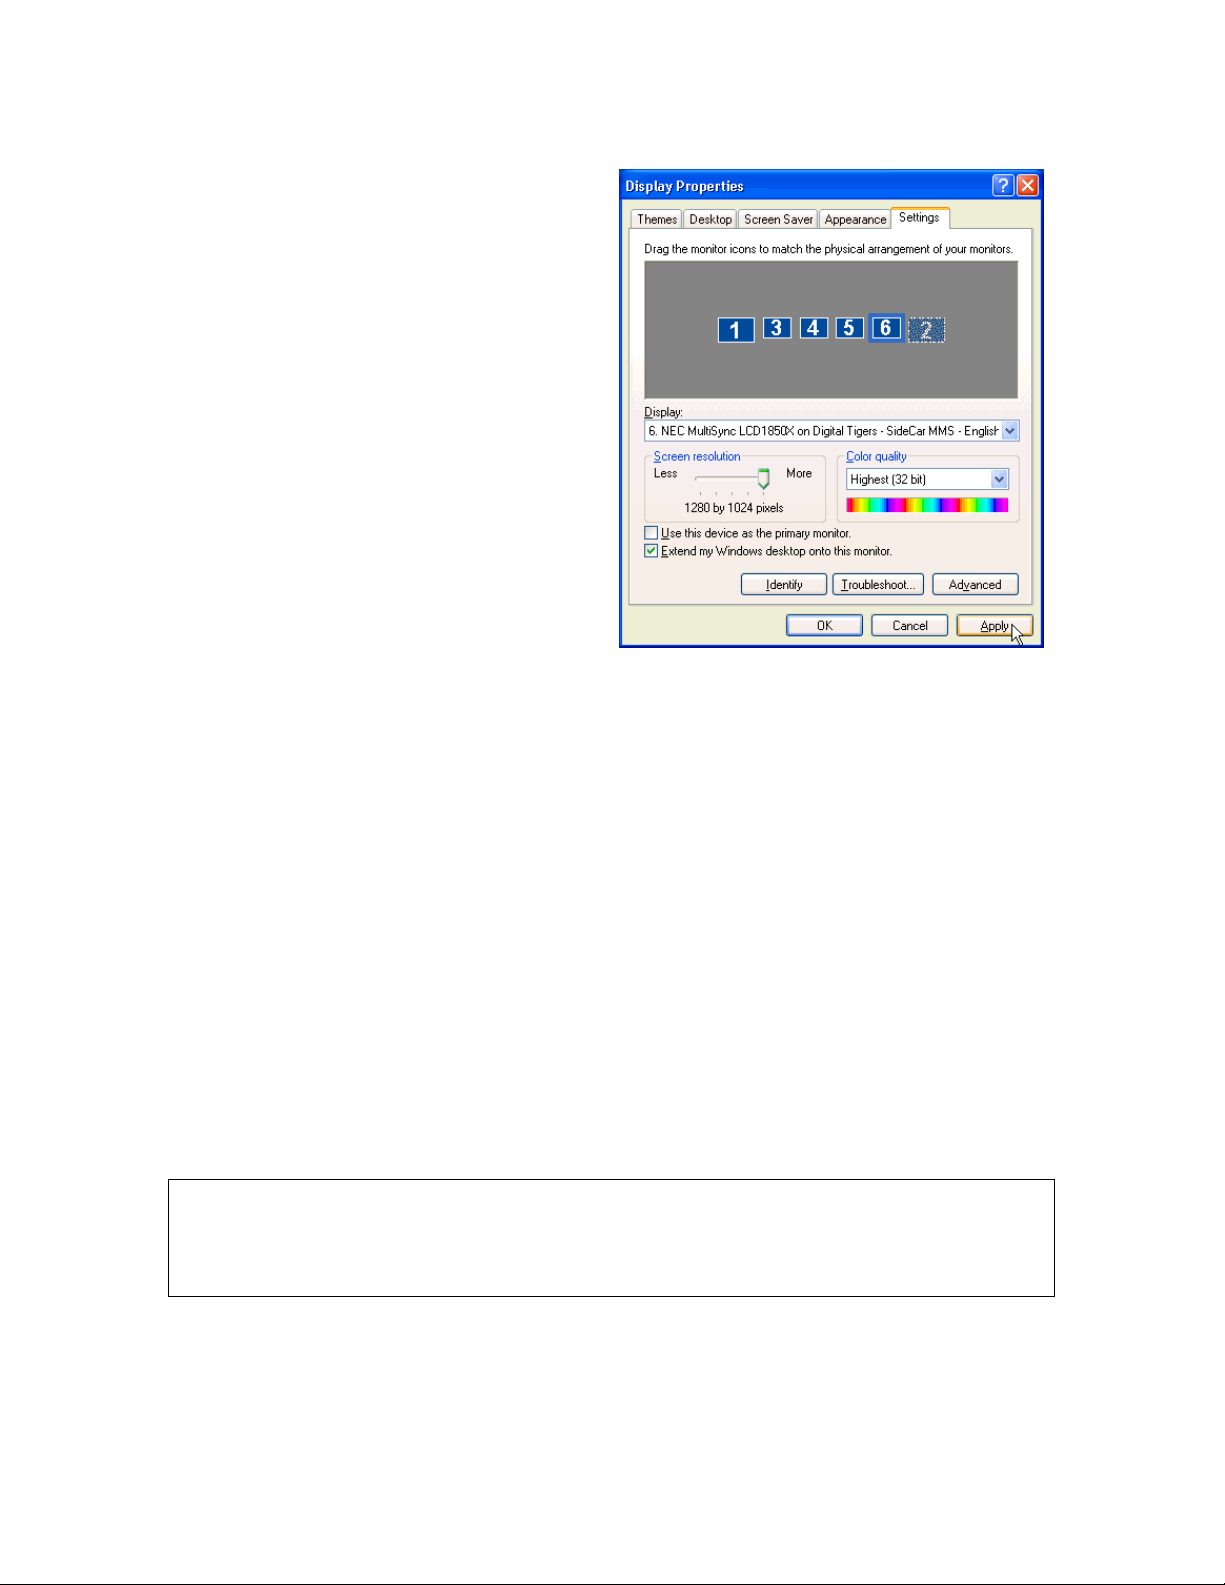
12. Click “Apply” when done. Display
Properties should look similar to this
(SideCar PlusFour MMS version):
13. Position the actual (physical) monitors on your work space as preferred. You can
choose any arrangement, with the notebook LCD placed anywhere in the sequence.
14. Once you have positioned the monitors appropriately, use the pictorial representation
of the monitors in “Display Properties” to match the physical arrangement of the
monitors. This is important so that your “extended desktop” operates correctly as a
continuous desktop from left to right across the monitors.
If your mouse drags seamlessly from left to right across all monitors, then your
settings are correct.
If not, reposition the monitors in “Display Properties” by selecting a monitor and
dragging it into proper position, using the mouse.
15. Once you are satisfied with your display settings and monitor arrang ement, close the
“Display Properties” dialog box by clicking “OK”.
Note: You can change your display settings at any time by returning to step 1.
Congratulations! You have completed the basic installation the SideCar. We wish you success
in your use of our product.
(If you wish to use the notebook external monitor port, see the final section of this chapter.)
38- M
ONITOR ACTIVATION AND CONFIGURATION
Page 43
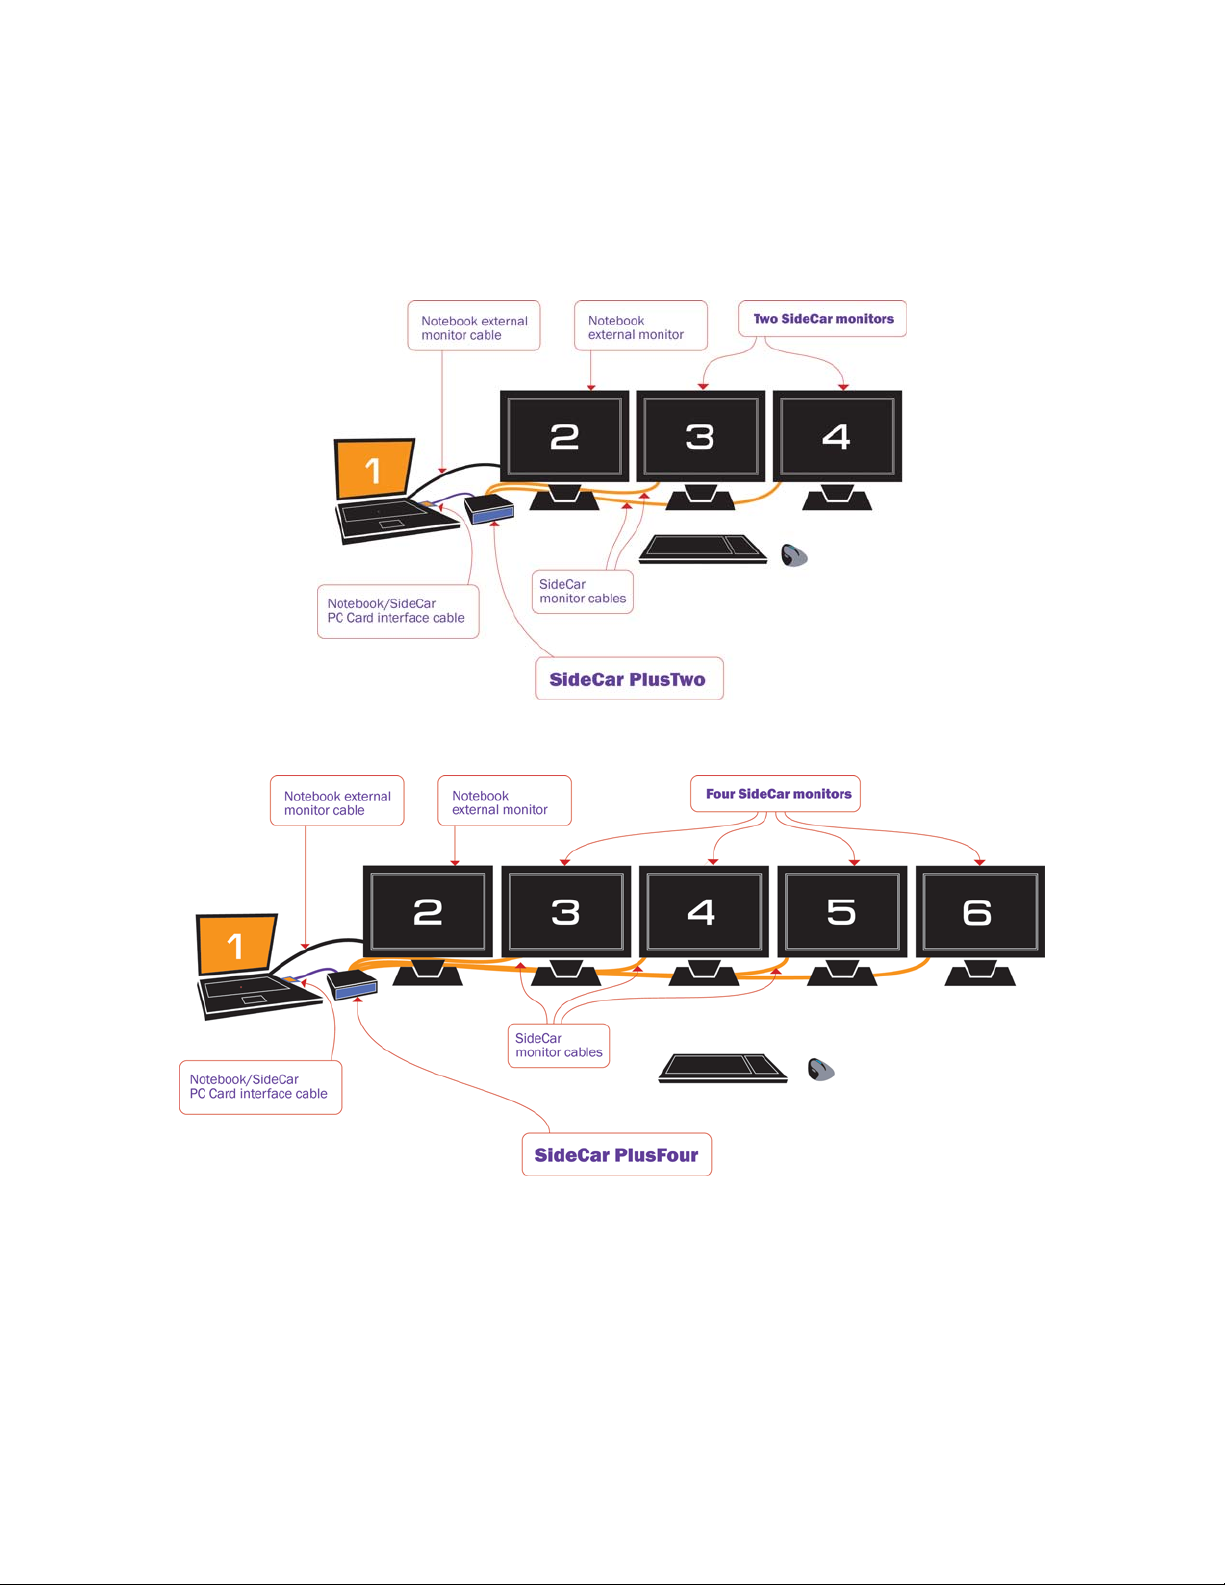
Using the notebook external monitor port
If your notebook has its own external display port available for use, you may wish to connect a
display to it and activate it as well. This enables the following Windows XP configurations, with
the notebook external monitor port driving monitor #2:
The notebook external display is usually only an independent display under Windows XP. Most
Windows 2000 notebooks cannot address the #2 external monitor as an independent display, but
can use the #2 external monitor as a mirror (clone) of the notebook display. (Some users will
activate this external clone display and then turn off the notebook LCD.)
Because the external port is on the same internal controller as your notebook’s own built-in
display, you should only need to connect a display and activate it in Display Properties.
39- M
ONITOR ACTIVATION AND CONFIGURATION
Page 44
Chapter 6 - Putting the SideCar to work: key tips
Please follow these key tips for successful daily operation of your SideCar.
Power-up sequence
It’s critical to follow the proper power-on sequence with your notebook, SideCar and displays. If
you don’t, the SideCar may not function until you start over with the proper sequence.
First, be sure all cables are connected properly, as described in Chapter 3 (Hardware setup).
Then, follow this sequence for power-up:
1. Power on your displays
2. Power on the SideCar
3. Power on the notebook
Power-down sequence
It’s also important to follow the proper power-down sequence:
1. Power down the notebook
2. Power down the SideCar
You may turn off your displays at any time, before or after the notebook and SideCar.
A simple way to remember the power-up and power-down sequence is that the notebook
should be last to power up and first to power down.
You can visualize this as a chain:
• On power up, turn on the displays, then move up the chain to the SideCar, and finish
with the notebook.
• On power down, start with the notebook and reverse the chain.
40- P
UTTING THE SIDECAR TO WORK: KEY TIPS
Page 45
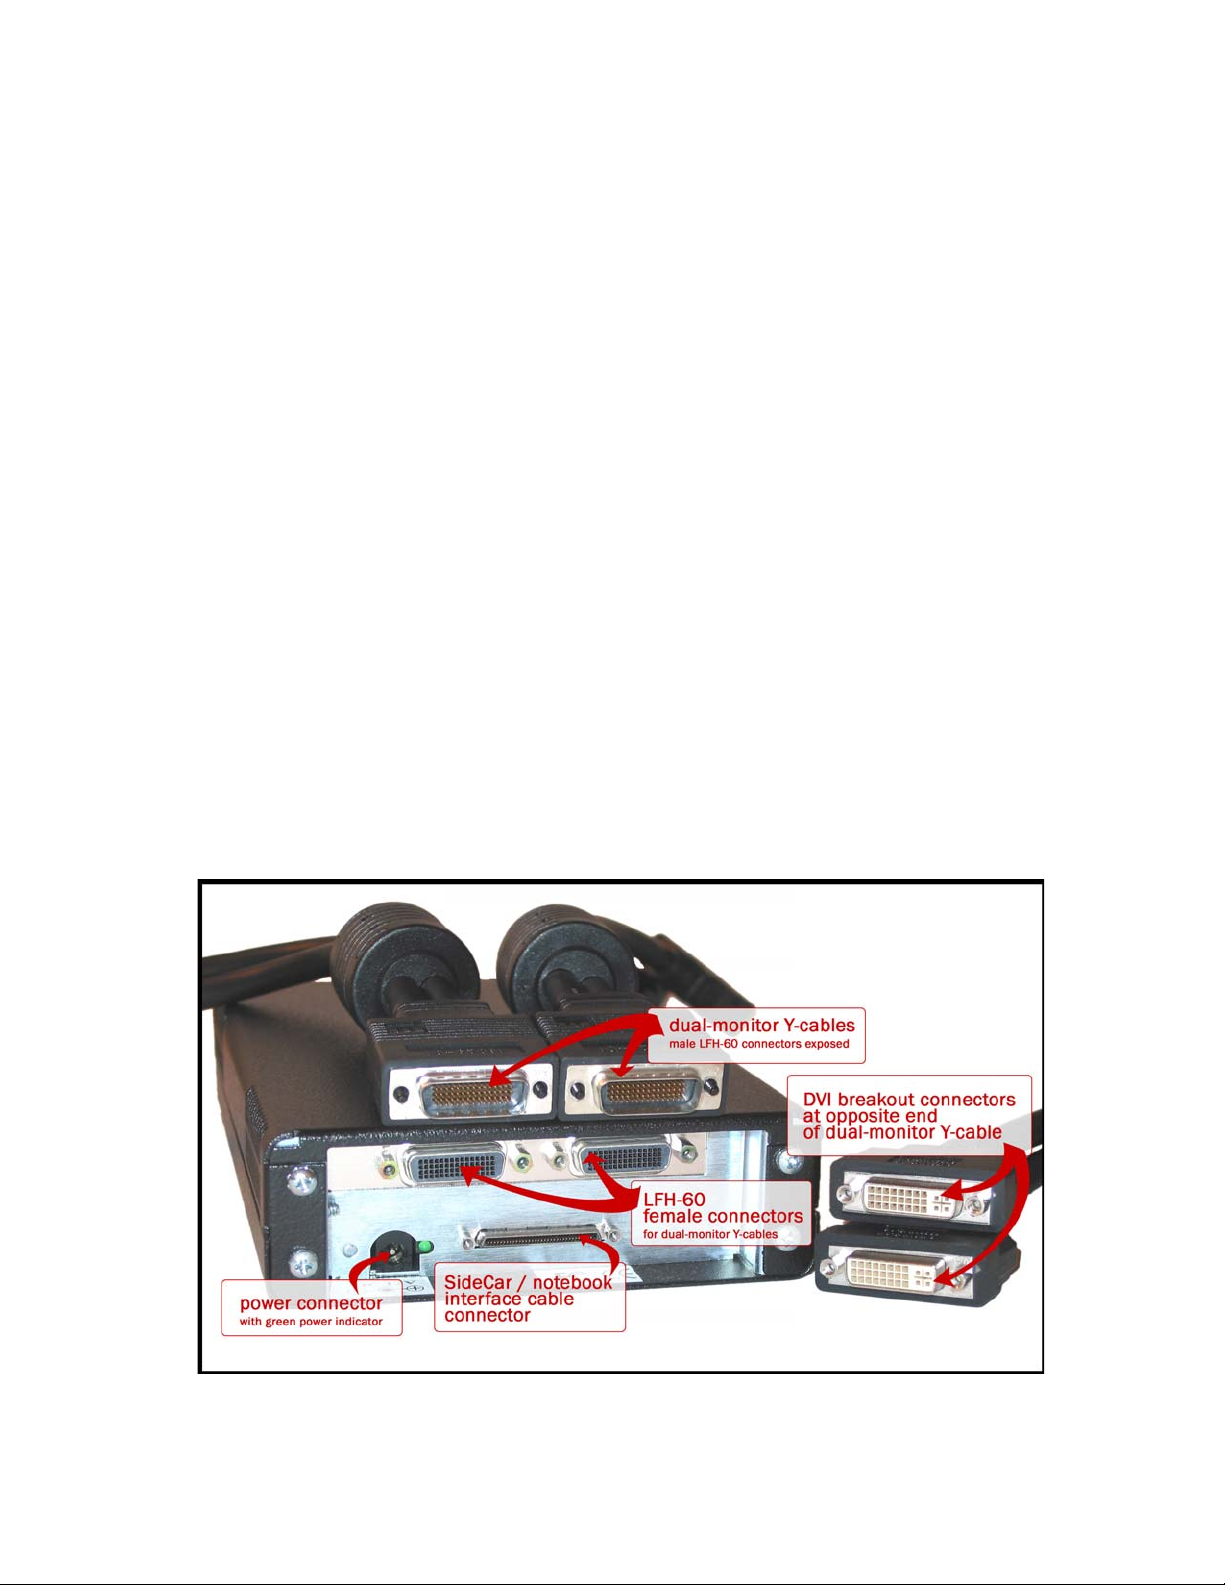
Use care when attaching the dual-monitor Y-cables
Your displays attach to the SideCar via two dual-monitor Y-cables. The SideCar connectors for
these Y-cables are called LFH-60 connectors (see photo below). They are the industry-standard
connectors for multi-monitor breakout cables.
The pins on the LFH-60 connector of the Y-cable are closely spaced and easily bent, which
can result in one or more displays becoming non-functional until the problem is corrected.. To
avoid damaging the LFH-60 connector on your dual-monitor cable, carefully insert this male
connector as straight as possible into the matching LFH-60 connector on the SideCar. Tighten
the thumbscrews firmly.
If you don’t exercise this routine care, you may discover that one or more displays attached
to the SideCar no longer works – despite showing up as an active display under Display
Properties. This can be corrected by carefully straightening the connector pins with tweezers, but
routine care when connecting the cables will avoid the problem altogether.
On a related note, you may want to attach the plastic connector caps to the Y-cables during
transport, to avoid the unlikely event of connector pins being damaged by external force. (You
may also leave the Y-cables attached to the SideCar during transport, so long as the connectors
are securely tightened using the thumbscrews.)
Finally, ensure that all your display cables and the SideCar/computer interface cable are
tightened securely with thumbscrews. The most likely cause of problems during operation is a
loose connection caused by a connector coming loose (or a connection that’s missing altogether).
Sometimes the loose connection is difficult to spot, because it may appear to be properly
connected at a glance. Tightening the thumbscrews routinely will avoid such problems.
SideCar PlusFour MMS: Connectors at rear of chassis and on dual-monitor Y-cables
41- P
UTTING THE SIDECAR TO WORK: KEY TIPS
Page 46

Avoid “Suspend” and “Hibernate” methods of shutdown
Most notebook computers offer the ability to shut down while saving open programs, through
Windows “suspend” and “hibernate” shutdown options.
These shutdown methods are not supported with the SideCar. They may work with some
notebooks, but the most reliable method for shutdown is to power off the notebook and SideCar
completely.
Of course, you may continue to use the “suspend” and “hibernate” options with your notebook
when the SideCar is not attached. However, if you are docking with the SideCar, you must start
with the notebook fully powered off, then follow the power-up sequence outlined earlier in this
chapter.
Take advantage of the usability options in the next chapter
The next chapter outlines four frequently used options:
1. Designate a new primary monitor
2. Move or auto-hide the Windows Taskbar
3. Use QuickDesk / PowerDesk utilities
4. Enlarge and speed up the mouse pointer
Of these options, probably the most universally useful option is the set of QuickDesk /
PowerDesk utilities, which control where dialog boxes and applications appear. If applications
are appearing in the “wrong” display on startup, or dialog boxes are straddling the “seam”
between displays, you can fix these issues quickly with these utilities.
In addition, designating a new primary monitor can be especially important for displaying
motion video. Motion video often plays only on the “primary” monitor, which you can designate
to suit your preferences and application layout.
42- P
UTTING THE SIDECAR TO WORK: KEY TIPS
Page 47

Chapter 7 - User options for multi-display ease of use
► Designate a new primary monitor
► Move or auto-hide the Windows Taskbar
► Use QuickDesk / PowerDesk utilities
► Enlarge and speed up the mouse pointer
User options
You may want to change some Windows settings to optimize your multi-monitor workspace. This
chapter discusses three popular options (which can be combined):
Designate a new primary monitor
Move the Windows Taskbar, if you prefer it placed on a different monitor
Use the supplied QuickDesk / PowerDesk utilities to control where program windows
and dialog boxes open
Enlarge and speed up the mouse pointer to accommodate the large display area
What is a “primary monitor”?
Windows employs the concept of a “primary” monitor, which can be complemented by a number
of “secondary” monitors. By default, when you install the SideCar, your notebook LCD
display remains the primary monitor, and all the SideCar monitors are secondary monitors.
The primary monitor typically has the following attributes:
Programs open by default in the primary monitor. (However, some programs will
save their window position on closing, and reopen where they were used last – sometimes
stretched across multiple monitors, if preferred. Also, supplied QuickDesk / PowerDesk
utilities can change the default application behavior.)
Dialog boxes (pop-up windows) from Windows and applications appear in the
primary monitor. (Again, supplied utilities change this default behavior.)
The primary monitor gathers Windows desktop icons on the left edge of that monitor.
The Windows Taskbar appears in the primary monitor by default, but can be moved
easily to any monitor.
The primary monitor often can display motion video using the DirectDraw
hardware overlay plane – required for best-quality motion video playback by many (but
not all) video editing applications and media players (Some applications display motion
video without such “hardware acceleration”, and some applications can display video
using either method – although hardware acceleration normally yields superior quality).
Note: support for the hardware overlay plane is left to the graphics controller
manufacturer and display adapter drivers, and can be enabled/disabled by the user
through the Display Properties / Settings / Advanced / Troubleshooting panel. (Drag the
“Hardware Acceleration” slider to “Full” to enable hardware video overlay. This is the
default setting, so normally users do not need to change the setting.)
43- U
SER OPTIONS FOR MULTI-DISPLAY EASE OF USE
Page 48
Secondary monitors do not have these attributes by default. Notably, secondary monitors
normally do not use hardware video overlay, which may degrade your ability to display best-
quality motion video on these monitors (or prevent motion video from appearing at all).
Designate a new primary monitor
Follow these steps to designate a new primary monitor:
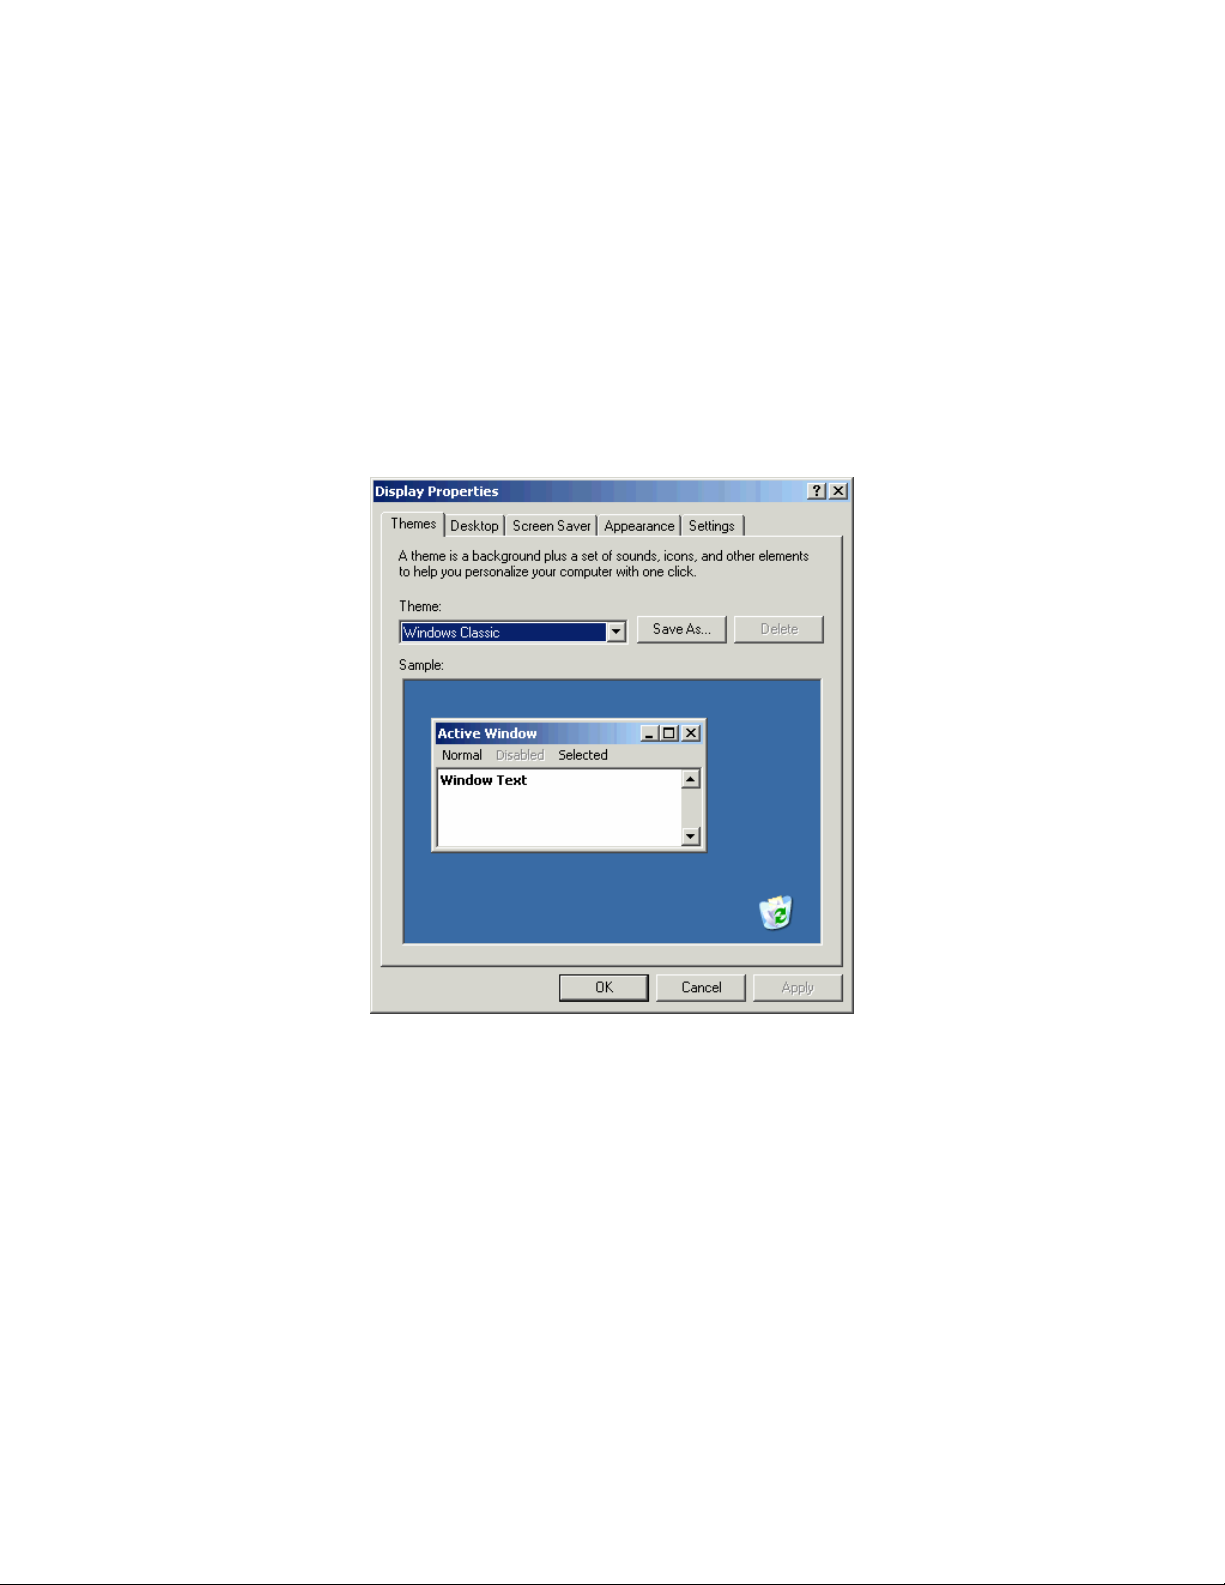
1. Right-click on the desktop, select “Properties” to open the Display Properties dialog
box:
44- U
SER OPTIONS FOR MULTI-DISPLAY EASE OF USE
Page 49
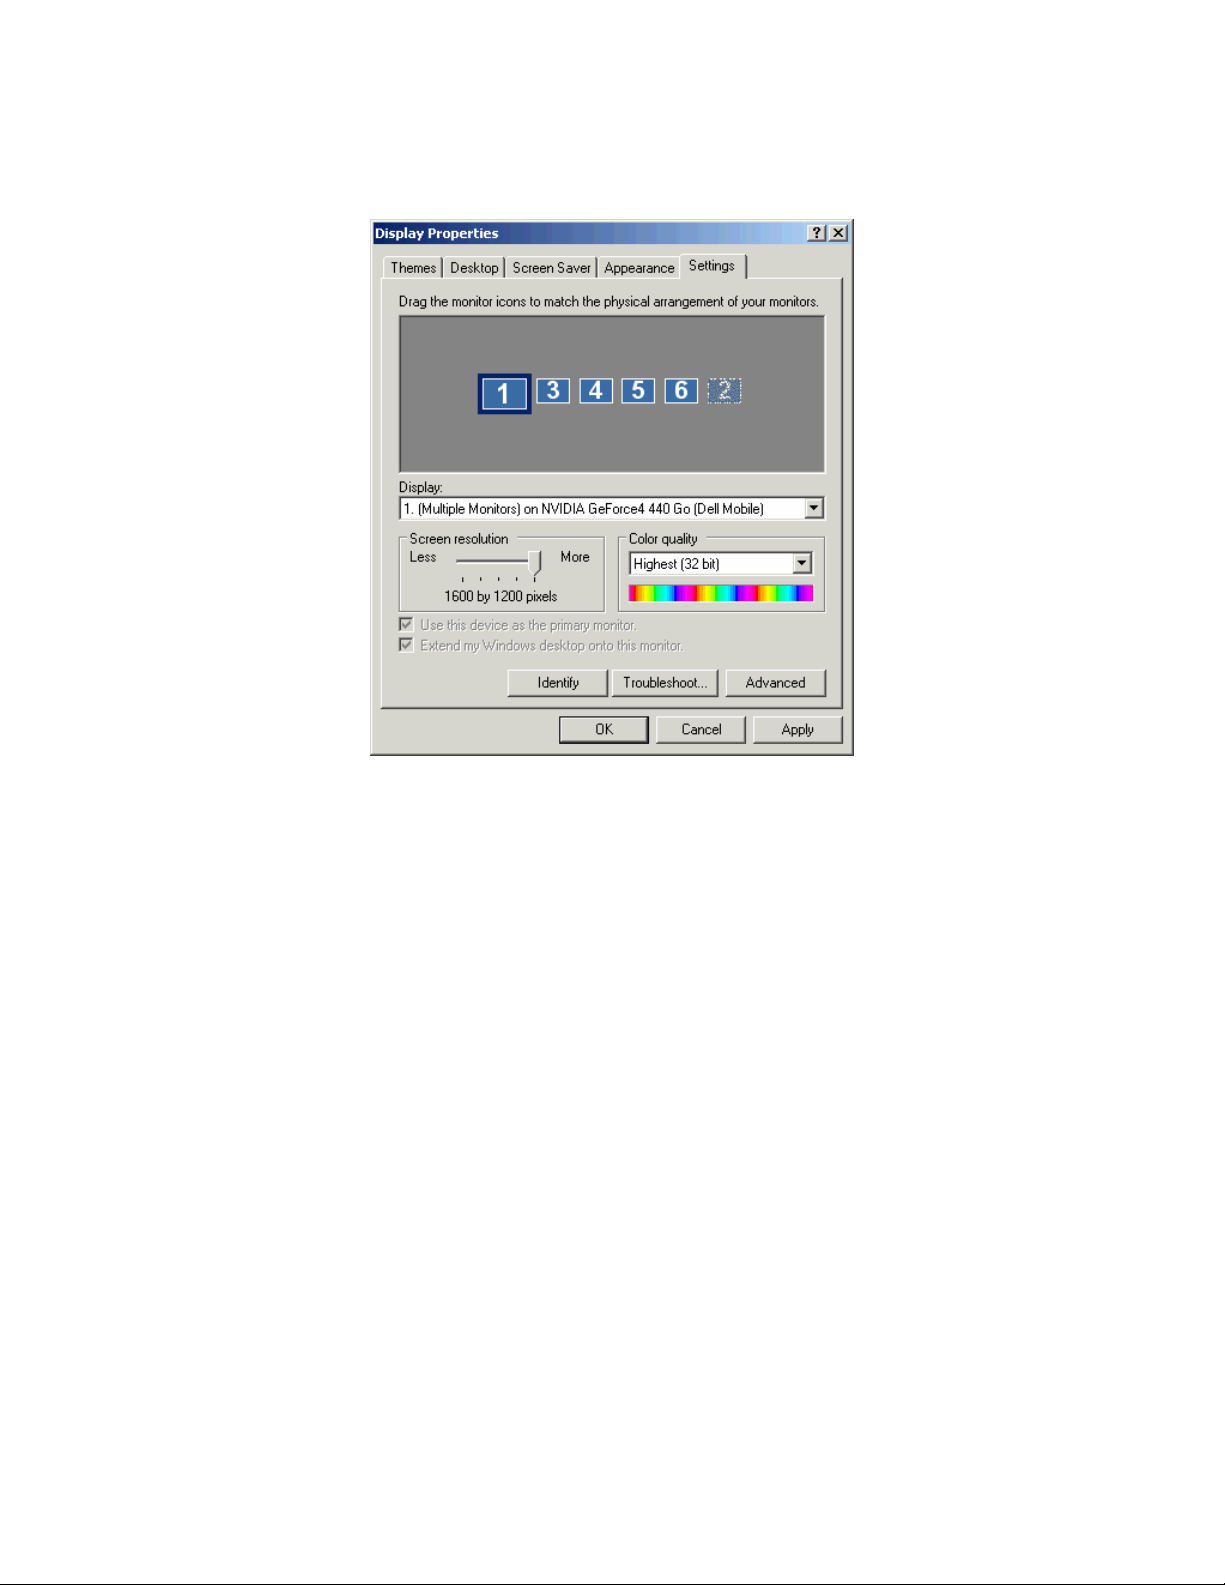
2. Click the “Settings” tab.
3. By default, your existing primary monitor is the #1 display, which is normally your
notebook LCD display. See in the example above that this display (Mobility Radeon, the
notebook’s graphics controller) has the item “Use this device as the primary monitor”
checked and grayed out. It is grayed out because Windows won’t allow you to turn off
this monitor’s primary monitor designation without assigning a new primary monitor at
the same time.
4. Select the monitor which you want to designate as the new primary monitor. (In the
example below, it is the #3 monitor – the first of four SideCar monitors. The grayed-out
#2 monitor in this example is the notebook’s secondary monitor port, available as a
separate monitor under Windows XP.)
45- U
SER OPTIONS FOR MULTI-DISPLAY EASE OF USE
Page 50
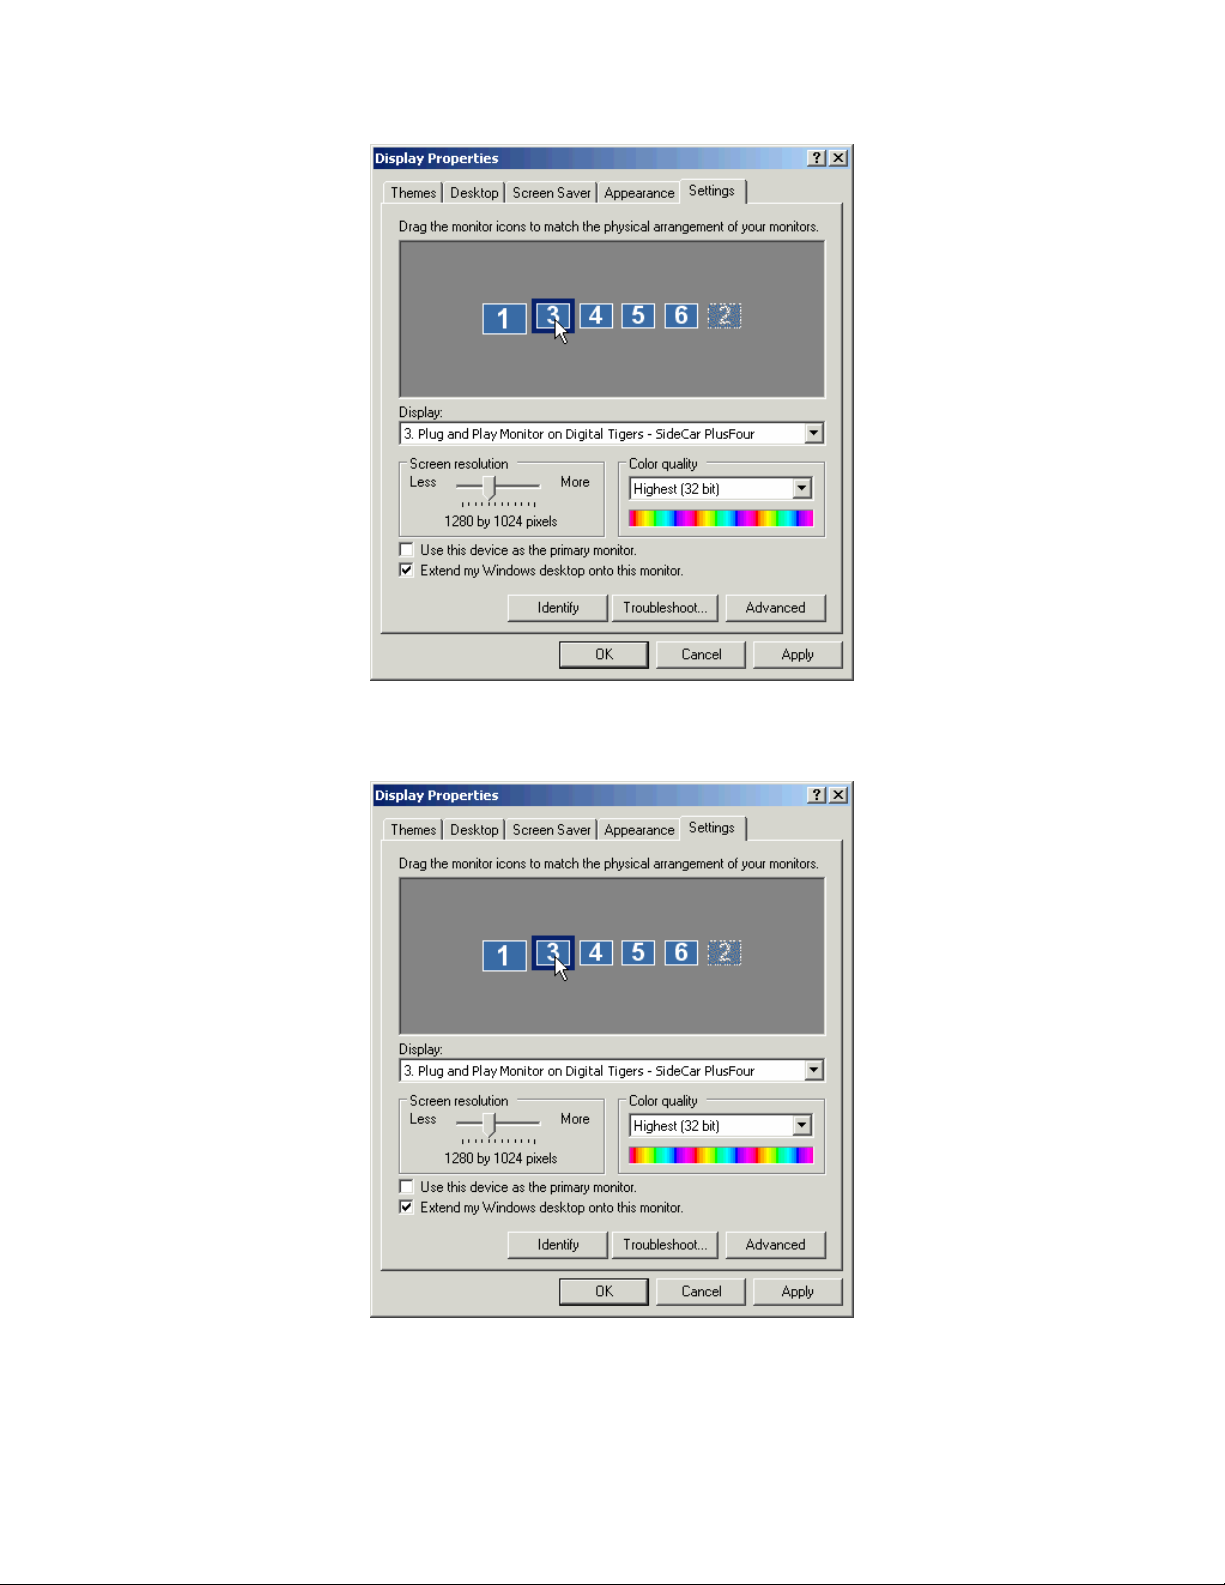
5. Click the checkbox, “Use this device as the primary monitor”. Clicking the checkbox
will cause it to gray out (below).
6. Click “Apply” to accept this change, then “OK” to close the dialog box.
46- U
SER OPTIONS FOR MULTI-DISPLAY EASE OF USE
Page 51
Move or auto-hide the Windows Taskbar
You may want to move the Windows Taskbar to a different monitor, to make it more convenient
to use in your multi-display setup. In addition you may want to “auto-hide” the Taskbar to
maximize screen area for applications stretched across multiple monitors.
Moving the Taskbar
To move the Taskbar:
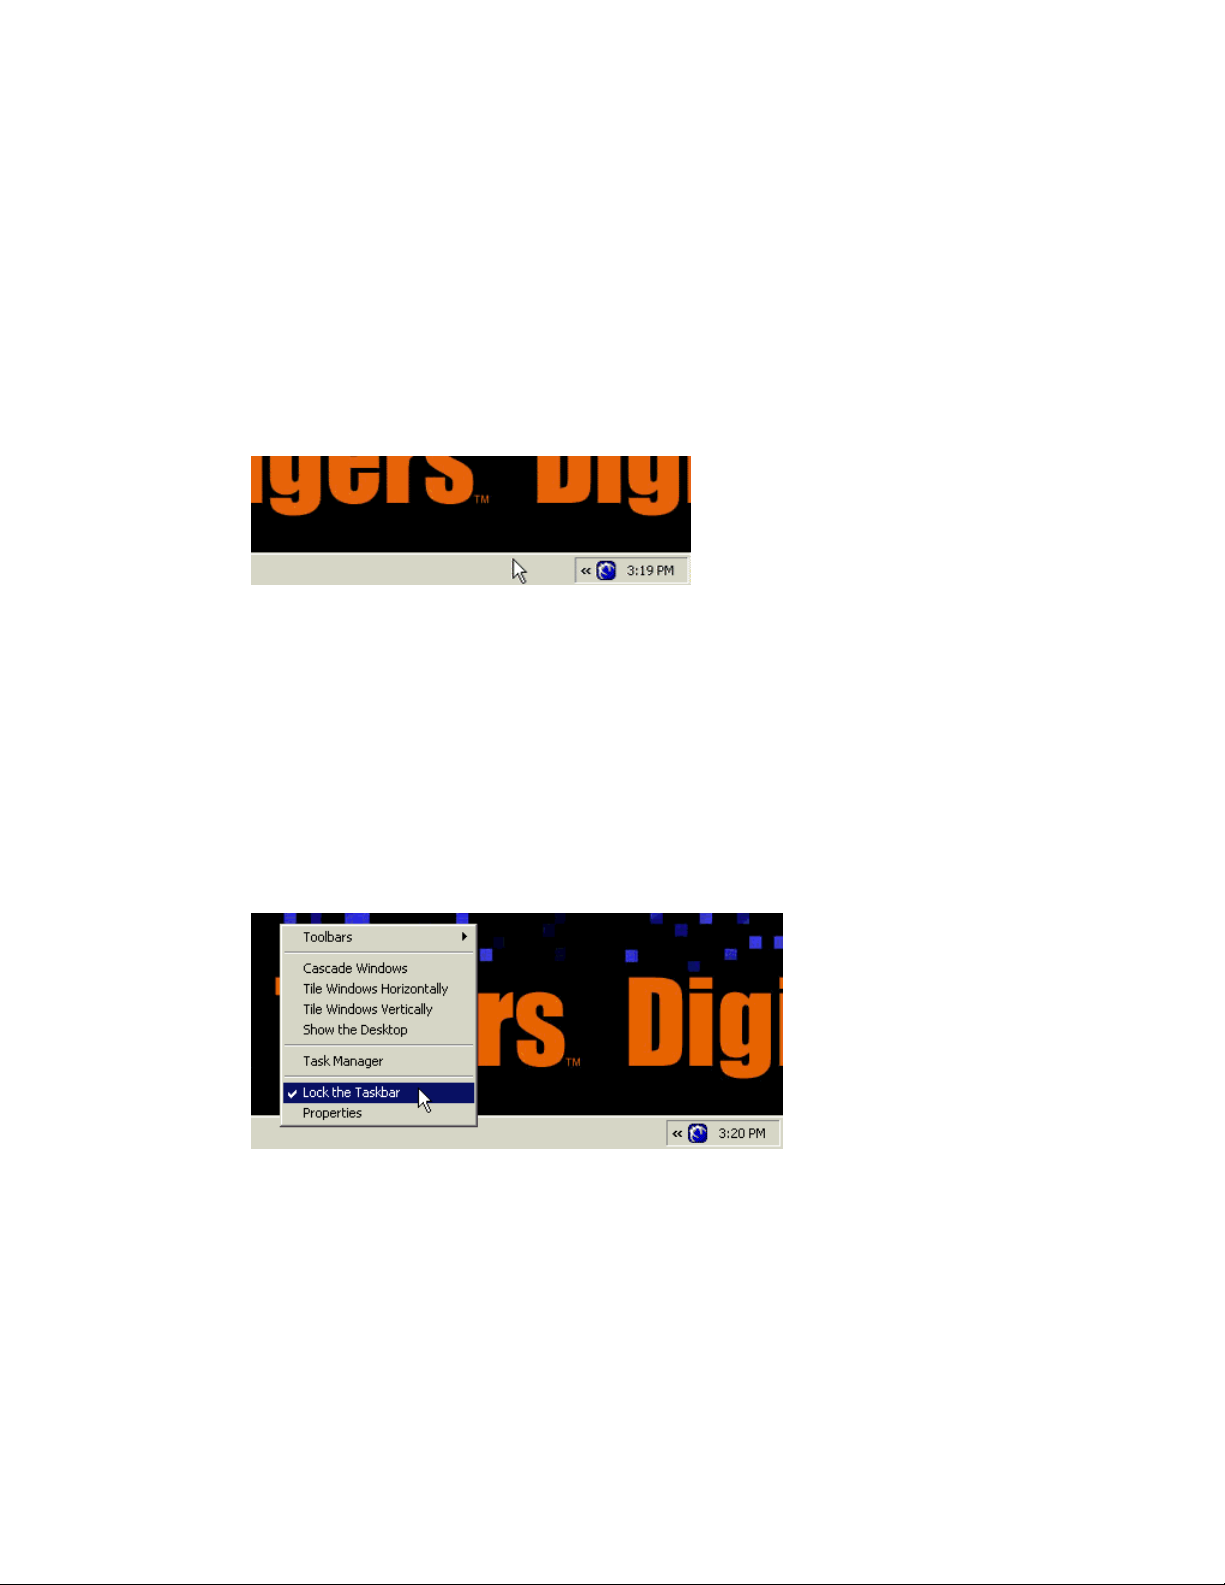
1. Click the Taskbar on an unused area (not occupied by an application icon):
2. While holding the left mouse button down, drag the Taskbar to the monitor where
you want it placed. (The Taskbar will move in jumps between bottom-edge placement
and side-edge placement as you move it across monitors.)
3. When you have positioned the Taskbar, let go of the mouse button.
If you can’t move the Taskbar
The Taskbar may be “locked”, which is an option under Windows XP.
1. Right-click the Taskbar on an unused area (not occupied by an icon):
2. See if “Lock the Taskbar” is checked.
3. If it is, click “Lock the Taskbar” to uncheck this option
4. Now follow the earlier steps to move the Taskbar
47- U
SER OPTIONS FOR MULTI-DISPLAY EASE OF USE
Page 52
Auto-hide the Taskbar
The Taskbar occupies the bottom area of one display under Windows XP/2000. In a multi-display
desktop, the usable desktop area for applications is thus less on one monitor than on others. For
many users, this works fine – certainly the ability to have the Taskbar always visible can be a
convenience. However, some users who wish to maximize application windows across all
displays may wish to reclaim the space used by the Taskbar.
Windows XP and 2000 offer an option to “auto-hide” the Taskbar – the Taskbar disappears (autohides) most of the time, and appears when the user wants to use it. To make the Taskbar reappear,
the user simply moves the mouse pointer near the bottom of the screen containing the hidden
Taskbar, and the Taskbar appears automatically.
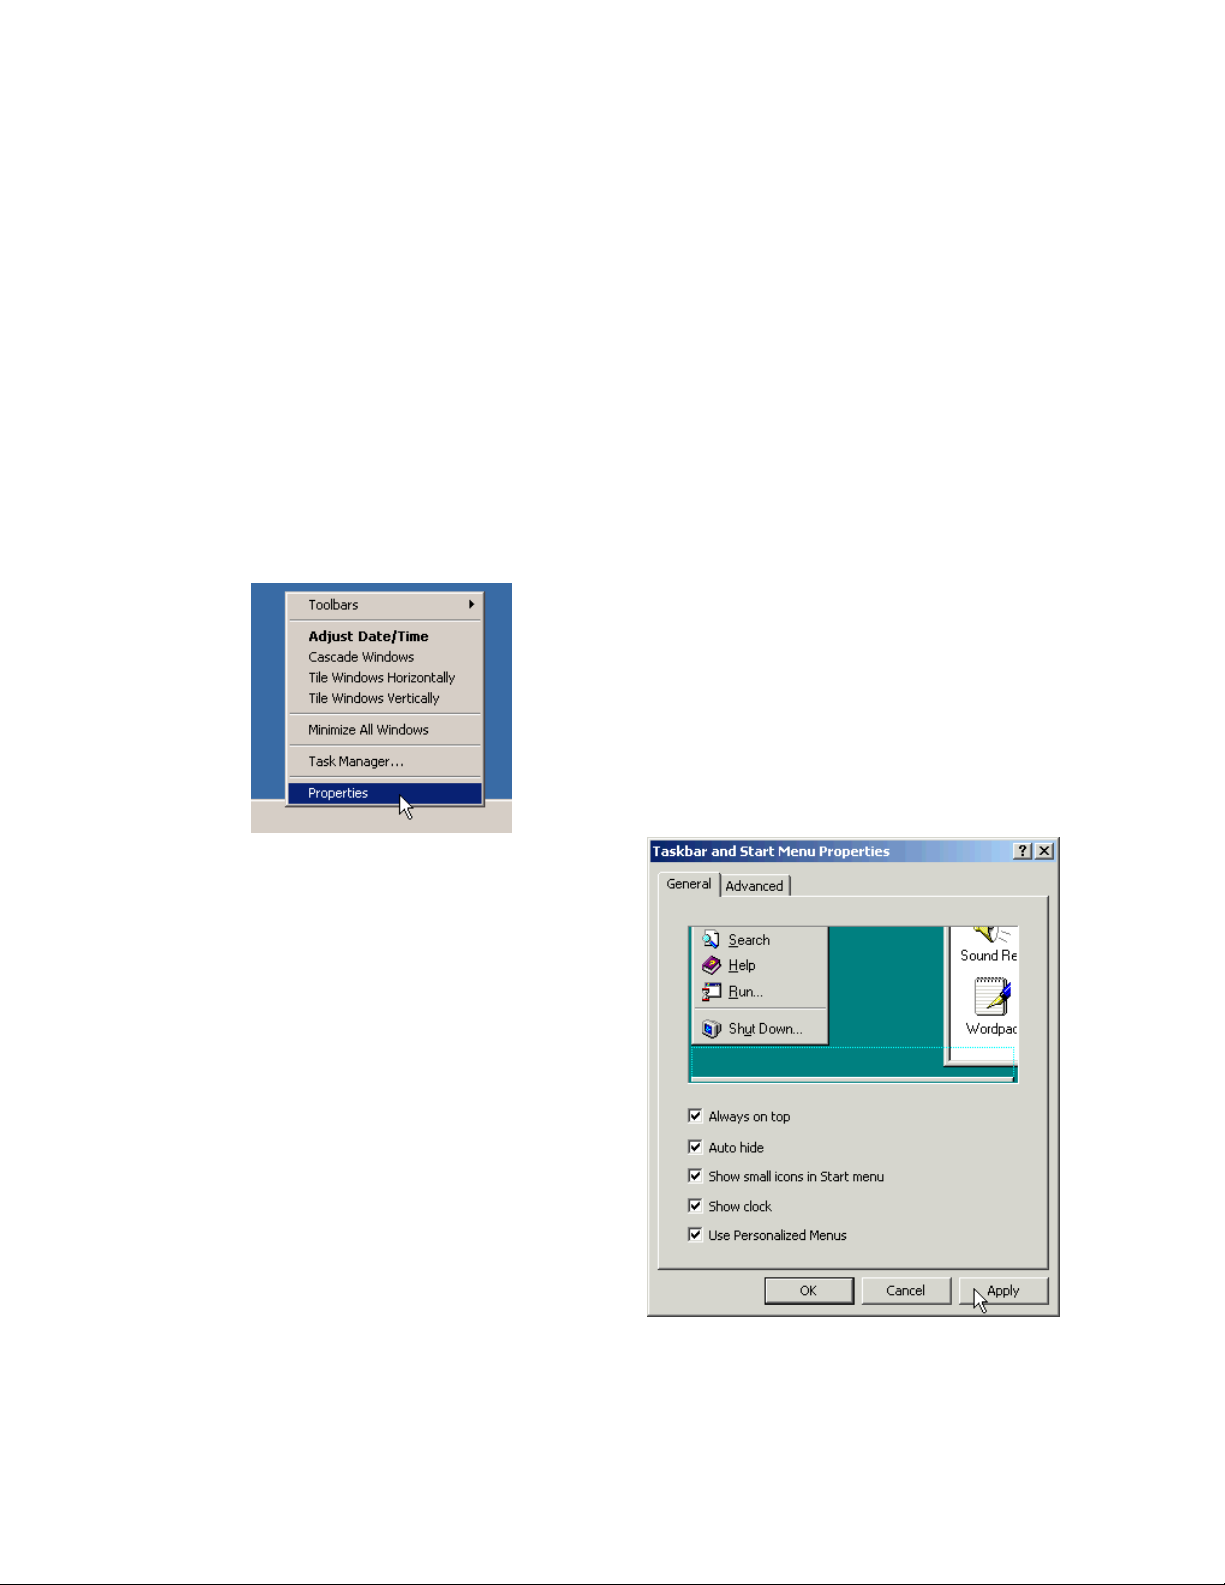
Windows 2000: auto-hide the Taskbar
1. Right-click on an unused area of the Taskbar, select “Properties”.
2. Select the checkbox “Auto hide”.
3. Click “OK” to apply the change and close
the dialog box.
Note: to turn off the auto-hide feature, simply
return to this dialog box and uncheck the
“Auto hide” option.
48- U
SER OPTIONS FOR MULTI-DISPLAY EASE OF USE
Page 53
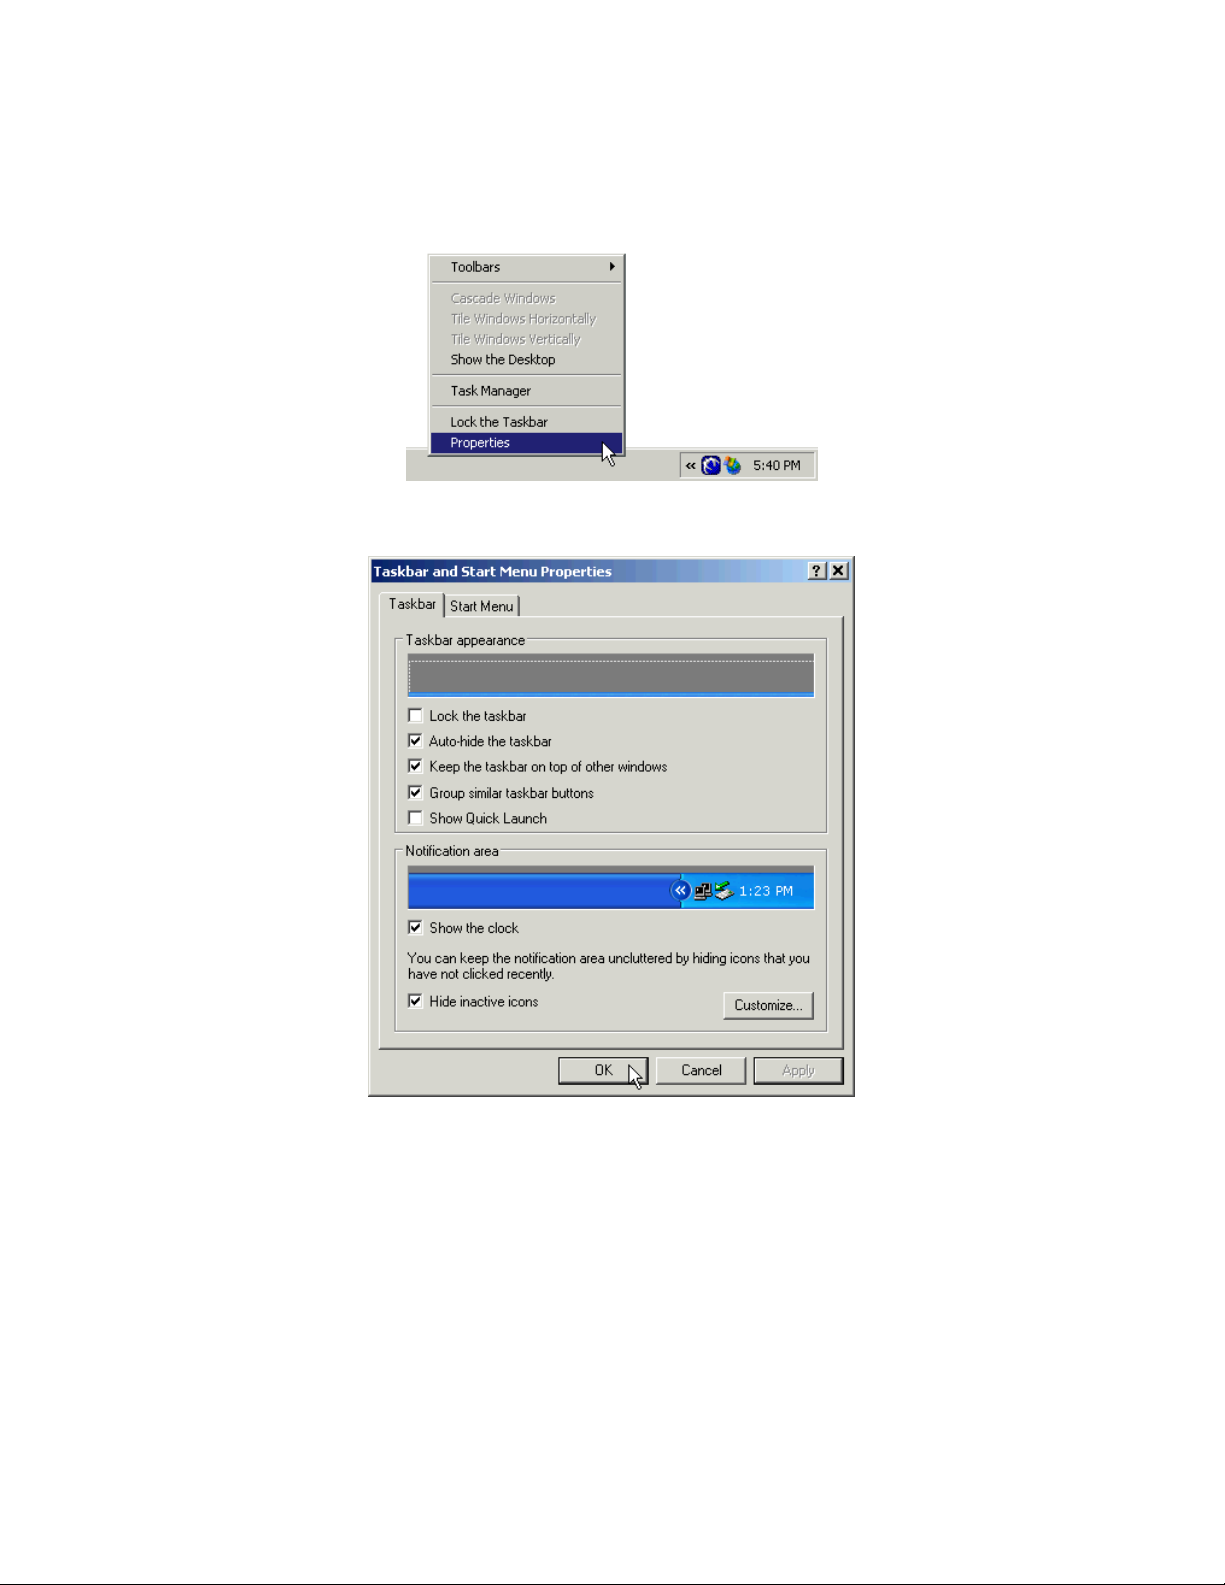
Windows XP: auto-hide the Taskbar
1. Right-click on an unused area of the Taskbar, select “Properties”.
2. Under “Taskbar appearance”, select the checkbox “Auto-hide the taskbar”.
3. Click “OK” to apply the change and close the dialog box.
Note: to turn off the auto-hide feature, simply return to this dialog box and uncheck the
“Auto hide” option.
49- U
SER OPTIONS FOR MULTI-DISPLAY EASE OF USE
Page 54
QuickDesk / PowerDesk utilities
(window / dialog box positioning)
The SideCar MMS includes Matrox QuickDesk / PowerDesk utilities that improve the
convenience of working with your multi-monitor desktop. Features of these utilities include
controlling where dialog boxes and program windows appear – so alert messages from your
programs appear where you want them, and programs open in your preferred monitors.
Since your multi-monitor desktop may span as many as six monitors, these utilities are very
helpful for visual organization. If you notice that dialog boxes are opening across the “seam”
between two monitors, or that you are moving programs around frequently from one monitor to
another, you may want to customize your preferences using these easy utilities.
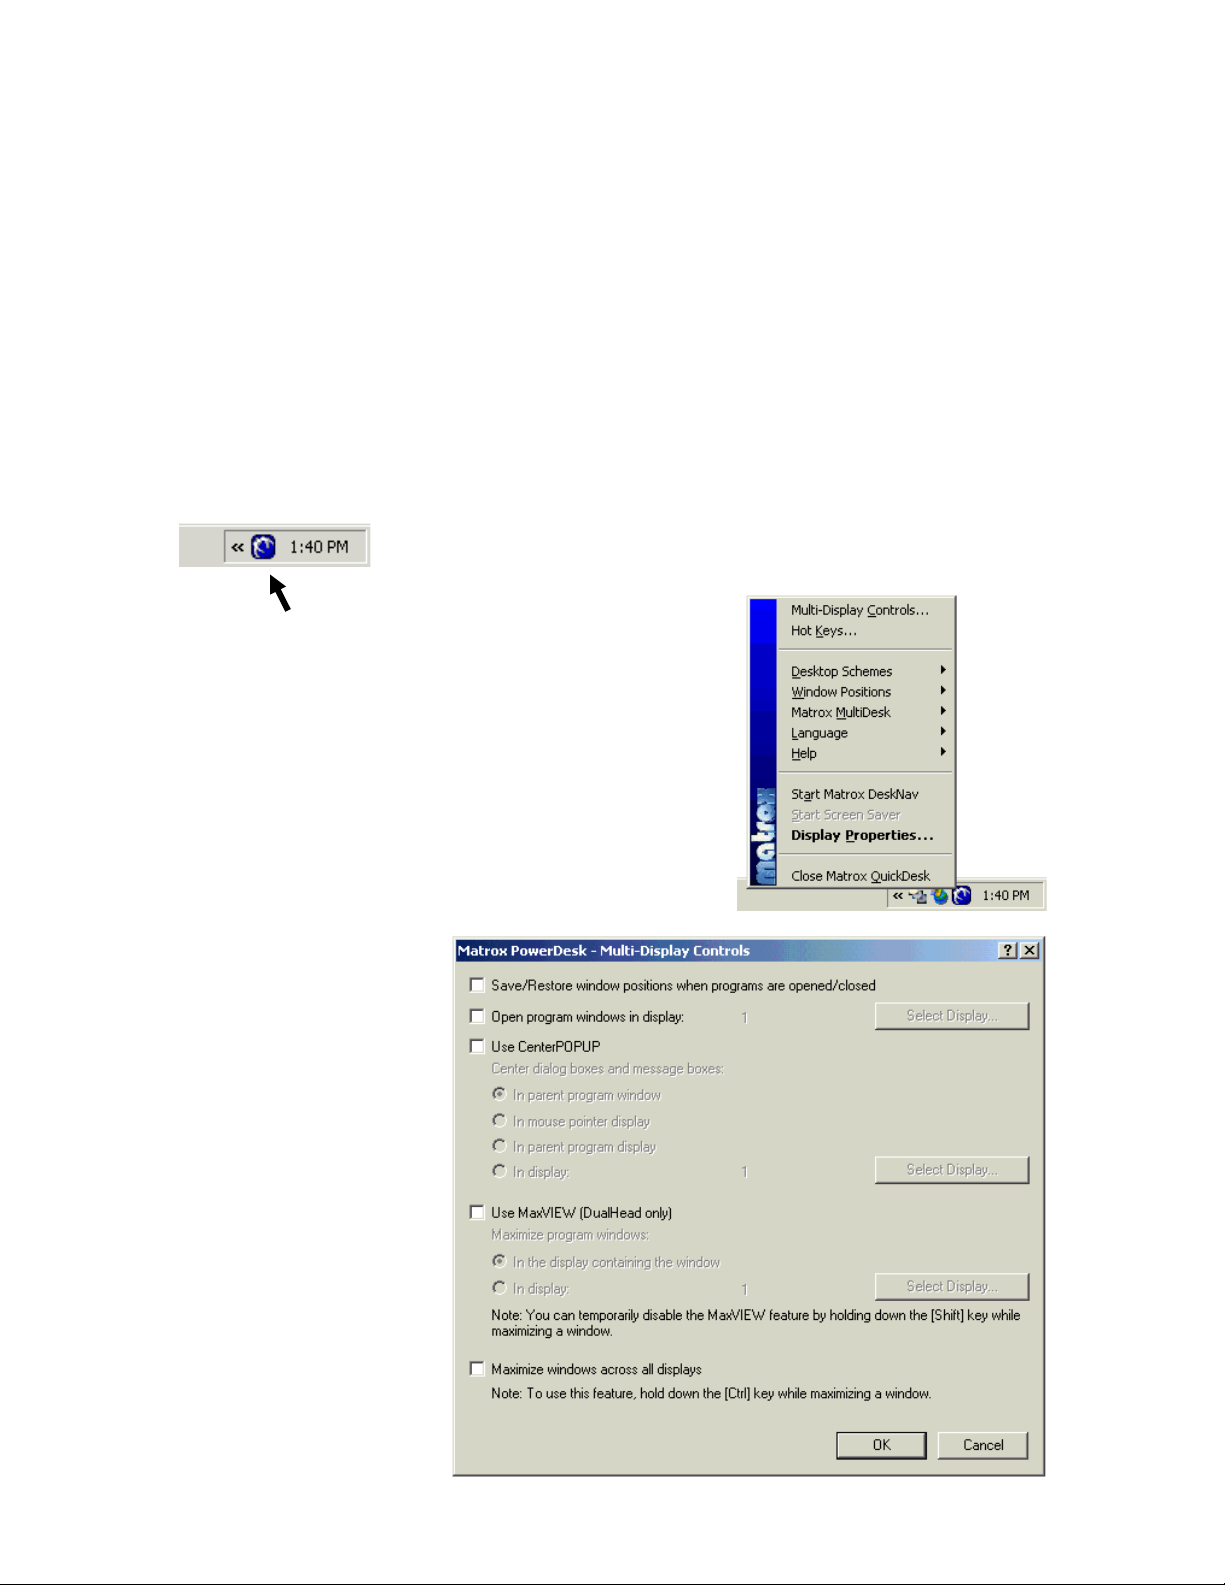
Any time a SideCar monitor is active (and the computer has been
rebooted once since installation of the SideCar), a QuickDesk shortcut
loads automatically on the Windows Taskbar. It is a blue icon that
appears near the clock on the Taskbar:
Clicking on that icon opens the following QuickDesk menu:
Select any of these items to
explore options for
customizing your
workspace. For example,
selecting “Multi-Display
Controls” opens the
following dialog box:
50- U
SER OPTIONS FOR MULTI-DISPLAY EASE OF USE
Page 55
Use CenterPOPUP
CenterPOP may be the most important utility. It controls where dialog boxes and message
boxes from applications and Windows appear. By default, CenterPOP is turned off, which means
that dialog boxes may appear across the “seam” between monitors in a multi-display desktop.
We strongly recommend that you use one of the CenterPOP options. Many users prefer the
option “In mouse pointer display”, which causes dialog boxes to open in the screen where your
mouse pointer is – highly convenient for most users. Other options may suit different user needs.
Save/Restore window positions when programs are opened/closed
Some applications “remember” their positioning on the Windows desktop and reopen in the same
place the next time you use the program. For example, a video editing application stretched
across three monitors will open on those same three displays the next time you use it – if the
application saves its positioning. (Sometimes applications offer this feature as a user option to
“save layout”.)
Other applications will open by default to the Windows primary monitor. In addition, the first
time any application is used, it has no positioning information stored, so will open by default to
the Windows primary monitor.
Select the “Save/Restore window positions” checkbox to ensure that all applications open with
the same positioning as when previously used.
Open program windows in display…
This option controls the default display used for applications when they open. Normally this is the
display designated as the “primary monitor” (see earlier in this chapter). You can change that
choice without changing your primary monitor by using this utility.
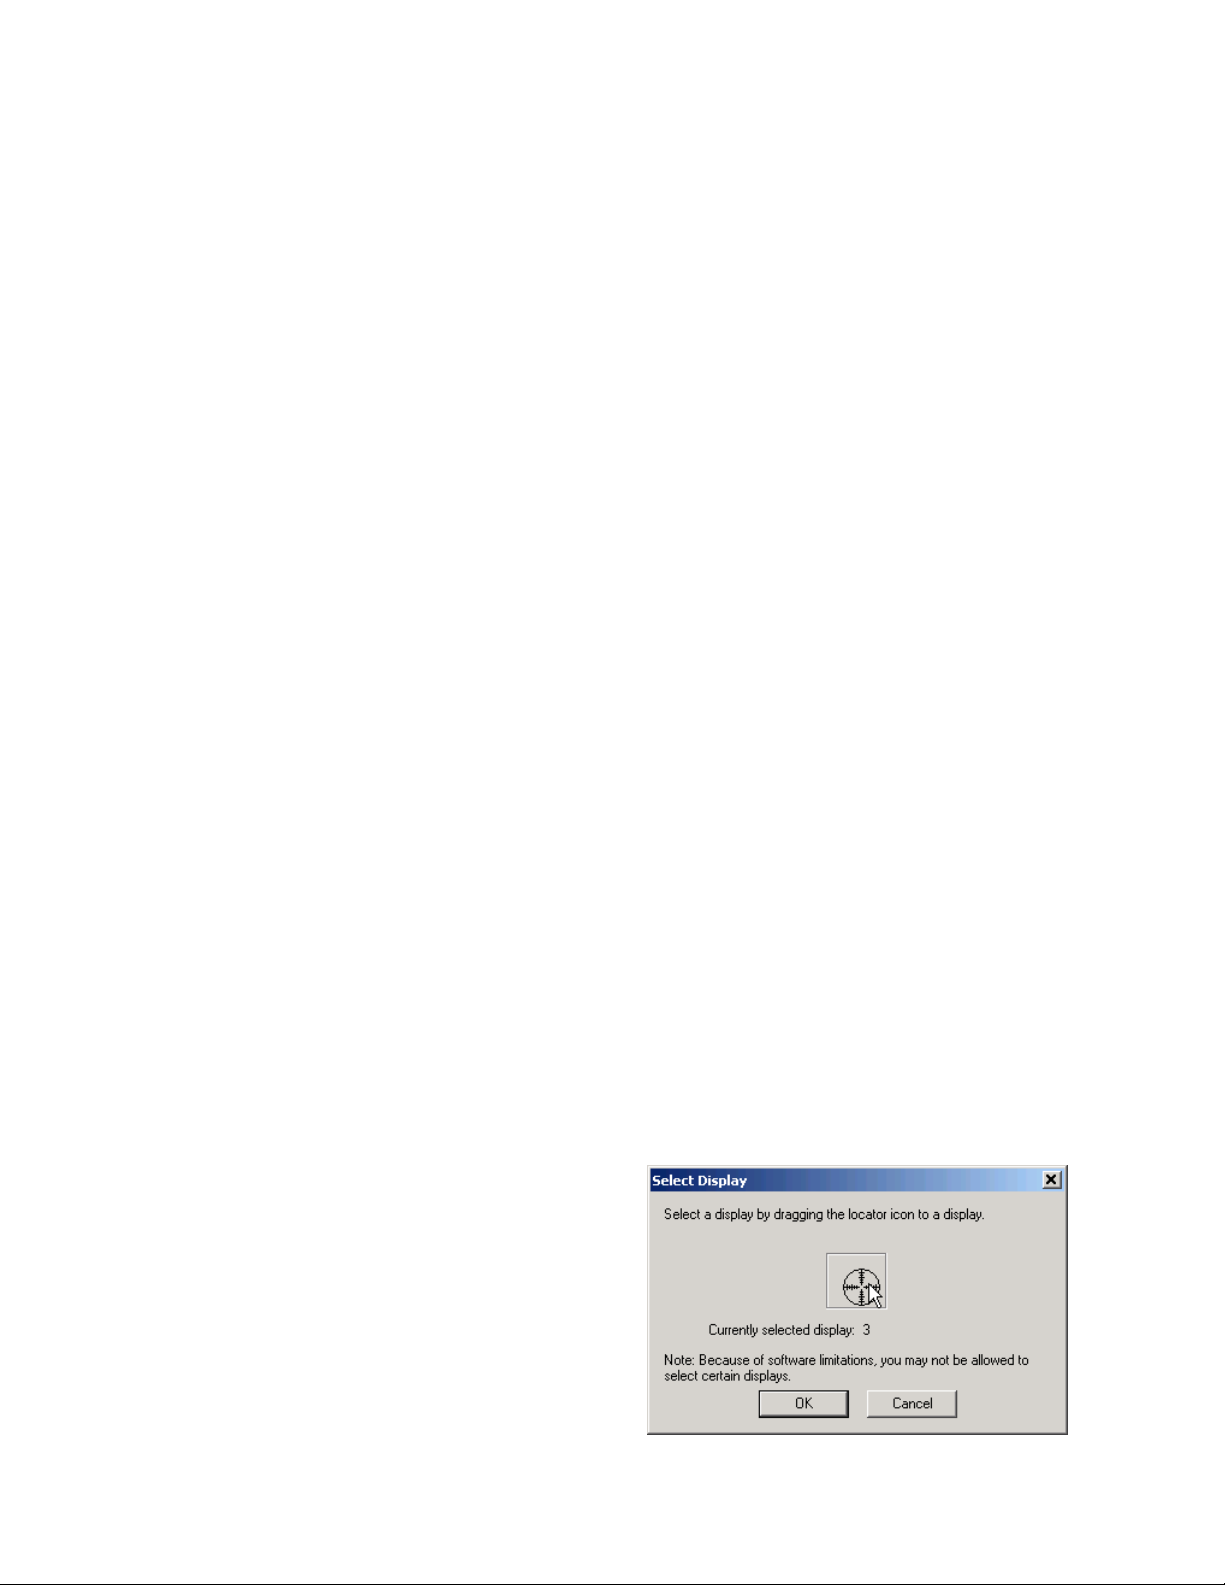
1. Select the checkbox “Open program windows in display:”
2. Click the button “Select Display…”
3. In the “Select Display” dialog box that opens, drag the targeting sight icon (in the box
at center) to the display you want to designate as the default program display.
4. Below the box, the message “Currently
selected display” should update to your
choice. The number assigned will be the
number of that display as determine by the
“Display Properties” dialog box. (See
Chapter 6.)
5. If you are satisfied with your selection,
click “OK” to return to “Multi-Display
Controls”.
51- U
SER OPTIONS FOR MULTI-DISPLAY EASE OF USE
Page 56
Combining the “Save/Restore” and “Open program windows” options
The two preceding options may be combined, but users should note that their actions when
combined may produce unexpected results. You can test these effects using a simple program
such as Windows Notepad. When both of the preceding options are selected, the following
scenarios illustrate the resulting behavior:
Program is opened in default display, then closed. Program will reopen exactly where it
was used before.
Program is opened in default display, then moved to a different display. Program will
reopen in original default display. (“Open program windows in display…” takes priority.)
Program is opened in default display, then stretched across the seam between two or
more displays, without touching the edge of the screen. Program will reopen in the same
positioning. (“Save/Restore window positions” takes priority.)
Maximize windows across all displays
This helpful option enables you to easily maximize applications across all available displays
(including the notebook LCD display, if active).
Clicking this checkbox simply enables this feature as an option. To use the feature, hold
down the CTRL key just before maximizing a window. The application will immediately
fill the entire Windows desktop.
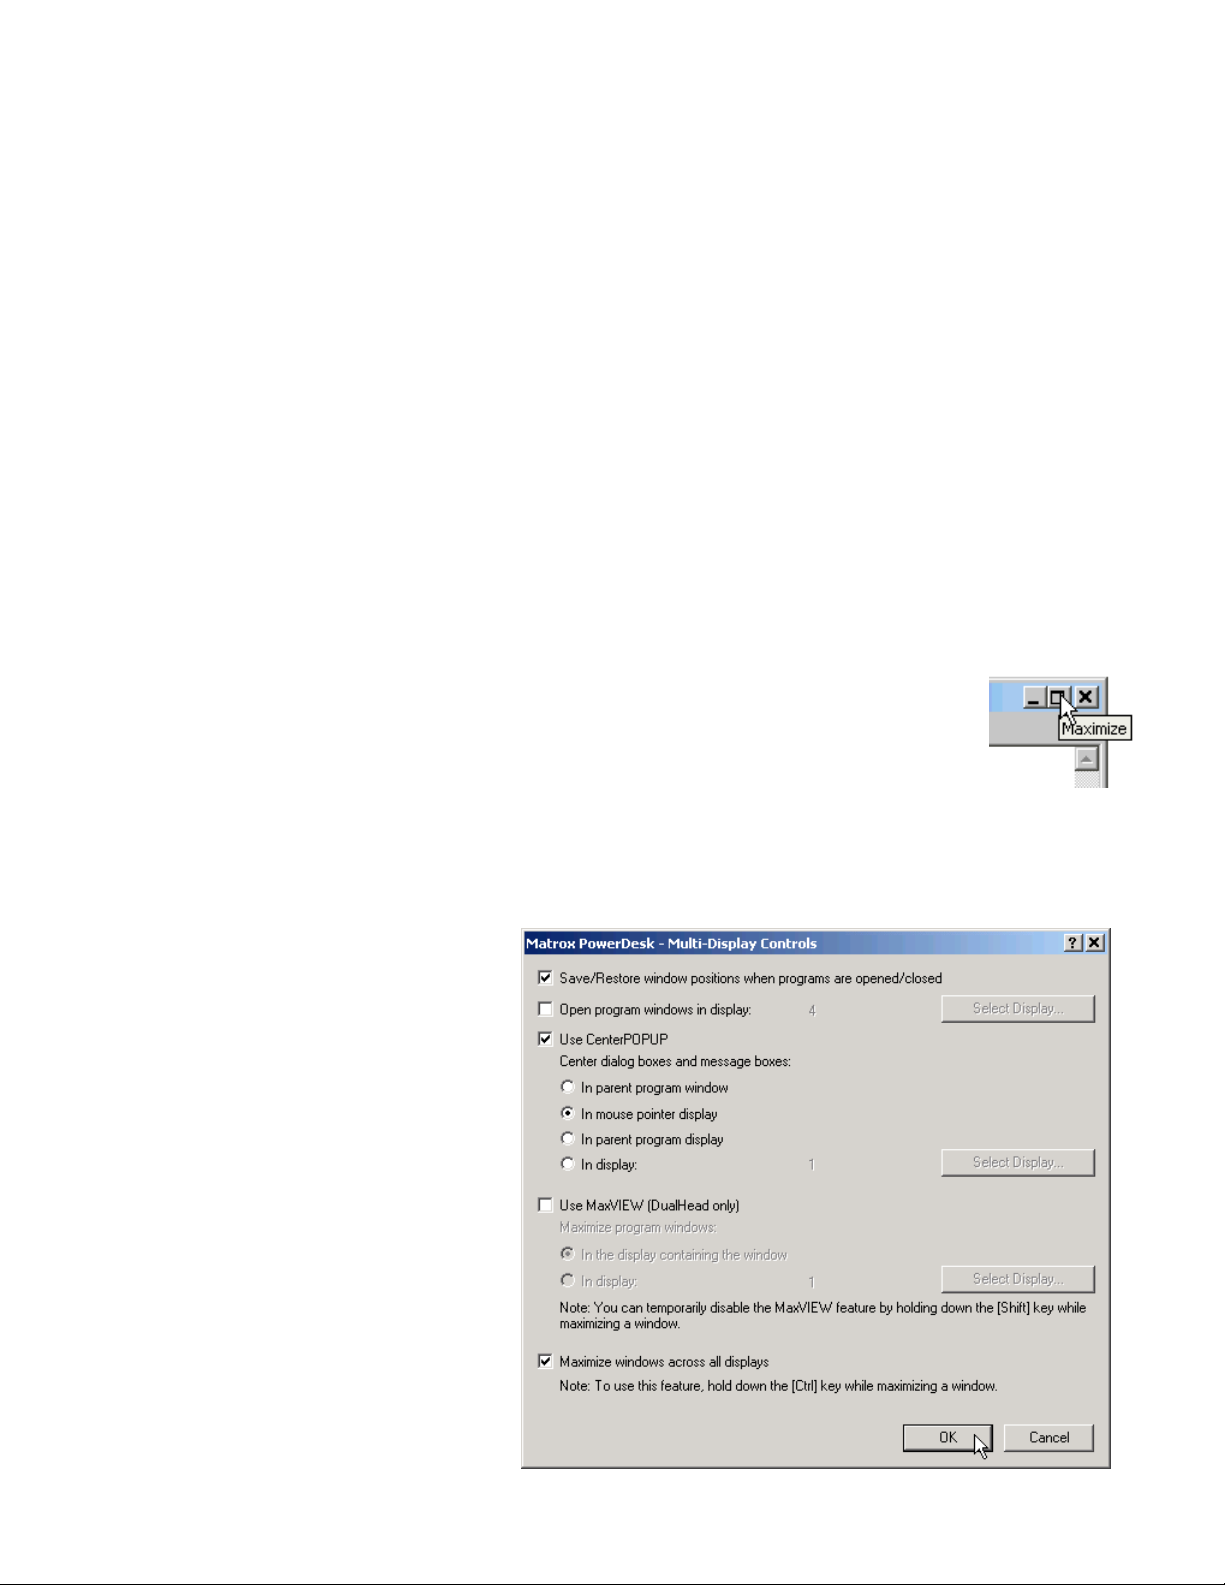
(To maximize a window, click the maximize icon at the top-right of Windows applications.)
Use MaxVIEW (DualHead only)
This option is unavailable for the
SideCar.
Recommended Multi-
Display Controls settings
The following combination of
settings (shown at right) works well
for many users.
When you have finished selections,
click “OK” to close the dialog box.
52- U
SER OPTIONS FOR MULTI-DISPLAY EASE OF USE
Page 57
Snap to display…
Another helpful option is the ability to “snap” windows to screen edges when their borders are
dragged within a certain range of the screen edge. The range can be as close as 1 pixel or as far as
50 pixels. Choosing this option can avoid some of the fuss of maximizing windows to the edges
of a screen.
Note: this option is helpful when you want to maximize a window to one or more screen edges,
but don’t want to maximize to a full screen or to the full Windows desktop. The fastest way to
maximize an application to a single full screen is with the application’s maximize button. To
maximize across the entire Windows desktop, activate the “Maximize windows across all
displays” option, discussed earlier.
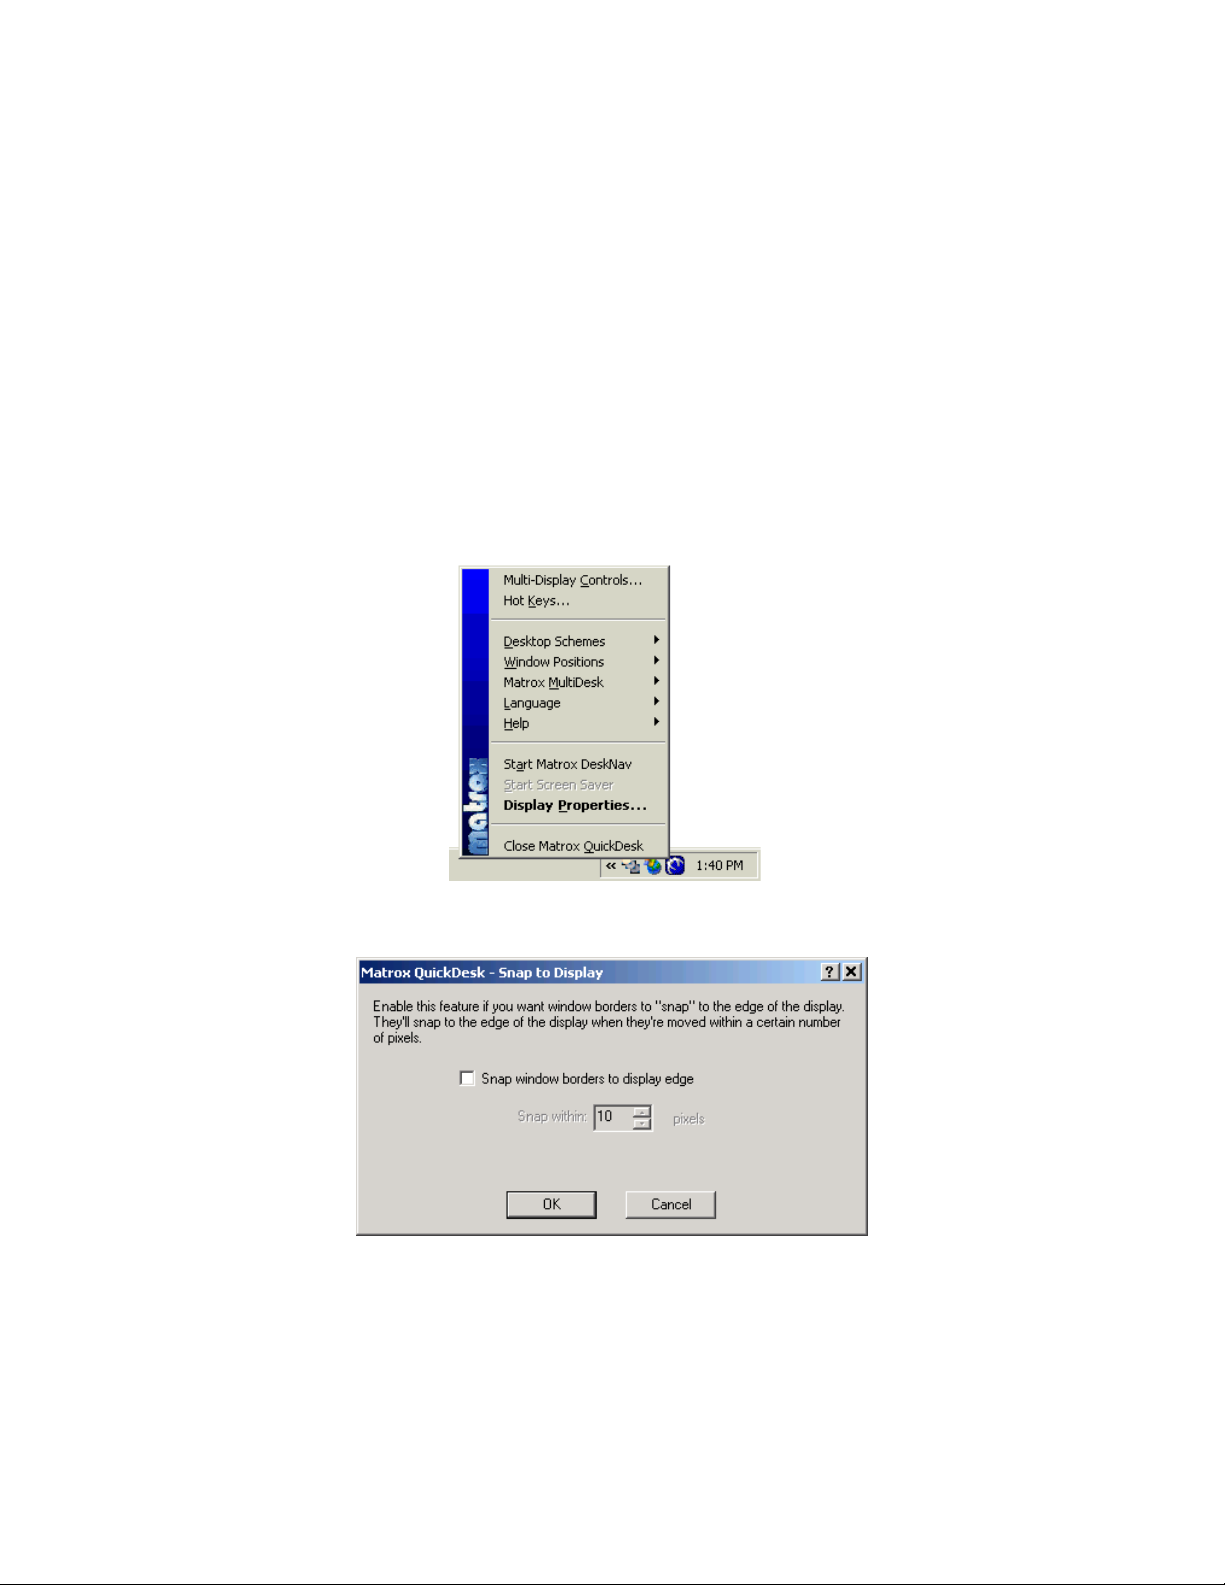
To activate the “Snap to display…” feature:
1. Open the QuickDesk menu from the Taskbar (click on the blue icon):
2. Select “Window Positions”, then “Snap to Display…”.
3. Click the checkbox “Snap window borders to display edge”.
4. Use the up/down arrows to select the pixel range (50 is highest, and is recommended
for maximum effect).
5. Click “OK” to apply the changes and close the dialog box.
53- U
SER OPTIONS FOR MULTI-DISPLAY EASE OF USE
Page 58
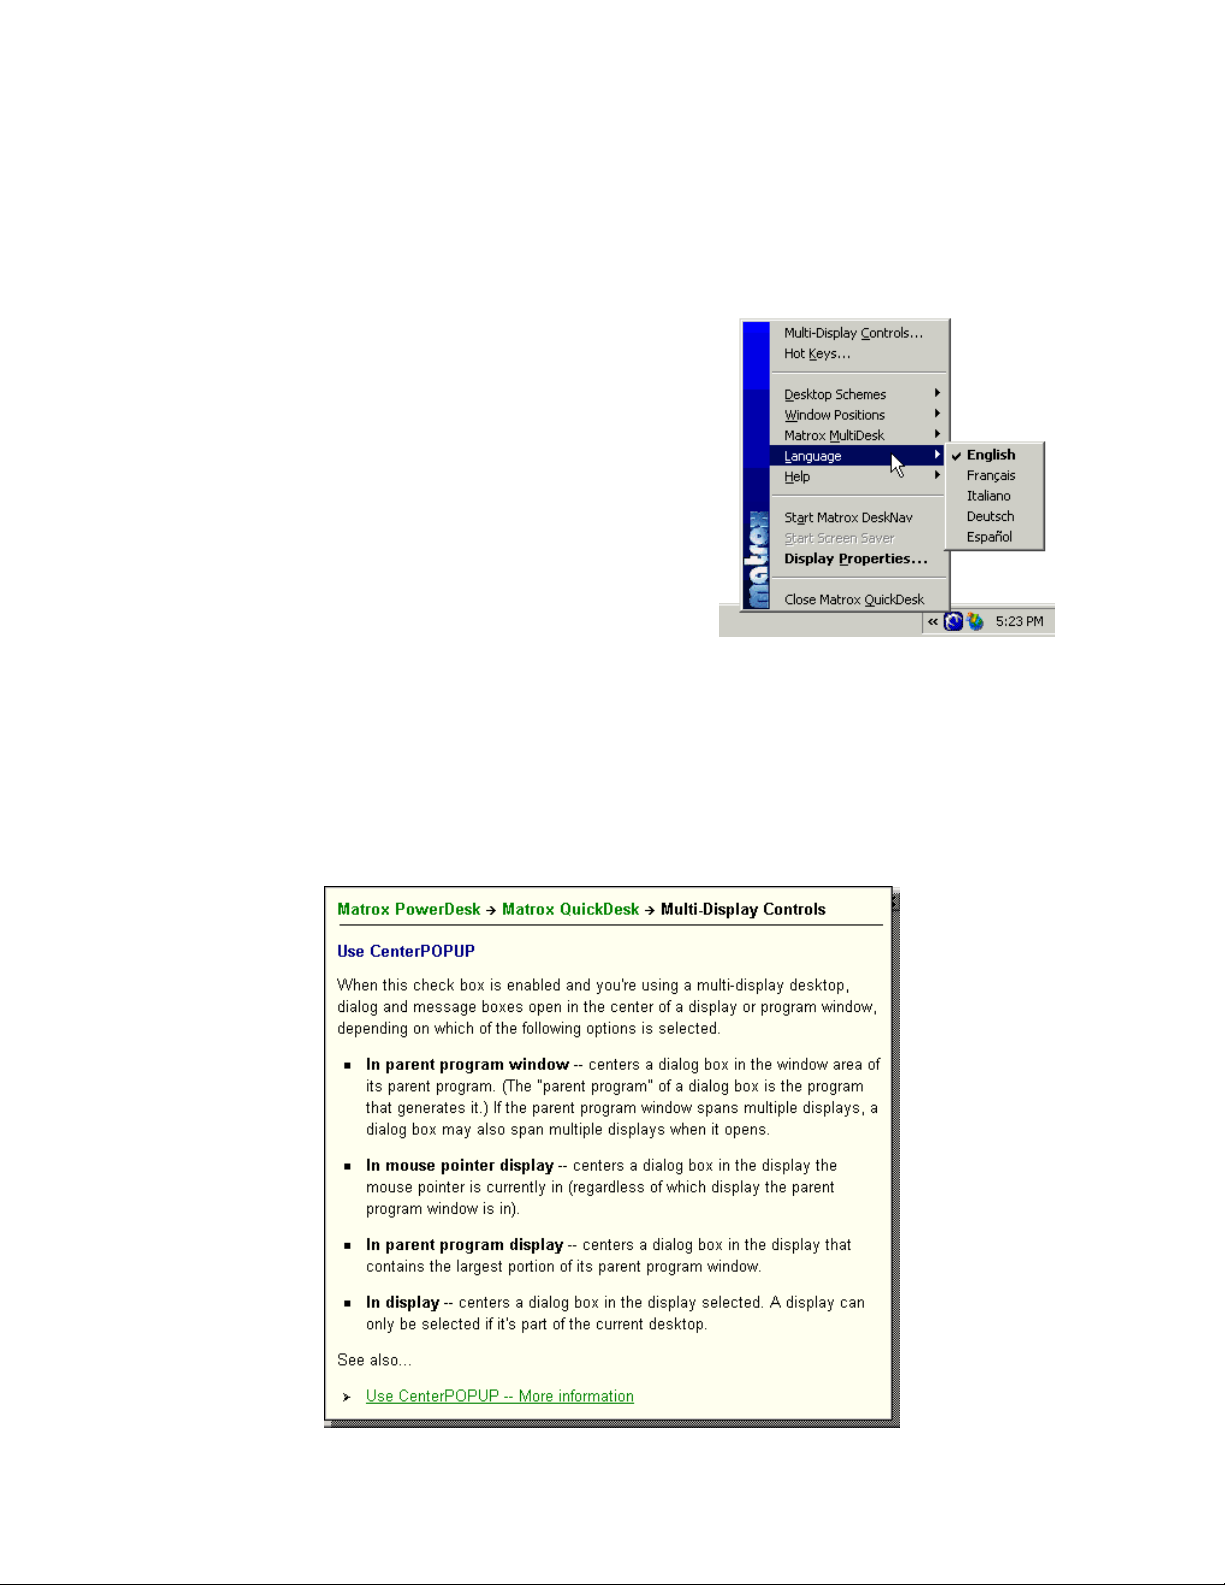
Change language for QuickDesk / PowerDesk menus
The SideCar installation offered you a choice of language for display utility menus and help files.
You can change that choice at any time, among English, French, German, Spanish and Italian.
1. Open the QuickDesk menu from the Taskbar (click on the blue icon):
2. Select “Language”.
3. Your current language choice is checked:
4. Choose your preferred language.
Note: This language choice affects QuickDesk and
PowerDesk menus, help files for these menus, and
tabbed areas of Windows Display Properties settings
that display the PowerDesk blue globe icon. The rest
of your Windows installation (including other areas of
Display Properties) is unaffected by this choice.
Getting help for QuickDesk / PowerDesk features
An easy way to learn about QuickDesk / PowerDesk features is through context-sensitive help.
Access context-sensitive help by positioning your cursor over the item in question (you may need
to select the item) and then press the “F1” function key.
This opens a context-sensitive help window, such as the following (for CenterPOP):
54- U
SER OPTIONS FOR MULTI-DISPLAY EASE OF USE
Page 59
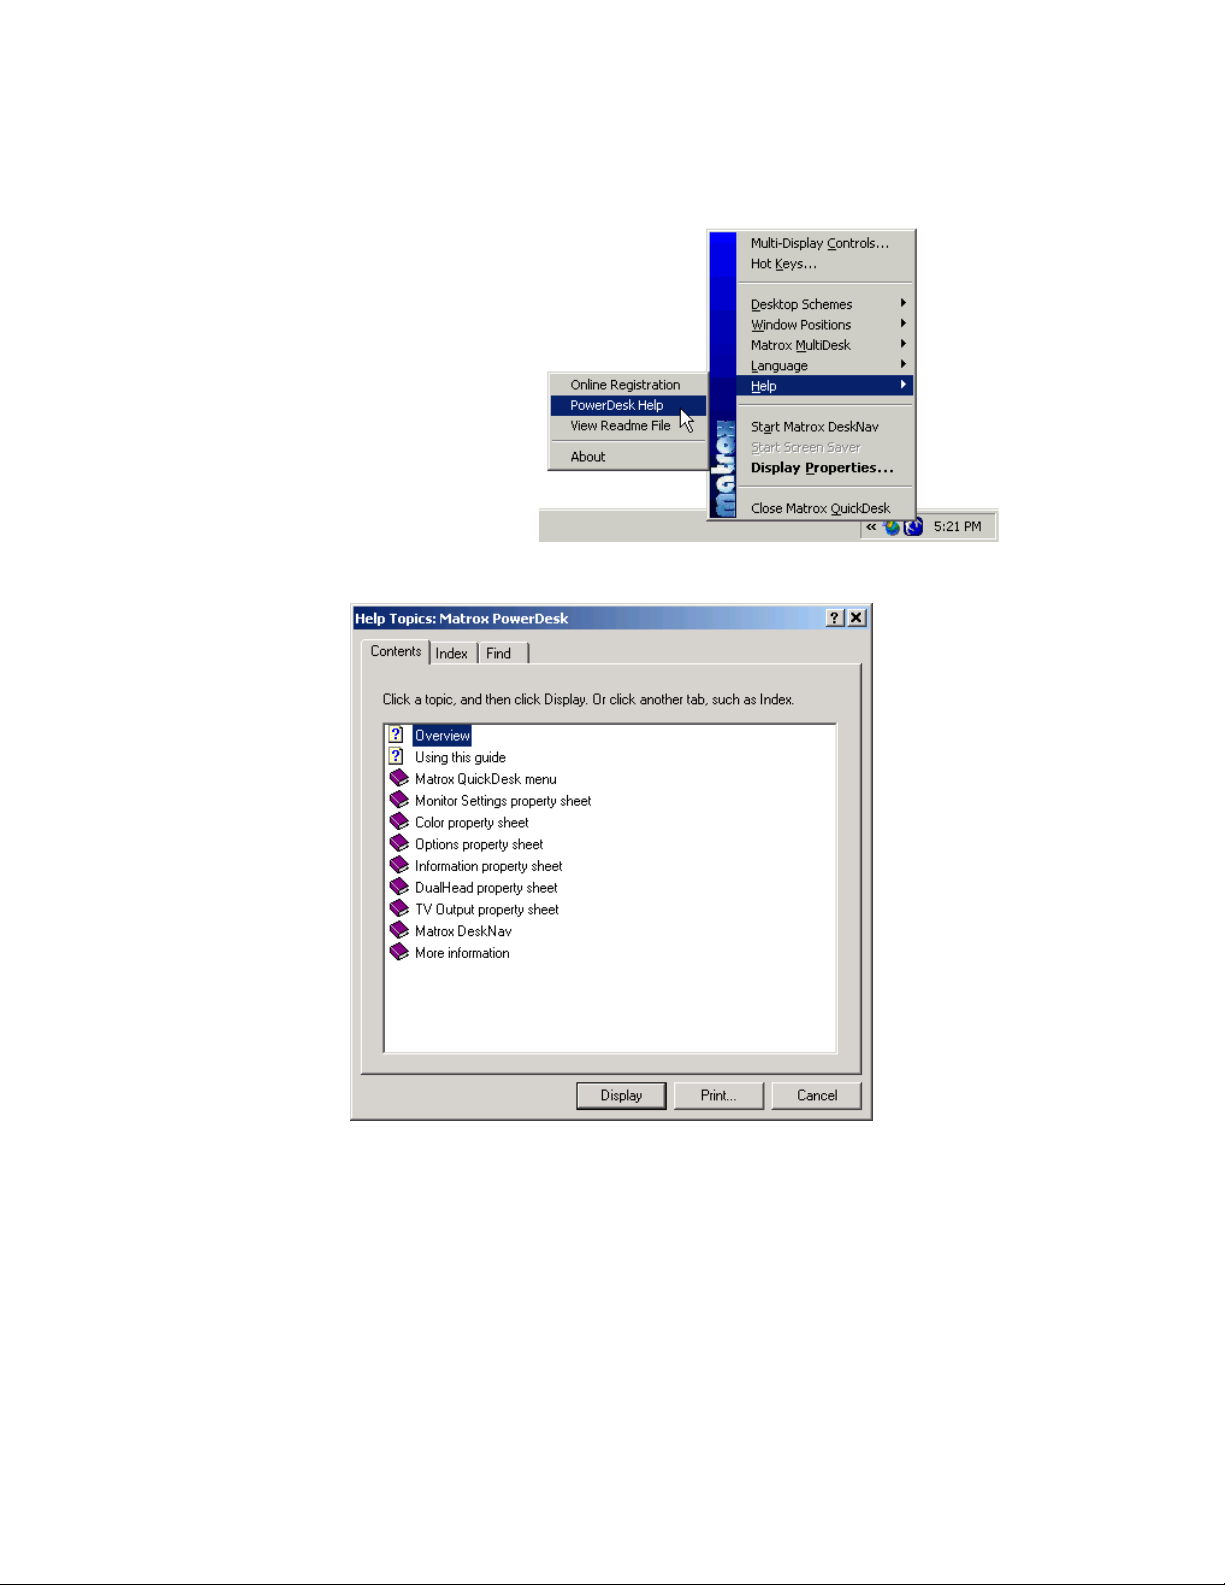
Extensive help is also available via the QuickDesk menu:
1. Open the QuickDesk menu
from the Taskbar (click on the
blue icon):
2. Select “Help”, then
“PowerDesk Help”.
3. This opens the following Help dialog box:
QuickDesk features are discussed under “Matrox QuickDesk menu”.
Note: The Help dialog box also offers help for selected advanced Display Properties topics.
These advanced features are discussed in the “Advanced options” (chapter 10) of this user guide.
Examples include: Monitor Settings, Color, and Options. Context-sensitive help for these items is
also available from within the Display Properties dialog box.
55- U
SER OPTIONS FOR MULTI-DISPLAY EASE OF USE
Page 60
Support from Matrox
If you have further questions about these Matrox utilities, please contact Matrox support via the
following dedicated support email address, [email protected]
as the Matrox G450 MMS.) Note that this support email is a Matrox no-charge premium service
for professional customers such as yourself who have purchased a Matrox MMS-powered
product. Matrox offers same-day callback or email response for your questions about Matrox
MMS issues.
. (Reference your product
Enlarge and speed up the mouse pointer
The SideCar adds up to four displays to your notebook desktop, for a total of five displays
(sometimes six, with the notebook secondary display port under Windows XP). With such a large
virtual desktop, users may find that they lose track of the mouse pointer at times. They may also
find it laborious to move the pointer across several screens.
To prevent losing track of the pointer, users can easily enlarge the size of their mouse pointer,
change it to a colored or 3D shape, or both. They can also speed up mouse movements and
change other mouse attributes. Users make these changes via the Mouse Properties dialog box,
one of the utilities in the Windows Control Panel.
How to change the mouse pointer:
1. Open the Windows Control Panel:
Windows 2000/XP: Double-click on “My Computer” on the desktop, then double-
click on “Control Panel” – or,
Windows 2000: Click “Start”, “Settings”, “Control Panel”.
Windows XP: Click “Start”, “Control Panel”.
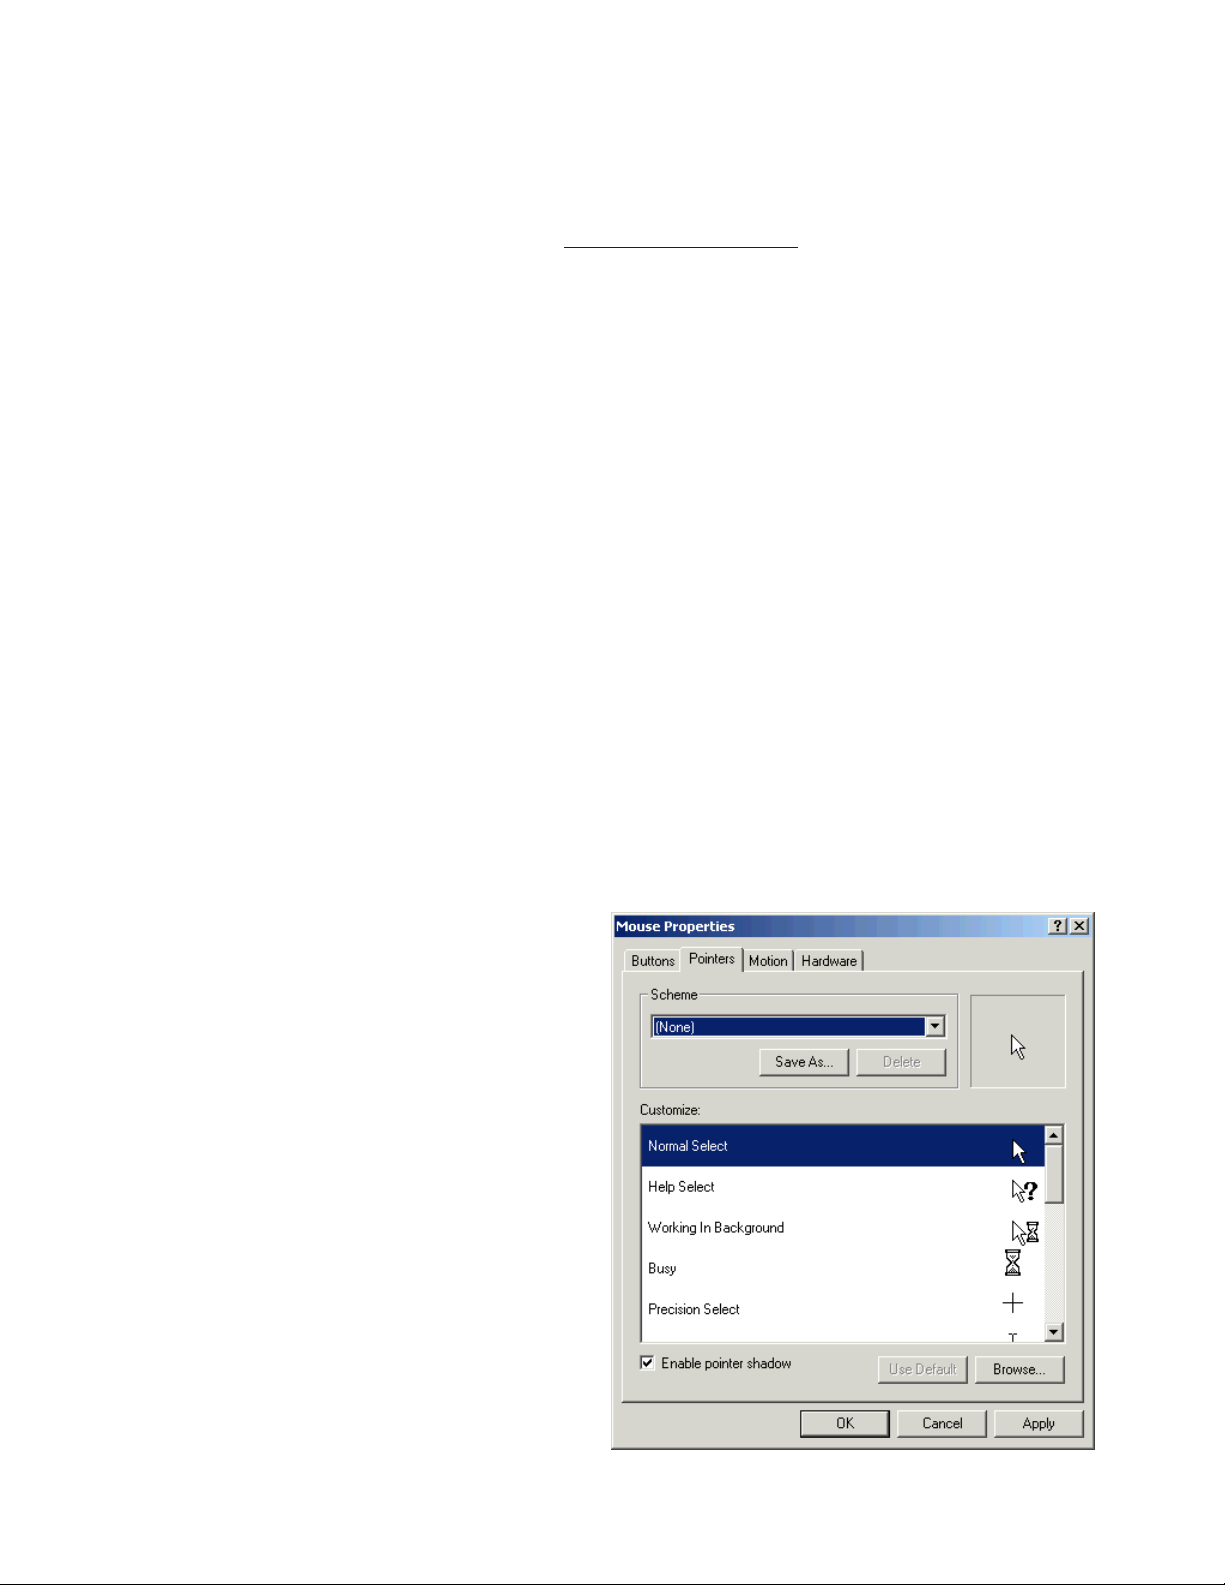
2. Double-click “Mouse” to open the
“Mouse Properties” dialog box.
3. Click on the “Pointers” tab, which
looks like this in Windows 2000:
56- U
SER OPTIONS FOR MULTI-DISPLAY EASE OF USE
Page 61
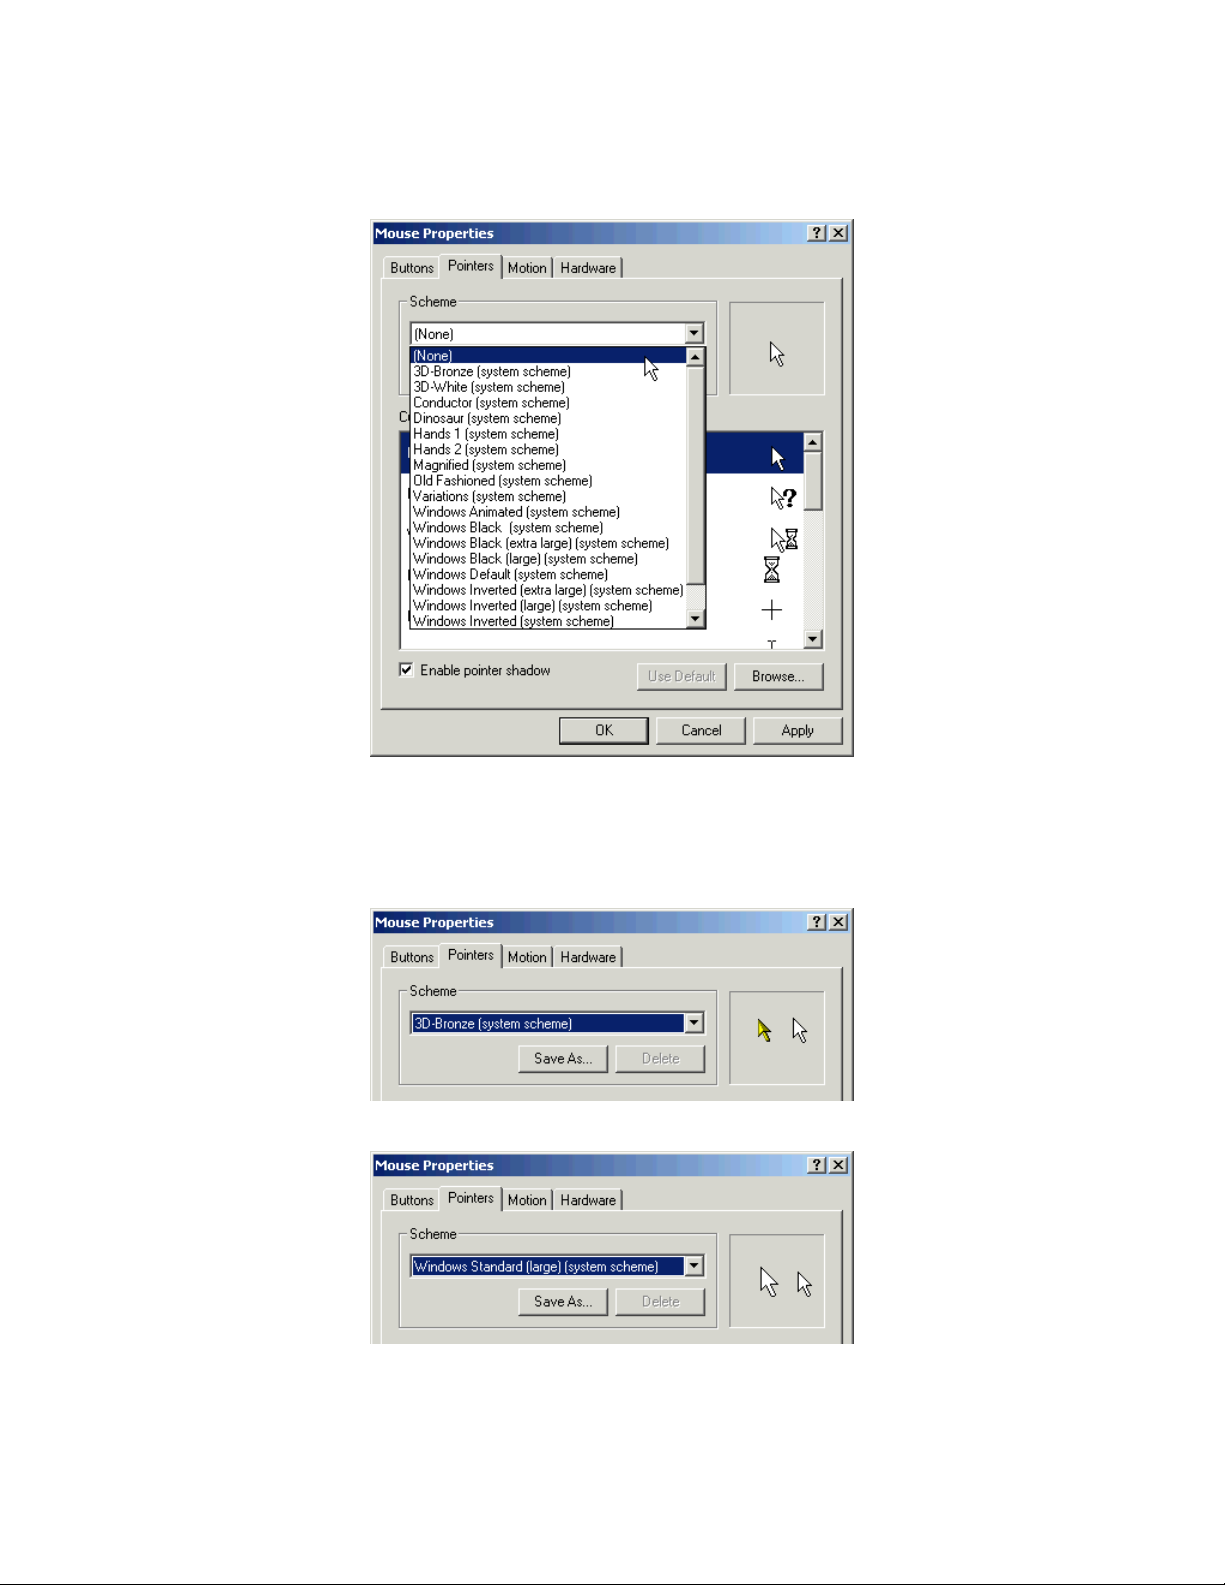
4. Click the down arrow under “Scheme” to explore alternative mouse pointer options:
5. Choose any of the options to see a preview of that scheme’s pointer style and size. Here
are some examples, with the preview pointer on the right, and the original pointer to the
right of the preview pointer:
57- U
SER OPTIONS FOR MULTI-DISPLAY EASE OF USE
Page 62
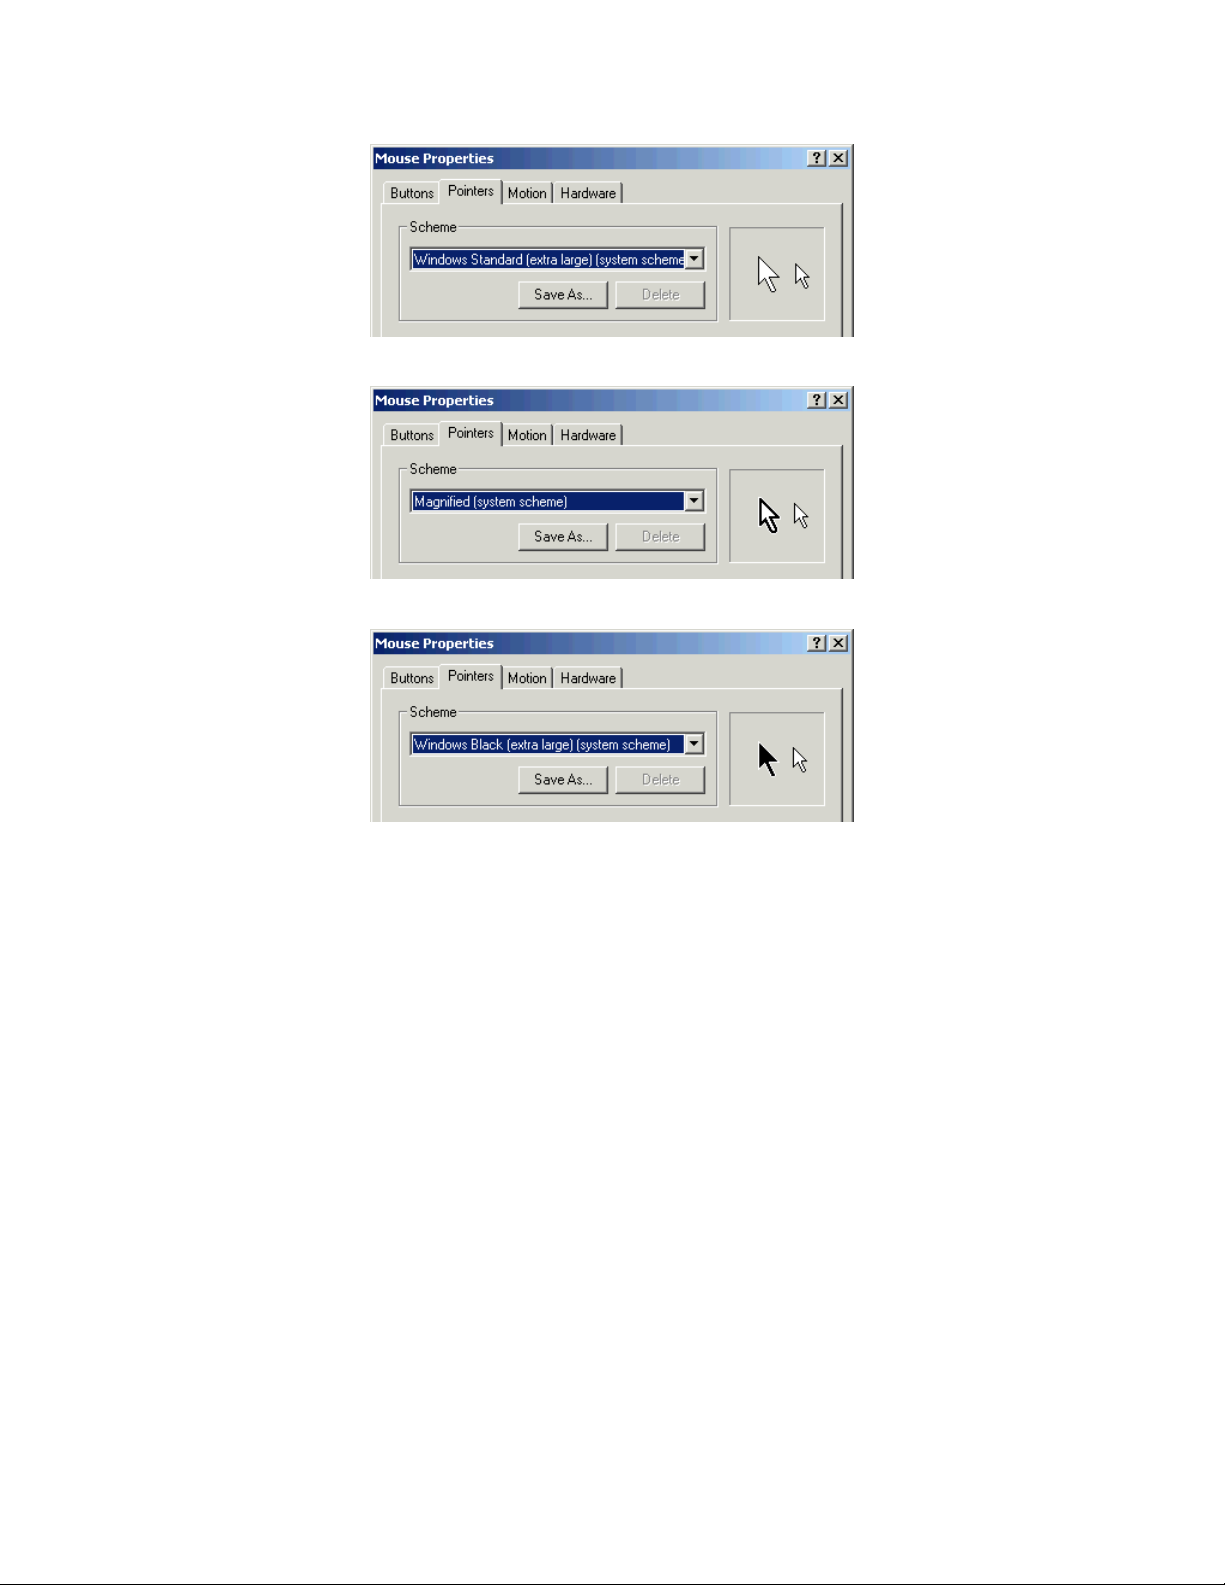
6. When you have found a pointer scheme you like, click the “Apply” button to activate
that pointer. Don’t close the dialog box yet. (Don’t click “OK”.)
7. Move the pointer around your displays to see if you like it. Roll over links (e.g., in Web
pages) and application buttons, to get a feel for the pointer in use.
8. If you want to try a different pointer, go back to step 5. Choose “(None)” if you want to
return to the system default. If you like your choice, go to step 9.
9. Now explore some options for mouse speed and other attributes that affect mouse
usability. Still in the Mouse Properties dialog box:
Windows 2000: click the “Motion” tab.
Windows XP: click the “Pointer Options” tab.
Since these tabs offer different options, we will explore each separately:
58- U
SER OPTIONS FOR MULTI-DISPLAY EASE OF USE
Page 63
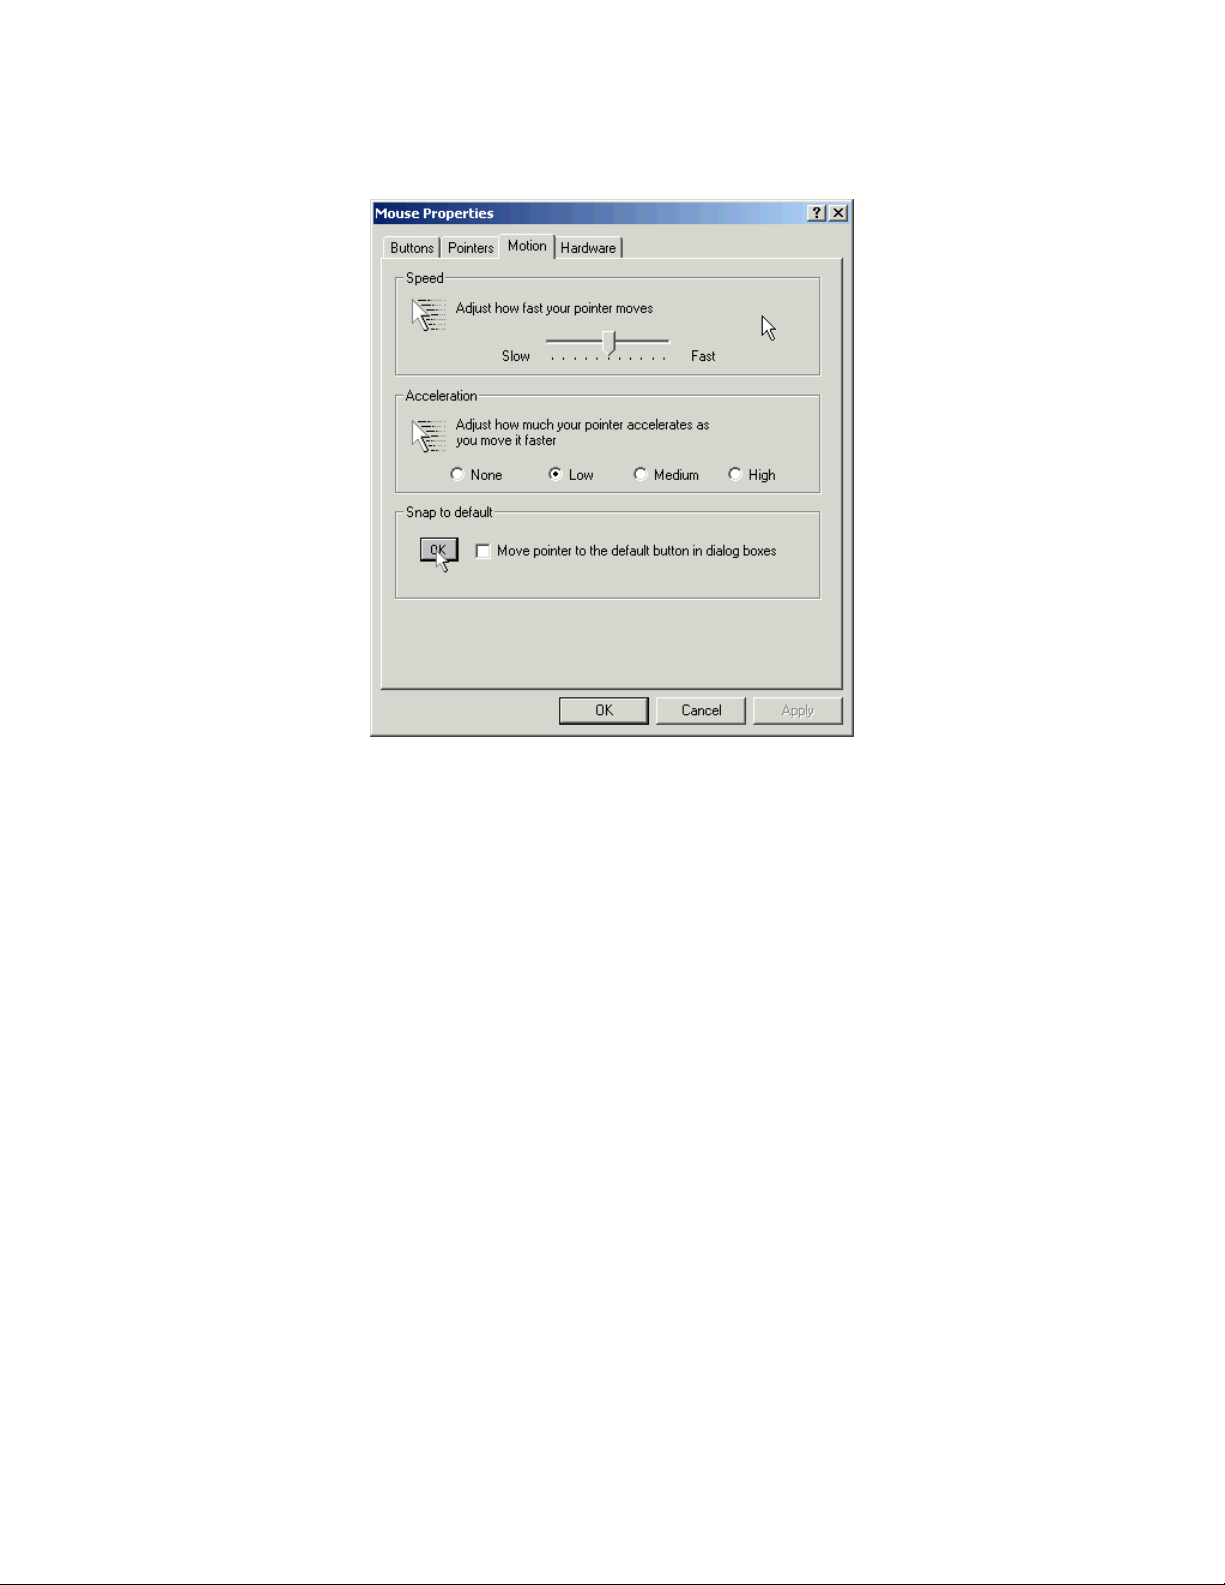
Windows 2000 “Motion” tab:
Speed – Move this slider to adjust the speed at which the pointer moves on your
screen. Changes are previewed immediately (without clicking “Apply”). You may
find that you prefer moving the slider toward “Fast” to make it easier to move the
pointer across your large, multi-screen desktop.
Acceleration – These options change how quickly the mouse pointer accelerates to
maximum speed. At the “High” setting, combined with a fast “Speed” setting, a
quick wrist flick will move your mouse immediately across several screens. Find a
combination of settings that enables you a comfortable compromise between quick
movement and precision in making mouse selections. (Those who use the mouse for
freehand drawing will need more precise control.)
Snap to default – Another Windows option: causes the cursor to “jump” to the
default button in dialog boxes. While this sounds convenient, many users find this
confusing – the mouse may seem to suddenly disappear, moving to a completely
different screen in response to a dialog box. We suggest you leave this option
unchecked.
When finished, click “OK” to close the Mouse Properties dialog box.
59- U
SER OPTIONS FOR MULTI-DISPLAY EASE OF USE
Page 64
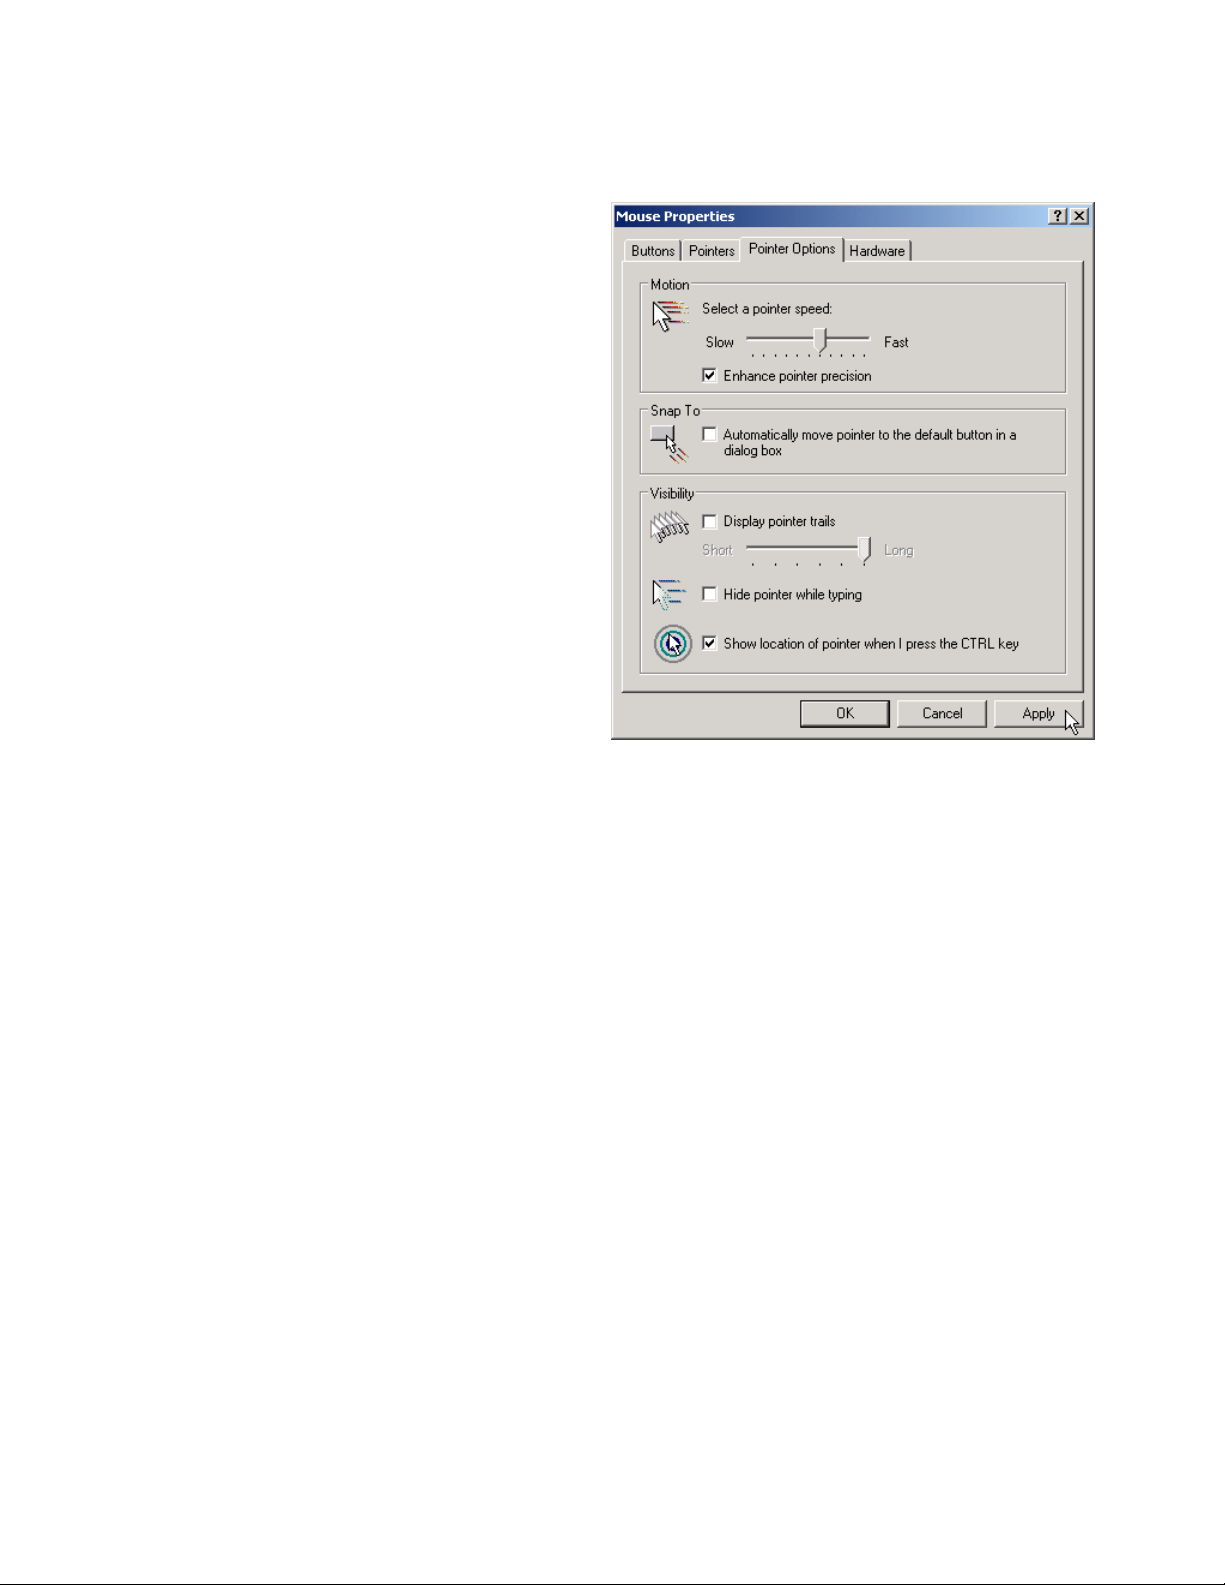
Windows XP “Pointer Options” tab:
Motion – Move this slider to
adjust the speed at which the
pointer moves on your screen.
Changes are previewed
immediately (without clicking
“Apply”). You may find that you
prefer moving the slider toward
“Fast” to make it easier to move
the pointer across your large,
multi-screen desktop.
Enhance pointer precision –
This option increase the precision
of small mouse movements, and
also helps decelerate the mouse
when finishing a mouse gesture.
We recommend selecting this
option.
Snap To – Another Windows
option: causes the cursor to
“jump” to the default button in
dialog boxes. While this sounds convenient, many users find this confusing – the
mouse may seem to suddenly disappear, moving to a completely different screen in
response to a dialog box. We suggest you leave this option unchecked.
Display pointer trails – An XP option: causes a comet-like trail of ghosted mouse
pointers to follow the mouse pointer around the screen. Default is unchecked, which
works best for most users.
Hide pointer while typing – Another XP option.
Show location of pointer when I press the CTRL key – This XP option is
particularly helpful on multi-screen desktops. When the CTRL key is pressed (and
released), a quick “bulls-eye” animation converges on the cursor and disappears. If
you find yourself misplacing the mouse pointer, we suggest selecting this option.
Click “Apply” to test checkbox options such as “Show location of pointer when I
press the CTRL key”.
When finished, click “OK” to close the Mouse Properties dialog box.
60- U
SER OPTIONS FOR MULTI-DISPLAY EASE OF USE
Page 65

Chapter 8 - Disable the notebook display
Some users may wish to disable their notebook display when using SideCar monitors. Reasons to
disable the notebook display include:
Preference to use only large desktop flat-panel displays or CRT monitors of equal
size on the desktop (to a achieve a nearly seamless multi-monitor experience)
Preference to use only remote monitors or projectors (such as at a trade show display
or business presentation)
Preference to use an external keyboard and leave the notebook computer closed and
tucked out of the way on the desktop
Dissatisfaction with the performance/resolution of the notebook LCD display
Disabling the notebook display does not harm the display or render it unusable when the
SideCar is detached from the notebook. If the user disables the notebook display and uses the
SideCar monitors, and then later powers up the notebook without the SideCar attached (such as
when traveling), Windows will revert automatically to using the notebook display.
Note that disabling the notebook display can cause temporary performance problems on
some notebooks, and so should be tested only after you have used the SideCar in its standard
arrangement as a supplement to the primary notebook LCD display. You will then be in a better
position to observe any performance issues (system sluggishness, strange colors, etc.) resulting
from deactivating the notebook LCD display.
To disable the notebook display
1. Using the Display Properties dialog box, designate one of the SideCar monitors as
your new primary monitor. (See “Designate a new primary monitor”, Chapter 8.)
2. Select the notebook LCD (#1), and unselect “Extend my Windows desktop onto this
monitor”. (The #1 display shifts to the right and become grayed out.)
:
61- D
ISABLE THE NOTEBOOK DISPLAY
Page 66
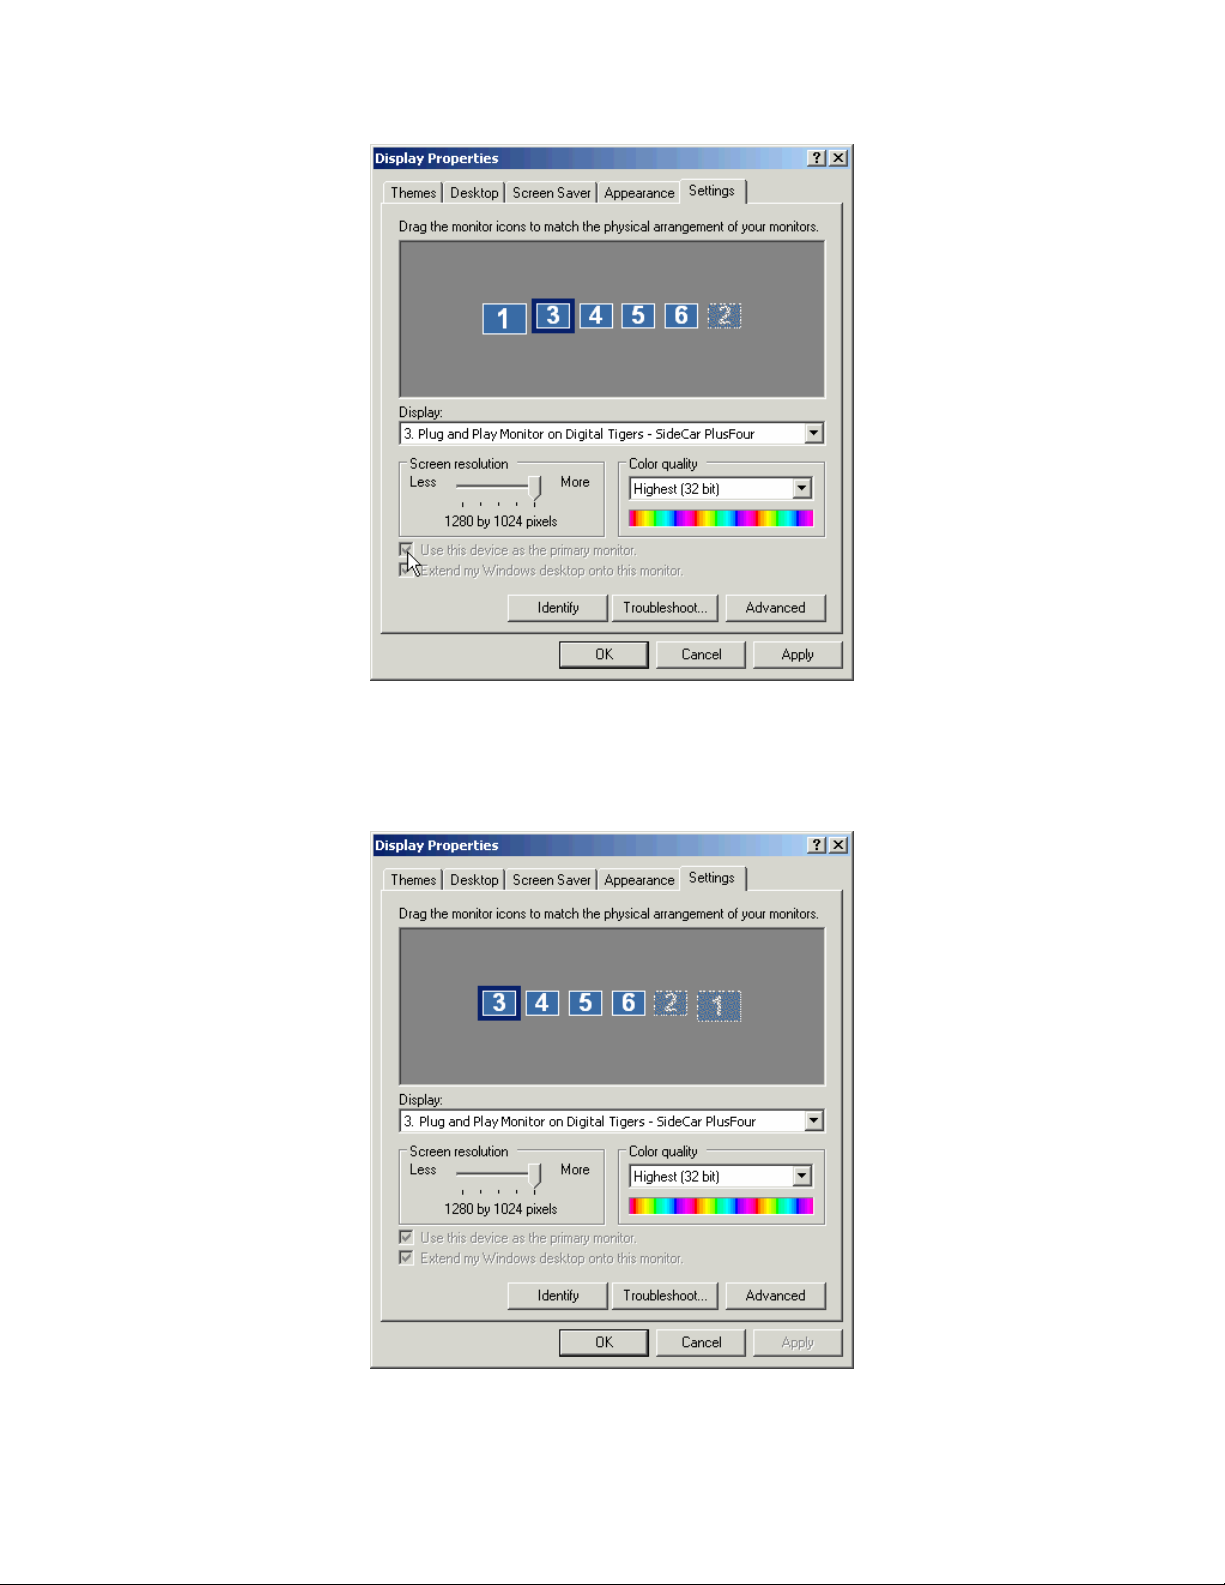
3. Click “Apply” to accept the changes, then “OK” to close the dialog box.
4. Now when you return to Display Properties / Settings in the future, you should see a
dialog box similar to this:
62- D
ISABLE THE NOTEBOOK DISPLAY
Page 67
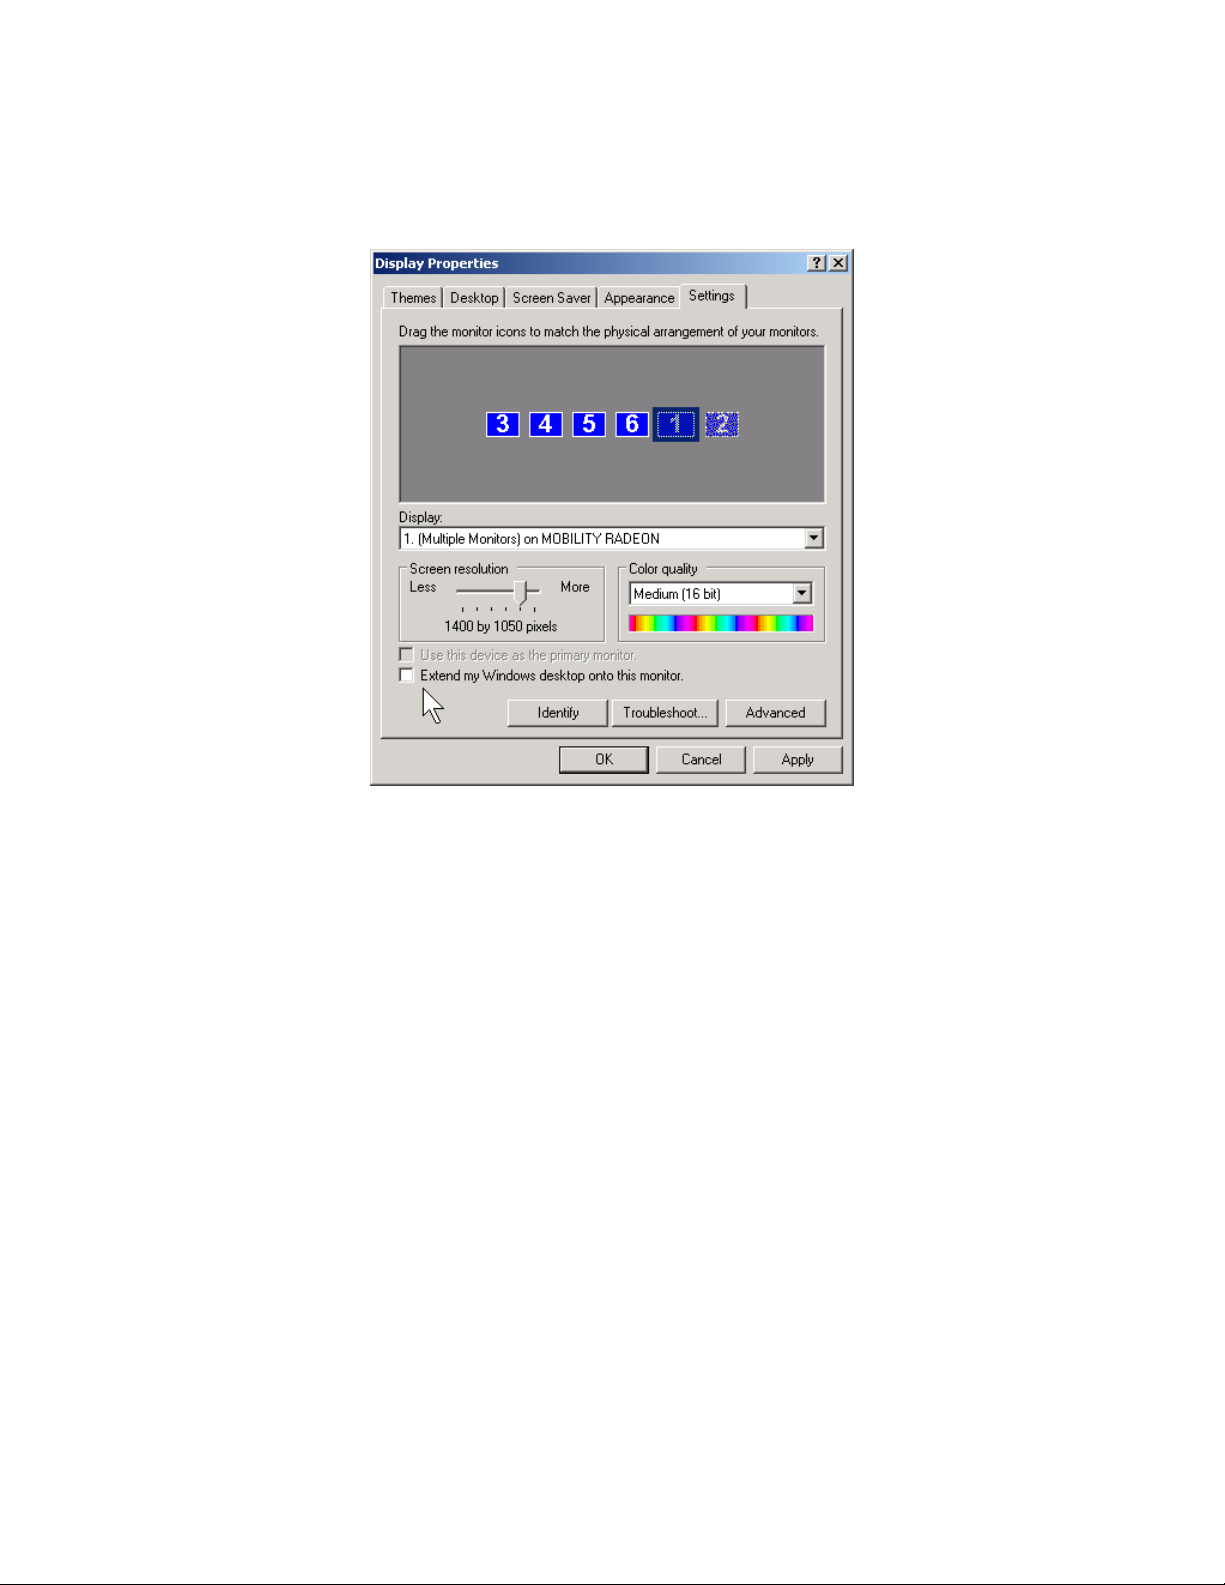
Reactivate the notebook LCD display
1. Click on the #1 monitor in this dialog box.
2. Click “Extend my Windows desktop onto this monitor”.
3. If you want to re-designate the notebook LCD as the primary monitor, click “Use this
device as the primary monitor”.
4. Reposition the #1 monitor, if necessary, to match your desktop monitor arrangement.
5. Click “Apply” to accept the changes, then “OK” to close the dialog box.
63- D
ISABLE THE NOTEBOOK DISPLAY
Page 68
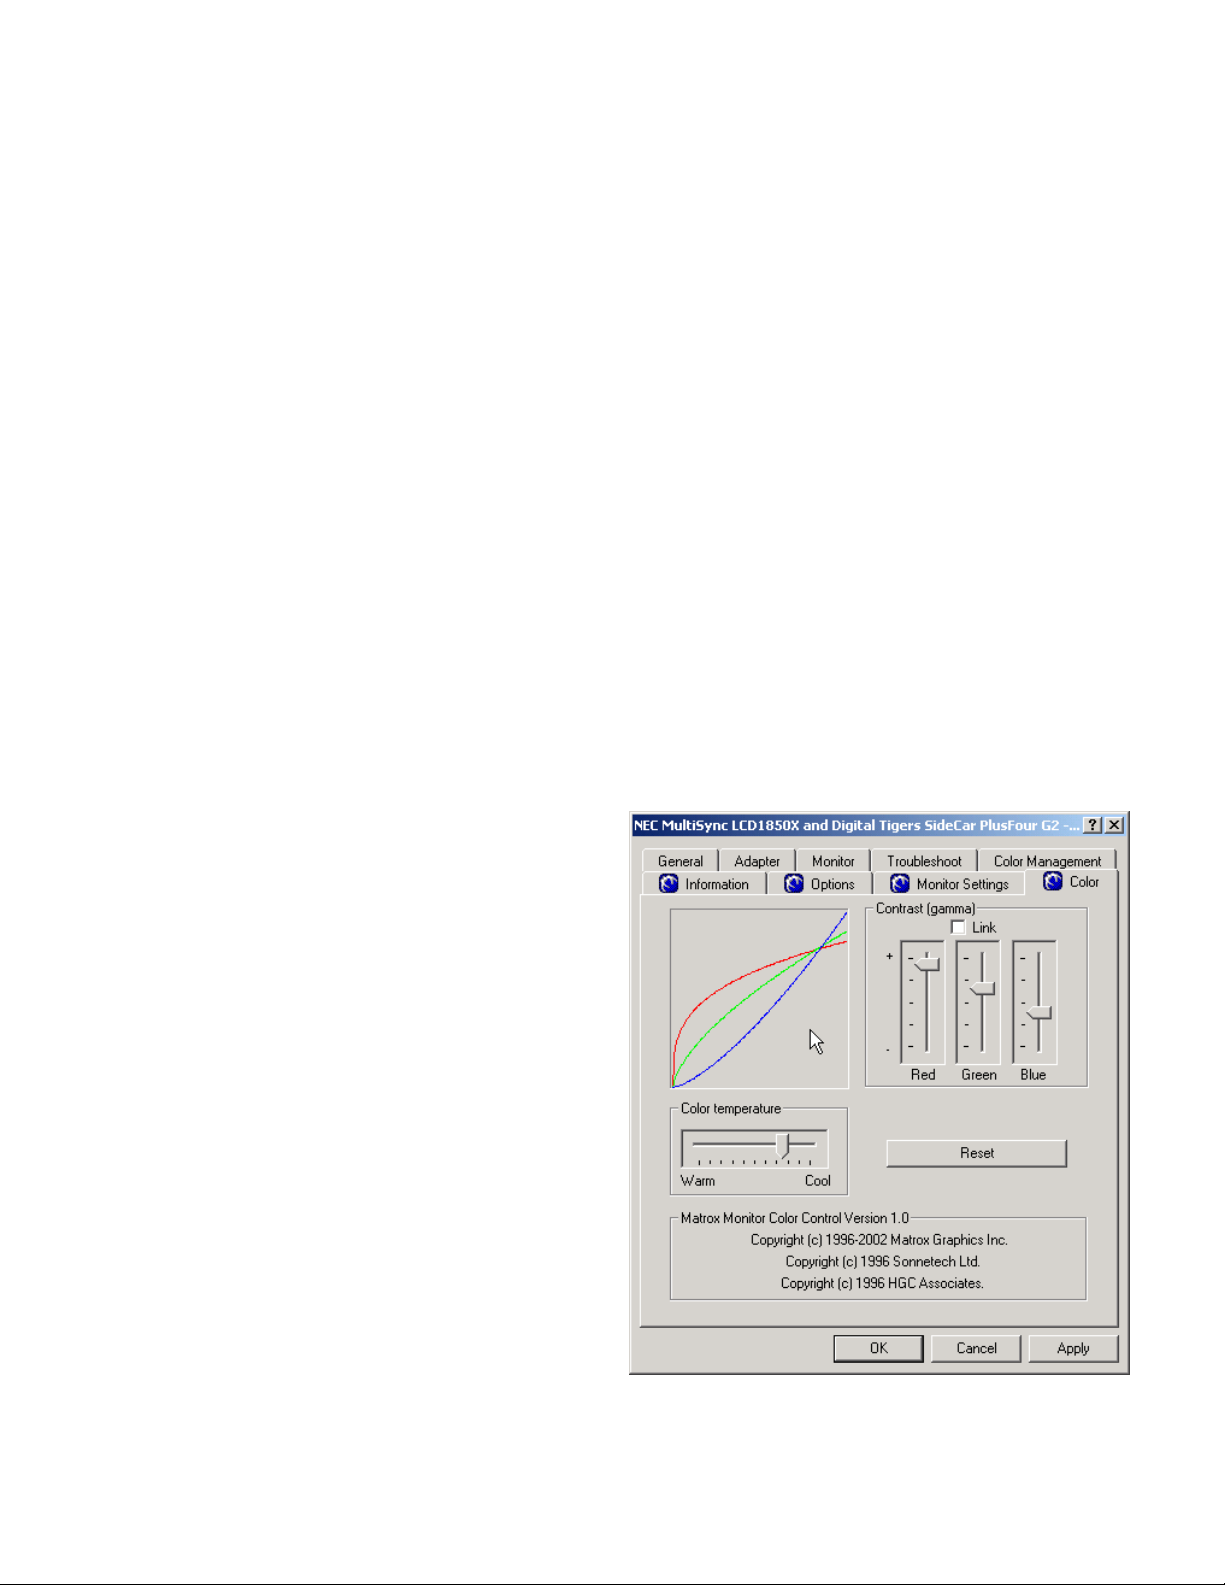
Chapter 9 - Advanced options
Adjust display color and contrast
Advanced users may wish to adjust the default color and contrast settings of the SideCar display
controllers. This may be important to match printed output, rectify monitor deficiencies, or to
compensate for environmental lighting conditions.
Note that the default settings of the display controllers are carefully calibrated for best results for
most users. Also, many monitor manufacturers offer adjustment controls that will help you
optimize display quality or match printed output. So you have a choice of where your want to
apply your adjustments: at the controller or monitor levels (or both).
For those users who wish to alter display color and contrast at the controller level, we offer
adjustment controls via the Display Properties dialog box.
1. Right-click on the desktop, select “Properties”.
2. Select the “Settings” tab.
3. Select the SideCar monitor you wish to adjust.
4. Click the “Advanced” button, then click the “Color” tab. You will see the following:
5. Make adjustments as you prefer:
Adjust overall color temperature
(from “warm” to “cool” colors)
using the Color temperature slider.
Adjust the overall contrast and
brightness of the display by
clicking the “Link” checkbox and
moving any of the vertical sliders up
or down.
Adjust individual color channels
(red, green, blue) using the
individual vertical sliders, with the
“Link” option unchecked.
Reset to default settings by
clicking the “Reset” button.
6. Click “OK” to exit the “Color” panel.
7. Click “OK” to exit Display Properties.
Note: you can return to Display Properties at any time to revert the color settings to the defaults.
64- A
DVANCED OPTIONS
Page 69
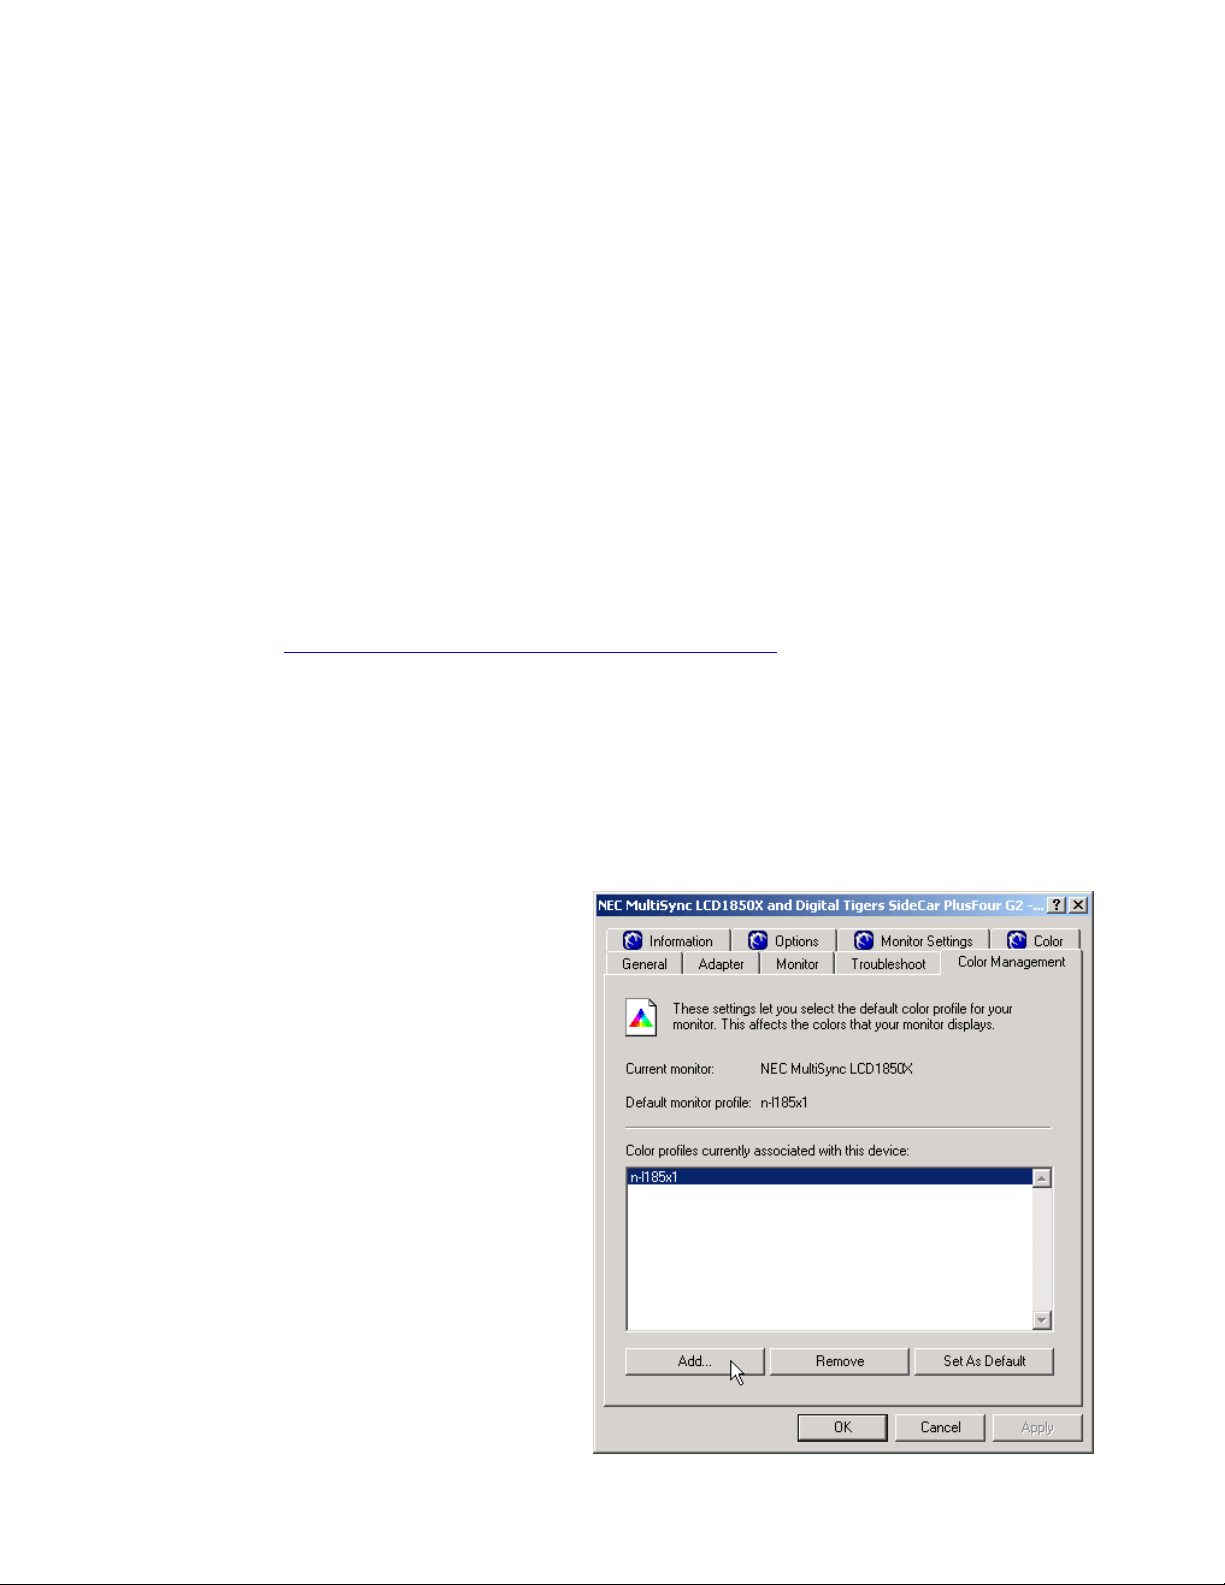
ICC/ ICM color profiles
Matching colors between computer screens and printed output is a considerable challenge, given
the radically different principles behind color production in illuminated color (used by computer
monitors, using the RGB process) and most printed material (which use the CMYK process). In
addition, there are a wide variety of computer monitors (such as CRTs and LCDs, with many
variant models offered) and printers (ink jets, color laser printers, dye sublimation printers,
professional presses, etc., with many variant models of each type).
While monitors and printers vary in their quality of output, what matters most to those who
produce professional printed material is that what designers see on screen matches the final
printed output. Since printers vary widely in their output color, there can be no “universal” color
profile for use by computer displays. Instead, designers adjust their computer display color
profiles to match their chosen printer.
To assist this process, the computer industry has standardized a system of ICC (International
Color Consortium) profiles for various devices (monitors, scanners, printers), which Microsoft
supports in Windows through its ICM (Image Color Management) system. For more on
ICC/ICM, please read “Color Management and Windows: An Introduction” on the Microsoft
Web site at http://www.microsoft.com/hwdev/tech/color/icmwp.asp
.
View and change the ICC / ICM profiles for your display
Windows and the SideCar display drivers will attempt to load a default color profile calibrated for
your monitor. If this profile is unavailable, a default profile will be loaded. In either case, you can
change this profile to a new profile, which may be supplied by your organization or other source.
To view or change your color display color profile, go to the Display Properties / Settings dialog
box:
1. Right-click on the desktop, select
“Properties”.
2. Select the “Settings” tab.
3. Select the SideCar monitor you
wish to adjust.
4. Click the “Advanced” button.
5. Click the “Color Management”
tab. The following example shows
the profile for the NEC LCD1850X
LCD display:
65- A
DVANCED OPTIONS
Page 70
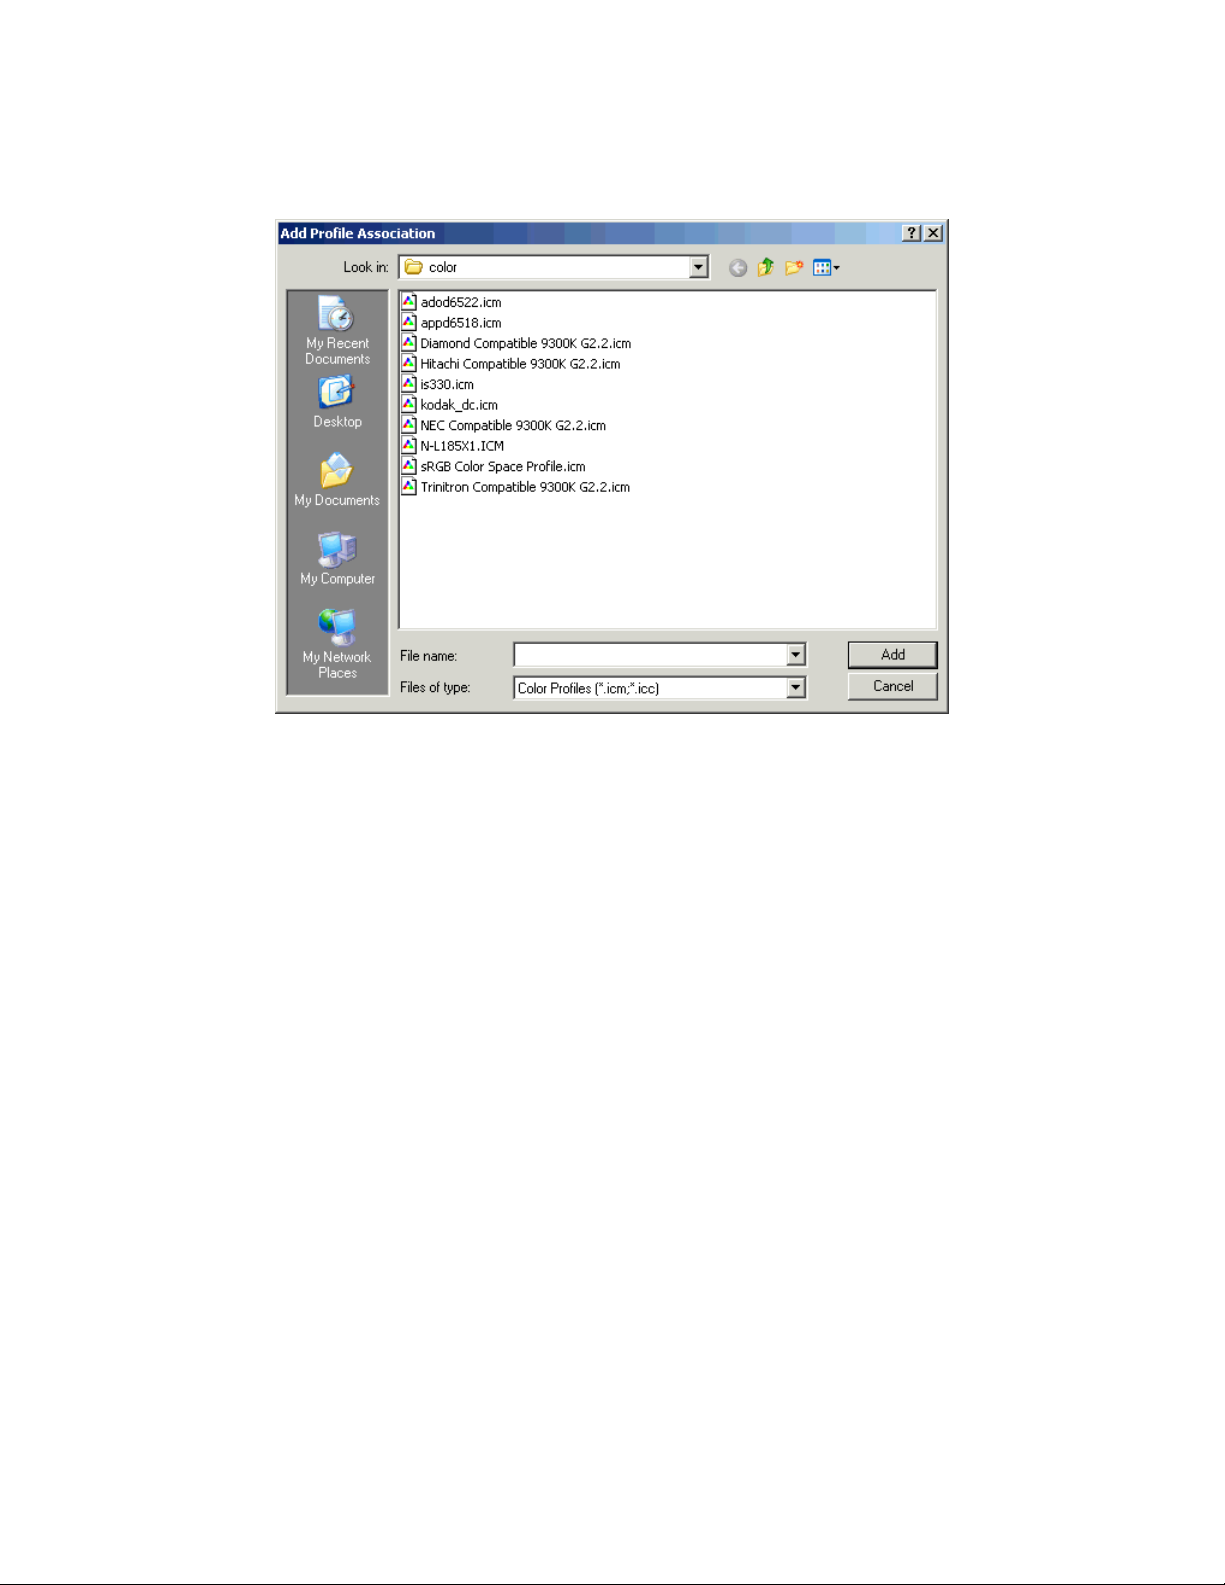
6. Click “Add” to load the new color profile you will supply.
66- A
DVANCED OPTIONS
Page 71
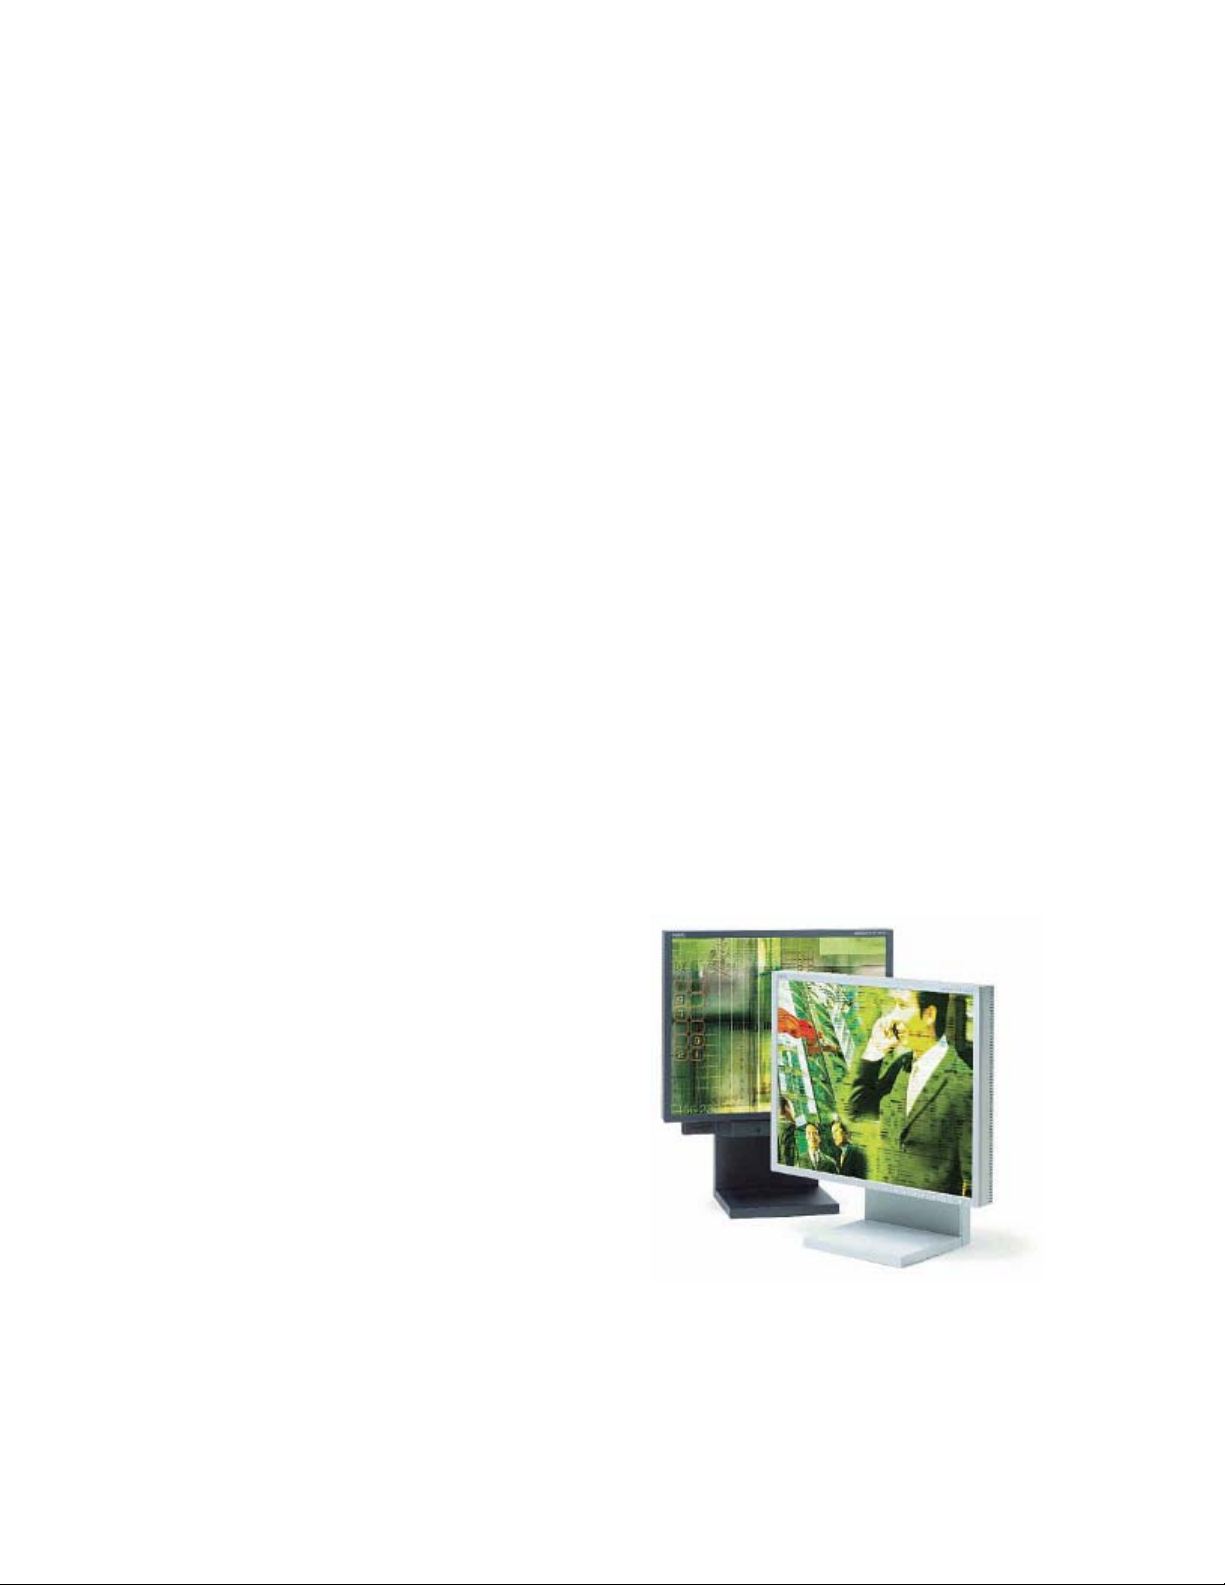
Chapter 10 - Monitor options
The SideCar MMS series can be used with nearly any analog (SVGA) or digital (DVI) monitor.
Digital DVI displays are supported at screen resolutions from 640 by 480 up to 1,280 by 1,024.
Analog displays are supported at resolutions from 640 by 480 up to 2,048 by 1,536 resolution.
That said, since up to three external displays will be used together, and since the SideCar and
notebook are highly portable, it makes sense to choose monitors with attributes that optimize
these mobile, multi-monitor qualities.
The ideal monitor might have the following attributes:
LCD or similar flat-panel technology
o Saves desk space, is portable, lower power/heat
Supports digital DVI and analog VGA inputs
o Digital DVI connections do not suffer from analog anomalies, such as a shimmer
known to occur sometimes with certain flat panels operating in analog mode
o Analog VGA interface is universal and therefore versatile (can support notebook
external VGA port, for example)
Optimized for 1,280 by 1,024 resolution
o Maximum recommended resolution for SideCar digital DVI outputs, although higher
resolutions are supported for analog outputs
Display area large enough for comfortable viewing at that resolution
o We recommend 18+ inches for 1,280 by 1,024 resolution
Thin, straight bezel (screen frame)
o Enables ganging of multiple displays
for a nearly seamless desktop
Stand with vertical and tilt adjustment
Removable stand; standard VESA rear
mounting plate
o Removable stand aids transport;
VESA mounting plate supports
monitor arms and/or mounting rails
Integrated power supply
o More portable than displays with
external power supplies; external
power supplies can also get misplaced
during travel
NEC LCD1880SX monitors surpass our
criteria. We recommend them highly.
67- M
ONITOR OPTIONS
Page 72
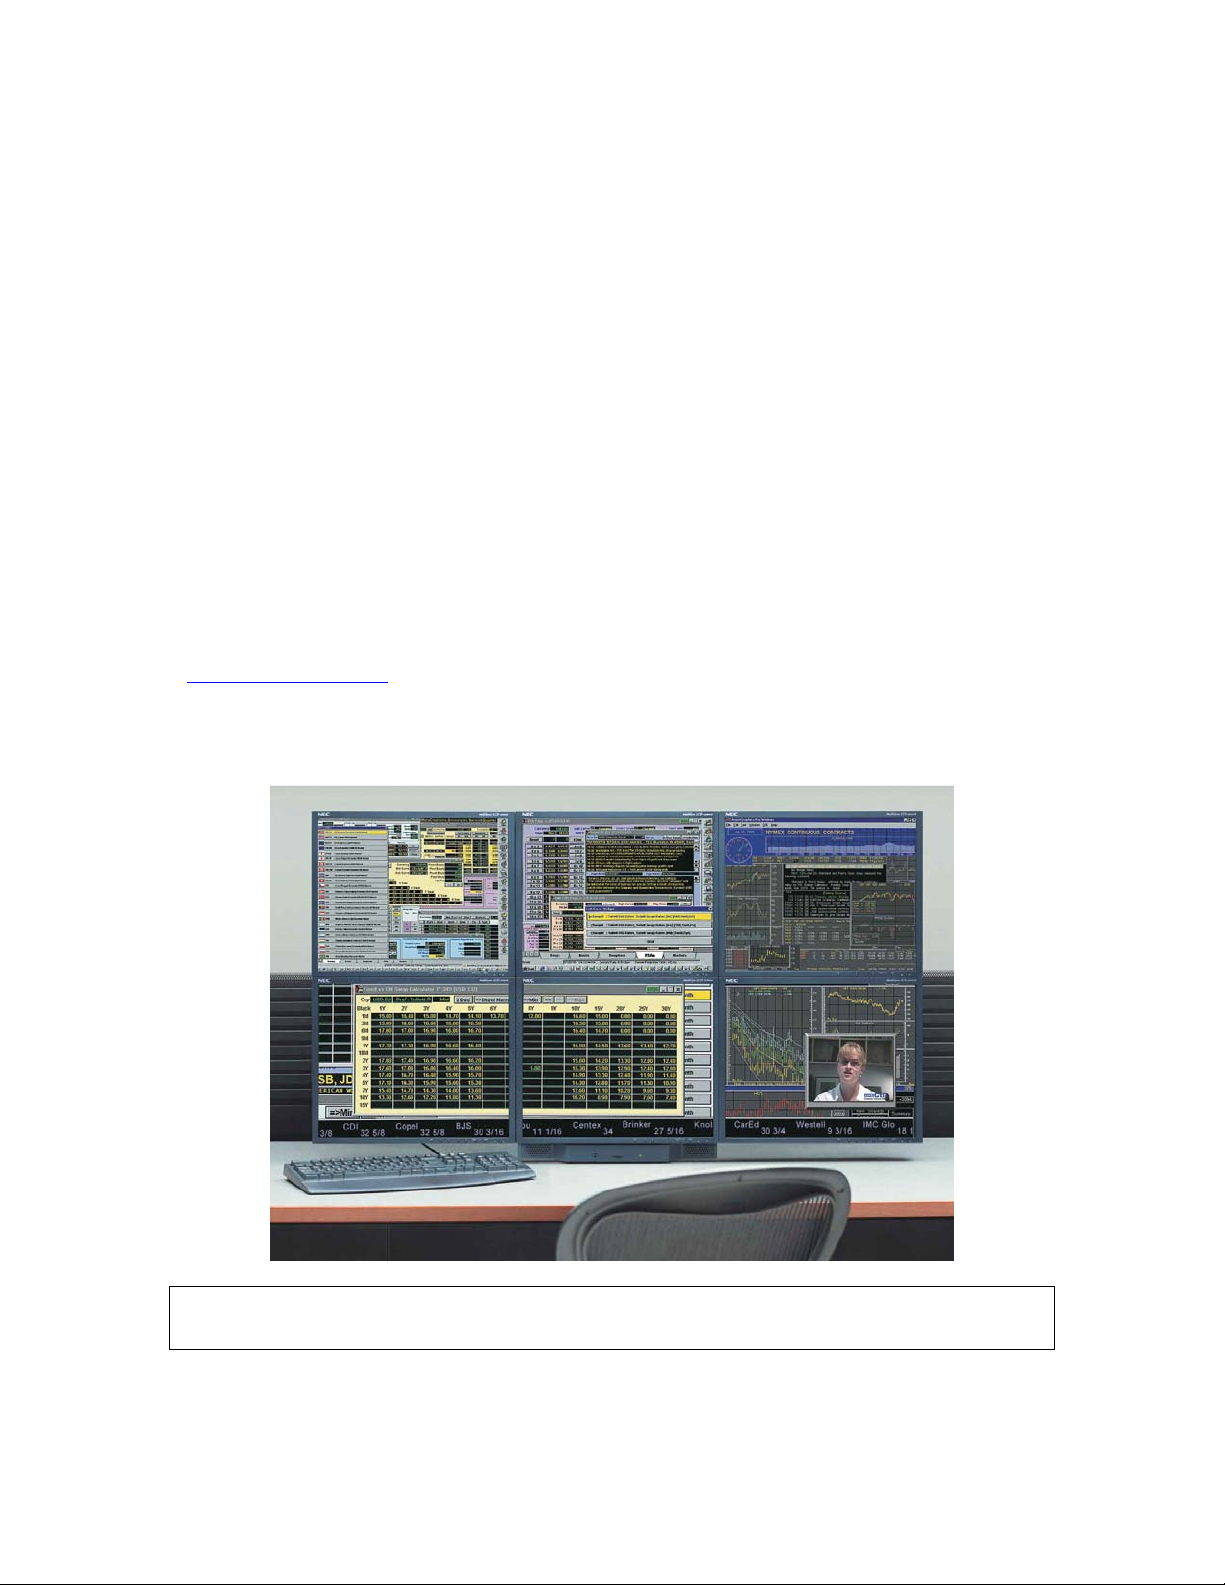
Bright, high-contrast screen; wide viewing angle
o Specifications vary greatly among manufacturers and models
High degree of color accuracy, and good support for standard color-matching systems
Fast-refresh pixels to support motion video and quick mouse movements on the screen
Convenient controls to adjust brightness, contrast, color, input selection, etc.
Able to support long display cable runs, to support flexible display setups
Recommended flat-panel monitors
There are undoubtedly at least several monitors on the market that meet this criteria. However, in
extensive testing by Digital Tigers, we have been most pleased by the current NEC line of digital
flat panel monitors – specifically the NEC MultiSync LCD1880SX.
We are pleased to offer sale of these NEC monitors. Please visit our Web site
(http://digitaltigers.com
and shipping case information below – our shipping cases are optimized for the NEC monitors.
) for more information about these. In addition, please note the luggage
This financial trader desktop is based on NEC LCD1880SX flat panel monitors mounted on rail s.
The rail mounting clears desk space normally used for stands, and enables stacking of monitors.
68- M
ONITOR OPTIONS
Page 73
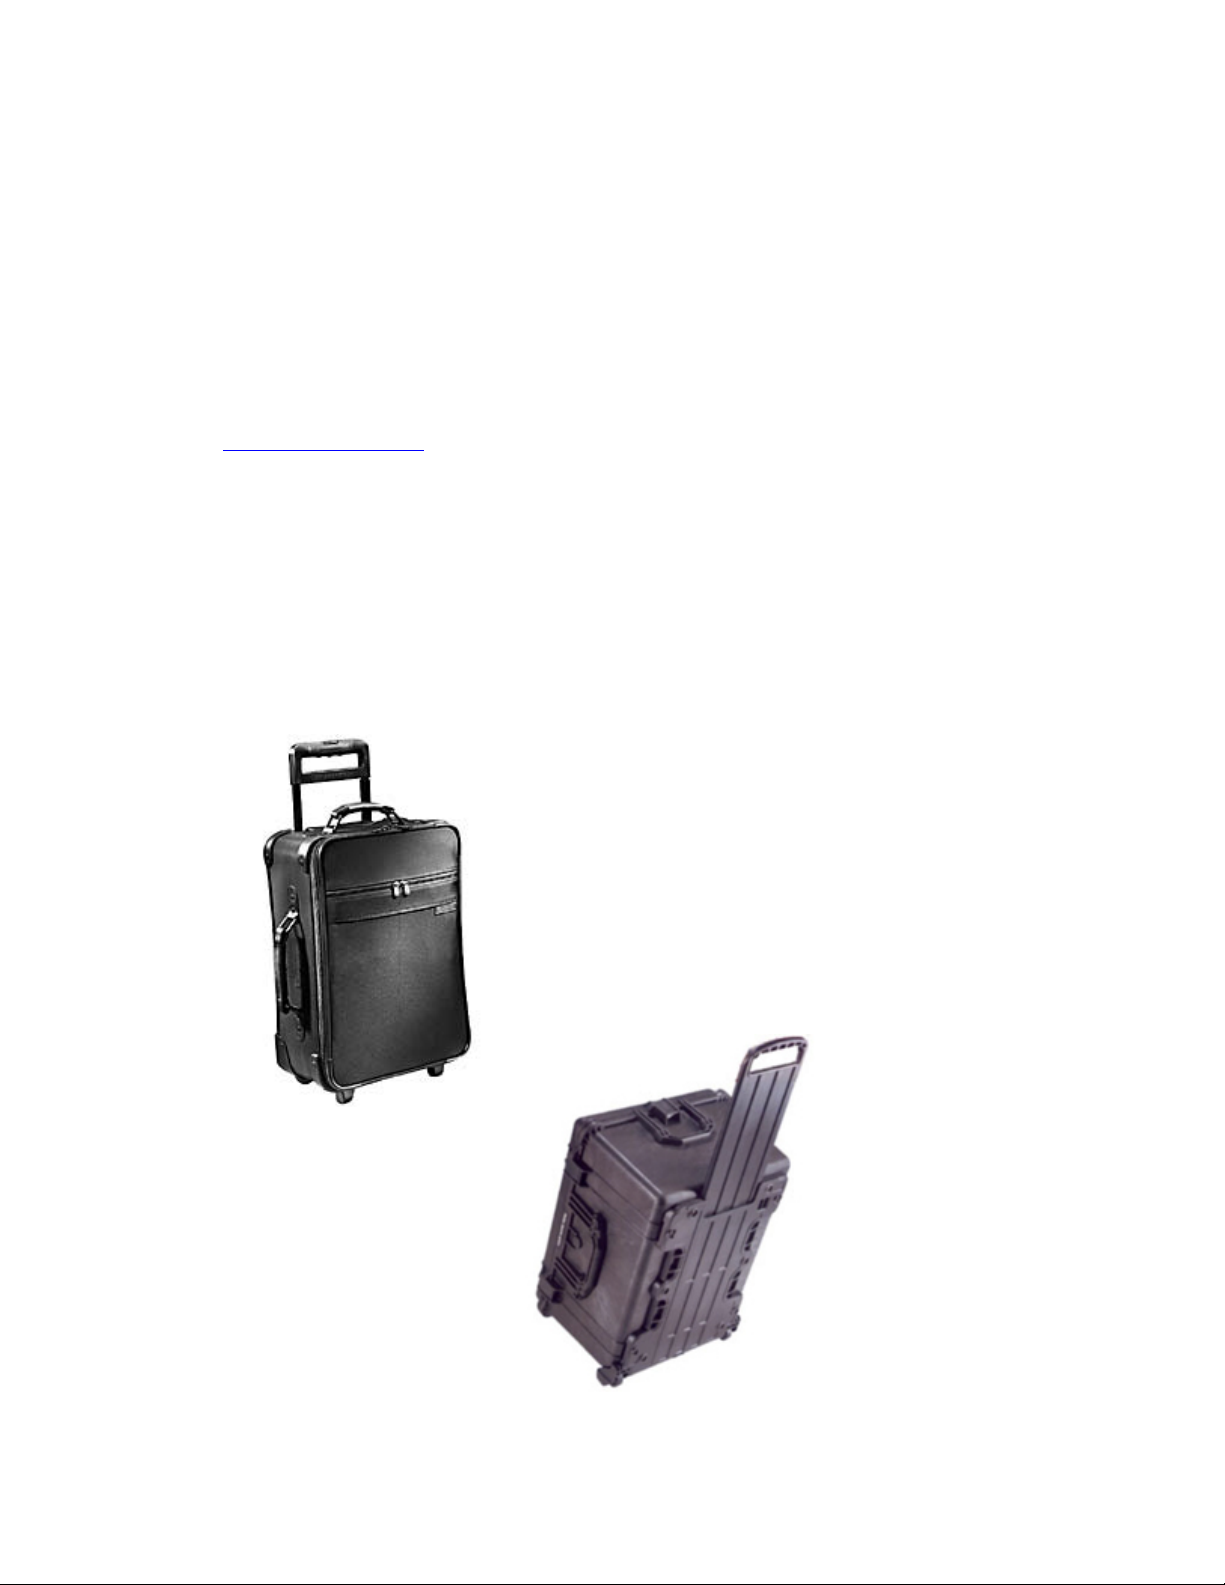
Monitor arms and mounting options
When monitors are intended for fixed or showcase installation, it can be convenient to employ
monitor arms or mounting rails. These options help clear desk space (since no stands are needed)
and enable flexible mounting options for such venues as trade shows and business presentations.
Most monitor arm and mounting options require a standard VESA mounting plate on the rear of
the monitor. You may want to consider such a mounting plate a requirement prior to purchase of
your monitors.
Digital Tigers will be offering a range of monitor arm and mounting options. Please visit our Web
site (http://digitaltigers.com
) for more information.
Carry-on luggage and shipping cases
The SideCar can easily support a mobile multi-monitor solution, for use at trade shows, business
presentations, on-site video editing at production locations, and more.
We support such solutions with both carry-on luggage (which can accommodate your flat-panel
monitors as well as notebook and SideCar) and durable shipping cases with custom foam padding
optimized for the NEC monitors and our mobile solutions.
High-quality Digital Tigers carry-on luggage
enables you to carry two NEC flat-panel monitors
without resorting to bulky shipping cases.
Durable and waterproof
Digital Tigers shipping
cases have custom foam
padding optimized for NEC
flat panel monitors and our
mobile solutions.
69- M
ONITOR OPTIONS
Page 74

Chapter 11 - Frequently asked questions (FAQs)
Does this product support Macintosh or other Windows versions besides
Windows XP and Windows 2000?
No. However, alternative SideCar products do support Macintosh.
What combination of DVI (digital) and analog (VGA type) monitors does the
SideCar support?
The SideCar PlusFour MMS supports up to four DVI (digital) monitors or analog (VGAtype) monitors, in any combination. The SideCar PlusTwo MMS supports up to two DVI
(digital) monitors or analog (VGA-type) monitors, in any combination.
Can I attach or detach the SideCar from my notebook while the notebook is
running?
No. You must power off your notebook before attaching or detaching the SideCar.
Does the SideCar support “suspend” (“stand by”) and “hibernate” shutdown
options?
No. You must power off your notebook completely.
Application dialog boxes are being displayed across the “seam” between
monitors, or on the wrong monitor. Also, I’d like better control over where my
application windows open. Is there a fix for this?
Yes. See Chapter 8, “QuickDesk / PowerDesk utilities”. To control dialog box placement,
open the “Multi-Display Controls” applet and activate the “CenterPOPUP” control. (We
prefer the “In Mouse Pointer Display” setting.) Use the same applet to designate which
monitor in which applications open, and to save window settings (useful to save your
preferences for applications with multiple windows and palettes).
My applications seem sluggish. (Or, I’m dropping frames in my video editing
application.) Why?
You may be exceeding the color depth and/or resolution recommendations for this
product. We recommend maximum resolution of 1280 by 1024 pixels per monitor, at 16bit color for fastest application performance.
Also, you may want to disable any anti-virus programs that are running, because these
programs sap system resources and can cause glitches in video editing applications.
70- F
REQUENTLY ASKED QUESTIONS
(FAQS)
Page 75

Why can’t I see motion video in applications and/or media players?
Playback of motion video frequently requires access by the application to the DirectDraw
hardware video overlay plane. This plane is accessible only on the display designated as
the “primary monitor”. You can choose which display is the primary monitor (see
Chapter 8, “Designate a new primary monitor”).
Also, note that only one application can access the overlay plane at a time. If you try to
run two different video-related applications at a time, only one may be able to play video.
(Some applications, such as some versions of Microsoft NetMeeting, are known to “grab”
the video overlay plane even when not operating, because a portion of the application
runs in the background when Windows starts. You may need to uninstall such
applications if they are interfering with access to the video plane by other applications.)
I’m running Avid Xpress DV. Why does the program crash at startup, or why won’t
it display motion video in the preview window?
Avid Xpress DV (and most other Avid applications) are written for one or two monitors.
You will need to disable all but one or two monitors when running Avid Xpress DV.
I can’t see my mouse pointer on some displays or applications. Is there a fix?
This rare behavior occurs occasionally with a few (non-certified) notebooks and
applications (typically video editing applications) used together with the SideCar. The
incompatibility is a combination of the notebook display adapter and the particular
application (the way it accesses the video overlay plane and cursor) when used with the
SideCar. Possible fixes and workarounds include:
Stop using the notebook display, if the problem occurs on that display
Upgrade your notebook video driver (see your notebook manufacturer)
Change the “hardware acceleration” settings for the notebook and/or SideCar
displays. You can access these settings via Display Properties (right-click on the
desktop, select Properties), Settings tab, select the display, click Advanced,
Troubleshoot tab. Lower the Hardware Acceleration slider at least two notches below
“Full” on the notebook display and/or SideCar displays until you find a combination
that works. (You may need to change all the SideCar displays to the same setting.)
Don’t use this application on the displays where the cursor disappears
Use a notebook certified by Digital Tigers for compatibility
Upgrade to a newer version of the application
71- F
REQUENTLY ASKED QUESTIONS
(FAQS)
Page 76

Chapter 12 - Uninstalling the SideCar
To uninstall the SideCar:
1. Open the Windows Control Panel:
• Windows 2000/XP: From the desktop, double-click “My Computer”, then double-
click “Control Panel”, or
Windows 2000: Click “Start” / “Settings” / “Control Panel”
Windows XP: Click “Start” / “Control Panel”
2. Windows XP: Double-click “Add/Remove Programs”
Windows 2000: Double-click “Add or Remove Programs”
3. Select each “SideCar” and “Digital Tigers” item from the list
4. Click the “Change/Remove” button for that entry
5. Click “Yes” in response to the confirmation dialog box
6. Repeat process and select “SideCar” from the list.
72- U
NINSTALLING THE SIDECAR
Page 77

(s)
Chapter 13 - Troubleshooting
Most major installation and “dead hardware” problems are traceable to
one of the following causes:
Hardware not plugged in and powered on.
Resolution: ensure that all cables are securely attached per directions in Chapter 3.
Ensure that all monitors and SideCar are powered on.
“Bad” PC Card slot
Many notebook computers have two PC Card slots (aka PCMCIA or CardBus slots).
Sometimes the SideCar PC Card interface works only in one slot, but not the other. Try
using the second slot. (IBM ThinkPad computers seem to prefer the bottom slot.)
Wrong operating system
This SideCar supports only Windows XP and Windows 2000. (Macintosh is supported
with different hardware.) Other Windows operating systems are not supported.
Failure to follow installation directions.
The SideCar chassis and display controller drivers must be installed according to our
precise instructions.
Incompatible notebook.
Not all notebook computers are
compatible with the SideCar. See
the support section of the Digital
Tigers Web site
(http://digitaltigers.com
approved notebooks, or call Digital
Tigers for clarification. (See note at
right for more information.)
Bent cable pins.
course of our testing we have
observed the unfortunate fragility
inherent in high-density LFH
connectors. LFH connectors are the
industry-standard connector for
multi-monitor breakout cables. The
SideCar MMS series uses LFH
connectors to attach the two Y-cable
(dual monitor) display breakout
.
) for
During the
.
Notebook compatibility
Notebook compatibility is usually determined by the
notebook’s CardBus controller. Most notebooks
use controllers made by Texas Instruments, which
are fully compatible with our SideCar products.
Toshiba controllers are also compatible.
CardBus controllers made by Ricoh and O2Micro
have consistently caused compatibility problems in
our tests. Sony VAIO notebooks as well as
selected IBM ThinkPad notebooks use Ricoh
controllers.
To determine the CardBus controller used by
your notebook:
Go to Device Manager (right-click on My
Computer, select Hardware tab, then Device
Manager)
Expand the “PCMCIA adapters” entry
Note the brand (and model) of the CardBus
Controller
listed
73- T
ROUBLESHOOTING
Page 78

cables. When this Y-cable male LFH connector is attached to the SideCar chassis female
LFH connectors, adjacent pins (particularly at the edges and corners of the pin grid) on
the Y-cable connector can very easily be bent and forced into adjacent holes on the
female connector on the SideCar chassis . This can in turn distort the thin plastic walls
between adjacent rows of pins, so even after straightening a pin, a bent wall can bend it
back out of position.
The most common symptom of a bent pin is a single display receiving no signal
while the other displays perform correctly.
Troubleshooting a “dead” display caused by bent cable pins:
o First, confirm that some of the SideCar monitors are working correctly. (If no
monitors are working, the problem is not likely to be bent cable pins.)
o Second, to differentiate from other possible problems, confirm that the
notebook’s Display Properties dialog box indicates that the “dead” display is
active and attached. (See chapter 6 for more on using Display Properties.)
o Third, confirm that the problem is not a bad display (independent of the
SideCar). Try attaching the “dead” display to another SideCar output or other
working computer display output connector.
o If the display is confirmed to be working, the problem may be bent cable pins in
the LFH connection between the Y-cable and the SideCar chassis. Detach the Ycable and carefully examine the male pins on the Y-cable base connector.
If you find the pins on one of your connectors are bent, carefully and
gently bend them back into position with a small tweezer, very small
screwdriver or straight pin. Then check the female connector on the card
and bend the wall back into position carefully and gently.
If at all possible, leave the Y-cable connected to the SideCar during
transport. Normal DVI and analog connectors are not as susceptible to
this problem, but it is a good idea to keep all male video connectors
covered with their included protective plastic cups whenever they are not
in use. Above all, exercise care in attaching the Y-cable, and tighten the
thumbscrews securely.
Note: Common operational issues (after successful installation) are addressed in
Chapter 12, “Frequently asked questions (FAQs)”.
74- T
ROUBLESHOOTING
Page 79

Technical Support
You may contact technical support via email at [email protected]
PC-VIDEO (866-728-4336). Outside the U.S., call 1-404-240-9293.
Please review the Troubleshooting steps and FAQs prior to contacting support.
When contacting support, please provide the exact details of your notebook type.
For issues regarding Matrox QuickDesk / PowerDesk utilities and other Matrox display utilities,
please contact Matrox support via the following dedicated support email address,
. (Reference your product as the Matrox G450 MMS Quad.) Note that
this support email is a Matrox no-charge premium service for professional customers such as
yourself who have purchased a Matrox MMS-powered product. Matrox offers same-day callback
or email response for your questions about Matrox MMS issues.
, or by calling 1-866-
75- T
ROUBLESHOOTING
Page 80

Chapter 14 - Specifications
Operating systems supported:
• Microsoft Windows XP
• Microsoft Windows 2000
Notebook computers supported:
• Please see the Digital Tigers Web site (http://digitaltigers.com) for certified notebooks
Notebook interface:
• CardBus PCMCIA PC Card (supplied)
• 1-meter interface cable (supplied)
Display types supported:
• Analog (VGA-type DB-15 connector)
• Digital (DVI-I connector; compatible with DVI-D connector)
• Total displays supported: Up to 4 (plus notebook display and notebook monitor port)
• Combination of displays supported:
o 4 analog; 4 digital; or any combination up to 4
Display modes supported* (per monitor)
Resolution Color depth
640 x 480 256 colors (8-bit), High color (16-bit), True color (24-bit), True color (32-bit) 85 Hz
800 x 600 256 colors (8-bit), High color (16-bit), True color (24-bit), True color (32-bit) 85 Hz
1024 x 768 256 colors (8-bit), High color (16-bit), True color (24-bit), True color (32-bit) 85 Hz
1152 x 864 256 colors (8-bit), High color (16-bit), True color (24-bit), True color (32-bit) 85 Hz
1280 x 1024 256 colors (8-bit), High color (16-bit), True color (24-bit), True color (32-bit) 85 Hz
1280 x 960 256 colors (8-bit), High color (16-bit), True color (24-bit), True color (32-bit) 85 Hz
1600 x 1200 256 colors (8-bit), High color (16-bit), True color (24-bit), True color (32-bit) 85 Hz
1600 x 1280 256 colors (8-bit), High color (16-bit), True color (24-bit), True color (32-bit) 60 Hz
1792 x 1344 256 colors (8-bit), High color (16-bit), True color (24-bit), True color (32-bit) 75 Hz
1800 x 1440 256 colors (8-bit), High color (16-bit), True color (24-bit), True color (32-bit) 70 Hz
1856 x1392 256 colors (8-bit), High color (16-bit), True color (24-bit), True color (32-bit) 75 Hz
1920 x 1080 256 colors (8-bit), High color (16-bit), True color (24-bit), True color (32-bit) 75 Hz
1920 x 1440 256 colors (8-bit), High color (16-bit), True color (24-bit), True color (32-bit) 75 Hz
2048 x 1536 256 colors (8-bit), High color (16-bit), True color (24-bit), True color (32-bit) 60 Hz
*Note: Support for any specific display mode is dependent on support for that mode by the
particular monitor. Exceeding the specifications of a monitor can damage the display. (For this
reason, Windows display drivers may exclude some choices from availability for your monitor.)
Resolution modes higher than 1280 x 1024 are for analog (VGA) displays only. Maximum
resolution for digital (DVI) monitors is 1280 x 1024 at true color (32-bit).
For fastest application responsiveness and performance, we recommend a maximum
resolution of 1280x1024 at 16-bit color for both analog and DVI monitors.
Max
Refresh
76- S
PECIFICATIONS
Page 81
Combined Windows desktop resolution:
Side-by-side monitors
2 monitors 3 monitors 4 monitors
1024 by 768
resolution standard
monitors
1280 by 1024
resolution standard
monitors
1536 by 768 2304 by 768 3072 by 768
2560 by 1024 3840 by 1024 5120 by 1024
Combined Windows desktop resolution:
Four monitors stacked two on two
1024 by 768
resolution standard
monitors
SideCar chassis specifications:
• Power supply: 45-watt external
• Dimensions: 5.45” W x 1.70” H x 8” D (13.84 W x 4.32 H x 20.4 D cm)
• Weight (without cables, power supply): 2.4 lbs (1.0 Kg)
Warranty:
• One-year parts and labor, limited warranty (USA).
Part Number:
• PC Card interface version: S4-WG4M-000
• PCI interface version: S4-WG4M-PCI
2048 by 1536 1280 by 1024
resolution
standard monitors
2560 by 2048
77- S
PECIFICATIONS
Page 82

Chapter 15 - Index
A
anti-virus programs...........................................70
applications
choosing preferred displays for application
windows................................50, 51, 52, 70
default display for application windows......43
financial trader desktop..................................5
home and office multi-monitor workstations.6
mobile multi-monitor workstations ...............7
multi-monitor workstation, with detachable
notebook....................................................6
save/restore window positions when programs
are opened/closed..............................51, 52
video editing.............See video: video editing
applications
Avid Xpress DV...............................................71
C
cables
SideCar interface cable..........................18, 76
CardBus interface.........................................2, 76
CenterPOPUP utility ..................................51, 70
cursor...................................... See mouse pointer
D
dialog box positioning....................43, 50, 51, 70
dimensions........................................................77
DirectDraw.................................................43, 71
Display Properties dialog box
accessing the Display Properties dialog box33
activating SideCar displays..........................33
brightness controls .......................................64
color quality...............................35, 36, 70, 76
Color tab................................................64, 65
color temperature controls...........................64
configuring SideCar displays.......................33
contrast controls...........................................64
default monitor for application windows.....43
dialog box positioning .............See dialog box
positioning
grayed-out monitors.....................................34
Hardware Acceleration slider ................43, 71
Identify (monitors) button............................35
inactive monitors .........................................34
landscape-mode displays.............................77
notebook LCD display.................................34
primary monitor.......35, 36, 43, 44, 45, 46, 71
refresh rate...................................................76
screen resolution..................35, 36, 70, 76, 77
secondary monitors................................43, 44
Troubleshoot wizard....................................35
Troubleshooting tab...............................43, 71
docking with the SideCar.............................2, 70
drivers
certified....................................................... 19
unapproved ................................................. 19
Windows 2000 drivers................................ 19
F
FAQs (frequently asked questions)....See support
H
hardware acceleration (for motion video)........ 43
hardware overlay plane...............................43, 71
help............................................ See also support
context-sensitive help ................................. 54
online help files........................................... 55
hibernate.......................................................... 70
I
icons
location of Windows desktop icons............ 43
installation
hardware preparation ...............................9, 16
problems and troubleshooting.......See support
Windows 2000............................................ 19
L
language
change language for menus......................... 54
LaunchPad......................................................... 8
M
Macintosh...............................................8, 70, 73
Matrox
CenterPOPUP utility..............................51, 70
Matrox support.......................................56, 75
Multi-Display Controls utilities.............50, 70
PowerDesk utilities....See PowerDesk utilities
QuickDesk utilities .... See QuickDesk utilities
maximize windows across all displays............ 52
MaxVIEW ....................................................... 52
Microsoft NetMeeting ..................................... 71
monitors
activating SideCar monitors........................ 33
analog (VGA type).......................2, 67, 70, 76
carry-on luggage for.............................7, 8, 69
color depth supported.................................. 76
color, contrast and brightness controls........ 64
configuring SideCar monitors..................... 33
default display for application windows..... 43
DVI (digital) ......................................2, 70, 76
mounting options...............................8, 67, 69
plasma........................................................... 8
portrait (rotated) mode – choosing an LCD
monitor................................................... 68
78- I
NDEX
Page 83

primary monitor....43, See Display Properties:
primary monitor
recommended LCD monitors.................67, 68
refresh rate supported ..................................76
resolution supported.....................................76
shipping cases................................7, 8, 68, 69
VESA mounting plate............................67, 69
mouse pointer
disappearing cursor......................................71
enlarging the mouse pointer.........................56
Mouse Properties dialog box.......................56
show location of mouse pointer...................60
speeding up the mouse pointer.....................58
Multi-Display Controls utilities..................50, 70
recommended settings .................................52
N
NEC LCD monitors..............................67, 68, 69
notebook display properties....... See also Display
Properties dialog box
disable the notebook display........................61
identifying the notebook display in Display
Properties dialog box ..............................34
notebook display as primary monitor ....43, 45
notebook secondary monitor port..........34, 45
reactivate the notebook display....................63
notebooks
approved................................................73, 76
incompatible ................................................73
non-certified.................................................71
P
PCMCIA card...................................2, 18, 73, 76
PCMCIA slot..............................................18, 73
performance issues.........See also support: FAQs
(frequently asked questions)
color-quality settings .............................36, 76
with notebook display disabled....................61
power supply..............................................18, 77
PowerDesk utilities.........................43, 50, 70, 75
primary monitor.........43, See Display Properties:
primary monitor
programs.....................................See applications
program dialog box positioningSee dialog box
positioning
Q
QuickDesk utilities.........................43, 50, 70, 75
R
resolution............. See Display Properties: screen
resolution
S
shutdown options -- suspend and hibernate..... 70
snap windows to edge of display..................... 53
specifications................................................... 76
support
context-sensitive help ................................. 54
Digital Tigers support............................19, 75
FAQs (frequently asked questions)............. 70
Matrox support.......................................56, 75
troubleshooting installation problems......... 73
suspend............................................................ 70
T
Taskbar.................................................43, 47, 48
technical support................................See support
troubleshooting..................................See support
U
undocking from the SideCar.........................2, 70
uninstalling the SideCar display controllers.... 72
V
video
media players.........................................43, 71
motion video on primary monitor............... 43
motion video on secondary monitors.......... 44
support by hardware video overlay pl ane... 43
video editing applications ..7, 8, 43, 69, 70, 71
video playback problems.................43, 70, 71
W
warranty........................................................... 77
weight.............................................................. 77
Windows
auto-hide the Windows Taskbar................. 48
Display Properties........See Display Properties
dialog box
hibernate function....................................... 70
moving the Windows Taskbar...............43, 47
other Windows operating systems.........70, 73
suspend function......................................... 70
Windows 2000 installation ......................... 19
Windows desktop icons.............................. 43
79- I
NDEX
 Loading...