

Page 1
TITAN series
Userware
addendum to User Manual
Rev A September 2008 page 5.1
Page 2

page 5.2 Rev A September 2008
Page 3

5. Userware
Contents
5. Userware 5.3
Introduction .............................................................................................................................5.5
Applet version ................................................................................................................................................. 5.5
Disconnect ................................................................................................................................................... 5.5
Reconnect .................................................................................................................................................... 5.5
Standalone version ......................................................................................................................................... 5.6
Disconnect ................................................................................................................................................... 5.6
Reconnect .................................................................................................................................................... 5.6
Show page ...............................................................................................................................5.7
On / Off ............................................................................................................................................................. 5.7
Shutter Open / Closed..................................................................................................................................... 5.7
Freeze / Un-Freeze .......................................................................................................................................... 5.7
Picture sliders ................................................................................................................................................. 5.7
Input Presets.................................................................................................................................................... 5.8
Recall ........................................................................................................................................................... 5.8
Save ............................................................................................................................................................. 5.8
Orientation ....................................................................................................................................................... 5.9
Input ................................................................................................................................................................. 5.9
Test Pattern .................................................................................................................................................... 5.10
Aspect Ratio .................................................................................................................................................. 5.10
Lens page............................................................................................................................... 5.11
Lens controls .................................................................................................................................................. 5.11
Shutter Open / Closed.................................................................................................................................... 5.11
Image page.............................................................................................................................5.12
Component .................................................................................................................................................... 5.12
Phase slider ................................................................................................................................................... 5.12
Colour Space ................................................................................................................................................. 5.13
Gamma ........................................................................................................................................................... 5.14
Parametric slider ........................................................................................................................................... 5.14
Screen page ...........................................................................................................................5.15
Blanking On / Off ........................................................................................................................................... 5.15
Blanking adjust ............................................................................................................................................. 5.15
Keystone adjust ............................................................................................................................................ 5.15
Position adjust .............................................................................................................................................. 5.15
MCGD page ............................................................................................................................5.16
The MCGD measurement procedure ........................................................................................................... 5.16
MCGD values ................................................................................................................................................. 5.17
Download ....................................................................................................................................................... 5.17
Save File ......................................................................................................................................................... 5.17
Open File ........................................................................................................................................................ 5.17
TCGD page .............................................................................................................................5.18
TCGD values .................................................................................................................................................. 5.18
Update Graph................................................................................................................................................. 5.19
Save File ......................................................................................................................................................... 5.19
Open File ........................................................................................................................................................ 5.19
Download User 1, User 2 .............................................................................................................................. 5.19
Read User 1, User 2 ...................................................................................................................................... 5.19
continued
Rev A September 2008 page 5.3
Page 4

Global Colour page ...............................................................................................................5.20
Global Colour Mode ...................................................................................................................................... 5.20
Modal Colour page ................................................................................................................5.21
Modal Colour Mode ....................................................................................................................................... 5.21
Lift and Gain sliders ...................................................................................................................................... 5.22
Temperature slider ........................................................................................................................................ 5.22
Information page ...................................................................................................................5.23
Projector Information .................................................................................................................................... 5.23
Digital Projection ........................................................................................................................................... 5.23
System page ..........................................................................................................................5.24
Backlight ........................................................................................................................................................ 5.24
DMD controls ................................................................................................................................................. 5.24
Lamp mode .................................................................................................................................................... 5.24
Lamp Power slider ........................................................................................................................................ 5.24
Discover page ........................................................................................................................5.25
Disconnect ..................................................................................................................................................... 5.25
Reconnect ...................................................................................................................................................... 5.25
Refresh ........................................................................................................................................................... 5.26
Connect .......................................................................................................................................................... 5.26
page 5.4 Rev A September 2008
Page 5
Digital Projection TITAN User Manual 5. Userware
Introduction
The Titan Userware provides an intuitive interface to enable control of many of the
features of the projector from a personal computer, via a LAN connection.
There are two versions of the Userware: the Applet version, stored on the projector
and the Standalone version, supplied on disk or from the Digital Projection website.
Applet version
• To activate the Userware, simply point the browser at the projector by typing its
LAN IP Address into the address bar, then press the Enter key or click on Go.
The Applet version does not require installation on the personal computer, as it
is in the form of a Java applet, downloaded automatically from the projector by
the browser. The first time the applet is downloaded, you may see the following
message:
New Java applet download:
Tick the box only if you trust the source.
I trust this applet. OK
• Tick the box and click OK. In future, the Userware will load immediately.
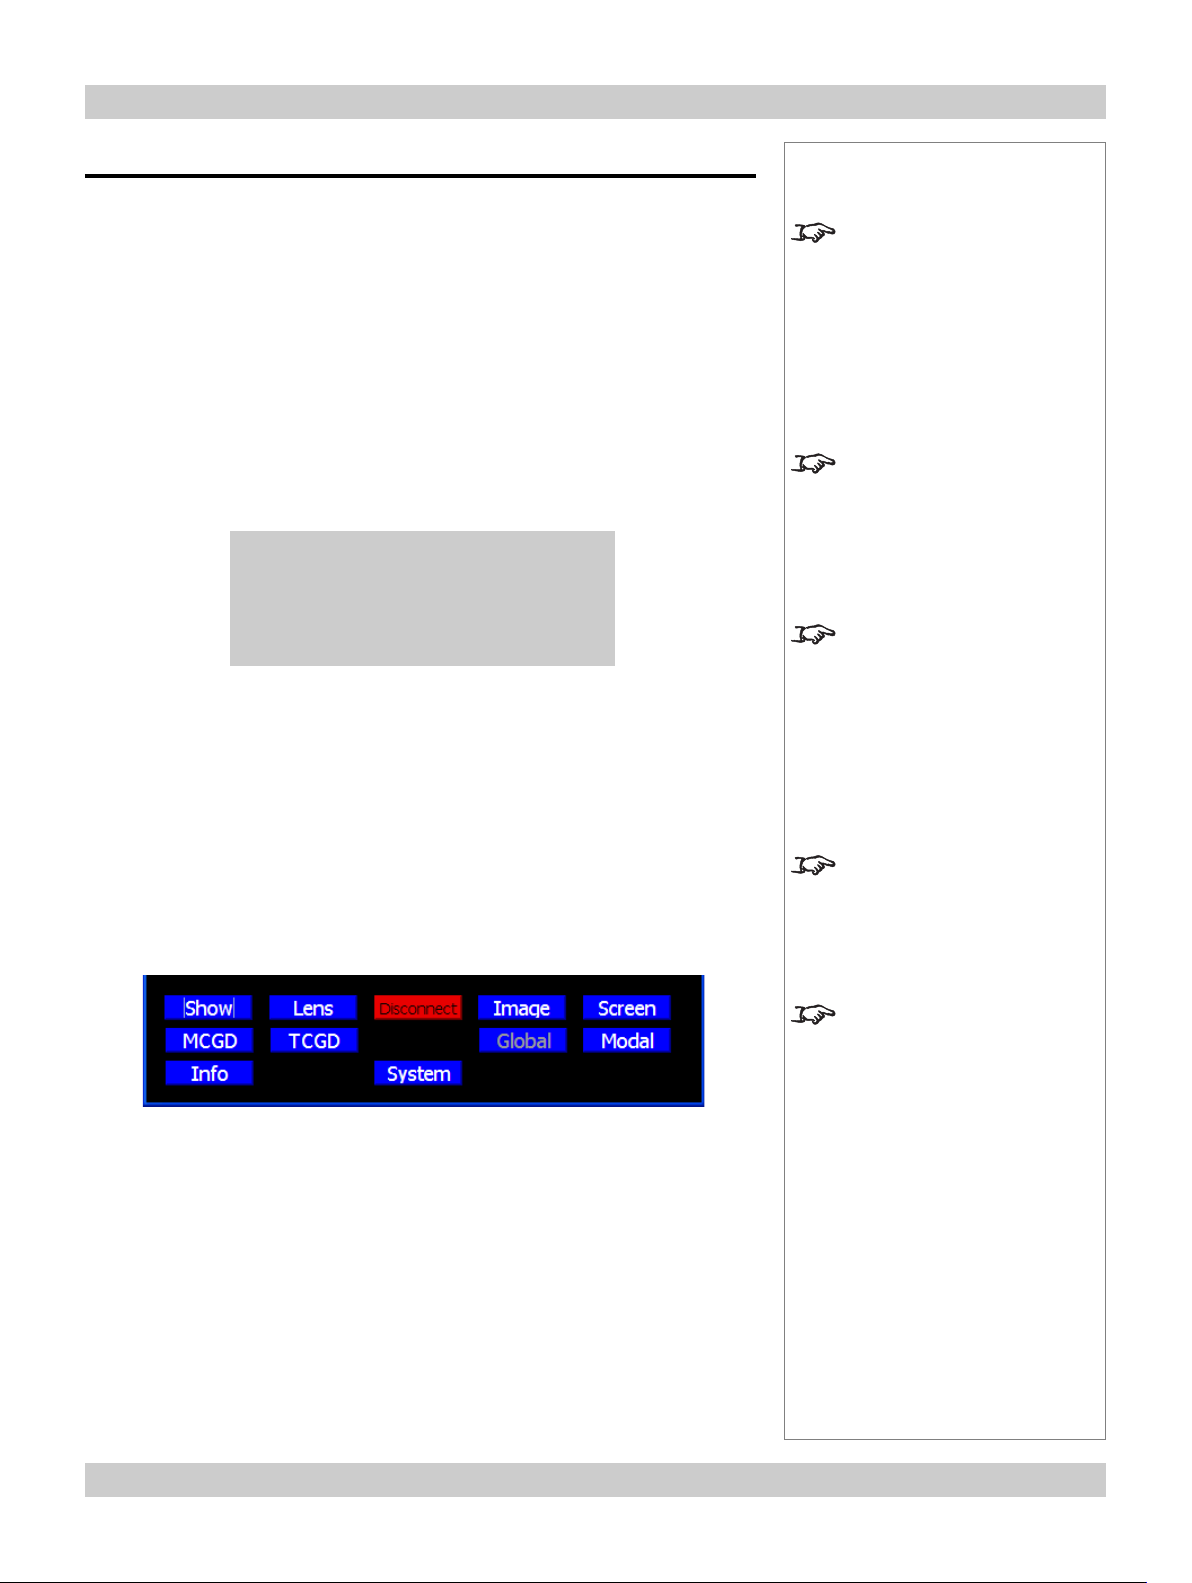
The Userware interface is organised into a number of pages, as listed below:
Notes
To use the Titan Userware the
Java Runtime Environment
software must be installed on
your browser. This software can
be downloaded, free of charge
from www.java.com.
The LAN IP Address of the
projector can be found in the
Network submenu of the Setup
menu, as described in section
4. Controlling the projector.
Whenever the projector is
connected to mains power,
whether in Running mode or
Standby mode, the Applet
version of the Userware will be
available.
Show Lens Image Screen
MCGD TCGD Global Modal
info System
Each page is described in full later in this section.
When the Userware is started, the Show page will display immediately. The Page
buttons are always visible at the bottom of the display:
Disconnect
• Click on Disconnect to disconnect from the projector.
Reconnect
• To reconnect, click on the browser’s Refresh button,
or re-type the IP Address in the browser address box then press Return.
The Applet version of the
Userware can be used only to
control the projector from which
it was downloaded.
The Userware can be used to
control only one projector at a
time, and only one instance can
be running at one time.
More than one computer can be
used to control more than one
projector on the same network.
Rev A September 2008 page 5.5
Page 6
5. Userware Digital Projection TITAN User Manual
Standalone version
• To install the Userware, simply copy the file (from the CD, or downloaded from
the Digital Projection website), to a folder on the computer.
• Double click on the filename to start the software.
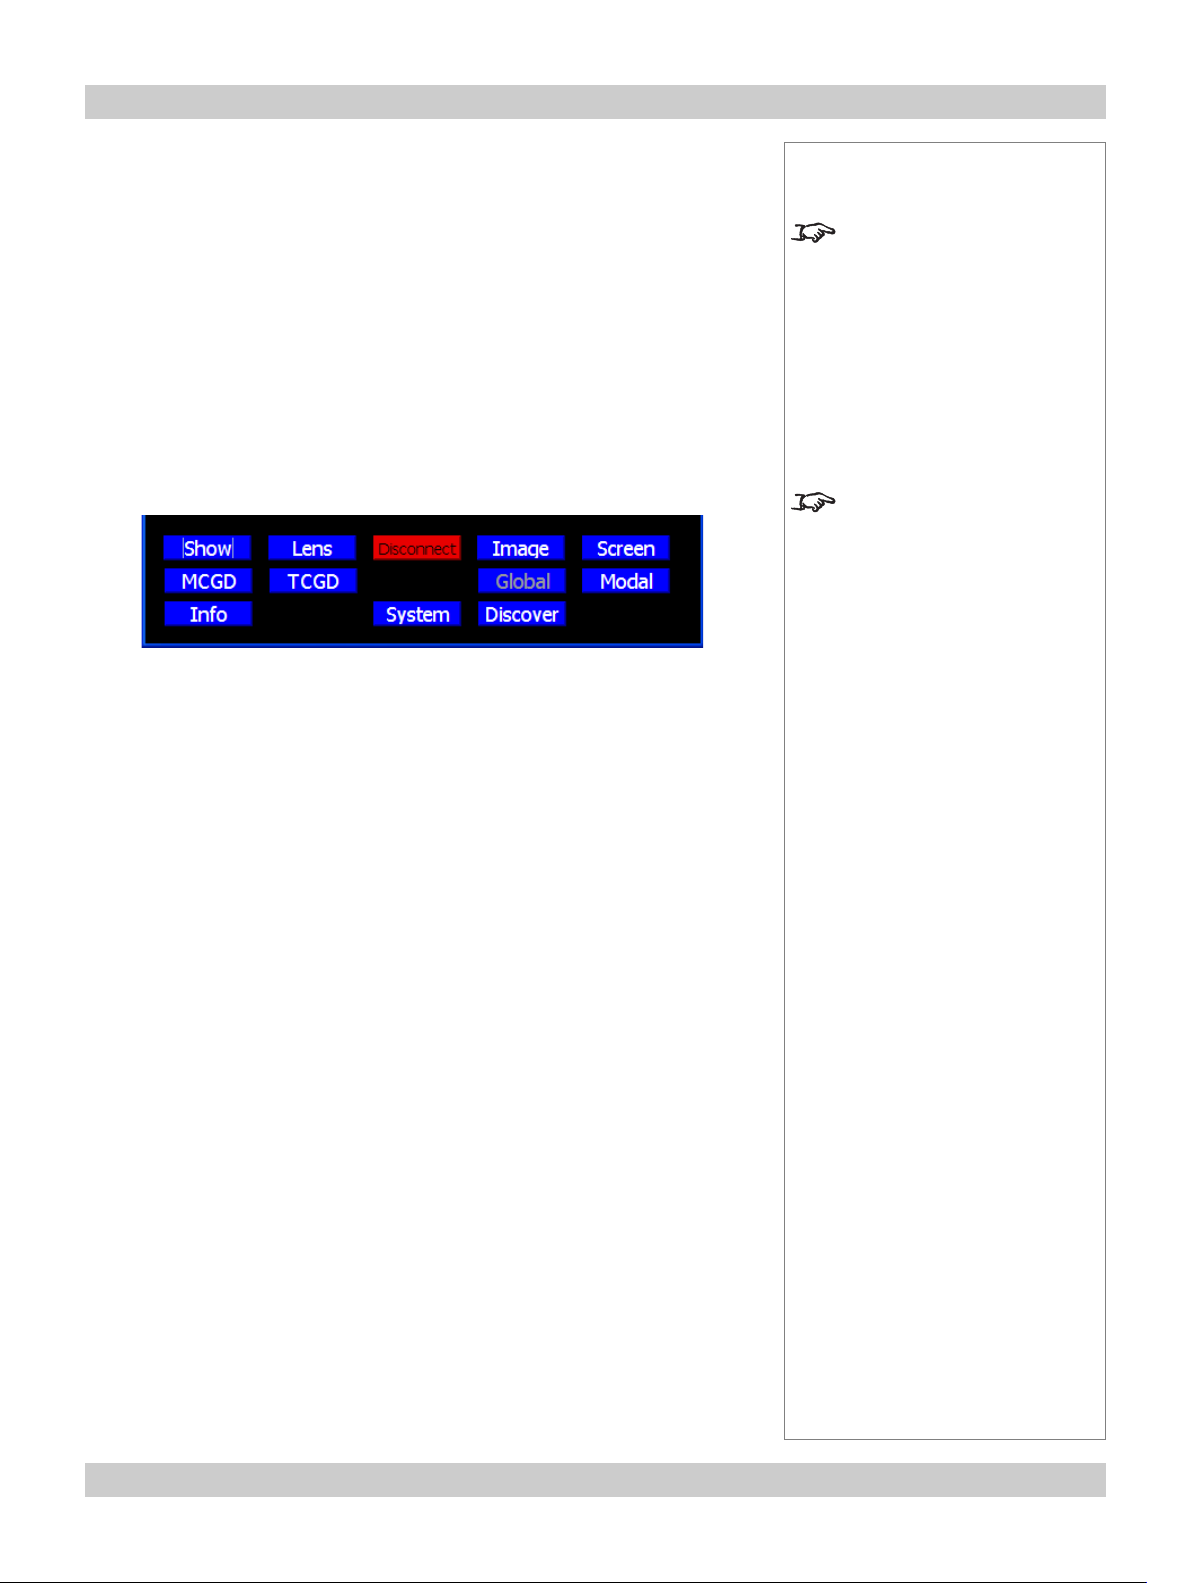
The Userware interface is organised into a number of pages, as listed below:
Show Lens Image Screen
MCGD TCGD Global Modal
info System Discover
Each page is described in full later in this section.
When the Userware is started, the Show page will display immediately. The Page
buttons are always visible at the bottom of the display:
Disconnect
• Click on Disconnect to disconnect from the projector.
Reconnect
• To reconnect, click on the Discover button. The Discover page is described in
more detail later in this section.
Notes
To use the Titan Userware the
Java Runtime Environment
software must be installed on
your computer. This software
can be downloaded, free of
charge from www.java.com.
The Userware can be used to
control only one projector at a
time, and only one instance can
be running at one time.
The Discover page can be
used to switch control between
multiple projectors.
(see later in this section)
More than one computer can be
used to control more than one
projector on the same network.
page 5.6 Rev A September 2008
Page 7
Digital Projection TITAN User Manual 5. Userware
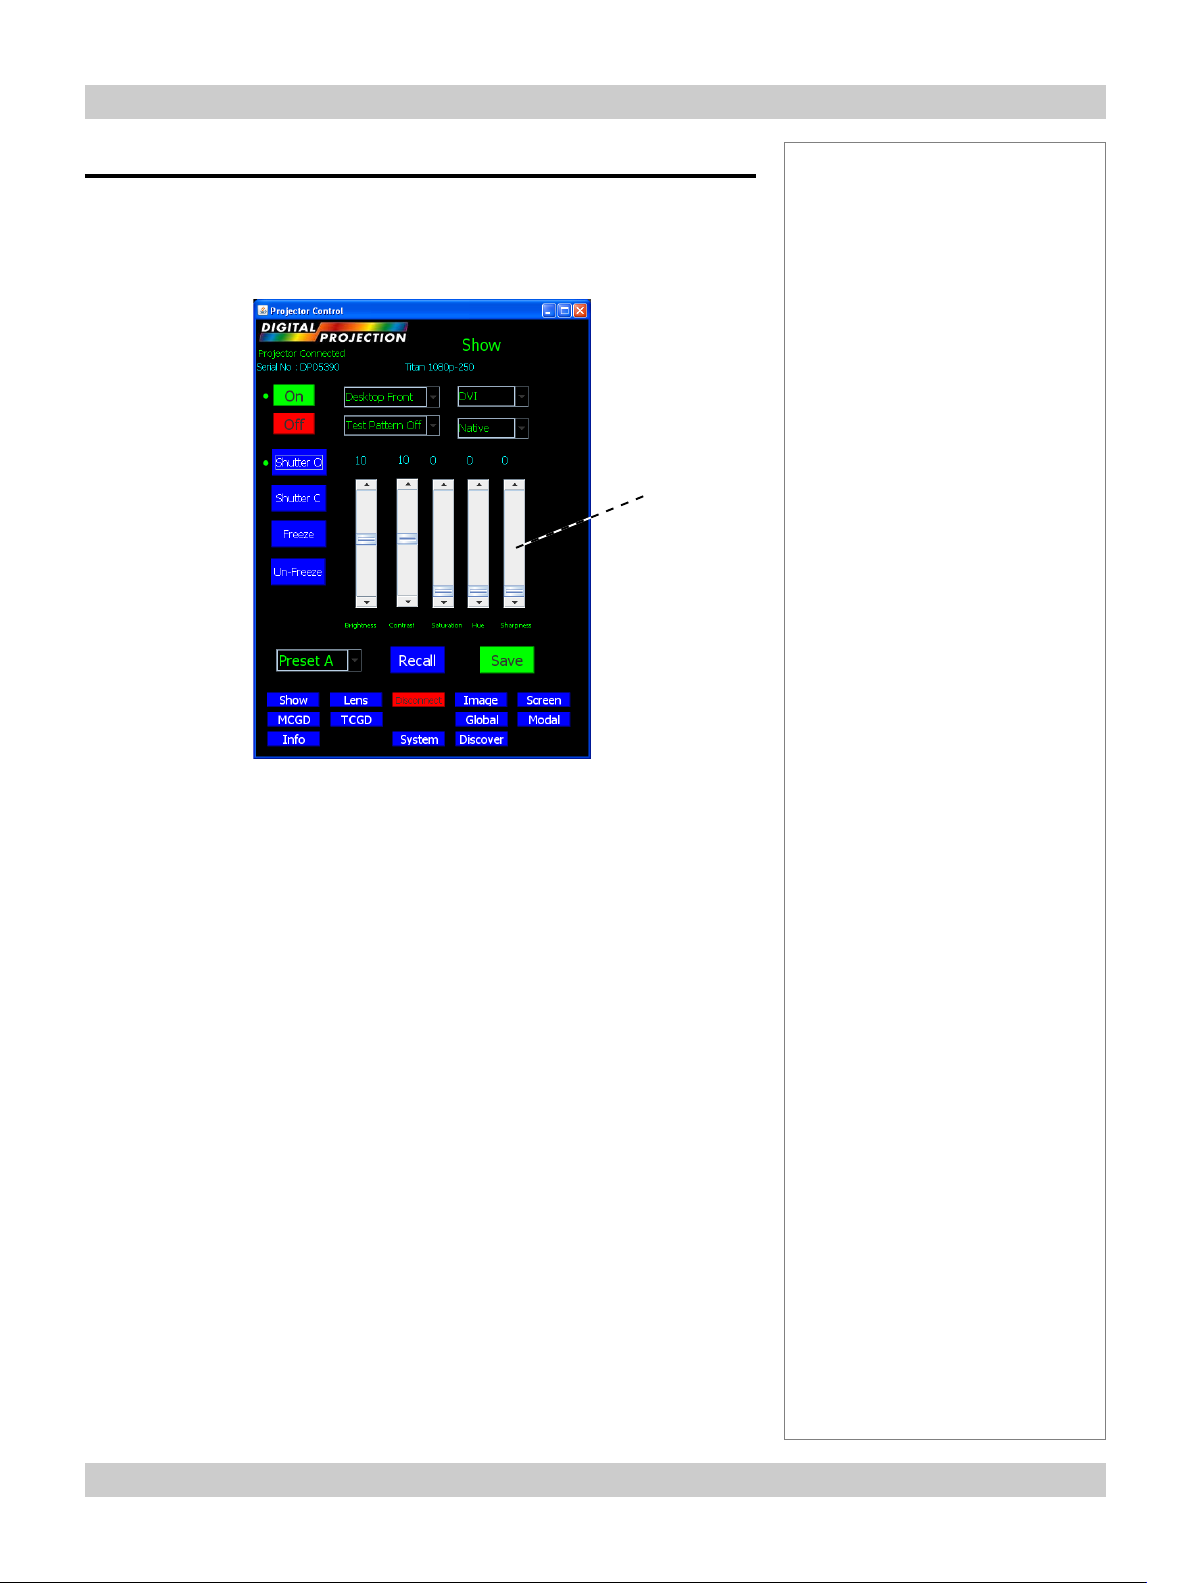
Show page
The Show page is the first to display when the browser connects to the projector.
• To return to the Show page at any time, click on Show.
Picture
sliders
Notes
On / Off
• Click On to switch the projector On.
• Click Off to switch the projector into Standby mode.
Shutter Open / Closed
• Click on Shutter O to open the shutter.
• Click on Shutter C to close the shutter.
Freeze / Un-Freeze
• Click on Freeze to freeze the display on the current frame.
• Click on Un-Freeze to un-freeze the display.
Picture sliders
• Use the sliders to adjust the Brightness, Contrast, Saturation, Hue and
Sharpness of the display.
• Click on the number above the slider to return to the default value.
Rev A September 2008 page 5.7
Page 8
5. Userware Digital Projection TITAN User Manual
Show page continued
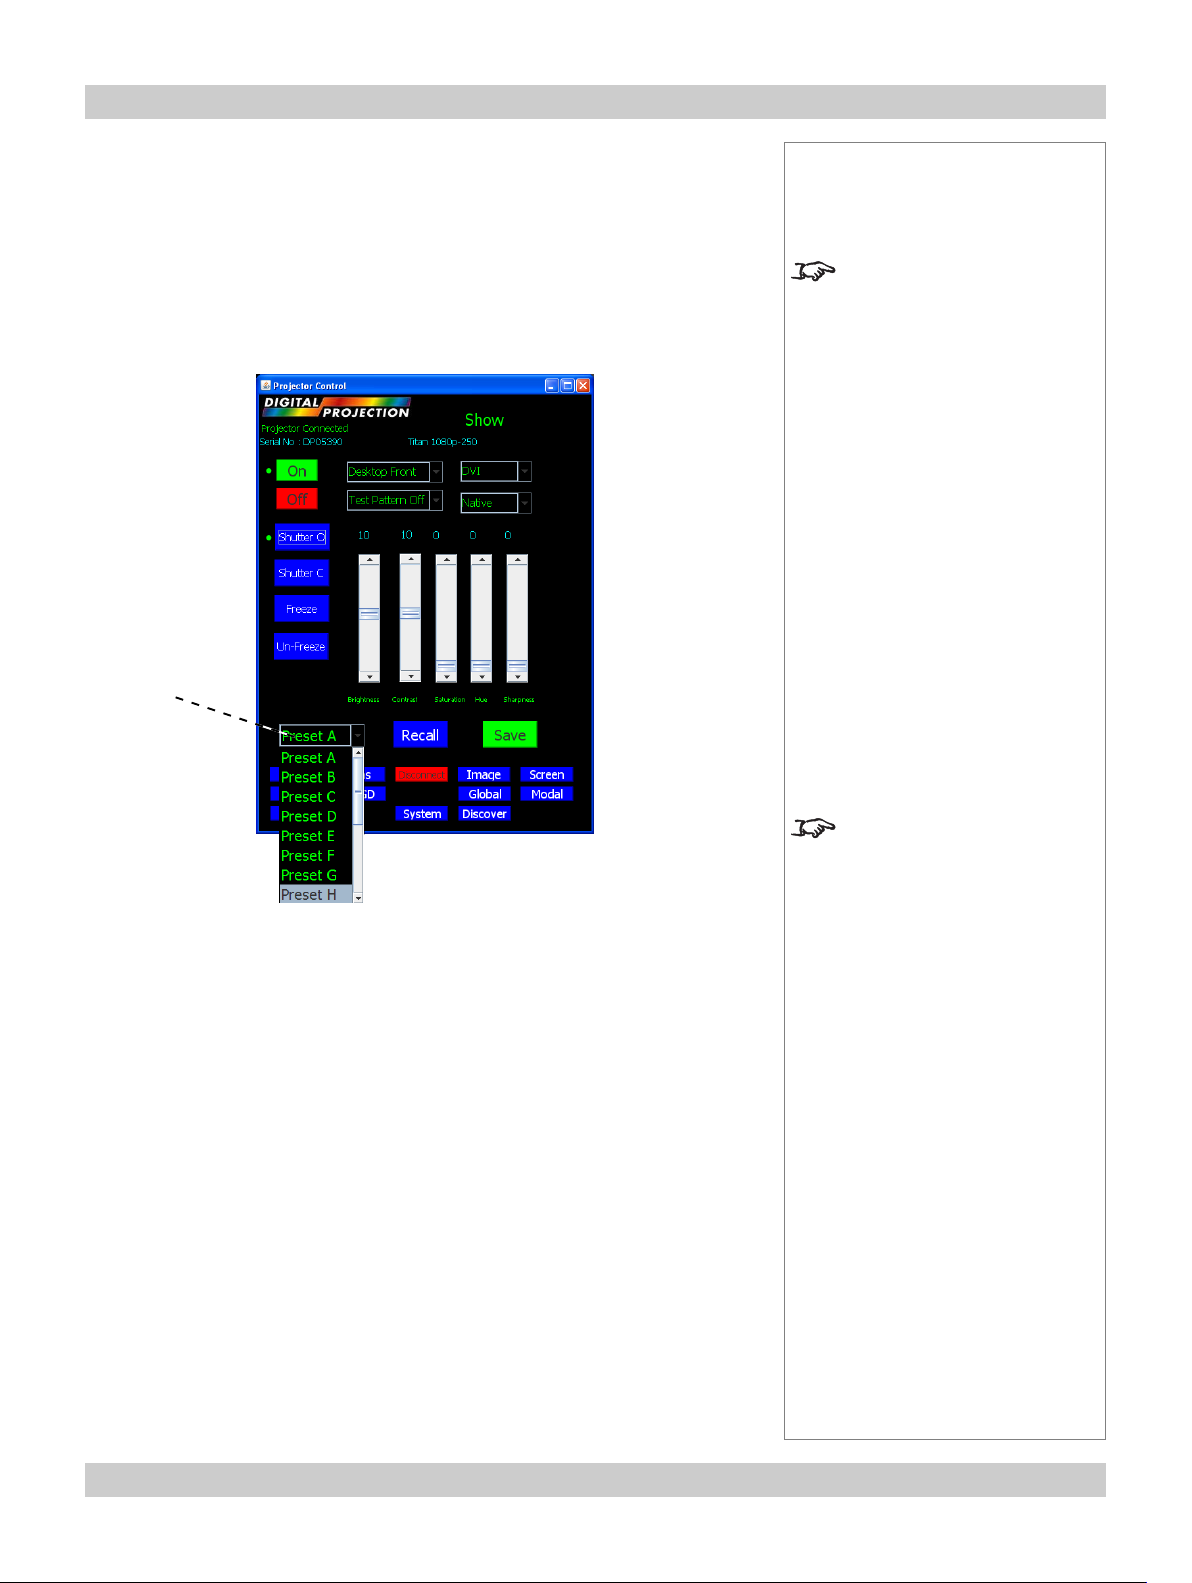
Input Presets
Recall
To recall a set of modal settings that have been saved:
• Click on Preset, and select one of the Presets A - S, from the drop down menu.
Preset
Notes
For more information about
input modes and input presets,
see Input modes and settings,
in section 4. Controlling the
Projector.
• Click on Recall.
The projector will switch to the saved input source, and redetect the input mode
before applying the saved modal settings.
Save
To save the current input source, mode and modal settings:
• Click on Preset, and select one of the Presets A - S, from the drop down menu.
• Click on Save.
The modal settings will be saved to the selected preset.
A preset can be applied only to
the same mode for which it was
created. If the detected input
mode does not match, then
settings from the mode history
or mode library will be applied
instead.
For more information about
input modes, see Input modes
and settings, in section
4. Controlling the Projector.
page 5.8 Rev A September 2008
Page 9

Digital Projection TITAN User Manual 5. Userware
Show page continued
Orientation
• Click on Orientation to select one of the following from the drop down menu:
Desktop Front
Ceiling Front
Desktop Rear
Ceiling Rear
Orientation
Input
Notes
Input
• Click on Input to select one of the following from the drop down menu:
RGB1
RGB2
DVI
SDI
Composite Video
S-Video
Component
Rev A September 2008 page 5.9
For more information about
input modes, see Input modes
and settings, in section
4. Controlling the Projector.
Page 10

5. Userware Digital Projection TITAN User Manual
Show page continued
Test Pattern
• Click on Test Pattern to select one of the following from the drop down menu:
Test Pattern Off
Alignment Pattern
Screen Layout
Chequerboard
Colour Bars
0% Field
Colormax Calibration
100% Field (Corrected)
Test
Pattern
Aspect
Ratio
Notes
For more information about test
patterns, see Setup menu, in
section 4. Controlling the
Projector.
Aspect Ratio
• Click on Aspect Ratio to select one of the following from the drop down menu:
Native
Fill
User
1.33:1 (4:3)
1.25:1 (5:4)
1.78:1 (16:9)
2.35:1 (Scope)
1.66:1 (Vista)
1.85 (Flat)
TheatreScope
page 5.10 Rev A September 2008
For more information about
aspect ratios, see Picture
menu and Geometry menu, in
section 4. Controlling the
Projector.
Page 11

Digital Projection TITAN User Manual 5. Userware
Lens page
• To see the Lens page, click on Lens .
Notes
Lens
controls
Lens controls
• Click on the buttons to Move, Focus and Zoom the lens.
• Click on Stop All Lens Movement to abort any unwanted lens control
movement.
Shutter Open / Closed
• Click on Shutter Open to open the shutter.
• Click on Shutter Close to close the shutter.
Rev A September 2008 page 5.11
Page 12

5. Userware Digital Projection TITAN User Manual
Image page
• To see the Image page, click on Image.
Component
• Click on Component to select one of the following from the drop down menu:
Component RGB
Component YUV
Component
Phase
slider
Notes
The Component selection is
available for the Component
input only.
Phase slider
• Use the slider to adjust the Phase.
For more information about
phase, see Picture menu and
Geometry menu, in section
4. Controlling the Projector.
The Phase slider is available for
RGB1 and RGB2 inputs only.
page 5.12 Rev A September 2008
Page 13

Digital Projection TITAN User Manual 5. Userware
Image page continued
Colour Space
• Click on Colour Space to select one of the following from the drop down menu:
RGB
SMPTE240 YPrPb
REC709 YPrPb
REC601 YPrPb
SMPTE240 YCrCb
REC709 YCrCb
REC601 YCrCb
Colour
Space
Notes
Rev A September 2008 page 5.13
Page 14

5. Userware Digital Projection TITAN User Manual
Image page continued
Gamma
• Click on Gamma Correction to select one of the following from the drop down
menu:
Graphics
NTSC
PAL
Linear
Punch
Parametric
User
Notes
For more information about
Gamma, see Picture menu, in
section 4. Controlling the
Projector.
User download of Gamma
correction tables is not yet
available.
Parametric slider
• Use the slider to adjust the Gamma manually.
Parametric
slider
page 5.14 Rev A September 2008
The Parametric slider is
available only when Parametric
is selected in Gamma
Correction.
Page 15

Digital Projection TITAN User Manual 5. Userware
Screen page
• To see the Screen page, click on Screen.
Notes
Blanking On / Off
• Click on Enable to turn the blanking On or Off .
Blanking adjust
• Use the sliders to adjust the Top, Bottom, Left and Right blanking curtains.
Keystone adjust
• Use the slider to adjust the Keystone setting.
Position adjust
• Use the sliders to adjust the Horizontal and Vertical position of the image.
The blanking curtains will not
applied until Blanking is turned
On.
For more information about
blanking, see Geometry menu,
in section 4. Controlling the
Projector.
For more information about
keystone adjustment, see
Geometry menu, in section
4. Controlling the Projector.
Rev A September 2008 page 5.15
Page 16

5. Userware Digital Projection TITAN User Manual
MCGD page
MCGD - Measured Colour Gamut Data - can be used to correct for a number of
environmental variables, for example:
two or more different projectors
lamp age
different lenses
ambient light
screen characteristics
The MCGD measurement procedure
1 On the Show page, select the ColorMAX test pattern.
2 Using a photo-spectrometer, measure the following values:
White x y
3 On the System page, switch off the Green and Blue DMDs.
4 Using a photo-spectrometer, measure the following values:
Red x y
5 Repeat for the Green and Blue x and y values.
6 Enter all the values into the MCGD page, as described on the next page.
Notes
Read the notes on MCGD,
TCGD and ColorMAX below,
before making any MCGD
settings.
Notes on MCGD, TCGD and ColorMAX User settings
TCGD (see the next section)
The parameters entered on the TCGD page establish the target settings that the
projector needs to aim for, in order to give a specified colour gamut.
MCGD (see this section)
The parameters entered on the MCGD page establish the starting settings, from
which the projector will calculate what adjustments are necessary to achieve the
color gamut specified on the TCGD page.
Only one set of MCGD data can be stored on the projector, but many more can be
stored on a computer, and retrieved using the MCGD page controls.
ColorMAX User settings
Only two sets of color gamut parameters can be stored on the projector ColorMAX User 1 and ColorMAX User 2 - but many more can be stored on a
computer, and retrieved using the TCGD page controls.
page 5.16 Rev A September 2008
Page 17

Digital Projection TITAN User Manual 5. Userware
MCGD page continued
• To see the MCGD page, click on MCGD .
On first entering the MCGD screen, the MCGD values will show those currently
loaded into the projector.
MCGD
values
MCGD values
• To enter MCGD values, click on each box in turn, and enter the measured x and
y values for each colour.
Notes
Read the notes on MCGD,
TCGD and ColorMAX earlier
in this section before making
any MCGD settings.
1. New MCGD values will not
be downloaded to the projector
until the Download button is
pressed.
2. The values will not be used
until the ColorMAX User 1 or
ColorMAX User 2 is chosen in
the Colour or Global
Colourimetry menus.
3. If one of the User settings is
already in use, then it will be
necessary to re-apply it before
any change is seen.
Download
• Click on Download to save the values on screen to the projector.
Save File
• Click on Save to save the values on screen to an MCGD file on the computer.
When promted, enter a filename or browse to an existing file that is to be
overwritten.
MCGD files are named
filename.mcgd.
Open File
• To retrieve a set of saved MCGD values, click on Open .
When promted, enter a filename or browse to the file that is to be opened.
Rev A September 2008 page 5.17
Page 18

5. Userware Digital Projection TITAN User Manual
TCGD page
TCGD - Target Colour Gamut Data - can be used to match the display to a predefined colour gamut, for example:
to match the MCGD values from another projector
to match a specification from the film maker
• To see the TCGD page, click on TCGD.
TCGD
values
Notes
Read the notes on MCGD,
TCGD and ColorMAX earlier
in this section before making
any TCGD settings.
1. New TCGD values will not be
applied to the projector until the
Download button is pressed.
TCGD values
• To enter TCGD values manually, click on each box in turn, and enter the x, y and
g values for each colour.
x and y are the colour coordinates, and g is gain.
g represents the luminance of the colour relative to luminance of the white point.
When g is set to zero the system will automatically calculate the most efficient value
of g to maximise the projector’s light output.
The example below shows what is required to set the projectors colour
gamut to Rec 709:
2. The values will not be used
until the ColorMAX User 1 or
ColorMAX User 2 is chosen in
the Colour or Global
Colourimetry menus.
3. If one of the User settings is
already in use, then it will be
necessary to re-apply it before
any change is seen.
page 5.18 Rev A September 2008
Page 19

Digital Projection TITAN User Manual 5. Userware
TCGD page continued
Update Graph
• Click on Update Graph to show the effects of the new color gamut graphically.
Save File
• Click on Save to save the values on screen to an TCGD file on the computer.
When promted, enter a filename or browse to an existing file that is to be
overwritten.
Open File
• To retrieve a set of saved TCGD values, click on Open .
When promted, enter a filename or browse to the file that is to be opened.
Download User 1, User 2
• Click on Download User 1 or Download User 2 to save the values on screen to
one of the two ColorMAX User settings on the projector.
Notes
Read the notes on MCGD,
TCGD and ColorMAX earlier
in this section before making
any TCGD settings.
TCGD files are named
filename.tcgd.
Read User 1, User 2
• Click on Read User 1 or Read User 2 to replace the values on screen with one
of the two ColorMAX User settings on the projector.
Rev A September 2008 page 5.19
Page 20

5. Userware Digital Projection TITAN User Manual
Global Colour page
• To see the Global page, click on Global.
Notes
The Global page will not be
available unless Global is
selected in Modal Colour
Mode (see next page).
For more information about
colour mode, see Colour
menu, and Setup menu, in
section 4. Controlling the
projector.
Global Colour Mode
• Click on Global Colour Mode to select one of the following from the drop down
menu:
Colour Temperature
User
Peak
Film
Video
Graphic
ColorMAX User 1
ColorMAX User 2
Select ColorMAX User 1 or
ColorMAX User 2, to use the
TCGD values set up on the
TCGD page.
For more information about
ColorMAX , read the notes on
MCGD, TCGD and ColorMAX
earlier in this section
page 5.20 Rev A September 2008
Page 21

Digital Projection TITAN User Manual 5. Userware
Modal Colour page
• To see the Modal Colour page, click on Modal.
Modal Colour Mode
• Click on Modal Colour Mode to select one of the following from the drop down
menu:
Global
Colour Temperature
User
Peak
Film
Video
Graphic
ColorMAX User 1
ColorMAX User 2
Notes
For more information about
colour mode, see Colour
menu, and Setup menu, in
section 4. Controlling the
projector.
Select ColorMAX User 1 or
ColorMAX User 2, to use the
TCGD values set up on the
TCGD page.
For more information about
ColorMAX , read the notes on
MCGD, TCGD and ColorMAX
earlier in this section
Rev A September 2008 page 5.21
Page 22

5. Userware Digital Projection TITAN User Manual
Modal Colour page continued
Lift and Gain sliders
• Use the sliders to adjust the Lift and Gain for Red, Green and Blue individually.
Notes
For more information about
colour mode, see Colour
menu, and Setup menu, in
section 4. Controlling the
projector.
The Lift and Gain sliders are
available only when User is
selected in Modal Colour
Mode.
Temperature slider
• Use the slider to adjust the Colour Temperature between 3,000K and 10,000K.
The Temperature slider is
available only when Colour
Temperature is selected in
Modal Colour Mode.
page 5.22 Rev A September 2008
Page 23

Digital Projection TITAN User Manual 5. Userware
Information page
• To see the Information page, click on Info.
Projector Information
• Click on Projector Information to see the following information about the
projector and the Userware:
Notes
Digital Projection
• Click on Digital Projection to see the following contact information:
Rev A September 2008 page 5.23
Page 24

5. Userware Digital Projection TITAN User Manual
System page
• To see the System page, click on System.
Notes
Backlight
• Click on Backlight to turn the control panel backlight On or Off .
DMD controls
• Click on the DMD buttons to turn each DMD On or Off.
Lamp mode
• Click on Lamp mode to select one of the following from the drop down menu:
Dual
Alternate
Lamp 1
Lamp 2
Lamp Power slider
• Use the slider to adjust the lamp power from 80% to 100%.
For projectors with only one
lamp, only Lamp 1 will be
available.
For more information about
lamp mode, see Setup menu,
in section 4. Controlling the
projector.
page 5.24 Rev A September 2008
Page 25

Digital Projection TITAN User Manual 5. Userware
Discover page
• To see the Discover page, click on Discover.
If the projector that launched the Userware is still connected, then its LAN IP
address will be listed in the panel and marked Online.
Projector Connected will be shown at the top left, together with the projector’s
Serial No and Model.
Notes
The Discover page is available
only on the Standalone version
of the Userware..
The Userware can be used to
control only one projector at a
time, and only one instance can
be running at one time.
The Discover page can be
used to switch control between
multiple projectors.
More than one computer can be
used to control more than one
projector on the same network.
Disconnect
• Click on Disconnect to disconnect from the projector.
Projector Disconnected will be shown at the top left.
Reconnect
• Click on the LAN IP address to reconnect to the projector.
Rev A September 2008 page 5.25
Page 26

5. Userware Digital Projection TITAN User Manual
Discover page continued
Refresh
• Click on Refresh to search the network for other projectors.
Any projectors previously connected, that are now no longer online, will be
marked Unreachable.
Notes
The Discover page is available
only in the Standalone version
of the Userware.
The Userware can be used to
control only one projector at a
time, and only one instance can
be running at one time.
The Discover page can be
used to switch control between
multiple projectors.
More than one computer can be
used to control more than one
projector on the same network.
Connect
• Click on the LAN IP address to connect to a projector in the list.
page 5.26 Rev A September 2008
 Loading...