

Page 1
HD4000
Page 2

Page 3

Safety Instructions
• Always read the safety instructions carefully
• Keep this User's Manual for future reference
• Keep this equipment away from humidity
• Place this equipment on a reliable flat surface before setting it up.
• Do not stand it on soft furnishings.
• If any of the following situation arises, get the equipment checked by a service
technician:
- The equipment has been exposed to moisture.
- The equipment has been dropped and damaged.
- The equipment has obvious sign of breakage.
- The equipment has not been working well or you cannot get it work according
to User's
Manual.
Warning
• To prevent the risk of electric shock, do not open the cover or the back of the
receiver.
• Do not block the ventilation holes of the device. Leave appropriate gap above
and around it to allow for adequate ventilation.
• Do not place the device in an unventilated cabinet or on top of a unit which emits
heat.
Copyright Statement
No part of this publication may be reproduced in any form by any means without
the prior written permission. Other trademarks or brand names mentioned herein
are trademarks or registered trademarks of their respective companies.
Disclaimer
Information in this document is subject to change without notice. The manufacturer
does not make any representations or warranties (implied or otherwise) regarding
the accuracy and completeness of this document and shall in no event be liable for
any loss of profit or any commercial damage, including but not limited to special,
incidental, consequential, or other damage.
This symbol indicates that this product incorporates double insulation
between hazardous mains voltage and user accessible parts. When
servicing use only identical replacement parts.
WARNING: To reduce the risk of fire or electric shock, do not expose this
apparatus to rain or colds.
1
Page 4

Table Of Contents
Introduction............................................................................................3
Front panel and rear panel illustration.................................................4
Front Panel...........................................................................................4
Rear Panel............................................................................................4
Remote control.......................................................................................5
Installing the batteries...........................................................................5
Installation & Connections....................................................................7
First time installation...........................................................................10
Basic operations..................................................................................11
Main menu ............................................................................................14
Menu Tree..........................................................................................15
Installation............................................................................................16
Auto Scan...........................................................................................16
Manual Scan.......................................................................................16
Program edit.........................................................................................17
System setup........................................................................................19
A/V Output Settings............................................................................19
Local Time Setting..............................................................................19
System Information.............................................................................19
Factory Default...................................................................................19
User preferences..................................................................................20
OSD Language...................................................................................20
OSD Transparency.............................................................................20
CH Info Bar Time Out.........................................................................20
Volume Bar Time Out .........................................................................20
Parental Control..................................................................................21
Trouble shooting..................................................................................22
Technical specifications......................................................................23
WARRANTY INFORMATION
WARRANTY CONDITIONS
2
Page 5

Introduction
This DVB-T TV Receiver is a Free-To-Air digital terrestrial receiver, allowing you to
access free-to-air digital terrestrial TV channels and radio broadcasts on your TV
set. Its digital reception covers VHF & UHF band. Compared with the analog TV
programs, digital TV programs eliminate the noise and interference but offer high
quality video and audio. An on-screen initial installation gui de is provided so that
you can easily start to enjoy watching the programs. In addition, a fully featured
remote control is included that offers you access to every feature with a simple
press of a button.
Main Features
- Full comply with Australian DVB-T standards
- Full MPEG2 ISO/IEC 13818 transport stream compliant audio/video decoding
- Bandwidth of 7MHz supported
- COFDM demodulator
- Automatic/manual channel search
- Channel edit, moving and deletion
- Parental lock control
- EPG (Electronic Program Guide) and teletext function (where available)
- RS-232 serial port for software upgrade
- Tuner RF in/loop through
- Dolby R Digital 5.1 Channel Surround Sound
- Component/S-Video/Digital Audio via coaxial & optical output
- HDMI output
- Full function remote control
Package Contents
Before installation, please check the items of the package. The package should
contain the following items:
1. DVB-T TV receiver x 1
2. Remote control x 1
3. AAA size battery for the remote control x 2
4. Instruction manual x 1
5. YPbPr cable x 1
6. CVBS cable x 1
3
Page 6
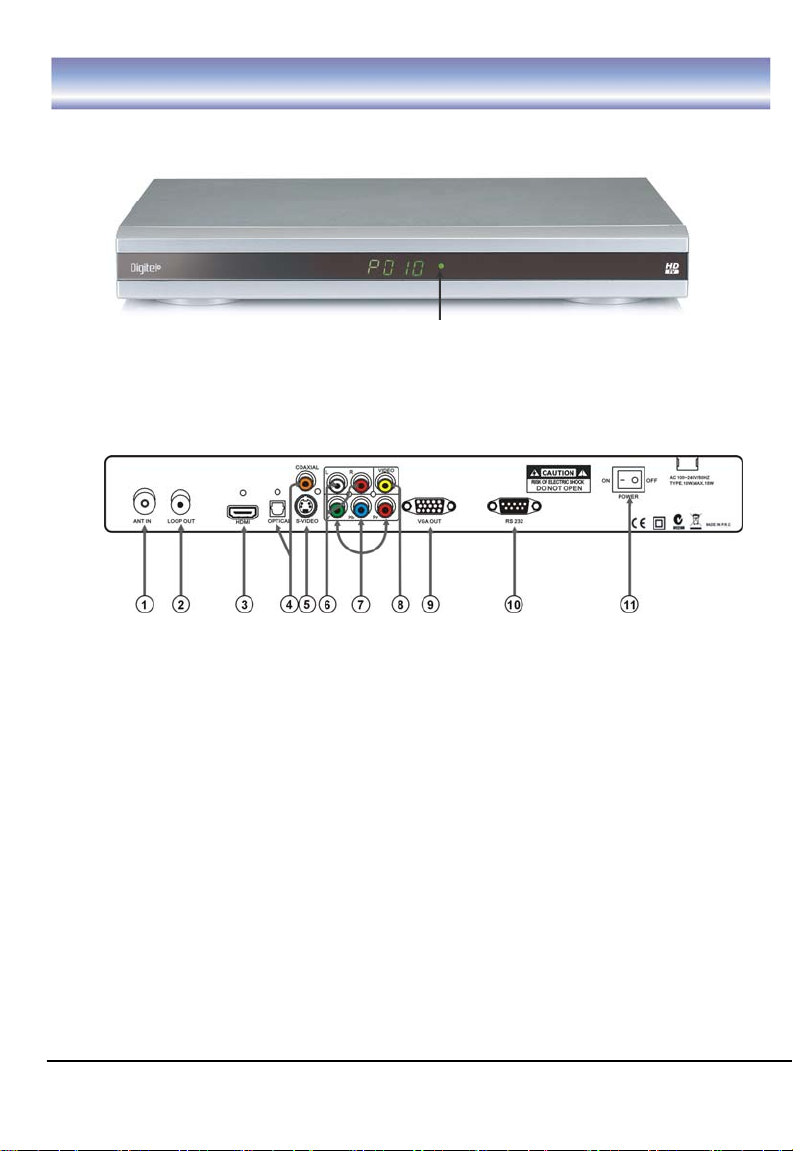
Front panel and rear panel illustration
Front Panel
① Green Light To indicate the Stand-by mode ON/OFF (this mode is controlled
by remote control only).
①
Rear Panel
① ANT IN connect the antenna here.
② LOOP OUT To connect a RF signal from the STB to either the RF Input jack
(antenna) on your VCR or to the antenna input of your TV.
③ HDMI video output used to connect to your HDMI device.
④ PDIF/COAXIAL Digital audio output.
⑤ S-VIDEO Y/C output for a S-VHS or Hi-Fi Video Recorder.
⑥ AUDIOL/R Audio output to connect to your TV.
⑦ YPbPr High definition video output to connect to your TV.
⑧ VIDEO CVBS output to connect to your TV.
⑨ VGA Video output to connect a VGA display monitor.
⑩ RS-232 Serial port for software upgrade.
⑪ POWER Switch ON/OFF.
4
Page 7
Remote control
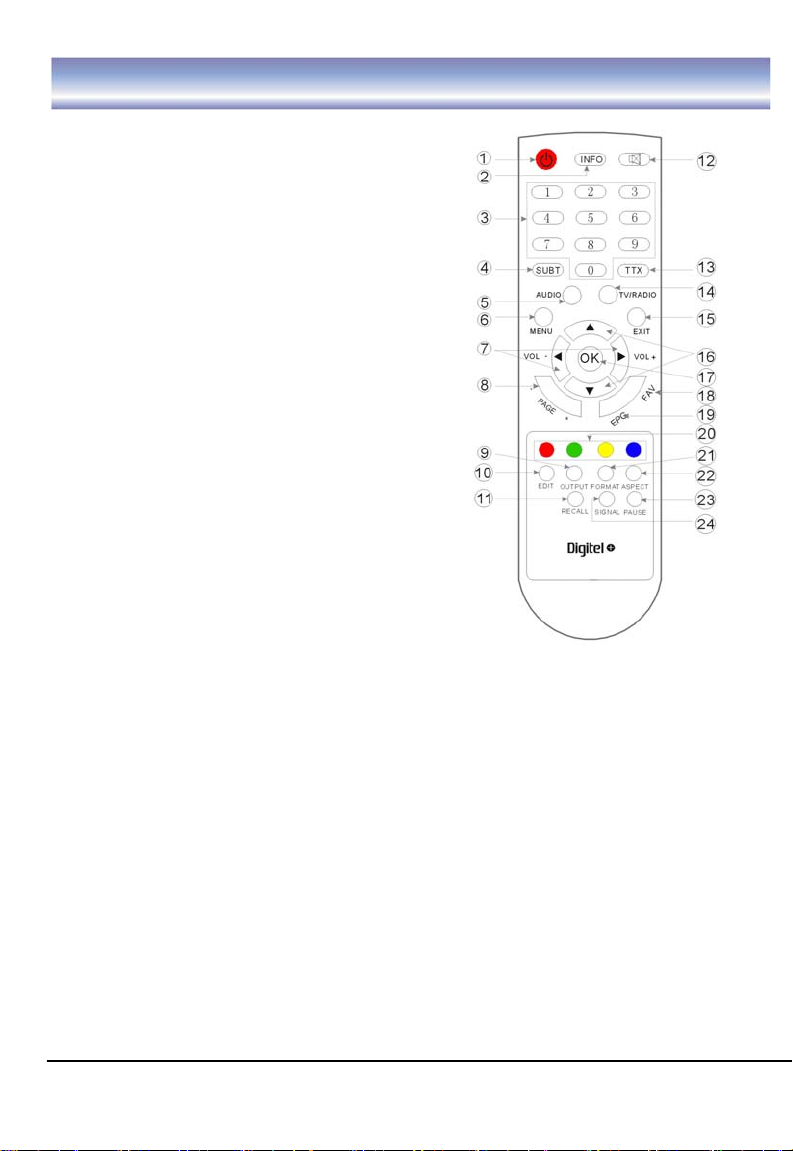
Remote key functions:
1. POWER To turn the Stand-by mode
ON/OFF.
2. INFO To display the current program
information.
3. Numeric buttons (0-9) To control the
numerical operation and especially to change
program directly.
4. SUBT To switch the close caption
ON/OFF.
5. AUDIO To display the Audio info of the
selected program.
6. MENU To enter into the main menu, Press
again to exit to previous menu.
7. VOL - / + To control the level of the
volume.
8. PAGE - / +To Page Down (5-)/Page Up
(5+).
9. OUTPUT To switch the output mode of HD
between YPbPr and VGA.
10. EDIT To edit the properties of the current
program.
11. RECALL To return to view the previous
program.
12. MUTE To mute or recover the sound of the receiver.
13. TTX To switch the teletext service ON/OFF.
14. TV/RADIO To switch the program between TV and Radio.
15. EXIT To cancel operation or exit the menu directly.
16. ▲▼ To change the program upward / downward.
17. OK To confirm the selected menu item / to open the program list.
18. FAV To cancel operation or exit the menu directly (Not supported now)
19. EPG To introduce some program info to the user.
20. 4 COLOR KEY To assist the operation of the box.
21. FORMAT To switch the different resolution (1080i, 720P, 576P , 576i
supported).
22. ASPECT To toggle among 16:9 full screen, 16:9 letter box, 4:3 full screen, 4:3
letter box, 4:3 panscan.
23. PAUSE To Pause the current program when pressed and go on playing the
current when pressed again.
24. SIGNAL To show the quality / level of signal.
5
Page 8
Installing the batteries
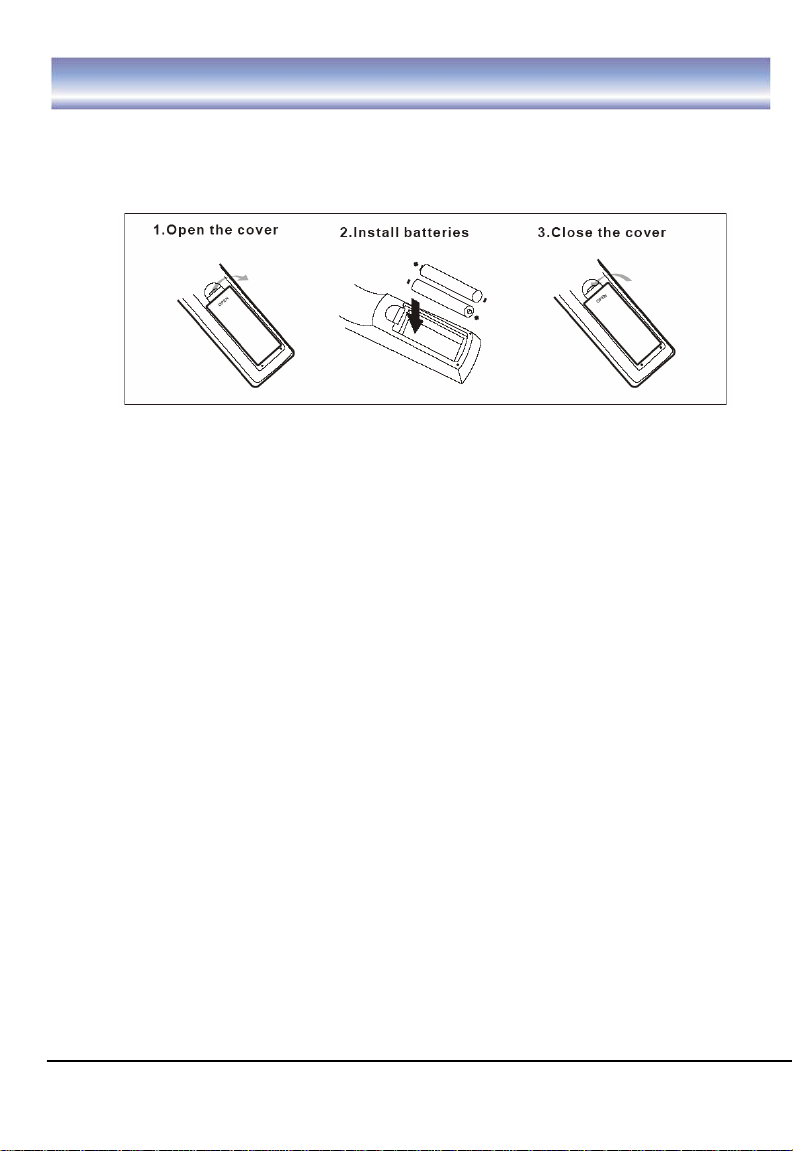
Remove the battery cover from the remote control and put two AAA size batteries
inside the compartment.
The diagram inside the battery compartment shows the correct way to install the
batteries.
Caution:
1. Keep batteries out of children’s reach.
2. Don’t attempt to recharge, short-circuit, disassemble, heat or throw the batteries
into the fire.
3. Always replace both batteries at the same time. Never mix new and old batteries
or batteries of a different type.
4. If you don’t intend to use the remote controller for an extended period, remove
the batteries to prevent possible leakage and corrosion.
5. Do not drop, apply shock or step on the remote control.
6. Do not spill water on the remote control.
Notes: If the receiver does not operate when operating the remote control from a close
range, you need to replace the batteries.
Using the Remote Control
1. To use the remote control, point it towards the front of the digital set top box.
2. The remote control has a range of up to 7 metres from the set top box at an
angle of up to 60 degrees.
3. The remote control will not operate if its path is blocked.
Note: Sunlight or very bright light will decrease the sensitivity of the remote control.
6
Page 9
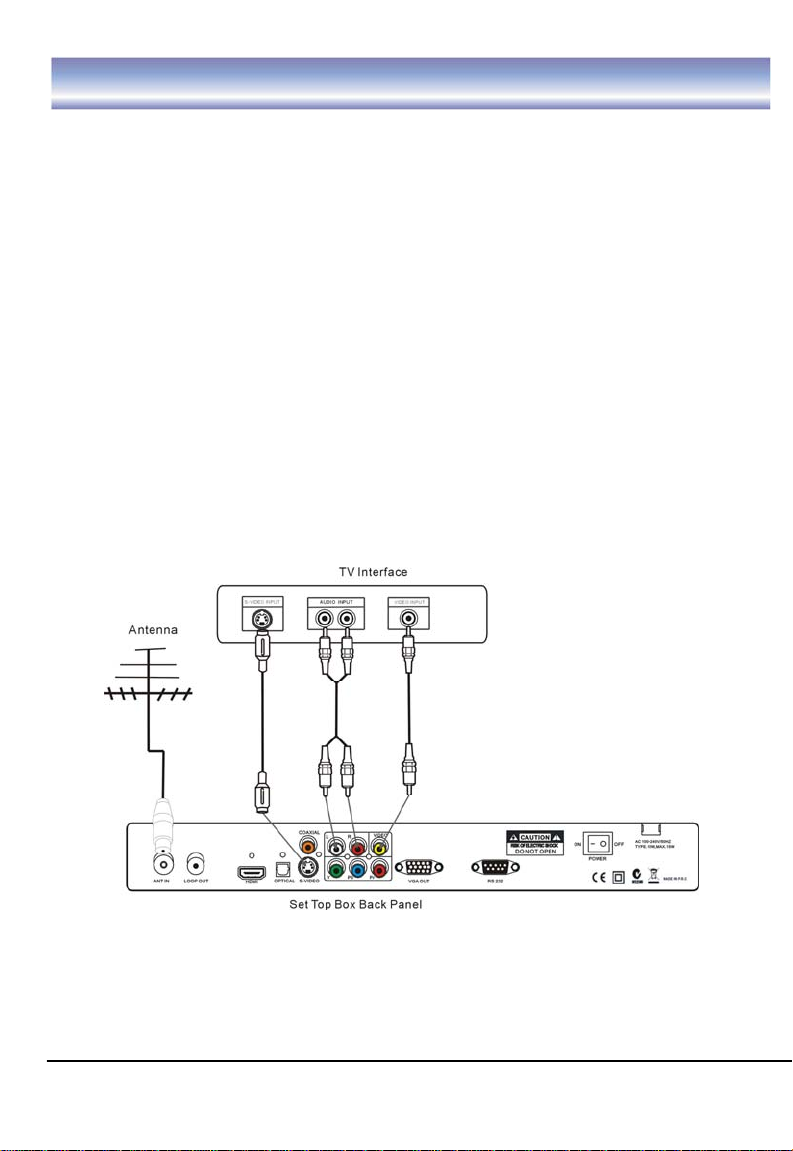
Installation and Connections
How to get good reception
• In general you are not required to change the existing antenna. However if your
antenna is not in good condition you should consider replacing them to ensure
uninterrupted digital television viewing.
• Viewers in areas of poor analog reception may need specialists’ advice about
antenna requirements for digital reception in their area.
• It’s recommended that viewers use quad shielded cab le from the antenna to the
television.
Connections to a TV
There are several ways of connecting your STB receiver to the TV and Hi-Fi
System. For high definition viewing your TV must support either 576p, 720 p, 1080i
resolution. Also the connection between the STB receiver and TV must be YPbPr
component, VGA, or HDMI. Other connection will provide standard definition
viewing.
Connect the STB receiver via Video/S-Video and Audio
(for standard definition viewing)
7
Page 10
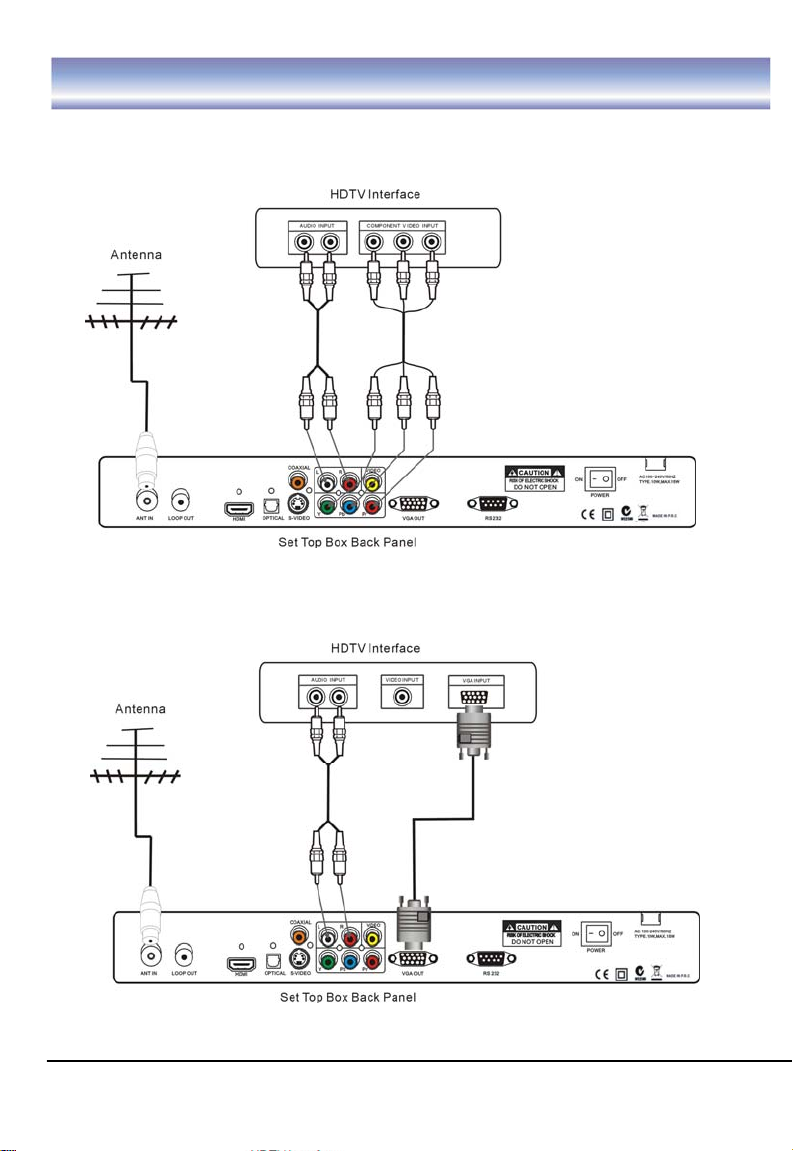
Installation and Connections
Connect the STB receiver via YPbPr output and Audio output
(for high definition viewing)
Connect the STB receiver via VGA output and Audio output
(for high definition viewing)
8
Page 11
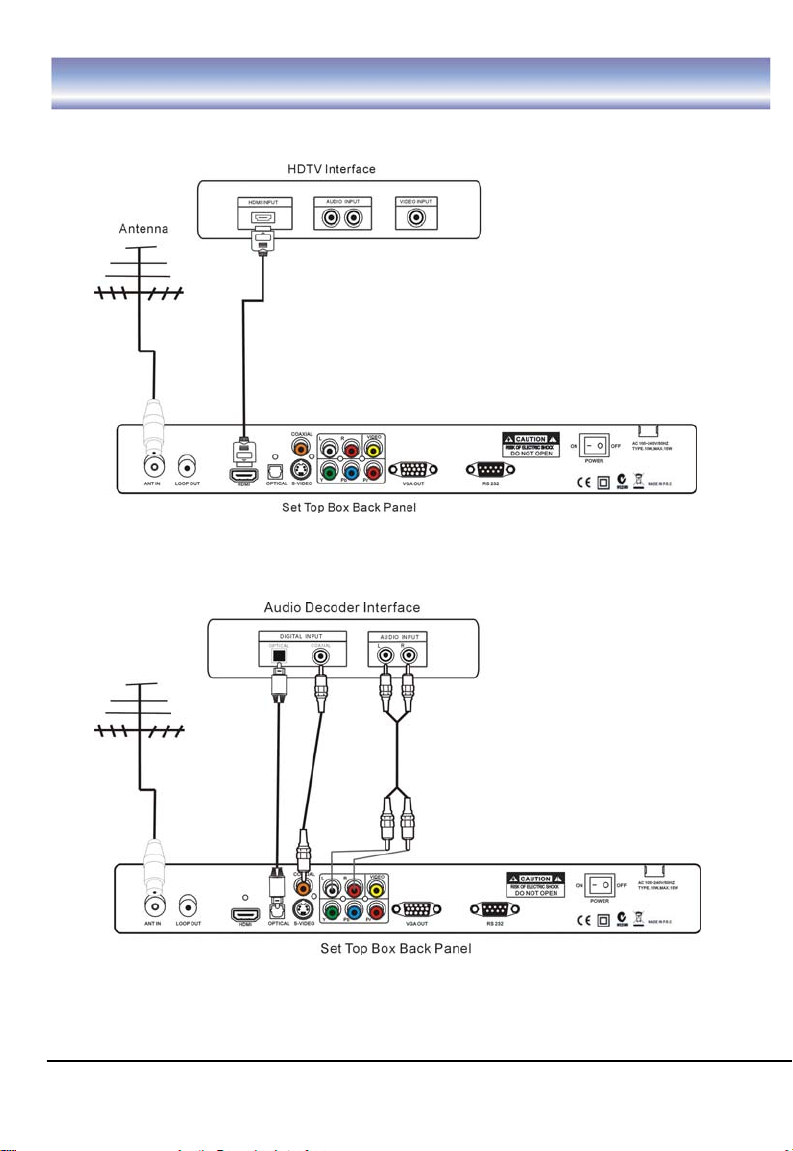
Installation and Connections
Connect the receiver via HDMI output (for high definition viewing)
Audio connections via Optical/Coaxial/Mixed Audio L/R Output
9
Page 12
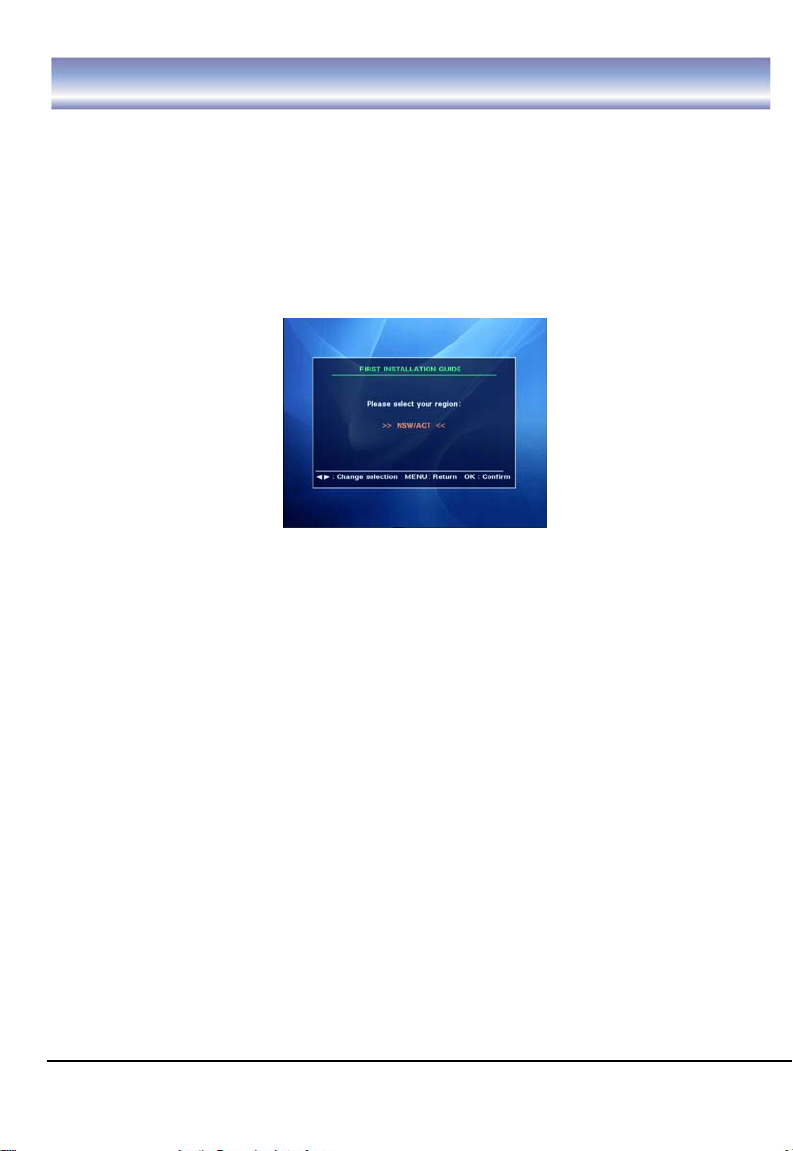
First time installation
Note: Be sure to turn on the main power at the rear of your receiver before using the
receiver.
After all the connections have been made properly, switch on your TV. Make sure
the receiver is connected to the mains and press Power to switch the receiver on. If
you are using the receiver for the first time or restored to factory default, a First
Time Installation menu will be displayed to guide you through the initial setup to
set the time zone, the daylight saving, the TV screen type and scan channels.
Use the remote controller to finish the setup.
When finished the scanning, all active channels found will be stored automatically.
The last found channel will be viewed. (In case you want to stop the scanning,
press the EXIT key to exit. The channels already found will be stored).
Now you are ready to watch digital terrestrial TV channels and radio broad casts.
In case you skip the First Time Installation screen, you can press MENU key to
bring up the main menu (please refer to page 14 for operation guidance)
10
Page 13
Basic operations
Switch program
1. Press the NUMERIC keys (0~9) on the remote cont rol to select the channel number you
want.
2. Press the ▲▼ key on the remote control or the front panel to change the available
channels upward/downward.
3. Press the RECALL key to view the previous channel selected.
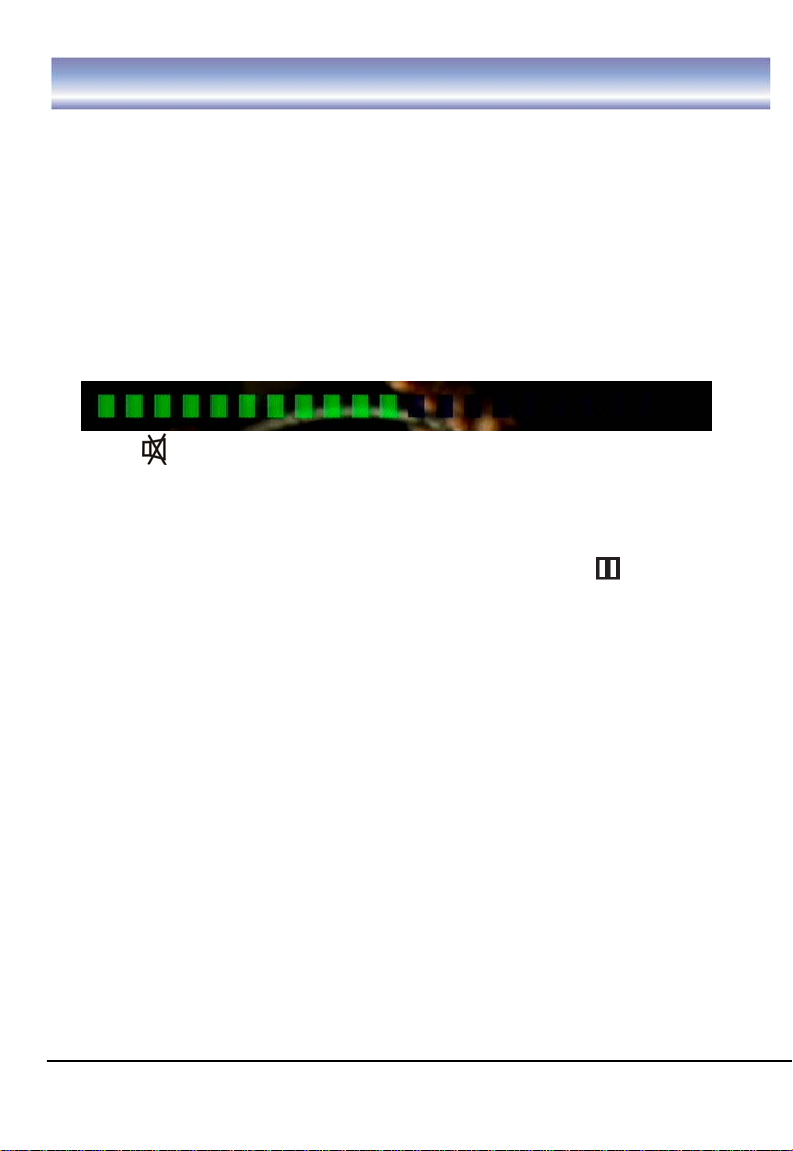
Volume control
1. Press the ◀▶ key on the remote control or front panel to adjust the volume.
The following volume bar will appear on screen.
Mute
1. Press the MUTE key to temporarily stop the sound.
2. To cancel mute, press the MUTE key again or press◀▶key.
Freezing picture
1. Press Pause key to pause current program and the pause icon will appear
on screen.
2. To cancel pause and continue to play, press again the PAUSE key and the
pause icon will disappear.
Change an audio language and audio mode
Press the AUDIO key on the remote control to select the audio control menu, press
the
◀▶,▲▼ and OK keys to select an audio language you want. Press EXIT key to
exit the menu.
NOTE: the Languages depend on the program providers.
Change screen aspect
Press Aspect key to switch screen aspect mode (16:9 full screen, 16:9 letter box,
4:3 full screen, 4:3 letter box, 4:3 panscan).
Change video resolution
Press Format key to set the video resolution mode (1080i, 720P, 576P).
NOTE: this receiver is default set to 1080i.
11
Page 14
Basic operations
Change video output mode
Press OUTPUT key to select the matched video monitor between YPbPr and VGA.
Change TV/Radio mode
Press TV/Radio key to change the program list mode between TV and Radio.
View program info
1. Press INFO key to view the detailed information of current program.
2. Press INFO/ EXIT to exit view.
Subtitle
Press SUBT key to switch subtitle on/off.
NOTE: the subtitle depends on the program providers.
Teletext service
1. Press TTX key to open a teletext page (if the teletext is transmitted)
2. Press EXIT key again or press EXIT key to close the teletext.
View signal info
1. Press SIGNAL key to view the signal level and quality of the current program.
2. Press EXIT or SIGNAL key to exit.
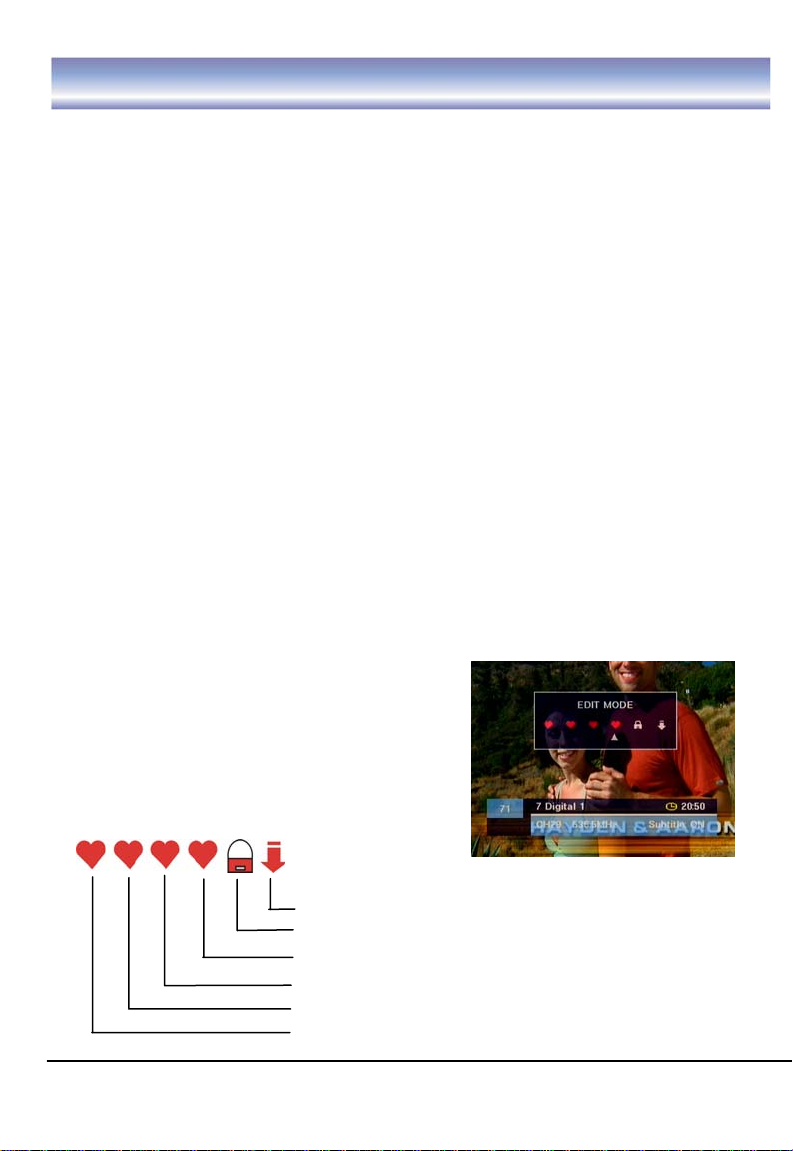
Quick edit of current program
1. Press EDIT key to show the edit mode.
2. Press ◀▶ to select the desired option.
3. Press OK key to confirm.
4. Press OK key again to cancel.
5. Press EXIT or EDIT key to exit the menu.
There are 6 options available for your quick edit.
To skip current program
To lock/unlock current program
Favorite list 4
Favorite list 3
Favorite list 2
Favorite list 1
12
Page 15
Basic operations
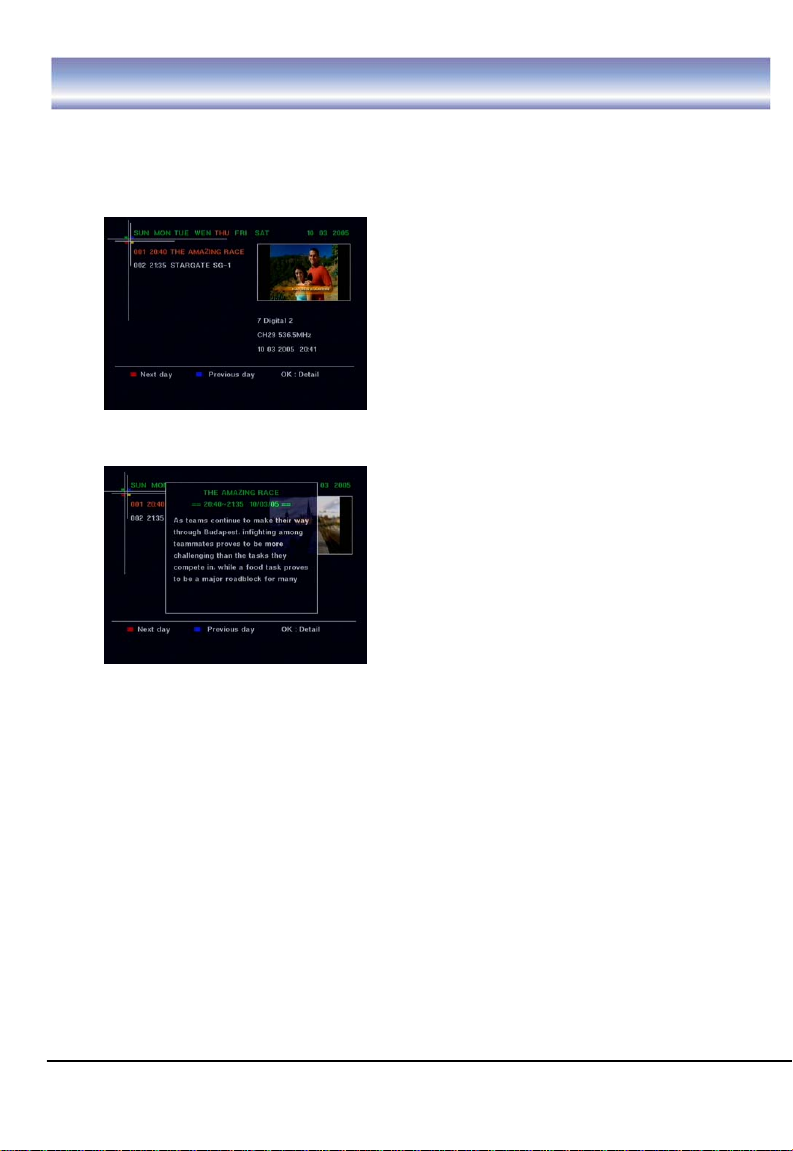
EPG (Electric Program Guide)
1. Press EPG key to view the EPG information that are provided by the content
providers.
2. Press ▲▼ key to view the event information such as event name, ev ent time.
.
3. Press OK key to view the detailed information of the current event.
4. Press RED key to view the event information of the next day, press BLUE key
view the event information of the previous day.
5. Press EPG key again or press EXIT key to exit the menu.
13
Page 16
Main menu
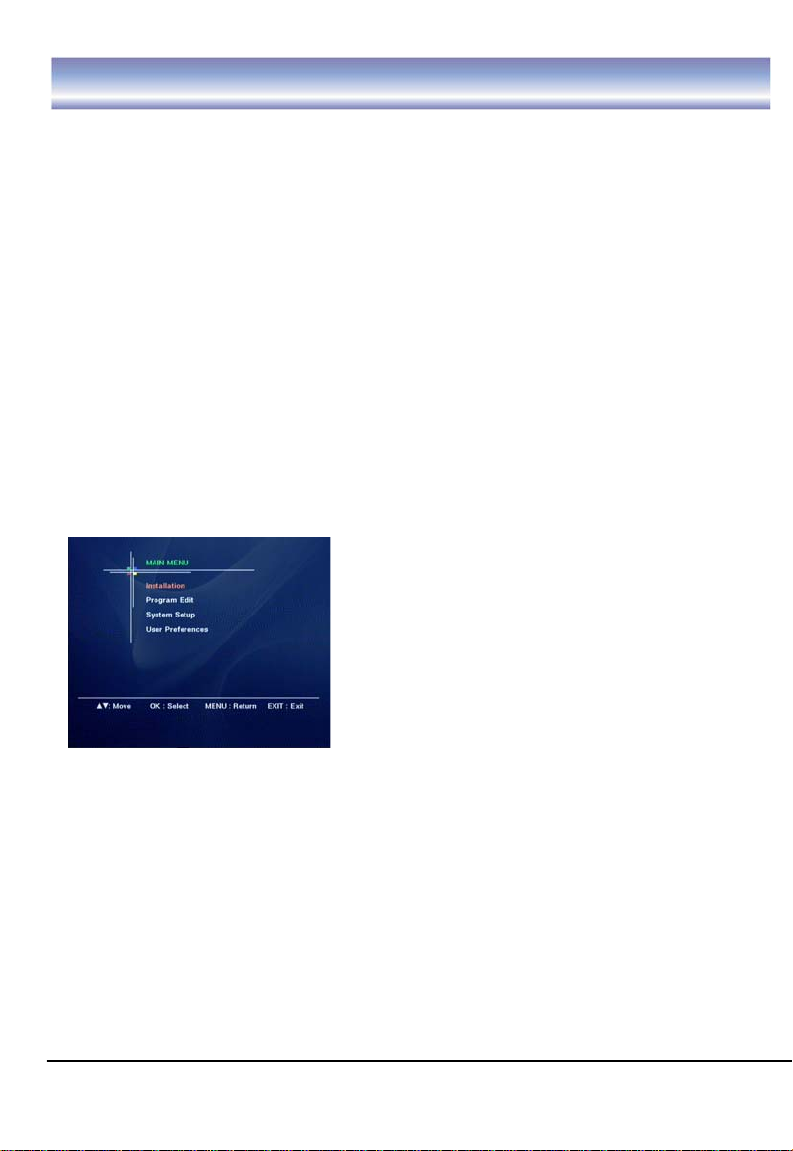
This section guides you to walk through of all options on the Menu screen
Navigation in the main menu
1. Press MENU key to bring up the main menu or return previous.
2. Press ▲▼ ke y to move upward/down to the desired sub menu.
3. Press OK key to enter into the sub menu you select.
4. Press EXIT key to exit the main menu.
The main menu is divided into 4 sections, please refer to the menu tree in the
next page.
Installation
Program Edit
System Setup
User Preferences
14
Page 17
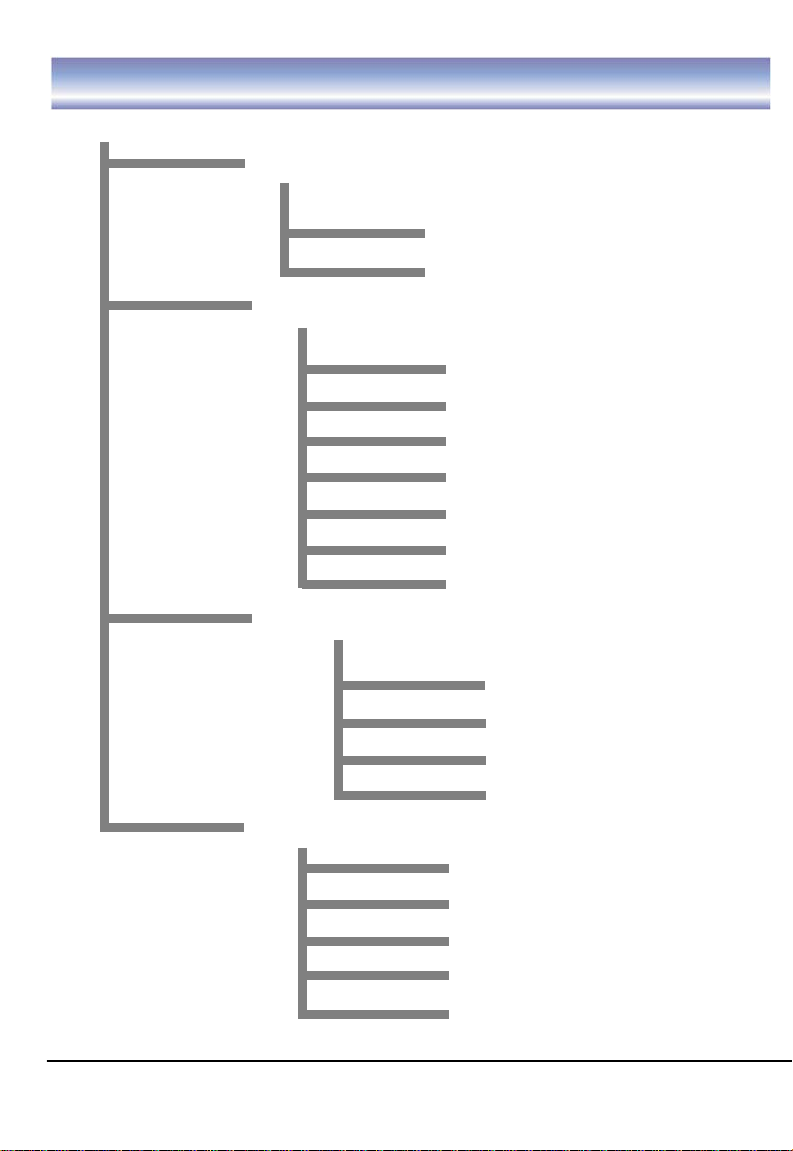
Main menu
Menu Tree
Installation
Scan selected channels
Auto scan
Program Edit
Edit FAV
Browse
Lock
Skip
Delete
Rename
Move
System Setup
A/V setting
Local time setting
System information
Factory default
User Preference
15
OSD Language
OSD Transparence
CH info bar time out
Volume bar time out
Parental control
Page 18
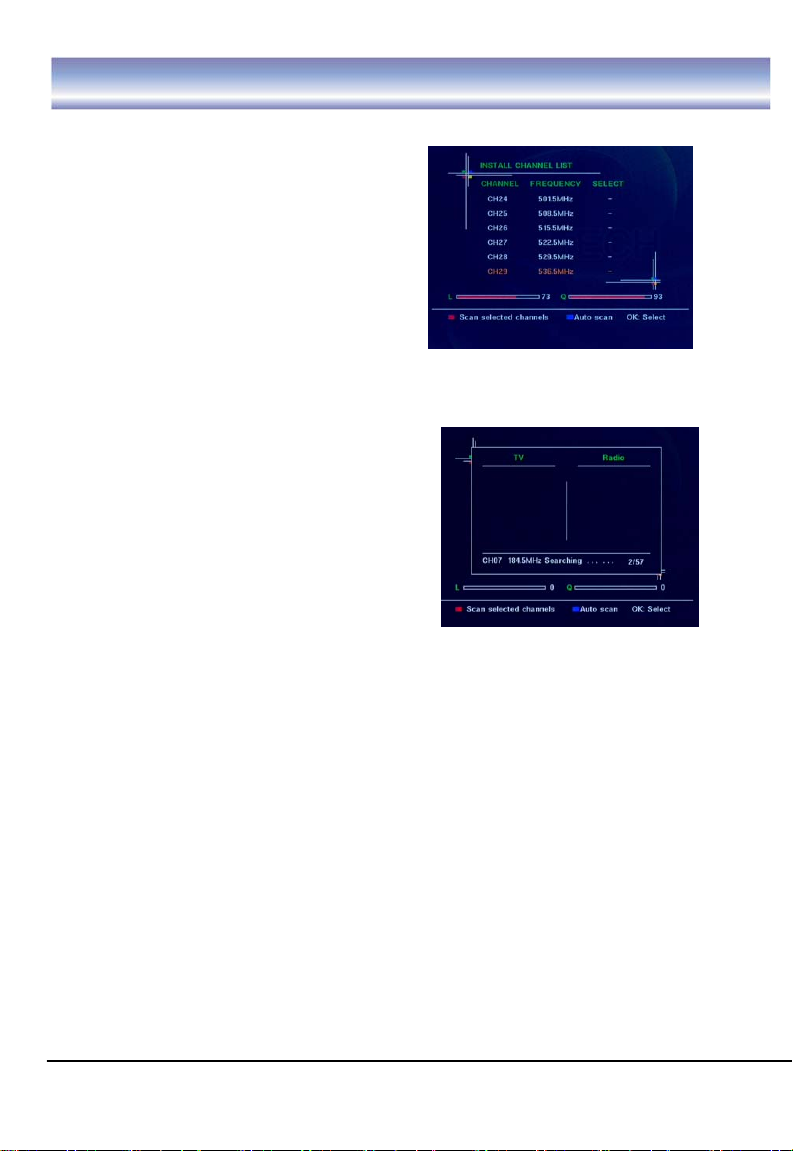
Installation
Auto Scan
1. Go to Main menu > Installation.
2. Press BLUE key to auto scan all the
channels.
3. Press EXIT key if you want to stop
during the auto scan.
Manual Scan
1. Go to Main menu > Installation
2. Press ▲▼ to select the channels you
want to scan. Press ◀▶ key to page
up/down .
3. Press OK key to select the channel, press
again to cancel your selection. If the channel
is selected, an icon “√” will appear.
4. Repeat step2, 3 to select other channels.
5. Press RED key to start scanning the
selected channels.
6. Press EXIT key if you want to stop during the scan.
16
Page 19
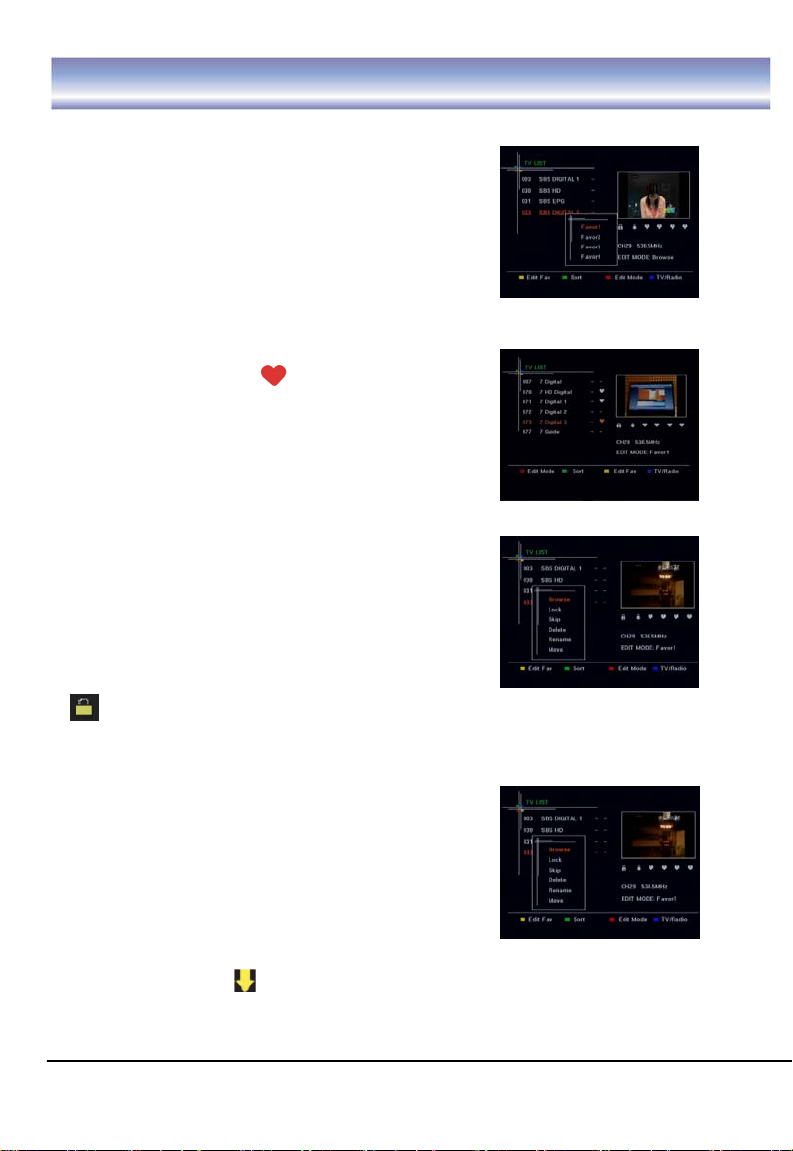
Program edit
NOTE: If there is no program stored, you can not access the edit menu.
Edit Favourite
1. Go to Main menu > Program edit > TV or Radio
list.
2. Press YELLOW key to show the favorite list and
then press ▲▼ key to select the desired favorite
list, press OK key to enter favorite edit mode.
3. Press
4. Press OK key to add the program to the fa vorite list
you selected, a FAV icon will appear.
5. Press OK key again to cancel this ope
FAV icon will disappear.
6. Press EXIT key to exit a
return to the previous menu
▲▼ key to select the program you desired.
ration, the
ll menu or press MENU to
Lock Program
1. Go to Main menu
list.
ess RED key to show a list of Edit modes.
2. Pr
Press ▲▼ key to select the lock item.
3. Press OK key to enable the lock functio
4. Press ▲▼key to select a program you desired,
and press OK key to lock this program , a lock icon
will appear.
5. Pr gain to cancel the operation. The lock icon will disappear.
ess OK key a
6. Press EXIT key to exit all menu or press MENU to return to the previous m
> Program edit > TV or Radio
n.
enu.
kip Program
S
1. Go to Main men
list.
ess RED key to show a list of Edit modes.
2. Pr
Press ▲▼ key to select the Skip item.
3. Press OK key to enable the Skip functi
4. Press ▲▼ key to select a program you de d, and press OK key to Skip this
program. a skip icon will appear.
5. Press OK key again to cancel the o
6. Press EXIT key to exit all menu or press MENU to return to the previous me
u > Program edit > TV or Radio
on.
sire
peration. The skip icon will disappear.
nu.
17
Page 20
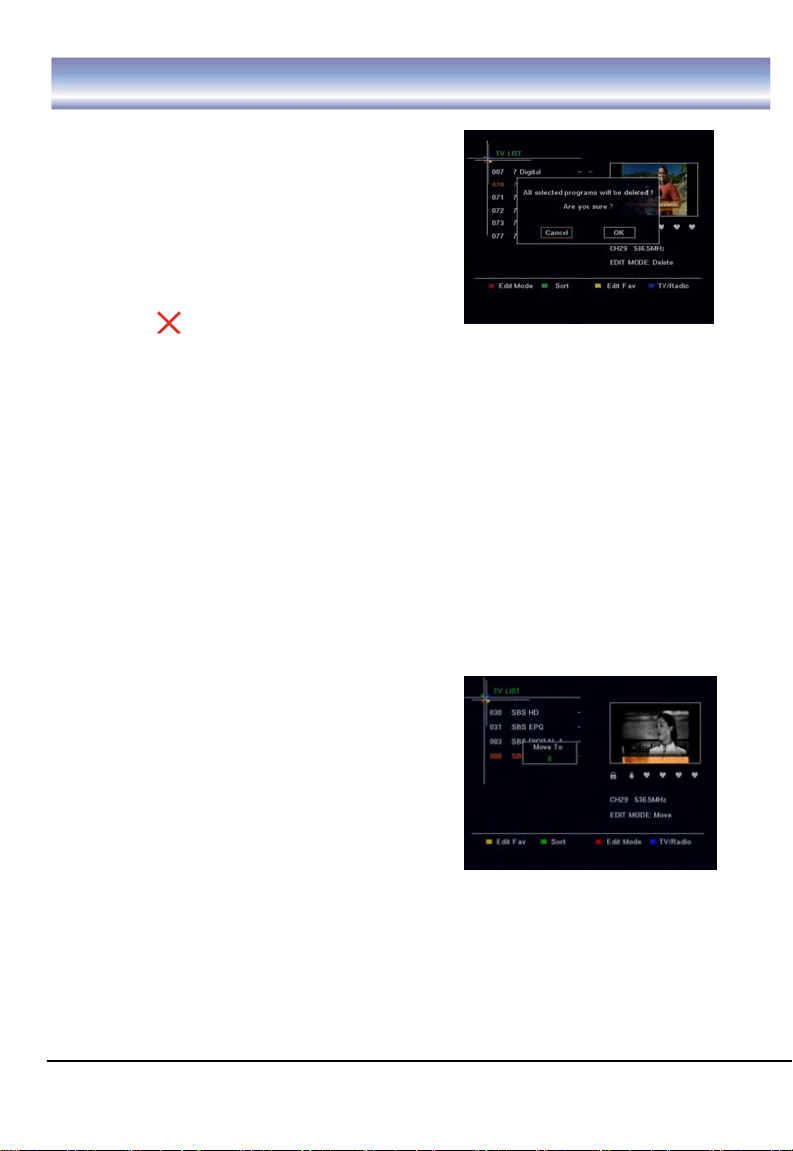
Program edit
Delete Program
1. Go to Main menu > Program edit > TV or
Radio list.
2. Press RE
Press ▲▼ key to select the delete item.
3. Press OK key to enable the delete funct
4. Press ▲▼ key to select the program you
dislike, and press OK key to mark this program
A cut icon will appear.
5. Press OK key again to can
6. Press EXIT key to exit all menu or press MENU to return to the previous m
ename
R
1. Go to Main
2. Press RED key to show a list box of all Edit modes. P
Rename item.
3. Press OK ke
4. Press ▲▼ to select a program you want to re
the Name Edit Menu. A keyboard will show on the screen.
5. Press ▲▼ ◀▶ to select the letters and press OK key t
YELLOW key to save and quit, press GREEN key to delete unwanted letters.
6. Press EXIT key to exit all menu or press MENU to return to the previous me
Move Program
1. Go to Main menu
Radio list.
2. Press RE
Press ▲▼ key to select the move item.
3. Press OK key to enable the move func
4. Press ▲▼ key to select a program you wan
to move, and press OK key.
5. Press NUMERIC key to set a ne
6. Press OK key to confirm, the selected program
position.
7. Press EXIT
witch TV/Radio list
S
Press BLUE key to switch be
D key to show a list of Edit modes.
ion.
.
cel the operation. T
menu > Program edit > TV or Radio list.
y to enable the rename function.
> Program edit > TV or
D key to show a list of Edit modes.
tion.
w position numb
he cut icon will disappear.
ress ▲▼ key to select the
name, and press OK key to enter
o confirm. Press
t
er for the selected program.
will be moved to the ne
key to exit all menu or press MENU to return to the previous menu.
tween the TV channel list and the radio channel list.
18
enu.
nu.
w
Page 21
System setup
A/V Output Settings
1. Go to Main menu > Sys tem setup > A/V output setting.
2. Press ▲▼ key to select the options: Resolution, Video
Audio output. And press OK to enter submenu of selected option.
3. Press ▲▼ key to select the item you want to set, and press OK
4. Press key to exit all menu or press MENU to return to the previous menu. EXIT
Resolution supported: 1080i, 720P, 576P, 576i Video output supported: YPbPr,
VGA. Screen aspect supported: 4:3 Letter box, 16:9 Letter box, 6:3 Full, 16:9 Fu
and 4:3 Panscan.
Audio output supported: MPE
G, AC-3 PCM, AC-3 CD
Local Time Setting
1. Go to Main menu > System setup > Local Time Setting.
2. Press ▲▼ key to select the options: Time zone, Daylight saving, and press OK
key to enter submenu of selected option.
3. Press key to select the item that you want to set, and press OK key to
confirm.
4. Press EXIT key to exit all menu or press MENU to return to the previous menu.
▲▼
System Information
1. Go to Main menu > System setup > System Information.
2. Press OK key to view the software/hardware Information of this receiver.
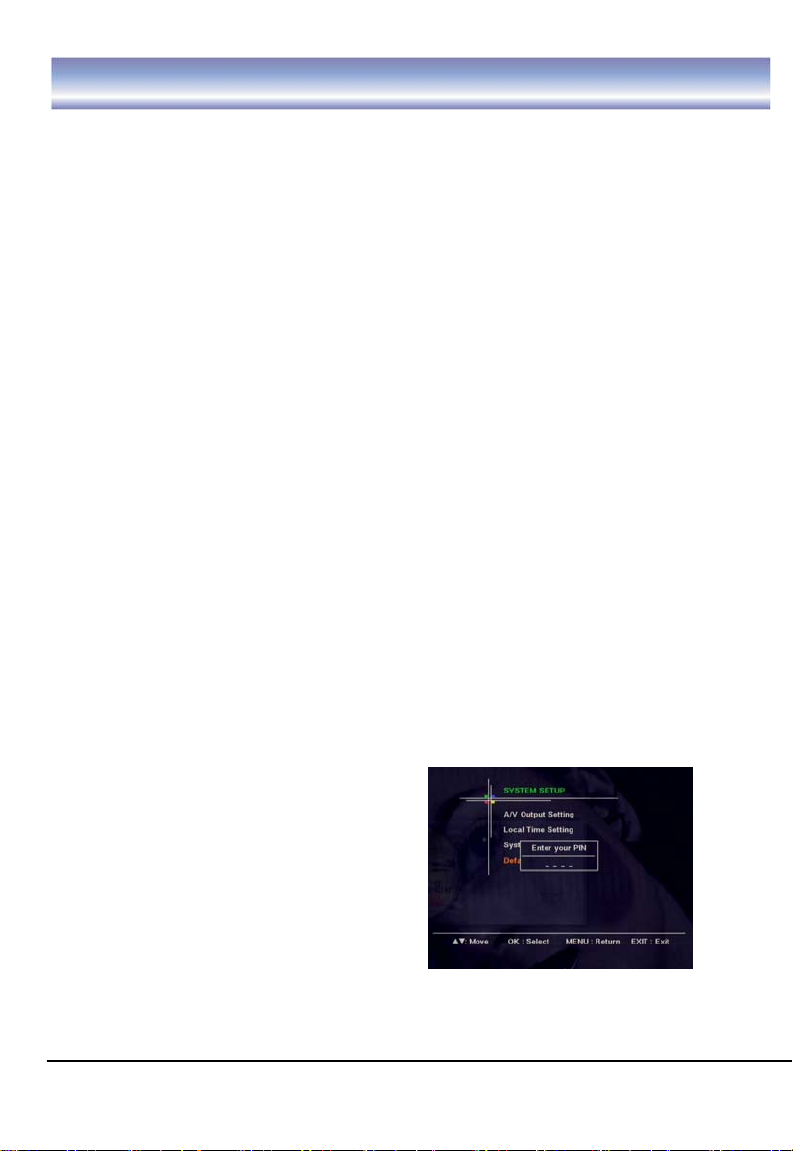
Factory Default
1. Go to Main menu > System setup >
Factory default.
2. Press OK key and input the correct the PIN
code and press OK key again to confirm your
selection, the factory default data will be
loaded.
NOTE: Factory default PIN is “0000”.
19
output, Screen aspect,
key to confirm.
ll
Page 22
User preferences
OSD Language
Go to Main menu > User preferences >OSD
language.
Only English is supported for this receiver.
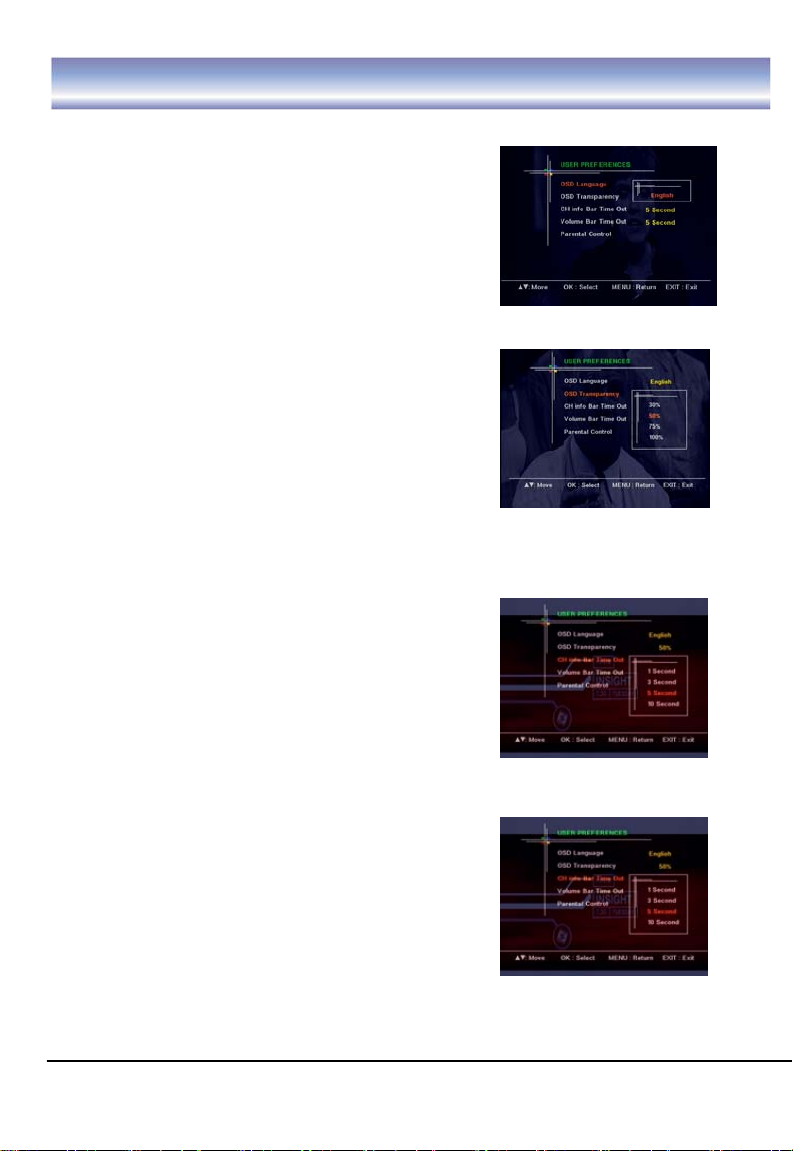
OSD Transparency
1. Go to Main menu > User preferences >OSD
Transparency.
2. Press ▲▼ key to select the OSD Transparency
option, and press OK key to enter submenu.
3. Press ▲▼ key to select the transparency value
that you desired (4 transparency modes are
available: 30%, 50%, 75%, 100%), and press OK key
to confirm.
4. Press EXIT key to exit all menu or press MENU to return to the previous menu.
CH Info Bar Time Out
1. Go to Main menu > User preferences >CH Info
Bar Time Out.
2. Press ▲▼ key to select the CH Info Bar Time Out
option, and press OK key to enter submenu.
3. Press ▲▼ key to select the timeout that you desired (4
timeout modes are available: 1 second, 3 second, 5
second, 10 second), and press OK key to confirm.
4. Press EXIT key to exit all menu or press MENU to return to the previous menu.
olume Bar Time Out
V
1. Go to Main menu > User pr
Bar Time Out.
2. Press ▲▼ key
option, and press OK key to enter submenu.
3. Press ▲▼ key to select the timeout that you desired (4
timeout modes are available: 1 second, 3 second, 5
second, 10 second), and press OK key to confirm.
4. Press EXIT key to exit all menu or press MENU to re
to select the Volume Bar Time Out
eferences >Volume
turn to the previous menu.
20
Page 23
User preferences
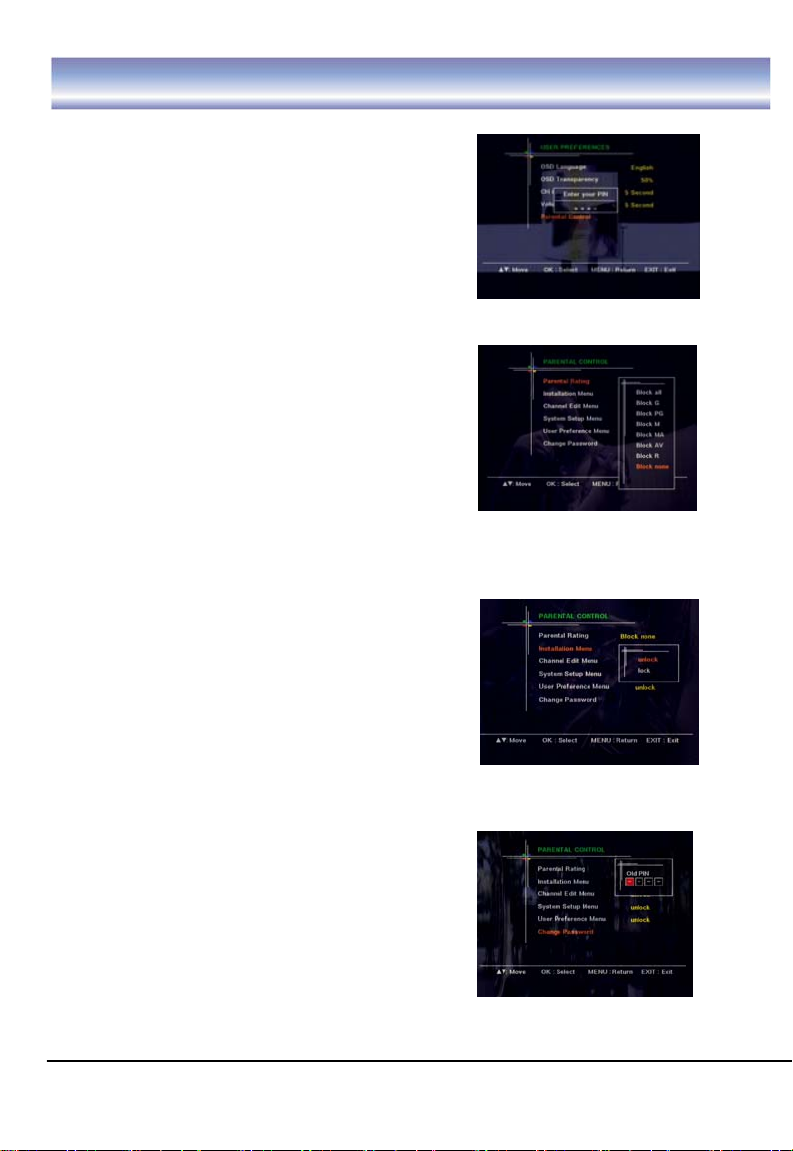
Parental Control
1. Go to Main menu >
>Parental control.
2. Press ▲▼ key to
and press OK key and input the correct the PIN code to
enter the submenu.
. Parental Rating
1
To set the rating leve
There are up to 8 levels
ALL: All programs are blocked
G: General
PG: Parenta
M: Mature audience, 15+
MA: Mature adult audience 15+ yea
AV: Adult audience, strong violence, 15+ ye
R: Restricted, 18+ year old
None: No program is blocke
. Installation Menu
2
T o lock/unlock the Inst allatio
. Channel Edit Menu
3
To lock/unlock the Chann
. Setup Menu
4
T o lock/unlock th e S
. User preferences Menu
5
T o lock/unlock the User pre ference
l guidance
. Change Password
6
To modify the user’s pa
OTE: Factory default password is “0000”.
N
If you forgot your password, please input the o
User preferences
select the Parental Control option,
l.
are available.
year old
r old
ar old
d
n Menu
el Edit Menu
etup Menu
s Menu
ssword
verride code 7710 to unlock.
21
Page 24
Trouble shooting
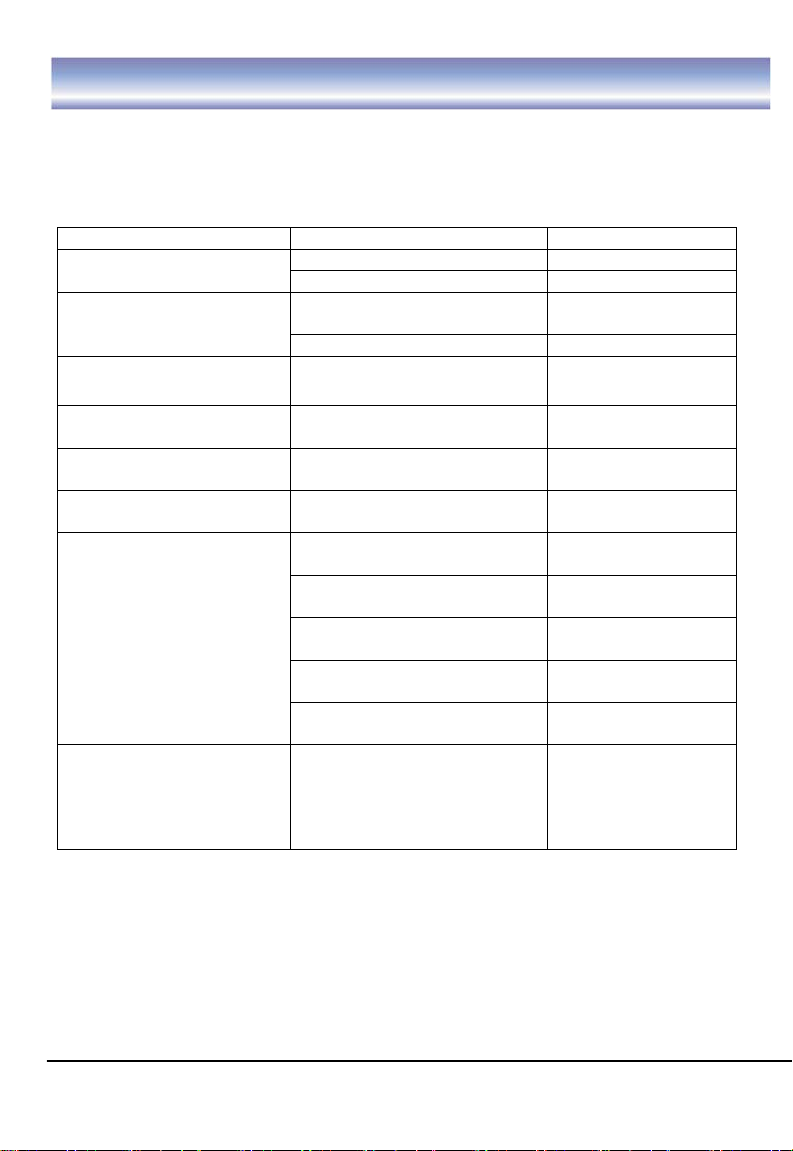
If you experience problems with this receiver or its installation, in the first instance
please read carefully the relevant sections of this User Manual and this
Troubleshooting section.
P
roblem Possible cause What to do
Main lead unplugged lead Check mainsDisplay on front panel not
lit
No signal found
No picture or sound
Mosaic blocks in picture or may not be compatible rial
picture freezes
Scrambled channel Channel is scrambled Select an alternative
message channel
Forgotten channel lock override
code
No response to remote
control
After moving the receiver T he aerial feed may come eed
to another room, you
can’t receive digital
reception
arning: If this doesn’t work, contact a qualified repair technician,
W
never attempt to repair the receiver yourself.
Main fuse blown Check fuse
Aerial is disconnected
Aerial is damaged/misa
Out of digital signal area Check with de
now
Aerial Check ae
Receiver off and turn on Plug in
Handset not aimed correctly front Aim handset at
Front panel obstructed
Remote control batteries are es
inserted incorrectly
Handset batteries ex Replace r
through a distribution system
which may reduce the digital
signal now received by the
receiver
ligned
hausted emote
Check aerial
Check aerial
Retune to another
ting Program not broadcas
channel
Use the
code
receiver
panel
Check for
obstructions
Check batteri
direction
control batteries
Try a direct f
from the antenna
lead
aler
22
Page 25
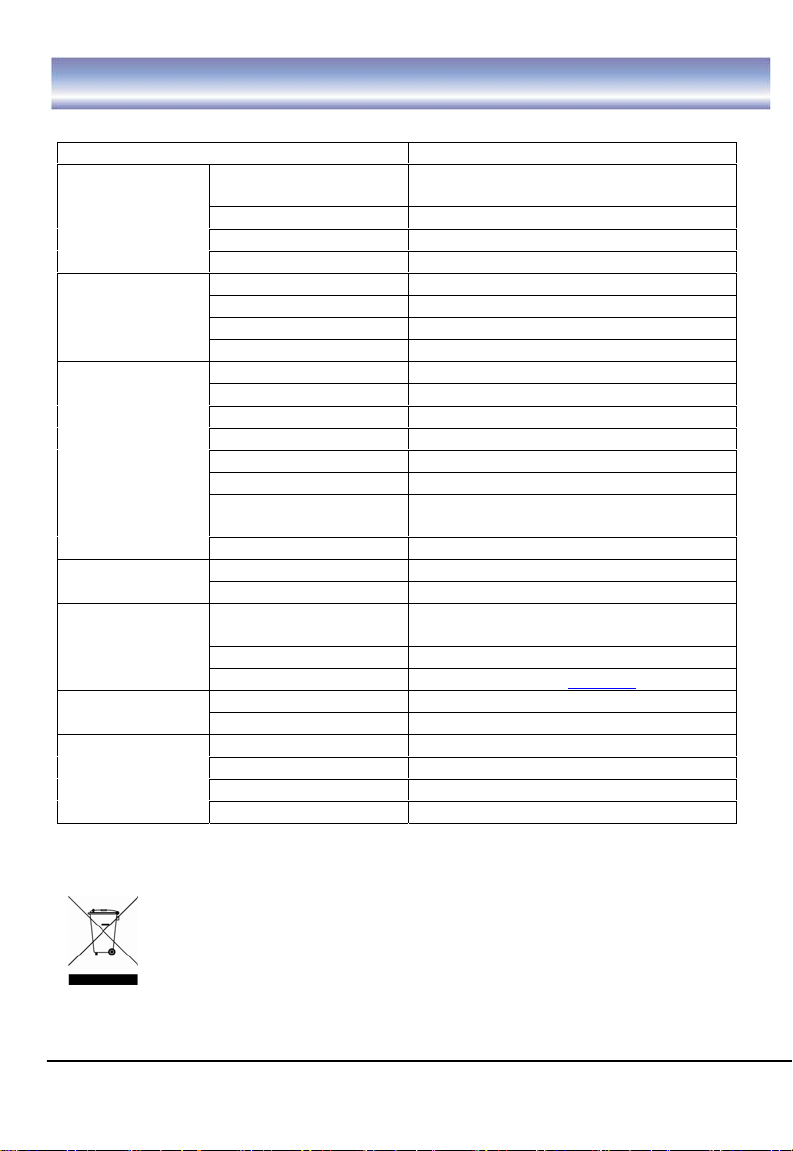
Technical specifications
em Specification
It
Tuner
Demodulation
Connectors
Power supply
Display
Decoding
Others
Specifications are subject to change without prior notice
*
T
that it should not be disposed with other household wastes at
the end of its working life. To prevent possible harm to the
environment or human health from uncontrolled waste
,
disposal
please separate this from other types of wastes and recycle it
responsibly to promote the sustainable reuse of material resources.
Frequency Range o 230MHz VHF: 174MHz t
UHF: 470MHz to 862MHz
Input Impedance 75Ohms unbalanced
Signal Input Level -78~-25dbm
Bandwidth 7MHz
Demodulator COFDM
OFDM Modulation T, SFN and MFN 2K, 8K FF
Packed Carries 2K/8K
Guard Interval 1/4, 1/8
RF IN IEC 169-2 female connector
RF Loop Through IEC 165-2 male connector
Y, Pb/Cb, Pr/Cr RCA for component video output
L/R RCA, Analog audio output
S-Video 4-Pin mini-DIN Connector
Coaxial RCA, for SPDIF digital audio output
RS-232 DB-9 male serial port, for software
upgrade
Input ~50/60Hz
Consumption 10W max.
Decoder Modu PAL
Resolution 1920X1080i, 1280X720p,
Aspect Ratio 9,Panscan 4:3(Letterbox, full), 16:
Video MPEG2 Transport
Audio MPEG2 Audio Layer I&II
ance nce Compli ETSI EN 300 744 DVB-T Complia
Sound Mode Right, Left, Stereo
Size 360*235*43mm
Weigh
t (Net) 1.8kg
le
100-240V
720X576p, 720X576i
, 1/16, 1/32
MP@HL
his marking shown on the product or its literature, indicates
23
Page 26

WARRANTY INFORMATION
PLEASE NOTE THAT DIGITAL PRODUCTS GROUP PTY LTD ACT
AS THE WARRANTY AND SERVICE AGENTS FOR THIS Digitel+
PRODUCT.
DO NOT RETURN THIS CARD TO DIGITAL PRODUCTS GROUP
IMPORTANT
PLEASE KEEP WARRANTY CARD, PROOF OF PURCHASE AND USER
MANUAL IN A SAFE PLACE AS YOU WILL REQUIRE THESE WHEN MAKING A
WARRANTY CLAIM.
Ensure that the following conditions are followed when operating the equipment.
Failure to do so may result in warranty being void.
Power requirements: Ensure main power supply is 240v AC +/- 10%, 40W Max,
50Hz +/- 5%.
Do Not place the unit in a confined cabinet or cupboard with out proper
ventilation.
To prevent shock or hazard risk Do Not place Liquid or Fluids near the appliance.
Do Not place appliance in a dusty or wet location.
Full warranty conditions are listed in the rear of the users manual.
Prior to making a claim you should read through the trouble shooting section in
the manual and consult the DPG web site www.digitalpg.com.au
For further Warranty information or to make a claim please contact Digital Product
Group on 1300 889 803.
Page 27

WARRANTY CONDITIONS
1. Where required by DIGITEL+ / DPG only the original invoice/receipt issued by
th
e dealer will be accepted as proof of purchase.
2. DIGITEL+ / DPG may reject warranty claims on equipment which it believes to
be illegally acquired or when the “owner” is unable to provi de proof of purchase or
where security labels or serial numbers have been tampered with or removed.
3. The warranty
fo
r a period of 12months from the date of original purchase.
4. This warranty is on “Return to Base” basis. The owner is responsible for t
d
elivery of the equipment to the point of purchase and for collecting the repaired or
replaced equipm
5. The warranty is void if failures arise as a result of any of the following. i) Abuse,
misuse, physical impact, normal wear and tear. ii) Alteration or repairs carried out
with out written authorization from DIGITEL+ / DPG. iii) Upgrade that are not
re
gistered by DIGIT
accordance with the manual supplied.
6. This equipment will not be considered defective as a result to incompatibility with
o
ther equipment or accessories other than the ones sup
time of purchase.
7. This unit should be returned in its original carton and protective packaging or
lternatively ina
accept any responsibility for goods damaged whilst the goods are in transit.
8. Repair or replacement under the terms of this warranty does not give the right to
extension or a beginning of a new warrant y period. Repairs or replacements may
be carried out with functionally equivalent recond itio
Parts that have been replaced become the property of DIGITEL+ / DP
9. The customer acknowledges that no promise representation or undertaking has
been given by DIGITEL+ / DPG or its dealer in relation to equipment other than as
tained in this warranty. con
10. A service charge will apply if the fault is not covered within the conditions of this
warranty or if there is no fault found. The charge will be based on the current
market rate.
11
. DIGITEL+ / DPG is not liable for any other loss other than the unit itself.
1
2. Nothing contained in this warranty shall be read or applied so as to affect the
right of the consumer in relation to the provisions of the trade practices act or other
st
atutory rights provided by legislation of the state or territory. In the absence of
a
pplicable legislation this warranty will be purchases sol e and exclusive remedy
a
nd neither DIGITEL+ / DPG nor its distributors or agents shall be liable for any
in
cidental or consequential damages for breach of any express or implied warranty
of this equipment.
or further Warranty information or to make a claim please contact
F
al Product Group on 1300 889 803.
Digit
covers only defects in the material and workmanship of the product
he
ent from the same location.
EL+ / DPG. iv) Operating or maintained other than in
plied with the unit at the
a packing suitable to prevent damage. DIGITEL+ / DPG will not
ned parts or equivalent part.
G.
 Loading...