

Page 1

Wireless/Wired IP Camera
H.264
(For IE Browser)
User Manual
Shenzhen Apexis Electronic Co., Ltd Tel: +86-755-26509025 Fax: +86-755-26509229
Page 2

More Security, More Convenience www.apexis.com.cn / www.apexis.cc
Statement
Thank you for using our IP camera products. The IP camera designed for network video surveillance, adopted
high performance and powerful single SOC chip media processor to integrate audio and video capture,
compression and transmission. Standard H.264 Main Profile coding algorithm ensures clearer and smoother
video transmission effect. Built-in Web Server allows users to easily perform real-time monitoring and remote
control over front-end cameras via IE browser.
The IP cameras are suitable for small and medium-sized enterprises, families, and other environments that
require remote network video transmission and monitoring. It is easy to be installed and operated.
Before installation, please check the product and all accessories. If anything is missing, please contact your
supplier in time.
Package Contents:
1 IP Camera X1
2 Power Adapter (refer to camera model) X1
3 CD X1
4 User Manual X1
5 WIFI Antenna X1
6. Bracket X1
7. Network Cable X1
NOTE:
Contents in this manual may be different from the edition that you are using. Should any unsolved problem
occur given that the product is used according to this manual, please contact our technical support
department or your product suppliers.
The content of this manual may be updated at irregular intervals without prior notice.
Shenzhen Apexis Electronic Co., Ltd Tel: +86-755-26509025 Fax: +86-755-26509229
2 of 42
Page 3

More Security, More Convenience www.apexis.com.cn / www.apexis.cc
CONTENTS
1. INTRODUCTION ........................................................................................................................................... 4
1.1. General Description............................................................................................................................. 4
1.2. Characteristic....................................................................................................................................... 4
1.3. Specification ........................................................................................................................................ 5
2. INSTALLATION AND SETTINGS .................................................................................................................. 6
2.1. Network Connection ............................................................................................................................ 6
2.2. IE Browser Settings............................................................................................................................. 7
2.3. UPnP Service ...................................................................................................................................... 8
2.4. IPCam IP Address Search Tool ........................................................................................................... 8
2.5. Intall the OCX ActiveX ......................................................................................................................... 9
3. SOFTWARE OPERATION (IE BROWSER) ................................................................................................ 10
3.1. Three main functions..........................................................................................................................11
3.2. For Live Video ....................................................................................................................................11
4. PARAMS SETTINGS ................................................................................................................................... 16
4.1. Device Info......................................................................................................................................... 16
4.2. Video Info. ......................................................................................................................................... 16
4.3. Audio Settings.................................................................................................................................... 17
4.4. Motion Detection ............................................................................................................................... 18
4.5. Alarm Settings ................................................................................................................................... 19
4.6. Basic Network Settings ..................................................................................................................... 21
4.7. Wireless Lan Settings........................................................................................................................ 25
4.8. UPNP Settings................................................................................................................................... 26
4.9. Cruise Settings .................................................................................................................................. 26
4.10. Indicator Settings............................................................................................................................. 28
4.11. User Manage ................................................................................................................................... 28
4.12. Log................................................................................................................................................... 29
4.13. Date Time Settings.......................................................................................................................... 30
4.14. Multi-Device Settings....................................................................................................................... 30
4.15. Mail Service Settings....................................................................................................................... 31
4.16. FTP Service Settings....................................................................................................................... 32
4.17. SD Card Info.................................................................................................................................... 32
4.18. Local Settings.................................................................................................................................. 33
4.19. System Tool ..................................................................................................................................... 34
5. PLAYBACK .................................................................................................................................................. 35
6. FREQUENTLY ASKED QUESTIONS ......................................................................................................... 38
7. OBTAINING TECHNICAL SUPPORT ......................................................................................................... 42
Shenzhen Apexis Electronic Co., Ltd Tel: +86-755-26509025 Fax: +86-755-26509229
3 of 42
Page 4

More Security, More Convenience www.apexis.com.cn / www.apexis.cc
1. INTRODUCTION
1.1. General Description
This is a minitype camera with elegant and beautiful shape, built-in Web server, open application interface
and industrial grade stable performance, makes the industrial network transmission safety, quickly, simple
operation, easy control. It integrates audio and image information, perform real-time monitoring
synchronously through the network, to achieve real-time monitoring audio and image via a standard Web
browser.
1.2. Characteristic
Easy to Install
Just insert the network cable to the RJ45 interface of the camera, inputting the camera’s IP address through
Microsoft IE, Mozilla Firefox, Google Chrome or other standard browsers, then using it.
High Quality Image
The camera adopts H.264 video compression, with clear picture, the maximum speed up to 30 frames/second
via 10M/100M network real-time transfer.
Open Standard Environment
Support TCP/IP network, support HTTP DNS DHCP PPPoE SMTP FTP SSL TFTP NTP ARP/RARP NFS
RTSP RTP RTCP protocols and Dynamic IP(DDNS). Support up to 10 users online simultaneously.
Advanced Extended Function
Connect home appliances and panalarm via GPIO interface to achieve I/O alarm input and output functions.
Simple Management Mode
Using standard web browser, to configure and manage the camera, upgrade the software online directly.
Safety Performance Guarantee
Multi-level users management and passwords definition, the administrator can set different access permission
to different level visitors.
Extensive Range Application
Real-time video is transferred by internet, which can’t be compared by traditional video surveillance system.
Users can view and remote control the real time image at anytime, anywhere via network. The camera can be
widely used such as product demonstrations, real-time monitoring, real-time recording and taking. It can also
be at the scheduled time or event occurs, send pictures to the specified E-Mail, FTP server timely.
Shenzhen Apexis Electronic Co., Ltd Tel: +86-755-26509025 Fax: +86-755-26509229
4 of 42
Page 5

1.3. Specification
Image Sensor
More Security, More Convenience
1/4" Color CMOS Sensor
www.apexis.com.cn / www.apexis.cc
Image Sensor
Audio
Video
Display Resolution 640 x 480 Pixels(300k Pixels)
Lens
Mini. Illumination
Viewing Angle
Input
Output
Audio Compression ADPCM
f: 6 mm, F:2.0 (IR Lens)
0.5Lux
60 Degree
Built-in Microphone/1 channel audio input
1 channel audio output
Image Compression H.264, MJPEG
Image Frame Rate 30fps(VGA),30fps(QVGA)
Resolution
640 x 480(VGA), 320 x 240(QVGA)
Flip Mirror Images Vertical / Horizontal
Light Frequency
50Hz, 60Hz
Video Parameters Brightness, Saturation, Contrast, Hue
Ethernet Interface Build in 10/100Mbps,Auto MDI/MDIX , RJ-45
TCP/IP HTTP DNS DHCP PPPoE SMTP FTP SSL TFTP NTP
Supported Protocol
ARP/RARP NFS RTSP RTP RTCP.
Communication
Physical
Power
Environment
Compress rate level
Wireless Standard IEEE 802.11b/g
128Kbps~4Mbps
/n
Data Rate 802.11b: 11Mbps (Max.), 802.11g: 54Mbps (Max.),
802.11n: 150Mbps (Max.),
Wireless Security WEP & WPA WPA2 Encryption
Pan/Tilt Angle
Infrared Light
Horizontal:270° & Vertical: 120°
10 IR LEDs, Night visibility up to 15 meters
Alarm Input 1 Channel on/off Input
Alarm Output 1 Channel relay Output
Power Supply
Power Consumption 7 Watts (Max.)
Operate Temper. 0° ~ 55°C (14°F ~ 131°F)
Operating Humidity 20% ~ 85% non-condensing
Storage Temper. -10°C ~ 60° (14°F ~ 140°F)
Storage Humidity 0% ~ 90% non-condensing
CPU
DC 5V/2.0A (EU,US,AU adapter or other types optional)
2.0GHZ or above (suggested 3.0GHz)
PC System
Memory Size
Display Card
256MB or above (suggested 1.0GHz)
64M or above
Requirements
Supported OS
Browser
Certification
Shenzhen Apexis Electronic Co., Ltd Tel: +86-755-26509025 Fax: +86-755-26509229
CE, FCC, RoHS
Microsoft Windows 2000/XP/Vista/7
IE6.0/7.0/8.0/Firefox/Safari/Google chrome or other standard browsers
5 of 42
Page 6
More Security, More Convenience www.apexis.com.cn / www.apexis.cc
2. INSTALLATION AND SETTINGS
System Requirement:
Operating System: Windows 2000 / XP / Vista / 7
Network Protocol: TCP/IP
Network Structure: Applies to all network connections 10/100M LAN platform
Browser: Internet Explore 6.0 or above.
2.1. Network Connection
Intranet and Extranet Connection Reference:
Extranet means public IP, Intranet means private IP. If your IP belongs to the follow range, then it’s a private
IP :
Category A: 10.0.0.0 - 10.255.255.255
Category B: 172.16.0.0 - 172.31.255.255
Category C: 192.168.0.0 - 192.168.255.255
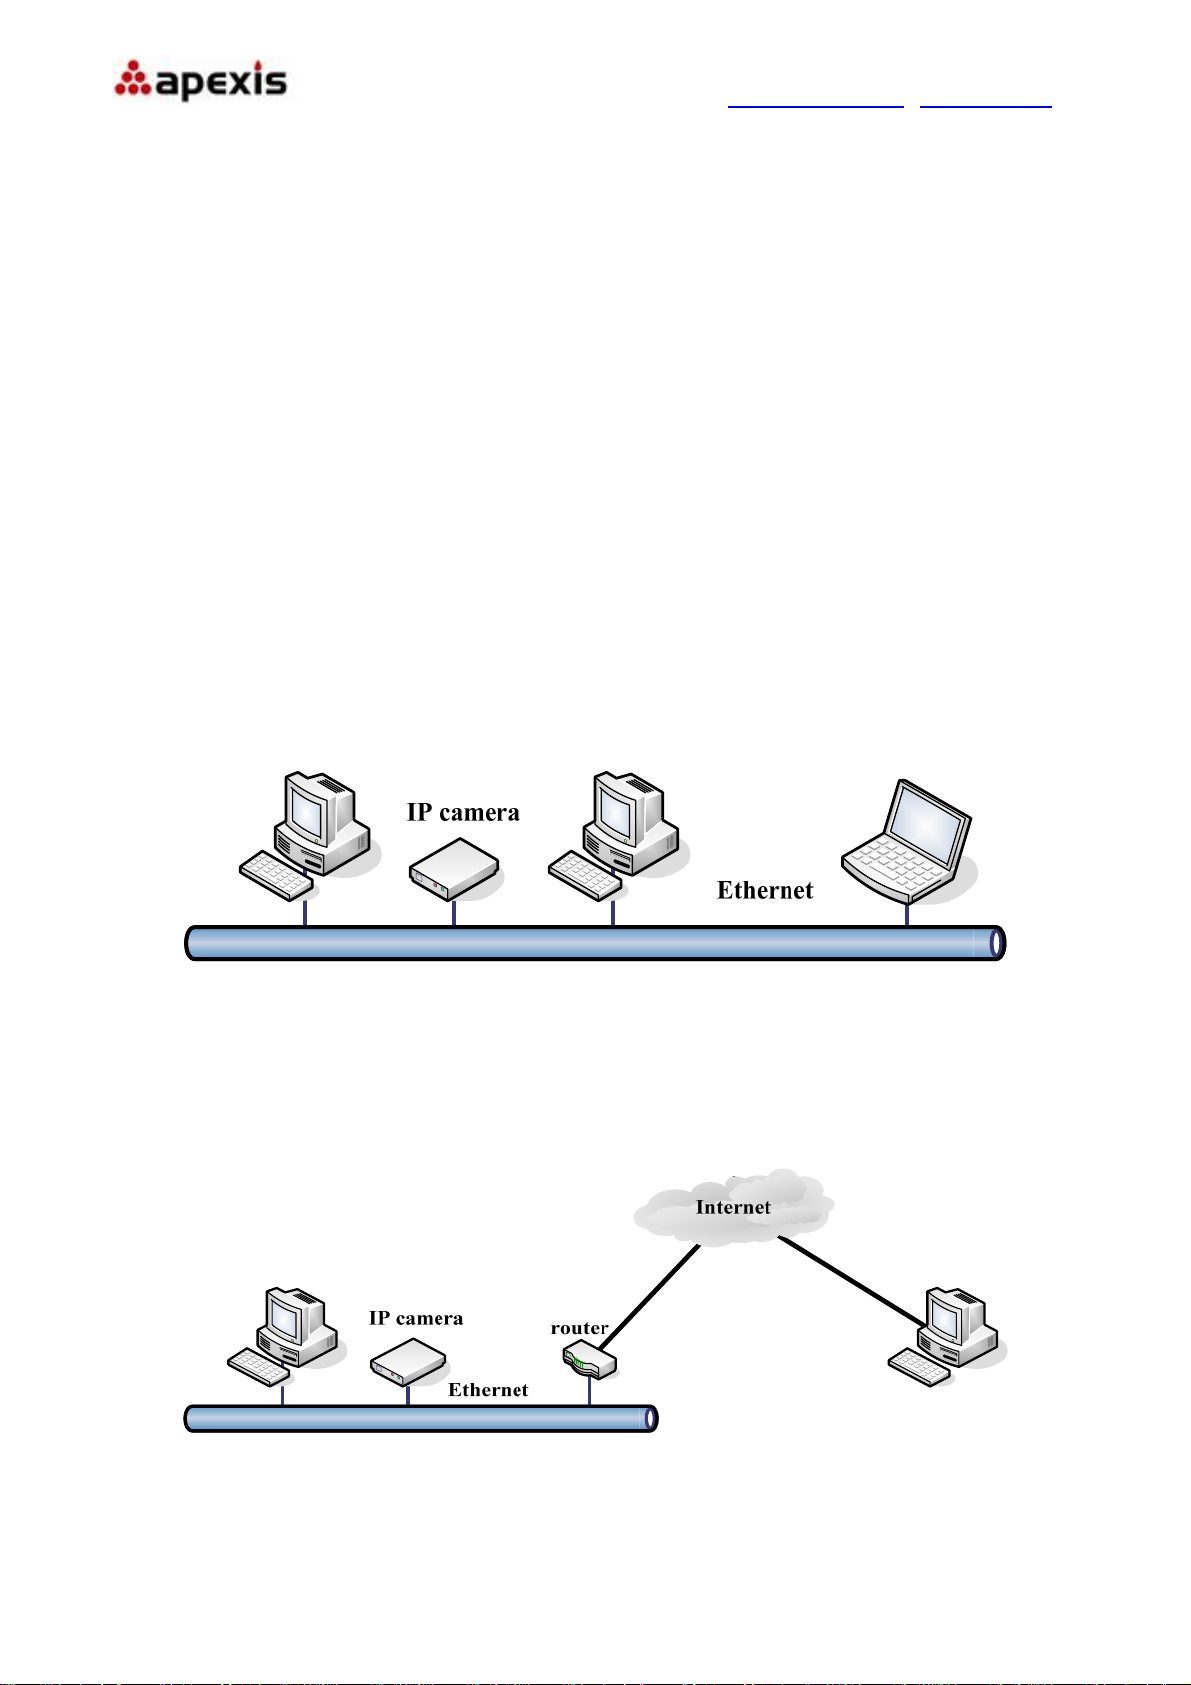
Intranet Connection: IP camera and user’s computer (device) should be under the same network
environment, and both of their IP should be under the same subnet, then means correct connection, picture
as below:
Figure1.0
Extranet Connection: there are 2 ways as below:
(1). IP camera connect to the Internet via router, here camera’s IP is a private IP, clients need to connect to IP
camera through a router, with forwarding rule to be connected correctly, as below:
Figure1.1
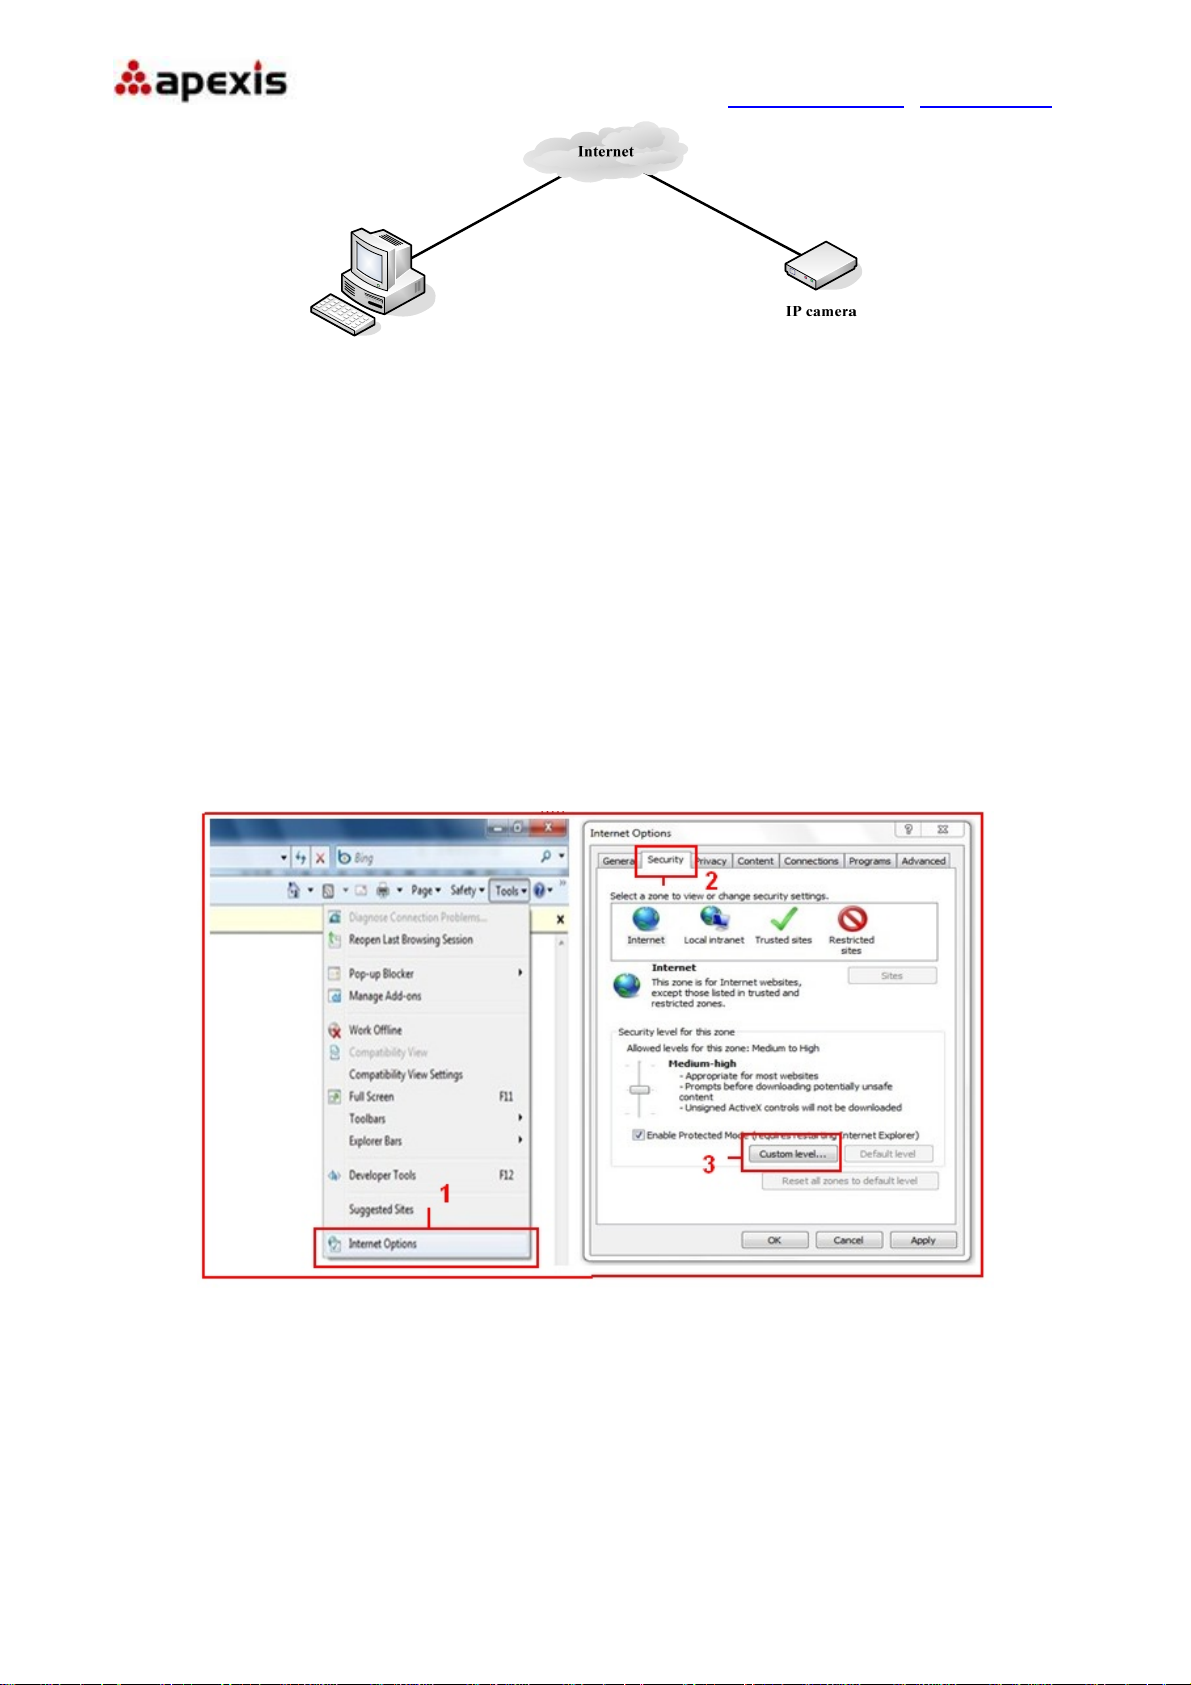
(2). IP camera connect to the Internet directly, if it’s a fixed IP which provided by ISP, just input it. If it’s a
floating IP, then input the account and password which provided by ISP to dial-up connection.
Shenzhen Apexis Electronic Co., Ltd Tel: +86-755-26509025 Fax: +86-755-26509229
6 of 42
Page 7
More Security, More Convenience www.apexis.com.cn / www.apexis.cc
Figure1.2
2.2. IE Browser Settings
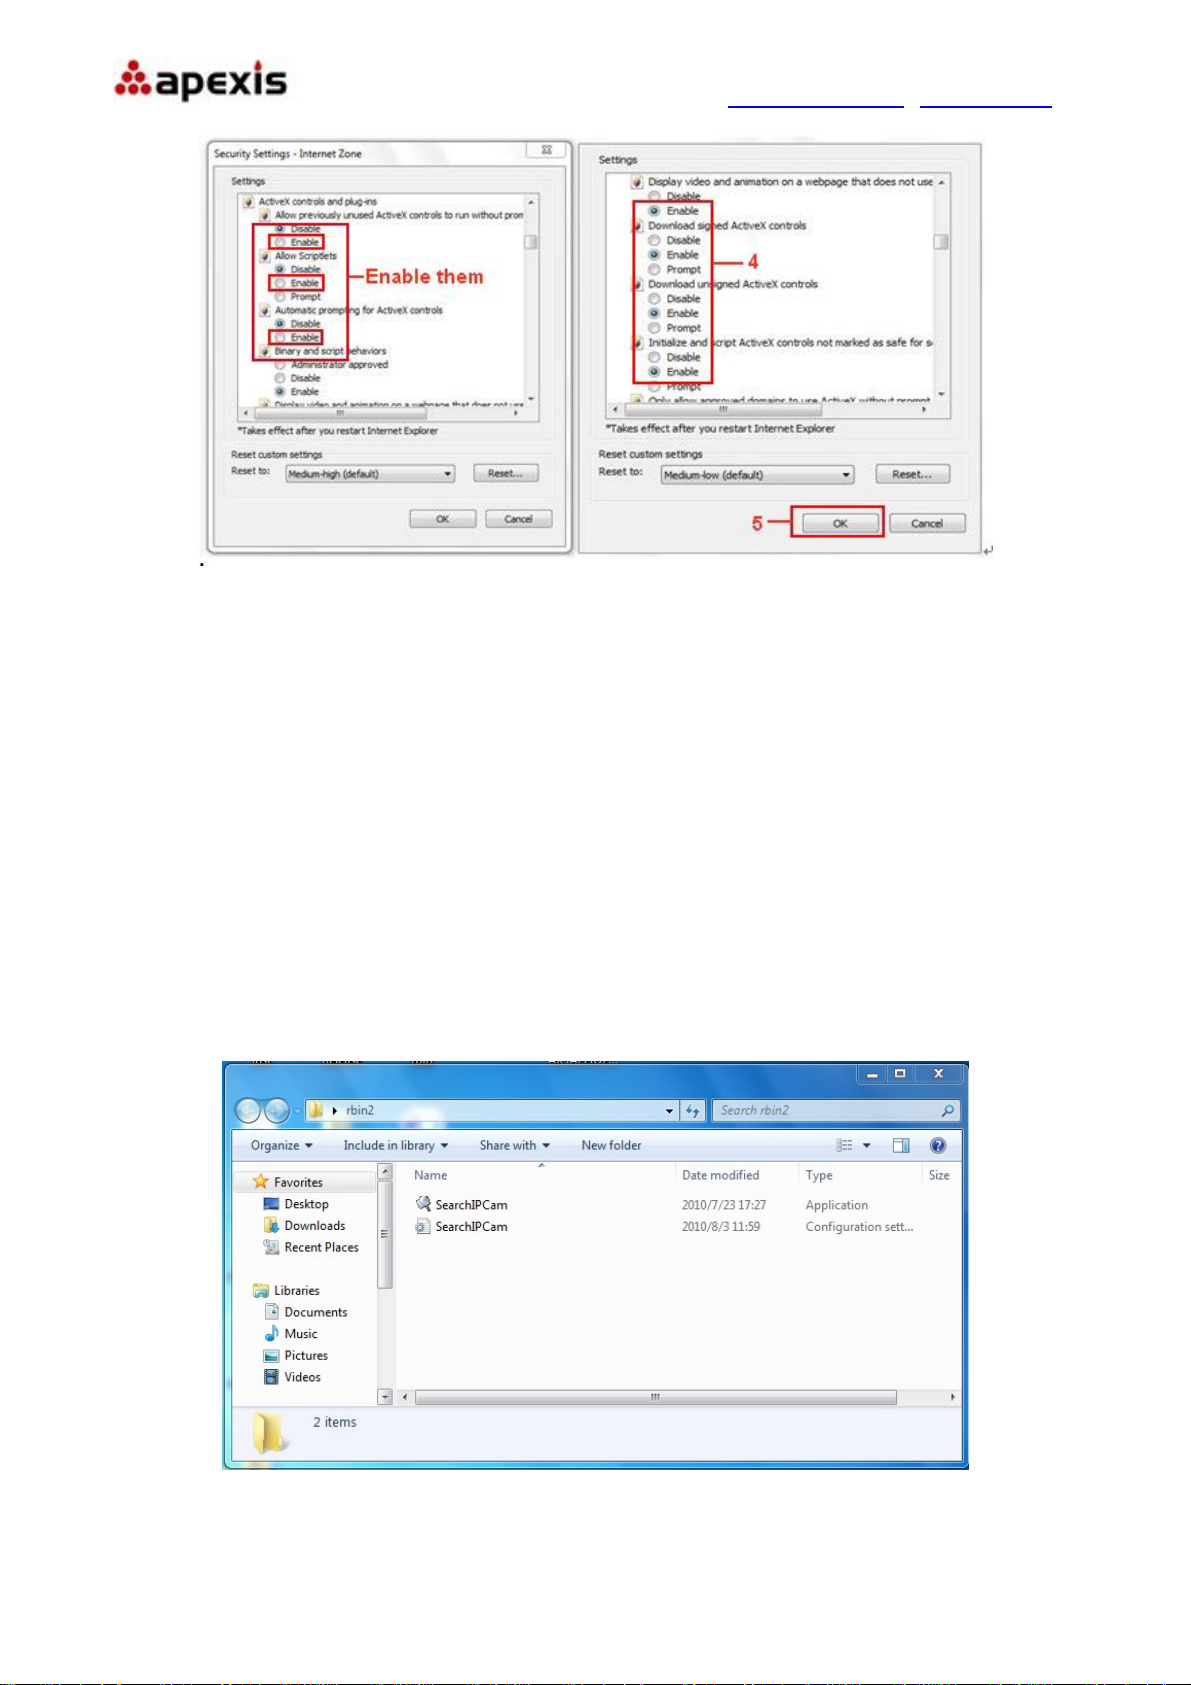
OCX will be downloaded automatically when users login the IP Camera, so users have to set the IE browser
to enable the OCX be downloaded automatically after signing in. Steps as below:
1. Close the firewall of your computer.
2. Change the ActiveX settings, “IE” browser > “Tool” > “Internet Options” > “Security”> “Custom Level” >
“ActiveX control and Plug-ins”, all the ActiveX options set to be “Enable”:
Especially:
Enable: Download unsigned ActiveX controls
Enable: Initialize and script ActiveX controls not marked as safe
Enable: Run ActiveX controls and plu-ins
Figure1.3
Shenzhen Apexis Electronic Co., Ltd Tel: +86-755-26509025 Fax: +86-755-26509229
7 of 42
Page 8
More Security, More Convenience www.apexis.com.cn / www.apexis.cc
Figure1.4
In addition: you can also click “Start” menu>“Internet Explorer”, choose “Internet attributes “ to enter, or via
“Control Panel” >“Internet Explorer”, enter to Security setting.
2.3. UPnP Service
UPnP could help you to find your camera’s IP more faster. For Window XP, from “Control Panel” > “Add or
remove applications” > “Add or remove Windows component” > “Network service” > “Detailed data” >
“UPnP users interface ”, enable it, factory settings is disable. Then it can allow your operating system to
support UPnP.
2.4. IPCam IP Address Search Tool
Step 1: Use tool “SearchIPCam.exe” to find IP address of LAN.
Figure1.5
Step 2: Double click “Search IPCam”, camera IP & MAC list will be displayed. If you want to re-search, click
Shenzhen Apexis Electronic Co., Ltd Tel: +86-755-26509025 Fax: +86-755-26509229
8 of 42
Page 9
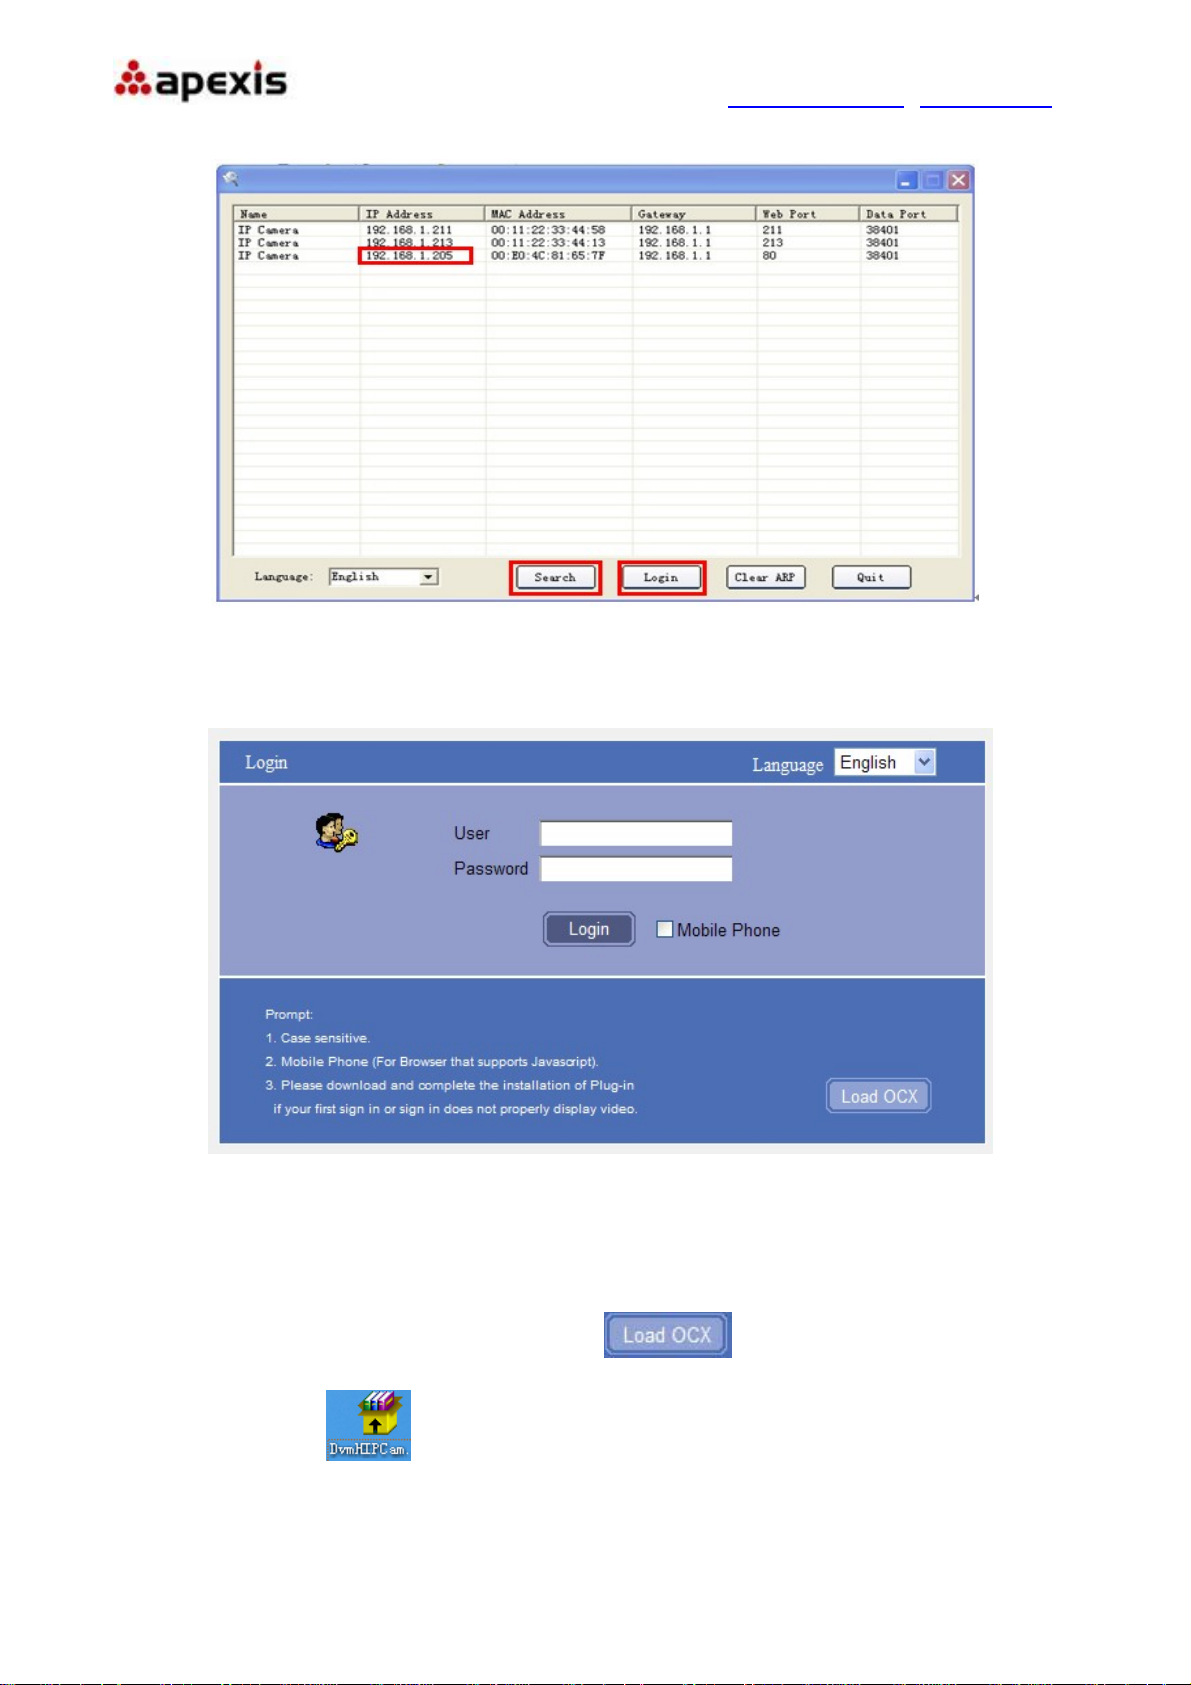
“Search” again.
More Security, More Convenience www.apexis.com.cn / www.apexis.cc
Figure1.6
Step 3: Choose the IP, click “Login” or double click the IP to enter IE login interface.
Figure1.7
2.5. Install the OCX ActiveX
Install the OCX activeX for the first time login; click the icon on the right bottom,
Download the OCX file
After OCX installed fully, then input the user name and password to login the camera.
Shenzhen Apexis Electronic Co., Ltd Tel: +86-755-26509025 Fax: +86-755-26509229
, After that, double click to install it automatically.
9 of 42
Page 10
More Security, More Convenience www.apexis.com.cn / www.apexis.cc
3. SOFTWARE OPERATION (IE BROWSER)
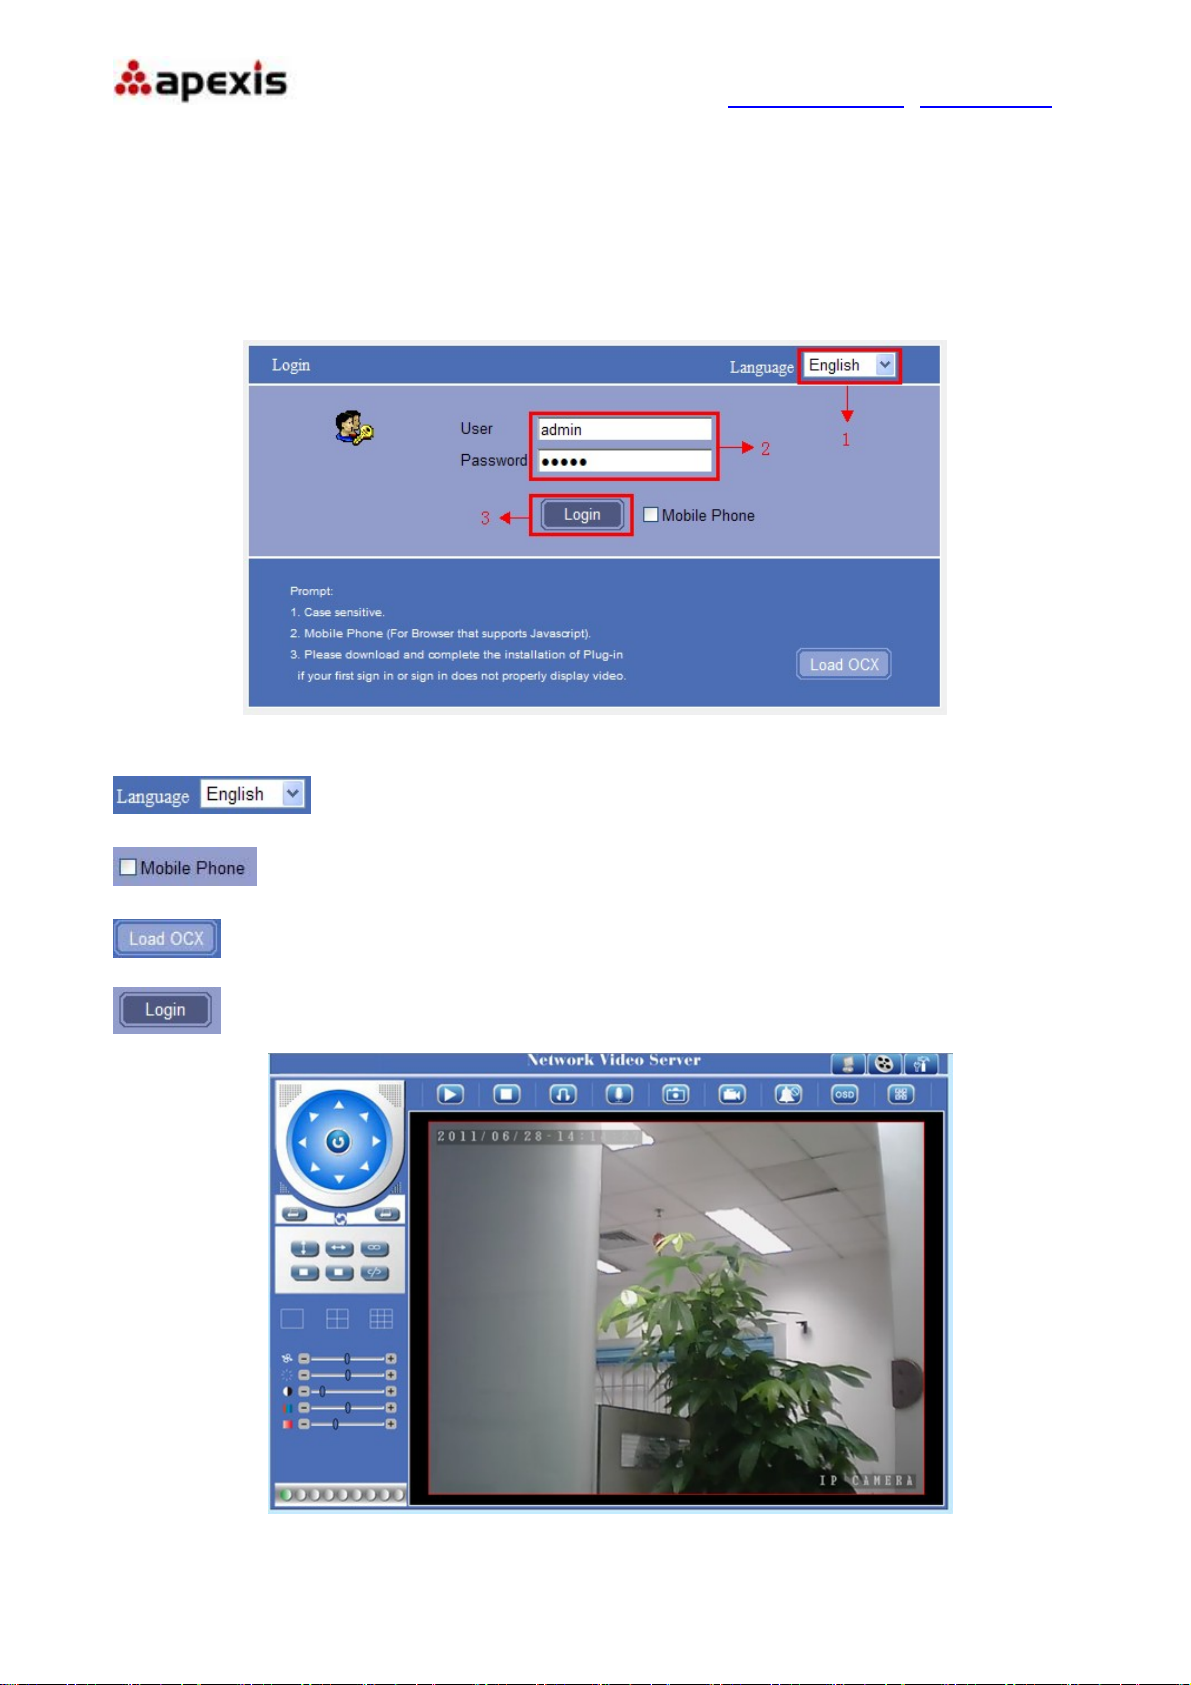
Choose the suitable language, input correct user name and password, then click “Login”
the factory default settings as below:
IP Address:192.168.1.155
User name: admin Password: admin
Figure1.8
:Choose languages here
:For mobile phone login
:For OCX installation
:Click to login the IE interface as below:
Figure1.9
Shenzhen Apexis Electronic Co., Ltd Tel: +86-755-26509025 Fax: +86-755-26509229
10 of 42
Page 11
More Security, More Convenience www.apexis.com.cn / www.apexis.cc
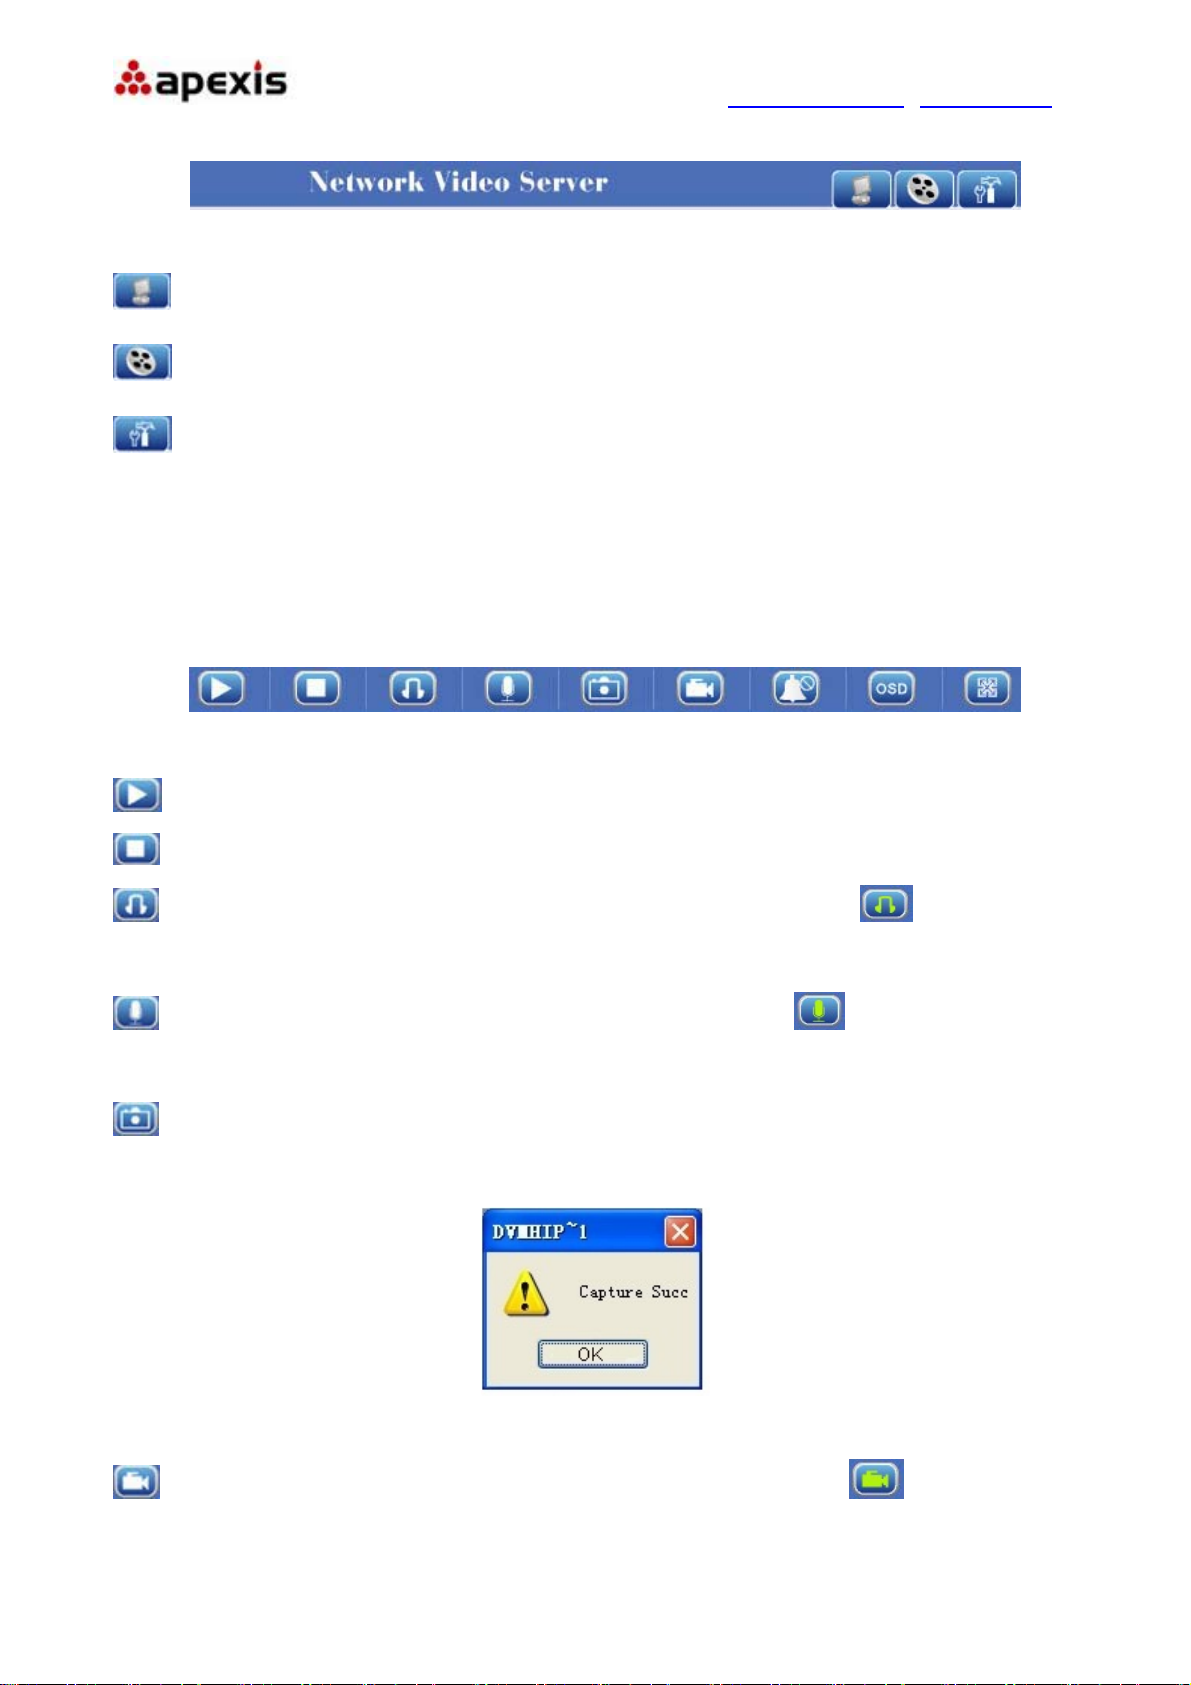
3.1. Three main functions:
Figure2.0
Live video: Click it, back to live video window from “Playback” or “Params settings”
Playback:Click to query and playback the video files (Details see 5 Playback)
Params Settings:Setting the camera’s parameters (Details see 4 Params settings)
3.2. For Live Video
3.2.1 TOP Menu:
Figure2.1
Play: Play the live video.
Stop: Stop the live video.
Listen: Click it to enable listen function, the icon will change to green color can hear the live
audio from camera via PC if audio is ON. Click it again, will stop listen function.
Talk: Click it to enable talk function, the icon will change to green color can talk between PC and
camera if audio device connected. Click it again, will stop talk function.
Capture: Click to take snapshot, the picture be saved in the PC to it’s appointed path as JPG format,
and pop-up the prompt as below:
Figure2.2
Record: Click to start record manually, the icon will change to green color Record file will be
saved in the PC to it’s appointed path as AVI format. Click it again, will stop record function.
Shenzhen Apexis Electronic Co., Ltd Tel: +86-755-26509025 Fax: +86-755-26509229
11 of 42
Page 12
More Security, More Convenience www.apexis.com.cn / www.apexis.cc
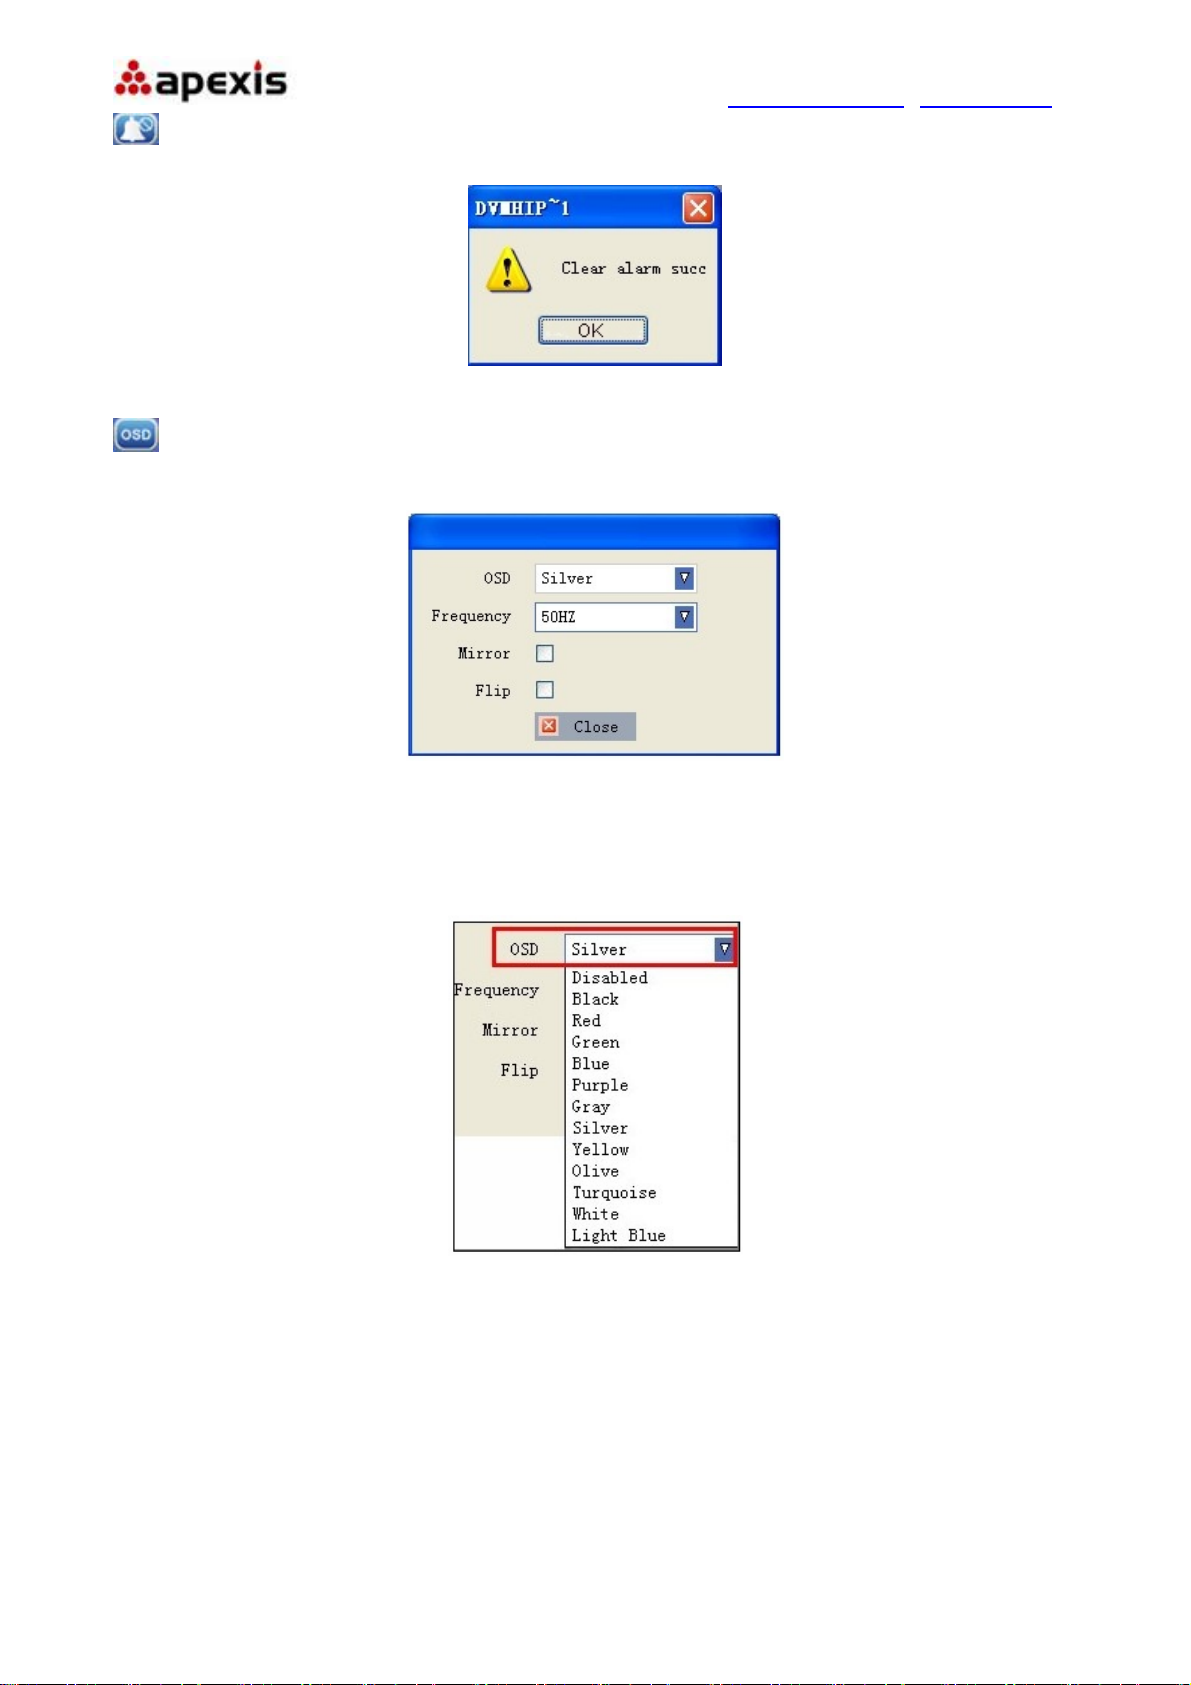
Clear Alarm: Click to stop the alarm manually when there is an alarm triggered, and pop-up prompt as
below:
Figure2.3
OSD Settings: Click it will pop-up the OSD settings interface, including OSD Color, Frequency, Image
Mirror and Flip.
Figure2.4
OSD: Means “On-Screen Display”
OSD Color: Including Disabled, Black, Red, Green, Blue, Purple, Gray, Silver, Yellow, Olive, Turquoise, White,
Light Blue etc.
Figure2.5
Frequency: Including 50HZ, 60HZ, Outdoor.
50HZ/60HZ for the users who use 50HZ/60HZ frequency, outdoor for the users who want to use this camera
to monitor the outdoor environment
NOTE: This camera normally should be used in a indoor environment
Shenzhen Apexis Electronic Co., Ltd Tel: +86-755-26509025 Fax: +86-755-26509229
12 of 42
Page 13
More Security, More Convenience www.apexis.com.cn / www.apexis.cc
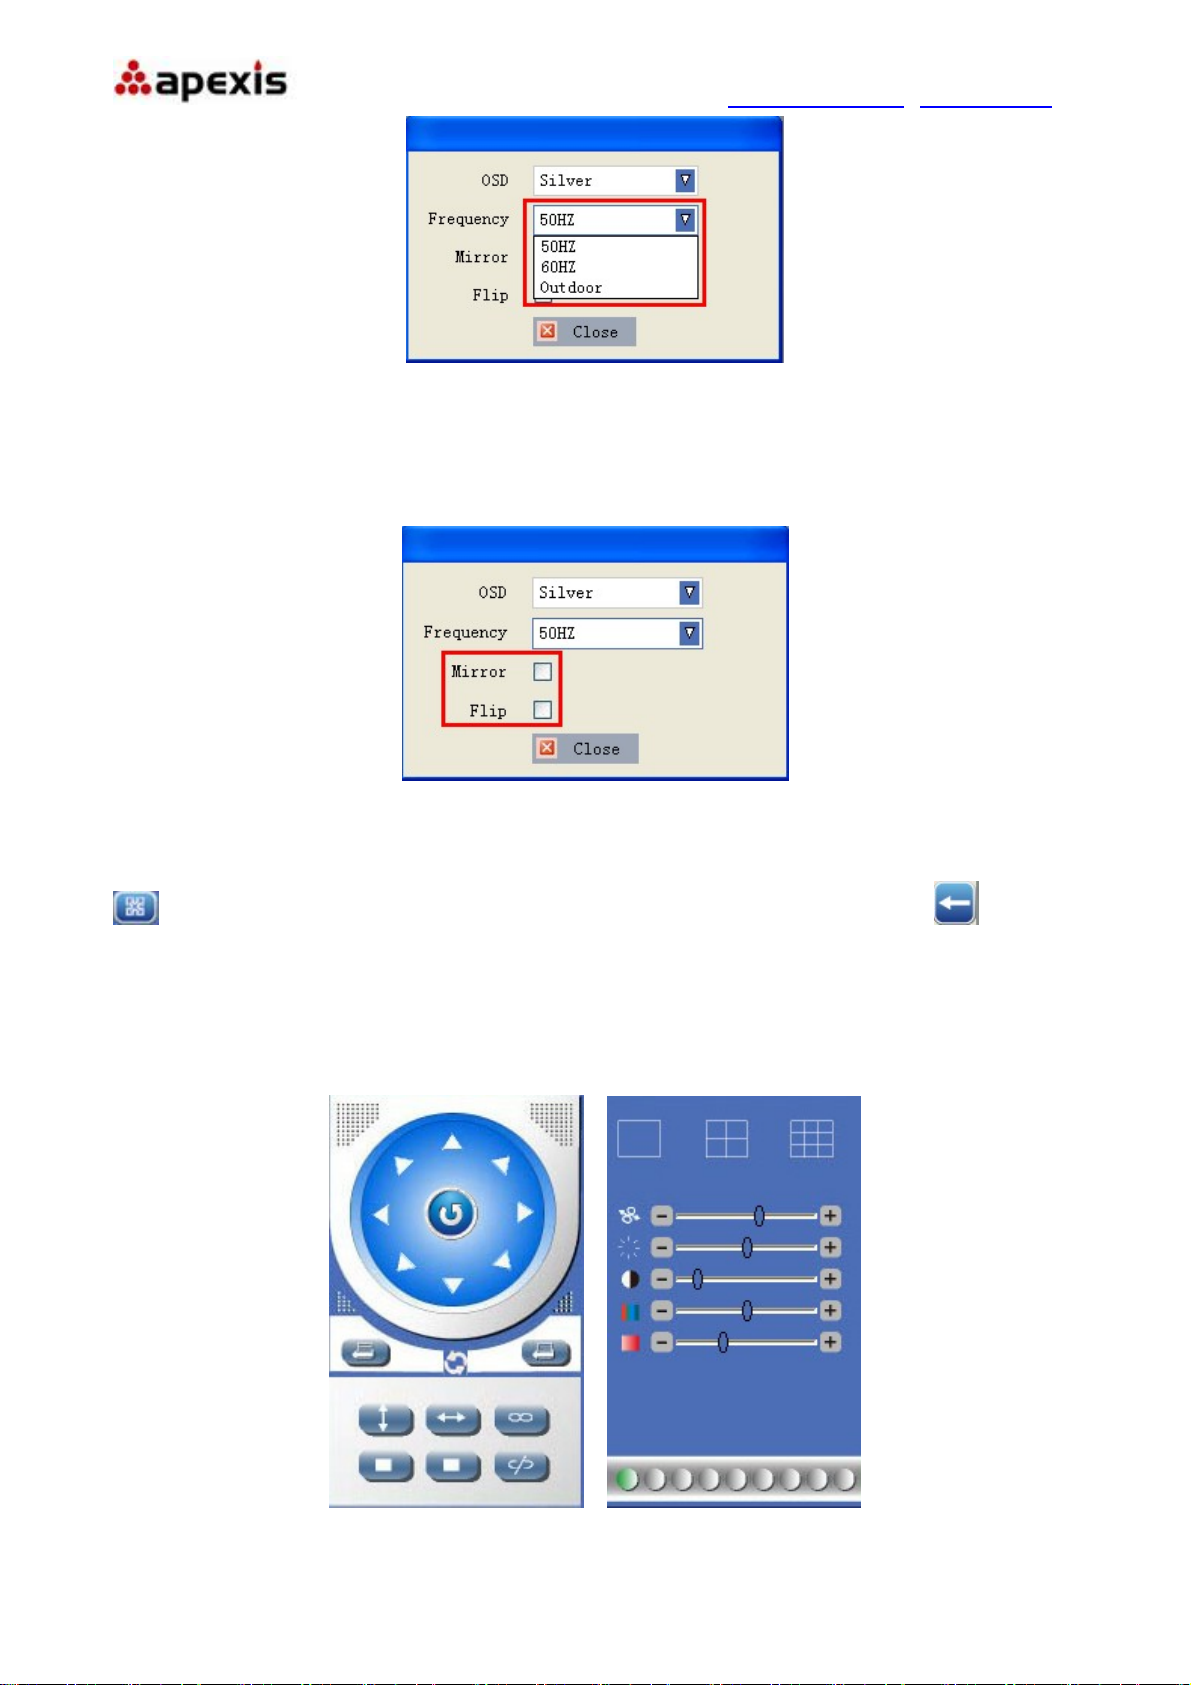
Figure2.6
Mirror and Flip
Mirror: Select this icon to see the mirror image. Erase it, will back to normal.
Flip: Select this icon to see the reversal image. Erase it, will back to normal.
Figure2.7
NOTE: You can choose Mirror and Flip function when you set up the camera in a special position.
Full Screen: Click it, shift to full screen mode, double click left mouse or click the icon on the left
bottom to exit full screen mode
3.2.2 Left Side Menu:
There are some basic operation icons listed on the left side menu as below:
Figure2.8
Shenzhen Apexis Electronic Co., Ltd Tel: +86-755-26509025 Fax: +86-755-26509229
13 of 42
Page 14
More Security, More Convenience www.apexis.com.cn / www.apexis.cc
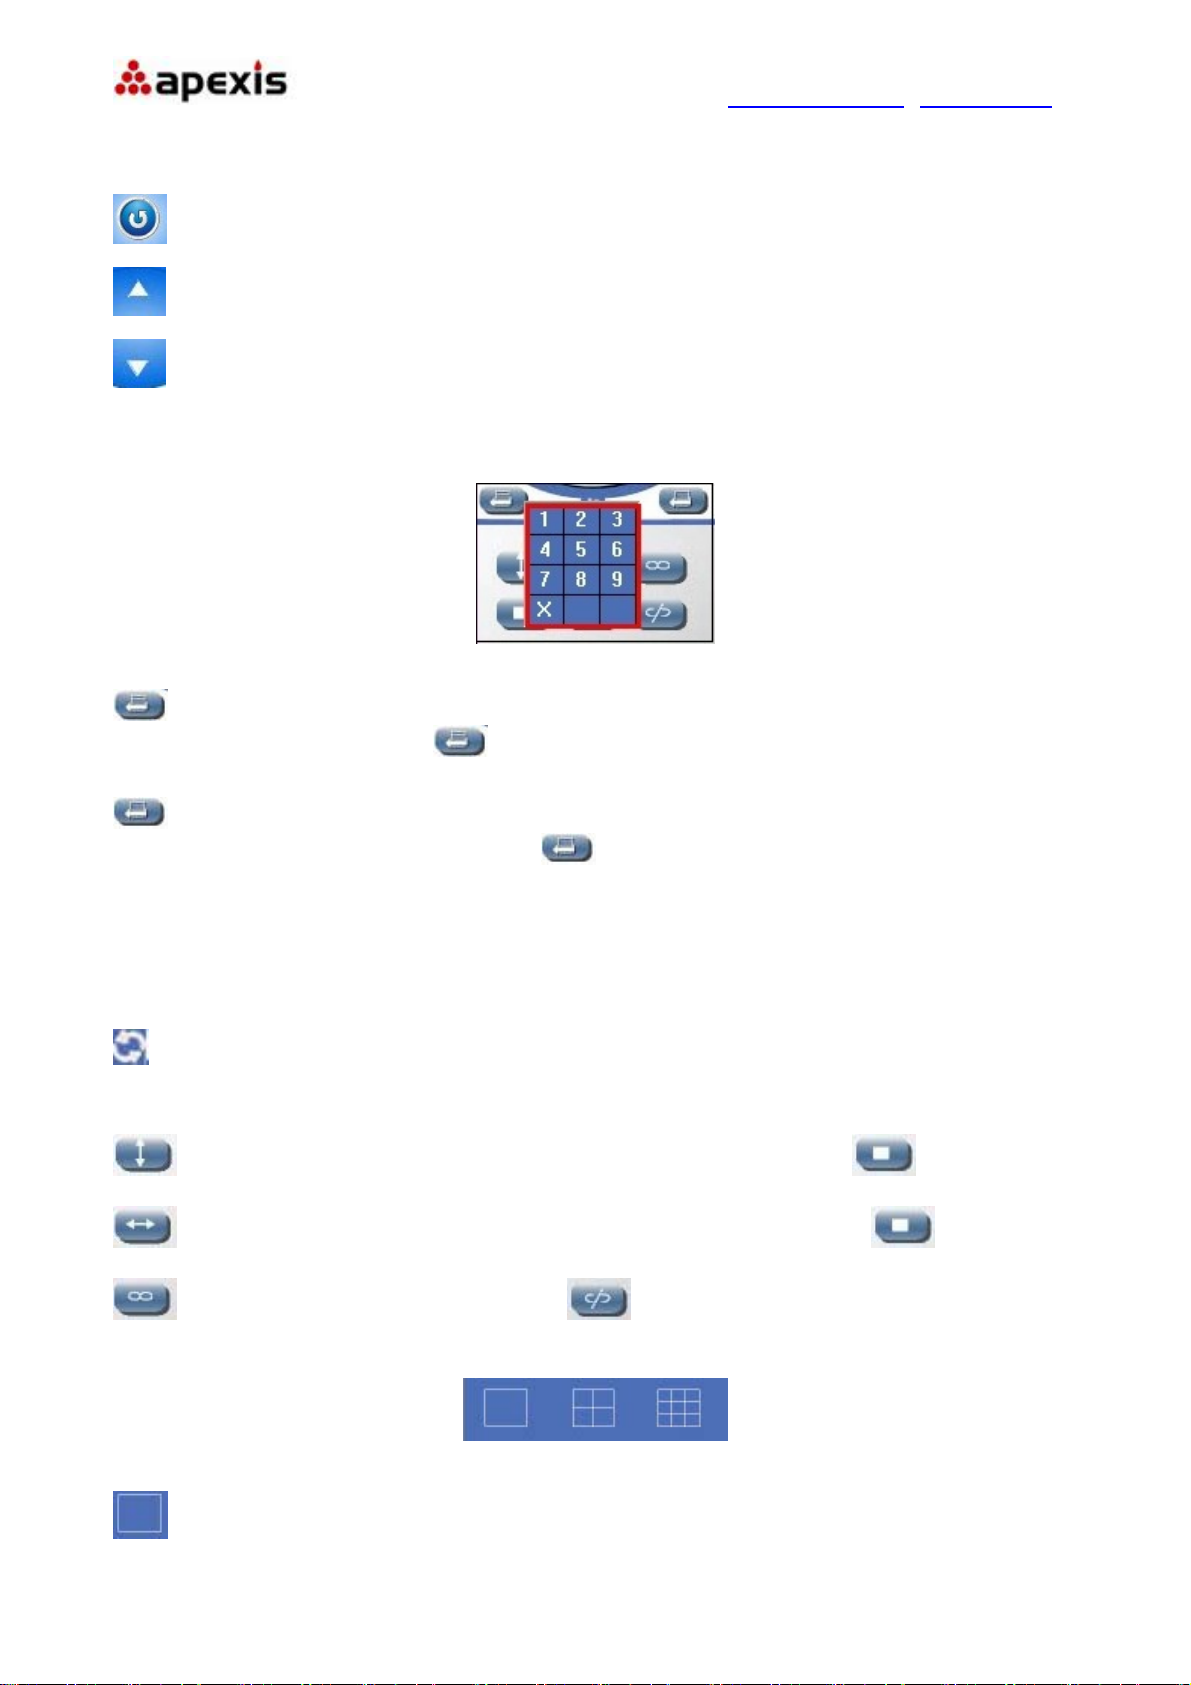
PT Control: Set Pan/Tilt as upward, downward, leftward, rightward, upleft, downleft, upright , downright etc
directions. (Preset preservation)
: Center: Click this icon, the camera will pan/tilt, then stop at the center. Normally it will rotate 1 circle
: Up: Click this icon, camera will move up, you can click one by one or hold it to control the movement
: Down: Click this icon, camera will move down, click it step by step or hold on to control the movement
NOTE: It is the same operation as left, right, up-left, up-right, down-left, down-right etc.
Figure2.9
:Set Preset: It supports 9 preset positions. Firstly, control the camera rotate to the special position you
need to set, click Set Preset button
, it will pop-up a dialog frame(Figure 2.9), choose the any number
(1-9) you want to set it be, then it done.
: Call Preset: It supports 9 preset positions. If operator wants to monitor an important area quickly and
precisely, just click Call Preset Position button
, it will pop-up a dialog frame(Figure 2.9), choose the
number, then camera will rotate to the preset area automatically.
If you want to use Call Preset, you have to Set Preset firstly.
NOTE: Set different positions with a same number, camera will record the last position setting only
:Cruise: Preset cruise, camera can cruise according to the different presets set by users. (Set preset
cruise see details 4.9).
: Click this icon, camera will rotate up and down, means vertical patrol, click to stop it
: Click this icon, camera will rotate left and right, means horizontal patrol, click to stop it
: Click this icon, IO output Switch ON. Click to set it OFF.
Figure3.0
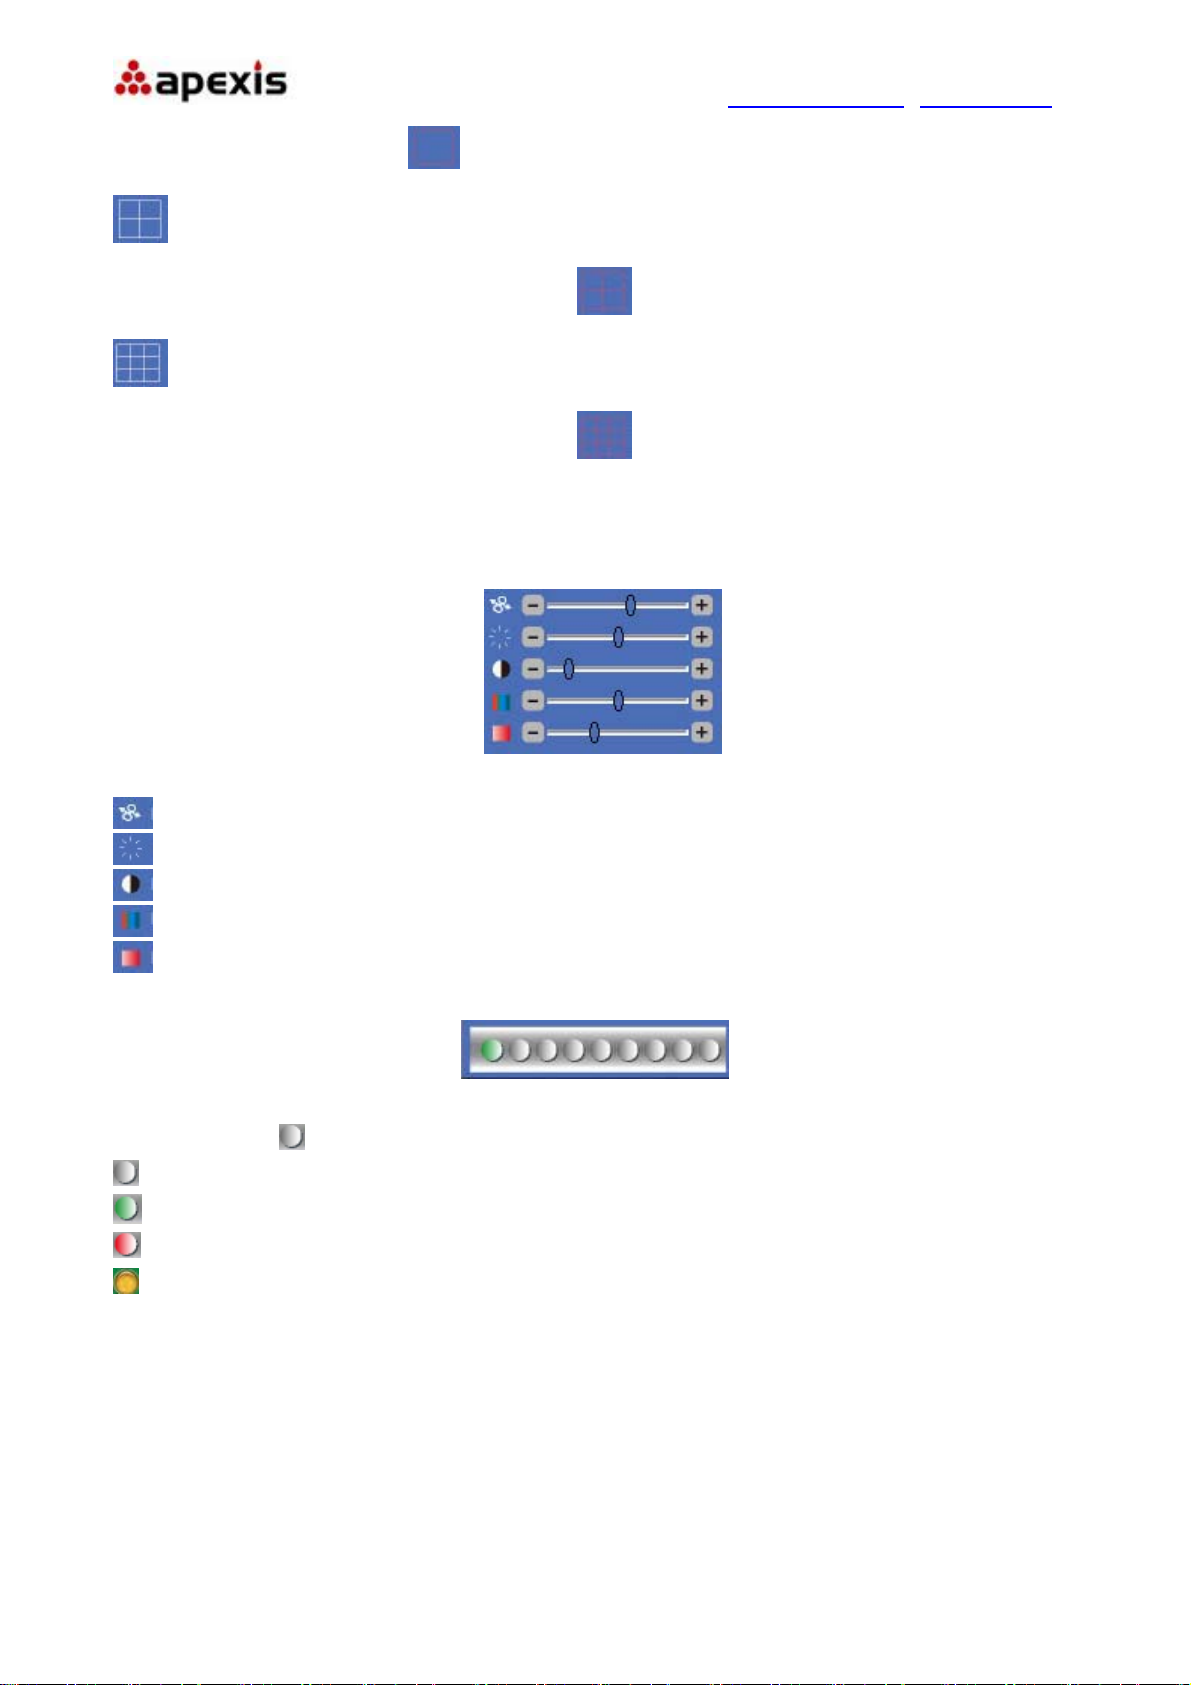
: Click this one, you can view the main channel of the camera you login, move the mouse to the icon,
Shenzhen Apexis Electronic Co., Ltd Tel: +86-755-26509025 Fax: +86-755-26509229
14 of 42
Page 15
More Security, More Convenience www.apexis.com.cn / www.apexis.cc
the frame will change to red color .
: Click this one; you can view 4 Channels of cameras which connected, from CH1 to CH4. move the
mouse to the icon, the frame will change to red color
.
: Click this one; you can view 9 Channels of cameras which connected, from CH1 to CH9. move the
mouse to the icon, the frame will change to red color
.
NOTE: If you want to view 4/9 channels, you should set the Multi-Device firstly (See 4.14 Multi-Device
Settings)
Figure3.1
: PTZ speed: set value from 1 to 100, click the icon, it will back to factory settings.
: Brightness: set value from 0 to 255, click the icon, it will back to factory settings.
: Contrast: set value from 0 to 255, click the icon, it will back to factory settings.
: Hue: set value from -128 to 127, click the icon, it will back to factory settings.
: Saturation: set value from 0 to 200, click the icon, it will back to factory settings.
Figure3.2
There are 9 icons
at the bottom of the UI which show the status of each channel of the camera.
: Grey color: means there is no device connected to the main device from this channel.
: Green color: means the device connected from this channel, and it works well.
: Red color: means the device of this channel is recording.
: Yellow color: means set this channel in multi-device already, but it fails to connect to the main device.
Shenzhen Apexis Electronic Co., Ltd Tel: +86-755-26509025 Fax: +86-755-26509229
15 of 42
Page 16
More Security, More Convenience www.apexis.com.cn / www.apexis.cc
4. PARAMS SETTINGS
4.1. Device Info.
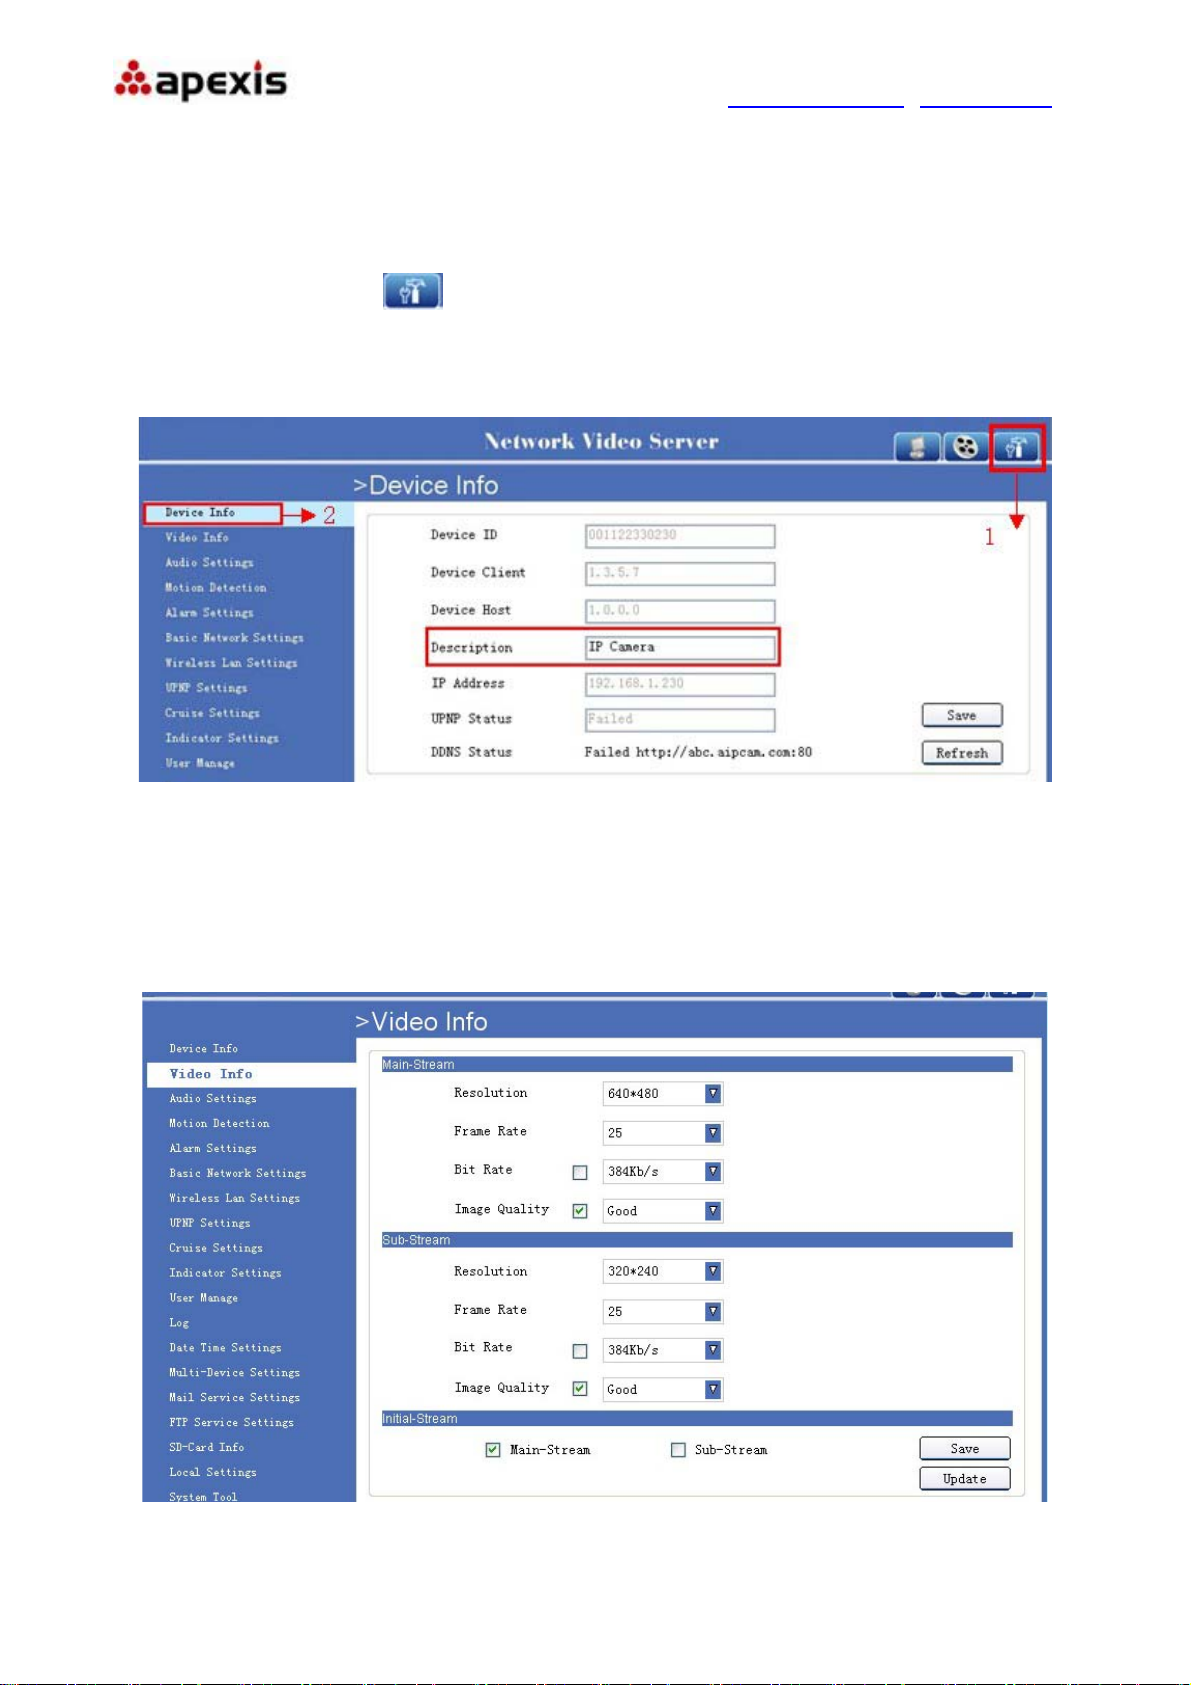
Click “Params Settings” icon , select “Device info”, it will show the basic information such as “Device
ID”, “Device Client”, “Device Host”, “Description”, “IP Address”, “UPNP Status”, “DDNS Status” etc.
Default device name is “IP Camera”, users can change the camera’s description here, picture as below:
4.2. Video Info.
Click “Video Info” to enter the interface as below:
Figure3.3
Figure3.4
Shenzhen Apexis Electronic Co., Ltd Tel: +86-755-26509025 Fax: +86-755-26509229
16 of 42
Page 17
More Security, More Convenience www.apexis.com.cn / www.apexis.cc
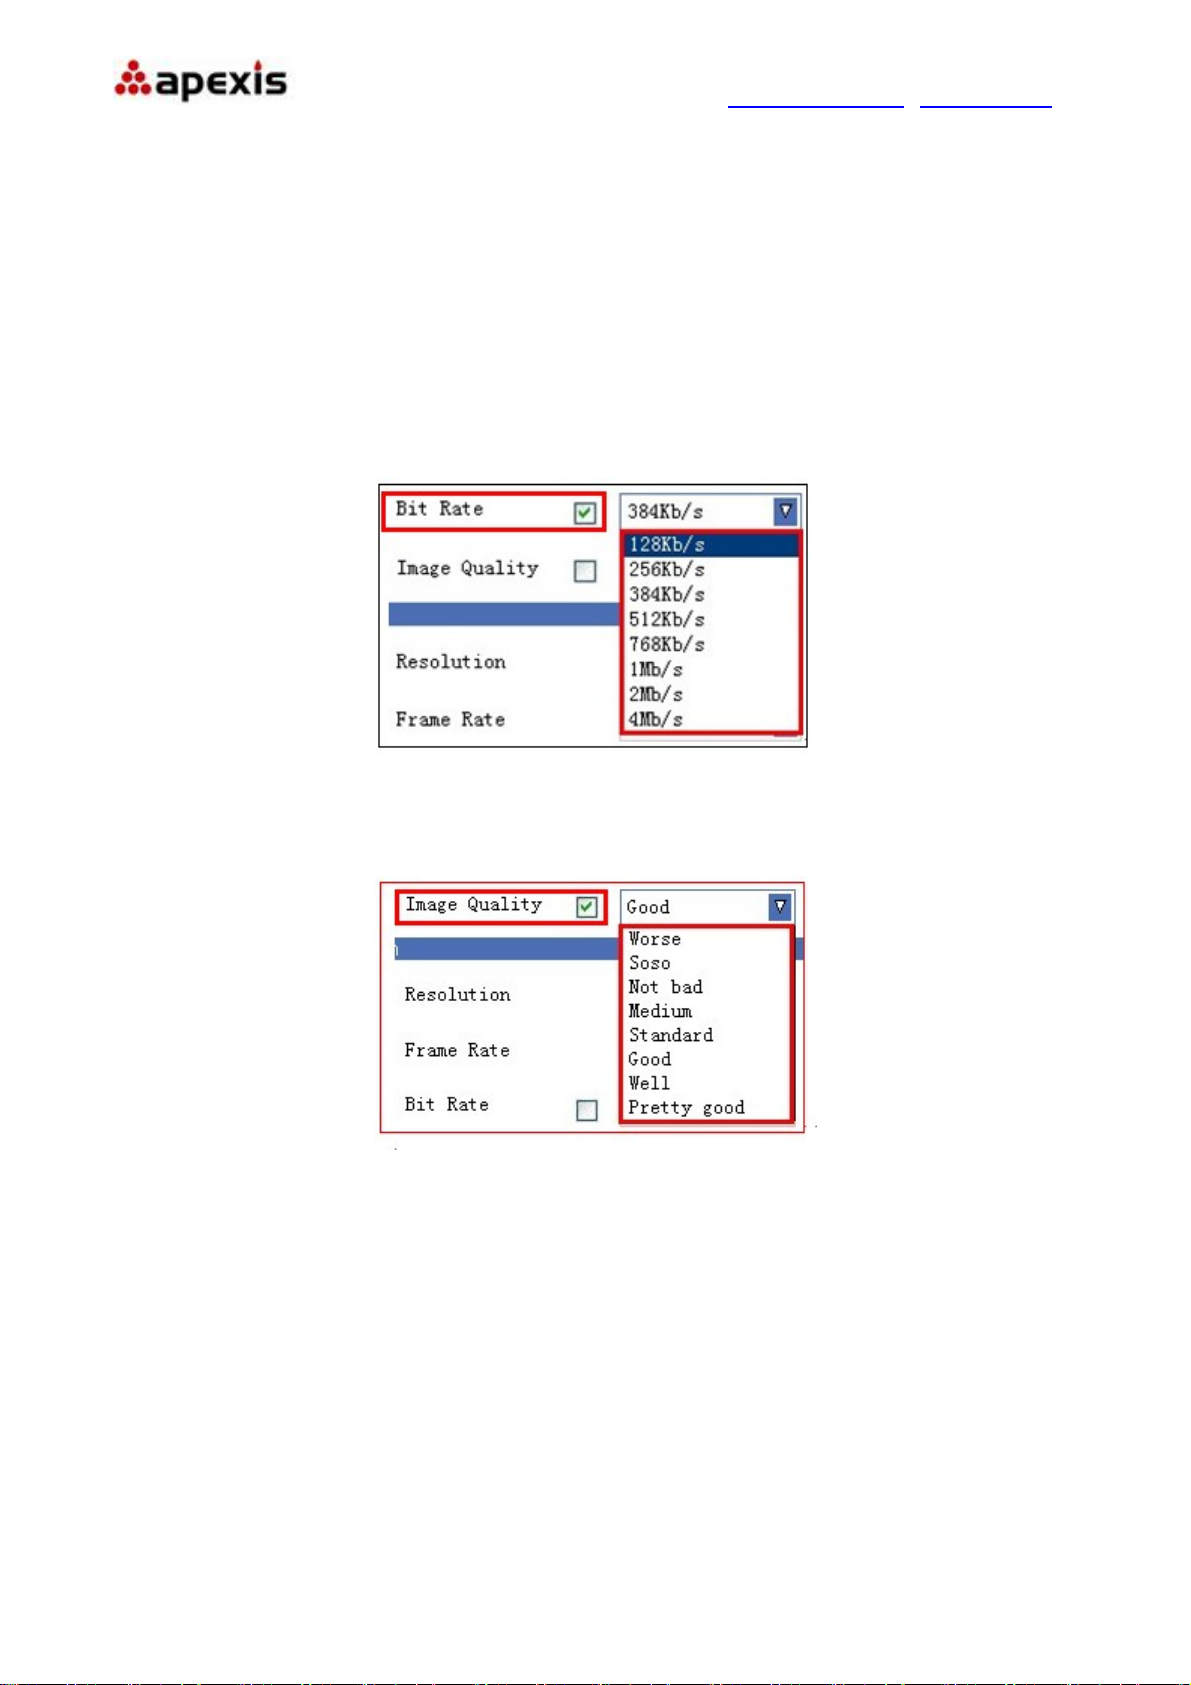
There are two option for stream, Main-Stream and Sub-Stream, users can set the stream based on the
actual operation environment, for example, if the band width is good enough, set Main-Stream as
Initial-Stream, or choose Sub-Stream will be better.
Set the parameters of Main-Stream and Sub-Stream as below:
Resolution: 640x480, 320x240 optional.
Frame Rate: Set the frame rate according to the band width. Frame rate could be “Auto” or “from 1fps to
30fps(Real time)”. if the network situation is not ideal, can reduce the frame rate to control the coding rate,
make the moving pictures more smoothly
Bit Rate: Higher bite rate means better quality images, but take more band width, so please adjust the
settings according to the actual band width. The range of bit rate from 128Kbps~4Mbps.
Figure3.5
Image Quality: Better image quality, higher bit rate value, and it will take more band width, the image quality
parameters could be set as below:
Figure3.6
NOTE: When the device runs, only can select Bit Rate or Image Quality either.
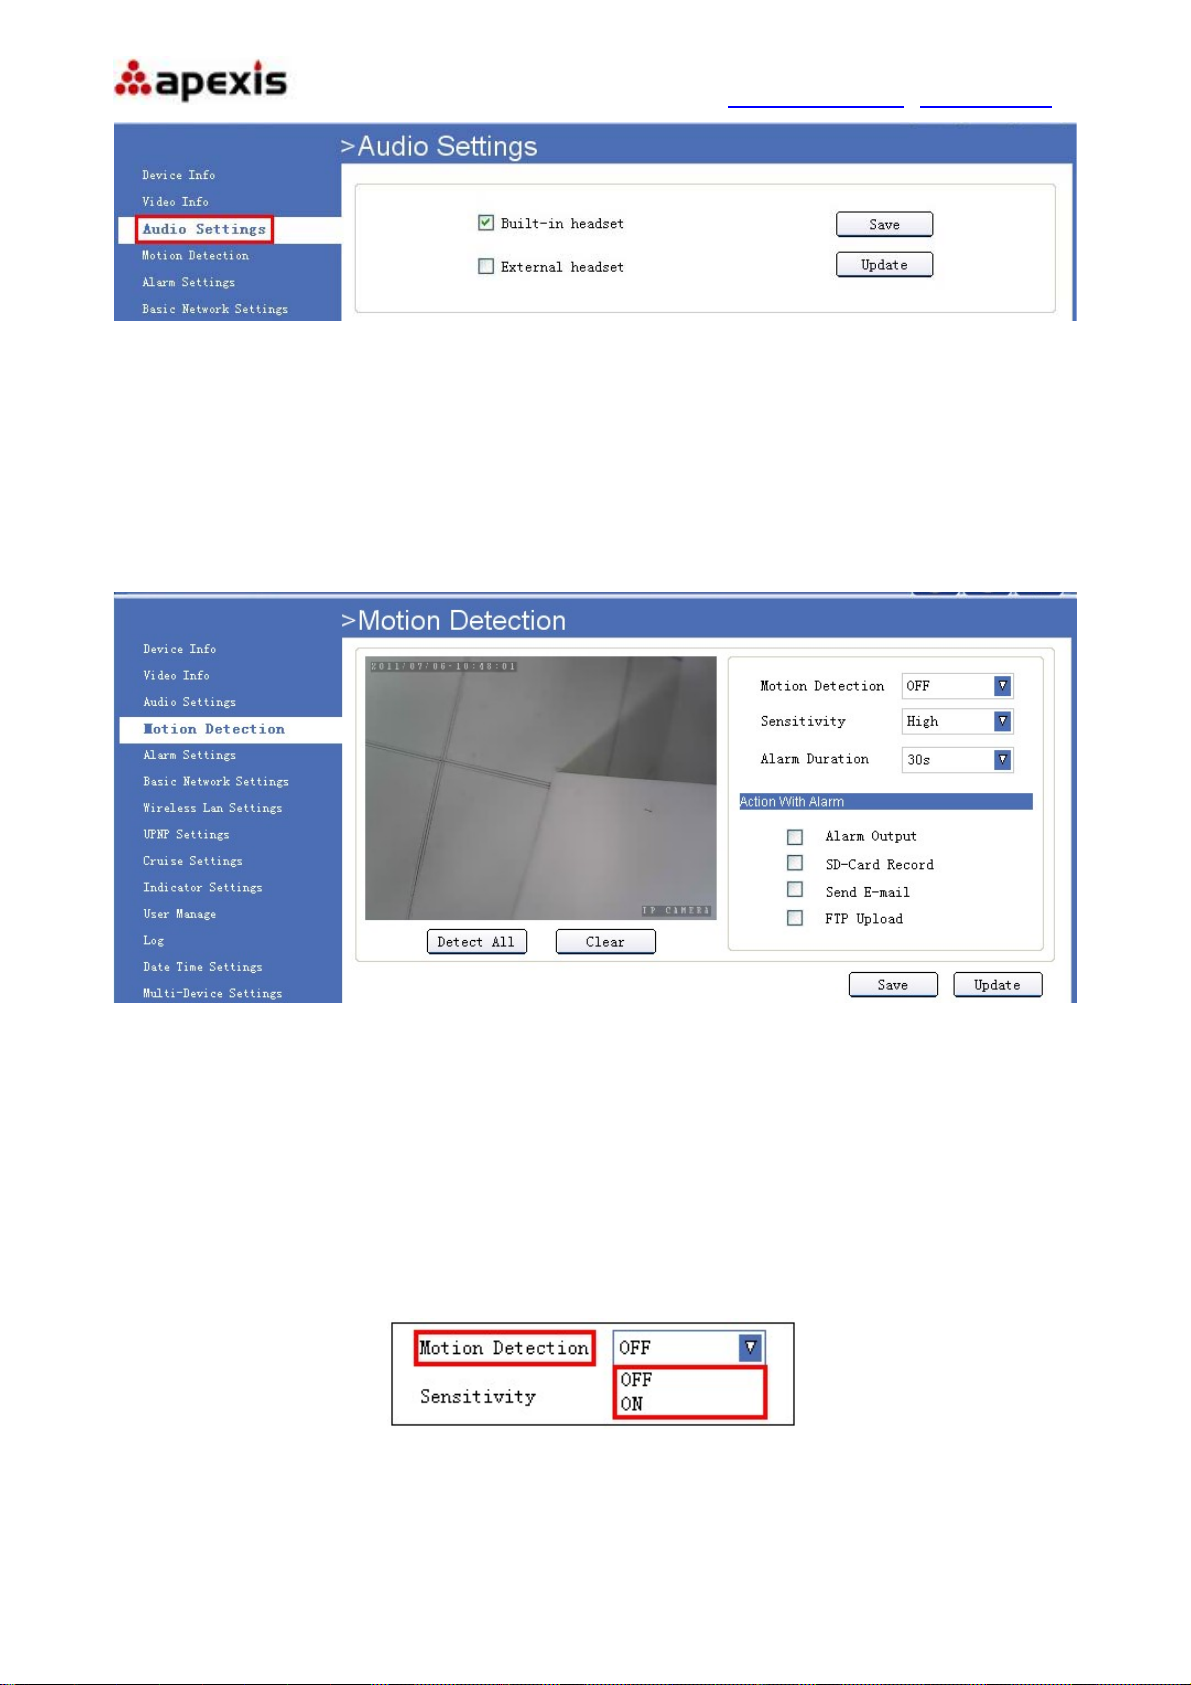
4.3. Audio Settings
Click “Audio Settings” to enter the interface:
Shenzhen Apexis Electronic Co., Ltd Tel: +86-755-26509025 Fax: +86-755-26509229
17 of 42
Page 18
More Security, More Convenience www.apexis.com.cn / www.apexis.cc
Figure3.7
Built-in headset: Choose built-in MIC as the audio input device.
External headset: Choose external headset as the audio input device.
4.4. Motion Detection
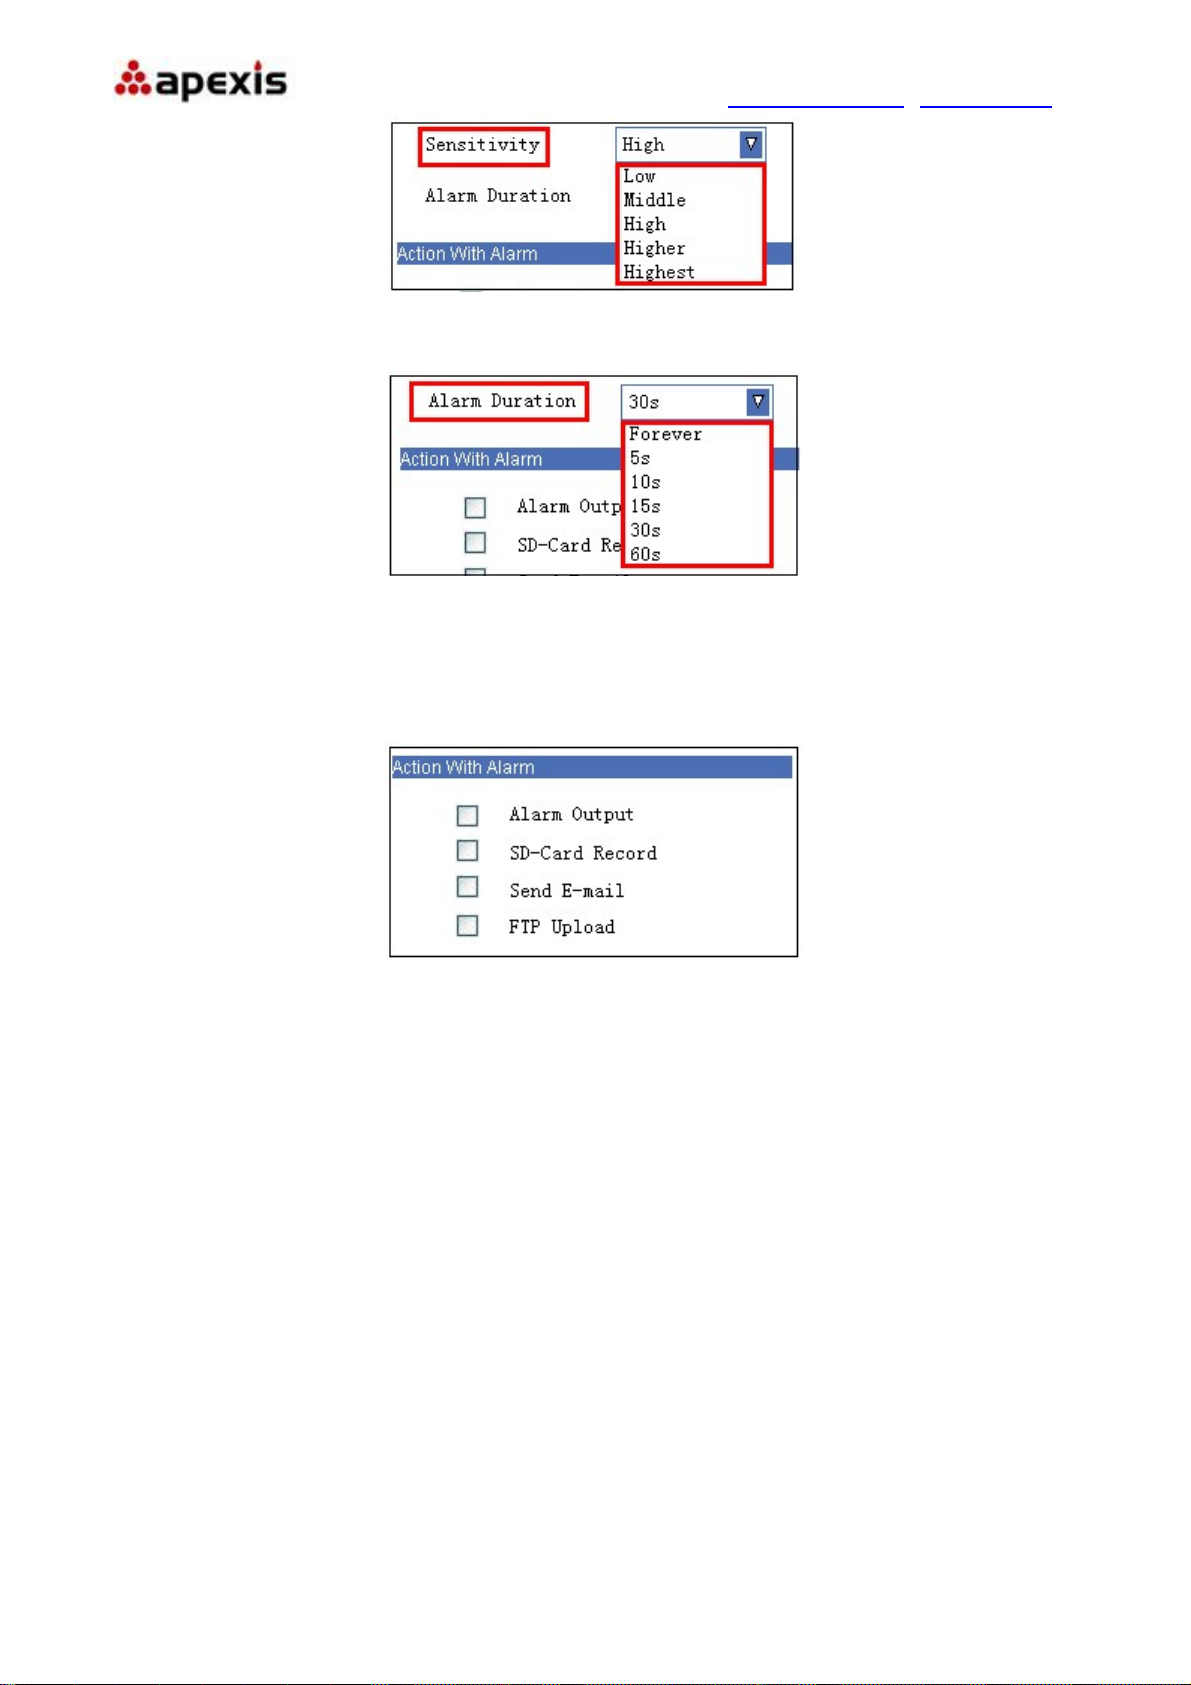
Click “Motion Detection” to enter the interface:
Figure3.8
Motion Detection Zone Armed:
Can set all zone to be armed, or a specified zone armed.
Before setting a specified zone, should set "Motion Detection" to "ON", then press left mouse, drag it on
video area to set the detection zone, and save it.
● Detect All: Setting the whole video window as the motion detect armed zone.
● Clear: Clear all armed zone.
● Motion Detection: Set motion detection armed function ON/OFF.
Figure3.9
● Sensitivity: Set detection sensitivity as Low, Middle, High, Higher, Highest.
Shenzhen Apexis Electronic Co., Ltd Tel: +86-755-26509025 Fax: +86-755-26509229
18 of 42
Page 19
More Security, More Convenience www.apexis.com.cn / www.apexis.cc
Figure4.0
● Alarm Duration: Set each alarm duration, can be forever, 5s, 10s, 15s, 30s, 60s.
Figure4.1
Action with Alarm
These are actions optional for motion detection.
Figure4.2
● Alarm output: Select it to enable alarm output, unselect to stop.
● SD-Card Record: Select it to enable record in SD card, unselect to stop.
● Send E-mail: Select it to enable E-mail alert function, unselect to stop. (Mail service details see 4.15)
● FTP Upload: Select it to enable FTP upload function, unselect to stop. (FTP details see 4.16)
Click Save to save all the settings.
Click Update to refresh the settings.
4.5. Alarm Settings
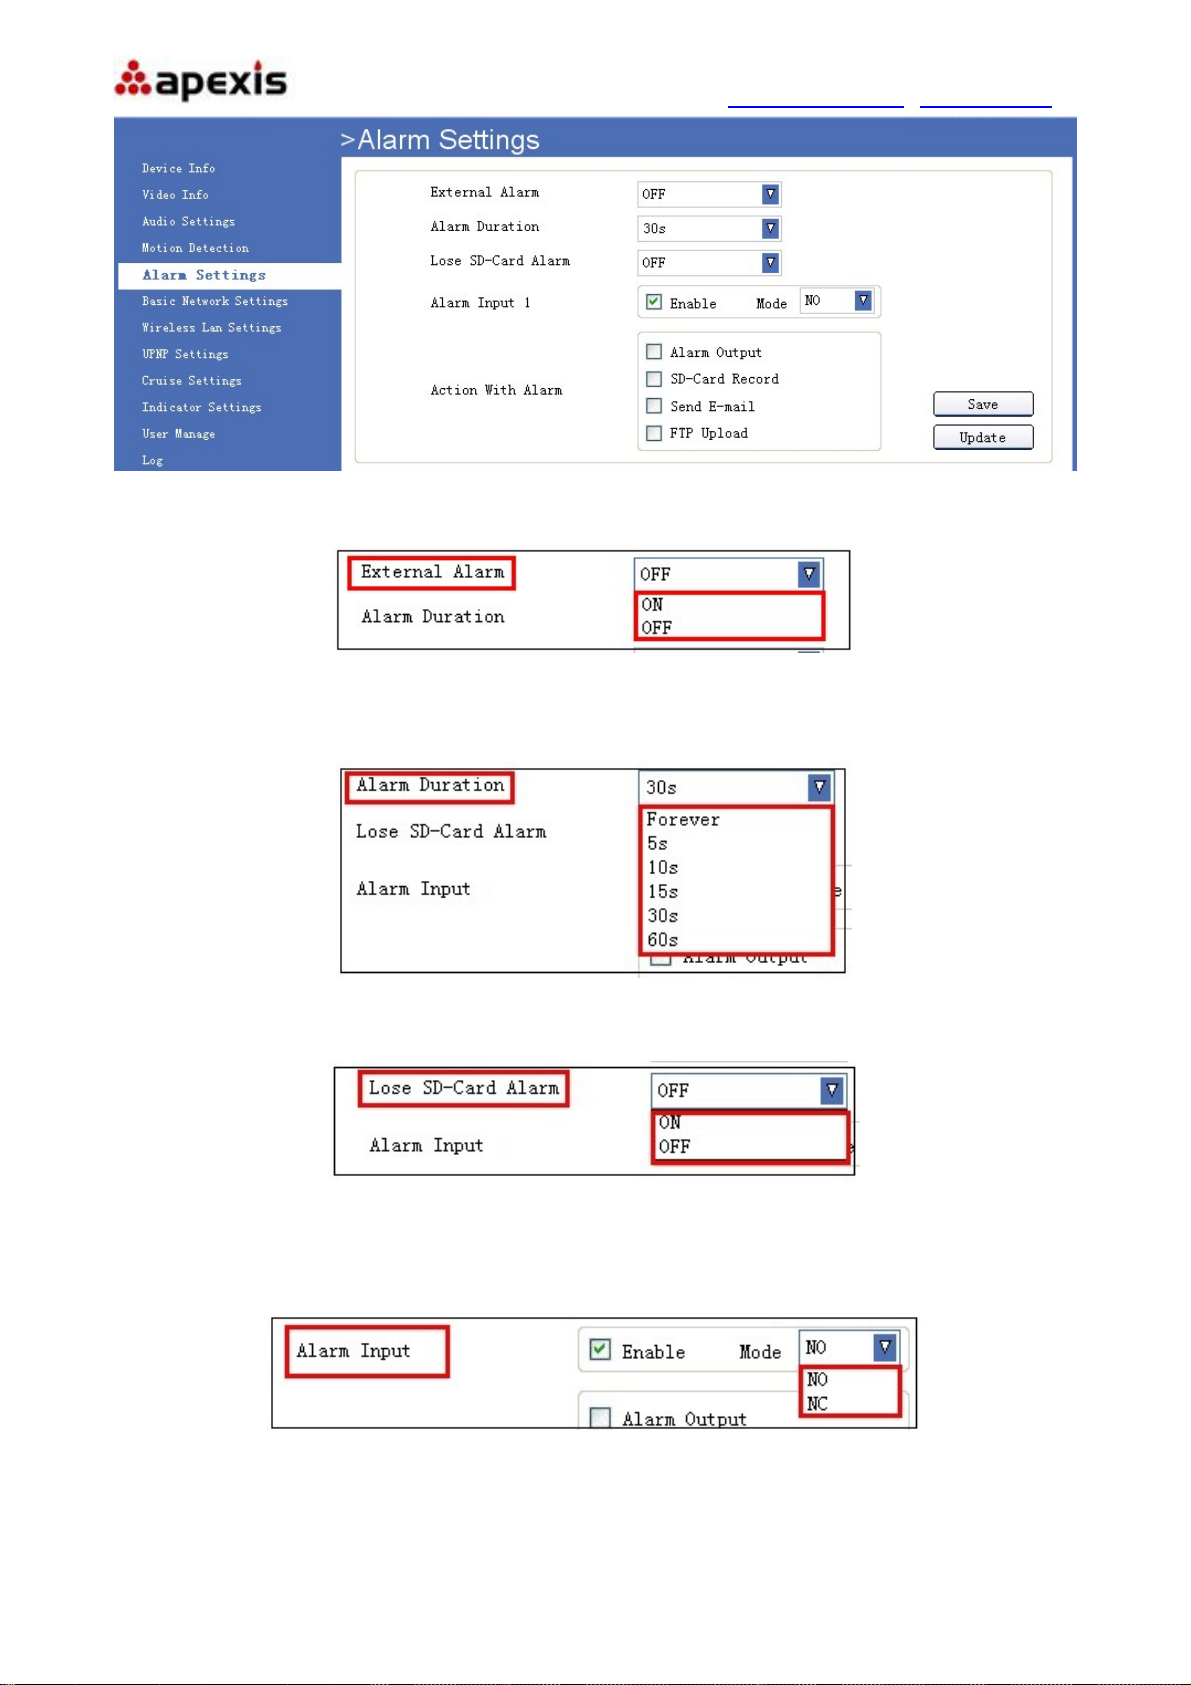
Click ”Alarm Settings” to enter the interface:
Shenzhen Apexis Electronic Co., Ltd Tel: +86-755-26509025 Fax: +86-755-26509229
19 of 42
Page 20
More Security, More Convenience www.apexis.com.cn / www.apexis.cc
Figure4.3
● External Alarm: Set external alarm function ON/OFF.
Figure4.4
● Alarm Duration: Set external alarm output duration(Relay close time), can be Forever, 5s, 10s, 15s, 30s,
60s, it refers to the I/O pin1 and pin2.
Figure4.5
● Lose SD-Card Alarm: Set alarm triggered ON/OFF if the SD-Card is lost.
Figure4.6
● Alarm Input: Set alarm input ON/OFF, it supports NO/NC external alalrm device, shoose the correct mode
to make sure it works well, it refers to the I/O pin3 and pin4.
Figure4.7
● Action with Alarm
These are actions optional for external alarm triggerred.
Shenzhen Apexis Electronic Co., Ltd Tel: +86-755-26509025 Fax: +86-755-26509229
20 of 42
Page 21
More Security, More Convenience www.apexis.com.cn / www.apexis.cc
Figure4.8
Alarm output: Select it to enable alarm output, unselect to stop.
SD-Card Record: Select it to enable record in SD card, unselect to stop.
Send E-mail: Select it to enable E-mail alert function, unselect to stop. (Mail service details see 4.15)
FTP Upload: Select it to enable FTP upload function, unselect to stop. (FTP details see 4.16)
Click Save to save all the settings.
Click Update to refresh the settings.
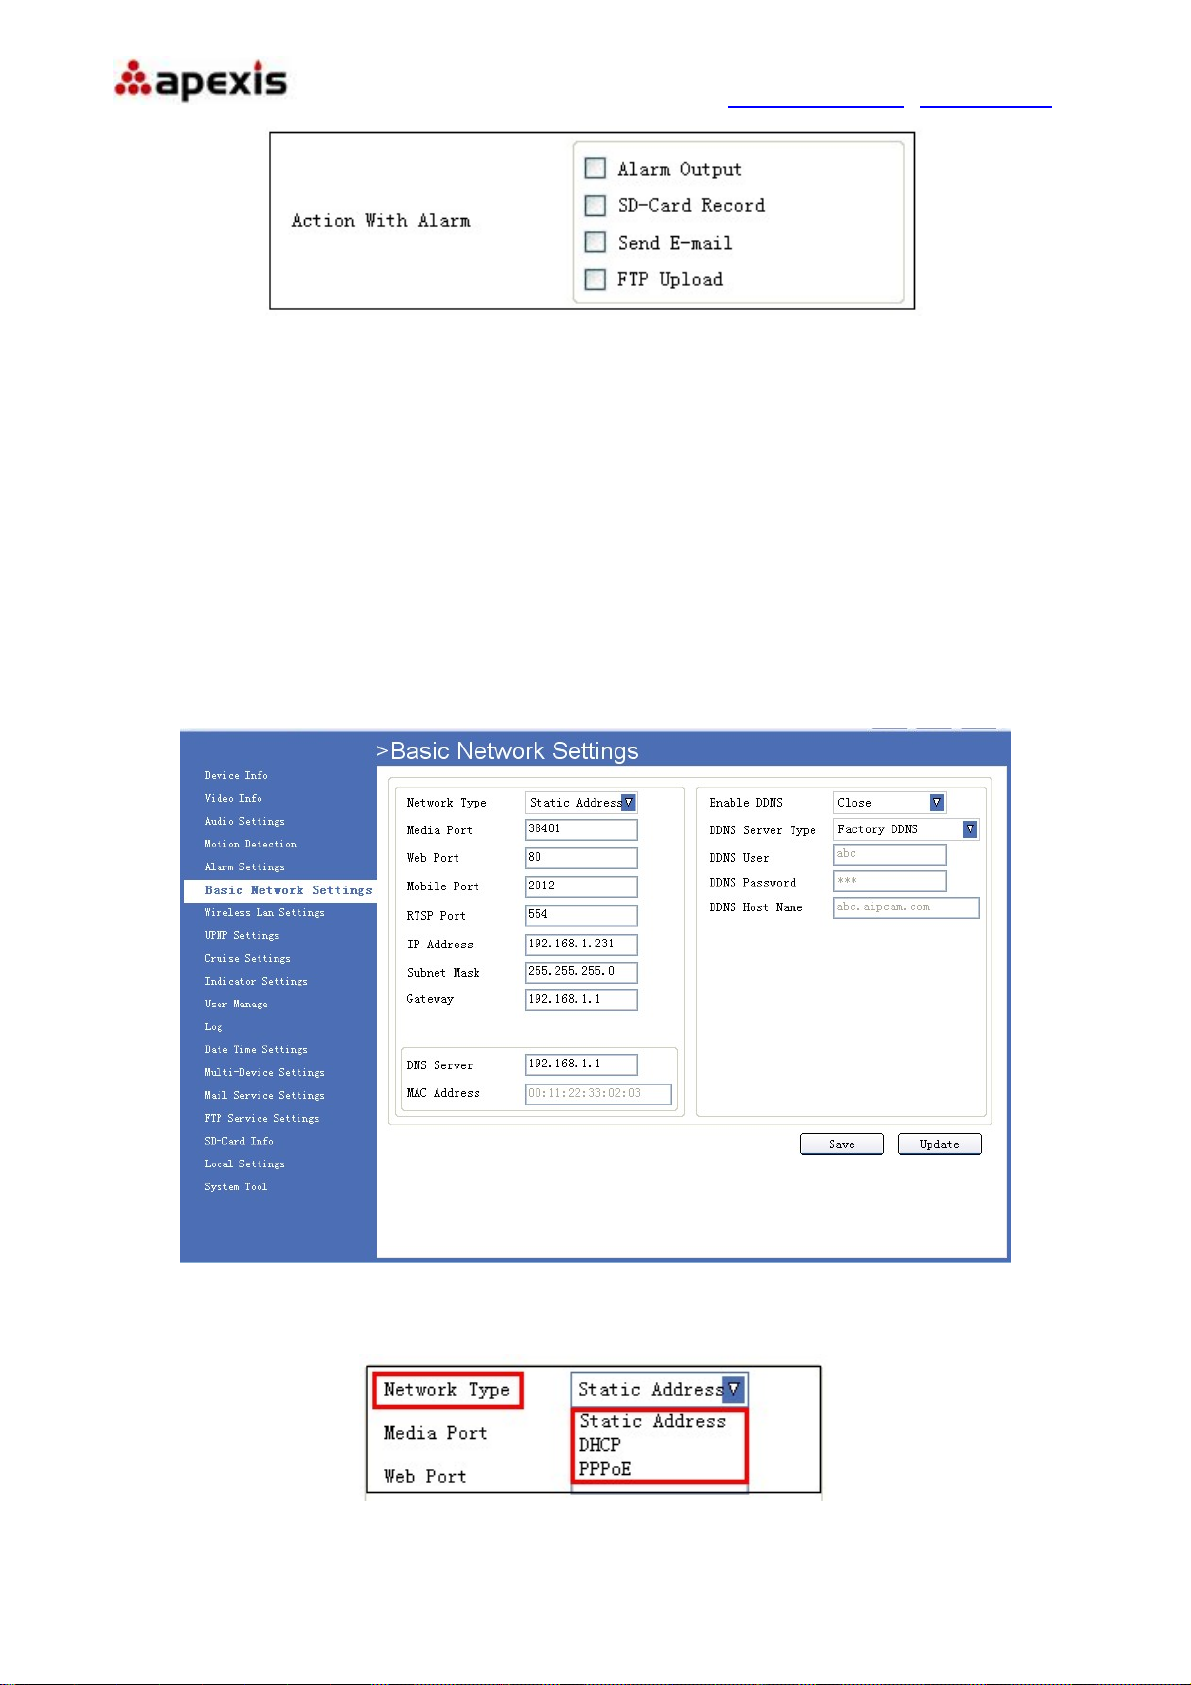
4.6. Basic Network Settings
Click ”Basic Network Settings” to enter the interface:
Figure4.9
Network Type: There are three modes: Static Address, DHCP, PPPoE.
Figure5.0
Shenzhen Apexis Electronic Co., Ltd Tel: +86-755-26509025 Fax: +86-755-26509229
21 of 42
Page 22
More Security, More Convenience www.apexis.com.cn / www.apexis.cc
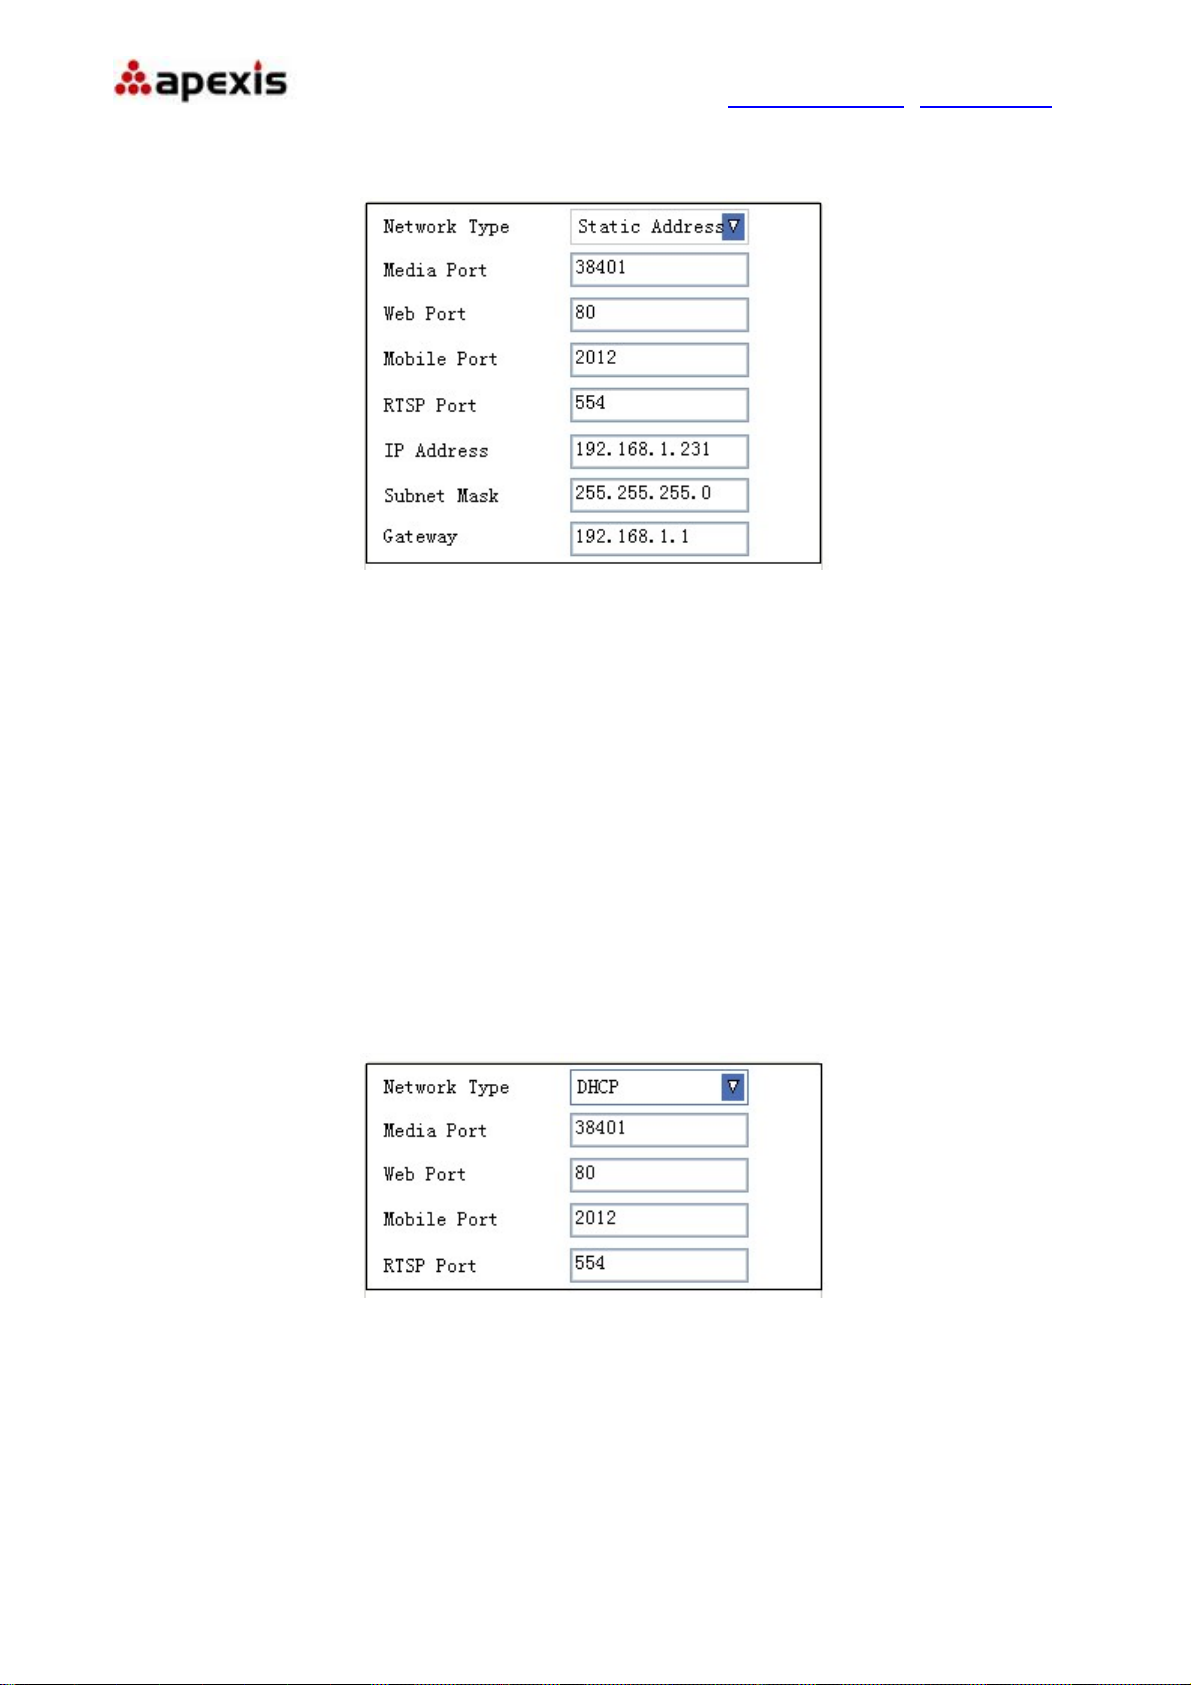
4.6.1 Static Address
Set network parameters manually
● Media Port: Default is 38401.
● Web Port: Default is 80.
Figure5.1
● Mobile Port: Default is 2012.
● RTSP Port: Default is 554.
● IP Address: Set the IP address of camera.
● Subnet Mark: Default is 255.255.255.0.
● Gateway: Set the gateway of IP camera. If the camera connect to extranet via router, then the gateway is
the router’s IP.
NOTE: Please don’t change the Media Port, Web Port, Mobile Port, RTSP Port if no necessary.
4.6.2 DHCP
Choose DHCP, the camera will get IP address automatically.
Figure5.2
● Media Port: Default is 38401.
● Web Port: Default is 80.
● Mobile Port: Default is 2012.
● RTSP Port: Default is 554.
NOTE: Please don’t change the Media Port, Web Port, Mobile Port, RTSP Port if no necessary.
Shenzhen Apexis Electronic Co., Ltd Tel: +86-755-26509025 Fax: +86-755-26509229
22 of 42
Page 23
More Security, More Convenience www.apexis.com.cn / www.apexis.cc
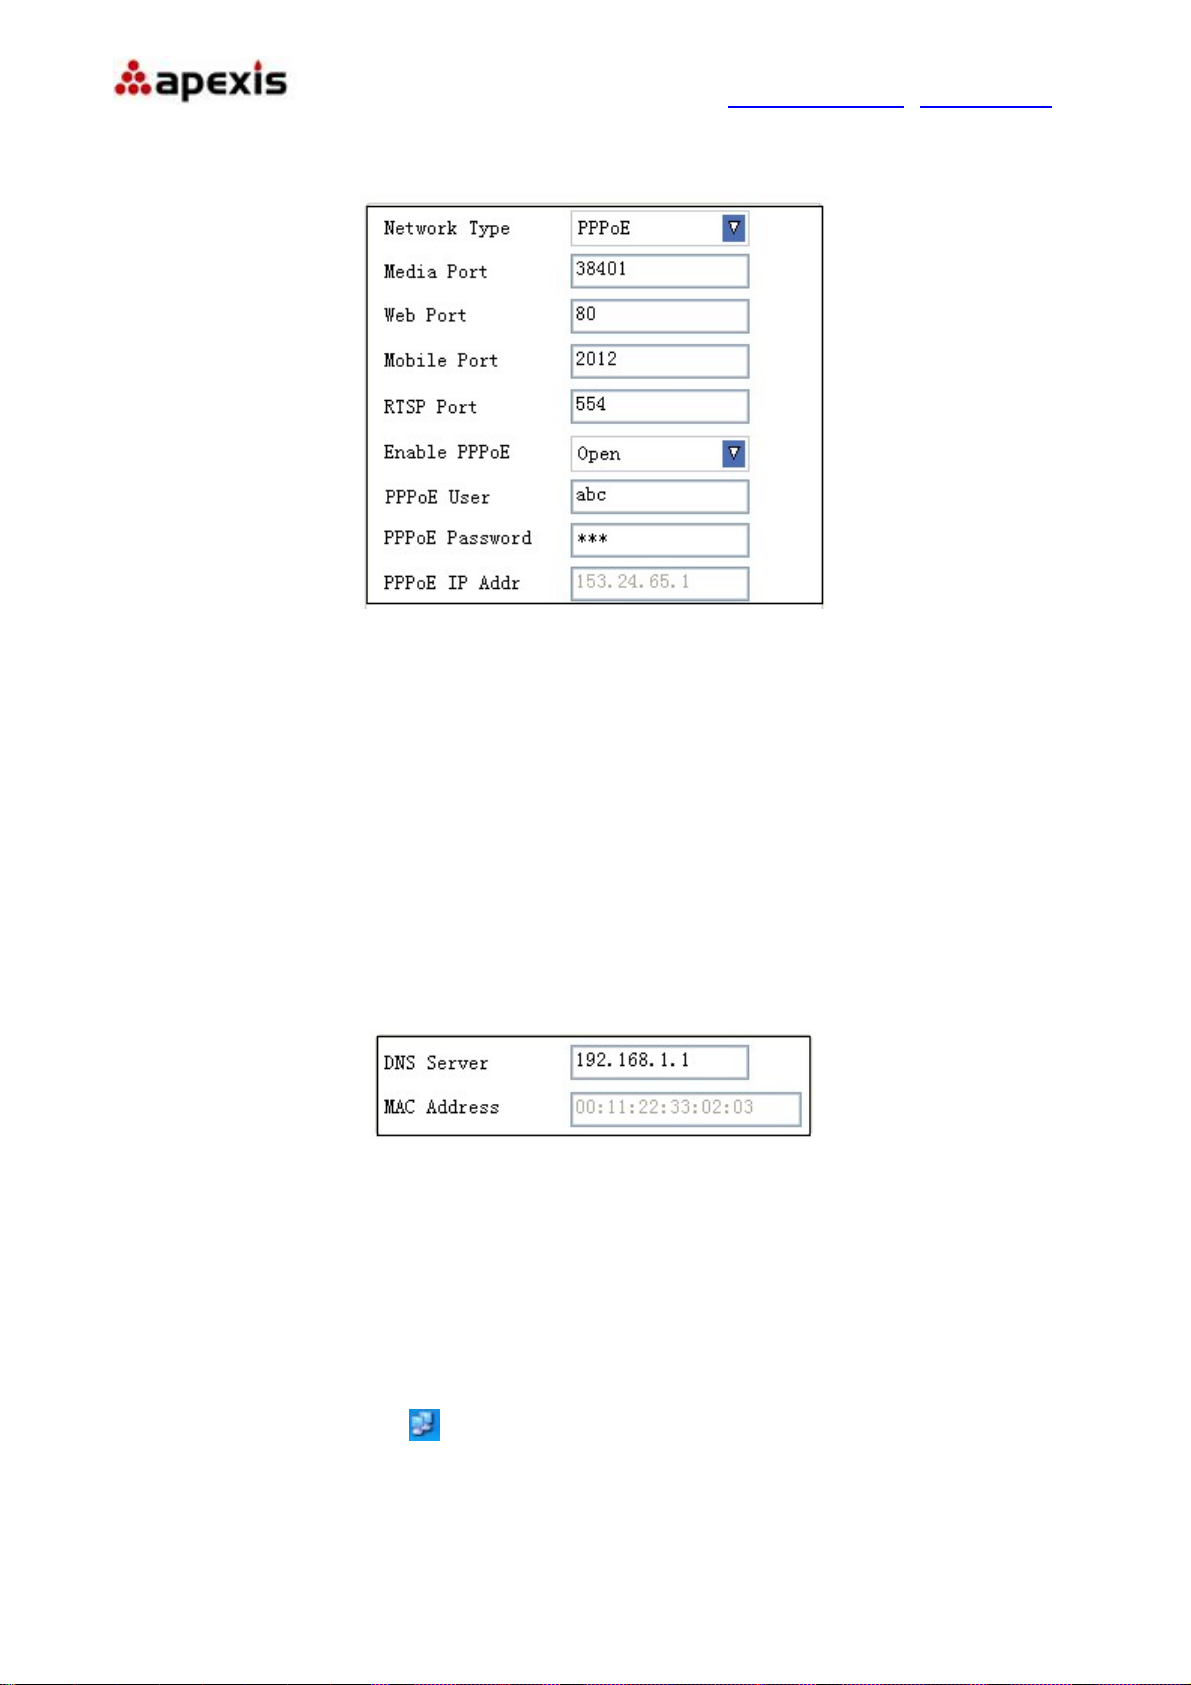
4.6.3 PPPoE
Set parameters here to enable PPPoE function.
● Media Port: Default is 38401.
Figure5.3
● Web Port: Default is 80.
● Mobile Port: Default is 2012.
● RTSP Port: Default is 554.
● Enable PPPoE: Choose Open to enable PPPoE function.
● PPPoE User: The account provided by ISP
● PPPoE Password: The password provided by ISP.
● PPPoE IP Addr. If PPPoE dial-up succeed, will display the IP address distributed by ISP.
NOTE: Please don’t change the Media Port, Web Port, Mobile Port, RTSP Port if no necessary.
Figure5.4
● DNS Server: Set DNS server
● MAC Address: MAC address of IP Camera.
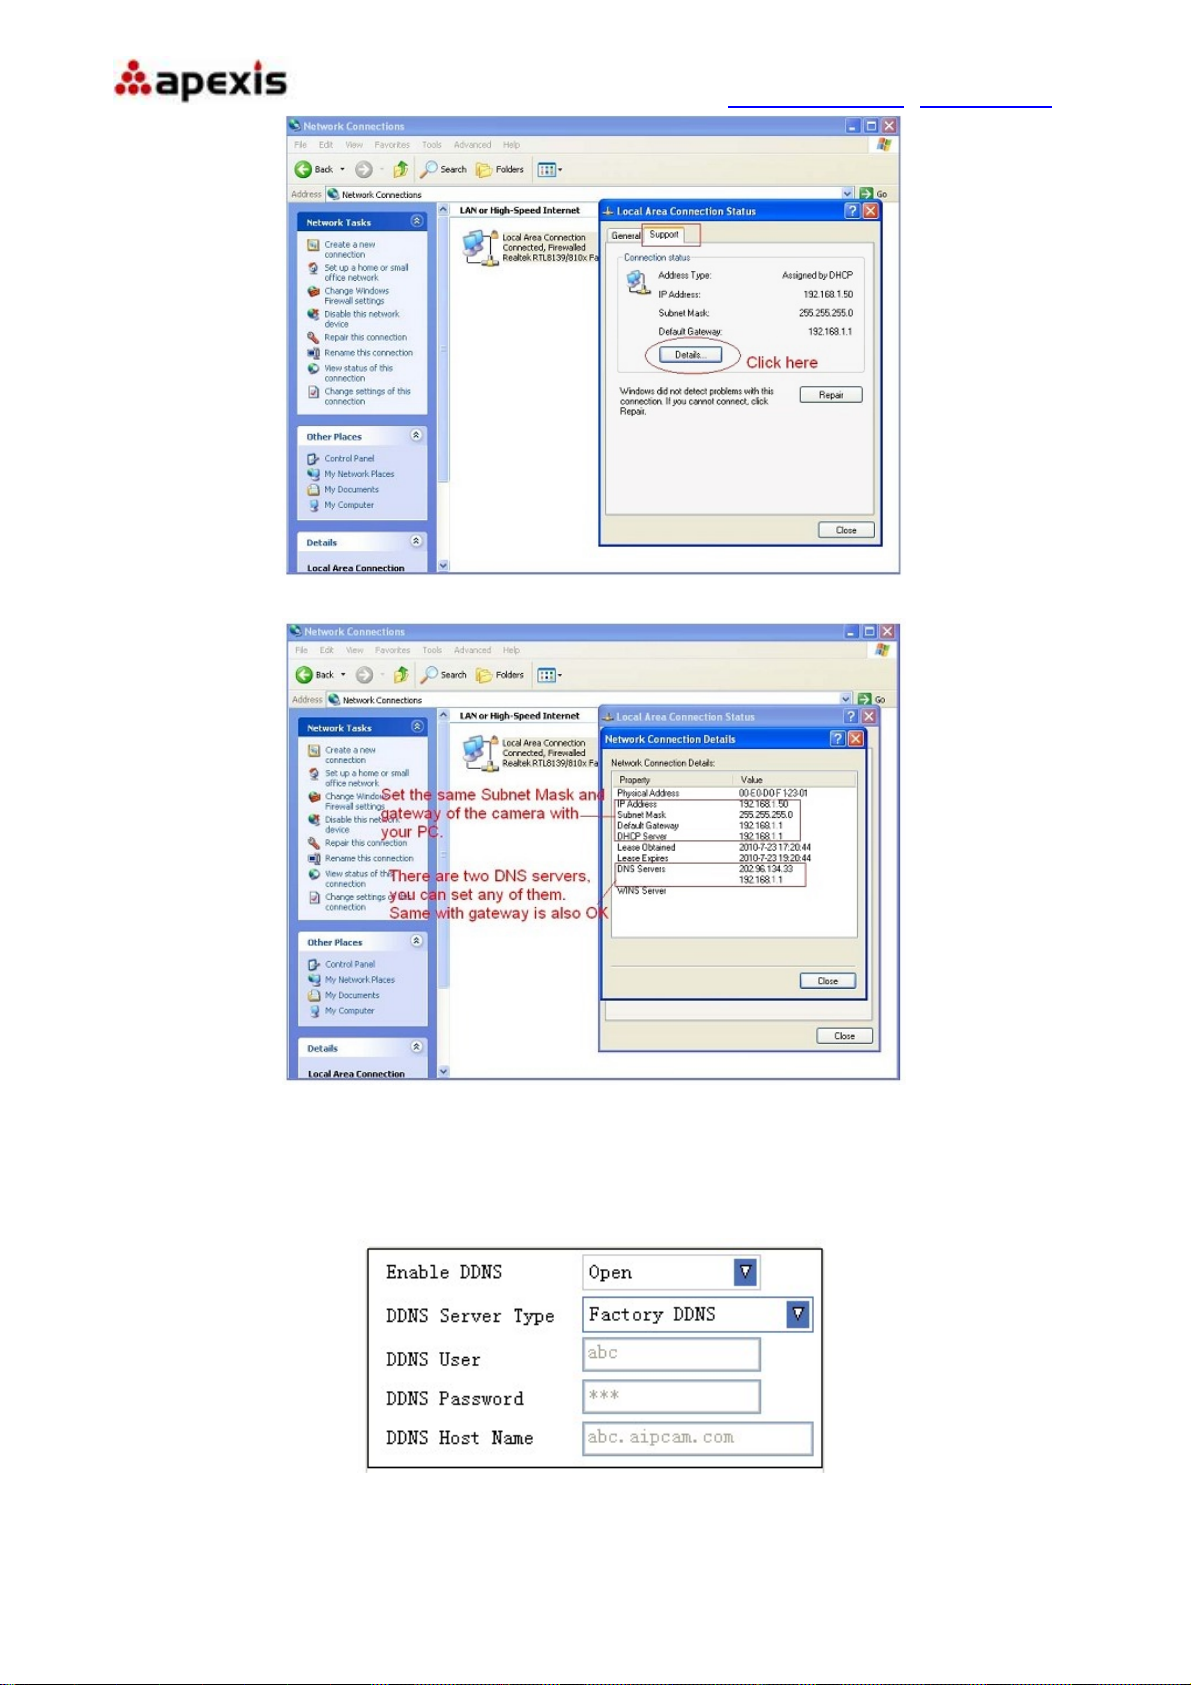
If you don’t know Subnet Mask, Gateway, DNS Server. Please check the Local Area Connection Status of
your computer; it contains all these information, steps as below:
1. Control Panel > Network Connections > Local Area Connections > Support > Details
2. Find the local connection icon
Shenzhen Apexis Electronic Co., Ltd Tel: +86-755-26509025 Fax: +86-755-26509229
from taskbar, left click it, choose Support > Details
23 of 42
Page 24
More Security, More Convenience www.apexis.com.cn / www.apexis.cc
Figure5.5
Figure5.6
If you don’t know the DNS Server, you can set it the same as Gateway.
4.6.4 DDNS: Enable DDNS function.
Figure5.7
There are 2 options:
Shenzhen Apexis Electronic Co., Ltd Tel: +86-755-26509025 Fax: +86-755-26509229
24 of 42
Page 25
More Security, More Convenience www.apexis.com.cn / www.apexis.cc
Factory DDNS: This domain is provided by manufacturer.
Third Party DDNS: This domain is provided by the 3rd party, such as Dyndns, 3322 etc.
● Enable DDNS: Set DDNS function ON/OFF.
● DDNS Server Type: Set DDNS server type, such as factory DDNS or third party DDNS server provider.
● DDNS User: Registered user name from DDNS server. (If use factory DDNS, it can’t be modified.)
● DDNS Password: Registered password from DDNS server. (If use factory DDNS, it can’t be modified.)
● DDNS Host Name: Domain name set by user. (If use factory DDNS, it can’t be modified.)
For the third party DDNS, you have to register an account firstly, keep the user, password, host, then input it.
NOTE: Only one DDNS can be chosen, for example, if you use manufacturer’s DDNS, the 3rd one won’t work,
if use the 3rd DDNS, the manufacturer’s one won’t work.
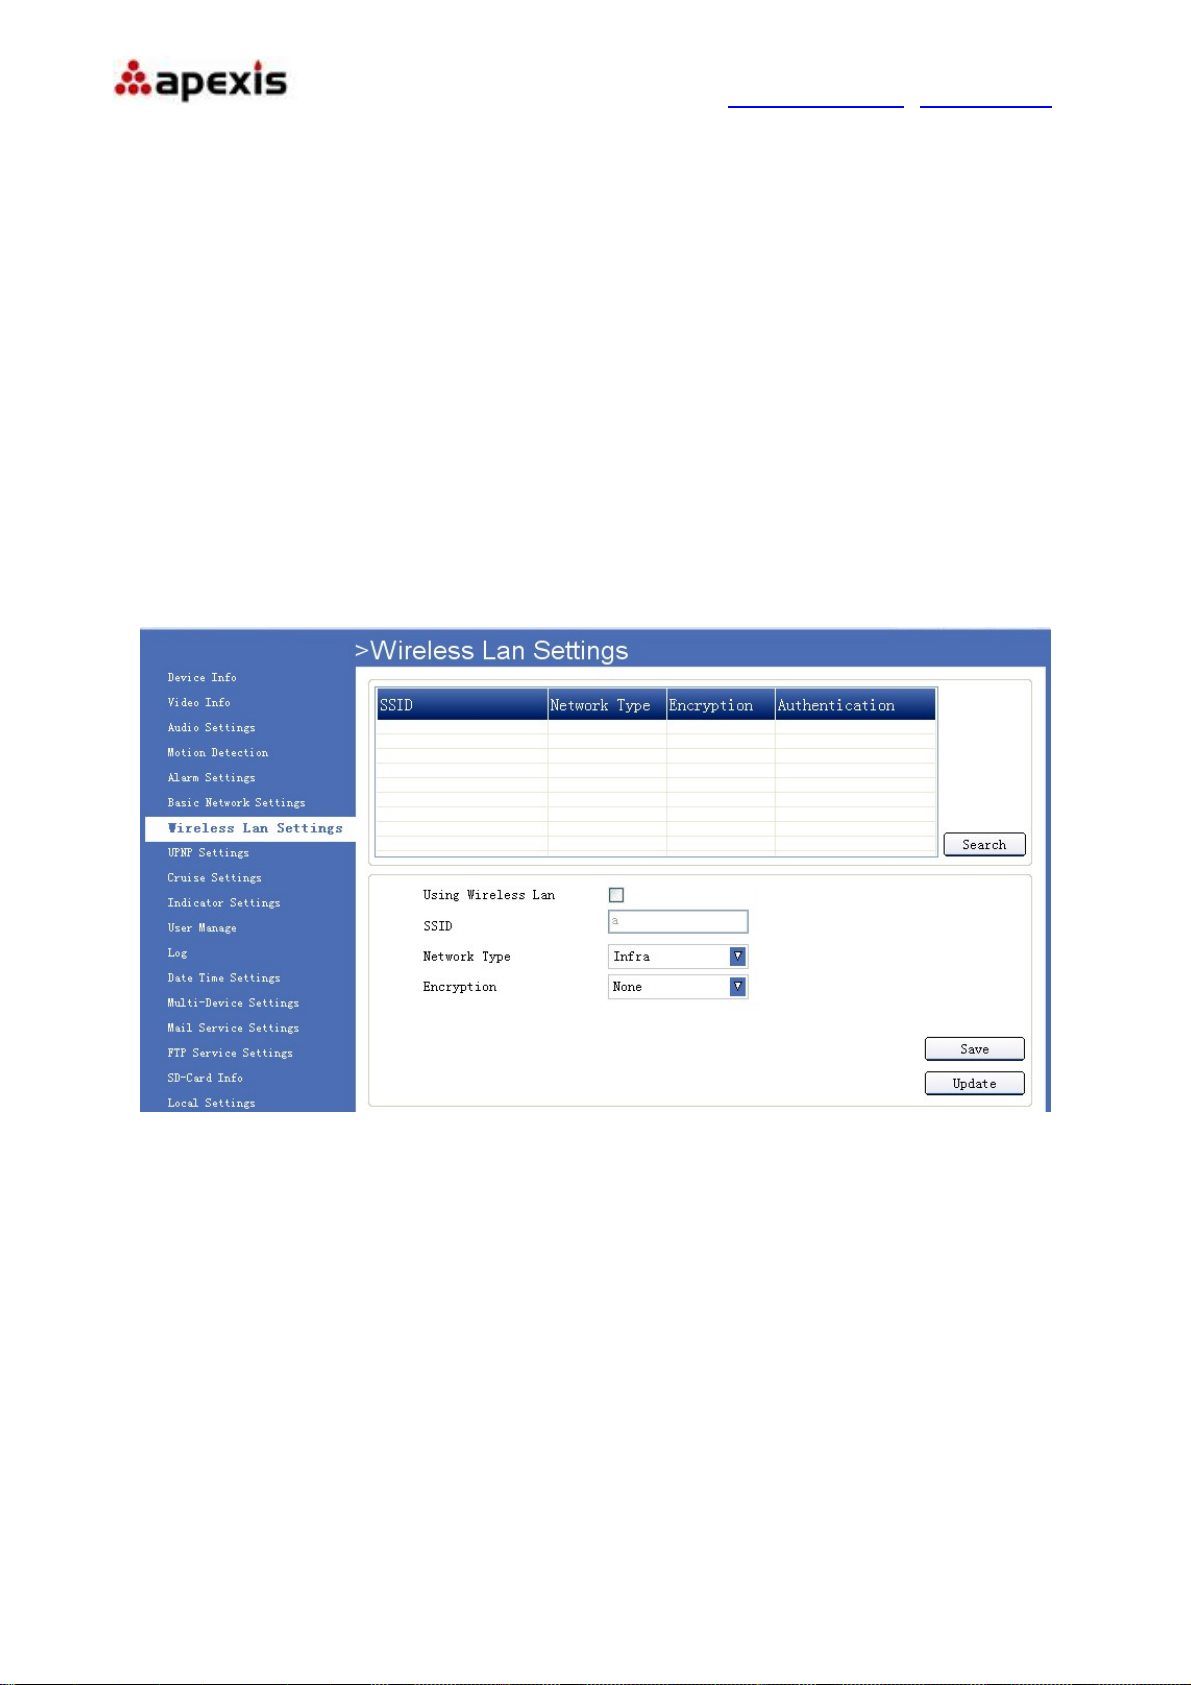
4.7. Wireless Lan Settings
Click ”Wireless Lan Settings” to enter the interface:
Figure5.8
Click the icon “Search” to scan the wireless network in this environment automatically.
Using Wireless Lan: Set WiFi ON/OFF.
SSID: the ID of Wireless network, it should be the same SSID as the connected WiFi router.
Network Type: Two modes:
1. Infra(Infrastructure Mode), if using normal AP, choose Infra mode..
2. Ad-Hoc Mode. If using point-to-point transmission, choose Adhoc mode.
The factory setting is Infra.
● Encryption: WEP, TKIP, AES optional.
● Authentication: WEP: Open System or Share Key. TKIP (AES): WPA-PSK or WPA2-PSK.
● Select Key: Choose the channel of WEP share Key.
● Key: Input the key the same as the settings in your router.
Shenzhen Apexis Electronic Co., Ltd Tel: +86-755-26509025 Fax: +86-755-26509229
25 of 42
Page 26
More Security, More Convenience www.apexis.com.cn / www.apexis.cc
All the WiFi encryption mode should be the same as WiFi router which connected, and different encryption
has different authentication menu.
4.8. UPNP Settings
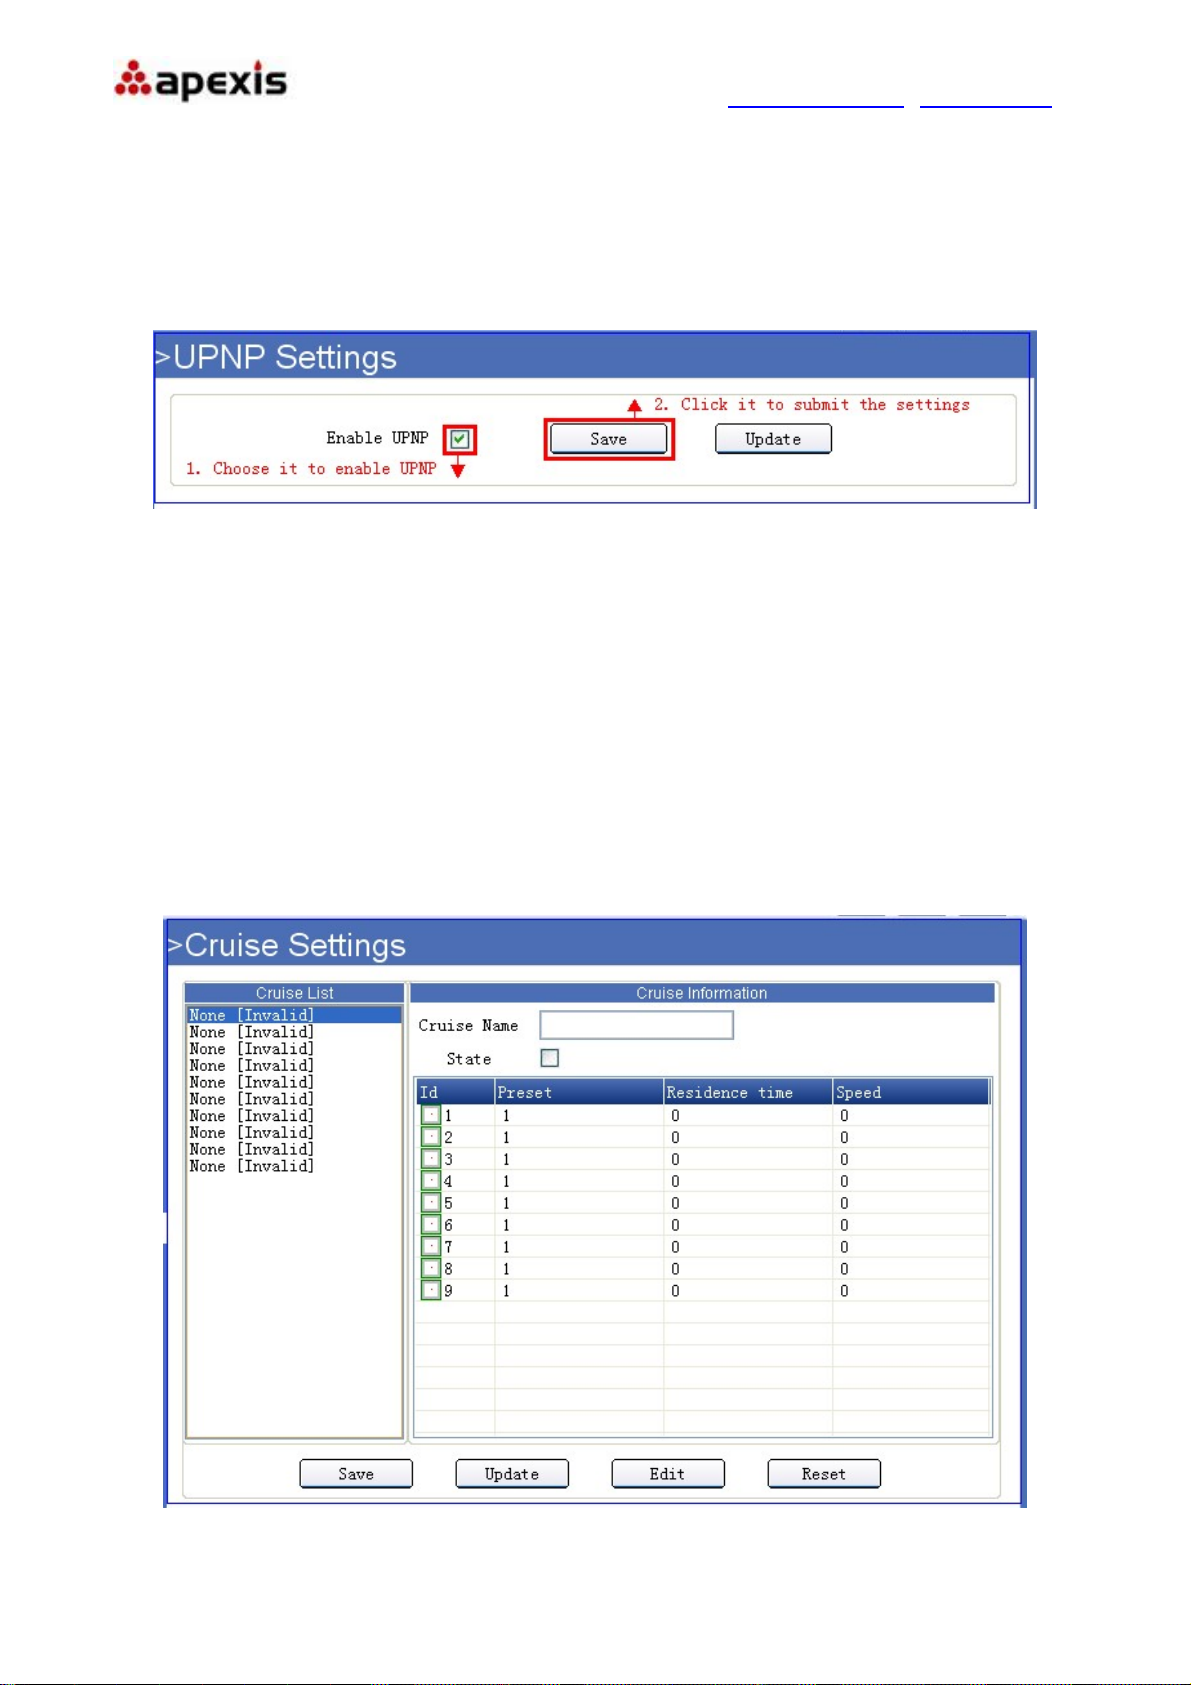
Click “UPNP Settings” to enter the interface:
Figure5.9
Enable UPNP: Set UPNP function ON/OFF.
Select it to enable UPNP, then the camera will do port forwarding automatically.
It’s helpful for using DDNS, if your router support UPNP, then you no need do port forwarding in router.
NOTE: Here UPNP only for port forwarding now. It has much relation with security settings of your router,
make sure the UPnP function of router is ON.
ATTENTION: If your router doesn’t support UPNP function, it may show error information. So we recommend
you do port forwarding manually in your router.
4.9. Cruise Settings
Click “Cruise Settings” to enter the interface:
Figure6.0
Shenzhen Apexis Electronic Co., Ltd Tel: +86-755-26509025 Fax: +86-755-26509229
26 of 42
Page 27
More Security, More Convenience www.apexis.com.cn / www.apexis.cc
Cruise means autocycle rotation between the different positions, these positions have been set as preset with
residence time and Pan/Tilt speed in advance. This device supports upto 10 cruise track, each cruise can
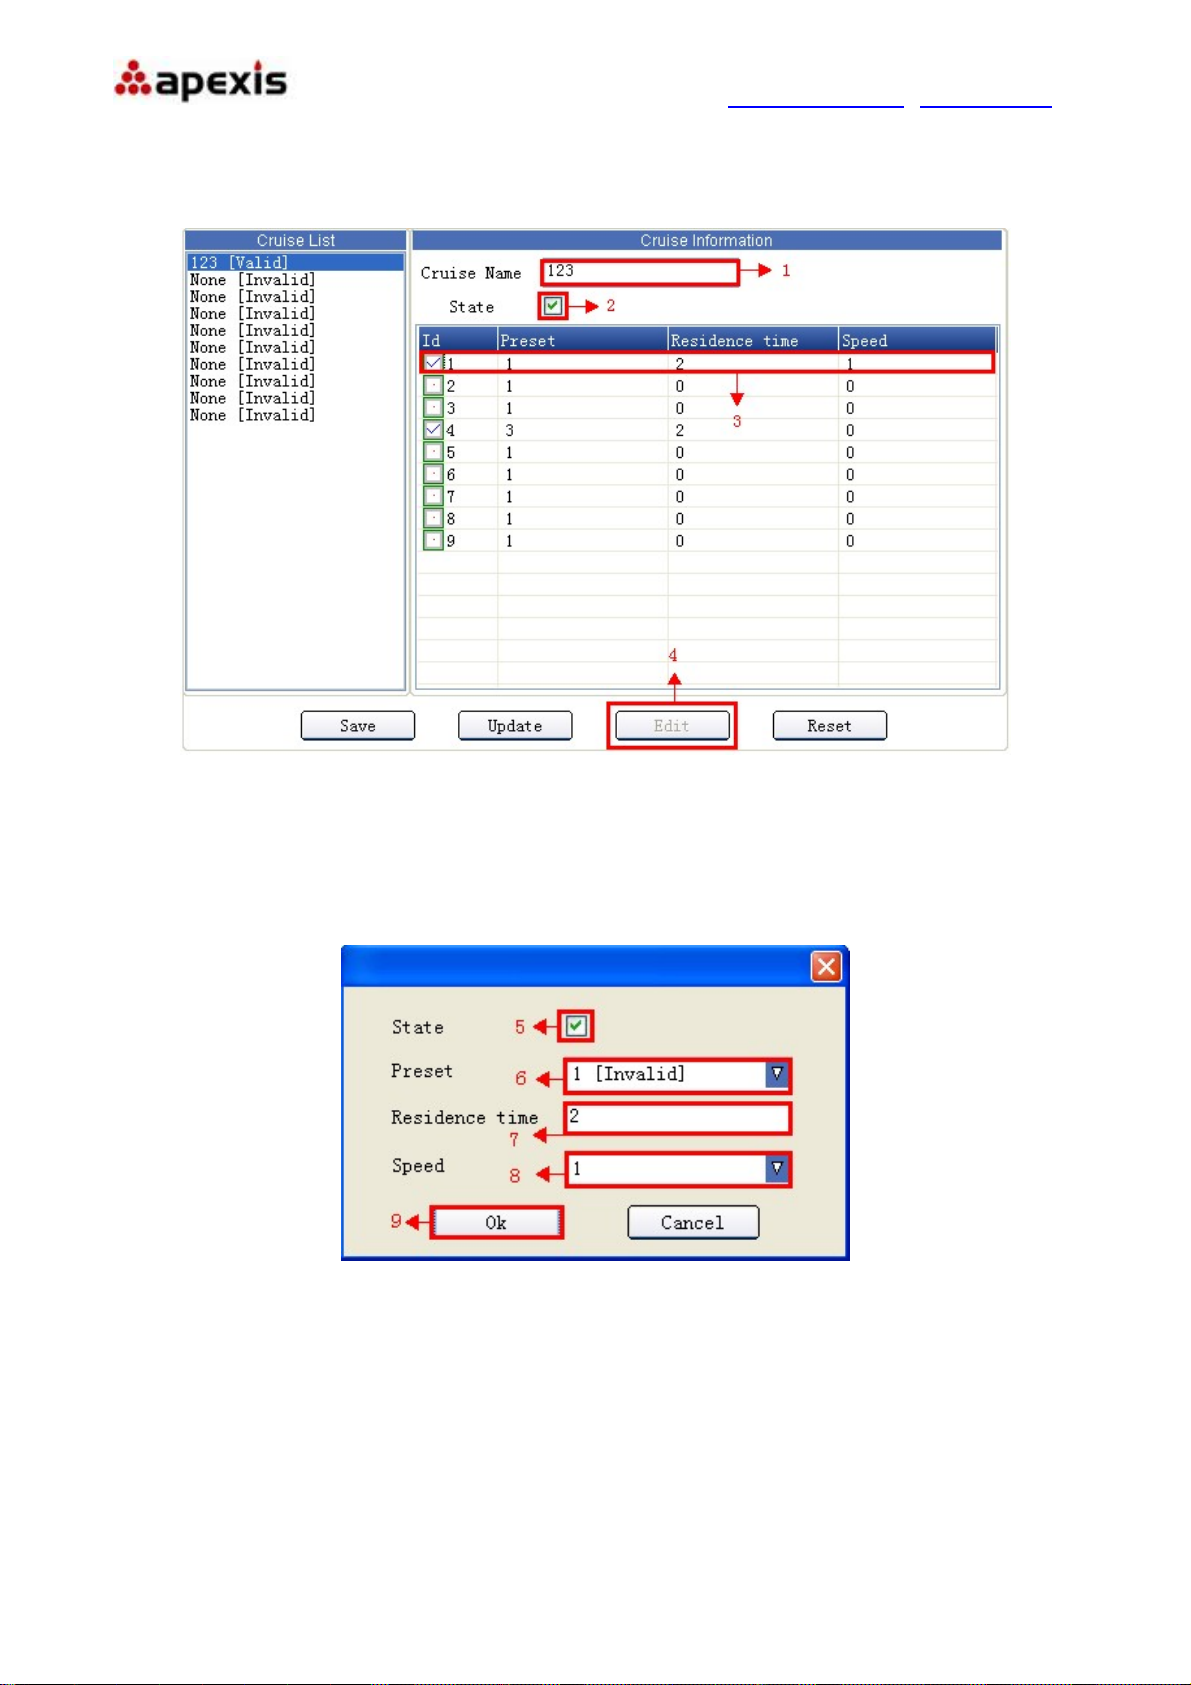
support upto 9 preset, steps as below:
Figure6.1
1. Set the cruise name.
2. Enable the state
3. Choose the SN you want to set,
4. Double click the number or click Edit, will pop-up the settings window. (Figure 6.2)
Figure6.2
5. Enable state.
6. Choose the preset which will be set. This camera supports 9 preset.
7. Set the residence time, could be 0 to 10 seconds.
8. Set the rotation speed, could be 0 to 10, and 0 means the fastest, 10 means the most slowly.
9. Click OK to save the settings.
After all done, click save to submit, it will be shown as valid in the cruise list on leftside. If unselect the state, it
will be shown as invalid.
Shenzhen Apexis Electronic Co., Ltd Tel: +86-755-26509025 Fax: +86-755-26509229
27 of 42
Page 28
More Security, More Convenience www.apexis.com.cn / www.apexis.cc
4.10. Indicator Settings
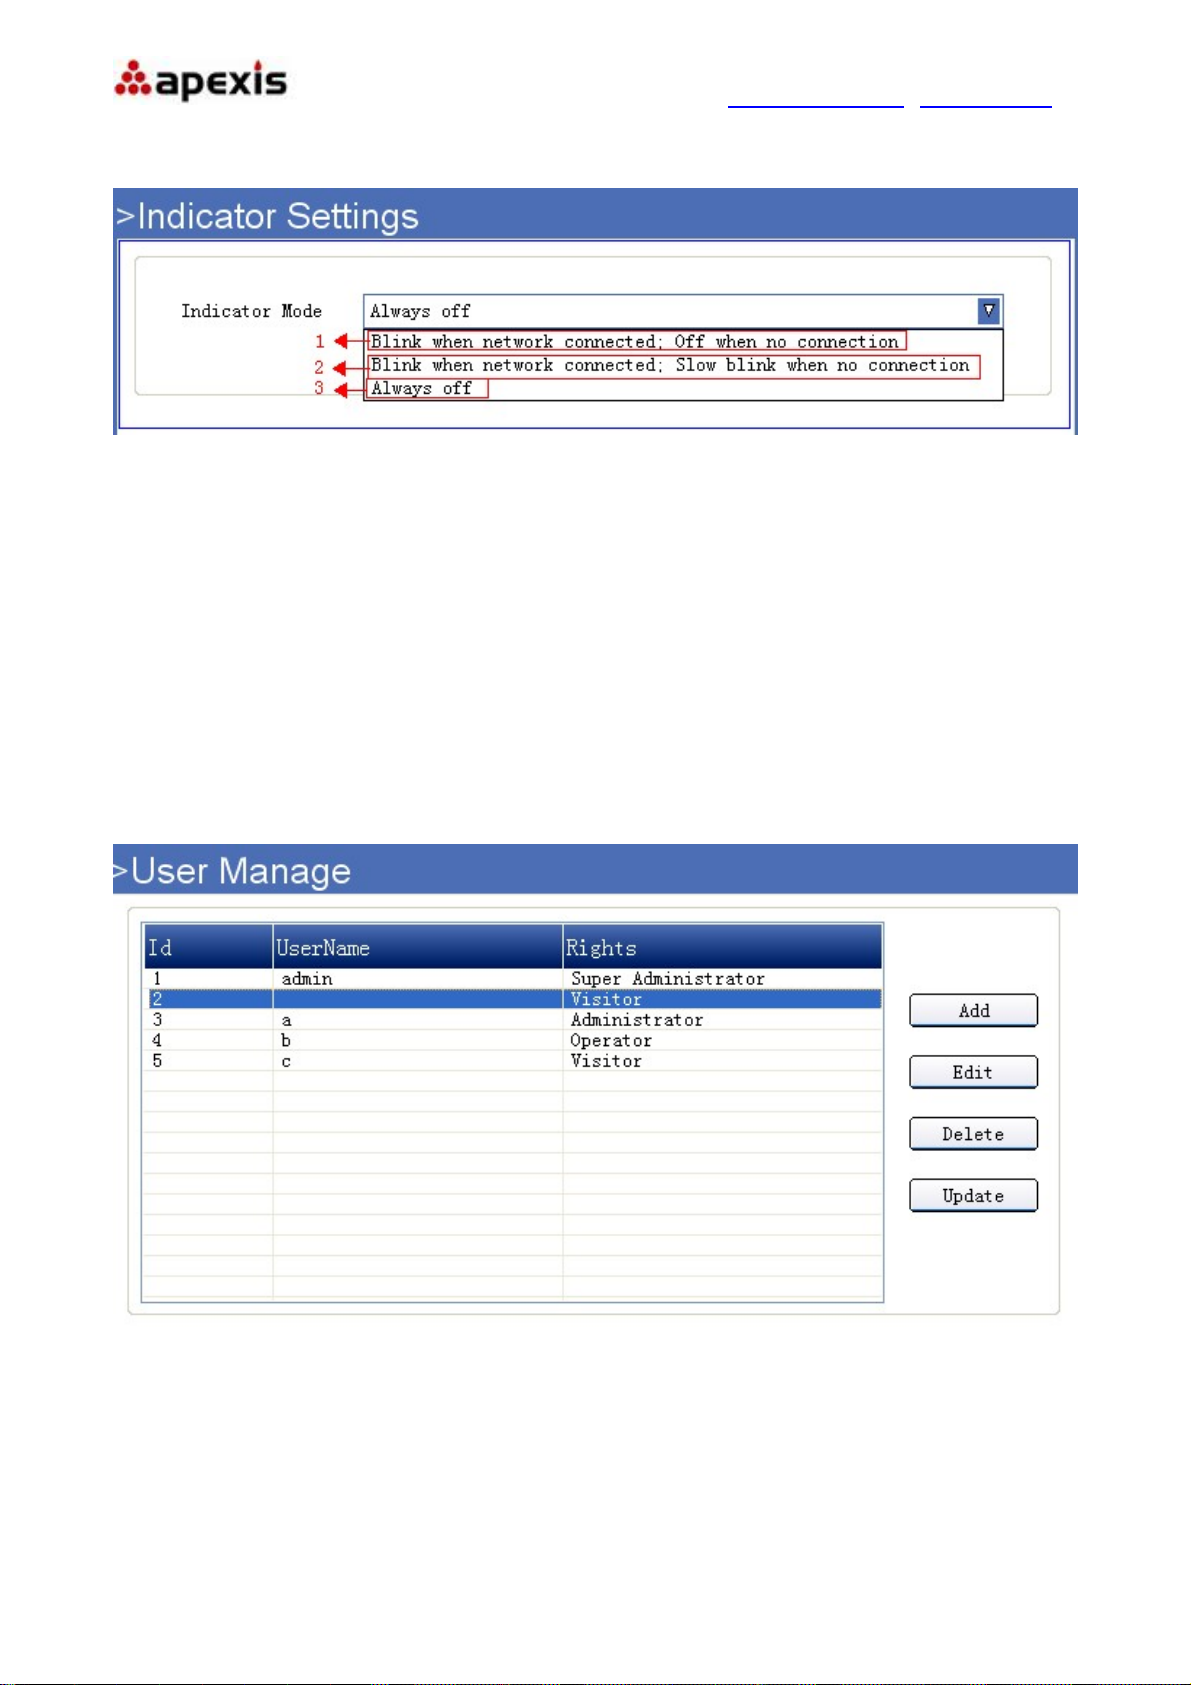
Click “Indicator Settings” to enter the interface:
Figure6.3
Set the pilot lamp mode, the following three options:
(1) Blink when network connected; Off when no connection: Twinkle while connect to the internet and
turn off when departed.
(2) Blink when network connected; Slow blink when no connection: Twinkle while connect to the internet
and more slower when departed.
(3) Always off: Keep OFF.
4.11. User Manage
Click “User Manage” to enter the interface:
Figure6.4
Every camera supports 16 users, and every user can be divided into three grades including Super
Administrator, Administrator, Operator, Visitor.
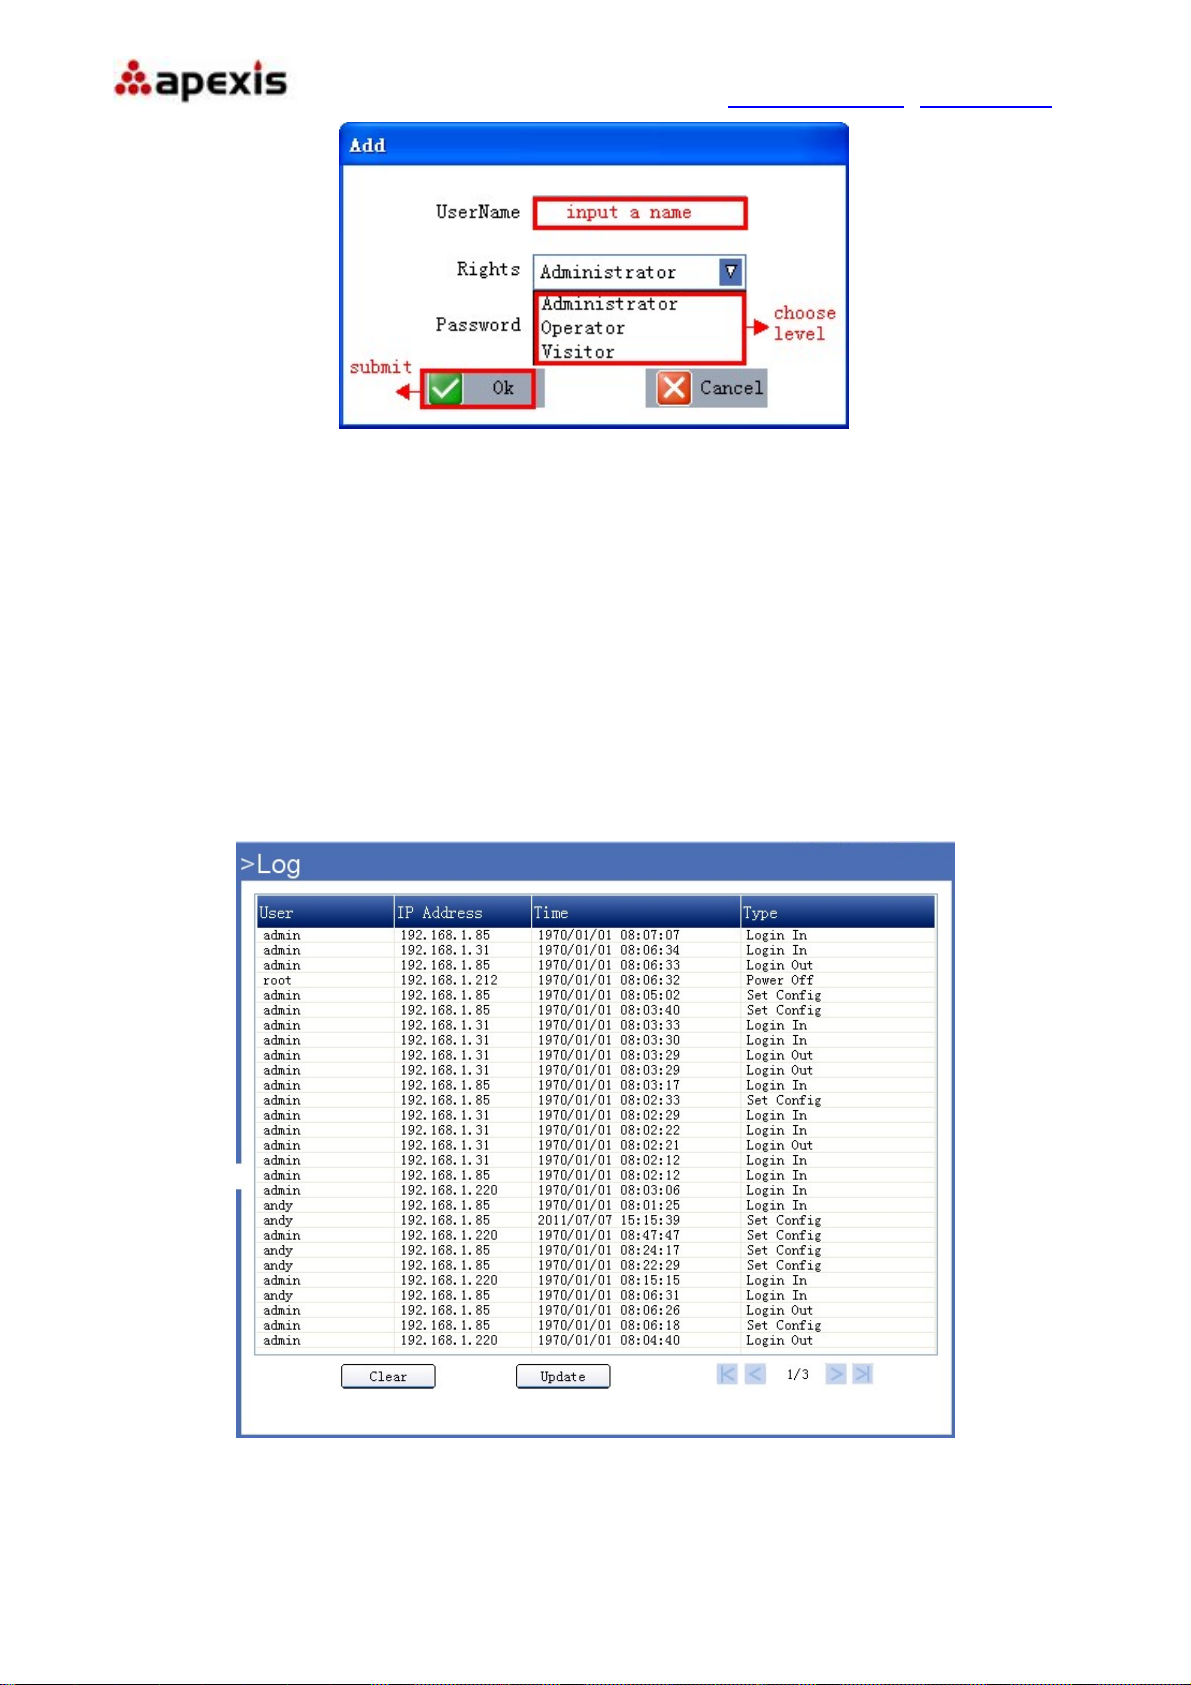
Click Add, will pop-up the window as below:
Shenzhen Apexis Electronic Co., Ltd Tel: +86-755-26509025 Fax: +86-755-26509229
28 of 42
Page 29
More Security, More Convenience www.apexis.com.cn / www.apexis.cc
Figure6.5
Super Administrator:Every device has a super administrator, it has the highest permission, can set all the
parameters.
Administrator:Lower permission than super administrator, it can set most of the parameters except adding
or editing other administrator accounts.
Operator: Lower permission than administrator, can do some operation such as pan/tilt control and set some
parameters.
Visitor: The lowest permission, only can view live video, can’t control the pan/tilt, parameter settings etc.
4.12. Log
Click “Log” to enter the interface:
Figure6.6
Record user information, including account, date, time, visitor IP address etc.
Shenzhen Apexis Electronic Co., Ltd Tel: +86-755-26509025 Fax: +86-755-26509229
29 of 42
Page 30
More Security, More Convenience www.apexis.com.cn / www.apexis.cc
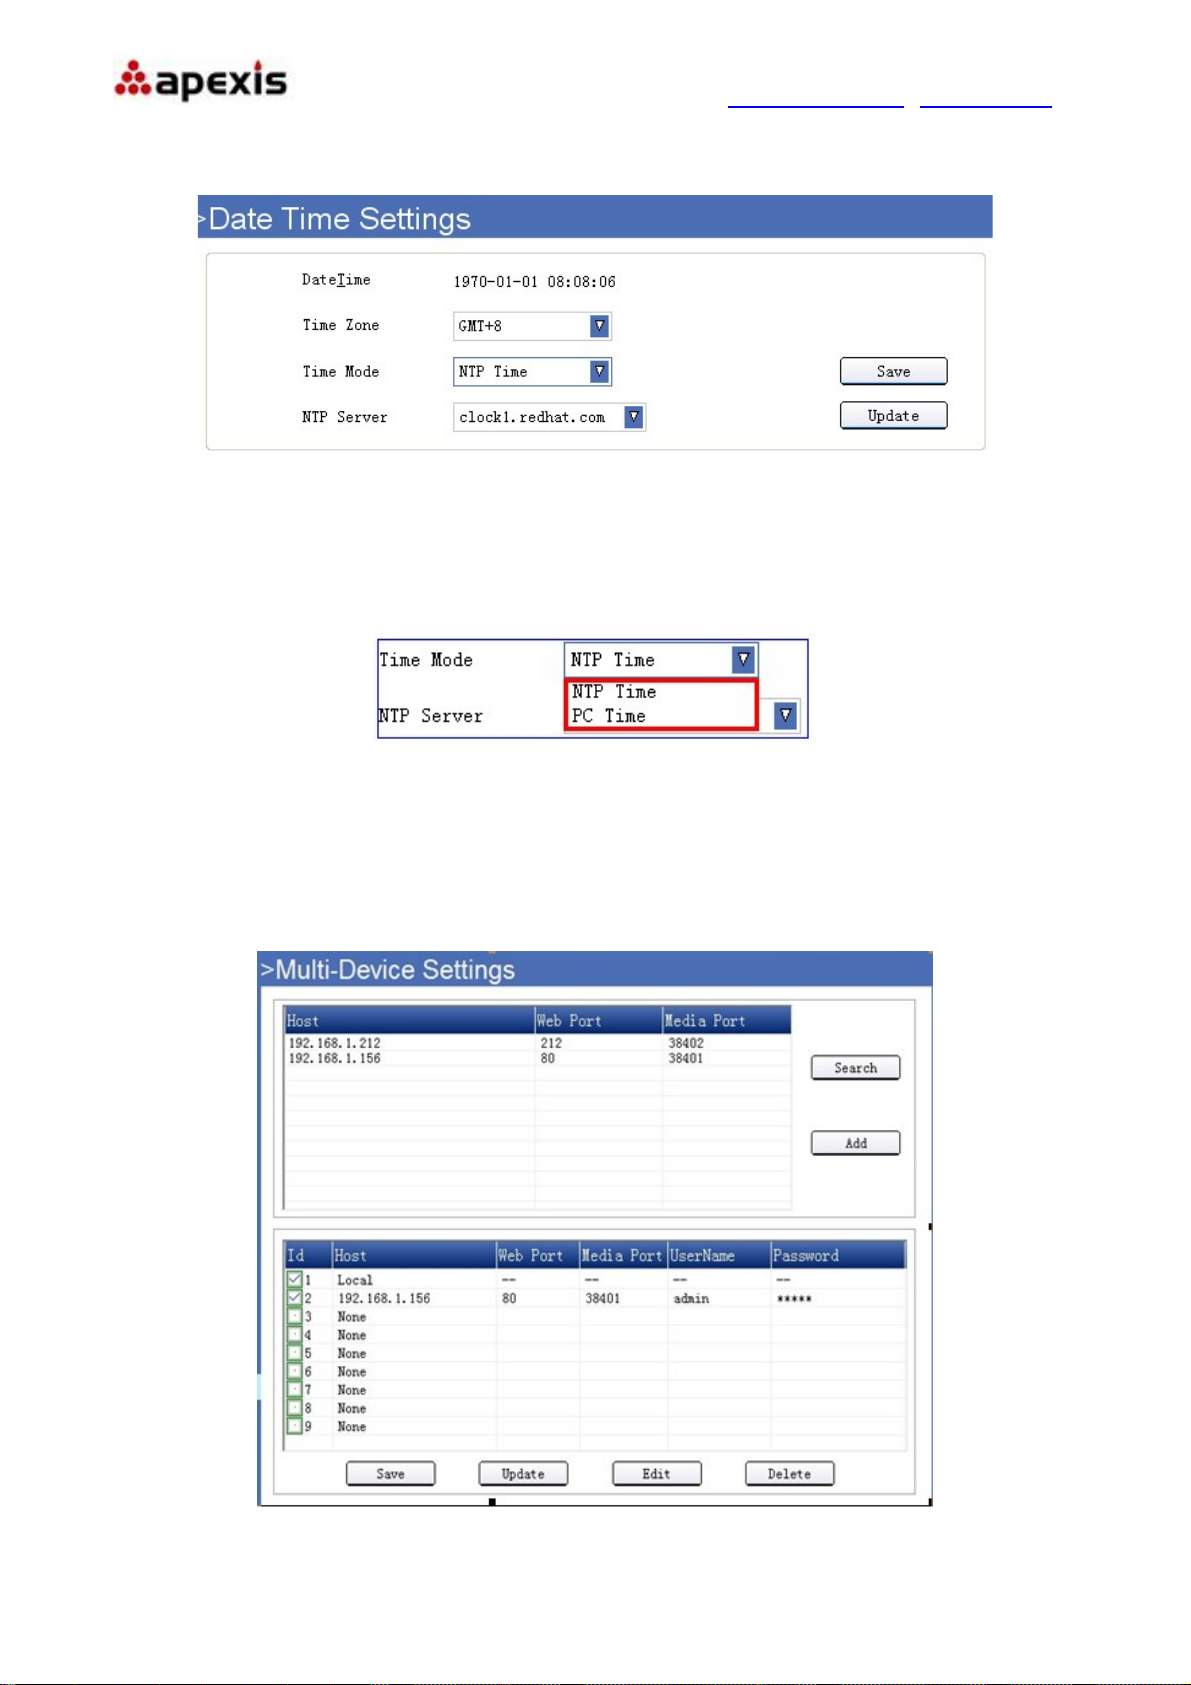
4.13. Date Time Settings
Click “Date Time Settings” to enter the interface:
Date Time: Display the current date and time
Time Zone: Set the current time zone
Time Mode: Can choose PC Time or NTP Time.
Figure6.7
Figure6.8
NTP Server: Choose the relevant NTP sever when set time mode as NTP Time.
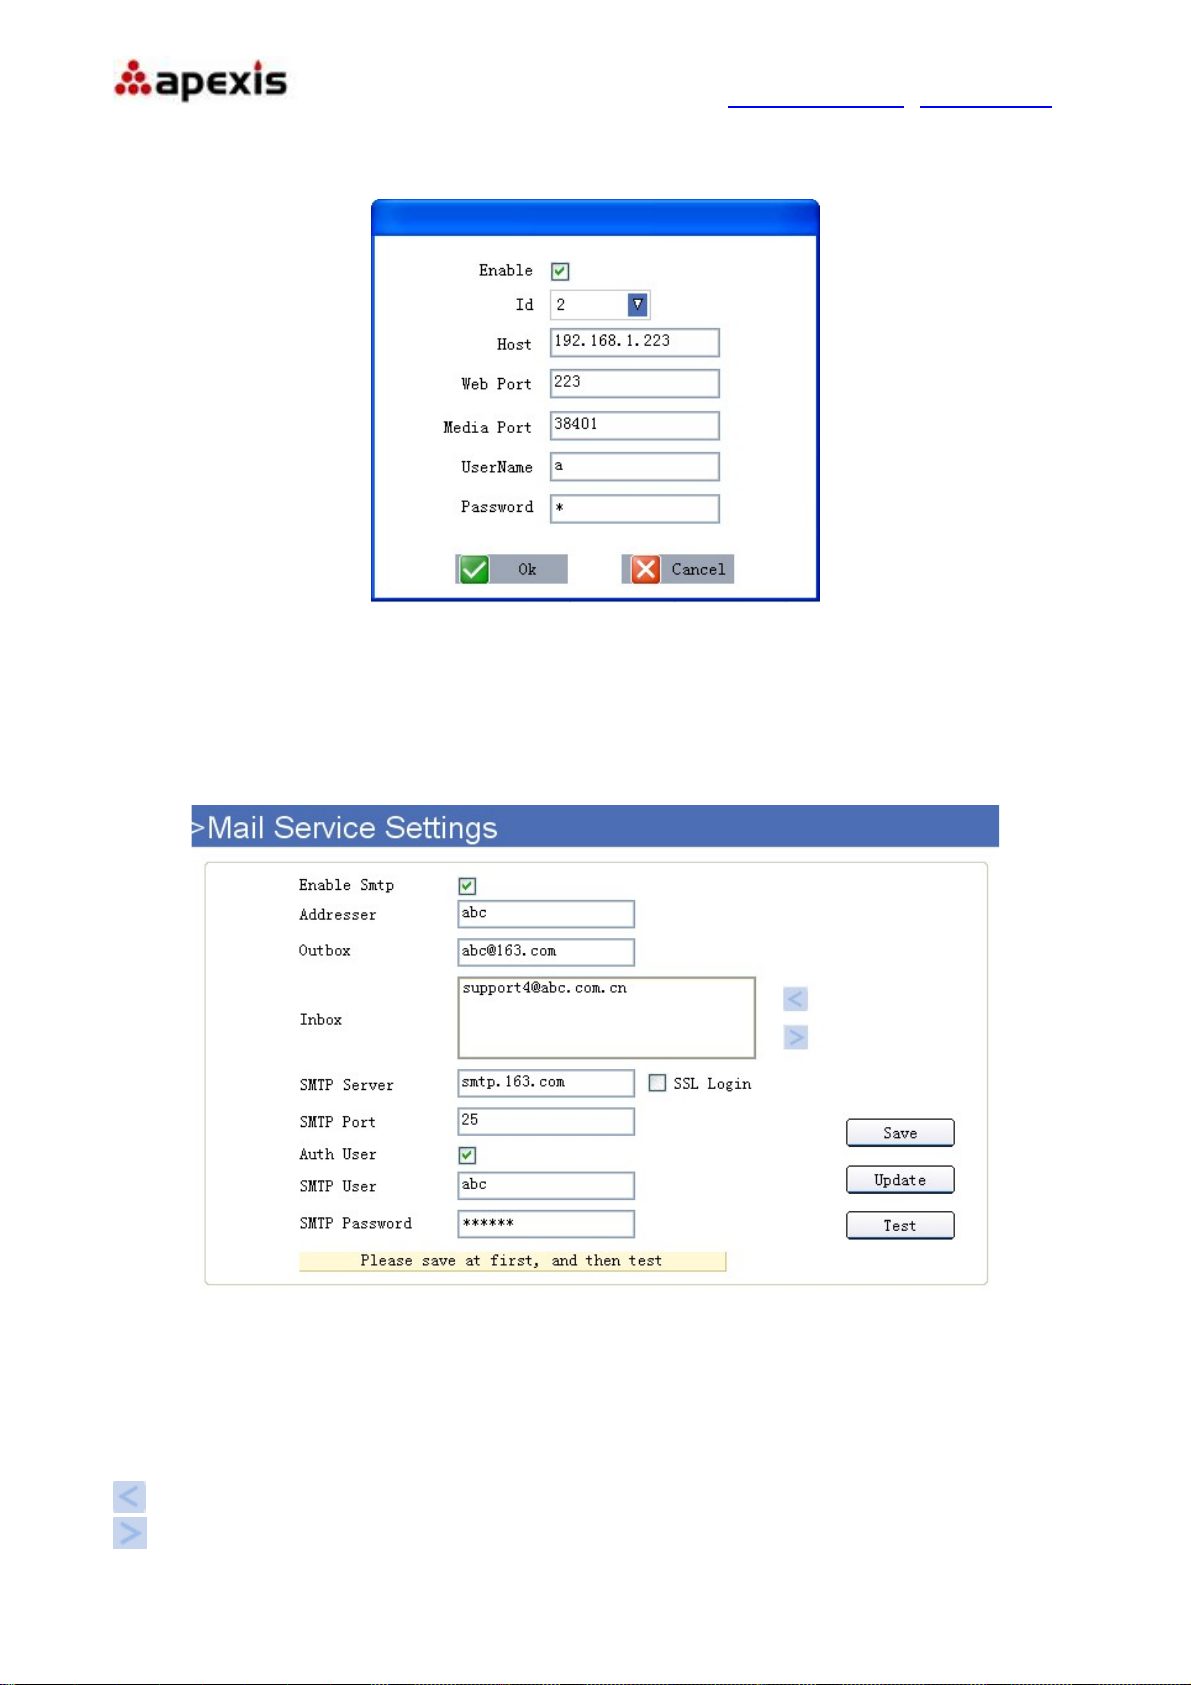
4.14. Multi-Device Settings
Click “Multi-Device Settings” to enter the interface:
Figure6.9
Shenzhen Apexis Electronic Co., Ltd Tel: +86-755-26509025 Fax: +86-755-26509229
30 of 42
Page 31
More Security, More Convenience www.apexis.com.cn / www.apexis.cc
Click Search, all the cameras connected in the Lan will be listed, then select a number from the bottom
window, click edit, will pop-up a parameter settings window:
Figure7.0
Choose the ID, input host, web port, media port, username, and password manually, click OK to submit.
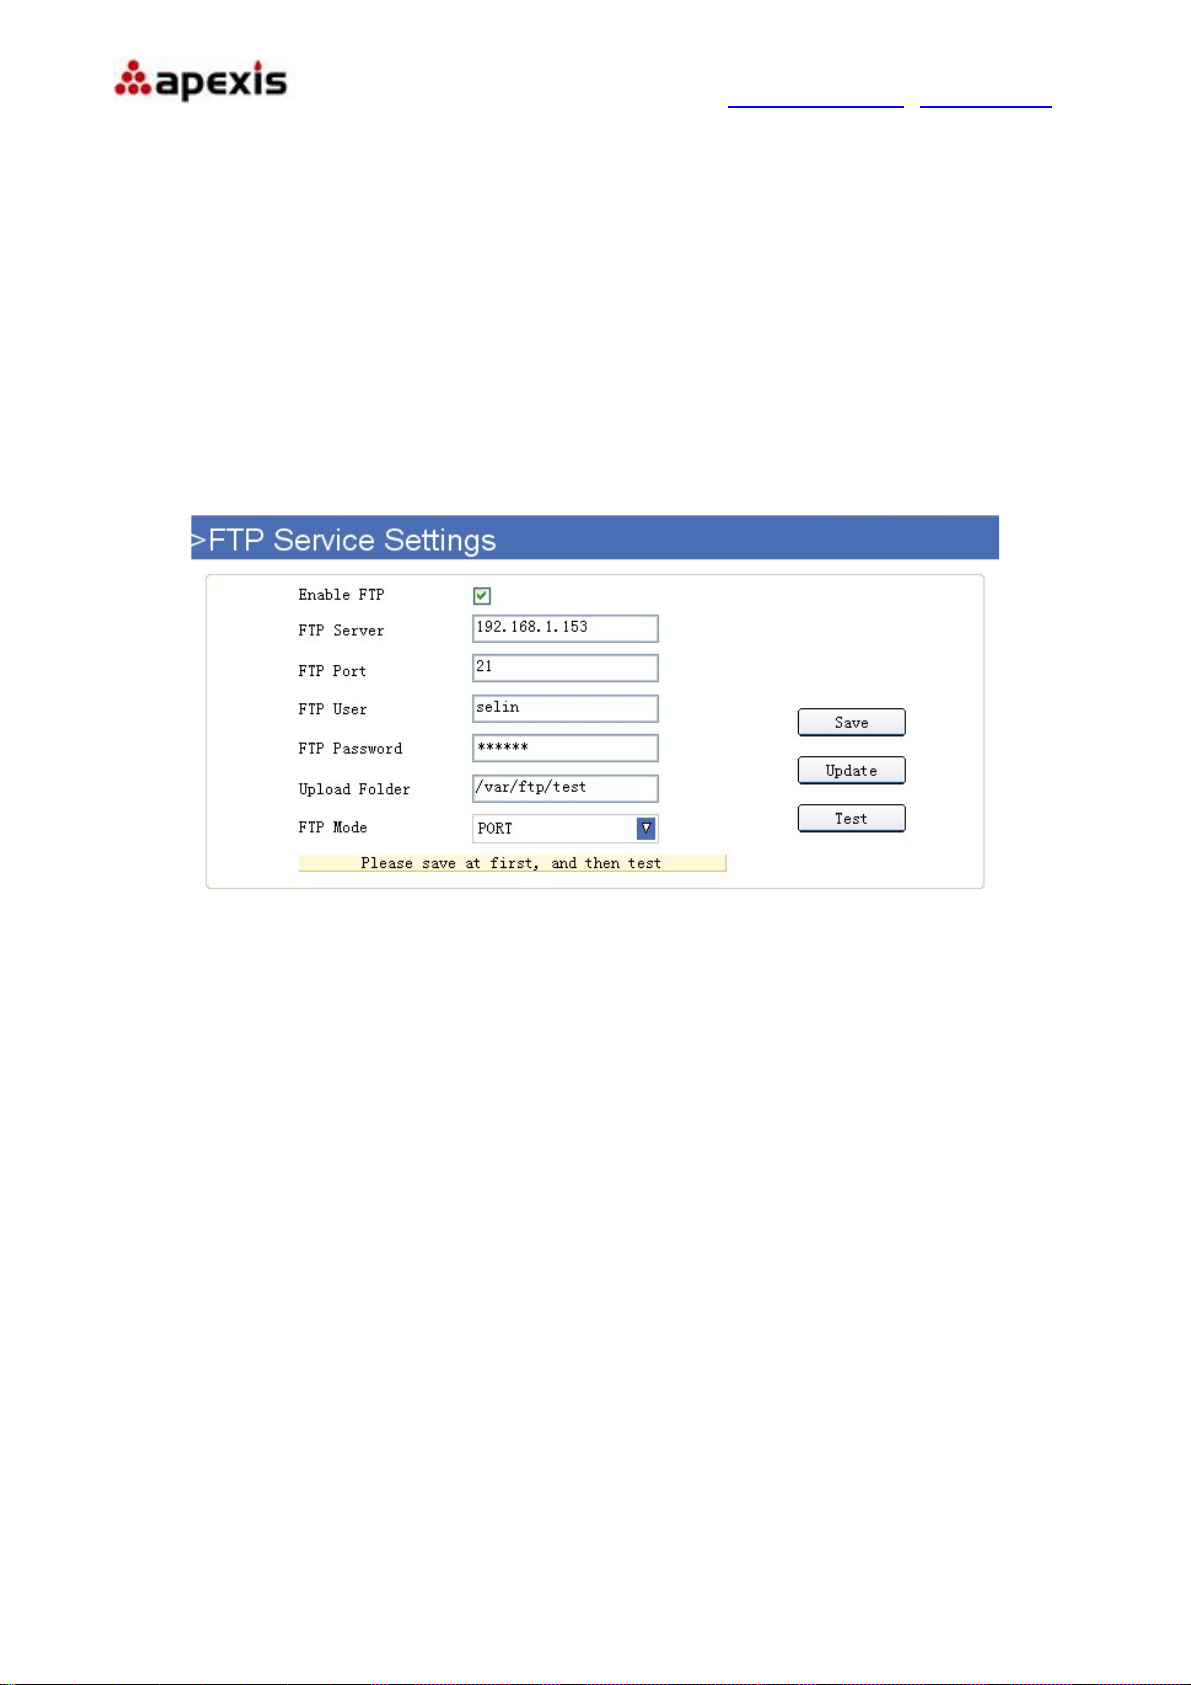
4.15. Mail Service Settings
Click “Mail Service Settings” to enter the interface:
Figure7.1
Enable Smtp: Set e-mail function ON/OFF.
Addresser: Set sender’s name.
Outbox: Set sender’s email address.
Inbox: Set receiver’s email box. (support the most 3 emails simultaneously)
: Add email address
: Delete email address which selected.
Shenzhen Apexis Electronic Co., Ltd Tel: +86-755-26509025 Fax: +86-755-26509229
31 of 42
Page 32
More Security, More Convenience www.apexis.com.cn / www.apexis.cc
SMTP Server: The sender’s SMTP server.
SMTP Port: The sender’s SMTP Port, usually is 25, some SMTP server have its own port, such as the smtp
port for Gmail is 465.
Auth User: Verify the user settings
SMTP User: Set sender’s user name.
SMTP pass word: Set sender’s password.
4.16. FTP Service Settings
Set FTP service, Snapshots will be delivered to appointed FTP server when alarmed.
Click “FTP Service Settings” to enter the interface:
Figure7.2
Enable FTP: Set FTP function ON/OFF.
FTP Server: Set FTP server address.
FTP Port: Set the port of FTP server, default is 21.
FTP User: Set the user name of FTP server.
FTP Password: Set the password of FTP server.
Upload Folder: Set the path of remote FTP server. Make sure that the folder you plan to store images exists.
For camera couldn’t create the folder itself. Also, the folder must be erasable.
FTP Mode: It supports standard (POST) mode and passive (PASV) mode.
Click save to submit, click test to check the settings.
NOTE: Only alarmed, there will be 3 snapshots sent to the FTP server every 1 second.
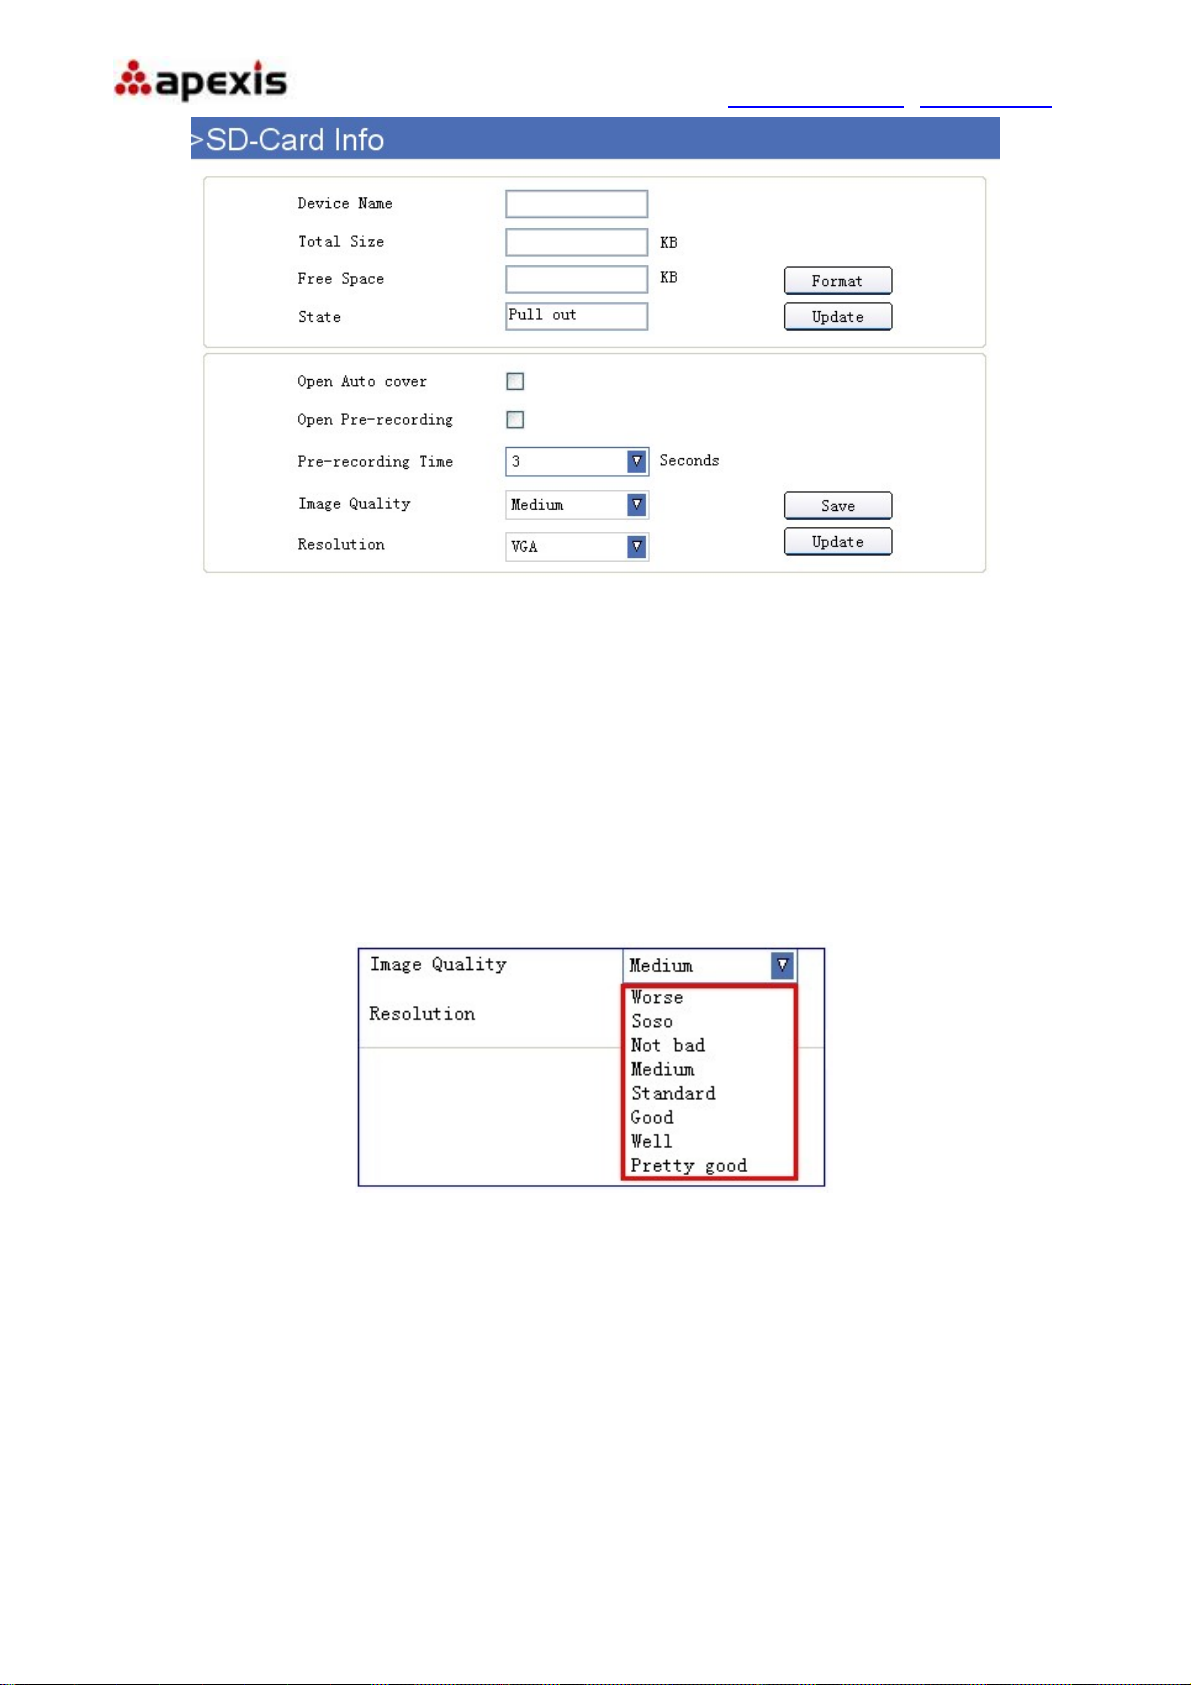
4.17. SD Card Info.
Click “SD-Card Info” to enter the interface:
Shenzhen Apexis Electronic Co., Ltd Tel: +86-755-26509025 Fax: +86-755-26509229
32 of 42
Page 33
More Security, More Convenience www.apexis.com.cn / www.apexis.cc
Device Name: Display the name of SD card.
Total Size: Display the total size of SD card
Figure7.3
Free Space: Display the free space of SD card
State: Display the state of SD card.
Format: Click it to delete all data and format the SD card. (All data will be lost if formatted)
Open Auto cover: Set SD card auto cover when it’s full.
Open Pre-recording: Set Pre-recording function(Record the video before alarm triggered).
Pre-recording Time: Set the Pre-recording time, could be from 1 to 6 seconds.
Image Quality: Set the record video image level which saved in the SD Card.
Figure7.4
Resolution: Set the record video resolution which saved in the SD Card, can be VGA and QVGA.
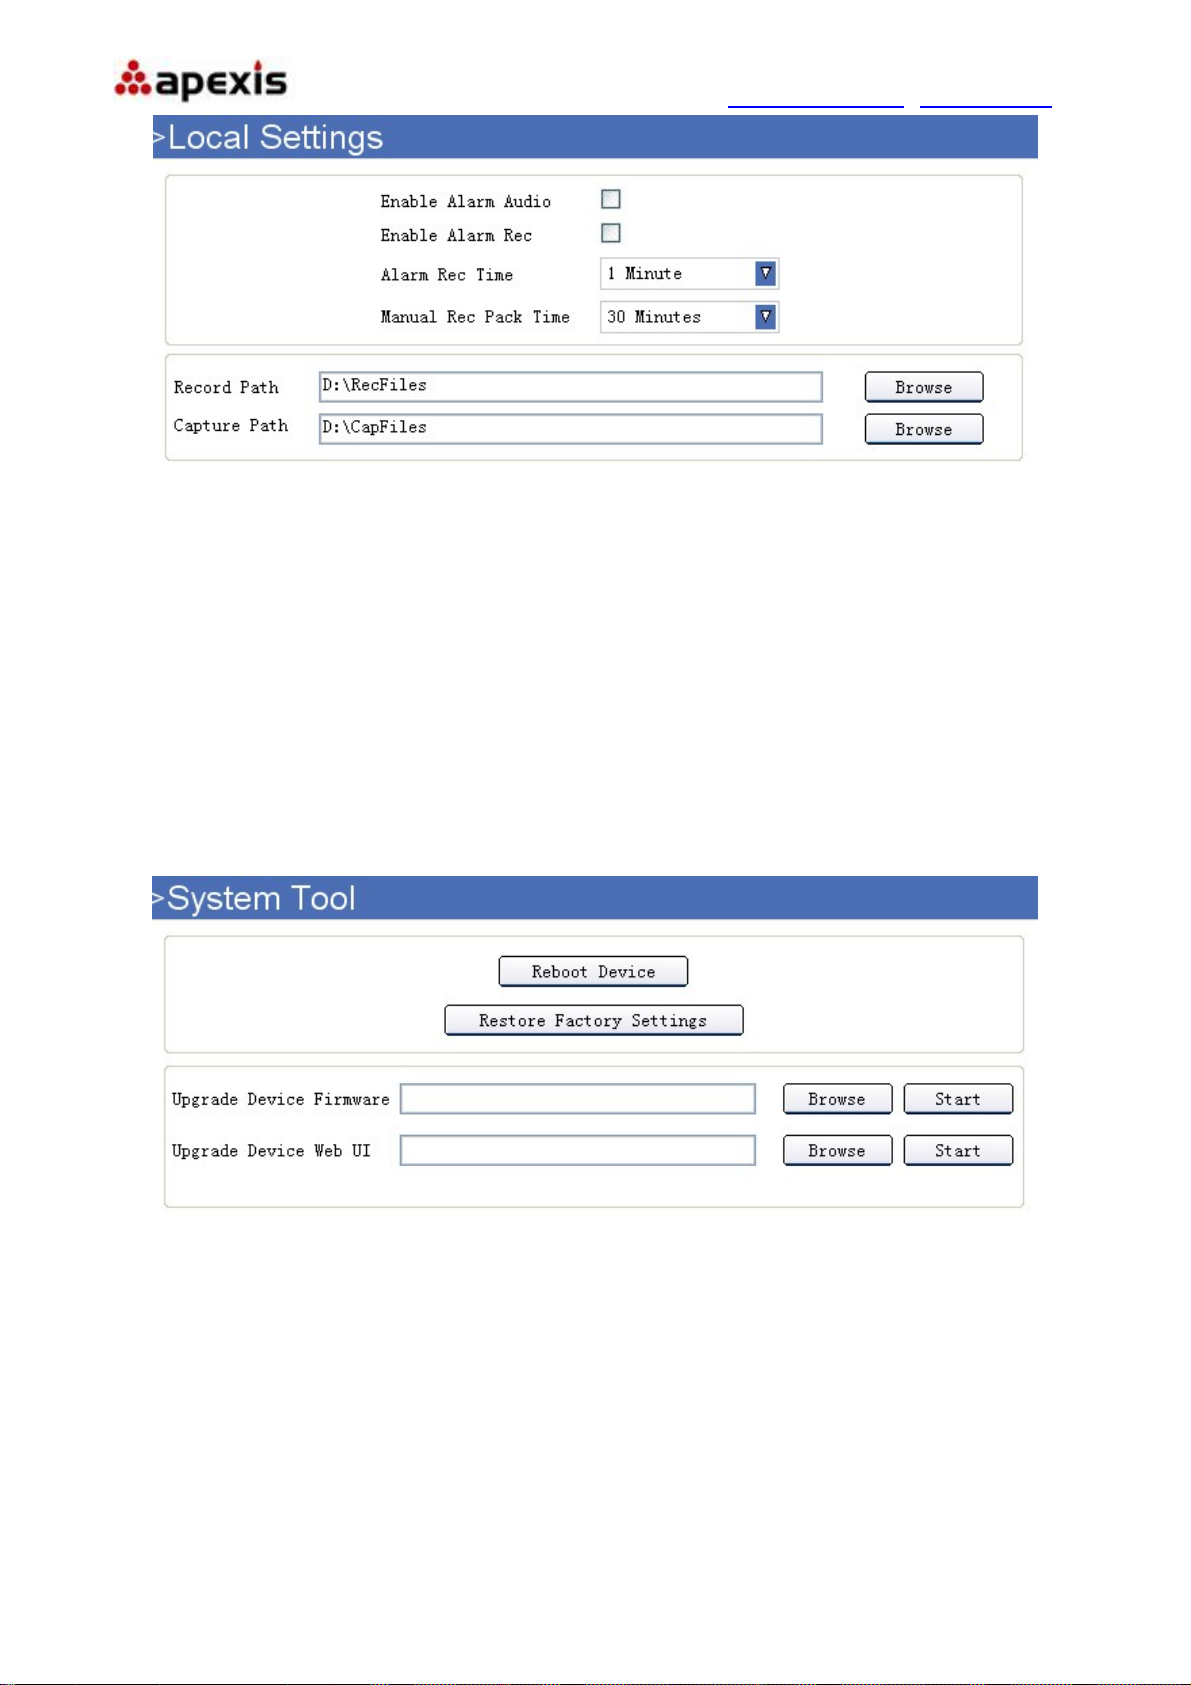
4.18. Local Settings
Click “Local Settings” to enter the interface:
Shenzhen Apexis Electronic Co., Ltd Tel: +86-755-26509025 Fax: +86-755-26509229
33 of 42
Page 34
More Security, More Convenience www.apexis.com.cn / www.apexis.cc
Figure7.5
Enable Alarm Audio: Set audio ON/OFF once alarmed.
Enable Alarm Rec: Set alarm record function ON/OFF.
Alarm Rec Time: Set alarm record duration time, can be 30s, 1min, 2min, 3min, 5min.
Manual Rec Pack Time: Set the manual record file pack time, can be 30min, 1h, 2h, 3h, 5h.
Record Path: Set the path for record file saved..
Capture Path: Set the path for snapshot saved.
4.19. System Tool
Click “System Tool” to enter the interface:
● Reboot Device: Click to Reboot the camera.
Figure7.6
● Restore Factory Settings: Click it, all the parameters will be back to factory settings.
● Upgrade Device Firmware: Click “Browse”, choose the correct system file for upgrade, then click “Start”.
● Upgrade Device Web UI: Click “Browse”, choose the correct Web UI file for upgrade, then click “Start”.
NOTE: Please use the correct upgrade file, must keep the power on when upgrading, wired mode suggested,
because wrong operation or incorrect upgrade file maybe damage the device.
Shenzhen Apexis Electronic Co., Ltd Tel: +86-755-26509025 Fax: +86-755-26509229
34 of 42
Page 35
More Security, More Convenience www.apexis.com.cn / www.apexis.cc
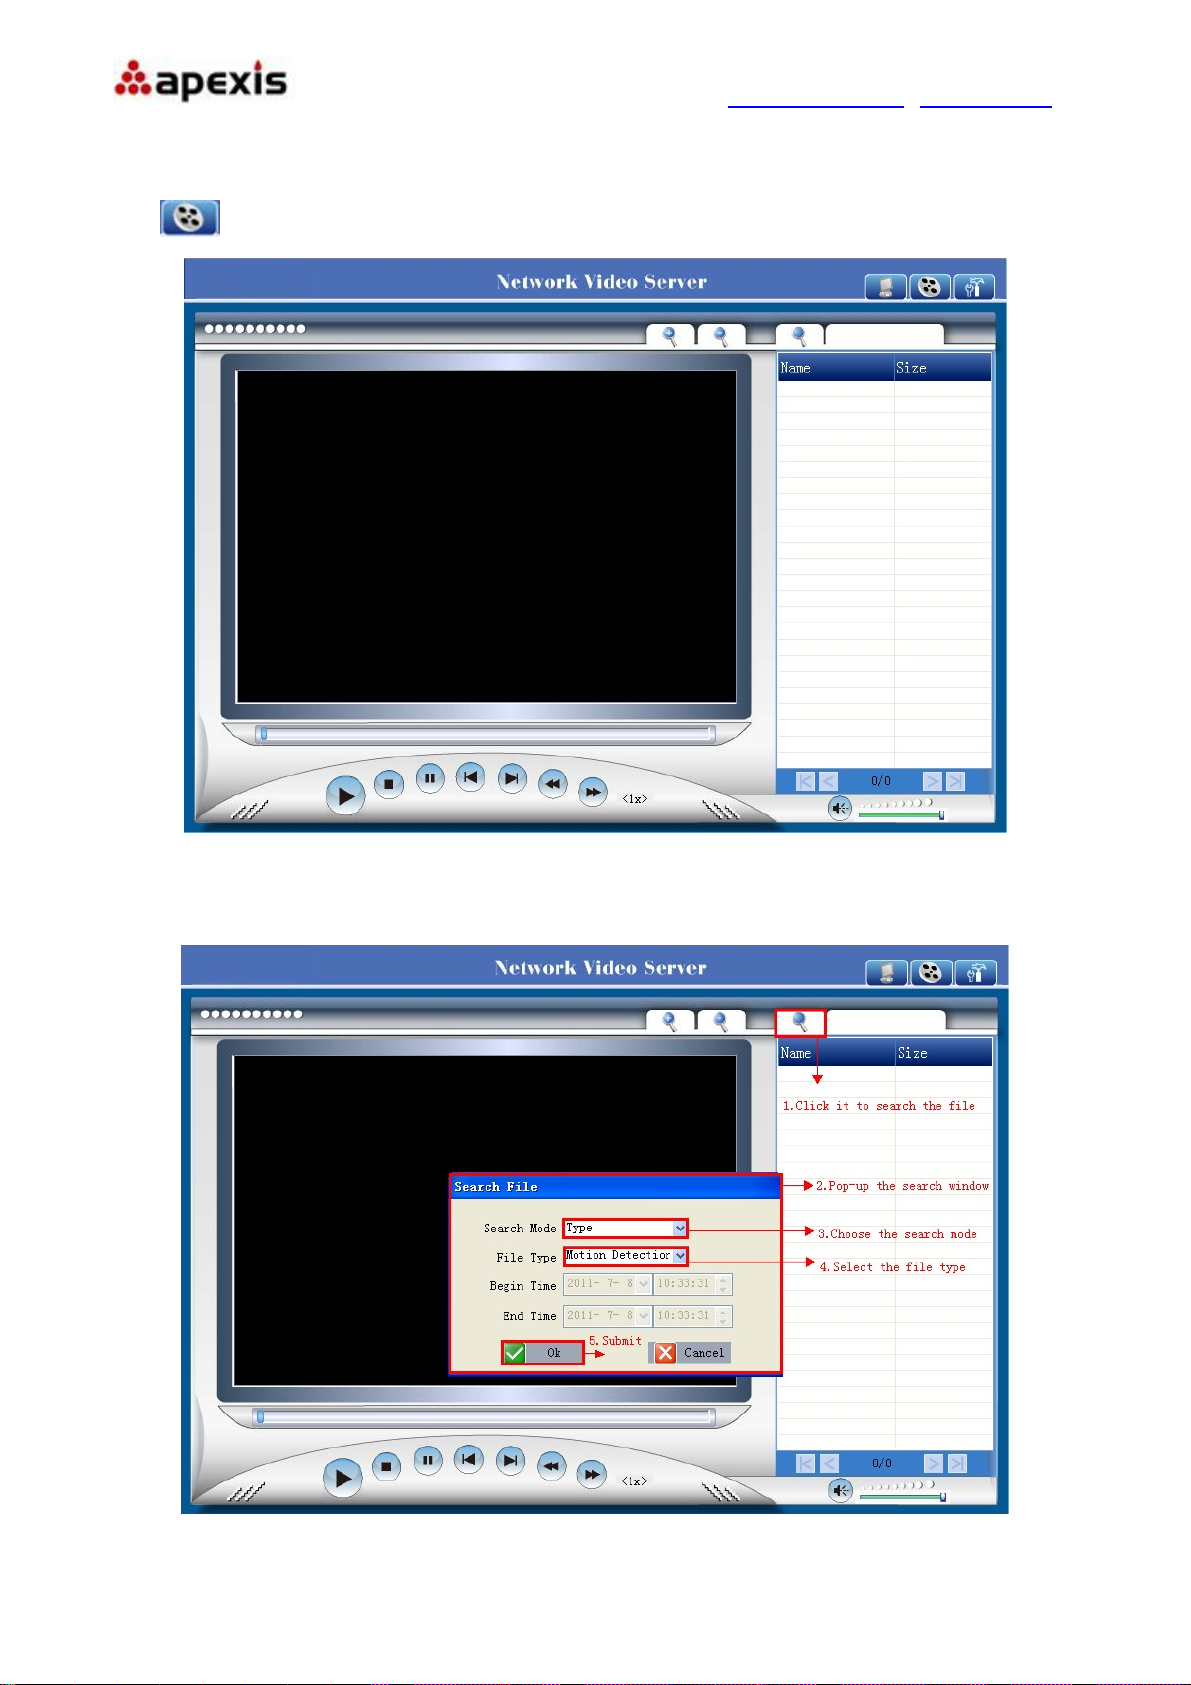
5. PLAYBACK
Click ,login the playback interface, this is for SD Card files playback.
Figure7.7
Click search icon, will pop-up a window for search file, set the mode or time, click OK to submit, then
all the correlative files will be listed on the right side.
Figure7.8
Shenzhen Apexis Electronic Co., Ltd Tel: +86-755-26509025 Fax: +86-755-26509229
35 of 42
Page 36
More Security, More Convenience www.apexis.com.cn / www.apexis.cc
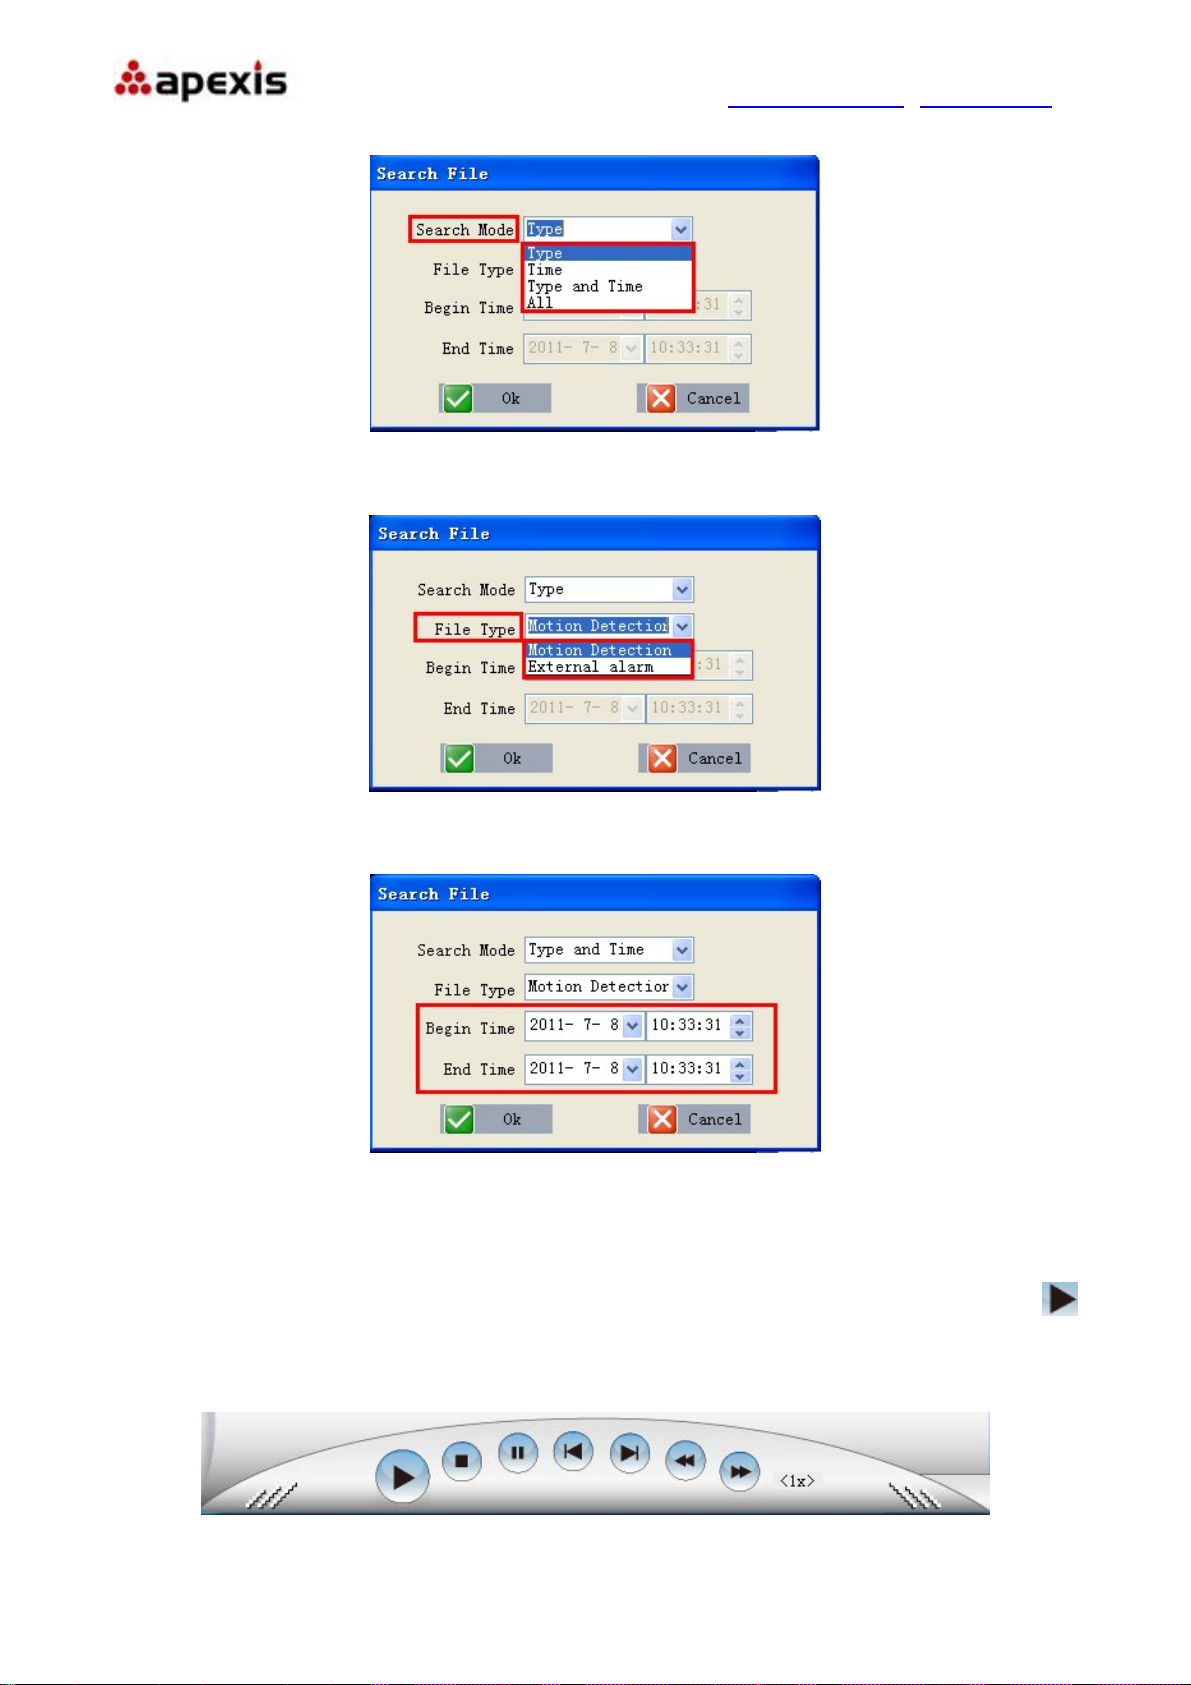
Search Mode: There are 4 search modes optional.
Figure7.9
1. Type: means search by the file type.
Figure8.0
2. Time: means search by the appointed record time
Figure8.1
3. Type and Time: means search by both file type and appointed record time.
4. All: means all the files.
After searching, files will be listed on the right side window, choose the file, double click it or click play icon
to start replay. Users can check the replay file information here, do other operation such as St op,
Pause, Previous, Next, Fast Backward, Fast Forw ard etc.
Figure8.2
Shenzhen Apexis Electronic Co., Ltd Tel: +86-755-26509025 Fax: +86-755-26509229
36 of 42
Page 37
More Security, More Convenience www.apexis.com.cn / www.apexis.cc
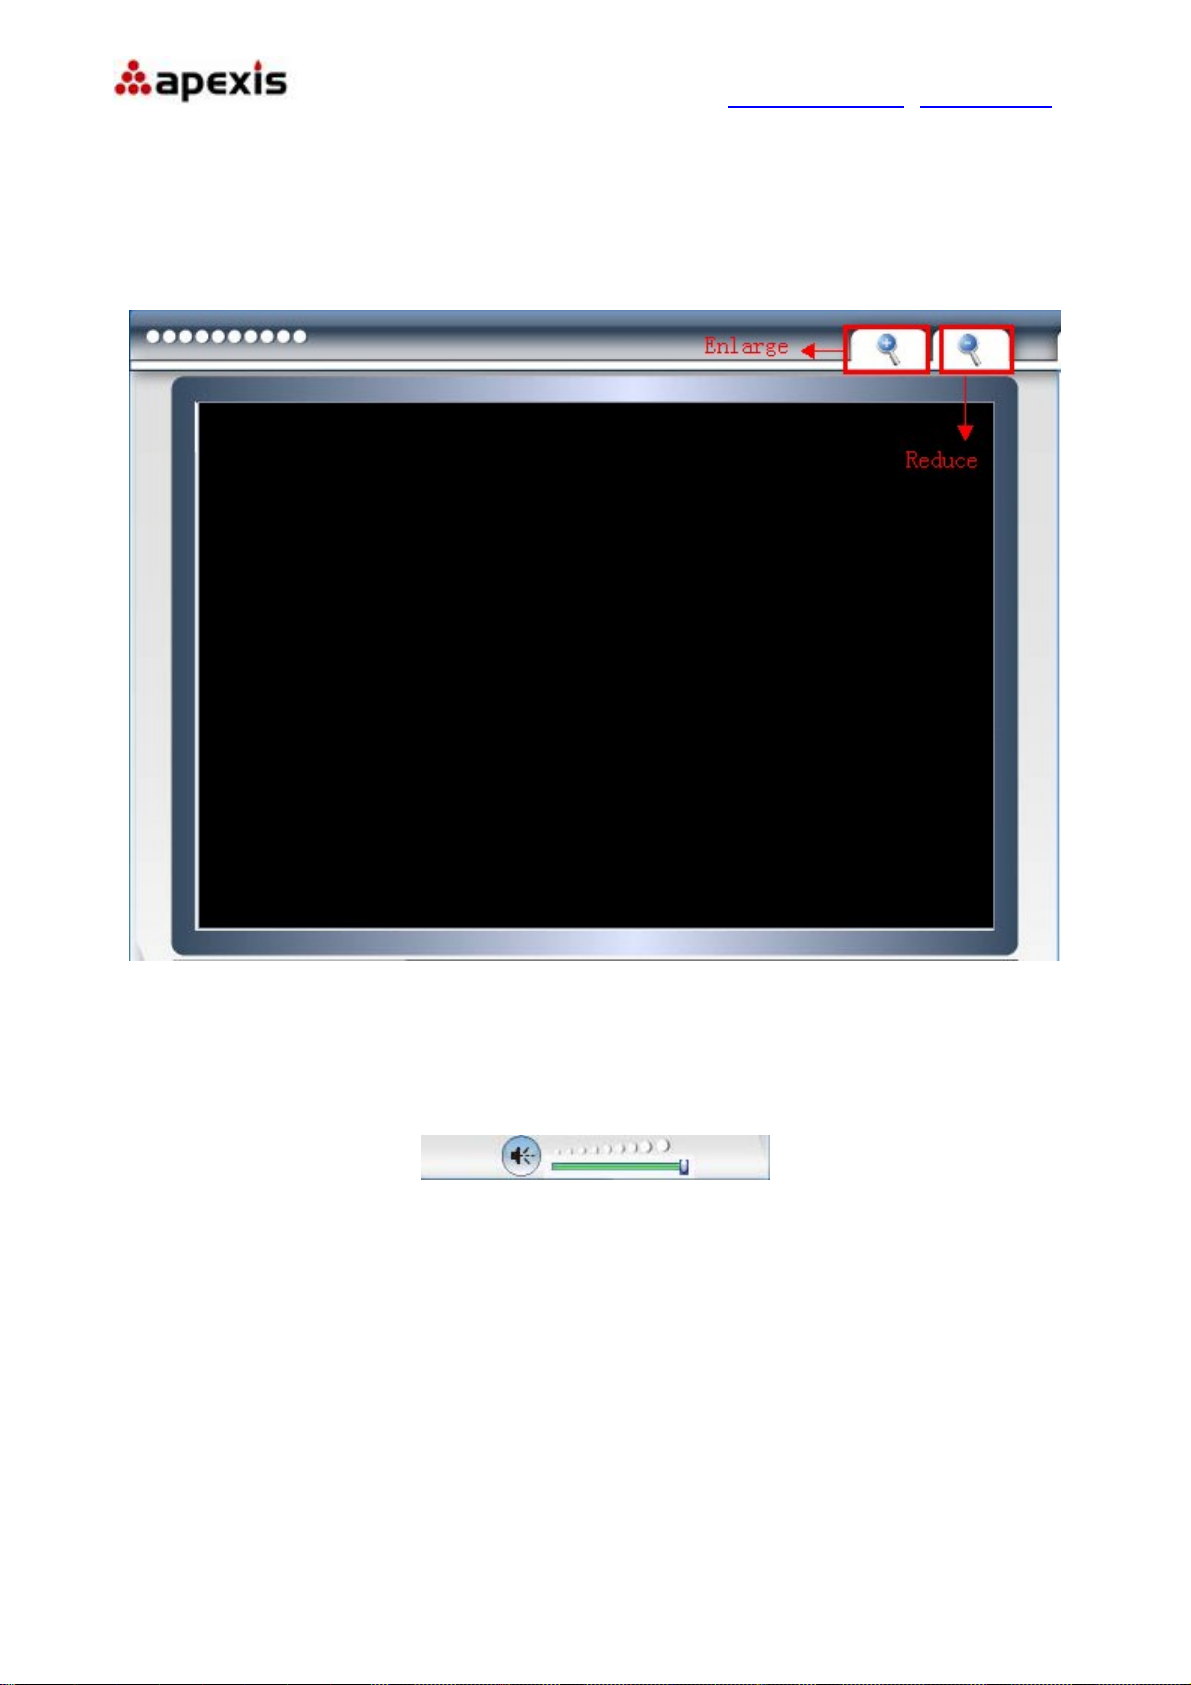
Image Enlarge and Reduce
During playback, users can enlarge the image to see the video details, it supports 2X, 4X, 8X zoom.
Click the enlarge icon, will pop-up a window to choose the zoom in type.
Click the reduce icon, will zoom out the image.
Figure8.3
Audio:
During playback, users can adjust the volume, drag the volume icon on the right bottom side.
Figure8.4
Shenzhen Apexis Electronic Co., Ltd Tel: +86-755-26509025 Fax: +86-755-26509229
37 of 42
Page 38

More Security, More Convenience www.apexis.com.cn / www.apexis.cc
6. FREQUENTLY ASKED QUESTIONS
1.
I have forgotten the administrator username and/or password
There is a [RST] button on the rear panel, keep the power on, hold the reset button for 10 seconds, it will
restore back to factory default settings as below:
Username: admin
Password: admin
NOTE: Please don’t press RST button if without professional guide.
2.
There is no picture displayed in IE browser
It maybe the ActiveX problem,
If use the IE browser for the first time, should install the ActiveX, details as below:
Before login, click the ActiveX icon
it to install the ActiveX.
3.
Fail to visit IP camera via IE after upgrading
Solution: Clear the browser buffer.
Steps: Open IE>click “Tools”> “Internet Options”>“General”>“Delete”> “Internet temporary files”, delete
the cookies and temporary files, then click “OK” and re-login.
4.
The video is not smooth
Possible reason 1: The frame rate value is too small.
Solution: Increase the frame rate value.
Possible reason 2: Too many users are connecting to the device.
Solution: Close some connection or reduce the video frame rate.
Possible reason 3: Network bandwidth is too low, lots of lost packets.
Solution: Reduce the video frame rate or video compression bit rate.
at the right side of interface to download, save the file, run
5. Fail to visit IP camera via IE browser
Possible Reason 1: Network is disconnected.
Solution: Connect your PC to network, check whether the network works well or not. Check whether the
cable problem, or network problem caused by PC virus.
Possible reason 2: IP Address has been occupied by other devices.
Solution: Stop the connection between IP camera and network; connect the IP camera to PC
directly, reset IP address according to the proper operations recommended.
Possible reason 3: IP addresses are in different subnets.
Solution: Check IP address, Subnet masking and Gateway.
Possible reason 4: Physical address of network conflict with IP camera.
Shenzhen Apexis Electronic Co., Ltd Tel: +86-755-26509025 Fax: +86-755-26509229
38 of 42
Page 39

More Security, More Convenience www.apexis.com.cn / www.apexis.cc
Solution: modify the physical address of IP camera.
Possible Reason 5: Web port has been modified.
Solution: Contact Network Administrator to obtain related information.
Possible Reason 6: Unknown.
Solution: Press RESET to restore to factory settings then connect it again, the default IP address is
192.168.1.155, subnet mask is 255.255.255.0
6. The color of image is abnormal (Green or other color)
Sometimes the IP camera images cannot be displayed properly because of different graphics cards, the
images appears to be green or other colors, then you should run the programme “Config.exe” from the
downloaded OCT files.
(or run C:\windows\system32\Config.exe) to set the following parameters of display buffer: auto-detection,
used display card memory or system memory,
then run IE , connect IP camera again.
7. There is no voice while monitoring
Possible Reason 1: No audio input connection
Solution: Check audio connection of the host
Possible Reason 2: the relative audio option of IP camera is OFF.
Solution: Check audio parameter settings to see if you have set the audio option ON, but without external
audio input.
8. Image processing doesn’t work properly
Possible Reason 1: System problem, DirectX function is disabled, which will cause slow display of images
and abnormal color.
Possible Reason 2: Hardware problem, graphics card doesn’t support image acceleration and hardware
zooming functions. (For hardware issue, the only solution is to change the graphics card)
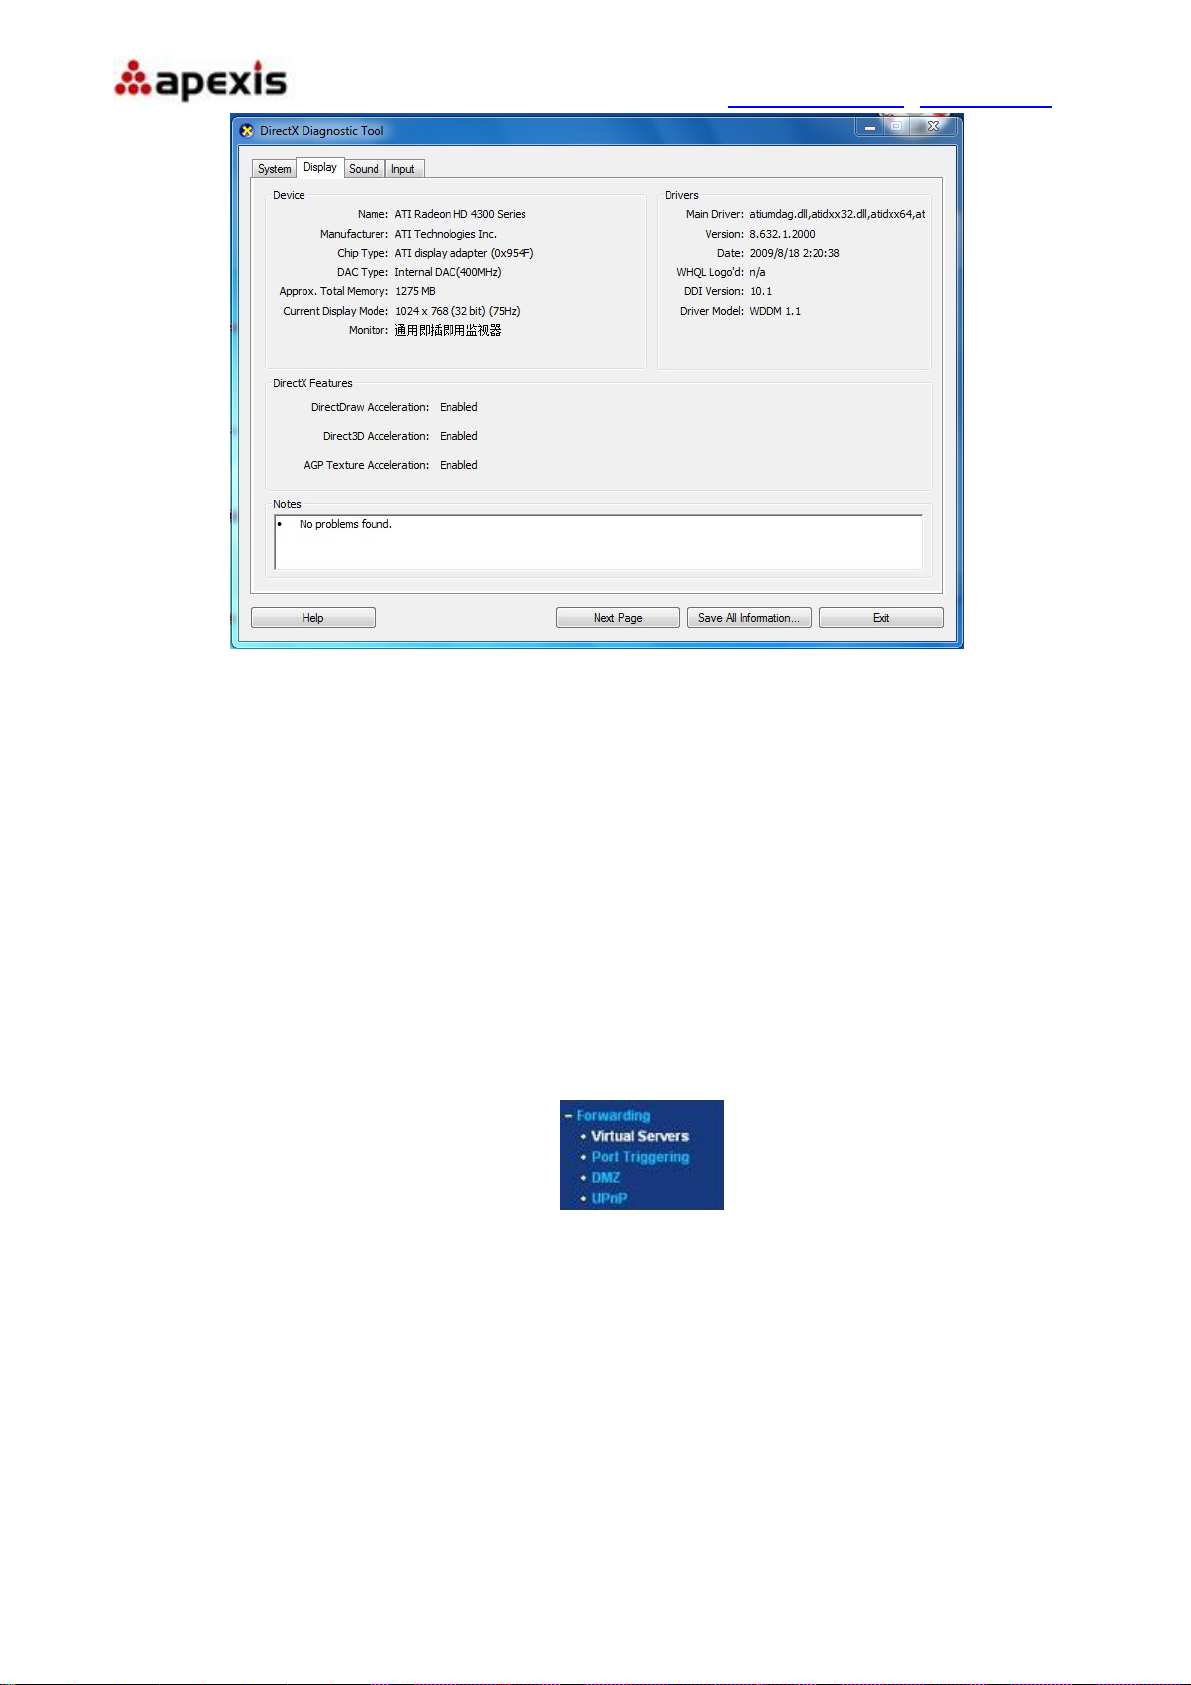
Solution: Install DirectX image driver, then click “Start”>”Run”>input “dxdiag”, set enable "DirectDraw
Acceleration" "Direct3D Acceleration " "AGP Texture Acceleration" functions.
Shenzhen Apexis Electronic Co., Ltd Tel: +86-755-26509025 Fax: +86-755-26509229
39 of 42
Page 40
More Security, More Convenience www.apexis.com.cn / www.apexis.cc
.
Figure8.5
Note: If you are unable to do it, it means your DirectX is not installed properly or hardware doesn't support this
function.
9.
Fail to use DDNS
Possible Reason 1: The PC or IP Camera can’t connect to the internet.
Solution: Check the internet connection and settings.
Possible Reason 2: Port forward is not set in router.
Solution: Set the port forward of extranet in router correctly.
For example, if IP Camera address is: 192.168.1.100, Media port is 38401, Web port is 85, factory DDNS is
http://test.aipcam.com. Use TP-Link router as below:
(1) Login the router.
(2) Choose “Forwarding”, select “Virtual Servers”
(3) Click the Add New button, pop-up below:
Shenzhen Apexis Electronic Co., Ltd Tel: +86-755-26509025 Fax: +86-755-26509229
40 of 42
Page 41

More Security, More Convenience www.apexis.com.cn / www.apexis.cc
Figure8.6
Fill the service port as 85, IP address as 192.168.1.100, click Save.
(4) Repeat the step 3, will pop-up the window again, fill the service port as 38401, IP address as
192.168.1.100, then save.
(5) Then check the “Device Info” –“DDNS Status”,
Will show DDNS: http://test.aipcam.com:85
, input this link in IE, then can visit this camera remotely.
Shenzhen Apexis Electronic Co., Ltd Tel: +86-755-26509025 Fax: +86-755-26509229
41 of 42
Page 42

More Security, More Convenience www.apexis.com.cn / www.apexis.cc
7. OBTAINING TECHNICAL SUPPORT
While we hope your experience with the IP CAMERA network camera is enjoyable and easy to use, you may
experience some issues or have some questions that this User’s Guide has not answered. Please contact
your reseller and ask for help firstly, if they could not resolve your issue, please contact our company.
If your cameras do not support some special functions showed in the manual, please contact our technical
support team to obtain the latest Firmware and WEB UI file for doing upgrade.
NOTE: Some old version cameras can’t be upgraded to the latest version, that’s not only the software
difference, but also the hardware difference. If you can’t make sure of it, please contact with our technical
support team directly.
Shenzhen Apexis Electronic Co., Ltd Tel: +86-755-26509025 Fax: +86-755-26509229
42 of 42
Page 43

FCC STATEMENT:
This device complies with Part 15 of the FCC Rules. Operation is subject to the following
two conditions:
(1) This device may not cause harmful interference, and
(2) This device must acce p t any interference received, including interference that may
cause undesired operation.
Warning: Changes or modifications not expressly approved by the party responsible for
compliance could void the user's authority to operate the equipment.
NOTE: This equipment has been tested and found to comply with the limits for a Class B
digital device, pursuant to Part 15 of the FCC Rules. These limits are designed to provide
reasonable protection against harmful interference in a residential installation.
This equipment generates uses and can radiate radio frequency energy and, if not
installed and used in accordance with the instructions, may cause harmful interference to
radio communications. However, there is no guarantee that interference will not occur in a
particular installation. If this equipment does cause harmful interference to radio or
television reception, which can be determined by turning the equipment off and on, the
user is encouraged to try to correct the interference by one or more of the following
measures:
Reorient or relocate the receiving antenna.
Increase the separation between the equipment and receiver.
Connect the equipment into an outlet on a circuit different from that to which the receiver
is connected.
Consult the dealer or an experienced radio/TV technician for help.
FCC Radiation Exposure Statement:
This equipment complies with FCC radiation exposure limits set forth for an uncontrolled
environment. This equipment should be installed and operated with minimum distance
20cm between the radiator & your body.
Page 44

- English: "
This device complies with Industry Canada licence-exempt RSS standard(s). Operation
is subject to the following two conditions:
(1) this device may not cause interference, and
(2) this device must accept any interference, including interference that
may cause undesired operation of the device."
-French:"
Le présent appareil est conforme aux CNR d'Industrie Canada applicables aux appareil
s radio exempts de licence. L'exploitation est autorisée
aux deux conditions suivantes :
(1) l'appareil nedoit pas produire de brouillage, et
(2) l'utilisateur de l'appareil doit accepter tout brouillage radioélectrique subi,
même si le brouillage est susceptible d'en compromettre le fonctionnement."
 Loading...