

Page 1

Digi Connect® Tank
v2
User Guide
Page 2

Revision history—90001469
Revision Date Description
G July 2017
H August 2017 Added battery safety information.
J May 2018
K October 2018
L December 2020 Updated ATEX requirements.
Trademarks and copyright
Digi, Digi International, and the Digi logo are trademarks or registered trademarks in the United
States and other countries worldwide. All other trademarks mentioned in this document are the
property of their respective owners.
© 2020 Digi International Inc. All rights reserved.
n Updated graphics and text with information about
correctly aligning the cover and base when
assembling the device.
n Updated the product specifications temperature
range.
n Updated insert SIM card instructions.
n Added note to Connect Tank range specifications.
Updated range specifications: Cellular specifications and
General product specifications.
Disclaimers
Information in this document is subject to change without notice and does not represent a
commitment on the part of Digi International. Digi provides this document “as is,” without warranty of
any kind, expressed or implied, including, but not limited to, the implied warranties of fitness or
merchantability for a particular purpose. Digi may make improvements and/or changes in this manual
or in the product(s) and/or the program(s) described in this manual at any time.
Warranty
To view product warranty information, go to the following website:
www.digi.com/howtobuy/terms
Send comments
Documentation feedback: To provide feedback on this document, send your comments to
techcomm@digi.com.
Digi Connect® Tank v2 User Guide
2
Page 3

Customer support
Digi Technical Support: Digi offers multiple technical support plans and service packages to help our
customers get the most out of their Digi product. For information on Technical Support plans and
pricing, contact us at +1 952.912.3444 or visit us at www.digi.com/support.
Digi Connect® Tank v2 User Guide
3
Page 4

Contents
Digi Connect® Tank v2 User Guide
Get started
Verify product components 8
Assemble the device 8
Activate a SIMcard 12
LED indicators 12
Device controls 13
Technical specifications
Cellular specifications 15
Sensor specifications 15
General product specifications 16
Hardware
Maximum power and frequency bands 18
Safety notices 18
Installation considerations 19
Warnings: Explosion hazards 19
RF exposure statement 20
UL/cUL conformity 20
Special conditions for safe use (ATEX) 21
ATEX marking 22
Safety information 24
Remote Manager reporting 24
Scheduled reports 24
Alarms 24
Cellular and GPS communication 25
Battery inspection 25
Battery life 25
Initial Connect Tank configuration
About waking the device 27
Wake the device 27
Connect to the device using the CLI 27
Digi Connect® Tank v2 User Guide
4
Page 5

Register Connect Tank on a cellular network 29
CLI commands 30
Install Connect Tank
Before you begin 35
Install the device on a tank 35
Check network coverage 36
Manage Connect Tank with Remote Manager
About using Remote Manager with Connect Tank 38
Before you begin 38
Add a device to Digi Remote Manager 38
Alarm reports and options 39
Configure alarms 39
High and low thresholds 40
Hysteresis 41
Sensor error and battery life 42
Configure device (report) settings 43
Custom scaled values for tank data 44
Configure cellular options 45
Configure Remote Manager settings 45
Remote Manager option definitions for Connect Tank 46
Alarm options 46
Cellular option definitions 46
Device Cloud option definitions 47
Device (report) settings option definitions 47
Use Remote Manager to view device and sensor data streams
About data streams 50
View device data streams 51
Data streams reference information 51
Connect Tank maintenance
Firmware updates 55
Update the firmware using Remote Manager 55
Update the firmware using the CLI 56
Battery replacement 58
Troubleshooting
Device not responding 61
Reset the device 61
Restore factory defaults to the device 61
Device not connected to the cellular network 61
Troubleshooting Connect Tank reports and alarms 62
Empty tank reports 62
No reports in Remote Manager 62
High liquid reports 63
Digi Connect® Tank v2 User Guide
5
Page 6

Alarms while filling the tank 65
Metal tank issues 65
Regulatory information
FCC certifications and regulatory information 66
Declaration of Conformity (DoC) 66
CE mark (Europe) 67
Digi Connect® Tank v2 User Guide
6
Page 7
Digi Connect® Tank v2 User Guide
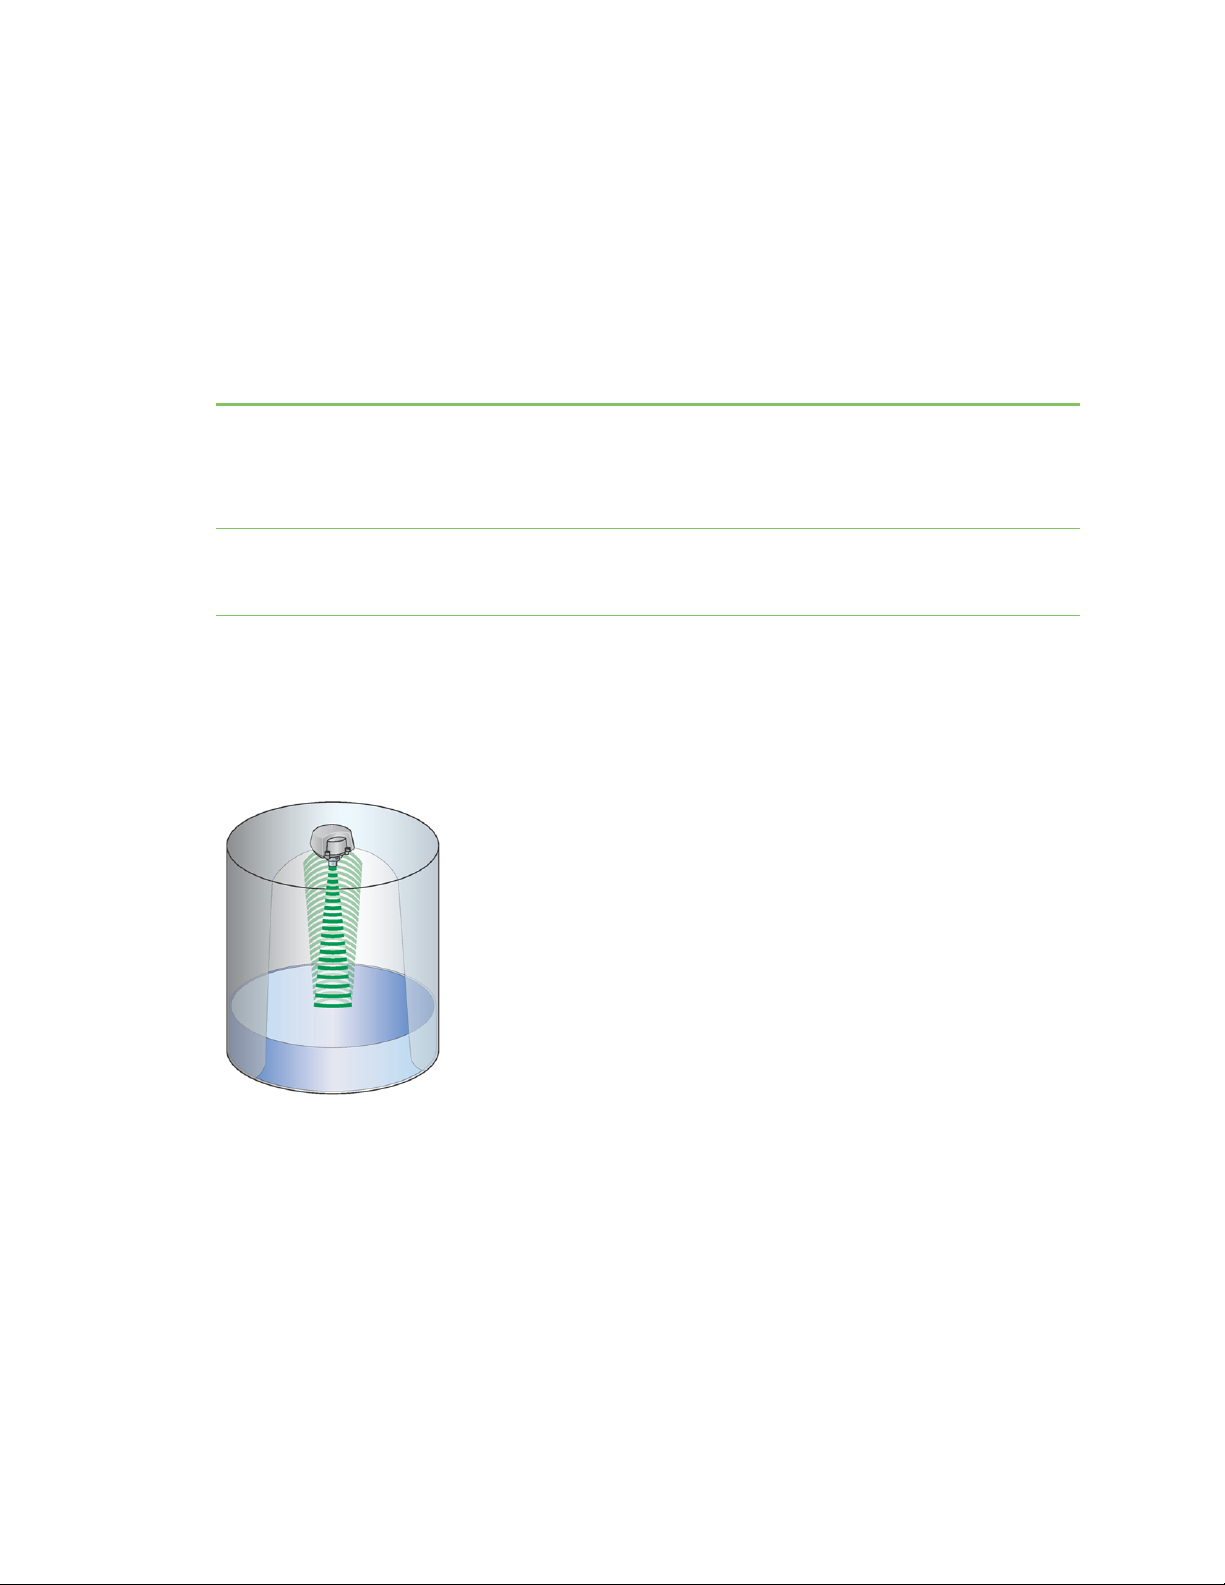
Digi Connect Tank v2 allows you to remotely monitor the liquid level in a single tank. The Connect
Tank device operates wirelessly by running on a long-life battery and communicating through the
cellular network.
Note Do not use Connect Tank to measure levels of non-liquid tanks. The Connect Tank device uses
ultrasonic sensing, which requires a uniform surface to take accurate measurements. Solid material
does not provide a uniform surface.
Using its ultrasonic sensor, the Connect Tank device transmits a narrow ultrasonic sound beam to the
surface of the liquid and reflects back to the sensor, as shown in the following figure. The device
measures the amount of time it takes for the ultrasonic sound beam to travel down to the surface of
the liquid and reflect back to the sensor. The device then converts the amount of time into a
measurement showing how far the liquid is from the top of the tank in inches and reports that
information to your Digi Remote Manager account.
Digi Connect® Tank v2 User Guide
7
Page 8
Get started
Before installing the Connect Tank device in a tank, make sure you review the information in this
section and complete all of the tasks.
Verify product components
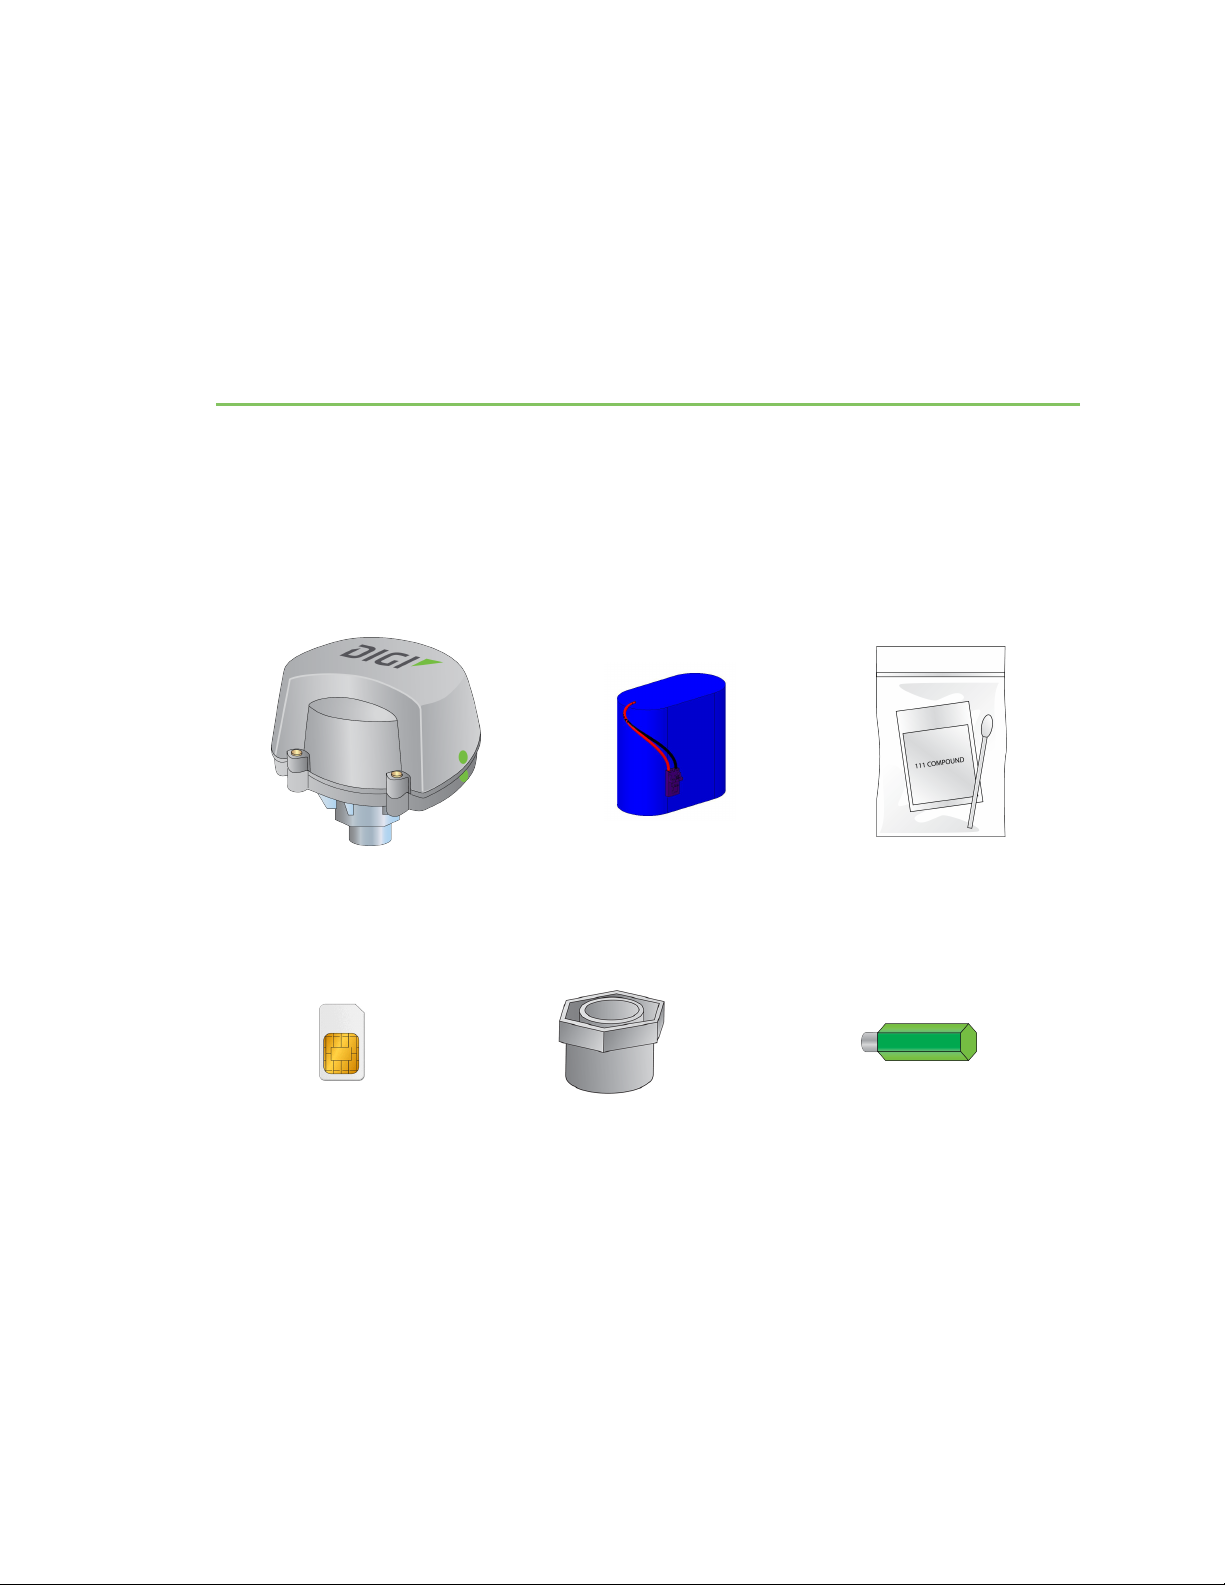
Make sure you have the necessary parts in the box.
Connect Tank includes the following components:
Connect Tank Battery Gasket lubricant
The following accessories are available through Digi International Inc. For more information, see the
Digi Connect Tank product support page.
Activated SIMcard
(when you purchase Digi
Bundled Services)
Assemble the device
Before you begin, make sure you have the following required equipment to assemble the Connect
Tank device:
n One 9/64-inch or 3.5 mm hex key
n Activated SIMcard: See Activate a SIMcard
Digi Connect® Tank v2 User Guide
NPT adapter
(for some tank configurations)
Magnet
(for manually waking the device)
8
Page 9
Get started Assemble the device
CAUTION! This product contains a lithium metal battery. Prior to installation, the
battery should be inspected for any signs of damage. If the battery appears to be
damaged or is dropped during the installation, do not use the battery and dispose of it
properly. See Battery inspection for more information.
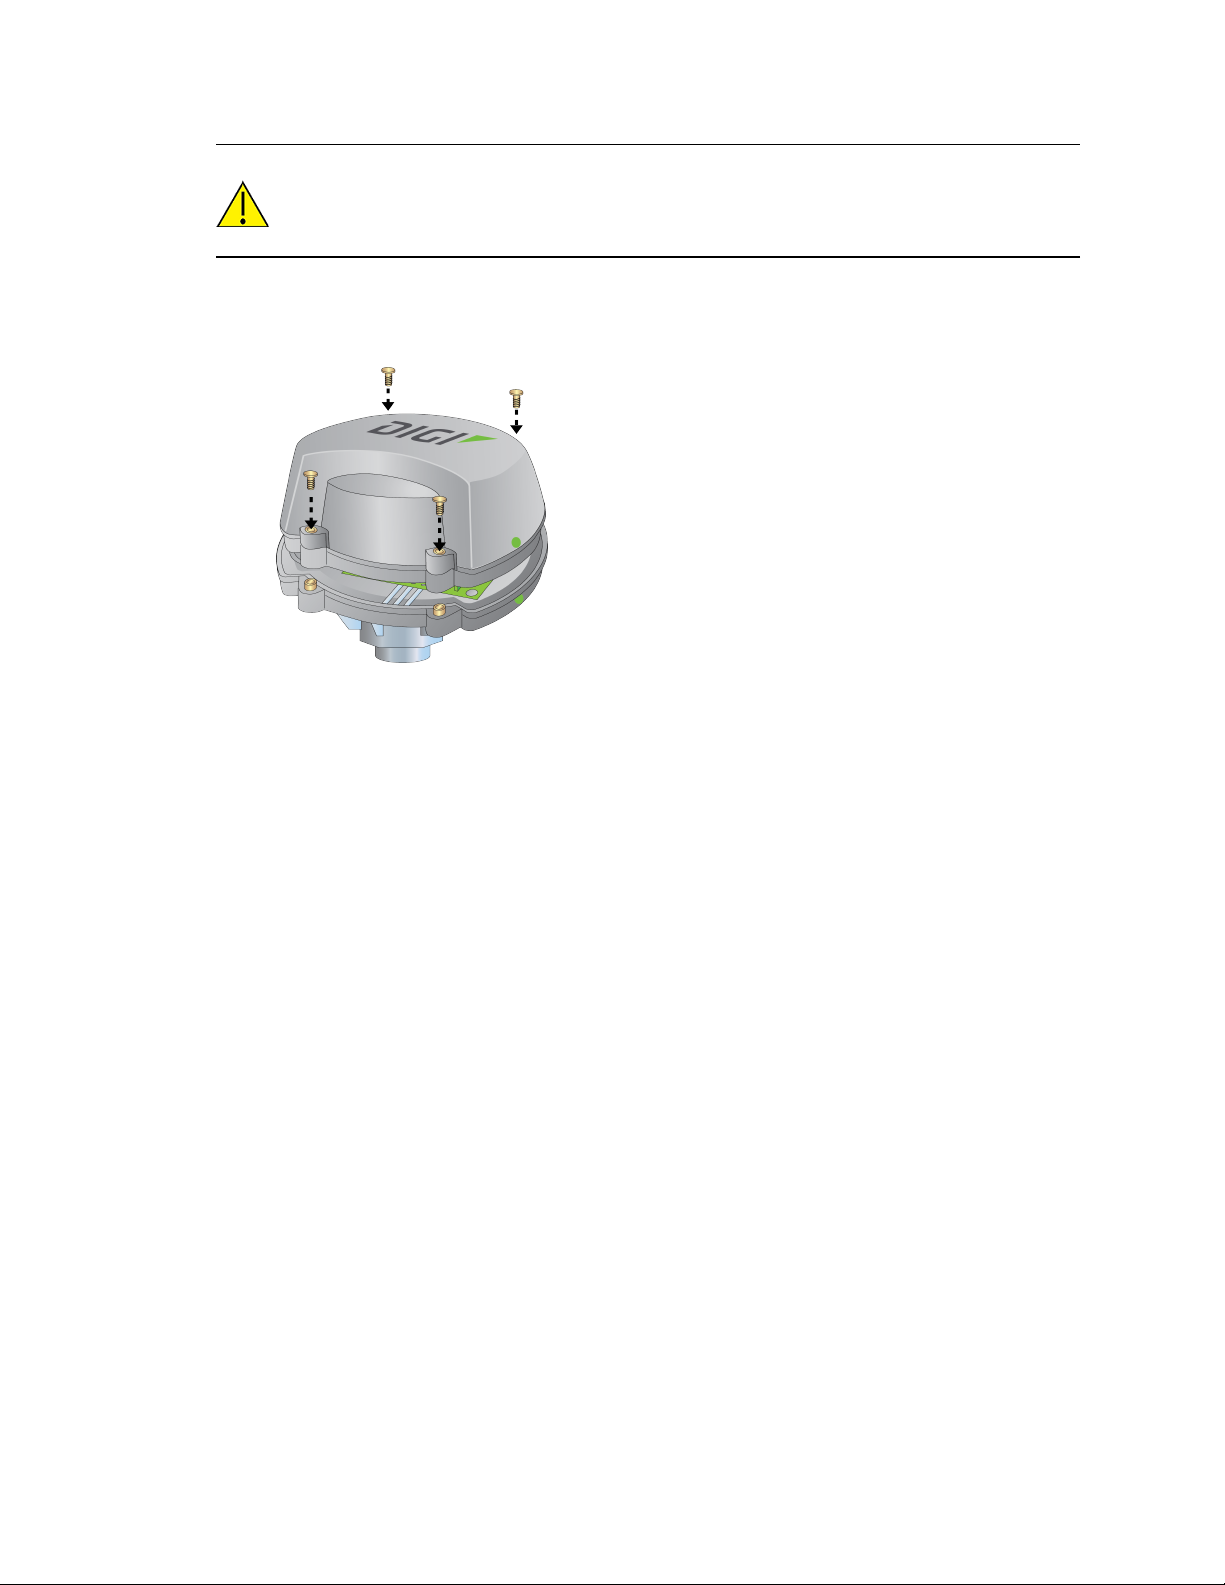
To assemble the device:
1. Use a 9/64-inch or 3.5 mm hex key to loosen the four retaining screws and open the Connect
Tank enclosure cover.
Digi Connect® Tank v2 User Guide
9
Page 10
Get started Assemble the device
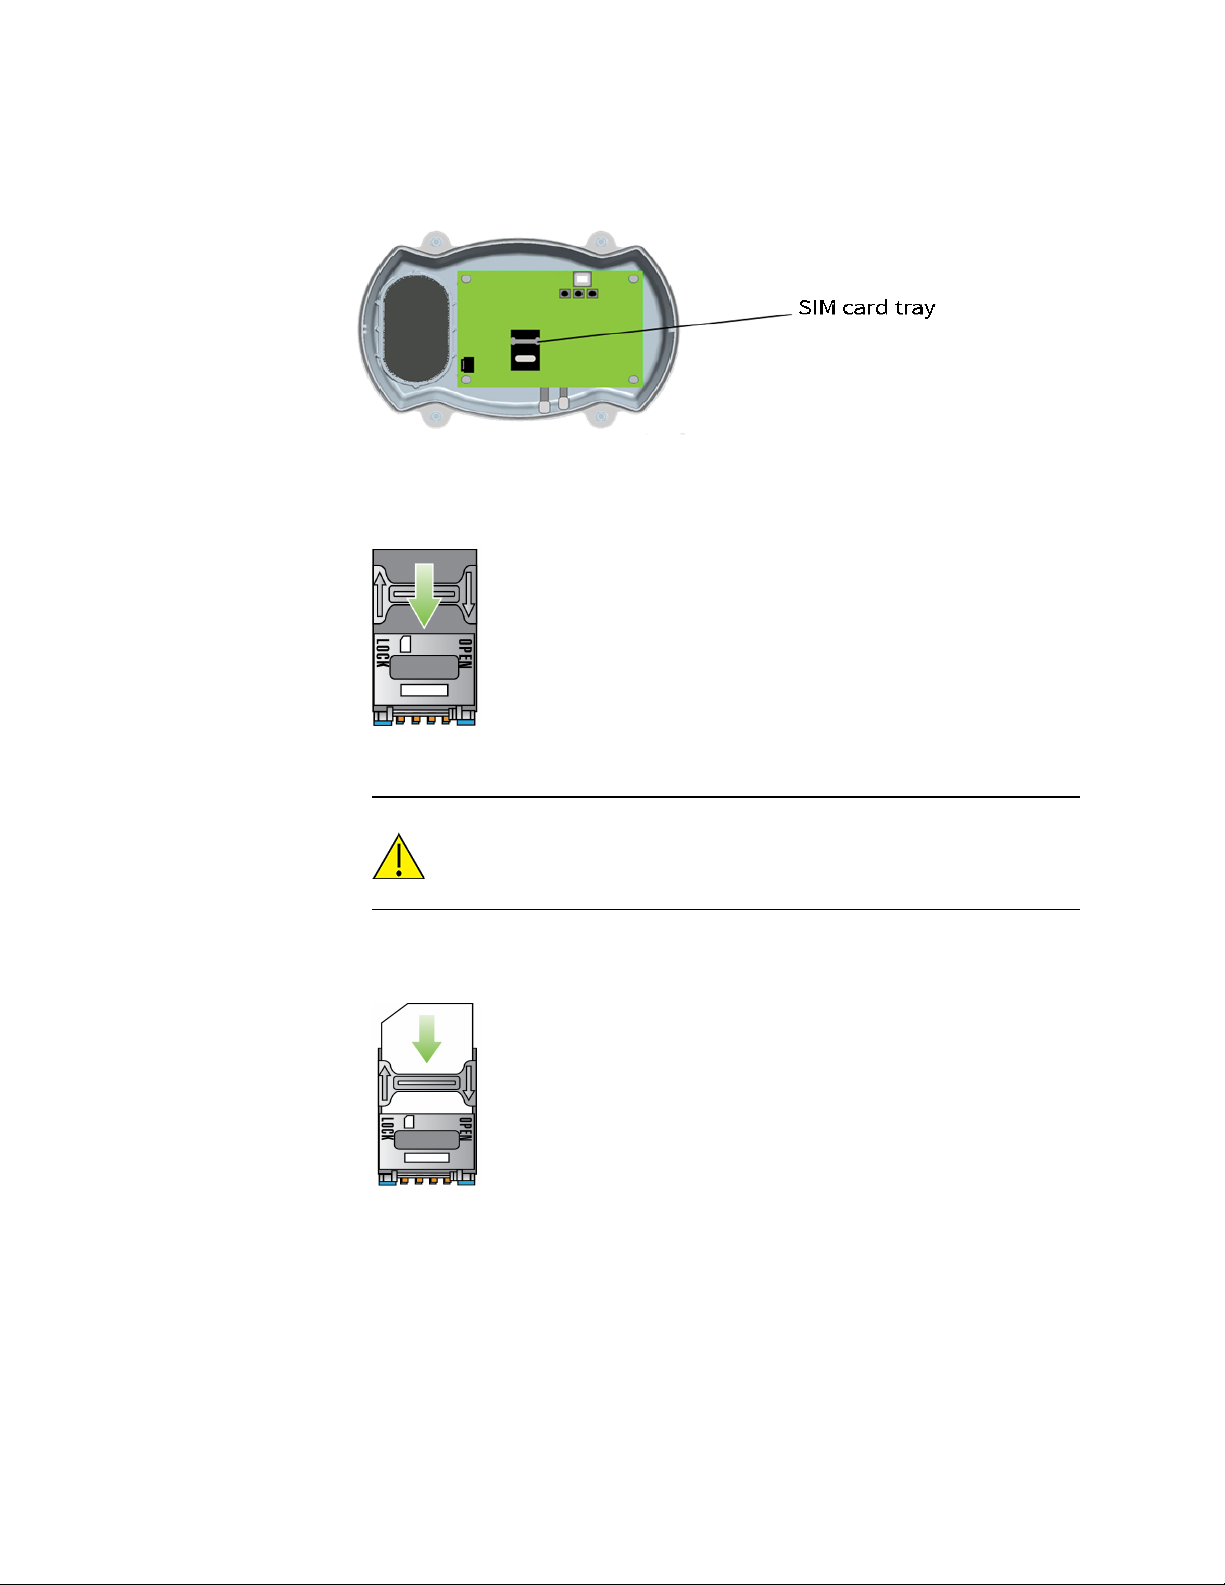
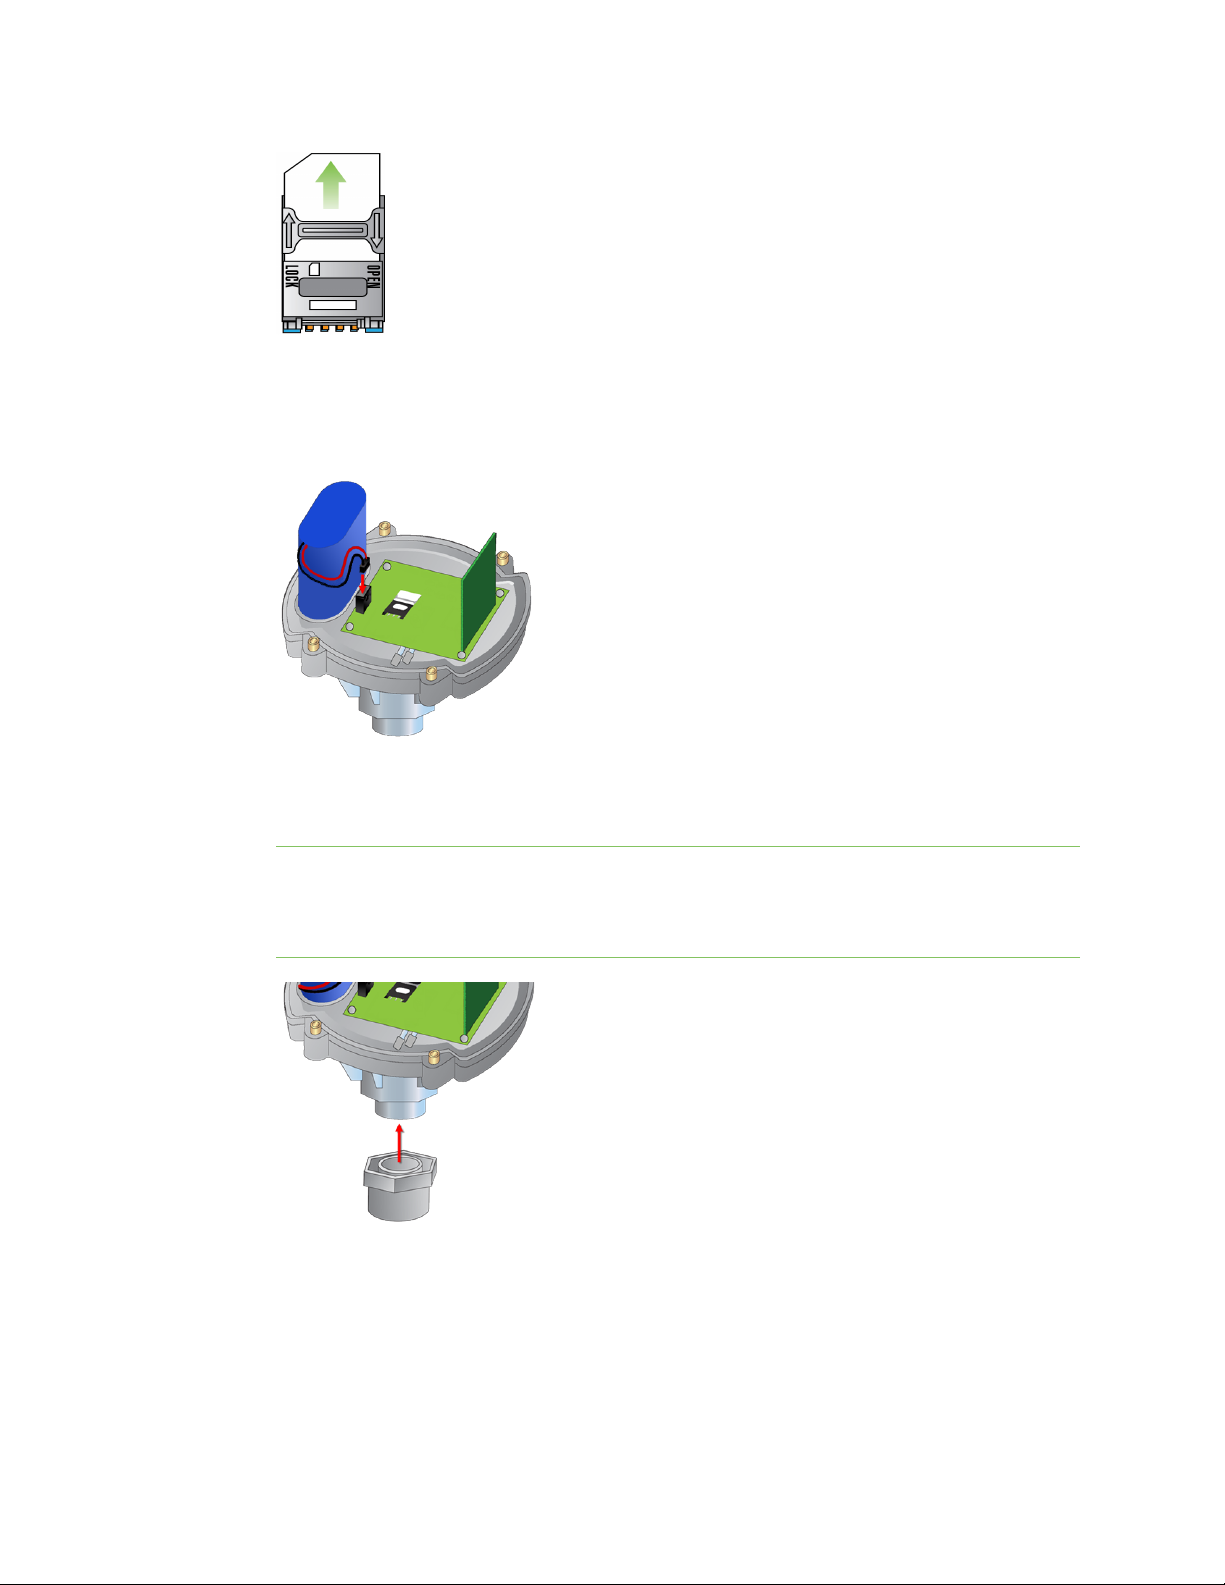
2. Insert the activated SIM card.
a. Orient Connect Tank to match the picture below.
b. Unlock the SIM card tray by gently pushing the metal bar toward the bottom of the
tray.
c. Open the SIMcard tray by pulling the tray up from the top or right side of the tray.
CAUTION! Do not pull the SIMcard tray up from the left side or use a
tool to open the tray. These actions may damage the SIM detect
switch, which is beneath the left side of the tray.
d. Insert the SIM card into the SIMcard tray, with the metal contacts face-down and
the flat edge inserted into the holder.
e. Press the SIMcard tray onto the board.
f. Lock the SIM card tray by gently pushing the metal bar toward the top of the
SIMcard holder.
Digi Connect® Tank v2 User Guide
10
Page 11
Get started Assemble the device
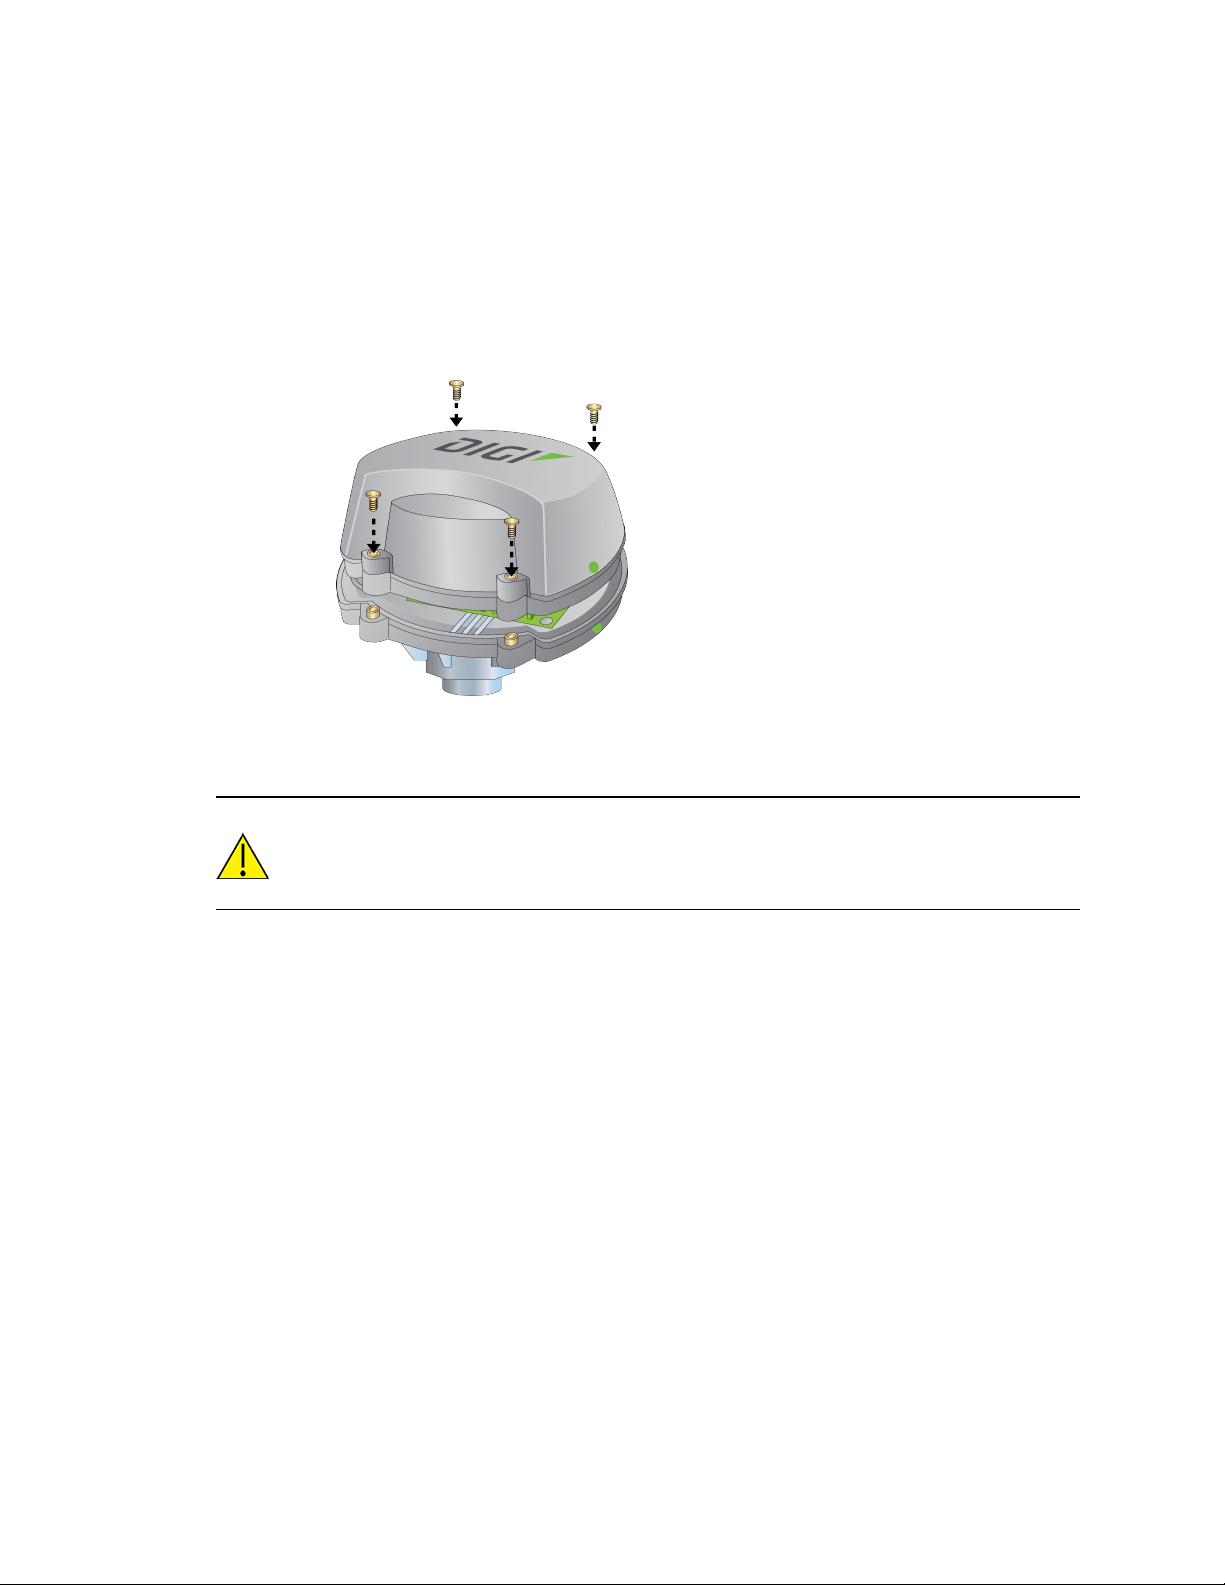
3. Place the battery in the battery holder. Make sure that the wiring attached to the top of the
battery is NOTplaced in the battery holder, as shown below.
4. Connect the wiring to the battery port on the circuit board.
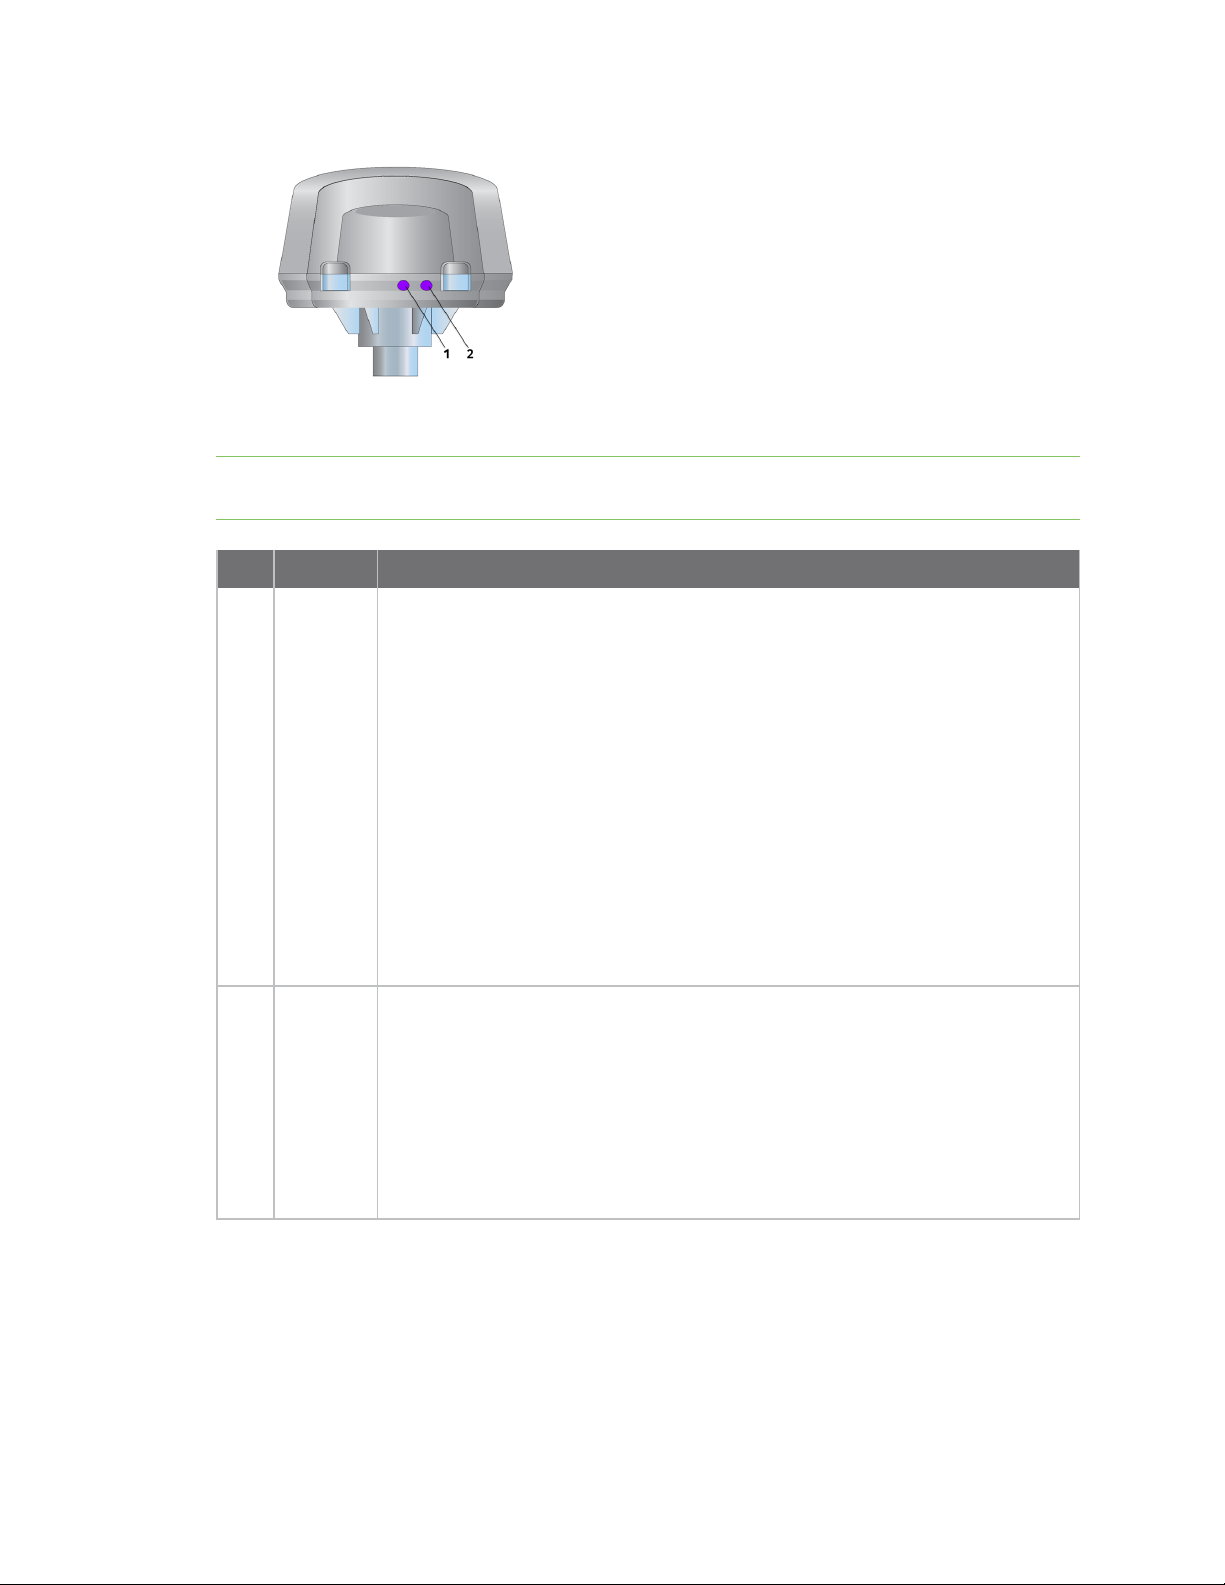
5. (Optional) If your tank has a 2-inch NPT threaded opening, you can attach a 1-inch to 2-inch
adapter to the bottom of the device.
Note If you are using a 2-inch NPT adapter, you should only use the adapter available through
Digi International (part number 76000910). This adapter has been modified specifically to not
cause reflections of the ultrasonic signal. Standard 2-inch NPT adapters will interfere with the
ultrasonic signal and cause incorrect tank level readings.
6. If this is the first time you are assembling the device, complete initial configuration using the
CLI. For more information, see Initial Connect Tank configuration. If initial configuration has
been completed, you can skip this step.
Digi Connect® Tank v2 User Guide
11
Page 12
Get started Activate a SIMcard
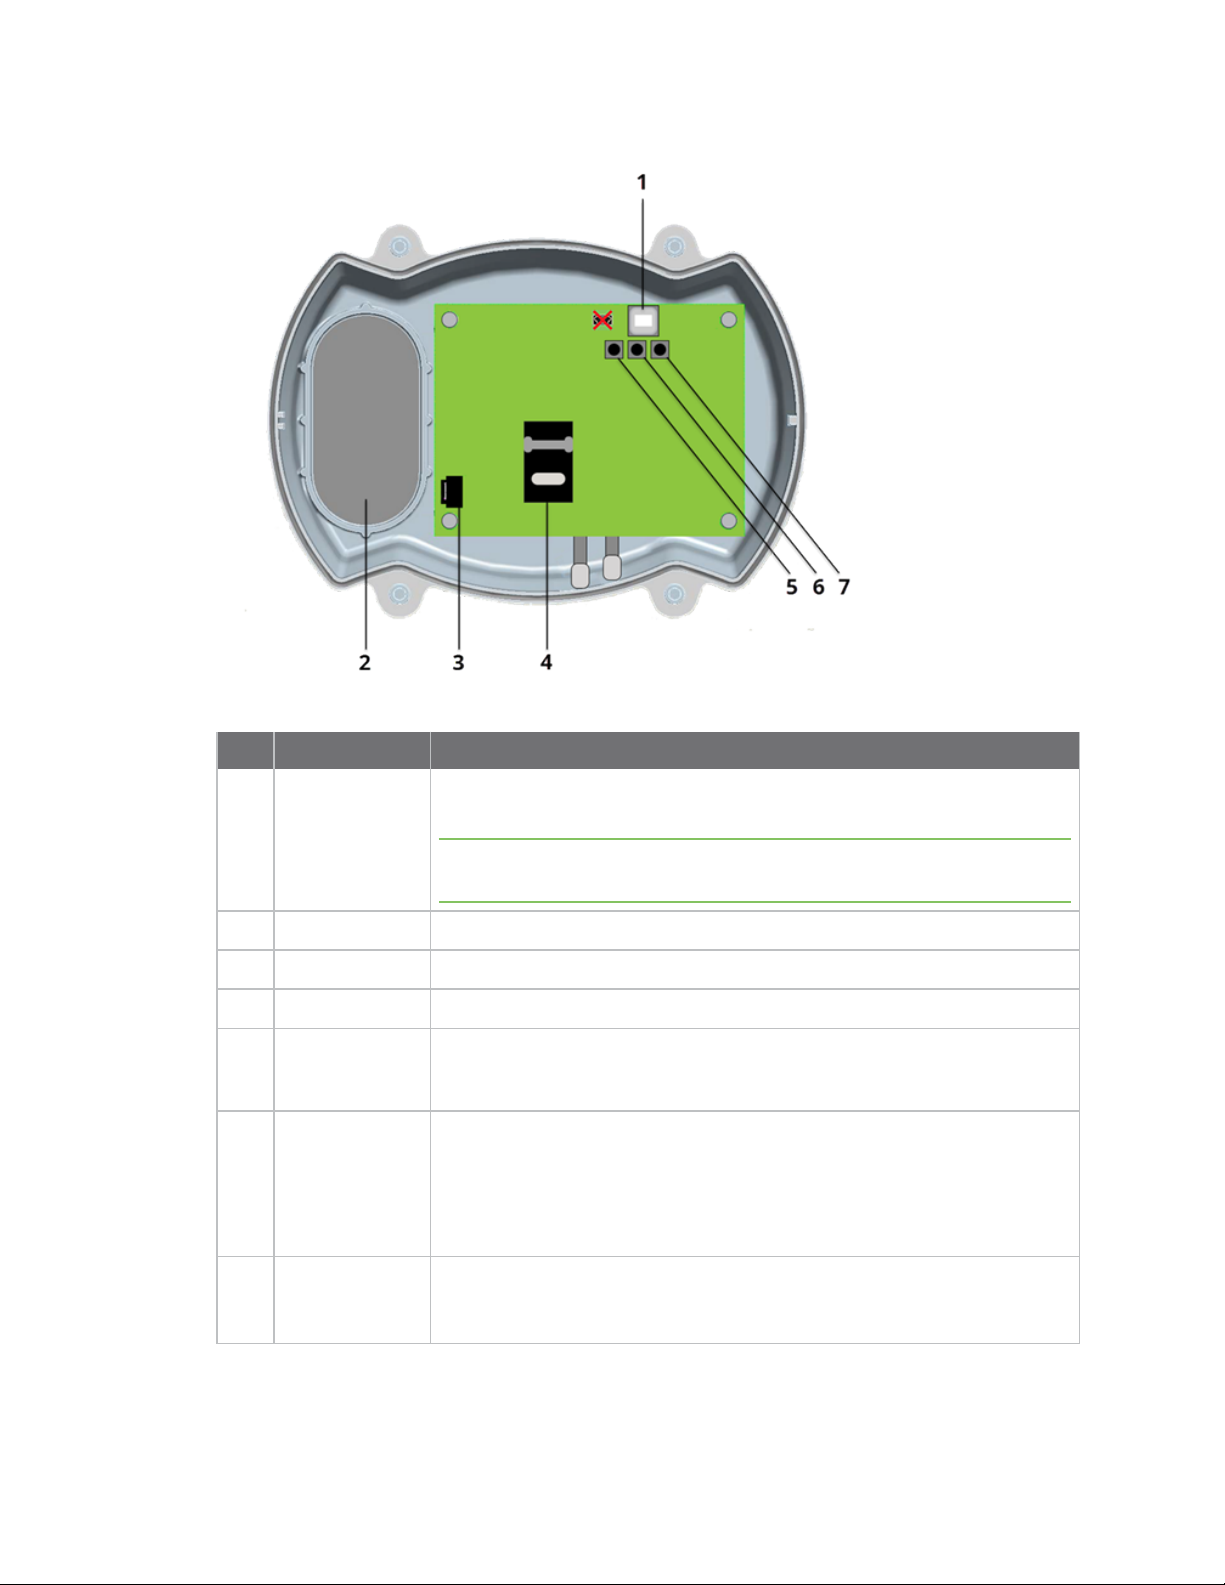
7. Reassemble the device.
a. Place the enclosure cover onto the base. To ensure that a gap does not appear
between the cover and the base:
n The green dots on the cover and the base must both be on the same side of
the device, as shown below.
n Make sure that the battery holder in the cover aligns with the battery holder
in the base.
b. Verify that an adequate seal is present between the cover and the base.
c. Tighten the screws
CAUTION! Cover screws are required as part of the safety rating. When tightening the
cover screws, use a screw torque of 0.79 to 1.92 newton meters (7 to 17 inch pounds).
Activate a SIMcard
You can activate a SIMcard from your cellular provider or from Digi.
1. Your SIM card provider needs the following information:
n Connect Tank IMEI number: The IMEInumber is on the label on the Connect Tank
device and on the box the device was shipped in.
n SIM card number: The SIMnumber is printed on the SIMcard.
2. Call your SIMcard provider to activate the SIMcard.
LED indicators
The Connect Tank device has two LED indicators to monitor the battery function, and the cellular
network connection, and GPS locating.
Digi Connect® Tank v2 User Guide
12
Page 13
Get started Device controls
The following table describes LED functions.
Note A solid light for an extended period of time may indicate the device needs service. For
assistance, contact Digi Technical Support.
Item Name Description
1 Cellular
and
GPSLED
2 Battery
LED
Indicator light for the cellular network connection:
n Purple: The device is awake.
n Red:
l Slowly blinking: Performing GPS location; the LED slowly blinks red for
an extended period of time during the first time the device performs
GPS location.
l Quickly blinking: Searching for the cellular network.
n Blue:
l Blinking: Connected to the cellular network and attempting to
communicate with Remote Manager.
l Solid light: Successfully sent data to Remote Manager; turns off after
a few seconds.
Indicator light for battery function:
n Purple: The device is awake.
n Red blinking: Indicates the battery life is less than or equal to the Battery
Life threshold alarm.
n Blue blinking: Indicates the battery life is greater than the Battery Life
threshold alarm.
For more information about the Battery Life threshold, see Battery life.
Device controls
The following figure shows the controls for setting up and configuring the Connect Tank device.
Digi Connect® Tank v2 User Guide
13
Page 14
Get started Device controls
Item Name Description
1 USB type B port
Connects the device to a computer using a standard USB type A to B cable;
used to access the command line interface (CLI).
Note Do not use the mini USB port, which is covered by a red X in the
graphic.
2 Battery holder Compartment for the battery.
3 Battery port Port where the battery connects to the device.
4 SIMcard tray Holds the SIM card.
5 Wake button
6 Factory button
n Wakes up the device.
n Skips the GPS location process during device configuration.
n Press and hold this button for a few seconds to remove all
configuration changes and restore the device to its original state.
n If you accidentally press this button, but do not hold it down, the
device wakes and immediately returns to sleep mode.
7 Reset button Press this button to restart the device when it is not responding to inputs
(from the CLI or otherwise), such as when one or both lights remain on for
an extended period of time.
Digi Connect® Tank v2 User Guide
14
Page 15

Technical specifications
Cellular specifications
The following table summarizes the wireless WAN specifications for Connect Tank v2.
Specification Details
Carriers AT&T, International GSM Carriers
Frequency
band
Data rate
Antenna Built-in
SIMslot 1
North American Version: Dual Band UMTS/HSPA+ (850/1900 MHZ)
International Version: Dual Band UMTS/HSPA+ (900/2100 MHZ) Dual-Band GSM
(900/1800 MHZ)
HSDPA Cat. 10 / HSUPA Cat.6 data rates:
n DL: up to a maximum of 14.4 Mbps
n UL: up to a maximum of 5.76 Mbps
EDGE class 12 data rates:
n DL: up to a maximum of 237 kbps
n UL: up to a maximum of 237 kbps
GPRS class 12 data rates
n DL: up to a maximum of 85.6 kbps
n UL: up to a maximum of. 85.6 kbps
Sensor specifications
The following table provides a summary of the Connect Tank v2 sensor specifications.
Note Range figure estimates are based on free-air terrain with limited sources of interference. Actual
range will vary based on transmitting power, orientation of transmitter and receiver, height of
transmitting antenna, height of receiving antenna, weather conditions, interference sources in the
area, and terrain between receiver and transmitter, including indoor and outdoor structures such as
walls, trees, buildings, hills, and mountains.
Digi Connect® Tank v2 User Guide
15
Page 16

Technical specifications General product specifications
Sensor Short range Mid range
Model Massa M-300/150 Massa M-300/95
Type Ultrasonic, built-in temperature/sound speed compensation
Range
Range when temperature is -20˚ C to +60˚
C:
n 4 inches (100 mm) to
n 7 feet (2.1 meters)
Range when temperature is -30˚ C to -20˚
C:
n 4 inches (100 mm) to
n 5 feet (1.5 meters)
General product specifications
The following table provides a summary of the Connect Tank v2 general product specifications.
GPS/Glonass
Channels 56
Tracking sensitivity
Horizontal accuracy
GPS: up to -161 dBm
Glonass: up to -158 dBm
GPS: up to 2.5m
Glonass: up to 4m
Range when temperature is -20˚ C to +60˚
C:
n 1 foot (0.3meters) to
n 13 feet (4 meters)
Range when temperature is -30˚ C to -20˚
C:
n 1 foot (0.3meters) to
n 12 feet (3.7 meters)
Antenna Built-in
Management
Configuration &
Device Cloud/Local USB to Serial CLI Protocol
management
Protocol TCP
Power
Battery 7.2V, 14.5 Ah, Lithium Thionyl Chloride, non-rechargeable,
replaceable
Battery life Approximately 2 years (@ 2 reads/transmits per day)
Environmental
Operating temperature
-30˚ C to +60˚ C (see range limitations in Sensor specifications)
Storage temperature -40˚ C to +85˚ C
Relative humidity 90% (non-condensing after 90%)
Battery discharge up to 1%/year if stored at +30˚ C
Digi Connect® Tank v2 User Guide
16
Page 17

Technical specifications General product specifications
GPS/Glonass
Physical
Dimensions
(L x W x H)
Weight 1.25 lbs
LEDs Battery, Network
Enclosure material Valox (note: Massa sensor is PVC/PPA)
Enclosure rating NEMA 4X
Mounting 1” NPT
7.0 in x 5.15 in x 6.0 in (17.8 cm x 12.9 cm x 15 cm)
Digi Connect® Tank v2 User Guide
17
Page 18

Hardware
Maximum power and frequency bands
This section contains the maximum power and frequency bands for Connect Tank.
Maximum power Associated frequencies
2 W Cellular 850 and 900 MHz bands
1 W Cellular 1800 and 1900 MHz bands
Safety notices
Digi products are designed to the highest standards of safety and international standards compliance
for the markets in which they are sold. However, cellular-based products contain radio devices that
require specific consideration. Make sure you read and understand all of the safety notices, warnings,
and cautions for this product. Digi International assumes no liability for failure to comply with these
precautions.
Digi Connect® Tank v2 User Guide
18
Page 19

Hardware Safety notices
Installation considerations
n Read all instructions before installing and powering the device and keep these instructions in a
safe place for future reference. See Nonincendive Field Wiring Diagram for additional ATEX
wiring safety guidelines.
n USB (P2) (J1) and SIM (P6) connectors are intended for maintenance use within a Division 2
classified area. These connectors can only be used if the power is disconnected or the area is
known to be free of ignitable concentrations of flammable gases or vapors.
All external or field wiring must be in accordance with NFPA 70 Article 501.10(B).
n v2 is intended for fixed installations only.
n Push button switches are not for normal operational or maintenance use in hazardous
locations.
n If the device shows any signs of damage or malfunction when connecting the battery, remove
the battery connection immediately and contact your supplier for repair or replacement.
n Changes or modifications not expressly approved by the party responsible for compliance could
void the user’s authority to operate the equipment. Use only the accessories and battery
provided by the manufacturer; connecting non-approved accessories and batteries may
damage the device.
n Do not attempt to repair the product. Any attempt to service or repair the device by the user
will void the product warranty.
n Connect Tank must be maintained by Digi or a Digi qualified technician only. Always use the
designated battery, model number 76000912, from Digi. You must remove the unit from the
installation or unclassified hazard location before opening the enclosure due to the risk of
screws or batteries falling into the storage tank.
n When inserting wires into the terminal block, we recommend tightening torque to 0.2N-m.
n Allowable wire size for terminal blocks is 0.5-1.5mm
2
.
ATEX requirements
n Connect Tank should be used in an area of not more than pollution degree 2, as defined in EN
60664-1.
Warnings: Explosion hazards
Review the following explosion hazard warnings for the Connect Tank device.
Note The Connect Tank device contains internal batteries.
WARNING! Connect Tank is suitable for use in UL/cUL Class I, Division 2, Groups A, B, C,
and D hazardous locations or non-hazardous locations only. Substitution of any
component may impair suitability for Class I, Division 2.
Digi Connect® Tank v2 User Guide
19
Page 20
Hardware Safety notices
WARNING - EXPLOSION HAZARD: BATTERIES MUST ONLY BE CHANGED IN AN AREA
FREE OF ignitable CONCENTRATIONS.
WARNING - EXPLOSION HAZARD: DO NOT DISCONNECT WHILE THE CIRCUIT IS LIVE OR
UNLESS THE AREA IS FREE OF ignitable CONCENTRATIONS.
WARNING! Electrostatic discharge (ESD) can damage equipment and impair electrical
circuitry. ESD damage occurs when electronic components are improperly handled and
can result in complete or intermittent failures.
RemarqueL’unité Connect Tank contient des batteries internes.
AVERTISSEMENT! L’unité Connect Tank est adaptée pour utilisation seulement dans des
endroits non dangereux ou des endroits dangereux UL/cUL de classe I, division 2,
groupes B, C et D. Le remplacement de tout composant risquerait de compromettre la
convenance à la classe I, division 2.
AVERTISSEMENT - RISQUE D’EXPLOSION: LES BATTERIES DOIVENT ÊTRE REMPLACÉES
DANS UN ENDROIT EXEMPT DE CONCENTRATIONS INFLAMMABLES.
AVERTISSEMENT - RISQUE D’EXPLOSION: NE DÉCONNECTEZ PAS LORSQUE LE CIRCUIT
EST SOUS TENSION OU À MOINS QUE LA ZONE SOIT LIBRE DE TOUTE CONCENTRATION
INFLAMMABLE.
AVERTISSEMENT! Les décharges électrostatiques peuvent endommager le matériel et
nuire aux circuits électriques. Les dommages des décharges électrostatiques
surviennent lorsque les composants électroniques sont mal manipulés et peuvent
entraîner une défaillance complète ou intermittente.
RF exposure statement
In order to comply with RF exposure limits established in the ANSI C95.1 standards, ensure users
maintain a distance from the product of no less than 20 cm (approximately 7.8 inches).
UL/cUL conformity
Conformity to UL / cUL standards in the United States and Canada is in accordance with the following:
Digi Connect® Tank v2 User Guide
20
Page 21
Hardware Safety notices
Issue
Standard Title
date
ANSI/ISA
12.12.01, 2012
CAN/CSA C22.2
No. 213-M1987
UL2054 UL Standard for Safety for Household and Commercial Batteries October
UN 38.3 Recommendations on the Transport of Dangerous Goods Manual of
UL 60950-1 Safety Requirements for Electrical Equipment for Measurement,
Nonincendive Electrical Equipment for Use in Class I and II, Division 2
and Class III, Divisions 1 and 2 Hazardous (Classified) Locations
Nonincendive Electrical Equipment for Use in Class I, Division 2
Hazardous Locations
Tests and Criteria
Control, and Laboratory Use
2012
1987
29, 2004
2009
October
14, 2014
Essential health and safety requirements
Connect Tank complies with the essential health and safety requirements provided by the following
standards:
Standard Title Issue date
EN 600790:2012/A11:2013
EN 6007915:2010
Explosive Atmospheres - Part 0: Equipment - General Requirements 2013
Explosive Apparatus for Explosive Gas Atmospheres - Part 15:
Construction, Test and Marking of Type Protection "n" Electrical
Apparatus
2010/05/01
Special conditions for safe use (ATEX)
n Digi complies with the ATEX Directive to ensure a safe working environment when working
with equipment in potentially explosive atmospheres.
n Connect Tank is intended for fixed installation, where the installation is intended to minimize
the risk from electrostatic discharge.
n Connect Tank should be used in an area of not more than pollution degree 2, as defined in EN
60664-1.
Digi complies with the ATEX Directive to ensure a safe working environment when working with
equipment in potentially explosive atmospheres. The Connect Tank device is compliant to the ATEX
Directive under Certification DEMKO 14 ATEX 1416X.
Applicability
Connect Tank has been evaluated according to the following conditions. The ATEX evaluation and the
special conditions in this section apply to part numbers 50001884-xx.
WARNING! Connect Tank is suitable for use in ATEX Zone 2, Group IIC hazardous
locations or non-hazardous locations only.
Digi Connect® Tank v2 User Guide
21
Page 22

Hardware Safety notices
WARNING! The Connect Tank unit should not be installed in process tanks containing
either pressurized or flammable materials. The battery should be replaced in
unclassified areas only.
WARNING! Connect Tank is intended for fixed installation, where the installation is
intended to minimize the risk from electrostatic discharge. Follow all installation safety
guidelines in this section to minimize the risk from electrostatic discharge.
WARNING! Install Connect Tank in an area that does not have more than pollution
degree 2 as defined in EN/ IEC 60664-1.
WARNING! To avoid potentially dangerous electrostatic discharges, control all likely
ignition sources, minimize the harmful effects of any accidental fire or explosion by using
explosion relief and suppression systems. All zoned areas containing potentially
explosive atmospheres should be clearly marked using ATEX Ex hazardous area warning
signs.
WARNING! Potential electrostatic charging hazard. To avoid building up an electrostatic
charge when cleaning the enclosure of this device, you must use a damp cloth moistened
only with water. Do not use flammable cleaning agents.
ATEX marking
The device must include the markings described in the following table.
Mark Description
ATEX logo
Digi Connect® Tank v2 User Guide
22
Page 23

Hardware Safety notices
Mark Description
ATEX symbol and classification:
II 3 G Ex nA IIC T6 Gc
n
— The ATEX symbol. This symbol indicates certification
for use in an explosive atmosphere. The symbols that
follow it provide the details of that certified use.
n II — This indicates Group II (Clause 4.2). The equipment is
intended for use in places with an explosive gas
atmosphere other than mines susceptible to firedamp.
n 3 — This indicates Equipment category 3. Category 3
comprises products designed to be capable of keeping
within its operational parameters, stated by the
manufacturer, and based upon a normal level of protection
for its intended use, considering areas in which explosive
atmospheres caused by mixtures of air and gases, vapors,
mists or air/dust mixtures are unlikely to occur and if they
do occur, do so infrequently and for a short period of time
only.
n G — This indicates that the Environment is based on
International Electrotechnical Commission (IEC) 60079-0,
Clause 29.4.
n Ex — This indicates that the product has been evaluated
for use in potentially explosive atmospheres.
n nA — This indicates that the product provides ignition
protection by using components that are non-sparking
during normal operations.
n IIC — The Group symbol where IIC is electrical equipment
for places with an explosive gas atmosphere other than
mines susceptible to firedamp.
n T6 — This is the Temp Code, indicating a maximum surface
temperature of 85° C.
n Gc — This indicates the Equipment Protection Level. Gc
means equipment for explosive gas atmospheres, having
an “enhanced” level of protection, which is not a source of
ignition in normal operation and which may have some
additional protection to ensure that it remains inactive as
an ignition source in the case of regular expected
occurrences (for example, failure of a lamp).
Digi Connect® Tank v2 User Guide
23
Page 24

Hardware Safety information
Safety information
The following safety information provides guidelines when assembling the Connect Tank device. For
additional safety guidelines, see Safety notices.
CAUTION! The device is sensitive to electrostatic discharge (ESD).
The Connect Tank device must be maintained only by Digi or a Digi qualified technician. Before
assembling the device, note the following:
n To avoid the risk of the screws or battery falling into the storage tank, do not assemble the
device in the installation area.
n Move the device to a non-hazardous and unclassified area before opening the enclosure and
connecting the hardware.
n Always use the designated battery, model number 76000912, from Digi International Inc.
n Allow only a trained technician to replace the lithium thionyl chloride batteries used in Connect
Tank.
n Prior to installation, the battery should be inspected for any signs of damage. If the battery
appears to be damaged or is dropped during the installation, do not use the battery and
dispose of it properly. See Battery inspection for more information.
n You may be required to have a licensed electrician install or perform maintenance on this
equipment. Always follow applicable local, state, and federal codes and guidelines.
Remote Manager reporting
The Connect Tank device sends its tank liquid level data to your Remote Manager account. You can
configure when the device reads the liquid level and how often it reports that data. You can also set
device alarms to report when a tank is nearly full, nearly empty, or the tank level drastically changes.
Scheduled reports
By default, the Connect Tank device checks and reports the liquid level in a tank twice a day. However,
you can change the frequency that it sends reports to accommodate your tank environment.
For example, you might want the device to check the tank liquid level twice a day, but send that data
to Remote Manager only once a day.
Alarms
You can configure the Connect Tank device to send an alarm separately from scheduled reports to
communicate liquid level and device information, including:
n Low and high thresholds
n Delta low and delta high thresholds
n Hysteresis
Digi Connect® Tank v2 User Guide
24
Page 25

Hardware Cellular and GPS communication
n Sensor error
n Battery life
Note Sending more than two reports a day to Remote Manager reduces the battery life.
For more information, see Configure alarms.
Cellular and GPS communication
The Connect Tank device has an internal cellular antenna and an optional GPS antenna for
communications. There are no external antennas required to operate the device. Before installing the
device, make sure your cellular service provider has enough network coverage where your tanks are
located. For more information about using the device to check network coverage, see Check network
coverage.
CAUTION! Unauthorized antenna modifications and attachments invalidate the device
type specifications and may violate local RF emission regulations.
Battery inspection
CAUTION! This product contains a lithium metal battery. Prior to installation, the
battery should be inspected for any signs of damage. If the battery appears to be
damaged or is dropped during installation, do not use the battery and dispose of it
properly.
Please contact Digi Technical Support at 952-912-3444 or Tech.support@digi.com to order a
replacement battery.
The MSDS (Material Safety Data Sheet) for the battery can be found at
www.digi.com/documentation/ConnectTank.
The Connect Tank enclosure top and bottom have green alignment dots to ensure the top is placed
correctly on the product. These alignment dots should align on top of each other when installed
correctly. If the top of the product is reversed 180 degrees, the product will be susceptible to water
ingress and the battery will be subject to additional shock and vibration during handling, potentially
damaging the battery. For more information about aligning the dots and correctly assembling the
Connect Tank, see Assemble the device.
Battery life
The Connect Tank device uses sleep and wake modes to manage power use. By default, the device
wakes only to check the liquid level in a tank and send reports. It is in sleep mode at all other times,
which reduces power consumption to the lowest possible levels.
The Connect Tank battery can operate for up to two years when you maintain these conditions:
n The device has adequate network coverage in the area.
n The device sends a report two times a day (or less).
The battery LED on the front of the device indicates battery life; for details, see LED indicators.
Digi Connect® Tank v2 User Guide
25
Page 26

Initial Connect Tank configuration
Before installing Connect Tank in the field, complete the initial configuration steps to register it with a
cellular network. When configuring Connect Tank, the device must be awake.
The following sections describe how to wake Connect Tank and register it with a cellular network
using the command line interface (CLI).
After initial configuration using the CLI, you can use Remote Manager to configure additional settings
and remotely manage the Connect Tank device; see Manage Connect Tank with Remote Manager.
About waking the device 27
Wake the device 27
Connect to the device using the CLI 27
Register Connect Tank on a cellular network 29
CLI commands 30
Digi Connect® Tank v2 User Guide
26
Page 27

Initial Connect Tank configuration About waking the device
About waking the device
You can wake the Connect Tank device by pressing the Wake button or swiping the optional magnet
across the front of the device. When you press the Wake button or activate the magnetic switch, the
following occurs:
n The device sends a report to Remote Manager with the following information:
l Sensor connection status
l Measured distance reading
l Measured temperature reading
l GPS location (optional, based on configuration)
l Battery life (the current battery percentage remaining)
l Device settings
l Cellular network signal strength
n Battery and network status LEDs glow indicating their respective functions. For more
information, see LED indicators.
Wake the device
You can wake the Connect Tank device as follows:
n If the Connect Tank enclosure is open, press the Wake button.
n If the Connect Tank enclosure is closed, swipe the magnet across the magnet icon on the
outside of the device.
Note This feature was not included in the ATEX evaluation. For more information, see Special
conditions for safe use (ATEX).
The LEDs blink indicating the device is on. For more information about LED behavior, see LED
indicators.
After the device wakes and sends a report to Remote Manager, it enters sleep mode. The device
remains in sleep mode until the next scheduled or manual wake cycle.
Connect to the device using the CLI
Perform the following initial configuration steps using a terminal program and CLI commands.
Before you begin, make sure you have the following required equipment for this step:
n Computer running a terminal program.
n USB type A to B cable.
To connect to the device using a terminal program:
1. Open the enclosure and make sure the battery is connected and the SIM card is installed. For
information, see Assemble the device.
2. Connect a USB type A to B cable from your computer to the USB type B port.
Note Do not use the mini USB port, which is covered by a red X in the graphic below.
Digi Connect® Tank v2 User Guide
27
Page 28

Initial Connect Tank configuration Connect to the device using the CLI
You may need to install device drivers or wait for your computer to automatically install them
when connecting Connect Tank to a computer using a USB cable. Digi recommends drivers
available at www.ftdichip.com/Drivers/VCP.htm.
3. Open a terminal program on a computer and connect to Connect Tank using the following
configuration:
n Connection port: Connect to the COM port associated with the USB cable connected to
Connect Tank
n Baud rate or bits per second: 115200
n Data: 8 bit
n Parity: None
n Stop: 1 bit
n Flow control: None
Digi Connect® Tank v2 User Guide
28
Page 29

Initial Connect Tank configuration Register Connect Tank on a cellular network
4. Press the Wake button.
n The command prompt appears in the terminal program window and the device
attempts to connect to the cellular network and obtain GPS location.
n The cellular and GPS LED slowly blinks red for an extended period while the device
performs GPS location for the first time.
Note To skip the GPS location process, press the Wake button again.
5. In the terminal program, type status at the command prompt and press Enter to see device
information, such as firmware version, battery life, serial number, and connection state.
6. In the terminal program, type set to view configuration information for the device, including
access point name (APN), user name, password, PIN, and ISN.
7. To change any of the configuration information:
a. Type set [configuration option]=[value] at the command prompt and press Enter.
The [configuration option] is the device setting you want to change and [value] is
the new option setting.
For device configuration options, see CLI commands.
b. [Optional] Type set again before the device goes to sleep to view the current and
pending values.
The device goes to sleep and immediately wakes up to make the change. After the
device completes the change it goes to sleep again.
c. Press the Wake button and type set at the command prompt to verify the change is
correct.
Register Connect Tank on a cellular network
The Connect Tank device is configured with a default APN that you might need to change to register
the device on the cellular network for your cellular account provider. Contact your cellular service
provider to get the correct APN before completing the following steps.
Note If you purchased Digi Bundled Services, the cellular connection is already configured on your
Connect Tank and you can skip this section.
To register the device on a cellular network:
1. Make sure the battery is connected and the SIM is installed, the device is connected to a
computer, and the terminal program is configured to communicate with the device. For
instructions, see Connect to the device using the CLI.
2. Open the terminal program and connect to the Connect Tank device. For instructions, see
Connect to the device using the CLI.
Digi Connect® Tank v2 User Guide
29
Page 30

Initial Connect Tank configuration CLI commands
3. Press the Wake button.
n The command prompt appears in the terminal program window and the device
attempts to connect to the cellular network and obtain GPS location.
n The cellular and GPS LED slowly blinks red for an extended period while the device
performs GPS location for the first time.
Note To skip the GPS location process, press the Wake button again.
4. At the command prompt, type set apn=thecellular.apn where thecellular.apn is the string
supplied by your cellular service provider.
5. Press Enter.
n The terminal program displays the APN configuration setting’s current value and the
pending value.
n The device goes to sleep and immediately wakes up to make the change. After the
device completes the change it goes to sleep again.
6. Press the Wake button and type set at the command prompt to verify your change was made
and that it is correct.
7. Use other commands in the CLI to see additional information about the device, such as
firmware version, battery life, cellular network strength, and more. See CLI commands.
CLI commands
The following table provides all of the available CLI commands for configuring the device and viewing
status information.
Command Use Options
fwupdate Update the
firmware with a
firmware image
Make sure the terminal program is able to transfer YMODEM files.
Digi Connect® Tank v2 User Guide
30
Page 31

Initial Connect Tank configuration CLI commands
Command Use Options
status Display device
information
View the following:
n Device Type: Name and version of the device hardware.
n Device ID: ID number for the Connect Tank device.
n Firmware Version: Version of the device’s current
firmware.
n UTC Time: Last reported date and time.
n Battery Life: Amount of battery life remaining.
n Sensor: Status of the sensor.
n Mobile support software: Version of the mobile software.
n Device type: Cellular network type the device connects to.
n Manufacturer: Cellular modem manufacturer.
n Model: Cellular modem model number.
n Modem revision: Modem firmware version.
n Serial number: Modem serial number.
n Phone number: Phone number registered to the activated
SIM card.
n SIM IMSI: Unique user identifier for the cellular network.
n SIM ICCID: SIM serial number.
n SIM PIN status: State of the SIM card.
n Connection state: Cellular connection state.
n Connection duration: Amount of time the cellular modem
was connected during last wake cycle.
n Disconnect reason: Cause of the cellular modem
disconnection during last wake cycle.
n Connections: Number of cellular connection attempts
since power up.
n Connection errors: Number of failed connections since
power up.
n User disconnects: Number of normal disconnections since
power up.
n Monitoring errors: Number of cellular modem errors since
power up.
n Device resets: Number of times cellular modem was reset
to recover from errors since power up.
Digi Connect® Tank v2 User Guide
31
Page 32

Initial Connect Tank configuration CLI commands
Command Use Options
set Manage device
configuration
Use the following commands to change settings:
n apn: Access point name for the cellular network (supplied
by your cellular service provider). Settings:
Note If you purchased Digi Bundled Services, the cellular
connection is already configured on your Connect Tank.
l Minimum length: 1 character
l Maximum length: 63 characters
l Alpha-numeric characters, hyphen, period
l Cannot be disabled
n isn: URL to connect to Remote Manager; this is configured
by default and should only be changed when directed by a
Digi representative. Settings:
l IPv4 address, such as 10.20.30.40 or an FQDN, such as
devicecloud.digi.com
l Minimum length: 1 character
l Maximum length: 63 characters
l Alphanumeric characters, hyphen, period
l Cannot be disabled
n pin: PIN for your SIM card, if required (supplied by your
cellular service provider). Settings:
l Minimum length: 4 characters
l Maximum length: 8 characters
l Numeric only
l No value: disabled (no PIN required)
n pwd: Password for your cellular account, if required
(supplied by your cellular service provider). Settings:
l Minimum length: 1 character
l Maximum length: 63 characters
l Printable characters and spaces only (no quotation
marks or backslashes)
l No value: disabled (no user name required)
n usr: User name for your cellular account, if required
(supplied by your cellular service provider). Settings:
Digi Connect® Tank v2 User Guide
32
Page 33

Initial Connect Tank configuration CLI commands
Command Use Options
l Minimum length: 1 character
l Maximum length: 63 characters
l Printable characters and spaces only (no quotation
marks or backslashes)
l No value: disabled (no user name required)
Digi Connect® Tank v2 User Guide
33
Page 34

Install Connect Tank
You must install the device correctly to ensure the ultrasonic sound beam reflects back to the sensor.
If the device is not installed correctly, it might cause false echoes, inaccurate measurements, or no
measurements.
Note Do not use the device to measure levels of non-liquid tanks. The device uses ultrasonic sensing,
which requires a uniform surface to take accurate measurements. Solid material does not provide a
uniform surface.
Use the information in the following sections to install the Connect Tank device correctly and to
troubleshoot inaccurate liquid level issues.
Before you begin 35
Install the device on a tank 35
Check network coverage 36
Digi Connect® Tank v2 User Guide
34
Page 35

Install Connect Tank Before you begin
Before you begin
Do the following before installing the Connect Tank device:
n Follow all of the safety and certification guidelines and requirements for the Connect Tank
device.
n Assemble the device and complete initial configuration using the CLI.
n Make sure you have the necessary tools and equipment for your tank type and mounting
option, such as NPT adapters.
n Review the installation information in this section to avoid incorrectly installing the device.
Incorrect installation results in inaccurate or missed liquid level measurements.
Install the device on a tank
Consider the following when installing the Connect Tank device:
n The sensor must be level (perpendicular to the liquid surface) to allow the ultrasonic sound
beam to travel straight down.
n Make sure there is a minimum of 7 inches between the Connect Tank sensor and the maximum
liquid level.
n Mounting the device vertically ensures proper orientation. If the device is not mounted
vertically, it may send incorrect readings.
n Make sure the ultrasonic sound beam’s transmission path does not have any obstructions.
n Position the device as close as possible to the center of the tank’s diameter.
For troubleshooting installation, see Troubleshooting.
Digi Connect® Tank v2 User Guide
35
Page 36

Install Connect Tank Check network coverage
Check network coverage
The Connect Tank device has an internal antenna for cellular and an optional antenna for GPS
communications. There are no external antennas required to operate the device.
CAUTION! Unauthorized antenna modifications and attachments invalidate the device
type specifications and may violate local RF emission regulations.
To check network coverage:
1. Place the device in the area where it will be installed.
2. Wake the device.
3. Make sure the cellular LED blinks blue to show it is connected to the network and that there is
an adequate network signal in the area.
If the device does not connect to the cellular network, see Device not connected to the cellular
network.
Note Proper network coverage helps reduce power consumption, leading to improved battery life.
Digi Connect® Tank v2 User Guide
36
Page 37

Manage Connect Tank with Remote Manager
Digi Remote Manager is a cloud-based device management platform that allows you to connect any
device to any application, anywhere. Remote Manager gives you the tools you need to manage many
devices quickly and effectively, as well as insight into the health and current state of your entire
device network.
The following sections describe how to use Remote Manager to remotely monitor and control all of
your Connect Tank devices from any web browser.
About using Remote Manager with Connect Tank 38
Before you begin 38
Add a device to Digi Remote Manager 38
Alarm reports and options 39
Configure device (report) settings 43
Configure cellular options 45
Configure Remote Manager settings 45
Remote Manager option definitions for Connect Tank 46
Digi Connect® Tank v2 User Guide
37
Page 38

Manage Connect Tank with Remote Manager About using Remote Manager with Connect Tank
About using Remote Manager with Connect Tank
After registering the Connect Tank device on a cellular network, use Remote Manager to remotely
change device configuration, review device information, set up device reporting, and review data
about liquid levels.
Remote Manager allows you to change Connect Tank device settings, update firmware, and schedule
the following tasks during wake cycles:
n Monitor the tank liquid level
n Report data to Remote Manager
n Check for and make scheduled configuration changes
n Check liquid level alarms
n Check battery life
For more information about Remote Manager, see http://www.digi.com/products/cloud/digi-remote-
manager.
Note The Connect Tank battery can operate for up to 2 years when you follow standard operating
conditions. Changes made to Remote Manager settings can affect battery life. For more information
on standard operating conditions, see Battery life.
Before you begin
Before using Remote Manager to manage the Connect Tank device, do the following:
n Get the Connect Tank IMEI:
l If you have physical access to the device, locate the 15-digit device IMEI number on the
Connect Tank label.
l If you need to remotely access the device, connect to the device using the CLI.
n Create a Remote Manager account. To complete this step, see the Remote Manager login
page.
Note For initial device test and development, you can use a free Developer Edition Remote Manager
account. When you are ready to deploy Connect Tank devices in the field, you need a Premiere account
to access all Connect Tank features in Remote Manager.
Add a device to Digi Remote Manager
To remotely manage Connect Tank and get sensor data, you need to create a Remote Manager
account and add your Connect Tank device to your account.
Note To serve our customers most effectively, Digi International Inc. is consolidating its cloud
services, Digi Device Cloud and Digi Remote Manager®, under the Remote Manager name. This phased
process does not affect device functionality or the functionality of the web services and other
features. However, you will find instances of both Device Cloud and Digi Remote Manager in some
documentation, firmware, and user interfaces.
Note If you purchased Digi Bundled Services, the following steps were completed for you. You can skip
this section.
Digi Connect® Tank v2 User Guide
38
Page 39

Manage Connect Tank with Remote Manager Alarm reports and options
To add a device to Remote Manager:
1. Sign in to your Remote Manager account:
n If you need to create an account, go to Remote Manager at remotemanager.digi.com,
click Sign up, and complete the form to create your account.
n If you already have an account, go to Remote Manager at remotemanager.digi.com and
sign in with your user name and password.
2. Locate the 15-digit device IMEI number on the Connect Tank label.
3. Click Device Management > Devices.
4. Click Add Devices. The Add Devices dialog appears.
You cannot use the Discover button to discover Connect Tank devices automatically because
the devices are not available on the local network.
5. From the Add Devices drop-down menu, select IMEI, and enter the number.
6. Click Add to add the device.
7. Click OK to close the Add Devices dialog. The device appears in the Device Management list.
Note If the device does not display in the Device Management list, you can wake Connect Tank
to force a connection with Remote Manager and update the data. For instructions, see Update
the firmware using the CLI.
8. Click Refresh if the device data does not appear on its own after a short period of time.
Device data appears after the first time it communicates with Remote Manager.
Alarm reports and options
You can configure the Alarm Settings options in the Remote Manager to have the Connect Tank device
send reports indicating when liquid level measurements do not meet normal conditions for your tank
environment. The alarms appear as reports in Remote Manager
Configure alarms
This section explains how to configure the Alarm Settings in Remote Manager. For details about Alarm
Settings options for the Connect Tank device, see Alarm options.
1. Sign into Remote Manager.
2. Click Device Management > Devices.
3. Double-click the Connect Tank device you want to configure.
4. Click Configuration > Alarm Settings.
5. Determine the alarms that you want to receive.
a. Select On for each alarm you want to receive.
o
High and low thresholds
o
Hysteresis
o
Sensor error and battery life
b. Enter an appropriate value for each alarm option.
Digi Connect® Tank v2 User Guide
39
Page 40

Manage Connect Tank with Remote Manager Alarm reports and options
6. Apply the configuration changes:
a. Click Save > Schedule. The Save Device Properties dialog appears.
b. Select a scheduling option. See Schedule options.
c. Click Schedule. Connect Tank downloads and applies configuration changes the
next time it connects to Remote Manager.
Note The Recurring option does not work with the Connect Tank device.
High and low thresholds
Use these settings to define if the liquid level in the tank is too high, too low, or changes too quickly
between two consecutive readings.
For example, the device is configured to take measurements every hour and send reports twice every
day at 8:00 and 20:00. If a device senses that the liquid level reached a high or low alarm threshold at
11:00, it immediately sends a report to Remote Manager with that information.
When configuring alarms, make sure you use correct measurements. The Connect Tank sensor
measures the distance in inches from the top of the sensor to the top of the liquid in the tank. A
smaller distance (such as 10 inches) is near the top of the tank; a larger distance (such as 70 inches) is
near the bottom of the tank.
Note Actual measurements depend on your tank size.
Digi Connect® Tank v2 User Guide
40
Page 41

Manage Connect Tank with Remote Manager Alarm reports and options
Threshold Description
High Sends an alarm report when the measurement indicates the liquid level is near the
1
top of the tank.
For example, the high threshold value might be 15 inches.
Low Sends an alarm report when the measurement indicates the liquid level is near the
2
bottom of the tank.
For example, the low threshold might be 75 inches.
Delta
3
high
Delta low Sends an alarm report when the liquid level decreases too much between two
4
Sends an alarm report when the liquid level increases too much between two
consecutive readings.
For example, the delta high threshold value might be 20 inches because liquid levels
should not increase more than 20 inches between two consecutive readings.
consecutive readings.
For example, the delta low threshold value might be 10 inches because liquid levels
should not decrease more than 10 inches between two consecutive readings.
Hysteresis
The liquid levels in your tanks may sometimes fluctuate during an alarm condition, which causes
repeated alarm reports.
For example, in a Connect Tank the liquid level increased to the high alarm threshold and the device
sent a high alarm report. Note that during this alarm condition, the liquid level may continue to
increase and decrease repeatedly between normal and high thresholds. In this situation, if you do not
set a hysteresis range, the Connect Tank device sends an alarm report every time the device
measures the liquid level at the high threshold.
Hysteresis works with the high and low alarm thresholds to tell the device when to keep an alarm on
without sending additional alarm reports, or when to shut off an alarm. Use this to avoid repeated
alarms during common liquid level fluctuations.
For example, if your high alarm threshold is 20 inches and your hysteresis value is 10 inches, then your
high alarm hysteresis is 30 inches. The following figure shows how a high alarm and hysteresis work in
a tank.
Digi Connect® Tank v2 User Guide
41
Page 42

Manage Connect Tank with Remote Manager Alarm reports and options
Alarm
state Description
1 On The device measures that the water increased above the high threshold. The device
sends an alarm report to
2 On The device measures that the water decreased below the high threshold, but it is still
above the hysteresis so the alarm remains on. If the water increases again above the
high threshold, no additional alarm reports are sent.
3 Off The water decreased below the hysteresis so the alarm turns off. If the water increases
again above the high threshold, the alarm turns on and the device sends another alarm
report.
For a low alarm hysteresis, if your low alarm threshold is 70 inches and the hysteresis value is 10
inches, then your low alarm hysteresis is 60 inches. The alarm is on and stays on when the liquid level
decreases below the low threshold and remains below the hysteresis. The alarm turns off when the
water increases above the 60-inch hysteresis.
Setting the hysteresis threshold to 0 (zero) causes Connect Tank to send an alarm report every time
the liquid level reaches a high or low alarm threshold.
Note Setting the hysteresis threshold to 0 (zero) may cause excessive data usage and reduce battery
life.
Remote Manager
.
Sensor error and battery life
Connect Tank includes alarm reports for the sensor and battery.
n Sensor error: Connect Tank reports an error to Remote Manager when it detects an issue with
the device's sensor.
n Battery life: Connect Tank reports the battery life percentage when it falls below the
percentage that you configure for this option.
Digi Connect® Tank v2 User Guide
42
Page 43

Manage Connect Tank with Remote Manager Configure device (report) settings
Configure device (report) settings
Use the Device Settings options in Remote Manager to configure Connect Tank reporting. Together,
these options control how often Connect Tank captures tank data, how often data is reported, and
how much data is included when it is sent to Remote Manager.
For details about the configuration options, see Device (report) settings option definitions.
CAUTION! If Connect Tank sends reports less than 15 minutes apart, it may result in an
internal temperature that is above the ambient temperature.
Note Reporting to Remote Manager more than twice a day reduces the battery life.
For example, the following settings cause the device to read the tank’s liquid level every half hour,
report that information twice a day, and send only the last four readings:
n Read Sensor Every: 30 minutes
n Report Sensor Data Every: 24 reads
n Send Last: 4 readings
If the sensor value reaches an alarm threshold, that data is sent as an alarm report during the next
device wake cycle regardless of device settings.
To configure device options:
1. Sign into Remote Manager.
2. Click Device Management > Devices.
3. Double-click the Connect Tank you want to configure.
4. Click Configuration > Device Settings.
5. Enter appropriate values for each option.
6. Apply the configuration changes:
Digi Connect® Tank v2 User Guide
43
Page 44

Manage Connect Tank with Remote Manager Configure device (report) settings
a. Click Save > Schedule. The Save Device Properties dialog appears.
b. Select a scheduling option. See Schedule options.
c. Click Schedule. Connect Tank downloads and applies configuration changes the
next time it connects to Remote Manager.
Custom scaled values for tank data
Connect Tank reports sensor data in inches. You can use the following Device Settings in Remote
Manager to convert inches into a custom value that makes sense for your tank configuration, such as
gallons or liters:
n Tank Volume Unit: Unit of measurement that you are converting to, such as gallons or liters.
n Tank Total Height: Total tank height in inches.
n Tank Sensor Offset: Distance from the Connect Tank sensor to the top of the liquid in a full
tank. The following images provide offset examples.
n Tank Total Volume: Total volume of the tank in the defined unit, such as gallons (unit defined
in Tank Volume Unit).
For example, you want the Connect Tank to report sensor values in gallons. The tank holds a
maximum of 5000 gallons and has a height of 8.1 feet (rounded to 97 inches). The Connect Tank is
mounted on a standpipe, so there is a 10-inch clearance between the Connect Tank sensor and the
top of the liquid when the tank is full. You should enter the tank information in Remote Manager as
shown in the following figure:
The result of the custom value calculations is reported in the cval data stream. For more information,
see Data streams reference information.
Digi Connect® Tank v2 User Guide
44
Page 45

Manage Connect Tank with Remote Manager Configure cellular options
Configure cellular options
You configured necessary cellular settings during the initial Connect Tank setup. Use these options to
review the cellular configuration. Make changes to these settings only when instructed by your
cellular service provider and when you have physical access to the device. For details about these
options, see Cellular option definitions.
CAUTION! If you make changes to cellular settings that result in a disconnected device,
you must use the CLI to reconnect it to the cellular network; see Register Connect Tank
on a cellular network. Using the CLIrequires physical access to the device.
To configure cellular options:
1. Sign in to Remote Manager.
2. Click Device Management > Devices tab.
3. Double-click the Connect Tank device you want to configure.
4. Expand the Configuration menu.
5. Click Cellular Settings.
6. Enter an appropriate value for each cellular option.
7. Apply the configuration changes:
a. Click Save > Schedule. The Save Device Properties dialog appears.
b. Select a scheduling option. See Schedule options.
c. Click Schedule. Connect Tank downloads and applies configuration changes the
next time it connects to Remote Manager.
Configure Remote Manager settings
Remote Manager settings options for Connect Tank are configured by default and require updates
only when instructed by Digi Technical Support. For details about these options, see Device Cloud
option definitions.
To configure Remote Manager options:
1. Sign in to Remote Manager.
2. Click Device Management > Devices tab.
3. Double-click the Connect Tank device you want to configure.
4. Expand the Configuration menu.
5. Click Device Cloud Settings.
6. Enter appropriate values for each option.
7. Apply the configuration changes:
a. Click Save > Schedule. The Save Device Properties dialog appears.
b. Select a scheduling option. See Schedule options.
c. Click Schedule. Connect Tank downloads and applies configuration changes the
next time it connects to Remote Manager.
Digi Connect® Tank v2 User Guide
45
Page 46

Manage Connect Tank with Remote Manager Remote Manager option definitions for Connect Tank
Remote Manager option definitions for Connect Tank
The following tables provide definitions for Remote Manager user interface options and data streams
for Connect Tank devices.
Alarm options
The following table provides Remote Manager alarm setting options for Connect Tank. For additional
information about using these options, see Configure alarms.
Option Description Range Default
High
Alarm
High
Threshold
Low Alarm Enables or disables Low Alarm reports for liquid levels below the
Low
Threshold
Delta Low
Alarm
Delta Low
Threshold
Delta High
Alarm
Delta High
Threshold
Hysteresis
Enables or disables High Alarm reports for liquid levels above the
High Threshold value.
Specifies the liquid level measurement in inches that generates a
High Alarm report when High Alarm isOn.
Low Threshold value.
Specifies the liquid level measurement in inches that generates a
Low Alarm report when Low Alarm isOn.
Enables or disables Delta Low Alarm reports when the liquid level
decreases more than the Delta Low Threshold value for two
consecutive readings.
Specifies the liquid level measurement in inches that generates a
Delta Low Alarm report when Delta Low Alarm isOn.
Enables or disables Delta High Alarm reports when the liquid
level increases more than the Delta High Threshold value for two
consecutive readings.
Specifies the liquid level measurement in inches that generates a
Delta High Alarm report when Delta High Alarm isOn.
Specifies the measurement in inches to keep an alarm on or shut
off an alarm during high and low alarm states.
0 — hysteresis is off
1 or more — hysteresis is on and managing alarms
On/Off Off
0.0-511.0 0
On/Off Off
0.0-511.0 511
On/Off Off
0.0-511.0 511
On/Off Off
0.0-511.0 511
0.0-511.0 0
Sensor
error
Battery
Life
Enables or disables the sensor error alarm that reports when the
device cannot get a valid reading from the sensor.
Specifies the battery life percentage that generates a low
battery alarm report.
Cellular option definitions
The following table provides Remote Manager cellular setting options for Connect Tank. For additional
information about using these options, see Configure cellular options.
Digi Connect® Tank v2 User Guide
On/Off Off
1-100 75
46
Page 47

Manage Connect Tank with Remote Manager Remote Manager option definitions for Connect Tank
Option Description
APN
User Name Specifies the user name for your cellular network account. Use only when
Password Specifies the password for your cellular network account. Use only when
SIMPIN Specifies the PIN for your cellular network SIM card. Use only when required by
Identifies the access point name that connects your device to the correct
cellular network.
required by your cellular service provider.
required by your cellular service provider.
your cellular service provider.
Device Cloud option definitions
The following table provides Remote Manager server name settings for Connect Tank. For additional
information about using these options, see Configure Remote Manager settings.
Option Description Value
Server Name
Specifies the URL that connects your
device to Remote Manager. This
setting is configured by default.
Note Do not make changes to this
setting without help from Digi
Technical Support.
my.devicecloud.com
NTP Server Name
Network Time Protocol (NTP) server
name that synchronizes Connect
Tank time with Coordinated
Universal Time (UTC). This setting is
configured by default.
Note Do not make changes to this
setting without help from Digi
Technical Support.
time.devicecloud.com
Device (report) settings option definitions
The following table provides Remote Manager device (report) setting options for Connect Tank. For
details about setting these options, see Configure device (report) settings.
Option Description Range Default
Read
Sensor
Every
How often the device sensor
reads the liquid level in a tank.
The time is measured in
minutes.
5 minutes to 1440 minutes (24 hours) 720
minutes
(12
hours)
Digi Connect® Tank v2 User Guide
47
Page 48

Manage Connect Tank with Remote Manager Remote Manager option definitions for Connect Tank
Option Description Range Default
Report
Sensor
Data Every
Report
Sensor
Every N
Days
First Daily
Report At
HHMM
How often the device wakes
and sends sensor data to
Remote Manager.
How often the device sensor
reads the liquid level in a tank.
The frequency is measured in
days.
Specifies the time that is used
to reset the device's schedule
to the beginning of a new day
and send the first daily report.
The time is noted as the
number of minutes after
midnight UTC.
Examples:
n 0 minutes = midnight
UTC
n 60 minutes = 1 hour
after midnight UTC
n 360 minutes = 6 hours
after midnight UTC
1 to 96 readings; setting this to more
than 96 results in lost data
0 days to 1439 days
0 to 1439 (minutes)
1
0 days
0
Send Last
Send
Location
Every
How many sensor values are
included in each report to
Remote Manager. If set to 0, all
buffered data is sent.
Specifies in number of reports
how often the device sends its
GPS location to Remote
Manager. Example:
n 10 = sends the GPS
location once every 10
reports
n If 2 reports are sent per
day, then the GPS
location is sent once
every 5 days.
0 to 50 readings 144
1 to 96 reports 1
Digi Connect® Tank v2 User Guide
48
Page 49

Manage Connect Tank with Remote Manager Remote Manager option definitions for Connect Tank
Option Description Range Default
Tank
Upload
Method
GPS Enable
Waveform
collection
Specifies which mode of
communication to use when
sending data to Remote
Manager.
Enables or disables GPS
location.
Enables or disables waveform
data collection when each
report is sent. Use for
debugging.
Note Enabling this option
increases your cellular data
usage and should be used only
for debugging purposes.
n TCP/IP only
n SMS only
n TCP/IP with SMS fallback
n SMS with TCP/IP fallback
TCP/IP
only
Off/On Off
Off/On Off
Digi Connect® Tank v2 User Guide
49
Page 50

Use Remote Manager to view device and sensor data streams
The Connect Tank device and sensor data appear as data streamsin Remote Manager.
About data streams
Data streams are detailed, time-based information about a tank that the Connect Tank device sends
to Remote Manager. For Connect Tank, data streams include detailed information such as distance,
temperature, alarms, thresholds, hysteresis, and more.
You can select a specific data stream to see its current value, as well as historical data. The Connect
Tank settings in Remote Manager have a corresponding three-letter short name, as shown in the
following image. The short names are useful when using data streams to analyze sensor data.
To learn more about:
Digi Connect® Tank v2 User Guide
50
Page 51

Use Remote Manager to view device and sensor data streams View device data streams
n Connect Tank data streams and their details, see Data streams reference information.
n General information for Remote Manager data streams, see the Remote Manager
documentation.
View device data streams
To view data for a Connect Tank device:
1. Sign into Remote Manager.
2. Access the Data Streams view:
n Click Device Management, double-click your device, and click View Device Streams.
n Click Data Services and enter the 15-digit device IMEI in the search field.
The Data Streams view appears showing all reported data for the selected device.
3. Click a data stream to display the details for the stream.
4. To view historical information for a data stream, click one of the following options in the
bottom half of the window:
n Click Charts to view the data as a graph.
n Click Raw Data to view the data in a table (see the following image).
Data streams reference information
The following table provides Remote Manager data streams descriptions for Connect Tank. For
additional information about data streams, see About data streams.
Short
name Long name Description
abt Alarm
battery
Digi Connect® Tank v2 User Guide
Battery Life threshold setting; for example, 75 (percent).
51
Page 52

Use Remote Manager to view device and sensor data streams Data streams reference information
Short
name Long name Description
adh Alarm delta
high
adl Alarm delta
low
aem Alarm enable
mask
ahy Alarm
hysteresis
alh Alarm high High Threshold setting; for example, 5 (inches).
all Alarm low Low Threshold setting; for example, 500 (inches).
alt Altitude Altitude location of the device in meters.
apn APN Access point name for the cellular network your device uses.
Delta High threshold setting; for example, 10 (inches).
Delta Low threshold setting; for example, 10 (inches).
Alarms that are enabled during the report; the value in the data stream
equals the sum of the enabled alarms:
1 — Alarm high enabled (alh)
2 — Alarm low enabled (all)
4 — Alarm delta low enabled (adl)
8 — Alarm delta high enabled (adh)
64 — Alarm on sensor error
For example, if you have the Alarm high and Alarm low enabled, the aem data
stream value is 3. If you have all alarms enabled, the aem data stream value
is 79.
Hysteresis setting; for example, 1.0 (inch).
arm Alarm reason
mask
bat Battery level Estimated percentage of battery life remaining.
cval Custom
value
dwt Device wake
reason
Alarms that are active during the report; the value in the data stream equals
the sum of the enabled alarms:
1 — Alarm high (alh)
2 — Alarm low (all)
4 — Alarm delta low (adl)
8 — Alarm delta high (adh)
64 — Alarm on sensor error
For example, if you have the Alarm high and Alarm low enabled, the aem data
stream value is 3. If you have all alarms enabled, the aem data stream value
is 79.
Value calculated from the raw value (val) using the following device settings:
Tank Volume Unit (unit)
Tank Total Height (tht)
Tank Sensor Offset (off)
Tank Total Volume (vol)
Reason the device woke up:
2 — normal reading or report
3 — alarm reading or report
8 — wakeup report
Digi Connect® Tank v2 User Guide
52
Page 53

Use Remote Manager to view device and sensor data streams Data streams reference information
Short
name Long name Description
fix GPS fix type
fwv Firmware
version
gin GPS interval GPS information sent to
gps GPS feature
isn Cloud server
name
lat Latitude Geographic latitude location of the device.
lon Longitude Geographic longitude location of the device.
off Tank sensor
offset
phn SMS phone
number
GPS location (fix) information:
0 — no fix
1 — valid fix
2 — invalid fix
Firmware version on the device; for example, 2.0.1.19.
Remote Manager
range is 1-96 reports. For example, GPS information is sent every 7 reports.
GPS enabled or disabled on the device:
0 — GPS off
1 — GPS on
URL or server address you use to connect to
Distance from the Connect Tank sensor to the top of the liquid in a full tank.
Phone number associated with your device’s SIM card.
every x-number of reports. The
Remote Manager
.
rdp Read period
(minutes)
rsi RSSI Signal strength of the cellular network.
scs Sensor
connected
status
sdc Send count Maximum number of readings that are sent during one report.
sdp Send interval Number of readings between each data transmission.
sdpd Read period
(days)
ser Sensor error
sst Send start
time
Number of minutes between readings.
Device sensor connection state:
0 — sensor not connected to the device
1 — sensor connected to the device
Number of days between readings.
When sdpd is used, the device follows the First Daily Report At HHMM (sst)
setting.
Sensor error state:
0 — sensor error
1 — no error
Number of minutes after midnight UTC that the new day begins and the first
report of the day is sent.
Digi Connect® Tank v2 User Guide
53
Page 54

Use Remote Manager to view device and sensor data streams Data streams reference information
Short
name Long name Description
sty Sensor type
tht Tank height
total
tmp Temperature Temperature in the tank, measured in degrees Celsius.
tum Tank upload
method
unit Tank volume
unit
val Distance Distance in inches the device sensor is from the surface of the liquid.
vol Total tank
volume
Type of sensor on your device.
1 — M300/150 (short range)
2 — M300/95 (mid range)
Total tank height in inches.
Method the device uses to send data to Remote Manager.
Note The only method supported in this version of Connect Tank is TCP/IP.
Unit of measurement that you are converting to, such as gallons or liters.
Total volume of the tank in the defined unit, such as gallons (unit defined in
Tank Volume Unit).
Digi Connect® Tank v2 User Guide
54
Page 55

Connect Tank maintenance
Use the following information when you need to update or downgrade the firmware or replace the
battery.
Firmware updates
You can use either the CLI or Remote Manager to update the Connect Tank device firmware, reload
the current firmware, install optional firmware, or downgrade to a previous version of the firmware.
Update the firmware using Remote Manager
Use Remote Manager to remotely update Connect Tank firmware. Using this method, the firmware is
updated the next time the device connects to Remote Manager.
1. Go to www.digi.com/support to download the Connect Tank v2 firmware file.
2. Sign in to Remote Manager.
3. Click Device Management > Devices tab.
4. Right-click the Connect Tank device you want to configure and click Firmware > Update
Firmware.
5. Click the gear button and do the following:
a. Select One-time.
b. Set up the schedule.
c. Select Schedule Offline.
d. Click outside the Schedule Options pop-up window to return to the Update
Firmware window.
6. Click Browse and find the file.
7. Click Update Firmware. The firmware is updated the next time the device connects to Remote
Manager.
8. Refresh your browser to get updated information.
9. Verify the firmware version in Remote Manager:
a. Click Device Management and find your Connect Tank in the list of devices.
b. Verify the firmware version in the Firmware Level column is correct for your device.
Digi Connect® Tank v2 User Guide
55
Page 56

Connect Tank maintenance Firmware updates
Update the firmware using the CLI
If you have physical access to Connect Tank, you can use the CLI to update the firmware.
1. Download the Connect Tankv2 firmware file.
a. Go to the Connect Tank product support page.
b. From the Product Support tab, click Firmware.
c. Download and install the firmware file.
2. Open the enclosure and make sure the battery is connected and the SIM card is installed.
3. Connect a USB type A to B cable from your computer to the USB type B port.
Note Do not use the mini USB port, which is covered by a red X in the graphic below.
Digi Connect® Tank v2 User Guide
56
Page 57

Connect Tank maintenance Firmware updates
You may need to install device drivers or wait for your computer to automatically install them
when connecting Connect Tank to a computer using a USB cable. Digi recommends drivers
available at www.ftdichip.com/Drivers/VCP.htm.
4.
Open a terminal program on a computer and connect to Connect Tank using the following
configuration:
n Connection port: Connect to the COM port associated with the USB cable connected to
Connect Tank
n Baud rate or bits per second: 115200
n Data: 8 bit
n Parity: None
n Stop: 1 bit
n Flow control: None
Digi Connect® Tank v2 User Guide
57
Page 58

Connect Tank maintenance Battery replacement
5. Press the Wake button. The command prompt appears in the terminal program window.
6. In the terminal program:
a. Type fwupdate at the command prompt and select the YMODEM protocol to send
the firmware file to the device. Refer to your terminal program documentation for
how to use the YMODEM protocol.
b. Press Enter. The device remains awake to load and install the firmware update.
After the device completes the change, it sends its updated status information to
Remote Manager.
7. Press the Wake button and type status at the command prompt to verify the firmware version.
Battery replacement
Before replacing the battery, review the safety information and make sure you have the necessary
tools and equipment. For more information about battery life, see Battery life.
1. Unscrew the four cover screws and open the enclosure cover.
2. Disconnect the battery.
a. Press in the tab at the top of the battery wire connector.
b. Pull up on the connector.
3. Remove the existing battery.
4. Place the new battery in the battery holder and connect the wiring to the battery port. Make
sure the battery and its wiring are properly placed.
5. Press the Wake button and wait for the battery LED to slowly blink blue five times and then
remain off.
Digi Connect® Tank v2 User Guide
58
Page 59

Connect Tank maintenance Battery replacement
6. Reassemble the device.
It is recommended that you apply lubricant to the gasket when you change the battery.
a. Retrieve the gasket lubricant kit that was provided with the Connect Tank
components.
b. Open the lubricant pouch and use the swab to apply the lubricant onto the gasket.
c. Place the enclosure cover onto the base. The green dots on the cover and the base
must both be on the same side of the device, as show below.
Note Make sure that the battery holder in the cover aligns with the battery holder in the
base. This ensures that a gap does not appear between the cover and the base.
d. Verify that an adequate seal is present between the cover and the base.
e. Tighten the screws.
Digi Connect® Tank v2 User Guide
59
Page 60

Connect Tank maintenance Battery replacement
CAUTION! Cover screws are required as part of the safety rating. When tightening the
cover screws, use a screw torque of 0.79 to 1.92 newton meters (7 to 17 inch pounds).
Digi Connect® Tank v2 User Guide
60
Page 61

Troubleshooting
This section provides troubleshooting information and resources for a Connect Tank device. You need
physical access to the device to perform the procedures in this section.
Digi International provides the following additional online resources:
n Knowledge Base: www.digi.com/support/kbase
n Support forum: www.digi.com/support/forum
n Support request: www.digi.com/support
Device not responding
If the Connect Tank is not responding, you can try the following methods to reset the device.
Reset the device
You can force a soft reset of the device.
1. Press the Reset button to force a soft reset when the Connect Tank device does not respond
to any inputs.
Pressing the Reset button cancels all operations and completes a power cycle, then it enters
sleep mode. The device retains the last successful changes you made to its configuration.
2. Wake the device and wait for the proper LED light sequence to indicate it is functioning.
Restore factory defaults to the device
If pressing the Reset button does not fix the issue, then press and hold the Factory button until both
lights flash purple to reset the device.
Device not connected to the cellular network
Network activation on a Connect Tank device can fail due to the following:
n APN is incorrect
n SIM card is not activated on the cellular network or assigned to a contract
n Device is placed in an area with no network coverage
Try the following to resolve this issue:
Digi Connect® Tank v2 User Guide
61
Page 62

Troubleshooting Troubleshooting Connect Tank reports and alarms
1. Make sure you have the correct APN:
a. Contact your cellular service provider to get the correct APN.
b. Use the CLI to make changes to the APN and check cellular network coverage. See
Register Connect Tank on a cellular network.
2. Work with your cellular service provider to make sure there is adequate network coverage for
the device installation area. If possible, move the device to an area with enough cellular
network coverage.
3. Contact your cellular service provider to make sure your SIM card is activated and assigned to
a contract.
Troubleshooting Connect Tank reports and alarms
Use the following information to troubleshoot errors for reports and alarms.
Empty tank reports
Use the following information when the Connect Tank device incorrectly reports that a tank is empty.
Issue
A report or alarm shows the tank is empty when it contains liquid.
Fix
Check the angle of the sensor. If the ultrasonic sound beam’s transmission path is not perpendicular
to the surface of the liquid, its reflection does not return to the sensor.
You might also need to use a self-aligning bulkhead fitting for an angled tank installation.
No reports in Remote Manager
Issue
No reports are appearing in Remote Manager for regularly scheduled readings and report cycles.
When the liquid level is less than 4 inches from the sensor on the short-range model and less than 12
inches from the sensor on the mid-range model, Connect Tank is unable to take a reading. When this
happens, Connect Tank reports an error (see ser), but does not report a value (see val).
Fix
Make sure there is a minimum of 7 inches between the Connect Tank sensor and the maximum liquid
level.
Digi Connect® Tank v2 User Guide
62
Page 63

Troubleshooting Troubleshooting Connect Tank reports and alarms
High liquid reports
Use the following information when a Connect Tank device incorrectly reports that the tank liquid
level reached the high alarm threshold.
Issue
A report or alarm shows the tank liquid level is too high when the liquid is at a normal level.
If the ultrasonic sound beam’s transmission path is blocked, its reflection returns to the sensor in less
time than it should, which can lead to a high-liquid level report or alarm. This is also called a false echo.
Fix
Make sure there are no obstructions in the ultrasonic sound beam’s transmission path.
Examples
Obstructions
n The device is installed too close to the side of the tank causing the side of the tank to interrupt
the transmission path.
n The transmission path is obstructed by recessed or protruding tank seams, or structures
mounted inside the tank (such as a ladder).
Fix: Make sure the device is installed as close as possible to the center of the tank’s diameter to avoid
any obstructions between the sensor and the surface of the liquid.
Digi Connect® Tank v2 User Guide
63
Page 64

Troubleshooting Troubleshooting Connect Tank reports and alarms
Narrow standpipe
The device is installed on a standpipe that is too narrow, which stops the ultrasonic sound beam from
reaching beyond the sides of the standpipe.
Fixes:
n Use a standpipe that is wide enough or short enough for the ultrasonic sound beam to clear it.
n Use a Digi-provided custom adapter that is designed to reduce reflections from standpipes.
Contact Digi for more information.
n Reduce the sensor’s sensitivity setting; work with the sensor manufacturer directly to adjust
the sensitivity setting.
Digi Connect® Tank v2 User Guide
64
Page 65

Troubleshooting Troubleshooting Connect Tank reports and alarms
Alarms while filling the tank
Use the following information for troubleshooting if the Connect Tank device sends alarm reports
when you are adding liquid to a tank.
Issue
A report or alarm shows the tank liquid level is high or empty while the tank is filling.
This happens when the liquid entering the tank either intersects with the ultrasonic sound beam or
agitates the surface of the liquid enough to affect the sound beam’s transmission path. The liquid
either disperses the sound beam so it does not reflect to the sensor or it creates a false echo that
reports a high-liquid level. The following figures show both of these scenarios.
Fix
When this happens, either disregard measurements taken during this time or move the device to a
location on the tank where the ultrasonic sound beam is not affected by incoming liquid. Wait a
suitable amount of time after filling to let the liquid settle before taking measurements.
Metal tank issues
Note the following when using the Connect Tank device on metal tanks.
Issue
Metal tanks sometimes have vibrations that travel through the metal and reflect to the sensor
causing occasional bad readings.
Fix
Install a rubber gasket between the Connect Tank enclosure and the tank’s metal surface to prevent
the vibrations from affecting Connect Tank.
Digi Connect® Tank v2 User Guide
65
Page 66

Regulatory information
FCC certifications and regulatory information
Radio frequency interface (RFI) (FCC 15.105)
This device has been tested and found to comply with the limits for Class B digital devices pursuant to
Part 15 Subpart B, of the FCC rules. These limits are designed to provide reasonable protection
against frequency energy, and if not installed and used in accordance with the instruction manual,
may cause harmful interference to radio communications. However, there is no guarantee that
interference will not occur in a particular installation. If this equipment does cause harmful
interference to radio or television reception, which can be determined by turning the equipment off
and on, you are encouraged to attempt to correct the interference with one or more of the following
measures:
n Reorient or relocate the receiving antenna.
n Increase the separation between the equipment and receiver.
n Connect the equipment to an outlet on a different circuit from the receiver.
n Consult the dealer or an experienced radio/TV technician for help.
Labeling requirements (FCC 15.19)
This device complies with Part 15 of FCC rules. Operation is subject to the following two conditions: (1)
this device may not cause harmful interference, and (2) this device must accept any interference
received, including interference that may cause undesired operation.
If the FCC ID is not visible when the device is installed inside another device, then the outside of the
device into which the module is installed must also display a label referring to the enclosed module
FCC ID.
Modifications (FCC 15.21)
Changes or modifications to this equipment not expressly approved by Digi may void the user’s
authority to operate this equipment.
Declaration of Conformity (DoC)
Digi has issued Declarations of Conformity for the Connect Tank concerning emissions, EMC, and
safety. For more information, see www.digi.com/resources/certifications.
Important note
Digi Connect® Tank v2 User Guide
66
Page 67

Regulatory information CE mark (Europe)
Digi customers assume full responsibility for learning and meeting the required guidelines for each
country in their distribution market. Refer to the radio regulatory agency in the desired countries of
operation for more information.
CE mark (Europe)
The Connect Tank is certified for use in several European countries. For information, visit
www.digi.com/resources/certifications.
If the Connect Tank is incorporated into a product, the manufacturer must ensure compliance of the
final product with articles 3.1a and 3.1b of the RE Directive (Radio Equipment Directive). A Declaration
of Conformity must be issued for each of these standards and kept on file as described in the RE
Directive (Radio Equipment Directive).
Furthermore, the manufacturer must maintain a copy of the Connect Tank user manual
documentation and ensure the final product does not exceed the specified power ratings, antenna
specifications, and/or installation requirements as specified in the user manual. If any of these
specifications are exceeded in the final product, a submission must be made to a notified body for
compliance testing to all required standards.
OEM labeling requirements
The CE marking must be affixed to a visible location on the OEM product.
CE labeling requirements
The CE mark shall consist of the initials “CE” taking the following form:
n If the CE marking is reduced or enlarged, the proportions given in the above graduated
drawing must be respected.
n The CE marking must have a height of at least 5mm except where this is not possible on
account of the nature of the apparatus.
n The CE marking must be affixed visibly, legibly, and indelibly.
Digi Connect® Tank v2 User Guide
67
 Loading...