


 Loading...
User Guide
Digi CM
90000301_E

Digi International Inc. 2004.
Digi, Digi International, the Digi logo, the Digi Connectware, the Making Device Networking Easy logo, Digi One, and RealPort are trademarks or registered trademarks of Digi International, Inc. in the United States and other countries worldwide. All other trademarks are the property of their respective owners.
Microsoft Windows Server 2003 is a trademark of Microsoft Corporation.

4

|
|
C o n t e n t s |
Chapter 1 |
Introduction |
|
Digi CM Model Support .................................................................................... |
9 |
|
Feature Overview ............................................................................................. |
9 |
|
Feature Summary............................................................................................. |
9 |
|
User Groups ................................................................................................... |
11 |
|
Root and Admin Usernames and Passwords................................................. |
11 |
|
Adding Port Administrators and Users ........................................................... |
11 |
|
Ways to Configure the Digi CM ...................................................................... |
11 |
|
Ways of Accessing the Digi CM: Overview .................................................... |
13 |
|
Web Interface Access Menu .......................................................................... |
13 |
|
Port Access Menu .......................................................................................... |
15 |
|
Direct Port Access.......................................................................................... |
15 |
|
Custom Menus ............................................................................................... |
16 |
|
Port Escape Menu.......................................................................................... |
16 |
|
Saving and Applying Changes ....................................................................... |
19 |
|
Automatic Device Recognition ....................................................................... |
19 |
|
Chapter 2 |
Getting Started |
|
Introduction..................................................................................................... |
21 |
|
Assigning IP Settings from the Console Port ................................................. |
21 |
|
Configuring HTTP and HTTPS....................................................................... |
22 |
|
Configuring for SSH ....................................................................................... |
23 |
|
Adding, Editing, and Removing Users............................................................ |
25 |
|
Chapter 3 Installing and Configuring PC Cards |
|
|
Introduction..................................................................................................... |
27 |
|
Compatible PC Cards..................................................................................... |
27 |
|
Adding a Compact-flash Card ........................................................................ |
27 |
|
Adding a Network Card .................................................................................. |
28 |
|
Adding a Wireless LAN Card.......................................................................... |
29 |
|
Adding a Serial Modem .................................................................................. |
30 |
|
Chapter 4 System and Port Logging |
|
|
Introduction..................................................................................................... |
33 |
|
Enabling Log Storage Location ...................................................................... |
33 |
|
Configuring System Logging .......................................................................... |
36 |
|
Configure Port Logging .................................................................................. |
38 |
|
Chapter 5 |
Configuring Ports |
|
Introduction..................................................................................................... |
41 |
|
Enabling and Disabling the Ports ................................................................... |
41 |
|
Resetting Ports............................................................................................... |
42 |
|
Port Title |
......................................................................................................... |
42 |
Contents |
5 |
Configuring Automatic Device Recognition .................................................... |
42 |
Apply all Ports Settings .................................................................................. |
44 |
Host Mode Configuration................................................................................ |
44 |
Configuring Host Mode................................................................................... |
47 |
Supported Protocols....................................................................................... |
48 |
Serial Port Parameters ................................................................................... |
49 |
Chapter 6 Alerts and Notifications |
|
Introduction..................................................................................................... |
51 |
Configuring SMTP Alerts................................................................................ |
52 |
SNMP Information.......................................................................................... |
52 |
Traps .............................................................................................................. |
53 |
Configuring SNMP.......................................................................................... |
54 |
Managing the SNMP Protocol ........................................................................ |
55 |
Configuring Port Event Handling .................................................................... |
56 |
Config Alerts for Automatic Device Recognition (ADR).................................. |
58 |
Chapter 7 User Administration |
|
Administering Users ....................................................................................... |
59 |
Chapter 8 Configuring Security and Authentication |
|
Introduction..................................................................................................... |
61 |
Configuring Network IP Filtering..................................................................... |
61 |
Configuring User Access Control ................................................................... |
64 |
Authentication................................................................................................. |
67 |
Configuring Authentication Methods for Port Access ..................................... |
67 |
Configuring Authentication for the Web Server .............................................. |
68 |
Chapter 9 Custom and Default Menus |
|
Introduction..................................................................................................... |
69 |
Making Custom Menus................................................................................... |
69 |
Default Menu.................................................................................................. |
72 |
Chapter 10 Microsoft SAC Support |
|
About Digi CM Support for Microsoft Windows Server 2003 ......................... |
75 |
Set Up Overview ............................................................................................ |
76 |
Setting Up the Windows Server 2003 Port..................................................... |
76 |
Setting Up the Digi CM for SAC Support........................................................ |
76 |
Accessing the Windows Server 2003 Console Port from the Digi CM GUI.... |
78 |
Chapter 11 Rackable Systems Management Card |
|
Introduction..................................................................................................... |
81 |
Set up............................................................................................................. |
81 |
Chapter 12 Configuring Remote Dial-In Access |
|
Introduction..................................................................................................... |
85 |
Configuring For Dial-In Modem Access.......................................................... |
85 |
Adding a PC Modem ...................................................................................... |
88 |
Configuring For Dial-In Terminal Server Access ............................................ |
88 |
6 |
Contents |
Chapter 13 Power Controller |
|
Introduction..................................................................................................... |
91 |
Installing Power Controller ............................................................................. |
92 |
Configuring Power Controller ......................................................................... |
92 |
Setting Alarms and Thresholds ...................................................................... |
94 |
Outlet Configuration ....................................................................................... |
95 |
User Access for Power Controller .................................................................. |
96 |
Power Controller Management....................................................................... |
98 |
Cascading Multiple Digi RPM Units.............................................................. |
100 |
Chapter 14 Port Clustering |
|
Introduction................................................................................................... |
103 |
Configuring Port Clustering .......................................................................... |
104 |
Chapter 15 System Administration |
|
Introduction................................................................................................... |
111 |
Upgrading the Firmware............................................................................... |
111 |
Configuration Management .......................................................................... |
112 |
Automatically Upgrading the Digi CM Firmware or |
|
Configuration using TFTP ............................................................................ |
112 |
Resetting Factory Defaults ........................................................................... |
114 |
Setting Date and Time.................................................................................. |
116 |
Configuring a Host Name............................................................................. |
116 |
Chapter 16 Command Line Interface |
|
Introduction................................................................................................... |
117 |
Linux Commands ......................................................................................... |
117 |
Important File Locations ............................................................................... |
118 |
Example Scripts ........................................................................................... |
120 |
User Administration ...................................................................................... |
122 |
Chapter 17 Configuration Menu |
|
Accessing the Configuration Menu............................................................... |
123 |
Configuring SSH........................................................................................... |
123 |
Adding, Editing, and Removing Users.......................................................... |
124 |
Adding and Configuring a PC Card .............................................................. |
124 |
Host Mode Configuration.............................................................................. |
125 |
Port Parameters ........................................................................................... |
126 |
Port Access Menu ........................................................................................ |
126 |
System Logging............................................................................................ |
127 |
Configuring SNMP........................................................................................ |
128 |
Configuring SMTP........................................................................................ |
128 |
Network IP Filtering ...................................................................................... |
129 |
Port IP Filtering............................................................................................. |
129 |
Sniff Sessions............................................................................................... |
130 |
Authentication............................................................................................... |
132 |
Contents |
7 |
Dial-in Modem Access.................................................................................. |
133 |
|
Dial-in Terminal Server Access .................................................................... |
134 |
|
Clustering |
..................................................................................................... |
135 |
Firmware Upgrade........................................................................................ |
136 |
|
Restoring Factory Defaults........................................................................... |
137 |
|
Setting Date and Time.................................................................................. |
137 |
|
Accessing the Boot Loader Program............................................................ |
137 |
|
Chapter 18 |
Hardware Information |
|
Introduction................................................................................................... |
141 |
|
Hardware Specifications............................................................................... |
141 |
|
LED Indicators.............................................................................................. |
143 |
|
About Serial Port Cabling ............................................................................. |
143 |
|
Serial Port Pinouts........................................................................................ |
143 |
|
Cable Adapters............................................................................................. |
144 |
|
Ethernet Pinouts........................................................................................... |
148 |
|
Rack Mounting Installation ........................................................................... |
149 |
|
Chapter 19 |
Certifications |
|
Safety ........................................................................................................... |
|
151 |
Emissions ..................................................................................................... |
153 |
|
Immunity....................................................................................................... |
|
153 |
Solaris Ready ............................................................................................... |
153 |
|
Index ................................................................................................................. |
|
155 |
8 |
Contents |

Introduction
Chapter 1
I n t r o d u c t i o n
Digi CM Model Support
This manual offers information on Digi CM 8-port, 16-port, 32-port, and 48-port models.
Feature Overview
With Digi CM, administrators can securely monitor and control servers, routers, switches, and other network devices from anywhere on the corporate
TCP/IP network, over the Internet, or through dial-up modem connections, even when the server is unavailable through the network.
Digi CM employs SSHv2 encryption, to keep server access passwords safe from hackers, and supports all popular SSH clients, as well as secure access from any Java-enabled browser. It is the first console server to provide a secure graphical user interface for easy out-of-band management of Microsoft
Windows Server 2003 systems. It connects to serial console ports using standard CAT5 cables, eliminating the hassles of custom cabling. In addition, the Digi CM offers a PCMCIA card slot, for adding dialup modems or wireless network cards. Flash memory cards can be used to save port logs and backup configuration files.
Digi CM is available in 8-, 16-, 32and 48-port models, in a 1U rack-mount form factor.
Feature Summary
Category |
|
Feature |
|
|
|
||
|
• SSH v2 server and client |
||
Security |
• |
SSL |
|
|
• |
IP Filtering |
|
|
|
|
|
|
• |
TACACS+ |
|
|
• |
RADIUS |
|
Authentication |
• |
LDAP |
|
• |
Kerberos |
||
|
|||
|
• User access per port |
||
|
• |
Local user database |
|
|
|
|
|
Chapter 1 |
9 |

Feature Summary
Category |
|
Feature |
|
|
|
|
• |
Command line |
|
• |
WEB --HTTP/HTTPS |
|
• |
SNMP |
|
• |
Custom applications |
Management |
• |
Port Triggers and Alerts |
|
• |
Multi level menus |
|
• |
Auto-discovery |
|
• Integrated power management and control |
|
|
• |
Automatic Device Recognition |
|
|
|
|
• |
Local port logging |
Data Capture |
• |
External logging (syslog, NFS, secure |
|
|
NFS, PC card) |
|
|
|
|
• Telnet/SSH with custom menu |
|
|
• |
Reverse Telnet/SSH |
Port Access |
• |
HTTP/HTTPS |
|
• |
Raw TCP |
|
• |
Port escape menu |
|
|
|
|
• |
CompactFlash memory card |
|
• Wireless LAN adapter (802.11b) |
|
PC Card Support |
• |
Ethernet LAN adapter |
|
• |
PSTN/CDMA modem card |
|
See http://cm.digi.com for more information. |
|
|
|
|
|
• |
Solaris Ready |
|
• Multiple users per port |
|
|
• |
Flash upgrade able |
|
• SSH sessions simultaneously on all ports |
|
Other Features |
• Secure Clustering - Single IP for multiple |
|
|
Digi CM devices |
|
|
|
|
|
• IP addresses per port |
|
|
• Automated TFTP firmware and |
|
|
|
configuration update upon boot |
|
• RSA SecurID® support using RADIUS |
|
|
|
|
10 |
Chapter 1 |
Introduction
User Groups
The Digi CM comes with built-in user groups, defined by access levels. The following table lists user groups, their access rights, and default user names.
Group |
Access Privileges |
Configuration |
Defaults |
||||
Privileges |
|||||||
|
|
|
|
|
|||
|
|
|
|
|
|
|
|
----------- |
Ports |
Command |
Ports |
System |
Login |
Password |
|
Line |
|||||||
|
|
|
|
|
|
||
|
|
|
|
|
|
|
|
Root |
yes |
yes |
yes |
yes |
root |
dbps |
|
|
|
|
|
|
|
|
|
System Admin |
yes |
yes |
yes |
yes |
admin |
admin |
|
(read only) |
|||||||
|
|
|
|
|
|
||
|
|
|
|
|
|
|
|
Port Admin |
yes |
no |
yes |
no |
- |
- |
|
|
|
|
|
|
|
|
|
User |
yes |
no |
no |
no |
- |
- |
|
|
|
|
|
|
|
|
|
Root and Admin Usernames and Passwords
The Digi CM comes with two default users; root and system admin.
The user names of the Digi CM are case sensitive.
User Name |
Default Password |
|
|
root |
dbps |
|
|
admin |
admin |
|
|
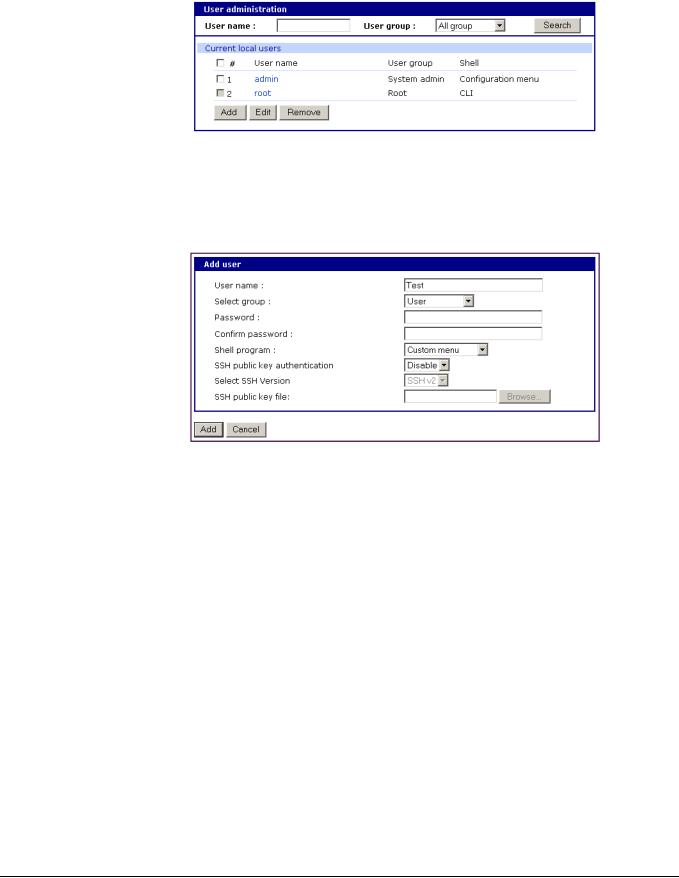
Adding Port Administrators and Users
The system administrator and root user can add port administrators and additional users easily with the web interface by choosing System administration > User administration > Add user.
Ways to Configure the Digi CM
This section discusses the three ways to configure the Digi CM using the web interface, configuration menu, or command line interface.
Web Interface
The Digi CM web interface features HTTPS for secure access.
The web interface provides an easy way to configure the Digi CM. The root user and system administrator can configure all features through the web. Port administrators can configure ports, including port clustering, but cannot modify system settings. No other users can use the web interface for configuration.
To access the web interface, enter the Digi CM IP address or host name in a browser’s URL window. The following page is displayed after login.
Chapter 1 |
11 |

Ways to Configure the Digi CM
Configuration Menu
The root user and system administrator have full access to the configuration menu from a Telnet or SSH session or a serial connection through the console port. Functionality is similar to the web interface, with the exception of custom menus, which can be created only from the web interface. The configuration menu is presented to system administrators automatically. Root users access the menu by entering the command configmenu. Port administrators can access this menu but can modify serial port configuration only. No other users can access this menu.
Command Line Interface
The command line interface can be accessed from a Telnet or SSH session or from the console port. The root user always has access to this interface. The
12 |
Chapter 1 |
Introduction
system administrator can be granted read-only permission as well. No other users can access the command line interface.
Ways of Accessing the Digi CM: Overview
There are four ways to access the ports on the Digi CM:
•Web Interface
•Port Access Menu
•Direct Port Access
•Custom Menus
Web Interface Access Menu
The web interface menu provides easy and convenient access to ports. All users can access the menu by entering the Digi CM IP address or host name in a web browser’s URL window. You will only be able to see the ports that you are allowed to access.
To access a port from the web interface, do the following:
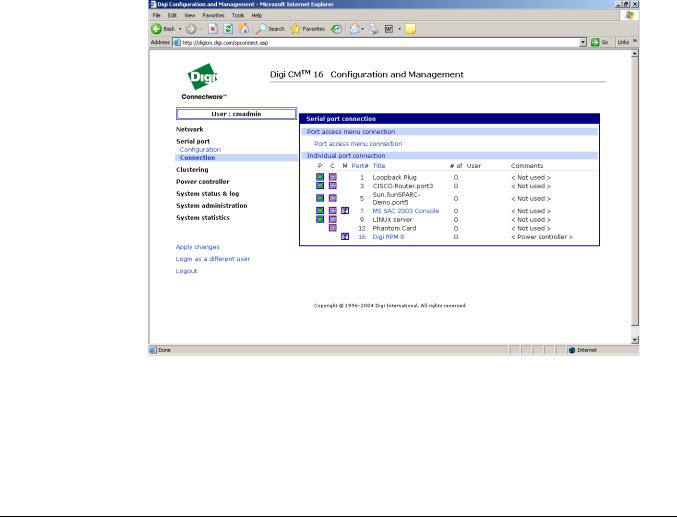
1.Access the web interface.
2.Click Serial port > Connection.
The P (Power) column allows you to control power of the attached devices, if a
Remote Power Management unit is attached and you have appropriate rights.
The M (Manage) column offers web based management for Windows Server
2003, Remote Power Management units or Rackable Systems Management Card.
The “# of User” column shows how many users are actually connected to the port and the username of the read/write user.
Chapter 1 |
13 |
Web Interface Access Menu
If you are conducting a special task through the console port, like BIOS upgrade and should not be interrupted, you can notify other users by entering a comment upon connect. This comment is shown here.
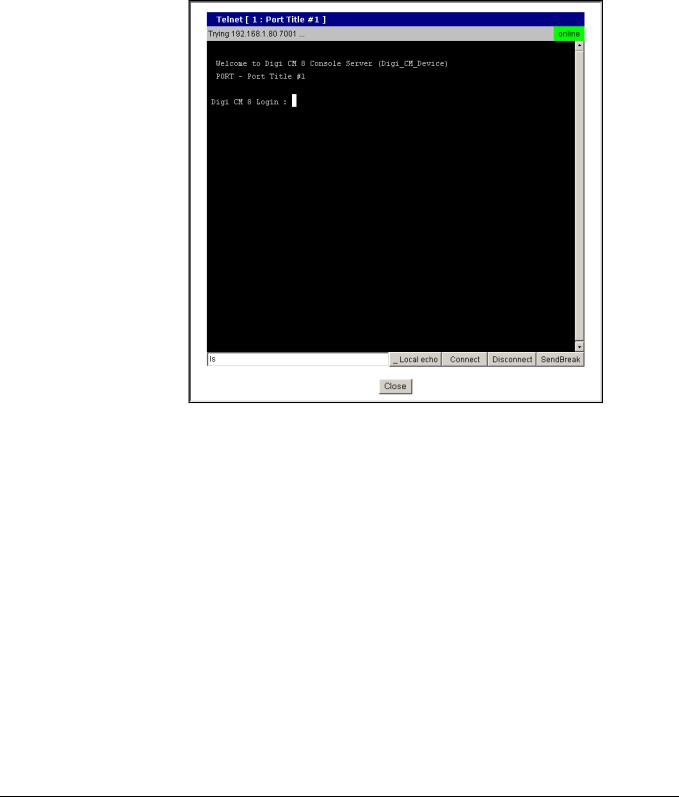
3.Select a port by clicking the icon in the C (Console) column. A Java applet or Telnet window opens with a login prompt.
The web interface can also be configured to call a local Telnet or SSH application, see "Configuring Host Mode" on page 47.
14 |
Chapter 1 |
Introduction
Port Access Menu
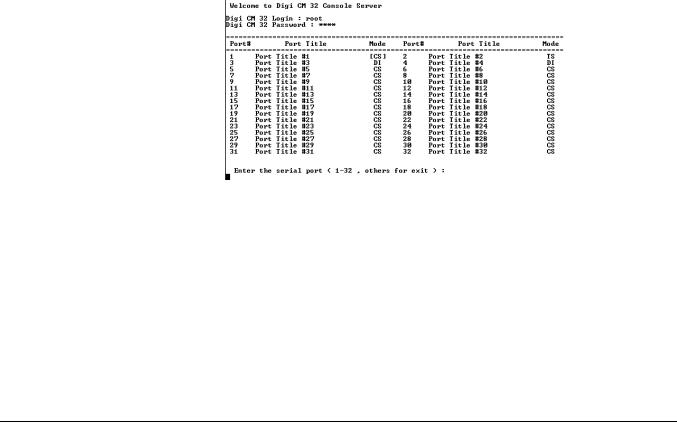
The Port Access Menu provides access to ports. It is accessible to all users through the web interface, Telnet and SSH sessions, and remote modem access. The information that follows shows you how to access this menu.
Access |
Permissions |
Procedure |
|
Type |
|||
|
|
||
|
|
|
|
|
|
1. Access the web interface |
|
Web interface |
Any user can use |
2. Choose Serial port > Connection > Port access |
|
this method. |
menu connection |
||
|
|||
|
|
3. Log in |
|
|
|
|
|
|
|
1. Telnet to the Digi CM specifying its IP address |
|
|
Any user can use |
and port 7000. (7000 is the default socket port for |
|
Telnet/SSH |
both Telnet and SSH) Example: |
||
this method. |
telnet 192.168.15.7 7000 |
||
|
|||
|
|
||
|
|
2. Log in |
|
|
|
|
|
Command |
|
From the command line, issue the |
|
Root |
portaccessmenu command. Example: |
||
line |
|||
|
portaccessmenu |
||
|
|
||
|
|
|
|
|
|
TCP port 23/22 |
|
Telnet/SSH |
Any user |
Example: telnet digicm.digi.com |
|
If user’s shell is configured to "Port access |
|||
|
|
||
|
|
menu", please refer to "Administering Users" on |
|
|
|
page 59. |
|
|
|
|
Direct Port Access
You can connect directly to a properly configured port through a Telnet or SSH session. Configuration requirements include setting the Host Mode to Console
Server Mode and the Protocol to either Telnet or SSH. Ports, by default are set to Console Server Mode and Telnet. Use the following information to make a
Telnet or SSH connection to a port:
Chapter 1 |
15 |

Custom Menus
Type |
Command Syntax |
Example: Connection to Port 3 |
|
|
|
|
|
|
telnet ip-address tcp-port |
telnet 192.168.15.7 7003 |
|
|
where ip-address is the Digi CM’s IP address |
|
|
Telnet |
(7000 is the default socket port for both |
|
|
and tcp-port is the Listening TCP port for a |
|
||
|
Telnet and SSH) |
|
|
|
port |
|
|
|
|
|
|
|
|
|
|
|
ssh user-name@ ip-address tcp-port |
ssh admin@ 192.168.15.7 -p 7003 |
|
|
where user-name is a user’s name, |
|
|
|
(7000 is the default socket port for both |
|
|
|
ip-address is the Digi CM’s IP address and |
|
|
SSH |
tcp-port is the Listening TCP port for a port |
Telnet and SSH) |
|
|
ssh user-name:”p=port-number”@ip-address |
ssh sunadmin:”p=25”@Digi12 |
|
|
or |
ssh ciscoadmin:”t=Cisco-main”@Digi12 |
|
|
ssh user-name:”t=port-title”@ip-address |
|
|
|
|
|
|
|
|
|
|
|
http://ip-address/connect.asp?t=port-title |
|
|
|
http://ip-address/connect.asp?p=port- |
|
|
|
number |
http://digicm.digi.com/ |
|
|
where ip-address is the Digi CM |
|
|
WEB |
connect.asp?t=CISCO.Router.port3 |
|
|
IP address or NDS name, port-number is the |
|
||
|
(the port name is case sensitive) |
|
|
|
number of the serial port and port title is the |
|
|
|
|
|
|
|
name of the port as assigned in serial port, |
|
|
|
port title. |
|
|
|
|
|
|
|
Note: The example assumes that the Listening TCP port is 7003, the default for port 3. |
||
Custom Menus
Custom menus are created by either root or the system administrator to limit your access to specific ports. For more information, see "Making Custom
Menus" on page 69.
Port Escape Menu
Port escape is the ability to escape from a port without disconnecting. Port escape is available in main sessions as well as sniff sessions. Every connection method accommodates port escape. You configure the escape sequence per port. Follow the procedure to configure the port escape sequence.
1.Serial Port > Configuration > Select the port number or All.
2.Host mode configuration > Port escape sequence - enter a letter for the Port escape sequence. The default is <ctrl> z.
3.Click Save to flash and continue with other configurations or click Save & apply for the changes to take effect.
16 |
Chapter 1 |
Introduction
The port escape menu is automatically started if there is one active session to the port established and a second user tries to connect.
To open a sniff session:
1.Click Serial port > Connection.
2.Select the port you want to access.
3.Log in with your user name and password.
Chapter 1 |
17 |
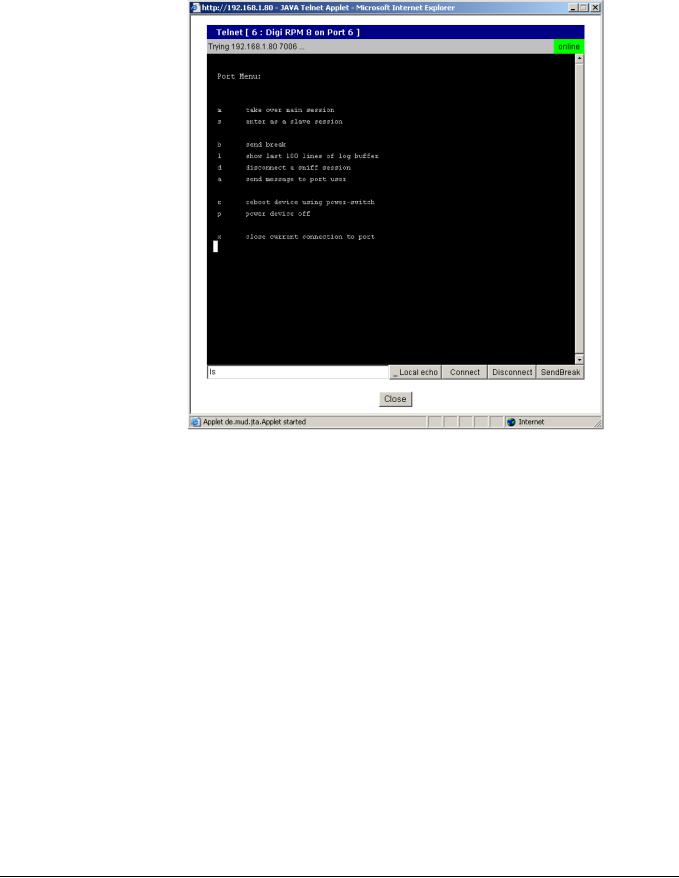
Port Escape Menu
4. Enter the letter of the port escape sequence.
The following table describes the fields and the operations for the port escape feature. You will only see the fields allowed for your permissions.
Description of Fields
Escape |
Description of Action |
Occurrence |
|
Sequence |
|||
Ctrl+ |
|
|
|
|
|
|
|
m |
|
only presented to users with read/ |
|
take over main session (read/write) |
write access upon entering a |
||
|
|
session |
|
|
|
|
|
s |
|
only presented to users with read/ |
|
enter as a slave session (read only) |
write access upon entering a |
||
|
|
session |
|
|
|
|
|
b |
send break |
not functional for sniff users |
|
|
|
|
|
l |
show last 100 lines of log buffer |
must enable logging for this option |
|
|
|
|
|
d |
disconnect a sniff session |
only functional to admin |
|
|
|
|
|
a |
send message to port user(s) |
not available to sniff users |
|
|
|
|
|
r |
reboot device using power-switch |
only if power management is |
|
available on this port |
|||
|
|
||
|
|
|
|
p |
power device on/off |
(show only on or off) only if power |
|
management is available on this port |
|||
|
|
||
|
|
|
18 |
Chapter 1 |

|
|
Introduction |
|
|
|
|
|
Escape |
Description of Action |
Occurrence |
|
Sequence |
|
||
Ctrl+ |
|
|
|
|
|
|
|
x |
close current connection to port |
closes the current connection |
|
|
|
|
|
Saving and Applying Changes
In the web interface, you can save and apply configuration changes in two ways. With the one-step method, you choose “Save & apply” and changes are saved and applied (take effect) immediately. With the two-step method, you choose “Save to flash,” which immediately saves changes but the changes do not take effect until you choose Apply changes. The following topics describe how to do each of these operations.
One Step: Save and Apply Changes
To save and apply changes immediately, choose the Save & apply button.
Two-Step: Save to Flash and then Apply Changes
To save multiple changes but apply changes once, do the following:
Choose the Save to flash button.
When you finish changing the configuration, choose the Apply changes link which is located on the left navigation menu (or the Save & apply button at the bottom of the page.)
Automatic Device Recognition
This feature allows the Digi CM to automatically detect and recognize attached devices. The Digi CM sends down a probe string, “Enter”, by default then analyzes the response. It then displays the detected OS, device and port number like:
CISCO.Router.port3
Sun.nemo.port5
To enable Automatic Device Recognition:
1.Serial Port > Configuration > Select the port number or All.
2.Port title
Automatic Detection - Enable
Use detected port title - Enable
Probe String - \x0D (means <Enter>)
Device detection method - Active
Detection initiation - periodically
Detection delay - every 5 minutes
3. Click Save & apply.
For more details about Automatic Device Recognition please refer to chapter
4, Configuring Ports.
Chapter 1 |
19 |

Automatic Device Recognition
Port 3 shows a real world example of a detected device.
Automatic Device Recognition also monitors each of the configured serial ports. This allows you to receive an e-mail or SNMP trap if there is a change in the expected response from the device connected to the serial port. If the device goes down or is disconnected for any reason, you are notified.
For configuration of this alarm feature please refer to chapter 4, Configuring
Ports.
20 |
Chapter 1 |
Getting Started
Chapter 2
Introduction
G e t t i n g S t a r t e d
This chapter covers basic configuration topics. Included is information on assigning IP settings, enabling secure access with the web interface, accessing the unit through SSH, and adding or removing users.
Note: Initial setup is described in the Quick Start Guide included with the product packaging. A copy of this document is also available online at http://cm.digi.com.
Assigning IP Settings from the Console Port
The default IP address is 192.168.161.5.
The following steps use the console port to assign IP settings.
1.Connect the console port on the rear panel of the Digi CM to a serial port on a workstation using the Ethernet console cable and the appropriate Digi console adapter packaged with the Digi CM. The arrow in the following graphic points to the console port.
console port
CM 32 back panel shown
2.Configure a terminal emulation program, such as HyperTerminal, using the following settings:
•bps=9600
•data bits=8
•parity=none
•stop bits=1
•flow control=none.
3.Establish a connection to the console port and press Enter to get a command prompt.
Chapter 2 |
21 |

Configuring HTTP and HTTPS
4.At the login prompt, log in as admin. The default password for admin is admin.
The Configuration menu appears.
5. Enter the number for Network configuration.
6.Enter the number for IP configuration.
7.Enter the appropriate parameters for the IP settings.
8.Press ESC when done to return to the main configuration menu.
9.Enter the number to exit and apply changes.
Changes are saved and applied immediately. There is no need to reboot.
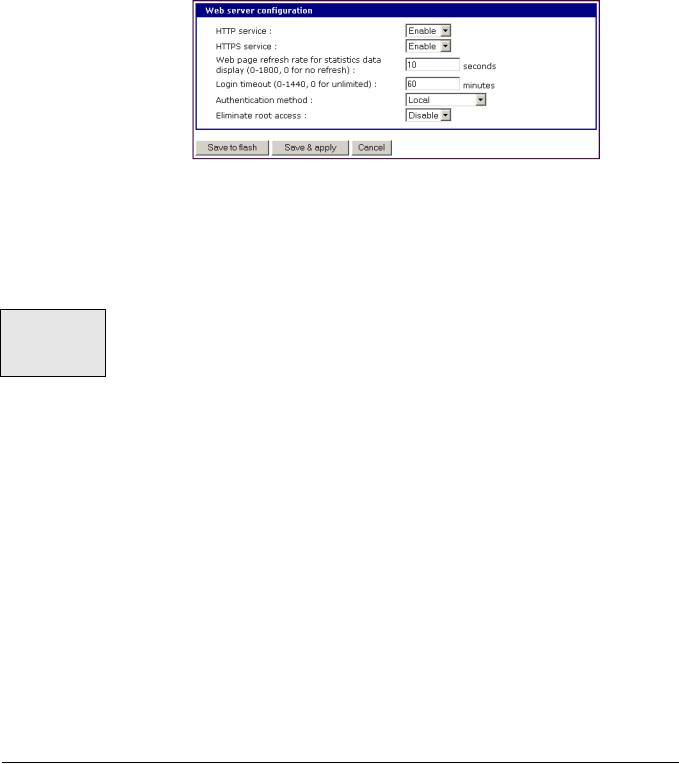
Configuring HTTP and HTTPS
By default HTTP and HTTPS are enabled on the Digi CM device. To modify these settings, do the following:
1.Enter the IP address for the Digi CM in a web browser’s URL.
2.Under the left navigation bar, Network > Web server configuration
3.Select Enabled or Disabled.
4.Set the desired refresh rate for statistics, connection, and power control data. The default value is 10 seconds.
22 |
Chapter 2 |
Getting Started
5.Select an authentication method for accessing the web interface. The default is local.
6.To save and apply changes, click Save & apply.
Configuring for SSH
The Digi CM supports Blowfish and 3DES encryption methods for SSH.
Accessing the Digi CM’s command line via SSH is enabled by default (TCP port 22).
Options
The Port Access Menu and individual ports can be configured for SSH.
Configuring the Port Access Menu for SSH
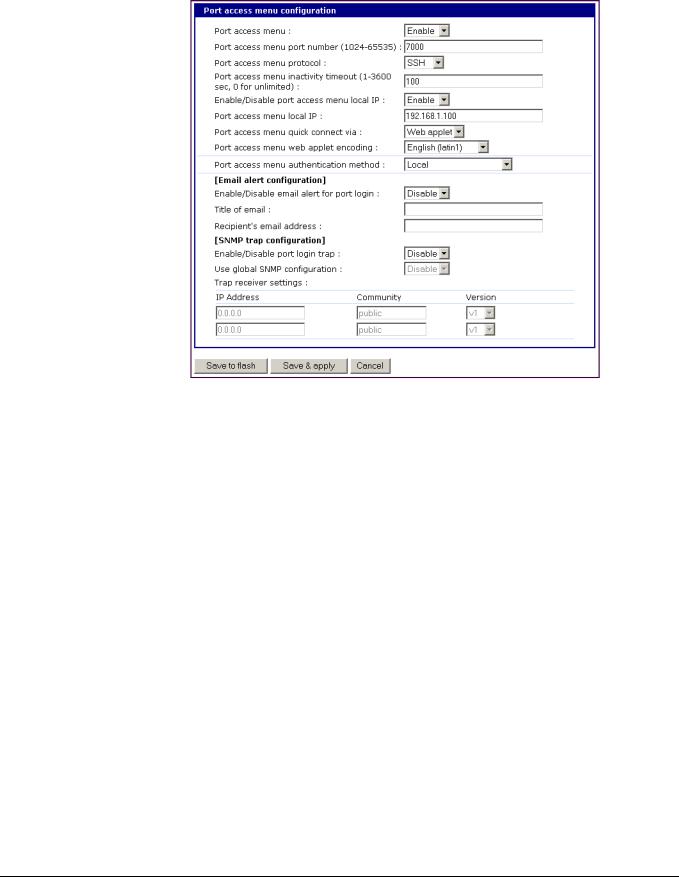
1. Access the web interface.
2.Log in as root, admin, or a member of the port administration group. The default password for root is dbps, and the default password for admin is admin.
3.Under Serial port > Configuration > Port access menu configuration.
The Port access configuration menu appears.
Chapter 2 |
23 |
Configuring for SSH
4. Select SSH as the Port access menu protocol.
5. Click Save & apply.
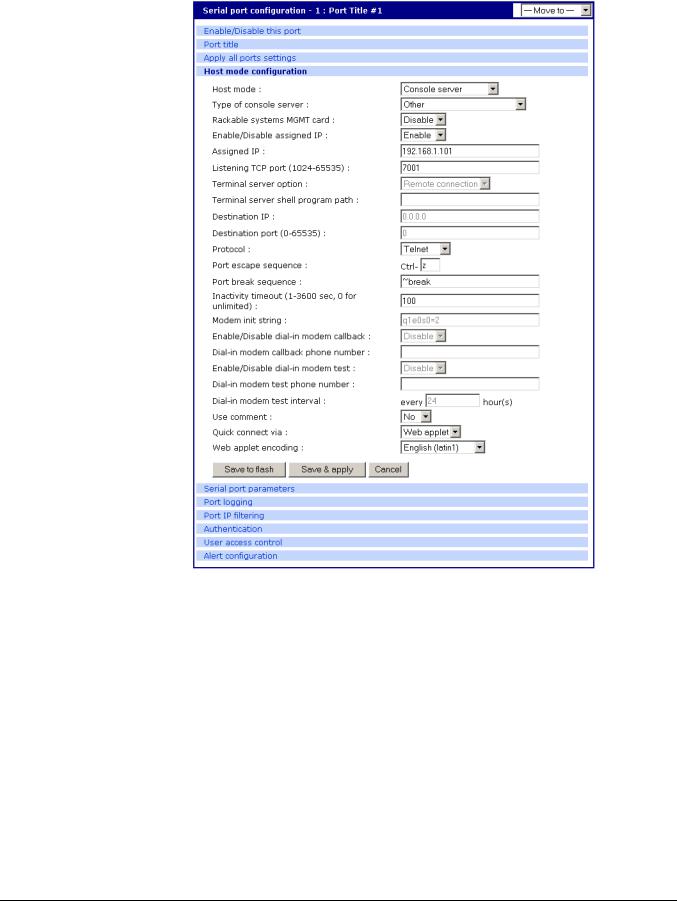
Configuring a Port for SSH
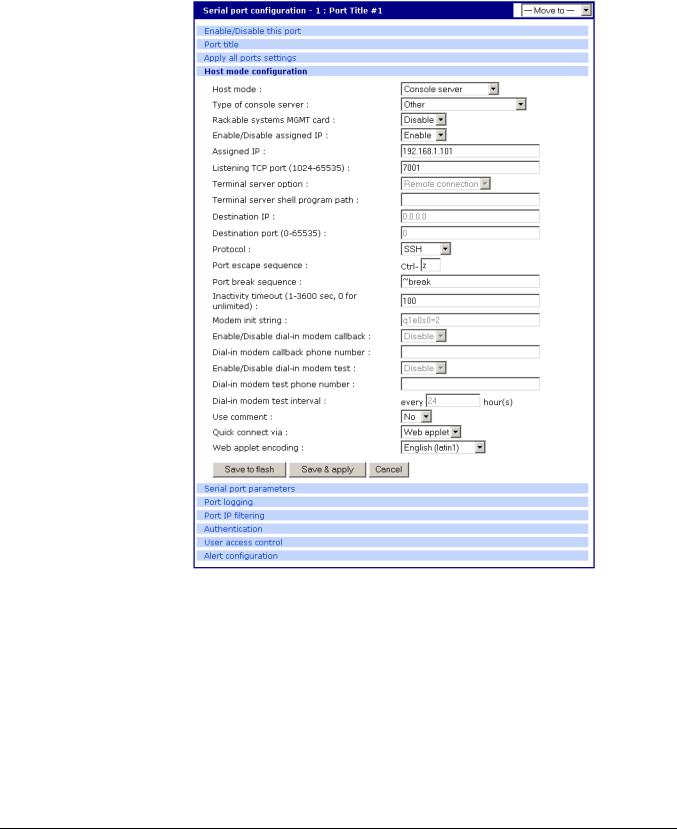
1.Access the web interface.
2.Log in as root, admin, or a member of the port administration group. The default password for root is dbps, and the default password for admin is admin.
3.Under Serial port > Configuration.
4.Select All or one individual port you want to configure for SSH.
5.Click Host mode configuration.
6.Specify SSH as the Protocol as shown in the following screenshot.
24 |
Chapter 2 |
Getting Started
7. Click Save & apply.
Adding, Editing, and Removing Users
The root user and system administrator can add, remove, or edit users from the web interface.
Procedure
1.Access the web interface.
2.Log in as root or admin. The default password for root is dbps, and the default password for admin is admin.
Chapter 2 |
25 |
Adding, Editing, and Removing Users
3. Under the System administration heading click Users administration.
4.Select Add, Edit, Remove or click the username to edit a user.
•Add: Assign a user name, user group, password, and shell.
•Edit: Change user group, password, or their shell
•Remove: Remove a user from the system
5. Click Save & apply.
Note: The root and admin users cannot be removed from the system.
About Shell Options
The shell program selection determines the interface you see when establishing a Telnet or SSH session or connecting via the console port with the Digi CM.
User Group |
Shell Program Options |
|
|
|
|
root |
command line |
|
|
|
|
system admin |
command line, configuration menu, port access menu, custom |
|
menus |
||
|
||
|
|
|
port admin |
configuration menu, port access menu, custom menus |
|
|
|
|
user |
port access menu, custom menus |
|
|
|
26 |
Chapter 2 |
Chapter 3
Introduction
Installing and Configuring PC Cards
I n s t a l l i n g a n d C o n f i g u r i n g P C C a r d s
This chapter includes information on adding and configuring PC cards for the Digi CM. PC card devices that can be added to the Digi CM include a serial modem, compact-flash card, wireless LAN card, and a network LAN card.
Compatible PC Cards
All compact-flash cards work with the Digi CM, but not all serial modem, wireless LAN, or regular LAN cards do. To see a list of compatible cards that have been tested with the Digi CM, visit the Digi support site at http://cm.digi.com.
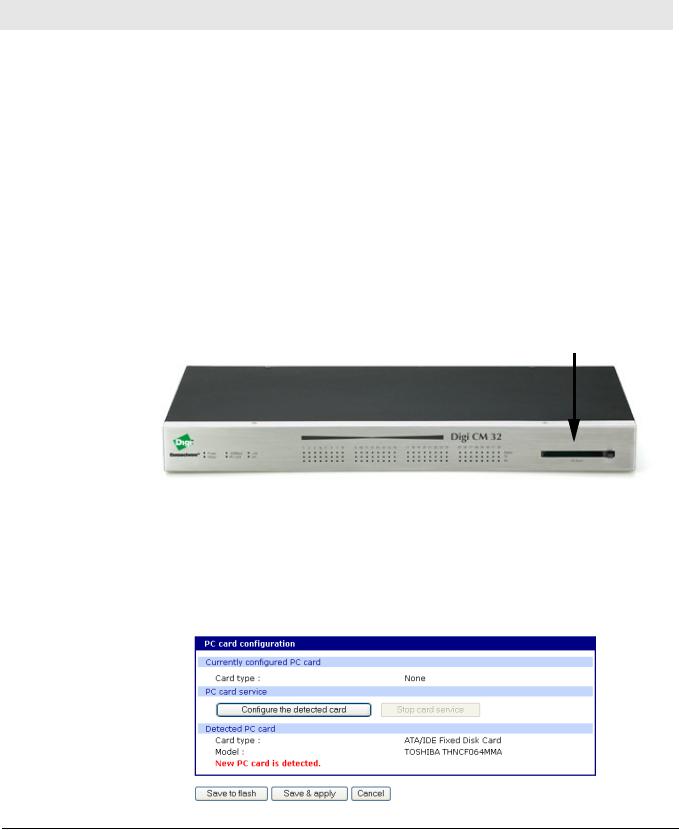
Adding a Compact-flash Card
A PC card slot is located on the front panel of the Digi CM. The arrow in the following graphic indicates the PC card slot.
PC card slot
Digi CM 32 shown
To install and configure the compact-flash card on the Digi CM, do the following.
1.Insert the card into the PC card slot.
2.Access the web interface.
3.Under the PC card heading click Configuration.
Chapter 3 |
27 |
Adding a Network Card
Always select the Stop card service button and Save & apply before removing the PC card.
4. Click Configure the detected card.
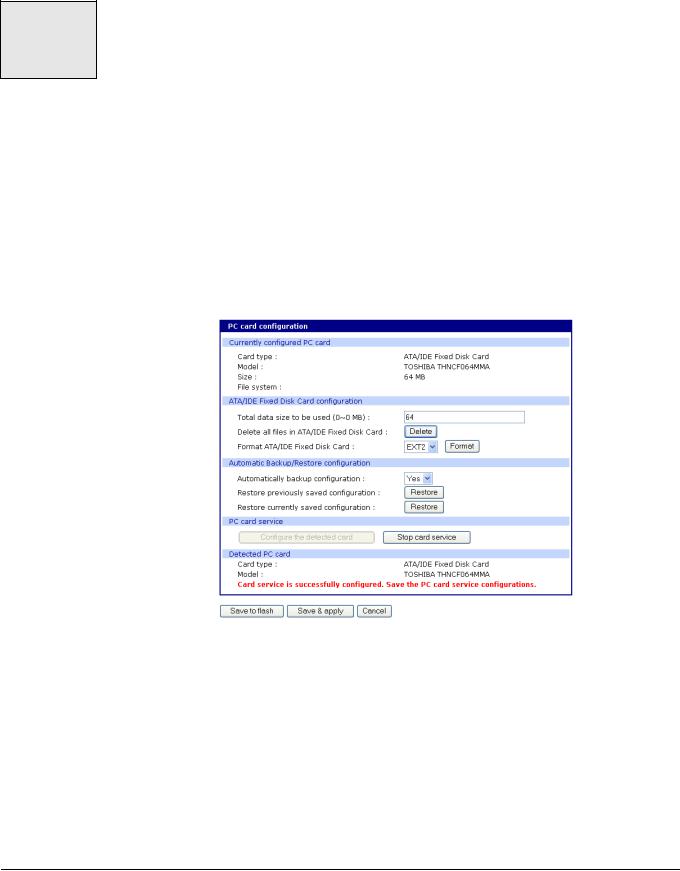
The following fields appear on the configuration page.
— ATA/IDE Fixed Disk Card configuration
Total data size to be used - Enter the amount of memory you want to assign to the compact-flash card for configuration files.
- Select the Delete button to clear the
Format ATA/IDE Fixed Disk Card. - The options are EXT2 or FAT formats. Select the format option and then select the Format button.
— Automatic Backup/Restore Configuration
Automatically backup configuration - Choose Yes to enable and No to disable
automatic backup.
Restore previously saved configuration - Click Restore to import the previously
saved configuration.
Restore currently saved configuration - Click Restore to import the most
recently saved configuration.
5.Enter the appropriate parameters on the configuration page.
6.Click Save to flash or Save & apply.
Adding a Network Card
To install and configure a network card on the Digi CM, do the following.
1.Insert the card into the PC slot.
2.Access the web interface.
3.Under the PC card heading, click Configuration.
Note: The card is automatically discovered and a configuration menu is displayed.
28 |
Chapter 3 |
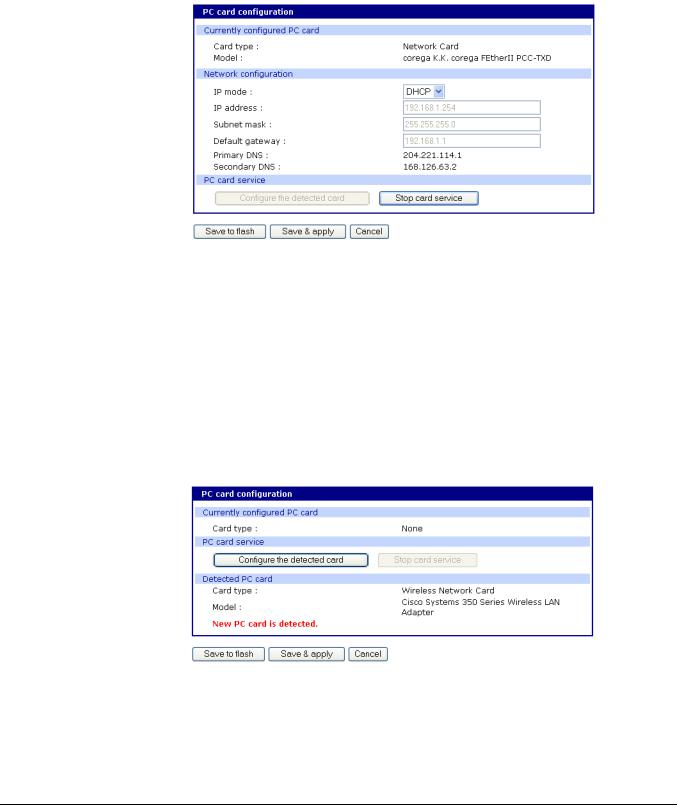
Installing and Configuring PC Cards
4. Enter the appropriate parameters in the configuration menu.
5. Click Save & apply.
Note: If DHCP is active the IP address will appear after the configuration is saved and applied.
Adding a Wireless LAN Card
To install and configure a wireless LAN card on the Digi CM, do the following.
1.Insert the card into the PC slot.
2.Access the web interface.
3.Under the PC card heading, click Configuration.
Note: The card is automatically discovered and a configuration menu is displayed.
4.Click Configure the detected card.
5.Enter the appropriate parameters in the configuration menu.
WEP is the acronym for Wired Equivalent Privacy and is a security protocol for wireless LANs using encryption to protect data transfers. If you are unsure of the settings for the wireless card, see your network administrator.
Chapter 3 |
29 |
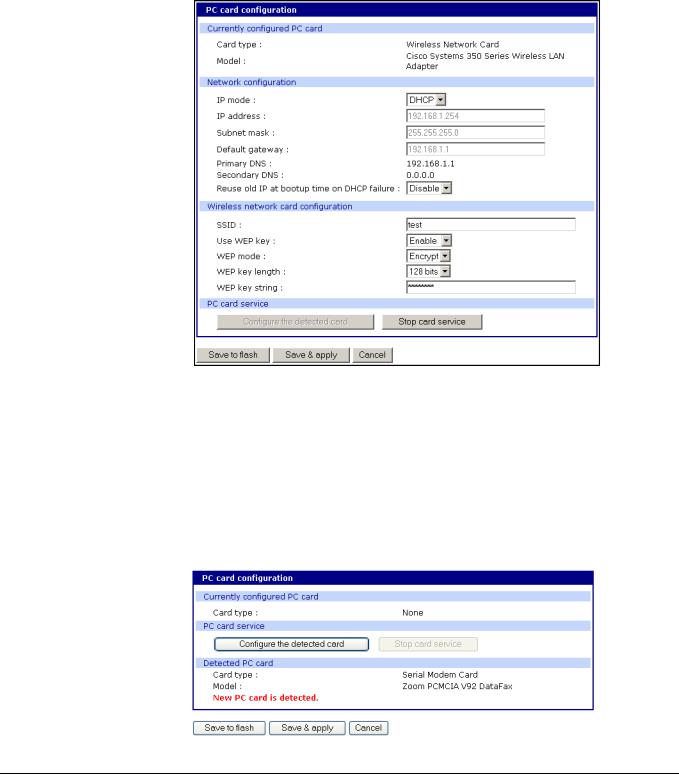
Adding a Serial Modem
SSID - Set Service Identifier and is the name of the wireless LAN network Use WEP key - Enable or disable the WEP key
WEP mode - Encrypted or unencrypted
WEP key length - The options are 40 or 128 bits if the WEP key is enabled
WEP key string - Refer to the wireless network administrator for the wireless encryption key string
6. Click Save to flash.
Adding a Serial Modem
The modem must first be inserted and installed on your system before it can be used. To configure the modem do the following:
1.Access the web interface.
2.From the menu click Configuration under the PC card heading.
Note: The card is automatically discovered and a configuration menu is displayed.
30 |
Chapter 3 |
Loading...