

Page 1
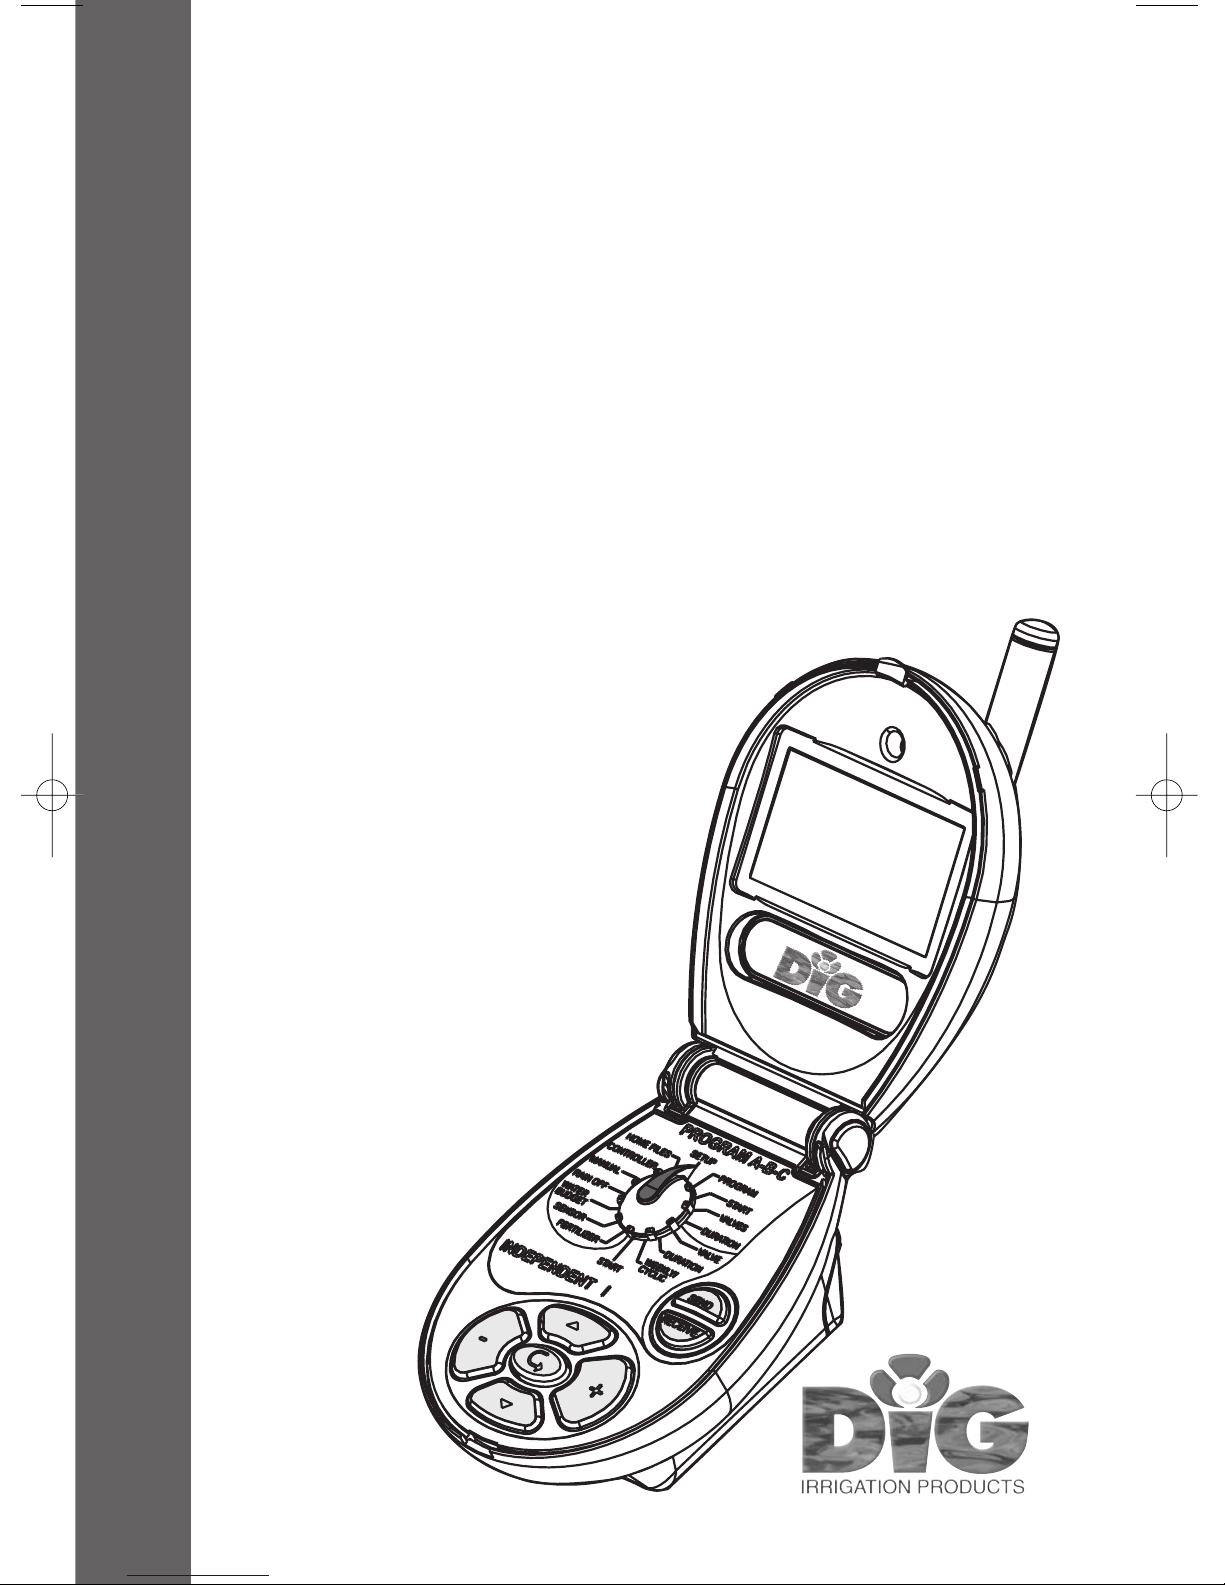
Model 600C
Radio Remote Control Handset
INSTRUCTION MANUAL
The 600 Series remote control handset and controller is a wireless system comprised of a
mobile, battery operated remote handset commanding numerous controllers. Operating
range between the remote control handset and the controllers is up to 300' line of sight.
Remote Handset Features
• Remote handset with selector is user friendly and easily operated
• Large liquid crystal display
• 4 optional languages: English, Spanish, Italian and French
• Operates numerous controllers
• The remote stores the memory of up to 50 controllers
• Weekly or cyclic irrigation programs for an
individual valve or a group of valves
• A fertilization program available for each valve
separately
• Optional change of the irrigation duration in
percentage (water budgeting)
• Rain Off from 1-99 days
• 8 start times per day for each program
or individual valve
• Irrigation duration from 1 minute up to 9 hours
• An irrigation cycle from once a day up to
every 30 days
• Option for manual computerized operation of
each separate valve or a group of valves
• Powered by 4, AA (1.5-volt) batteries
• Permanent memory
Page 2

2
FCC COMPLIANCE
CAUTION: The user should make no field changes or modifications to the unit. Any change or
modification to the equipment will void the user's authority to operate the unit, and render
the equipment in violation of FCC part 15. Any tampering with this product will void the
warranty.
This equipment has been tested and found to comply with the limits for a Class B digital device,
pursuant to Part 15 of the FCC rules. These limits are designed to provide reasonable protection
against harmful interference in a residential installation. This equipment generates, uses and can
radiate radio frequency energy. If not installed and used in accordance with the instructions,the
radio signals may cause harmful interference to radio communications. However,there is no
guarantee that interference will not occur in a particular installation. If this equipment does cause
harmful interference to radio or television reception, which can be determined by turning the
equipment off and on, the user is encouraged to try to correct the interference by one or more of
the following measures:
1. Reorient or relocate the receiving antenna.
2. Increase the separation between the equipment and receiver.
3. Connect the equipment to an outlet on a circuit different from that to which the receiver is
connected.
4. Consult the dealer or an experienced radio/TV technician.
This device complies with part 15 of the FCC rules. Operation is subject to the following two
conditions: (1) this device may not cause harmful interference, and (2) this device must accept any
interference received, including interference that may cause undesired operation.
3
TABLE OF CONTENTS
1. Introduction …………………………………………………………………………4
2. Getting to Know the Remote …………………………………………………………4
3. Inserting Batteries into the Remote ……………………………………………………6
4. Set Up (Language, Date & Time) ………………………………………………………6
5. Programs A-B-C ………………………………………………………………………7
5.1 Irrigation Program for a Group of Valves ……………………………………………7
5.2 Selecting a Program (Weekly or Cyclical) …………………………………………7
5.3 Start Time ………………………………………………………………………8
5.4 Seleecting Valves …………………………………………………………………8
5.5 Irrigation Duration per Valve ………………………………………………………9
6. Independent I Program ………………………………………………………………9
6.1 Selecting a Valve …………………………………………………………………9
6.2 Irrigation Duration per Valve ………………………………………………………9
6.3 Weekly Programming ……………………………………………………………10
6.4 Cyclical Programming……………………………………………………………10
7. Fertilizing ……………………………………………………………………………11
8. Sensor ………………………………………………………………………………11
9. Percentage (%) ………………………………………………………………………12
10. Rain Off ……………………………………………………………………………12
11. Manual ……………………………………………………………………………12
12. Controller ……………………………………………………………………………14
12.1 Controller Operation ……………………………………………………………14
12.2 New Controller Added to System ………………………………………………14
12.3 Clear or Erase Program …………………………………………………………15
12.4 Load Programs from Controller …………………………………………………15
12.5 Delete Controller from System …………………………………………………15
12.6 Rename Controller ……………………………………………………………16
12.7 Send Program from Remote to Controller ………………………………………16
12.8 Receive Program from Controller ………………………………………………17
12.9 Status Check of Controller in Field ………………………………………………17
13. Home Files …………………………………………………………………………18
13.1 Save to File ……………………………………………………………………18
13.2 Load to Edit ……………………………………………………………………18
14. Summary – Programming the System ………………………………………………19
15. Warranty ……………………………………………………………………………20
Page 3
4
1. INTRODUCTION
Thank you for purchasing a DIG 600C Remote Control Handset. This manual is designed to help set
up the 600C handset. After reading the manual and getting familiarized with the basic functionality
of the device, use the manual as reference for less common tasks in the future.
Please take the time to read through the enclosed instructions and follow them step-by-step. If you
have any questions, please call our customer service line 1-800-322-9146.
2. GETTING TO KNOW THE REMOTE
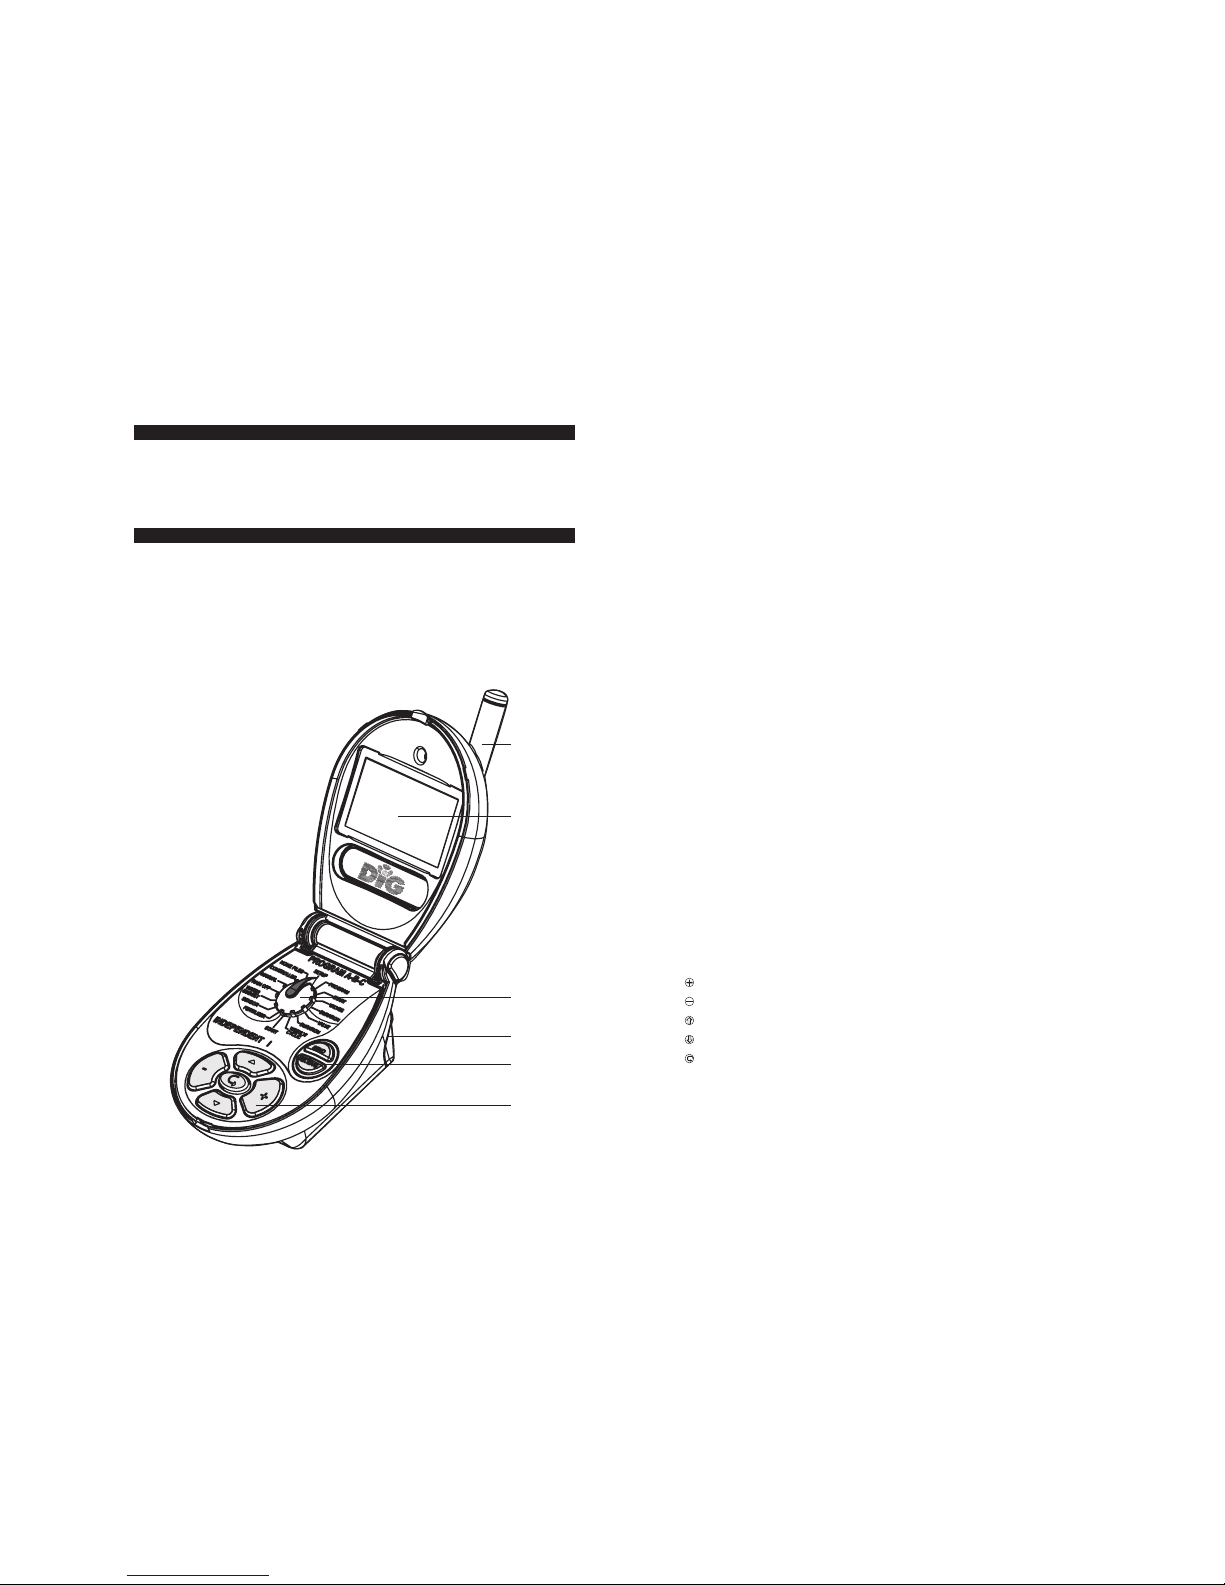
1) Antenna
2) Display
3) Program selector
4) Battery compartment
5) SEND and RECEIVE pushbuttons
6) Programming pushbuttons
b
d
e
c
g
f
5
General Information
The Remote is easily operated by a selector and five buttons. You can save programs in home files
(up to 3 programs), or send the programs directly to a controller. Programs that were sent to the
controller and received are saved in the memory of the remote according to the controller's code
(up to 50 controllers).
By using the remote you can transfer programs from home files to controllers, modify programs
located in the controller and create new programs.
NOTE: The irrigation is set in the remote only and not in the controller itself.
The controller receives the programs and operates the valves. To transmit programs to the
controllers, ascertain that the remote is located within the reception range of the controller (up to
300' line of sight). When the transmission is completed successfully, the message Send Successful
is displayed on the screen, confirming reception of the program.
The Remote Offers Two Types of Irrigation Programs
1. Irrigation programs for a group of valves
2. An irrigation program for an individual valve
Additional Options
Fertilizing program for each valve
An Irrigation Program for a Group of Valves (see section 5.1, pg. 7)
You can program three programs:A, B and C.
For each program, select the irrigation days on which the valves will operate. Set a start time for the
first valve only and define the irrigation duration for each valve separately. The valves open in
sequence, according to their serial number on the display.When the first valve shuts off the second
valve opens, etc. Only one valve operates at any given moment.When setting programs (A, B, C)
with overlapping irrigation times, program A starts first and program B starts only after program A
ends. Program C opens after program B ends.
When no fertilization program is set, two valves can open simultaneously.
Independent I Program for an Individual Valve (see section 6.0, pg.9)
Use this method to define an individual program for each valve. Select the desired valve first and
then proceed to define the irrigation program: set watering duration, irrigation days or irrigation
cycles and the start time of that valve.
General Description
Program the controller using the 16 position selector and 5 buttons:
Increase button – to add to the selected value and confirm activity in certain conditions
Decrease button – to deduct from the given value
Scroll up button
Scroll down button
Opens the field and moves from one field to another
Page 4
6
3. INSERTING BATTERIES INTO THE REMOTE
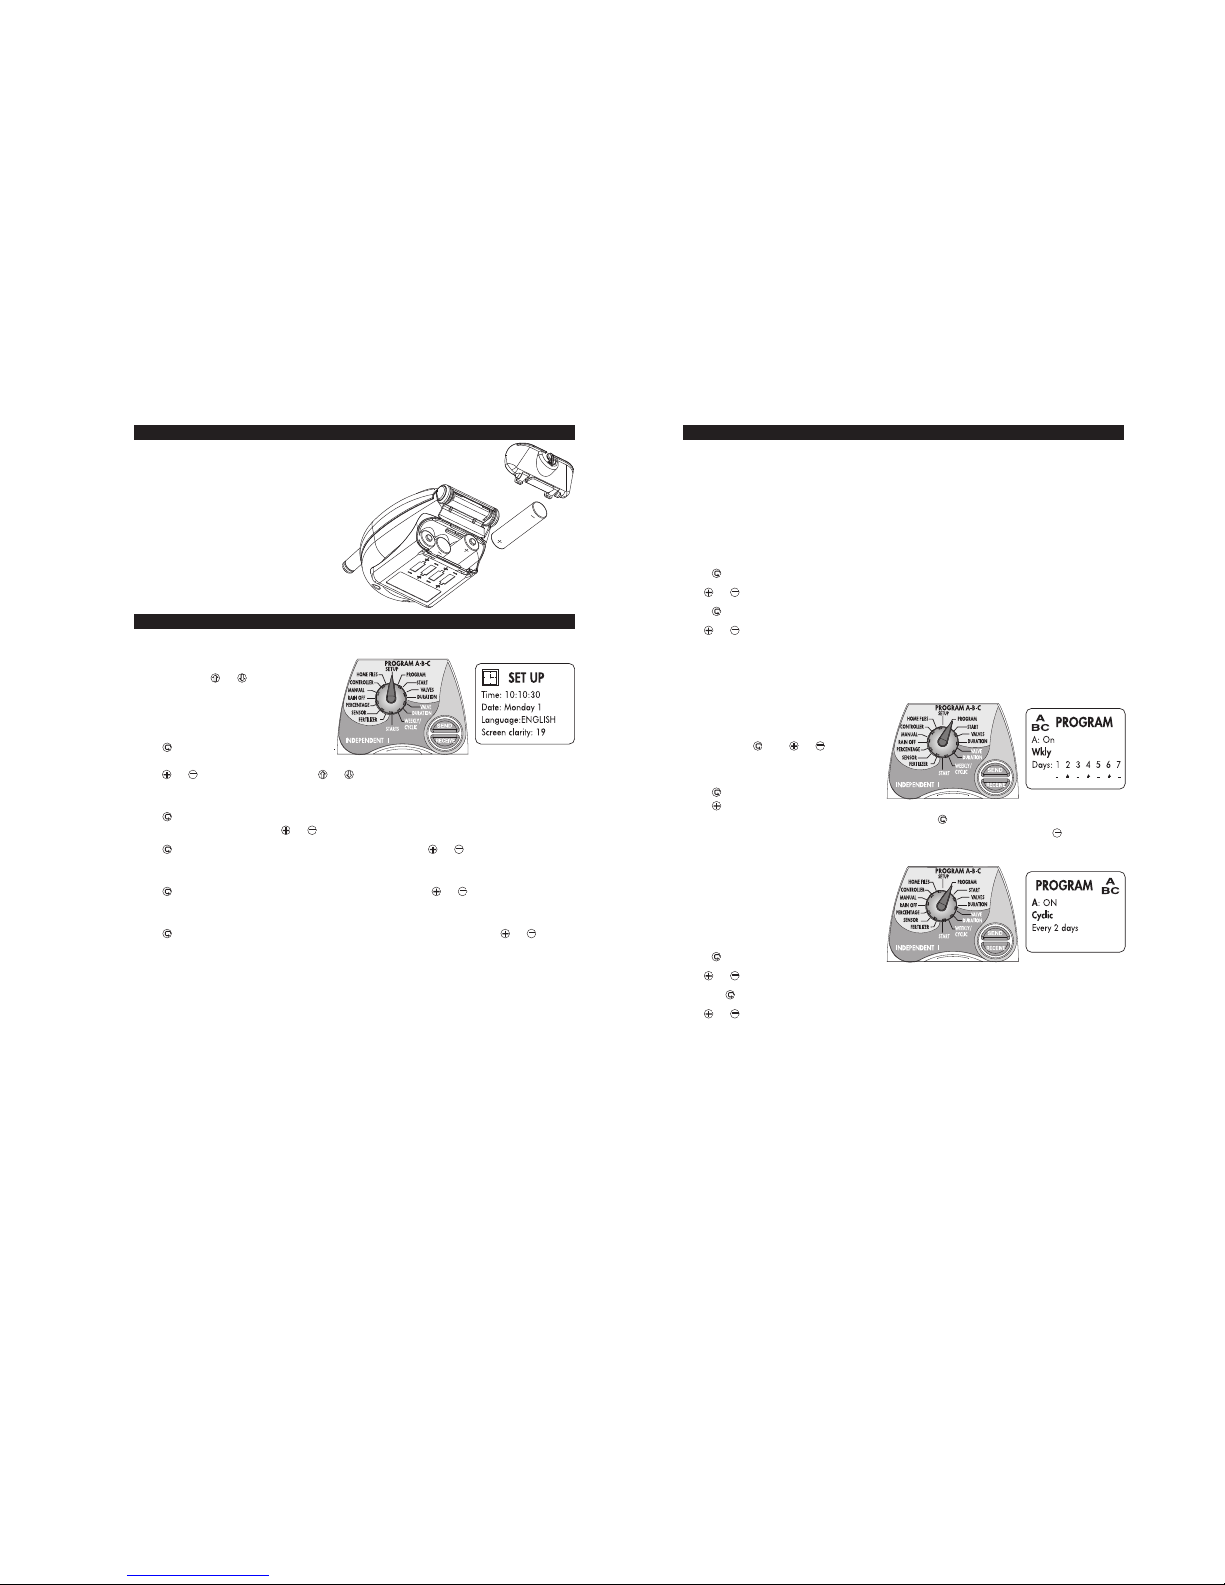
Open the cover of the battery compartment,
using the designated lever.
Insert the batteries (4 AA, 1.5V) as shown in
the figure. Ensure correct direction of polarity
(+/–).
Close the cover of the battery compartment
using the designated lever.
NOTE: Use high quality alkaline batteries
only.
4. SET-UP LANGUAGE SELECTION, CURRENT DATE AND TIME
When the display is turned off, press one of the programming buttons to start the display.
Turn the selector to SETUP position.
You can use the or buttons to move
quickly from one line to another. The arrow
indicates the line you reached.
Language
Press until the cursor moves to the
language line. Set the required language
using or button. (You may also use or buttons to reach the language line.)
Setting Current Time
Press until the cursor moves below the hour digit. The arrow on the left indicates the line you
reached. Set the hour digit using or button.
Press . The cursor moves to the minutes. Set the minutes using or button.
Setting the Date
Press . The cursor moves to the days. Set the current time using or button.
Brightness
Press . The cursor moves to brightness. Set the desired screen brightness using or button.
7
5. PROGRAM A-B-C
5.1 IRRIGATION PROGRAM FOR A GROUP OF VALVES
The Remote offers two valve programming options:
1. Program A, B, C – a common program for a selected number of valves.
2. Independent I program – a separate program for each valve.
Turn the selector to PROGRAM position
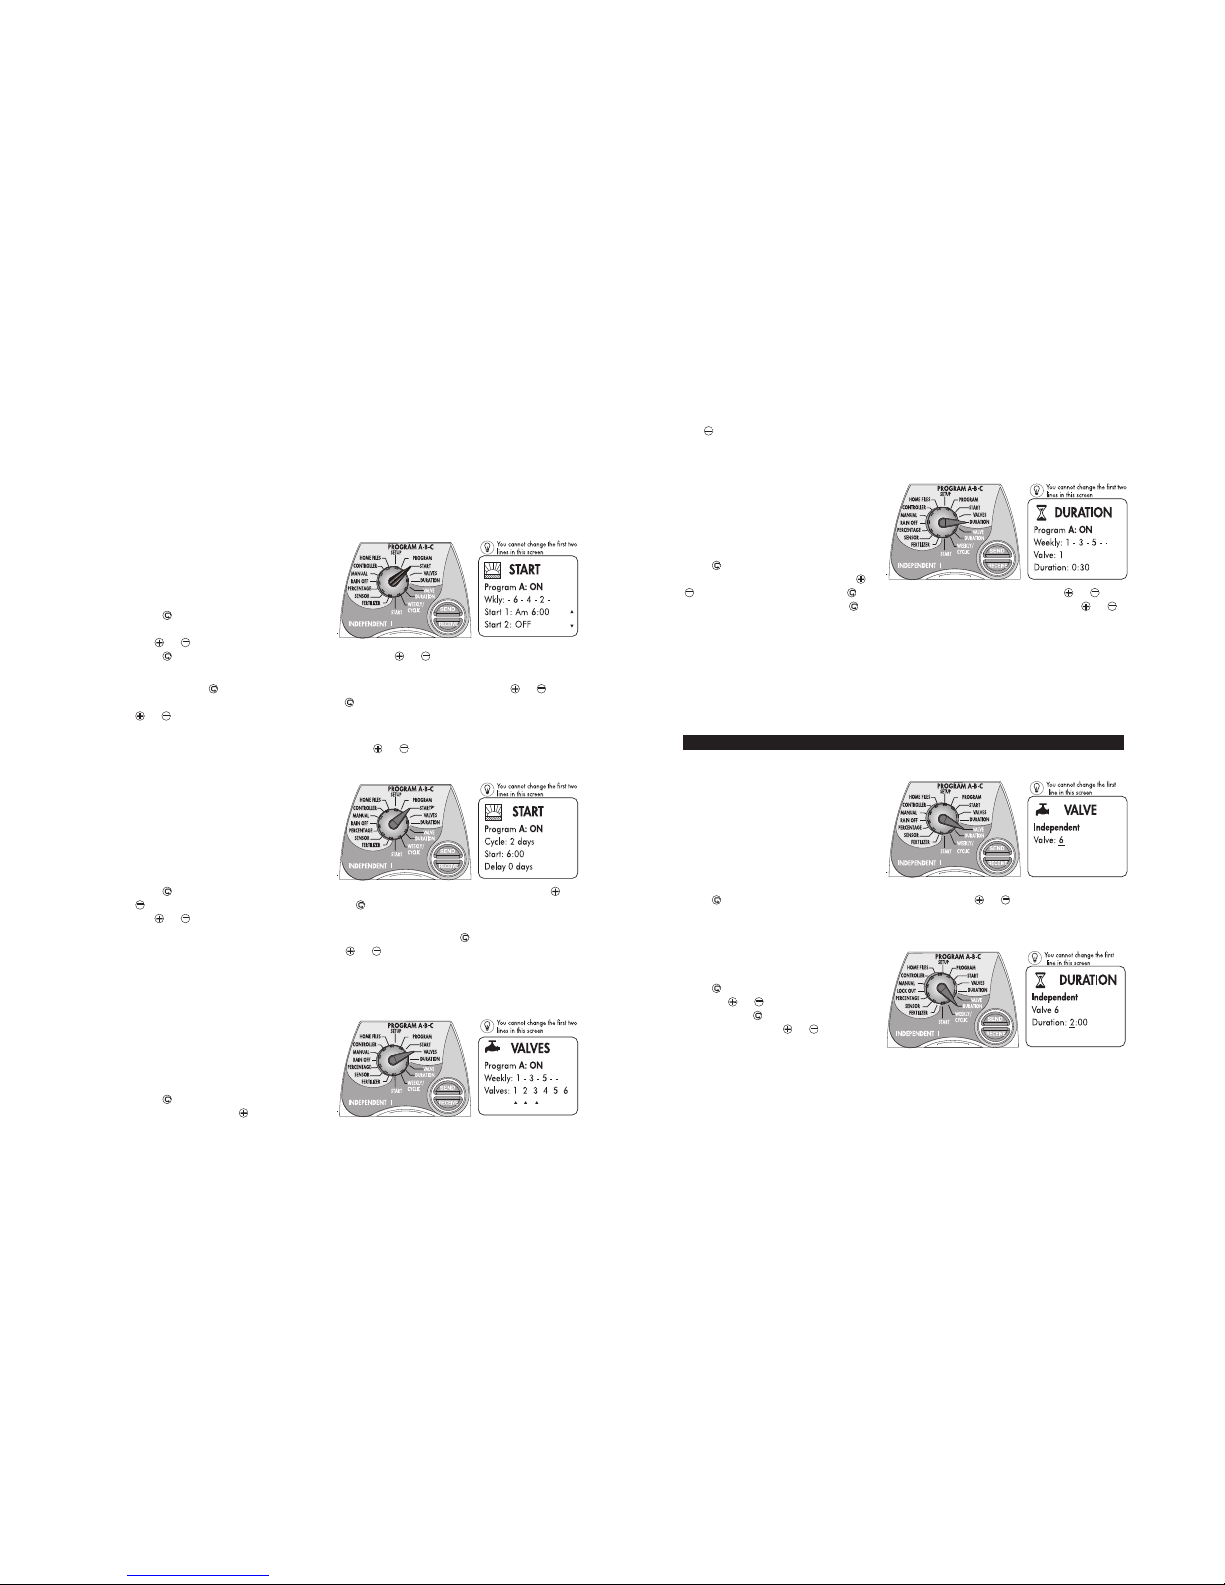
5.2 SELECTING A PROGRAM (WEEKLY OR CYCLICAL)
Press until the cursor moves below the A, B or C program icon.
Use or button to select the desired program.
Press . The cursor moves to On/Off.
Use or button to define the On or Off program.
You can stop a program by turning it to on position, even after you programmed it.
At this stage, select weekly or cyclical programming.
Weekly Program
This program sets the days of the week on
which the valves assigned to the program will
operate. Select the desired program (A, B, C)
and then press . Use or button to
select Weekly. You have to select Irrigation
Days for the weekly program.
Press . The cursor appears under day 1.
Press . A small triangle appears under the
digit 1 (Monday) is selected as an irrigation day. Press on , the cursor moves to 2 (Tuesday).
Continue marking the desired days in the same way.To delete selected days, press .
Cyclical Program
Use this mode to program the remote to
operate the selected program at a fixed
cyclical time. The cycle time can be from
1-30 days. The cycle time is identical for all
the valves assigned to this program.
Select the desired program (A, B, C) and then
press .
Use or button to select Cyclic.
Press on . The cursor appears under days digit.
Use or button to set the desired cycle time (in days).
Page 5
8
5.3 START TIME
Use this screen to set the start time of the selected program. You have two options:
1. Start times for a weekly program – up to 8 starts.
2. Start time for a cyclical program – one start time.
Turn the selector to START position
Start Time for a Weekly Program
You can set 8 start times for a weekly
program. The first valve is operated at the
desired time and the other valves open
sequentially from the first to the last valve in
the program.
Press . The cursor appears below the word
Off or under the hour digit in the Start 1 line.
Use or to set the desired start time.
Press . The cursor appears below the minutes digit. Use or button to set the desired
minute.
When you press again the cursor moves down to the hour digit in Start 2. Use the or
button to set the desired hour for Start 2. Press . The cursor appears below the minutes digit. Use
or button to set the desired minute for Start 2.
You can set 8 starts for each program in the same way. To cancel a start: Select the start you wish
to cancel, set the cursor on the hour digit and use the or button to bring it to the OFF status.
Start Time for a Cyclical Program
If you selected a cyclical program, set the
start time and the number of days up to the
cycle start of the first valve (a cyclical
program has only one start time). All other
valves programmed for this program open
after the first valve closes, in sequence.
Turn the selector to START position
Press . The cursor appears below the word OFF or under the hour digit in the Start line. Use or
pushbutton to set the desired start time. Press . The cursor appears below the minutes digit.
Use or to set the desired minute.
Delay – You can start the irrigation cycle after a delay of 0-30 days. Press , the cursor appears
under the number of days in the delay line. Use or to set the number of days up to the
beginning of the first cycle. 0 = open on the current day; 1 = open in one day's time; 2 = open in 2
days time, and so on, up to 30 days.
5.4 SELECTING VALVES
Use this screen to assign valves to the
selected program. You can assign up to 6
valves to each program. You can sign each
valve to one program only.
Turn the selector to VALVES position
Press . The cursor appears below the first
selected valve. Use the to set the valve
you wish to assign to the selected program. A
small triangle appears below the valve marking the valve as assigned to the program.
9
Use to remove a valve from the program (the triangle disappears). This screen will not display
valve numbers that were selected for another program.
5.5 IRRIGATION DURATION PER VALVE
Use this screen to set the irrigation duration
for valves assigned to the selected program.
You can set an irrigation duration from 1
minutes to 9 hours (8:59) for each valve.
Turn the selector to DURATION position
Press . The cursor appears below the
number of the first selected valve. Use or
to select the valve number. Press . The cursor appears below the hour digit. Use or to
set the desired hours duration. Press . The cursor appears below the minutes digit. Use or
to set the desired minutes duration. Move to the next selected valve and set the desired irrigation
duration.
You have now completed programming the first program, including:
• selecting a program • starting irrigation (weekly/cyclic)
• selecting valves • irrigation duration per valve
To proceed to program additional options (fertilizing, sensor, percent %) go to page 11.To select an
additional program, repeat the programming steps on pages 7-8.
6. INDEPENDENT I PROGRAM
Irrigation Program for an Individual Valve
First select the desired valve and then
program all the programming steps
continuously: Irrigation Duration,
Weekly/Cyclic, Start Time.
6.1 SELECTING A VALVE
Turn the selector to the VALVE position
in the INDEPENDENT I dark blue section
Press . The cursor appears below the number of the valve. Use or to select the desired
valve. This screen will not display valve numbers that were selected for a previous program.
6.2 IRRIGATION DURATION PER VALVE
Turn the selector to the DURATION
position
Press . The cursor appears below the hour
digit. Use or to set the desired number
of hours. Press . The cursor appears below
the minutes digit. Use or to set the
desired number of minutes.
NOTE: A valve with an irrigation duration of 0:00 never opens.
Page 6
10
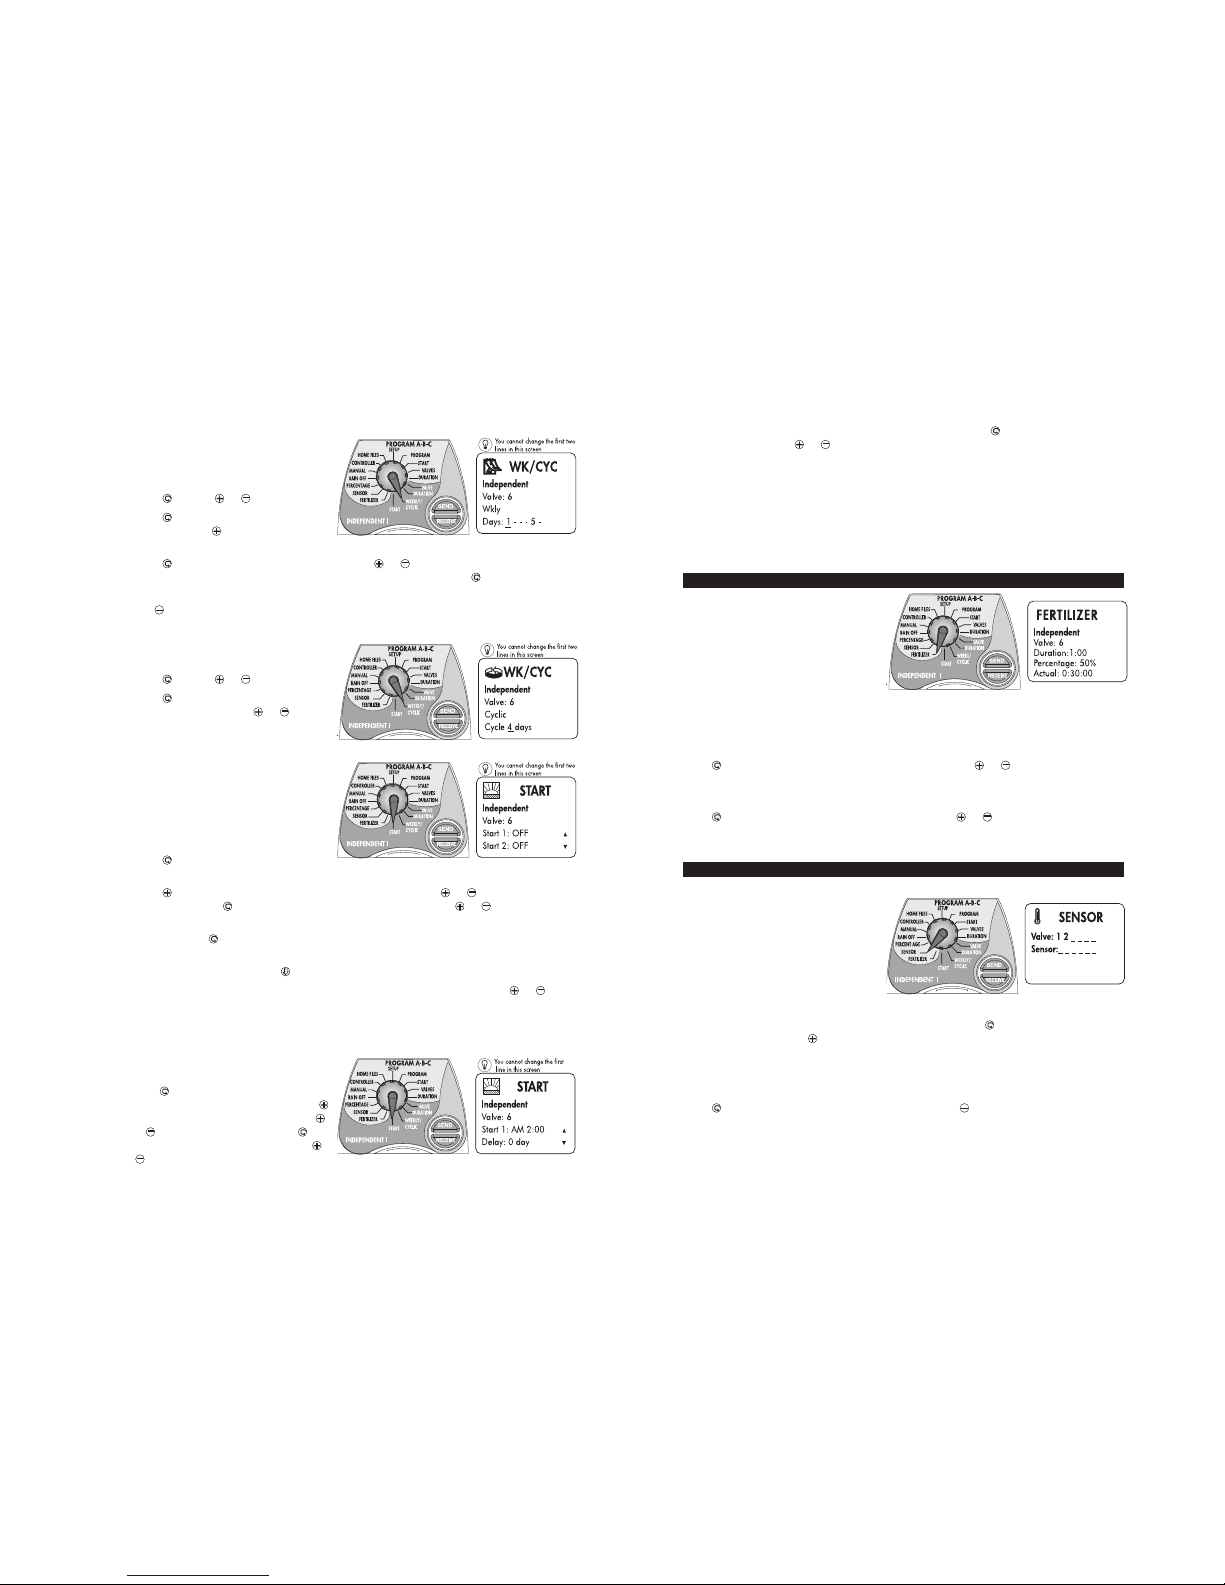
6.3 WEEKLY PROGRAMMING
Selecting Irrigation Days – Weekly
Turn the selector to WEEKLY / CYCLIC
position
Press and use or to select Weekly.
Press . The cursor appears below the mark
on the left. Press to turn the mark to 1.
Monday is set as the selected day.
Press . The cursor appears below the next day. Use or to select additional days. The
numbers of the days displayed are the selected days. To cancel a day,press until you reach the
desired day.
Use to cancel the day: the number disappears from the display – the irrigation day is cancelled.
Programming an Irrigation Cycle – Weekly
Turn the selector to WEEKLY / CYCLIC
position
Press and use or to select Cyclic.
Press . The cursor appears below the
number of cycle days. Use or to select
the number of cycle days (1-30).
Programming a Start Time – Weekly
You can program up to 8 different starts
every 24 hours.
The selected valve opens at each of the start
times and operates for the set duration.
Turn the selector to START position in
the Independent 1 section
Press . The cursor appears below the word
OFF or under a previously chosen start time.
Press . The cursor appears below the hour digit in Start 1 line. Use or to set the desired
start hour. Press on . The cursor appears below the minutes digit. Use or to set the desired
minute.
When you press again, the cursor moves down to Start 2 and sets the start time for the second
opening of the valve.
To set additional start hours, use .
To cancel a start: Select the appropriate line, set the cursor on the hour digit and use or to
bring it to the OFF status.
6.4 CYCLICAL PROGRAMMING
Programming the Start of an Irrigation Cycle (Time and Day) – Cyclical
Turn the selector to START position
in the individual valve section
Press . The cursor appears below the word OFF
or under a previously chosen start time. Press .
The cursor appears below the hour digit. Use
or to set the desired hour digit. Press . The
cursor appears below the minutes digit. Use or
to set the desired minute.
11
Delay – You start the irrigation cycle after a delay of 0-30 days. Press . The cursor appears under
the number of days. Use or to set the number of days up to the beginning of the first cycle. 0
= open on the current day; 1 = open in one days time; 2 = open in 2 days time, etc.
You have now completed programming the first individual valve, including:
• selecting a valve • irrigation duration
• selecting irrigation days in the weekly program or an irrigation cycle in a cyclic program and a
start time
To proceed to program additional options (fertilizing, sensor, percent %) – see below. To program an
additional individual valve, repeat the programming steps on pages 9-10.
7. FERTILIZING
In fertilizing mode, set the fertilizing duration
for each valve separately. Define the
fertilizing according to a % of the irrigation
duration (from 10-90% of the irrigation
duration of the valve).
The fertilizer always starts in the middle of
the irrigation. Example: A valve is
programmed to irrigate for 1 hour.The fertilizing time is 50%. In practice, the irrigation is performed
as follows: The first 15 minutes, regular irrigation without fertilizer.Then 30 minutes with fertilizer
(50% of the time) followed by 15 minutes of regular irrigation without fertilizer.
Turn the selector to FERTILIZER position
Press . The cursor appears below the number of the valve. Use or to set the desired valve
number.
You cannot change the second line (irrigation duration for the valve is set at a previous stage).
Press . The cursor appears below the percent number. Use or to set the fertilizing duration
in percents, from 10-90%, at intervals of 10%.The bottom line displays the actual fertilizing time.
You can set fertilizing only for valves with preset irrigation duration programmed at a previous step.
8. SENSOR
Assigning a Valve to a Sensor
The sensor operates by shutting off the valve
to which it is assigned, according to the
conditions (rain, humidity,temperature).
When the sensor is activated, it prevents the
valve from opening. You can assign each
valve to the sensor according to your
requirements.
Turn the selector to SENSOR position
The valve numbers programmed are displayed on the screen. Press . The cursor appears below
the first selected valve. Use to assign the valve to the sensor.A triangle is displayed below the
valve assigned to the sensor.
Repeat the same steps for the other valves.
To Cancel Assignment of the Sensor to a Valve
Press . The cursor appears below the assigned valve. Press to cancel the assignment of the
valve to the sensor.
Page 7
12
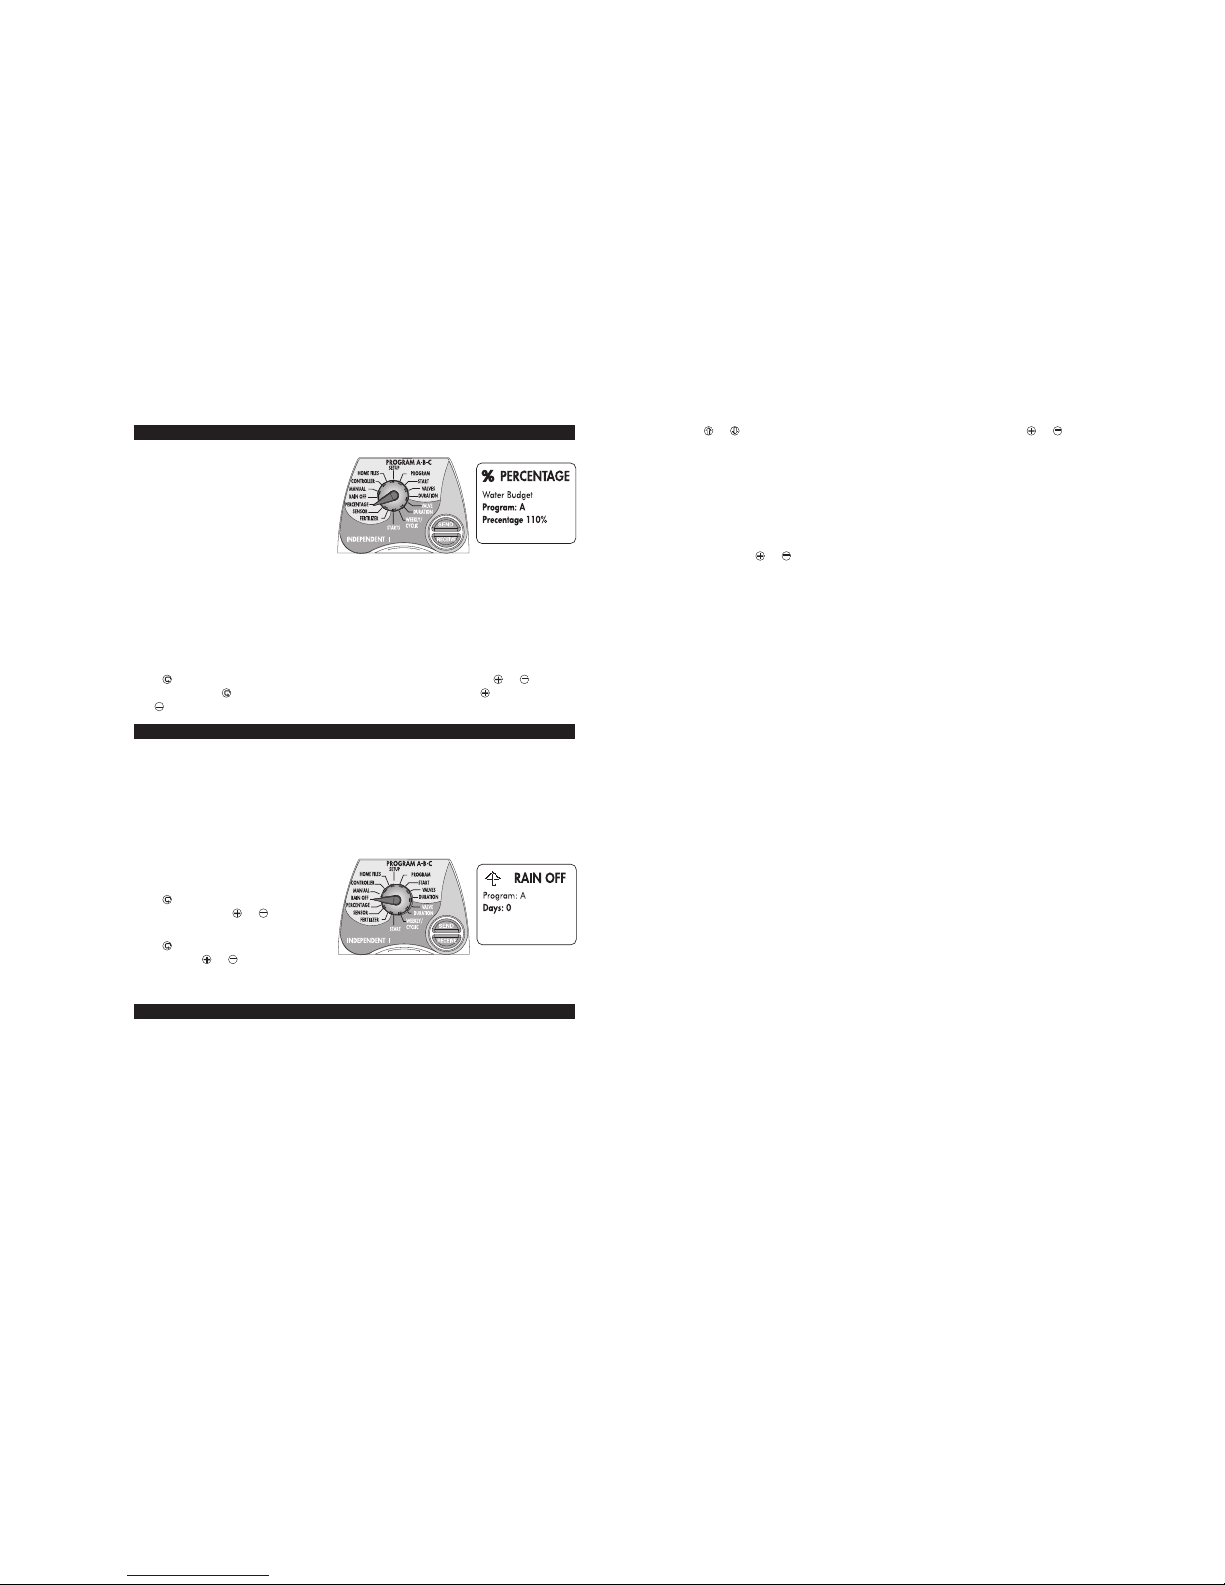
9. PERCENTAGE (%)
Irrigation Percentage – Change the
Irrigation Duration in %
You have an option to increase or decrease
the duration of the irrigation in %, in all the
valves.
You have 2 options:
1. An identical increase in % for all valve
groups
2. A different percent for each group:A, B, C and independent I program.
90% to 10% – a decrease at intervals of 10%
110% to 190% – an increase at intervals of 10%
NOTE: When a % change rate was set for one of the programs (A, B, C,I) you cannot access
All. When a % change rate was set for ALL you cannot access A, B, C, I.
Turn the selector to PERCENTAGE position
Press until the cursor appears below the desired program, A, B, C,I or All. Use or to select
the program. Press until the cursor appears below the desired % digit. Use to set increase %.
Use to set the decrease %.
10. RAIN OFF
Use this option to cancel the control of the remote over some valves or all valves, temporarily
(e.g., when it rains). The irrigation program is saved but the irrigation will not start.
You can lock out all the valves together in ALL position and also lockout one valve or several valves
according to valves assignment to program A, B, C, or I. The lockout is for 1 day up to 99 days.
When the Rain Off duration ends, the controller resumes the original program.
NOTE: If you locked out a valve or program you cannot lockout all the valves through ALL.
If all the programs and valves were locked out through All, you cannot lockout single
programs.
Turn the selector to RAIN OFF position
Press until the cursor appears below the
desired program. Use or to select the
program.
Press until the cursor appears below the
days digit. Use or to set the desired
number of lockout days (1-99 days). Select another program and additional Rain Off days in the
same way.
11. MANUAL
This mode enables you to:
• Open a program/valve manually from the remote
• Shut a currently open valve
• Close the program
• Shut all the currently operating valves/programs or those in line to start
• Send from the Remote to the controller: current time, increase % of the irrigation, Rain Off
• Serial test of all the valves
Turn the selector to MANUAL position
13
Use or to select the desired controller (according to code number). Use or to select the
desired operation (see all the options on the next page). After you select the option, send the
command to the controller – press SEND. The Remote displays SENDING in the bottom line. If the
message is transmitted, Successfully Sent is displayed. If the communication fails, Out of Range is
displayed.
• A valve with no defined irrigation duration cannot be opened manually.
• The fertilizing valve opens with the valves to which it is assigned and according to the
fertilizing %.
• You may use or to move among the programs and the individual valves continuously.You
cannot open individual valves which are assigned to a program.
NOTE: Manual operation or any change in the program stops the operation of valves which
are open at that time.
In a cyclical program, the irrigation starts again. Sending current time,irrigation %, Rain Off
does not stop the operation of the valves.
Available Commands in Manual Mode
Open/Close All
Open- set the valves/programs sequentially which are programmed
Open A Open- program A (if it includes programmed valves)
Open B Open- program B (if it includes programmed valves)
Open C Open- program C (if it includes programmed valves)
Open I Open/ only valves with set irrigation duration
Open 1 Open/ valve No. 1 (only if it is set as an independent)
Open 2 Open/ valve No. 2 (only if it is set as an independent)
Open 3 Open/ valve No. 3 (only if it is set as an independent)
Open 4 Open/ valve No. 4 (only if it is set as an independent)
Open 5 Open/ valve No. 5 (only if it is set as an independent)
Open 6 Open/ valve No. 6 (only if it is set as an independent)
Open All Open all the valves
Close A Close program A
Close B Close program B
Close C Close program C
Close I Close all the individual valves/cancel valves in line
Shut irrigation valve Shut the currently irrigating valve and open the next (if any).
Current time Send current time to the controller.
Serial test Close all irrigation activities, perform a serial test – open shut all the valves,
one after the other, each for 10 seconds.
The communication line is displayed after pressing SEND button. When communication is
successful: Success indicates successful transmission. When communication fails:Fail indicates
that you are out of range and must go closer to the controller.
NOTE: Manual operation or any change in the program stops the operation of valves which
are open at that time.
Page 8
14
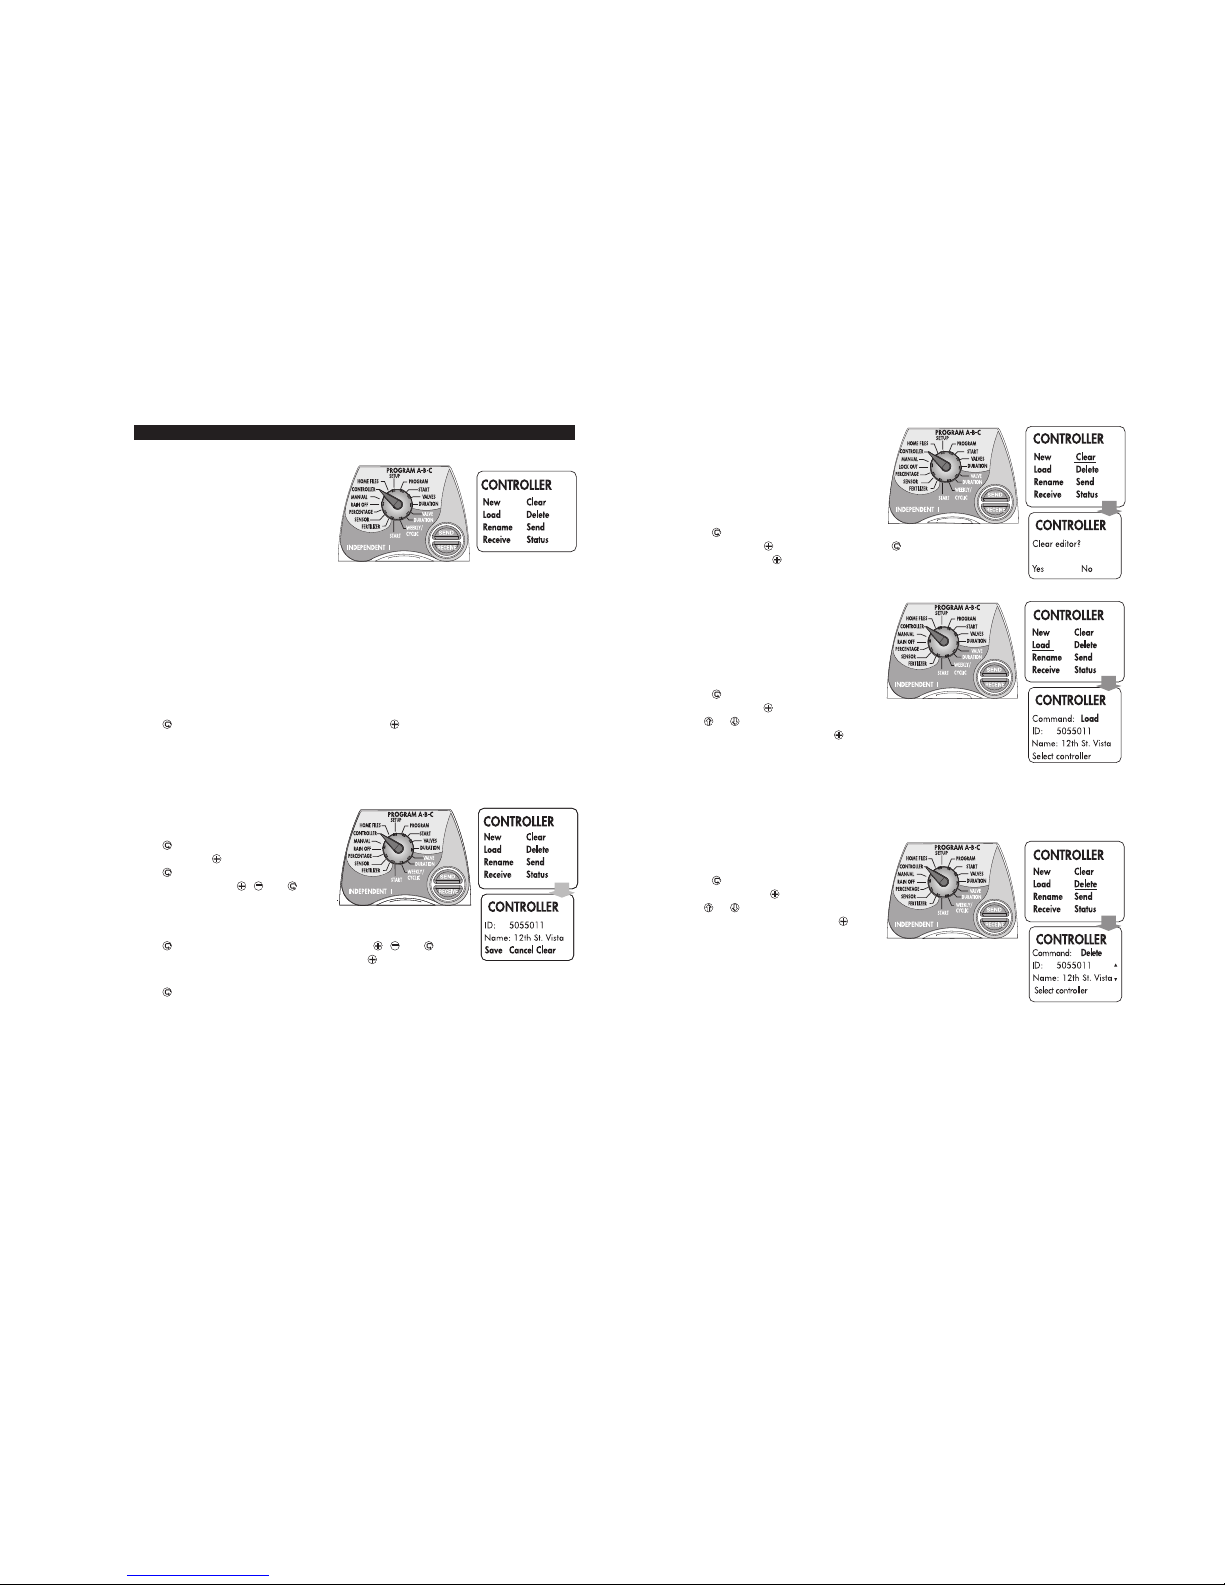
12. CONTROLLER
12.1 CONTROLLER OPERATION
Communication between the remote and the
controller is established in this mode.
Turn the selector to CONTROLLER
position
The opening screen displays the available
options:
New Enter a new controller name into the system, set an ID No. and a name
Load Load a program from the memory
Rename Change the name of the controller (ID cannot be changed)
Receive Read a program from a controller
Clear Erase the current editor
Delete Delete the controller and memory from the system
Send Send a program to a controller and save in memory
Status Read the status of a controller
Press to bring the cursor to the desired operation. Use to select the operation. The screen
changes accordingly.
12.2 NEW CONTROLLER ADDED TO SYSTEM
When you add a new controller to the system or during the initial stage, when the system is still
empty, give names to the different controllers,according to the ID numbers of the controllers.
Turn the selector to CONTROLLER
position
Press until the cursor appears below the
word New. Press , the screen changes.
Press . The cursor appears below the left
digit of the ID line. Use , and to copy
the ID number that is displayed on the body
of the controller.This ID number is imprinted on the controller and cannot be
changed.
Press . The cursor appears to the left of Name. Use , and to give
a name to the controller for your convenience. Press until the cursor is
below the required mode Save, Cancel or Clear.
Press to select the required mode and wait for confirmation:
Save Saves the name
Cancel Does not save
Clear Clears the current name
At this stage, you can send the program to the controller,refer to page 16
15
12.3 CLEAR OR ERASE PROGRAM
Used to erase the program you are editing.
Turn the selector to CONTROLLER
position
NOTE: Clear erases complete program
from the editor.
Press until the cursor appears below the
word Clear. Press , the screen changes. Use to indicate if you wish to
delete or not. Press to receive confirmation of the delete.
12.4 LOAD PROGRAMS FROM CONTROLLER
Used to read or review a program of a chosen
controller, when you are not near the
controller.You can read the program from the
memory of the Remote.
Turn the selector to CONTROLLER
position
Press until the cursor appears below the
word Load. Press , the screen changes.
Use or to select the ID and name of the
controller you wish to read. Press .
Upon receiving confirmation:
program was transferred to the editor and you can review and read it.
12.5 DELETE CONTROLLER FROM SYSTEM
Used to delete a chosen controller from the system.
Turn the selector to CONTROLLER
position
Press until the cursor appears below the
word Delete. Press , the screen changes.
Use or to select the ID and name of the
controller you wish to erase. Press . Upon
receiving confirmation, the controller is
deleted.
The controller does not exist in the system nor in the memory of the
remote.
Page 9
16
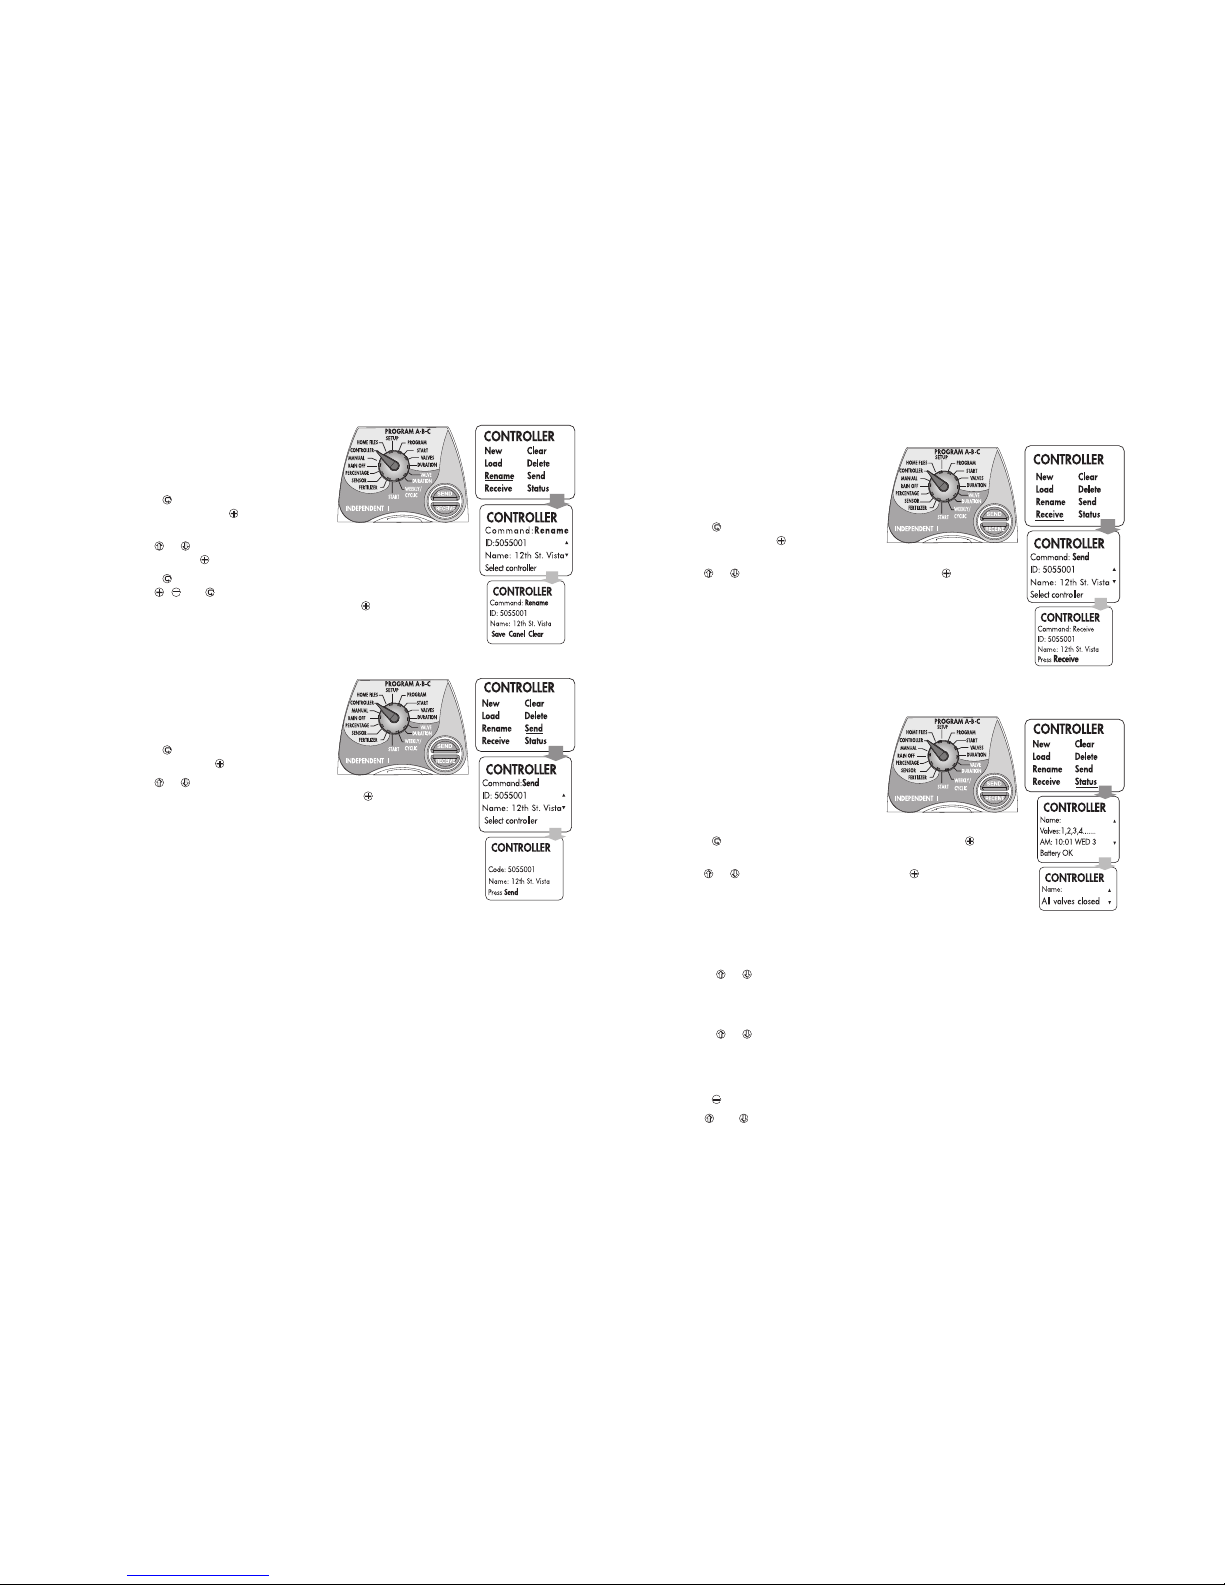
12.6 RENAME CONTROLLER
Used to change the name of a controller.
Turn the selector to CONTROLLER
position
Press until the cursor appears below the
word Rename. Press , the screen changes.
The command: Rename
Use or to select the ID and name of the controller you wish to
change. Press , the screen changes. Select a controller.
Press . The cursor appears below the first letter of the controller's name.
Use , and to give a new name to the controller.Once you enter the
new name, move the cursor below Save and press . The name change
has been performed.
12.7 SEND PROGRAM FROM REMOTE TO THE CONTROLLER
Used to send the program from the remote to
the controller.
Turn the selector to CONTROLLER
position
Press until the cursor appears below the
word Send. Press , the screen changes.
Use or to select the controller to which
you wish to send the program (ID and name). Press , the screen changes.
The controller's ID and name are displayed. Press on SEND and wait for the
confirmation that the loading succeeded.
NOTE the progress of the command input by the transmission bar at
the bottom of the screen. If the communication fails, improve your
position in relation to the controller and repeat the command
The program received by the controller is also saved in the remote's
memory (up to 50 controllers).
17
12.8 RECEIVE PROGRAM FROM CONTROLLER
Used to read the existing program from the
controller in the field, in order to review or
make changes.
Turn the selector to CONTROLLER
position
Press until the cursor appears below the
word Receive. Press , the screen changes.
The command is Receive.
Use or to select the controller's ID and name. Press , the screen
changes. Press on RECEIVE and wait for the confirmation that the reading
succeeded.
NOTE the progress of the command input by the progress of the
transmission bar at the bottom of the screen. If the communication
fails, improve your position in relation to the controller and repeat the
command. Maintain the correct distance from the controller.
You can now read the program that resides in the controller on the screen of the Remote.
12.9 STATUS CHECK OF CONTROLLER IN FIELD
Used to check the status of the controller in
the field from the remote. You can receive the
following data: number of valves in the
controller, current day and time, battery
condition, open valve, Rain Off activated and
Sensor status.
Turn the selector to CONTROLLER
position
Press until the cursor appears below the word Status. Press , the
screen changes.
Use or to select the desired controller. Press , the screen changes.
Verify that this is the controller you wish to check. Press RECEIVE and wait
until you receive data from the controller.
The first screen displays:
a. Controller model – number of valves
b. Updated time and day
c. Condition of the battery
Use or to move to another screen
The second screen displays:
a. Open program or valve
b. Remaining time for open valves
Use or to move to another screen
The third screen displays:
a. Sta tus of sensor – wet or dry
b. If the Rain Off is activated
Press to return to the main screen.
Use and to move among screens.
Page 10
18
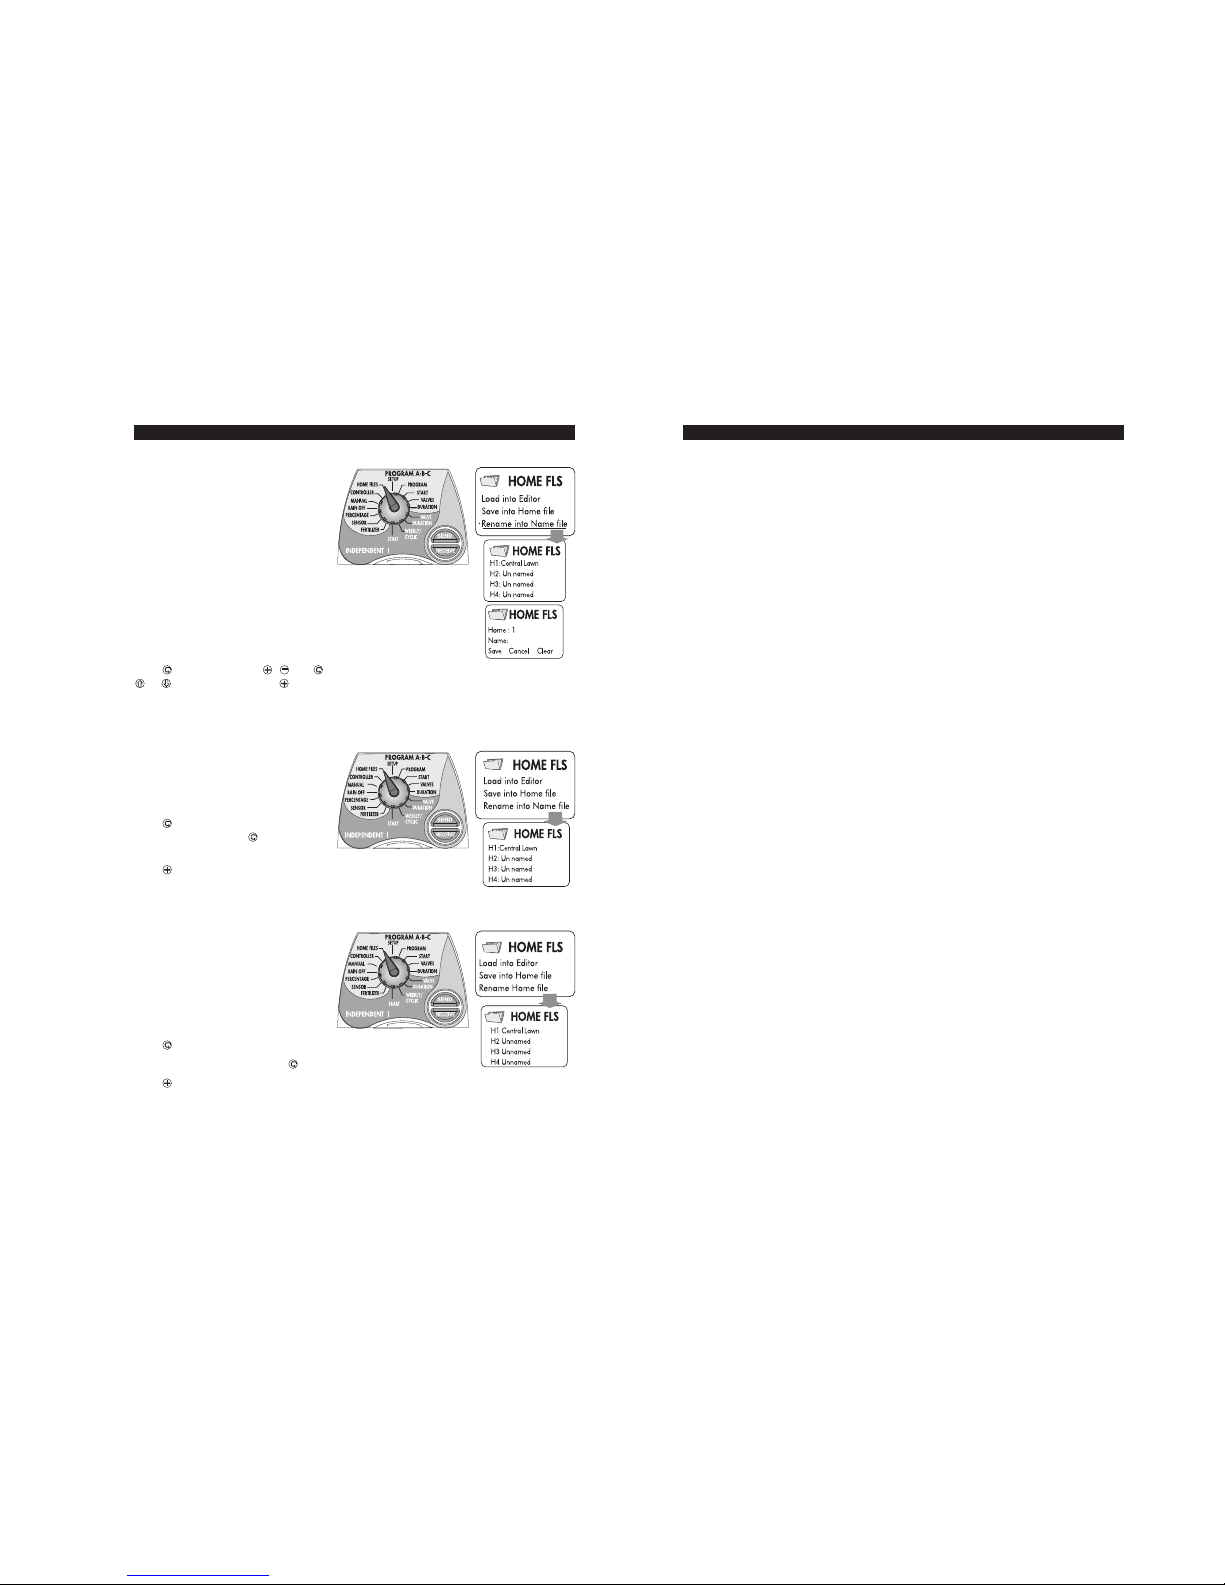
13. HOME FILES
In this mode you can save up to 4 files
(programs) in the memory of the remote. You
can retrieve these files (Home Files) from the
memory and send them to the controllers at
any time you wish.
Save to File – Transfers a file from the editor
to Home Files.
Load to Edit – Transfers one of the Home Files to the editor.
Change File Name – Changes the name of a file, for your convenience.
Turn the selector to HOME FILES position
Change File Name – Sets and changes the name of a chosen file in Home
Files.
Press to select a file. Use , and to enter a name for the file, for your convenience. Use
or to move to Save. Press and wait for: Successful. The name was set.
You can change the name of the file at your convenience by following the steps on this page.
13.1 SAVE TO FILE
Turn the selector to HOME FILES
position
Use this mode to save a chosen file, that is in
the editor, in one of the Home Files, under a
chosen Name.
Press until the cursor appears under the
words Save to File. Press until you reach
the place where you wish to save the file.
Press and wait for: Save Successful. The file is saved.The screen returns
to the main menu.
13.2 LOAD TO EDIT
Turn the selector to HOME FILES
position
Load to Edit – Retrieves a program out of a
Home File to the remote for entering changes
or review. A program saved in a Home File is
a program you prepared in advance which
does not reside in any of the controllers or
the memory.
Press until the cursor appears under the words Load into Editor.
4 files names are displayed. Press to select the desired file.
Press . Approval of successful loading is displayed in the bottom line.The screen returns to the
main menu. The program is residing in the editor for review/change or for sending to a chosen
controller.
19
14. SUMMARY – PROGRAMMING THE SYSTEM
Summary of Operations
1. Initial programming and sending program to a controller in the field
a. Program the controller in the remote (editor)
b. Access controller mode using the selector
c. Select send mode
d. Execute send command to a chosen controller
e. Receive confirma tion. Program sent to the controller and saved in the memory of the Remote
2. Read a program from the controller in the field for test and change
a. Access controller mode using the selector
b. Select receive mode
c. Execute receive command
d. Receive confirmation. Program transferred from the controller to the Remote for test or change
3. Read program from memory for testing
a. Access controller mode using the selector
b. Access load mode.
c. Execute load command. The program resides in the editor
4. Reading the Controller Status
a. Use the selector to access controller mode
b. Access status
c. Reach status command
d. Receive confirmation. If the command fails, repeat the request
e. Read sta tus
5. Manual Operation
a. Access manual mode using the selector
b. Select controller, name and ID
c. Select desired type of operation
d. Press send to implement the command and receive confirmation
6. Save in Home File
a. Full programming of a controller according to a defined program
b. Access home file mode using the selector
c. Access save to file mode
d. Access files table and select a file
e. Sa ve the program in the file
7. Load a program from Home Files to the Editor
a. Access home files using the selector
b. Access load to edit
c. Access files table and select a file
d. Receive confirmation. The program resides in the editor
Page 11

Website: E
http://www.digcorp.com
e-mail: [email protected]
080306 DIG CORP 26-050
Printed in the USA
1210 Activity Drive
Vista, CA 92081-8510, USA
CUSTOMER SERVICE:
1-800-322-9146 FAX: 760-727-0282
15. WARRANTY
DIG CORPORATION warrants these products to be free from defects in material and workmanship
for a period of three years from date of purchase. This warranty does not cover damage resulting
from accident, misuse, neglect, modification or improper installation. This warranty shall extend
only to the original purchaser of the product for use by the purchaser. This warranty shall not cover
batteries or any malfunction of the product due to battery failure. The obligation of DIG
CORPORATION under this warranty is limited to repairing or replacing at its factory this product
which shall be returned to the factory within three years after the original purchase and which on
examination is found to contain defects in material and workmanship.
DIG CORPORATION SHALL IN NO EVENT BE LIABLE FOR ANY INCIDENTAL OR CONSEQUENTIAL
DAMAGES OF ANY KIND; THE SOLE OBLIGATION OF DIG BEING LIMITED TO REPAIR OR
REPLACEMENT OF DEFECTIVE PRODUCTS. SOME STATES DO NOT ALLOW THE EXCLUSION OR
LIMITATION OF INCIDENTAL OR CONSEQUENTIAL DAMAGES, SO THE ABOVE LIMITATION OR
EXCLUSION MAY NOT APPLY TO YOU.
Unattended use for prolonged periods without inspection to verify proper operation is beyond the
intended use of this product, and any damage resulting from such use shall not be the responsibility
of DIG CORPORATION.There are no warranties which extend beyond the description on the face
hereof. In the case of purchase of the product for use other than, for irrigation purposes, DIG
CORPORATION hereby disclaims any implied warranties including any warranties of merchantability
and fitness for a particular purpose. In the case of the purchase of the product for personal, family
or household purposes, DIG CORPORATION disclaims any such warranties to the extent permitted
by law. To the extent that any such disclaimer or implied warranties shall be ineffectual, then any
implied warranties shall be limited in duration to a period of three years from the date of the original
purchase for use by the purchaser. Some states do not allow limitation on how long an implied
warranty lasts, so the above limitation may not apply to you.
In order to obtain performance under this warranty, the unit must be returned to the factory, along
with proof of purchase indicating original date of purchase, shipping prepaid, addressed as follows:
DIG CORPORATION, 1210 Activity Drive,Vista, CA 92081-8510. Repaired or replaced units will be
shipped prepaid to the name and address supplied with the unit returned under warranty.Allow four
weeks for repairs and shipping time. Repair of damaged units not otherwise within warranty may
be refused or done at a reasonable cost or charge at the option of DIG CORPORATION.
This warranty gives you specific legal rights, and you may also have other rights which vary from
state to state.
 Loading...