


DVXP706USB
Manuale d’istruzioni

Precauzioni
Per prevenire la scossa elettrica o il pericolo di incendio, non esporre l’apparecchio all’
umidità o alla pioggia.
Attenzione: non aprire il prodotto, rivolgersi a personale qualificato autorizzato.
Questo simbolo avverte l’utente della presenza di voltaggio pericoloso che potrebbe
costituire rischio di scossa elettrica alle persone.
Questo simbolo avverte l’utente della presenza di importanti istruzioni per la
manutenzione. Per evitare la scossa elettrica, assicurarsi che la spina sia inserita
completamente.
PRODOTTO LASER CLASSE 1
Questo marchio indica la presenza di raggi laser all’interno dell’apparecchio, CLASSE 1 si riferisce alla
classe più bassa, non c’è pericolo di radiazioni pericolose.
Attenzione: ai fini della sicurezza si ricorda che non è consentita la visione durante le fasi della guida.

Precauzioni
Leggere attentamente questo manuale
prima di installare e utilizzare
l’apparecchio.
Posizionare il cavo di alimentazione
in modo che non è possibile
calpestarlo.
Scollegare l’apparecchio in queste
condizioni: temporale oppure se non
viene utilizzato per lungo tempo.
Non sovraccaricare le prese a muro
o i cavi prolunga oltre la loro capacità;
questo potrebbe causare incendi o
scossa elettrica..
L’alimentazione richiesta da questo
prodotto è 100-240VAC, 50/60Hz.
Controllare regolarmente il collegamento.
In caso di rotture o mancanza di
isolamento, chiamare un tecnico
specializzato.
Installare il prodotto in un luogo dotato di
adeguate aperture di ventilazione ( 8 cm),
non bloccare le aperture di ventilazione
sui componenti per non ostacolare la
circolazione dell’aria.
Non utilizzare il prodotto vicino all’acqua.
Non appoggiare il prodotto su oggetti
instabili, altrimenti potrebbe cadere e
danneggiarsi.
La presa di rete viene utilizzata per
scollegare l’apparecchio e deve
essere facilmente accessibile in
qualsiasi istante.
Non far cadere liquidi sul prodotto,
potrebbe causare incendi o scossa.

Precauzioni
Nessuna sorgente di fiamma nuda,
quali candele accese, deve essere
posta sull’apparecchio.
Non posizionare l’unità vicino o
sopra radiatori, stufe o altre fonti di
calore.
Scollegare l’apparecchio dalla presa
prima di pulirlo. Non utilizzare solventi
liquidi, usare un panno leggermente
inumidito nell’acqua per pulire la
parte esterna.
.
Non posizionare oggetti pesanti
sull’unità.
Non posizionare oggetti pesanti
sull’unità.
Non riparare l’apparecchio da soli,
l’apertura o la rimozione del coperchio
potrebbe esporvi a voltaggio pericoloso
o altri pericoli; rivolgersi al personale
qualificato.
Scollegare l’apparecchio e rivolgersi al
personale qualificato nei seguenti casi:
A. se il cavo di alimentazione o la spina
sono danneggiati.
B. se è caduto del liquido o degli oggetti
sul prodotto.
C. l’apparecchio è stato esposto all’acqua.
D. se non funziona correttamente durante
le normali operazioni.
E. se l’apparecchio è caduto o si è
danneggiato il coperchio.
F. quando l’apparecchio mostra un calo
distinto nelle prestazioni.

Precauzioni
TELECOMANDO
Puntare il telecomando direttamente al ricevitore sull’apparecchio.
Non far cadere in terra il telecomando oppure colpirlo con altri oggetti.
Non posizionare il telecomando in un luogo caldo e umido.
Non far entrare liquidi all’interno.
Non aprire il telecomando.
Distanza: da 3 a 7m dal ricevitore.
Angolo: circa 30 verso destra/sinistra.
Non esporre il telecomando alla luce diretta del sole o altre fonti di
calore, altrimenti potrebbe venire danneggiato.
Da 3 a 7 metri

Precauzioni
Note sul disco
Maneggiare i dischi:
maneggiare il disco dai bordi, non toccare la superficie;
non attaccare niente sulla superficie del disco.
Pulizia dischi
impronte o polvere sulla superficie potrebbero causare
problemi durante la riproduzione.
Pulire il disco con un panno morbido, strofinare dal centro
verso il bordo. Se non è possibile togliere la polvere, usare
un panno umido e poi asciugare con uno asciutto.
Non utilizzare prodotti chimici come benzene, etc.
Conservazione dischi
non esporre il disco alla luce diretta del sole o altre fonti di calore.
Dopo l’utilizzo, riporre il disco nella propria custodia.
Non posizionare oggetti pesanti sopra il disco che potrebbe piegarsi.

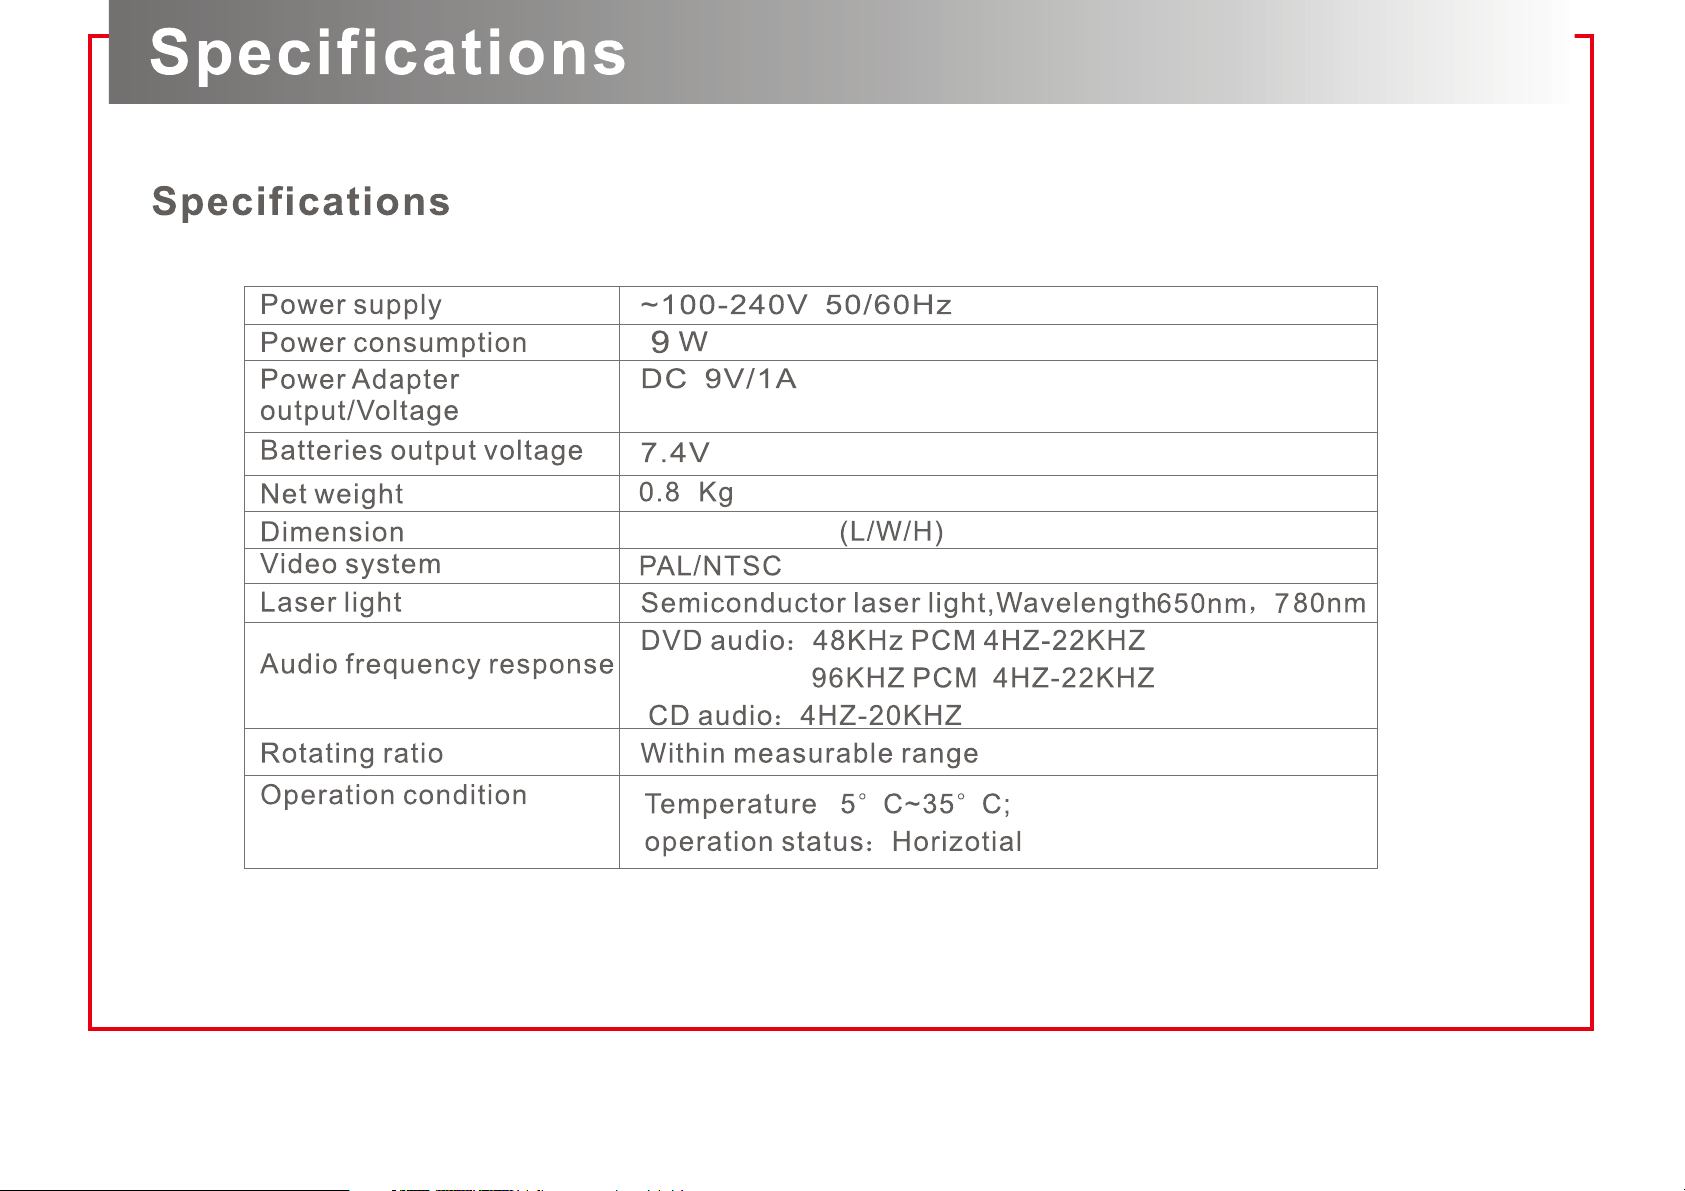
Caratteristiche
Schermo TFT LCD 7”
rapporto immagine 16:9 o 4:3.
Altoparlante incorporato.
presa cuffia.
Entrata e uscita AV
Tre tipi di alimentazione:
adattatore AC/DC 100 – 240V 50/60Hz --- 9V 1A
adattatore 12V da macchina (presa accendisigari).
batteria ricaricabile Li-ion 7,4V – 1800mAh
La batteria ricaricabile a piena carica può durare per circa 2 ore.
Utilizzando l’adattatore è possibile ricaricare la batteria durante l’utilizzo dell’apparecchio.
Telecomando
Cavo audio e video
Cuffie/auricolari
Lettore DVD/MPEG4/JPEG/MP3/CD-DA/CDR/CDRW
MPEG4 (versione 3.11 / 4 / 5)
Ingresso USB riproduce file del tipo MPEG2 / MPEG4 (versione 3.11 - 4 - 5 ) / JPEG / MP3
Riproduzione di file JPEG / MP3 da scheda SD/MMC

Interfaccia operazioni
Interfaccia unità principale
Funzione direzione in condizioni di
impostazione,funzione riproduzione veloce
OK
Funzione direzione in condizioni di
impostazione
Tasto DVD/AV
Setup:Tasto Setup per
USB/CARD
Tasto Open (premere per aprire il
comparto disco)
Stop
Riproduzione/pausa
Tasto volume +
Tasto volume –
1

Interfaccia operazioni
Interfaccia di collegamento
USB
Ingresso scheda SD
Uscita cuffia
Uscita AV
Ingresso DC 9V
Tasto ON/OFF
(accensione e spegnimento)
Ingresso AV
2
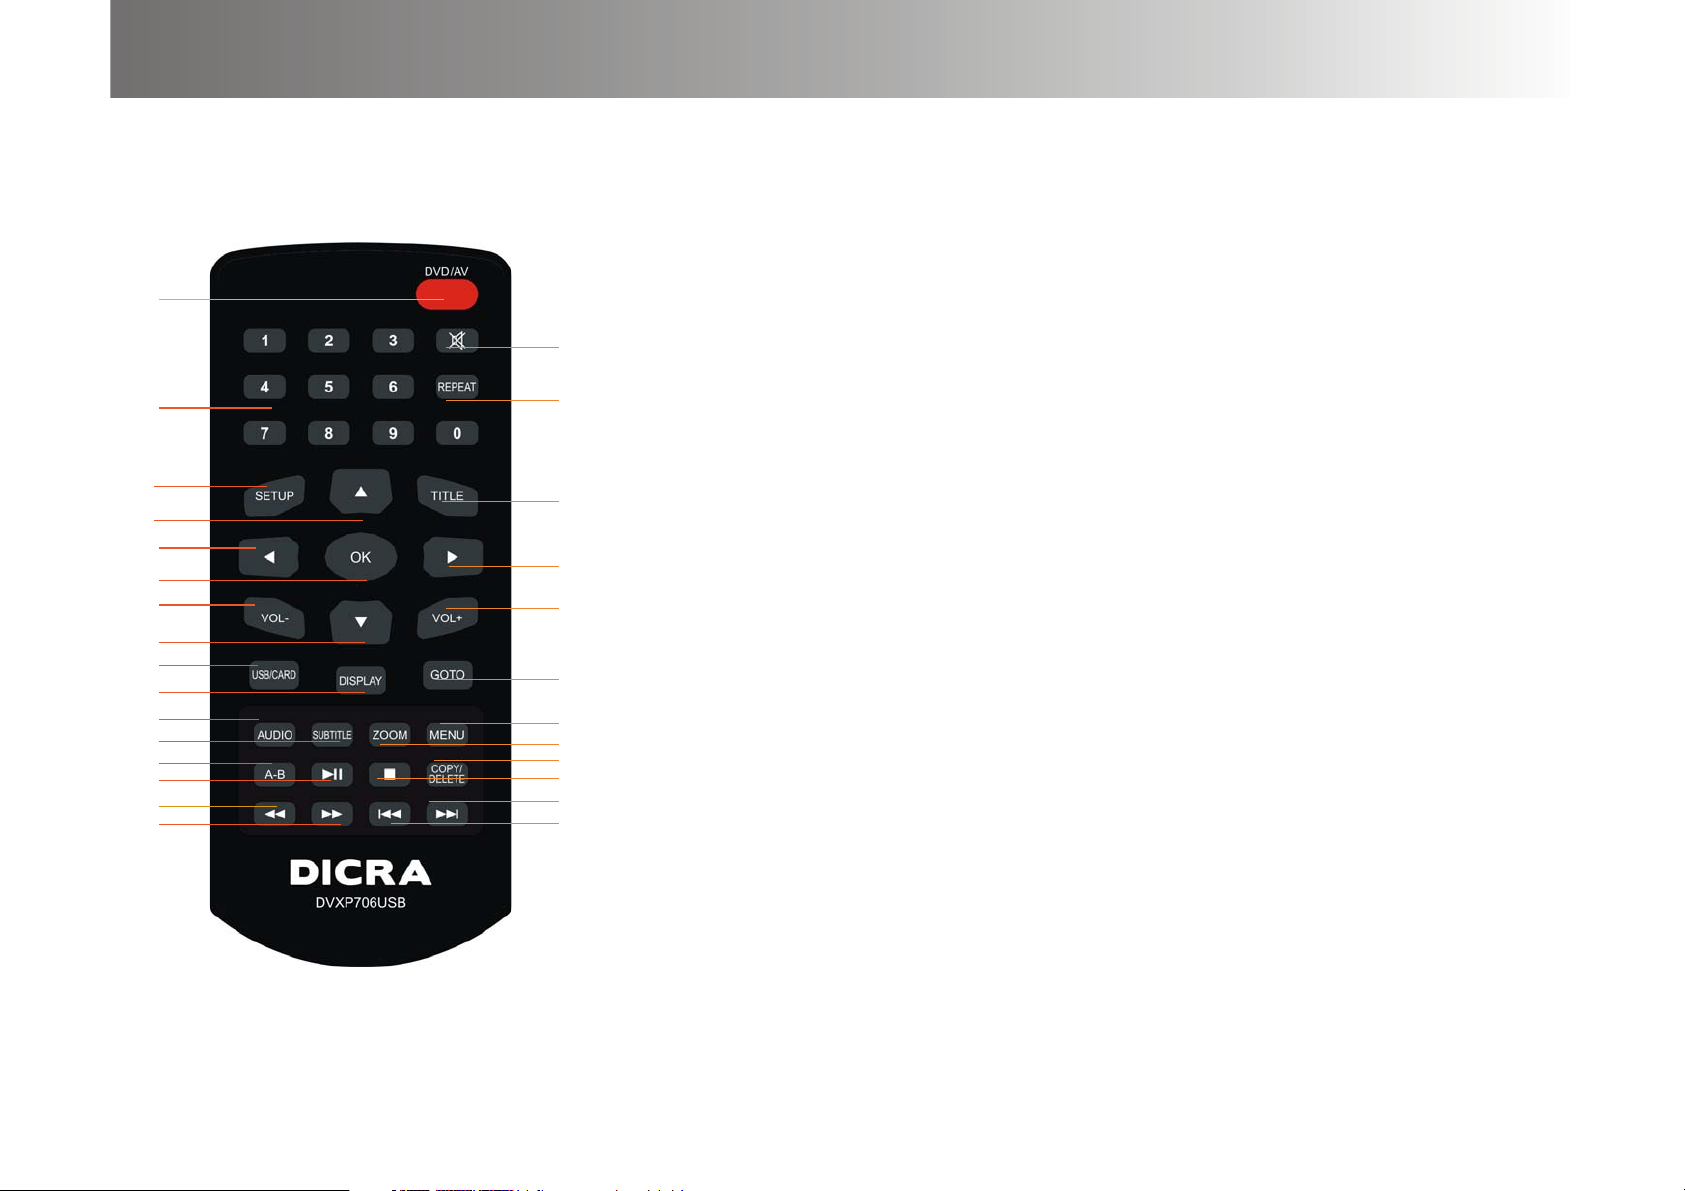
Interfaccia operazioni
Interfaccia telecomando
1. tasto DVD/AV
2. tasti numero
3. SETUP
1
2
3
4
5
6
7
8
9
10
11
12
13
14
15
16
17
18
19
20
21
22
23
24
25
26
27
28
4.
5. sinistra
6. OK: confermare
7. volume giù
8. giù
9. USB/CARD
10.Display
11.opzione audio
12.funzione sottotitoli
13.A-B
14.riproduzione/pausa
15.ritorno veloce
16.avanzamento veloce
17.tasto mute
18.riproduzione ripetuta capitolo corrente
19.Title
20.Destra
21.volume su/
22.ricerca (Goto)
23.menu
24.zoom
25.Copy delete
26.stop
27.salto indietro
28.salto avanti
su
3
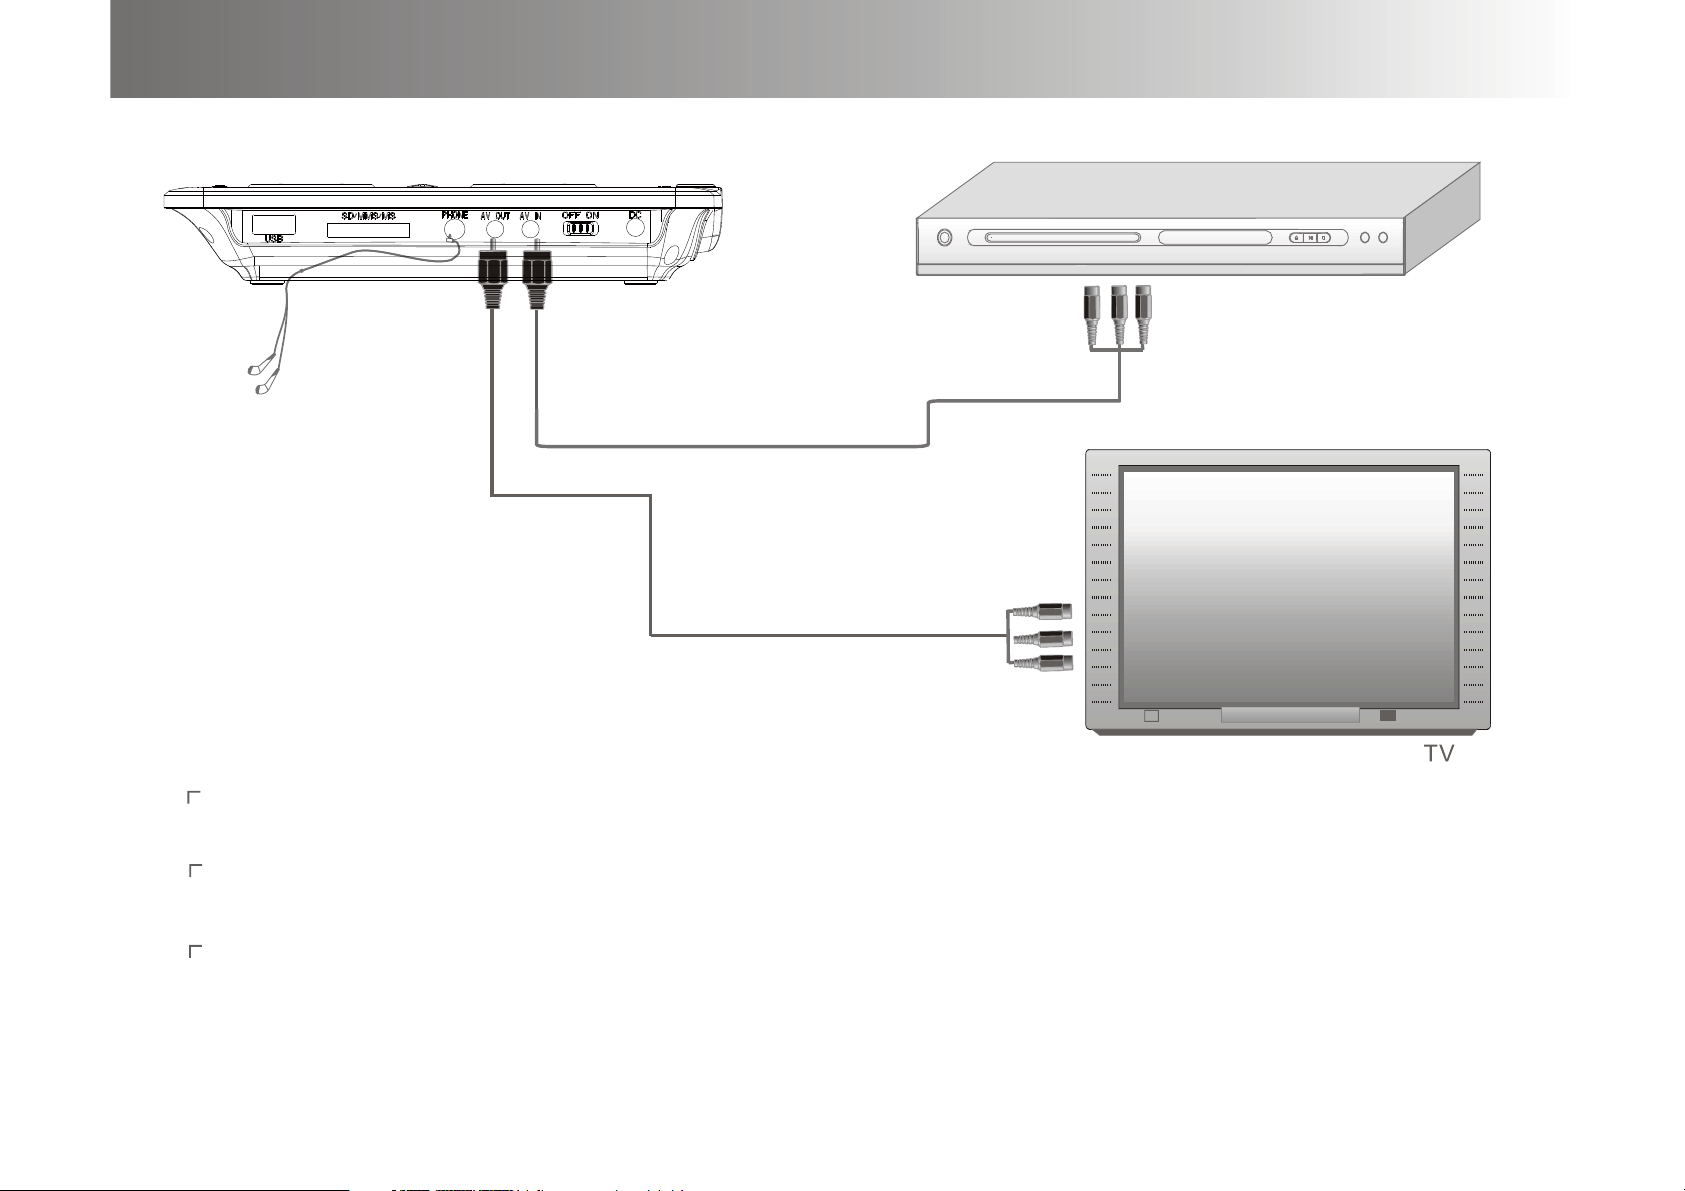
Collegamenti sistema
Collegamento ingresso/uscita AV e cuffie
Collegamento AV
VCD, DVD/VCR
Giallo Rosso Bianco
Giallo Rosso Bianco
Nota: spegnere tutti i dispositivi prima del collegamento.
Come da figura, usare il cavo AV per collegare il lettore DVD portatile alla TV, o altri
dispositivi.
Accendere il lettore DVD portatile e gli altri dispositivi collegati. Premere il tasto
DVD/DVBT/AV sull’apparecchio o sul telecomando per entrare in modalità AV.
Nota: l’uscita audio supportata è analogica.
Usare il cavo AV in dotazione per collegare l’uscita audio/video dell’apparecchio
all’ingresso corrispondente sul TV o amplificatore stereo.
4
Riproduzione base
Operazioni di base
On/Off
Dopo aver collegato l’adattatore AC, premere il tasto on/off e l’apparecchio si accenderà e commuterà
in modalità DVD.
STOP
Durante la riproduzione di dischi DVD, SVCD, VCD e CD, premere il tasto Stop una volta e
l’apparecchio memorizza la posizione corrente. Premere il tasto play/pause e l’unità inizia da dove era
stato fermato. Premere il tasto Stop due volte, l’apparecchio si ferma e perde l’ultima memoria.
Play/pause
Durante la riproduzione del disco, premere una volta per mettere in pausa; premere ancora una volta
per riprendere la riproduzione.
SKIP
Durante la riproduzione del disco, premere per riprodurre l’ultimo capitolo o titolo.
Durante la riproduzione del disco, premere per riprodurre il capitolo o titolo successivo.
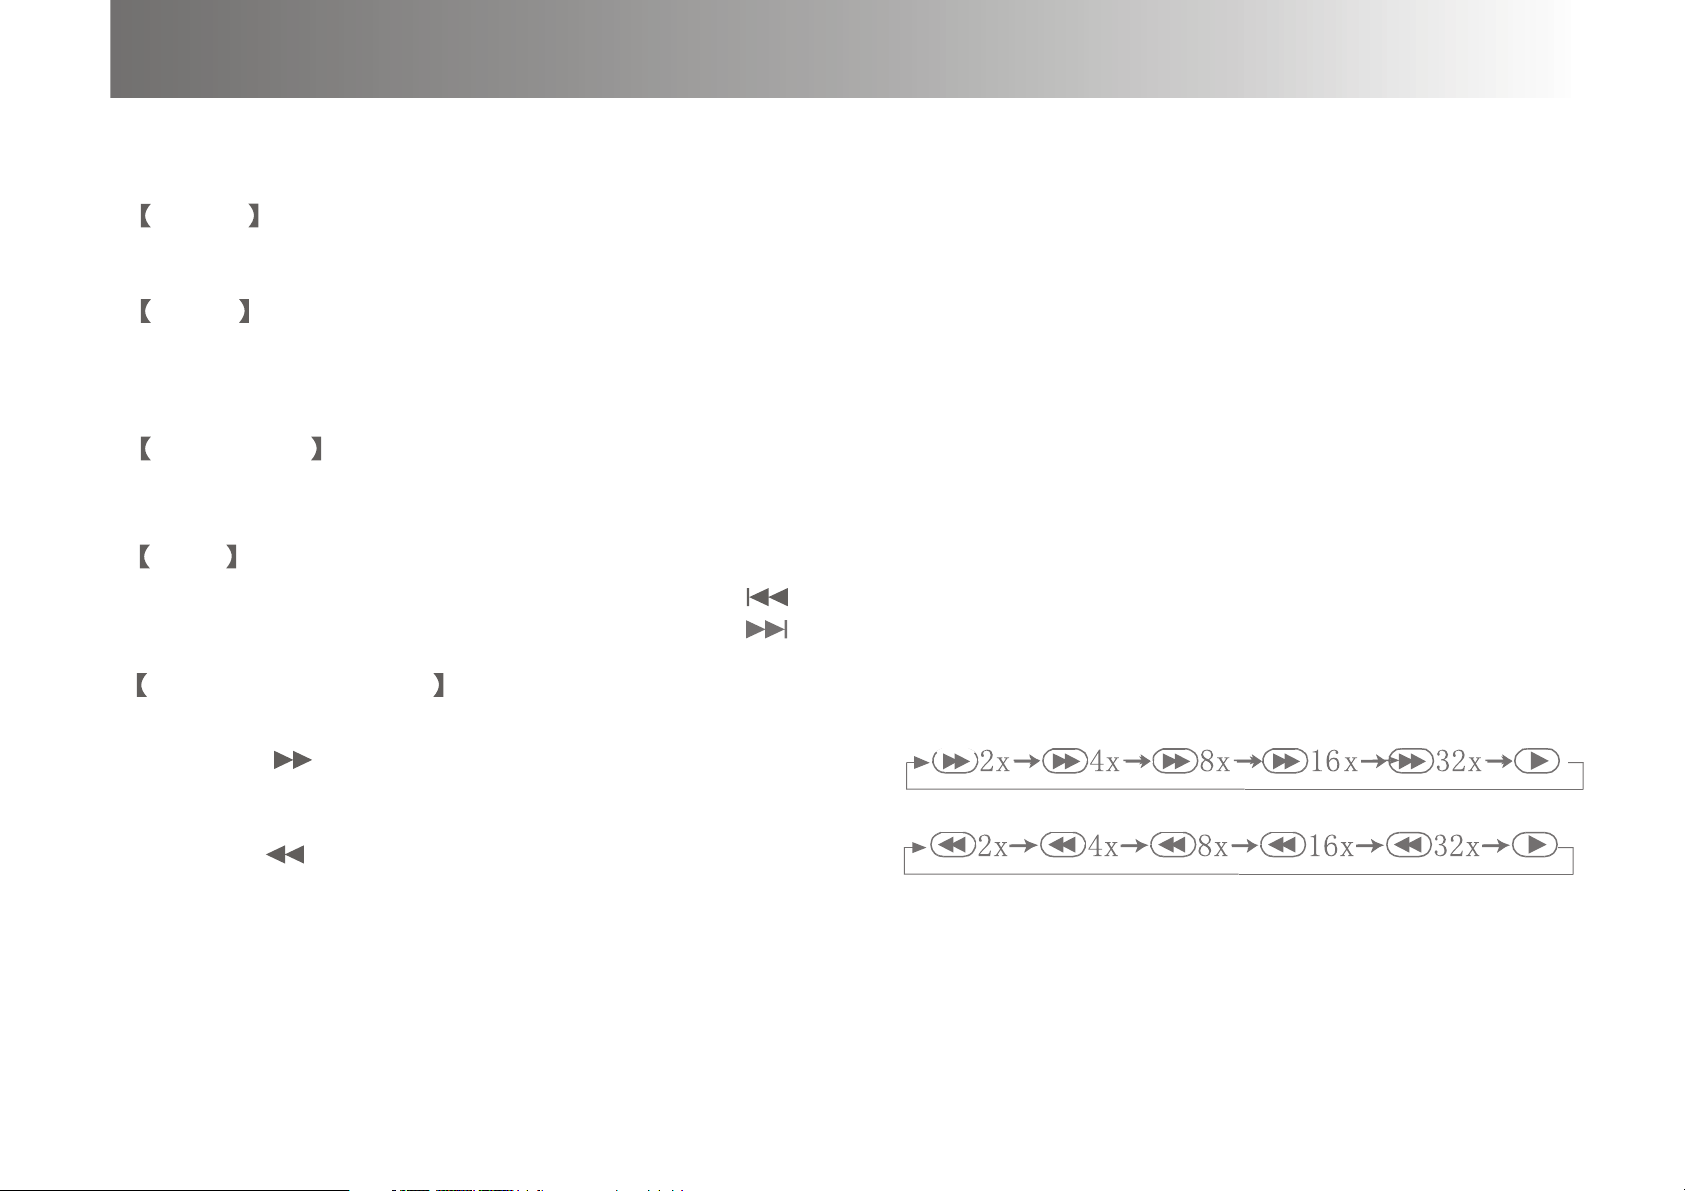
Riproduzione veloce
Durante la riproduzione del disco, premere il tasto per l’avanzamento o ritorno veloce.
Premere , la velocità di riproduzione aumenterà di
Premere , la velocità di riproduzione aumenterà di
In modalità riproduzione veloce, premendo il tasto play/pause tornerà alla riproduzione normale.
5

Riproduzione base
Ripetizione
Questa funzione attiva la funzione “ripetizione titolo, traccia o intero disco”.
Durante la riproduzione di un DVD, premere il tasto ripetizione e apparirà come segue:
ripetizione capitolo ripetizione titolo ripetizione tutto ripetizione spenta
Durante la riproduzione di un CD, VCD 1.1, SVCD o VCD 2.0 in modalità PBC, se viene
premuto il tasto ripetizione, apparirà come segue:
ripetizione traccia ripetizione tutto ripetizione spenta
Muto
Premere una volta il tasto Mute, il suono verrà tolto e il monitor LCD visualizza Mute;
premere un’altra volta, il suono tornerà. È anche possibile ripristinare l’audio premendo il
tasto volume +.
Volume
Il volume può essere regolato tramite sia dai tasti volume +/- e dal controllo volume manuale.
n.b. mettere il controllo volume manuale al massimo e poi regolare con i tasti volume +/-
Tasti numero
Durante la riproduzione dischi CD, DVD, SVCD, VCD (i tasti numero non saranno disponibili
quando PBC è attivo) è possibile scegliere direttamente la traccia desiderata tramite i tasti
numero. Per esempio, se volete riprodurre la traccia 8 dovete premere prima 0 e poi 8; per la
traccia 18 invece premere 1 e 8.
6

Riproduzione base
Audio
Durante la riproduzione di un disco multicanale SVCD, VCD, CD, premere il tasto audio per scegliere
una diversa uscita audio; apparirà come segue:
stereo – canale sinistro – canale destro
Durante la riproduzione di un disco multilingua DVD, SVCD, premere il tasto audio per scegliere la
lingua desiderata; apparirà come segue:
Sottotitoli
Durante la riproduzione di un disco multilingua, premere il tasto SUBTITLE per scegliere i sottotitoli;
apparirà come segue:
Sottotitolo 1/3
Menu
Durante la riproduzione di un disco SVCD, VCD 2.0, premere il tasto MENU per attivare/disattivare
la funzione PBC.
sottotitolo 2/3
sottotitolo 3/3
7

Riproduzione base
Subtitle/chapter/time
Durante la riproduzione di un disco DVD, premere il tasto GOTO. L’apparecchio visualizza il menu
di ricerca sullo schermo del TV come da figura sotto.
Titolo capitolo
Durante la riproduzione di un disco SVCD, VCD, premere il tasto GOTO. L’apparecchio visualizza
il menu di ricerca sullo schermo del TV come da figura sotto.
Muovere il tasto cursore per scegliere la funzione desiderata. Premere il tasto Enter per entrare
in modalità ricerca e scegliere l’elemento desiderato con il tasto numero.
tempo titolo
Tempo disco
tempo capitolo
tempo repertorio
tempo capitolo
8

Impostazione sistema (DVD)
Menu setup
In modalità DVD con apparecchio acceso senza disco inserito, premere il tasto setup per entrare nel
menu principale del sistema; apparirà la seguente figura:
General Audio Video Preference
Scegliere la funzione desiderata usando i tasti direzione e premere OK per confermare.
Scegliere la funzione desiderata usando i tasti direzione e premere OK per confermare.
Tornare al menu setup usando i tasti direzione e premere setup per modificare il menu.
Nota:
muovendo il cursore sull’elemento selezionato verranno visualizzate le informazioni relative
in basso.
L’apparecchio memorizza la configurazione all’uscita del menu principale .
L’unità può entrare in modalità setup quando si trova in modalità stop oppure il comparto
disco è aperto.
9

Impostazioni di sistema
Schermo LCD Normale/PS
Impostazioni generali
Display TV
Normale/PS: immagine a pieno schermo
Schermo LCD Normale/LB
Normale/LB: immagine visualizzata in 4:3
Schermo LCD Wide
Wide: immagine visualizzata in 16:9
OSD language: scegliere la lingua a video desiderata.
Angle Mark:selezionare l'angolo di visualizzazione, durante la riproduzione di dischi DVD multi-angolo.
Screen Saver: in modalità ON viene attivato uno “screen saver”, dopo un certo tempo che non viene fatta
nessuna operazione sullo schermo appare un logo in movimento.
Last memory: questa funzione memorizza il punto in cui era stata interrotta la riproduzione
precedentemente e riprende da quel punto se la funzione è attiva.
MP3 Lyric
visualizza i testi delle tracce MP3 se sono disponibili.
10

Impostazioni di sistema
Impostazione audio
Downmix
LT/RT: durante la riproduzione di un disco 5.1ch, l’uscita
del canale sinistro include il segnale dell’intero
canale sinistro, parte del canale centrale e i canali
surround sinistro e destro; il canale destro include
il segnale dell’intero canale destro, parte del canale
centrale e i canali surround sinistro e destro.
Stereo: durante la riproduzione di un disco 5.1ch, l’uscita
del canale sinistro include l’intero canale sinistro e
parte del centrale, il canale destro include il segnale
dell’intero canale destro e parte del canale centrale.
11
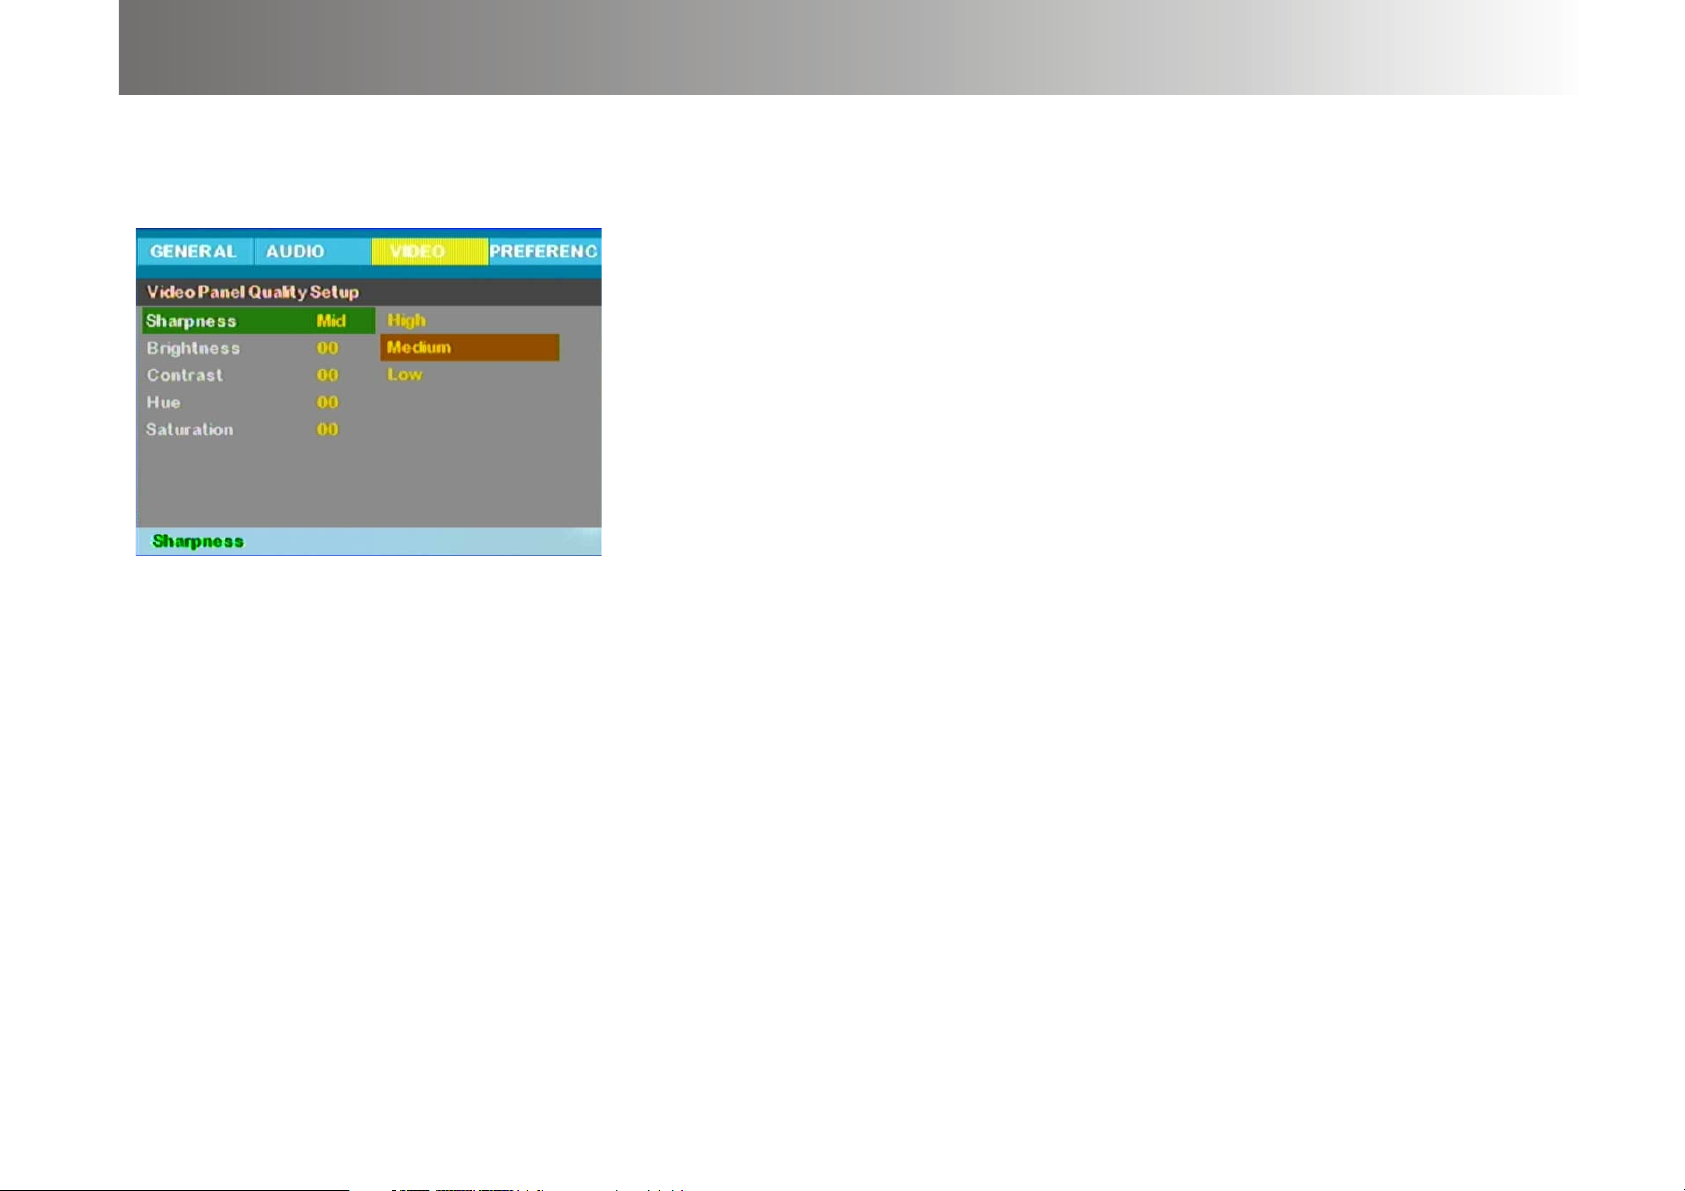
Impostazioni di sistema
Impostazione video
Sharpness
questa opzione permette di impostare la nitidezza dell’immagine
e la qualità, è possibile scegliere tra alto, medio o basso.
Brightness
impostare questo elemento per controllare la luminosità
dell’immagine, la gamma disponibile va da -15 a +15.
Contrast
impostare questo elemento per controllare il contrasto
dell’immagine, la gamma disponibile va da -16 a +16.
Hue
impostare questo elemento per controllare la tinta, la gamma
disponibile va da –9 a +9.
Saturation
impostare questo elemento per controllare la saturazione
dell'immagine, la gamma disponibile va da –9 a +9.
12

Impostazioni di sistema
Tipo TV:
questo apparecchio funziona con qualsiasi tipo di TV o LCD.
Selezionare il sistema TV:
A.PAL
Hong Kong, Cina ed Europa utilizzano questo tipo, quando il tipo di
TV non combacia con questa impostazione, lo schermo visualizza
delle righe nere.
B.Auto
seleziona automaticamente tra PAL e NTSC.
C.NTSC
Taiwan, Giappone e USA utilizzano questo tipo.
Impostazione suono, sottotitoli, lingua menu disco:
questa funzione è disponibile solo se il disco DVD contiene le
informazioni relative.Impostare la lingua e i sottotitoli desiderati,
se il disco contiene queste modalità il disco inizierà nella modalità
desiderata.Nella modalità sottotitoli con la funzione “OFF” è
possibile disattivarli.
Controllo genitori:
alcuni dischi DVD sono codificati in base al contenuto con un livello da 1 (film per tutti) a 8 (film per
adulti contiene scene di violenza e/o sesso).
Il lettore può essere impostato su un livello da 1 a 8 , quando un livello è impostato nel lettore vengono
riprodotti solo dischi e scene con livello di codifica uguale o inferiore a quello impostato.
Per selezionare un livello nel lettore vi verrà chiesto una password quella impostata di default è 8806.
Password:
questa funzione vi permette di cambiare la password per impostarne una differente da quella di default.
Se intendete cambiare la password selezionare “Change” e inserire la password di default poi la nuova
password e confermarla premere OK per uscire e salvare le modifiche.
Nel caso vi dimenticate la nuova password adoperate la password di default per inserirne una nuova.
Default:
questa funzione carica le impostazioni originali della fabbrica (default).
se selezionerete Reset il prodotto porterà tutte le impostazioni come al primo utilizzo.
13

Impostazioni di sistema
USB and CARD connection
LA PORTA USB RIPRODUCE FILE MULTIMEDIALI E SUPPORTA DISPOSITIVI USB 1.0 E 2.0 HIGH SPEED .
la porta USB è attiva in modalità DVD, per entrare in modalità USB premere il tasto USBsul telecomando.
I seguenti formati sono supportati:MPEG2/ MPEG4/XviD/JPEG/MP3/WMA
(alcuni file potrebbero non funzionare i n quanto non tutti i codecs sono inclusi)
Quando si utilizza un dispositivo USB o un HDD(alimentato) assicurarsi che il formato usato sia FAT32.
non è garantita la compatibilità con tutti i dispositivi USB o HDD in commercio)
Funzione USB
Per utilizzare un dispositivo USB, l'app arecchio deve essere in modalità DVD “Stop” o“No disc”.
Premere il tasto USB , ,il tempo di lettura dei files e dei contenuti dipende dalla dimensione degli stessi e
da l la quantità .Usare i tasti freccia per selezionare i files e premere il tasto Enter per confermare.
S e volete fermare la riproduzione, premer e i l tasto USB.
14
215x170x45mm
15
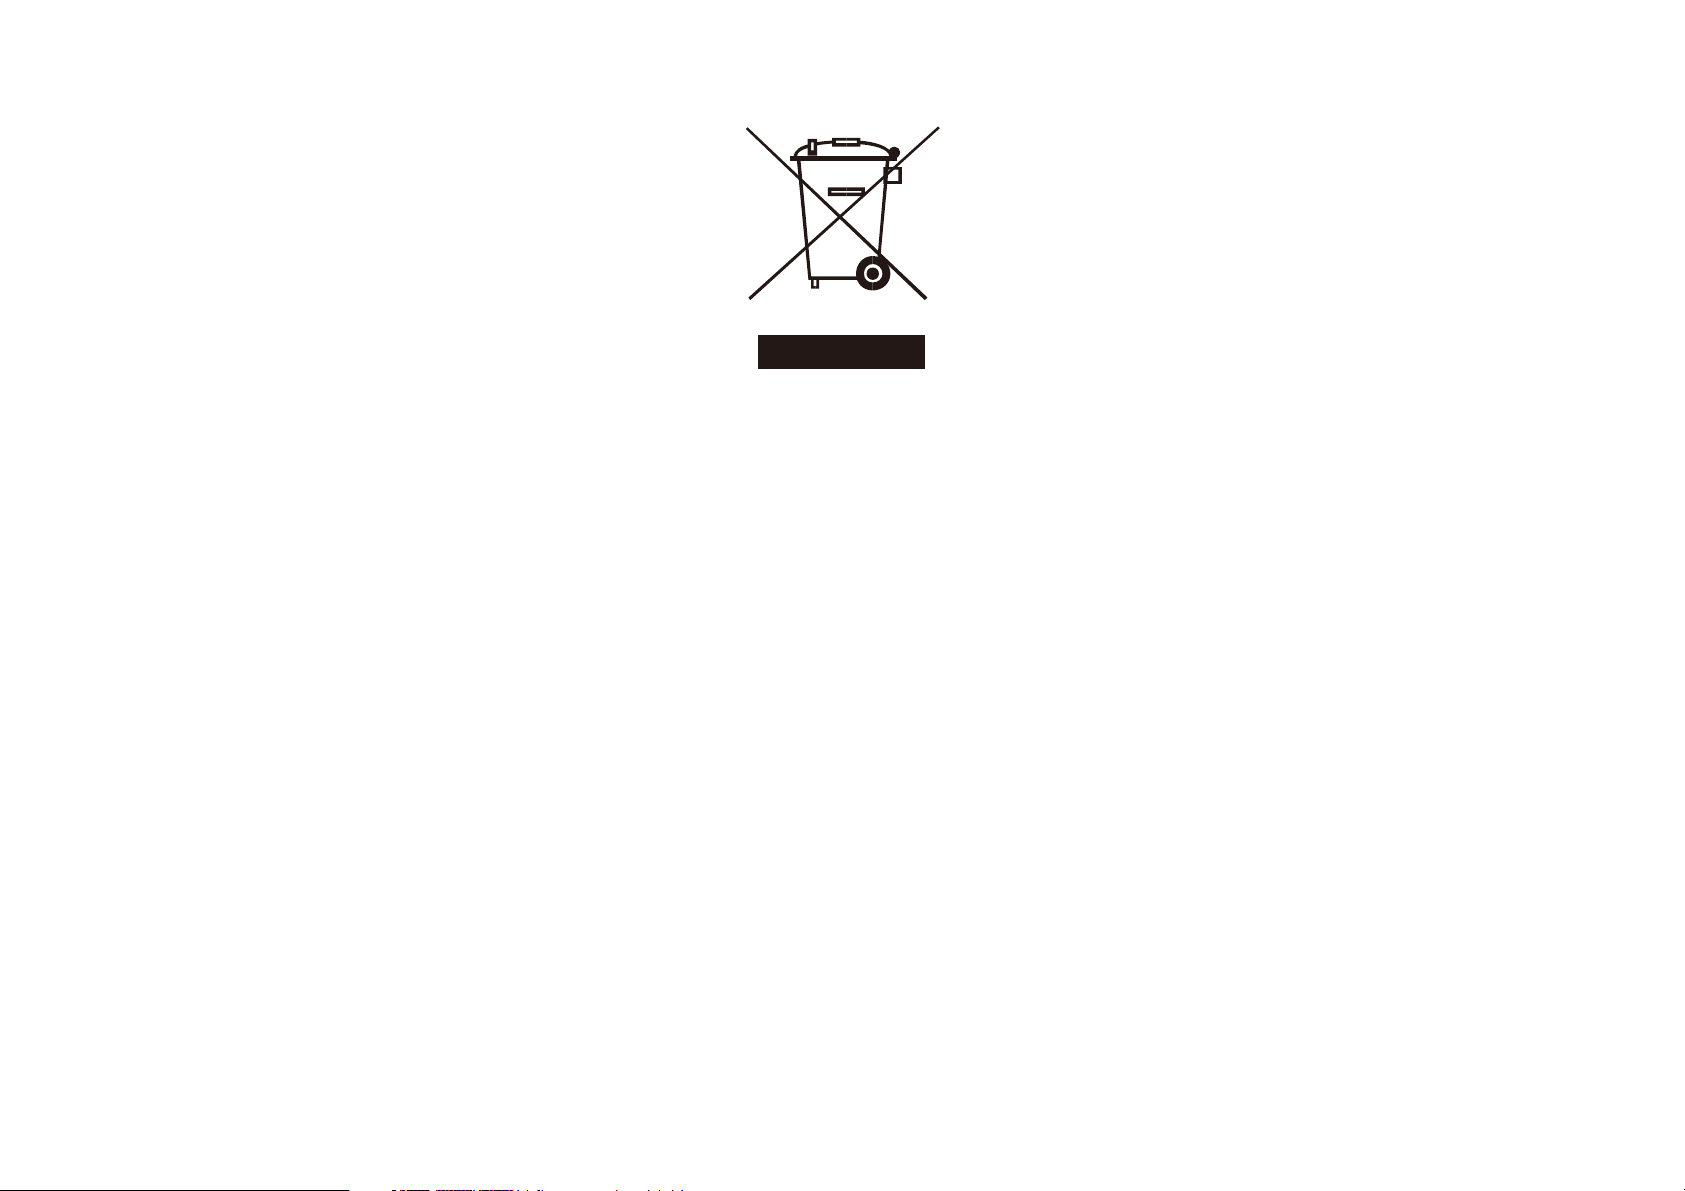
Informativa sullo smaltimento delle unità a fine vita
ai sensi dell’art. 13 del Decreto Legislativo 25 luglio 2005, n. 151 “Attuazione
delle Direttive 2002/96/CE e 2003/108/CE, relative alla riduzione dell’uso di
sostanze pericolose nelle apparecchiature elettriche ed elettroniche, nonché
allo smaltimento dei rifiuti”
Il simbolo del cassonetto barrato riportato sull’apparecchiatura indica che il prodotto
alla fine della propria vita utile deve essere raccolto separatamente dagli altri rifiuti.
L’utente dovrà, pertanto, conferire l’apparecchiatura giunta a fine vita agli idonei centri
di raccolta differenziata dei rifiuti elettronici ed elettrotecnici, oppure riconsegnarla al
rivenditore al momento dell’acquisto di una nuova apparecchiatura di tipo equivalente,
in ragione di uno ad uno.
L’adeguata raccolta differenziata per l’avvio successivo dell’apparecchiatura dimessa
al riciclaggio, al trattamento e allo smaltimento ambientale compatibile contribuisce
ad evitare possibili effetti negativi sull’ambiente e sulla salute e favorisce il riciclo dei
materiali di cui è composta l’apparecchiatura.
Lo smaltimento abusivo del prodotto da parte dell’utente comporta l’applicazione delle
sanzioni amministrative di cui al D.Lgs n. 22/1997
(articolo 50 e seguenti del D.Lgs. n. 22/1997).

PORTABLE DVD
DVXP706USB
USER MANUAL ENGLISH

Point for attention
Precautions
To prevent electric shock or fire hazard do not expose the unit to rain or moisture.
Warning To avoid electric shock or fire hazard,do not open the cabinet,refer servicing to
qualified person only.
This symbol is intended to alert the user to the presence of uninsulated “dangerous
voltage”within the product’s enclosure that may be of sufficient magnitude to
constitute a risk of electric shock to persons.
This symbol is intended to alert the user to the presence of important operating and
maintenance servicing instructions in the literature accompanying the appliance.
warning to avoid electric shock please ensure plug is inserted completely.
CLASS 1 LASER PRODUCT:
This marking indicates the presence of laser beams used in this unit, and CLASS 1 refers to laser beams of
the weaker class. There is no danger of hazardous radiation outside this unit.
Warning: for safety we advise that it is not allowed to watch video during driving!

Point for attention
Please read this safety&operation
manual before you install and use the
unit,and please follow the instruction.
Pay attention to warning and do follow
them.
Route the power cord so that it is not
likely to be walked on or pinched by
items placed upon or against them,
paying particular attention to the plugs,
receptacles,and the point where the
cord exists from the appliance.
Please disconnect the unit under these
conditions:Lightning,Rainstorm or you
won't use it for a long time,this can avoid
electric shock.
The power requirement of this unit is
100~240VAC,50Hz/60Hz.
Check the connection reguarly.If any
rupture of failure in insulation,call for
a maintenance man to replace them.
To ensure reliable operation,and to
protect it from overheating,the unit
must be put in somewhere well ventilated
Do not use power-line operated sets
near water-for example,near a bathtub,
washbowl,kitchen sink,or laundry tub,
in a wet basement,or near a swimming
pool,etc.
Do not overload wall outlets,extension
cords or convenience receptacles
beyond their capacity,since this can
result in fire or electric shock.
Power jack is used to disconnect the
unit and should be easy accessible
everytime.
Do not place the unit on an unstable
object,the set may fall,causing serious
injury to a child or an adult,and serious
damage to the unit.
Never let any liquid spattered on the
unit.It might cause electric shock or fire
hazard.

Point for attention
Never place the unit near or over
such objects:for example,radiator,
heat register,stove or other heat
sources(including amplifier).
Unplug the unit from the wall outlet
before cleaning or polishing it.Do not
use liquid cleaners or aerosol cleaners,
use a cloth lightly dampened with water
for cleaning the exterior of the unit.
Never place heavy object on the unit.
Notice:
Keep safety utilization of electric power.
electrical wire of peripherals should
marked with safety label.and the wire
cannot be lose its security feature for
random replacement.following this can
avoid electric shock or fire hazard,in case
such accident happens,you should
contact qualified technician.
copyrights:
the copyright protected content cannot be
copied.broadcasted,screened,cablecasted,
played publicly and rented,unless it is
authorized.
Do not use cracked or anamorphic discs,
or it might damage the loader.
Do not repair the unit yourself,opening
or removing the cover may expose you to
dangerous voltage or other hazards,
refer all servicing to qualified service
personnel.
Unplug the unit and refer servicing to
qualified service personnel under the
following conditions:
A.when the power cord or plug is
damaged or frayed.
B.If liquid has been spilled or objects
have fallen into the unit.
C.The unit has been exposed to rain or
water.
D.If the unit does not operate normally
when following the operating
instructions.
E.If the unit has fallen or the cabinet has
been damaged.
F.When the unit exhibits a distinct change
in performance-this indicates a need
for service.
Tips:Upon completion of any service or repairs
to the set,ask the service technician to perform
routine safety checks to determine that the unit
is in safe operating condition.

Point for attention
REMOTE FUNCTIONS
Aim the remote directly at the receiver on the unit while operating.
Do not drop the remote control on the floor or impact any other object.
Do not place the remote in a hot or moist location.
Do not let any water or other liquid fall on the remote.
Do not open the remote.
Distance from 3 to 7m from
Angle about 30 left/right from the axle wire.
Do not expose the remote control to direct sunlight or other heating sources.
The remote control may get damaged.
the receiver.
Da 3 a 7 metri

Point for attention
Notes about the disc
Notes about handling discs
Handle the disc by its edge,do not touch the surface.
Do not stick any kind of object on the disc surface .
Notes about cleaning discs:
Finger mark or dust on the surface may cause change in picture
and sound.
Clean the disc with a cleaning cloth.Wipe the disc from the center
out.If soft cloth cannot wipe the dust,use a wet cloth,then use a
dry cloth.
Do not use chemical products such as benzine,etc...
Notes about storage of discs
Do not expose the disc to direct sunlight or other heat sources.
After playing,store the disc in its case
Placing heavy object on it or stacking will make the disc bend.
:

Features
Features
7 inch TFT LCD
16:9 or 4:3 aspect ratio
Built in speaker;Earphone output.
Three kinds of power supply:Power Adapter,Li-Nion polymer chargeable battery and car adapter12V.
Li-Nion polymer chargeable battery7.4V-1800mAh.one fully
Intelligent charging function.
Use Power Adapter,Li-Nion polymer chargeable battery,you can charge while playing.
75 ohms antenna jack
Remote control
Audio/Video cable
Earphones (3,5 mm jack)
Discs playback: DVD/ MPEG-4/JPEG/MP3/CD-DA/CD-R/CD-RW
MPEG4 (3.11/4/5 versions)
charged battery can last for 2 hours.

Contents
Operation interface --------------------------------------------------------------------------------1-3
System connection ---------------------------------------------------------------------------------4
Basic playback---------------------------------------------------------------------------------------5 -9
Basic operation
System setup-----------------------------------------------------------------------------------------9 -13
Setup menu
General setup
Audio setup
Video setup
Preference setup
SpecifIcation------------------------------------------------------------------------------------------14

Operation interface
Mainbody operation interface
Direction function in setup condition,
Fast playback function in play condition
OK
Direction function in setup condition
Push close
Switch DVD/AV Button
(DVD) setup
Switch USB(DVD)/CARD button
Stop
Play/Pause
Volume up button
Volume down button
1

Operation interface
Connection interface
SD/MMC/MS
Earphone output
AV output
DC INPUT
POWER BUTTON
AV input
2

Operation interface
Remote interface
1
17
2
3
4
5
6
7
8
9
10
11
12
13
14
15
16
18
19
20
21
22
23
24
25
26
27
28
1. Switch DVD/AV button
2. Number keys
SETUP
3.
UP
4.
5.
Left
6.
OK
7.
Vol-
8.
Down DVD
9.
USB/CARD
10.
Display
11. AUDIO
12.
Subtitle function
13.
A-B
14. PLAY/PAUSE
15.
Fast backward
16. Fast forward
17. Switch Sound/Soundless button
18. Repeat play the current chapter
Title
19.
20.
Right
21.
Vol+
22. Goto
23. Menu
24.
Zoom
25.
Copy delete
26. STOP
27. Skip forward
28.
Skip backward
3

System connection
AV input/output and earphone connection
AV conne ct
V
C
V
D
C
a
p
l
V
D
,
D
R
y
/
Notice:Please turn off all devices before connection.
As per the picture, use the A/V cable to connect the portable DVD
player to a TV or other devices.
Turn on the portable DVD player and the other unit to which connection has been made.
Press the DVD/DVBT/AV button on the portable DVD player or on the remote control to
enter in A/V mode.
Note:
The audio output only supports Analogue output.
Use the AV cable in the accessory bag,connect the audio/video output on this unit to the
corresponding
Input on TV or stereo amplifier
.
4

Basic playback
Basic operation
On/Off
After connecting the AC adaptor, press the on/off button and the unit will turn on and switch to DVD mode.
STOP
When playing DVD,SVCD,VCD
current position. Press play/pause button and the unit will start from where you stop.Press stop
button twice
Play/pause
the unit will stop and will lose the last memory.
and CD disc,press the button once and the unit will memorize the
When playing disc press the button once to pause the current playback to resume playback.
SKIP
When playing disc, press to play last chapter or title.
When playing disc press to play next chapter or title.
Fast play
When playing disc,press the button to fast play forward or backward.
Press ,playback speed will be
Press ,playback speed will be
Under fast play status,pressing [play/pause] will resume normal playback.
Press once more
5

Basic playback
Repeat
This function activates “repeat one title only, one chapter, one track, or the whole disc”.
When playing a DVD, press the repeat button and the following display will appear:
Chapter repeat Title repeat Full repeat Repeat off
When playing a CD, VCD 1.1,SVCD or VCD 2.0 in pbc mode, if the repeat button
is pressed, the following display will appear
Track repeat Full repeat Repeat off
Mute
Press MUTE once,the sound will be turned off and the LCD monitor will show Mute
Press once more
,the volume will return.You can also resume the volume by volume button + -.
Volume
The volume can be adjusted by volume button +- or by the knob. Set the knob to max and then adjust
with +/-.
Number buttons
When playing CD,DVD,SVCD,VCD discs, number buttons will be unavailable when PBC is on .
You can choose the track you want directly by number buttons.For example,if you want to play track 8,
press 0 first then press 8,if you want track 18,press 1 first then press 8.
6

Basic playback
Audio
When playing a multi channel SVCD, VCD, CD disc, press the "audio" key to chose a different audio
output. The following display will appear:
Stereo---Left channel---Right channel
When playing a multi-language DVD, SVCD disc, press the "audio" key to chose the desired
language. The following display will appear:
Subtitle
playing a Multi-Language disc, press the "SUBTITLE” key to chose a subtitle. The following display
will appear.
Subtitle1/3
Menu
when playing a SVCD, VCD2.0 disc, press the "MENU" BUTTON to activate/dissactivate the PBC function.
Subtitle2/3
Subtitle3/3
7

Basic playback
Subtitle/chapter/time
When playing back a DVD disc, press the "GOTO” key. The unit will display the search menu on the
TV screen. See below picture.
Title chapter T time Chapter time
When playing back a SVCD, VCD disc, press the "GOTO” key. The unit will display the Search menu on
the TV screen. See below picture.
Full disc time
Chapter time
Repertoire time
key into searching status
chose the desired items by number key.
Move the cursor keys to chose the desired function. Press "enter”
itle
8

System setup (DVD)
Setup menu
When the unit is in DVD mode without any disc, press the setup key to enter the main menu system. See
the below picture.
General Audio Video Preference
Choose the desired function using the direction keys and press "OK” to confirm.
Choose the desired function using the direction keys and press "OK” to confirm.
Return to the setup menu by using the direction keys Press setup to edit the menu.
Note:
By moving the cursor to the selected item, a display will appear at the bottom displaying the information
The unit will memorize the setup configuration once you exit main menu.
The unit can only enter in setup mode if it is in”stop”mode or tray is opened.
9

System setup
General setup
LCD display Normal/PS
Normal/PS display full image
LCD display
Normal/LB display the image as 4 3
Normal/LB
LCD display
Wide Display the image as 16:9
OSD language:choose the desired OSD language.
Angle Mark:select display angle, when playing multi-angle DVD disc.
Note:The caption functionwill only work with NTSC DVD disc.
Screen saver:in ON mode a screen saver is activated, after some time
Last memory:
This function memorizes the end of the last playback and will resume from that point if the function
is enabled.
MP3 Lyric
Show MP3 Lyric on or not.
Wide
10

System setup
Audio setup
Downmix
LT/RT:when playing 5.1ch disc,the left output channel
includes signal of entire left channel,partial center
channel and left& right surrounding channels;the
right channel includes signal of entire right channel,
partial center channel and left&right surrounding
channels.
Stereo:when playing 5.1ch disc,the left output channel
includes signal of entire left channel and part of
center channel,the right channel includes signal
of entire right channel,part of center channel.
11

System setup
Video setup
Sharpness
This option allows you to set the image sharpness and quality.you
can
Brightness
choose among high,middle and low.
Setup this item to control the
from -15 to +15.
Contrast
Setup this item to control the contrast of image available range
from -16 to +16.
Hue
Setup this item to control the hue of image, available range
from –9 to +9.
brightness of image
available range
Saturation
Setup this item to control the saturation of image, available
range from –9 to +9.
12

System setup
TV type
Preference setup
ParentaI:
The discs can be encoded based on the contents with a level from 1 (film for all) to 8 (film for adults).
When a level is set,the unit can only play discs with the same or lower rating than the one preset.
Default password to choose the level is 8806.
This unit can work with all types of televisions or LCD's.
Select the TV system:
A.PAL
Hongkong,China and Europe
match this setup,the
B.Auto
Select TV type
C.NTSC
Taiwan,Japan, USA etc use this type.
Audio, subtitle, disc menu language setup:
This function will only be available if the DVD disc
contains the information Set the language and subtitles, if the disc
contains such info playback will start from the desired mode. In the
subtitle mode you can turn it off by chosing OFF option.
automatically.
screen will be in black strip state.
use this type,when TV type doesn’t
Password:
it is possible to set a different password than default; if you want to change the password
select "change"and insert default password, then insert the new one and confirm with OK;if you forgot
the new password you can always use default one.
Default:
This functions will load the original factory settings.
The initial password of the unit is 8806,after changing the
password,press Enter key to confirm.
13

System setup
USB and CARD connection
the USB port is active under DVD mode, to enter USB mode you can press USB button on remote control
The unit can support the following formats: MPEG2/MPEG4/Xvid/JPEG/MP3/WMA.
(Some files may not work as not all formats and codecs are included)
When using a USB stick or a HDD drive,make sure the format used is FAT32.
USB function
In order to use the USB device, the unit should be in “Stop” or “No disc” mode,Press
the USB button on the DVD player. Theloading time of the files and the content will depend on the size
of these,and the amount of files. After having loaded the file,use the Key arrow buttons to select the
files and press the “Enter” button to confirm,If you want to stop the playback,press theUSB button.
14

215x170x45mm
15
 Loading...