

Page 1

External USB 7.1 Channel Sound Card
User’s Manual
©2010 Diamond Multimedia. All rights reserved.
Page 2

External USB 7.1 Channel Sound Box User’s Manual
ABOUT THIS MANUAL
This manual is designed for use with the External USB 7.1 Channel Sound Card. Information in this
document has been carefully checked for accuracy; however, no guarantee is given to the
correctness of the contents. The information in this document is subject to change without notice.
The manufacturer does not make any representations or warranties (implied or otherwise) regarding
the accuracy and completeness of this document and shall in no event be liable for any loss of profit
or any commercial damage, including but not limited to special, incidental, consequential, or other
damage.
SAFETY INSTRUCTIONS
Always read the safety instructions carefully:
Keep this User’s Manual for future reference.
Keep this equipment away from humidity.
If any of the following situation arises, get the equipment checked by a service technician:
• The equipment has been exposed to moisture.
• The equipment has been dropped and damaged.
• The equipment has obvious sign of breakage.
• The equipment has not been working well or you cannot get it to work according to the
User’s Manual.
COPYRIGHT
This document contains proprietary information protected by copyright. All right are reserved. No
part of this manual may be reproduced by any mechanical, electronic or other means, in any form,
without prior written permission of the manufacturer.
i
Page 3

Table of Contents
Table of Contents
1. Introduction ...................................................................................................................... 1
Features ............................................. .................................... ................................... ......... 2
Package Contents .............................................................. ................................................ 2
System Requirements ........................................................................................................ 2
2. Using the Adapter ............................................................................................................ 3
How to Use Your Audio I/O Devices ................................................................................... 3
How to Setting 7.1 Surround Sound Speakers .............. .... .... ........ .... .... ... .... .... ........ .... .... . 6
3. Application Software Installation ... ............................ ........................... ....................... 15
For Windows XP and Vista only ....................................................................................... 15
Using Interface and Function Control ................................................................... .... .... ... 18
3. Troubleshooting ............................................................................................................. 28
4. Limitation ……..……………………………………………………………………………….31
5. Specifications ........................... .................................................... .................................. 32
6. Regulatory Compliance ................................................................................................. 33
FCC Conditions ................................................................................................................ 33
CE ..................................................................................................................................... 33
WEEE Information ............................................................................................................ 33
ii
Page 4
Error! Use the Home tab to apply 標題 1 to the text that you want to appear here.
1. Introduction
The external USB 7.1 Channel Sound Card provides an amazing audio accessory for
computer with a USB port. It is equipped with standard input and output connectors to
add great stereo performance. The sound card not only combines high quality audio
recording and playback capabilities but also allows the connection of most popular
audio gear such as microphones, home stereos, musical instruments, amplifiers and
powered speakers to your computer with USB ports. It is easy to add stereo 7.1
Channel sound effects to your computers with simply inst all plug-and-play oper ation for
PC and Mac.
Note: For Windows® XP and Vist a™ user only, the valued driver can support Xear 3D™,
which makes your games sound better than ever when you play games. The fantasy
magic voice and karaoke function makes you have karaoke party with more fun. You
can change the atmosphere by choosing environment sound and the room size can be
also selected .
1
Page 5

External USB 7.1 Channel Sound Box User’s Manual
Features
Dramatically improve your PC/ Computer/ Notebook audio quality
Auxiliary inputs for microphone, stereo, and other analog sources
Volume controlled through your computer or by manually on the adapter
Dolby® digital audio streaming via S/PDIF out
USB remote wake-up support
Playback with soft-mute function
Volume up/ Volume down/ Playback mute/ Record mute HID button
Virtual speaker shifter support
Plug-and- play operation with Micros oft OS/ Mac OS default drivers
Full-duplex playback/recording audio stream without wound card in PC
Supports suspend/ resume and remote wake-up
Window Vista™ Premium Level Compliant
Package Contents
External USB 7.1 Channel Sound Card x1
CD (Driver and User’s Manual included) x1
Quick installation Guide x1
USB Type A to Type B Cable x1
S/PDIF cable(optional) x1
System Requirements
The minimum requirements for the PC are:
Intel Pentium III or AMD K6 500 CPU above
At least 128MB RAM
At least 50 MB hard disk space
PC or Mac with one USB port
With one of the f ol lowing operat i on systems :
Windows® 2000, XP and Vista™
Mac OS X v10.x or higher
2
Page 6

Error! Use the Home tab to apply 標題 1 to the text that you want to appear here.
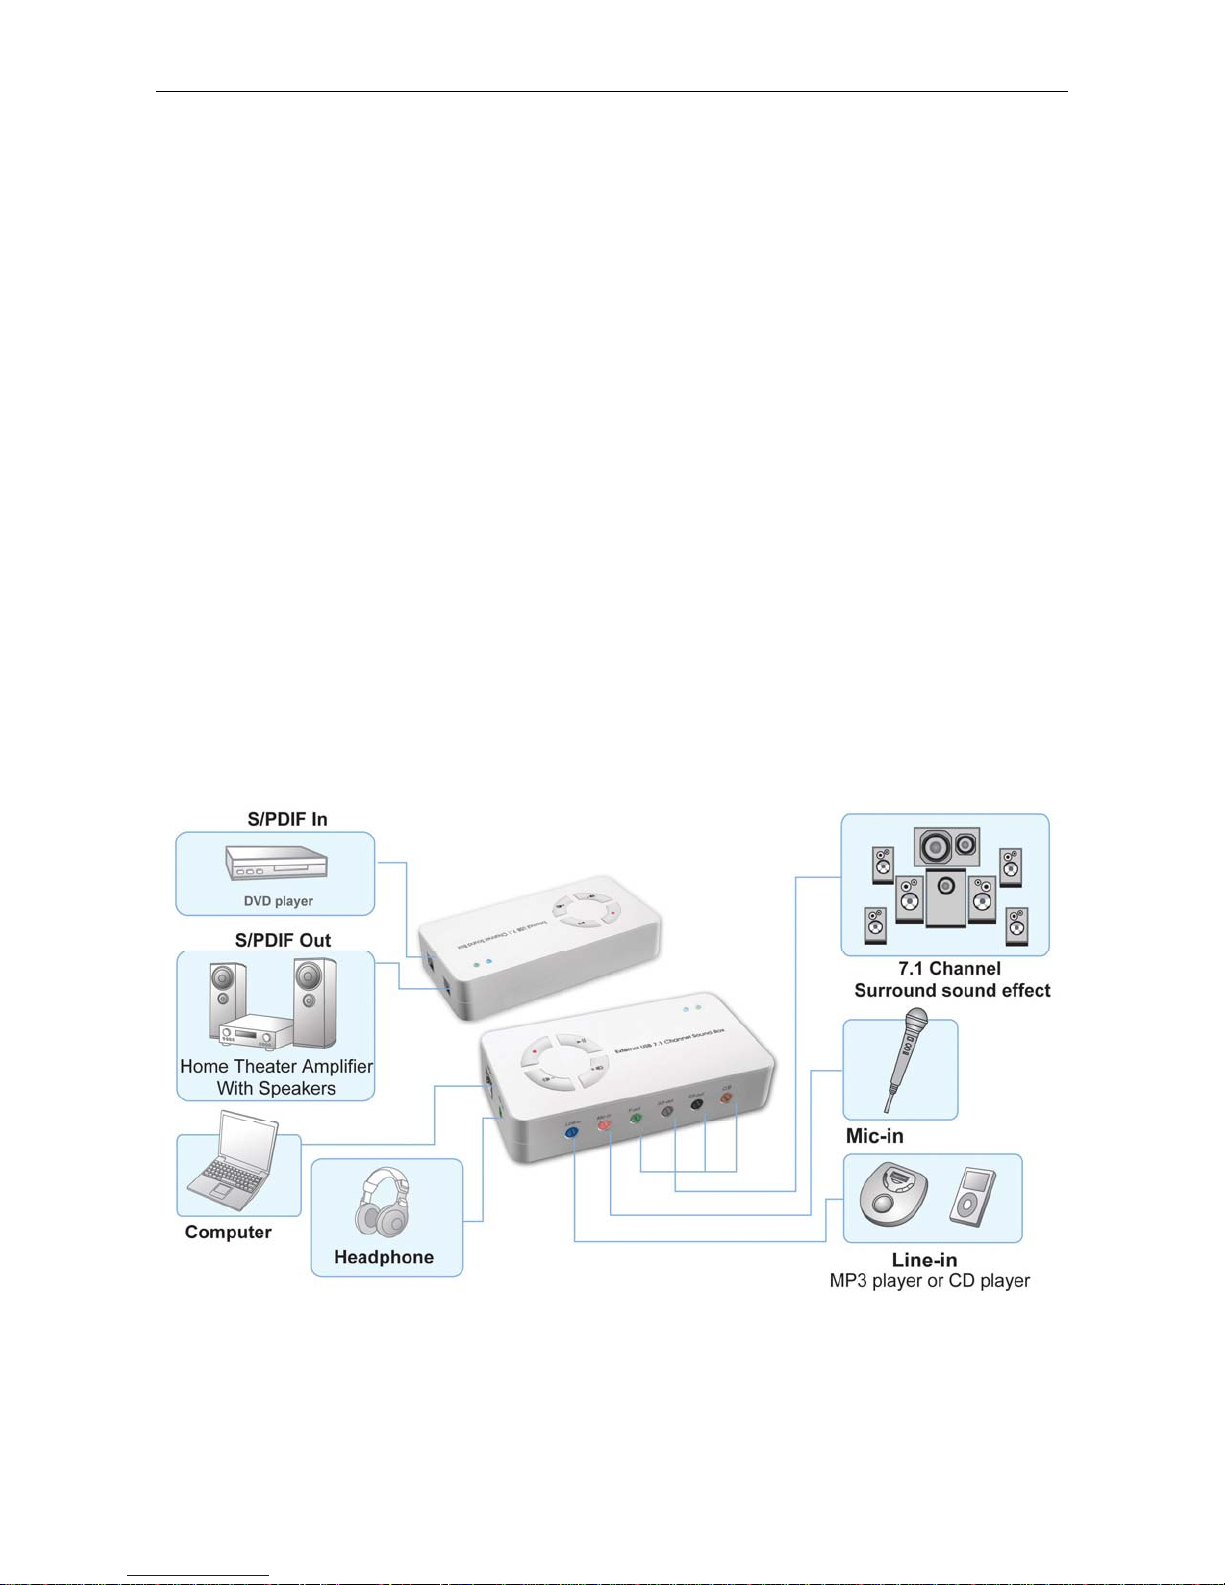
2. Using the Adapter
How to Use Your Audio I/O Devices
No external driver installed under OS support of Win Vista, Win 2000, Win XP and Mac.
Simply use a cable line to connect the External USB 7.1 Channel sound card and the
available USB port of your PC or MAC and get the External USB 7.1 Channel Sound Card
effects directly.
USB (Type B)
Headphone
Line-In
Record mute
Volume down
Mic-In
Playback mute
Volume Up
F-Out
SS-Out
SPDIF-Out
SPDIF-In
C/B BS-Out
3
Page 7
External USB 7.1 Channel Sound Box User’s Manual
1. 7.1 Channel Speaker
Plug the speaker cable into the speaker/line-out jack as F-out (Front), SS-out
(Surround), BS-out (Back) and C/B (Center/Subwoofer) on the USB 7.1 Channel
Sound Card.
Notice for Mac users:
The speaker/line-out jack of 7.1 Channel Rear Surround and 7.1 Channel Surround are
F-Out (Front), SS-Out (Back), BS-Out (Surround) and C/B (Center/Subwoofer)
respectively.
2. Microphone
Plug the MONO microphone into the Mic-in jack on the USB Audio Adapter.
3. Stereo Audio Input
Plug the STEREO line into the Line-in jack on the USB Audio Adapter.
4. Headphone
Plug the Headphone line into the headphone jack on the Sound Card.
5. Power LED Indicator: Lights up when powered on; flash when operation.
Record Mute LED Indicator: Lights up for recording muted, lights off for recording
function can be used.
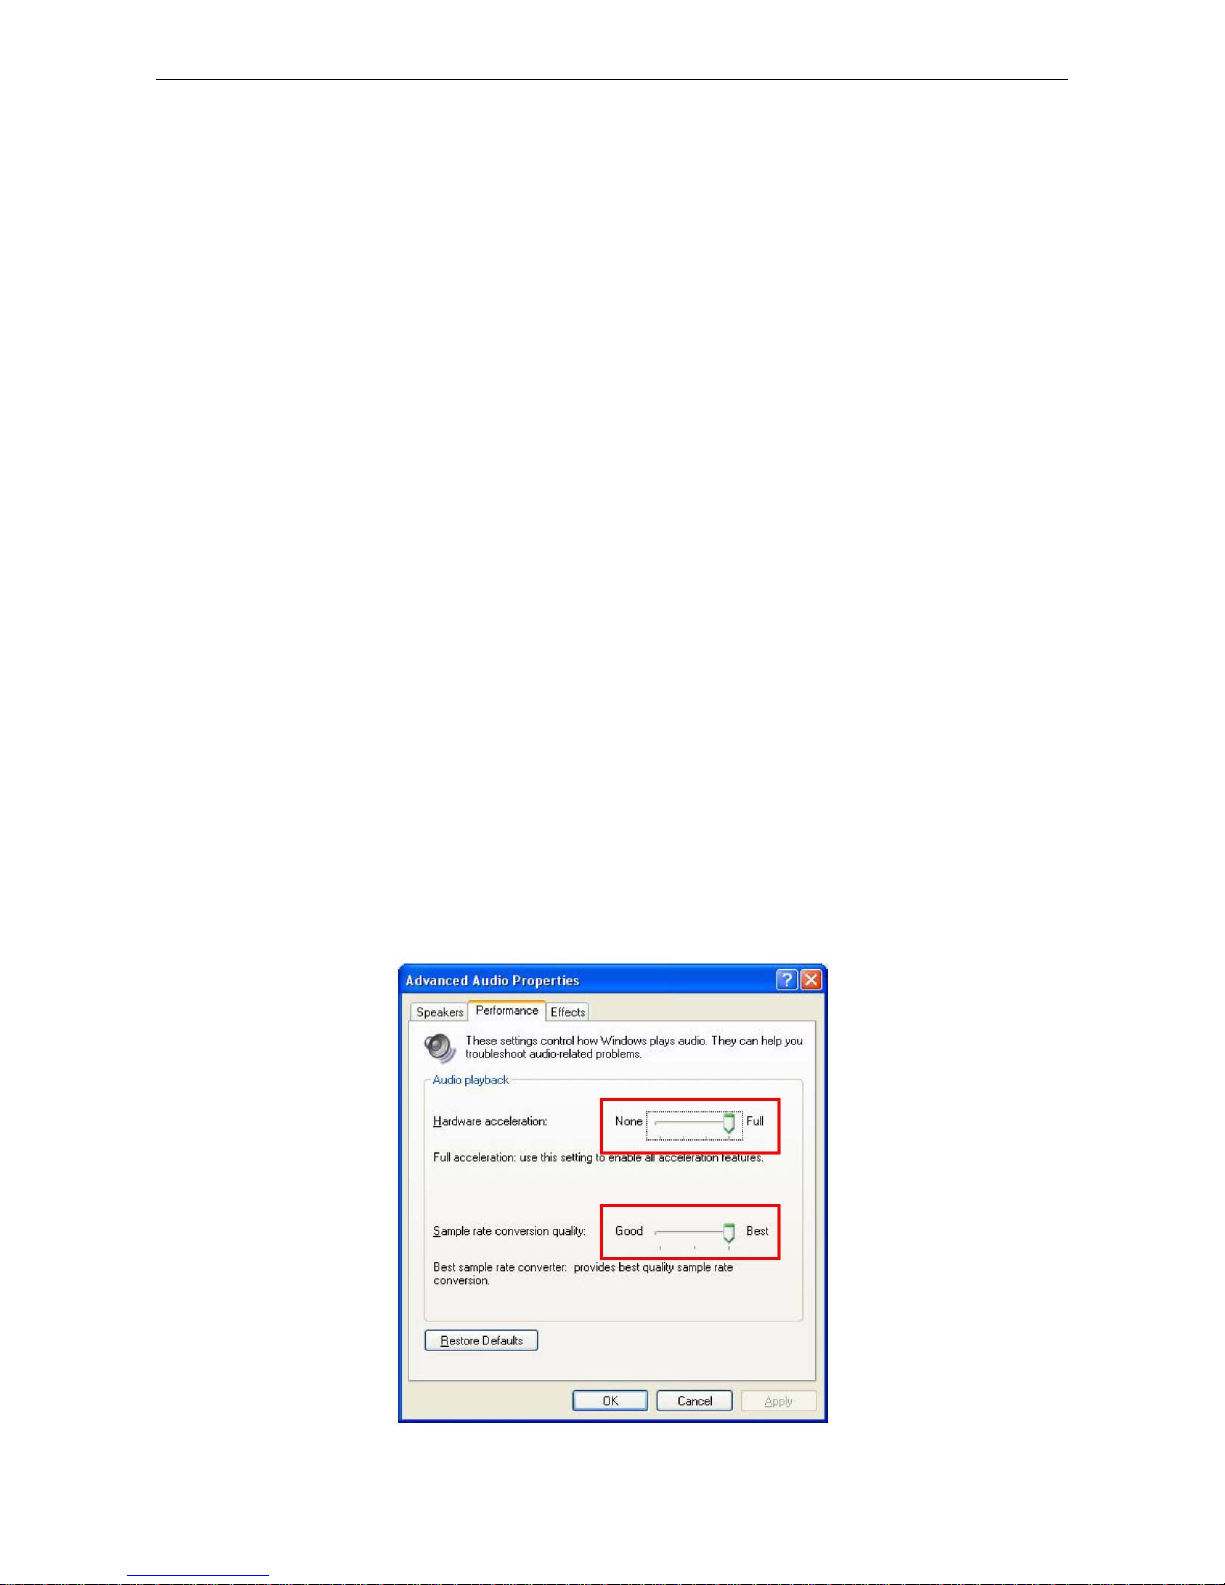
6. To enhance your audio performance, set your audio properties to the full hardware
acceleration and the best sample rate conversion quality.
4
Page 8
Error! Use the Home tab to apply 標題 1 to the text that you want to appear here.
Note:
Some USB Host Controller may have problem with data stream package loss, this will
influence output audio data and make some discontinuous sound. But this is very rare.
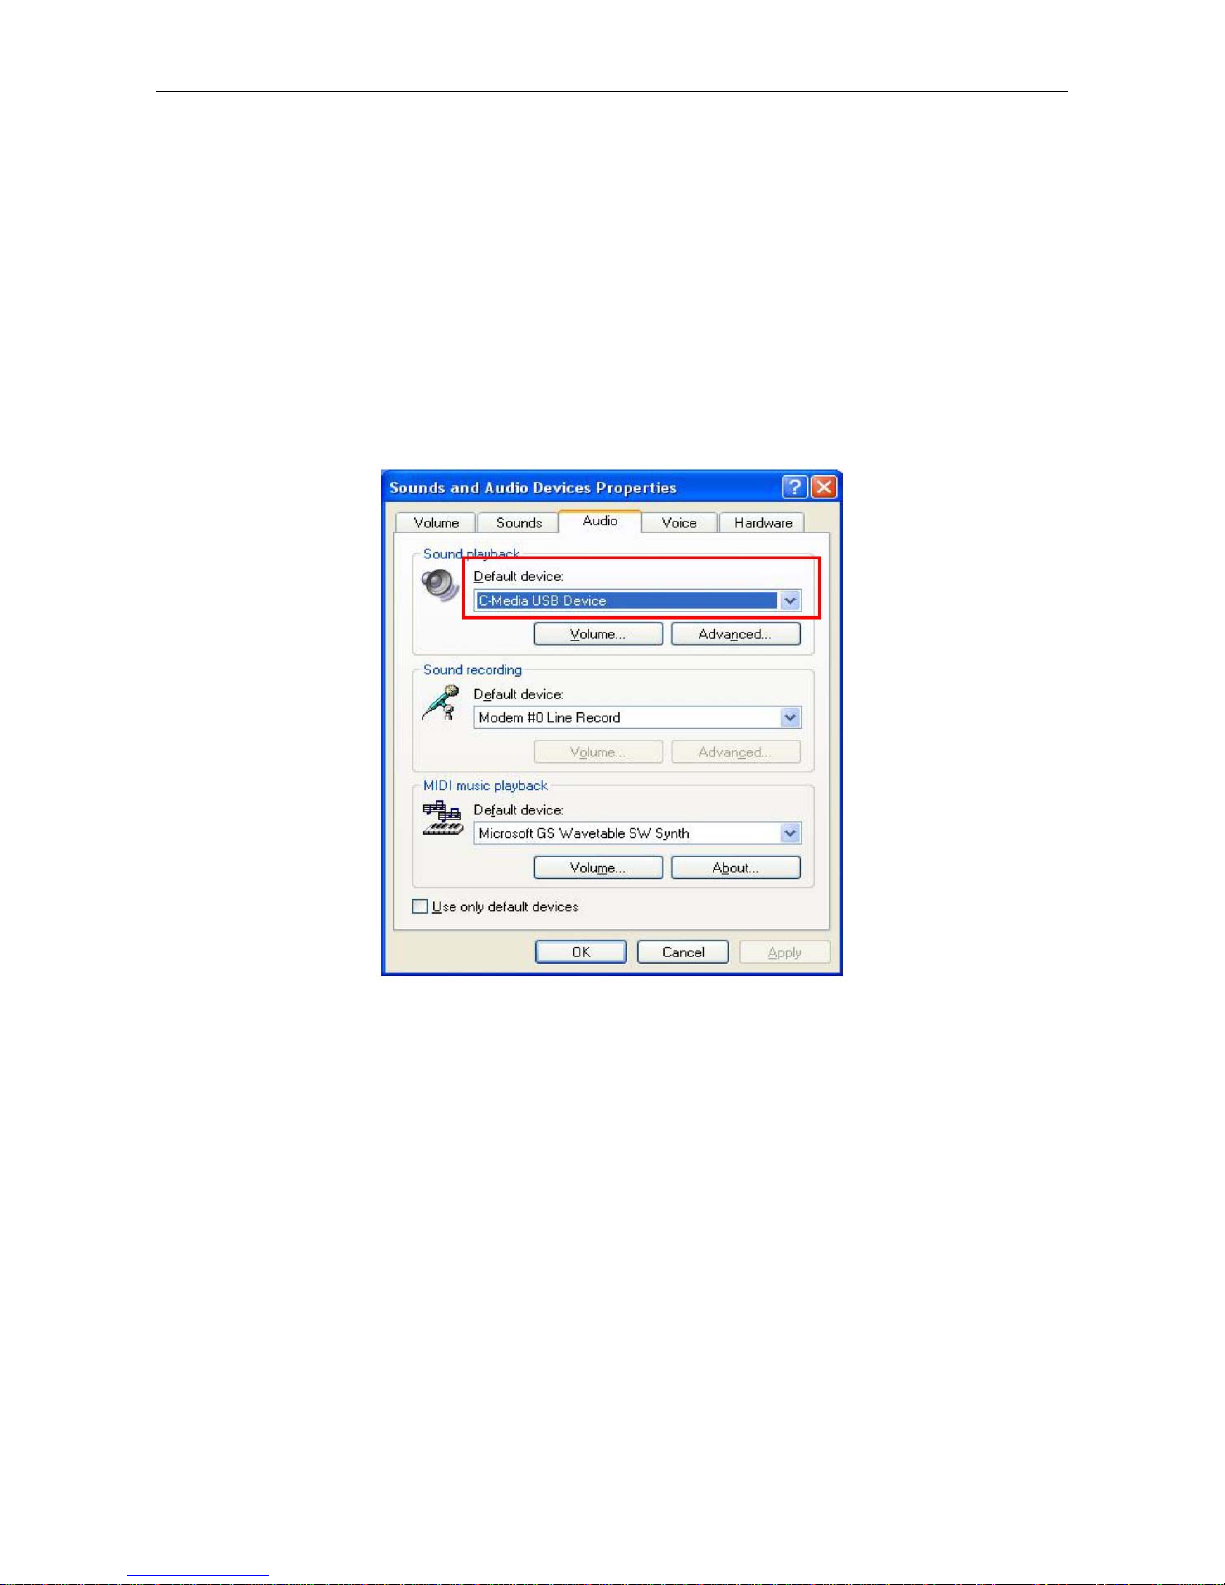
Sometime, when user plug USB Personal Multi-media Device on PC system and OS
cannot auto change audio device to USB audio; please switch the audio device to USB
audio sound and audio devices properties in control panel.
5
Page 9
External USB 7.1 Channel Sound Box User’s Manual
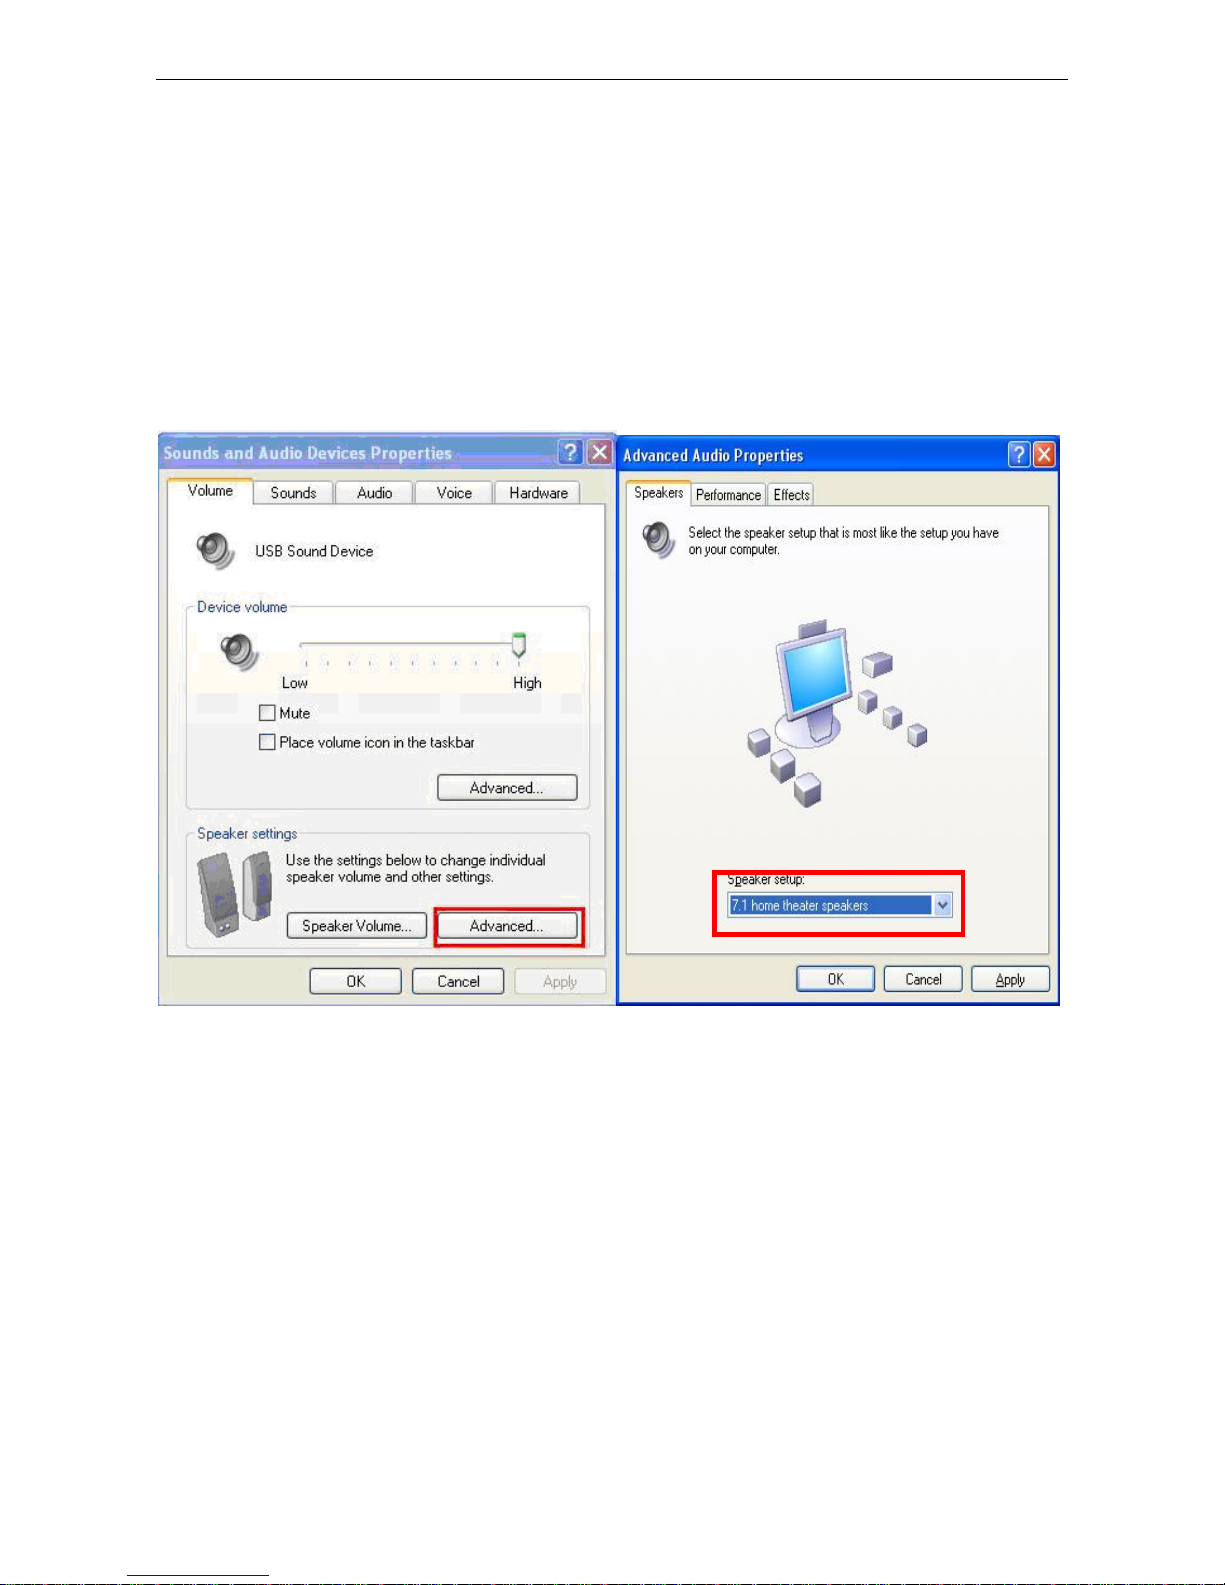
How to Setting 7.1 Surround Sound Speakers
On Windows 2000 and XP
Please follow the steps and finished the 7.1 surround sound speakers setting.
My computer > Control Panel > Sounds and Audio Devices > Volume > Speaker Settings >
Advanced > Speaker set up > 7.1 surround sound speakers.
*Actual strings depend on your operation system. These screen shots are from Windows XP
and might vary slightly for each operation system.
6
Page 10
Error! Use the Home tab to apply 標題 1 to the text that you want to appear here.
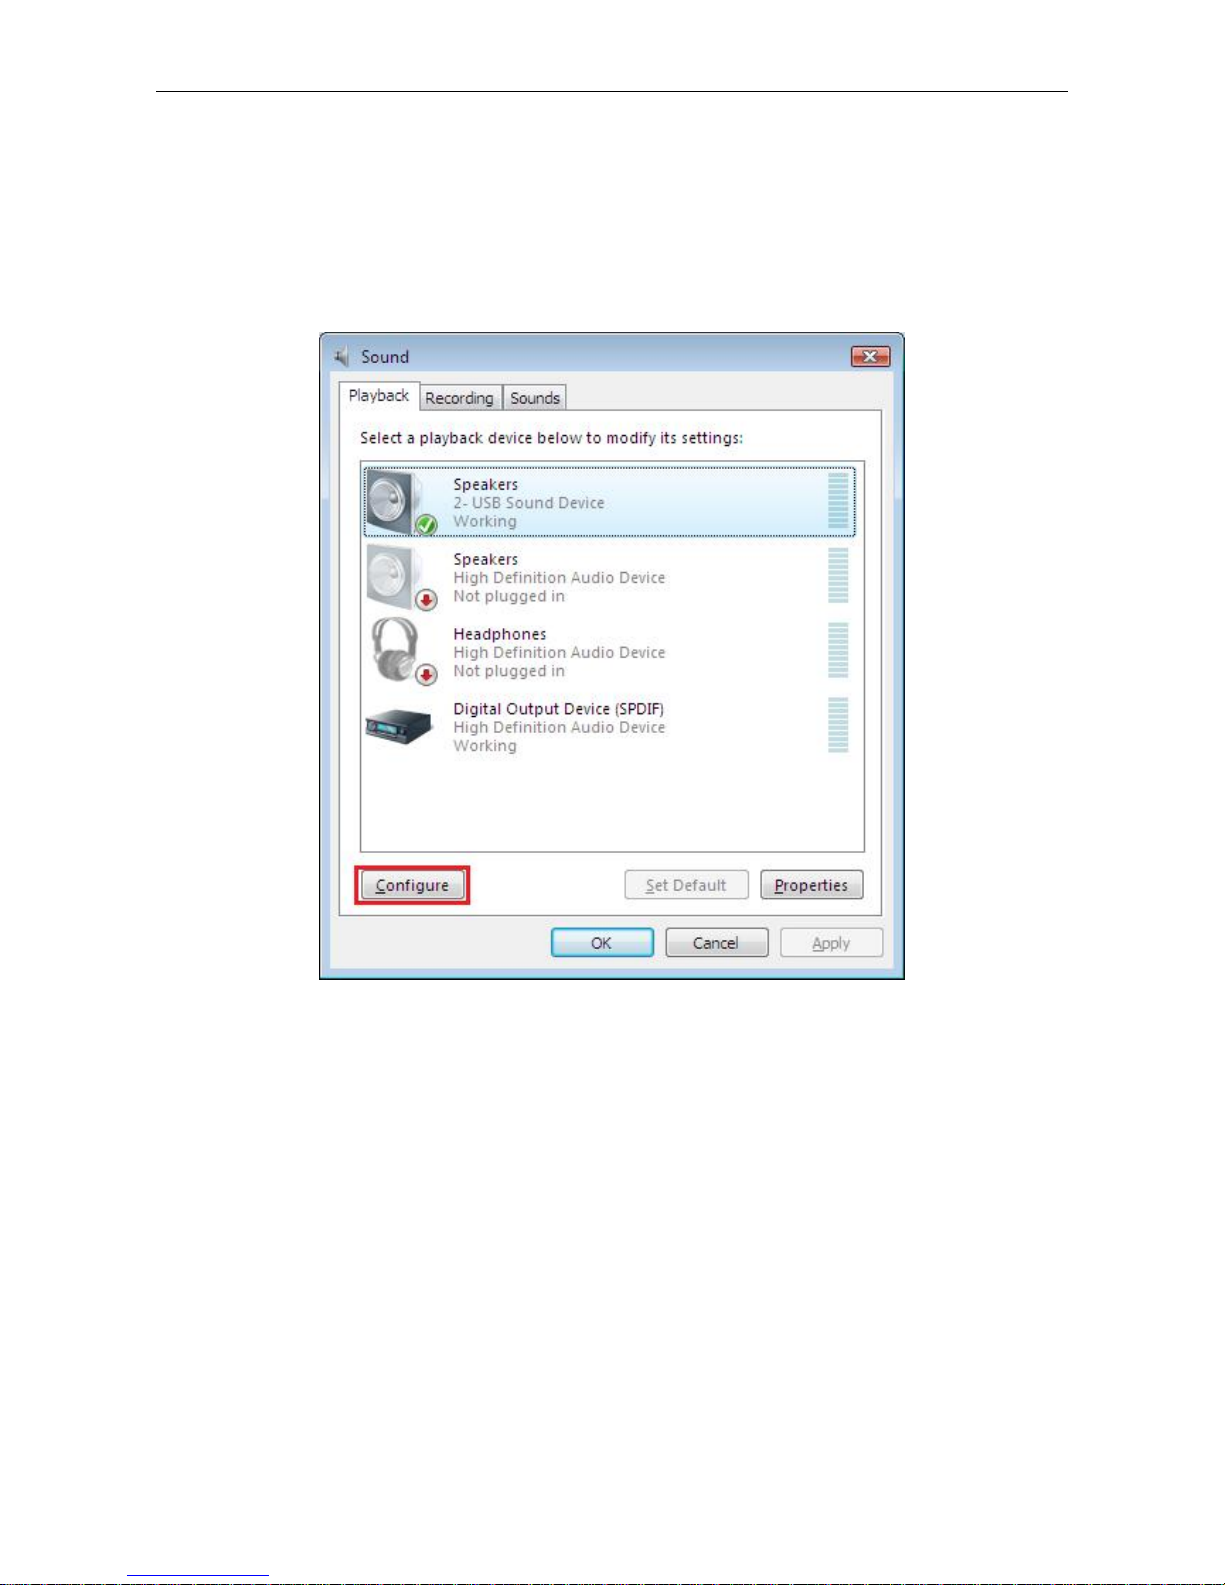
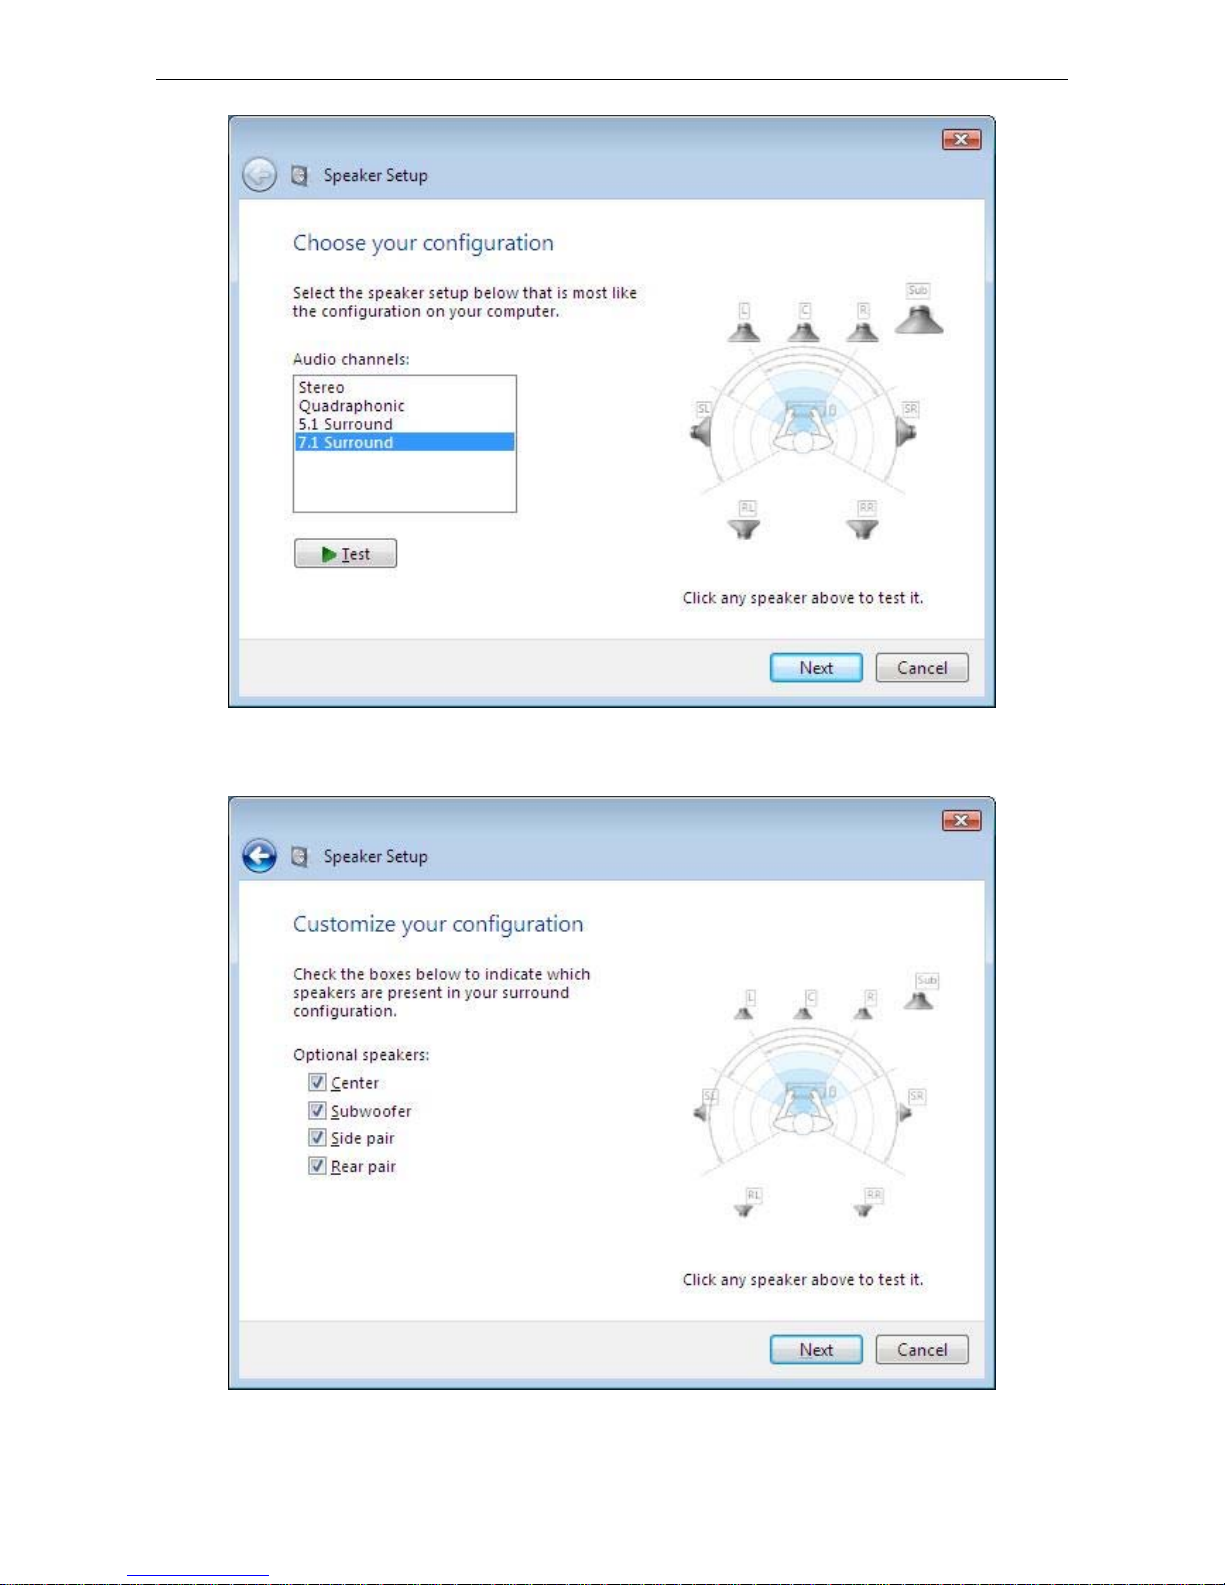
On Windows Vista
Please kindly follow the steps and finished the 7.1 surround sound speakers setting.
Settings > Control Panel > Hardware and Sound > Playback > Configure > Speaker setup
> 7.1 surround sound speakers.
7
Page 11
External USB 7.1 Channel Sound Box User’s Manual
8
Page 12
Error! Use the Home tab to apply 標題 1 to the text that you want to appear here.
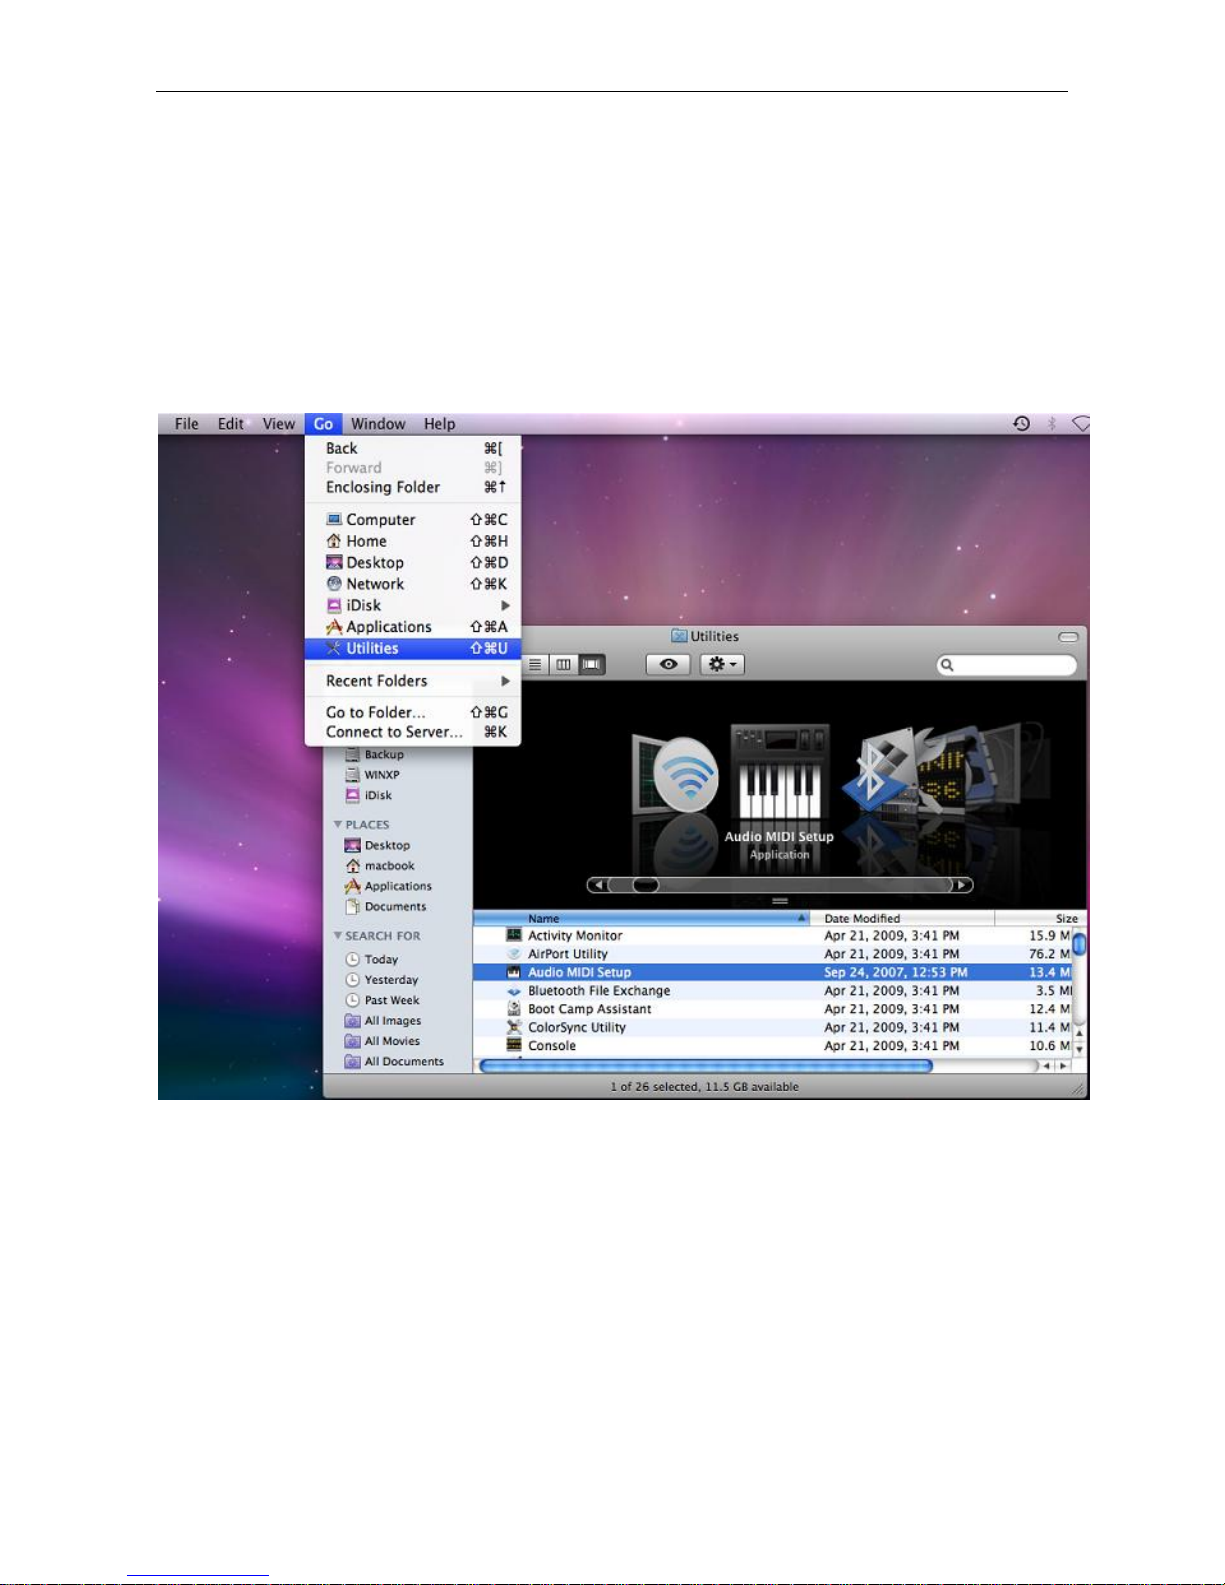
On Mac OS X v10.x or higher
Please kindly follow the steps and finished the 7.1 surround sound speakers setting.
1. Select Go first and then chose Utilities after, keep select Audio MIDI Setup as below
screen.
9
Page 13
External USB 7.1 Channel Sound Box User’s Manual
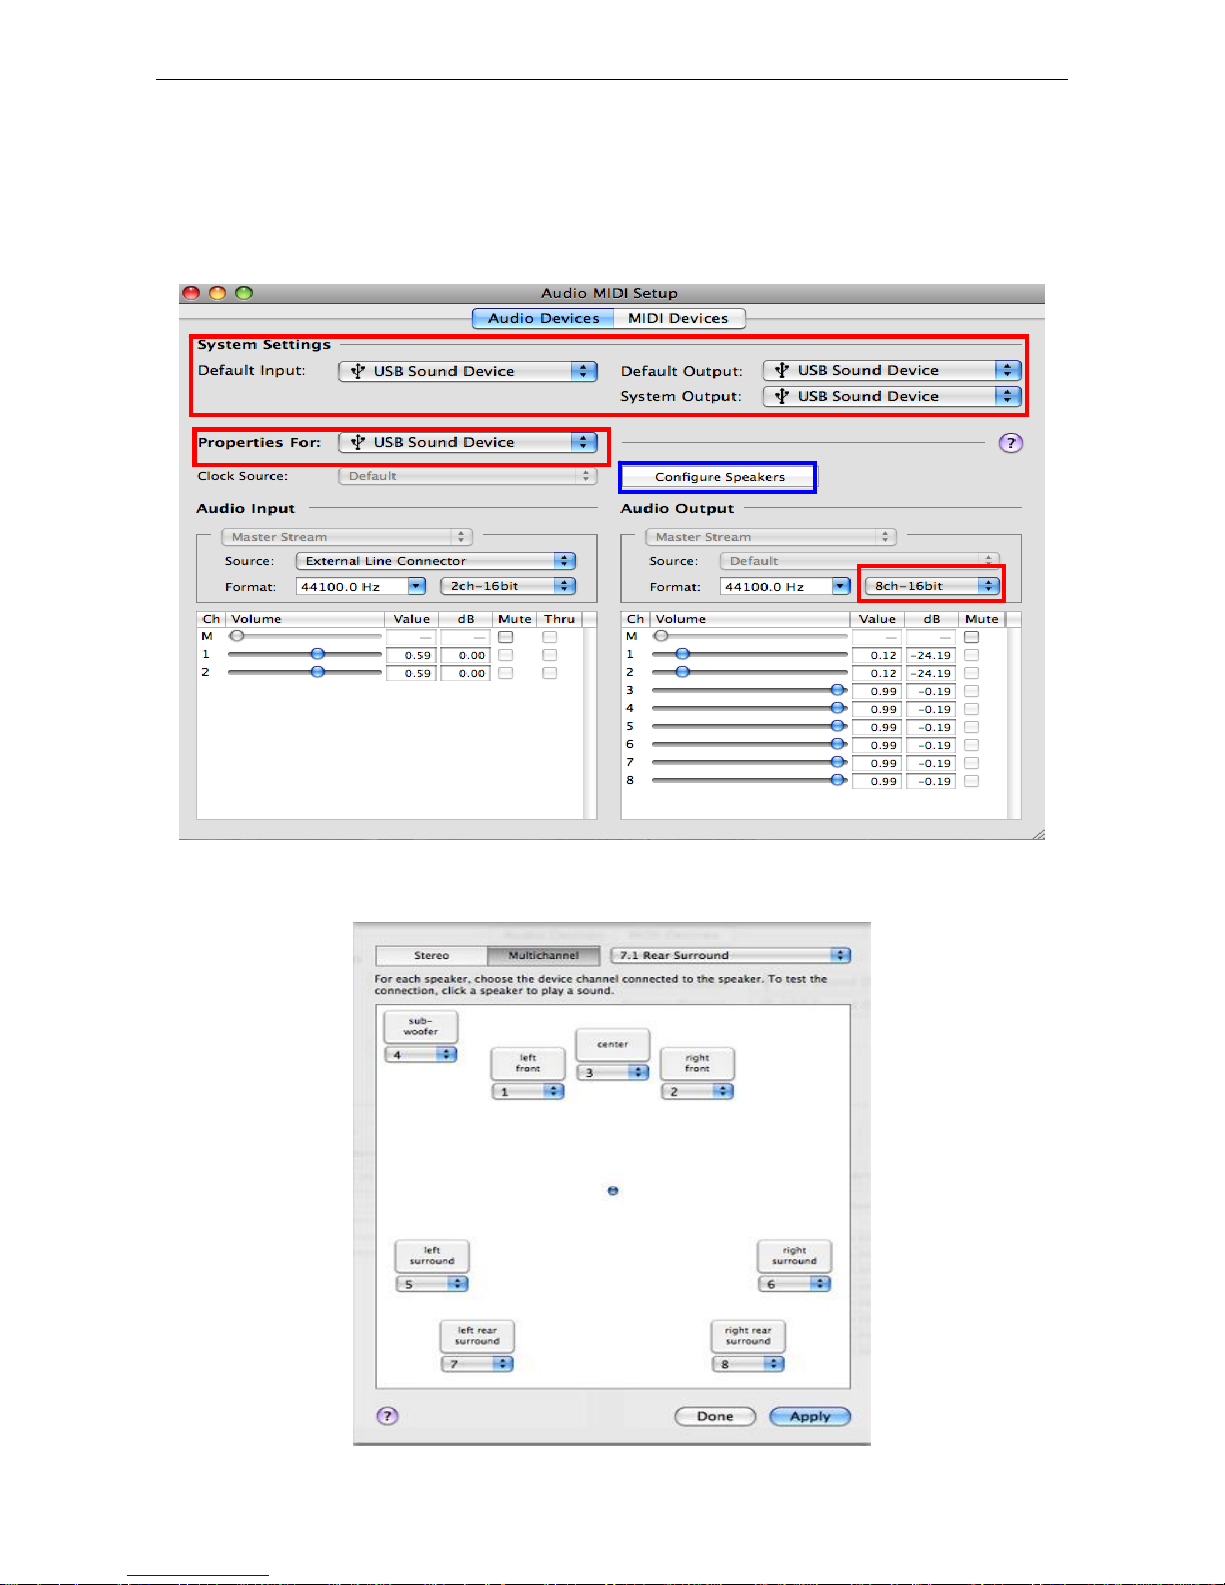
2. Under Audio MIDI Setup, open the Audio Devices, and make sure you have chose
USB Sound Device under System Settings and Properties For. Also please check
Audio Output has setting the Format: at 8ch-16bit.
After settings as above, please select Configure Speakers and going to next step.
3. Select Multichannel then chose 7.1 Rear Surround, and now the setting has finished.
10
Page 14

Error! Use the Home tab to apply 標題 1 to the text that you want to appear here.
4. Recording Function in SPDIF IN.
After settings as above, please select External SPDIF Interface under source.
5. Please open Audio Recorder, and double click Audio Recorder.
(The Audio Recorder may vary by different System)。
11
Page 15

External USB 7.1 Channel Sound Box User’s Manual
6. Please click the red circle next to Output File to choose which file you want to save to.
7. Please name the file.
12
Page 16

Error! Use the Home tab to apply 標題 1 to the text that you want to appear here.
8. Please click save and the following screen will show up.
9. Please choose USB Sound Device under Recording Audio Device.
13
Page 17

External USB 7.1 Channel Sound Box User’s Manual
10. Please click Record to start recording.
14
Page 18

Error! Use the Home tab to apply 標題 1 to the text that you want to appear here.
3. Application Sof tware Installation
For Windows XP and Vista only
Notice:This application soft ware allows you have extra functions as Karaoke, microphone
echo, magic voice, key shifting and vocal canceling…etc. Only support on Windows XP and
Vista only.
Connect the ad apter first and then follow the procedures below to install the driver.
1. Connect the USB 7.1 Channel Adapter to your USB port of computer first, and insert
provided CD into CD-Rom. You may find the screen pop up as below. You may find the
USB Audio Device screen pop in the notification area as below.
2. Please follow the steps and process the installation.
15
Page 19

External USB 7.1 Channel Sound Box User’s Manual
3. When the USB Multi-Channel Audio Device screen appears, Click on Next, and you
may find the Setup Status process automatically as below screen.
16
Page 20

Error! Use the Home tab to apply 標題 1 to the text that you want to appear here.
4. After USB Multi-Channel Audio Device Driver installation complete, please select Yes,
and reboot the computer to effect the driver install.
5. After reboot and system running up again, a pop-up message will appear in the
notification area indicating the installation is complete. You may click it to open and for
functions control.
*Actual strings depend on your operation system. These screen shots are from Windows XP
and might vary slightly for each operation system.
17
Page 21

External USB 7.1 Channel Sound Box User’s Manual
Using Interface and Function Control
This section will show you the using Interface and function control.
Please Right click the USB Multi-Channel Audio Device icon to use the function as
Volum e Control, Windows M edia Player, Sound Recorder and Multimedia Properties.
To open the Using interface, please Left click the USB Multi-Channel Audio Device icon
and select Open, or double click the USB Multi-Channel Audio Device icon to entry the
Using Interface.
18
Page 22

Error! Use the Home tab to apply 標題 1 to the text that you want to appear here.
Main Setting
Using Analog Output
1. Analog Output:Turn on this button then can select analog output channels mode.
2. Analog Output channels Mode:Earphone, 2CH, 4CH, 6Ch and 8CH for selected.
3. Digital Output:Turn on this button then can select SPDIF Out data format.
4. Digital Output Mode:Dolby RTCE, PCM for selected.
5. Audio Jack Connected Display
6. DSP Mode:Pull down to select different DSP Mode. (Default support Xear 3D)
7. Virtual SPEAKER SHIFTER:Can open SPEAKER SHIFTER windows for control.
(For detail information see the next page)
8. Digital Volume Control:Can open each channel to adjust digit al volume. (For detail
information see the next page)
9. Channel Display & Speaker Test:Can show analog output channel status and
19
Page 23

External USB 7.1 Channel Sound Box User’s Manual
directly click speaker graphic can do sound testing.
10. Auto Sound Test:Can auto testing every channel sound effect.
11. Stop Auto Sound Test:Can stop auto testing.
Victual Speakers Shifter
1. T otal Volume Up Control
2. Total Volume Down Control
3. Clockwise
4. Counter Clockwise
5. Manual Rotation
6. Manual Shifter
7. Reset
8. Shifter Drag
20
Page 24

Error! Use the Home tab to apply 標題 1 to the text that you want to appear here.
Digital Volume Control
1. Reset Volume
2. Left Channel Control
3. Center Channel Control
4. Right Channel Control
5. Subwoofer Channel Control
6. Rear Right Channel Control
7. Right Back Channel Control
8. Left Back Channel Control
21
Page 25

External USB 7.1 Channel Sound Box User’s Manual
9. Rear Left Channel Control
1. Balance Control
2. Volume Up/Down Control
3. Master Volume On/Off
4. Wave Volume Balance
5. Wave Volume Control
6. Wave Volume On/Off
7. SW Synth Volume Balance
8. SW Synth Volume Control
9. SW Synth Volume On/Off
10. CD Volume Balance
11. CD Volume Control
12. CD Volume On/Off
13. Microphone Balance
14. Microphone Control
15. Microphone On/Off
16. Microphone Advanced Setting
22
Page 26

Error! Use the Home tab to apply 標題 1 to the text that you want to appear here.
Recording Volume Control
1. Stereo Mixed Balance Control
2. Stereo Mixer
3. Stereo Mixer
4. Microphone Record Balance
5. Microphone Record Volume Control
6. Microphone Record On/Off
7. Microphone Record Advanced Setting
23
Page 27

External USB 7.1 Channel Sound Box User’s Manual
Effects
Environment
1. Bathroom
2. Opera
3. Underwater
4. Music Pub
5. More option:27 mode for selected
Environment Size
24
Page 28

Error! Use the Home tab to apply 標題 1 to the text that you want to appear here.
6. Large
7. Middle
8. Small
9. Ten Band Equalizer Adjust
10. Pre-Set Mode (Default)
11. Pre-Set Mode (Dance) 20. Pre-Set Mode (Classic)
12. Pre-Set Mode (Bass) 21. Pre-Set Mode (Vocal)
13. Pre-Set Mode (Treble) 22. Equalizer User Define On/Off
14. Pre-Set Mode (Live) 23. Pull to select user define mode
15. Pre-Set Mode (Rock) 24. User Define naming key in
16. Pre-Set Mode (Soft-Rock)
17. Pre-Set Mode (Jazz)
Equalizer
18. Pre-Set Mode (Metal)
19. Pre-Set Mode (RAP)
25. Add new user define mode
26. Del user define mode
25
Page 29

External USB 7.1 Channel Sound Box User’s Manual
26
Page 30

Karaoke
Error! Use the Home tab to apply 標題 1 to the text that you want to appear here.
1. Karaoke On/Off:Click this button then can control all k araoke functions.
2. Karaoke Setting Reset:Can reset all setting to default value
3. Start Microphone Echo Function:Select this button will pop up a dialog box to
enable microphone function.
Click “OK” button to select recording source and enable microphone
27
Page 31

External USB 7.1 Channel Sound Box User’s Manual
4. Echo Low/High Control Bar:Adjust echo low/high
5. Magic Voice Function (Optional):This function only supported in multi-channel
audio products.
When you enable microphone echo then can pull down the menu to select magic
voice. Magic voice provides 5 different effects f or choice.
6. Start Key Shifting Function:Select this button to enable key shifting function
and control.
7. Key Shifting Low/High Control Bar:This function can adjust tune of background
music to fit your singing.
8. St ar V ocal Cancellation Function : Select this button to enable vocal cancellation
function and control.
9. Vocal Canceling Control Bar : This function can control singer’s vocal of
28
Page 32

Error! Use the Home tab to apply 標題 1 to the text that you want to appear here.
background music and cancel it as possible.
29
Page 33

External USB 7.1 Channel Sound Box User’s Manual
3. Troubleshooting
1. No Sound
You can often resolve a few basic problems by checking:
The power of the speaker
The sound volume
The cable connections
The audio CD compatibility
2. No Sound Is Recorded
You can often resolve a few basic problems by checking:
If the MIC is probably connected
If the file is saved and opened properly
3. Why play CD without sound ?
30
Page 34

Error! Use the Home tab to apply 標題 1 to the text that you want to appear here.
Most general case was digital CD playback function did not open. Because USB
audio is digital signal, it is use different path to process CD music with traditional
analog CD.
You should open “Device Manager”, select “DVD/CD ROM drives” and open it.
Then switch to “properties” page and enable digital CD audio.
4. When using software application program (Like: Media player, Winamp,
PowerDVD, WinDVD….) to playback any media files, can I plug out USB audio
device while playing?
It is incorrect mode of operations, because while application programs were
playing audio stream, windows system is stilling using audio device to process
and deliver data real-time. So, when user plug out USB audio device windows
system can not delivering audio data to the same device, so that system will be
confused and make application programs failure or system crash.
The right way to plug out USB Audio device was stop playback function first.
Especially when your Windows system was Win98SE or WinME, this corrected
operation will keep stability of working system. Otherwise, uncorrected plug out
will cause application program or system crash.
Note:
Do not plug out while application programs were playing media files. Please
stop playback before plug out USB audio device.
31
Page 35

External USB 7.1 Channel Sound Box User’s Manual
5. If the real 7.1 source is not available under Vista™
If the real 7.1 source is not available under Vista, you have to click the bu tton of
surrounding effect to activate audio output via SS-out, BS-out and C/B out. Otherwise,
audio output will transmit through headphone and Front out only.
First of all, please click “DSP Mode” to change the screen of DSP Effect to Shifter.
Secondly, please click clockwise or counter clockwise surrounding effect to activate
audio output via SS-out, BS-out and C/B out.
Clockwise, counter
clockwise surround
32
Page 36

Error! Use the Home tab to apply 標題 1 to the text that you want to appear here.
4. Limitations
1. If the audio source is not 7.1 Channel, the output cannot achieve the optimized
audio effect.
2. Windows® 2000:
Does not support Line-In, SPDIF-In, and SPDIF-out.
Mac OS:
Does not support SPDIF Out
Support recording but monitoring under Line In.
3. Windows® XP and Vista™:
If the driver of External USB 7.1 Channel Sound Card is properly installed; External
USB 7.1 Channel Sound Card will switch to headphone mode after plugging in a
headphone jack. There will no output for surround output, back surround output, and
center/Subwoofer output but front out will keep functioning.
4. The button of Playback mute can work at Headphone-out, F-out, SS-out, BS-out, and
33
Page 37

External USB 7.1 Channel Sound Box User’s Manual
C/B out but SPDIF out.
5. Specifications
Item Description
Interface
Connector
LEDs
USB 1.1/ 2.0 1 x USB Type B Port
Headphone 1x3.5mm Stereo audio Jack Female in Green
Front Audio 1x3.5mm Stereo audio Jack Female in Green
Audio-Out
Audio-In
Green Lights up when powered on; flash when operation.
Blue
Surround 1x3.5mm Stereo audio Jack Female in Gray
Back surround 1x3.5mm Stereo audio Jack Female in Black
Center/Subwoofer 1x3.5mm Stereo audio Jack Female in Yellow
S/PDIF-In 1x S/PDIF Audio Jack Female in Black
Line-In Port 1x3.5mm Stereo audio Jack Female in Blue
Mic-In Port 1x3.5mm Stereo audi o Jack Female in P ink
S/PDIF-In 1x S/PDIF Audio Jack Female in Black
Lights up for recording muted, lights off for recording function can be
used.
HID Buttons Volume Up Press the Volume up bottom for volume up
34
Page 38

Error! Use the Home tab to apply 標題 1 to the text that you want to appear here.
Volume Down Press the Volume down bottom for volume down
Play Mute Press the Play Mute bottom for playback mute
Record Mute Press the Record Mute bottom for recording precess mute.
Power mode Self-Power only
Sampling rate Supports Fixed 48/44.1 KHz sampling rate in analog recording and playback
USB 1.1 and 2.0 full speed specification to 1.5/12 Mbps
USB audio device class specification 1.0
Compliant
USB HID class specification V1.1
IEC 60958 spec. compliant
(consumer format S/PDIF input and output with loop-back support)
SCMS (Serial Copy Management System)
* Specifications are subject to change without notice.
35
Page 39

External USB 7.1 Channel Sound Box User’s Manual
6. Regulatory Compliance
FCC Conditions
This equipment has been tested and found to comply with Part 15 of the FCC
Rules. Operation is subject to the following two conditions:
(1) This device may not cause harmful interference
(2) This device must accept any interference received. Including interference that
may cause undesired operation.
Important! Changes or modifications not expressly approved by the manufacturer
responsible for compliance could void the user’s authority to operate the equipment.
Use an approv ed phone set.
CE
This equipment is in compliance with the requirements of the following regulations:
EN 55 022: CLASS B
WEEE Information
For EU (European Union) member users:
According to the WEEE (Waste electrical and electronic equipment) Directive, do not
dispose of this product as household waste or commercial waste.
electronic equipment should be appropriately collected and recycled as required by
practices established for your country.
please contact your local
where you purchased the product.
Waste electrical and
For information on recycling of this product,
authorities, your household waste disposal service or the shop
36
Page 40

Error! Use the Home tab to apply 標題 1 to the text that you want to appear here.
Technical Support
Diamond Technical Support staff is here to help resolve any iss ues that you may be
experiencing.
Prior to contacting technical support please make sure you have the following information
available.
1. Model #: (Printed on the bar code, located on the box)
2. Installation CD Version: (printed on the CD label)
3. The version of Windows that your system is running.
4. The manufacturer and model # of your computer.
5. CPU type and speed (example: Intel Pentium4 2.4GHZ)
6. A complete description of the problem that you are
experiencing including any steps that you have taken to try to resolve the issue.
Technical Support Options
Free Telephone Support
818-357-5165
(long distance rates may apply)
Mon - Fri, 8 - 4:30 PST
http://www.diamondmm.com
37
Page 41

External USB 7.1 Channel Sound Box User’s Manual
SHIPPING
Starting June 1st 2009 Diamon d Mu lt ime di a w il l pay fo r s hi pp ing cost fro m Di am ond b a ck to US and Cana d ia n c ustom ers
provided the product is indeed under warranty and there is no damage caused by improper ins tallation or modi_cation of
the merchandise. Customers located outside of the United States and Canada or using military addresses (APO,etc) will be
required to pay for return shipping. Average shipping times ran ge from 5 to 10 days, depending on actu al shipment
destination. Shipments mad e outside the US may take longer to deli ver. Diamond Multim edia reserves the right to claim for
shipping fees along with service charges for any product that is returned incomplete or not under warranty. Return
Authorization ( RMA ) is required for all warranty return products.
ONE YEAR LIMITED WARRANTY
The warranty described below is extended o nly to the orig in al buy er an d is not tra n sfe ra b le.
Diamond warrants to the original purchaser of the hardware product, that the product is free f rom defects in materials or
workmanship under normal use and service for a period of on e (1) year from the date of purchase . All cables and
accessories provided with a Diamond product are warranted to be free from defects in materials or workmanship under
normal use and service for a period of for (90) ninety days from date of purchase. Diamond’s sole obligation under this
warranty shall be, at Diamond’s option, to: (I) repair the defective product or parts; (II ) deliver to customer an equivalent
product or part to replace the defective product. When a product or part is replaced or exchanged, that item becomes the
customer’s property and the replaced or exchanged item bec omes Diamond’s property. When a refund or replacement
product is given, the defective p rodu ct b e come s Diam on d’s p rope rty . Repla cem e nt pa rts or prod u cts may be new or
include serviceable used parts with at least the same functional equivalence to the original product. If, at the time of repair,
a product is "out of warranty" or within the last ninety (90) days of the warranty period, Diamond warrants any repair for
ninety (90) days. All software provided is subject to the terms of the assoc iated software end-user license agreement.
WARRANTY EXCLUSIONS AND LIMITATIONS
TO BE ELIGIBLE FOR THIS WARRANTY, YOU NEED TO PROVIDE THE ORIGINAL SALES RECEIPT SHOWING THE
DATE OF PURCHASE OF THE PRODUCT. DIAMOND MAY REQUEST THE ORIGINAL SALES RECEIPT OR A COPY
AS PROOF OF THE DATE OF PURCHASE.
Diamond does not warrant third party products which Diamond distributes "AS IS" unless otherwise speci_ed. Third party
products may be warranted by the third party.
Diamond makes no warranty or repre sentation that: (I) the operatio n of the product will be uninterrupted or error free; (II)
defects in the product will be corrected; or (III) that the product will meet Customer’s requirements or work in combination
with any hardware or software provided by third parties. TO THE FULLEST EXTENT ALLOWED BY LAW, THE
WARRANTIES, REMEDIES AND LIMITATIONS CONTAINED HEREIN ARE EXCLUSIVE AND ARE IN LIEU OF ALL
OTHER WARRANTIES, TERMS OR CONDITIONS, EXPRESS OR IMPLIED, EITHER IN FACT OR BY OPERATION OF
LAW, STATUTORY OR OTHERWISE, INCLUDING WITHOUT LIMITATION, WARRANTIES, TERMS OR CONDITIONS
OF MERCHANTABILITY, FITNESS FOR A PARTICULAR PURPOSE, QUALITY, CORRESPONDENCE WITH
DESCRIPTION AND N ON-INFRINGEM ENT, ALL OF WHIC H ARE EXPRESSLY DISCLAIMED. DI AMOND WILL NOT BE
LIABLE UNDER THIS WARRANTY IF ITS TESTING AND EXAMINATION DISCLOSE THAT THE ALLEGED DEFECT
OR MALFUNCTION IN THE PRODUCT OR SOFTWARE DOES NOT EXIST OR WAS CAUSED BY CUSTOMER’S OR
38
Page 42

Error! Use the Home tab to apply 標題 1 to the text that you want to appear here.
ANY THIRD PARTY’S MISUSE, NEGLECT, IMPROPER INSTALLATION OR TESTING, UNAUTHORIZED ATTEMPTS
TO OPEN, REPAIR OR MODIFY THE PRODUCT OR SOFTWARE, OR ANY OTHER CAUSE BEYOND THE RANGE OF
THE INTENDED USE, OR BY ACCIDENT, FIRE, LIGHTNING, OTHER HAZARDS, OR ACTS OF GOD. THIS
WARRANTY WILL NOT APPLY TO PRODUCTS USED FOR NUCLEAR RELATED, WEAPONS RELATED, MEDICAL
OR LIFE SAVING PURPOSES . TO THE FULLEST EXTENT ALLOW ED BY LAW, DIAMOND ALSO EXCLUDES FOR
ITSELF AND ITS SUPPLIERS ANY LIABILITY, WHETHER BASED IN CONTRACT OR TORT (INCLUDING
NEGLIGENCE), FOR INCIDENTAL, CONSEQUENTIAL, INDIRECT, SPECIAL OR PUNITIVE DAMAGES OF ANY KIND,
OR FOR LOSS OF REVENUE OR PROFITS, LOSS OF BUSINESS, LOSS OF INFORMATION OR DATA, OR OTHER
FINANCIAL LOSS ARISING OUT OF OR IN CONNECTION WITH THE SALE, INSTALLATION, MAINTENANCE, USE,
PERFORMANCE, FAILURE, OR INTERRUPTION OF ITS PRODUCTS, EVEN IF DIAMOND, ITS SUPPLIERS OR ITS
RESELLER HAS BEEN ADVISED OF THE POSSIBLITY OF SUCH DAMAGES. DIAMOND’S SOLE LIABILITY WITH
RESPECT TO ITS PRODUCT IS LIMITED TO REPAIR OR REPLACEMENT OF THE PRODUCT, AT DIAMOND ’S
OPTION. THIS DISCLAIMER OF LIABILITY FOR DAMAGES WILL NOT BE AFFECTED IF ANY REMEDY PROVIDED
HEREIN SHALL FAIL FOR ESSENTIAL PURPOSE.
DISCLAIMER: Some jurisdictions may not allow the exclusion or limitation of incidental or consequential damages for
products supplied to consumers, or the limitation of liability for personal injury, so the foregoing limitations and exclusions
may not apply or may be limited in the ir applica tion to you. When im plied warra nties are not all owed to be excl uded in their
entirety, they will be limited to the duration of the applicable written warranty. This warranty gives you speci_c legal rights
that may vary depending on the law of the applicable jurisdiction.
OBTAINING WARRANTY SERVICE: Please review the "help" resources ref erred to in your products accompanying
documentation before seeking warranty service. If the product is still not functioning properly after making use of these
resources, please access the support page at http://www.diamondmm.com/support.php for warranty instructions and
services. Some additional charges may apply for phone support
39
 Loading...