

Page 1
®
“No Electricity? No Problem!”
Elite 19 cu ft Gas Refrigerator
Owner’s Manual
Page 2
07/12 Version 3.1
Page 2
Thank-you for purchasing a Diamond refrigerator. We designed this refrigerator especially with
you, our customer, in mind. We want to assure you that this refrigerator should give you years of troublefree service. If for some reason this refrigerator is defective, we will stand behind you with a 5 year limited warranty. Thoroughly read the owners manual, and follow all instructions therein. If you have questions regarding the use and operation of your refrigerator, please contact your local dealer.
To install this product you must have:
Level
13/16” fixed wrench or adjustable wrench
5/8” fixed wrench
After installing, make sure:
Door handles are secure and tight (some models only)
Door seals are sealing properly
Refrigerator is level on sides and top
Front grille is securely attached (some models only)
Refrigerator is solid on all corners
Mail pre-addressed Warranty Card to validate your warranty
Proper Disposal of your old Refrigerator or Freezer
Risk of child entrapment
Child entrapment and suffocation are not
problems of the past. Junked or abandoned refrigerators or freezers are still dangerous- even if
they will sit for “just a few days”. If you are getting rid of your old refrigerator or freezer, please
follow the instructions below to help prevent accidents.
Proper Disposal of Refrigera-
tors/Freezers
We strongly encourage responsible appli-
ance recycling/disposal methods. Check with
your utility company or visit
www.recyclemyoldfridge.com for more infor-
mation on recycling your old refrigerator.
Before you throw away your old Refriger-
ator/ Freezer:
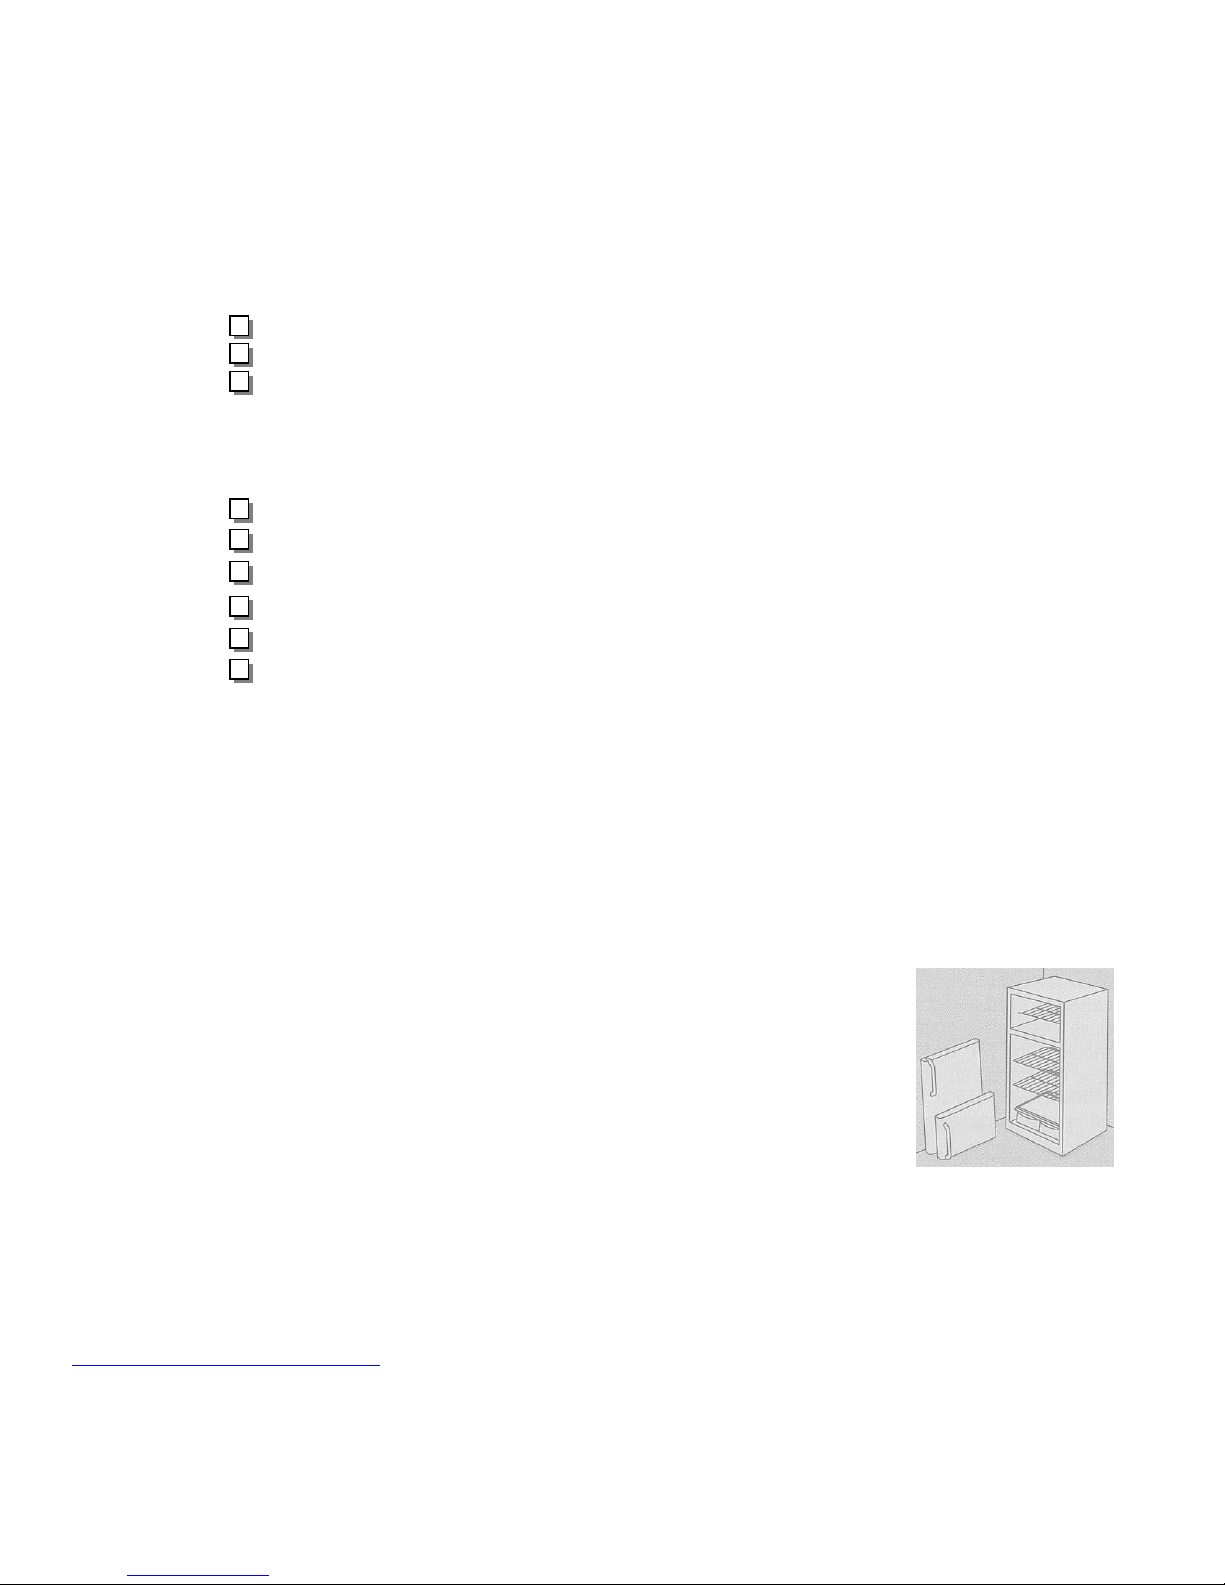
Remove Doors
Leave Shelves in place
so children may not
easily climb inside.
Have refrigerant removed by a qualified
technician.
Page 3

07/12 Version 3.1
Page 3
Table of Contents
Page
Cooling Unit Diagram………………………………………………………………… 14
General Operation…………………………………………………………………….. 6
Adjusting Temperatures………………………………………………………………………. 6
Operating Tips……………………………………………………………………………………... 7
Freezing Tips……………………………………………………………………………………….. 7
Lighting……………………………………………………………………………………. 6
Hand Lighting……………………………………………………………………………………… 6
Maintenance…………………………………………………………............................ 7
Cleaning the Refrigerator……………………………………………………………………… 7
Defrosting the Refrigerator………………………………………………………………….. 7
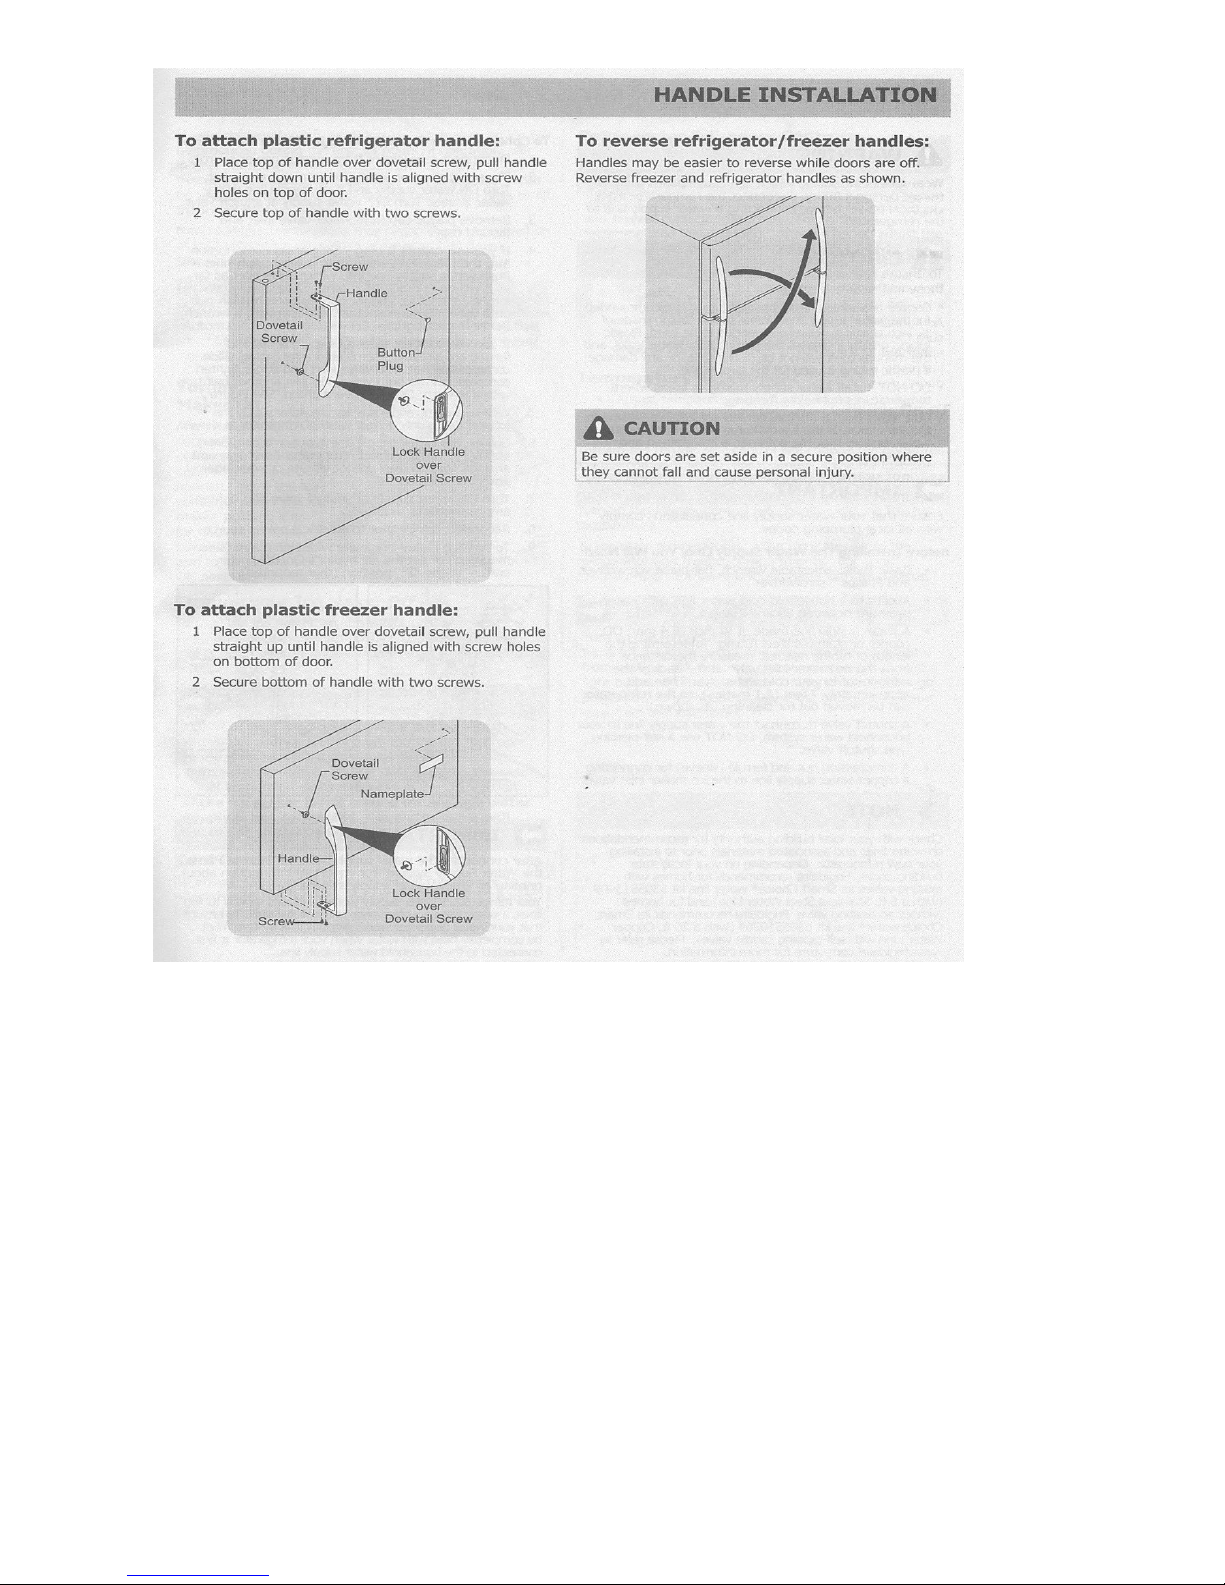
Reversing the Door Swing……………………………………………………………………. 10-11
Repairs…………………………………………………………………………………….. 8
Cleaning the Burner……………………………………………………………………………… 8
Cleaning the Flue and Baffle…………………………………………………………………. 9
Cleaning the Orifice………………………………………………………………………………. 9
Refrigerator Set-up…………………………………………………………………… 4
Gas connection…………………………………………………………………………………….. 4
Leak testing…………………………………………………………………………………………. 4
Gas Pressure………………………………………………………………………………………… 4
Interior Light……………………………………………………………………………………….. 4
Leveling………………………………………………………………………………………………. 5
Ventilation…………………………………………………………………………………………… 5
Transporting Refrigerator………………………………………………………… 9
Troubleshooting……………………………………………………………………….. 12-13
Unpackaging Your Refrigerator…………………………………………………. 4
Warranty………………………………………………………………………………….. 9
Page 4
Unpackaging your Refrigerator
A qualified person should perform
all gas connections and installations.
Propane is flammable. If you
smell gas, extinguish open flames;
do not operate electrical switches;
open windows and promptly call
your gas supplier.
!
Leak Present!
No Leak
Backer Wrench
07/12 Version 3.1
Page 4
To unpackage your refrigerator cut and re-
move all plastic strapping; remove cardboard
box and edge protectors, then remove plastic bag
covering refrigerator. Caution, keep plastic bag
away from children. Dispose of, or recycle
promptly. Proceed by removing packaging tape
from all Styrofoam and cardboard corners, and
remove refrigerator from it’s cardboard/
Styrofoam base. Leave tape from doors in place
until refrigerator is in it’s desired spot. Now
transport unpackaged refrigerator to site. Note: a
padded appliance hand truck is great to move
refrigerator through doors and up or down
stairways. A padded appliance hand truck can be
rented from most appliance retail shops.
Refrigerator Set-up
To set up refrigerator, please follow these
instructions to their entirety.
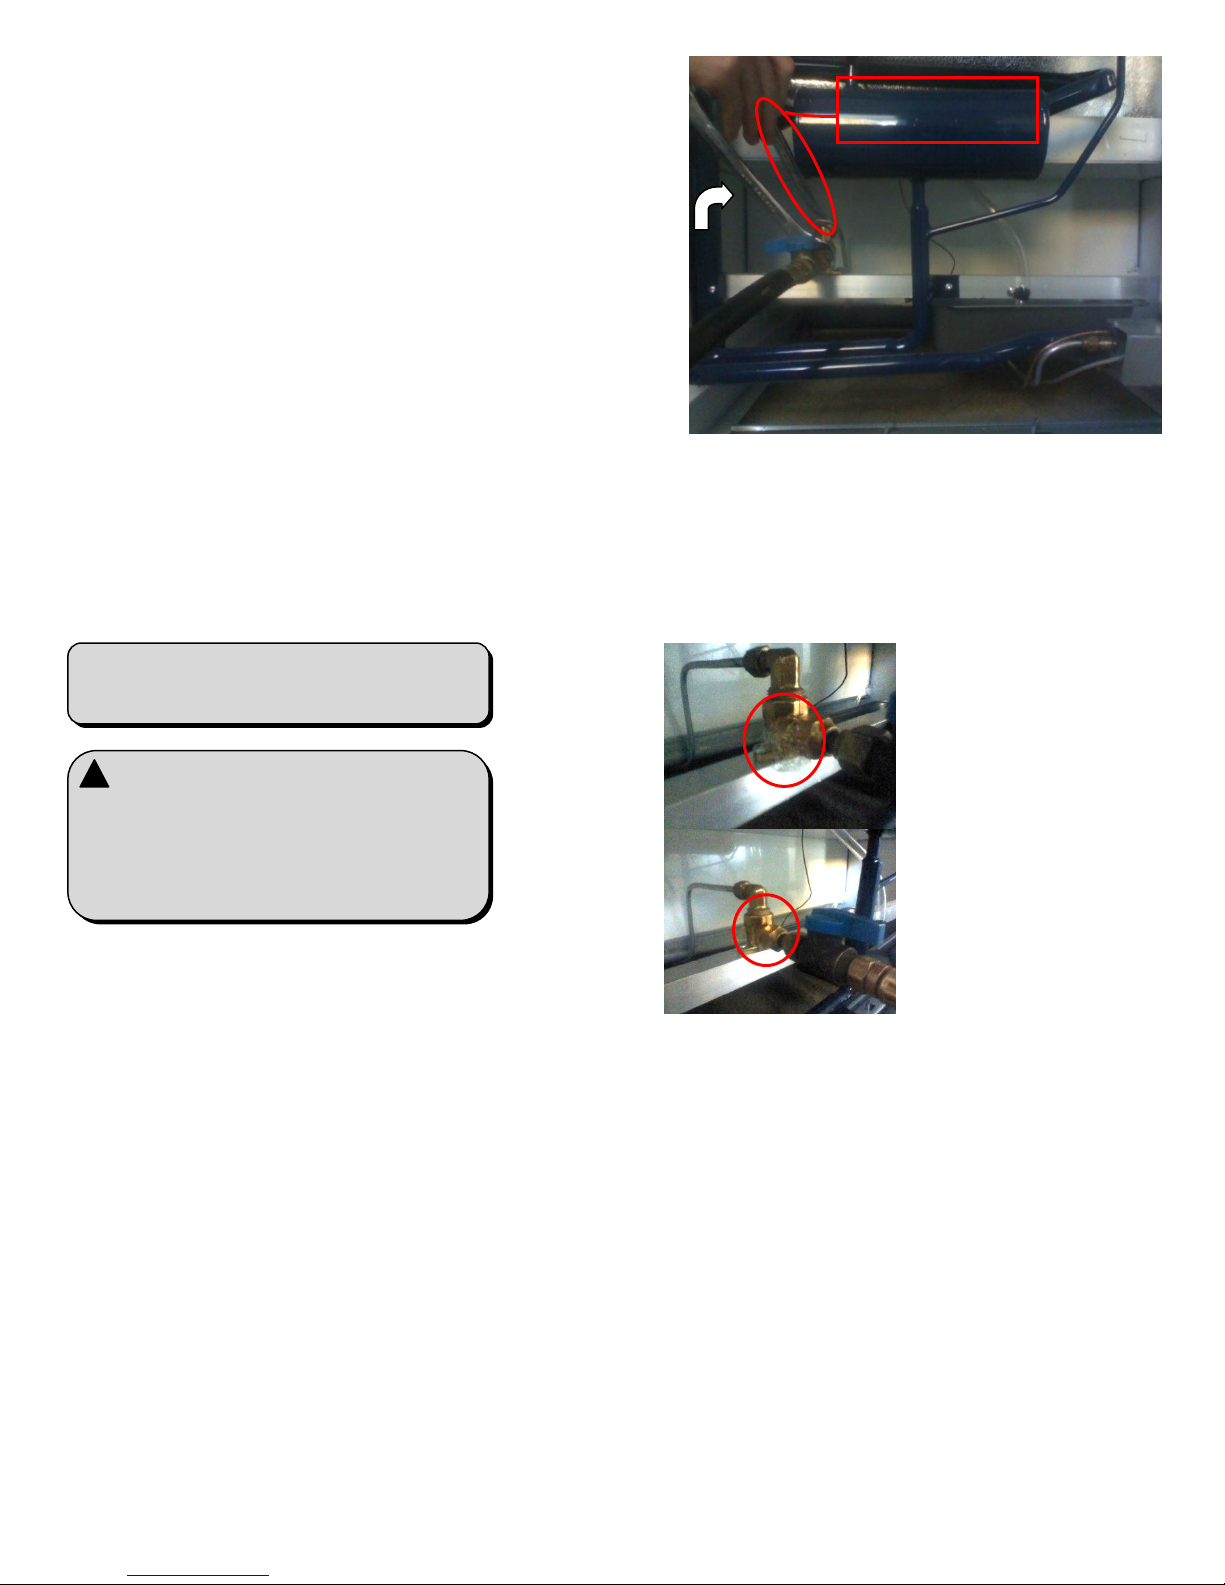
1. Gas Connection.
All Diamond refrigerators are equipped
with a ⅜” male flare hook-up. This connection is located on the back of the refrigerator
towards the bottom, left side. This fitting
does not require the use of any paste, tape,
or liquid sealers. Use a flex line to connect
the refrigerator from the gas source that is
long enough to move the refrigerator away
from the wall to access the rear for service.
Be careful not to over tighten the connection. The fitting needs only to be snug with a
wrench. Remember to use a backer wrench
when tightening fitting. (See picture
above)It is recommended that you install an
ON/OFF gas valve before the flex line.
2. Leak Testing
Prior to lighting your refrigerator, you
must check for leaks. This is done by mix-
ing some dish soap
with water and applying the solution to all
gas fittings with a
toothbrush or paintbrush then turn on
your gas supply. If
leaks are present, air
bubbles will appear.
Should you find air
bubbles, shut off gas
supply and re-tighten
fitting. Be careful not
to overtighten the fitting. For more information, watch the Diamond Maintenance DVD
3. Gas Pressure
Diamond propane refrigerators are
designed to operate from an LP gas supply with a gas pressure of 11” water column. Have your gas supplier or another
qualified person check this for you.
4. Interior Light
Diamond refrigerators are equipped
with LED interior lights. Light may or may
not be used. If you wish to use the light, insert four AA batteries (included) into battery holder on back of refrigerator.
Page 5
6” x 24”
6” x 24”
Floor
Back wall
Ill.1
Ill.2
07/12 Version 3.1
Page 5
5. Leveling
Diamond refrigerators operate with
the use of gravity. The flow rate of the
liquidsis determined by the angle of the
tubing in the cooling unit. It is critical
that the refrigerator is level to get the
correct flow for the best efficiency. To
level unit, place a level on the top of the
refrigerator and level the refrigerator
from right to left and front to back. Turn
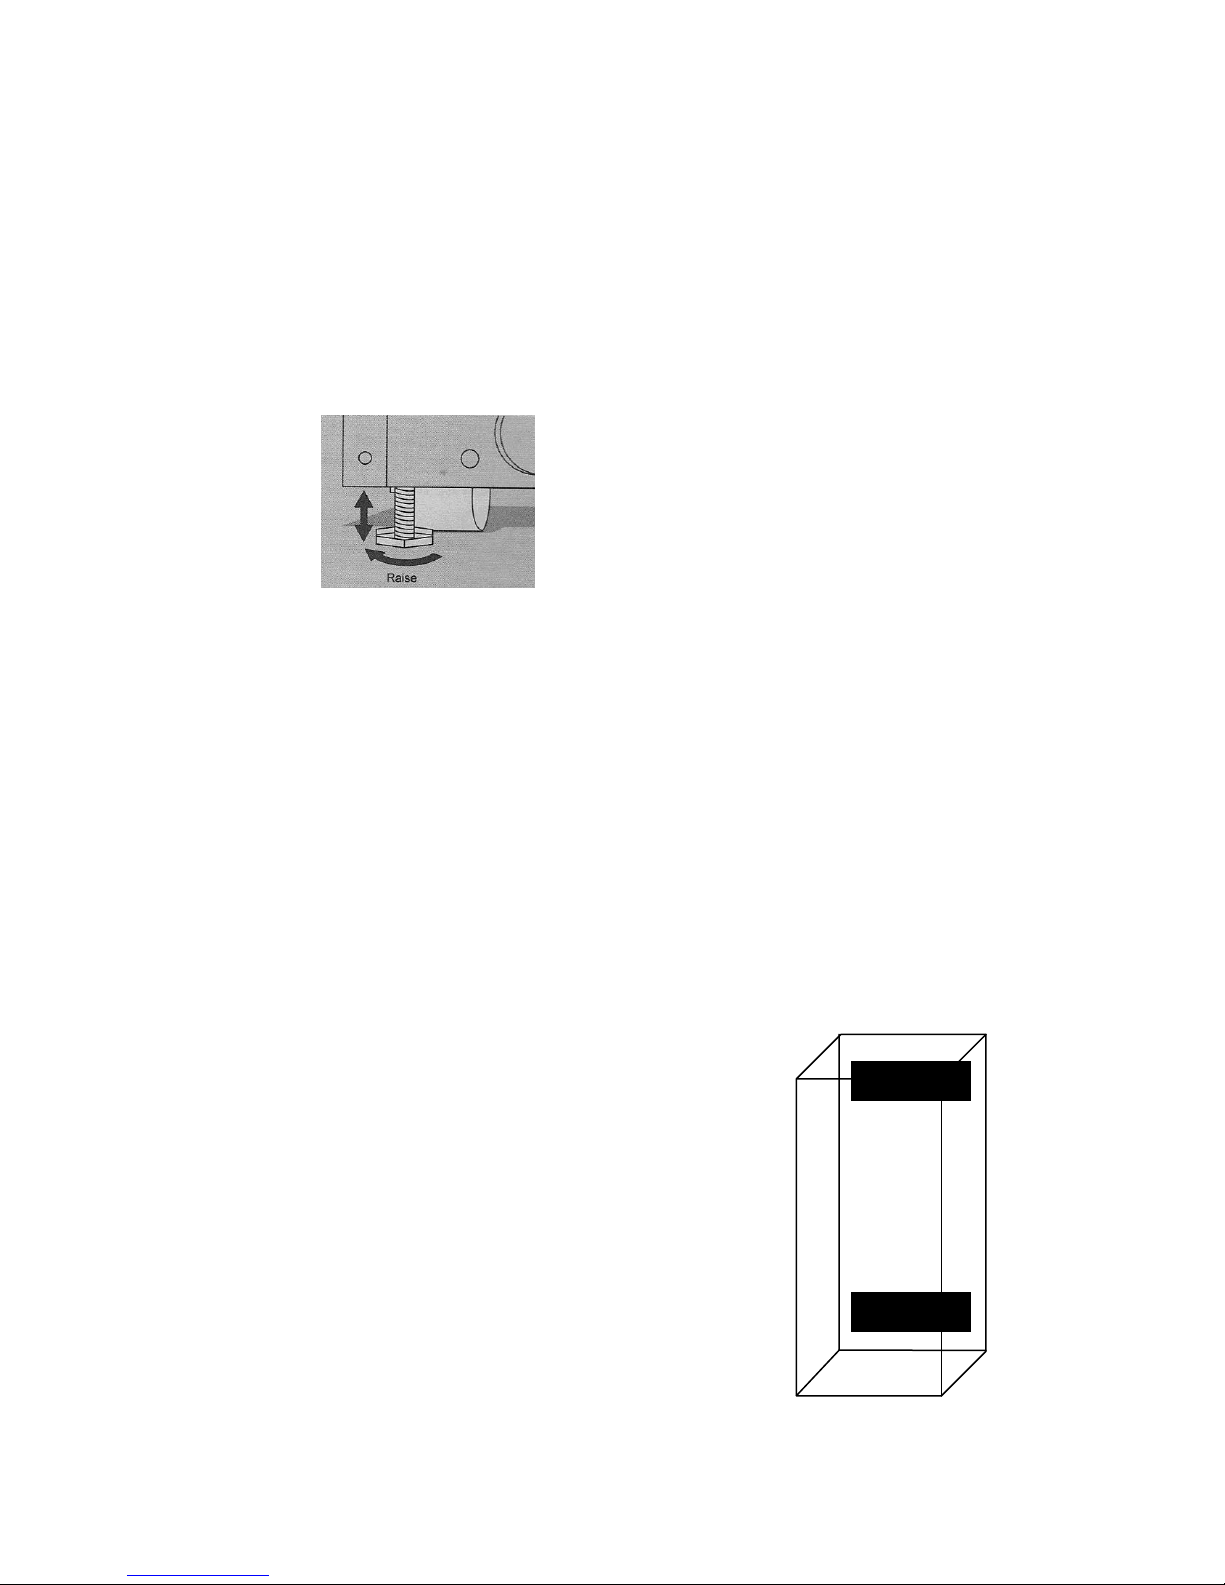
the leveling feet clockwise to raise refrigerator. (See ill. 1)If the floor under
the refrigerator is out of
level, it may
be needful to
put shims under the leveling feet.
6. Ventilation
Air ventilation (circulation) is very
important. Always provide ample air circulation behind and above the refrigerator. The purpose for proper air circulation is:
1.) To prevent any heat build-up result-
ing from the lack of ventilation.
2.) To provide ample airflow for proper
refrigerator performance.
3.) To prevent any direct draft to the
burner area, which may extinguish
the flame.
When venting directly outside or into
the attic, use a shield or baffle between
flue pipe and vent pipe to prevent a direct
draft from occurring. Allow no less than
6” from the top of the refrigerator to the
ceiling or other obstructions. To create air
circulation for better flow, see the following tips.
1.) A 6”x24” or equivalent hole cut in the
floor or back wall with a register in-
stalled. When putting the hole in the
back wall put the bottom of the hole
6” from the floor. Allowing air intake
from the basement or crawl space
will allow air to circulate up the back
of the cooling unit. It is advisable to
use a register that can be opened and
closed. When possible, cut another
6”x24” or equivalent hole towards
the top of the back wall to release the
heat from the refrigerator to an outside area.
2.) Allow 2 inches from the back of the
refrigerator to the wall additional air
circulation. It is recommended that
the refrigerator is installed free
standing.
3.) Venting the flue pipe directly outside
or into an attic or similar plumbing as
a water heater requires will rid the
area of most of the heat the refrigerator produces. Do not make a sealed
connection between the flue and vent
pipeconnection. Simply hover the
vent pipe over the flue pipe allowing
some air to draft in at this point to
create a good airflow.
4.) If the circulation is suspected to be
inadequate, roll refrigerator away
from the walls and other obstructions
and let it run in this position for a period of time and compare performance to the intended location. If the
refrigerator compartment lowers
drastically during this period while
under similar circumstances of use,
the air circulation in the intended location is inadequate. See ill.2
Page 6
No Flame indicator
Remove front grille
07/12 Version 3.1
Page 6
Lighting
After set-up of refrigerator is complete, you
are ready to light the burner. Lighting the refrigerator for the first time will take longer than
usual due to the air in the gas lines.
Before attempting to light the refrigerator, you
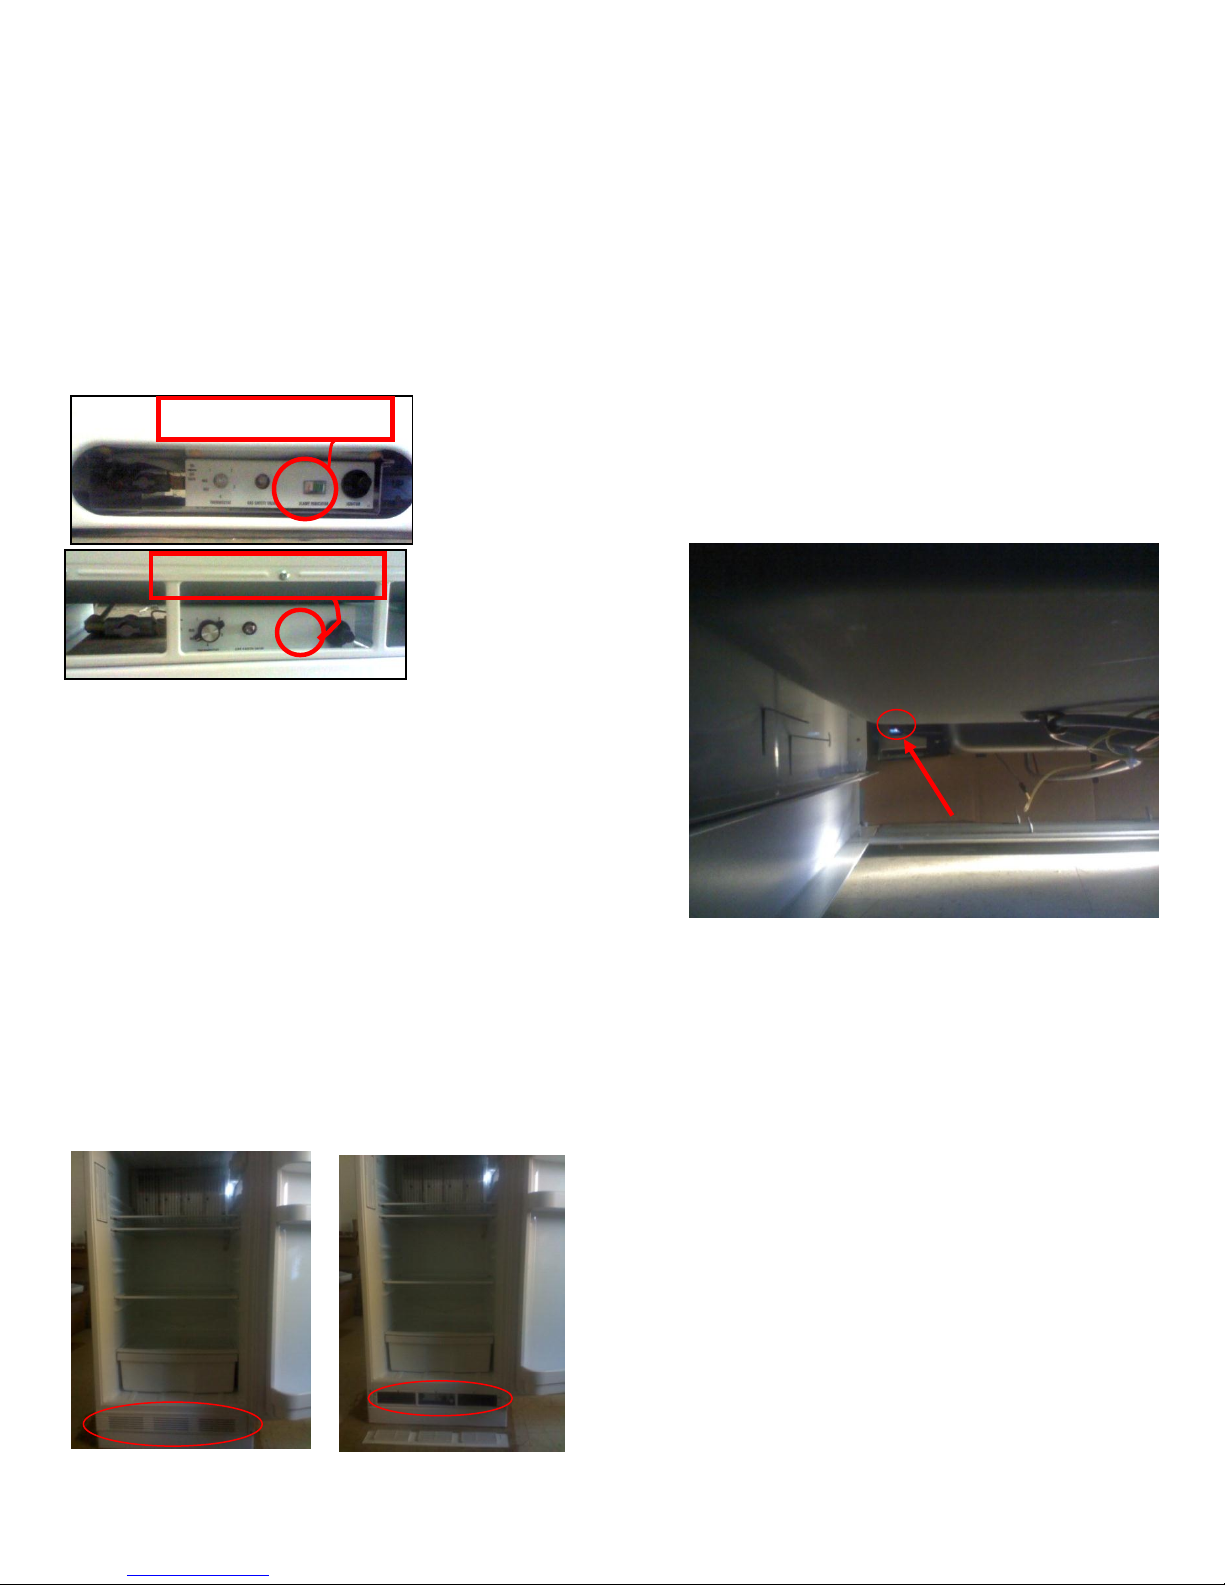
will need to determine with which control style
your refrigerator is equipped. The difference is if
your control has a flame indicator or not.
If you have a flame indicator follow instruction A. If not, follow lighting instructions B.
Lighting Instructions A.
1.) Remove front grill (See Picture below)
2.) Turn thermostat knob to position 3
3.) Turn ON/ OFF valve to “ON” position
(horizontal).
4.) Press in and hold the gas safety button
while pushing the ignitor button repeatedly to light the burner.Watch the red
needle on the flame indicator to see if the
flame is lit. When lit, the red needle will
movefrom white to green.
Lighting Instructions B.
1.) Remove Front grill
2.) Turn thermostat knob to position 3
3.) Turn ON/OFF valveto “ON” position
(horizontal)
4.) Press in and hold the gas safety button
while pressing the ignitor button repeatedly to light the burner. Watch through
the opening to the left of the thermostat
to locate the flame at the back, left side of
the appliance, approximately five inches
from the floor. (See picture below)
We recommend that upon initial lighting to
take a picture or a good look at the flame and
memorize the size and color for future reference.
It is recommended that you check the color and
size of the flame upon every start-up.
Hand Lighting
If for some reason the refrigerator will not
light with the peizo ignition or the ignitor fails to
spark, it is possible to hand light the burner. To
do this you will need two people and simply use
the above procedure and replace the ignitor button with a person at the burner with a lighter.
Page 7

07/12 Version 3.1
Page 7
General Operation
Adjusting Temperatures
Diamond refrigerators are equipped with a
thermostat that can be adjusted. To do this, turn
the thermostat knob to the desired setting. Always start the refrigerator at setting “3” and let
the unit cool down for at least 8-12 hours. Then
place food in the refrigerator in small amounts
spread out every couple of hours. If a large portion of room temperature food is placed into the
refrigerator at one time, this will overload the
cooling system and it may take three times longer to recover. Once you have placed the food into
the refrigerator, allow the unit to stabilize at
least overnight. Adjust the thermostat to a higher
number if a colder temperature is desired. Warning: the colder you turn your refrigerator, the
faster frost will build up on the fins.
Adjusting to the correct temperatures may
take a span of a few days. Once this is achieved,
then adjusting should only need to be done if the
ambient temperatures (between seasons)
change, or your lifestyle changes (more people
using the refrigerator).
Operating Tips
All propane refrigerators are manual de-
frost. If the frost build-up is solid between the
fins in the refrigerator, it is time to defrost. (See
defrosting page 8)
Follow the tips below to keep frost levels lower.
Check the door seals for leaks.
Place lids on food and liquid containers before
placing them in the refrigerator.
Adjust the thermostat knob to keep food at the
desired temperature. This will generallybe between settings 2 and 3. Turning the control high-
er, or to “MAX” will not necessarily make your
fridge colder, especially if thetemperature probe
is encased in ice on the fins.
Let food cool to room temperature or colder
prior to storage in refrigerator.
Wipe condensation off cold containers with a
dry towel prior to placing them into the refrigerator.
Limit how often the door is opened, especially
in hot humid weather.
Freezing Tips
For items with higher levels of sugar, such
as ice cream, put these items on the bottom plate
of the freezer. This is always the coldest spot in
the freezer. Chill warm items before placing
them into the freezer. When putting water in the
freezer for freezing, make sure your water is as
cold as possible and put these containers on the
freezer shelf with meat and vegetables. It is advisable to use metal ice trays, because metal
transfers cold better than plastic. When quickfreezing items such as water and juice, these
items should be placed as far back and towards
the bottom as possible.
Maintenance
Cleaning the Refrigerator
Proper cleanliness of your refrigerator is
important, especially the inside. A recommended
and convenient time is during regular maintenance or right after defrosting. Cleaning both the
inside and outside should be done with a soft
cloth and mild soap and warm water solution. Do
not use a harsh cleaner or a coarse cloth.
Cleaning the outside of your refrigerator requires a soft cloth and mild soap, warm water
solution. Check the door seals for debris, for this
can produce an unsealed surface and cold air can
escape. Keeping the seals clean is especially critical to assure longer life and proper sealing, especially in the lower parts of the door. When done
cleaning, you can wax the refrigerator to prevent
from minor scuffs and scratches and improve the
overall appearance of your refrigerator. A standard auto wax works great. Do not wax the handles, plastic, or the rubber gasket.
Page 8
Condenser Fins
Absorber Coils
07/12 Version 3.1
Page 8
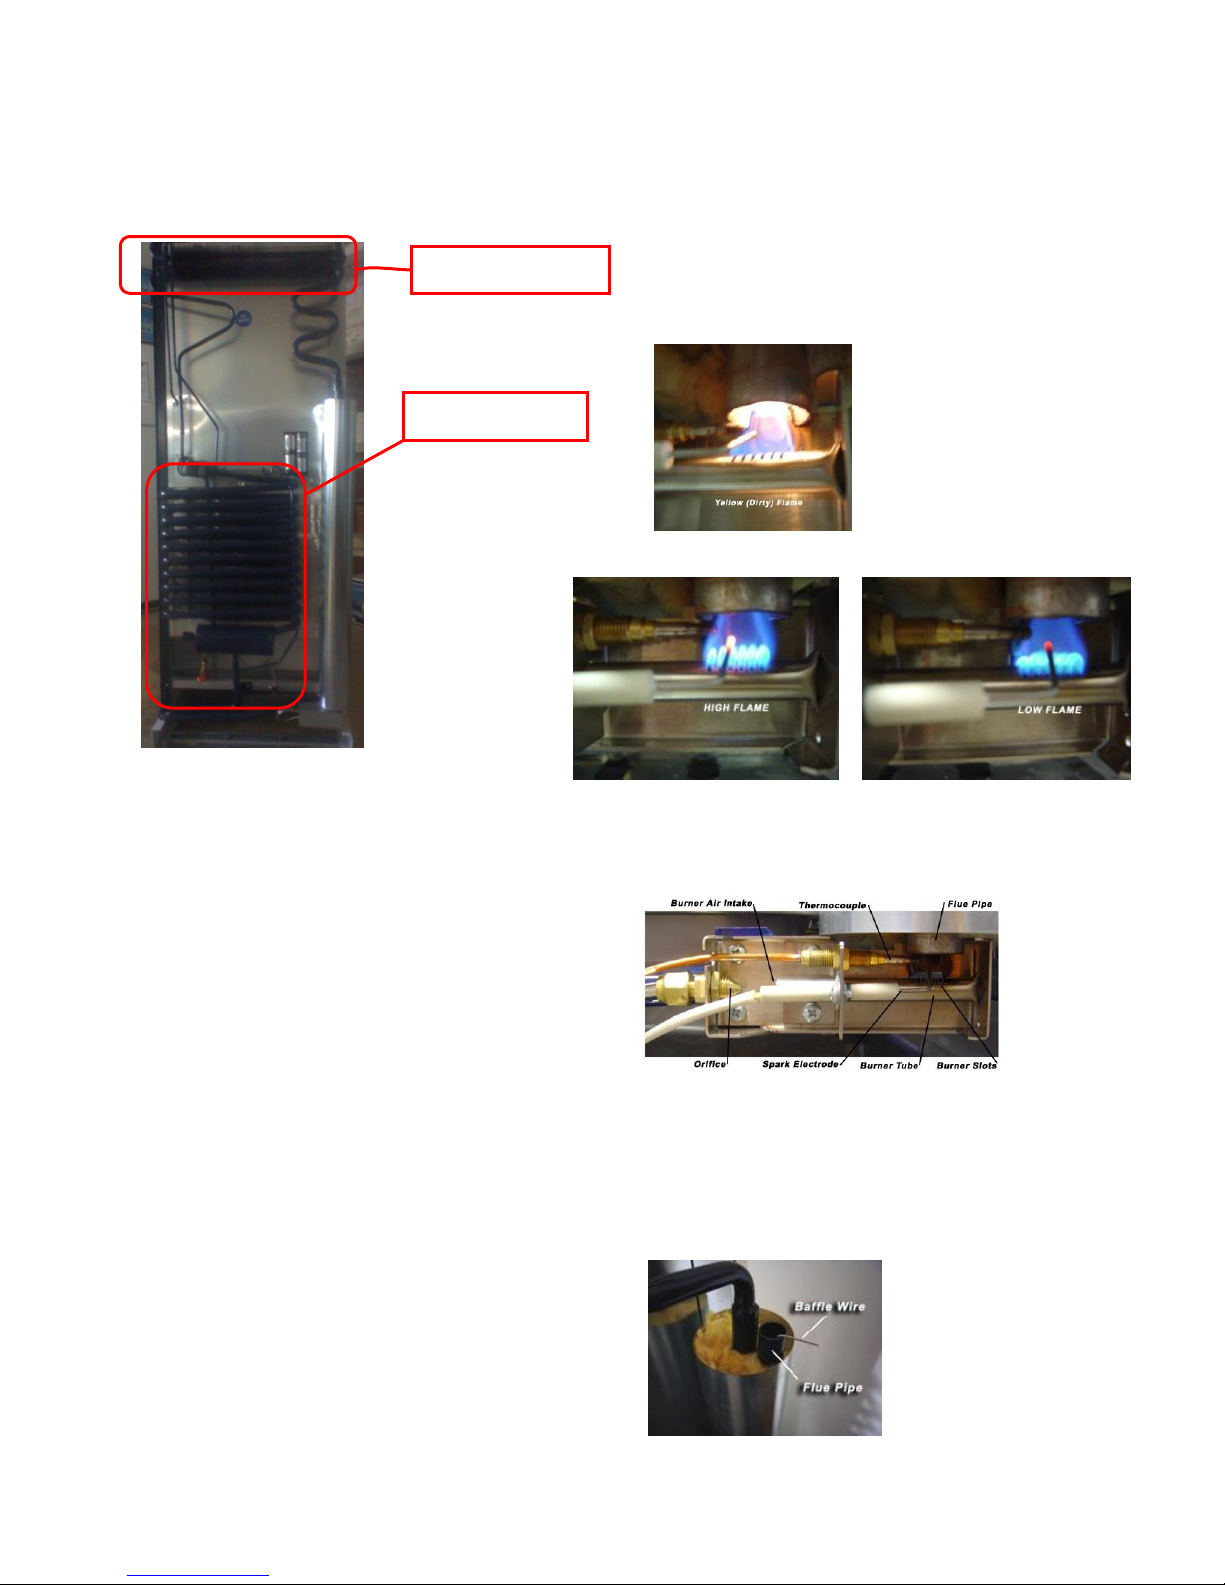
Cleaning the cooling unit will improve the
overall efficiency. This should be done every
three months. Simply use a large bristle brush
and remove the lint and dust from the condenser
fins and the absorber coils. (See picture below)
Keep the area around and under the refrigerator clean. If this is not done, dust and other
light debris will be sucked into the burner tube.
This is a common problem with refrigerator failure. This should be done every three months or
more often is better. (See Cleaning the Burner,
Cleaning the Flue and Baffle, and Cleaning the
Orifice section for more information)
Defrosting
There are two ways to defrost your refriger-
ator: 1.) Turn the thermostat knob to setting
“MIN” overnight. The next morning, turn the
knob to it’s original setting. Doing this weekly
should be sufficient to keep the ice off the fins.
Remember, you must turn thermostat knob
to it’s original setting or refrigerator will not
cool properly! 2.) Once ice build-up is solid be-
tween fins, turn off refrigerator, and allow ice to
thaw, and then remove the ice by hand. You can
use a plastic scraper to remove the larger
chunks. Do not use an ice pick or metal scraper.
The drain pan is not designed to hold the large
amount of water this defrosting method produces. Drain the drain pan during this process or
sponge away the water.
Repairs
Cleaning the Burner
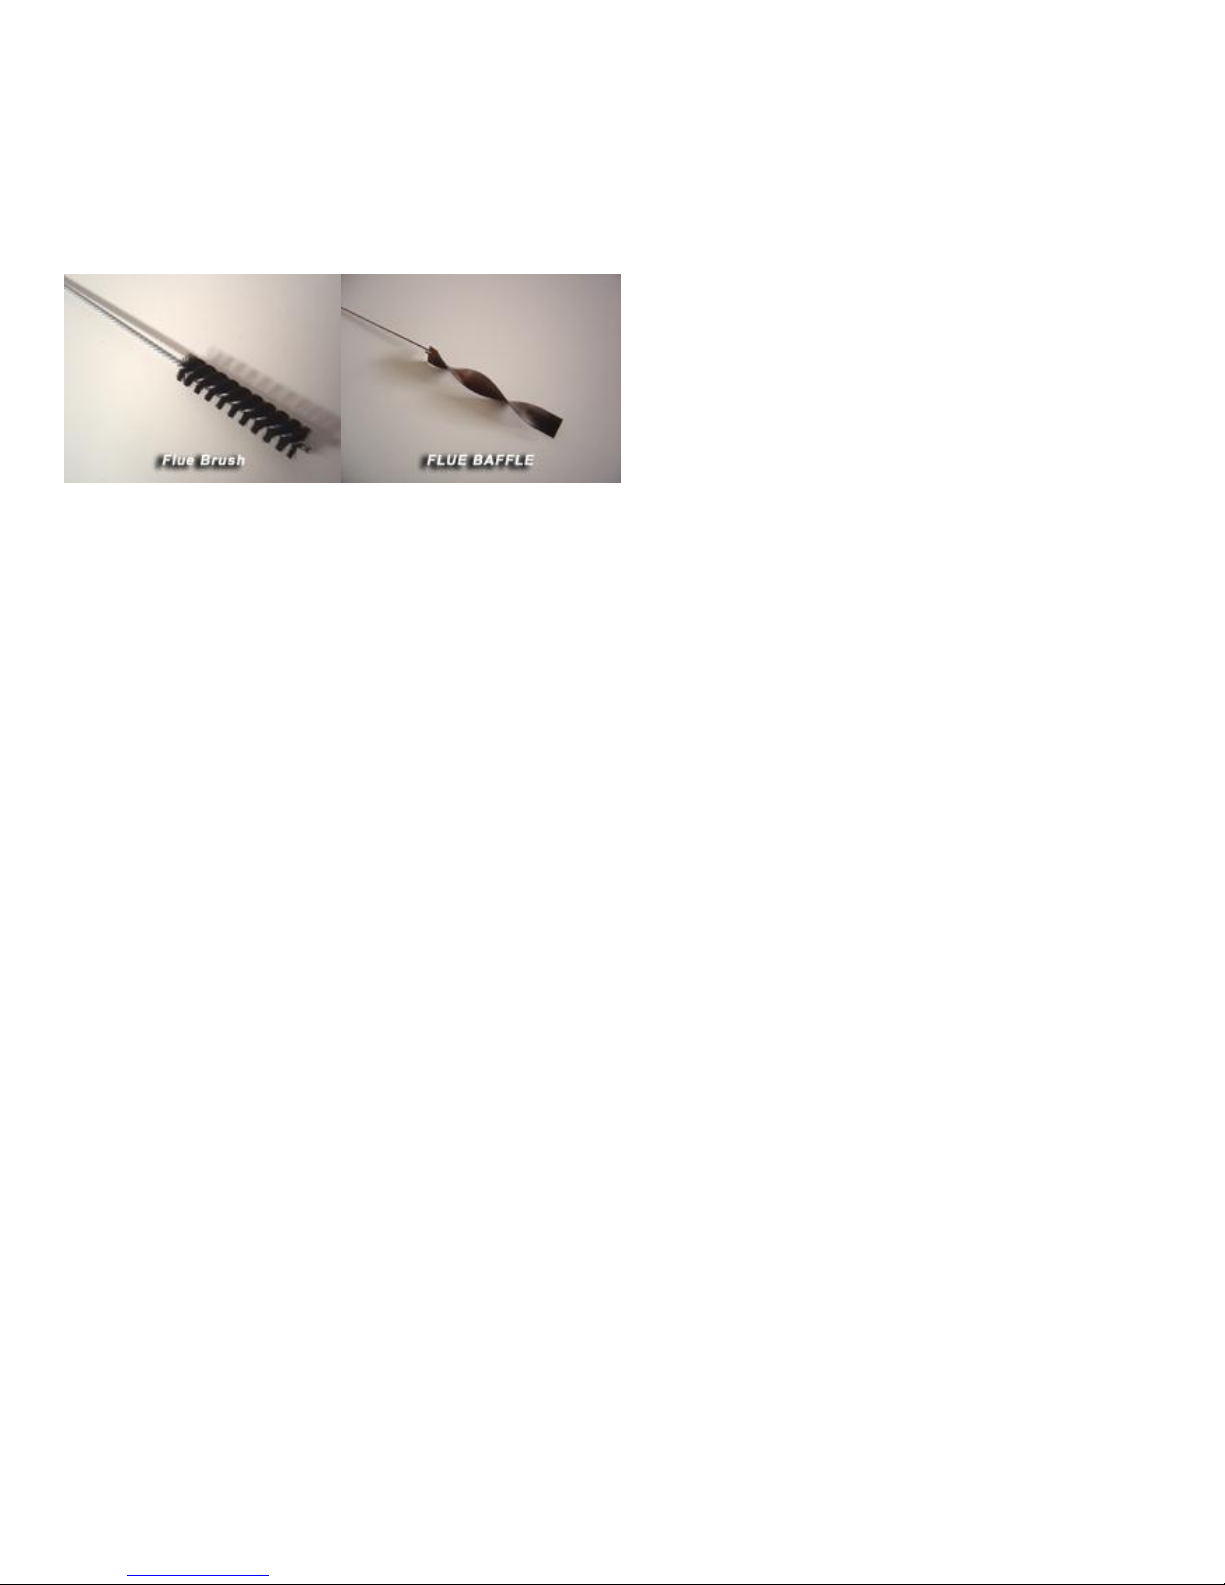
The burner tube is easily cleaned with com-
pressed air. Air in a Can is another option that
works. Caution: Some Air
in a Can is flammable. Be
sure burner flame is
turned off and that the
burner has cooled completely!Simply blow air
from the burner slots to the burner air intake.
The burner tube has no parts inside, so be sure
that the tube is unobstructed. A pipe cleaner can
be used to loosen dust and other debris from the
burner
tube. Once
the burner
is cleaned,
the flame
will be
crisp and clean. (See picture above) If the flame
has been burning dirty for any period of time, be
sure to clean the flue and baffle.
Cleaning the Flue and Baffle
If soot build-up is present inside the flue
pipe, or if the flame was
burning dirty then
cleaning is required.
Turn off the gas supply
and let the flue pipe
cool. Remove the baffle-
Page 9
07/12 Version 3.1
Page 9
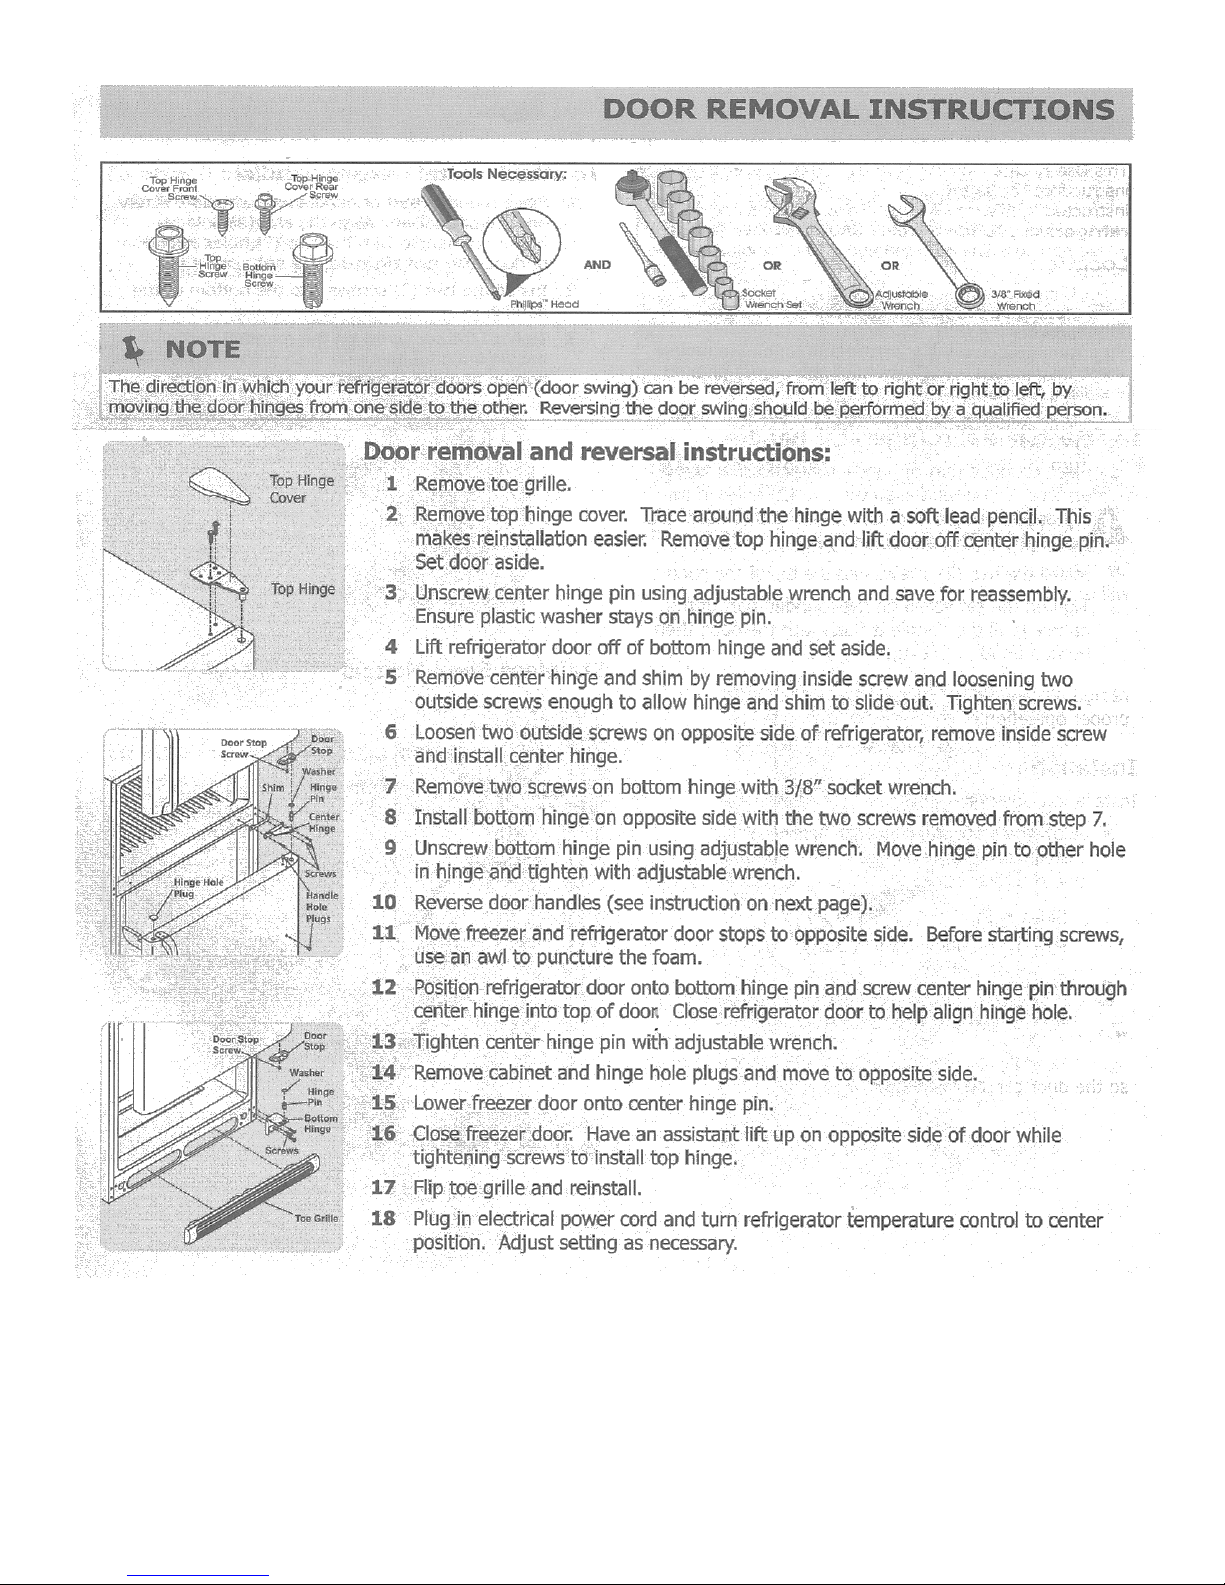
by unhooking the baffle wire from the top of the
flue tube and pull up and out. To clean the baffle,
take a wire brush and remove the soot.
To clean the flue, remove the baffle and
place some aluminum foil over the burner to
catch the debris. Then, take a flue brush and
brush the flue pipe. Be careful not to damage the
burner tube.
Cleaning the Orifice
It is rare that debris will get around the fil-
ters and make it to the orifice. If the flame size is
small, the thermostat and gas supply check out
good, then it is possible the orifice needs to be
cleaned. To remove the orifice, loosen the brass
fitting to the left side of the orifice. Gently move
this to the side. Do NOT kink gas line. Remove
the brass nut that holds the orifice to the burner
bracket. Clean the orifice by washing in rubbing
alcohol or with high-pressure compressed air.
NEVER force ANY object into the orifice!
Changing the orifice hole by ANY amount will
damage your refrigerator and void your warranty. When re-installing the orifice, be sure to line
up the orifice so the gas will pass directly into
the burner tube. Check for leaks at the gas supply
line after reconnecting gas line. (See Leak Testing)
Transporting Refrigerator
Diamond refrigerators can be transported on
their side. To transport, lay the refrigerator on
the burner side. (left side facing refrigerator)
The refrigerator will not require any additional
set-up if transported this way. The refrigerator
can also be transported standing, providing the
refrigerator is properly strapped.
Warranty
Diamond refrigerators are covered by a five
(5) year limited warranty. Five year warranty on
the cooling unit. Three year warranty on parts
and labor on refrigerator. All warranties are
“carry in service”. Please see original warranty
card supplied within the refrigerator or contact
your dealer.
Page 10
07/12 Version 3.1
Page 10
Page 11
07/12 Version 3.1
Page 11
Page 12
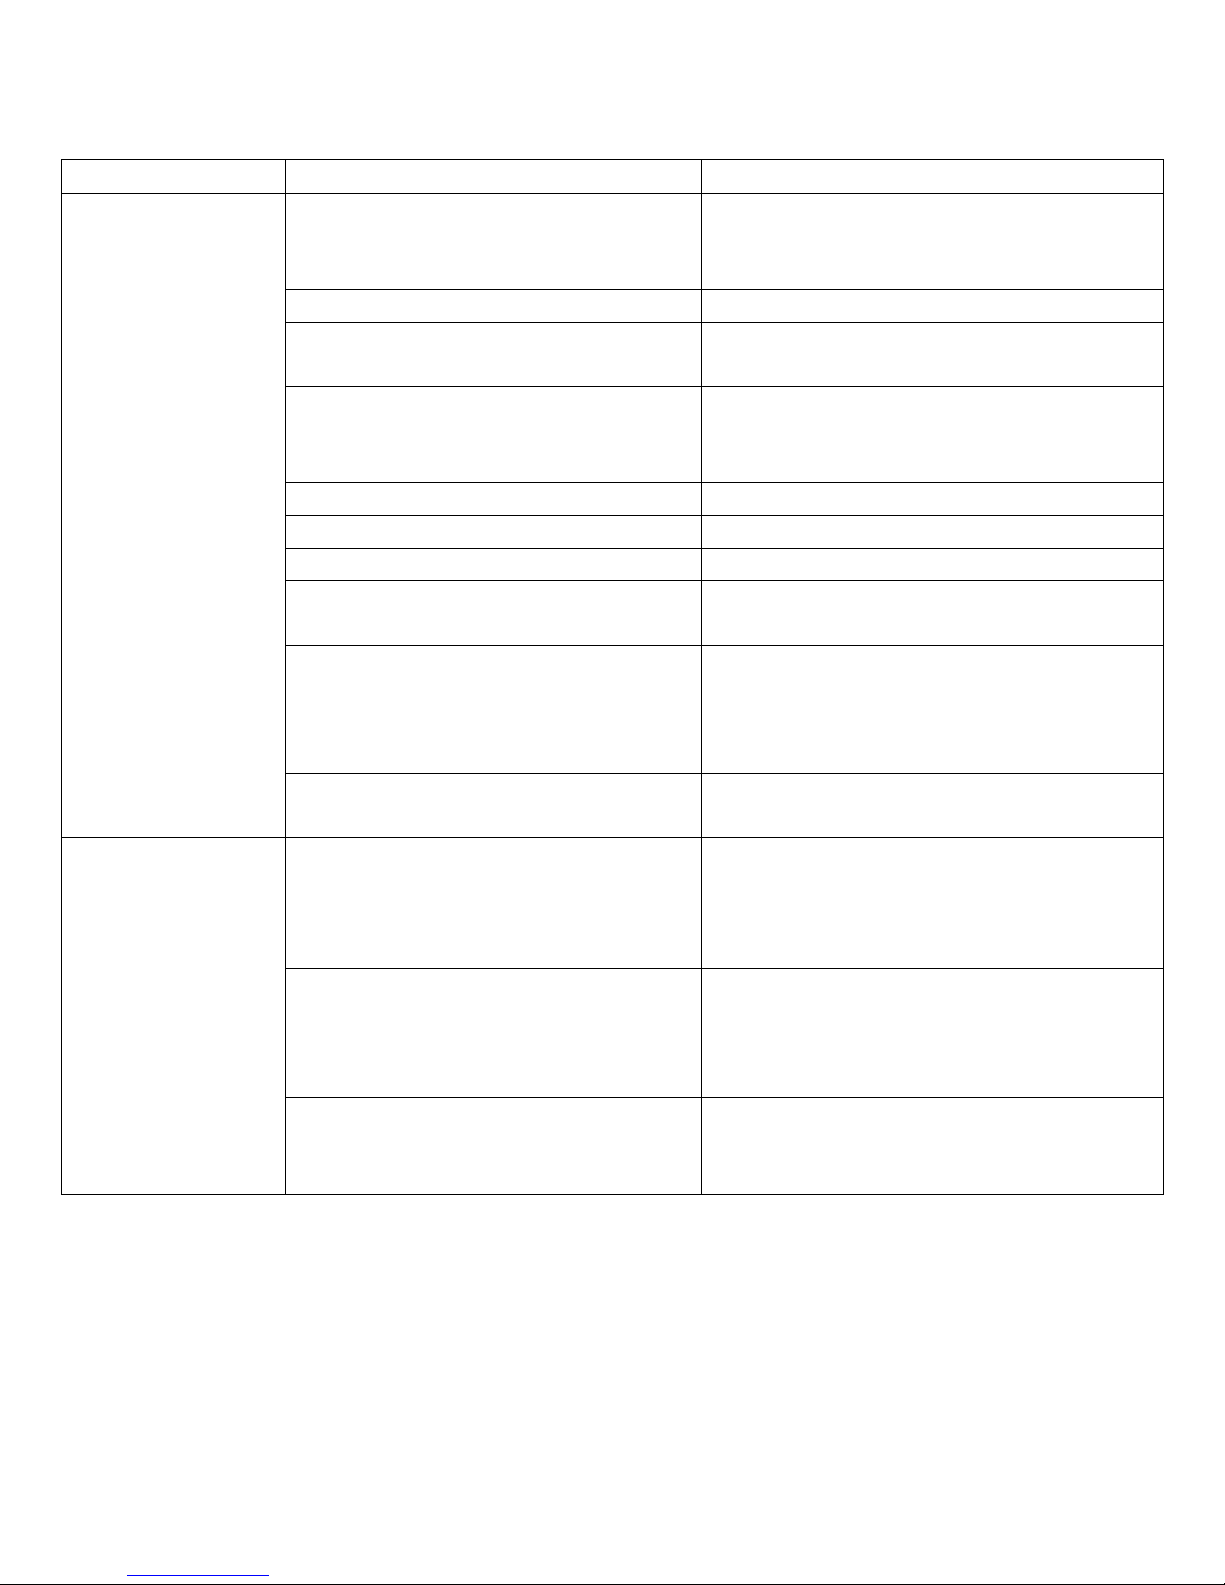
Problem
Likely Cause
Solution
Refrigerator
and/or Freezer are
to warm
Is the burner lit
If the burner is not lit, re-light and check operation. If the burner does not light, refer to
“Burner will not Light”
Is it time to defrost
Defrost according to Owner’s Manual
Is ventilation according to Owner’s
Manual
Make sure ventilation is according to Owner’s Manual
Is the gas pressure correct
Have a qualified technician check your gas
pressure. i.e. local propane company. The gas
pressure should be 11” water column.
Is the ambient temperature extra warm
Limit door openings to absolute minimum
Are the condenser fins dirty
Clean the condenser fins (see page 8)
Are the absorber coils dirty
Clean the absorber coils (see page 8)
Do you smell ammonia
If there is an ammonia smell, the cooling unit
is leaking and must be replaced
Check for frost on evaporator outlet
tubing
Tip refrigerator forward to 10:00 position and
hold it there for 5 seconds, or you can wait
for 10 – 12 hours and refrigerator will quit by
itself. (see note 1)
Is the refrigerator level
Level the refrigerator according to the Owner’s Manual
Refrigerator com-
partment freezes
my food
Is the burner modulating? (flame goes
from “high” to “low” flame while someone else turns thermostat knob from
“MAX” to “MINIMUM”)
If flame does not modulate, it may be possible that the thermostat is defective. Contact
your local Diamond dealer for further information and replacement.
Refrigerator is located in an unheated
area, or where the temperature is low
If the area where the refrigerator is below 50
F, you must either move the refrigerator to a
heated area, or build a cover for the refrigerator.
Thermostat knob is at a cold setting
Turn thermostat knob counterclockwise to
the warmest position, and then turn it clockwise to setting “2”
07/12 Version 3.1
Page 12
Troubleshooting
Note:
1. Frost on evaporator tube will only occur when refrigerator has not been running for a
period of time, or upon initial start-up.(first time refrigerator is lit)
Page 13
Manufactured By
Miller Refrigeration LLC
7295 50th Ave.
Sears, MI49679
231-734-2500
866-825-4013
The Diamondlogo is owned by Miller Refrigeration
Problem
Likely Cause
Solution
Burner will not
Light
Ignitor will not spark
Reconnect ignitor wire.
Inspect that the spark electrode tip is not
further from burner slots than ⅛” (see picture on pg. 8)
Ignitor wire may be shorting out
Inspect the ignitor wire for frays and
tears, and if torn or frayed, call your local
Diamond dealer to get a replacement.
Is the peizo ignitor functioning
Operate the ignition more often when
lighting. Push the button rapidly until the
flame lights
Ignitor sparks, but
burner will not
light or stay lit.
Thermocouple may be bad
If flame does not stay lit when you release
the gas safety valve, replace the thermocouple.
Is the gas pressure correct
Have a qualified technician check your gas
pressure. i.e. local propane company. The
gas pressure should be 11” water column.
07/12 Version 3.1
Page 13
Troubleshooting
Page 14
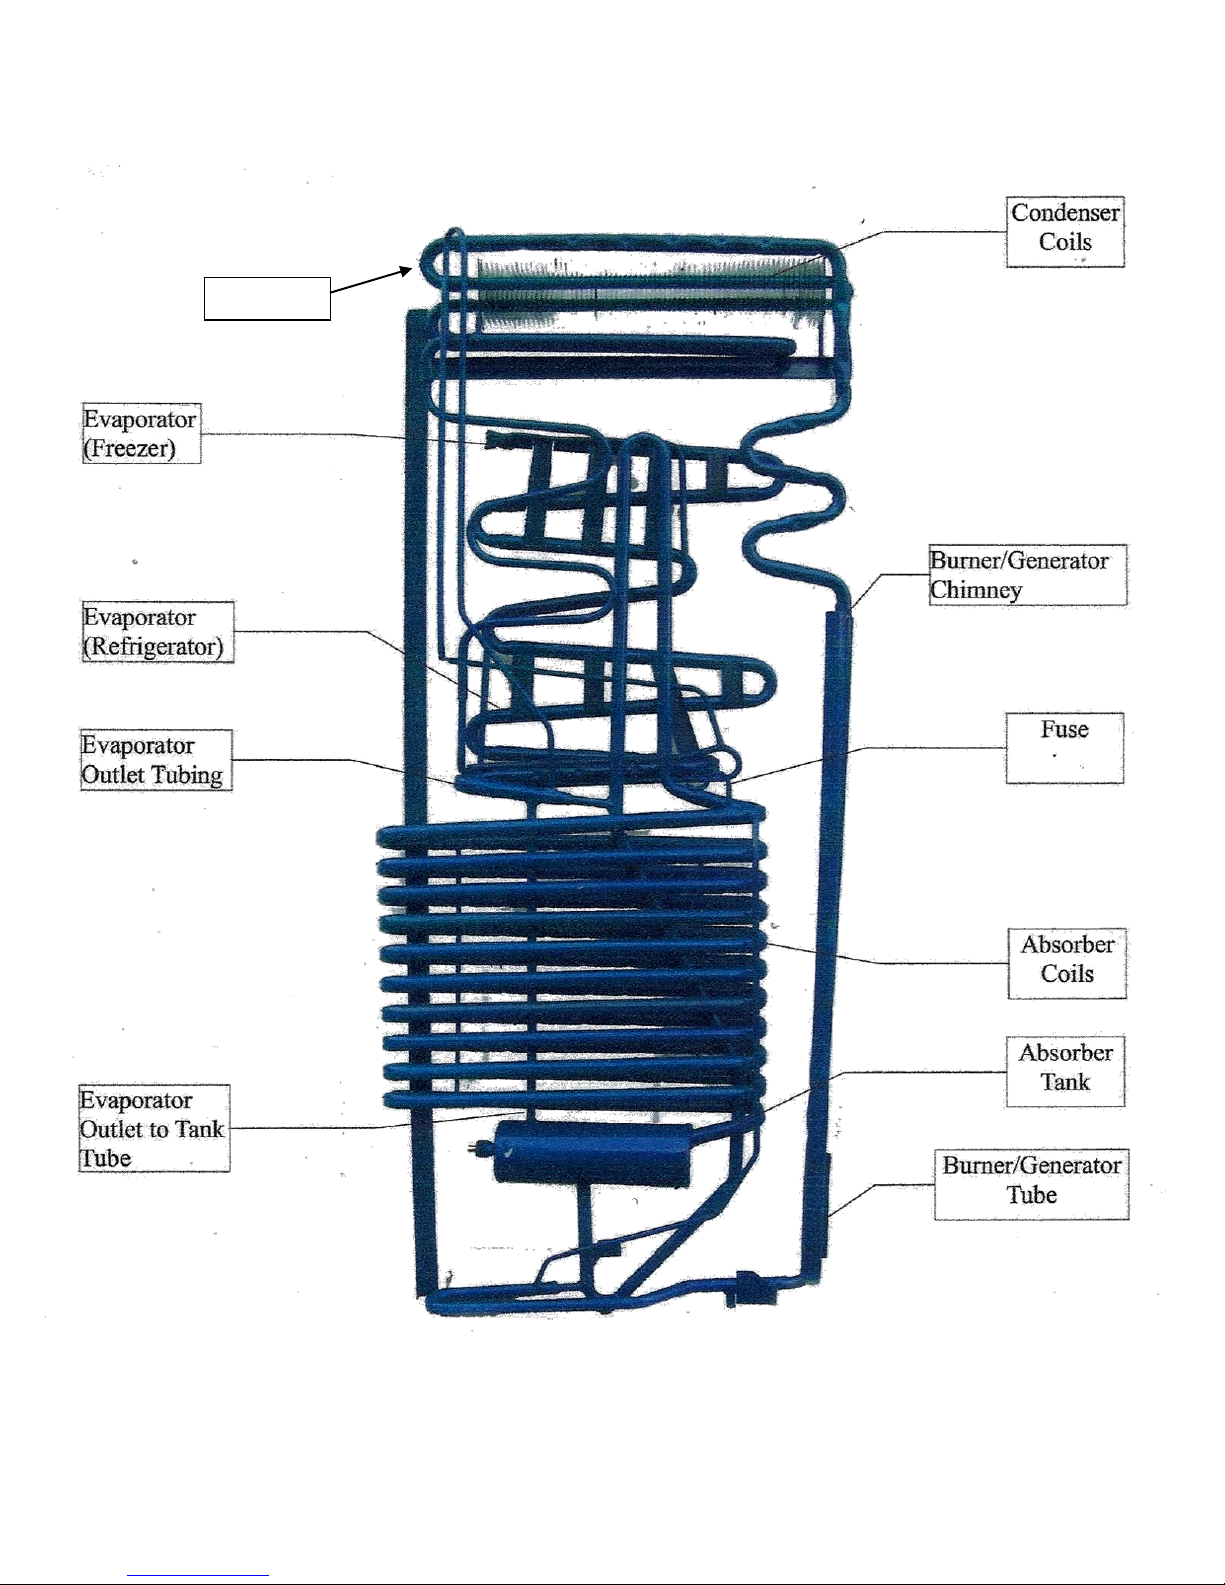
U bend
07/12 Version 3.1
Page 14
Cooling Unit Diagram
 Loading...