

Diamond DV190 User Manual

DIAMOND VIEW
Colour TFT LCD Monitor
19.0” (48.26 cm) LCD Panel Size
User’s Manual
®
DV190
2

Copyright 2003, Mitsubishi Electric Australia Pty. Ltd. All rights reserved.
No part of this publication may be reproduced, transmitted, transcribed, stored in a retrieval system
or translated into any language or computer language, in any form or b y any means, electronic,
mechanical, magnetic, optical, chemical, manual or otherwise, without the prior written permission.
2
MA/MONDV190/0903/1

Table of Contents
1 Important Safety Instructions ..........................................3
1
2 Features.............................................................................4
2
3 Unpacking the Monitor .....................................................5
3
4 Hardware Installation........................................................6
4
VGA Cable Installation......................................................6
DVI-D Cable Installation …………………………………….7
Power Cable Installation................................................... 7
5 Windows Software Installation ........................................ 8
5
Windows 95......................................................................8
Windows 98......................................................................8
Windows Millennium Edition (Windows ME).....................9
Windows 2000 and Windows XPError! Bookmark not defined.
6 Setting the Display Resolution ......................................11
6
Choosing The Best Resolution ....................................... 11
Supported Graphics Modes and Refresh Rates .............12
7 Adjusting the Monitor..................................................... 16
7
Picture Optimisation........................................................16
Manual Picture Adjustment.............................................16
8 Security Lock Installation............................................... 20
8
9 Frequently Asked Questions.......................................... 21
9
0 Specifications..................................................................23
110
1 Service Contacts............................................................. 25
111
Australian Service Contacts............................................ 25
New Zealand Service Contacts.......................................26
i
Copyright Notice
Copyright 2003, Mitsubishi Electric Australia Pty. Ltd. All rights reserved. No
part of this publication may be reproduced, transmitted, transcribed, stored in
a retrieval system or translated into any language or computer language, in
any form or by any means, electronic, mechanical, magnetic, optical,
chemical, manual or otherwise, without the prior written permission.
Disclaimer
Mitsubishi Electric Australia Pty. Ltd. makes no representations or warranties,
either expressed or implied, with respect to the contents hereof and
specifically disclaims any warranties, merchantability or fitness for any
particular purpose. Further, Mitsubishi Electric Australia reserves the right to
revise this publication and to make changes from time to time in the contents
hereof without obligation to notify any person of such revision or changes.
Diamond View is a registered trademark of Mitsubishi Electric Australia Pty. Ltd.
Microsoft and Windows are registered trademarks of Microsoft Corporation.
All other trademarks remain the property of their respective owners.
Reference Information
For future reference, write the following information about your
monitor in the space below. The serial number is on the back of
the product or on the bottom of its stand.
Monitor Information
Product Name: DV190
Serial Number:
Date of Purchase:
Dealer Information
Dealer:
Telephone
Number:
Address:
ii

1
1
Important Safety Instructions
Please read the following safety instructions before installing or cleaning
your Diamond View monitor:
1. The AC adapter isolates this equipment from the AC supply.
2. Unplug this product from the wall outlet before cleaning. Do not use
liquid or aerosol cleaners. Use a soft cloth to clean the monitor housing
and sticky tape to remove dust and fingerprints from the screen panel.
3. Slots and openings on the back or top of the cabinet are provided for
ventilation. They must not be blocked or covered. This product should
never be placed near or over a radiator or other heat source, or in a
built-in installation unless proper ventilation is provided.
4. This product should be operated from the type of power indicated on
the marking label. If you are not sure of the type of power available,
consult your dealer or local power company.
5. Never push objects of any kind, or spill liquid of any kind into this
product.
6. Do not attempt to service this product yourself, as opening or removing
covers may expose you to dangerous voltages or other risks. If any
problems or accidents (dropping, incorrect operation) occur, contact a
qualified service agent for servicing.
3

2
2
Your Diamond View DV190 Monitor has the following features:
Features
♦ High Resolution, 1280 x 1024 Pixel LCD Panel
♦ Super Slim Bezel Border Design
♦ High Brightness, Contrast Ratio and Super Wide Viewing Angle
250 cd/m² brightness, 700:1 contrast ratio and ±85/±85(H/V) viewing
angle.
♦ Dual Input Supported
Supports both analogue (D-sub) and digital (DVI-D) input.
♦ Plug and Play Compatibility
With Microsoft® Windows® 95, 98, 2000, Millenium Edition and XP.
♦ Space Saving - only 193 mm deep including the stand
♦ Light Weight - only 8.5 kg
♦ Lower Power Consumption - 40 W maximum.
♦ Power Saving
Power management complies with VESA DPMS standard. When the
system is idle (in power saving mode), the monitor automatically cuts
its power consumption to less than 1 W.
♦ On Screen Display
Allows you to adjust all settings simply using on-screen menus.
♦ True Colour Display
With dithering support, the Diamond View DV190 monitor enhances
visual effects and offers you better image quality.
♦ Auto Adjustment Function
The auto adjustment key automatically optimises the displayed image.
♦ Removable Stand with VESA Standard Mounting
4

3
3
Please check that the following items are included with your monitor. If they
are missing or damaged, please contact your place of purchase immediately.
Locate the model name and the serial number label on the back of your
monitor and write the details of the monitor and your place of purchase in the
space on page (ii) of this manual for future reference.
Unpacking the Monitor
♦ LCD monitor
♦ User’s manual
♦ VGA cable
♦ DVI-D cable
♦ Power adapter
♦ Power cord
♦ Utilities and Driver Floppy Diskette
5
4
4
Your monitor is equipped with an automatic power supply with a voltage
range from 100 to 240 Volts AC at a frequency of 50 to 60 Hz. Make sure
that your local power supply is within the supported range. If you are unsure,
please contact your electricity supplier.
To install your Diamond View DV190 monitor:
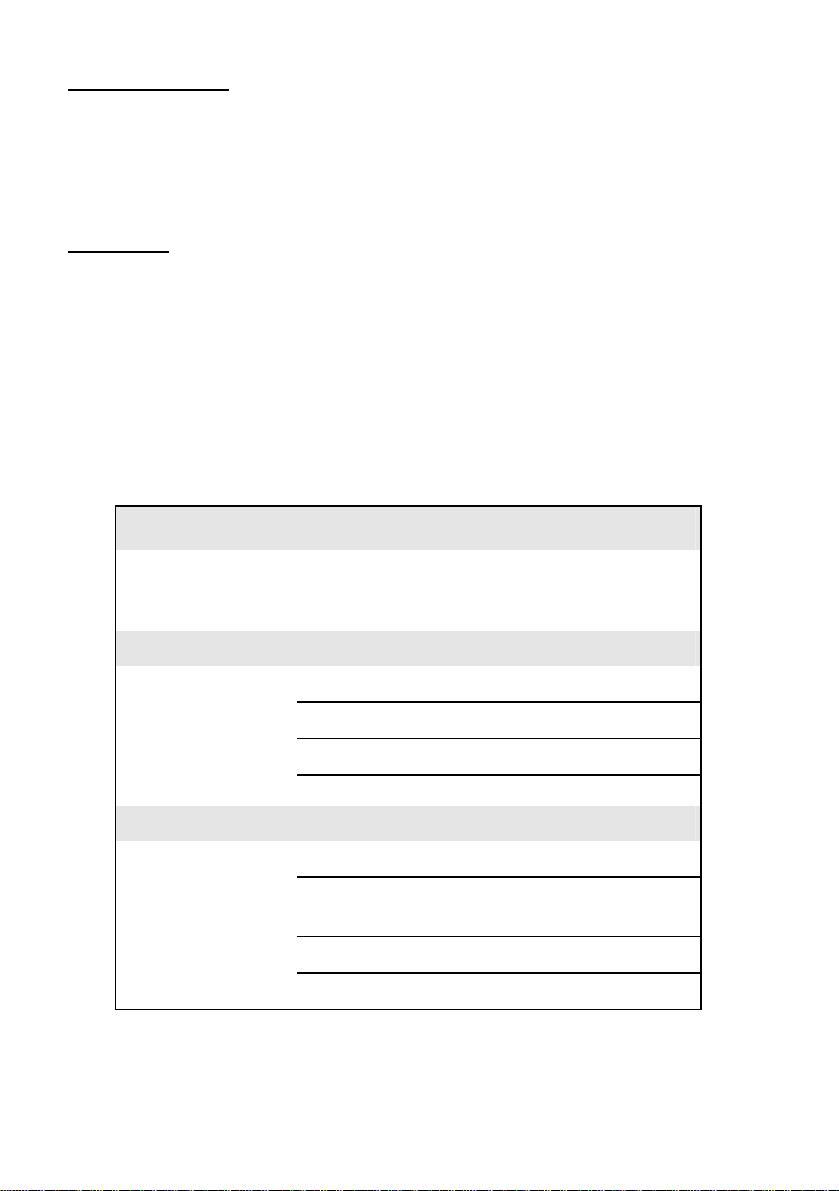
VGA Cable Installation
1. Make sure that the power to the computer and to the monitor are both
2. Connect one end of the monitor’s VGA cable to the analog VGA
3. Connect the other end of the monitor’s VGA cable to the VGA connector
Hardware Installation
turned off.
connector (15-pin socket) of the computer‘s conventional graphics card.
(15-pin socket) in the rear of the monitor.
6
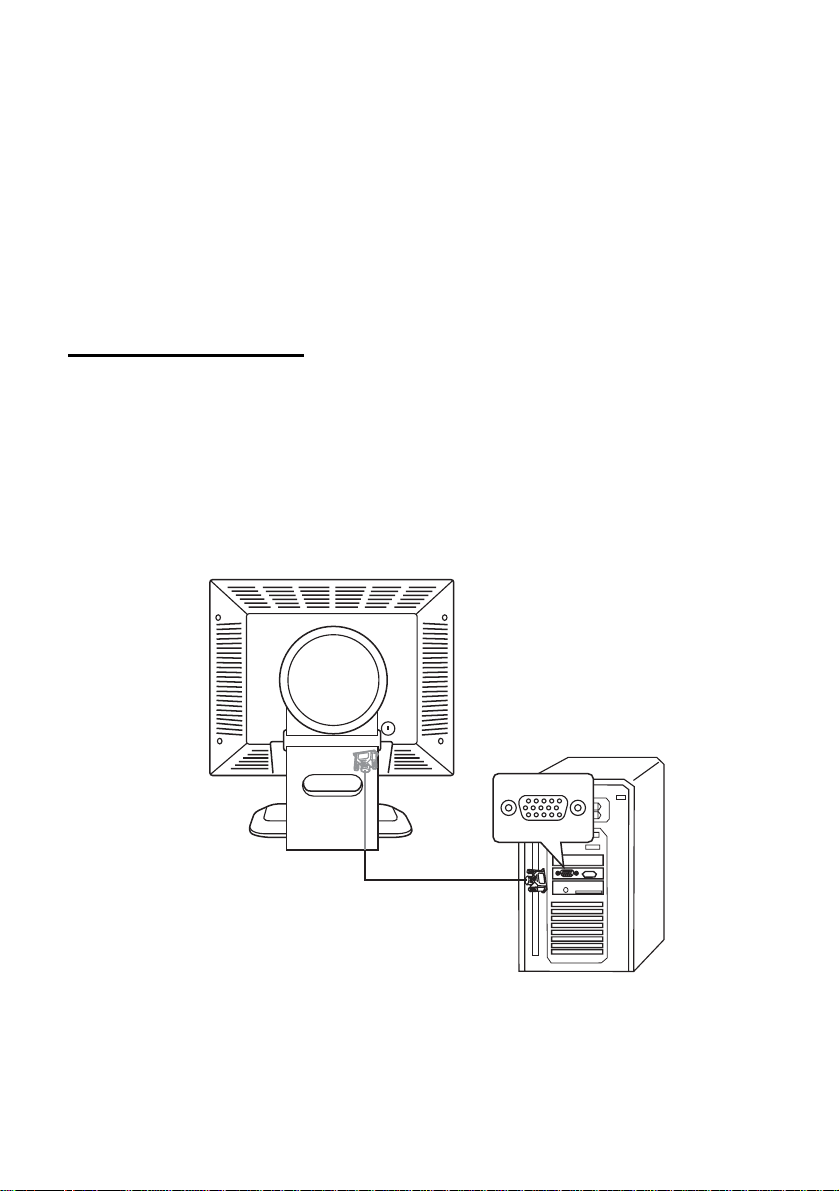
DVI-D Cable Installation(Optional)
1. Make sure that the power to the computer and to the monitor are both
turned off.
2. Connect one end of the monitor’s DVI-D cable to the digital DVI-D
connector (24-pin socket) of the computer‘s graphics card.
3. Connect the other end of the monitor’s DVI-D cable to the DVI-D
connector (24-pin socket) in the rear of the monitor.
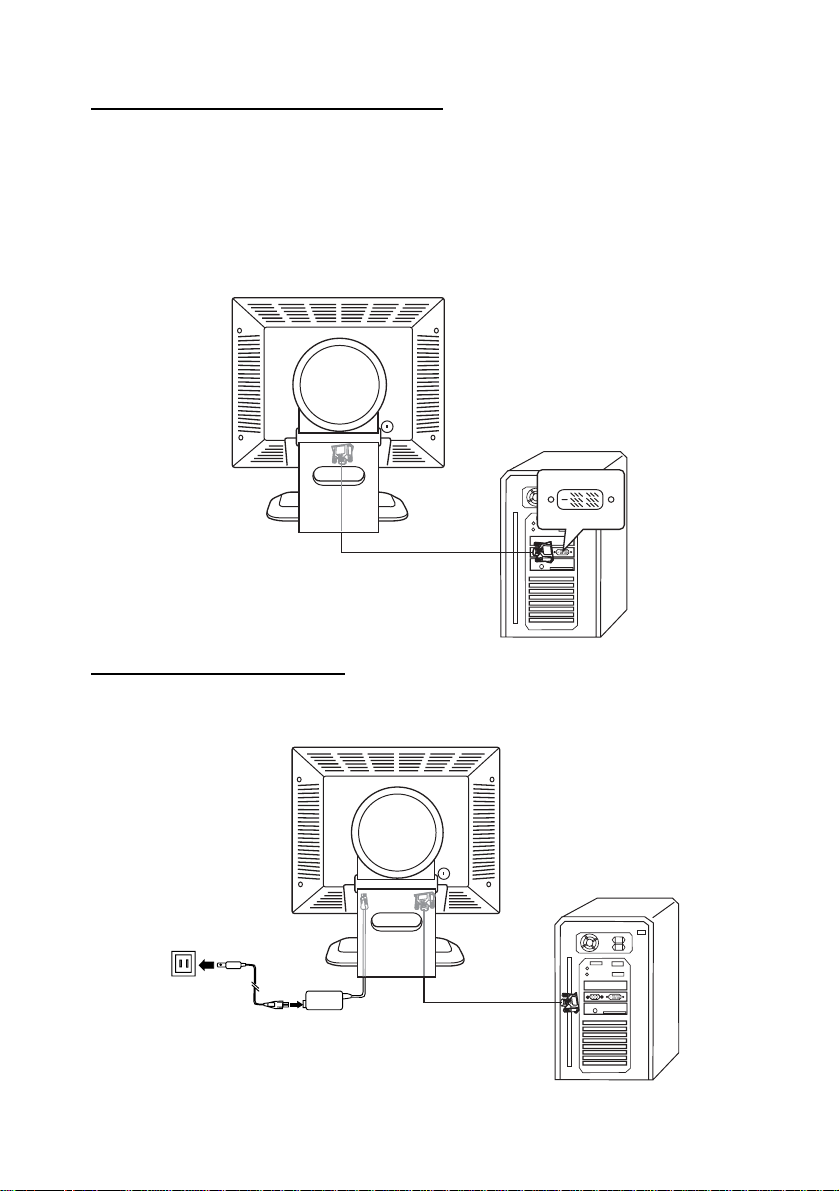
Power Cable Installation
Connect one end of the power cord to the rear of the monitor, and the other
end to the wall outlet (as shown).
7
 Loading...