


Dialogic® 2000 Media Gateway Series
Quick Start Guide for Microsoft®
Office Communications Server 2007
Introduction
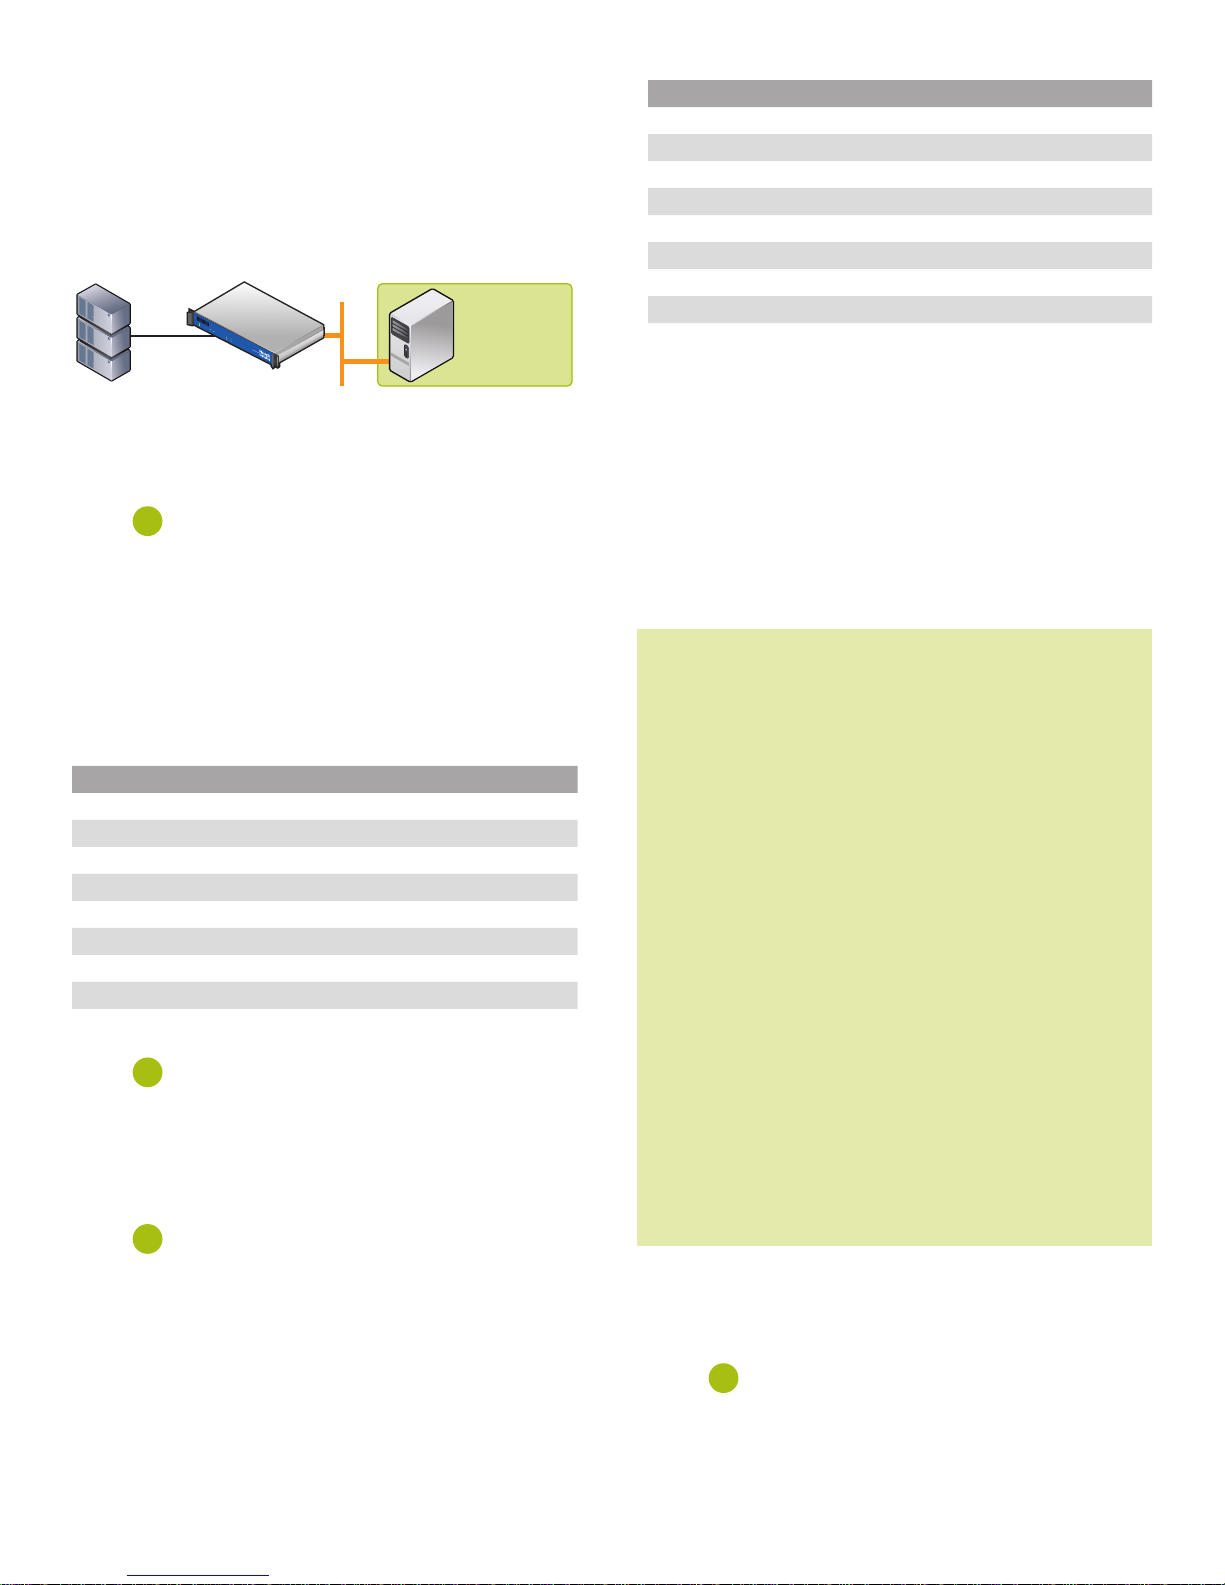
PBX
IP LAN
T1/E1
Dialogic
®
2000
Media Gateway Series
Mediation Server
Microsoft® Office
Communications
Server 2007
Environment
Dialogic® Media Gateways can link a traditional PBX or PSTN voice circuit to new
VoIP solutions such as Microsoft® Office Communications Server 2007. They are
designed and tested to be easy to deploy, easy to manage, and to provide reliable
operation. This guide provides instructions for installation and configuration of
the Dialogic® 2000 Media Gateway Series (DMG2000).
System Diagram
Caption: Dialogic® 2000 Media Gateway Series can link legacy PBX infrastructure and the Microsoft®
Office Communications Server 2007 Environment.
STEP
Trunk Preparation
The PBX-side T1 or E1 trunk must be configured for T1 (NI2, QSIG, 5ESS or DMS
protocols) or E1 (Euro ISDN or QSIG protocols). For more information on PBX
programming, refer to: http://www.dialogic.com/microsoftuc/ocs_integration.htm
Cabling Requirements
Cabling for T1/E1 ISDN Connections must be CAT5e or better. A T1/E1 crossover
cable may be needed depending on the PBX. See Table 1 for the connector pin
designations.
Pin Description
1 RCV_RING
2 RCV_TIP
3 No Connection
4 XMIT_RING
5 XMIT_TIP
6 No Connection
7 No Connection
8 No Connection
Table 1. T1/E1 Connector Pin Designations
STEP
1. Unpack gateway.
2. Connect T1/E1 cables to rear panel.
3. Connect power cord.
4. Turn on power switch.
STEP
There are two options for performing the initial configuration of the gateway -serial or IP.
Connecting with Serial Port
1. Connect a DB9 serial cable to the COM 2 port on the gateway.
2. Establish a connection to the gateway (Baud=115200, Data Bits=8, Stop
Bits=1, Parity=none, Flow Control=none) using a terminal emulation
program (e.g. HyperTerminal). See Table 2 for the serial port pin outs.
– PREPARATION
1
– GATEWAY INSTALLATION
2
– GATEWAY CONFIGURATION
3
Pin Signal
1 Data Carrier Detect
2 Transmit Data
3 Receive Data
4 Data Terminal Ready
5 Signal Ground
6 Data Set Ready
7 Clear to Send
8 Request to Send
9 Ring Indicator
Table 2. Serial Port Pin Outs
Connecting with Ethernet
1. Connect gateway to Network using LAN 1.
2. Configure computer connecting to gateway on the 10.12.13.x subnet
(e.g. 10.12.13.75) and subnet mask of 255.255.255.0.
3. Use Telnet and connect to gateway at: 10.12.13.74.
Initial Gateway Configuration
1. Configure initial gateway. Press Enter key until you get to the “PIMG”
prompt. Follow the steps below and modify the settings in red to match
your environment. The values in bold are what you will be entering.
PIMG> pwd
Enter Password: IpodAdmin
Admin level accepted.
PIMG-admin> quickcfg
LAN 1 IP Address[10.2.2.3] : (Enter new IP Address that
matches gateway IP Address entered in Mediation server)
LAN 1 Subnet Mask[255.255.255.0] :
(Enter new Subnet Mask)
LAN 1 Default Network Gateway Address[10.2.2.5] :
(Enter new Default Network Gateway Address)
LAN 2 IP Address[10.2.2.2] :
LAN 2 Subnet Mask[255.255.255.0] :
Select Line Mode ...
Valid entries:
1. T1
2. E1
Enter Number for Line Mode Selection [T1] : 1
Select Protocol ...
Valid entries:
1. CAS - Loop Start
2. CAS - Ground Start
3. CAS - E&M Immediate
4. CAS - E&M Delay
5. CAS - E&M Wink
6. ISDN - QSIG
7. ISDN - NI-2
8. ISDN - 5ESS
9. ISDN - DMS-100
Enter Number for Protocol Selection [ISDN - NI-2] : 6
Saving parameters now...
Parameters successfully congured!
******* Restart Required ******* (Type ‘restart’)
PIMG-admin> restart
rebooting...
2. Clear ARP Table on computer connecting to gateway (e.g. on Windows-based
machine, the command is “arp -d*” from a Command Shell).
3. Change the IP address on computer connecting to gateway to match the
newly configured gateway IP subnet.
STEP
– FINAL GATEWAY CONFIGURATION
4
Once the initial configuration is complete and the gateway has been reset, you will
need to log into the web interface by browsing to the IP address of the gateway
using “admin” as the user and entering the gateway password (“
IpodAdmin”
is the default).
 Loading...