

Dialogic Diva ISDN PCI, Diva Pro PC Card, Diva Pro PCI Quick Start Manual [en, de, es, it, fr]
Page 1

Diva ISDN USB / Diva ISDN PCI
Diva Pro PCI / Diva Pro PC Card
Quickstart • Kurzübersicht • Démarrage rapide
Instalación rápida • Guida di riferimento rapido
www.dialogic.com
Page 2

Third Edition (January 2007) 227-274-03
COPYRIGHT NOTICE AND LEGAL DISCLAIMER
Copyright © 2006-2007 Dialogic Corporation. All Rights Reserved. You may not reproduce
this document in whole or in part without permission in writing from Dialogic Corporation.
All contents of this document are subject to change without notice and do not represent a
commitment on the part of Dialogic Corporation or its subsidiaries. Reasonable effort is made
to ensure the accuracy of the information contained in the document. However, due to
ongoing product improvements and revisions, Dialogic Corporation and its subsidiaries do
not warrant the accuracy of this information and cannot accept responsibility for errors or
omissions that may be contained in this document. It is possible that the use or
implementation of any one of the concepts, applications, or ideas described in this document,
in marketing collateral produced by or on web pages maintained by Dialogic Corporation or
its subsidiaries may infringe one or more patents or other intellectual property rights owned
by third parties. Dialogic Corporation or its subsidiaries do not provide any intellectual
property licenses with the sale of Dialogic products other than a license to use such product
in accordance with intellectual property owned or validly licensed by Dialogic Corporation or
its subsidiaries. More detailed information about such intellectual property is available from
Dialogic Corporation's legal department at 9800 Cavendish Blvd., 5
Canada H4M 2V9. The software referred to in this document is provided under a Software
License Agreement. Refer to the Software License Agreement for complete details governing
the use of the software.
Dialogic Corporation encourages all users of its products to procure all necessary
intellectual property licenses required to implement any concepts or applications
and does not condone or encourage any intellectual property infringement and
disclaims any responsibility related thereto. These intellectual property licenses
may differ from country to country and it is the responsibility of those who develop
the concepts or applications to be aware of and comply with different national
license requirements.
Please be aware that in the United States, the use of the Dialogic® Diva® digital
board to route facsimile transmissions using DID is likely to infringe certain claims
of U.S. Patent Nos. 5,488,651 and 5,291,546 owned by Cantata Technology Inc.
All names, products, and services mentioned herein are the trademarks or registered
trademarks of their respective organizations and are the sole property of their respective
owners. Dialogic, Eicon, Eicon Networks, Diva, Diva ISDN, Diva Client, and Connecting People
to Information are registered trademarks or trademarks of Dialogic Corporation or its
subsidiaries.
To contact Dialogic Customer Support, visit our web site at www.dialogic.com.
th
Floor, Montreal, Quebec,
www.dialogic.com
Page 3

Dialogic Corporation License Agreement for use of software
This is an Agreement between you, the Company, and your Affiliates (referred
to in some instances as "You" and in other instances as "Company") and all your
Authorized Users and Dialogic Corporation ("Dialogic").
YOU SHOULD CAREFULLY READ THE FOLLOWING TERMS AND CONDITIONS
BEFORE INSTALLING OR DOWNLOADING THE SOFTWARE. IF YOU AGREE WITH
THESE TERMS YOU MAY PROCEED WITH THE DOWNLOAD OR INSTALLATION OF
THE SOFTWARE. IF YOU DO NOT AGREE WITH THESE TERMS, PLEASE RETURN
THE PACKAGE IN "AS NEW" CONDITION (INCLUDING DOCUMENTATION AND
BINDERS OR OTHER CONTAINERS) AND YOUR MONEY WILL BE REFUNDED.
DOWNLOADING OR INSTALLING THE SOFTWARE CONSTITUTES YOUR
ACCEPTANCE OF THESE TERMS AND CONDITIONS. YOU ASSUME
RESPONSIBILITY FOR THE SELECTION OF THE PROGRAM TO ACHIEVE YOUR
INTENDED RESULTS, AND FOR THE INSTALLATION, USE, AND RESULTS
OBTAINED FROM THE PACKAGE.
Copyright
The enclosed Software ("Program") and documents are owned by
Dialogic Corporation ("Dialogic") and its suppliers and are protected by copyright
laws and international treaty provisions. Therefore, You and your Authorized
Users must treat the Program and documentation like any other copyrighted
material except as expressly permitted in this License Agreement.
License
Under the terms and conditions of this License Agreement:
• You may install and use one copy of the Program on a single-user computer,
file server, or on a workstation of a local area network, and only in conjunction
with a legally acquired Dialogic hardware or software product;
• The primary Authorized User on the computer on which the "Program" is
installed may make a second copy for his/her exclusive use on either a home
or portable computer;
• You may copy the Program into any machine readable or printed form for
backup or modification purposes in support of your use of one copy of the
Program;
• You may make one copy of Dialogic's documentation provided that all
copyright notices contained within the documentation are retained;
• You may modify the Program and/or merge it into another Program for your
use in one computer; (any portion of this Program will continue to be subject
to the terms and conditions of this Agreement);
• You may transfer the Program, documentation and the license to another
eligible party within your Company if the other party agrees to accept the
terms and conditions of this Agreement. If You transfer the Program and
documentation, You must at the same time either transfer all copies whether
in printed or machine readable form to the same party or destroy any copies
not transferred; this includes all modifications and portions of the Program
contained in or merged into other Programs;
• You must reproduce and include the copyright notice on any copy, modification
or portion of the Program merged into another Program;
• You may not rent or lease the Program. You may not reverse engineer,
decompile or disassemble the Program. You may not use, copy, modify or
transfer the Program and documentation, or any copy, modification or merged
portion, in whole or in part, except as expressly provided for in this License
Agreement;
www.dialogic.com
Page 4

• If You transfer possession of any copy, modification or merged portion of the
Program or documentation to another party in any way other than as expressly
permitted in this License Agreement, this license is automatically terminated.
Upgrades
If the Program is provided as an upgrade and the upgrade is an upgrade from
another software product licensed to You and Your Authorized Users by Dialogic,
the upgrade is governed by the License Agreement earlier provided with that
software product package and the present License Agreement does not grant you
additional license(s).
Term
The license is effective until terminated. You may terminate it at any time by
destroying the Program and documentation together with all copies, modifications
and merged portions in any form. It will also terminate upon conditions set forth
elsewhere in this Agreement or if you fail to comply with any terms or conditions
of this Agreement. You agree upon such termination to destroy the Program and
documentation together with all copies, modifications and merged portions in any
form.
Limited Warranty
The only warranty Dialogic makes is that the medium on which the Program is
recorded will be replaced without charge if Dialogic, in good faith, determines that
it was defective in materials or workmanship and if returned to your supplier with
a copy of your receipt within ninety (90) days from the date you received it. Dialogic
offers no warranty for your reproduction of the Program. This Limited Warranty is
void if failure of the Program has resulted from accident, misuse, abuse, or
misapplication.
Customer Remedies
Dialogic's entire liability and You and Your Authorized Users exclusive remedy shall
be, at Dialogic's option, either (a) return of the price paid or (b) repair or
replacement of the Program that does not meet the above Limited Warranty. Any
replacement Program will be warranted for the remainder of the original Warranty
period.
No Other Warranties
Dialogic disclaims all other warranties, either expressed or implied, including but
not limited to implied warranties or merchantability and fitness for a particular
purpose and the warranty against latent defects, with respect to the Program and
the accompanying documentation. This limited warranty gives You specific legal
rights. You may have others, which may vary from jurisdiction to jurisdiction.
No Liability for Consequential Damage
In no event shall Dialogic or its suppliers be liable for any damages whatsoever
(including without limitation, damages for loss of business profits, business
interruption, loss of information, or other pecuniary loss and indirect,
consequential, incidental, economic, or punitive damages) arising out of the use
of or inability to use this Program, even if Dialogic has been advised of the
possibility of such damages. As some jurisdictions do not allow the exclusion or
limitation for certain damages, some of the above limitations may not apply to You
or your Authorized Users.
www.dialogic.com
Page 5

Limit of Liability
Dialogic's entire aggregate liability under any provision of this agreement shall
be limited to the amount actually paid by You for the affected Program.
Right to Audit
If this Program is licensed for use in a Company, your Company agrees to keep
all usual and proper records and books of accounts and all usual proper entries
relating to each reproduction and Authorized User of the Program during the term
of this Agreement and for a period of three (3) years thereafter. During this
period, Dialogic may cause an audit to be made of the applicable records in order
to verify Your compliance with this Agreement and prompt adjustment shall be
made to compensate for any errors or omissions disclosed by such audit. Any
such audit shall be conducted by an independent certified public accountant
selected by Dialogic and shall be conducted during the regular business hours at
Your offices and in such a manner as not to interfere with Your normal business
activities. Any such audit shall be paid for by Dialogic unless material
discrepancies are disclosed. For such purposes, "material discrepancies" shall
mean three percent (3%) or more of the Authorized Users within the Company.
If material discrepancies are disclosed, Your Company agrees to pay Dialogic for
the costs associated with the audit as well as the license fees for the additional
Authorized Users. In no event shall audits be made more frequently than
semi-annually unless the immediately preceding audit disclosed a material
discrepancy.
Supplementary Software
Any Supplementary Software provided with the Dialogic Program referred to in
this License Agreement is provided "as is" with no warranty of any kind.
U.S. Government Restricted Rights
The Program and documentation are provided with RESTRICTED RIGHTS. Use,
duplication or disclosure by the U.S. Government is subject to restrictions as set
forth in subparagraph c) 1) ii) of The Rights in Technical Data and Computer
Software clause at DFARS 252.227-7013 or subparagraph c) 1) and 2) of the
Commercial Computer Software-Restricted Rights at 48 CFR52.227-19, as
applicable.
Governing Law
This Agreement shall be construed and controlled by the laws in force in the
Province of Quebec, Canada.
Contractor/ manufacturer is:
Dialogic CORPORATION.
9800 Cavendish Blvd., Montreal, Quebec, Canada H4M 2V9
This Agreement has been drafted in English at the express wish of the parties.
Ce contrat a été rédigé en anglais à la demande expresse des parties.
www.dialogic.com
Page 6

Dialogic Corporation End User Warranty Statement
Unless your rights have been modified through the direct agreement between
Dialogic Corporation ("DIALOGIC") and DIALOGIC's direct customer through
whom you purchased your DIALOGIC Product your warranty rights are set out in
full as follows:
Warranty for Software Products: The only warranty DIALOGIC makes is that the
medium on which the program is recorded will be replaced without charge if
DIALOGIC, acting reasonably, determines that it was defective in materials or
workmanship and if returned to your authorized DIALOGIC supplier with a copy
of your receipt within ninety (90) days from the date you received it. DIALOGIC
offers no warranty for the installation of the program even if it has provided
assistance to you in making such installation. This Limited Warranty is void if
failure of the program has resulted from accident, misuse, abuse, or
misapplication. DIALOGIC'S ENTIRE LIABILITY AND YOUR EXCLUSIVE REMEDY
SHALL BE, AT DIALOGIC'S OPTION, EITHER (A) RETURN OF THE PRICE PAID OR
(B) REPAIR OR REPLACEMENT OF THE PROGRAM THAT DOES NOT MEET THIS
WARRANTY. ANY REPLACEMENT PROGRAM WILL BE WARRANTED FOR THE
REMAINDER OF THE ORIGINAL WARRANTY PERIOD.
Warranty for Hardware Products: DIALOGIC warrants that its hardware products
will be free from defects in material and workmanship. The warranty will be for
five years from the date of original purchase from your supplier, except as relates
to ADSL or Shiva products where the warranty will be for one year from the date
of original purchase from your supplier. This warranty is void if the defect has
resulted from accident, misuse, abuse or misapplication. To obtain warranty
service for any hardware product which becomes defective during the warranty
period you must return the defective product within thirty (30) days after
discovery of the defect, freight-prepaid and insured, to the authorized DIALOGIC
supplier from which you purchased the DIALOGIC product. You must include
product identification information, including model number and serial number (if
applicable) with a detailed description of the problem you are experiencing. You
must also include proof of the date of original purchase as evidence that the
product is within the applicable warranty period. Any product found to be
defective by DIALOGIC will be repaired or replaced at DIALOGIC's option.
No Other Warranties: DIALOGIC DISCLAIMS ALL OTHER WARRANTIES, EITHER
EXPRESS OR IMPLIED, INCLUDING BUT NOT LIMITED TO IMPLIED WARRANTIES
OF MERCHANTABILITY AND FITNESS FOR A PARTICULAR PURPOSE AND ANY
WARRANTY AGAINST LATENT DEFECTS, WITH RESPECT TO ANY DIALOGIC
PRODUCT.
No Liability for Damages: IN NO EVENT SHALL DIALOGIC OR ITS SUPPLIERS BE
LIABLE FOR ANY DAMAGES WHATSOEVER (INCLUDING, WITHOUT LIMITATION,
DAMAGES FOR LOSS OF PROFITS, INTERRUPTION OF ACTIVITIES, LOSS OF
INFORMATION OR OTHER PECUNIARY LOSS AND DIRECT OR INDIRECT,
CONSEQUENTIAL, INCIDENTAL, ECONOMIC, OR PUNITIVE DAMAGES) ARISING
OUT OF THE USE OF OR INABILITY TO USE ANY DIALOGIC PRODUCT OR DUE
TO THE FAULT OR NEGLIGENCE OF DIALOGIC OR THOSE FOR WHICH IT IS
RESPONSIBLE AT LAW, EVEN IF DIALOGIC HAS BEEN ADVISED OF THE
POSSIBILITY OF SUCH DAMAGES. (NOTE: SOME JURISDICTIONS DO NOT
ALLOW THE EXCLUSION OR LIMITATION OF LIABILITY FOR CERTAIN DAMAGES
AND ACCORDINGLY THE ABOVE LIMITATION OR EXCLUSION MAY NOT APPLY TO
YOU.)
www.dialogic.com
Page 7

Contents
English
Contents of your package......................................................9
Install your Diva Client adapter ............................................ 12
Connect your ISDN line....................................................... 14
Install Your Diva Client for Windows Software ........................15
Test the hardware and ISDN connection ................................ 17
Deutsch
Lieferumfang Ihrer Diva Client Karte..................................... 19
Installation Ihrer Diva Client Karte........................................ 22
Anschließen der ISDN-Leitung.............................................. 24
Installation der Diva Client for Windows Software ...................25
Testen der Hardware und der ISDN-Verbindungen .................. 27
Français
La boîte doit contenir les éléments suivants ........................... 29
Installez la carte Diva Client ................................................ 32
Connectez votre ligne RNIS ................................................. 34
Installez le logiciel Diva Client for Windows............................ 35
Testez le matériel et la connexion RNIS................................. 37
Español
El paquete de su adaptador Diva Client ................................. 39
Instalación de su adaptador Diva Client................................. 42
Conexión de la línea RDSI ................................................... 44
Instalación del software Diva Client for Windows .................... 45
Prueba del hardware y de la conexión RDSI ........................... 48
Datos sobre la homologación ............................................... 48
www.dialogic.com
Page 8

Italiano
Contenuto della confezione ..................................................49
Installazione dell’adattatore Diva Client .................................52
Collegamento della linea ISDN .............................................54
Installazione del software Diva Client for Windows ..................55
Verifica dell’hardware e della connessione ISDN......................58
Appendix......................................................................... 59
www.dialogic.com
Page 9

Dialogic Diva Client Quickstart Guide
Dialogic Diva Client Quickstart Guide
This Dialogic® Diva® Client Quickstart Guide provides instructions on how to
physically install a
• Dialogic Diva ISDN PCI,
• Dialogic Diva Pro PCI,
• Dialogic Diva Pro PC Card,
• Dialogic Diva ISDN USB
and how to install the software Diva Client for Windows
For instructions on how to configure your adapter after you installed it, refer
to the Dialogic Diva Client for Windows Guide on the Dialogic Diva Client
Software Suite CD-ROM under ‘Documentation’.
®
.
Contents of your package
The content of your package depends on the Diva Client adapter you
purchased.
• For Diva ISDN PCI and Diva Pro PCI see below.
• For Diva Pro PC Card see page 10.
• For Diva ISDN USB see page 11.
ENGLISH
Diva ISDN PCI and Diva Pro PCI package
Your package should contain the following items:
Diva ISDN PCI or
Diva Pro PCI
Insert the adapter
into an available PCI
slot in your
computer.
ISDN cable Diva Client Software
Use the cable to
connect the adapter
to the ISDN wall
jack.
Suite CD-ROM
Use this CD to install
the software and to
view the
documentation.
page 9
Page 10

Contents of your package
ENGLISH
Diva Pro PC Card package
Your package should contain the following items:
Diva Pro PC Card ISDN dongle
Use the ISDN dongle to connect
your Diva Pro PC Card to the ISDN
ISDN cable Diva Client Software Suite
Use the cable to connect the
adapter to the ISDN wall jack.
Use this CD to install the software
and to view the documentation.
line.
CD-ROM
Note: The Diva Pro 3.0 PC Card does not need a dongle to be connected to
the ISDN line.
page 10
Page 11

Dialogic Diva Client Quickstart Guide
Diva ISDN USB package
Your package should contain the following items:
Diva ISDN USB adapter USB cable
Use the USB cable to connect your
Diva ISDN USB to the computer.
ENGLISH
ISDN cable Diva Client Software Suite
Use the cable to connect the
adapter to the ISDN wall jack.
CD-ROM
Use this CD to install the software
and to view the documentation.
page 11
Page 12

Install your Diva Client adapter
ENGLISH
Install your Diva Client adapter
Identify Diva ISDN USB’s main components
Before you install the Diva ISDN USB take a few minutes to identify its main
components.
Two LEDs, one for
each B-channel
that display the
status of the ISDN
The installation depends on the Diva Client adapter you purchased:
• For Diva ISDN PCI and Diva Pro PCI see below.
• For Diva Pro PC Card see page 13.
• For Diva ISDN USB see page 14.
connection.
ISDN
interface
One LED that
displays the
status of Diva
ISDN USB’s
connection to
your computer.
USB
interface
stand
Insert your Diva ISDN PCI or Diva Pro PCI
Warning: For your safety, install the Diva Client adapter in your
computer before you connect your ISDN line.
1. Turn off the power to your PC and all peripheral devices.
2. Drain static electricity from your body by touching the computer’s metal
chassis (the unpainted metal at the back of your PC).
3. Remove the power cord from your PC.
4. Remove the cover of your PC as described in your PC’s manual.
5. In your PC, locate an available PCI slot. If your PC has both PCI and ISA
slots, the PCI slots are shorter, as shown on the next page.
6. If there is a metal plate at the end of the slot, remove it and keep the
screw.
page 12
Page 13

Dialogic Diva Client Quickstart Guide
7. Firmly insert the adapter into the selected slot as shown below.
Warning: To avoid damaging your PC or the adapter, insert the
adapter only into a PCI slot.
Diva PCI adapter
PCI Slot
8. Fasten the adapter with the screw to ensure that the adapter is secured
to the PC’s chassis.
9. Replace the cover of your PC as described in your PC’s manual.
10. Plug in your PC.
Screw
Install your Diva Pro PC Card
Warning: For your safety, install the Diva Pro PC Card in your
notebook before you connect your ISDN line.
1. Close all applications on your notebook. You can leave your notebook
switched on.
2. If you install another version than the Diva Pro 3.0, plug the ISDN dongle
into Diva Pro PC Card’s ISDN socket.
3. Insert the card into your notebook’s PC Card slot (type II or type III),
with the ‘Diva PC Card’ label facing upwards. An arrow on the label
indicates which end should be inserted.
ENGLISH
page 13
Page 14

Connect your ISDN line
ENGLISH
Install your Diva ISDN USB
For your safety, install the Diva ISDN USB before you connect your
ISDN line.
You can install your Diva ISDN USB on a desktop or notebook computer. Keep
your computer switched on during the installation.
USB interace
USB ports
3.
1
USB
2
2.
1.
USB cable
1. Take the USB cable that came with your Diva ISDN USB. You can identify
it by the USB symbol on its plug.
2. Plug one end of the USB cable into the USB interface of the Diva ISDN
USB adapter.
3. Plug the other end of the USB cable into any available USB port on your
computer.
Connect your ISDN line
In Europe and most countries outside of North America and Japan, connect
your Diva Client adapter directly to your ISDN line using the cable that came
with your adapter.
To connect your adapter do the following:
1. Take the ISDN cable that came with the Diva Client adapter.
2. Plug one end into the adapter.
3. Plug the other end into the ISDN wall jack.
page 14
Page 15

Dialogic Diva Client Quickstart Guide
Install Your Diva Client for Windows Software
To be able to use all features of Diva Client for Windows, you must install the
Diva Client for Windows software on your computer. The software installation
procedure is the same for all Diva Client adapters.
Note: You must be logged on with administrator rights.
Install the Microsoft Windows 2000/XP/Server 2003/Vista
ISDN drivers
After you have installed your Diva Client adapter and connected your ISDN
line, turn on your computer. Windows detects the new hardware.
The procedure depends on the dialog box that appears on your screen, either
case 1 or case 2.
Note: The screens for Windows XP, Windows Server 2003 and Windows Vista
may differ slightly from the ones shown below.
Case 1
1. If Windows 2000/XP/Server 2003/Vista cannot install its own drivers for
your adapter, the ‘Found New Hardware Wizard’ appears. Click ‘Next’.
2. In the ‘Install Hardware Device Drivers’ box, click ‘Search for a suitable
driver for my device (recommended)’ and click ‘Next’.
ENGLISH
page 15
Page 16

Install Your Diva Client for Windows Software
ENGLISH
3. In the ‘Locate Driver Files’ box, select ‘Specify a location’.
Insert the Diva Client Suite CD-ROM into your computer’s CD-ROM drive,
and click ‘Next’.
4. When prompted, enter the following location: D:\WIN_2K\INSTALL
(where D: is your CD-ROM drive letter), and click ‘Next’.
5. Follow the instructions that appear on your screen.
After the drivers are upgraded, the installation of the Diva Tools begins.
6. When prompted, restart your computer. After your computer is restarted,
the installation of the Diva Tools is completed and Diva Assistant is
installed.
Case 2
1. If Windows 2000/XP/Server 2003/Vista automatically installs its own
ISDN drivers, the ISDN configuration wizard appears.
2. Click ‘Next’. Enter the switch protocol your phone company or ISP
(Internet Service Provider) uses and its telephone number(s) to complete
the wizard.
After you have completed the Microsoft ‘ISDN’ wizard, you must update
the automatically installed drivers with the Diva Client for Windows
software. The Diva Client for Windows software provides functionality and
additional tools that are not available with the drivers that are
automatically installed by Windows.
page 16
Page 17

Dialogic Diva Client Quickstart Guide
To update drivers with the Diva Client for
Windows 2000/XP/Server 2003/Vista software
1. Insert the Diva Client Software Suite CD-ROM into your CD-ROM drive.
The Diva Client Software Suite welcome screen should appear
automatically.
If the welcome screen does not appear, click ‘Start > Run’. In the ‘Run’
dialog box, type D:\CDSETUP.EXE (where D: is your CD-ROM drive letter).
Click ‘OK’.
2. From the Diva Client Software Suite welcome screen, click ‘Installation’.
3. If required, select ‘Windows 2000’ under ‘Select an operating system’,
then click ‘Update Diva Software for Windows 2000/XP/
Server 2003/Vista’.
4. Follow the on-screen instructions until the ‘Diva Client for
Windows 2000/XP/Server 2003/Vista’ wizard is displayed.
5. In the ‘Diva Client for Windows 2000/XP/Server 2003/Vista’ wizard, click
‘Start’.
Note: If the ‘Start’ button is not available, the software on the CD-ROM
is the same version or an older one than the automatically installed
software.
If this is the case, you can skip the rest of this procedure and click ‘Cancel’
to exit.
6. Follow the instructions that appear on your screen.
7. After the drivers are upgraded, installation of the Diva Tools begins.
8. When prompted, restart your computer. After your computer is restarted,
installation of the Diva Tools is completed and Diva Assistant is installed.
ENGLISH
Test the hardware and ISDN connection
You should perform the following test to ensure that your Diva Client adapter,
ISDN cable, and ISDN connection are working properly. To perform the test,
use the ‘Line Test’ tool, which was automatically installed when you installed
the software.
Click ‘Start > Programs > Diva Client for Windows > Diva Client Line Test’. In
the ‘Line Check’ tab click ‘Start’.
If your Diva Client adapter, ISDN cable, and ISDN connection are working
properly, you get this message:
‘Line Check passed.’
Click ‘Close’.
page 17
Page 18

Test the hardware and ISDN connection
ENGLISH
Troubleshooting
If you encounter problems using your Diva Client adapter, you might want to
use the Dialogic Help Web (D
OC/HELPWEB/DEFAULT.HTM) included on the Diva
Client Software Suite CD-ROM.
If you have internet access, you can view the most up-to-date version of the
Help Web at http://www.dialogic.com/support/helpweb.
page 18
Page 19

Dialogic Diva Client Kurzübersicht
Dialogic Diva Client Kurzübersicht
Diese Kurzübersicht enthält Anweisungen zur Installation einer:
®
• Dialogic
• Dialogic Diva Pro PCI,
• Dialogic Diva Pro PC Card,
• Dialogic Diva ISDN USB
und zur Installation der Diva Client for Windows
Software.
Informationen zur Konfiguration der Diva Client Karte nach der Installation
finden Sie im Diva Client for Windows Reference Guide auf der Diva Server
Software Suite CD-ROM unter ‘Dokumentation’.
Diva® ISDN PCI,
®
2000/XP/Server 2003/Vista
Lieferumfang Ihrer Diva Client Karte
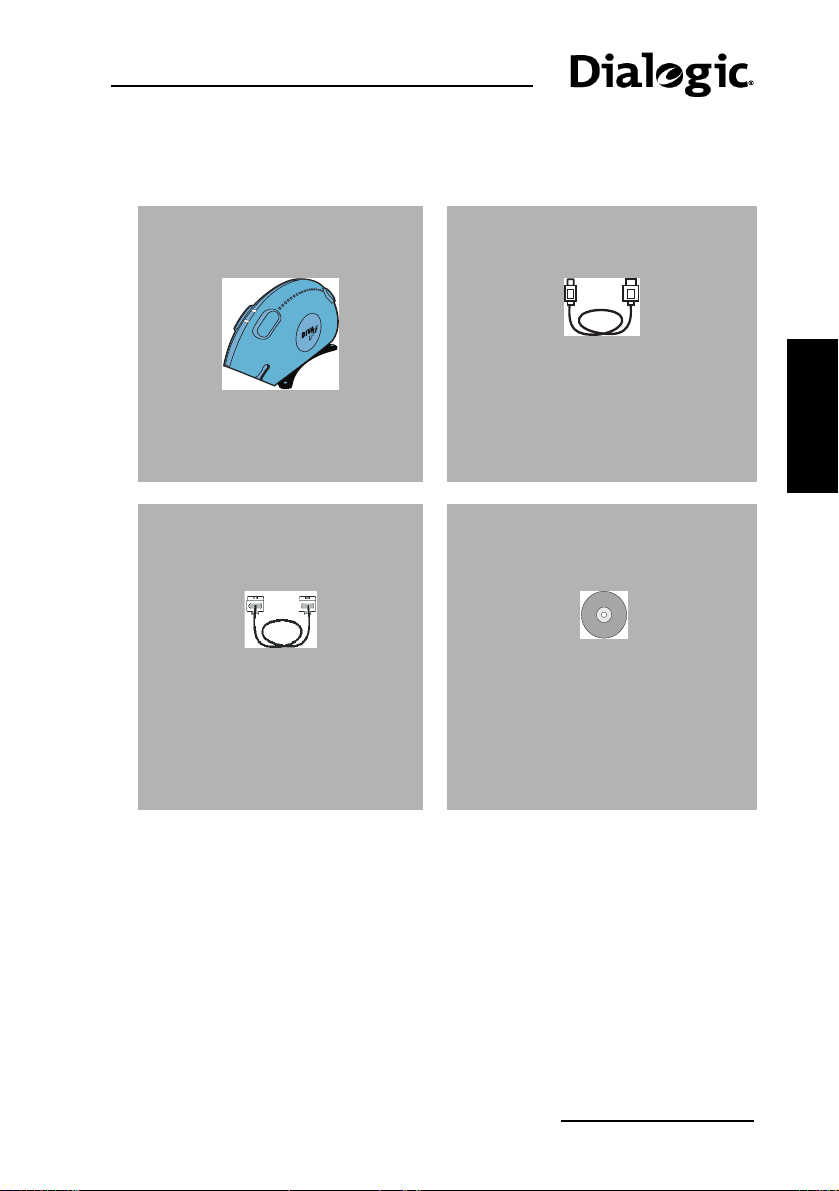
Der Lieferumfang hängt von der Diva Client Karte ab, die Sie erworben haben.
• Für eine Diva ISDN PCI und Diva Pro PCI sehen Sie unten.
• Für eine Diva Pro PC Card sehen Sie Seite 20.
• Für eine Diva ISDN USB sehen Sie Seite 21.
DEUTSCH
Lieferumfang der Diva ISDN PCI und Diva Pro PC
Zum Lieferumfang der Karte gehören:
Diva ISDN PCI oder
Diva Pro PCI
Setzen Sie die Karte
in einen freien
PCI-Steckplatz
Ihres Computers
ein.
ISDN-Kabel Diva Client Software
Verwenden Sie
dieses Kabel zum
Anschluss der Karte
an die
ISDN-Steckdose.
Suite CD-ROM
Verwenden Sie diese
CD zur Installation
der Software und
zum Lesen der
Dokumentation.
Seite 19
Page 20

Lieferumfang der Diva Pro PC Card
Zum Lieferumfang der Karte gehören:
DEUTSCH
Lieferumfang Ihrer Diva Client Karte
Diva Pro PC Card ISDN-Dongle
Verwenden Sie den ISDN-Dongle
zum Anschluss der Diva Pro PC
Card an die ISDN-Leitung.
ISDN-Kabel Diva Client Software Suite
Verwenden Sie dieses Kabel
zum Anschluss der Diva Pro PC
Note: Die Diva Pro 3.0 PC Card benötigt keinen Dongle zum Anschluss an die
ISDN-Leitung.
Card an die
ISDN-Wandsteckdose.
Verwenden Sie diese CD zur
Installation der Software und
zum Lesen der Dokumentation.
CD-ROM
Seite 20
Page 21
Dialogic Diva Client Kurzübersicht
Lieferumfang der Diva ISDN USB
Zum Lieferumfang der Diva ISDN USB gehören:
Diva ISDN USB und Halterung USB-Kabel
Verwenden Sie dieses Kabel zum
Anschluss der Diva ISDN USB an
Ihren Computer.
DEUTSCH
ISDN-Kabel Diva Client Software Suite
Verwenden Sie dieses Kabel
zum Anschluss der Diva ISDN
USB an die
ISDN-Wandsteckdose.
CD-ROM
Verwenden Sie diese CD zur
Installation der Software und zum
Lesen der Dokumentation.
Seite 21
Page 22

DEUTSCH
e
Installation Ihrer Diva Client Karte
Installation Ihrer Diva Client Karte
Hauptkomponenten der Diva ISDN USB
Nehmen Sie sich vor der Installation der Diva ISDN USB ein paar Minuten Zeit,
um sich mit den wesentlichen Komponenten vertraut zu machen.
Eine Leuchtdiode,
Leuchtdioden
(LEDs), eine für
jeden B-Kanal, die
den Status der
ISDN-Verbindung
ISDN-Schnittstelle
Die Installation hängt von der Karte ab, die Sie erworben haben:
• Für eine Diva ISDN PCI und Diva Pro PCI sehen Sie unten.
• Für eine Diva Pro PC Card sehen Sie Seite 23.
• Für eine Diva ISDN USB sehen Sie Seite 24.
Zwei
anzeigen.
die den Status der
Diva ISDN
USB-Verbindung
zum Computer
anzeigt.
USB-Schnittstell
Halterung
Einsetzen der Diva ISDN PCI und Diva Pro PCI
Warning: Zu Ihrer eigenen Sicherheit sollten Sie erst die Diva Client
Karte in den Computer einbauen und dann die ISDN-Leitung
anschließen.
1. Schalten Sie den PC und alle Peripheriegeräte aus.
2. Berühren Sie ein Metallteil des PCs (z. B. die nicht lackierte Metallplatte
auf der Rückseite), um statische Ladungen zu entladen.
3. Ziehen Sie das Netzkabel vom PC ab.
4. Entfernen Sie die Abdeckung gemäß der Beschreibung im PC-Handbuch.
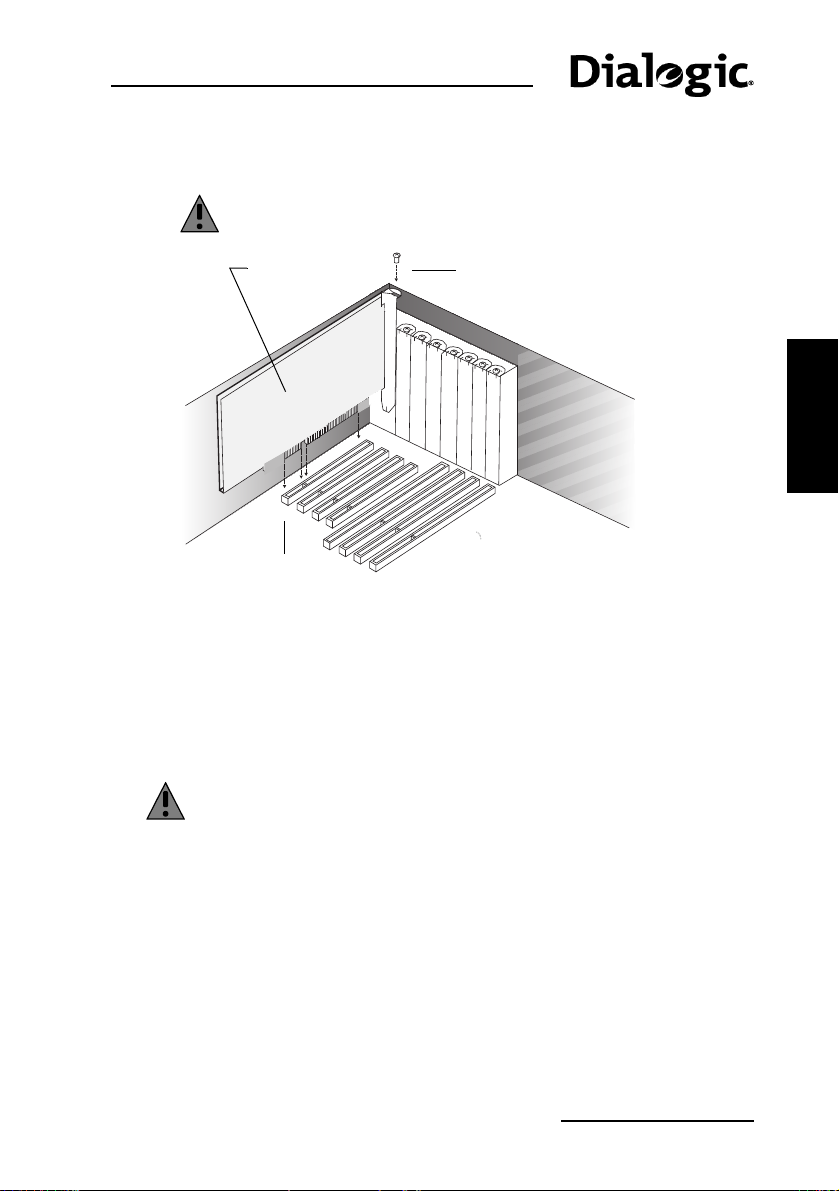
5. Suchen Sie in Ihrem PC einen freien PCI-Steckplatz. Falls Ihr PC sowohl
PCI- als auch ISA-Steckplätze enthält, orientieren Sie sich an der
Abbildung auf der nächsten Seite (PCI-Steckplätze sind kürzer).
6. Entfernen Sie ggf. die hintere Metallabdeckung des Steckplatzes. Achten
Sie darauf, die Schraube nicht zu verlieren.
Seite 22
Page 23
Dialogic Diva Client Kurzübersicht
7. Setzen Sie die Karte in den gewählten Steckplatz ein und drücken Sie sie
fest (siehe Abbildung).
Warning: Um den PC oder die Karte nicht zu beschädigen, dürfen
Sie die Karte nur in einen PCI-Steckplatz einsetzen.
Diva PCI Karte
PCI-Steckplatz
8. Befestigen Sie die Karte mit der Schraube, um sicherzustellen, dass sie
fest mit dem PC-Gehäuse verbunden ist.
9. Bringen Sie die Abdeckung gemäß der Beschreibung im PC-Handbuch
wieder an.
10. Schließen Sie das Netzkabel des Computers wieder an.
Schraube
Einbauen der Diva Pro PC Card
Warning: Zu Ihrer eigenen Sicherheit sollten Sie erst die Diva Pro PC
Card in das Notebook einbauen und dann die ISDN-Leitung
anschließen.
DEUTSCH
1. Schließen Sie alle Anwendungen auf Ihrem Notebook. Sie können das
Notebook eingeschaltet lassen.
2. Stecken Sie den ISDN-Dongle in die ISDN-Buchse der Diva Pro PC Card.
Note: Die Diva Pro 3.0 PC Card benötigt keinen Dongle zum Anschluss an
das ISDN.
3. Stecken Sie die Karte so in den PC Card-Steckplatz (Typ II oder Typ III)
Ihres Notebooks, dass das Etikett nach oben zeigt. Ein Pfeil auf dem Etikett
gibt an, welches Ende eingesteckt werden muss.
Seite 23
Page 24
Anschließen der ISDN-Leitung
Anschließen der Diva ISDN USB
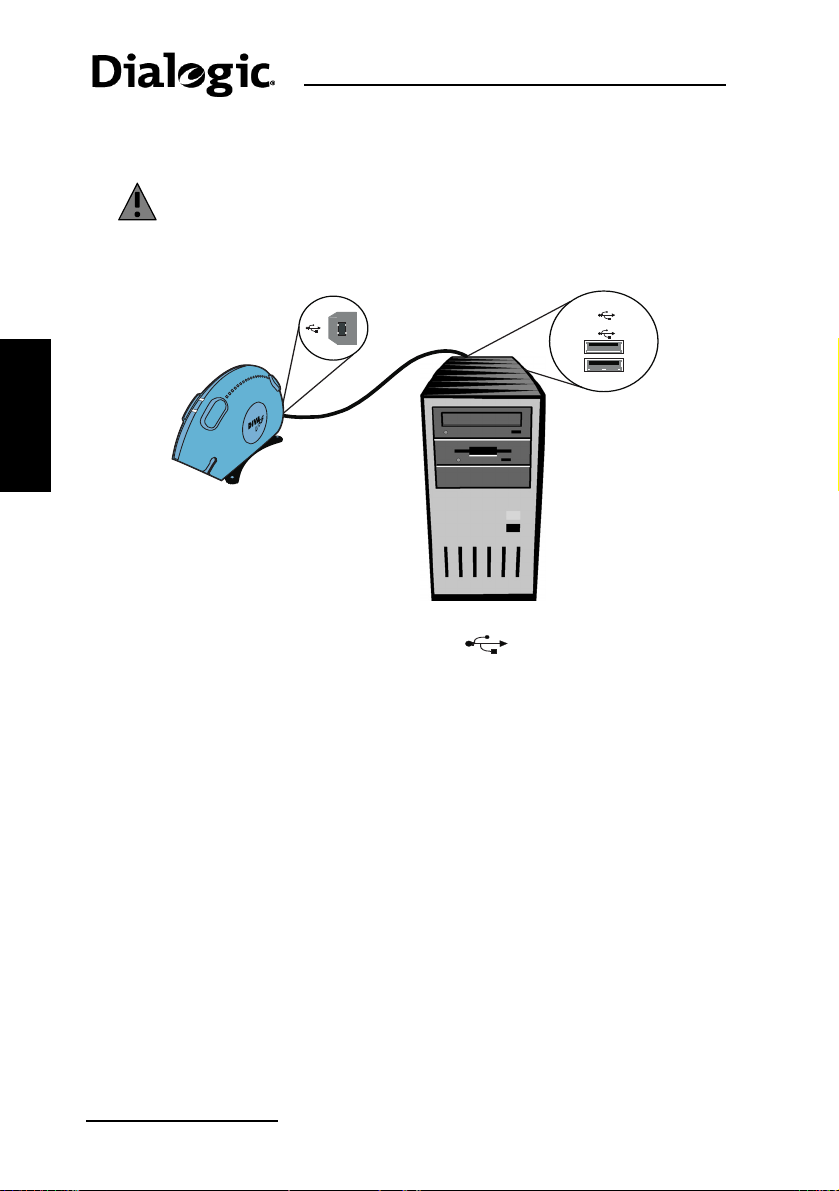
Warning: Zu Ihrer eigenen Sicherheit sollten Sie erst die Diva ISDN
USB am Computer anschließen und dann die ISDN-Leitung.
Sie können die Diva ISDN USB an einen Desktop-Computer oder ein Notebook
anschließen. Lassen Sie den Computer während der Installation eingeschaltet.
DEUTSCH
Anschließen der ISDN-Leitung
USB-Schnittstelle
2.
USB-Anschlüsse
3.
3.
1
USB
2
1.
USB-Kabel
1. Nehmen Sie das mitgelieferte USB-Kabel zur Hand. Sie können dieses
Kabel problemlos an dem USB-Symbol erkennen, das auf dem
Stecker angebracht ist.
2. Stecken Sie ein Ende des USB-Kabels in die USB-Schnittstelle der Diva
ISDN USB.
3. Stecken Sie das andere Ende des USB-Kabels in einen der vorhandenen
USB-Anschlüsse am Computer.
1. Nehmen Sie das mitgelieferte ISDN-Kabel zur Hand.
2. Stecken Sie ein Ende des Kabels in die Diva Client Karte.
3. Stecken Sie das andere Ende in die ISDN-Wandsteckdose.
Seite 24
Page 25
Dialogic Diva Client Kurzübersicht
Installation der Diva Client for Windows Software
Um alle Leistungsmerkmale von Diva Client for Windows nutzen zu können,
müssen Sie die Diva Client for Windows Software auf Ihrem Computer
installieren.
Note: Sie müssen sich mit Administratorrechten anmelden, um Diva Client
for Windows installieren zu können.
Installation der ISDN-Treiber von Microsoft Windows
2000/XP/Server 2003/Vista
Nachdem Sie Ihre Diva Client Karte angeschlossen und mit der ISDN-Leitung
verbunden haben, schalten Sie Ihren Computer ein. Unter Windows
2000/XP/Server 2003/Vista wird die neue Hardware automatisch erkannt.
Der zutreffende Installationsvorgang – Installationsvorgang 1 oder
Installationsvorgang 2 – hängt davon ab, welches Dialogfeld auf Ihrem
Bildschirm angezeigt wird.
Note: Die Dialogfelder von Windows XP, Server 2003 und Vista können sich
von den unten abgebildeten Dialogfeldern geringfügig unterscheiden.
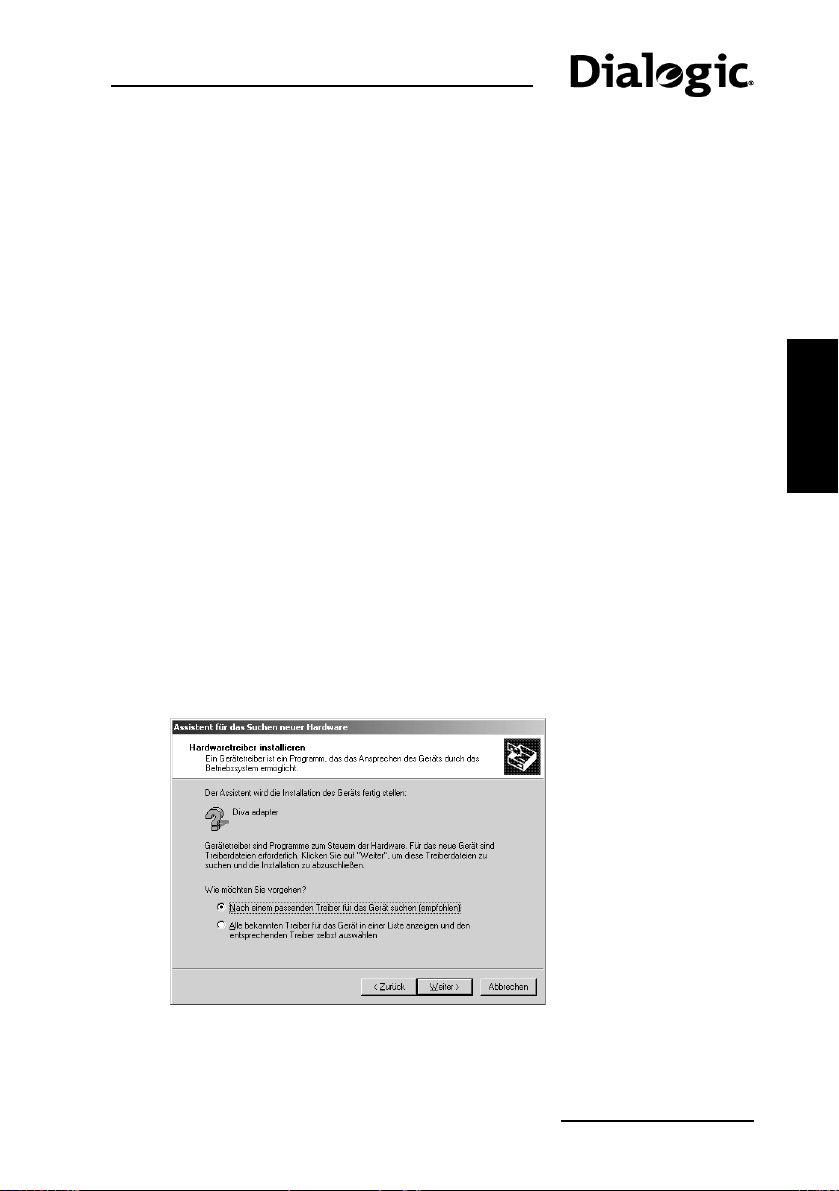
Installationsvorgang 1
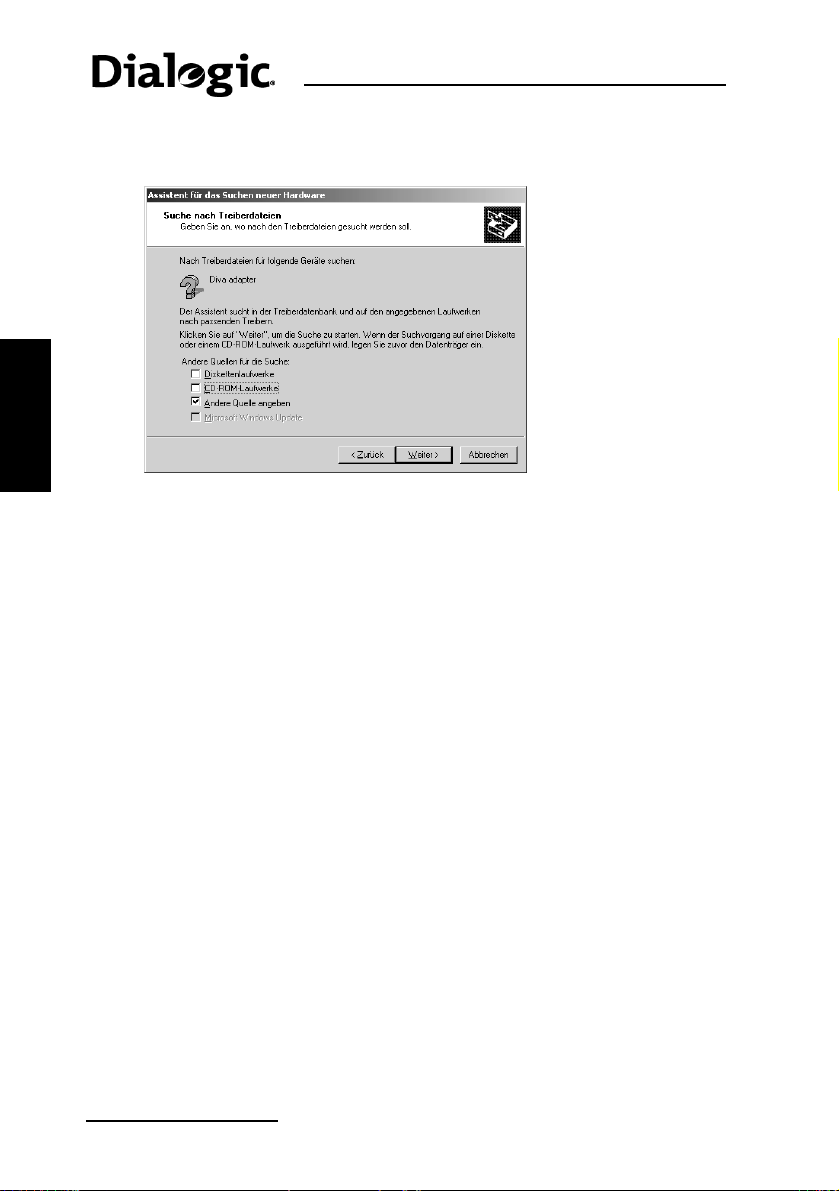
1. Wenn Windows 2000/XP/Server 2003/Vista keine eigenen Treiber für die
Karte installieren kann, wird der ‘Assistent für das Suchen neuer
Hardware’ angezeigt. Klicken Sie auf ‘Weiter’.
2. Klicken Sie auf ‘Nach einem passenden Treiber für das Gerät suchen
(empfohlen)’.
DEUTSCH
Klicken Sie auf ‘Weiter’.
Seite 25
Page 26
DEUTSCH
Installation der Diva Client for Windows Software
3. Im Fenster ‘Suche nach Treiberdateien’ wählen Sie ‘Andere Quelle
angeben’.
Legen Sie die Diva Client Software Suite CD-ROM ein und klicken Sie auf
‘Weiter’.
4. Geben Sie bei entsprechender Aufforderung die Quelle
D:\WIN_2K\INSTALL ein (wobei D: den Laufwerksbuchstaben des
CD-ROM-Laufwerks bezeichnet) und klicken Sie auf ‘Weiter’.
5. Folgen Sie den Anweisungen auf dem Bildschirm.
6. Nach der Aktualisierung der Treiber erfolgt die Installation der Diva Tools.
7. Starten Sie den Computer neu, wenn Sie dazu aufgefordert werden. Nach
dem Neustart wird die Installation der Diva Tools fertig gestellt.
Anschließend erfolgt die Installation des Diva Assistenten.
Installationsvorgang 2
1. Wenn Windows 2000/XP/Server 2003/Vista automatisch die eigenen
ISDN-Treiber installiert, wird der ‘ISDN-Konfigurations-Assistent’
angezeigt.
2. Klicken Sie auf ‘Weiter’. Geben Sie das von Ihrem Netzbetreiber oder
Internet Provider verwendete Vermittlungsprotokoll (D-Kanal-Protokoll)
und dessen Einwahlnummer(n) an, um den Assistenten zu beenden.
Nachdem Sie die assistentengestützte ISDN-Konfiguration fertig gestellt
haben, müssen Sie die automatisch installierten Treiber mit der Software Diva
Client for Windows aktualisieren. Die Software Diva Client for Windows stellt
zusätzliche Funktionen und Tools zur Verfügung, die die automatisch
installierten Windows-Treiber nicht zur Verfügung stellen.
Seite 26
Page 27

Dialogic Diva Client Kurzübersicht
So aktualisieren Sie die Treiber mit der Software
Diva Client for Windows
1. Legen Sie die Diva Server Software Suite CD-ROM in das
CD-ROM-Laufwerk ein. Der Begrüßungsbildschirm der Diva Client
Software Suite wird in der Regel automatisch angezeigt.
Erfolgt die Anzeige nicht automatisch, klicken Sie auf ‘Start > Ausführen’.
Geben Sie im Dialogfeld ‘Ausführen’ den Befehl D:\CDSETUP.EXE ein
(wobei D: den Laufwerksbuchstaben des CD-ROM-Laufwerks bezeichnet).
Klicken Sie auf ‘OK’.
2. Klicken Sie im Begrüßungsdialog ‘Willkommen’ auf ‘Installation’.
3. Klicken Sie auf ‘Diva Software for Windows 2000/XP/Server 2003/Vista
Upgrade’.
4. Folgen Sie den Anweisungen auf Ihrem Bildschirm bis der Diva Client for
Windows-Assistent angezeigt wird.
5. Klicken Sie im Diva Client for Windows-Assistenten auf ‘Start’.
Note: Wenn die Schaltfläche ‘Start’ nicht zur Verfügung steht, enthält
die CD-ROM dieselbe oder eine ältere Version der automatisch
installierten Software. Sollte dies zutreffen, können Sie die Installation
abbrechen und den Rest dieser Ausführungen überspringen.
6. Folgen Sie den Anweisungen auf dem Bildschirm.
7. Nach der Aktualisierung der Treiber erfolgt die Installation der Diva-Tools.
8. Starten Sie den Computer neu, wenn Sie dazu aufgefordert werden. Nach
dem Neustart wird die Installation der Diva Tools abgeschlossen.
Anschließend erfolgt die Installation des Diva Assistenten.
DEUTSCH
Testen der Hardware und der ISDN-Verbindungen
Zum Überprüfen der korrekten Funktionsweise von Diva Client Karte,
ISDN-Kabel und ISDN-Verbindung sollten Sie folgenden Test durchführen.
Verwenden Sie dazu die Software Diva Client Anschlusstest, das bei der
Installation der Software automatisch eingerichtet wurde.
1. Klicken Sie auf ‘Start > Programme > Diva Client for Windows > Diva
Client Anschlusstest’. Klicken Sie in der Registerkarte ‘Anschluss’ auf
‘Start’.
2. Wenn die Diva Client Karte, das ISDN-Kabel und die ISDN-Verbindung
ordnungsgemäß funktionieren, erhalten Sie diese Meldung:
‘Anschlusstest bestanden’
3. Klicken Sie auf ‘Schließen’.
Seite 27
Page 28

Problembehandlung
DEUTSCH
Testen der Hardware und der ISDN-Verbindungen
Wenn Probleme bei der Verwendung der Diva Client Karte auftreten, versuchen
Sie diese anhand der im Dialogic Help Web angegebenen Lösungsvorschläge
(D
OC/HELPWEB/DEFAULT.HTM) zu beheben. Das Help Web ist auf der Diva Client
Software Suite CD-ROM enthalten.
Wenn Sie über Internetzugang verfügen, können Sie die jeweils aktuellste
Version des Help Web unter der Adresse
http://www.dialogic.com/support/helpweb abrufen.
Seite 28
Page 29
Dialogic Diva Client Démarrage Rapide
Dialogic Diva Client Démarrage Rapide
Ce manuel de démarrage rapide explique comment installer:
®
• les cartes Dialogic
• la carte Dialogic Diva Pro PC Card
• l’adaptateur Dialogic Diva ISDN USB
et le logiciel Dialogic Diva Client for Windows
Pour savoir comment configurer la carte Diva Client après son installation,
reportez-vous au Diva for Windows Reference Guide (en anglais) disponible
sur le Diva Client Software Suite CD-ROM sous ‘Documentation’.
Diva® ISDN PCI et Diva Pro PCI
®
2000/XP/Server 2003/Vista.
La boîte doit contenir les éléments suivants
Le contenu de la boîte diffère selon la carte Diva Client que vous avez achetée
• Pour les cartes Diva ISDN PCI et Diva Pro PCI, voir ci-dessous.
• Pour la carte Diva Pro PC Card, voir page 30.
• Pour l'adaptateur Diva ISDN USB, voir page 31.
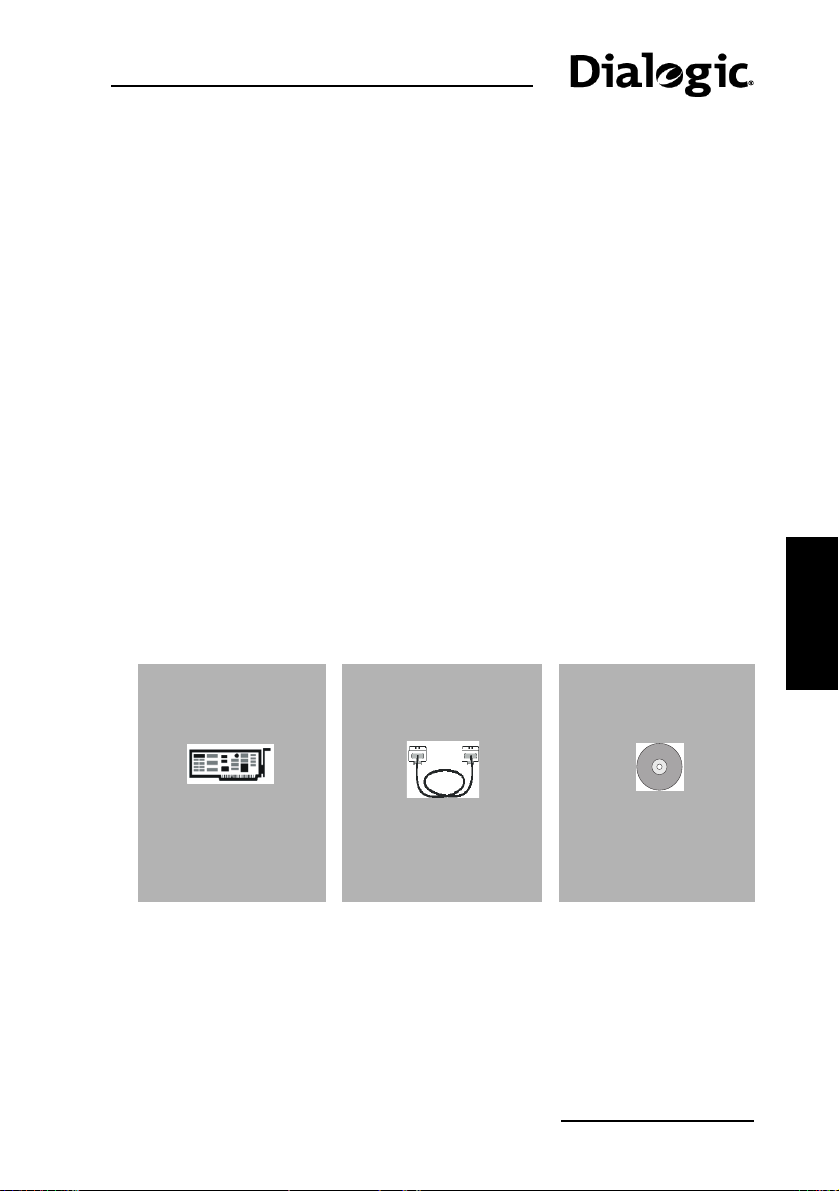
Contenu des boîtes des cartes Diva ISDN PCI et Diva Pro PCI
Votre boîte devrait contenir les éléments suivants :
Carte Diva Client Câble RNIS Diva Client Software
Suite CD-ROM
FRANÇAIS
Insérez la carte
dans un
connecteur PCI
disponible de votre
ordinateur.
Utilisez le câble pour
connecter la carte à la
prise murale.
Le CD-ROM contient
le logiciel et la
documentation.
page 29
Page 30
La boîte doit contenir les éléments suivants
Contenu de la boîte de la carte Diva Pro PC Card
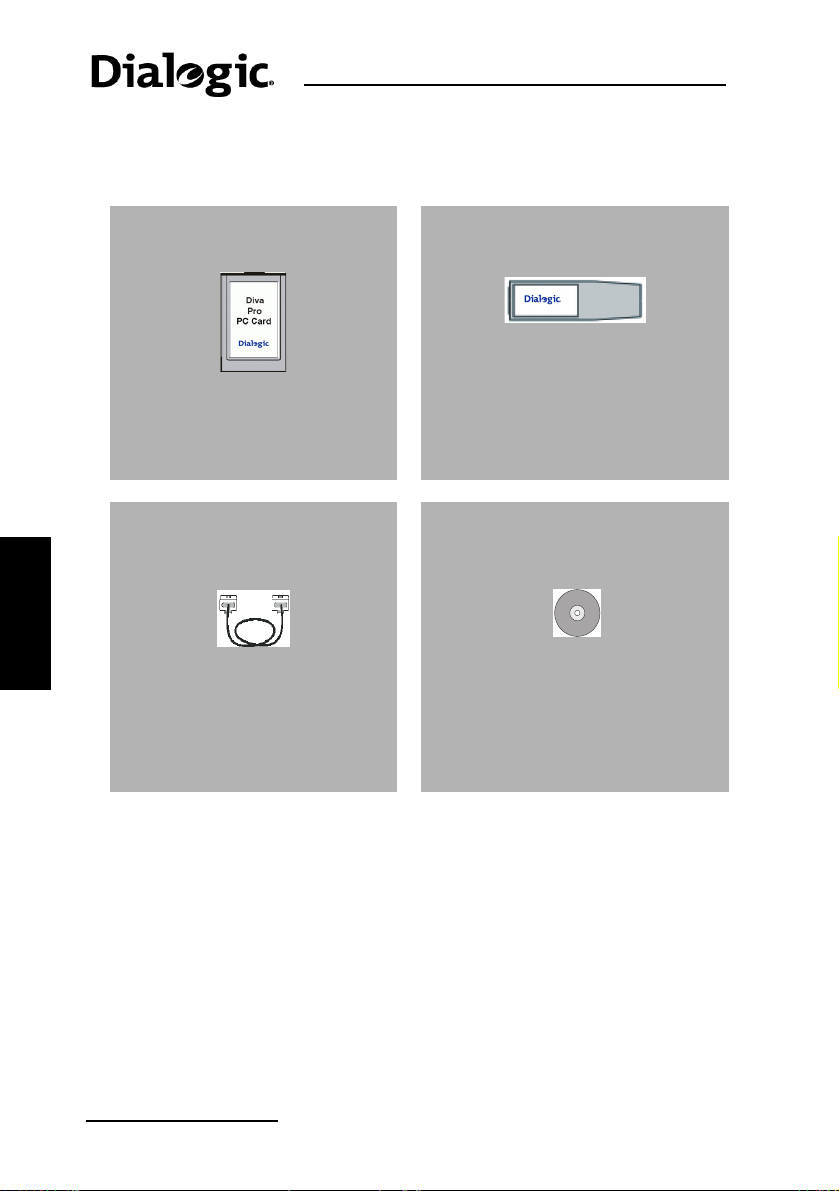
Votre boîte devrait contenir les éléments suivants :
Diva Pro PC Card Dongle RNIS
Le dongle RNIS permet de
connecter la Diva Pro PC Card au
réseau RNIS.
FRANÇAIS
Note: Pour la connexion de la Diva Pro 3.0 PC Card au réseau RNIS, on n‘a
plus besoin d’un dongle.
Câble RNIS Diva Client Software Suite
Ce câble permet de connecter la
Diva Pro PC Card à la prise
murale RNIS.
CD-ROM
Le CD-ROM contient le logiciel et
la documentation.
page 30
Page 31
Dialogic Diva Client Démarrage Rapide
Contenu de la boîte de Diva ISDN USB
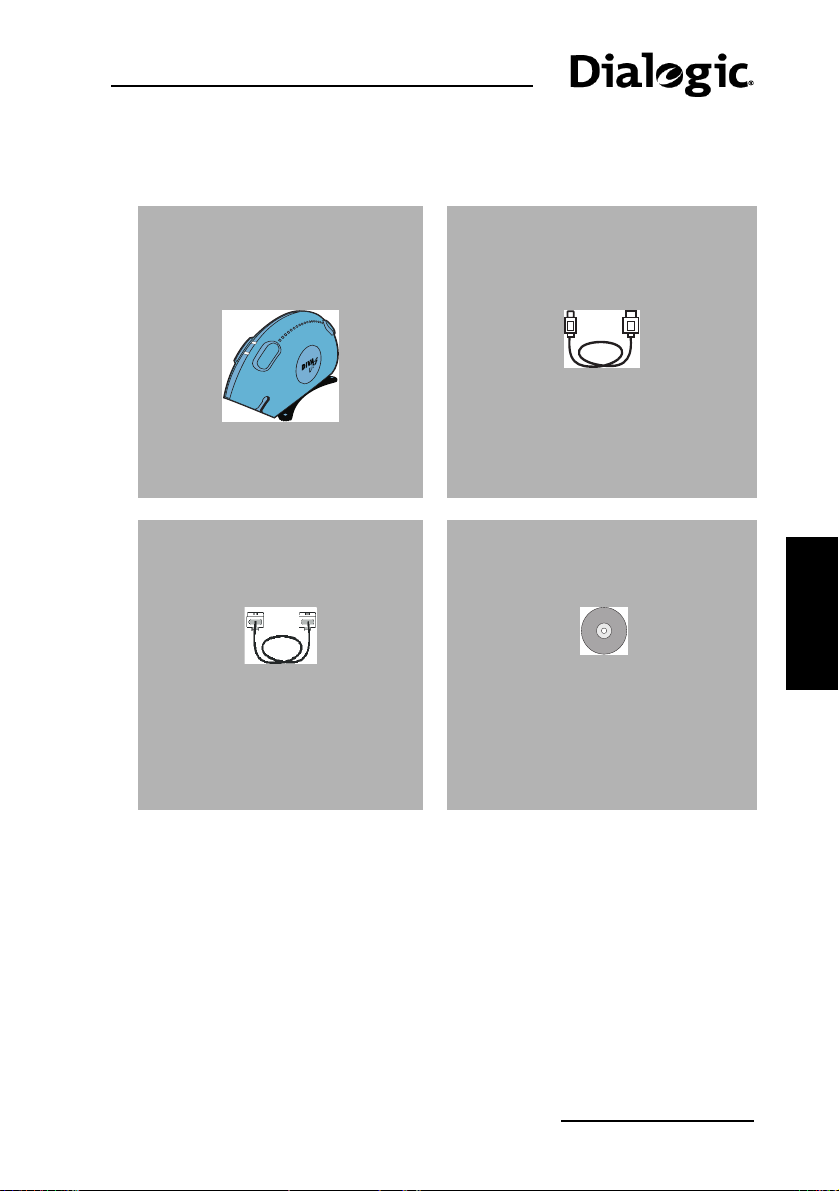
Votre boîte devrait contenir les éléments suivants :
Adaptateur Diva ISDN USB et
support
Câble RNIS Diva Client Software Suite
Ce câble permet de connecter
l’adaptateur Diva ISDN USB à la
prise murale RNIS.
Câble USB
Ce câble permet de connecter
Diva ISDN USB à l'ordinateur.
CD-ROM
FRANÇAIS
Le CD-ROM contient le logiciel et
la documentation.
page 31
Page 32
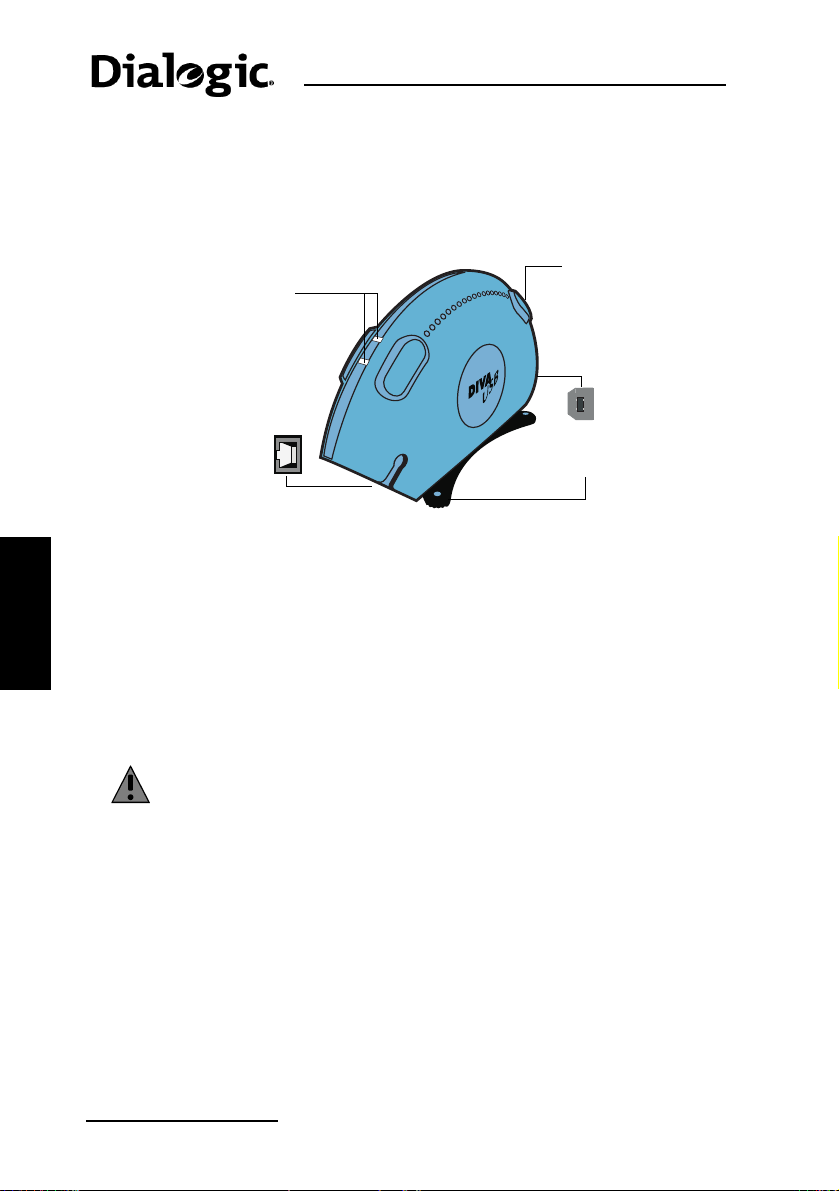
Installez la carte Diva Client
Identifiez les principaux composants de l’adaptateur Diva
ISDN USB
Avant d'installer l’adaptateur Diva ISDN USB, consacrez quelques minutes à
l'identification de ses principaux composants.
affichant l'état de la
FRANÇAIS
Installez la carte Diva Client
L'installation diffère selon la carte Diva Client que vous avez achetée :
• Pour les cartes Diva ISDN PCI et Diva Pro PCI, voir ci-dessous.
• Pour la carte Diva Pro PC Card, voir page 33.
• Pour l'adaptateur Diva ISDN USB, voir page 34.
Insérez votre carte Diva ISDN PCI ou Diva Pro PCI
1. Débranchez l'ordinateur ainsi que tous les périphériques.
2. Evacuez toute électricité statique en touchant le châssis métallique (partie
3. Retirez le cordon d'alimentation de l'ordinateur.
4. Retirez le capot de l'ordinateur, comme décrit dans le manuel d'utilisation
5. Localisez un emplacement PCI disponible. Si votre ordinateur dispose à
6. Si une plaque métallique se trouve à l'extrémité du connecteur, retirez-la
Deux témoins DEL,
un par canal B,
connexion RNIS.
Interface RNIS
Warning: Pour votre sécurité, installez la carte Diva Client avant de
vous connecter à la ligne RNIS.
métallique non peinte à l'arrière de l'ordinateur).
de l'ordinateur.
la fois de connecteurs ISA et PCI, les connecteurs PCI sont plus petits,
comme le montre l'illustration ci-dessous.
en veillant à conserver la vis.
Un témoin DEL
affichant l'état de
la connexion de
Diva ISDN USB à
votre ordinateur.
Interface USB
Support
page 32
Page 33
Dialogic Diva Client Démarrage Rapide
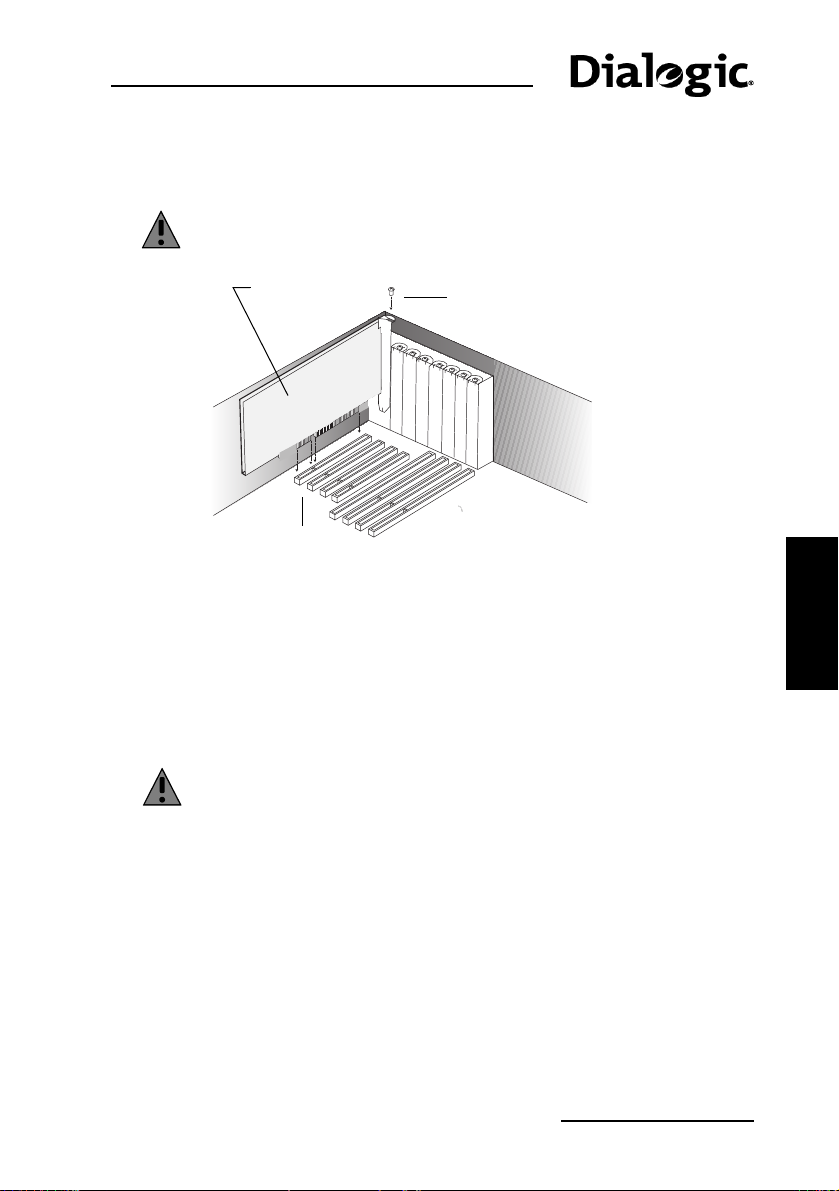
7. Insérez fermement la carte dans le connecteur sélectionné, comme le
montre l'illustration.
Warning: Pour ne pas endommager l'ordinateur et la carte, insérez
la carte uniquement dans un connecteur PCI.
Carte Diva
PCI
Connecteur PCI
8. Sécurisez la carte au moyen de la vis (afin de vous assurer qu'il est
correctement fixé au châssis de l'ordinateur).
9. Replacez le capot de l'ordinateur, comme décrit dans le manuel
d'utilisation de l'ordinateur.
10. Branchez l'ordinateur.
Vis
Installez votre Diva Pro PC Card
Warning: Pour votre sécurité, installez la carte Diva Pro PC avant
de vous connecter à la ligne RNIS.
1. Fermez toutes les applications éventuellement ouvertes sur l'ordinateur
portable. Vous pouvez laisser l'ordinateur sous tension.
2. Branchez le dongle RNIS dans la prise RNIS de la Diva Pro PC Card.
Remarque : Pour la connexion de la Diva Pro 3.0 PC Card au réseau
RNIS, on n‘a plus besoin d’un dongle.
3. Insérez la carte dans le connecteur de carte de l'ordinateur (type II ou
type III), l‘étiquette Diva Pro PC Card face vers le haut. La flèche figurant
sur l'étiquette indique dans quel sens la carte doit être insérée.
FRANÇAIS
page 33
Page 34
Connectez votre ligne RNIS
Installez l’adaptateur Diva ISDN USB
Vous pouvez installer l’adaptateur Diva ISDN USB sur un ordinateur de bureau
ou sur un portable. Maintenez l'ordinateur sous tension au cours de
l'installation.
Warning: Pour votre sécurité, installez l’adaptateur Diva ISDN USB
avant de vous connecter à la ligne RNIS.
FRANÇAIS
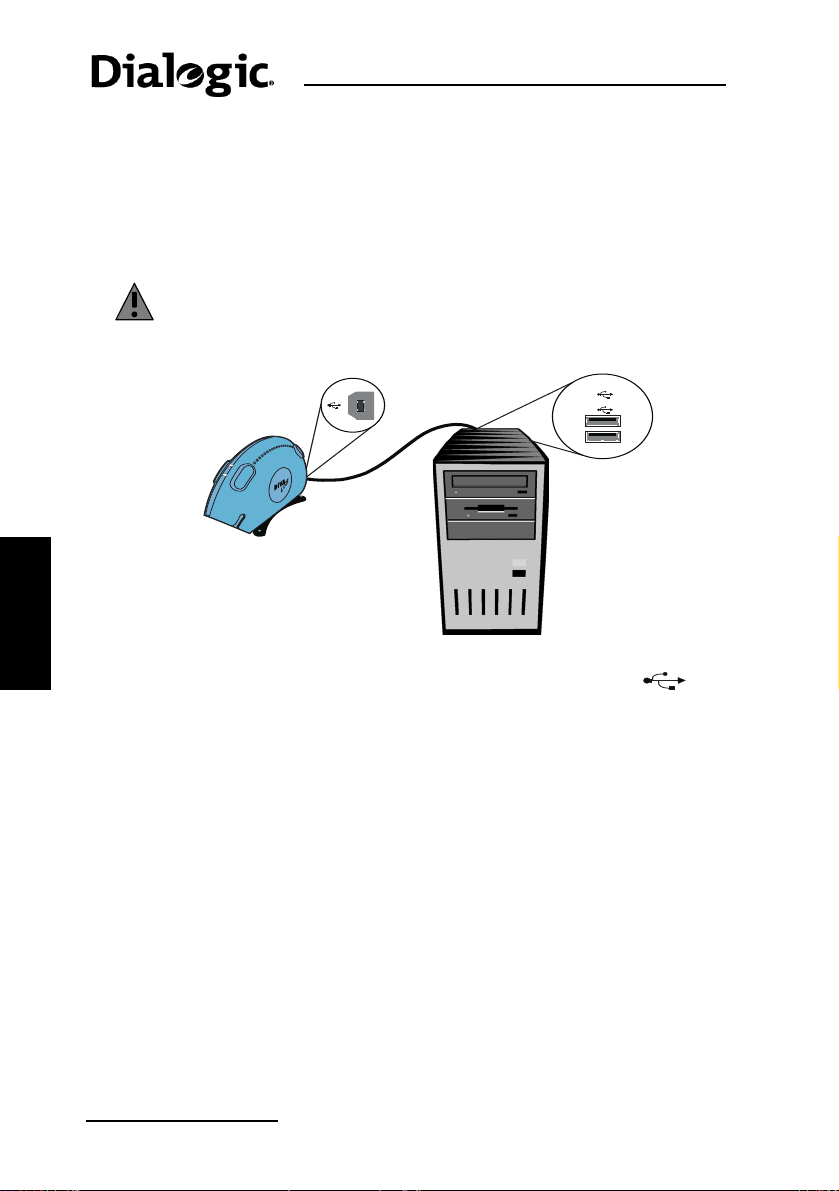
1. Munissez-vous du câble USB livré avec l’adptateur Diva ISDN USB. Il est
2. Branchez l'une des extrémités du câble USB dans l'interface USB de
3. Branchez l'autre extrémité du câble USB dans n'importe quel port USB
Connectez votre ligne RNIS
En Europe et dans la plupart des pays autres que le Canada, les Etats-Unis et
le Japon, vous pouvez connecter la carte Diva Client directement à la ligne
RNIS à l'aide du câble fourni avec ce-dernier, comme décrit ci-dessous.
1. Munissez-vous du câble RNIS livré avec la carte Diva Client.
2. Branchez l'une des extrémités dans la carte Diva Client.
3. Branchez l'autre extrémité dans la prise murale RNIS.
Interface USB
2.
Ports USB
3.
1
USB
2
1.
CâbleUSB
reconnaissable grâce au symbole USB figurant sur sa prise : .
l'adaptateur.
disponible de votre ordinateur.
page 34
Page 35
Dialogic Diva Client Démarrage Rapide
Installez le logiciel Diva Client for Windows
Pour configurer les communications RNIS, vous devez installer le logiciel Diva
Client for Windows sur votre ordinateur.
Note: Vous devez être connecté avec les droits d'administration.
Installez les pilotes RNIS Microsoft Windows 2000/XP/Server
2003/Vista
Une fois la carte Diva Client connecté, mettez l'ordinateur sous tension.
Windows 2000/XP/Server 2003/Vista détecte le nouveau matériel.
La procédure dépend de la boîte de dialogue qui s'affiche (Scénario 1 ou 2).
Note: Les écrans de Windows XP, Windows Server 2003 et Windows Vista
peuvent présenter de légères différences avec ceux ci-dessous.
Scénario 1
1. Si Windows 2000/XP/Server 2003/Vista ne peut installer ses propres
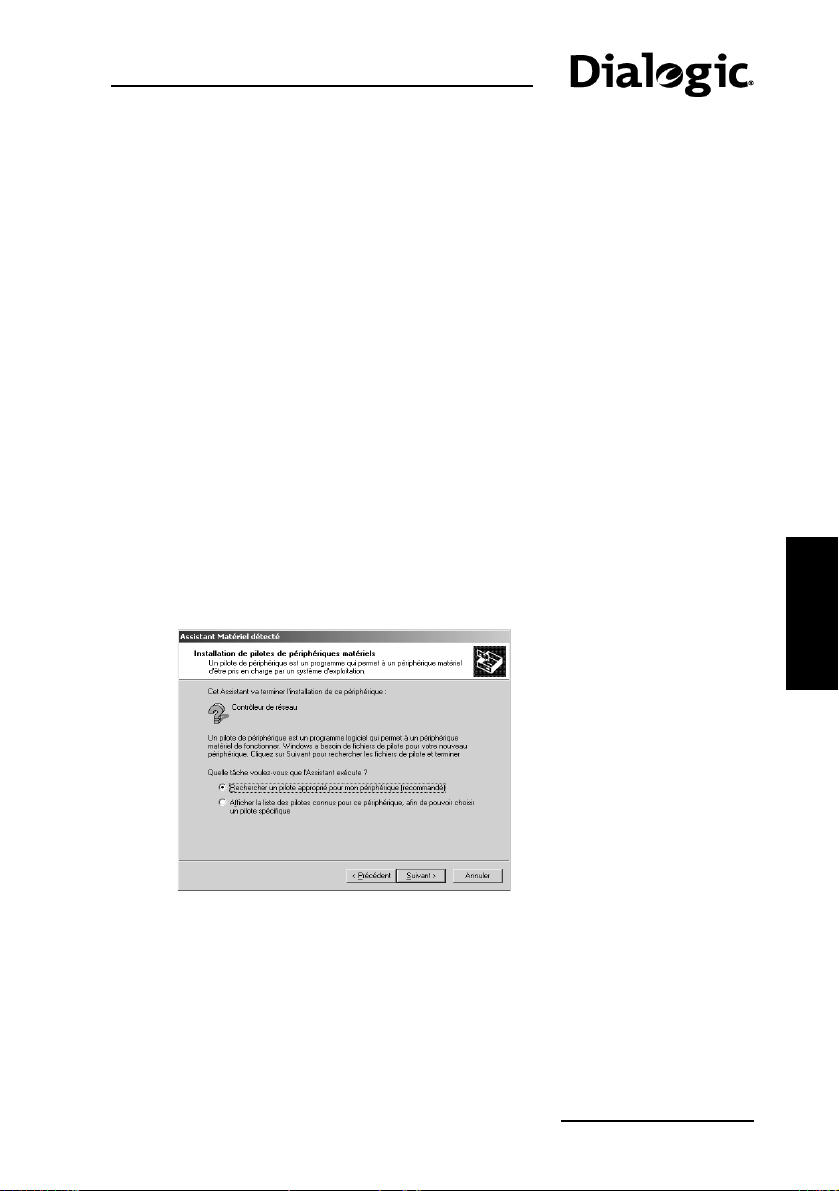
pilotes pour votre carte, l'Assistant ‘Ajout de nouveau matériel’ s'affiche.
Cliquez sur ‘Suivant’ et effectuez la procédure ci-dessous.
2. Sélectionnez d'abord ‘Rechercher un pilote approprié pour mon
périphérique (recommandé)’. Cliquez sur ‘Suivant’.
page 35
FRANÇAIS
Page 36
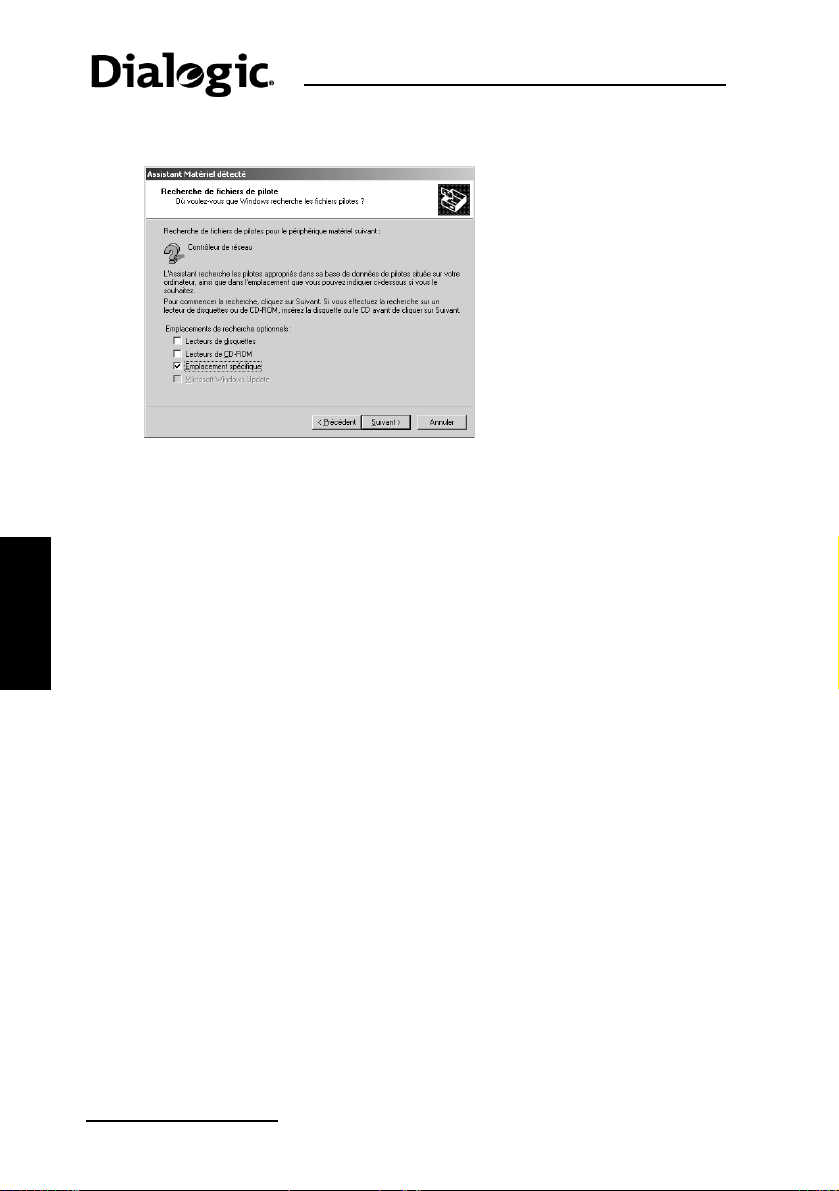
3. Assurez-vous que seule l'option ‘Emplacement spécifique’ est activée.
4. Lorsque vous y serez invité, entrez le chemin suivant :
FRANÇAIS
5. Suivez les instructions affichées.
Installez le logiciel Diva Client for Windows
Insérez le CD-ROM Diva Client Software Suite dans le lecteur CD-ROM,
puis cliquez sur ‘Suivant’.
D:\WIN_2K\INSTALL
(D: correspondant à la lettre de votre lecteur CD-ROM), puis cliquez sur
‘Suivant’.
Une fois les pilotes mis à jour, l'installation des outils Diva commence.
Redémarrez l'ordinateur lorsque vous y serez invité. Une fois l'ordinateur
redémarré, l'installation des outils Diva est terminée et l’Assistant Diva
est installé.
Scénario 2
1. Si Windows 2000/XP/Server 2003/Vista installe automatiquement ses
propres pilotes RNIS, l'Assistant ‘Configuration RNIS’ s'affiche.
2. Cliquez sur ‘Suivant’. Entrez le protocole de connexion que votre
compagnie de téléphonie ou votre fournisseur d'accès Internet utilise ainsi
que son ou ses numéro(s) de téléphone pour terminer la configuration
RNIS.
Lorsque l'exécution de l'Assistant ‘RNIS Microsoft’ est terminée, vous
devez mettre à jour les pilotes automatiquement configurés avec le
logiciel Diva Client for Windows 2000/XP/Server 2003/Vista. Ce logiciel
propose des fonctionnalités et des outils que ne comportent pas les pilotes
installés automatiquement par Windows.
page 36
Page 37

Dialogic Diva Client Démarrage Rapide
Pour mettre à jour les pilotes avec le logiciel Diva Client for
Windows 2000/XP/Server 2003/Vista
1. Insérez le Diva Client Software Suite CD-ROM dans le lecteur. L'écran de
bienvenue de la Diva Server Software Suite devrait apparaître
automatiquement.
Si ce n'est pas le cas, cliquez sur ‘Démarrer > Exécuter’. Dans la boîte de
dialogue ‘Exécuter’, tapez D:\CDSETUP.EXE (D: correspondant à la lettre
de votre lecteur CD-ROM). Cliquez sur ‘OK’.
2. A partir de l'écran de bienvenue de la Diva Client Software Suite, cliquez
sur ‘Installation’.
3. Cliquez sur ‘Mettre à jour de Diva for Windows
2000/XP/Server 2003/Vista’.
4. Suivez les instructions affichées à l'écran jusqu'à ce que l'Assistant Diva
Client for Windows 2000/XP/Server 2003/Vista apparaisse.
5. Dans l'Assistant ‘Diva Client for Windows 2000/XP/Server 2003/Vista’,
cliquez sur ‘Start’ (Démarrer).
Remarque : Si le bouton ‘Start’ (Démarrer) n'est pas disponible, le
logiciel du CD-ROM correspond à la même version que le logiciel installé
automatiquement, ou à une version antérieure. Dans ce cas, vous pouvez
ignorer le reste de cette procédure en cliquant sur ‘Cancel’ (Annuler) pour
quitter.
6. Suivez les instructions affichées.
7. Une fois les pilotes mis à jour, l'installation des outils Diva commence.
8. Redémarrez l'ordinateur lorsque vous y serez invité. Une fois l'ordinateur
redémarré, l'installation des outils Diva est terminée et l’Assistant Diva
est installé.
FRANÇAIS
Testez le matériel et la connexion RNIS
Pour vous assurer que l’adaptateur Diva Client, le câble et la connexion RNIS
fonctionnent correctement, vous devriez réaliser le test suivant. Vous utilisez
pour cela l'outil de contrôle de ligne Line Check, qui est installé
automatiquement avec le logiciel.
1. Cliquez sur ‘Démarrer > Programmes > Diva Client for Windows >
Diva Client Line Test’. Sélectionnez l'onglet ‘Line Check’ (Contrôle de
ligne), puis cliquez sur ‘Start’ (Démarrer).
2. Si la carte Diva Client, le câble et la connexion RNIS fonctionnent
correctement, le message suivant s'affiche :
‘Line Check passed.’
(‘Le test de contrôle de ligne a réussi.’)
3. Cliquez sur ‘Close’ (Terminer).
page 37
Page 38

Dépannage
Si la carte Diva Client présente des problèmes, essayez d'appliquer les conseils
proposés dans l'aide Dialogic Help Web (D
sur le CD-ROM Diva Client Software Suite.
Si vous disposez d'un accès à Internet, vous pouvez afficher la version la plus
récente de l'aide Help Web à l'adresse
http://www.dialogic.com/support/helpweb.
FRANÇAIS
Testez le matériel et la connexion RNIS
OC/HELPWEB/DEFAULT.HTM) disponible
page 38
Page 39
Dialogic Diva Client Instalación Rápida
Dialogic Diva Client Instalación Rápida
Este guía de instalación rápida proporciona instrucciones sobre cómo instalar:
• un adaptador Dialogic
• un adaptador Dialogic Diva Pro PCI,
• una tarjeta Dialogic Diva Pro PC,
• un adaptador Dialogic Diva ISDN USB
y sobre cómo instalar el software Diva Client for Windows
2003/Vista.
Para obtener más instrucciones sobre cómo configurar el adaptador Diva Client
una vez instalado consulte la guía Diva Client for Windows Reference Guide
(en inglés) incluida en el CD de Diva Client Software Suite en ‘Documentación’.
®
Diva® ISDN PCI,
®
2000/XP/Server
El paquete de su adaptador Diva Client
El contenido del paquete depende del tipo de adaptador que Usted tiene:
• Para Diva ISDN PCI y Diva Pro PCI véase a continuación.
• Para Diva Pro PC Card véase la página 40.
• Para Diva ISDN USB véase la página 41.
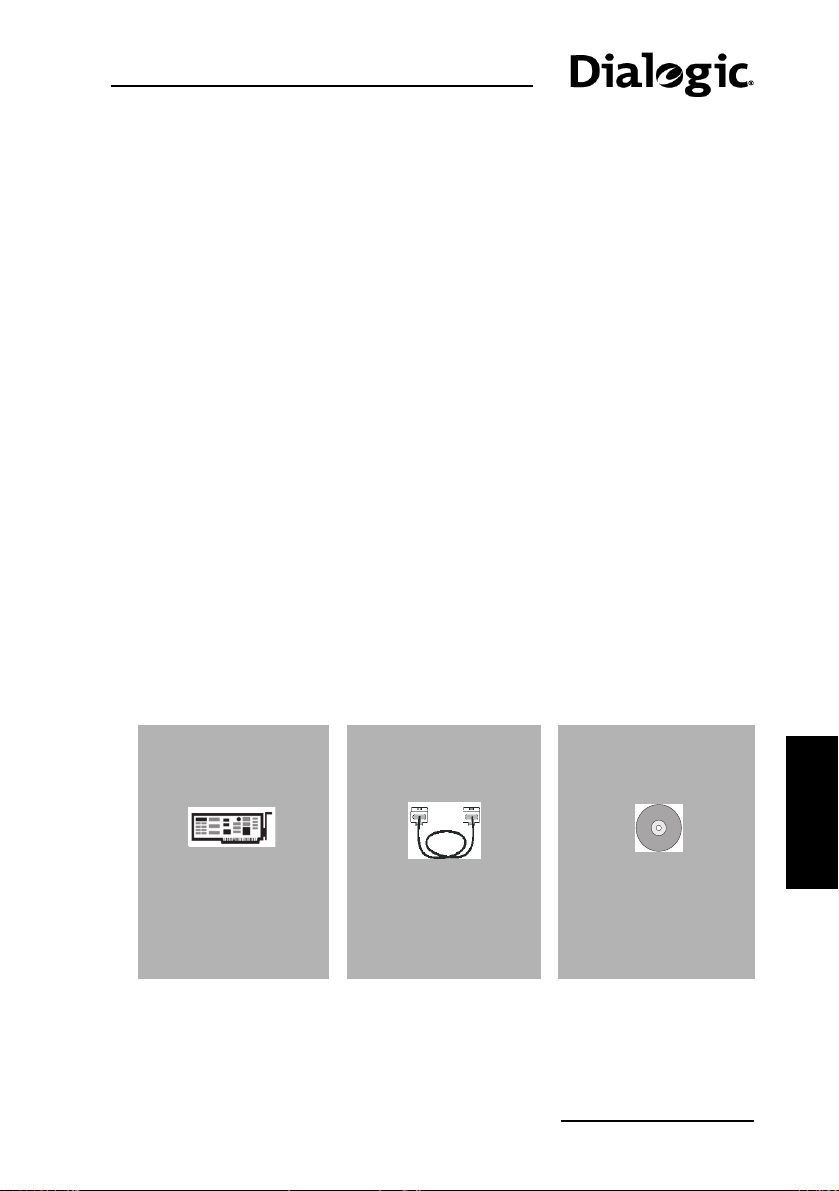
Paquete de Diva ISDN PCI y de Diva Pro PCI
El paquete debe contener lo siguiente:
Adaptador Diva
Client
Inserte el adaptador
en una ranura PCI
libre del ordenador.
Cable RDSI
Utilice el cable para
conectar el
adaptador Diva
Client al conector de
pared RDSI.
CD de Diva Client
Software Suite
Use este CD-ROM
para instalar el
software y ver la
documentación.
página 39
ESPAÑOL
Page 40
El paquete de su adaptador Diva Client
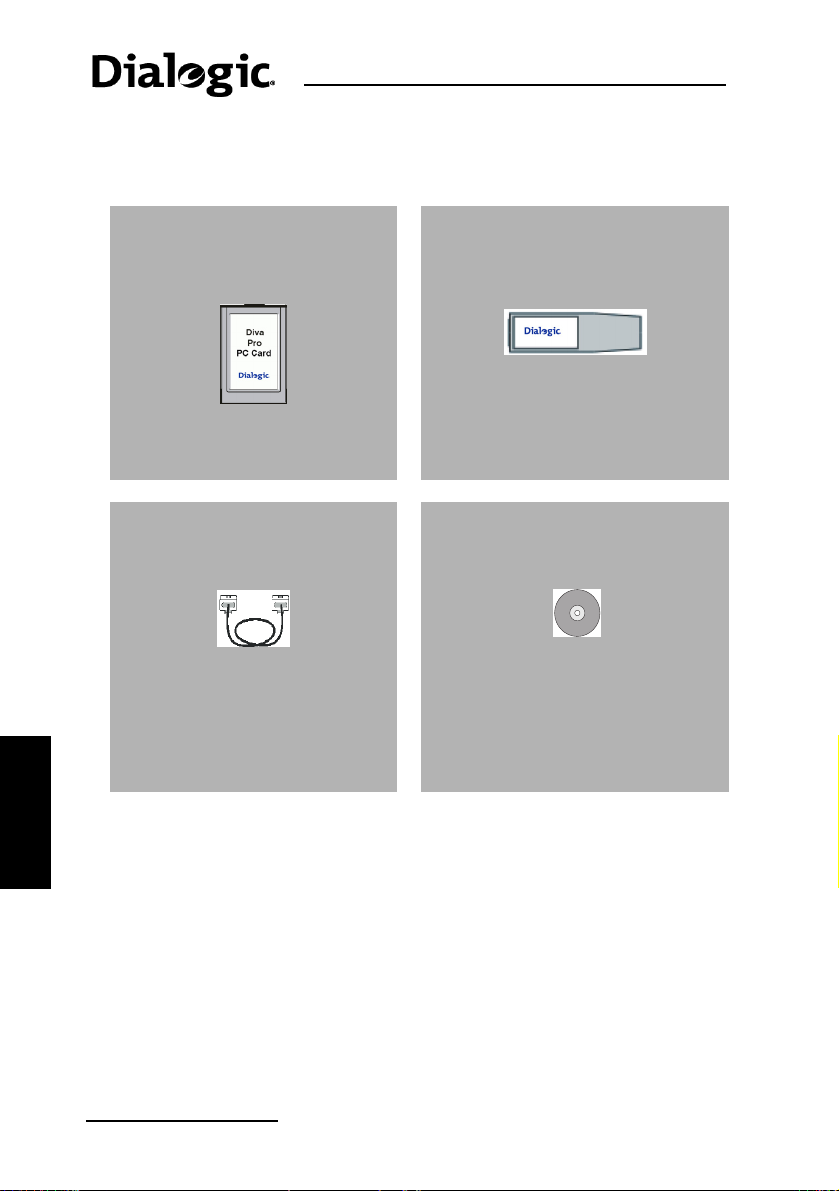
Paquete de Tarjeta Diva Pro PC
El paquete debe contener lo siguiente:
ESPAÑOL
Tarjeta Diva Pro PC Dispositivo de protección de
Utilice el dispositivo para
conectar la tarjeta a la línea RDSI.
Cable RDSI CD-ROM de Diva Client Software
Utilice este cable para conectar
la tarjeta al conector de pared
RDSI.
Use este CD-ROM para instalar el
software y ver la documentación.
RDSI
Suite
Note: Para conectar la Diva Pro 3.0 PC Card a la línea RDSI no se requiere
el dispositivo de protección.
página 40
Page 41
Dialogic Diva Client Instalación Rápida
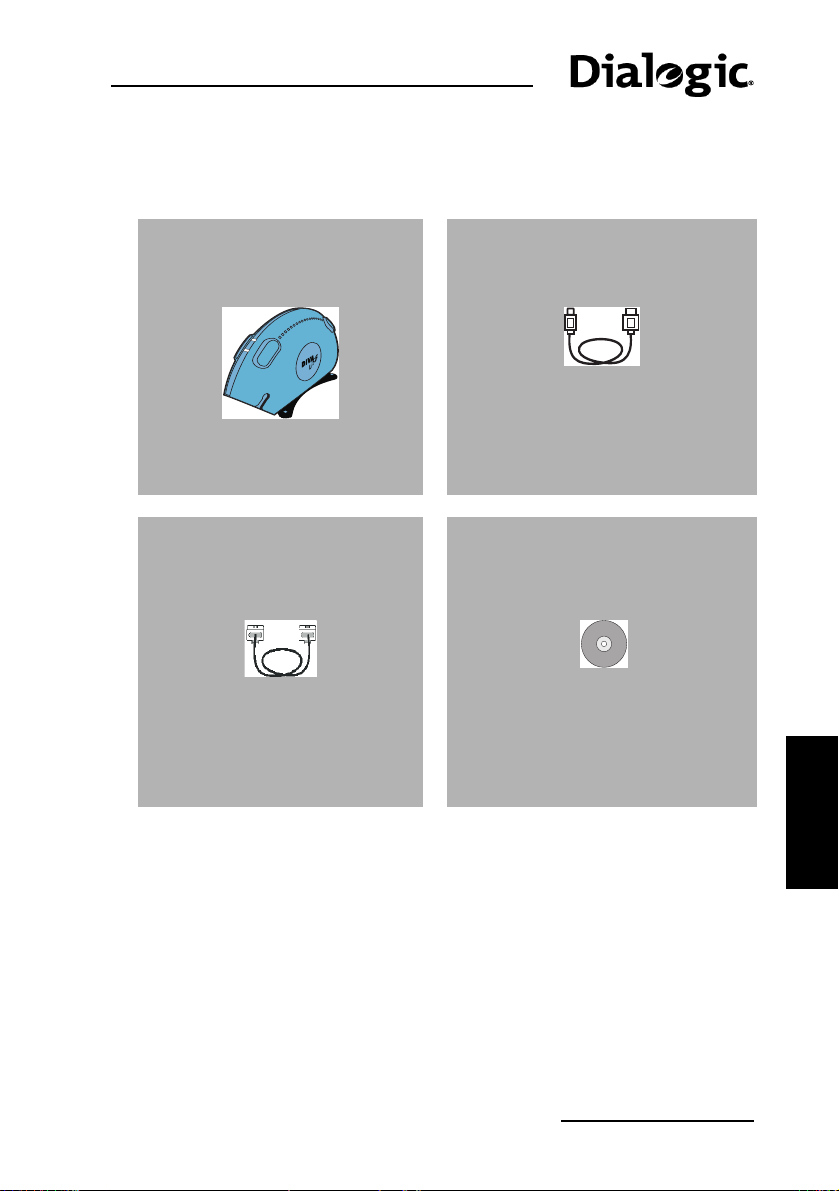
Paquete de Diva ISDN USB
El paquete debe contener lo siguiente:
Diva ISDN USB adaptador y
soporte
Cable RDSI CD-ROM de Diva Client Software
Utilice este cable para conectar
el Diva ISDN USB al conector de
pared RDSI.
Cable USB
Utilice este cable para conectar el
Diva ISDN USB a su ordenador.
Suite
Use este CD-ROM para instalar el
software y ver la documentación.
página 41
ESPAÑOL
Page 42
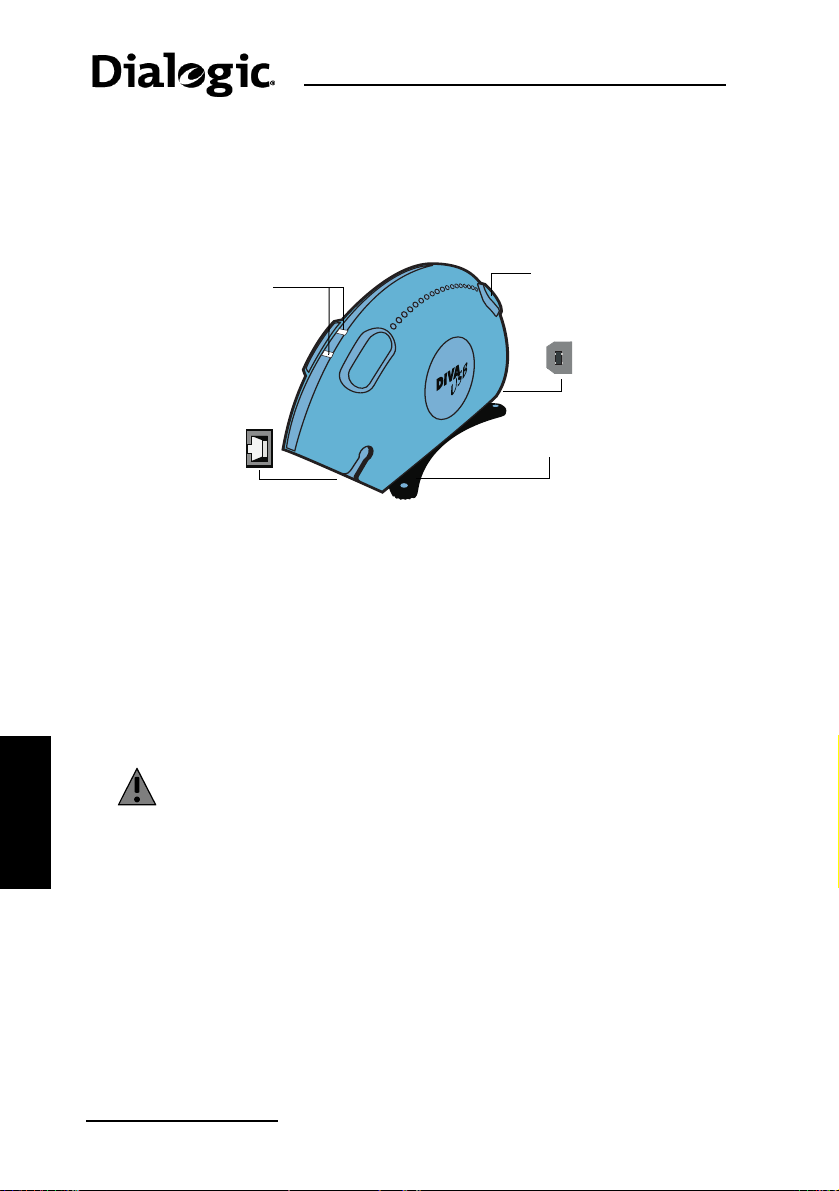
Instalación de su adaptador Diva Client
Identificación de los principales componentes del
Diva ISDN USB
Antes de instalar el Diva ISDN USB, identifique sus componentes principales.
Un indicador
Dos indicadores
luminosos, uno
para cada canal B
que muestra el
estado de la
conexión RDSI.
luminoso que
muestra el estado de
la conexión del Diva
ISDN USB con el
ordenador.
Interfaz
USB
Instalación de su adaptador Diva Client
Insertar el adaptador Diva ISDN PCI o Diva Pro PCI
ESPAÑOL
Interfaz
RDSI
La instalación depende del tipo de adaptador que Usted tiene:
• Para Diva ISDN PCI y Diva Pro PCI véase a continuación.
• Para Diva Pro PC Card véase la page 43.
• Para Diva ISDN USB véase la page 44.
Warning: Para su seguridad, instale el adaptador Diva Client en el
ordenador antes de conectar la línea RDSI.
1. Desconecte el ordenador y todos los dispositivos periféricos.
2. Elimine la electricidad estática de su cuerpo tocando el chasis metálico
del ordenador (el metal sin pintar que está en la parte posterior del
ordenador).
3. Retire el cable de alimentación del ordenador.
4. Retire la cubierta del ordenador según se describe en el manual del
ordenador.
5. En el ordenador, localice una ranura PCI libre. Si el ordenador tiene
ranuras PCI e ISA, las ranuras PCI son las más cortas.
6. Si hay una placa metálica en el extremo de la ranura, retírela y guarde
el tornillo.
Soporte
página 42
Page 43
Dialogic Diva Client Instalación Rápida
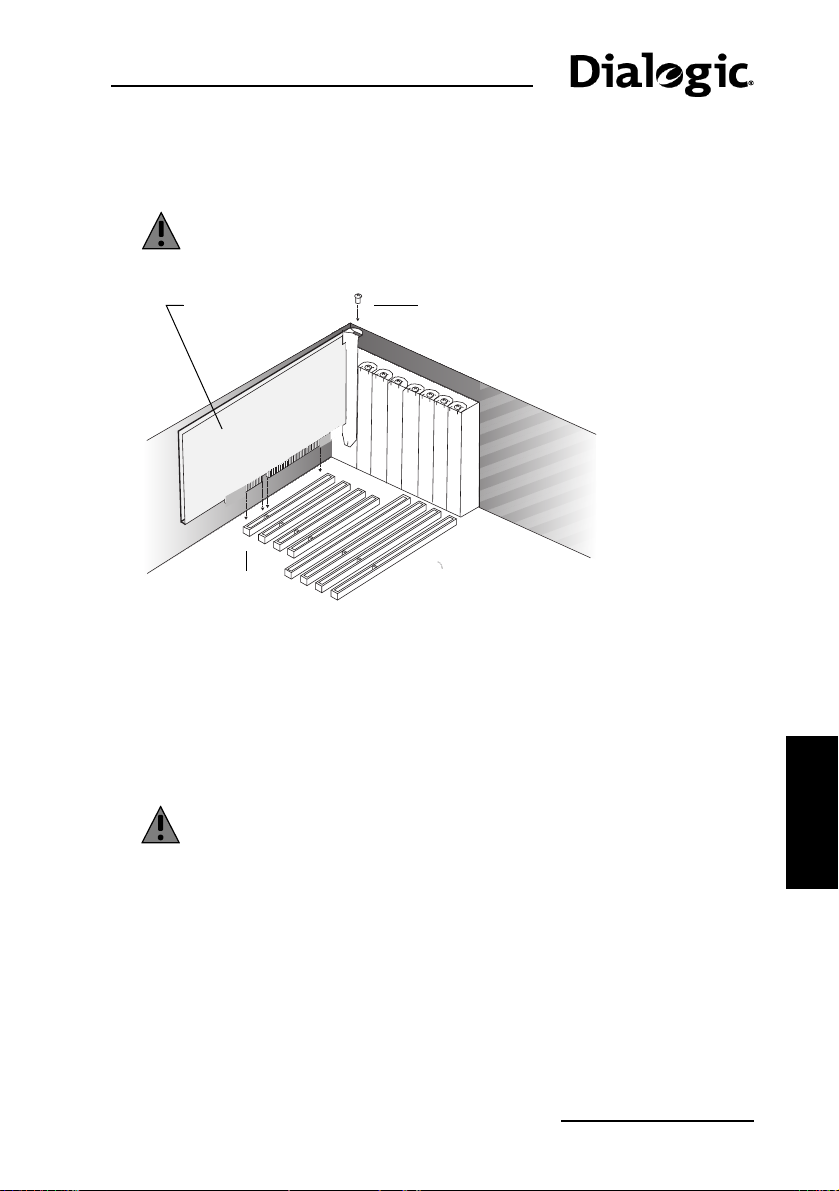
7. Inserte firmemente el adaptador en la ranura seleccionada, tal como se
indica a continuación.
Warning: Para evitar daños en el ordenador o el adaptador, inserte
el adaptador únicamente en una ranura PCI.
Adaptador Diva
PCI
Ranura PCI
8. Sujete el adaptador con el tornillo para asegurarse de que el adaptador
está sujeto de manera correcta al chasis del ordenador.
9. Coloque de nuevo la cubierta del ordenador según se describe en el
manual del PC.
10. Vuelva a conectar el ordenador.
Tornillo
Insertar la tarjeta Diva Pro PC
Warning: Para su seguridad, instale la tarjeta en el ordenador
portátil antes de conectar la línea RDSI.
1. Cierre todas las aplicaciones del ordenador portátil. Puede dejar el portátil
encendido.
2. Conecte el dispositivo de protección de RD SI a l e nc hu fe RD SI de la ta rj et a.
Note: Para conectar la Diva Pro 3.0 PC Card a la RDSI, no se requiere
el dispositivo de protección.
3. Inserte la tarjeta en la ranura de la tarjeta PC del portátil (tipo II o tipo
III), con la etiqueta ‘Diva Pro PC Card’ hacia arriba. Una flecha en la
etiqueta indica el extremo que debe insertar.
ESPAÑOL
página 43
Page 44
Conexión de la línea RDSI
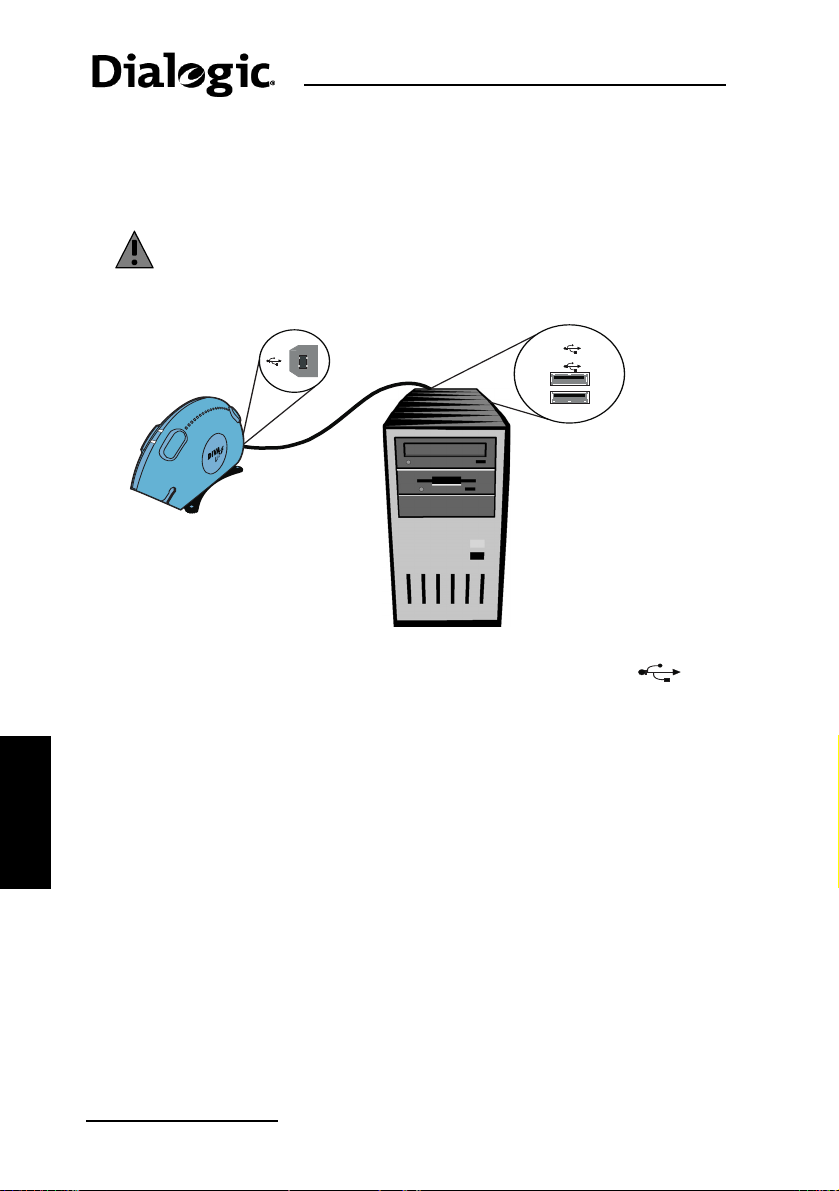
Conectar la Diva ISDN USB al ordenador
Puede instalar el Diva ISDN USB en un ordenador de sobremesa o portátil.
Tenga el ordenador encendido durante la instalación.
Warning: Para su seguridad, instale el Diva ISDN USB antes de
conectar la línea RDSI.
ESPAÑOL
Conexión de la línea RDSI
Interfaz USB
Puertos USB
3.
1
USB
2
2
1.
Cable USB
1. Tome el cable USB que viene adjunto con el Diva ISDN USB. Puede
identificar este cable mediante el símbolo USB del enchufe: .
2. Conecte un extremo del cable USB a la interfaz USB del Diva ISDN USB.
3. Conecte el otro extremo del cable USB a cualquier puerto USB disponible
en el ordenador.
En Europa, y en la mayoría de los países, aparte de Norteamérica y Japón,
conecte el adaptador Diva Client directamente a su línea RDSI utilizando el
cable incluído con el adaptador, como se describe a continuación.
1. Tome el cable RDSI que viene adjunto con el adaptador Diva Client.
2. Conecte un extremo al adaptador Diva Client.
3. Conecte el otro extremo al conector de pared RDSI.
página 44
Page 45
Dialogic Diva Client Instalación Rápida
Instalación del software Diva Client for Windows
Para configurar las comunicaciones RDSI, debe instalar el software Diva Client
for Windows en el ordenador.
Note: Debe estar conectado al sistema con los derechos del administrador.
Instale los controladores RDSI de Microsoft Windows
2000/XP/Server 2003/Vista
Una vez conectado el adaptador Diva Client con el ordenador y con la línea
RDSI, encienda el ordenador. Windows 2000/XP/Server 2003/Vista detecta el
nuevo hardware.
El procedimiento depende del cuadro de diálogo que aparezca en la pantalla,
ya sea el caso 1 o el 2.
Note: Las pantallas para Windows XP, Windows Server 2003 y Windows Vista
pueden diferir ligeramente de las mostradas a continuación.
Caso 1
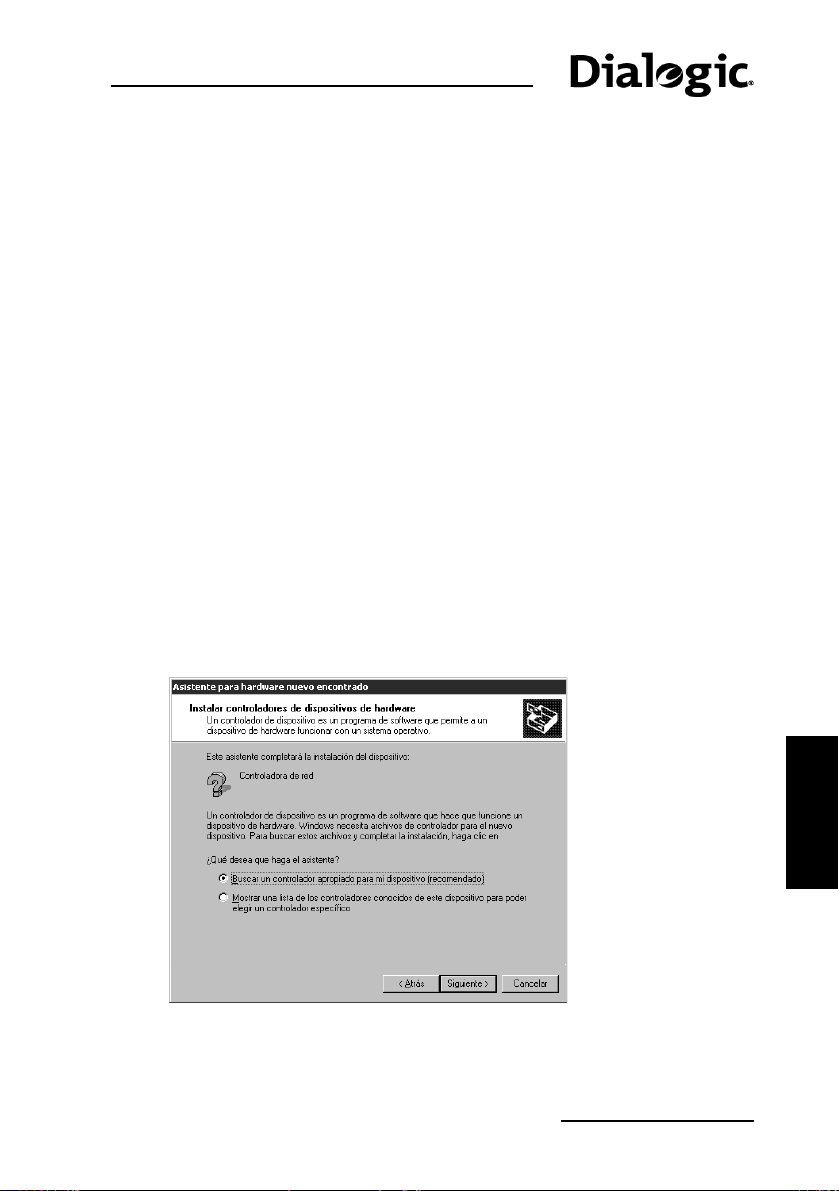
Si Windows 2000/XP/Server 2003/Vista no puede instalar sus propios
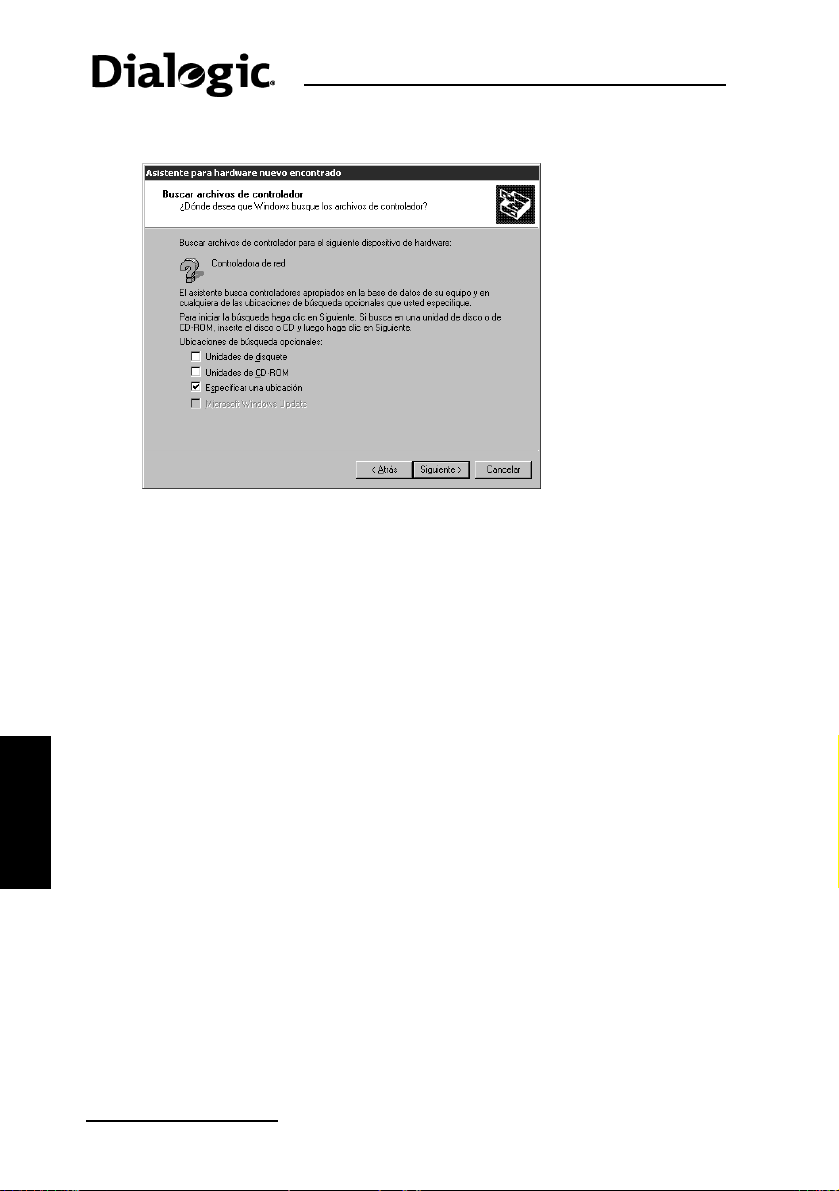
controladores para el adaptador, aparece ‘Asistente para hardware nuevo
encontrado’. Haga clic en ‘Siguiente’ y ejecute estos pasos:
1. Haga clic en ‘Buscar un controlador apropiado para mi dispositivo
(recomendado)’ y haga clic en ‘Siguiente’.
página 45
ESPAÑOL
Page 46
Instalación del software Diva Client for Windows
2. Haga clic en ‘Especificar una ubicación’.
Introduzca el CD-ROM de Diva Client Software Suite en la unidad de
CD-ROM del ordenador y haga clic en ‘Siguiente’.
3. Cuando se le solicite, introduzca la siguiente ubicación:
D:\WIN_2K\INSTALL (donde D: es la letra de la unidad de CD-ROM) y
haga clic en ‘Siguiente’.
4. Siga las instrucciones en pantalla. Una vez actualizados los controladores,
comienza la instalación de las herramientas de Diva.
5. Cuando se le solicite, reinicie el ordenador. Tras reiniciar el ordenador, se
completa la instalación de las herramientas de Diva y se instala el
asistente de Diva.
ESPAÑOL
página 46
Caso 2
1. Si Windows 2000/XP/Server 2003/Vista instala automáticamente sus
propios controladores RDSI, aparece el asistente para configuración de
ISDN (RDSI).
2. Haga clic en ‘Siguiente’. Introduzca el protocolo del conmutador que utiliza
su compañía telefónica o su proveedor del servicio de internet y el número
o números de teléfono para completar el asistente.
Una vez completado el asistente para ‘ISDN’ de Microsoft, debe actualizar
los controladores instalados automáticamente con el software Diva Client
for Windows 2000/XP/Server 2003/Vista. El software Diva Client for
Windows 2000/XP/Server 2003/Vista proporciona las funcionalidades y
herramientas adicionales que no están disponibles con los controladores
instalados por Windows automáticamente.
Page 47

Dialogic Diva Client Instalación Rápida
Para actualizar los controladores con el software
Diva Client for Windows 2000/XP/Server 2003/Vista
1. Introduzca el CD-ROM de Diva Client Software Suite en la unidad de
CD-ROM. La pantalla de bienvenida de Diva Client Software Suite debe
de aparecer automáticamente.
Si no aparece automáticamente, haga clic en ‘Inicio > Ejecutar’. En el
cuadro de diálogo ‘Ejecutar’, escriba
letra de la unidad de CD-ROM). Haga clic en ‘Aceptar’.
2. En la pantalla de bienvenida de Diva Client Software Suite, haga clic en
‘Instalación’.
3. Si es necesario, seleccione ‘Windows 2000’ en ‘Seleccione un sistema
operativo’ y luego haga clic en ‘Actualizar Diva Software for Windows
2000/XP/Server 2003/Vista’.
4. Siga las instrucciones en pantalla hasta que aparezca el asistente para
Diva Client for Windows.
5. En el asistente para ‘Diva Client for Windows 2000/XP/Server 2003/Vista’,
haga clic en ‘Inicio’.
Note: Si el botón ‘Inicio’ no está disponible, es que el software del CD
es la misma versión o una versión más antigua que la del software
instalado automáticamente. En este caso, puede omitir el resto de este
procedimiento haciendo clic en ‘Cancelar’ para salir.
6. Siga las instrucciones en pantalla.
Una vez actualizados los controladores, comienza la instalación de las
herramientas de Diva.
7. Cuando se le solicite, reinicie el ordenador. Tras reiniciar el ordenador, se
completa la instalación de las herramientas de Diva y se instala el
asistente de Diva.
D:\CDSETUP.EXE (donde D: es la
página 47
ESPAÑOL
Page 48

Prueba del hardware y de la conexión RDSI
Prueba del hardware y de la conexión RDSI
Debe realizar la siguiente prueba para asegurarse de que el adaptador
Diva Client, el cable RDSI y la conexión RDSI funcionan correctamente. Para
llevar a cabo esta prueba, debe utilizar la herramienta ‘Line Test’, que se ha
instalado automáticamente durante la instalación del software Diva Client for
Windows.
1. Haga clic en ‘Inicio > Programas > Diva Client for Windows >
Diva Client Line Test’. En el menu ‘Line Check’, haga clic en ‘Start’.
2. Si el adaptador Diva Client, el cable RDSI y la conexión RDSI funcionan
correctamente, verá este mensaje:
‘Line Check passed.’
(‘Prueba de comprobación de línea superada.’)
3. Haga clic en ‘Close’ (Finalizar).
Solución de problemas
Si se encuentra con problemas durante el uso del adaptador Diva Client,
intente aplicar las sugerencias de la Web de ayuda de Dialogic
(D
OC/HELPWEB/DEFAULT.HTM) que se incluyen en el CD-ROM de Diva Client
Software Suite.
Si tiene acceso a Internet, puede ver la versión más actualizada de la web de
ayuda en http://www.dialogic.com/support/helpweb.
Datos sobre la homologación
ESPAÑOL
página 48
Dialogic declara, bajo su responsabilidad, que este aparato cumple con lo
dispuesto en la Directiva 99/05/CE, del Parlamento Europeo y del Consejo de
9 de marzo de 1999, transpuesta a la legislación española mediante el Real
Decreto 1890/2000, de 20 de noviembre.
Firma autorizada:
Montreal, 12 de Junio de 2001
Gaetan Hogue - Approvals Manager Montreal
Page 49
Dialogic Diva Client guida di riferimento rapida
Dialogic Diva Client guida di riferimento rapida
Questa guida di riferimento rapida fornisce le istruzioni necessarie per
l'installazione dell’adattatore:
®
• Dialogic
• Dialogic Diva Pro PCI,
• Dialogic Diva Pro PC Card,
• Dialogic Diva ISDN USB
e del software Diva Client for Windows
Per le istruzioni necessarie alla configurazione del dispositivo Diva Client dopo
l'installazione vedere il Diva Client for Windows Reference Guide (inglese) sul
CD Diva Client Software Suite (Documentazione).
Diva® ISDN PCI,
®
2000/XP/Server 2003/Vista.
Contenuto della confezione
Il contenuto del vostro prodotto dipende dal tipo di Diva Client acquistato.
• Per la Diva ISDN PCI e Diva Pro PCI vedi qui sotto.
• Per la Diva Pro PC Card vedi pagina 50.
• Per la Diva ISDN USB vedi pagina 51.
Confezione Diva ISDN PCI e Diva Pro PCI
Il tuo prodotto contiene i seguenti articoli:
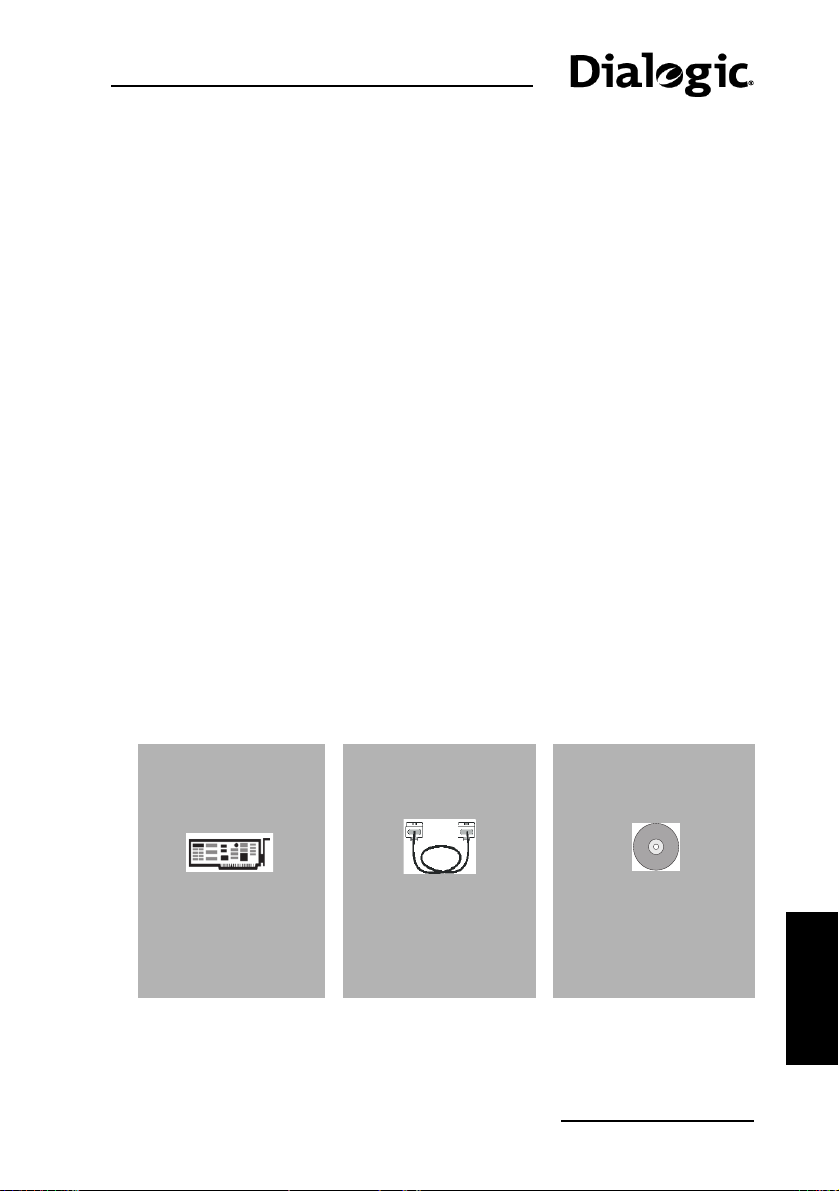
Adattatore Diva
Client
Inserire
l'adattatore in uno
slot PCI disponibile
del computer.
Cavo ISDN
Utilizzare il cavo per
collegare
l'adattatore Diva alla
presa ISDN.
Diva Client Software
Suite CD
Utilizzare questo CD
per installare il
software e per
consultare la
documentazione.
pagina 49
ITALIANO
Page 50
Contenuto della confezione
Confezione Diva Pro PC Card
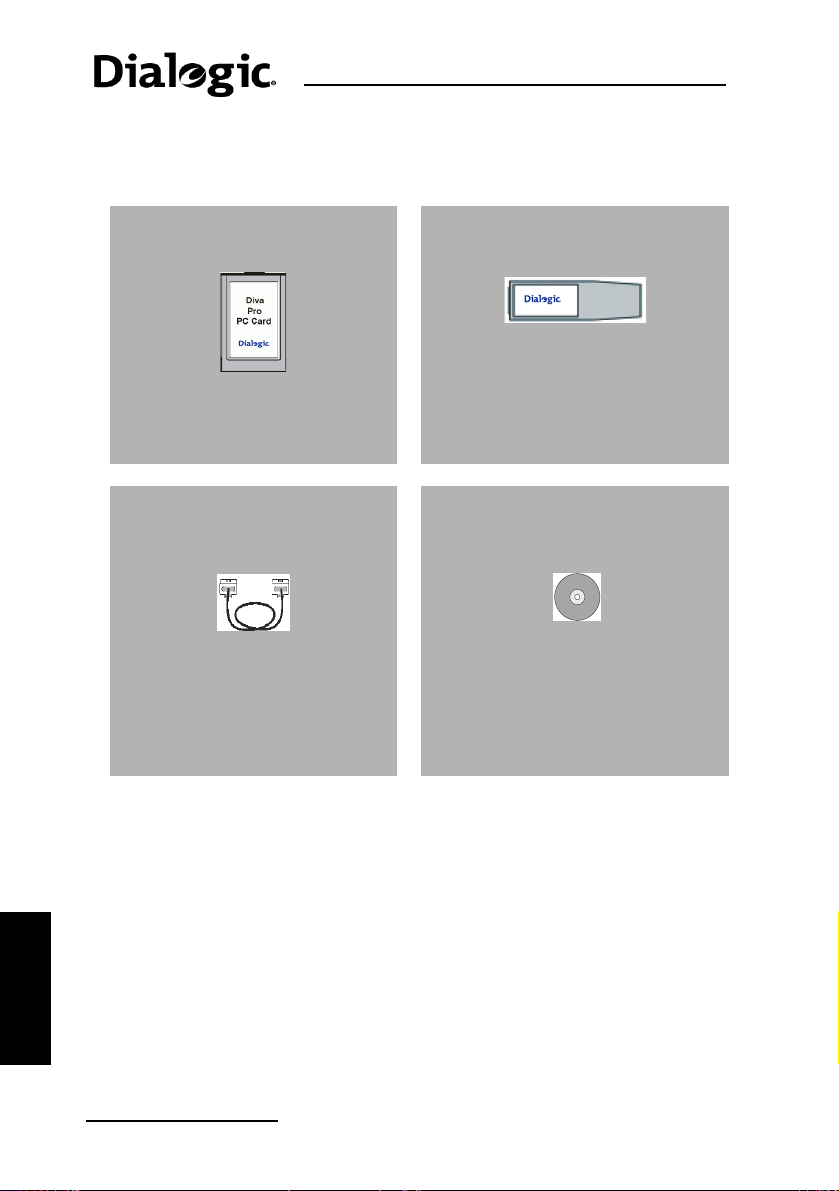
Il tuo prodotto contiene i seguenti articoli:
Diva Pro PC Card Adattatore ISDN (Dongle)
Cavo ISDN Diva Client Software Suite CD
Utilizzare l'adattatore ISDN per
collegare la Diva Pro PC Card alla
rete ISDN.
Note:
è isieme al cavo ISDN.
ITALIANO
pagina 50
Utilizzare il cavo per collegare
la Diva Pro PC Card alla presa
ISDN.
Utilizzare questo CD per installare
il software e per consultare la
documentazione.
La Diva Pro 3.0 PC Card non ha più bisogno dell’adattatore. L’adattatore
Page 51
Dialogic Diva Client guida di riferimento rapida
Confezione Diva ISDN USB
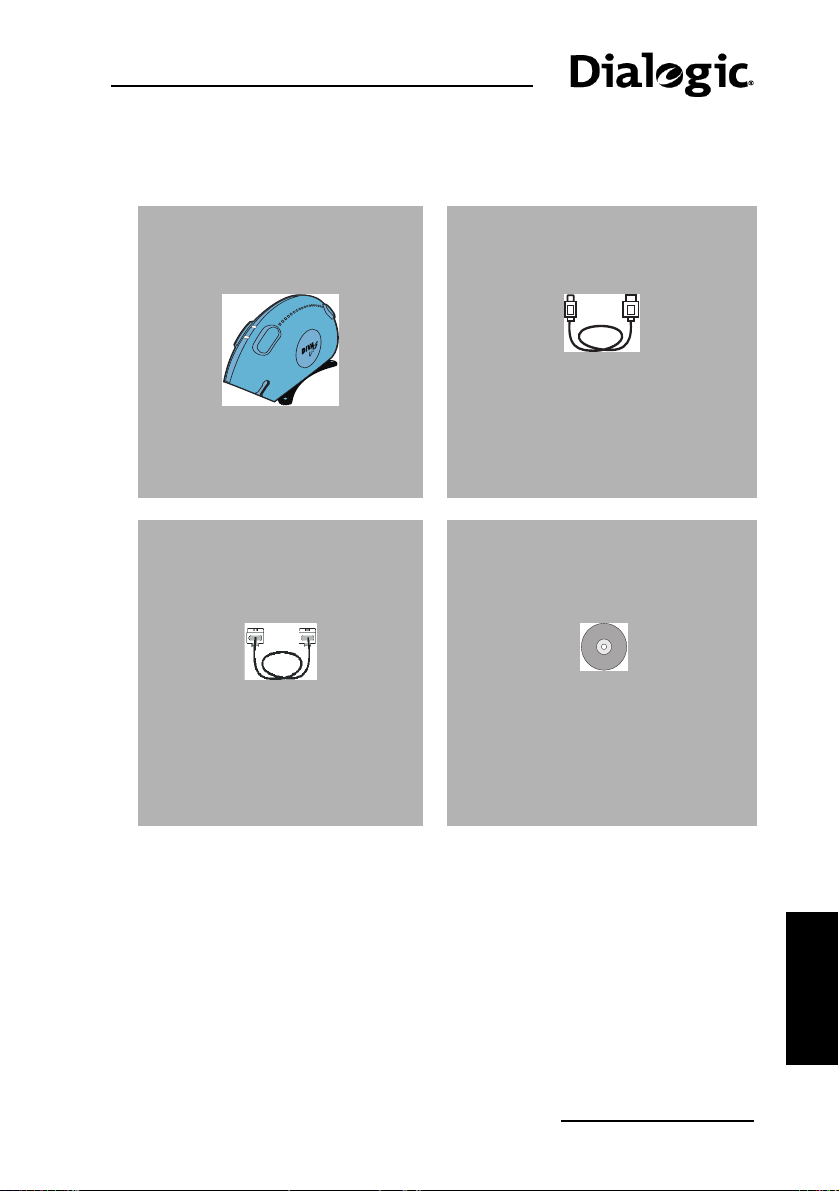
Il tuo prodotto contiene i seguenti articoli:
Adattatore Diva ISDN USB Cavo USB
Utilizzare questo cavo per
collegare il dispositivo Diva ISDN
USB al computer.
Cavo ISDN CD-ROM de Diva Client Software
Utilizzare questo cavo per
collegare il dispositivo Diva
ISDN USB alla
presa ISDN.
Suite
Utilizzare questo CD per installare
il software e per consultare la
documentazione.
ITALIANO
pagina 51
Page 52
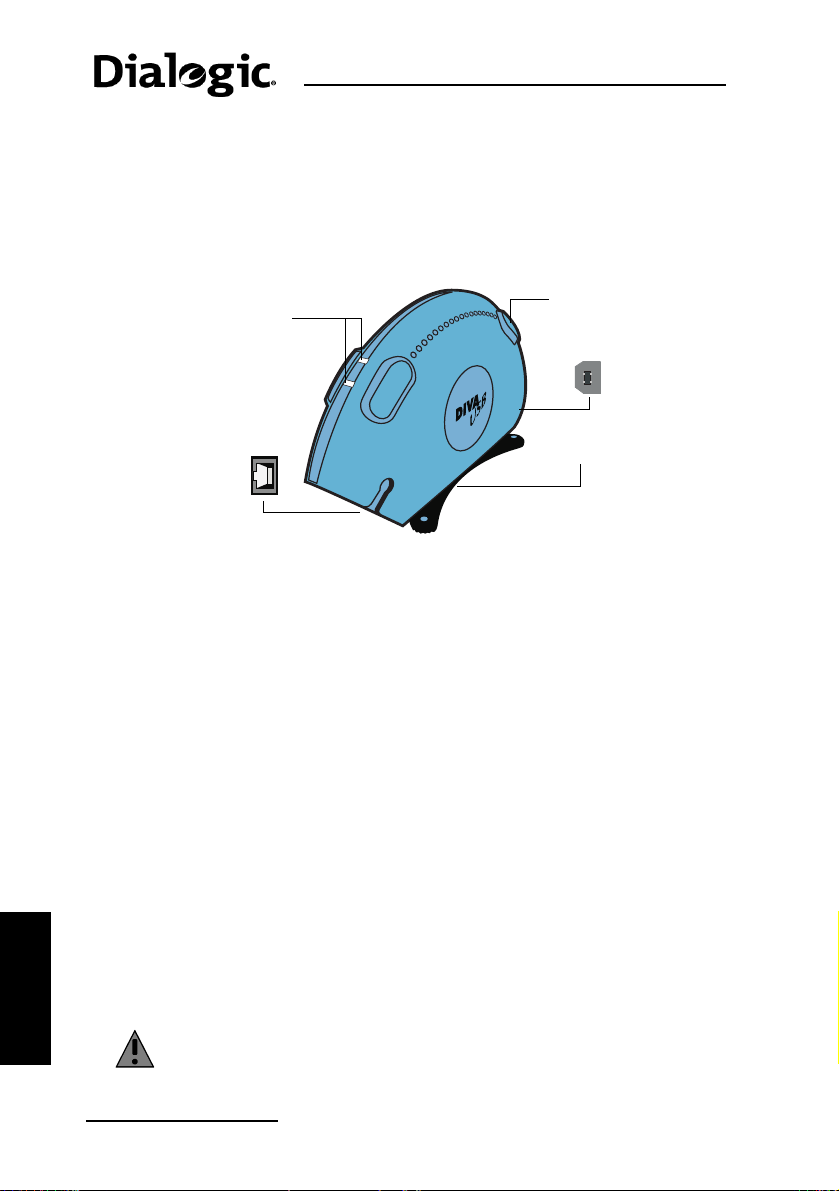
Installazione dell’adattatore Diva Client
Identificazione dei componenti principali del dispositivo
Diva ISDN USB
Prima di installare il dispositivo Diva ISDN USB, è necessario identificarne i
componenti principali.
Un LED che
Due LED, uno per
ciascun canale B,
che visualizzano lo
connessione ISDN.
Interfaccia
ISDN
stato della
visualizza lo stato
della connessione
del dispositivo
Diva ISDN USB al
computer.
Interfaccia
USB
Supporto
Installazione dell’adattatore Diva Client
Il tipo d'installazione dipende dal vostro tipo di Diva Client:
• Per la Diva ISDN PCI e Diva Pro PCI vedi qui sotto.
• Per la Diva Pro PC Card vedi pagina 53.
• Per la Diva ISDN USB vedi pagina 54.
Inserisci la Diva ISDN PCI o Diva Pro PCI
1. Spegnere il PC e tutte le periferiche ad esso collegate.
2. Scaricare l'elettricità statica accumulata sul proprio corpo, toccando la
3. Scollegare il cavo di alimentazione dal PC.
4. Rimuovere il coperchio del PC come descritto nel relativo manuale.
5. Sul PC, individuare uno slot PCI disponibile. Se il PC dispone sia di slot
ITALIANO
6. Se nella parte finale dello slot è presente una lamiera, rimuoverla
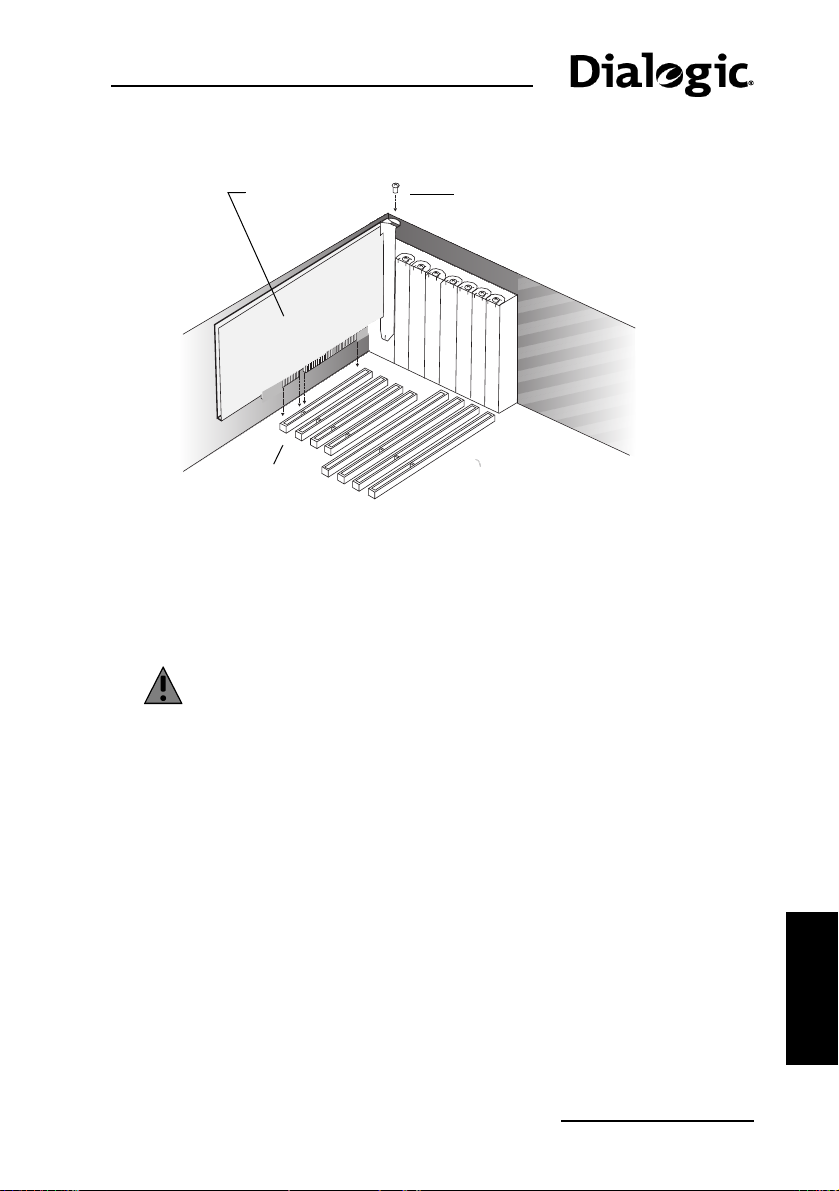
7. Inserire l'adattatore nello slot, come mostrato di seguito.
pagina 52
struttura metallica non verniciata nella parte posteriore del computer.
PCI che ISA, gli slot PCI sono quelli più corti.
conservando la vite.
Warning: Per evitare di danneggiare l'adattatore o il PC, inserire
l'adattatore solamente in uno slot PCI.
Page 53
Dialogic Diva Client guida di riferimento rapida
Adattatore
Diva PCI
Slot PCI
8. Fissare l’adattatore allo chassis del PC utilizzando la vite.
9. Rimontare il coperchio come da manuale del PC.
10. Collegare il PC.
Vite
Installa la Diva Pro PC Card
Warning: A scopo precauzionale, installare l’adattatore nel
computer prima di collegare la linea ISDN.
1. Chiudere tutte le applicazioni in esecuzione sul computer portatile. È
possibile lasciare acceso il computer portatile.
2. Eseguire le operazioni.
Note: La Diva Pro 3.0 PC Card non ha più bisogno dell’adattatore.
L’adattatore è isieme al cavo ISDN.
3. Inserire l'adattatore ISDN (Dongle) nel socket ISDN della Diva Pro PC
Card.
4. Inserire la scheda nello slot per scheda PC del computer portatile (tipo II o
tipo III), con l'etichetta Diva Pro PC Card rivolta verso l'alto. Una freccia
sull'etichetta indica quale estremità deve essere inserita.
pagina 53
ITALIANO
Page 54
Collegamento della linea ISDN
Installa el Diva ISDN USB
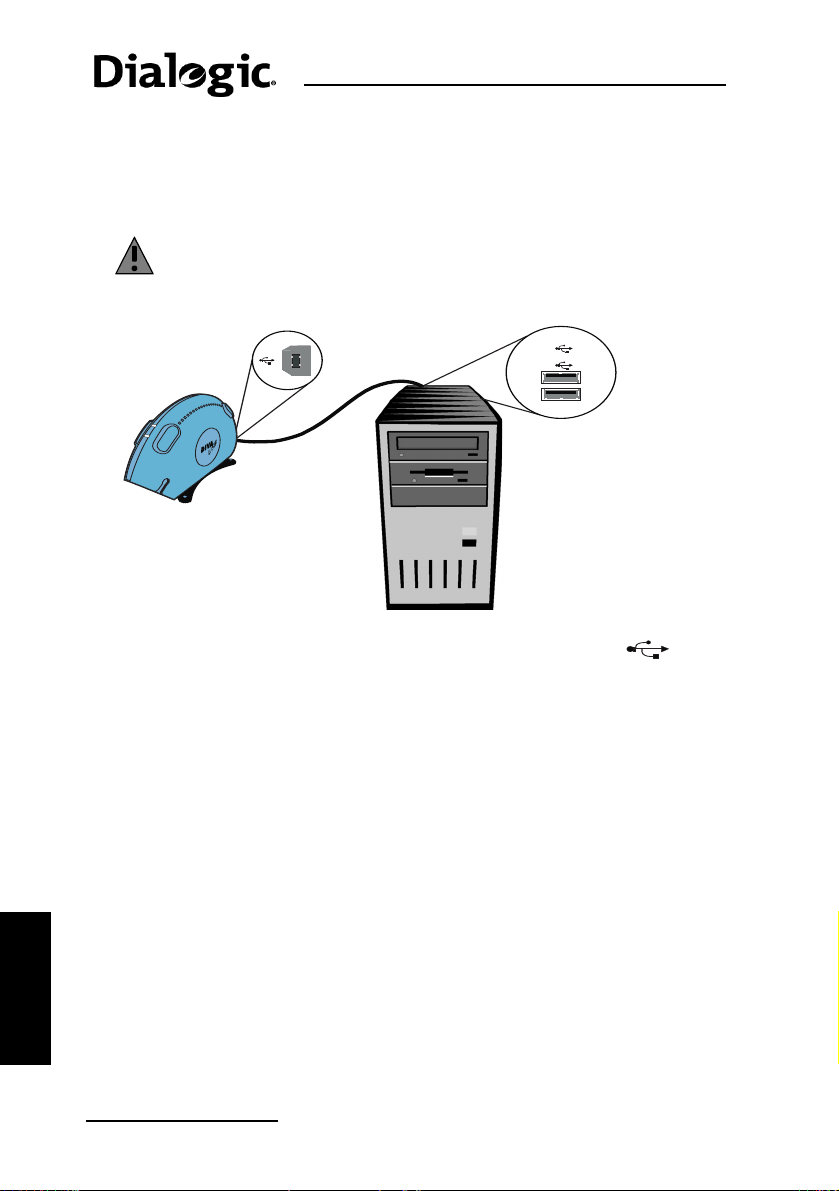
È possibile installare il dispositivo Diva ISDN USB in un computer desktop o
portatile. Durante l'installazione è necessario tenere il computer acceso.
Warning: A scopo precauzionale, installare il dispositivo Diva ISDN
USB prima di collegare la linea ISDN.
1. Prendere il cavo USB fornito con il dispositivo Diva ISDN USB. Questo
2. Inserire un'estremità del cavo USB nell'interfaccia USB dell'adattatore.
3. Inserire l'altra estremità del cavo USB in una porta USB disponibile sul
Collegamento della linea ISDN
In Europa e in molti paesi, ad esclusione del Nord America e del Giappone,
collegare l’adattatore Diva Client direttamente alla linea ISDN utilizzando
l'apposito cavo fornito con esso, come descritto di seguito.
ITALIANO
1. Prendere il cavo ISDN fornito con l’adattatore Diva Client.
2. Inserire un'estremità nell’adattatore Diva Client.
3. Inserire l'altra estremità del cavo nella presa ISDN.
Interfaccia USB
2.
Porte USB
3.
1
USB
2
1.
Cavo USB
cavo è identificabile dal simbolo USB presente sulla spina: .
computer.
pagina 54
Page 55
Dialogic Diva Client guida di riferimento rapida
Installazione del software Diva Client for Windows
Per configurare le comunicazioni ISDN, è necessario installare il software Diva
Client for Windows nel computer.
Note: È necessario disporre dei diritti di amministratore.
Installazione dei driver ISDN per Microsoft Windows
2000/XP/Server 2003/Vista
Dopo aver installato l’adattore e dopo averlo collegato alla linea ISDN,
accendere il computer. Windows 2000/XP/Server 2003/Vista rileva il nuovo
componente hardware.
La procedura varia in base alla finestra di dialogo visualizzata sullo schermo.
Si possono verificare due casi.
Note: Le schermate di Windows XP, Windows Server 2003 e Windows Vista
possono essere leggermente differenti da quelle riportate di seguito.
Caso 1
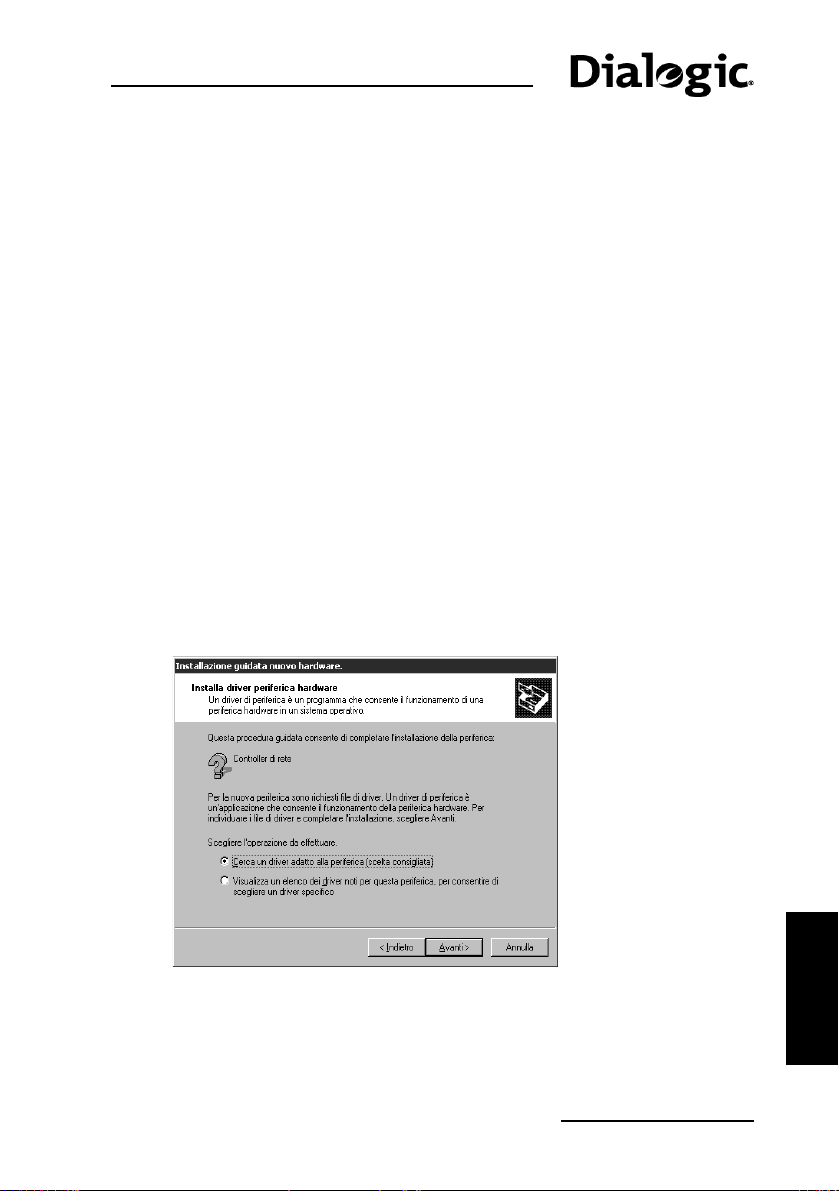
1. Se l'installazione dei driver di Windows 2000/XP/Server 2003/Vista per
l'adattatore non riesce, verrà visualizzata la procedura guidata ‘Trovato
nuovo hardware’. Fare clic su ‘Avanti’.
2. Fare clic su ‘Cerca un driver adatto alla periferica’ (scelta consigliata)’.
Fare clic su ‘Avanti’.
pagina 55
ITALIANO
Page 56
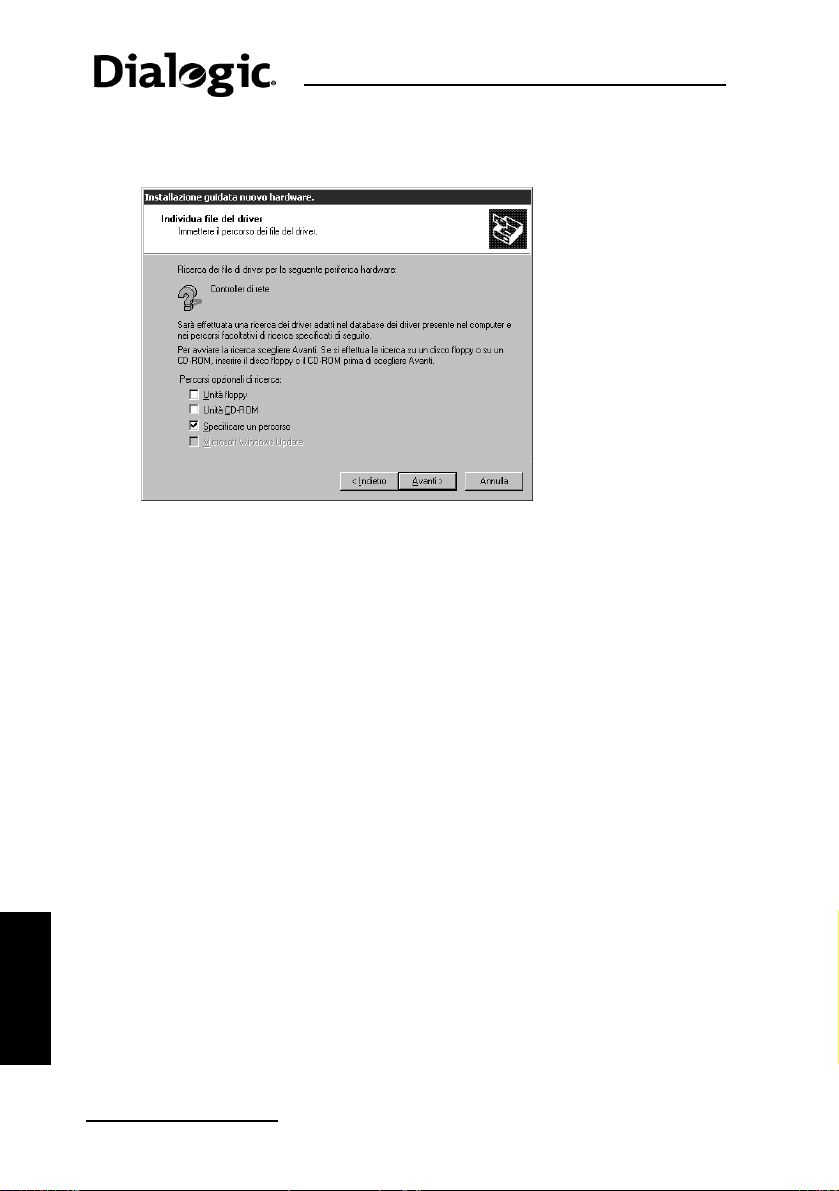
Installazione del software Diva Client for Windows
3. Accertarsi che sia selezionata solamente l'opzione ‘Specificare un
percorso’.
Inserire il CD Diva Client Software Suite nell'unità CD-ROM del computer,
quindi fare clic su ‘Avanti’.
4. Quando richiesto, specificare il percorso
5. Attenersi alle istruzioni visualizzate sullo schermo.
6. Quando richiesto, riavviare il computer. Una volta riavviato il computer,
D: rappresenta l'unità CD-ROM), quindi fare clic su ‘Avanti’.
(dove
Una volta aggiornati i driver, partirà l'installazione di Diva Tools.
verrà completata l'installazione di Diva Tools e Diva Assistant sarà
installato.
D:\WIN_2K\INSTALL
Caso 2
1. Se i driver ISDN di Windows 2000/XP/Server 2003/Vista vengono
2. Fare clic su ‘Avanti’. Per completare la procedura guidata, specificare il
Dopo aver completato la ‘Configurazione guidata ISDN’, è necessario
ITALIANO
aggiornare i driver installati automaticamente con il software Diva Client for
Windows. Il software Diva Client for Windows fornisce funzioni e strumenti
aggiuntivi che non sono disponibili con i driver installati automaticamente da
Windows.
pagina 56
installati, verrà visualizzata la Configurazione guidata ISDN.
protocollo ISDN utilizzato dalla compagnia telefonica o dal proprio
provider di servizi Internet e i relativi numeri telefonici.
Page 57

Dialogic Diva Client guida di riferimento rapida
Per aggiornare i driver con il software Diva Client for
Windows 2000/XP/Server 2003/Vista, attenersi alla
procedura riportata di seguito
1. Inserire il Diva Client Software Suite CD-ROM nell'unità CD-ROM.
Dovrebbe venire visualizzata la schermata di benvenuto di Diva Server
Software Suite.
Se la schermata di benvenuto non viene visualizzata, fare clic su ‘Start’
e quindi su ‘Esegui’. Nella finestra di dialogo ‘Esegui’, digitare
D:\CDSETUP.EXE
D: rappresenta l'unità CD-ROM). Fare clic su ‘OK’.
(dove
2. Dalla schermata di benvenuto di Diva Client Software Suite, cliccate
‘Installazione’.
3. Cliccate ‘Aggiornare Diva Software for Windows 2000/XP/Server
2003/Vista’.
4. Attenersi alle istruzioni visualizzate sullo schermo finché non viene
visualizzata la procedura guidata Diva Client for Windows.
5. Nella procedura guidata ‘Diva Client for Windows 2000/XP/Server
2003/Vista’, fare clic su ‘Avvia’.
Note: Se il pulsante ‘Avvia’ non è disponibile, significa che la versione
del software contenuta nel CD è la stessa oppure è una versione
precedente rispetto a quella installata automaticamente. In questo caso,
è possibile ignorare la parte restante della procedura facendo clic su
‘Annulla’ per uscire.
6. Attenersi alle istruzioni visualizzate sullo schermo.
7. Una volta aggiornati i driver, verrà avviata l'installazione di Diva Tools.
8. Quando richiesto, riavviare il computer. Una volta riavviato il computer,
verrà completata l'installazione di Diva Tools e Diva Assistant sarà
installato.
pagina 57
ITALIANO
Page 58

Verifica dell’hardware e della connessione ISDN
Verifica dell’hardware e della connessione ISDN
Per verificare che l’adattatore Diva Client, il cavo ISDN e la connessione ISDN
funzionino correttamente, è possibile eseguire un test. Per eseguire il test,
utilizzare lo strumento ‘Line Check’, installato automaticamente insieme al
software.
1. Fare clic su ‘Start > Programmi > Diva Client for Windows > Diva Client
Line Test’. Nella finestra ‘Line Check’, fare clic su ‘Start’.
2. Se adattatore Diva Client, il cavo ISDN e la connessione ISDN funzionano
correttamente, viene visualizzato il seguente messaggio:
‘Line check passed.’
(‘Il controllo della linea è stato superato con
successo!’).
Se viene visualizzato questo messaggio, è possibile procedere con
l'impostazione della connessione.
3. Fare clic su ‘Close’ (Fine).
Risoluzione dei problemi
Se si riscontrano problemi durante l'uso dell’adattatore Diva Client, vedere i
suggerimenti in Dialogic Help Web (D
CD Diva Client Software Suite.
Se si dispone di accesso a Internet, è possibile consultare la versione più
recente di Help Web all'indirizzo
http://www.dialogic.com/support/helpweb.
OC/HELPWEB/DEFAULT.HTM) sul
ITALIANO
pagina 58
Page 59

Appendix
Your Dialogic adapter and the WEEE Directive
In August 2005, the European Union Directive on Waste Electrical and
Electronic Equipment (2002/96/EC) and its amendment (2003/108/EC),
collectively known as the WEEE Directive, came into force throughout most
of the European Union. This Dialogic product comes within the scope of the
WEEE Directive.
We are confident that this product will provide you with many years of reliable
service. Moreover, we are pleased to advise you that Dialogic warrants this
product, as detailed in Dialogic Corporation License Agreement for use
of software on page 2 of this guide and provides a fee based repair service
when the product is out of warranty. However, a time will come when the
product will no longer meet your needs or will become uneconomic to repair.
It is at that stage that we ask for your co-operation in recycling this product
in the spirit of the WEEE directive.
Dialogic has taken great care to minimize the environmental burden of this
product by careful design, and manufacturing it under an Environmental
Management System, registered to ISO 14001. The requirements of ISO
14001 are similar to and as rigorous as the requirements of ISO 9001, Quality
Management Systems with which you may be more familiar. We ask you to
help us to ensure that the environmental burden of this product is minimized
when it is of no further use to you by recycling it.
Like all electrical and electronic equipment, including televisions and
computers, it may contain small amounts of materials which could lead to
environmental damage. To minimize any environmental damage we ask you
to have this product recycled by:
• bringing it to the recycling collection point in your company
• by handing it into the store where you are purchasing the replacement
• by delivering it to a local bring-center in your area
No charge can be imposed on you for this recycling service in the European
Union, as Dialogic has paid for recycling this product when it was placed on
the market. These are requirements of the WEEE directive.
We thank you in advance for you co-operation and working with Dialogic in
protecting our environment.
Please do not dispose of
this product through
municipal or general
waste, recycle it.
www.dialogic.com
Page 60
Appendix
Declaration of Conformity
No: D0008
Revision 01
The equipment described below is declared to be in conformity with the following applicable national and international
standards. The conformity is valid ONLY when the equipment is used in a manner consistent with the manufacturer’s
recommendations and the reference documents.
Equipment Type(s): Diva ISDN PCI 2.02
Document No / Edition /Date Title
IEC 60950 – 3 Edition (1999)
EN 60950-1: 2001
FCC, 47 CFR Part 15, Class B digital device Radio Frequency Devices - Subpart B - Unintentional Radiators
ICES-003 Issue 4 - Feb 2004, Class B Interference-Causing Equipment Standards - Digital Apparatus
EN 55022: 1998, Class B Limit Information Technology Equipment - Radio Disturbance Characteristics
EN 55024: 1998 Information Technology Equipment - Immunity Characteristics
47 CFR part 68, TIA/EIA/IS-968: Jun 01 Technical Requirements for Connection of Terminal Equipment to the Telephone Network
CS-03 Issue 9 Part VI, A3: Oct 06 Specification for Terminal Equipment, Terminal Systems, Network Protection Devices, Connection Arrangements
TBR3: Nov 95, A1: Dec 97 Attachment requirements for terminal equipment to connect to a ISDN using ISDN basic access
Additional information:
European Economic Area (EEA): Dialogic Corporation (address below) declares the equipment in compliance with the essential requirements of EC Council
Directives: 1999/5/EC - R&TTE: 2006/95/EC - Safety/LVD: 89/336/EEC – EMC
USA: Dialogic Corporation (address below) make this SDoC as Responsible Party for equipment registered with ACTA as number: Reg. no: E3SCAN-40181-XD-N
Canada: Dialogic Corporation (address below) is the Declaring Party for equipment registered with Industry Canada as number: IC: 885E-803009
Any other region where the Regulatory Requirements are satisfied by compliance to the standards declared above.
Regions:
This Declaration of Conformity is issued by
Company Address:
Dialogic Corporation
9800 Cavendish 5
Montreal, Quebec
Canada, H4M 2V9
Copies of this Declaration of Conformity may be downloaded at http://www .dialogic.com/declarations
th
floor
Unit 4034 Kingswood Avenue Citywest Business Campus, Saggart, Co. Dublin, Ireland.
Safety of Information Technology Equipment
Safety of Information Technology Equipment (see additional information)
CSA report # EN 163217-1512426 covers Diva ISDN PCI 2.02.
Dialogic Corporation
Dialogic Distribution Limited, our location in Europe operates from:
, which is solely responsible for the declared compliance.
Authorized signature, name and function:
Gaetan Hogue - Appro als Manager
Date:
25, January, 2007
v
www.dialogic.com
Page 61
Declaration of Conformity
No: D0009
Revision 01
The equipment described below is declared to be in conformity with the following applicable national and international standards. The
conformity is valid ONLY when the equipment is used in a manner consistent with the manufacturer’s recommendations and the
reference documents.
Equipment Type(s): Diva Pro PCI
Document No / Edition /Date Title
IEC 60950 – 3 Edition (1999)
EN 60950-1: 2001
FCC, 47 CFR Part 15, Class B digital device Radio Frequency Devices - Subpart B - Unintentional Radiators
ICES-003 Issue 4 - Feb 2004, Class B Interference-Causing Equipment Standards - Digital Apparatus
EN 55022: 1998, Class B Limit Information Technology Equipment - Radio Disturbance Characteristics
EN 55024: 1998 Information Technology Equipment - Immunity Characteristics
47 CFR part 68, TIA/EIA/IS-968 Technical Requirements for Connection of Terminal Equipment to the Telephone Network
CS-03 Issue 8 Part VI Specification for Terminal Equipment, Terminal Systems, Network Protection Devices, Connection Arrangements
TBR3: Nov 95, A1: Dec 97 Attachment requirements for terminal equipment to connect to a ISDN using ISDN basic access
AS/NZS 60950: 2000, A1: 2003 Safety of Information Technology Equipment
AS/ACIF S031: 2001 Requirements for ISDN Basic Access Interface
Additional information:
Australia test reports: Nemko report # FS-0106-02352, dated 11/07/2001 covers EN55022
Nemko report # 6S65295AU1, dated 29/05/2006 covers AS/NZS 60950
Eicon internal report dated, 29/01/2002 and TBR3 layer 1, 2, 3 report # 01/02980/1/Z from Deutsche Telekom AG,
European Economic Area (EEA): Dialogic Corporation (address below) declares the equipment in compliance with the essential requirements of EC Council
Directives: 1999/5/EC - R&TTE: 2006/95/EC - Safety/LVD: 89/336/EEC – EMC
USA: Dialogic Corporation (address below) make this SDoC as Responsible Party for equipment registered with ACTA as number: Reg. no: E3SCAN-40181-XD-N
Canada: Dialogic Corporation (address below) is the Declaring Party for equipment registered with Industry Canada as number: IC: 885E-803011
Australia / New Zealand: Supplier Code N964 [Dialogic
Any other region where the Regulatory Requirements are satisfied by compliance to the standards declared above.
Regions:
This Declaration of Conformity is issued by
Company Address:
Dialogic Corporation
9800 Cavendish 5
Montreal, Quebec
Canada, H4M 2V9
Copies of this Declaration of Conformity may be downloaded at
th
floor
Unit 4034 Kingswood Avenue Citywest Business Campus, Saggart, Co. Dublin, Ireland.
Safety of Information Technology Equipment
Safety of Information Technology Equipment (see additional information)
CSA report # EN 163217-1512426 covers Diva Pro PCI
dated 12/07/2001 covers AS/ACIF S031
Pty Ltd.
Level 12, 1 Pacific HighwayNorth Sydney NSW 2060] ACN: 064 824 899
Dialogic Corporation
Dialogic Distribution Limited, our location in Europe operates from:
, which is solely responsible for the declared compliance.
Authorized signature, name and function:
Gaetan Hogue - Appro als Manager
Date:
http://www.dialogic.com/declarations
25, January, 2007
v
www.dialogic.com
Page 62

Appendix
www.dialogic.com
Page 63

www.dialogic.com
Page 64

Appendix
www.dialogic.com
 Loading...