


IntelliLED™
Gateway
User Manual
www.dialight.com |
9100127291899_D |

SAVE THESE INSTRUCTIONS!!
READ AND FOLLOW ALL SAFETY INSTRUCTIONS
Refer to operating temperature ratings of this device before installing.
DO NOT let the Gateway touch hot surfaces.
DO NOT mount near gas or electric heaters
Equipment should be mounted in locations and at heights where it will not be subjected to tampering by unauthorized personnel.
The use of accessory equipment not recommended by the manufacturer may cause unsafe conditions.
DO NOT use this equipment for other than intended use.
DO take pictures of the installation and mounting for future reference.
Contact your local Sales representative or Dialight when necessary
The installation and maintenance must be carried out by authorized personnel.
Repairs and Installation must only be carried out by a qualified electrician.
Only genuine or authorized Dialight replacement parts must be used when unforeseen repairs are required.
Observe the national safety rules and regulations during installation!
Mounting in extreme heat locations should be avoided. Failure to do so could void all warranties!
No alterations are allowed without the written agreement from Dialight Corp. Alterations other than written in this manual will void all warranties.
1 |
www.dialight.com |

Table of Contents |
|
Table of Contents..................................................................................................................................................... |
2 |
Introduction............................................................................................................................................................... |
4 |
IntelliLED™ Gateway Visual Overview ................................................................................................................. |
5 |
Mounting & Placement........................................................................................................................................... |
6 |
Additional Mounting Considerations ........................................................................................................................ |
6 |
Powering On the IntelliLED™ Gateway for the First Time................................................................................... |
7 |
Installation Instruction of RJ45..................................................................................................................................... |
7 |
IntelliLED™ Gateway Interface Features.............................................................................................................. |
8 |
IntelliLED™ Gateway Web Application............................................................................................................... |
10 |
Stand-Alone Gateway User Interface Web Application Login ........................................................................ |
10 |
Login Screen .................................................................................................................................................................... |
10 |
Home Page ....................................................................................................................................................................... |
11 |
Info Bar Detail................................................................................................................................................................... |
11 |
Menu Options ................................................................................................................................................................. |
13 |
Home:............................................................................................................................................................................ |
13 |
About:............................................................................................................................................................................ |
13 |
Logout: .......................................................................................................................................................................... |
13 |
Backup:.......................................................................................................................................................................... |
13 |
Manage ............................................................................................................................................................................. |
14 |
Manage Alerts............................................................................................................................................................. |
14 |
Group Control ................................................................................................................................................................. |
14 |
Net Analysis................................................................................................................................................................. |
16 |
Configure.......................................................................................................................................................................... |
17 |
Step-by-Step Commissioning Wizard.................................................................................................................. |
17 |
Discover your Devices ........................................................................................................................................ |
18 |
Check Network Health on Network Analysis Page ................................................................................... |
19 |
Create Groups on the Configure Groups Page......................................................................................... |
20 |
Create Schedules to Control Your New Groups ....................................................................................... |
20 |
Add Schedules to Groups ................................................................................................................................ |
22 |
Configure Active Alerts ..................................................................................................................................... |
22 |
System........................................................................................................................................................................... |
22 |
Alerts.............................................................................................................................................................................. |
24 |
Configure Devices and Informational.................................................................................................................. |
24 |
Configure Device and Device Information Pages................................. |
Error! Bookmark not defined. |
Parameter Descriptions..................................................................................................................................... |
25 |
Configure Gateways.................................................................................................................................................. |
27 |
2 |
www.dialight.com |

Configure Groups ...................................................................................................................................................... |
28 |
Parameters and Pages....................................................................................................................................... |
30 |
Wireless Occupancy Sensor Configuration ................................................................................................ |
30 |
Daylight Harvesting Configuration................................................................................................................. |
31 |
Add Schedules to a Group............................................................................................................................... |
32 |
Schedules...................................................................................................................................................................... |
32 |
Creating a New Schedule................................................................................................................................. |
32 |
Configuring a Schedule..................................................................................................................................... |
33 |
Users .............................................................................................................................................................................. |
34 |
Gateway LED Panel Indicators .................................................................................................................................. |
34 |
Power LED.................................................................................................................................................................... |
35 |
OFF / Resume ............................................................................................................................................................. |
35 |
Alert ............................................................................................................................................................................... |
35 |
Emergency ................................................................................................................................................................... |
35 |
Ethernet ........................................................................................................................................................................ |
36 |
Wireless Network ....................................................................................................................................................... |
36 |
Gateway Local Controls .............................................................................................................................................. |
36 |
OFF/RESUME, Override Buttons............................................................................................................................ |
36 |
Gateway Control........................................................................................................................................................ |
28 |
Light Replacement......................................................................................................................................................... |
37 |
Gateway replacement (with backup file) ............................................................................................................. |
385 |
Gateway replacement (without backup file)....................................................................................................... |
385 |
Field Repairs ............................................................................................................................................................. |
386 |
Opening the gateway................................................................................................................................................ |
386 |
Fuse Replacement....................................................................................................................................................... |
386 |
Appendix B- Multi-Gateway Discovery................................................................................................................ |
407 |
Appendix C- Time Settings...................................................................................................................................... |
418 |
Legal Notice............................................................................................................................................................. |
39 |
Who we are ............................................................................................................................................................. |
39 |
Contact Us ............................................................................................................................................................... |
39 |
3 |
www.dialight.com |

Introduction
This manual is for orientation and a quick guide to the installation process and configuration of the Control and Monitoring gateway.
It applies to the following model numbers:
GAUW24AG WIFI IntelliLED™ GATEWAY ASSEMBLY
Included in this manual:
System overview
System configuration instructions
User Interface overview
Note:
In order to use WiFi functionality, a Wi-Fi enabled device must be used.
System Specifications
Certification
AC Operating Voltage
Operating Temperature
Ethernet
Dimensions (WxDxH)
Dialight Part #
Ratings
Quick Disconnect
UL 916, CSA C22.2 No.205, FCC, Canada IC, NEMA 4x, IP66, EN 55032, EN 55016-2-1, EN 55016-2-3, EN 61000- 3-2, EN 61000-3-3, EN 61000-4-2, EN 61000-4-3, EN 61000-4-4, EN 61000-4-5, EN 61000-4-6, EN 61000-4-11
100-277 VAC, 50/60Hz
-40C to +65C
10/100/Gb Ethernet
13.09 x 15 x 21.214 | 323.5mm x 382mm x 538.84mm
GAUW24AG
Install only dry locations, IP66
This device must be connected to a quick disconnect device, such as a circuit breaker
4 |
www.dialight.com |

IntelliLED™ Gateway Visual Overview
In the box
1x – IntelliLED™ Gateway
1x – Sealed RJ45 network connector assembly
1x – Antenna
1x – Antenna (Wi-Fi Gateway only)
|
|
|
5 |
www.dialight.com |
|

Note: Ac Power entry is ¾” (19.05 mm) NPT threaded
Mounting & Placement
100ft Max distance to first node
AC Power Input
Ethernet Input
Additional Mounting Considerations
For optimal performance gateway must have direct line of sight (LoS) to at least one light fixture to be controlled.
Do not mount gateway behind walls or behind/in metal cages. This will
diminish the wireless signal
6 |
www.dialight.com |
Ensure that the mounting bolts are securely fastened to a solid backing.
Powering On the IntelliLED™ Gateway for the First Time
The IntelliLED™ Gateway does not have an external power switch; it will automatically turn on when power is connected.
Apply AC power to terminal block.
AC supply requirements, 110-277VAC, 50/60Hz, capable of supplying 1 Amp.
A minimum of 14 AWG(2.08mm2) cable is to be used. The terminal block can accept up to 8 AWG(10.55mm2) cable.
Once power has been applied, wait for the gateway to start up. (approximately 1 minute)
Once power LED turns ON you can control your gateway via Wi-Fi or Ethernet connection.
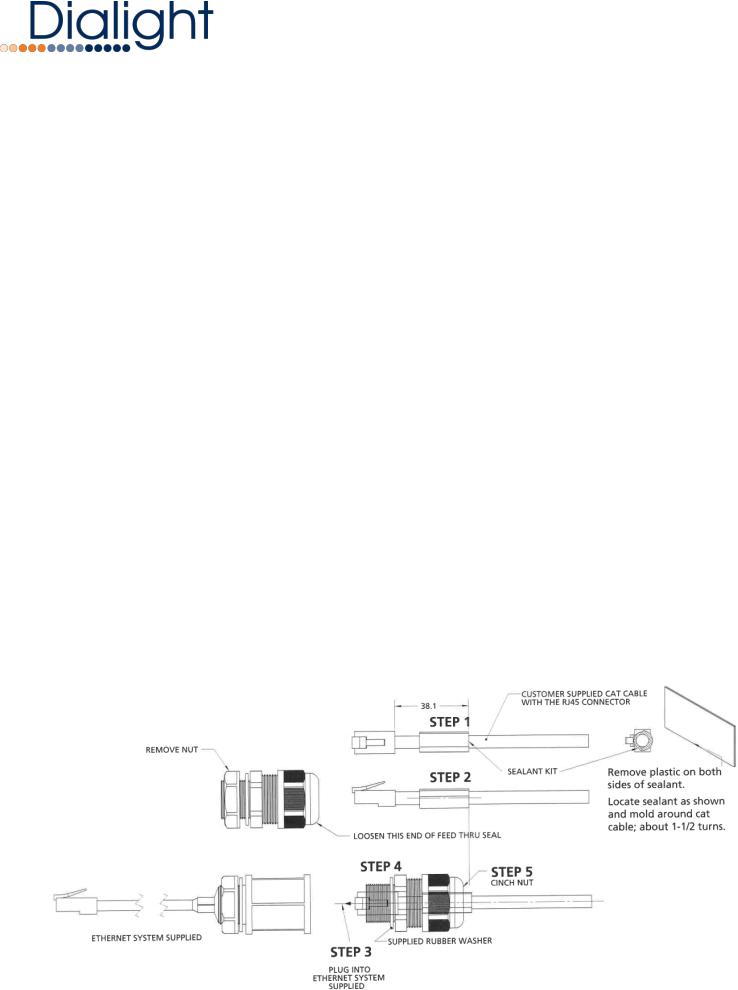
Installation Instruction of RJ45
1.Apply sealant
2.Slide cable thru fitting
3.Mate plug and jack inside Ethernet port
4.Fully seat supplied feed thru to Ethernet port
5.Tighten cinch nut only if sealant is in proper location

IntelliLED™ Gateway Interface Features
Gateway LED Interface gives you status of controls enabled LED fixture system performance.
LEDs provide notifications for the current state of Gateway.
Off/Resume Switch – This button allows you to manually resume the schedule or turn OFF the connected lights. This button must be held for 5 seconds to activate
Override – This button allows you to manually override any system schedules by quickly turning on your lighting network to 100% capacity .
The red OVERRIDE
LED gives status notification.
8 |
www.dialight.com |

Note: Once activated, both buttons will override the regular operation of the lighting system
9 |
www.dialight.com |
IntelliLED™ Gateway Web Application
Stand-Alone Gateway User Interface Web Application Login
Supported Browsers:
Dialight supports browser interaction with the control system using the following browsers:
o Google Chrome v. 42 or newer o Mozilla Firefox v. 40 or newer
NOTE: Using Internet Explorer may lead to performance/visual issues
Launching the UI though LAN wired connection:
When using a wired LAN, you must set up the IP address of your Laptop/Desktop to 192.168.1.20 and its subnet mask to 255.255.255.0 using Windows LAN configuration utility as shown in Figure below.
Once configured, open the Google Chrome Browser and type into its address bar: 192.168.1.150 and then hit ENTER.
Launching the UI though Wi-Fi connection:
If you choose to use WIFI to access the Gateway, then make sure to enable the Wi-Fi interface on your Laptop/Desktop. Join the Dialight_GW_XXXX network with the password DialightGW. Each Gateway will have a unique set of numbers/letters for the XXXX portion of the Wi-Fi network name.
Open one of the supported browsers on your Laptop/Desktop machine and using the address bar browse to address 10.10.0.1.
Login Screen
Enter default Username: admin
Enter default Password: password
Click Login
Note: Username and Password are case sensitive
10 |
www.dialight.com |

Home Page
A. Date & Time |
|
D. Gateway Override |
|
E. Override |
|
|
|
|
|
|
|
B. Alerts |
|
C. Off/Resume |
F. Menu |
|
|
||
|
|
|
|
|
|
|
|
||
|
|
|
|
|
Info Bar Detail
A.Date & Time
Server Date 
oDate displayed by Month, Day, Year
Server Time (24 Hour time) 
oTime displayed by Hour, Minute, Second
Auto-Logout (60 Minute countdown)
oHover cursor over time, tooltip displays countdown time.
o The system automatically logs the user out after 60 minutes of inactivity.
B. Unacknowledged Alerts indicator:
Displays number of unacknowledged alerts
Click on Alert iconManage Alerts page opens C. Off/Resume 
Turns off lights for entire system!
All lighting devices go to 0% brightness
Off Icon will turn yellow while in off mode
Click on icon to turn off lights and to resume previous lighting state
All lighting devices return to their previous state after deactivating button.
11 |
www.dialight.com |
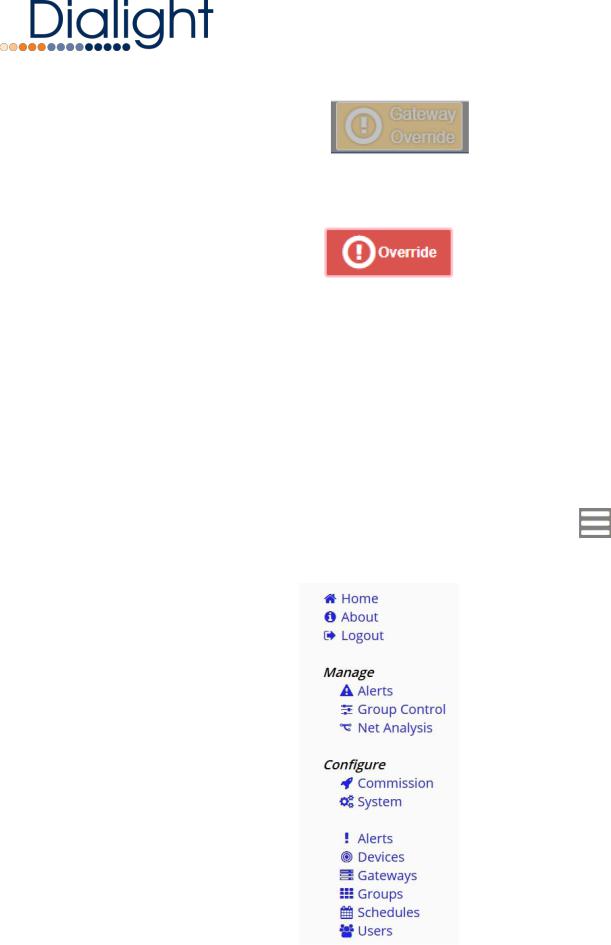
D.Gateway Override (G.O)
Displays the status of the Override button on the gateway
The Gateway Override (G.O.) will turn yellow and blink when the Override button is pressed on the gateway
E.Override
Turns Override on for entire system!
All lighting devices go to 100% brightness
Override Icon will flash while in override mode
Click on icon to enable or disable override
All lighting devices return to their previous state when override is turned off
Note: Override will override all functions of the gateway while active (scheduling, manual control, off/resume, etc.). To resume these functions, the button must be turned off.
F.Menu Icon
Note - The Menu Icon is the main method to access all of the pages in the UI.
12 |
www.dialight.com |
 Loading...